8. 视觉感知
到上一章为止,机器人能听语言指令但还"瞎"——只能执行 walk(vx, wz, t) 这种盲走指令。这一章我们给它装上一只眼睛(MuJoCo 里的相机 sensor),让它通过图像找到并跟着一个目标移动;同时把"看见 → 定位 → 跟踪"包装成 §7 LLM 可以调用的新工具,整个课程的闭环到这里才合上。
本章目标
- 能在 MJCF 里正确配置
camera和sensor,从 Python 读到 RGB / Depth 帧 - 能用一个最简目标检测(颜色阈值 or YOLO 小模型)在图像里定位目标
- 能把图像平面的目标位置映射为机器人航向修正量
- 让 Pupper 追着一个移动的小球走
前置阅读
- 第 5–6 章(有步态才能谈"朝目标走")
- 第 7 章(视觉将作为新工具接到 LLM agent 上)
- VLM · ViT 与视觉表征(可选延伸)
8.1 挂相机
在 MJCF 里给 torso 加一个 <camera> 节点就够了。Pupper 的相机一般装在前胸偏上、稍微往下俯角,让远处地面在画面里露出来:
<body name="torso" pos="0 0 0.18">
  <freejoint/>
  ...
  <camera name="head_cam"
          pos="0.10 0 0.06"             // torso 系下:前 10 cm,上 6 cm
          xyaxes="0 -1 0  0 0 1"        // x→世界 -y, y→世界 +z (向前看,正姿)
          fovy="60"/>                    // 垂直视场角 60°
</body>
这里先记住三个最容易调错的参数:
mode默认是fixed,相机随父 body 走——这正是我们想要的"机器人视角"。mode="trackcom"是把镜头钉在场景质心,仿真调试看全局可以临时切。fovy60° 是仿真版的好默认值。真机 Pupper 用的是鱼眼镜头(视场角 150°+,但带强烈枕形畸变),所以 CS123 Lab 7 slides 里专门给了一段 unwarping 代码——仿真版直接用 pinhole 模型跳过这一步,等迁移到真机时再补。xyaxes是相机坐标系的 x、y 轴在父 body 系下的方向,z 由叉乘自动给出。最容易翻车的地方:默认相机 +z 轴是"看向反方向"(OpenGL 风),第一次画面颠倒就是这里写错。
8.2 采集图像
新 API 直接用 mujoco.Renderer,不用再折腾 EGL 后端:
import mujoco, numpy as np

# 载入 MJCF,并创建一份可推进的仿真状态。
model = mujoco.MjModel.from_xml_path('pupper.xml')
data  = mujoco.MjData(model)

# 离屏渲染器:这里把相机输出固定成 320×240,方便后面做图像处理。
renderer = mujoco.Renderer(model, height=240, width=320)

# MJCF 里写的是相机名字,MuJoCo 渲染时需要先转成内部 id。
cam_id = mujoco.mj_name2id(model, mujoco.mjtObj.mjOBJ_CAMERA, 'head_cam')

def get_rgb():
    # 每次 render 前,都要用当前 data 刷新相机看到的场景。
    renderer.update_scene(data, camera=cam_id)
    return renderer.render()                     # (H, W, 3) uint8

def get_depth():
    # 深度图需要临时切到 depth 模式;用完再切回普通 RGB 渲染。
    renderer.enable_depth_rendering()
    renderer.update_scene(data, camera=cam_id)
    depth = renderer.render()                    # (H, W) float, 单位 m
    renderer.disable_depth_rendering()
    return depth
帧率方面:Renderer.render() 在 CPU 上 320×240 大约 5–10 ms,30 fps 完全够;4 路并行 env 训练时可以只在每隔 N 步调用一次相机,把视觉降到 10 Hz——和真机 Pupper 30 fps 相比也只是数量级差不多。
离屏 vs viewer:
mujoco.Renderer是离屏渲染(headless),不弹窗口。viewer 那一套(§4 实验里用过)是另一条路径,不能直接拿数组——拿数组就用 Renderer。
8.3 目标检测
方案 A:HSV 阈值(仿真首选)
仿真的好处是你完全控制目标颜色——给球贴个鲜红色 <material rgba="1 0.1 0.1 1">,HSV 阈值就能 30 行写完,每帧 < 1 ms:
import cv2, numpy as np

def detect_red_ball(rgb):
    # Renderer 给的是 RGB;OpenCV 的 HSV 阈值更适合做颜色分割。
    hsv = cv2.cvtColor(rgb, cv2.COLOR_RGB2HSV)

    # 红色在 HSV 里横跨 0 度,需要用两段区间拼成一个 mask。
    mask  = cv2.inRange(hsv, ( 0, 120, 80), ( 10, 255, 255))
    mask |= cv2.inRange(hsv, (170, 120, 80), (180, 255, 255))

    # 只取外轮廓;对单个红球来说,最大的连通区域就是候选目标。
    contours, _ = cv2.findContours(mask, cv2.RETR_EXTERNAL,
                                   cv2.CHAIN_APPROX_SIMPLE)
    if not contours:
        return None
    c = max(contours, key=cv2.contourArea)
    if cv2.contourArea(c) < 50:                  # 太小,大概率是噪点
        return None

    # 返回目标中心、宽高和粗略面积,后面的航向控制只需要 cx。
    x, y, w, h = cv2.boundingRect(c)
    return {'cx': x + w/2, 'cy': y + h/2,
            'w': w, 'h': h, 'area': w * h}
方案 B:YOLOv8-nano
迁移到真机或者要识别多类目标时,换成 YOLO。ultralytics 的 yolov8n 在 CPU 上 320×240 也能跑到 25 fps,几乎是 plug-and-play:
from ultralytics import YOLO

yolo = YOLO('yolov8n.pt')        # 第一次跑会自动下载权重

def detect_yolo(rgb, target='person'):
    # YOLO 返回一个 results 列表;单张图只取第 0 个结果。
    results = yolo(rgb, verbose=False)[0]
    boxes = []

    # 每个 b 是一个候选框,里面带类别、置信度和 xyxy 坐标。
    for b in results.boxes:
        label = results.names[int(b.cls)]
        if label != target:
            continue

        # xyxy 的顺序是 [x1, y1, x2, y2],对应框的左上角和右下角。
        x1, y1, x2, y2 = b.xyxy[0].tolist()
        boxes.append({'cx': (x1 + x2) / 2, 'cy': (y1 + y2) / 2,
                      'w':  x2 - x1, 'h': y2 - y1,
                      'conf': float(b.conf)})
    return boxes                                  # 多个 box,留给 8.5 节挑
怎么选:仿真里专追一个目标用 HSV,写一行
cv2.inRange调试方便、确定性高。一旦想做"找人 / 找椅子 / 找猫",YOLO 是没得选的。CS123 Lab 7 slides 用的是 YOLO + ROS message,本质是一回事:results.boxes对应 slides 里的msg.detections.data。
8.4 航向控制
目标在画面里偏左,机器人就该向左转——这就是 CS123 Lab 7 slides 反复强调的P 控制器。先把"偏多少像素"归一化成 [-1, 1]:
然后 P 控制器直接给航向角速度命令:
负号是因为画面 +x 在右、对应需要负向 yaw(顺时针)才能把目标转回中心。前进速度可以用目标 bbox 大小反映距离——bbox 越小说明目标越远,给一个非零 vx 让机器人靠过去:
h_ref 是"理想跟踪距离"对应的 bbox 高度——经验值:1 m 距离的红球 bbox 大概 30 像素,靠近到 40 就停下来。
# 两个 P 控制增益:一个管转向,一个管前进速度。
KP_YAW, KP_VX = 1.0, 0.4
H_REF = 30                   # 目标在理想距离时的 bbox 高度,单位像素

def visual_servo(box, image_w, image_h):
    # 没检测到目标就停住;搜索逻辑交给 8.5 节的状态机处理。
    if box is None:
        return 0.0, 0.0

    # 目标中心相对画面中心的偏差,归一化到大约 [-1, 1]。
    # cx 在右侧时 e_yaw > 0,Pupper 需要顺时针转,所以 wz 前面有负号。
    e_yaw = (box['cx'] - image_w / 2) / (image_w / 2)
    wz = -KP_YAW * e_yaw

    # bbox 越小说明目标越远,vx 越大;bbox 接近 H_REF 时自然减速。
    vx =  KP_VX * (H_REF - box['h']) / H_REF

    # 给底盘命令限幅,避免检测抖动时突然冲太快或转太猛。
    return float(np.clip(vx, -0.3, 0.3)), float(np.clip(wz, -1.0, 1.0))
calibrate P 控制器(slides 用词)的实操:先把 vx 锁 0、只调
KP_YAW,让机器人原地稳定地把目标转到画面中心——太小会一直追不上、太大会震荡。再开 vx,按"距离收敛 ≈ 转向收敛"调KP_VX。永远不要两个 K 同时调,否则你不知道是哪个在抖。
8.5 跟踪状态机
§8.4 的 P 控制器有两个工程缺口,CS123 Lab 7 slides 都点到了:
- 目标暂时丢失怎么办? 不能直接
wz=0站着——可能用户只是被遮了一下;也不能继续按上一帧wz——那会原地转出视野更远。 - 画面里同时有 3 个人 / 3 个红球怎么办? YOLO 会同时返回多个 box,盲选第一个会反复跳目标。
状态机
from enum import Enum, auto

# 三个状态只负责决定机器人该怎么动,真正的速度命令在 step() 里返回。
class State(Enum):
    SEARCHING = auto()      # 没目标,慢速原地左右扫
    TRACKING  = auto()      # 有目标,跑 8.4 P 控制器
    STOPPED   = auto()      # 太久没目标,主动停下

class TrackerFSM:
    def __init__(self, lost_timeout=2.0):
        # 初始先进入搜索状态;看到目标后才切到 TRACKING。
        self.state = State.SEARCHING
        # 记录上一帧跟踪的目标框,用来在多目标时保持同一个目标。
        self.last_box = None
        # 上一次看到目标的时间戳;-inf 表示启动后还没见过目标。
        self.t_last_seen = -np.inf
        # 目标丢失超过这个时间,就从 SEARCHING 切到 STOPPED。
        self.lost_timeout = lost_timeout

    def step(self, t, boxes, image_w, image_h):
        # 每帧先从所有检测框里挑一个最可信的跟踪目标。
        box = self._select(boxes)
        if box is not None:
            # 一旦看到目标,就刷新状态和历史框,再交给视觉伺服算 vx/wz。
            self.state = State.TRACKING
            self.last_box = box
            self.t_last_seen = t
            return State.TRACKING, *visual_servo(box, image_w, image_h)

        # 没看到目标时,不立刻停;先短暂慢转,给检测器一个找回目标的机会。
        elapsed = t - self.t_last_seen
        if elapsed < self.lost_timeout:
            self.state = State.SEARCHING            # 慢速摆头找
            return State.SEARCHING, 0.0, 0.5         # vx=0, wz=0.5 慢转
        else:
            # 超时还没找回目标,就主动停下,避免一直原地乱转。
            self.state = State.STOPPED
            return State.STOPPED, 0.0, 0.0
多目标选择
    def _select(self, boxes):
        # boxes 来自 HSV 或 YOLO 检测器;没有检测框就交给状态机处理丢失逻辑。
        if not boxes:
            return None
        if self.last_box is None:
            # 第一帧还没有历史位置,只能先选置信度最高的目标。
            # HSV 检测没有 conf 字段,所以默认按 1.0 处理。
            return max(boxes, key=lambda b: b.get('conf', 1.0))   # 第一帧:置信度最高

        # 后续帧选离上一帧中心最近的框,避免多目标场景里来回跳目标。
        def dist(b):
            return ((b['cx'] - self.last_box['cx']) ** 2 +
                    (b['cy'] - self.last_box['cy']) ** 2) ** 0.5
        return min(boxes, key=dist)
这一招就是 slides 里那句 "maintain the last tracking position and select the closest detection"——简单、零依赖,足以对付"两人交错走过"这种场景。要再硬核就上 SORT/ByteTrack,但本章用不到。
接入策略
把 (vx, wz) 喂给 §6 PupperEnv 的 cmd,整条管线就闭环了:
camera → detect → fsm.step(t, boxes) → (state, vx, wz)
                                              │
                                              ▼
                              env.cmd[:] = (vx, 0, wz)
                                              │
                                              ▼
                                  policy.predict(obs) → action
                                              │
                                              ▼
                                          mj_step
8.6 原地追球
最干净的"P 控制器有没有调对"自检——锁死 base 的平移自由度,只让 yaw 转。在 XML 里加一个会动的红球:
<body name="ball" pos="1.2 0 0.05" mocap="true">
  <geom type="sphere" size="0.03" rgba="1 0.1 0.1 1"/>
</body>
控制循环里手动给球画一个左右往返的轨迹,看机器人 wz_actual 是否平滑跟随 ball.x:
fsm = TrackerFSM(lost_timeout=2.0)

while data.time < 20:
    # mocap_pos[0] 对应 XML 里的 ball;这里让球在机器人前方左右摆动。
    data.mocap_pos[0] = [1.2, 0.5 * np.sin(0.4 * data.time), 0.05]

    # 采一帧相机图像,用 HSV 找红球;FSM 接收的是 boxes 列表。
    rgb   = get_rgb()
    box   = detect_red_ball(rgb)
    boxes = [box] if box else []

    # 状态机根据检测结果给出当前状态,以及视觉伺服算出的 vx/wz。
    state, vx, wz = fsm.step(data.time, boxes, 320, 240)

    # 这一节只测转向控制:锁死平移,把 wz 直接施加到 base 的 yaw 速度。
    data.qpos[:3] = [0, 0, 0.18]                # x,y,z 钉死
    data.qvel[5]  = wz                           # 只让 yaw 动
    mujoco.mj_step(model, data)
观察重点:
- 红球远离/靠近时机器人不要动(vx=0 因为锁死);横向移动时**
wz平滑跟随**。 - 把
KP_YAW调到 3.0,应该能看到震荡——这是上限信号,回到 1.0 附近。 - 把球突然移出画面,2 秒后状态从 SEARCHING 切到 STOPPED——FSM 工作正常。
8.7 行走追球
放开 base、接上 §6 RL policy。这一节给一个最容易复制的"乒乓球场景"——球随机改向、偶尔藏到机器人后面:
import random
fsm = TrackerFSM(lost_timeout=2.0)
target_pos = np.array([1.2, 0.0, 0.05])   # 球的初始位置:机器人前方 1.2 m

while data.time < 60:
    # 跨过 3 秒边界时,给球一个新的水平偏移,模拟目标突然改向。
    if int(data.time / 3) != int((data.time - env.dt) / 3):
        target_pos[:2] += np.random.uniform(-0.5, 0.5, 2)

    # mocap 球不受物理碰撞约束,直接写位置就能移动目标。
    data.mocap_pos[0] = target_pos

    # 相机采图 → 红球检测 → 状态机输出跟随命令。
    rgb = get_rgb()
    box = detect_red_ball(rgb)
    boxes = [box] if box else []
    state, vx, wz = fsm.step(data.time, boxes, 320, 240)

    # 把视觉伺服给出的速度命令交给第 6 章训练好的 RL 步态。
    env.cmd[:] = [vx, 0.0, wz]
    obs, _, term, trunc, _ = env.step(policy.predict(obs, deterministic=True)[0])

    # term 表示机器人摔倒等终止情况;重置后继续下一轮追球。
    if term:
        env.reset()
观察 + 分析(写到动手任务的失败分析里):
- 光照:MuJoCo 默认环境光足够,但如果给场景加阴影,红色阈值上下界要放宽 10–15。
- 遮挡:把另一个红色障碍物挡在球前面,看 FSM 是不是会跳目标——§8.5 那个
_select用 last_box 最近距离选择,应该不会。 - 远距离:球放到 3 m 外,bbox 只有 5–10 像素,HSV 几乎检不到——这是仿真版"分辨率天花板",YOLO 也救不了。如果你的演示需要远距离,把
Renderer(width=640, height=480)提一档。
录一段 30 秒视频是动手任务交付物,视频里要能看到至少一次"丢失 → 找回"切换,这是本章最有信息量的一帧。
8.8 接入语言 agent
到这里,"看见 → 跟随"是个独立闭环。但课程的初衷是让 LLM 调度它——把 §8.4–§8.5 这套包成 §7 工具集里的两个新工具:
# 加到 7.2 节的 TOOLS 列表里
EXTRA_VISION_TOOLS = [
    {
        "name": "look_for",
        "description": "Search the camera view for an object of given color or label. "
                       "Returns whether it is visible, its bbox, and a rough distance.",
        "input_schema": {
            "type": "object",
            "properties": {
                "target": {"type": "string",
                           "description": "color name like 'red' or YOLO label like 'person'"}
            },
            "required": ["target"],
        },
    },
    {
        "name": "follow",
        "description": "Visually servo toward target for at most `seconds` seconds. "
                       "Stops when bbox height >= h_close or seconds elapse.",
        "input_schema": {
            "type": "object",
            "properties": {
                "target":  {"type": "string"},
                "seconds": {"type": "number"},
            },
            "required": ["target", "seconds"],
        },
    },
]
dispatch 里把它们接到 §8.5 的 FSM 上,§7 的 50 行 agent 循环不用动一行就能跑:
def _look_for(target):
    # 单帧查询工具:只看当前画面,不移动机器人。
    rgb   = get_rgb()

    # 简单颜色目标走 HSV;语义目标交给 YOLO。
    boxes = detect_red_ball(rgb) if target == 'red' else detect_yolo(rgb, target)
    if not boxes: return {"ok": True, "found": False}

    # HSV 可能返回单个 dict,YOLO 返回列表;这里统一成"选一个最佳 box"。
    b = max([boxes] if isinstance(boxes, dict) else boxes,
            key=lambda x: x.get('conf', x.get('area', 0)))

    # distance_m 只是给 LLM 做粗略决策,真正闭环仍靠 _follow 里的视觉伺服。
    return {"ok": True, "found": True, "bbox": b,
            "distance_m": float(H_REF / max(b['h'], 1) * 1.0)}    # 粗估

def _follow(target, seconds):
    # 连续跟随工具:内部自己维护 FSM,不依赖 LLM 每一帧发命令。
    fsm = TrackerFSM()
    t_end = env.data.time + seconds
    last_state = None

    while env.data.time < t_end:
        rgb   = get_rgb()
        boxes = ...                                # 同 _look_for

        # FSM 把检测框转成 vx/wz;第 6 章训练好的 policy 负责把速度变成关节动作。
        last_state, vx, wz = fsm.step(env.data.time, boxes, 320, 240)
        env.cmd[:] = [vx, 0, wz]
        env.step(policy.predict(env._get_obs(), deterministic=True)[0])

        # bbox 足够高说明目标已经靠近,提前结束,避免机器人继续往前顶。
        if last_state == State.TRACKING and boxes and boxes[0]['h'] >= 40:
            break                                  # 已经到位

    # 把最后停在哪个状态返回给 LLM,方便它决定要不要重试或换策略。
    return {"ok": True, "stopped_state": last_state.name}
试跑 "看看周围有没有红球,找到就走过去"——期望的 agent 行为:
turn 1  Claude → tool_use(look_for, target='red')
turn 2  你    → {"found": true, "bbox": {...}, "distance_m": 1.4}
turn 3  Claude → tool_use(follow, target='red', seconds=8.0)
turn 4  你    → {"ok": true, "stopped_state": "TRACKING"}
turn 5  Claude → "Found a red ball ~1.4 m away and walked over."
进阶:接入 VLM
更强的玩法是把整张 RGB 图作为 user message 发给 Claude,让它用视觉直接判断。这一步把"object detector + LLM"两段融成 VLM 一段,对应 CS123 Lab 7 slides 的 "multimodal AI system combining camera feeds with language models":
import base64
from io import BytesIO
from PIL import Image

def get_camera_view_b64():
    # get_rgb() 返回 numpy 数组;先转成 PIL Image,方便编码成 PNG。
    img = Image.fromarray(get_rgb())

    # 用内存缓冲区保存 PNG,不需要落盘生成临时文件。
    buf = BytesIO(); img.save(buf, format='PNG')

    # 多模态 API 里图片通常以 base64 字符串放进 message。
    return base64.b64encode(buf.getvalue()).decode()

# 在同一条 user message 里同时放图片和文字问题。
messages = [{"role": "user", "content": [
    # image 块是真正的相机画面。
    {"type": "image", "source": {
        "type": "base64", "media_type": "image/png",
        "data": get_camera_view_b64()}},

    # text 块告诉 VLM 要回答什么,不然它只会泛泛描述画面。
    {"type": "text", "text": "What do you see? Should the robot turn left, right, or go straight?"},
]}]
VLM 路线的优势是可以对付"找一张椅子"、"绕开桌脚"这类 YOLO 标签覆盖不到的场景;代价是单次调用变贵(1 张 320×240 PNG 大约 250 token),不适合每帧都发——典型策略是FSM 进入 SEARCHING 状态时拍一张交给 VLM,让它给一个高层方向建议。
小结
- MuJoCo 端流程很短:MJCF 加
<camera>→mujoco.Renderer取 RGB → OpenCV/YOLO 拿 bbox → P 控制器换(vx, wz)→ §6 RL policy 做底层。 - 状态机是工程必需:SEARCHING / TRACKING / STOPPED 三态 + last_box 最近选择,能把"目标暂时丢失"和"多目标交错"两个最常见的鬼怪挡掉。
- calibrate P 控制器分两步:先关 vx 调 KP_YAW、再开 vx 调 KP_VX,永远不要同时调两个增益。
- 视觉作为工具是闭环点:把
look_for/follow加进 §7 的 dispatch,整条 语言 → 工具 → 步态 链就能用上感知,整门课程的闭环到这里合上。 - VLM 是开放方向:直接把摄像头帧发给 Claude,能对付 YOLO 标签不覆盖的场景;代价是 token 成本,建议只在 SEARCHING 时调用。
下一步(不在本章作业里,但值得做):把整套管线搬到真机 Pupper,会立刻撞上 slides 里那两个真实问题——鱼眼畸变和电池续航。仿真版至少把"算法对不对"先定下来,剩下的就是工程细节。
动手任务
§8.3–§8.5 分别做了 HSV 检测、P 控制器和 TrackerFSM,§8.6–§8.7 在原地和行走两种模式下验证了追踪效果。本章动手任务把这三块拧到一起做"毕业汇演"——Pupper 看到红球、走过去、在球前停下,20 秒追球 GIF 是整门课唯一一段"前面所有章节的资产同时上场"的视频:§6 用的上游 RTNeural policy 跑底层步态,§7 的物理循环(50 Hz policy / 500 Hz physics)驱动关节,这一章的视觉闭环在上面叠了 10 Hz 的 camera → detect → FSM → (vx, wz) 控制层。
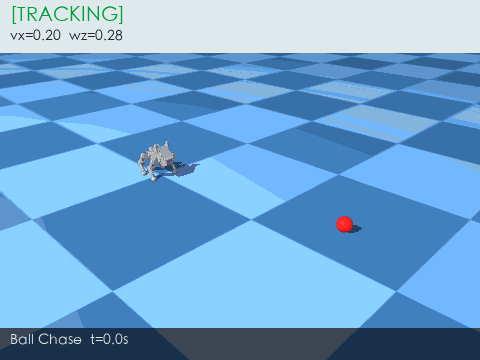
追球毕业视频:红球每 3 秒随机移动一次,Pupper 通过头部相机的 HSV 检测定位球心,P 控制器把像素偏差转成航向角速度 wz,TrackerFSM 在 SEARCHING / TRACKING / STOPPED 三态间切换。字幕栏实时显示当前 FSM 状态和速度命令,底层物理和 §5 / §7 完全相同——区别只在于谁在发 (vx, wz):§7.3 是 LLM 从自然语言推理出来的,这里是视觉闭环从像素算出来的。
要做的三件事:
- 写
detect_red_ball():在perception/ball_detector.py里实现 HSV 阈值检测——RGB → HSV →cv2.inRange(红色两段并集 H∈[0,10] ∪ H∈[170,180])→findContours→ 返回 bbox dict 或 None(§8.3 方案 A) - 写
visual_servo()+TrackerFSM.step():在perception/tracker_fsm.py里实现 P 控制器(e_yaw = (cx - W/2) / (W/2)→wz = -KP_YAW * e_yaw)和三态 FSM 切换——检测到球 → TRACKING,丢失超时 → SEARCHING(慢转找球),长时间丢失 → STOPPED(§8.4–§8.5) - 写
run_chase():在starter.py里组装追球主循环——每个物理步更新球位置,按 10 Hz 采样 head_cam →detect_red_ball→fsm.step→ 得到 (vx, wz),按 50 Hz 调用robot._policy_tick(cmd)驱动 RL 步态,500 Hz 跑mj_step(§8.6–§8.7)
完整 starter / 测试 / 交付清单见 exercises/lab_8_ball_chase/。
参考资料
- CS123 Lab 6: Seeing is Believing
- MuJoCo 文档 · Rendering