Beginner Level 4: Injecting AI Capabilities into Your Prototype
Chapter Introduction
1. API Fundamentals
As mentioned earlier, our goal is to "integrate AI capabilities" so that the prototype is no longer a static demo but a tool that can call real AI services. The key to achieving this lies in understanding and using APIs (Application Programming Interfaces).
API is an important abstraction concept in computer science. Simply put: you send a request in the format the other party requires, and they send back a result in the same format.
- What you send out: Usually includes a "key (API Key)" and "what you want to generate"
- What they send back: If successful, you get the result; if it fails, they tell you why (e.g., "invalid key," "insufficient balance," "incorrect parameters")
Specifically, you need to master the following core elements:
- API Key: Your "pass" and also your "wallet key." Anyone who gets it can make API calls on your behalf and incur charges.
- Endpoint: The specific path for the API request, telling the server which function you want to access. The full request URL is typically composed of "Base URL + Endpoint path." For example:
- Text generation: Base URL (
https://api.service.com) + Endpoint (/v1/chat/completions) = Full URLhttps://api.service.com/v1/chat/completions - Image generation: Base URL (
https://api.service.com) + Endpoint (/v1/images/generations) = Full URLhttps://api.service.com/v1/images/generations
- Text generation: Base URL (
- Call/Request: The process of sending a task to the AI service and getting results back
- Request Content: The specific content you send to the AI, such as the topic you want the AI to write about, the description of the image to generate, etc.
- Response: The content the AI returns after processing, such as the generated article, image, etc.
- Error Handling: Knowing how to troubleshoot when problems occur (such as incorrect API Key, too many requests, etc.)
ℹ️ What is an API
For a more in-depth explanation of APIs, see the appendix: Introduction to APIs.
🔐 API Security Notes
The API Key is your "pass" for requesting AI services — it's a secret string used for authentication and billing.
Since the API Key is directly linked to your account and charges, be sure to:
- Never share it in group chats, screenshots uploaded online, or public forums
- Never hardcode it into your code and commit it to a Git repository (especially public repositories)
- If you suspect your Key has been leaked, replace it with a new Key immediately
In the content below, we will paste the API KEY directly into the AI IDE for operations. Don't do this in real projects!! Since we're just practicing, it's fine for now. (Once you're more experienced, you can have the AI generate a configuration file and simply put the API KEY in the config file.)
2. Integrating the Text Generation API: DeepSeek
Although APIs involve these technical concepts, the actual operation during the prototyping phase can be very simple and efficient. The core approach is:
Find the official example, get the API Key, and have the AI IDE help you wire it to a button.
Once you've grasped these concepts, you'll find that whether you're integrating a text model or an image model, the underlying process is the same: when the user clicks a button, the frontend organizes the input and sends a request; after the API returns a result, it displays the result on the page. Let's verify this through hands-on practice.
In 1.2 Building Your Prototype, you already created an interactive prototype. What we need to do next is turn the "AI-like features" in the prototype into real, working capabilities: when the user clicks a button, the prototype sends a request to an external AI service and displays the returned text.
ℹ️ Further Reading on Principles
If you want to learn more about the underlying principles, check out the appendix: Introduction to Large Language Models (LLM).
Learn More: What is DeepSeek?
Hangzhou DeepSeek Artificial Intelligence Basic Technology Research Co., Ltd., operating under the brand name DeepSeek, is a Chinese artificial intelligence (AI) company that develops large language models (LLMs). DeepSeek is headquartered in Hangzhou, Zhejiang, and is owned and funded by the Chinese hedge fund High-Flyer. DeepSeek was founded in July 2023 by Liang Wenfeng, co-founder of High-Flyer, who also serves as CEO of both companies. The company launched its eponymous chatbot and its DeepSeek-R1 model in January 2025.
Let's look at how DeepSeek compares with other top models in the GPQA benchmark rankings. Notably, DeepSeek is an open-source model (anyone can download the model from the internet), while other common models like Grok, Google Gemini, and ChatGPT are closed-source. As we can see, DeepSeek has largely caught up with the first tier of models.
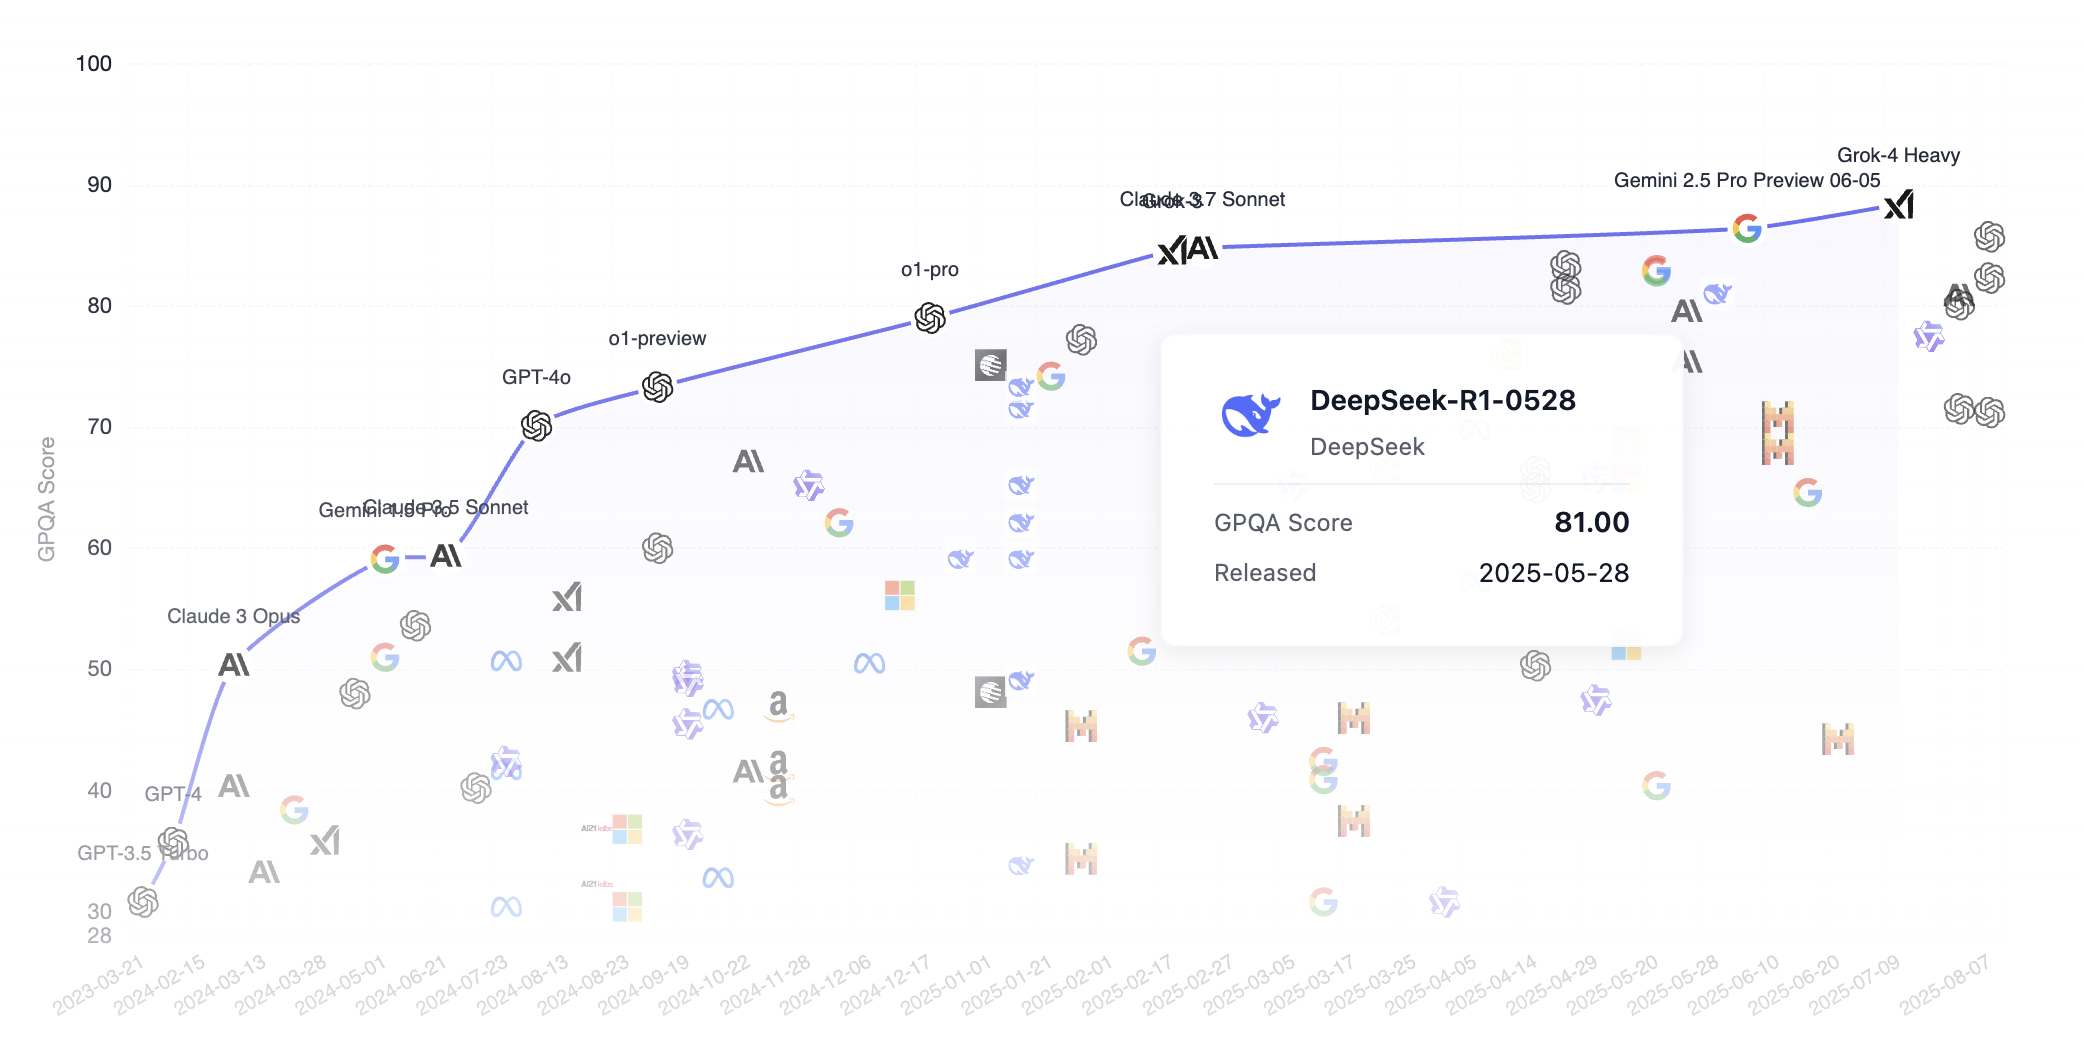
GPQA stands for "Graduate-Level Google-Proof Q&A Benchmark," a graduate-level benchmark for scientific question-answering tasks. Here's a detailed introduction.
GPQA contains 448 multiple-choice questions covering subfields of biology, physics, and chemistry, such as quantum mechanics, organic chemistry, molecular biology, and more. These questions were written by 61 experts who hold or are pursuing doctoral degrees and have undergone a rigorous validation process.
Follow these 3 steps to quickly integrate a large model generation API:
- Create an API Key on the DeepSeek platform
- Find the text generation example in the DeepSeek documentation (there's usually ready-made code you can copy directly)
- Open the AI IDE, paste in the API Key + official example, and tell the AI what functionality to implement:
Help me integrate this large model's API to support the copywriting generation task for this application
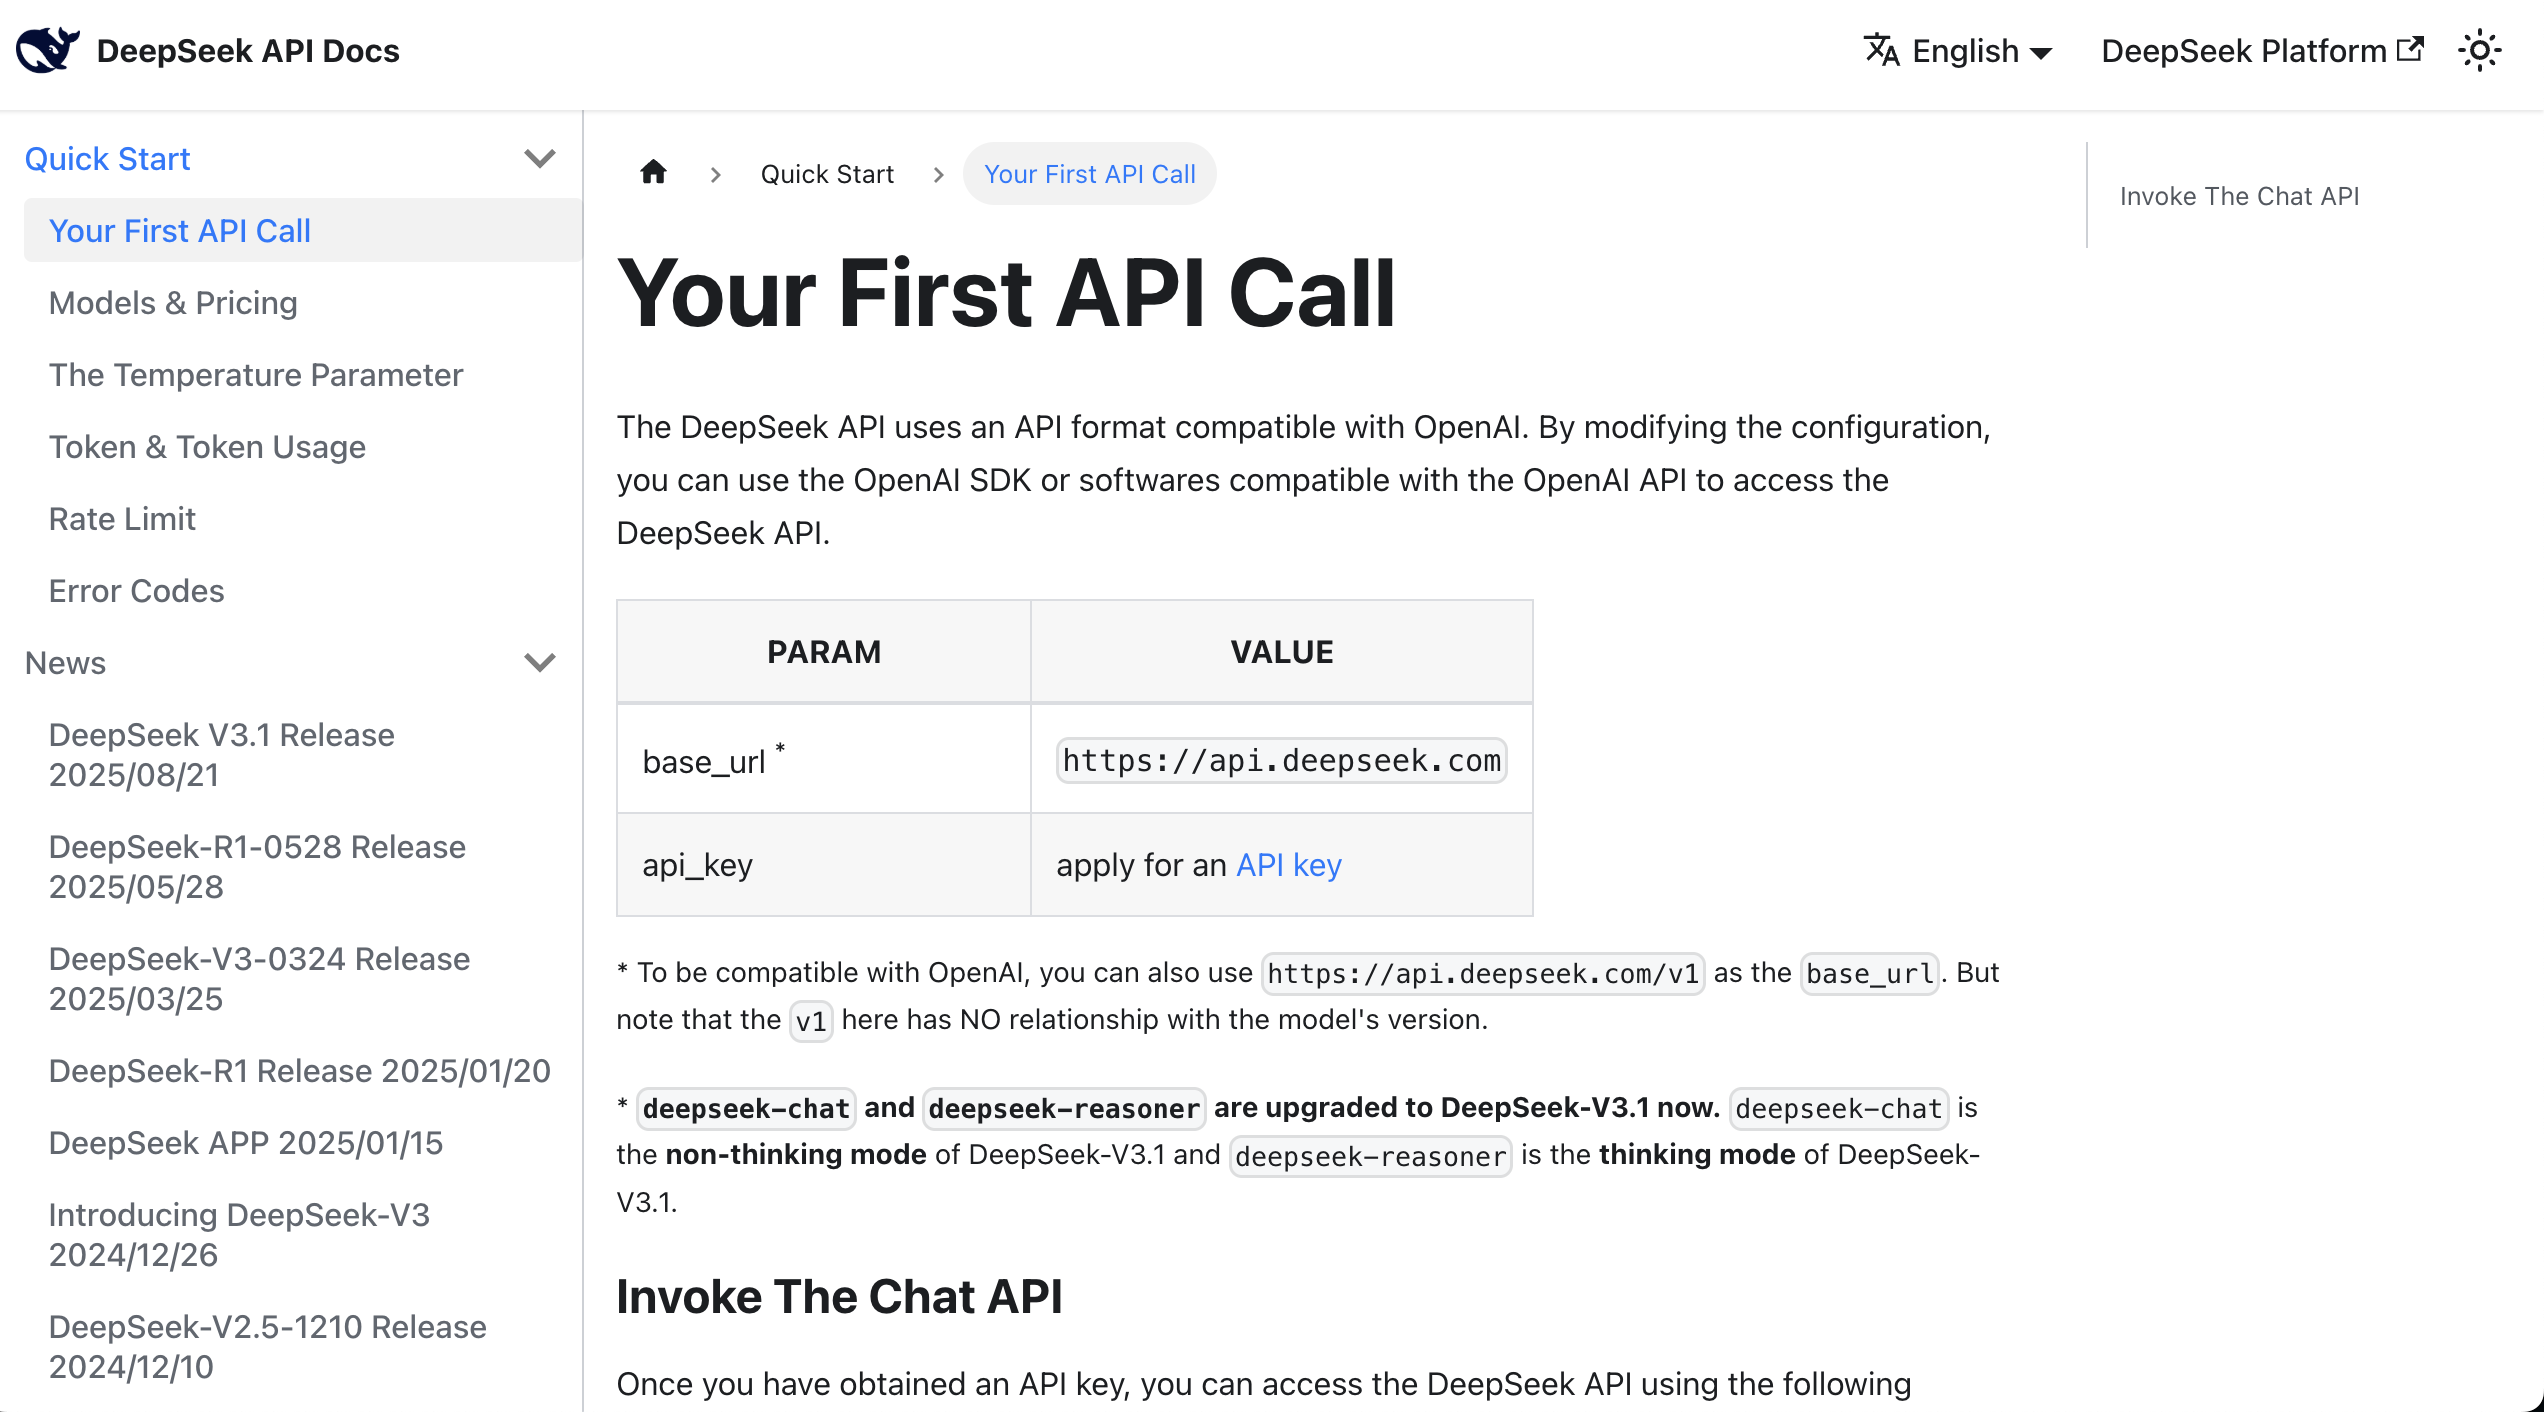
Next, we'll walk through a demo. You can follow along with the entire process. First, register a DeepSeek account, create an API Key, and top up a small amount for testing.
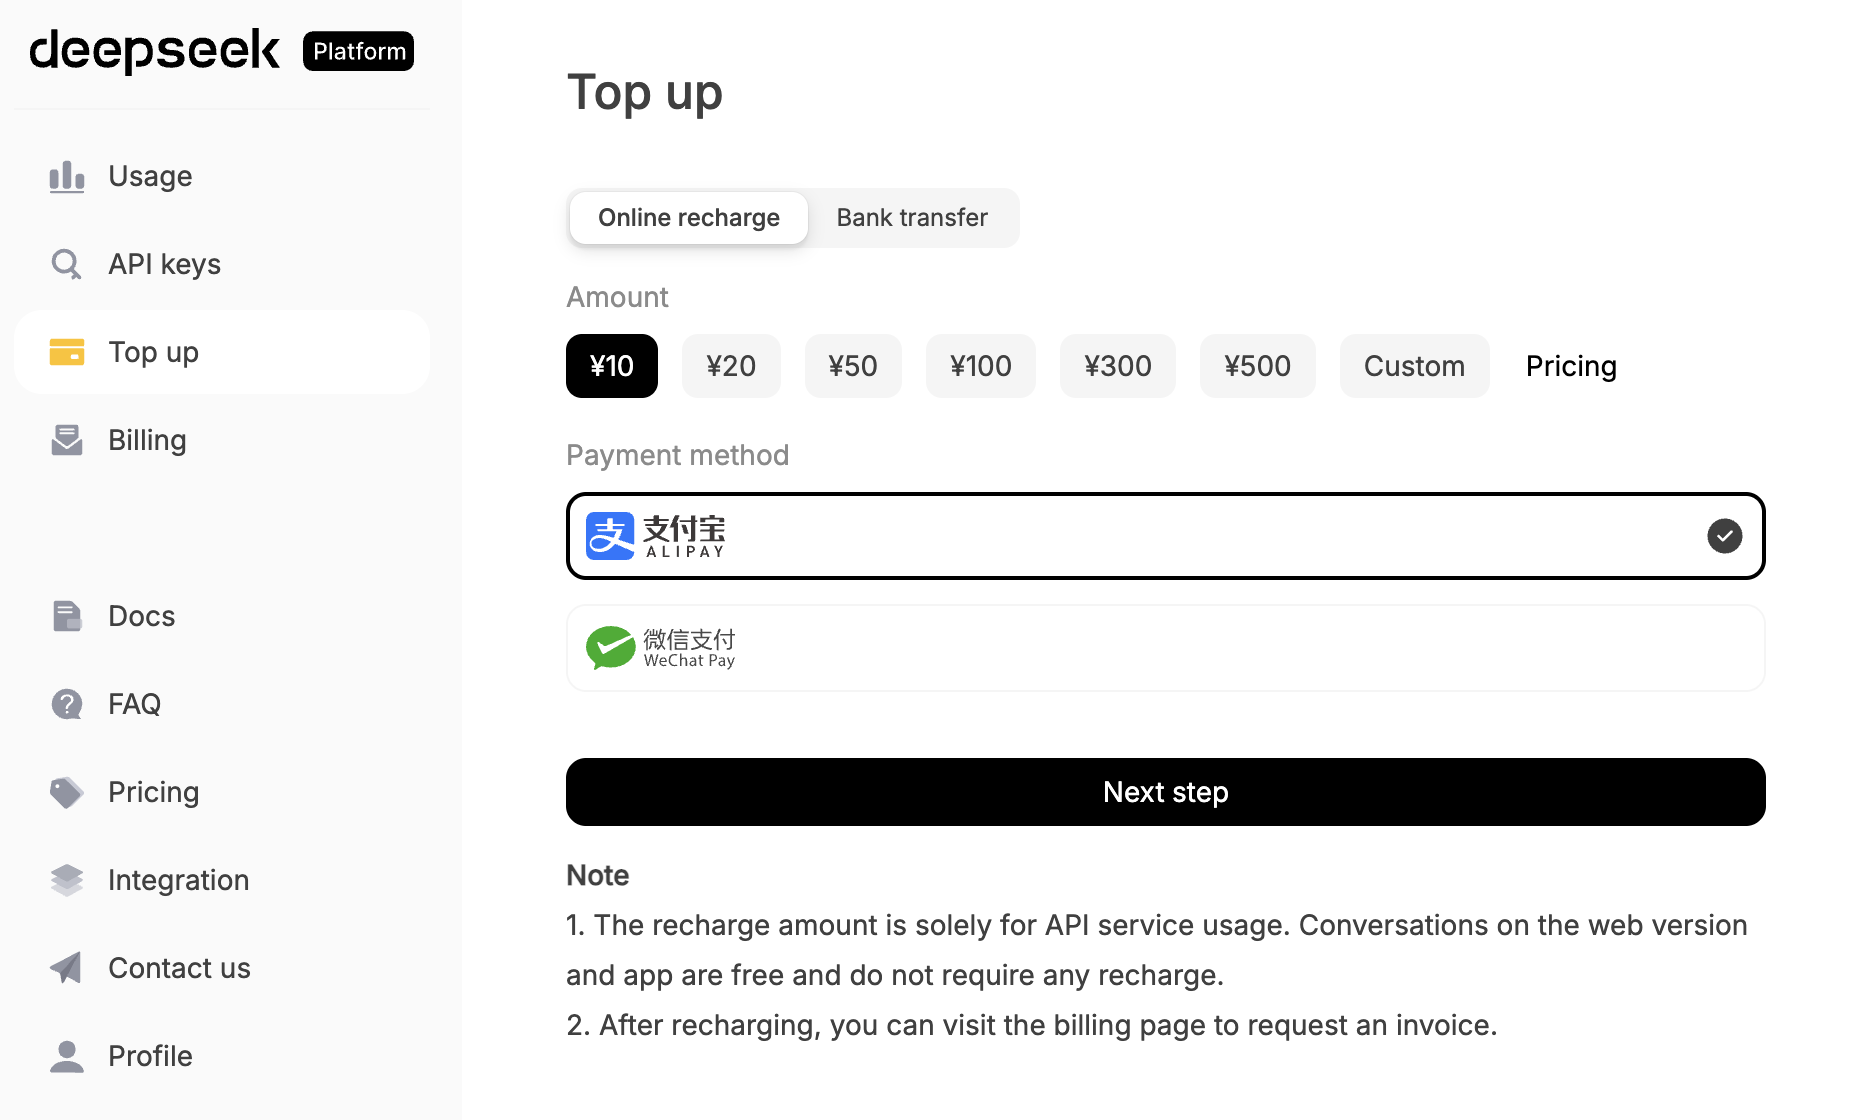
Click "API KEYS" and find "create new API key" at the bottom of the screen. You'll end up with an API key that looks something like sk-8573341c39fc44315aadc071c53rh7d2.
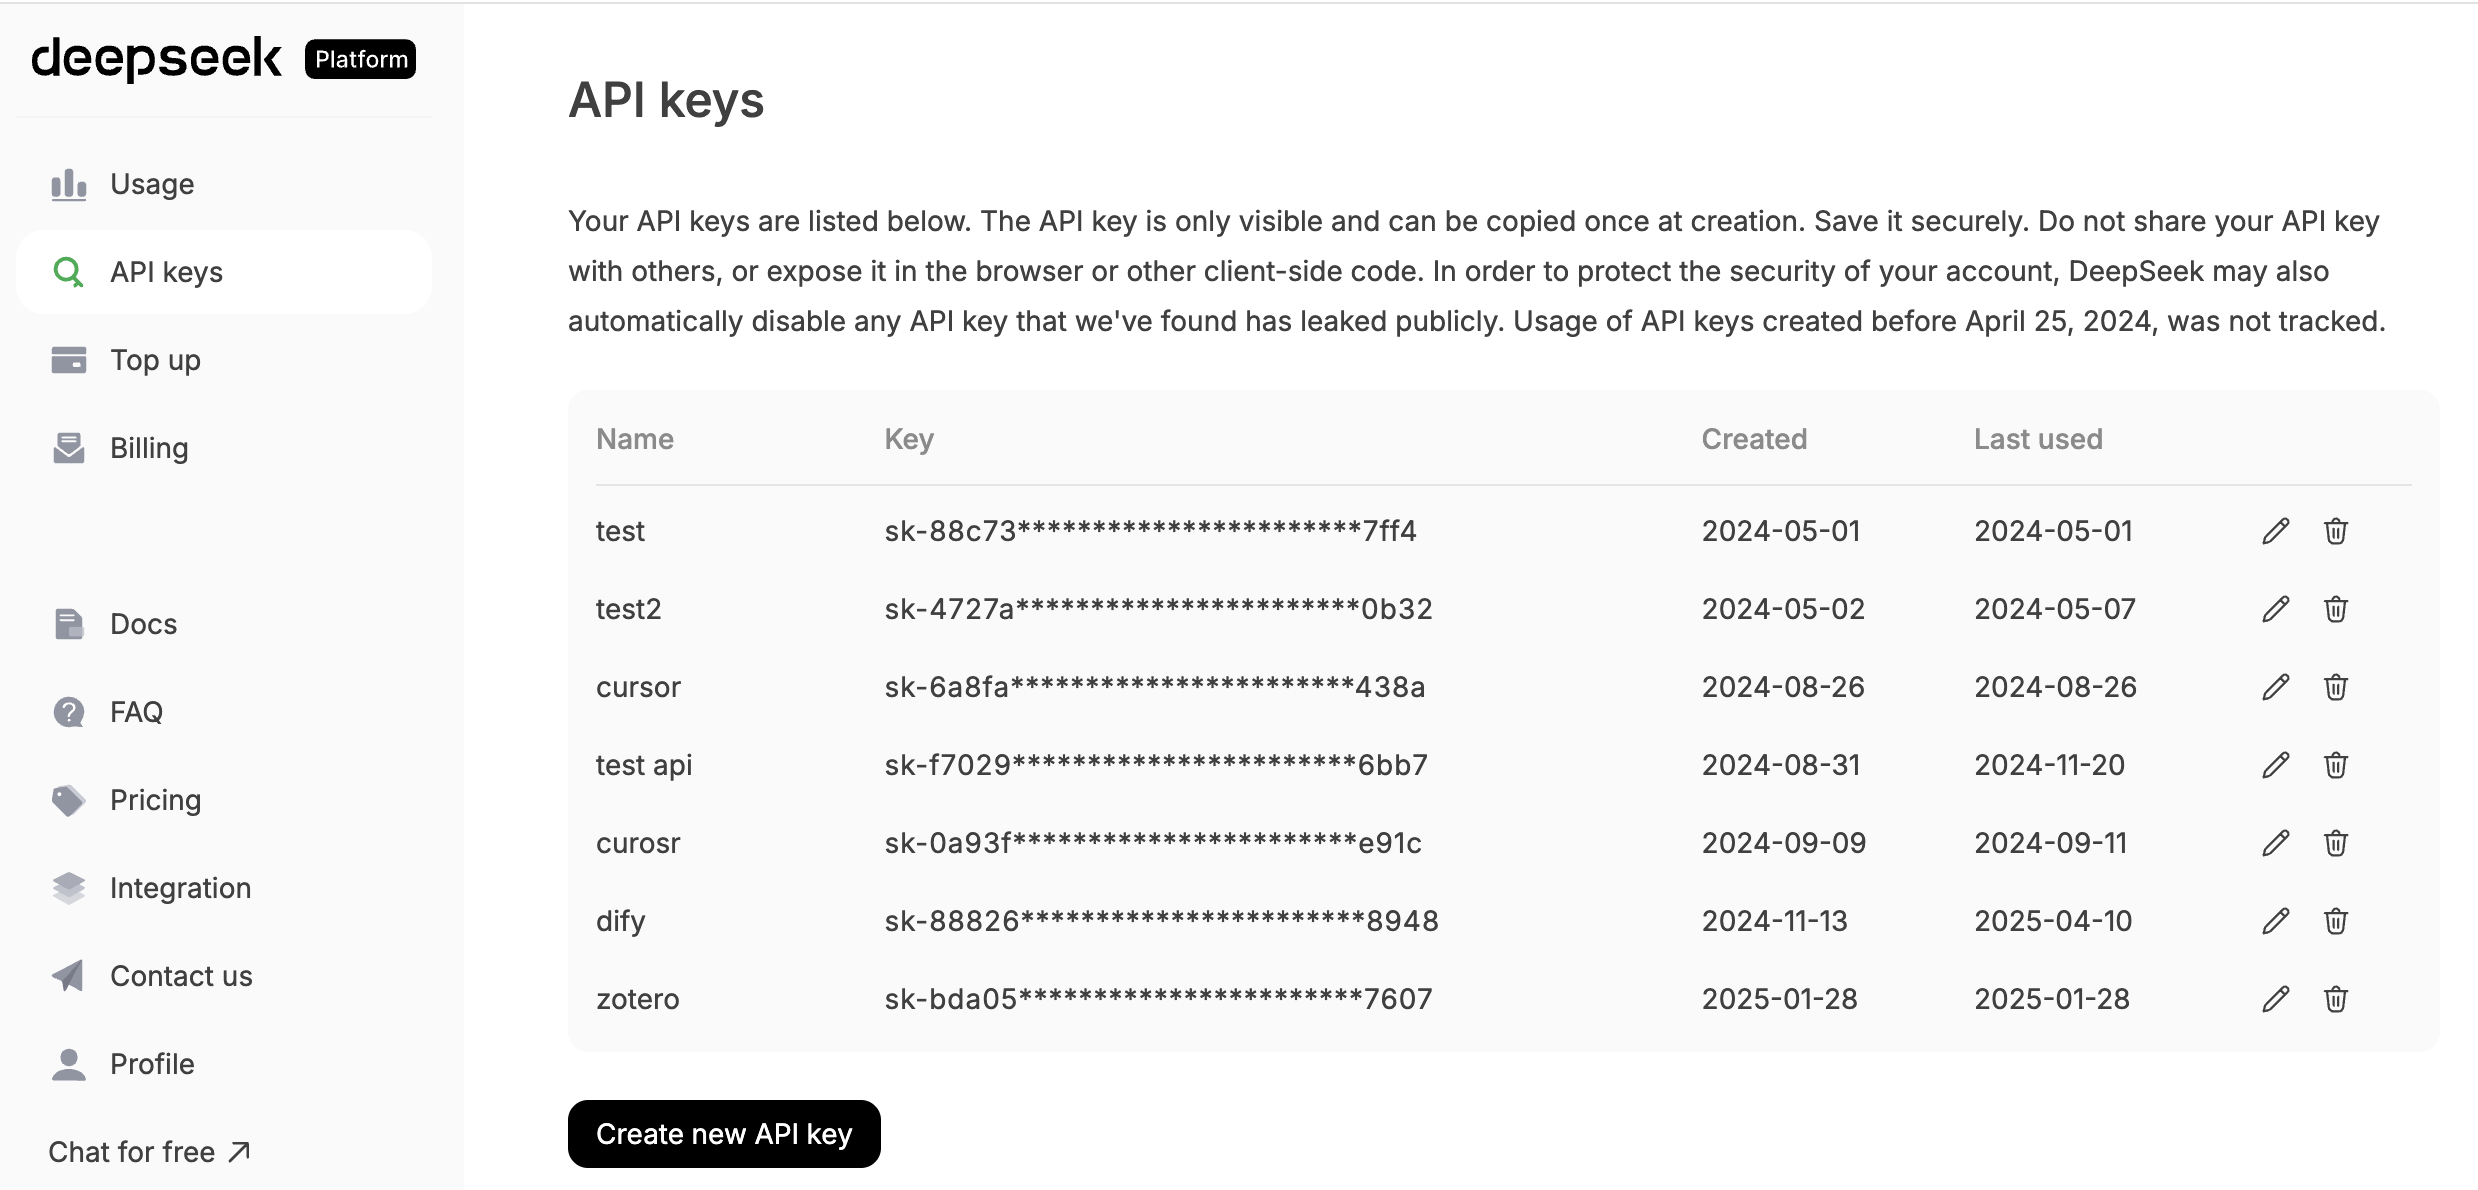
Once you have the key, you have permission to call the model.
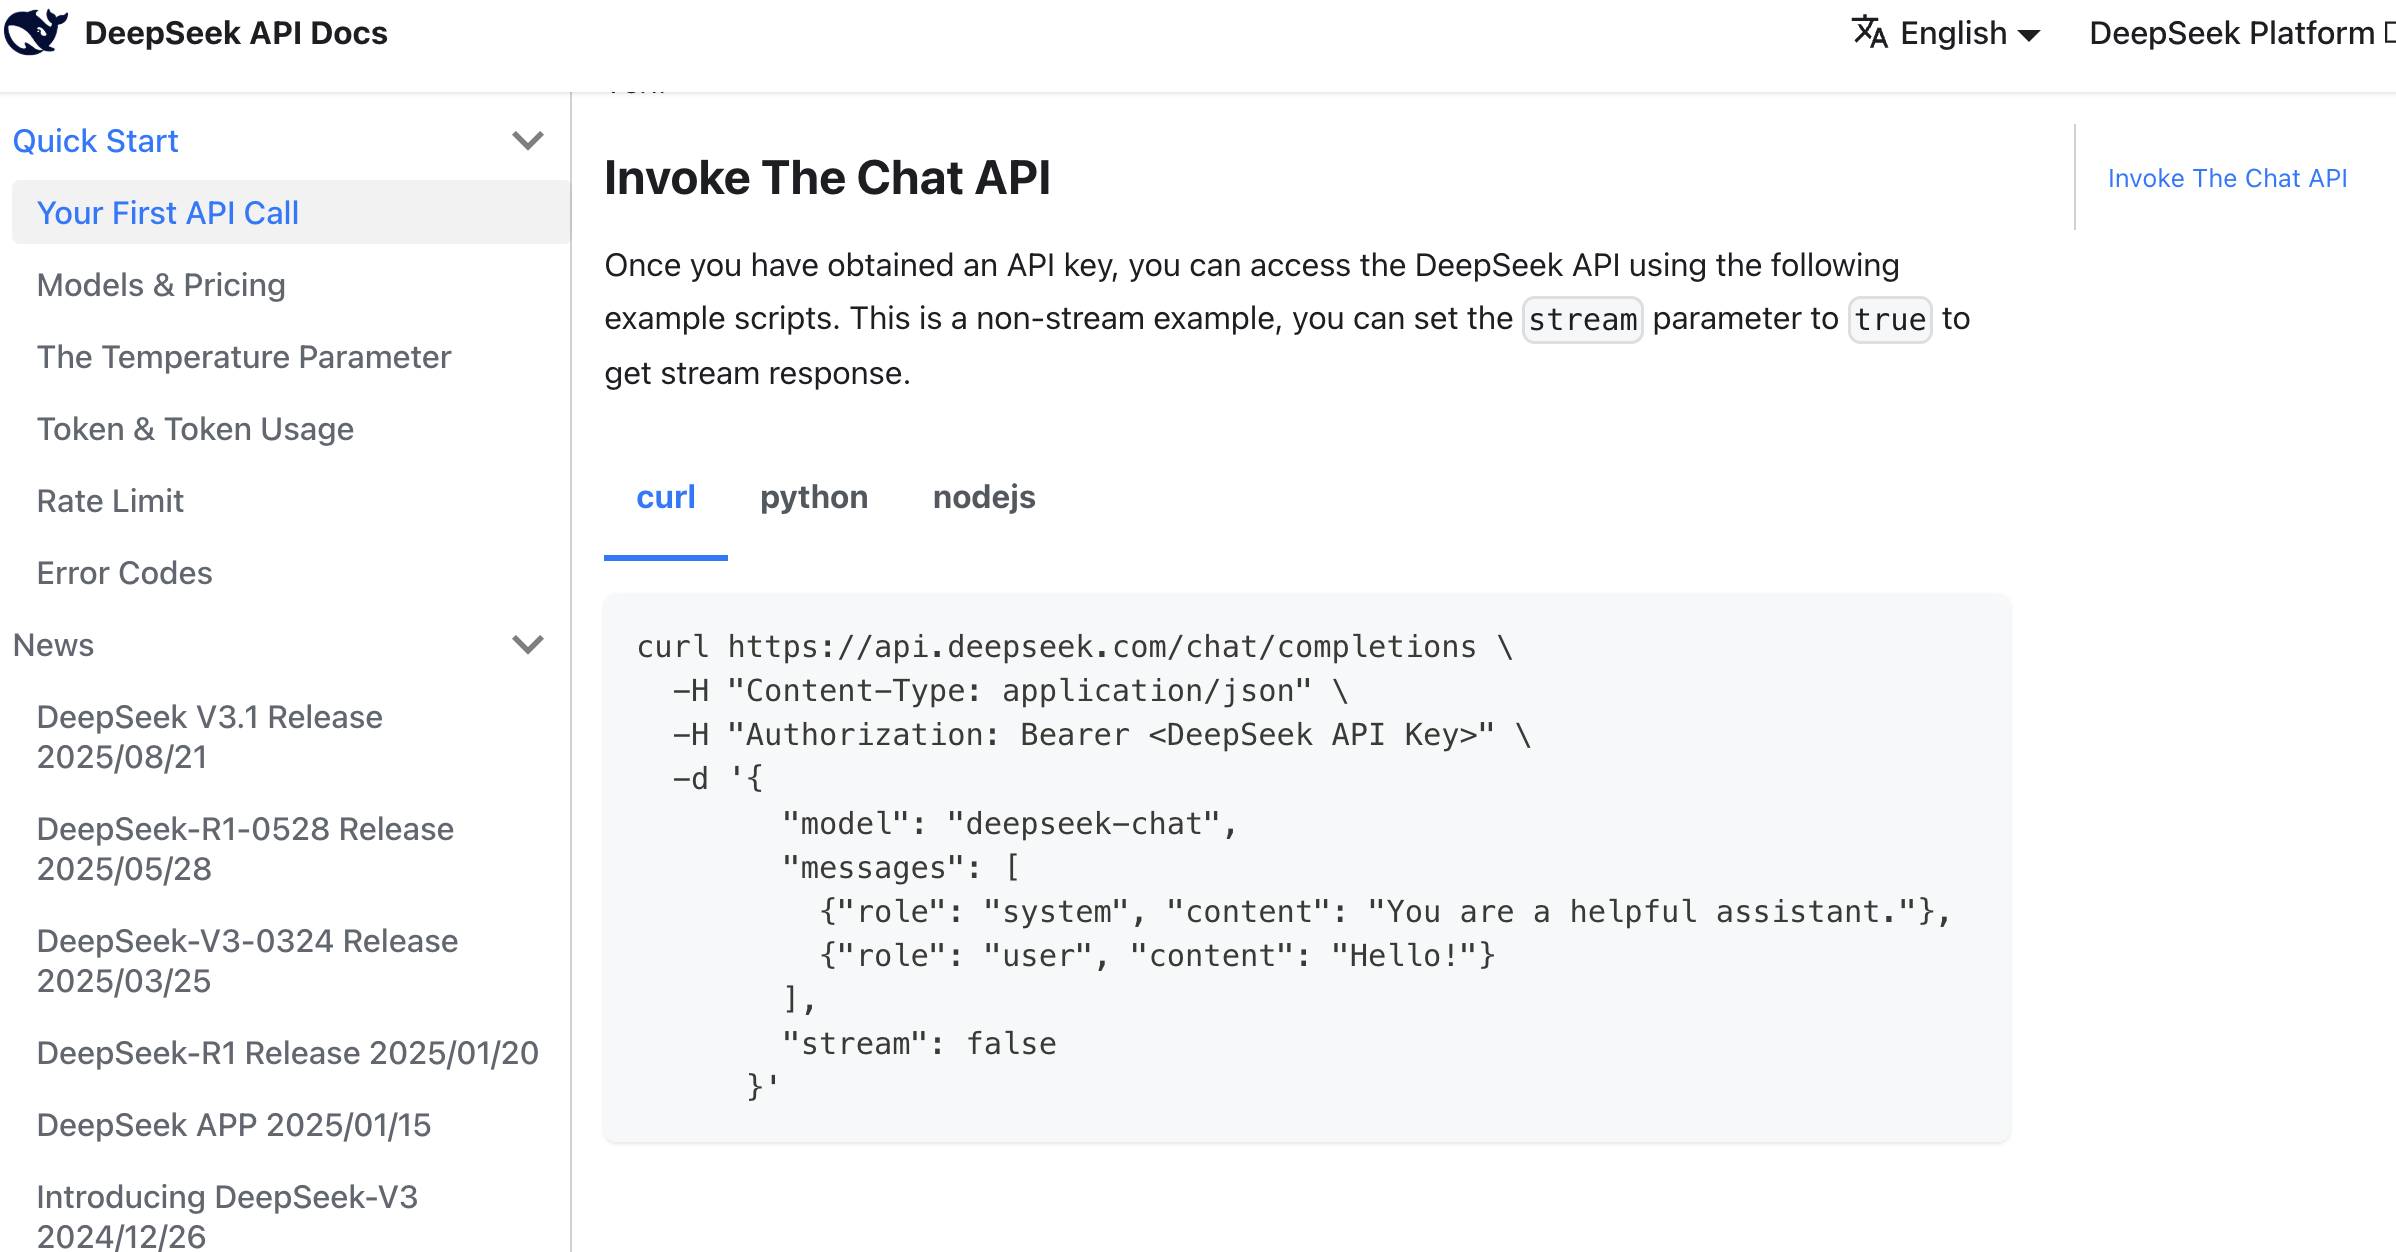
At this point, you can directly read the API documentation, which typically provides curl or Python call examples.
After finding the example, you can copy all the content from the documentation along with your key into the AI IDE's chat box, asking it to help you integrate the large language model into the prototype you've already developed.
Here's a reference prompt:
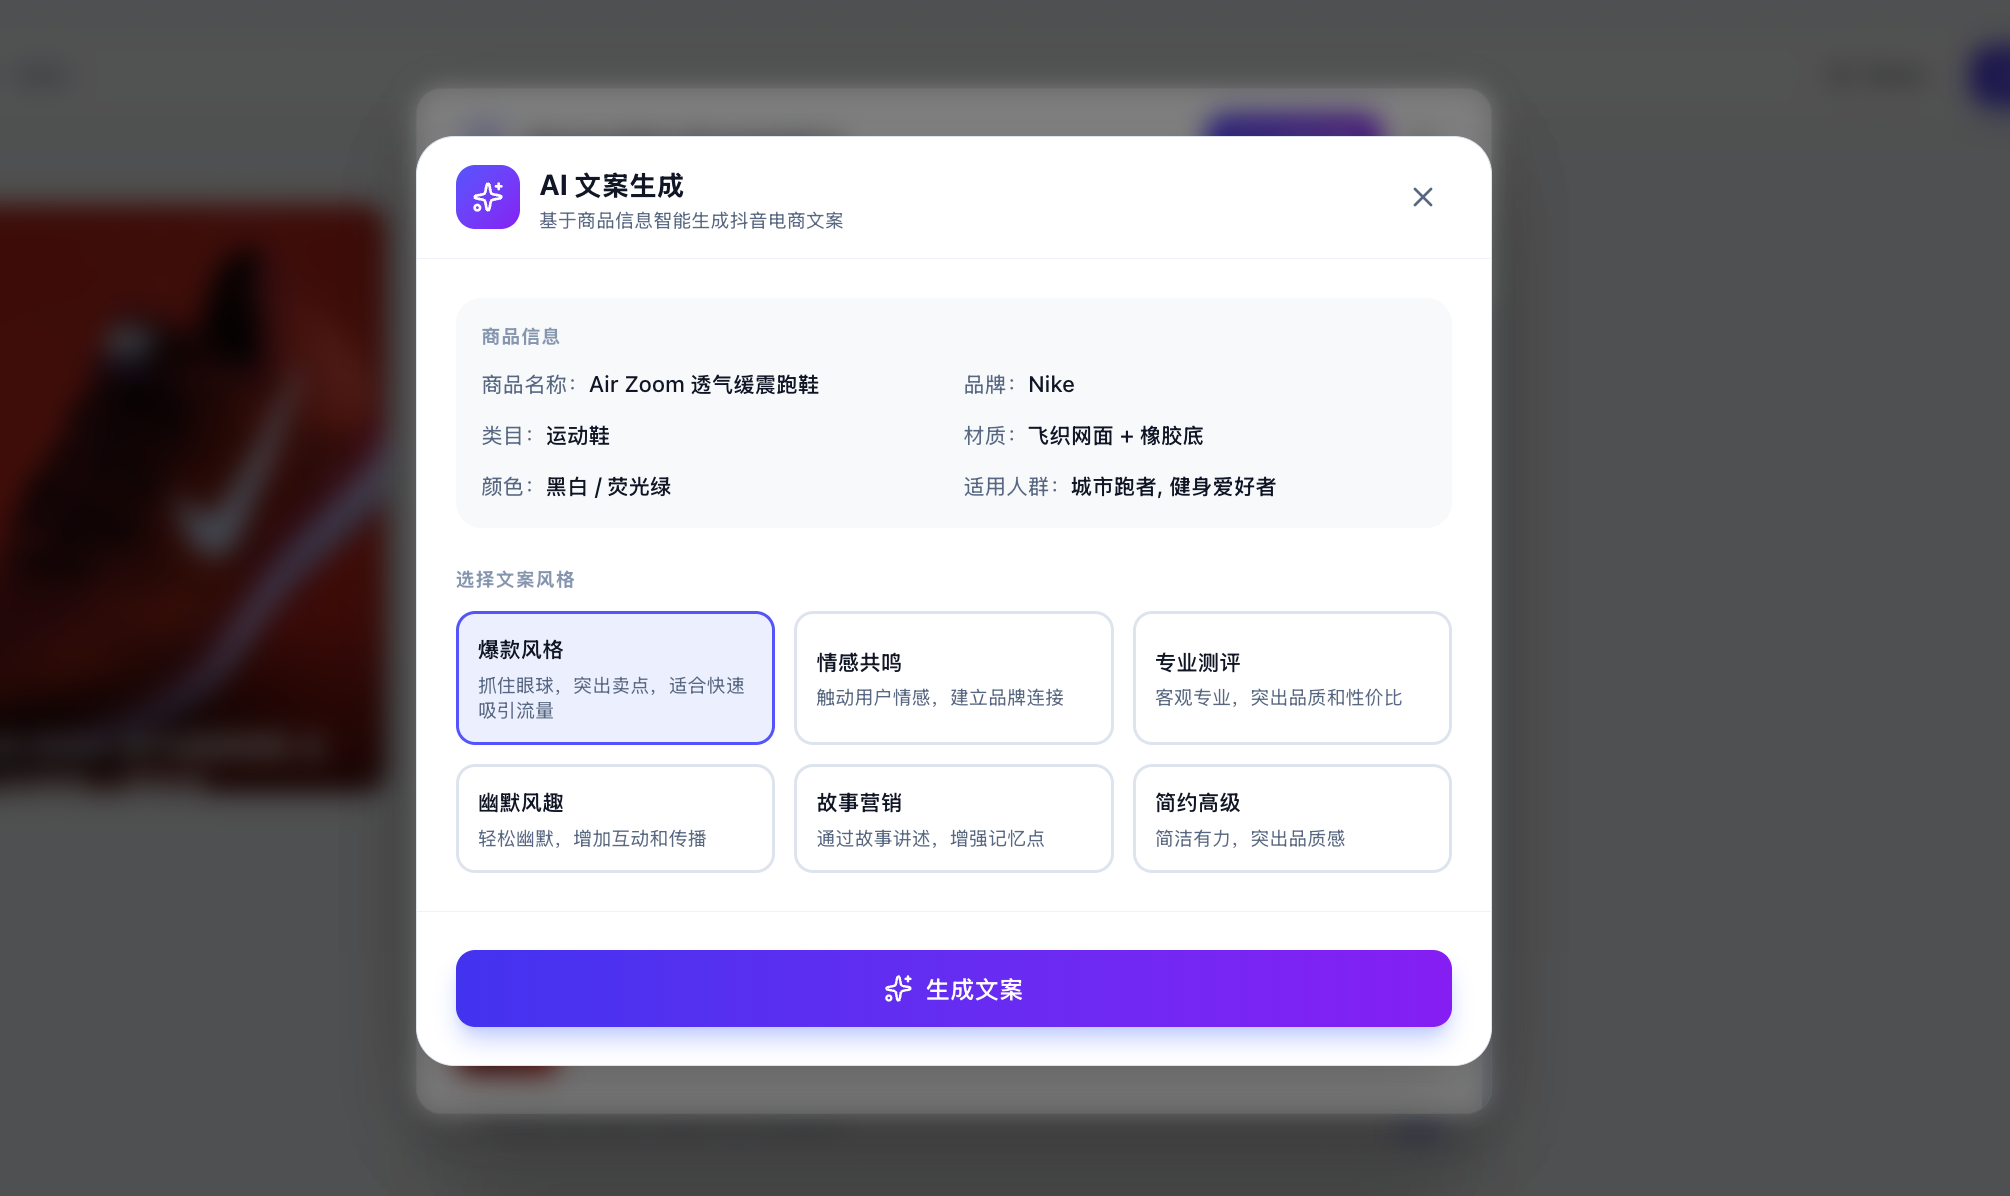
Based on this API call method, help me implement a copywriting generation feature that can generate Douyin (TikTok) e-commerce copy in various styles based on product information when clicked.

Reference materials:
api key: sk-8573341c39aefa1efe
api request reference:
curl  \
  -H "Content-Type: application/json" \
  -H "Authorization: Bearer ${DEEPSEEK_API_KEY}" \
  -d '{
        "model": "deepseek-chat",
        "messages": [
          {"role": "system", "content": "You are a helpful assistant."},
          {"role": "user", "content": "Hello!"}
        ],
        "stream": false
      }'
After some AI code generation, you'll easily get a corresponding copywriting generation button to test. If you can't find the entry point, you can ask the AI IDE to tell you which page leads to it. If you really can't find it, you can ask the AI IDE to directly refactor and improve based on your ideas to get the final copywriting generation result.
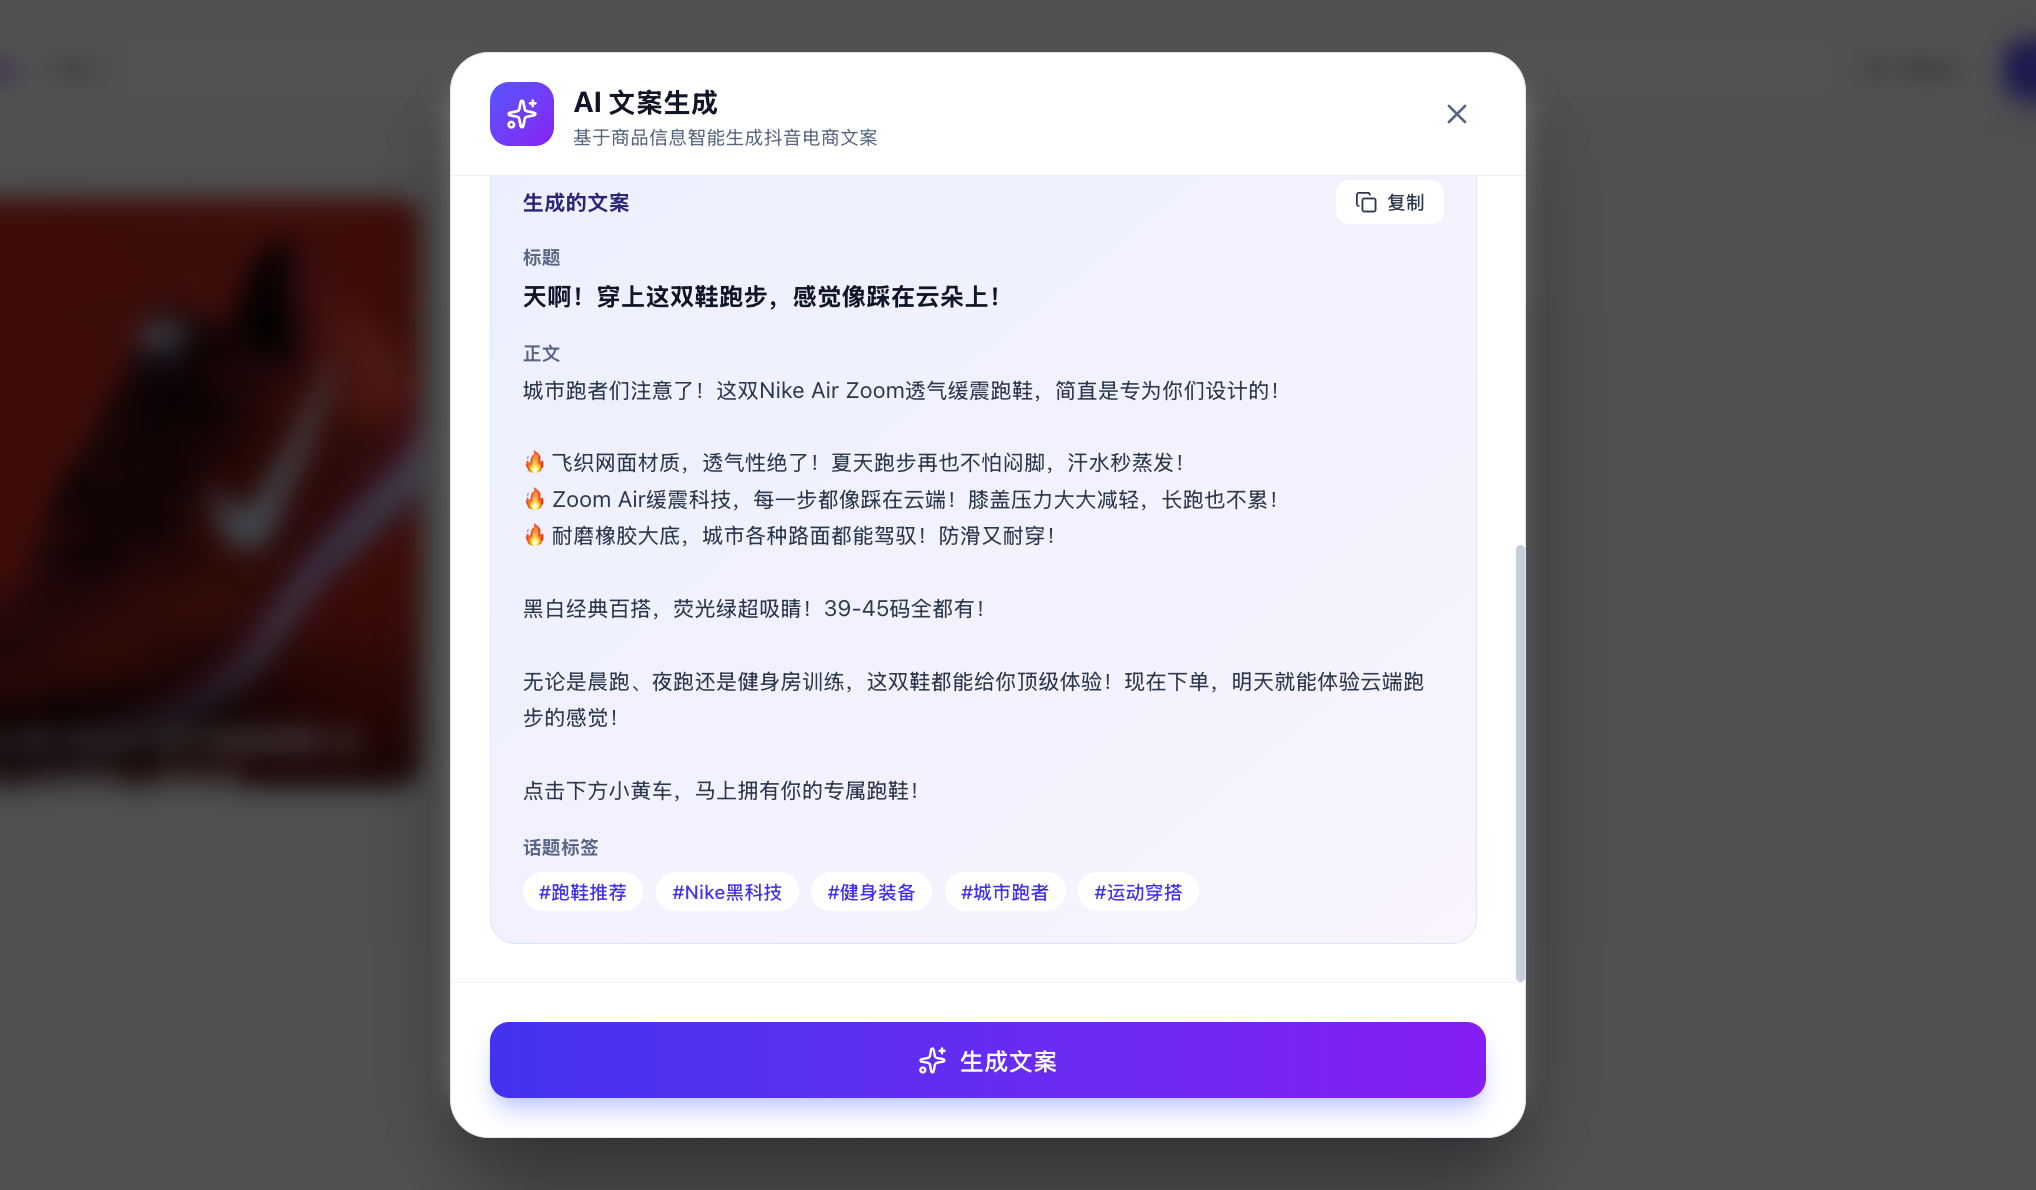
Of course, you might be wondering: how do I know it's actually calling the large model and not just returning hardcoded responses? You can enter custom copy and have the large model generate corresponding content based on your custom analysis specified on the spot.
If you find that the results are different each time and logically coherent, you can be confident that the API is being called correctly. You can also check the API usage management platform to see if the calls were successful (though it may take a few minutes to show up).
More Text Generation Model Options
In addition to DeepSeek, you can also try other large language models. Since most models provide an OpenAI-compatible API, switching is very simple — you only need to change the API Key, base URL, and model name.
MiniMax Integration
Learn More: What is MiniMax?
MiniMax is a Chinese AI company dedicated to general artificial intelligence research. MiniMax has developed its own MiniMax-M2.5 series of large language models, which perform well in multiple benchmarks with excellent cost-effectiveness.
Key Features of MiniMax-M2.5 Series:
- Ultra-long context: Supports a 204,800-token context window, suitable for processing long documents and multi-turn conversations
- Cost-effective: Input $0.3/M tokens, Output $1.2/M tokens, extremely competitive pricing
- OpenAI-compatible API: Can be called directly using the OpenAI SDK, no need to learn a new API format
- Two available models:
MiniMax-M2.5: Flagship model for complex tasksMiniMax-M2.5-highspeed: High-speed version with same performance but faster response
The integration process is the same as DeepSeek, just three steps:
- Go to MiniMax Platform to register and create an API Key
- Find the API call examples in MiniMax documentation
- Paste the API Key + example into your AI IDE
Since MiniMax provides an OpenAI-compatible API, you can copy the following curl example along with your API Key and send it to your AI IDE for integration:
curl https://api.minimax.io/v1/chat/completions \
  -H "Content-Type: application/json" \
  -H "Authorization: Bearer ${MINIMAX_API_KEY}" \
  -d '{
        "model": "MiniMax-M2.5",
        "messages": [
          {"role": "system", "content": "You are a helpful assistant."},
          {"role": "user", "content": "Hello!"}
        ],
        "stream": false
      }'
✅ Tip
MiniMax's API format is almost identical to DeepSeek (both are OpenAI-compatible), so if you've already successfully integrated DeepSeek, switching to MiniMax only requires changing three things:
- Base URL: Change to
https://api.minimax.io/v1 - API Key: Use your MiniMax API Key
- Model name: Change to
MiniMax-M2.5orMiniMax-M2.5-highspeed
For more details, refer to the MiniMax OpenAI Compatible API Documentation.
3. Integrating the Image-to-Text API: Qwen3 VL
ℹ️ Further Reading on Principles
If you want to learn more about the underlying principles, check out the appendix: Introduction to Vision Language Models (VLM).
Learn More: What is Qwen3 VL?
Qwen3 VL is the latest version in the multimodal vision-language model series developed by Alibaba Cloud's Tongyi Qianwen team. VL stands for "Vision-Language," meaning it's a vision-language model. It can understand image content and generate text descriptions based on images, answer questions about images, extract information from images, and more.
Key capabilities of Qwen3 VL include:
- Image Understanding: Can recognize objects, scenes, people, text, and other content in images
- Visual Q&A: Accurately answers questions about images based on user queries
- Image Captioning: Generates detailed or concise text descriptions of images
- Multi-image Understanding: Supports processing multiple images simultaneously for comparative analysis
- Text Extraction: Extracts text content from images (OCR capability)
Why choose Qwen3 VL?
Compared to the previous generation, Qwen3 VL has significantly improved image understanding accuracy and supports longer, more complex image analysis tasks. It excels in Chinese language understanding, has relatively low API call costs, and offers good value for money. Additionally, its larger context window enables it to handle more complex visual reasoning tasks.
Typical use cases:
- E-commerce: Automatically generate titles, descriptions, and selling points from product images
- Content creation: Automatically generate copy or image suggestions based on reference images
- Office: Image content extraction, automatic report recognition
- Education: Automatic parsing of image-based questions, knowledge point extraction
In the previous section, we explained how to integrate a text generation API. But for the application scenario above, we'll notice a problem: we're uploading an image, and if we only use a large language model, it can't understand the content of the image very well, so the generated results may be off.
We want a model that can help us turn an image into a text description — this requires a Vision Language Model (VLM). In our case, we'll use a vision language model to generate product selling point descriptions, improving the user experience.
For convenience, we'll use the API provided by SiliconFlow cloud platform to integrate the image-to-text API.
Learn More: What is SiliconFlow?
SiliconFlow is a well-known AI model aggregation platform in China, providing API services for various mainstream large language models and vision language models.
Platform features:
- Multi-model support: Integrates various mainstream AI models, including DeepSeek, Qwen, Llama series, and other open-source models
- Technical optimization: Optimized inference for open-source models, providing low-latency, high-concurrency API services
- Interface compatibility: Provides OpenAI-compatible API interfaces for easy integration with existing applications
- Pay-as-you-go: Supports usage-based billing
SiliconFlow is relatively mature in inference services for open-source large models and is a common choice for using domestic open-source AI models.
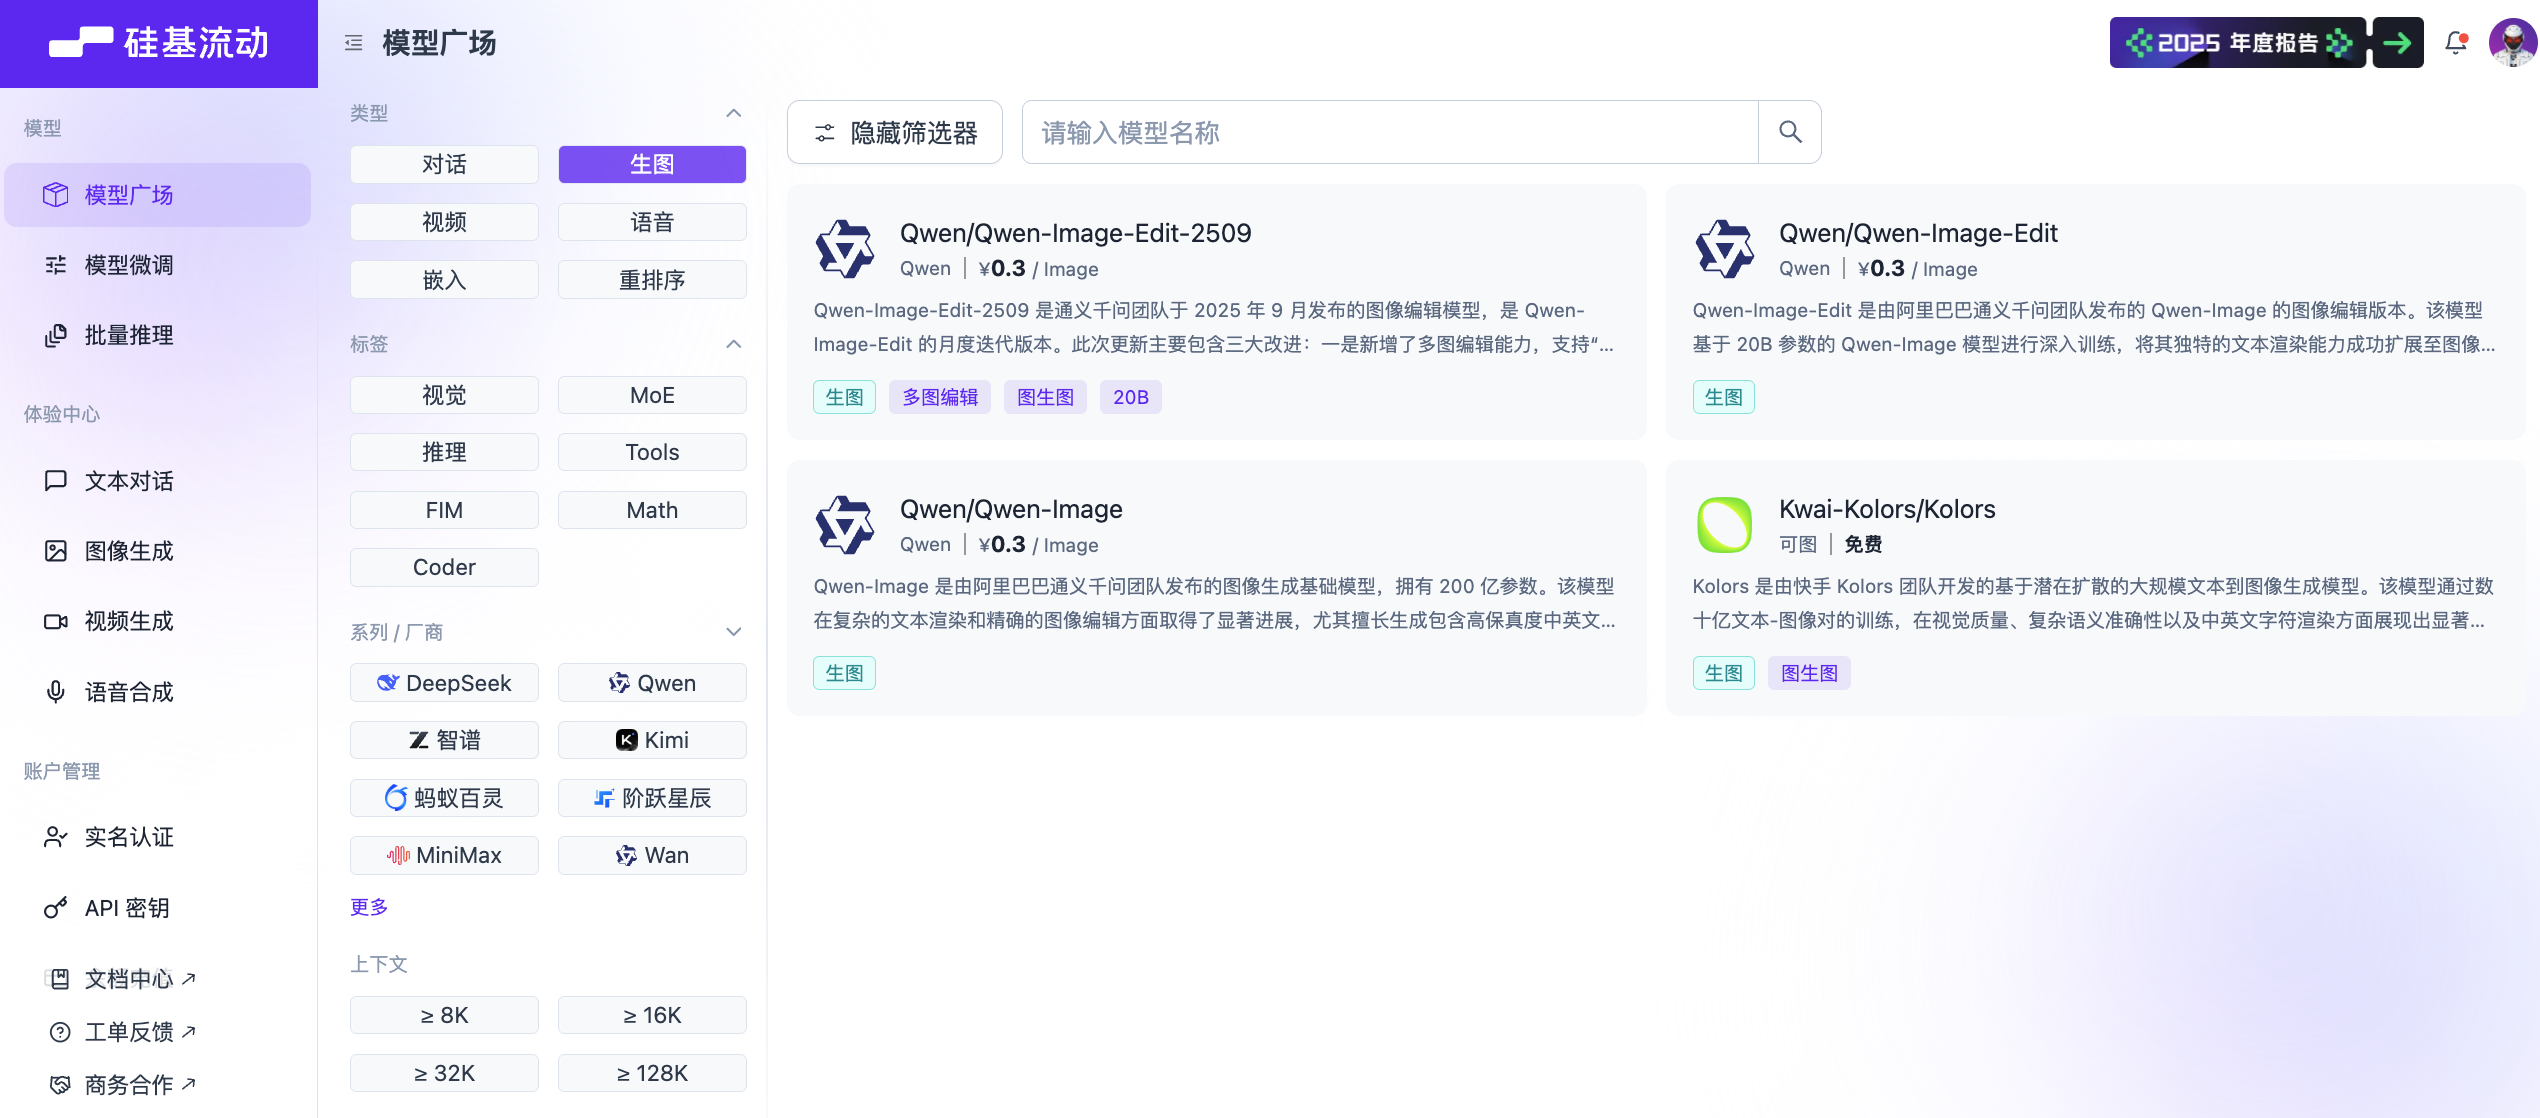
Go to the SiliconFlow platform homepage, where you'll see many models to choose from. Find the filter in the upper left corner, click to expand it, select the "Vision" tag, and you'll see many image-to-text models, such as Zhipu GLM-4.6V or Qwen3-VL.
You can choose any one to test. Here we'll use Qwen/Qwen3-VL-8B-Instruct as an example.
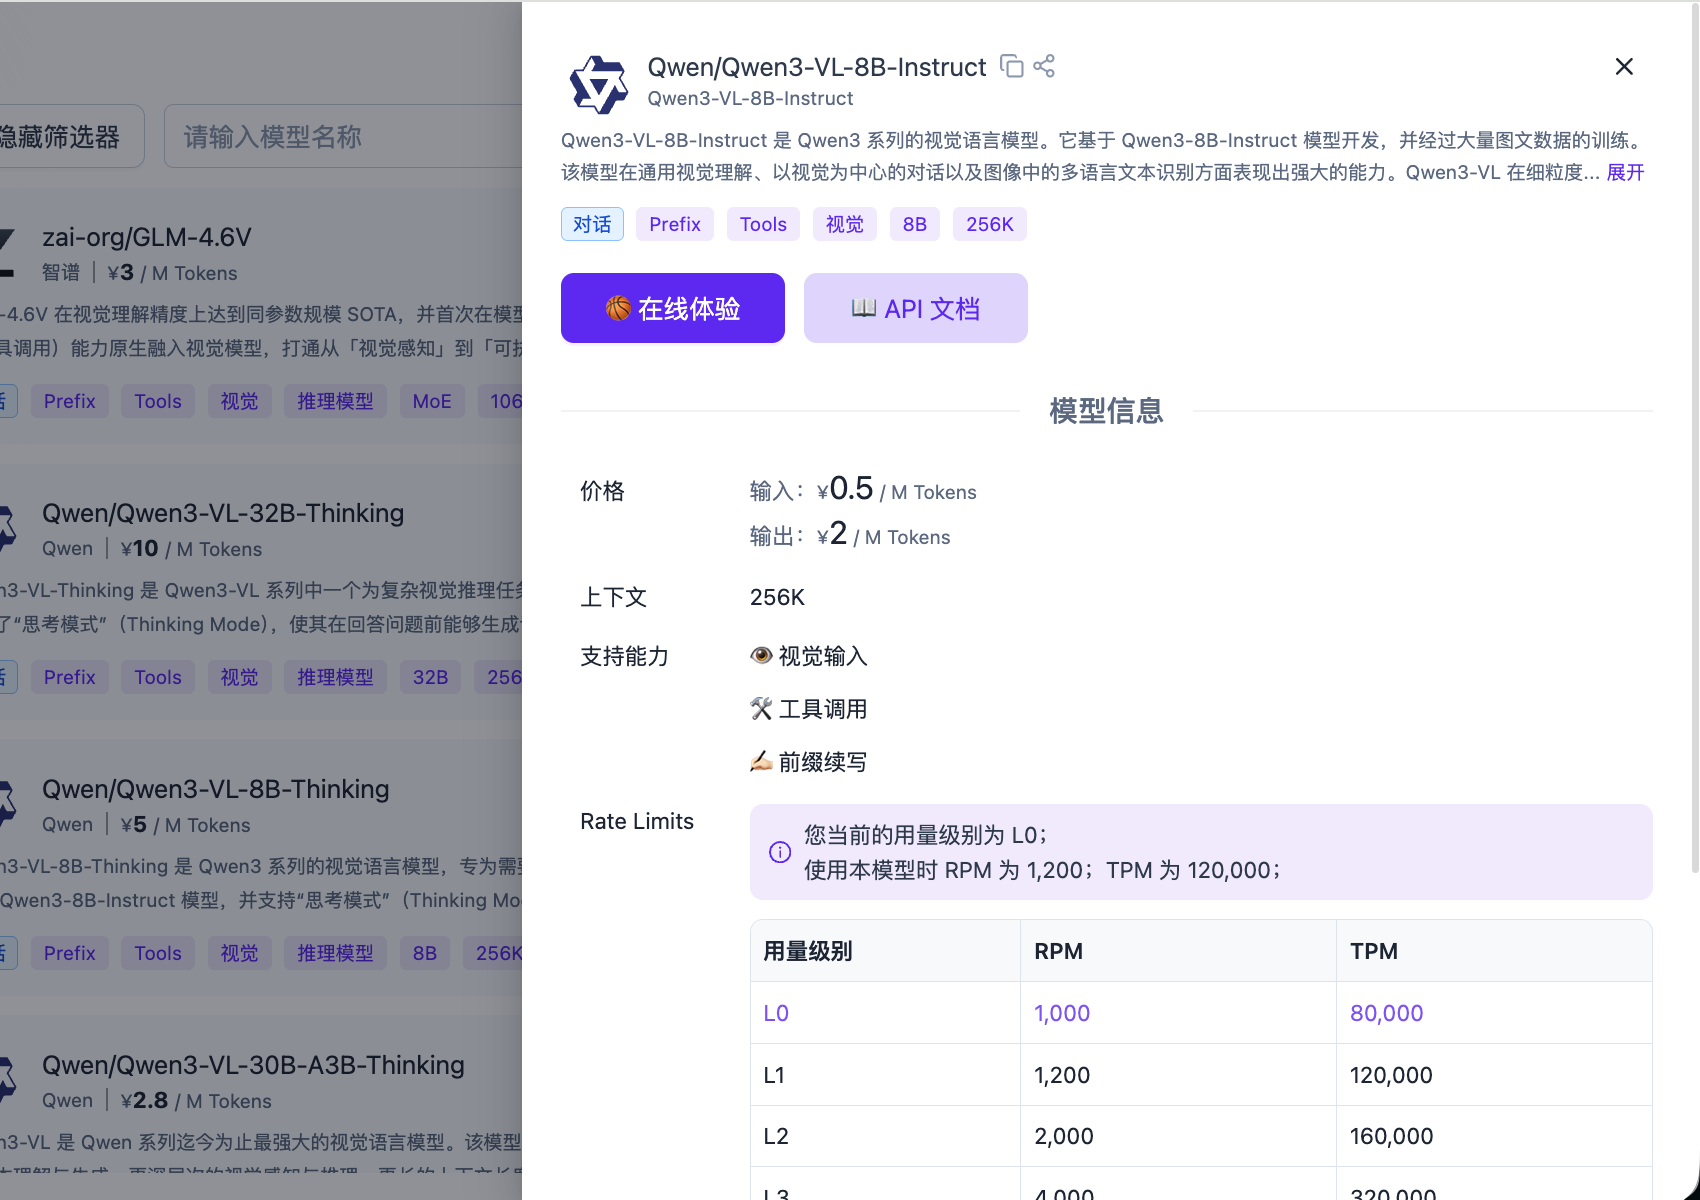
Go to the SiliconFlow platform, click "Create New API Key" in the API Keys section to create a new API Key.
You can directly use the code below as reference code, and send it along with the generated API Key to the AI IDE for feature integration.
Image-to-Text Reference Code
from openai import OpenAI
from typing import Dict, Any, List
import base64
import os
SILICONFLOW_API_KEY: str = ""
SILICONFLOW_BASE_URL: str = "https://api.siliconflow.cn/v1/"
MODEL_NAME: str = "Qwen/Qwen3-VL-8B-Instruct"

def encode_image(image_path: str) -> str:
    with open(image_path, "rb") as image_file:
        return base64.b64encode(image_file.read()).decode('utf-8')

def get_vlm_completion(client: OpenAI, messages: List[Dict[str, Any]]) -> str:
    response = client.chat.completions.create(
        model=MODEL_NAME,
        messages=messages,
        max_tokens=512,
        temperature=0.7,
        top_p=0.7,
        frequency_penalty=0.5,
        stream=False,
        n=1
    )
    return response.choices[0].message.content

def caption_image(image_path: str) -> str:
    base64_image = encode_image(image_path)
    messages = [
        {
            "role": "user",
            "content": [
                {
                    "type": "text",
                    "text": "Please describe this image in detail."
                },
                {
                    "type": "image_url",
                    "image_url": {
                        "url": f"data:image/jpeg;base64,{base64_image}"
                    }
                }
            ]
        }
    ]

    client = OpenAI(
        api_key=SILICONFLOW_API_KEY,
        base_url=SILICONFLOW_BASE_URL
    )

    return get_vlm_completion(client, messages)

image_path = "images.jpg"
caption = caption_image(image_path)
For image-generation integration, failures can be noisy and hard to debug. Ask AI IDE to display full error details every time (instead of only "generation failed"), for example:
Don't only show "image generation failed." Please always display the full failure reason, such as model mismatch, request errors, or timeout details.If changes are not reflected in the page after multiple attempts, ask AI IDE to restart the project.
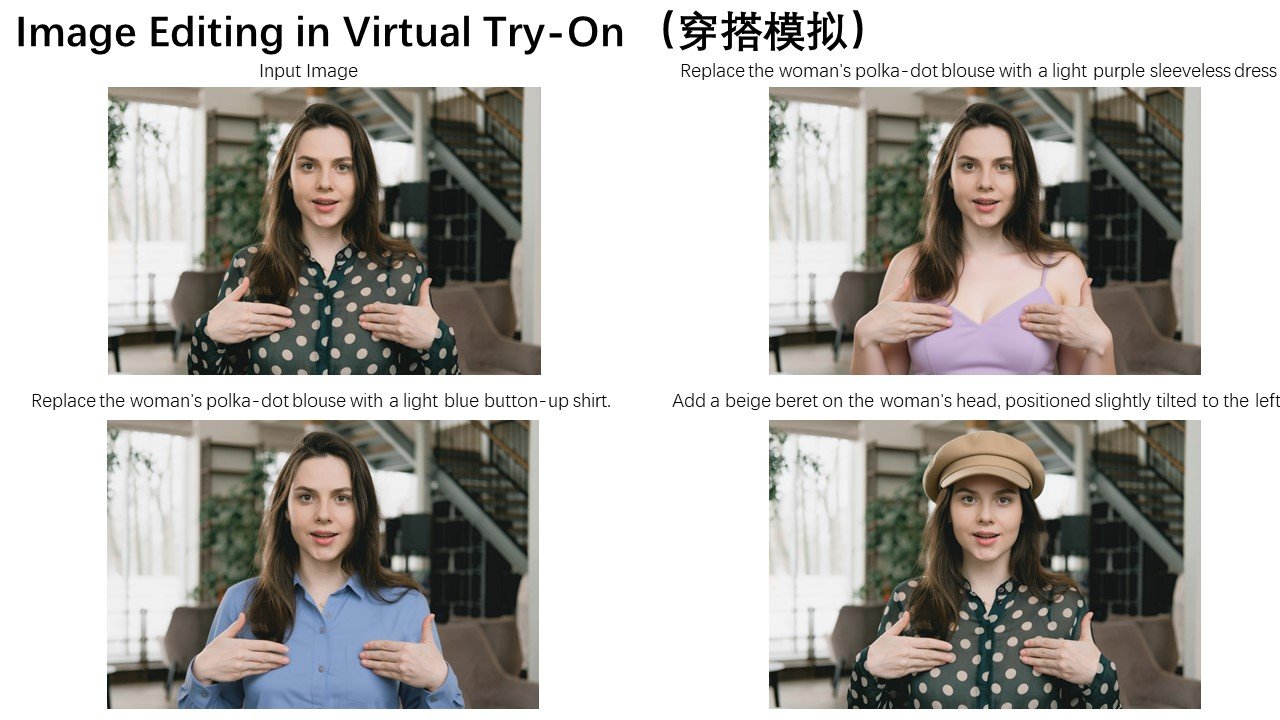
In ecommerce scenarios, you may want uploaded clothes to be automatically "worn" by virtual models, or automatically generate attractive product posters and promotional visuals. Here is an example prompt for generating an ecommerce poster:
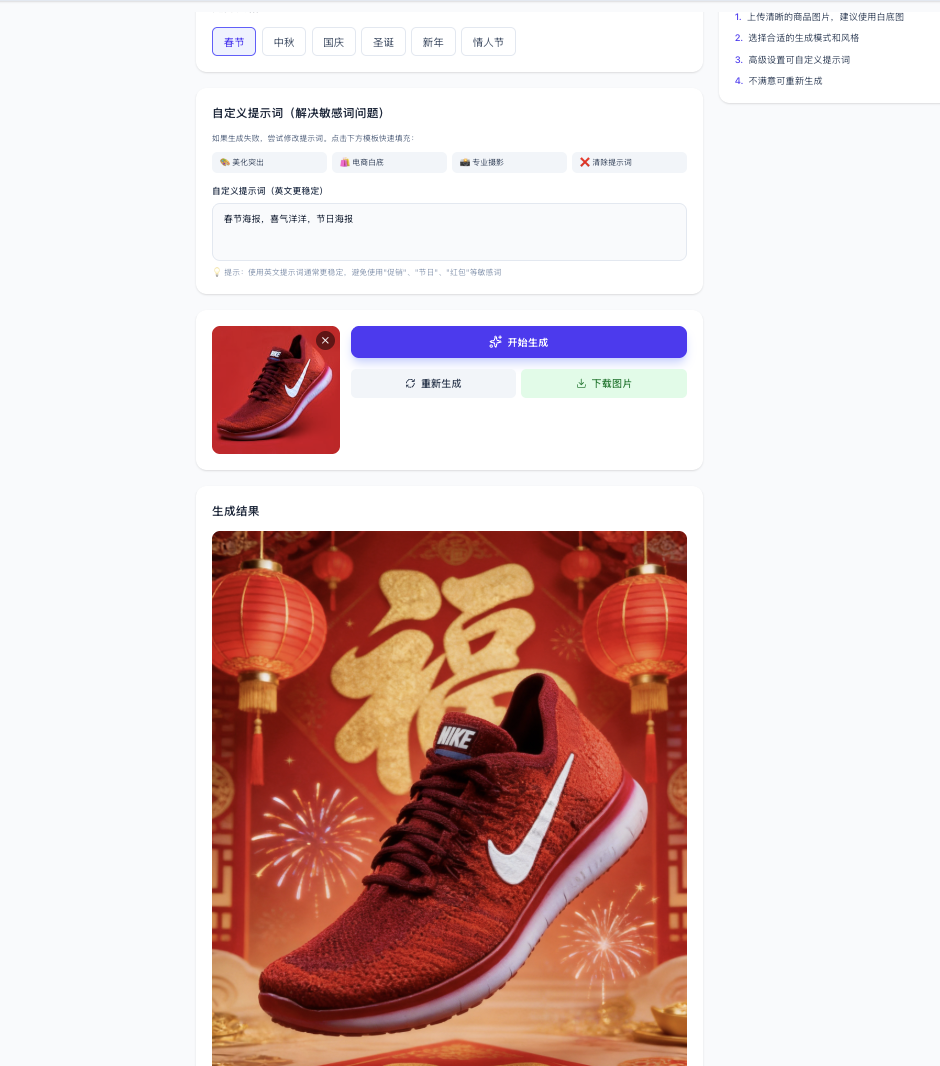
You can combine text-to-image and image-to-image APIs based on your own business scenario ideas.
4. More Image Service Options
Below are additional choices. It's recommended to first run through a working Qwen image generation result, then replace with another service based on quality and cost.
4.1 Recraft Integration
If your prototype is more design-production oriented (for example brand-style illustrations, marketing posters, vector-style assets), Recraft is often a better fit. The integration method is exactly the same: get a Key + find official examples + let AI IDE wire them into your page/button.
Learn More: What is Recraft?
Recraft is an AI tool for designers, illustrators, and marketers, founded in 2022 (US) with headquarters in London. It supports generating and iterating visual content (images, vector art, and 3D graphics), with strengths in output quality, element-level control, and brand-consistent design.


First, go to the API entry to obtain an API Key.
Recraft currently does not provide a free quota in this workflow, so you'll need to top up credits yourself.

Then follow the same process and use official documentation examples:
4.2 Qwen Image / Qwen Image Edit Integration
If you want a relatively simple way to integrate image generation, Qwen Image is also a good choice. The approach is unchanged: treat it as an image API and connect it to your prototype button.
Learn More: What are Qwen Image and Qwen Image Edit?
Qwen Image is Alibaba Tongyi's image generation model family, mainly including two model types:
1. Qwen Image: Text-to-Image
Generate a brand-new image from text prompts. You provide a description, the model interprets it and generates matching visuals.

Main capabilities:
- Text-to-image: Supports multiple styles (realistic, cartoon, ink, cyberpunk, etc.)
- Style transfer: Convert an image into a target artistic style
- Image variation: Generate new images with similar style from references
- Resolution enhancement: Improve clarity and details
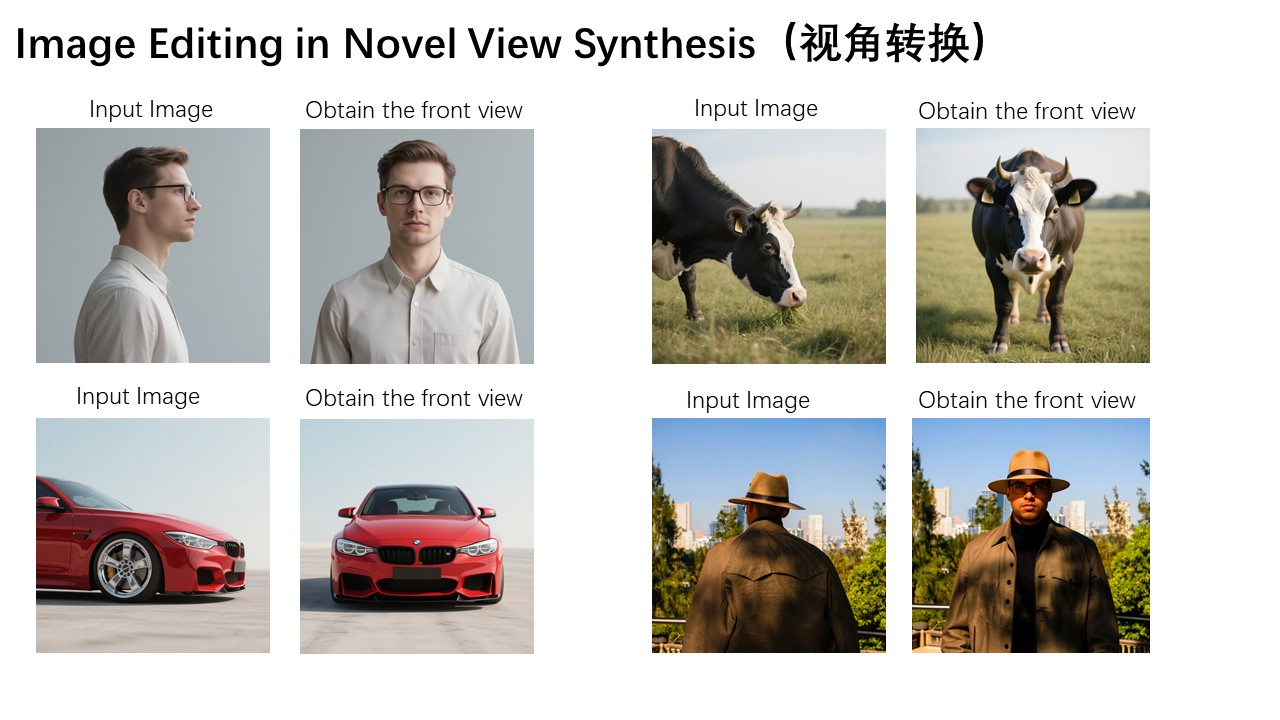
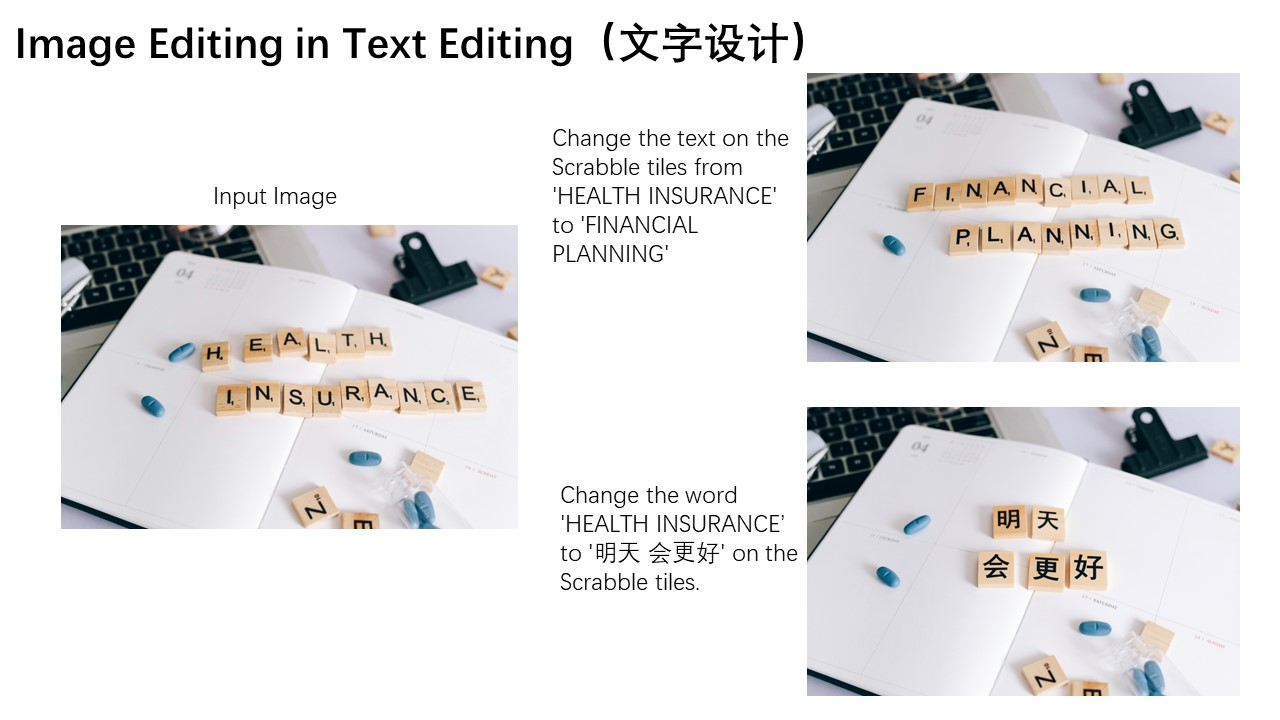
2. Qwen Image Edit: Image-to-Image
Edit existing images through natural language instructions.
Main capabilities:
- Local replacement: Replace specific objects/characters (e.g. "change the background to a beach")
- Element removal: Remove unwanted elements
- Style conversion: Apply filters or artistic effects
- Image expansion: Extend the image boundary and generate new content
- Smart retouching: Auto-enhance quality, lighting, and defects
Why choose the Qwen Image series:
- Better Chinese prompt understanding
- Lower cost compared with many global alternatives
- Fast generation speed
- Stable output quality in ecommerce and content scenarios
- Rich style diversity
Typical use cases:
- Ecommerce: main images, detail-page images, promo posters
- Social media: avatars, stickers, visual assets
- Design: quick concept assets, background assets
- Marketing: ad visuals, event banners, holiday posters
Open SiliconFlow and use the Playground (without calling APIs) to test model effects. Use the top "Filters" option to narrow to image-generation models and choose Qwen/Qwen-Image.
After confirming the model, check the official API reference and open the image generation API section. Then send the example request plus your API key to AI IDE.
curl --request POST \
  --url https://api.siliconflow.cn/v1/images/generations \
  --header 'Authorization: Bearer <token>' \
  --header 'Content-Type: application/json' \
  --data '
{
  "model": "Qwen/Qwen-Image-Edit-2509",
  "prompt": "an island near sea, with seagulls, moon shining over the sea, light house, boats in the background, fish flying over the sea"
}
'
You can use either Qwen/Qwen-Image or Qwen/Qwen-Image-Edit-2509.
Image Edit Reference Code
Copy the code below plus your key into AI IDE:
import requests
import os
from typing import Dict, Any, Optional

SILICONFLOW_API_KEY: str = ""
SILICONFLOW_BASE_URL: str = "https://api.siliconflow.cn/v1/images/generations"
QWEN_IMAGE_EDIT_MODEL: str = "Qwen/Qwen-Image-Edit-2509"

def generate_image_edit(
    prompt: str,
    image: Optional[str] = None,
    image2: Optional[str] = None,
    image3: Optional[str] = None,
    negative_prompt: Optional[str] = None,
    cfg: Optional[float] = 4.0,
    seed: Optional[int] = None
) -> Optional[Dict[str, Any]]:
    payload: Dict[str, Any] = {
        "model": QWEN_IMAGE_EDIT_MODEL,
        "prompt": prompt,
    }
    if image:
        payload["image"] = image
    if image2:
        payload["image2"] = image2
    if image3:
        payload["image3"] = image3
    if negative_prompt:
        payload["negative_prompt"] = negative_prompt
    if cfg is not None:
        payload["cfg"] = cfg
    if seed is not None:
        payload["seed"] = seed

    headers: Dict[str, str] = {
        "Authorization": f"Bearer {SILICONFLOW_API_KEY}",
        "Content-Type": "application/json"
    }

    try:
        response = requests.post(SILICONFLOW_BASE_URL, json=payload, headers=headers)
        response.raise_for_status()
        return response.json()
    except requests.exceptions.RequestException as e:
        print(f"Error generating image: {e}")
        return None

def save_image_from_url(image_url: str, output_path: str = "image.png") -> bool:
    try:
        response = requests.get(image_url)
        response.raise_for_status()
        os.makedirs(os.path.dirname(output_path) if os.path.dirname(output_path) else ".", exist_ok=True)
        with open(output_path, "wb") as f:
            f.write(response.content)
        print(f"Image saved successfully to: {output_path}")
        return True
    except requests.exceptions.RequestException as e:
        print(f"Error downloading image: {e}")
        return False
    except Exception as e:
        print(f"Error saving image: {e}")
        return False

prompt: str = "Change the sky to dusk, add moon and stars, dreamy style"
negative_prompt: str = "blur, low quality, distortion"
image_url: str = "https://inews.gtimg.com/om_bt/Os3eJ8u3SgB3Kd-zrRRhgfR5hUvdwcVPKUTNO6O7sZfUwAA/641"
image2_url: Optional[str] = None
image3_url: Optional[str] = None

cfg: float = 4.0
seed: int = 12345
output_path: str = "edited_image.png"

print(f"Generating edited image with prompt: {prompt}")
print(f"Input image: {image_url}")
print(f"CFG: {cfg}, Seed: {seed}")
print("-" * 50)

result = generate_image_edit(
    prompt=prompt,
    image=image_url,
    image2=image2_url,
    image3=image3_url,
    negative_prompt=negative_prompt,
    cfg=cfg,
    seed=seed
)

if result and "images" in result:
    images = result["images"]
    if images and len(images) > 0:
        image_url_result = images[0]["url"]
        print(f"Image edit generated successfully. URL: {image_url_result}")
        success = save_image_from_url(image_url_result, output_path)
        if success:
            print(f"Image saved to: {output_path}")
        else:
            print("Failed to save image to local file")
    else:
        print("No images found in response")
else:
    print("Image generation failed")
    if result:
        print(f"Response: {result}")
Appendix: How to Find Stronger AI Models Today
Text model development moves quickly, so you should regularly verify whether your chosen model is still competitive. The two websites below are useful for tracking model quality, popularity, and cost-performance.
You can think of them as model arenas: they compare outputs from different models and let people vote or inspect benchmark dimensions.
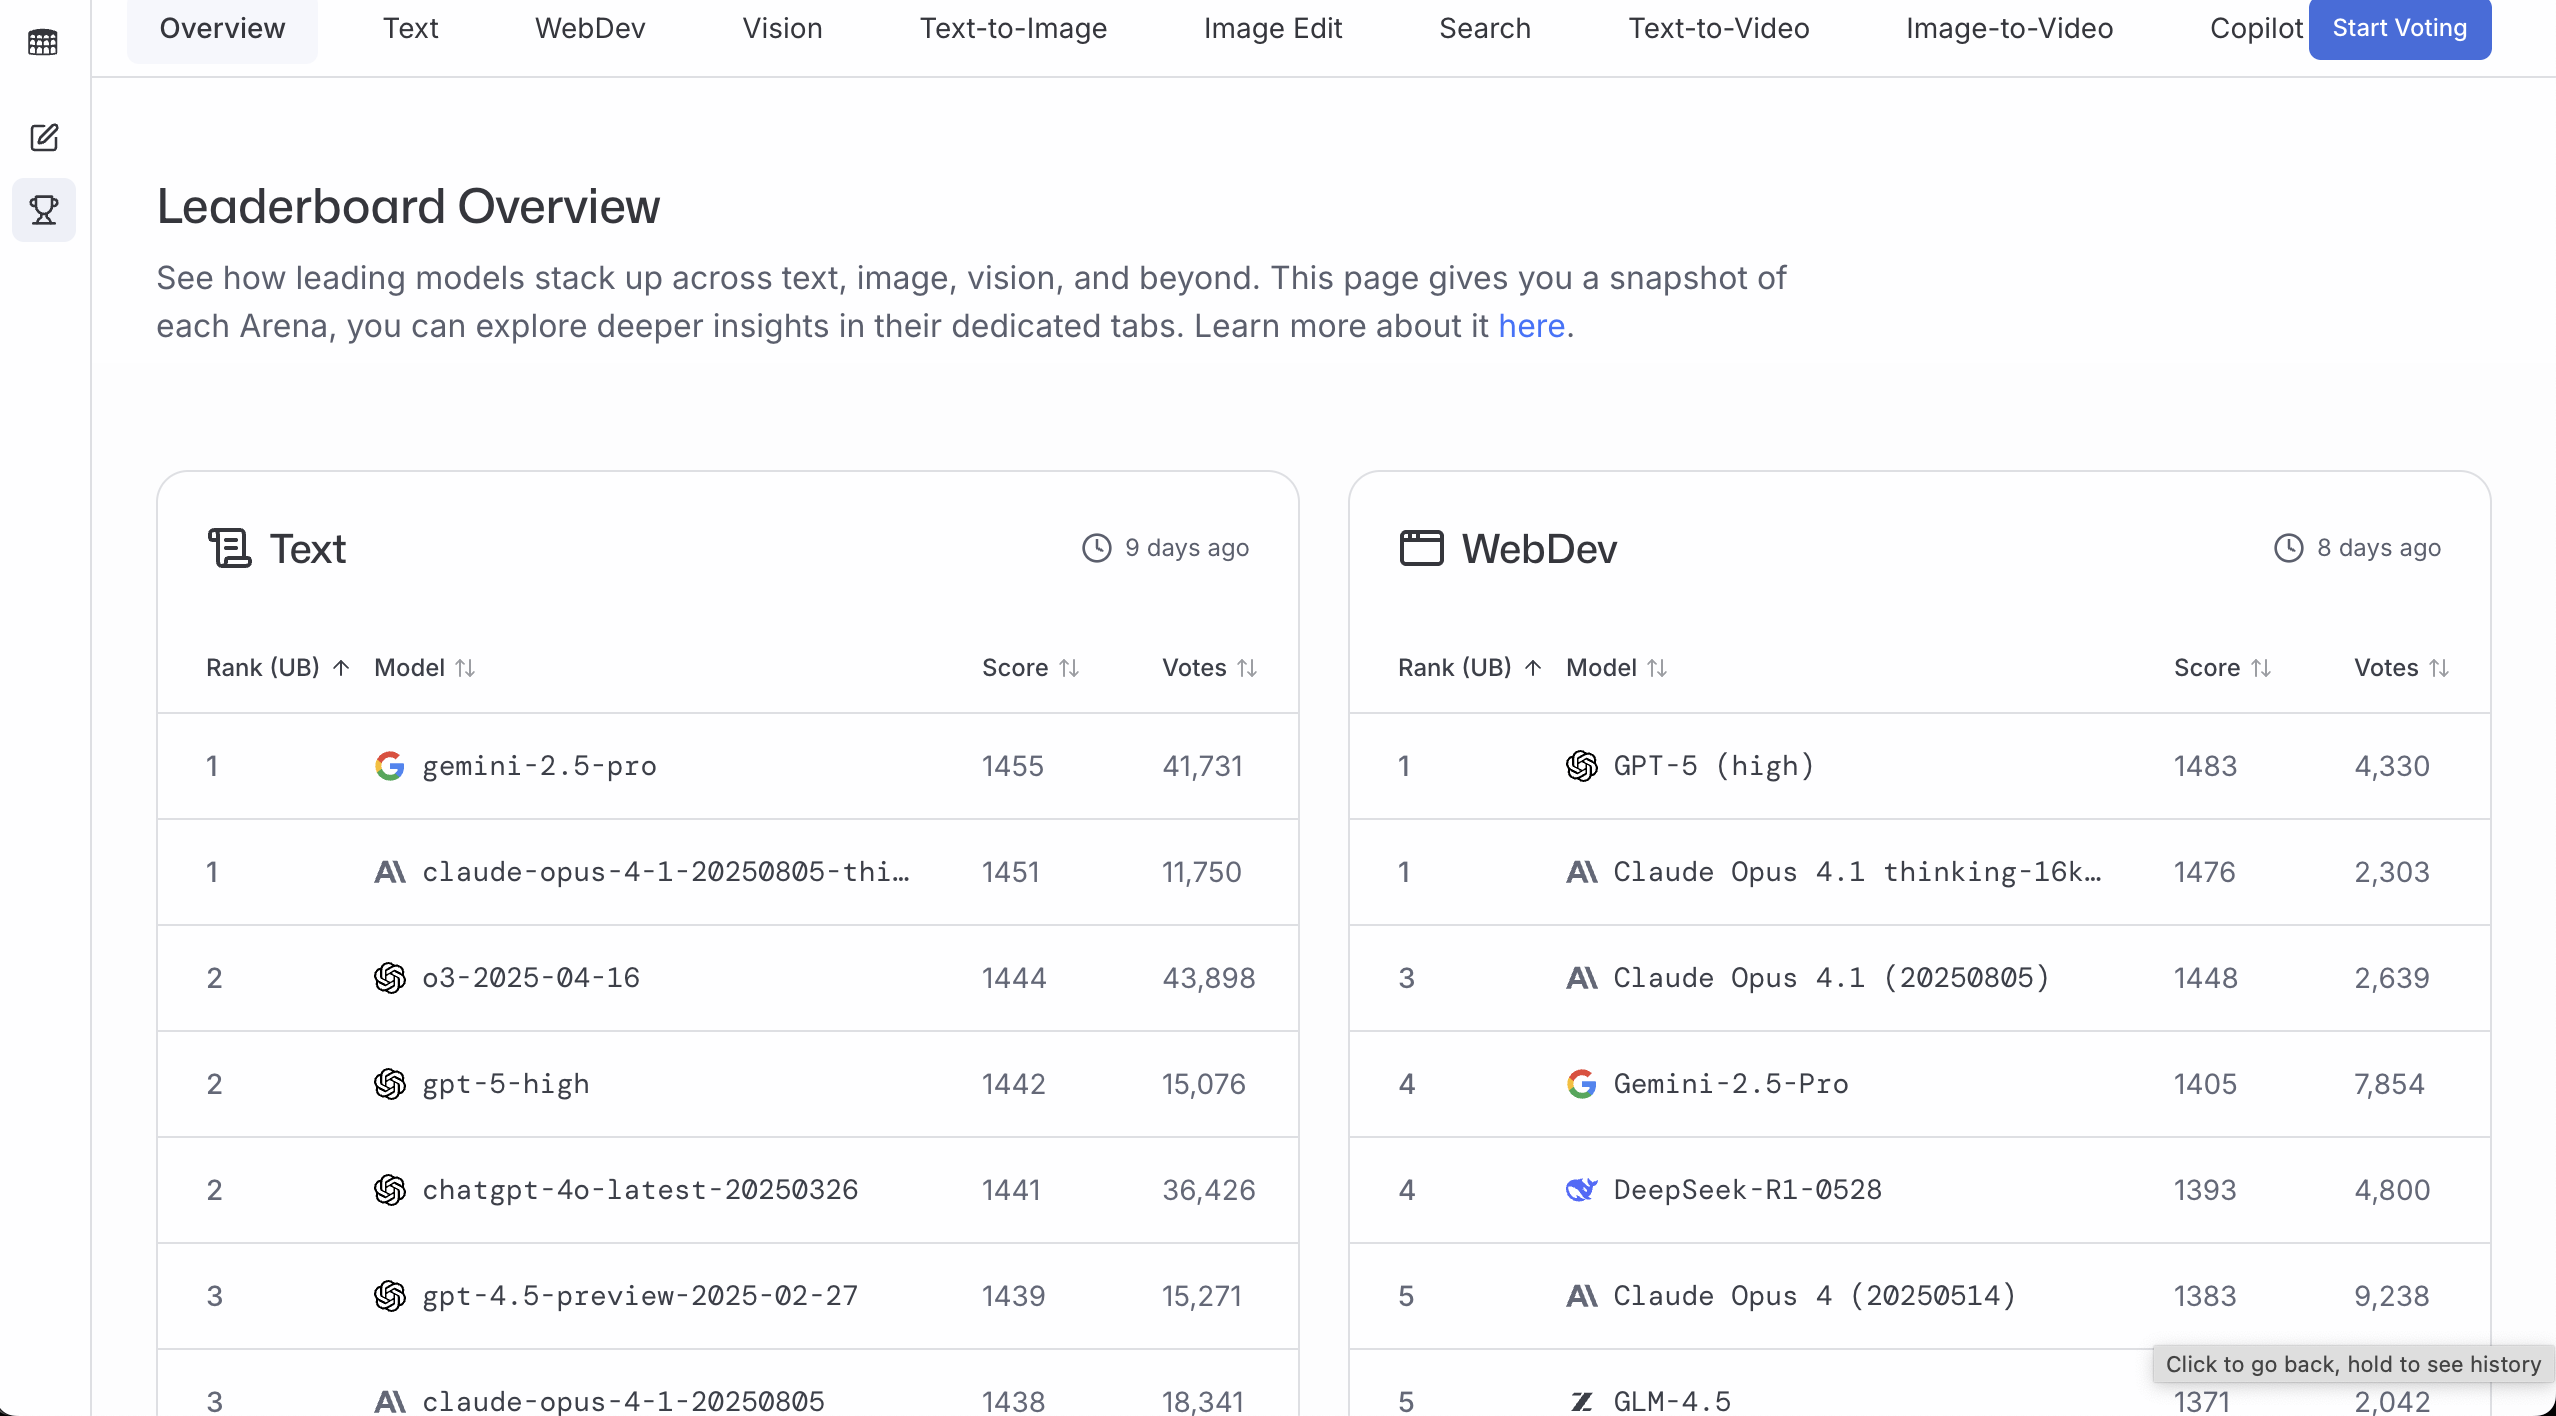
LMArena
Website: https://lmarena.ai/
LMArena is useful for seeing which model responses users generally prefer. More votes and higher scores usually suggest more stable quality in real usage.
A practical workflow:
- Check the leaderboard
- Filter by your target task (general chat / coding / vision)
- Pick one model from the top candidates that meets your access, latency, and budget constraints
Artificial Analysis
Website: https://artificialanalysis.ai/
Artificial Analysis is useful when you want to compare quality, price, and speed on one dashboard.
Common workflow:
- Choose the model category you care about (text / image generation / etc.)
- Compare Quality + Price + Latency/Throughput
- Select the model with the best overall fit for your product constraints
✅ Recommendation
Do not argue model quality by feeling. A more reliable method is to test the same input set against 2-3 models, then decide with ranking and pricing data.
Summary
When integrating AI services, you don't need to overcomplicate API concepts. Most scenarios can be solved if you lock onto these essentials:
- API is a communication bridge: you send requests, receive model responses
- SDK is an API wrapper: it handles boilerplate (auth, request signing, error handling) and usually saves time
- When reading docs, focus on three things: endpoint, API key, and required parameters
Once these are clear, modern IDEs and tooling can handle most implementation details while you focus on business logic.
5. 📚 Assignment: Integrate Your First AI Capability
Follow this chapter's prompts and complete one full loop:
- Full Loop Practice
- Choose and integrate one AI service (LLM / text-to-image / image-to-image) → complete frontend/backend interaction → integrate into your prototype
- Share Results
- Take a screenshot of your feature page and share it
- Thinking Exercise
- For the next "Complete Project Practice" chapter, think ahead: how will you combine these AI capabilities into one practical and interesting workflow?
Next Step
In the next chapter, we will connect these separate AI capabilities into one complete product based on a real business scenario:
- Connect content planning, product listing, and data analysis into one end-to-end workflow
- Embed this chapter's AI capabilities (LLM copywriting, text-to-image, image editing) into concrete business nodes
- Build a truly usable "Ecommerce AI Workbench" instead of isolated demos