From Database to Supabase
In the previous lesson, we learned the basics of UI design tools (Mastergo and Figma), how to use GitHub for code retrieval and version control, and how to deploy websites with Zeabur so more people can access our apps.
To make this lesson easier to connect, let's quickly review the previous core points with a few short questions:
- What are frontend design tools, and how do Figma and MasterGo work?
- What are the basic methods for turning design drafts into code?
- What is GitHub, how do you configure SSH, and how do you create your first repository?
- What does deployment mean, how do you use Zeabur, and how do you deploy GitHub/local code to a public network?
If any of the above still feels blurry, review the previous lesson notes first. You can always ask questions in the WeChat study group.
In this lesson, we move from "an app that can run" to "an app that looks like a real online product." That means not only managing data changes with a database, but also building a complete user system (registration, login, authorization) and other core backend capabilities. We use Supabase as the main path: first implement "database + user system," then use Supabase modules to understand the core components of modern cloud backend services.
What you will learn
- What data is, what a database is, and common database usage
- What Supabase is and how to do basic database operations with it
- How to add basic user management with Supabase
- Supabase advanced features: realtime, storage, and edge functions
- How to enable Google and GitHub login for Supabase
- A basic app that supports user sign-up/sign-in and stores data in an online database
- A reusable Supabase backend template (database + user management, etc.) for future projects
1. What is Database
1.1 What is Data
In the digital world, data is everywhere. Data is simply the carrier of information: your friend's contact info, a WeChat article, a short video, a game character level. In apps, data is everything that needs to be recorded and managed: user profiles, order history, app settings, and so on.
In programs, data has different forms. The simplest form is variables:
# Python variable definition examples

# Integer variable: stores age information
age = 30

# Boolean variable: stores status (whether active)
is_active = True  # True means active, False means inactive

# List variable: stores a set of score data
scores = [85, 92, 78, 90]  # Contains 4 integer elements representing different scores

# Dictionary variable: stores multiple related information of a user
user_info = {
    "age": 30,           # Key "age" corresponds to the value of age
    "height": 1.80,      # Key "height" corresponds to the value of height (unit: meter)
    "login_count": 156   # Key "login_count" corresponds to the value of login times
}
For more complex data such as user profiles and order history, tables are usually used:
| user_id | name | |
|---|---|---|
| 1001 | Alice | alice@example.com |
| 1002 | Bob | bob@example.com |
| order_id | user_id | amount | status |
|---|---|---|---|
| 901 | 1001 | 29.99 | completed |
| 902 | 1002 | 15.50 | pending |
For hierarchical, variable-structure data, JSON is often better. JSON is a universal internet data format that almost all systems can parse. For example, one order may contain multiple items, and each item has its own fields.
{
  "order_id": 901,
  "user_id": 1001,
  "amount": 29.99,
  "status": "completed",
  "items": [
    { "sku": "BG-001", "name": "Beef Burger", "quantity": 1, "price": 18.00 },
    { "sku": "SD-003", "name": "French Fries", "quantity": 1, "price": 6.99 },
    { "sku": "DK-002", "name": "Cola", "quantity": 1, "price": 5.00 }
  ],
  "shipping_address": {
    "street": "123 Tech Park Road",
    "city": "Shenzhen",
    "zip_code": "518057"
  }
}
There is also vector data. After unstructured data (text/images/audio) is processed by AI embedding models, the output is typically a high-dimensional float array:
[0.123, -0.456, 0.789, ..., -0.234]
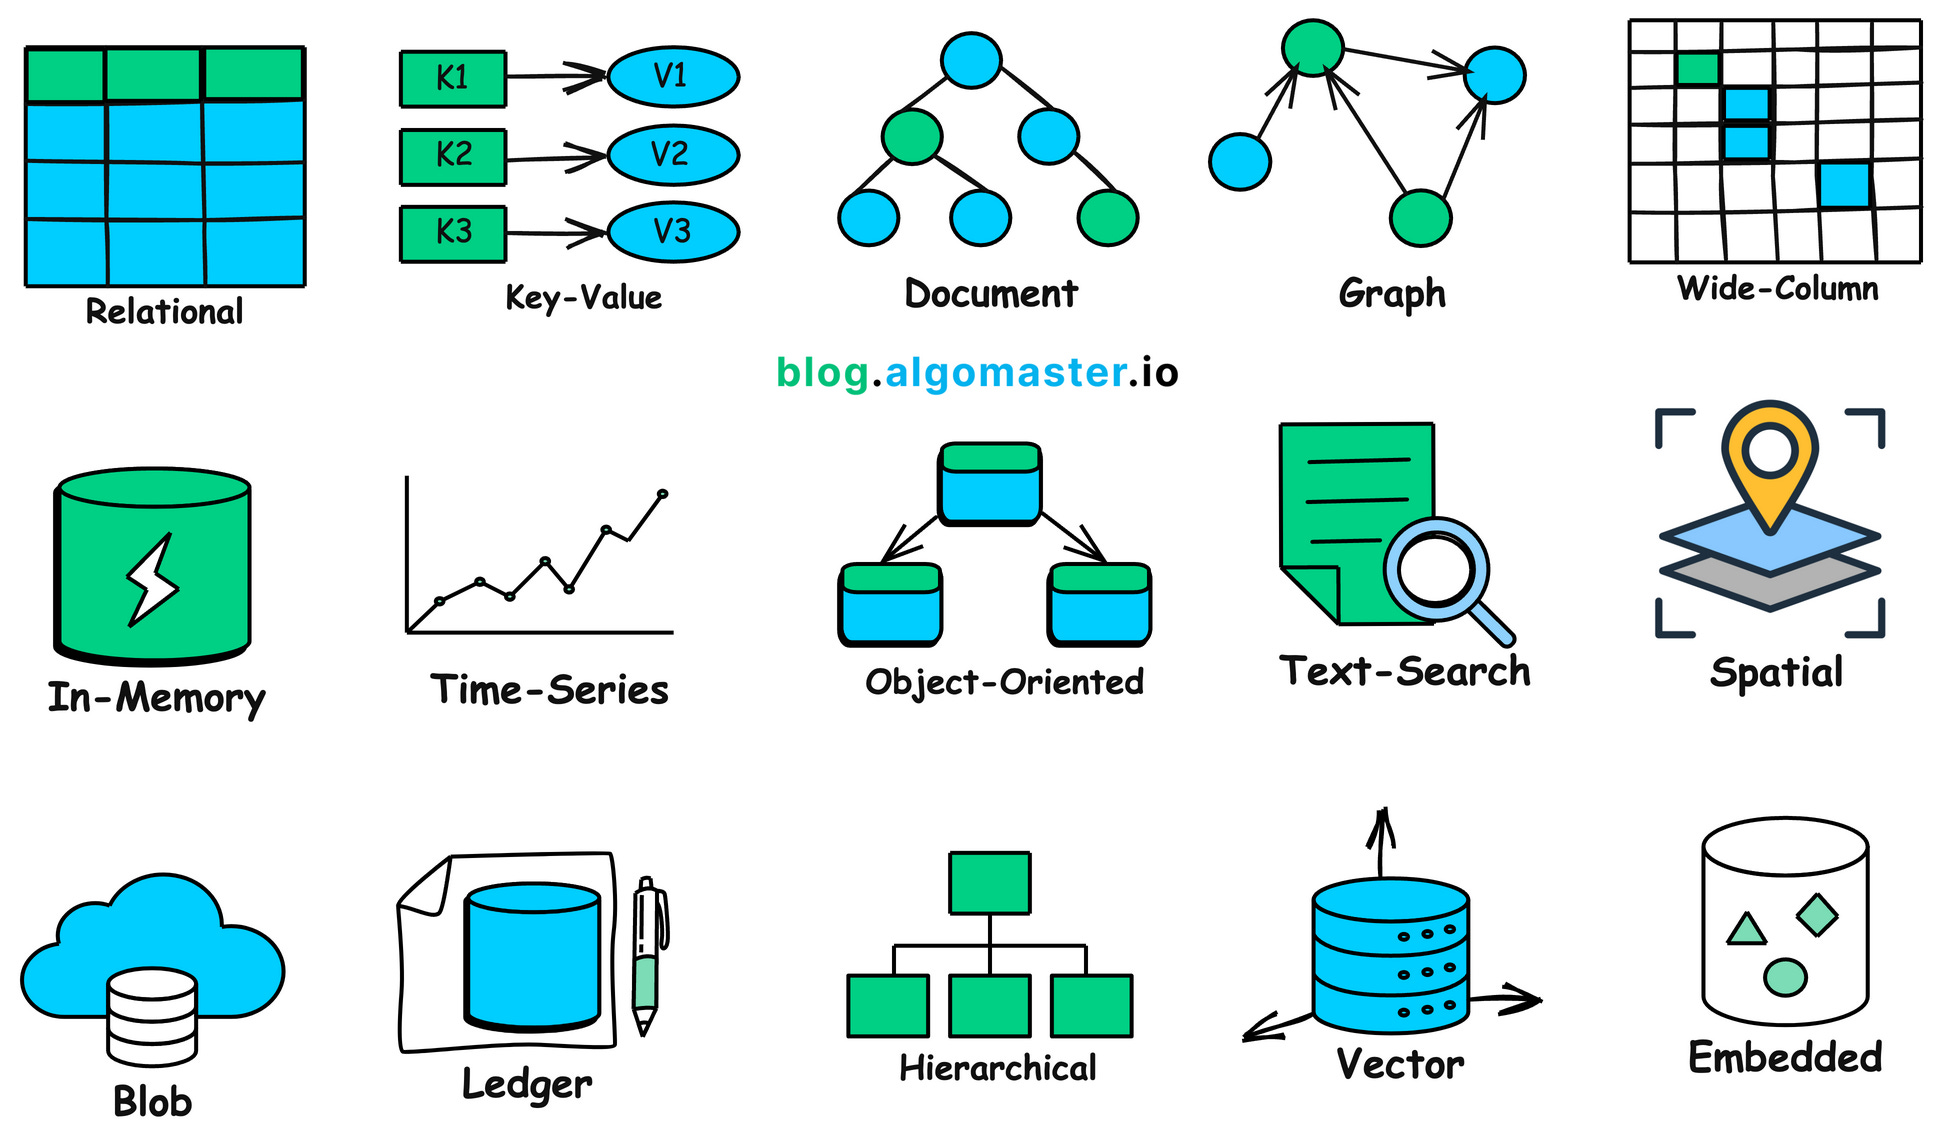
In real projects, there are many data shapes and many corresponding storage systems:
1.2 Why We Need Database
Real-world data is complex. To store and use data efficiently, we need a dedicated system to manage it: this is the purpose of databases.
A database is a specialized program that organizes, stores, manages, and queries data safely and efficiently.
Without a database, app data quickly breaks down:
- once users close the browser, in-memory data disappears
- login state and preferences cannot be persisted
- key shared data (inventory, orders) cannot be coordinated across users
Databases can be deployed locally or in the cloud. Cloud databases support elastic scaling and can handle high concurrency and larger data volume.
Core problems databases solve:
- Persistent storage: data survives app restarts
- Efficient query and analysis: SQL supports filtering, aggregation, analysis
- High performance and high concurrency: indexing, caching, pooling, distributed architecture
- Integrity and consistency: constraints, uniqueness, data validity guarantees
- Security and recovery: authentication, authorization, encryption, backup/restore
1.3 Relational Database VS Non-Relational Database (NOSQL)
In practice, you typically choose between relational databases and NoSQL databases.
Relational databases are like strictly structured spreadsheets. You define schema in advance (field types and rules) and connect tables by relational keys. This is highly reliable and great for scenarios such as finance and inventory where correctness is critical, but schema changes can be less flexible.
NoSQL databases are more like flexible containers. They can store documents, key-value data, and changing structures without fixed schema upfront. They are easier to scale for rapidly changing and large-volume internet scenarios, but they trade off some relational query power and strict consistency.
In typical usage:
- relational DBs: transactions, inventory, order systems, accounting, strong consistency
- NoSQL DBs: social content, logs, IoT high-write streams, recommendation features
In early-stage startups, you usually do not need to over-optimize database type at day one. Mature cloud providers already offer strong defaults. In real business settings, teams usually match business needs with vendor support first, then optimize later.
You can also refer to cloud vendor database selection guides, such as: Aliyun database selection recommendation
| Database Type | Database | Price | Typical Scenarios |
|---|---|---|---|
| Relational | RDS MySQL | Low | Basic: learning and small websites. HA: medium pressure business scenarios. Cluster: no-interruption and heavier traffic |
| RDS SQL Server | High | Basic: testing and small commercial sites. HA: enterprise websites. Cluster: no-interruption enterprise business | |
| RDS PostgreSQL | Lowest | Basic: learning and small websites. HA: medium business pressure. Cluster: heavy access and often better performance than common MySQL setups | |
| RDS PPAS | High | General and dedicated enterprise Oracle-compatible scenarios | |
| DRDS | Medium | Entry to enterprise and high-concurrency online business | |
| NoSQL | Redis | Medium | Hot standby persistent data and cache acceleration under read pressure |
| MongoDB | Medium | Single node for dev/test, replica set for read-heavy scenarios, sharded clusters for high-scale online workloads |
Let's use one concrete "blog platform" example to compare SQL and NoSQL storage models.
Assume we need:
- Users: id, username, email
- Posts: id, title, content, author_id
- Comments: id, content, commenter_id, post_id
- Tags: id, name
- Post-tag many-to-many relationships
Relational database (SQL) example
In SQL, we normalize entities into separate tables and connect with foreign keys.
userstable
| user_id (PK) | username | |
|---|---|---|
| 101 | Alice | alice@example.com |
| 102 | Bob | bob@example.com |
poststable
| post_id (PK) | title | content | author_id (FK) |
|---|---|---|---|
| 1 | SQL Intro | This is an article about SQL... | 101 |
| 2 | NoSQL Intro | NoSQL provides flexible models... | 102 |
commentstable
| comment_id (PK) | body | commenter_id (FK) | post_id (FK) |
|---|---|---|---|
| 1001 | Great article! | 102 | 1 |
| 1002 | Learned a lot. | 101 | 2 |
| 1003 | Any more examples? | 101 | 1 |
tagstable
| tag_id (PK) | tag_name |
|---|---|
| 51 | database |
| 52 | technology |
| 53 | beginner |
post_tagstable (many-to-many relation)
| post_id (FK) | tag_id (FK) |
|---|---|
| 1 | 51 |
| 1 | 52 |
| 2 | 51 |
| 2 | 52 |
| 2 | 53 |
To fetch complete post information (post + author + comments + tags), we use multi-table joins:
SELECT
    p.title,
    p.content,
    u.username AS author,
    c.body AS comment,
    t.tag_name AS tag
FROM
    posts p
JOIN
    users u ON p.author_id = u.user_id
LEFT JOIN
    comments c ON p.post_id = c.post_id
LEFT JOIN
    post_tags pt ON p.post_id = pt.post_id
LEFT JOIN
    tags t ON pt.tag_id = t.tag_id
WHERE
    p.post_id = 1;
This is SQL's strength: flexible complex queries with consistency and low redundancy.
NoSQL database (NoSQL) example
In NoSQL document databases (for example MongoDB), related business data is often aggregated into a single document, reducing joins at read time.
A sample document in posts:
{
  "_id": 1,
  "title": "SQL Intro",
  "content": "This is an article about SQL...",
  "author": {
    "user_id": 101,
    "username": "Alice",
    "email": "alice@example.com"
  },
  "tags": [
    "database",
    "technology"
  ],
  "comments": [
    {
      "comment_id": 1001,
      "body": "Great article!",
      "commenter": {
        "user_id": 102,
        "username": "Bob"
      }
    },
    {
      "comment_id": 1003,
      "body": "Any more examples?",
      "commenter": {
        "user_id": 101,
        "username": "Alice"
      }
    }
  ]
}
The advantage is obvious: one lookup can return full business context.
The trade-off is data redundancy. If username changes, many documents may need updates. In read-heavy scenarios (blogs, product pages), this trade-off is often acceptable for faster reads. In write-heavy scenarios, you need careful design trade-offs.
If you want to explore more databases:
Examples of SQL databases: Db2, MySQL, PostgreSQL, YugabyteDB, CockroachDB, Oracle Database, Azure SQL Database
Examples of NoSQL databases: Redis, CouchDB, MongoDB, Cassandra, Elasticsearch, BigTable, Neo4j, HBase
2. Supabase
Above, we discussed database categories and usage. But in real projects, a database is only one backend module. You also need sign-in/sign-up, permissions, file upload/storage, APIs, scheduled jobs, realtime notifications, and more.
That broader context is backend services. A complete app is usually frontend + backend. In traditional workflows, teams had to build servers, configure databases, design APIs, implement security, and maintain operations manually.
To reduce repeated backend groundwork, the industry created BaaS (Backend as a Service): package common backend capabilities (DB/auth/storage/realtime, etc.) as cloud services that developers can call directly via SDK/API.
Supabase is a modern BaaS representative. It uses PostgreSQL as the core and integrates Auth, Storage, Realtime, Edge Functions, Vector, and more into a "Postgres-centered one-stop backend platform."
Next, we move from "choosing only a database" to "choosing a complete backend development platform."
2.1 Step by Step Guide
After understanding Supabase's positioning, let's walk along the Supabase console path and break down each capability and responsibility.

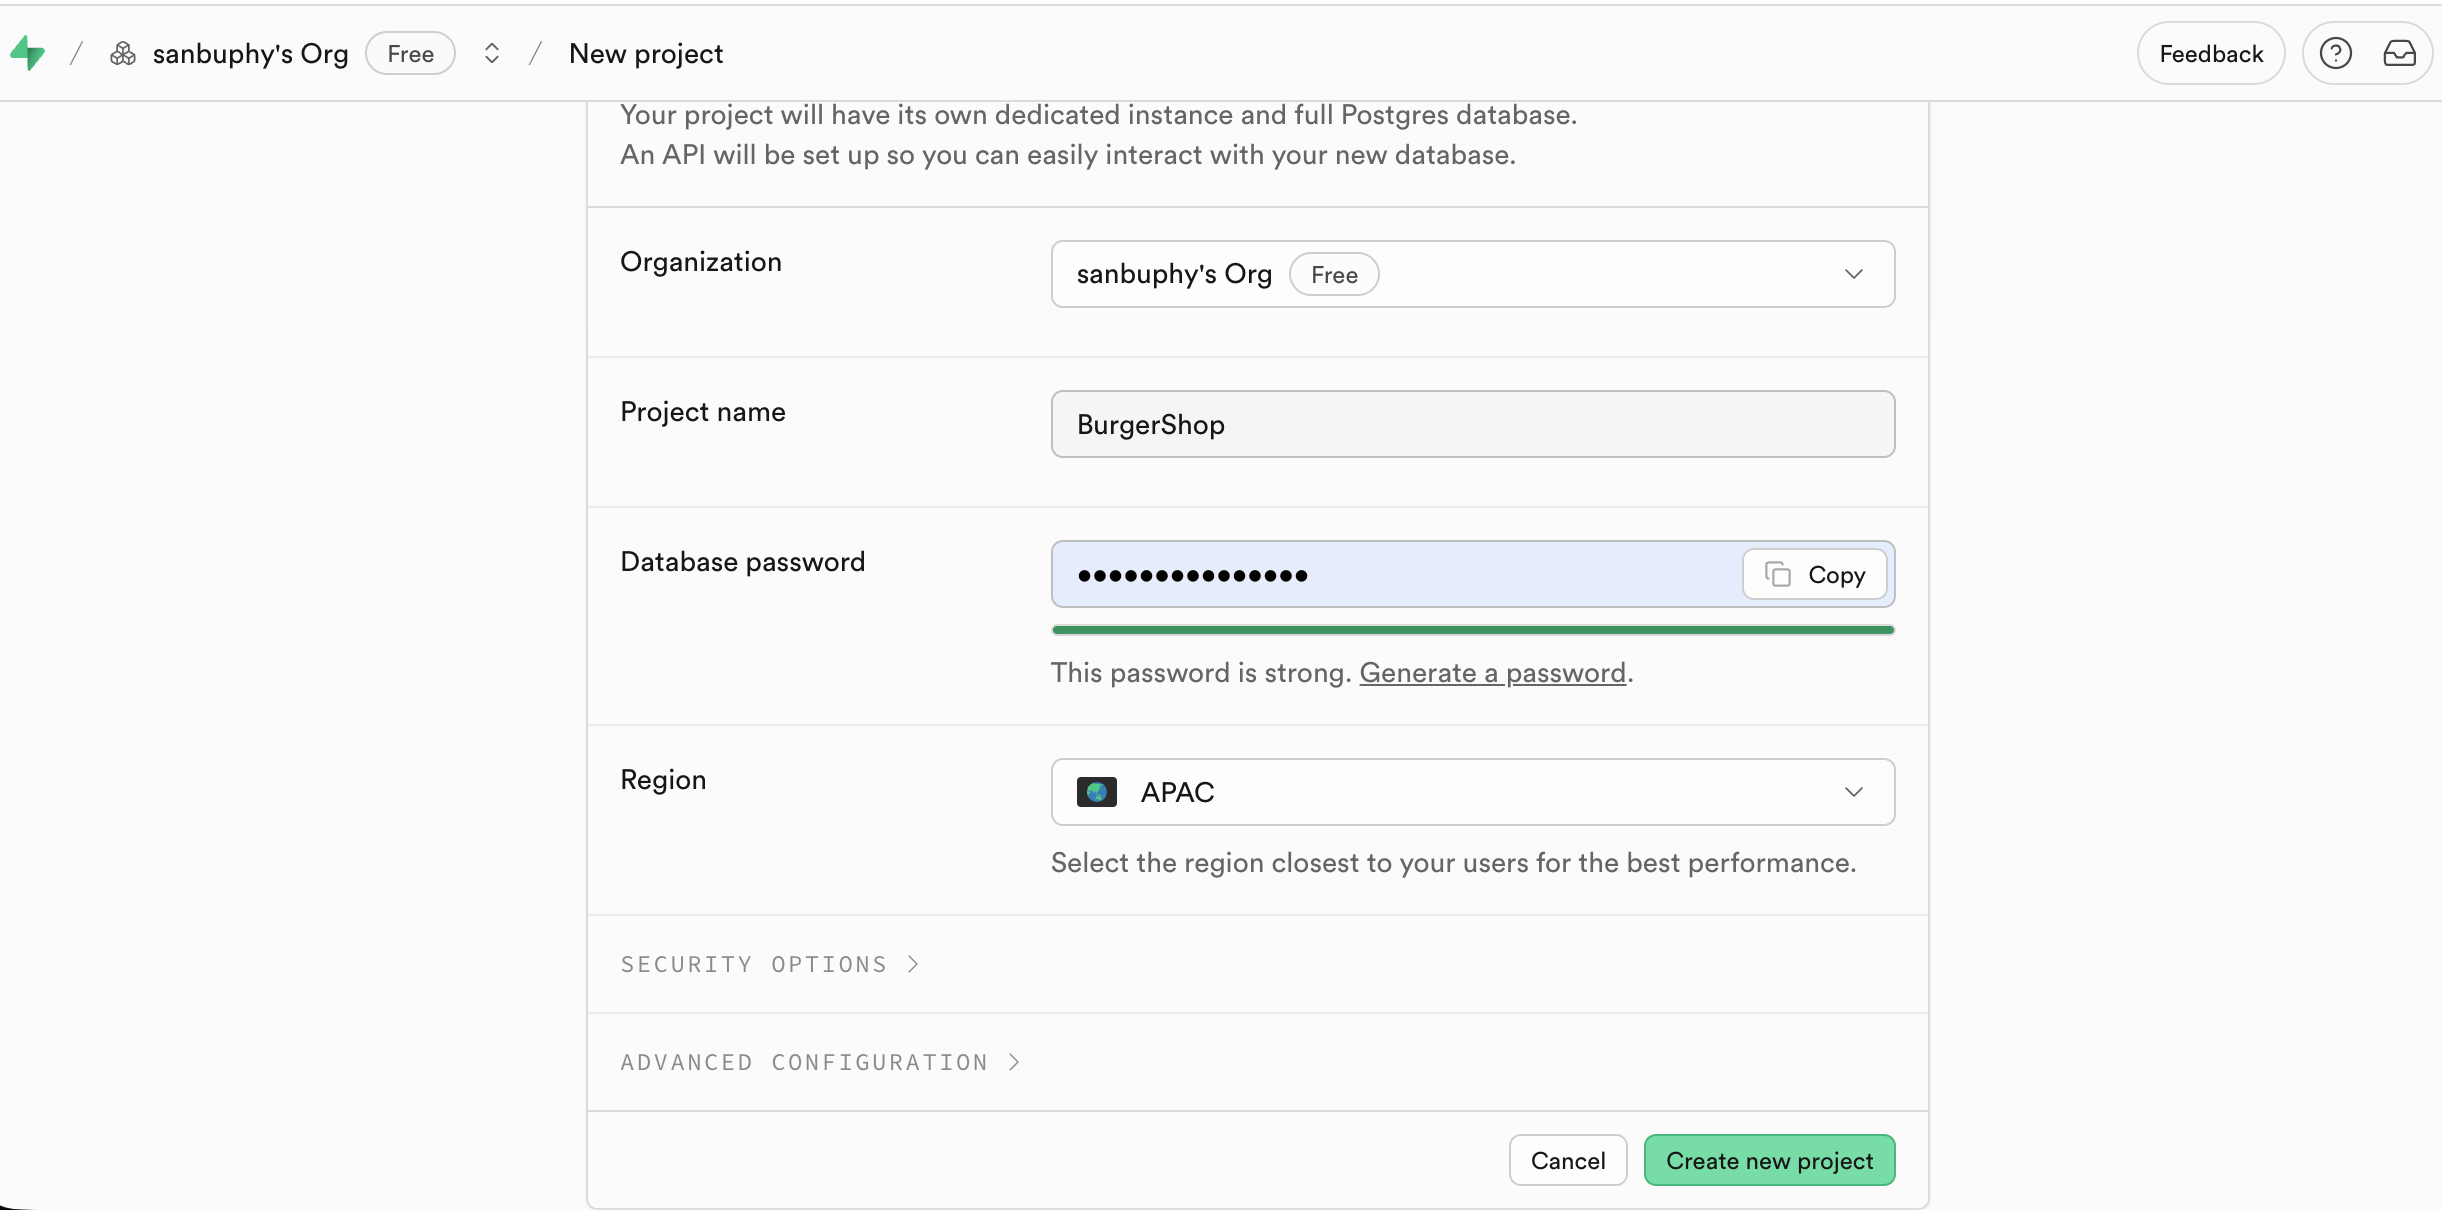
After signing in at Supabase and clicking New project:
- set project name
- set DB password
- choose region near your target users
After creation, the left sidebar shows key modules: Table Editor, SQL Editor, Database, Authentication, and so on.
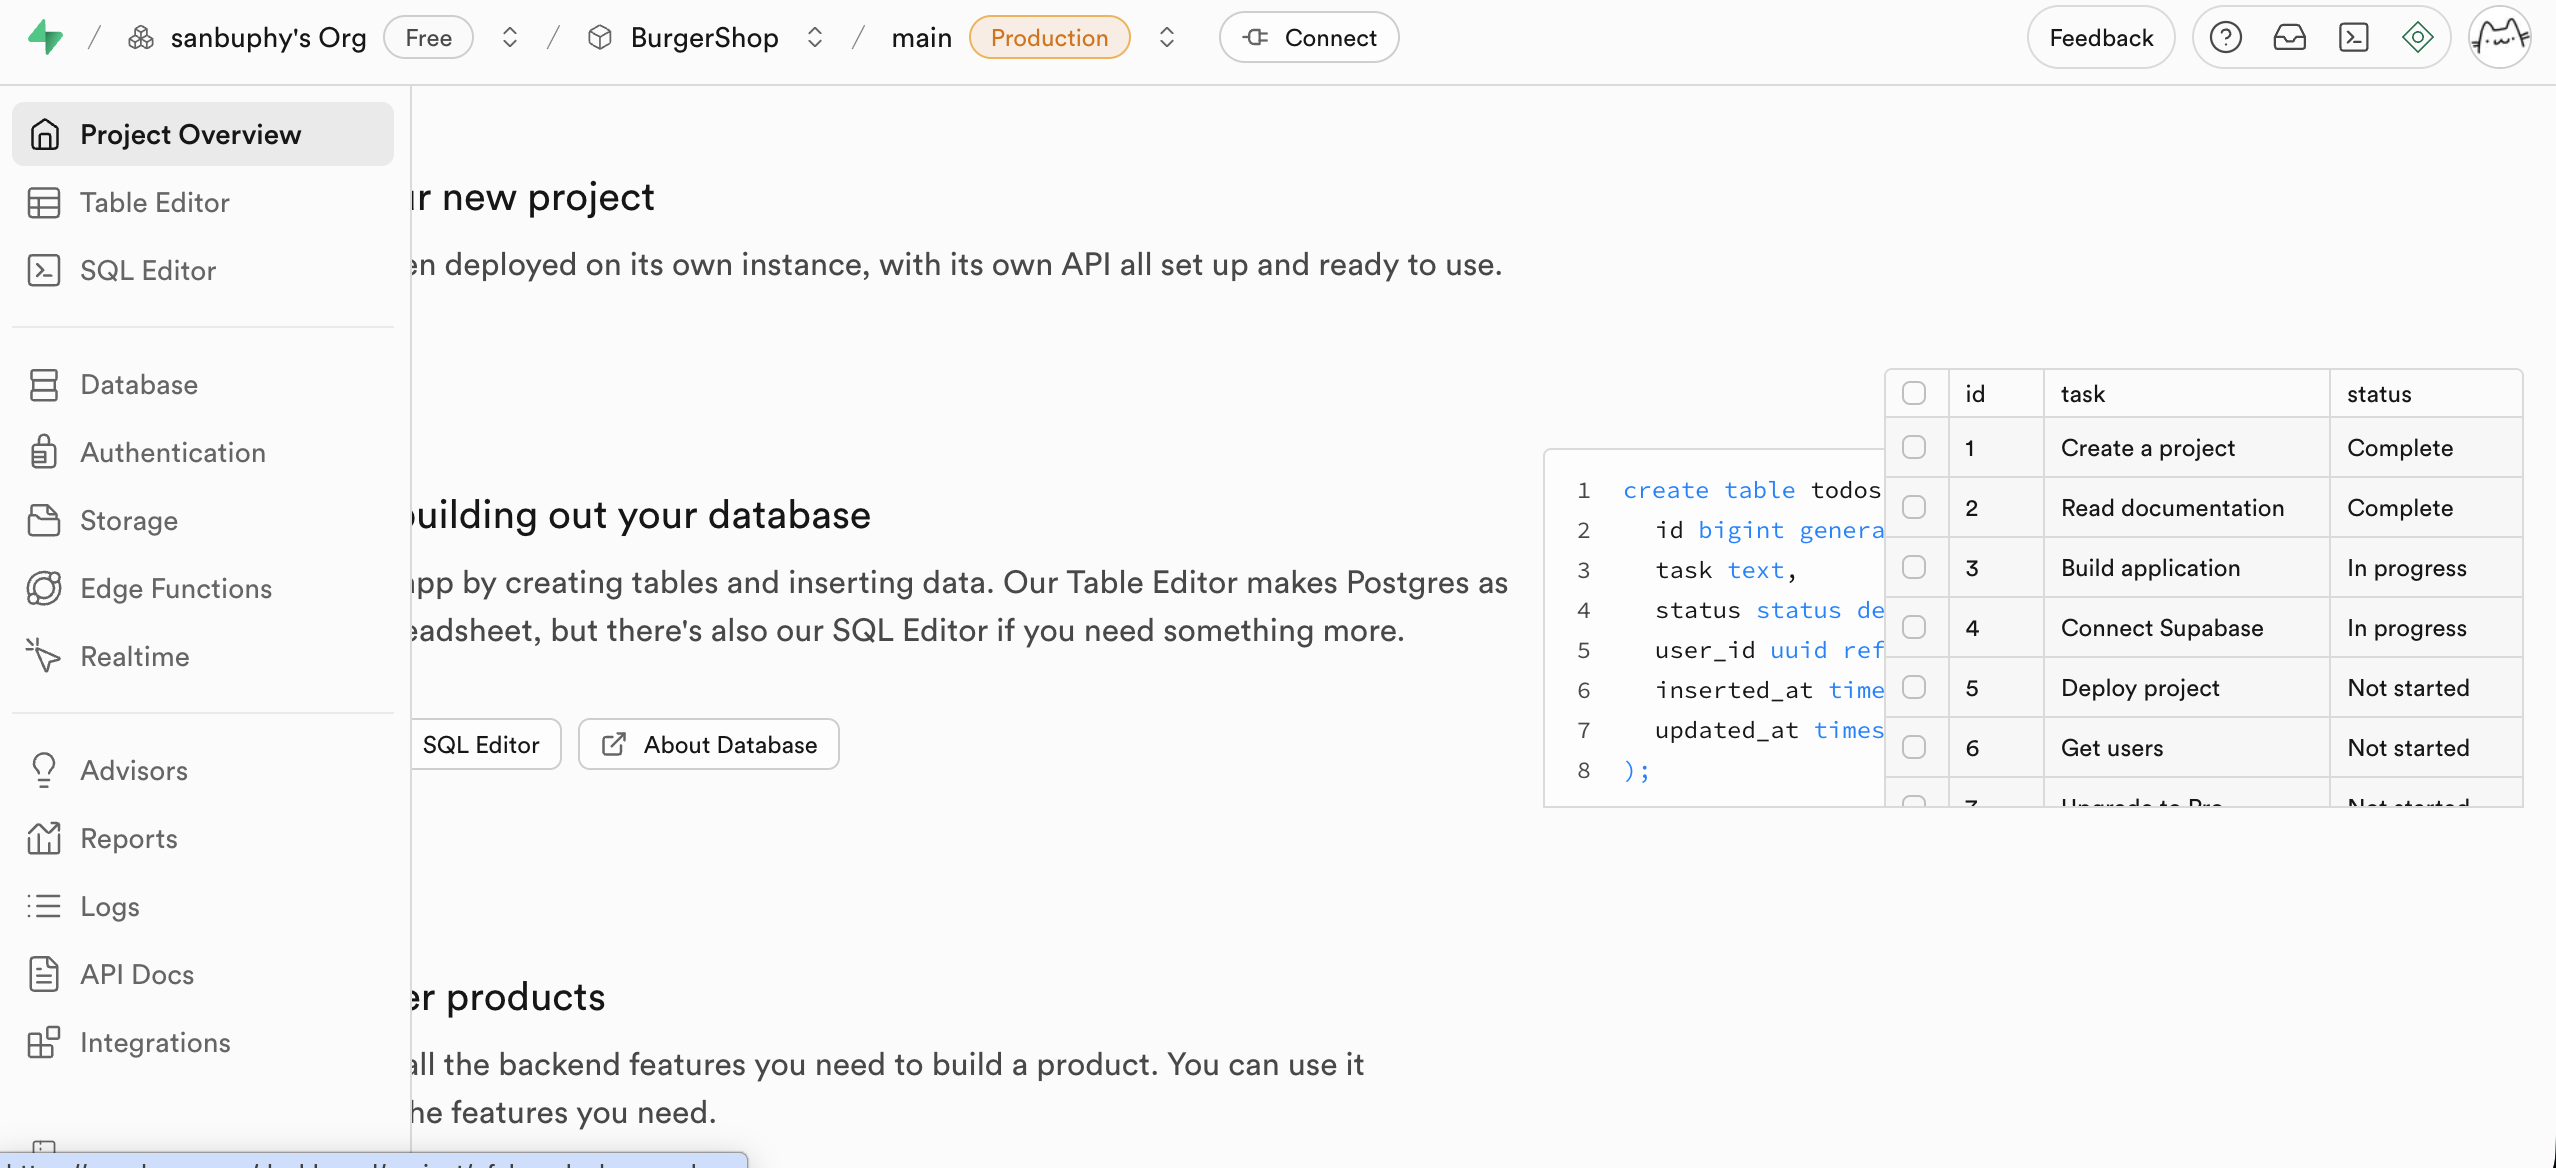
Table Editor
Table Editor is Supabase's visual data table editor. You can inspect and edit DB data without writing SQL, similar to spreadsheet interaction.
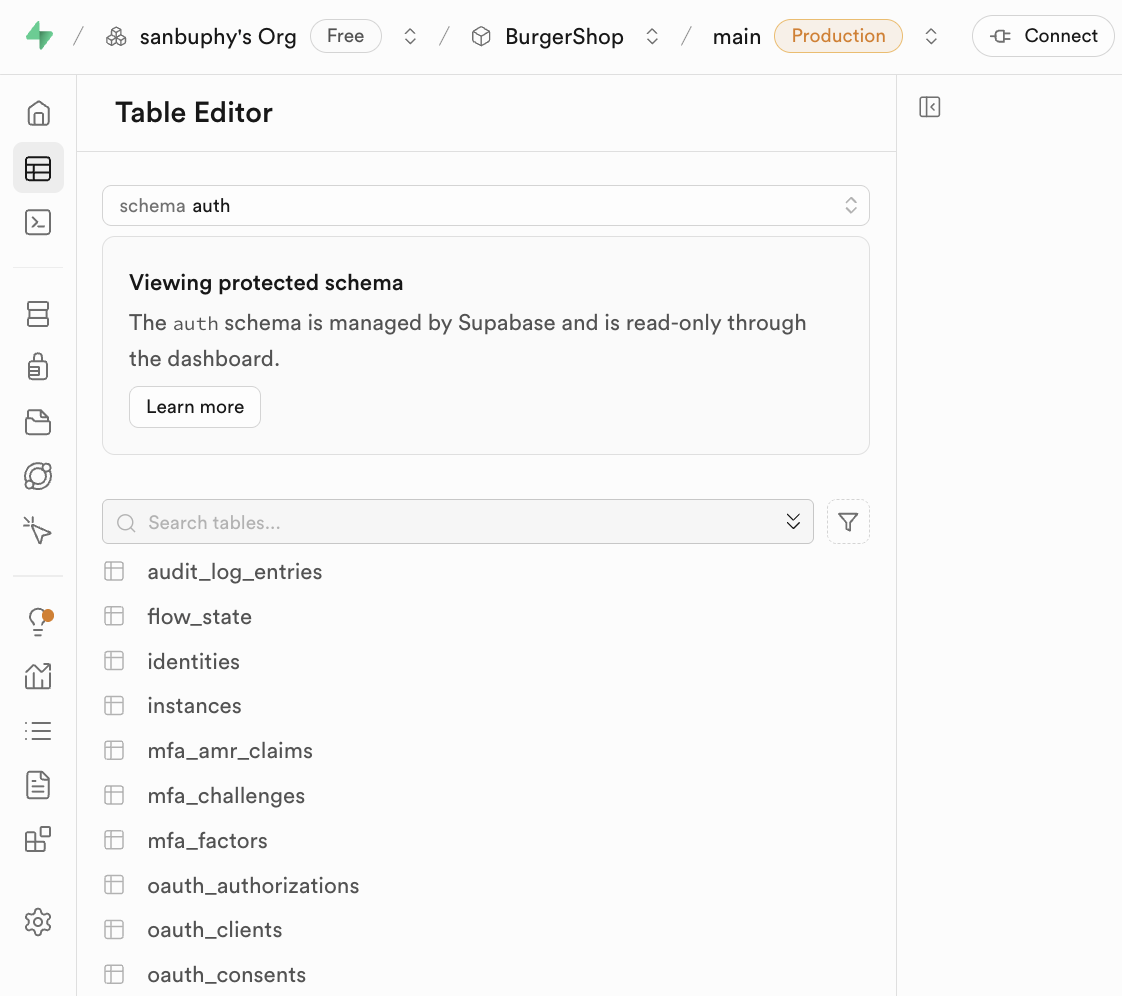
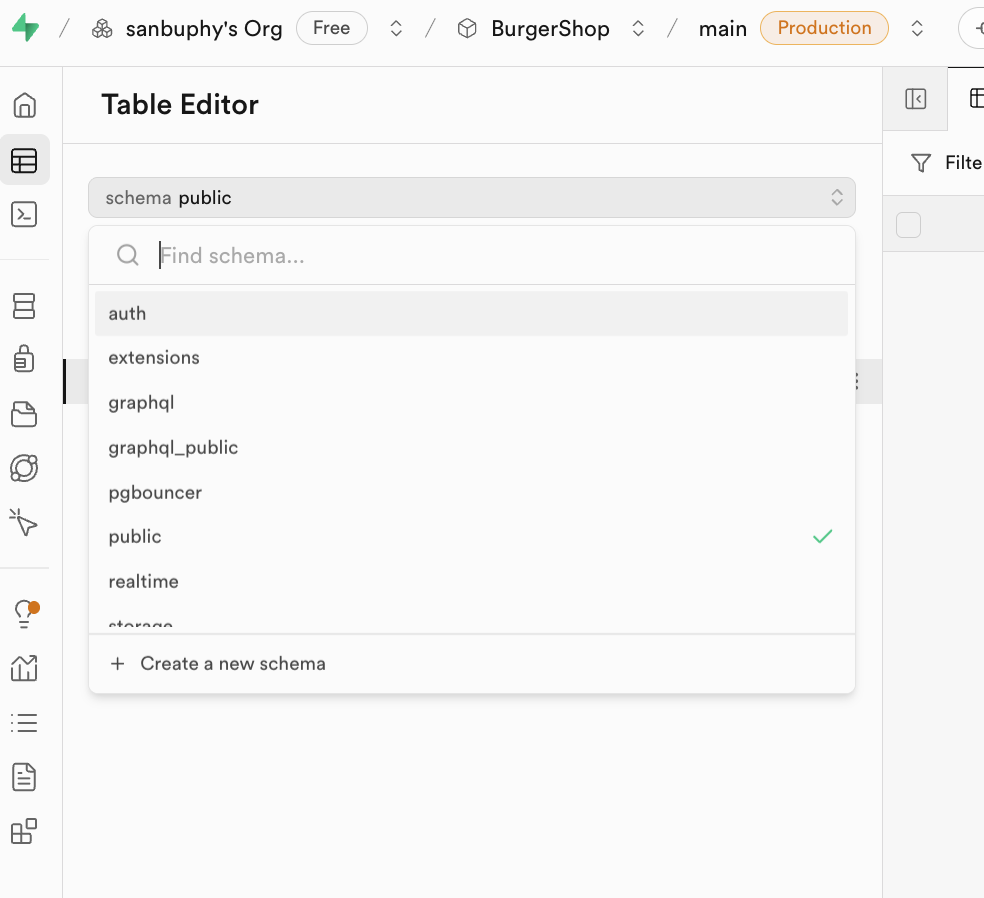
The key concept here is Schema.
Schemas are resource containers for tables, views, functions, indexes, etc. They help with:
- avoiding naming conflicts
- permission isolation
In daily development, most people mainly use:
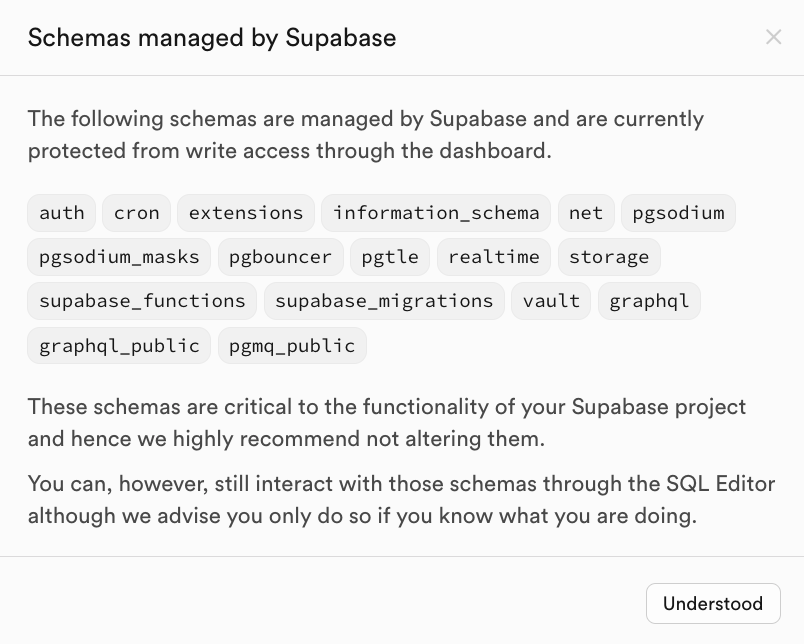
public: default business tables (posts/comments/orders/etc.)auth: authentication tables (for exampleauth.users), usually do not edit built-in auth schema tables manually
SQL Editor
SQL Editor is the SQL execution console. You can run model-generated SQL directly and inspect results quickly.
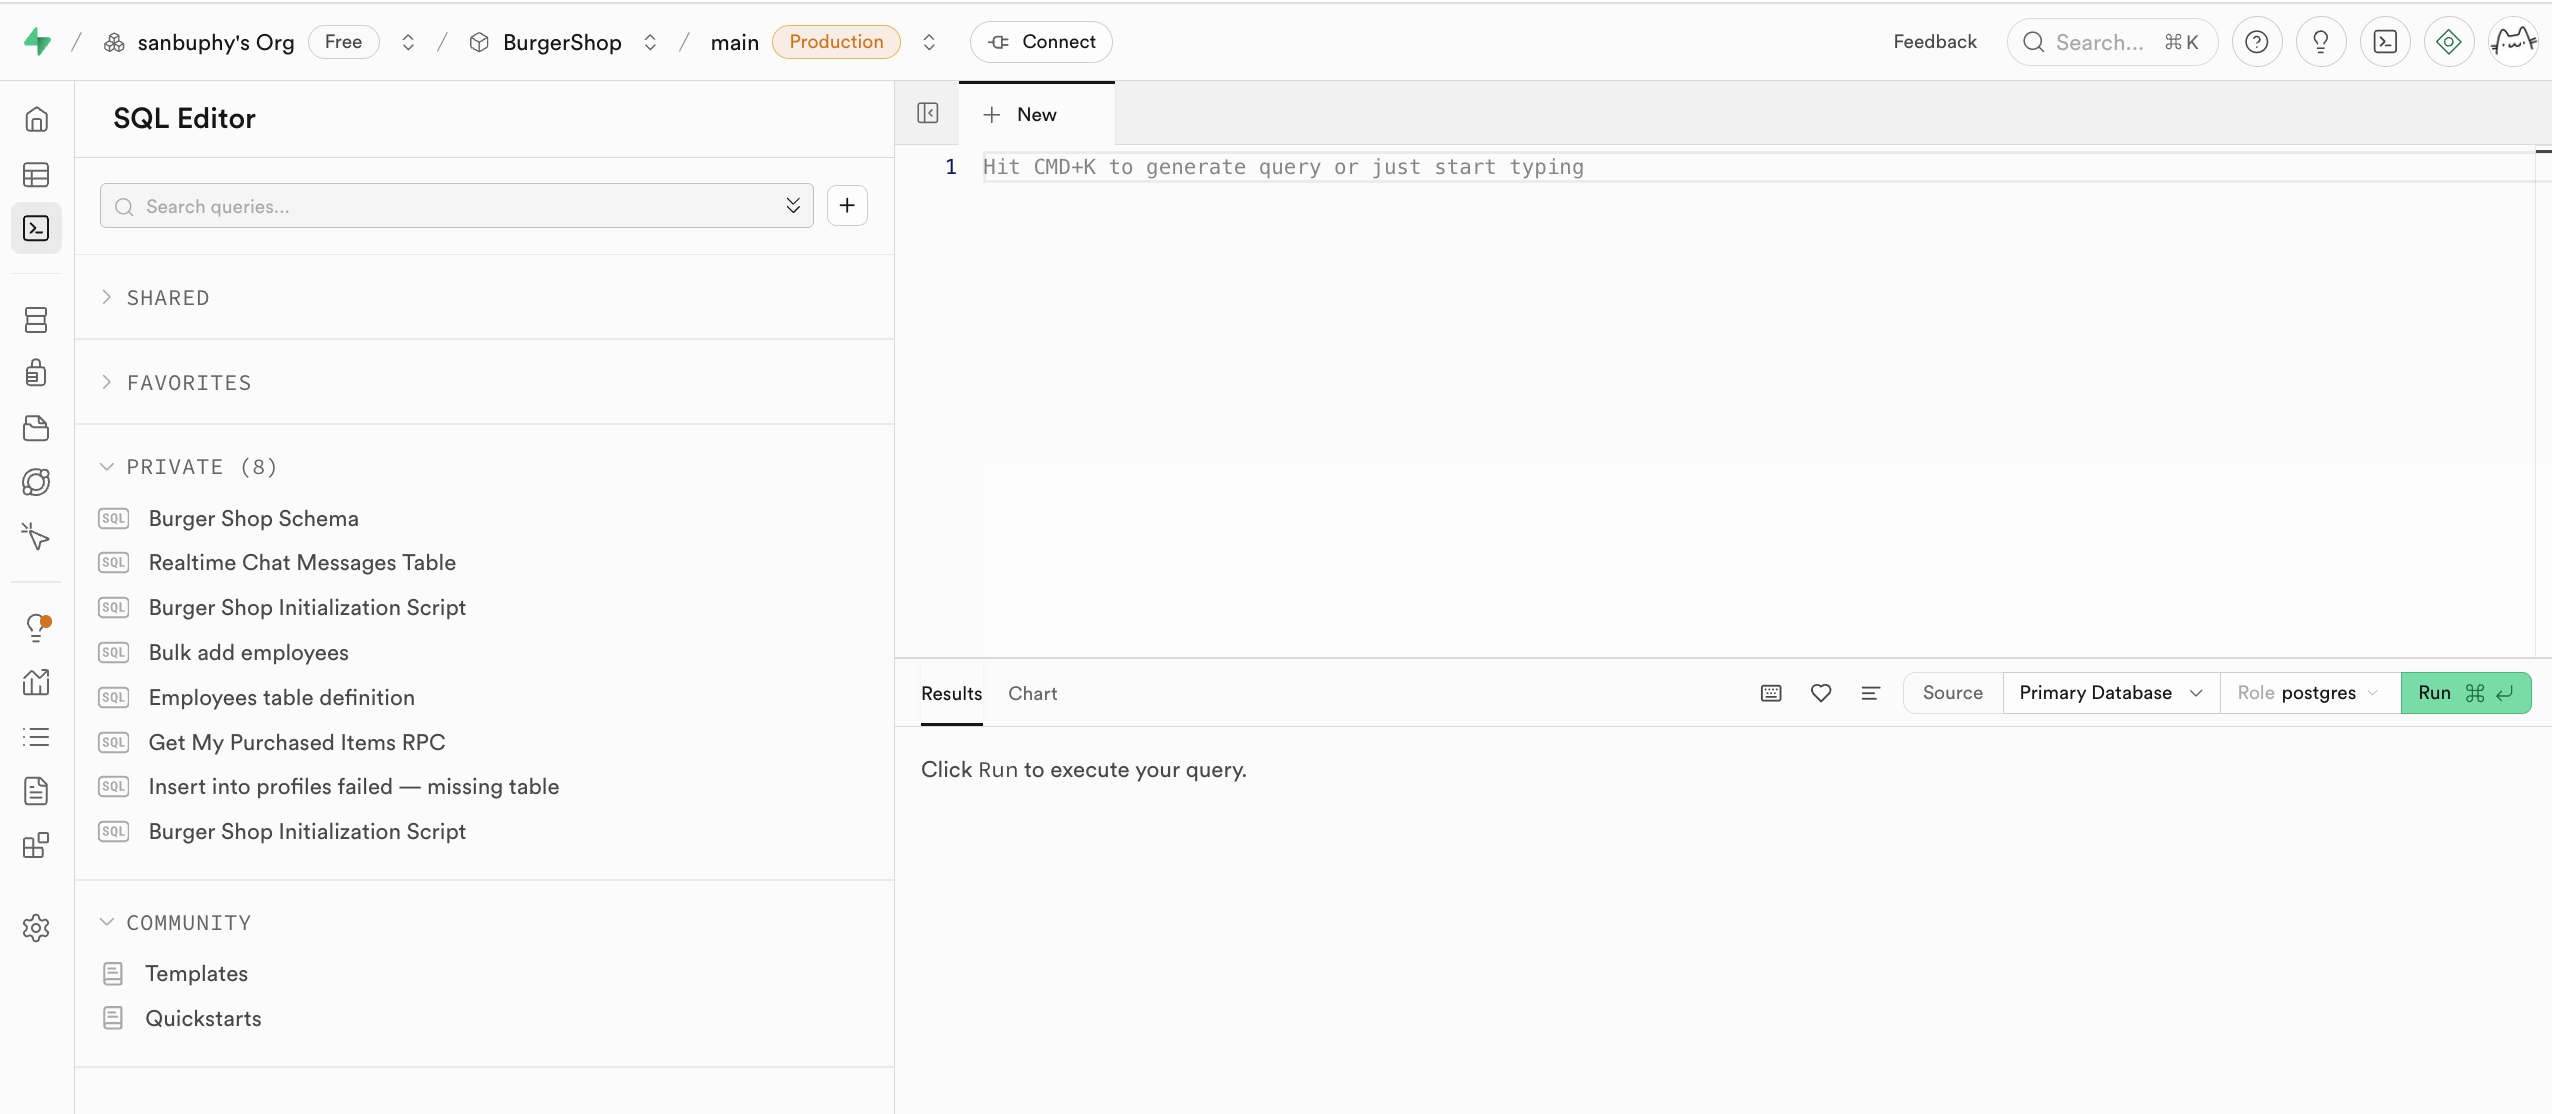
After executing SQL, you can view new tables in Table Editor (public schema). Executed SQL is also saved in the left private history, and can be starred.
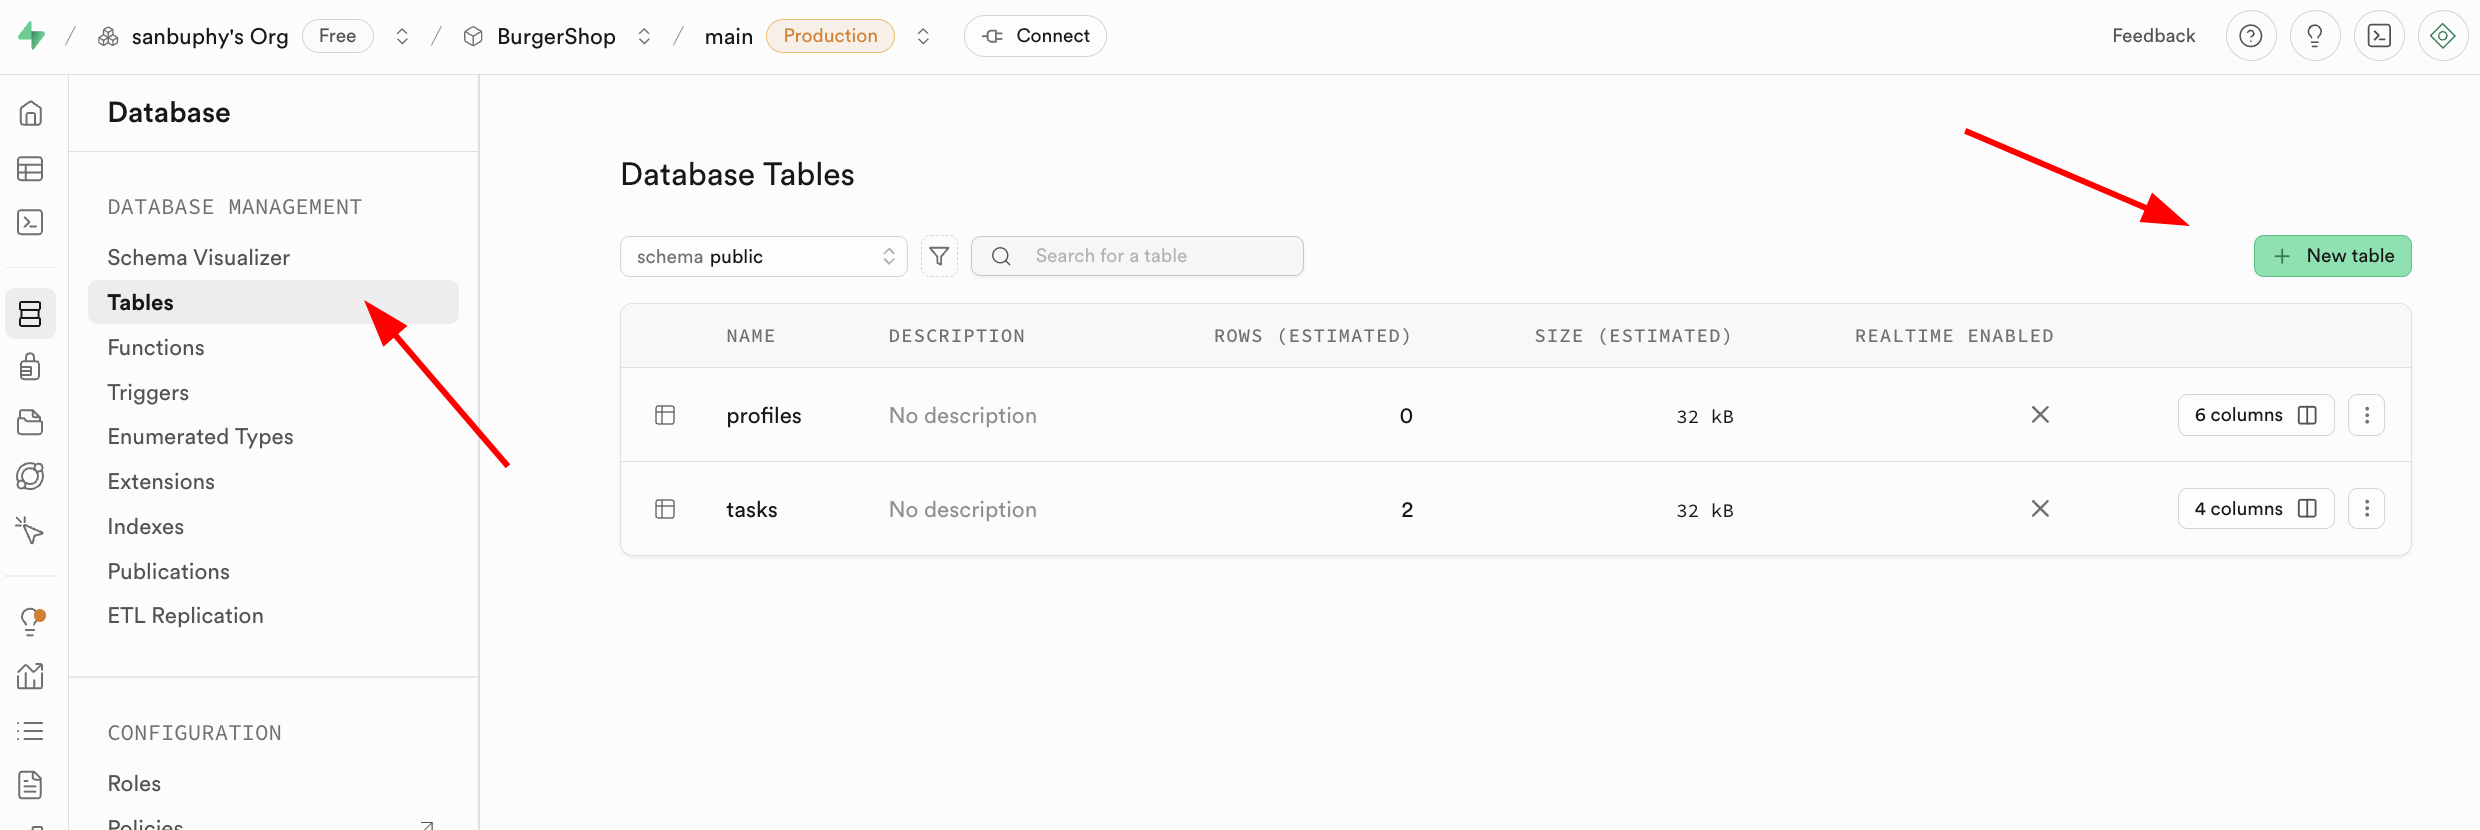
Database
Database is the management center where you inspect tables and relationships (foreign key constraints) visually.
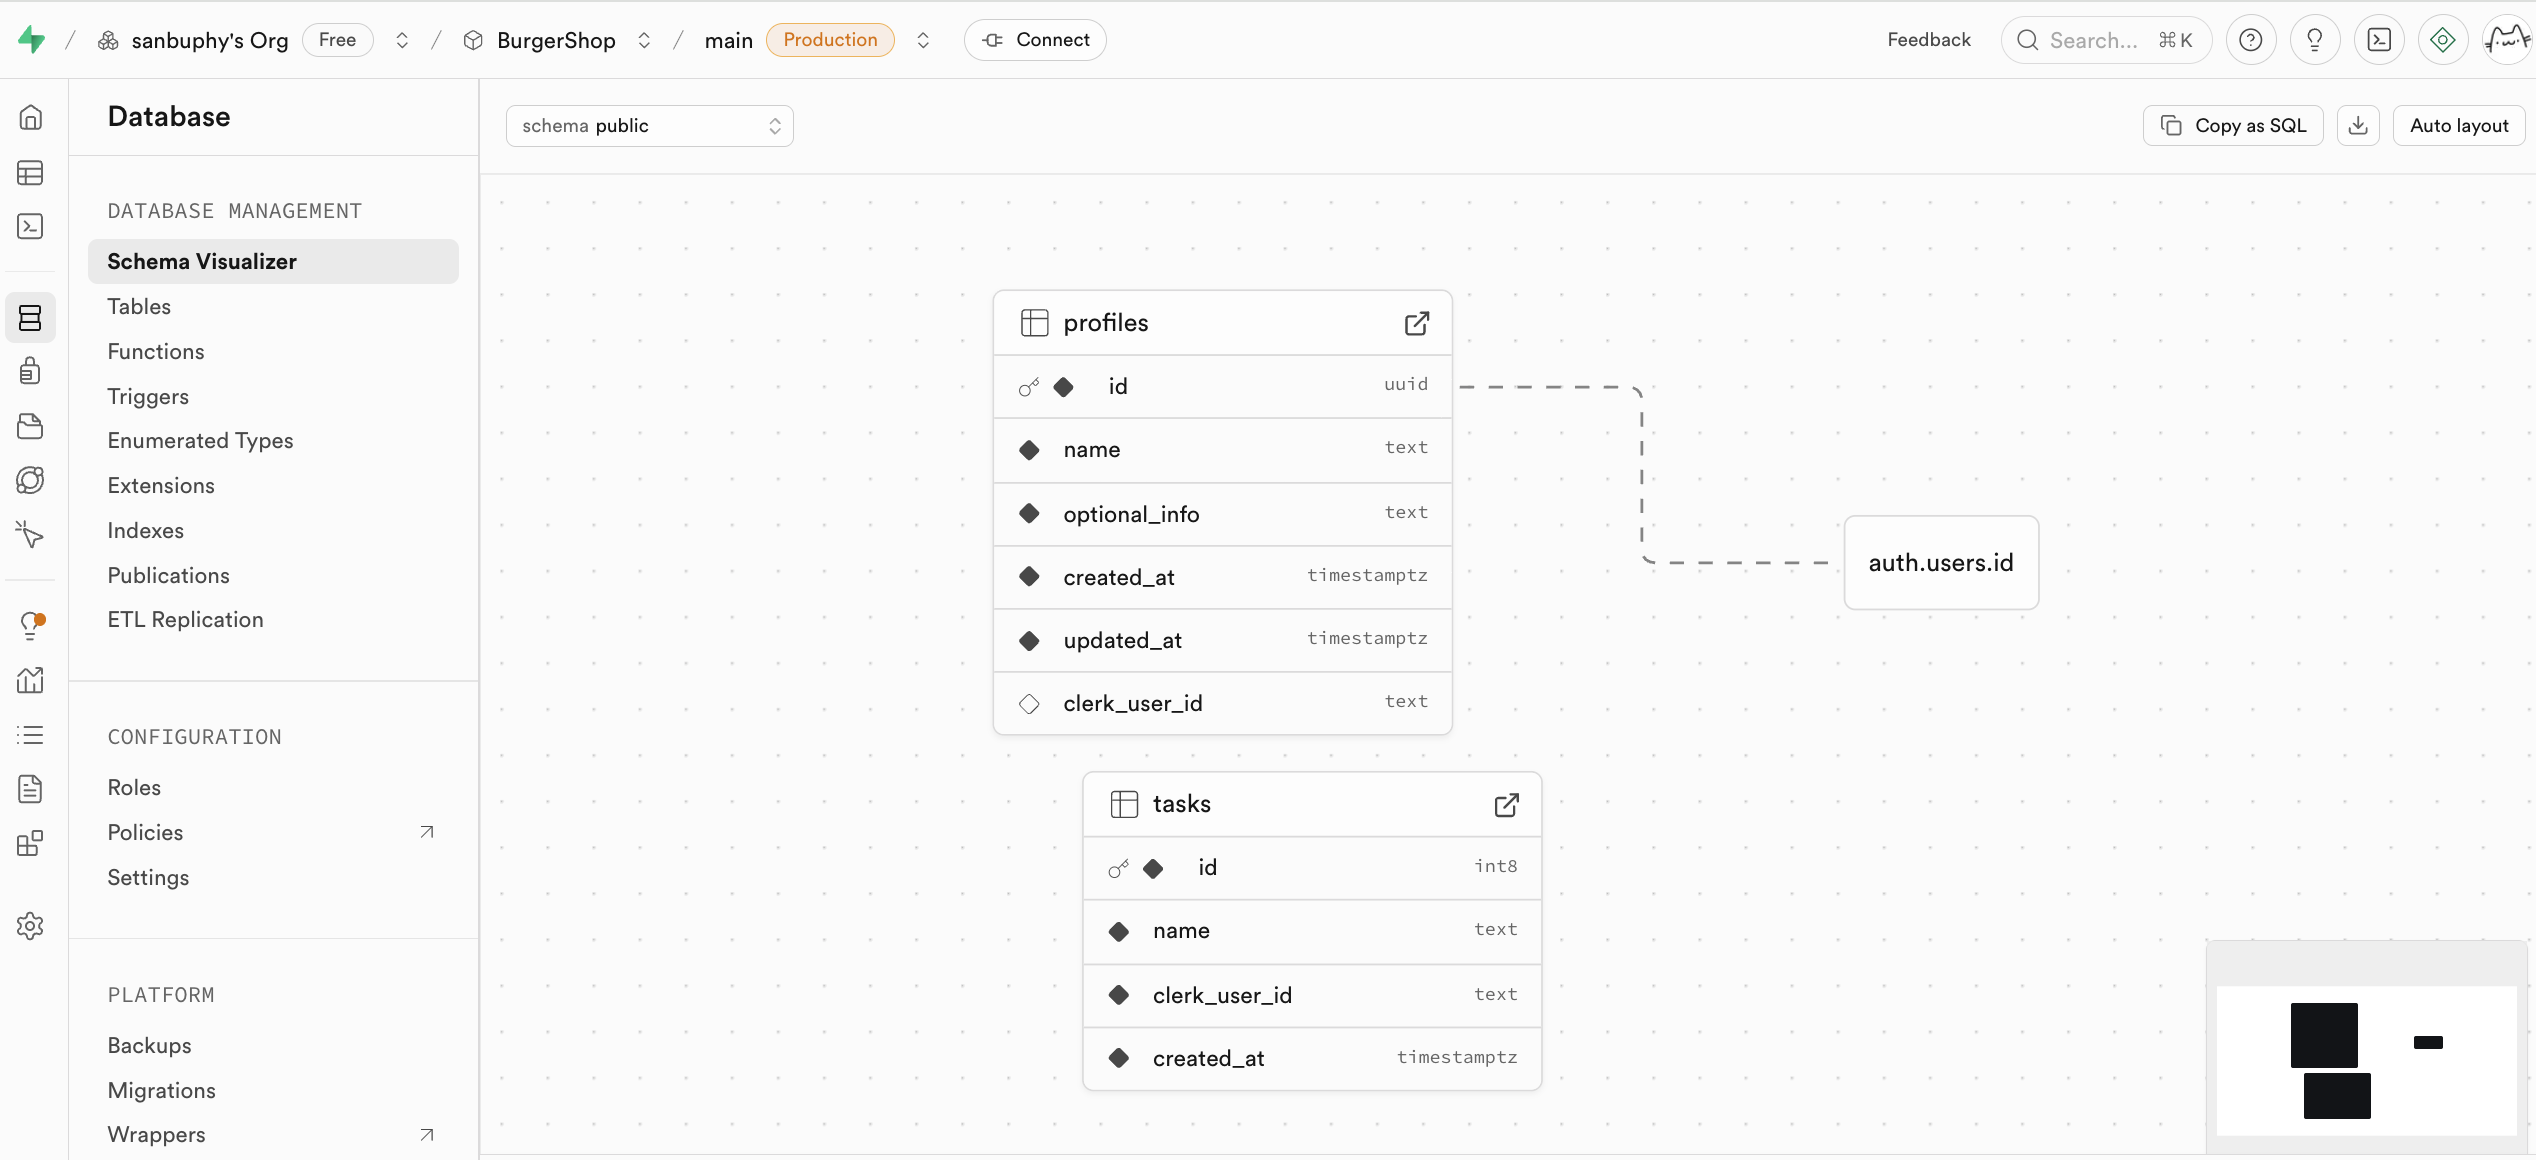
You can also create tables manually in Database -> Tables.

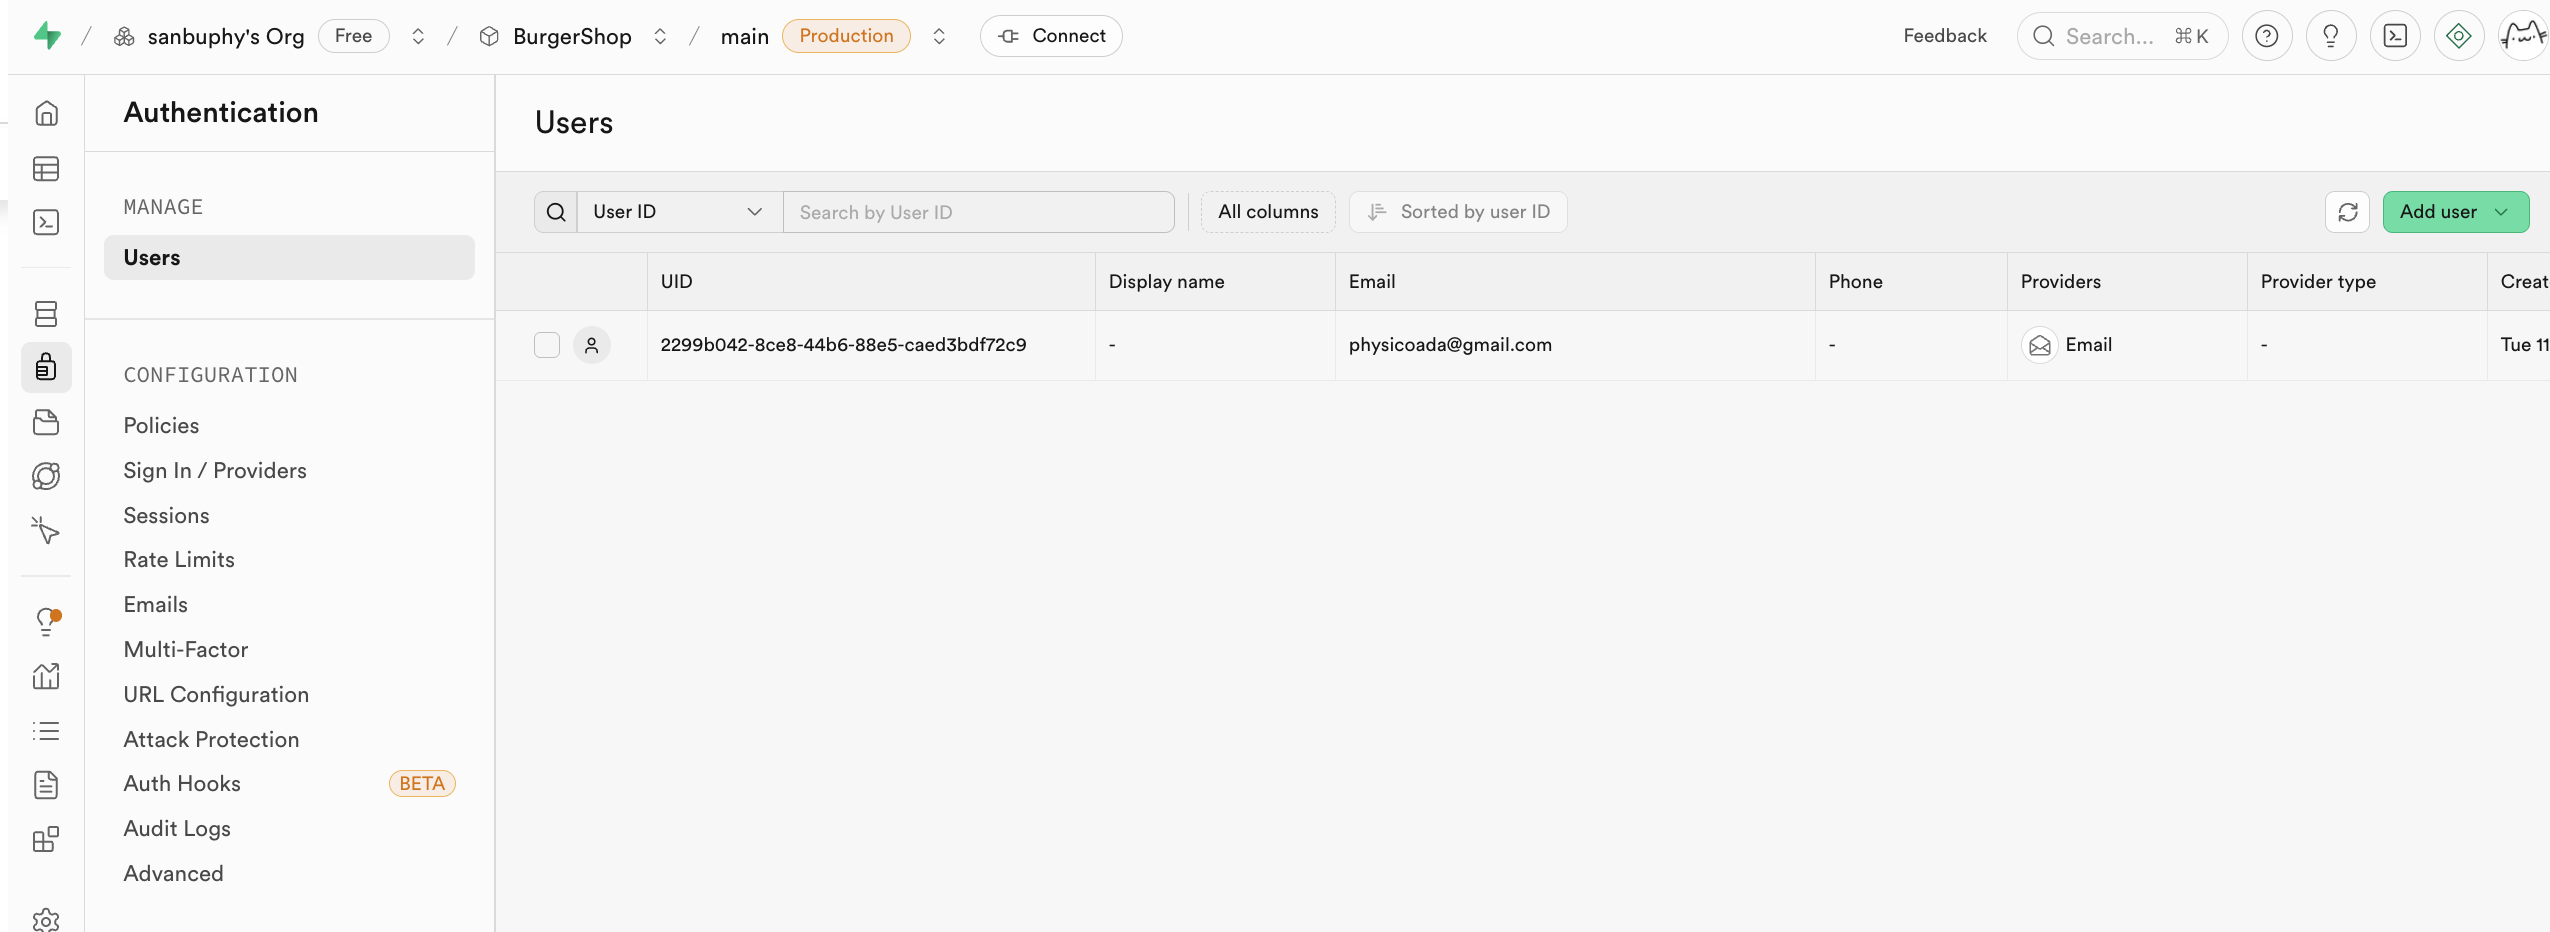
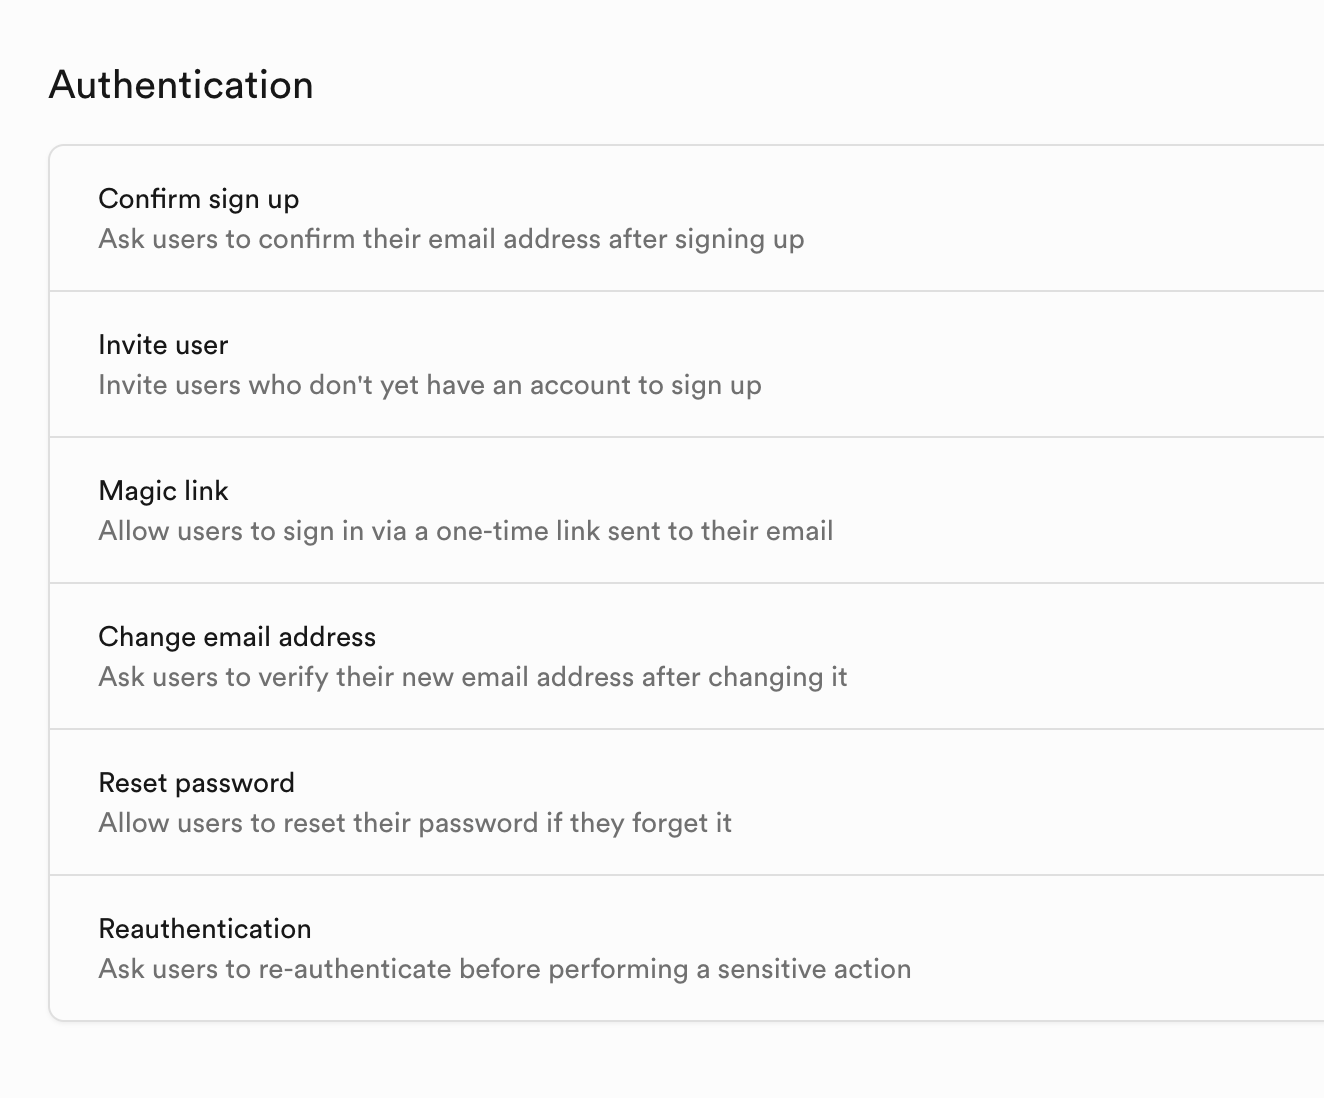
Authentication
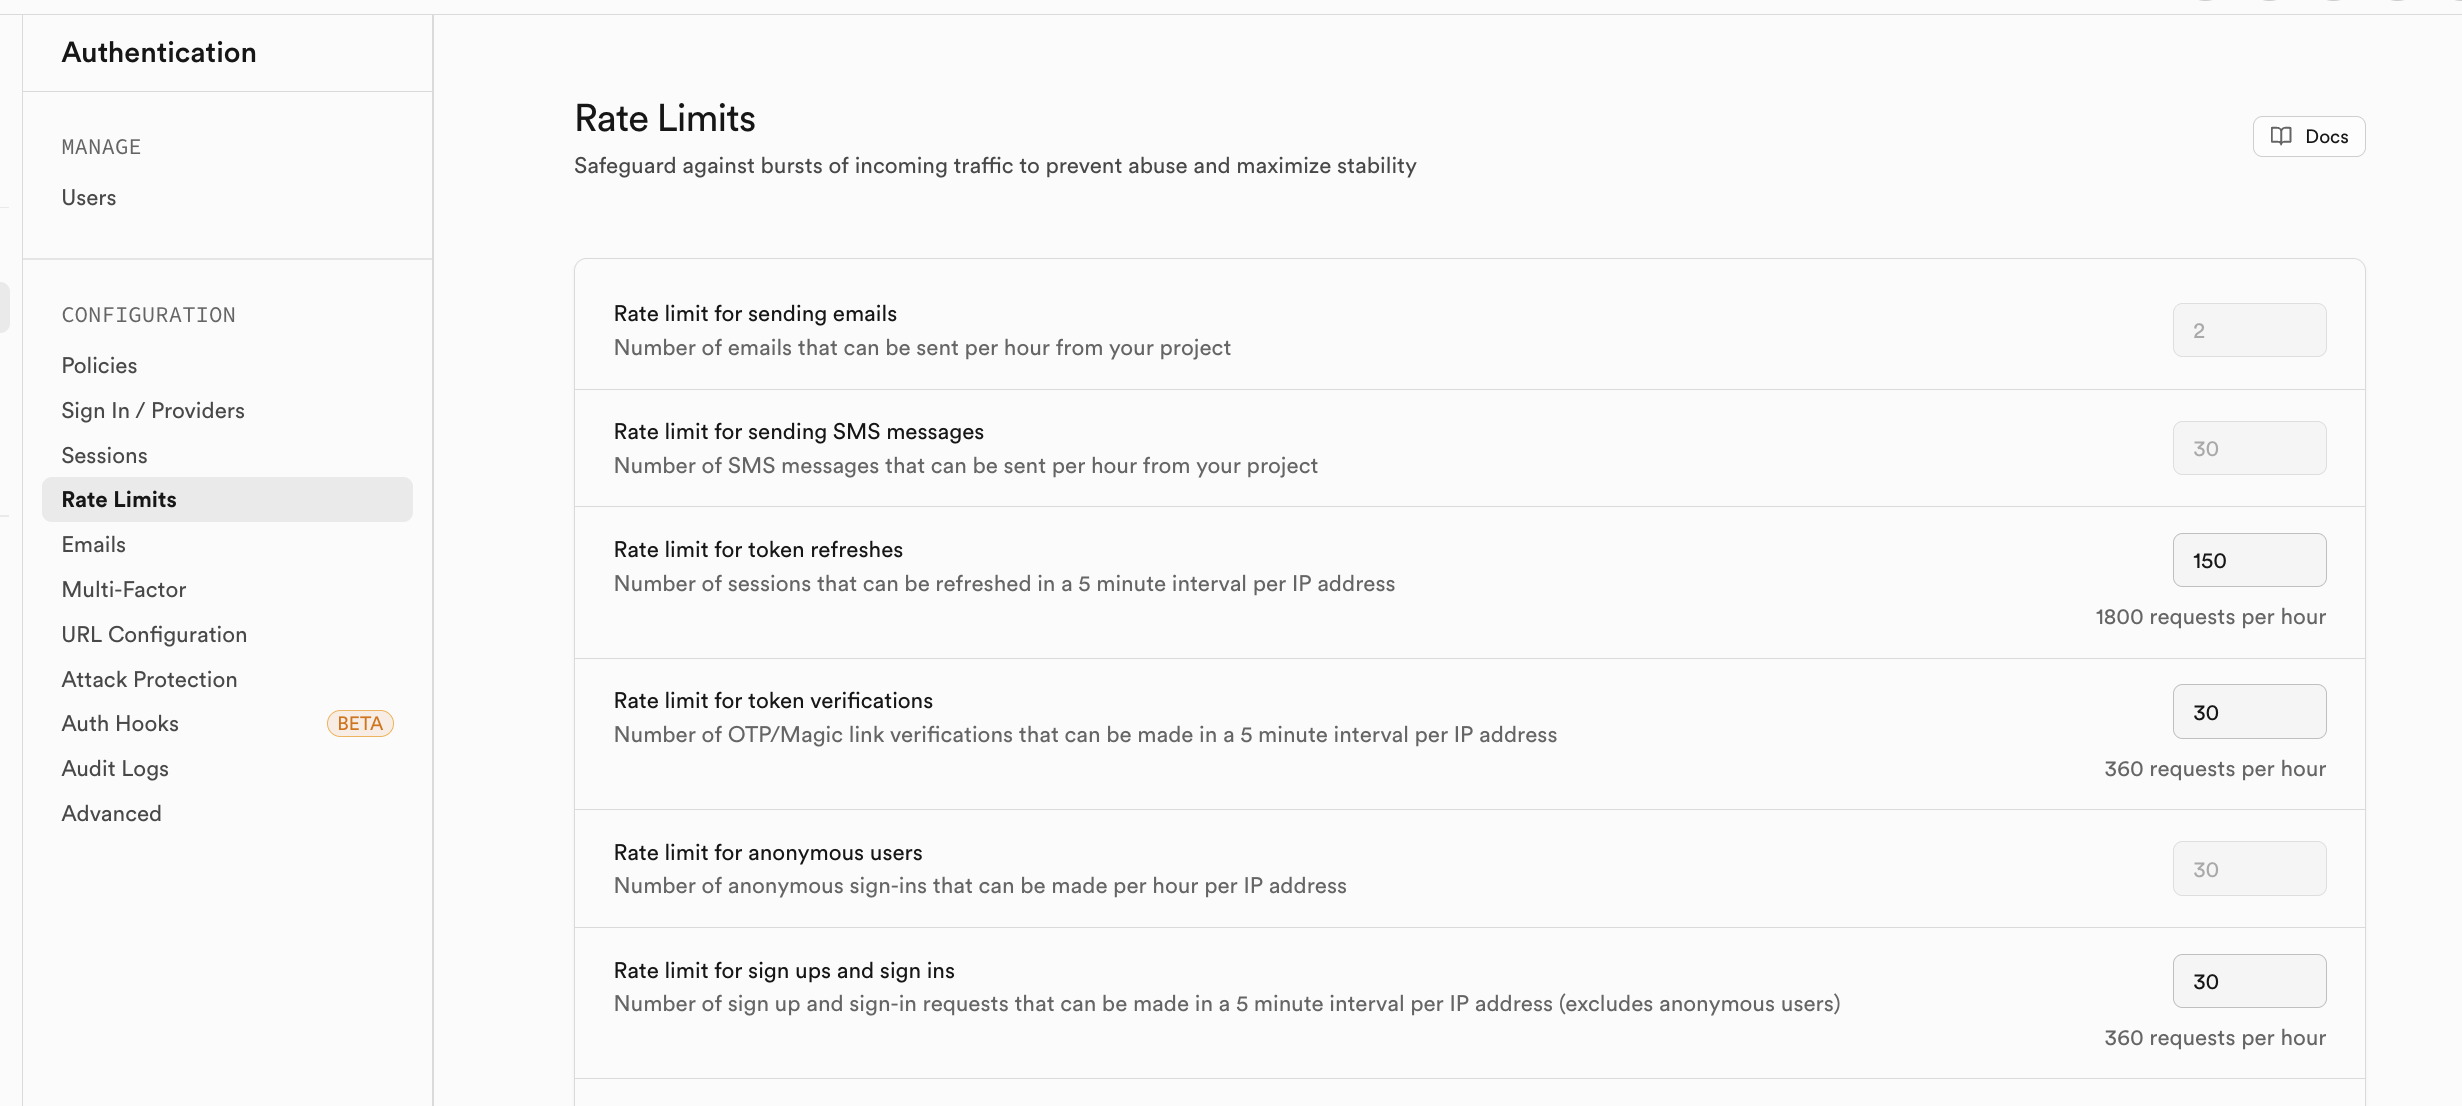
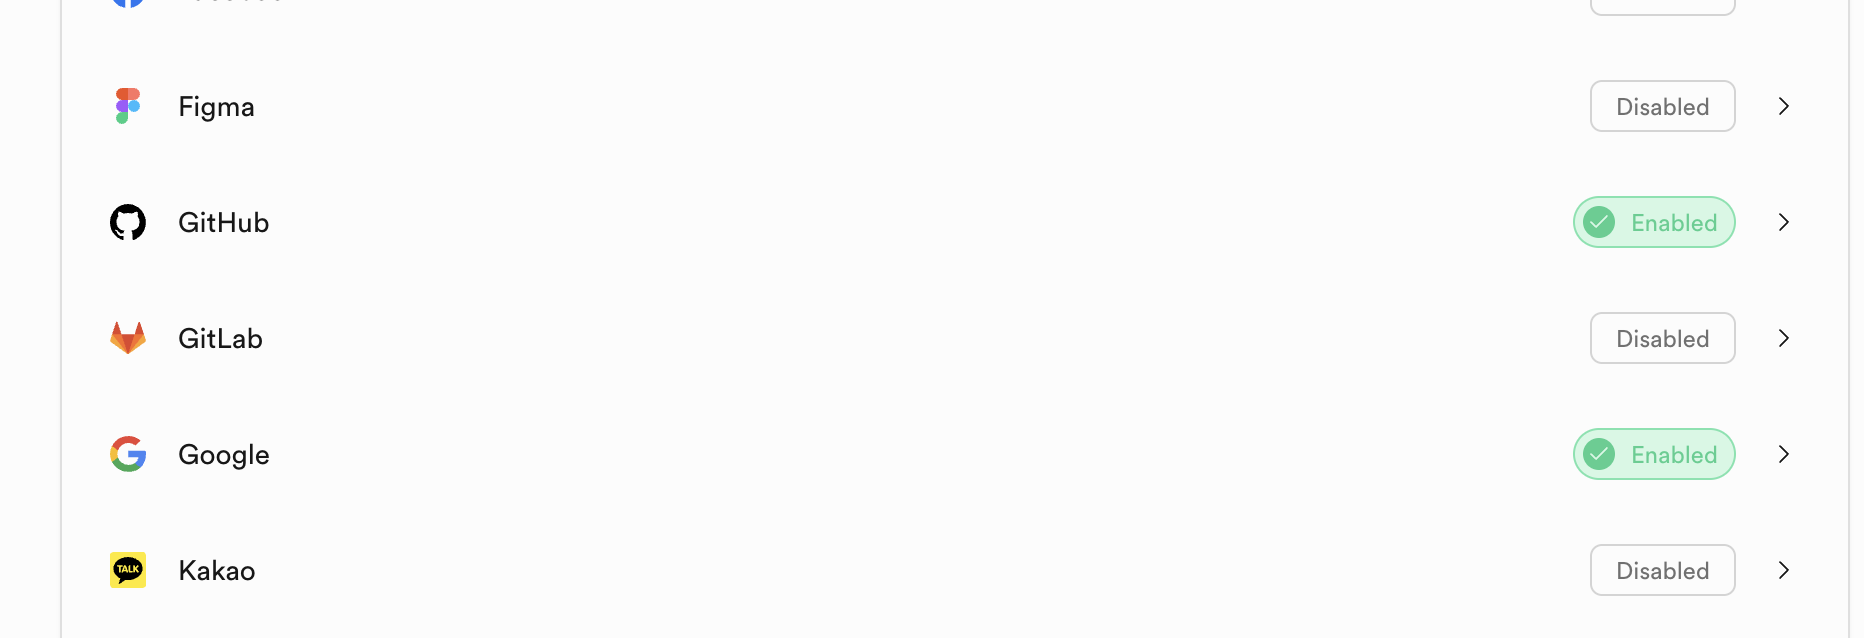
Authentication manages sign-up/sign-in and permissions. It supports registration, login, password reset, email verification, and OAuth providers (Google/GitHub/others). User data is synced automatically into auth.users.
Provider options are visible in the Provider panel. By default, email login is enabled. For GitHub/Google login, extra provider config is required.
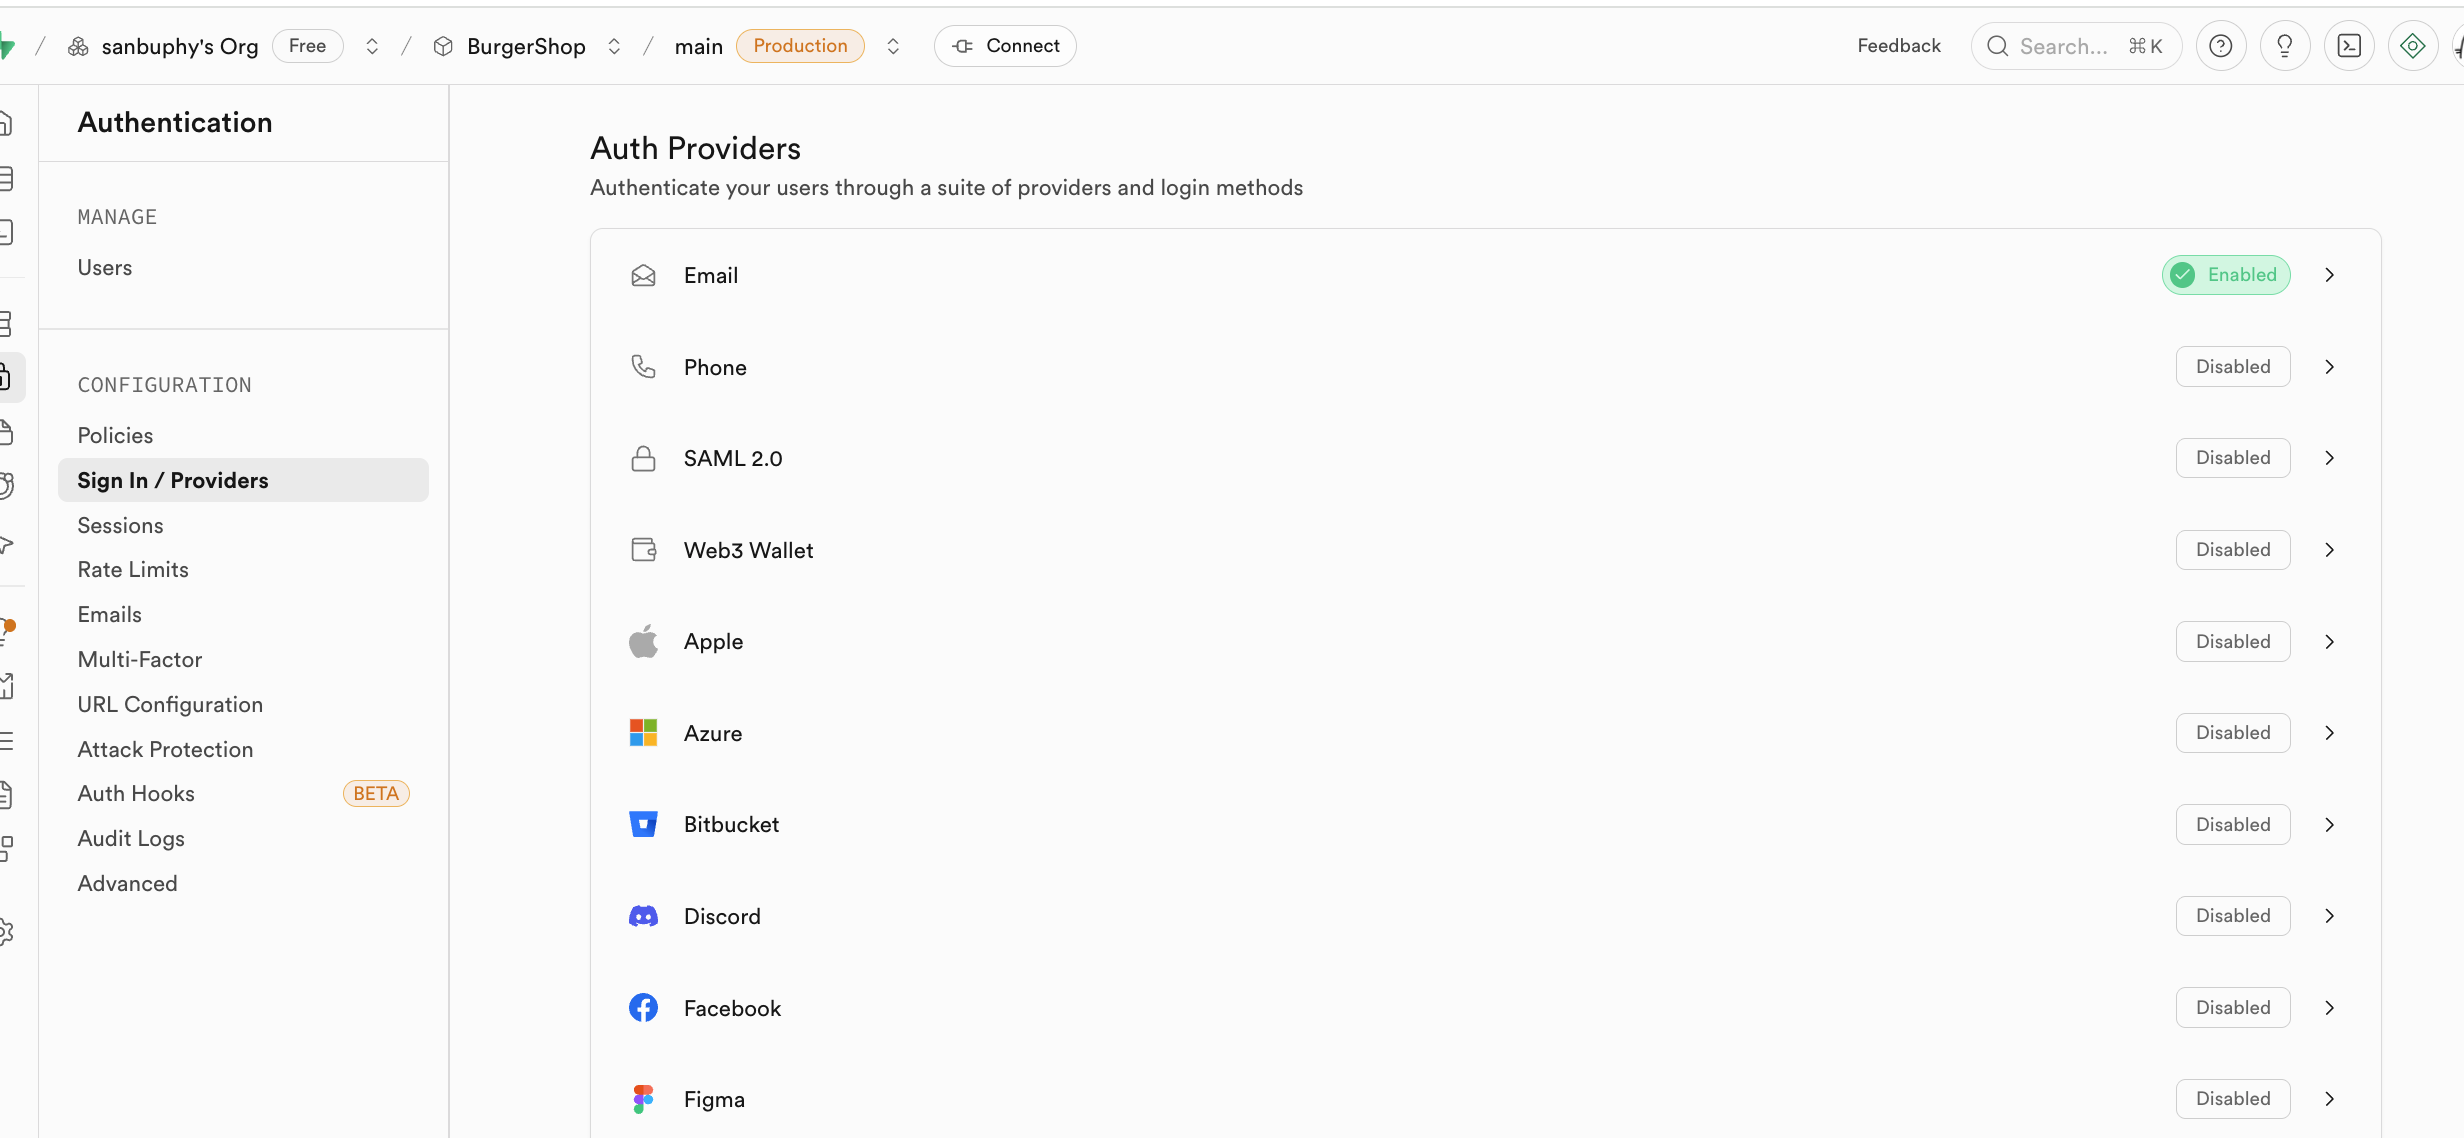
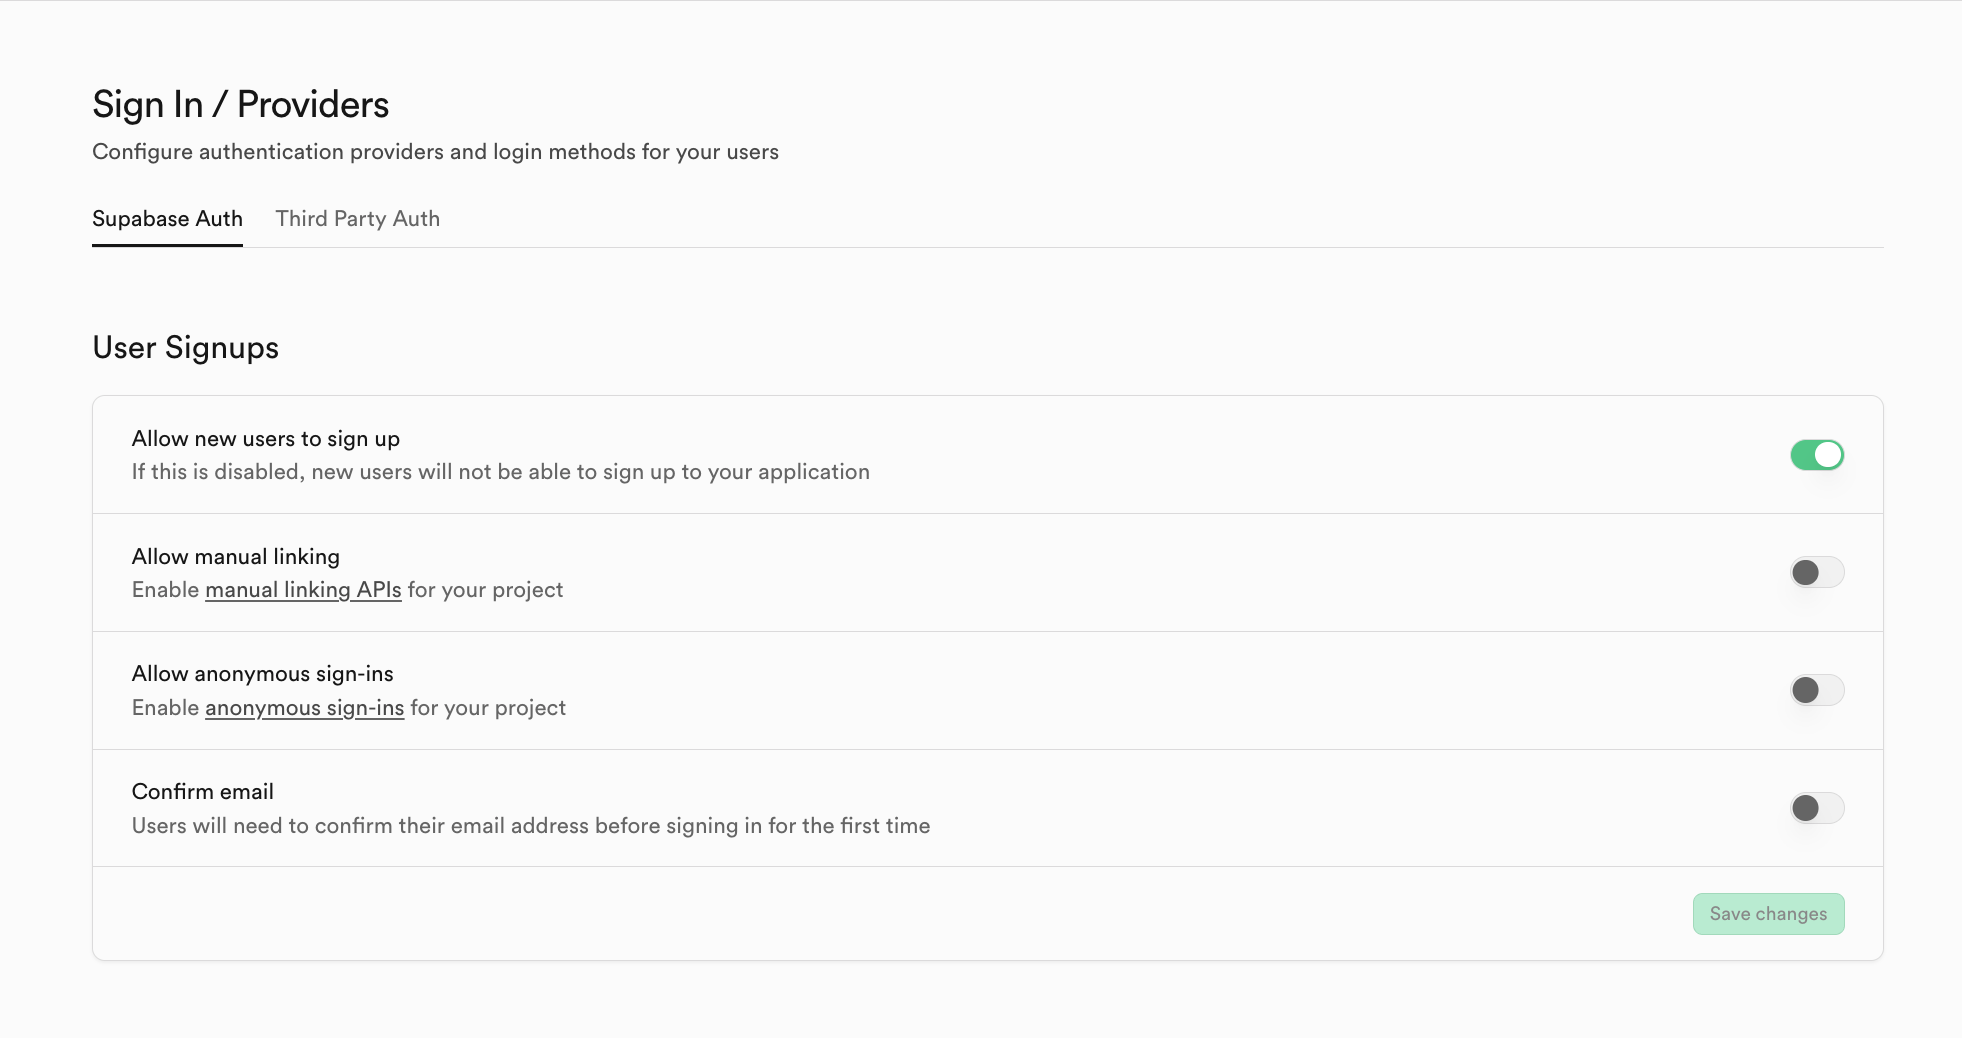
In Sign In / Providers, you can configure registration behavior (for example, whether email confirmation is required).
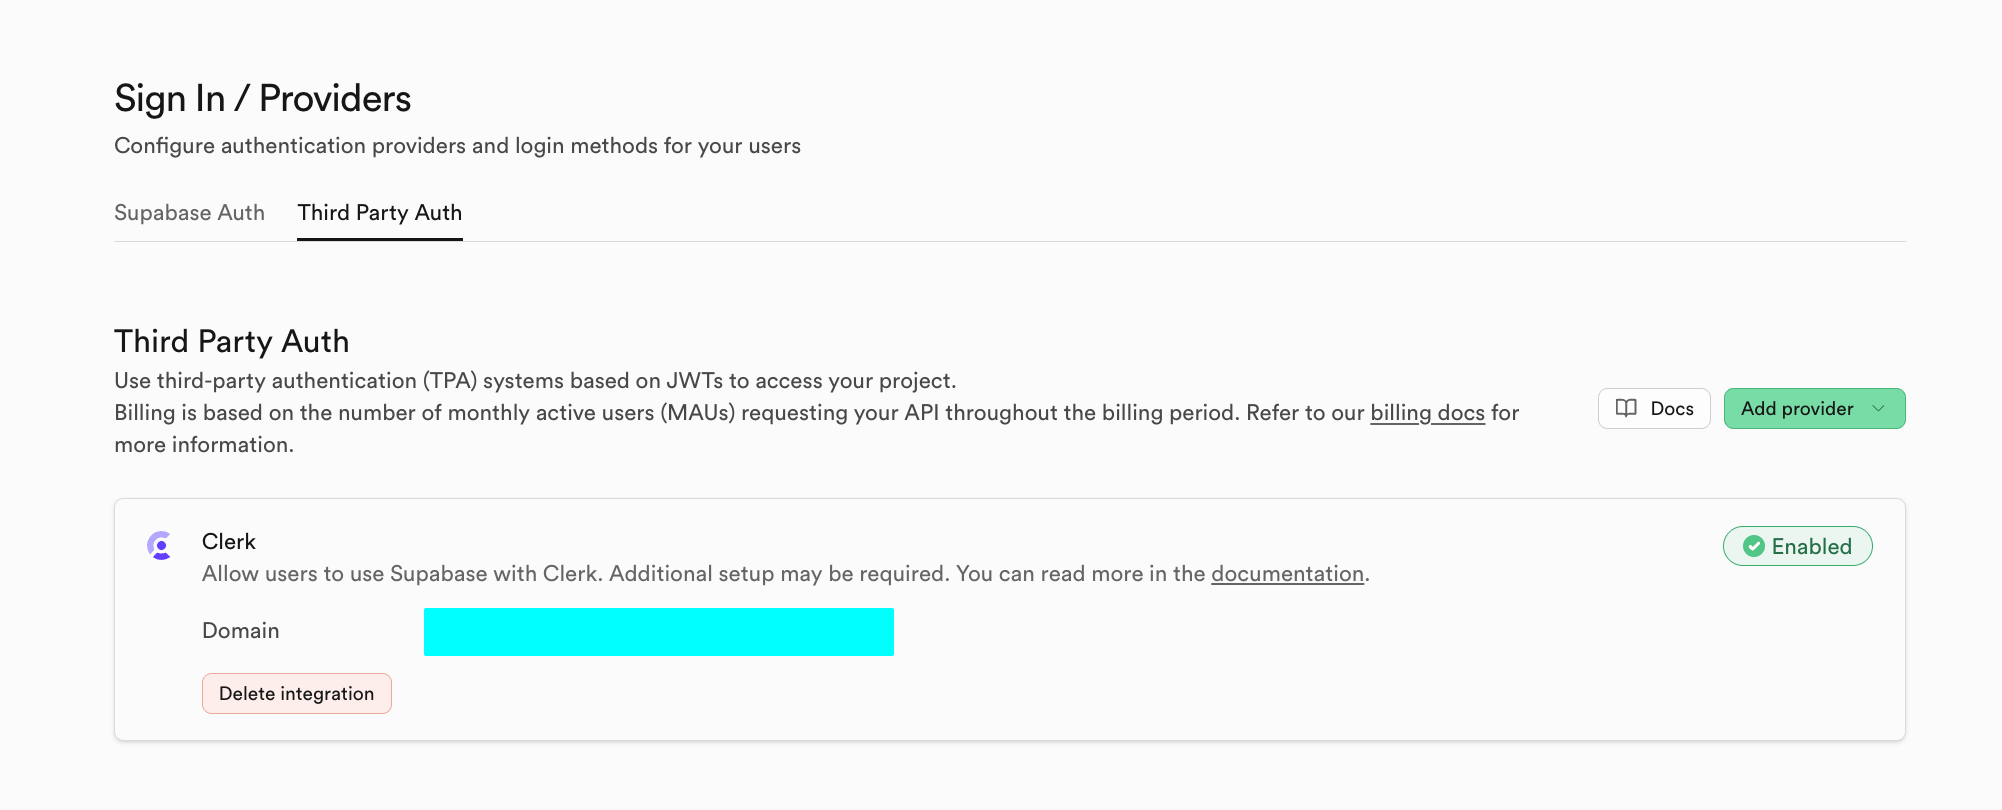
You can also use third-party auth systems in Third Party Auth (for example Clerk).
You can enable rate-limiting policies in Rate Limits to control abusive traffic.
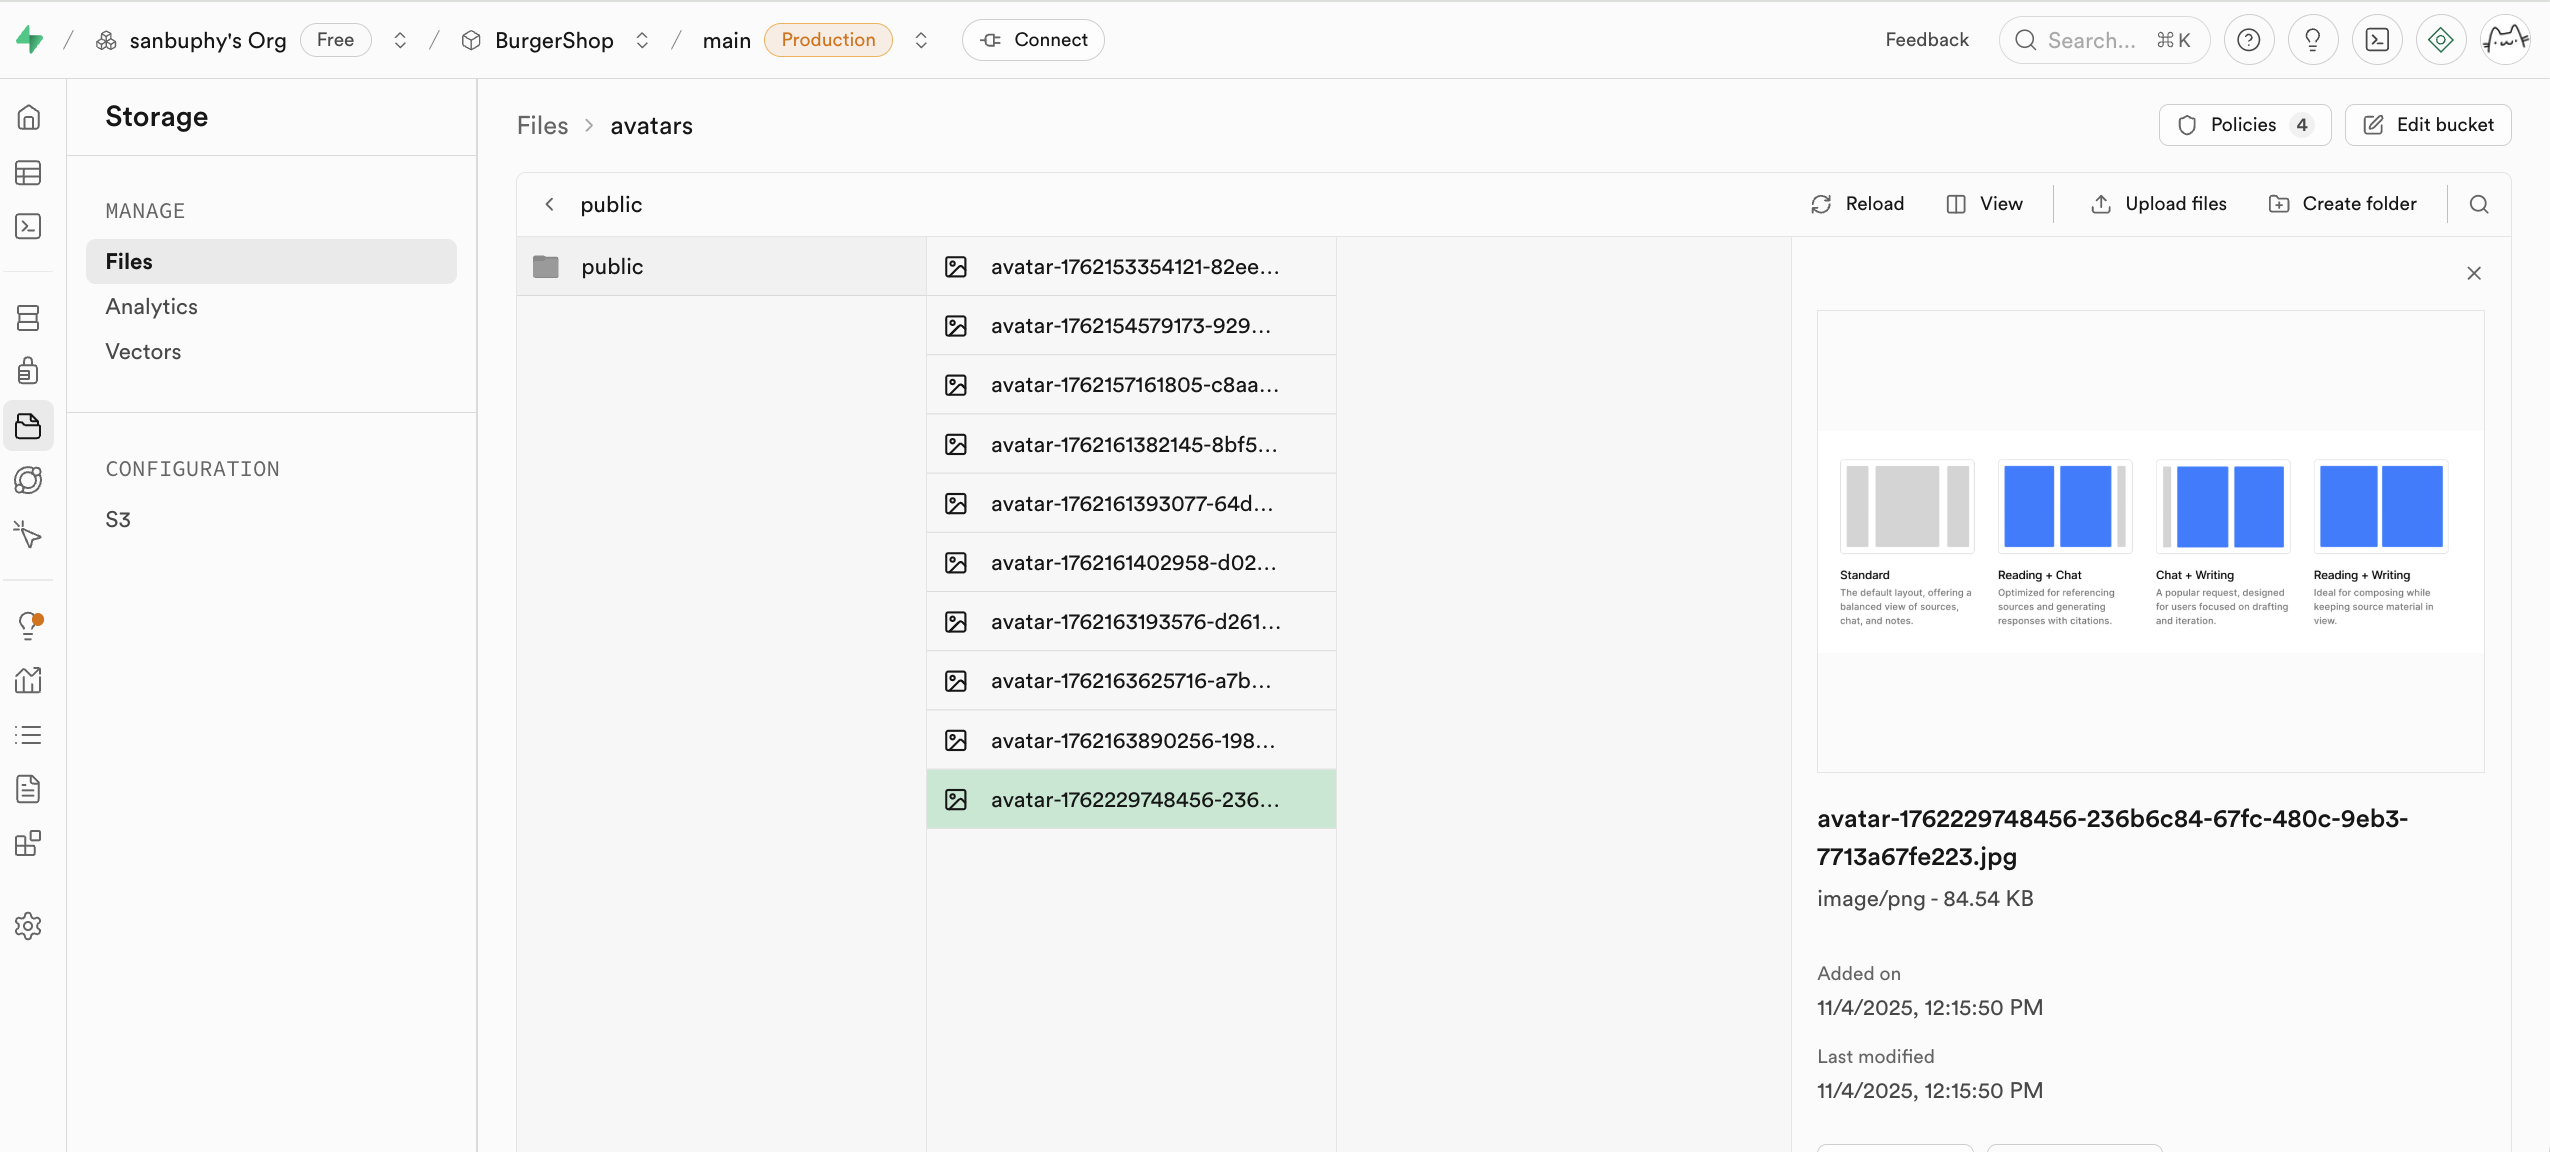
Storage
Storage is Supabase file storage and is S3-compatible in concept. It stores files (images/videos/docs/audio), supports public/private access control, and supports permanent/temporary link generation.
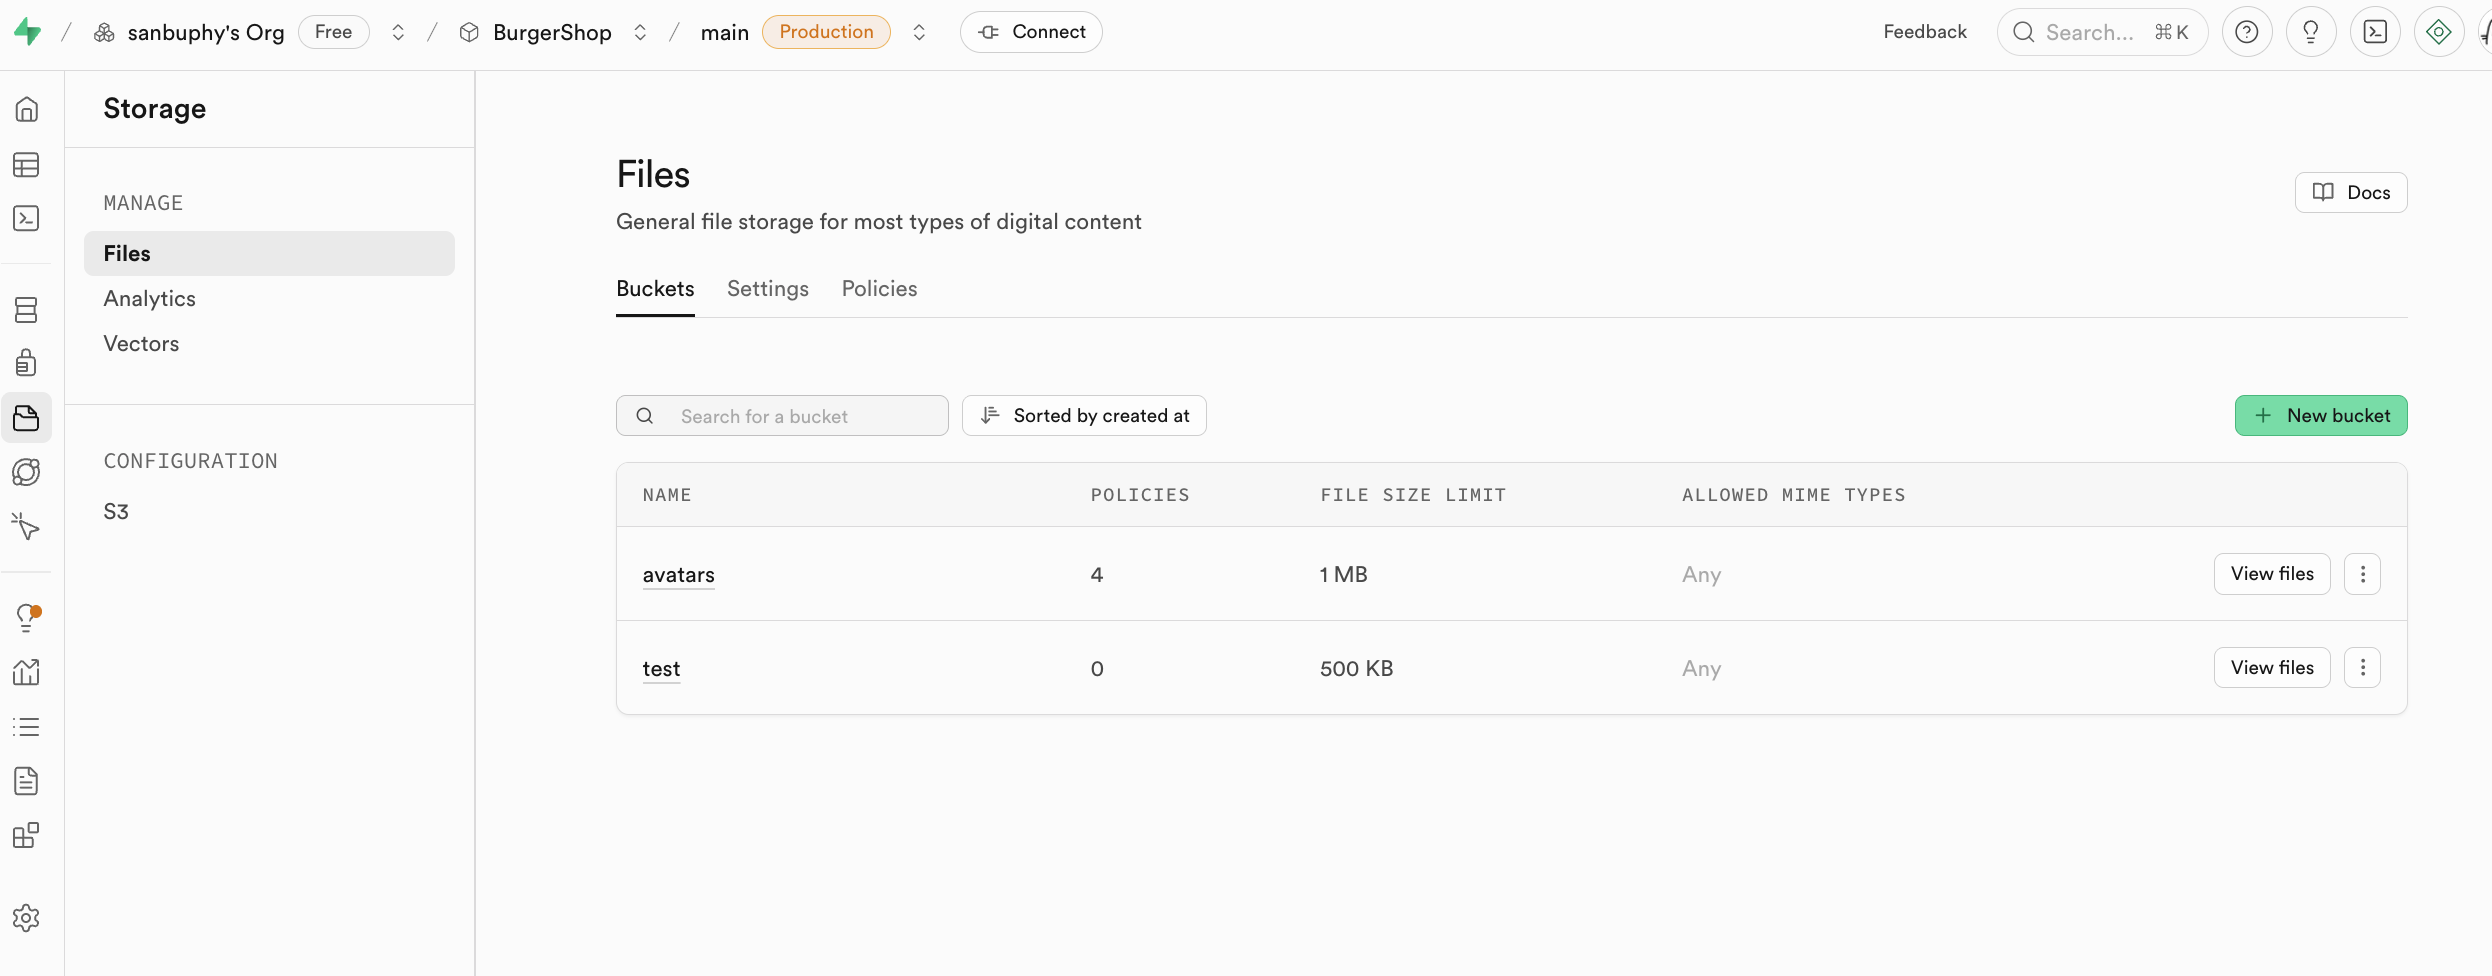
We cover concrete usage in later project sections.
If needed, you can operate via S3-compatible settings.
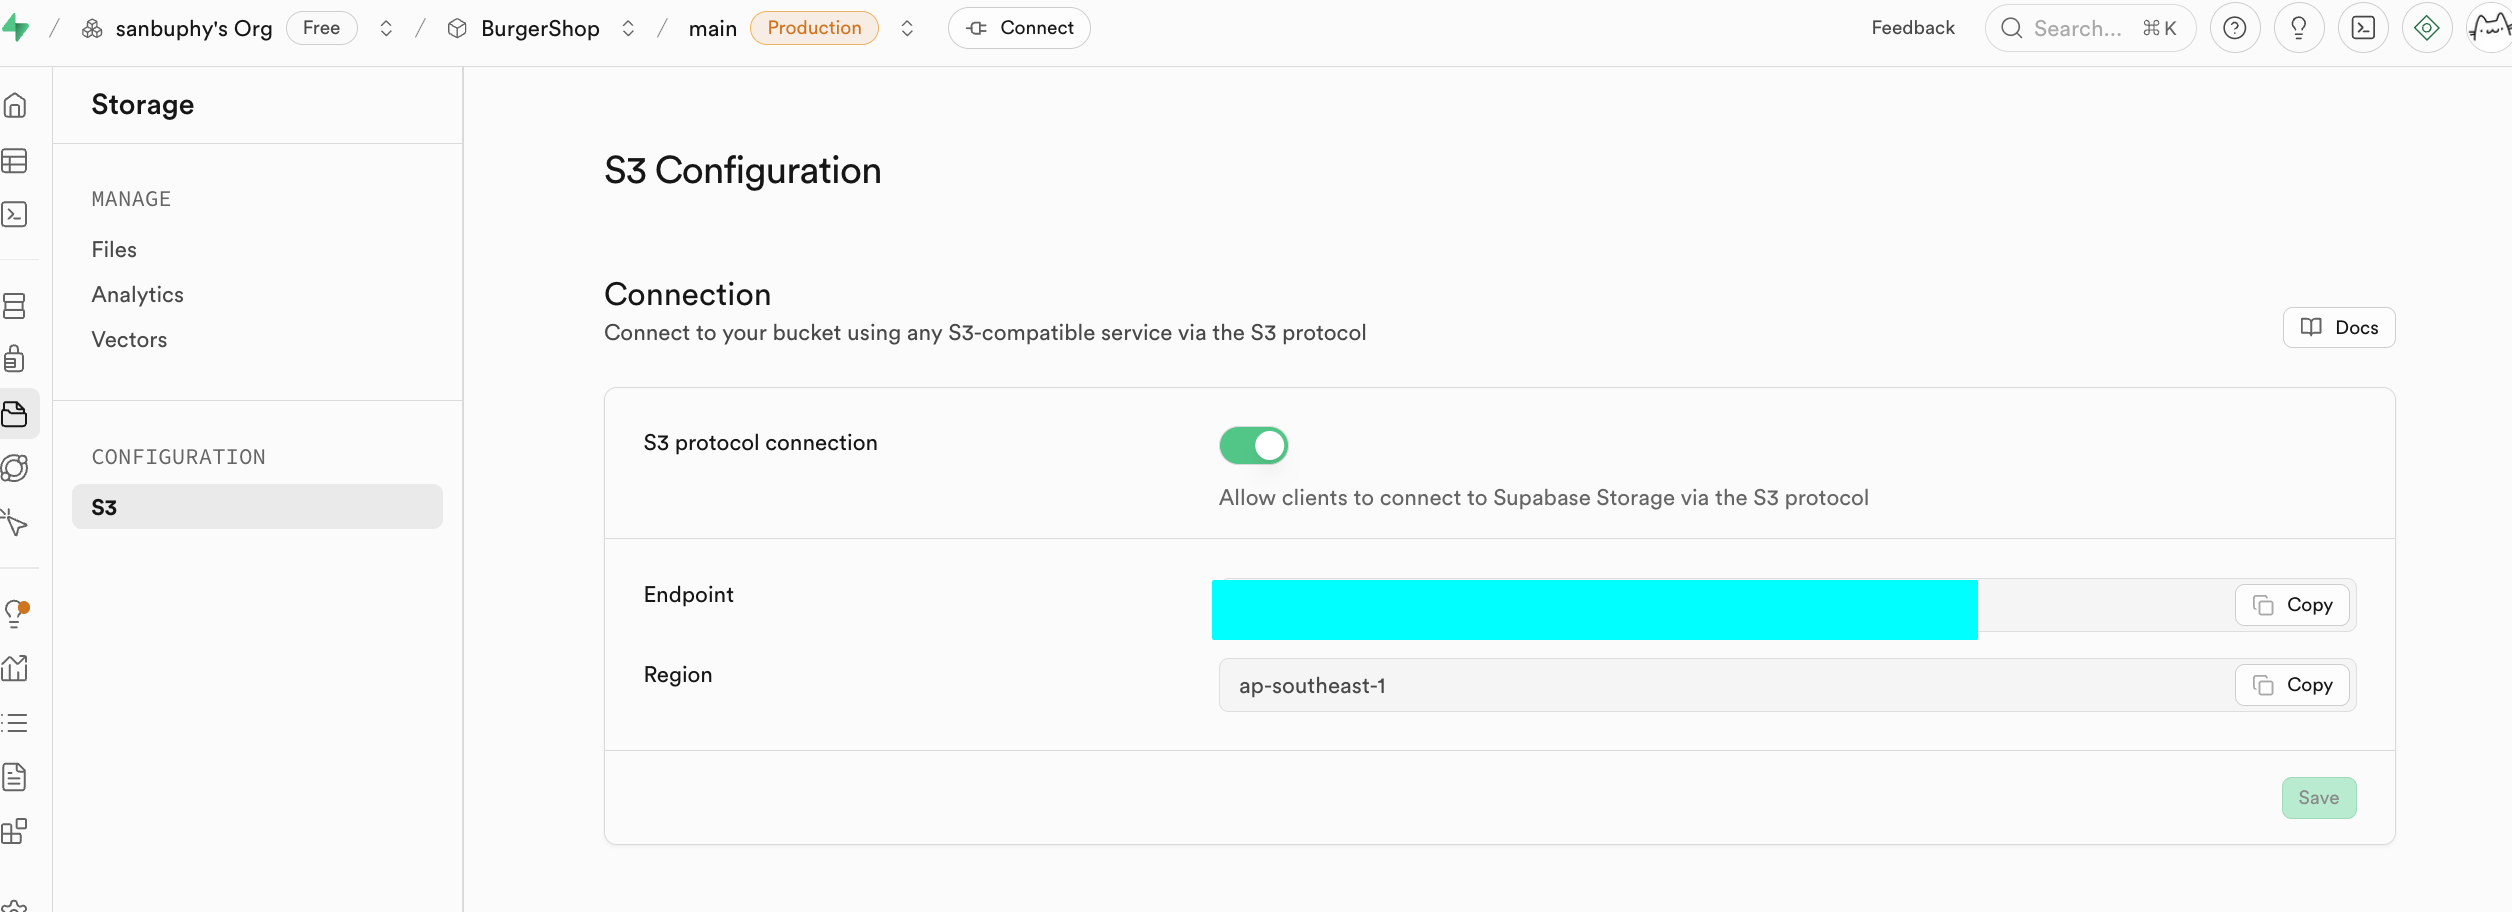
Amazon Cloud (AWS) is a cloud platform. S3 is AWS's object storage service and has effectively become an industry standard for object storage APIs.
Why S3-compatible APIs matter: there is a large ecosystem of SDKs/tools/docs. Compatibility dramatically reduces integration cost.
Edge Functions
If you do not want to self-host a full backend, but still need secure server-side logic, use Edge Functions. They are globally distributed server functions managed by Supabase.
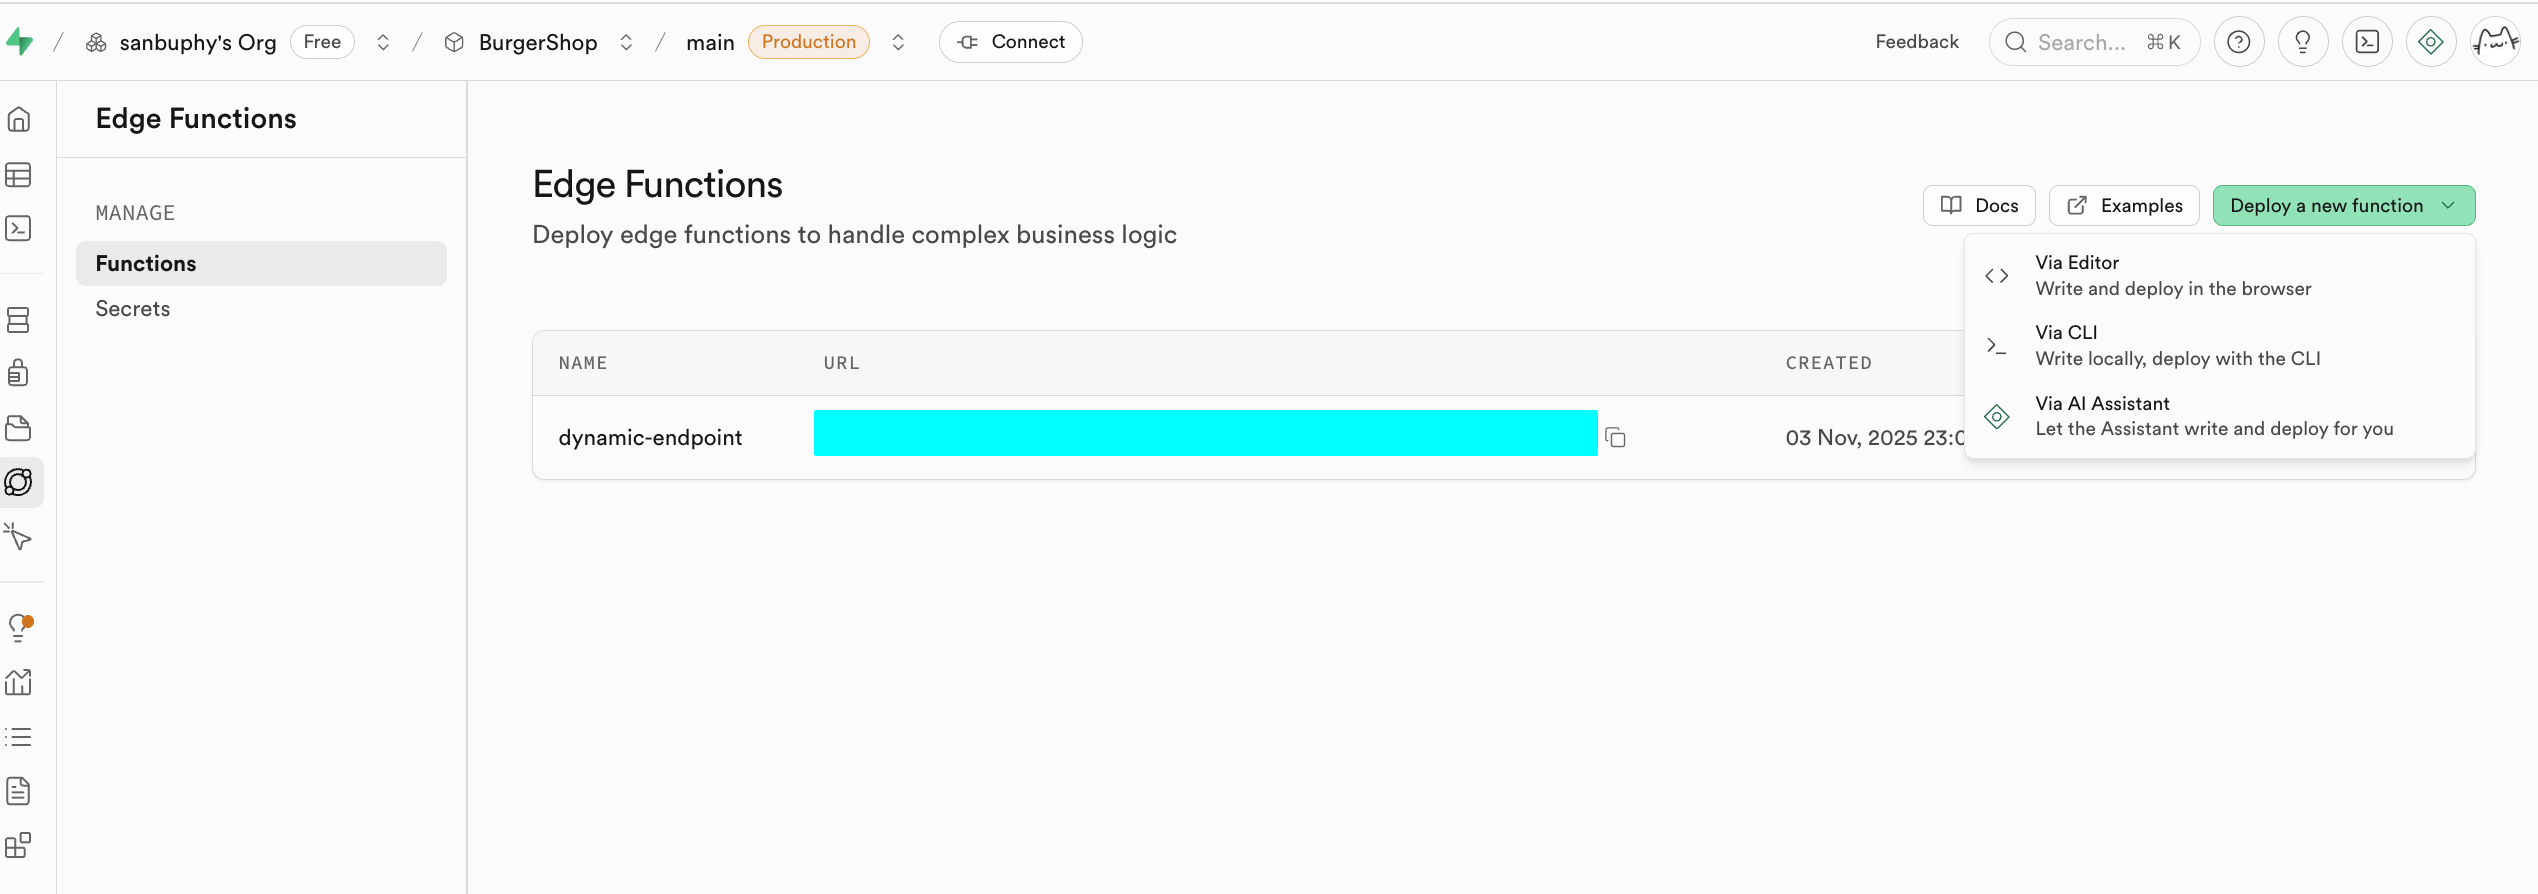
A core use case is secure API proxying. Never expose sensitive keys (OpenAI/Stripe/etc.) in frontend code. Instead:
- frontend calls your Supabase function
- function securely uses secrets stored in Supabase
Function secrets are injected as environment variables (for example through Deno.env.get), so keys are never exposed to browsers.

Minimal Edge Function request example:
// Core config (replace with your own values)
const projectId = "your Supabase project ID";
const functionName = "target Edge Function name";
const supabaseKey = "Supabase anon_key";

async function callEdgeFunction() {
  const url = `https://${projectId}.supabase.co/functions/v1/${functionName}`;

  try {
    const response = await fetch(url, {
      method: "POST",
      headers: {
        "Content-Type": "application/json",
        "Authorization": `Bearer ${supabaseKey}`
      },
      body: JSON.stringify({ order_id: "123", action: "refund" })
    });

    const result = await response.json();
    console.log("Success:", result);
  } catch (error) {
    console.error("Failed:", error.message);
  }
}

callEdgeFunction();
Edge Functions integrate with Supabase auth sessions and RLS. They can identify current users and operate with your security model.
Typical scenarios:
- third-party webhooks
- email notifications
- PDF generation
- custom API endpoints and business rules
Example: Clerk only manages auth identity. If you need user data synchronized into business tables, you can listen to Clerk webhooks via Edge Functions and write into Supabase automatically.
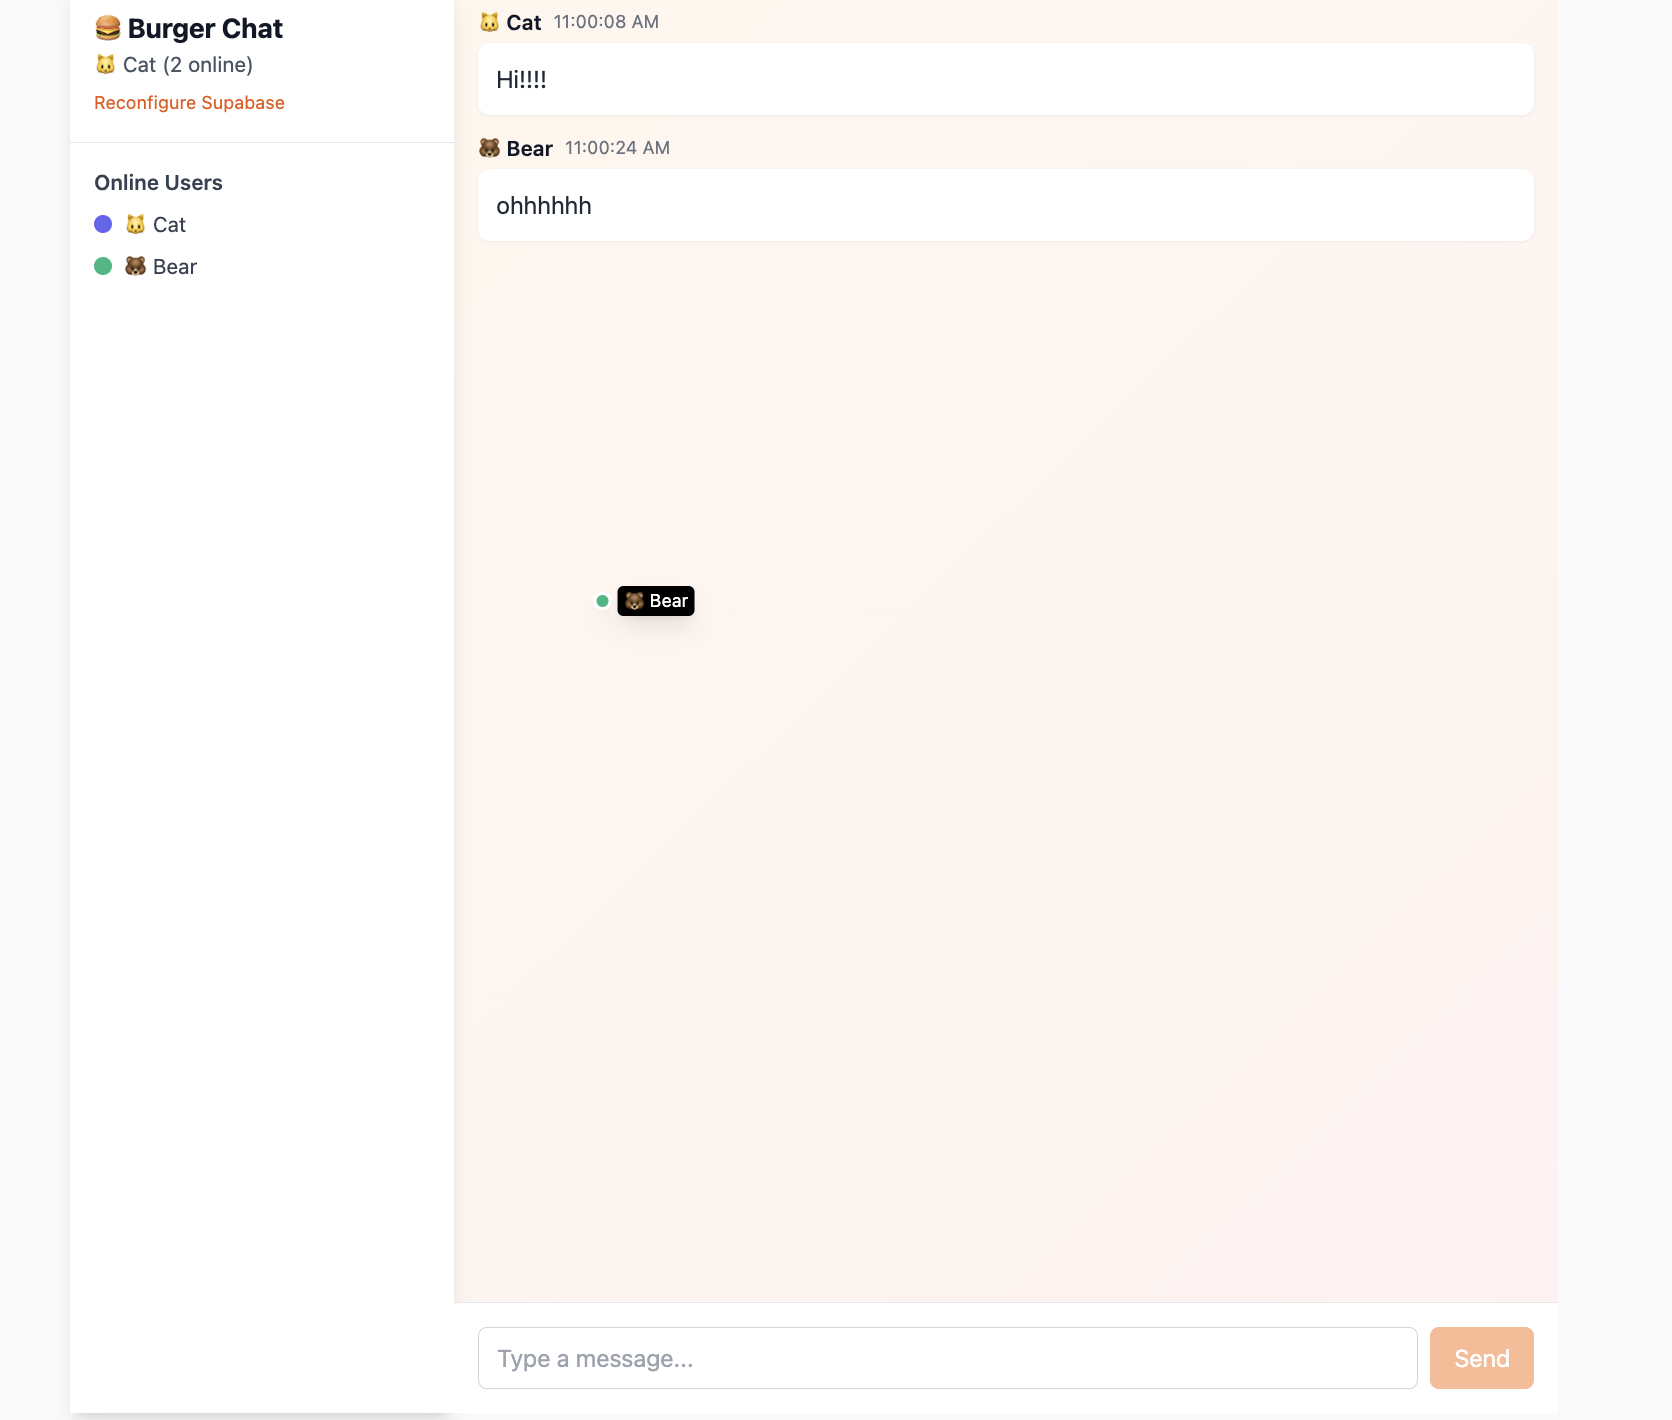
Realtime
Realtime allows clients to receive DB changes instantly through WebSocket instead of polling.
It includes:
- Postgres Changes: subscribe to row-level
INSERT/UPDATE/DELETE - Broadcast: low-latency temporary channel messages
- Presence: online status tracking/synchronization
We will use it in project-based sections later.
Project Settings
Project Settings is for deeper resource and parameter configuration.
At beginner stage, focus on:
- Data API: your Supabase URL (
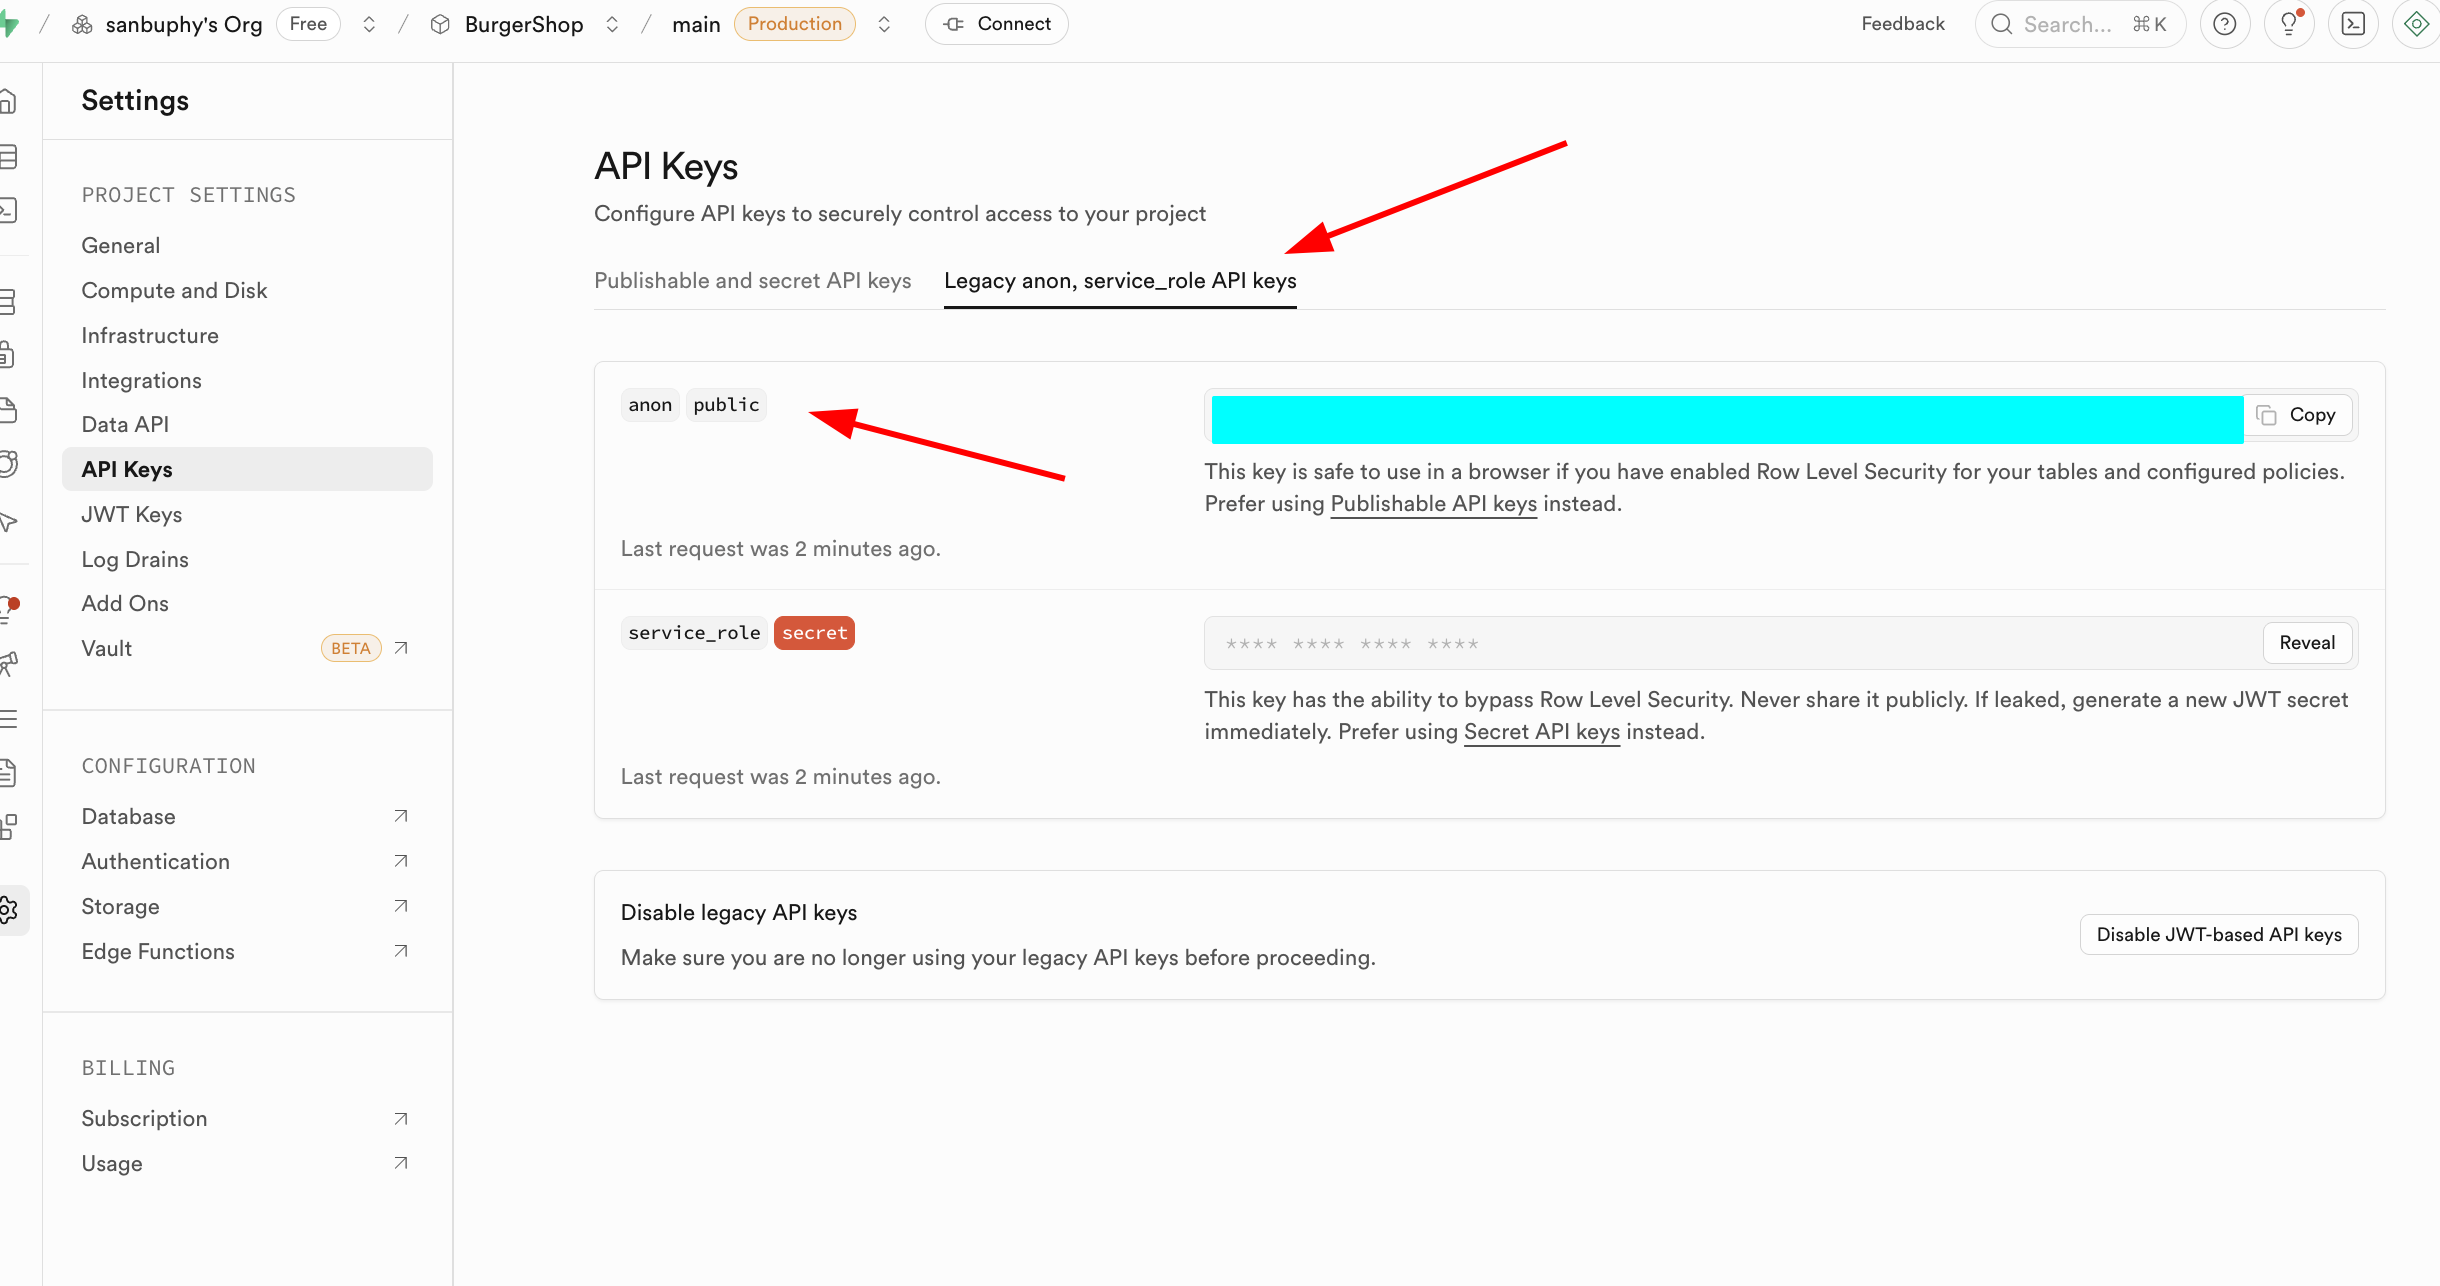
https://xxx.supabase.co) - API Keys: anon key vs service_role key
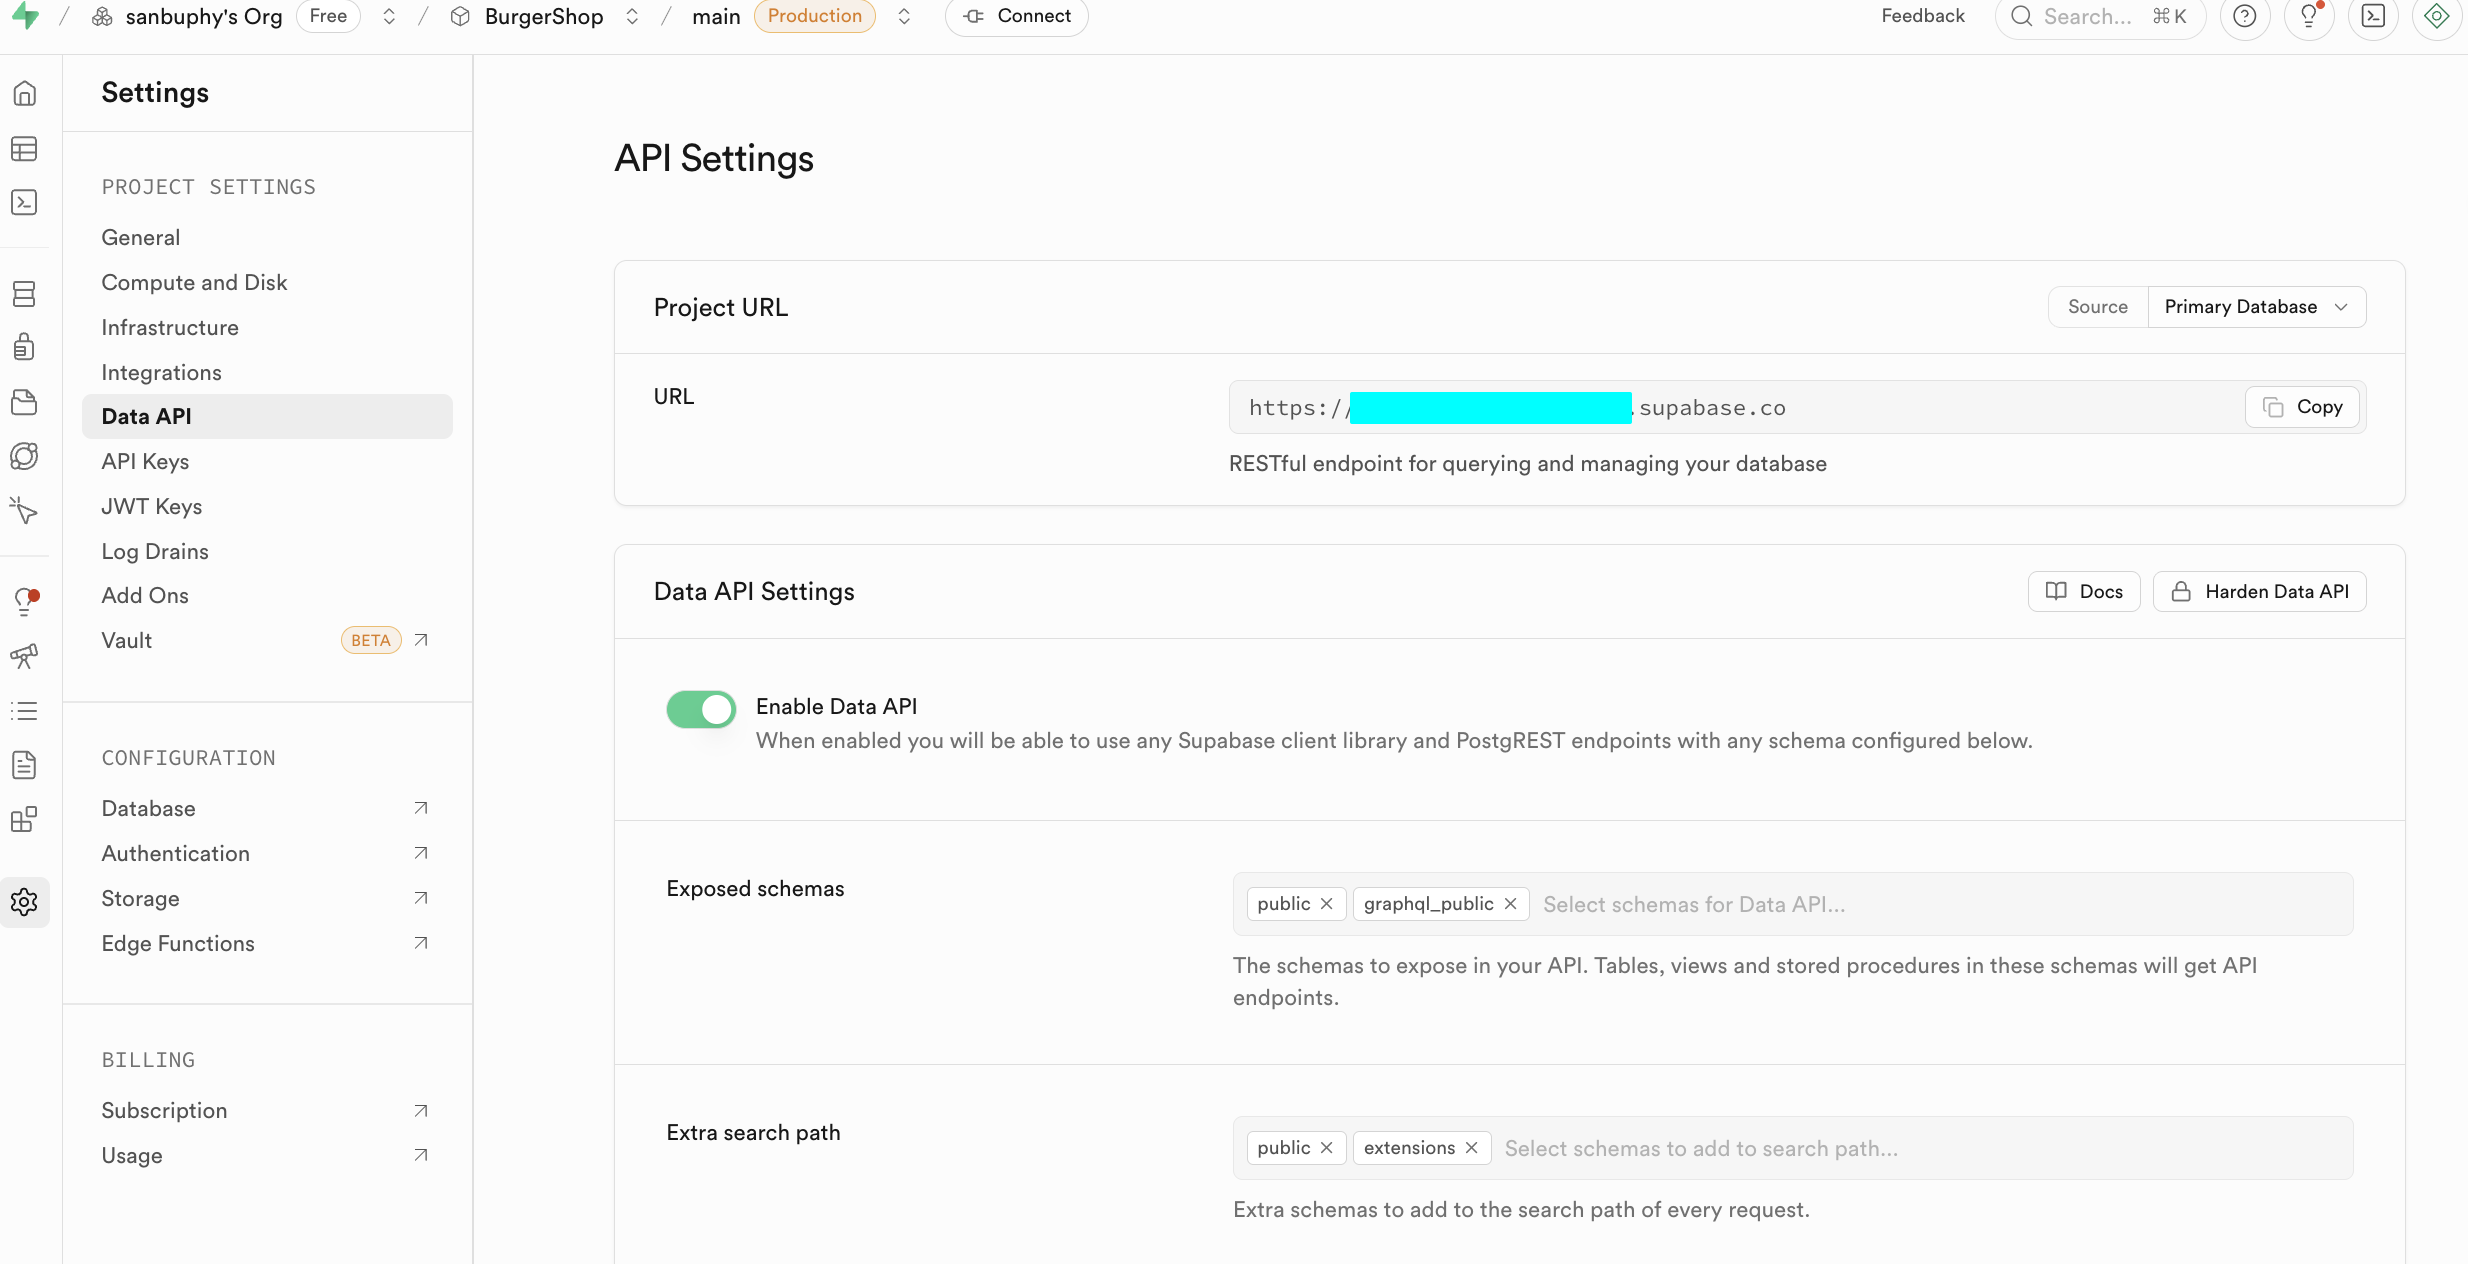
anon is for restricted client access under RLS. service_role is high-privilege server key and must never be exposed publicly.
2.1 Create Your First SQL Table
After understanding the console, let's move to core DB operations.
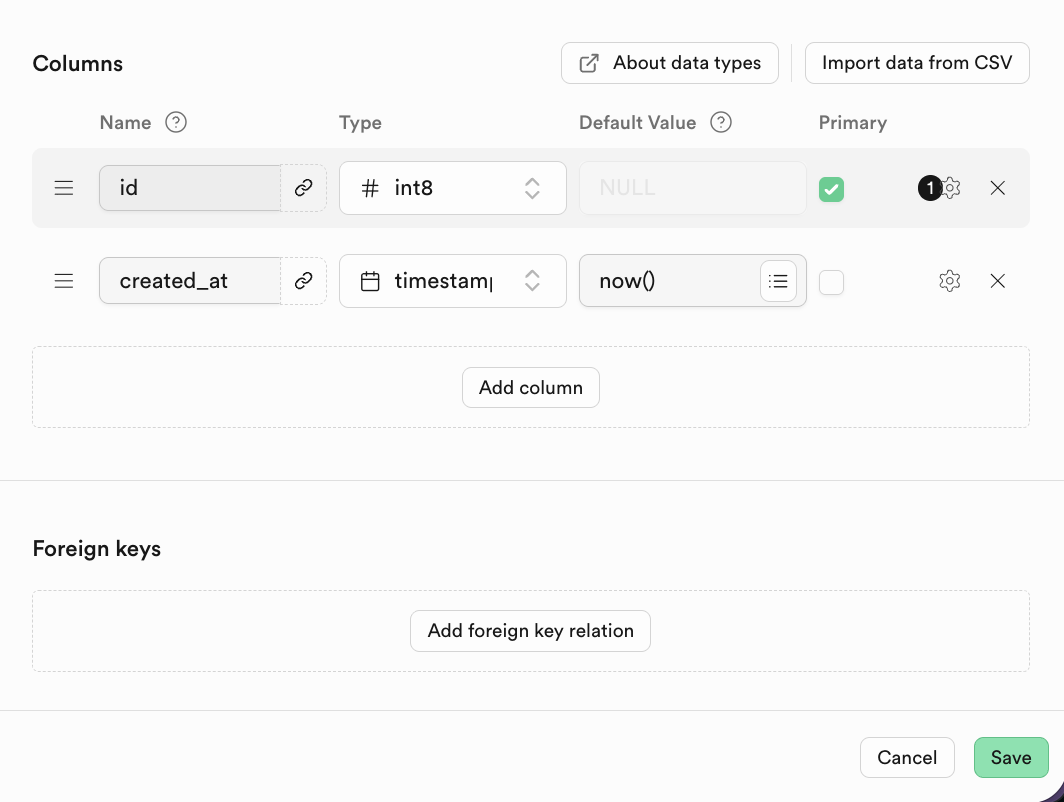
There are two common ways to create tables in Supabase:
- (recommended) generate SQL via LLM and run it in SQL Editor
- visual creation via
Database -> Tables -> New table
You can define table name and column types in Columns.
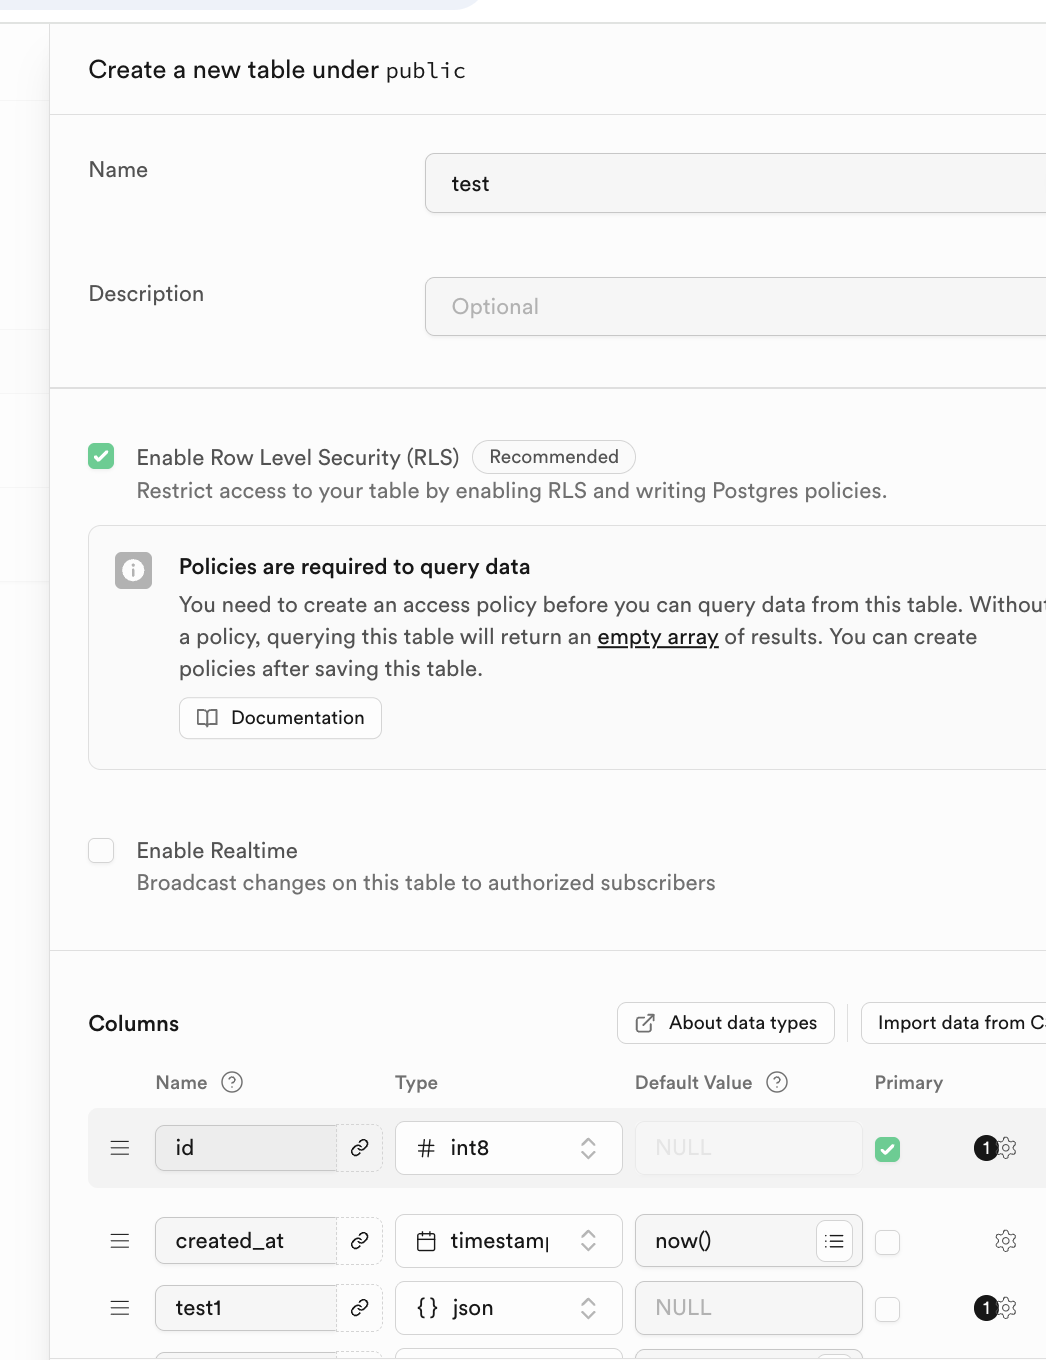
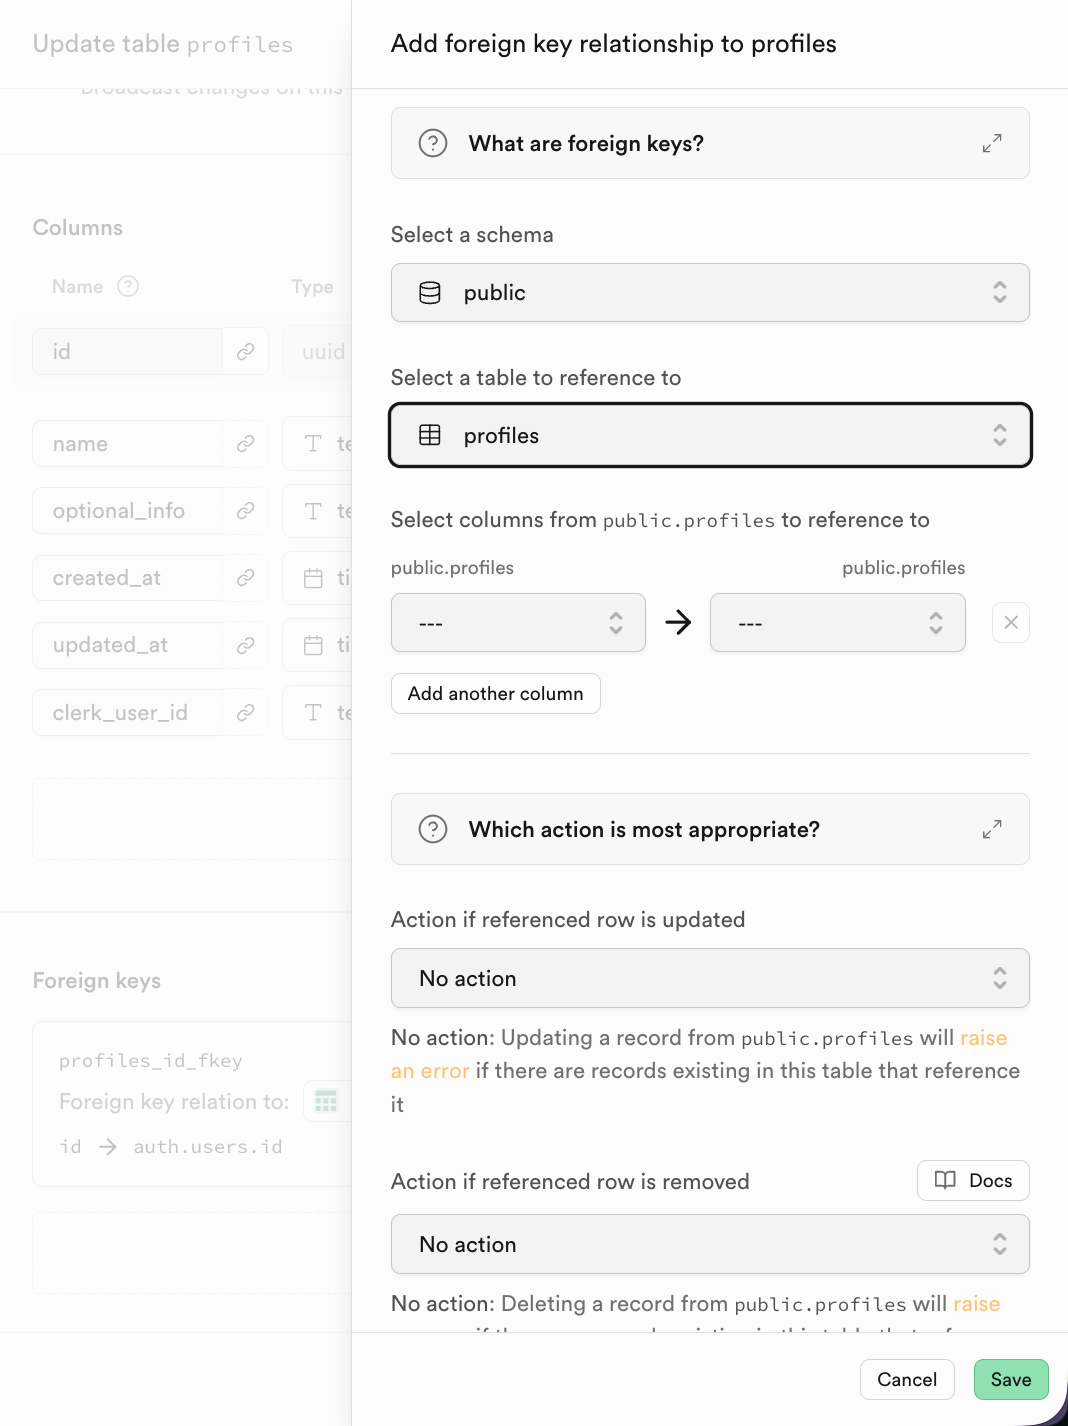
Relational DBs rely on table relationships. Configure relations in Foreign keys.
Example (student table referencing class table):
CREATE TABLE students (
    student_id INT PRIMARY KEY,
    student_name VARCHAR(50),
    class_id INT,
    FOREIGN KEY (class_id) REFERENCES classes(class_id)
);
Visualized example:
Classes table:
| class_id | class_name |
|---|---|
| 101 | Grade 1 Class 1 |
| 102 | Grade 1 Class 2 |
Students table:
| student_id | student_name | class_id |
|---|---|---|
| 2024001 | Zhang San | 101 |
| 2024002 | Li Si | 102 |
| 2024003 | Wang Wu | 101 |
In Supabase, after adding a foreign key, choose referenced table and column directly.
2.3 SQL Editor 简介与数据库基本操作
Now we run a series of SQL scripts and practice CRUD step by step.
All sample SQL files are available here:
https://github.com/THU-SIGS-AIID/Project5-Supabase-Demos/tree/main/apps/sql-examples
2.3.1 CREATE - 创建表结构
CREATE TABLE defines schema, columns, data types, and constraints.
-- Step 1: Create the 'orders' table
-- This file is fully independent and creates a sample table for later steps.
CREATE TABLE IF NOT EXISTS orders (
id serial PRIMARY KEY,
user_id int NOT NULL, -- User ID
status text NOT NULL, -- Order status (e.g. paid, pending)
amount numeric(10, 2) NOT NULL, -- Order total amount
details jsonb, -- Item and extra details as JSON
placed_at timestamptz DEFAULT now(), -- Order creation time
is_paid boolean DEFAULT false -- Paid flag
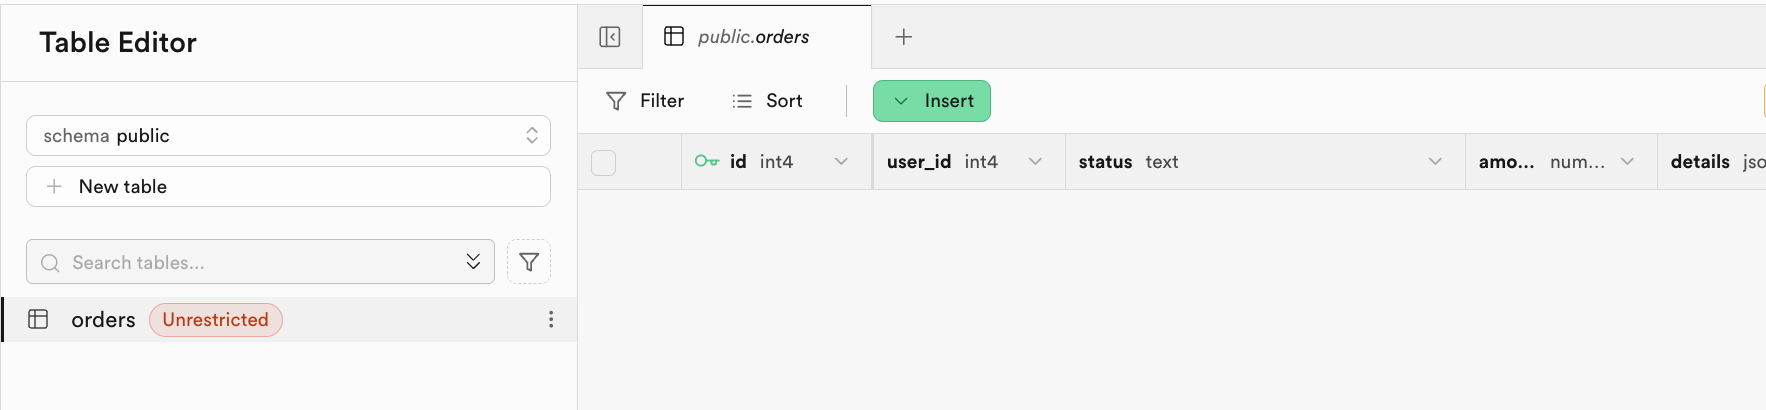
);After execution, check Table Editor:
2.3.2 INSERT - 填充初始数据
After creating the table structure, the next step is to use INSERT INTO to add data rows into the table.
-- Step 2: Insert initial rows into the orders table
-- Provides realistic, varied data for demo/testing. All values are self-contained.
INSERT INTO orders (user_id, status, amount, details, placed_at, is_paid) VALUES
(2001, 'pending', 23.50, '{"items":[{"sku":"BGR001","name":"Beef Burger","qty":1,"price":12.00}]}', now() - interval '2 days', false),
(2002, 'paid', 50.00, '{"items":[{"sku":"BGR002","name":"Chicken Burger","qty":2,"price":10.00},{"sku":"DRK001","name":"Lemonade","qty":2,"price":5.00}]}', now() - interval '1 day', true),
(2003, 'cancelled', 15.00, '{"items":[{"sku":"FRY001","name":"French Fries","qty":3,"price":5.00}], "reason":"Not available"}', now() - interval '45 days', false),
(2004, 'paid', 22.98, '{"items":[{"sku":"BGR003","name":"Veggie Burger","qty":2,"price":9.99}], "promo":"SUMMER22"}', now() - interval '10 days', true),
(2005, 'pending', 18.75, '{"items":[{"sku":"SAL001","name":"Salad","qty":1,"price":6.75},{"sku":"BGR001","name":"Beef Burger","qty":1,"price":12.00}]}', now() - interval '7 hours', false),
(2006, 'paid', 8.00, '{"items":[{"sku":"DRK002","name":"Cola","qty":2,"price":4.00}]}', now() - interval '3 hours', true),
(2007, 'refunded', 14.50, '{"items":[{"sku":"BGR003","name":"Veggie Burger","qty":1,"price":9.99},{"sku":"FRY001","name":"French Fries","qty":1,"price":4.51}], "refund_reason":"Late delivery"}', now() - interval '15 days', false),
(2008, 'paid', 26.99, '{"items":[{"sku":"BGR002","name":"Chicken Burger","qty":2,"price":10.00},{"sku":"DRK001","name":"Lemonade","qty":1,"price":6.99}]}', now() - interval '12 days', true),
(2009, 'pending', 9.99, '{"items":[{"sku":"BGR003","name":"Veggie Burger","qty":1,"price":9.99}]}', now() - interval '30 minutes', false),
(2010, 'paid', 19.89, '{"items":[{"sku":"BGR001","name":"Beef Burger","qty":1,"price":12.00},{"sku":"DRK002","name":"Cola","qty":2,"price":3.95}]}', now() - interval '5 days', true),
(2011, 'cancelled', 0.00, '{"items":[], "reason":"User cancelled"}', now() - interval '2 days', false);
-- Expected Output:
-- After running this script, SELECT * FROM orders will show about 11 rows with varied user_id, status, amount, details (JSON), placed_at, and is_paid fields.
-- For example:
-- | id | user_id | status | amount | is_paid | placed_at |
-- |----|---------|-----------|--------|---------|---------------------|
-- | 1 | 2001 | pending | 23.50 | false | 2025-10-28 13:40:00Z|
-- | 2 | 2002 | paid | 50.00 | true | ... |
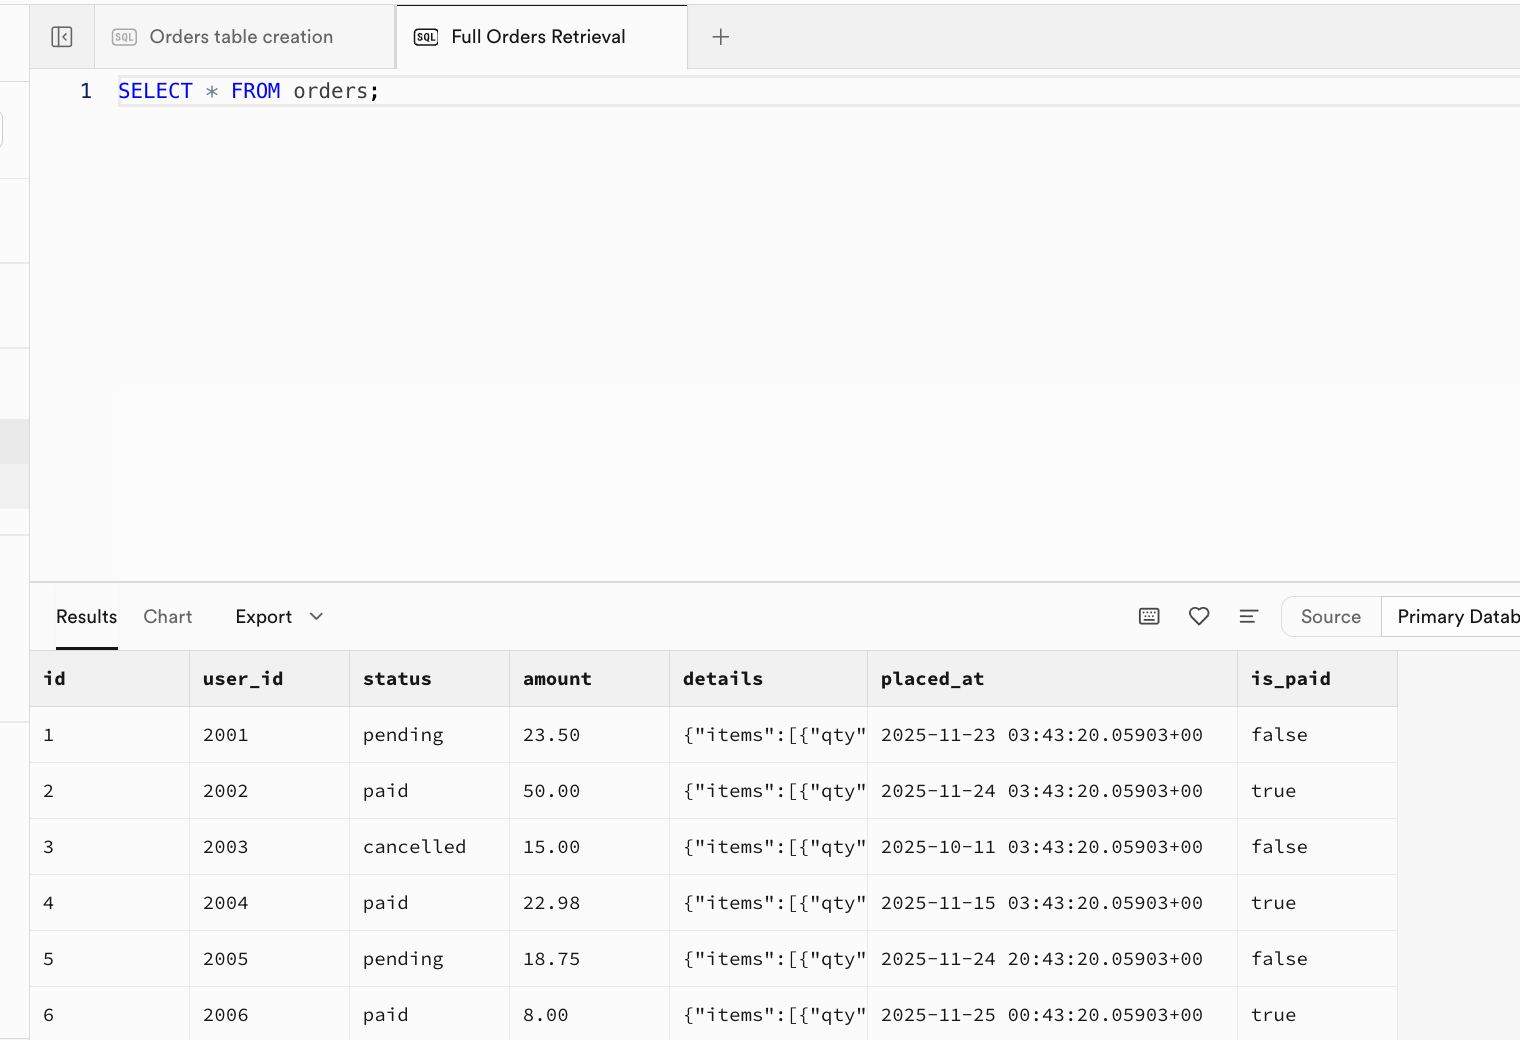
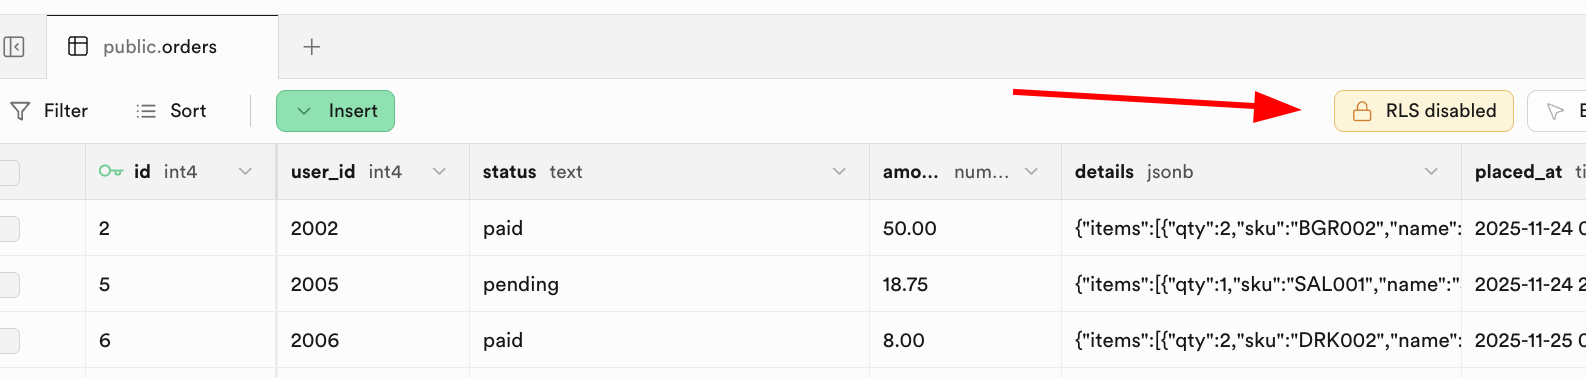
-- |... | ... | ... | ... | ... | ... |After the script executes successfully, initial data is now inserted into the table. You can refresh Table Editor to see the result, or open a new SQL Editor tab and run SELECT * FROM orders; to view it directly:
2.3.3 SELECT - 读取与查询数据
SELECT is used to query, filter, and format data:
-- Example 1: Select all fields for all orders
SELECT * FROM orders;

-- Example 2: Select only pending orders
SELECT id, user_id, amount FROM orders WHERE status = 'pending';

-- Example 3: Select paid orders
SELECT id, status, is_paid, amount FROM orders WHERE is_paid = true;

-- Example 4: Extract JSON item list
SELECT id, details -> 'items' AS item_list FROM orders;
Example 2 result:
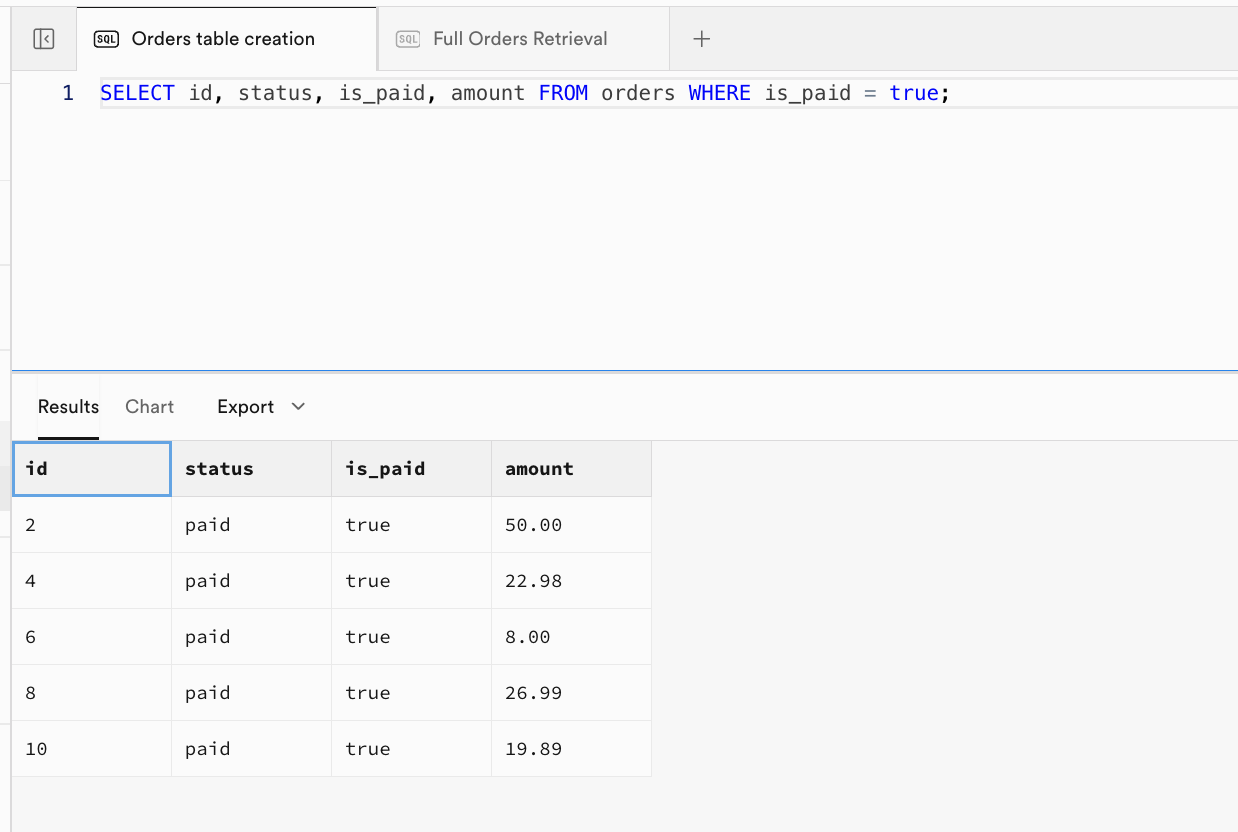
Example 3 (paid orders):
| id | status | is_paid | amount |
|---|---|---|---|
| 2 | paid | true | 50.00 |
| 4 | paid | true | 22.98 |
| 6 | paid | true | 8.00 |
| 8 | paid | true | 26.99 |
| 10 | paid | true | 19.89 |
Example 4 (JSON array extract):
| id | item_list |
|---|---|
| 1 | [{"qty":1,"sku":"BGR001","name":"Beef Burger","price":12}] |
| 2 | [{"qty":2,"sku":"BGR002","name":"Chicken Burger","price":10},{"qty":2,"sku":"DRK001","name":"Lemonade","price":5}] |
| 3 | [{"qty":3,"sku":"FRY001","name":"French Fries","price":5}] |
| ... | ... |
2.3.4 INSERT - 插入单条记录
In 2.3.2, we demonstrated batch initialization inserts at the beginning. Now let's see how to insert a single new row.
-- Step 4: INSERT a new order (single row)
-- Example: Add a new paid order for user 2012 with one Chicken Burger
INSERT INTO orders (user_id, status, amount, details, is_paid)
VALUES (
  2012, 'paid', 9.99,
  '{"items":[{"sku":"BGR002","name":"AIID Burger","qty":100,"price":1000}]}',
  true
);
-- Expected Output:
-- Before (table fragment):
-- | id | user_id | status | amount | is_paid |
-- | ...|   ...   |  ...   |  ...   |  ...    |
--
-- After (last row):
-- | id | user_id | status | amount | is_paid |
-- | xx |  2012   |  paid  |  9.99  |  true   |
-- (where xx = next serial value)
Now run SELECT * FROM orders; again. You will see the orders table increase successfully from 11 rows to 12 rows.
2.3.5 UPDATE - 修改现有数据
In practical work, we frequently update table data. We can use UPDATE to modify existing records in a table.
-- Step 5: UPDATE example
-- Example: Mark order with id=1 as paid and update its status
UPDATE orders SET status = 'paid', is_paid = true WHERE id = 1;
-- Expected Output:
-- Before (row with id=1):
-- | id | status  | is_paid |
-- | 1  | pending |  false  |
-- After (row with id=1):
-- | id | status | is_paid |
-- | 1  | paid   |  true   |
-- All other rows remain unchanged.
2.3.6 DELETE - 删除数据
DELETE can be used to remove records from a table, and with conditions, it can target only a specific subset of data.
-- Step 6: DELETE example
-- Example: Delete orders older than 2 days to clean up old data
DELETE FROM orders WHERE placed_at < now() - interval '2 days';
-- Expected Output:
-- Before (filtered for affected rows):
-- | id | status    | placed_at           |
-- |  3 | shipped   | 2025-10-13 ...     |  <-- will be deleted
--
-- After:
-- No such rows remain. SELECT * FROM orders WHERE placed_at < now()-interval '2 days' yields zero rows.
-- Other rows in orders table are unaffected.
Before executing, you can run SELECT id, status, placed_at FROM orders WHERE placed_at < now() - interval '2 days'; to inspect the rows matching the condition. After running DELETE, execute the same query again: SELECT id, status, placed_at FROM orders WHERE placed_at < now() - interval '2 days';. It should return an empty result, which means those rows were deleted successfully.
2.4 RLS (Row level security)
After basic CRUD, we need one key security concept: RLS (Row Level Security).
RLS solves data isolation:
- user A should see only user A's rows
- user B should not access user A's private rows
For example, in orders, define policy: users can read only rows whose user_id matches current authenticated user.
Once RLS is enabled, every SELECT/INSERT/UPDATE/DELETE request must pass at least one matching policy, or the DB will reject it.
Supabase provides auth.uid() to reference the current authenticated user id, making policy writing straightforward.
You can configure policies in the Supabase RLS UI:
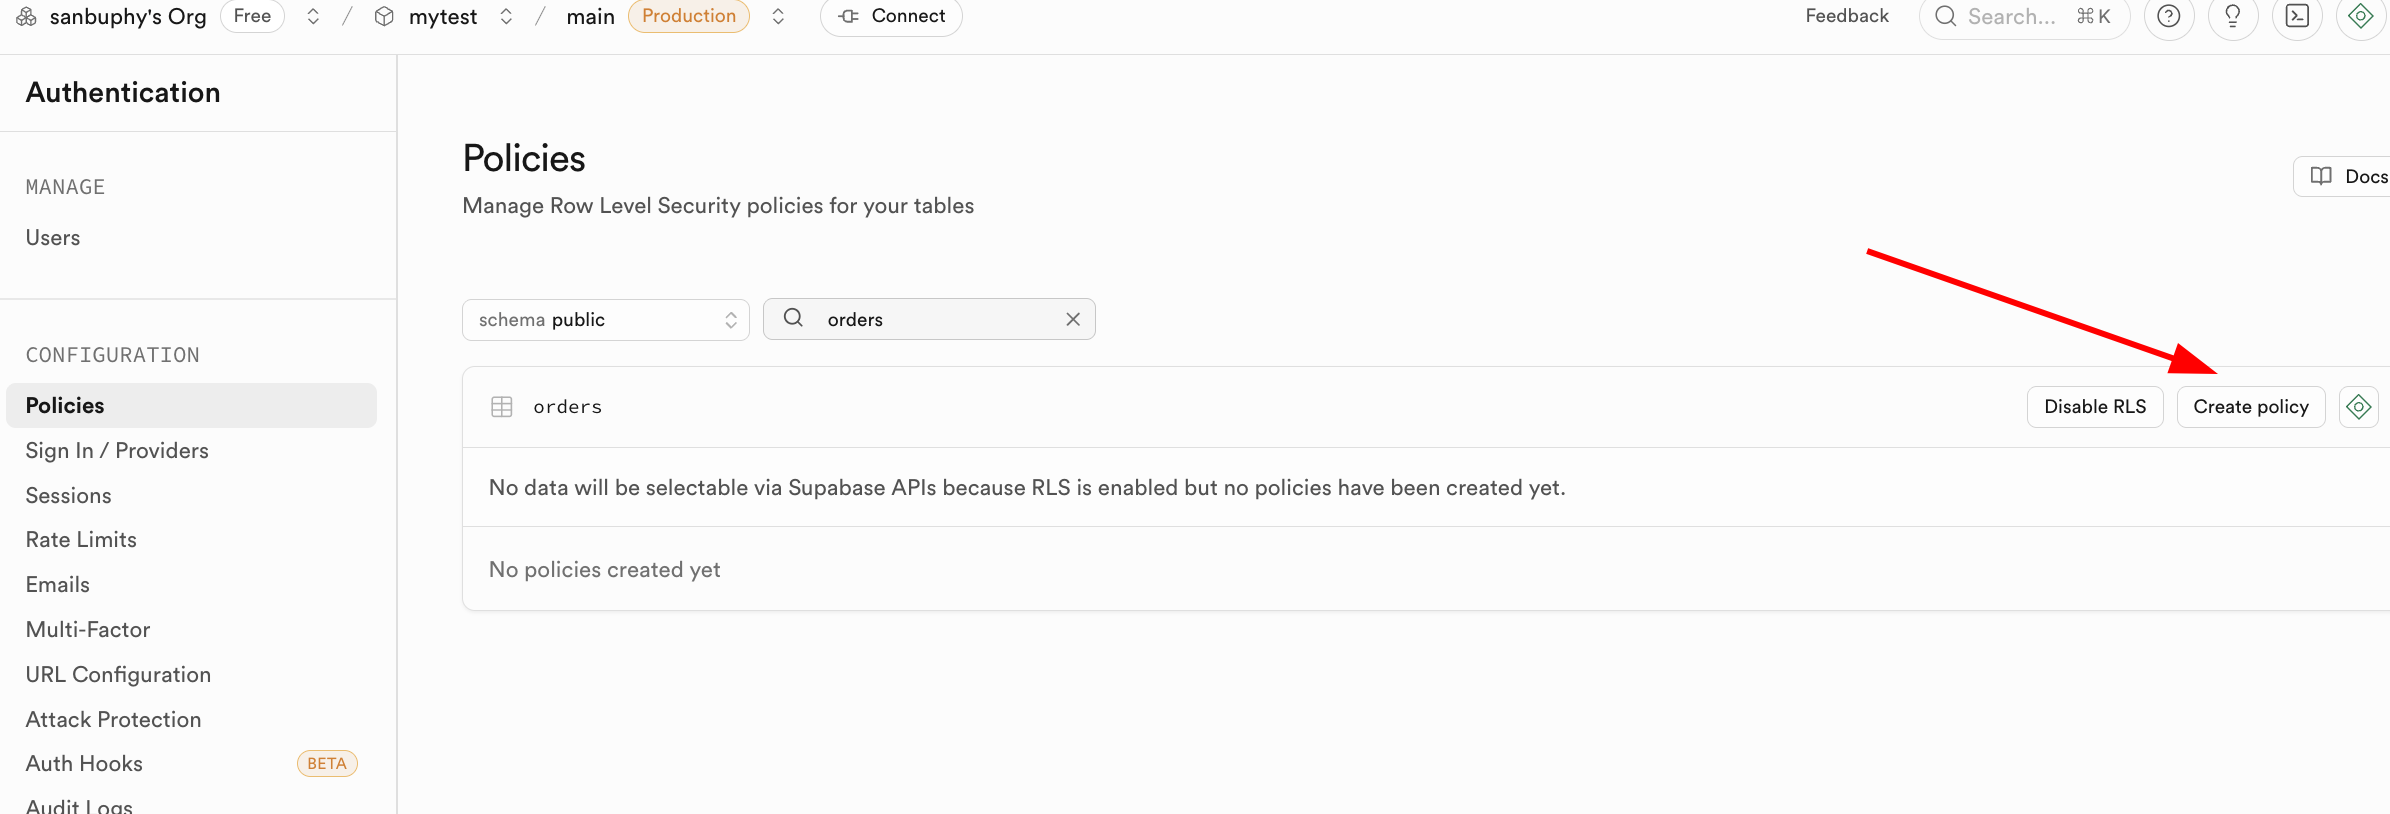
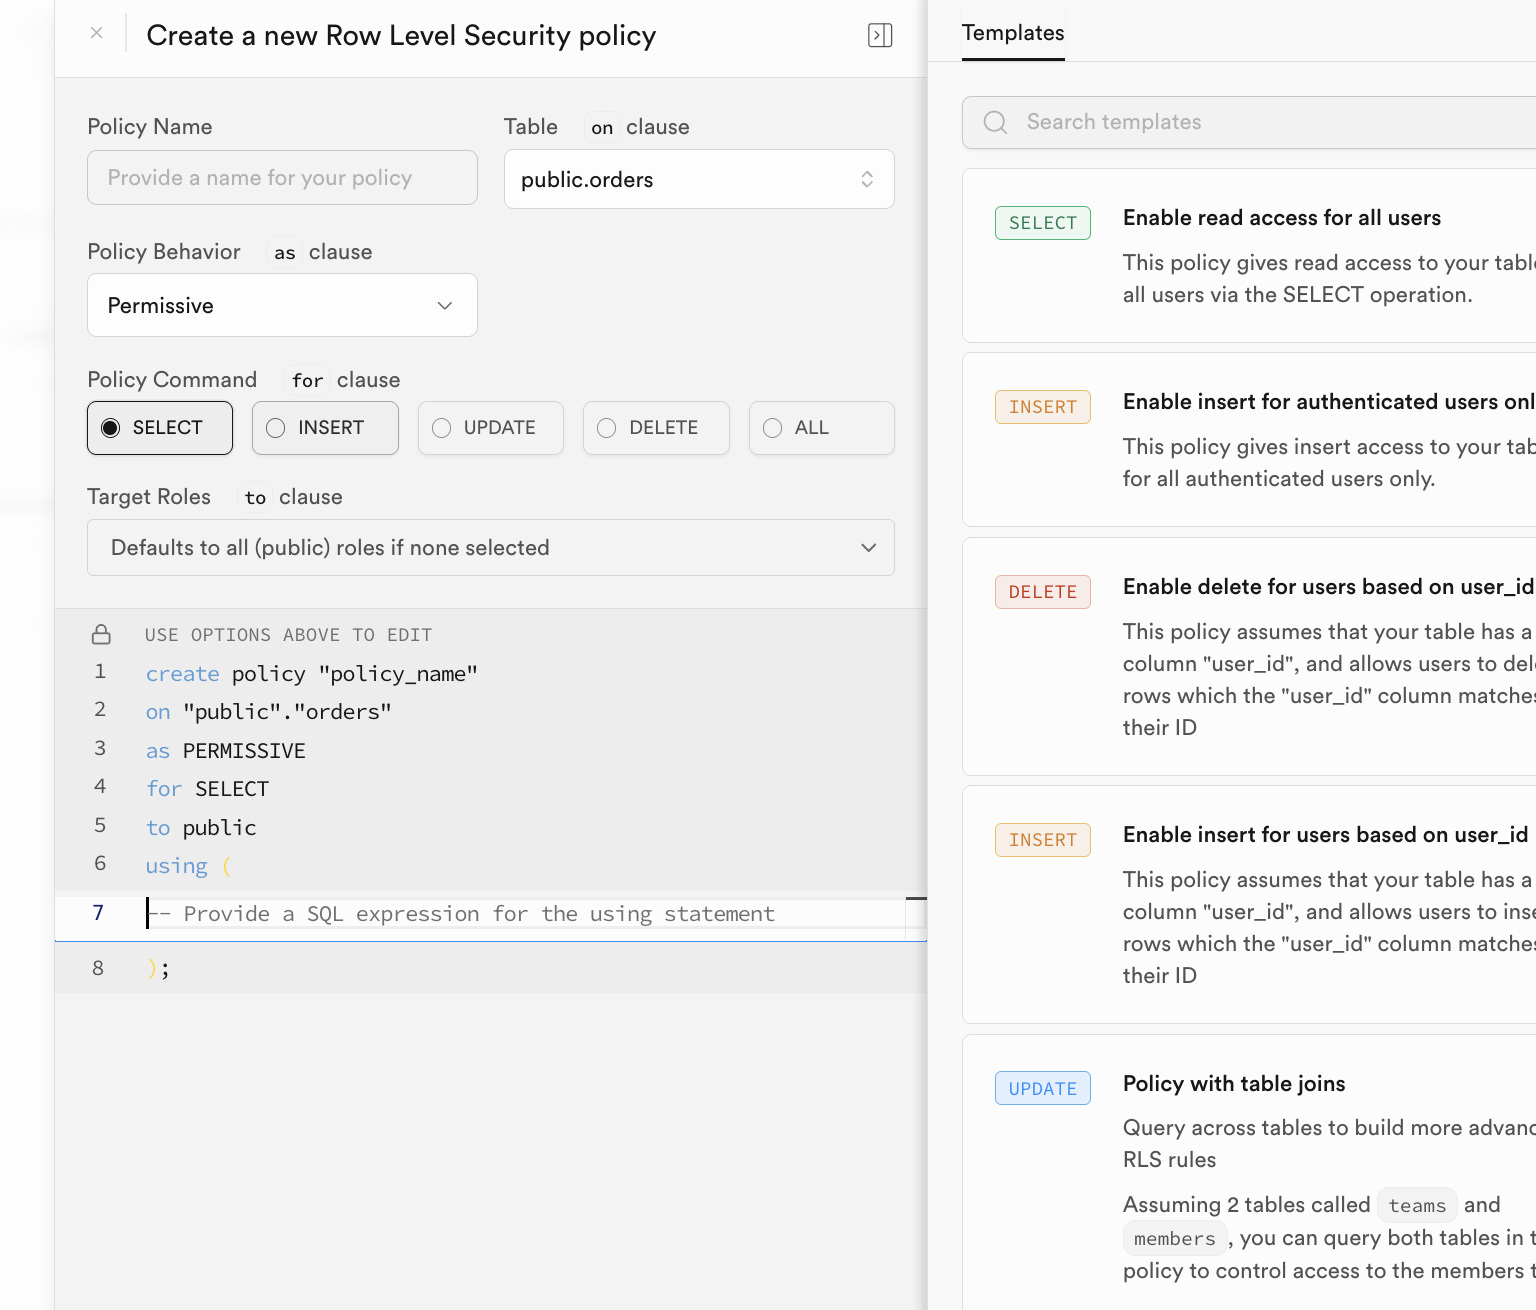
In practice, policies are often created in initialization SQL:
3. The First SQL Application
Now we move to practical project exercises. We use a burger-shop scenario to practice Supabase end to end: DB initialization, app connection, auth, and RLS behavior.
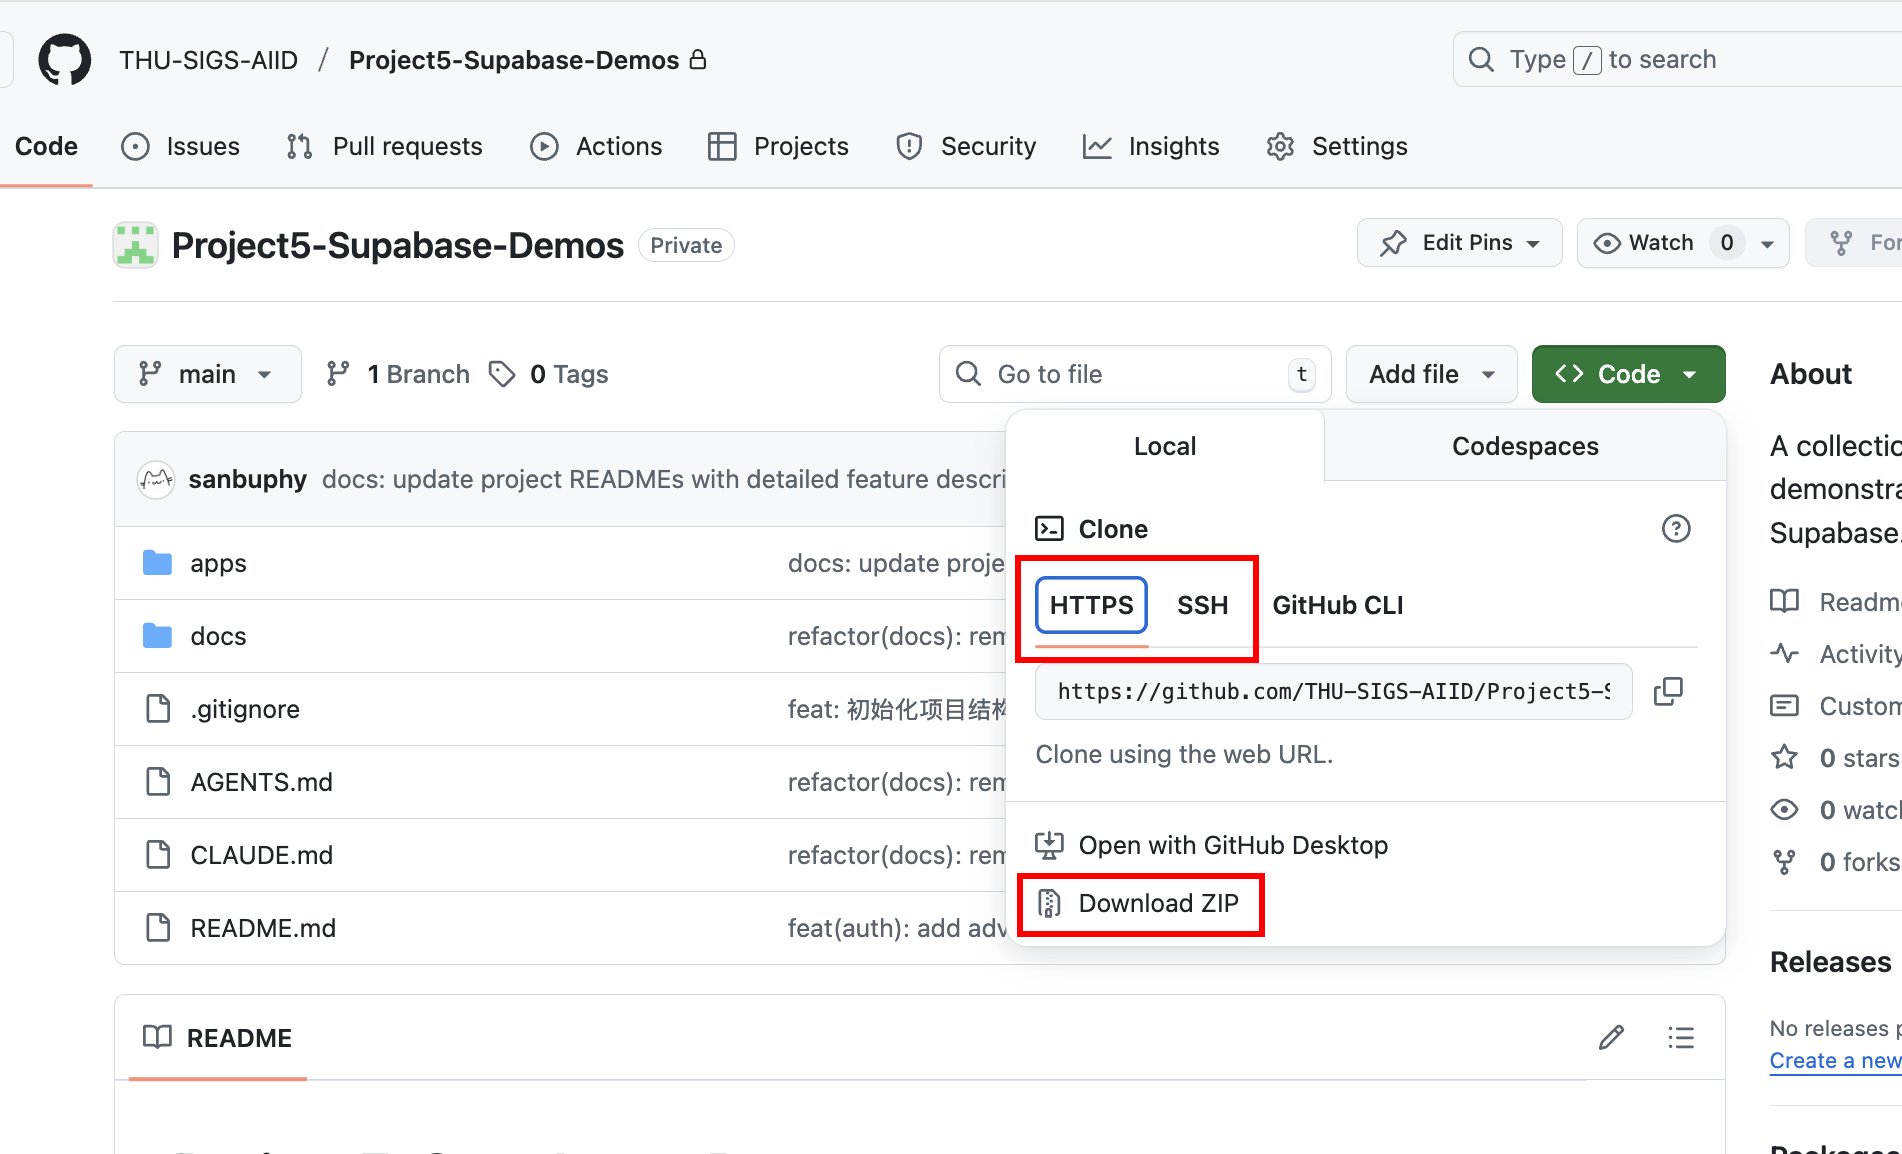
3.1 Clone and Run Supabase Demos
Clone the demo repository:
https://github.com/THU-SIGS-AIID/Project5-Supabase-Demos
If you already configured SSH keys, prefer SSH clone:
git@github.com:THU-SIGS-AIID/Project5-Supabase-Demos.git
If network/SSH has issues, use Download ZIP.
After cloning, ask Trae or Claude Code to run a target project directory directly.
3.2 Project1 - burger-shop-menu-crud
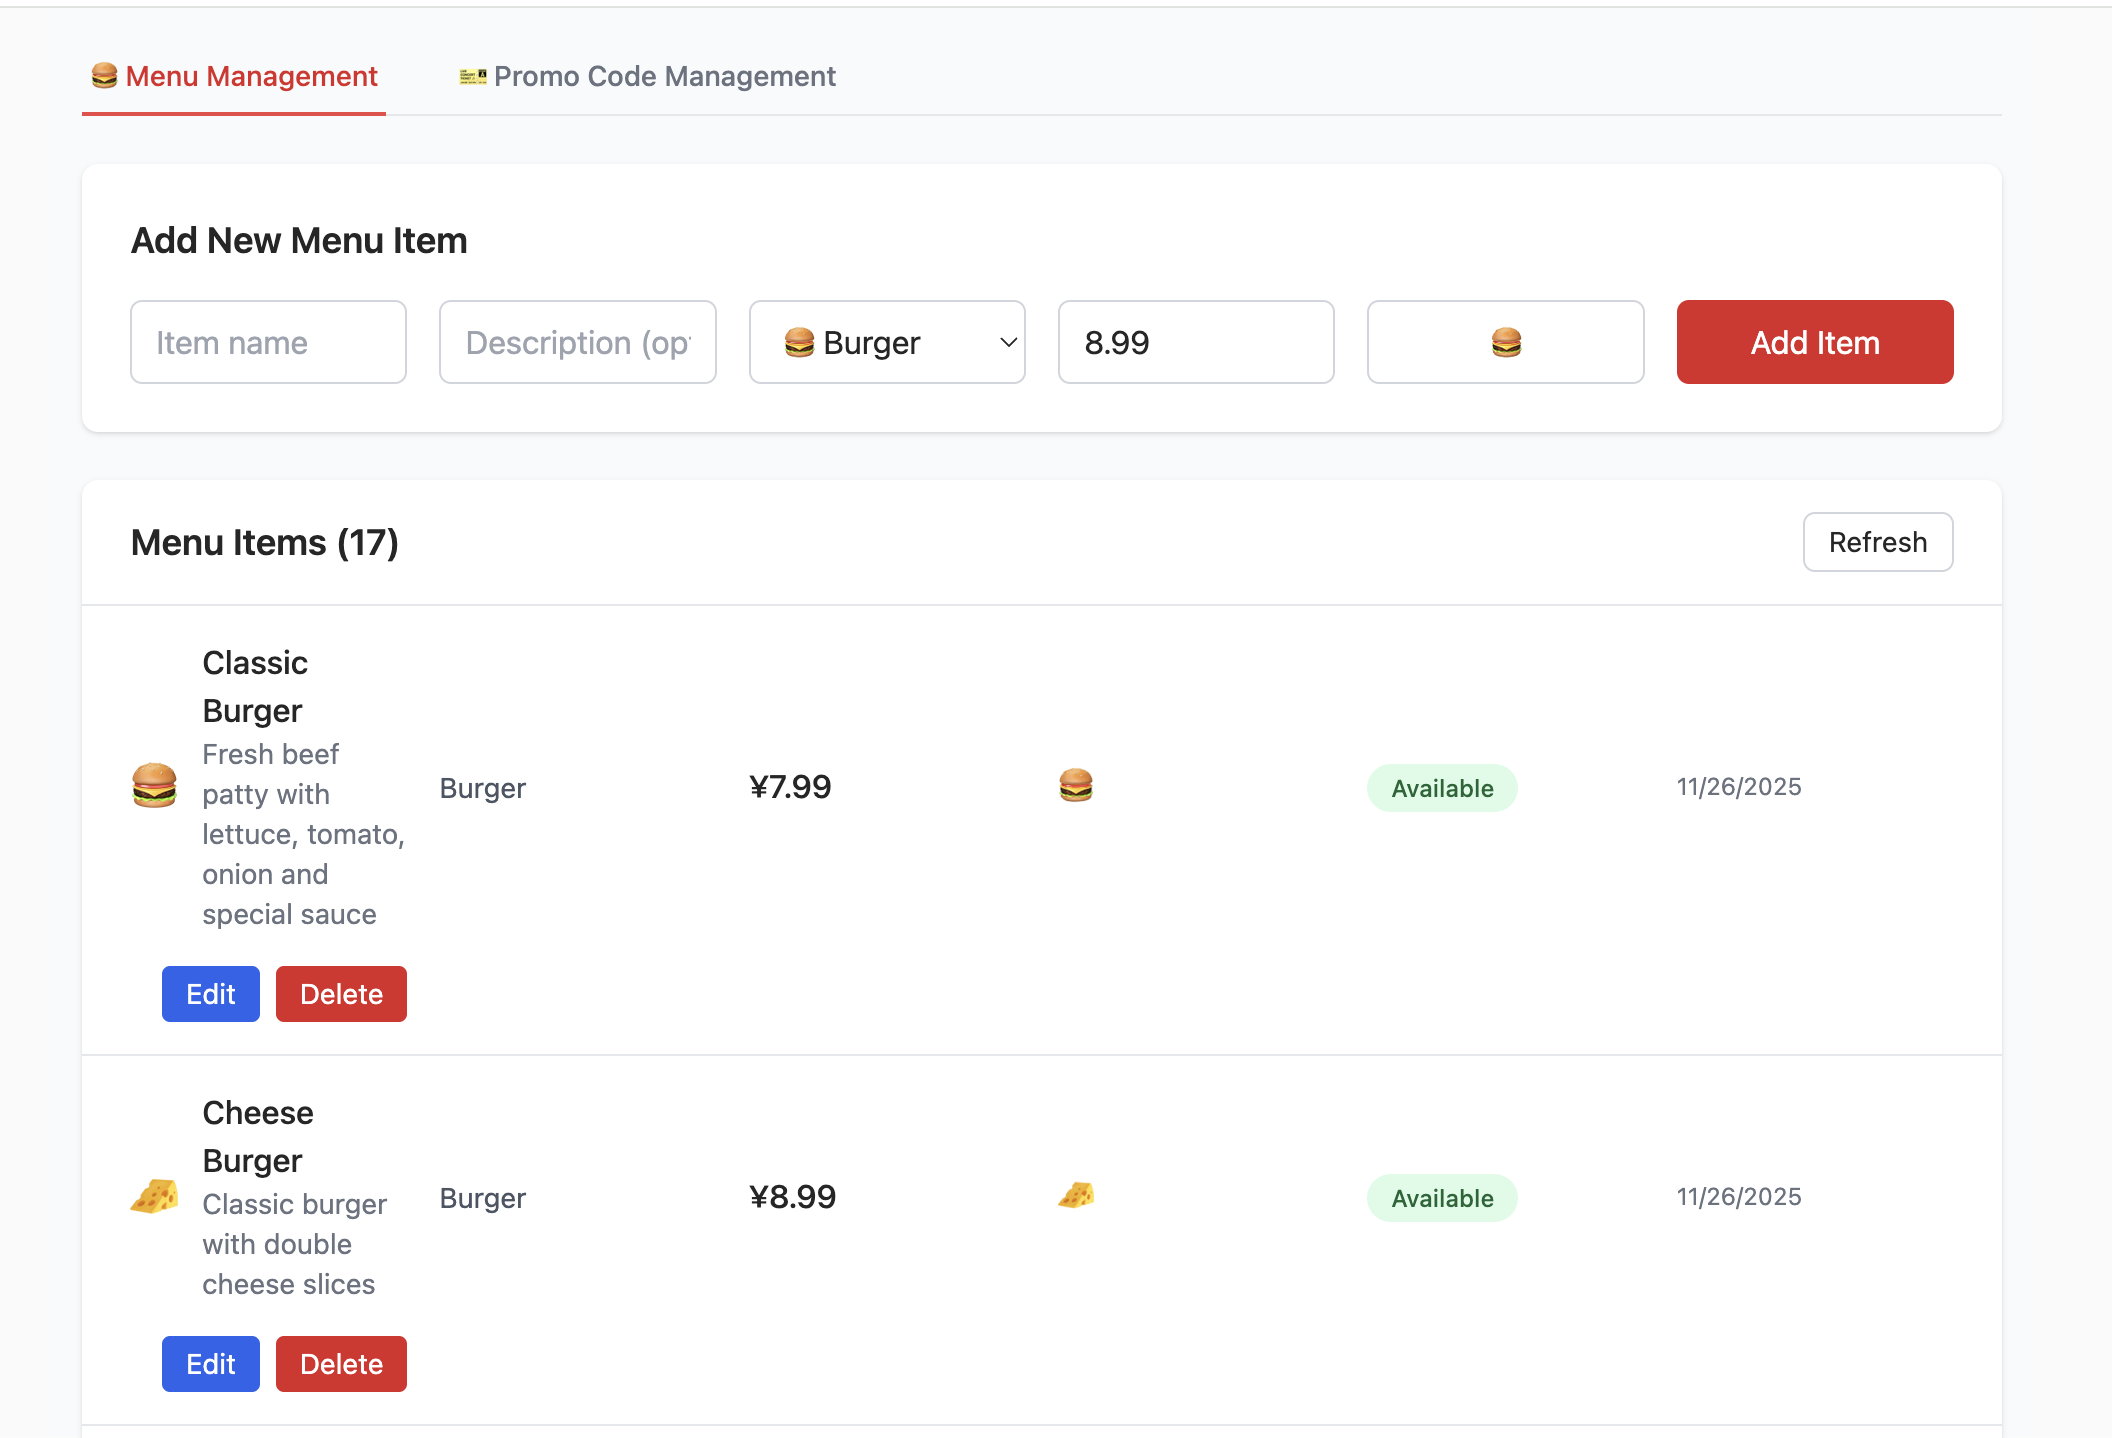
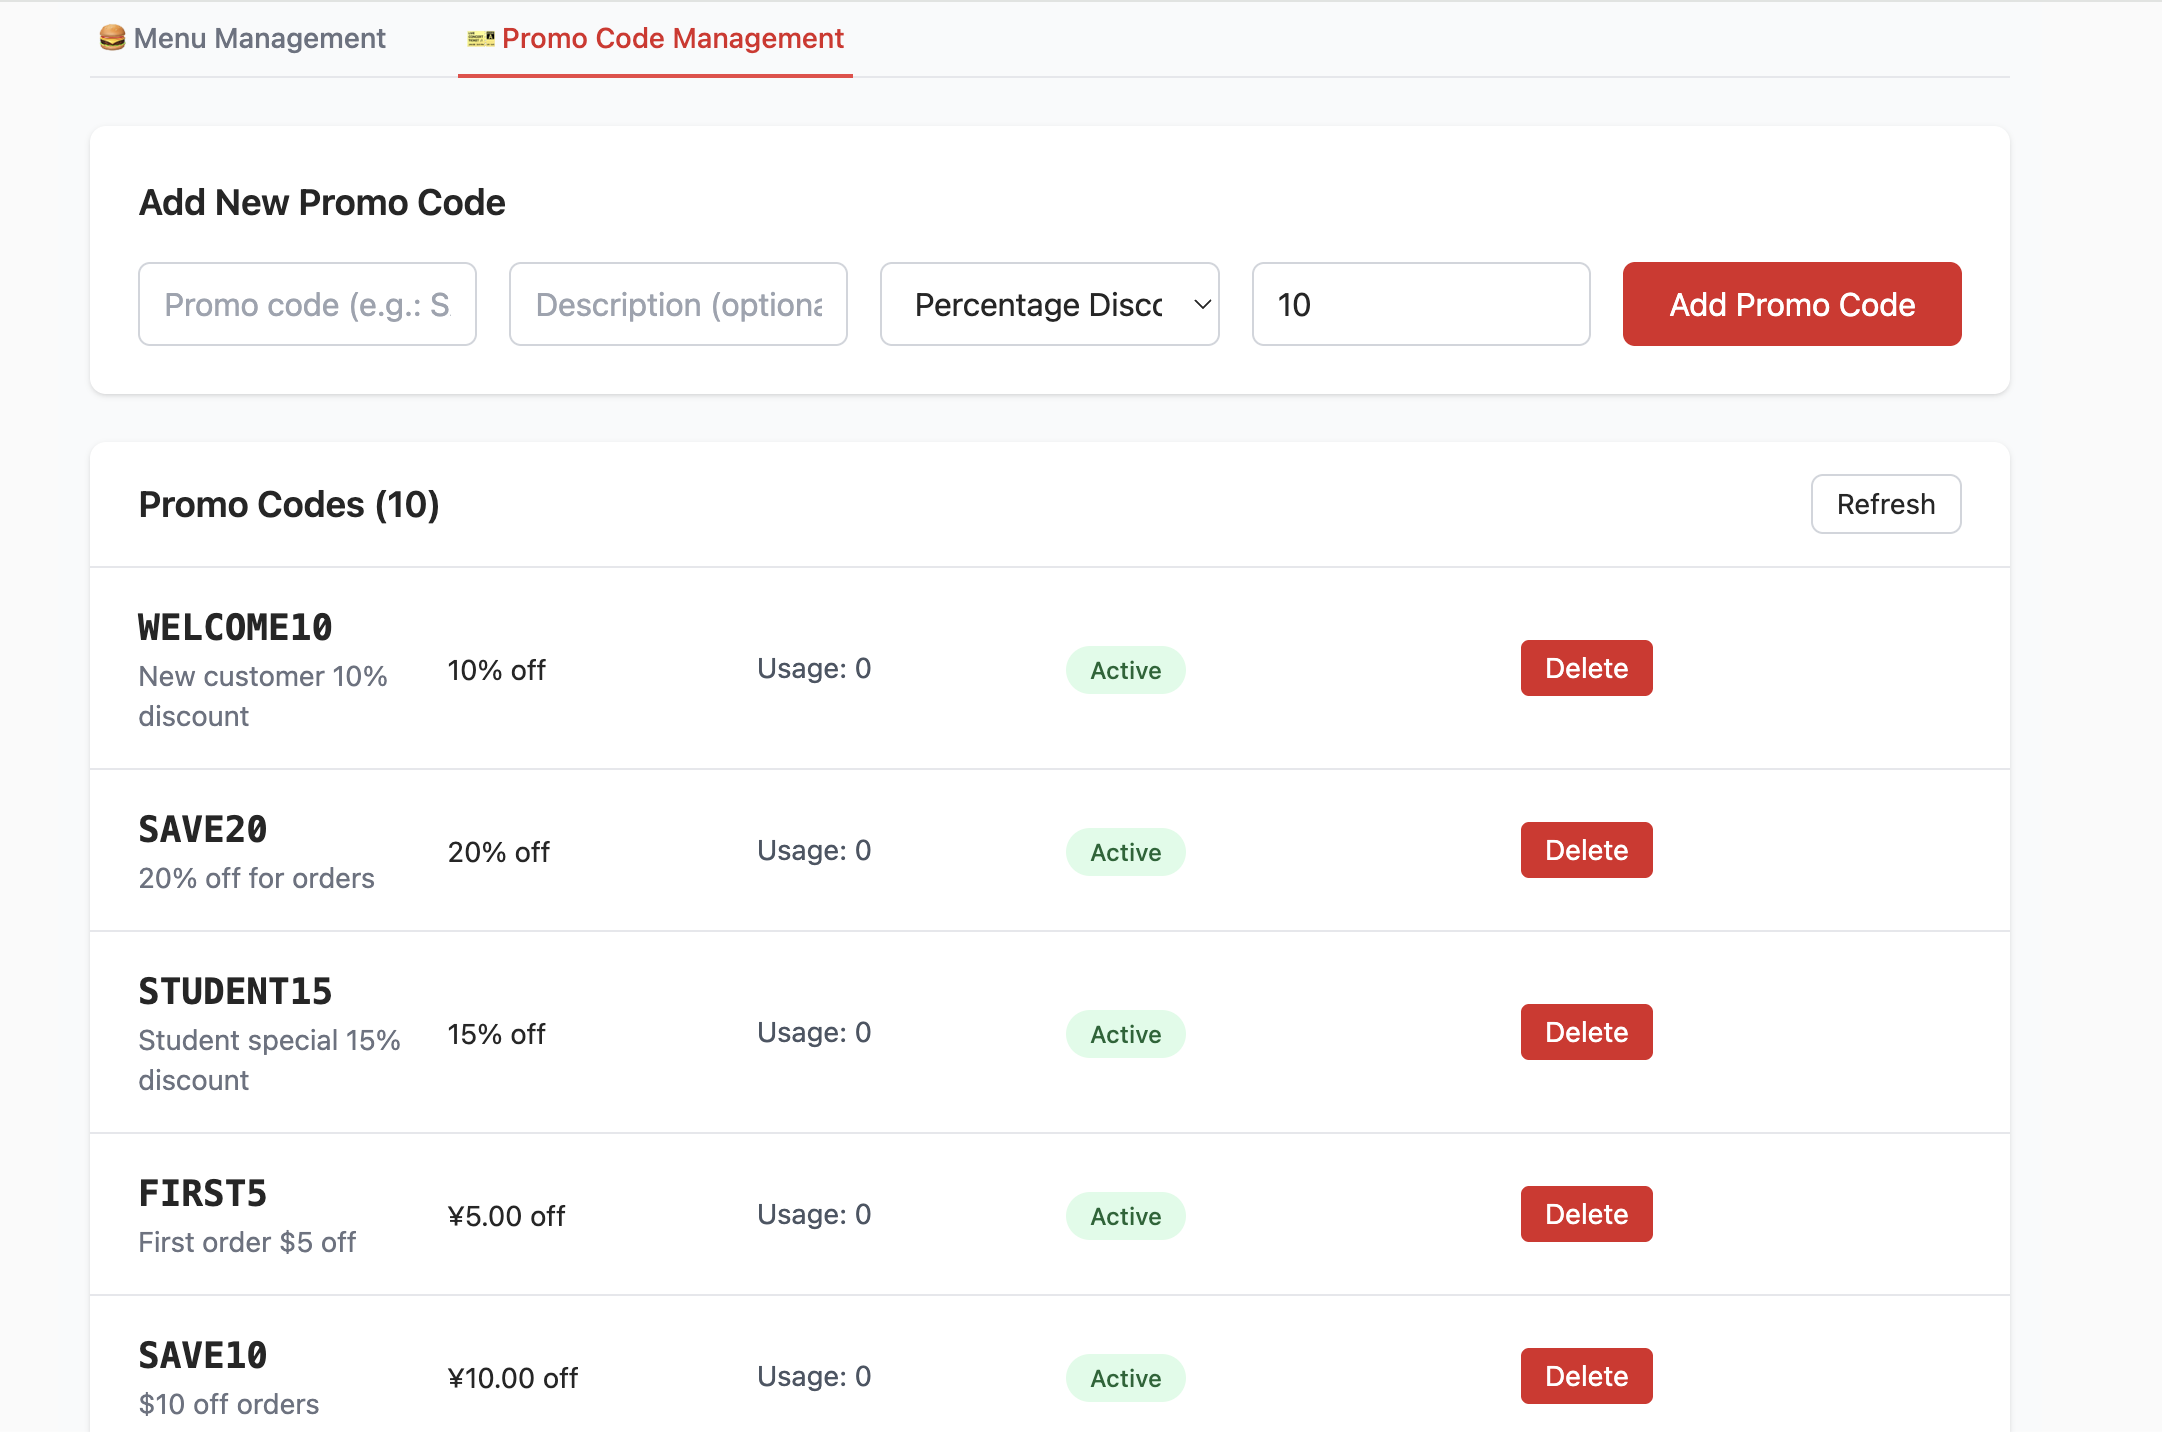
In project-burger-shop-menu-crud-1, we initialize Supabase with SQL scripts and connect frontend reads/writes to Supabase.
Create a Database Using Scripts
First, we need to create the required tables in Supabase. In the Project1 directory, there is a folder named scripts, which contains one database script file init.sql. It can automatically create all related database resources (including table schemas and initial data). We will frequently use this file later to initialize tables in the database.
......
-- ============================================================================
-- 2. Create Menu Items Table
-- ============================================================================
create table if not exists public.menu_items (
id uuid primary key default gen_random_uuid(),
name text not null,
description text,
category text check (category in ('burger','side','drink')) default 'burger',
price_cents int not null check (price_cents > 0),
available boolean default true,
emoji text,
created_at timestamptz not null default now(),
updated_at timestamptz not null default now()
);
-- Comments for documentation
comment on table public.menu_items is 'Burger shop menu items for CRUD demo';
comment on column public.menu_items.id is 'Unique identifier for each menu item';
comment on column public.menu_items.name is 'Display name of the menu item';
comment on column public.menu_items.description is 'Detailed description of the menu item';
comment on column public.menu_items.category is 'Category: burger, side, or drink';
comment on column public.menu_items.price_cents is 'Price in cents (integer) to avoid floating point issues';
comment on column public.menu_items.available is 'Whether the item is currently available for order';
comment on column public.menu_items.emoji is 'Optional emoji representation of the menu item';
comment on column public.menu_items.created_at is 'Timestamp when the item was created';
comment on column public.menu_items.updated_at is 'Timestamp when the item was last updated';
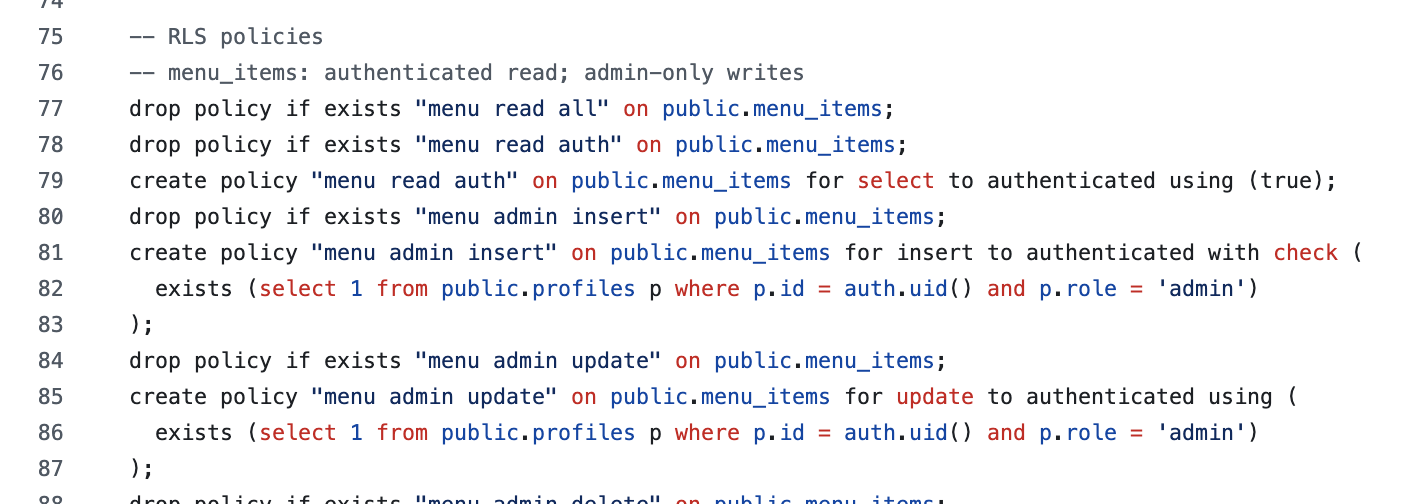
......After running the initialization SQL script in SQL Editor, you can see the created tables in Table Editor. The specific execution logic of the database initialization code is:
- Create the
menu_itemstable: - This table stores all items in the burger shop menu. It includes fields such as
name(product name),description,price_cents(price in cents to avoid floating-point precision issues),category, andavailable(whether it is currently sellable). This covers the information required by a menu item. - Create the
promo_codestable: - This table manages promotions such as discount codes. It defines fields like
code,discount_type(percentage or fixed amount), anddiscount_value. - Disable Row Level Security (RLS):
- For convenience during development and testing, RLS is explicitly disabled in the script. But based on the RLS core logic we learned earlier: RLS is a key security capability in Supabase, and can precisely control "who can access/modify which data" through policies (for example, only admins can edit promo codes while regular users can only view menus). Therefore, in production, you must enable RLS and configure proper policies to block unauthorized access at the data layer.
- Insert seed data:
- To let the frontend display realistic menu and promo data right after startup (without manual test-data entry), the
init.sqlscript also inserts seed data intomenu_itemsandpromo_codes. For example, you can see various burgers, sides, drinks, and multiple discount codes.
Set up the connection with database
Once the database is ready, we need to connect this frontend project with Supabase so it can read data normally. We need to place the Supabase project URL and anon key into the expected configuration. This project provides two flexible approaches:
- Configure via environment variables
Create a .env file in the project root and fill in your Supabase credentials:
NEXT_PUBLIC_SUPABASE_URL=https://your-project.supabase.co
NEXT_PUBLIC_SUPABASE_ANON_KEY=your-anon-key- Configure directly in the project page
To make quick demos and switching among different Supabase projects easier, the homepage provides a Settings button in the upper-right corner. You can click it and directly input or paste the Supabase URL and anon key in the popup modal.
After clicking "Save", this information is used to dynamically create a Supabase client instance, similar to the following code:
Client creation example:
import { createClient, type SupabaseClient } from '@supabase/supabase-js';

export function maybeCreateBrowserClient(): SupabaseClient | null {
  const url = process.env.NEXT_PUBLIC_SUPABASE_URL;
  const anon = process.env.NEXT_PUBLIC_SUPABASE_ANON_KEY;
  if (!url || !anon) return null;
  return createClient(url, anon);
}
After creating the database and filling the Supabase link configuration, you can see an interface like the following. You can try CRUD operations on products and observe corresponding table changes in Supabase.
📚 Assignment
- Try adding and deleting items, then inspect changes in Table Editor.
3.4 Project2 - burger-shop-auth-users
Project1 focuses on menu CRUD and DB connection. Project2 adds user authentication and RLS permission control.
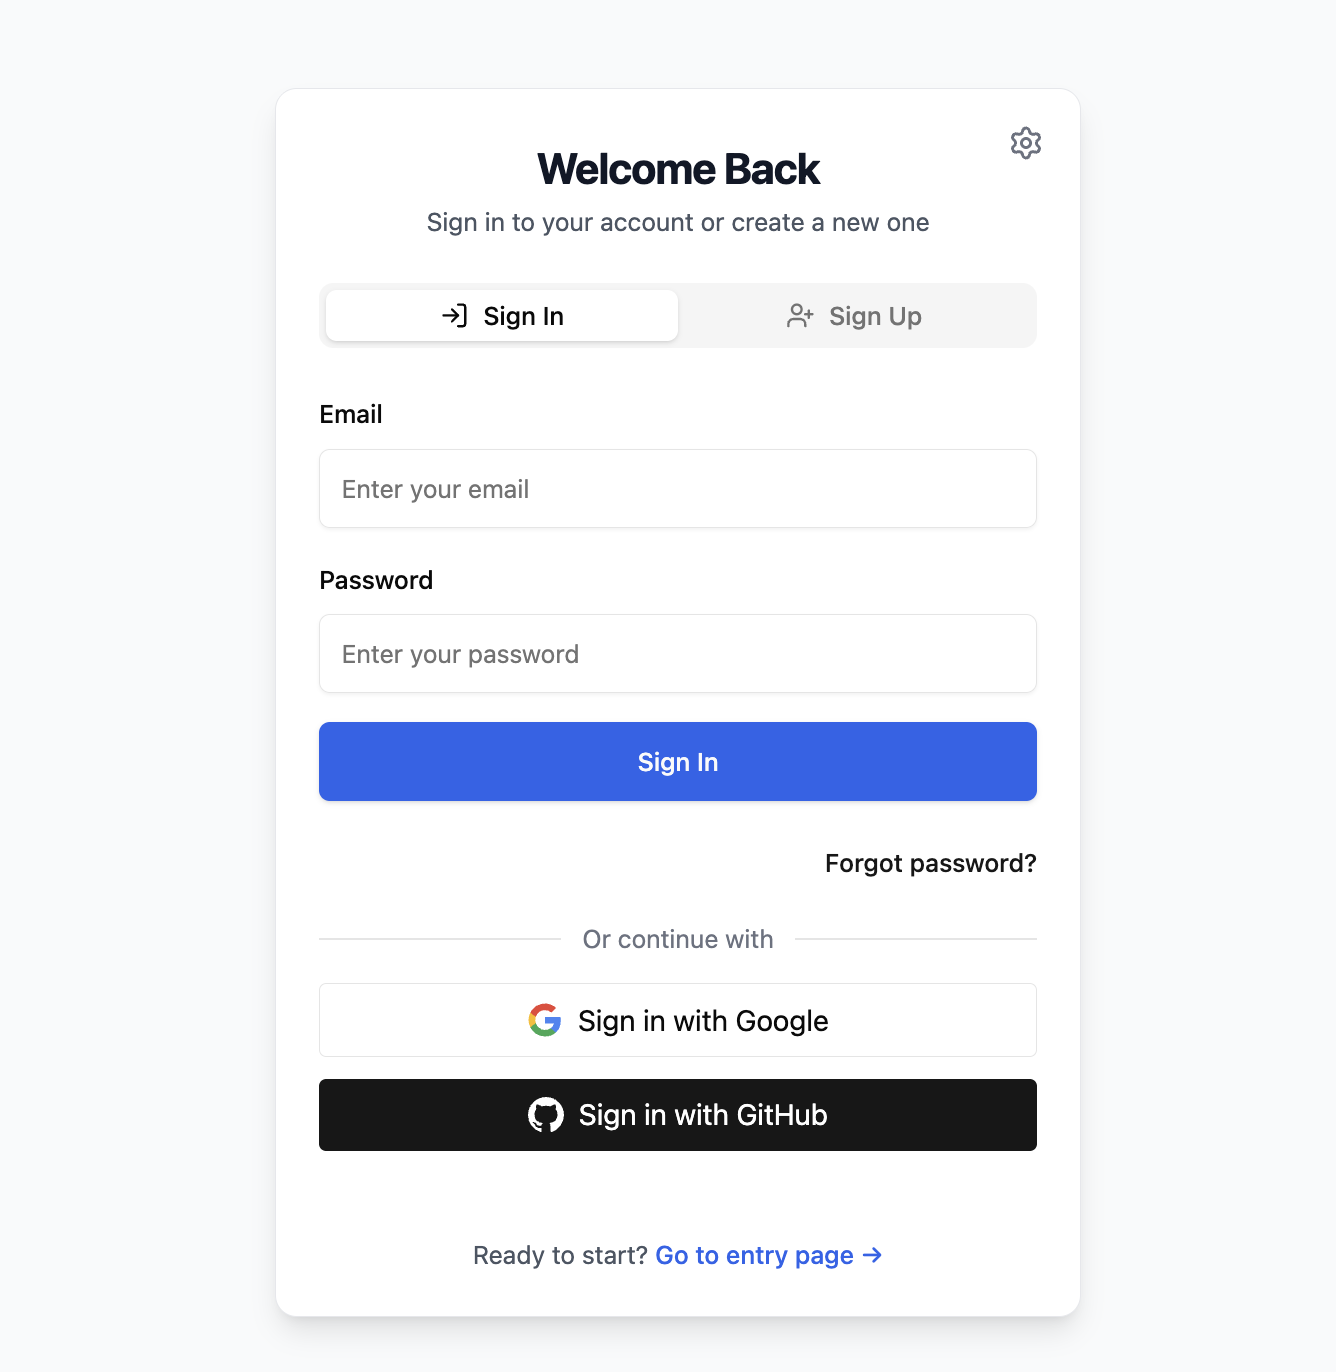
The login page supports email/password registration and sign-in via Supabase Auth native methods:
const { error: err } = await supabaseClient.auth.signUp({
  email,
  password,
  options: {
    data: {
      full_name: fullName || null,
      birthday: birthday || null,
      avatar_url: avatarUrl || null
    }
  }
});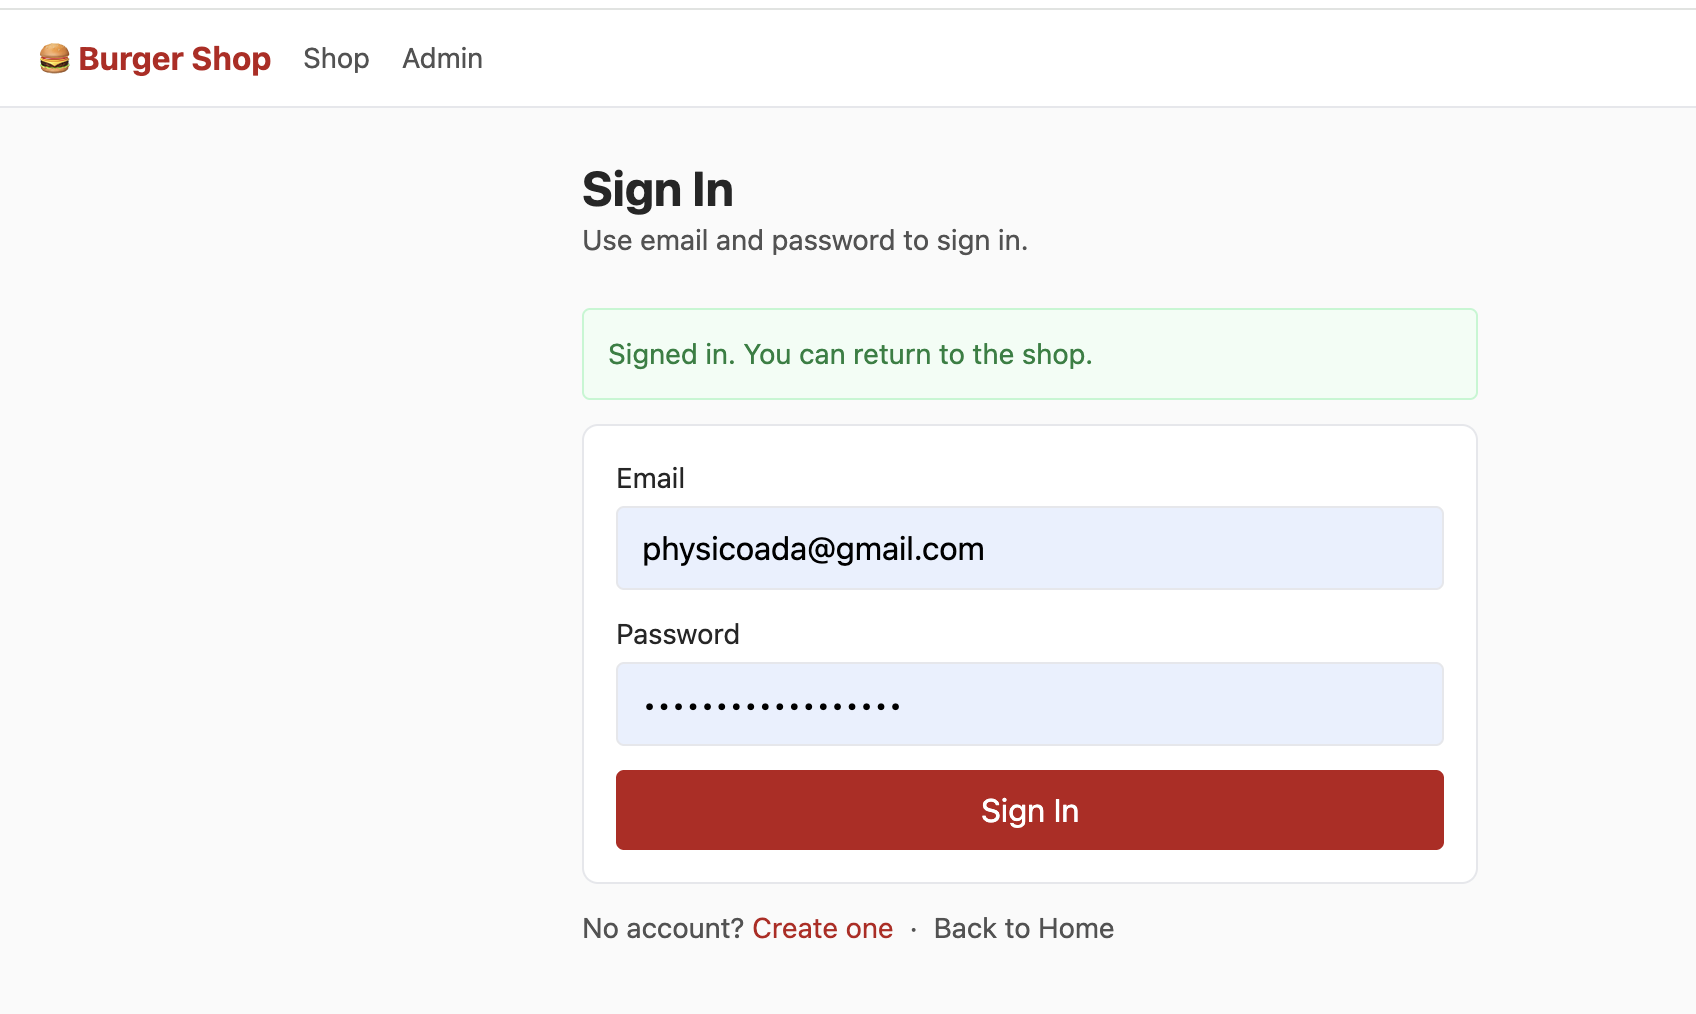
After login, Supabase creates session automatically. With RLS, each user only sees their own account data.
Initialize with init.sql first (if initialization fails, clean old tables or recreate the Supabase project).
After sign-up and email verification, you can enter shop UI:
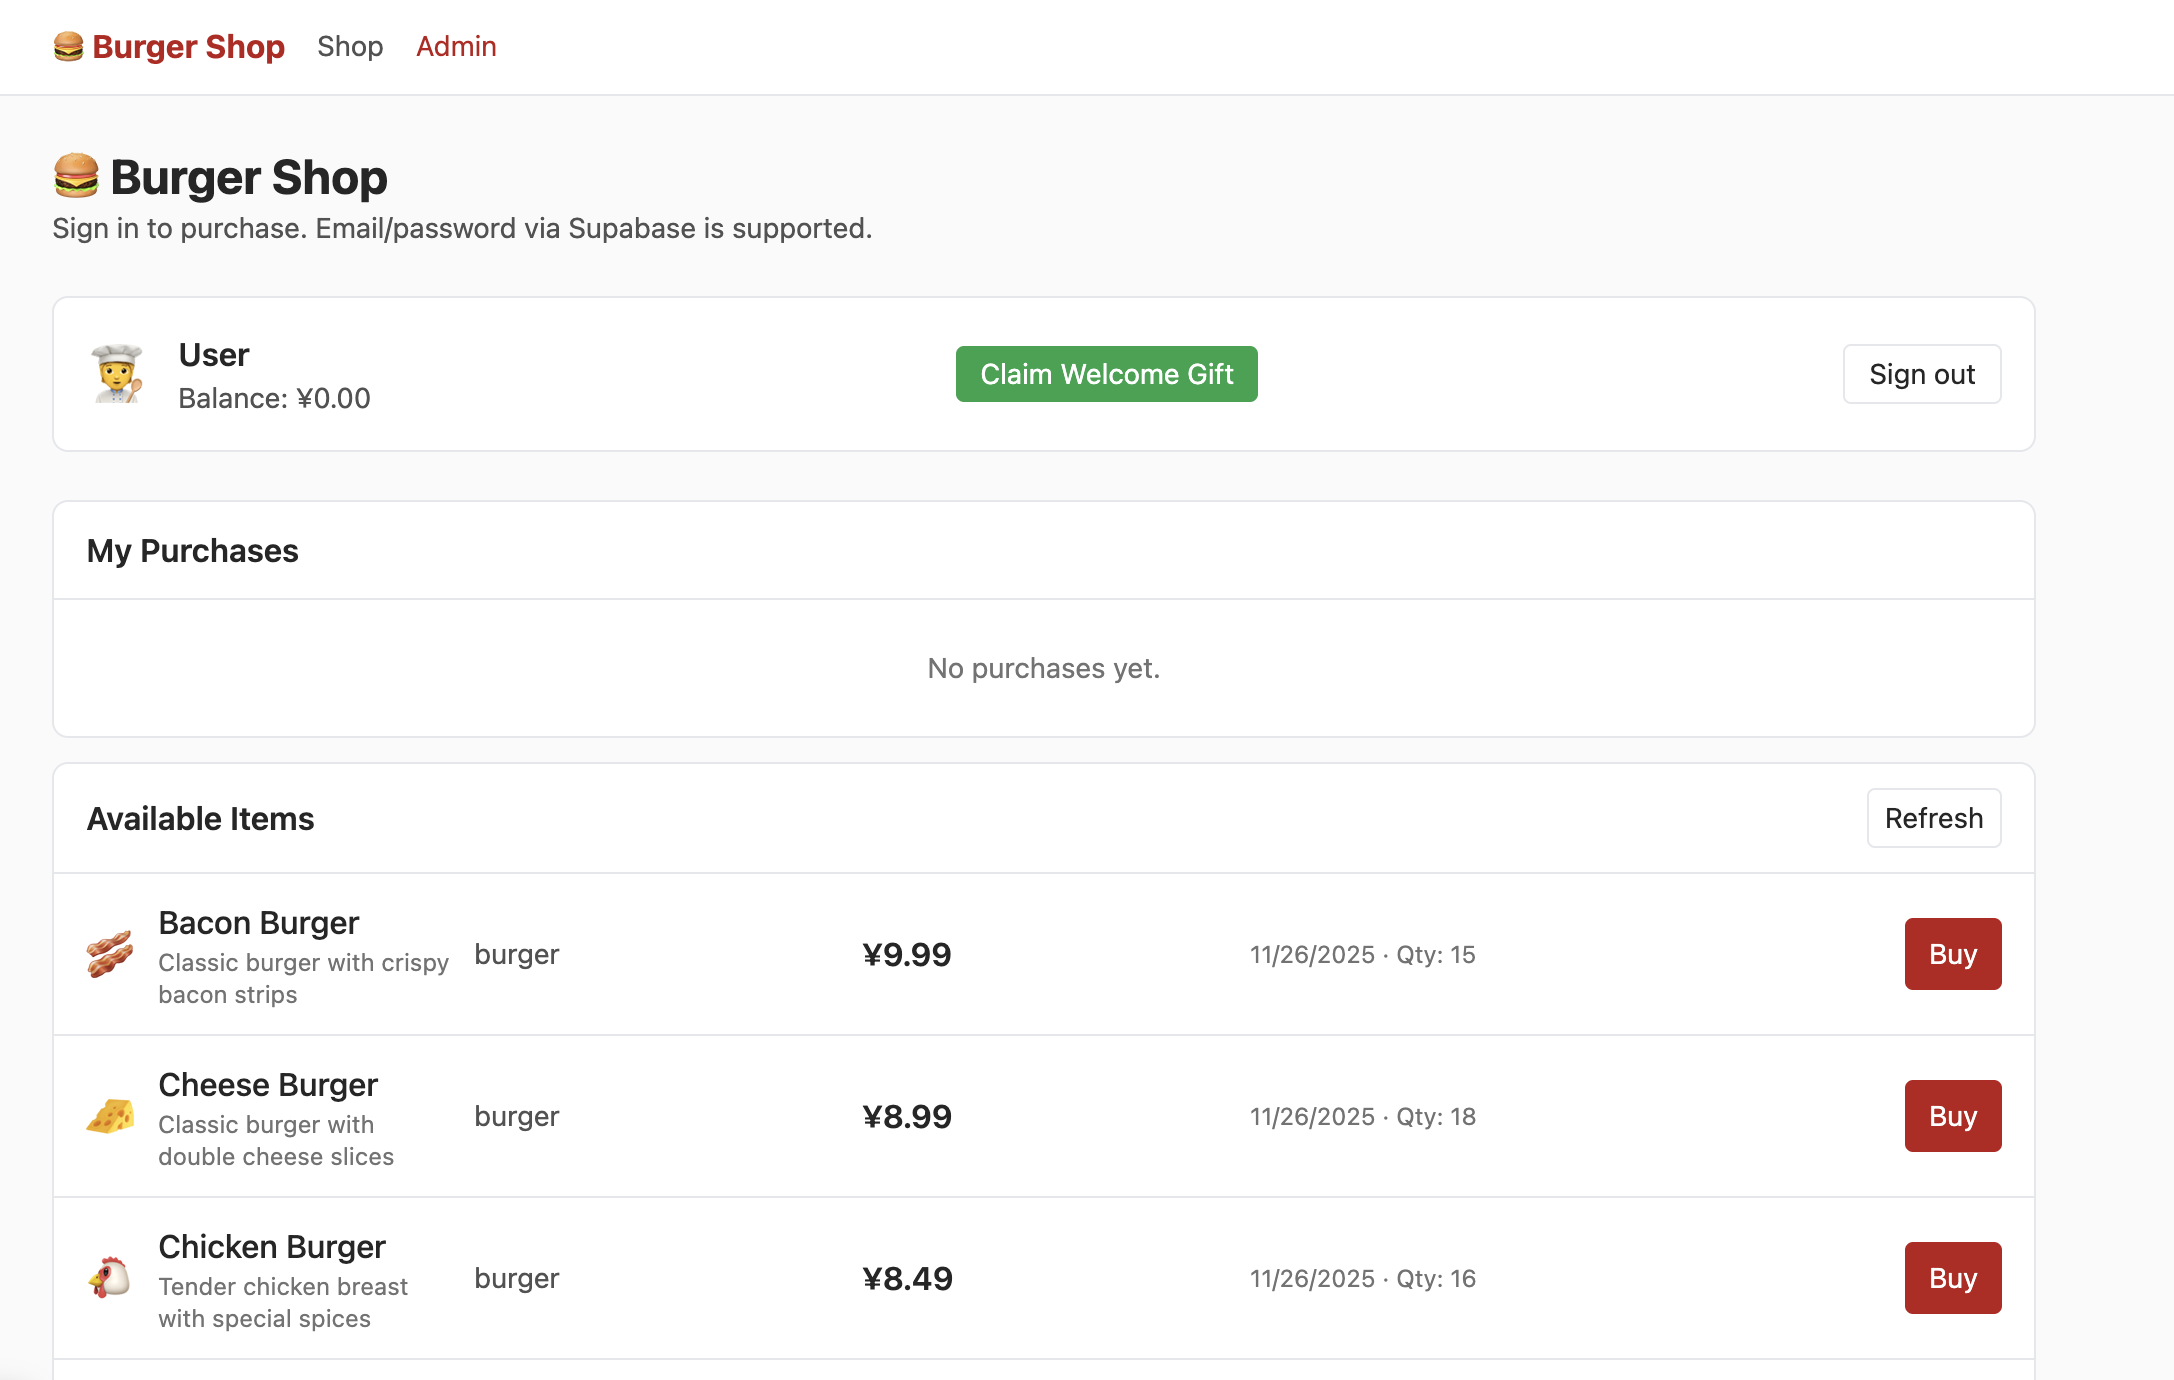
To access admin UI, modify corresponding role field to admin in DB:

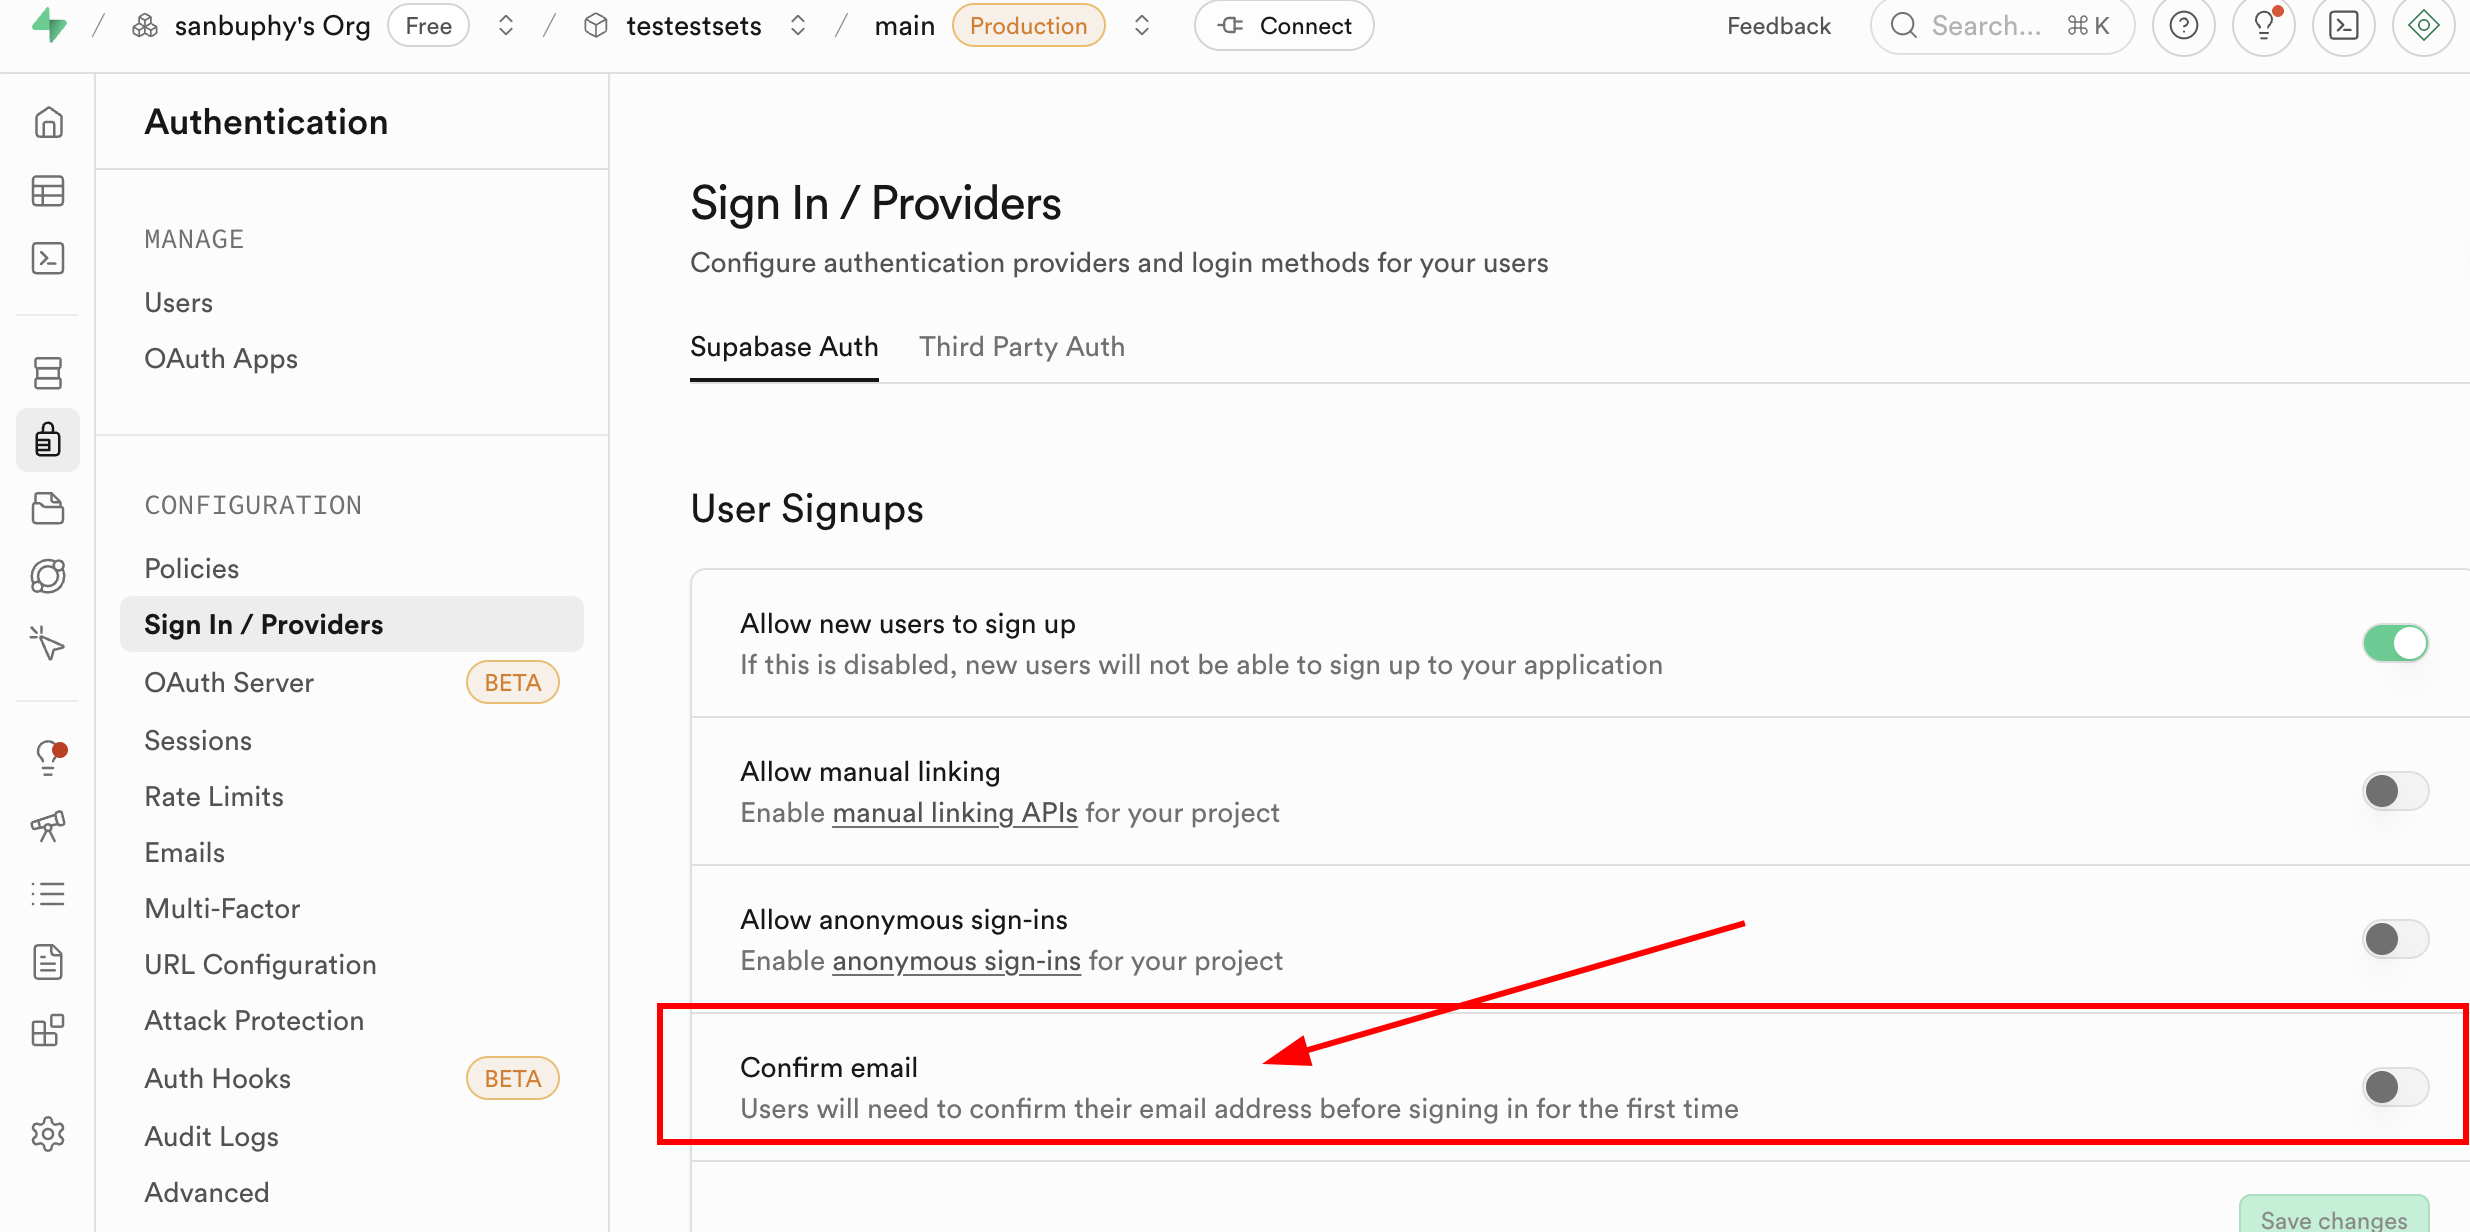
By default, each new email sign-up requires email confirmation. You can disable forced confirmation in Authentication -> Sign In / Providers -> Confirm email.
📚 Assignment
- Claim starter pack and complete purchase flow.
- Locate role-related table and set role to
admin, then modify product quantities in admin page. - Locate wallet balance table and modify values to increase remaining wallet amount.
4. Build Your First Supabase App
Now that you understand DB operations, auth, and RLS, build your own app with database + user login.
4.1 为任意应用接入 Supabase 数据库的标准化流程
Use this standardized process:
- Clarify requirements and tell AI clearly.
- Describe app function and required DB behavior (for example: local React Todo needs cloud sync with Supabase).
- Add constraints if needed (timestamp format, money precision, per-user visibility).
- Review AI output and correct missing fields.
- Ask AI to generate
init.sqlbased on confirmed schema; run in SQL Editor; if errors, feed error back and iterate. - Ask AI to refactor code according to SQL schema and communication logic.
- Configure Supabase URL/key and test end-to-end.
- run app and test DB interactions
- inspect Table Editor sync behavior
- if failures occur, report exact symptoms to AI and iterate
For auth pages, ask AI directly to integrate email sign-up/sign-in and define page routing expectations.
You can also ask AI to migrate implementation patterns from an existing project path directly.
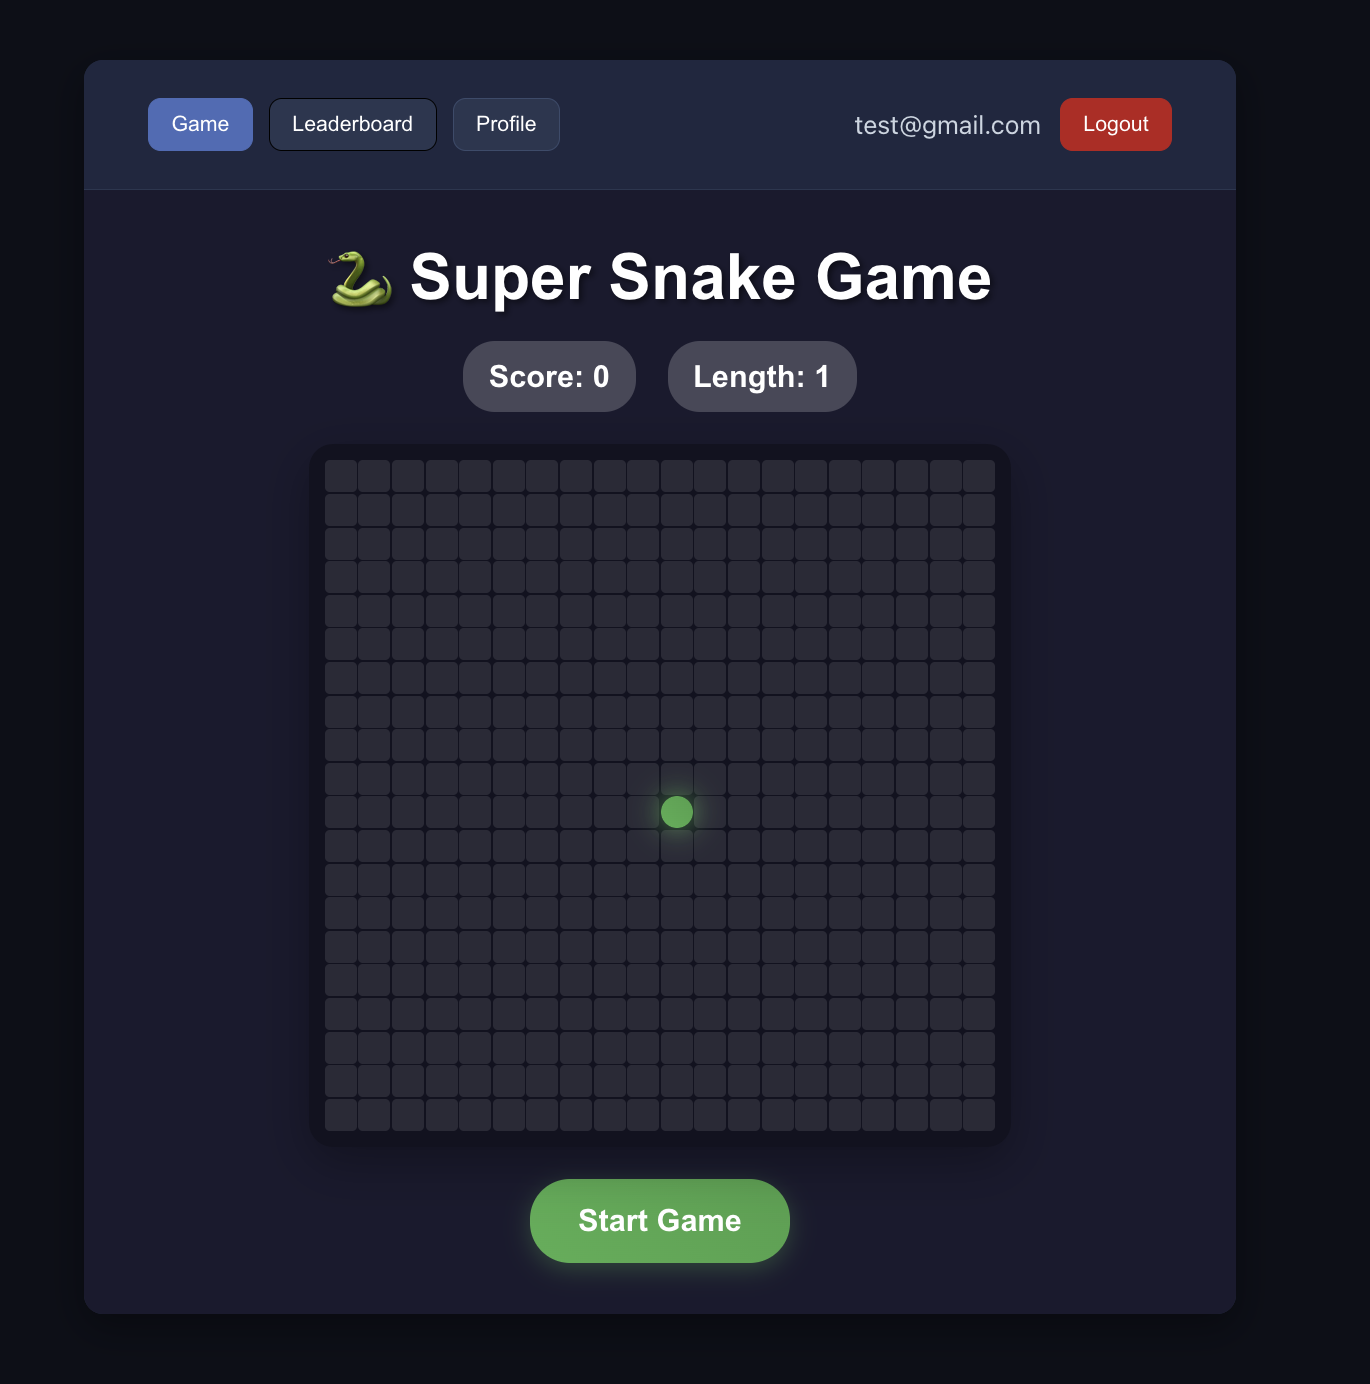
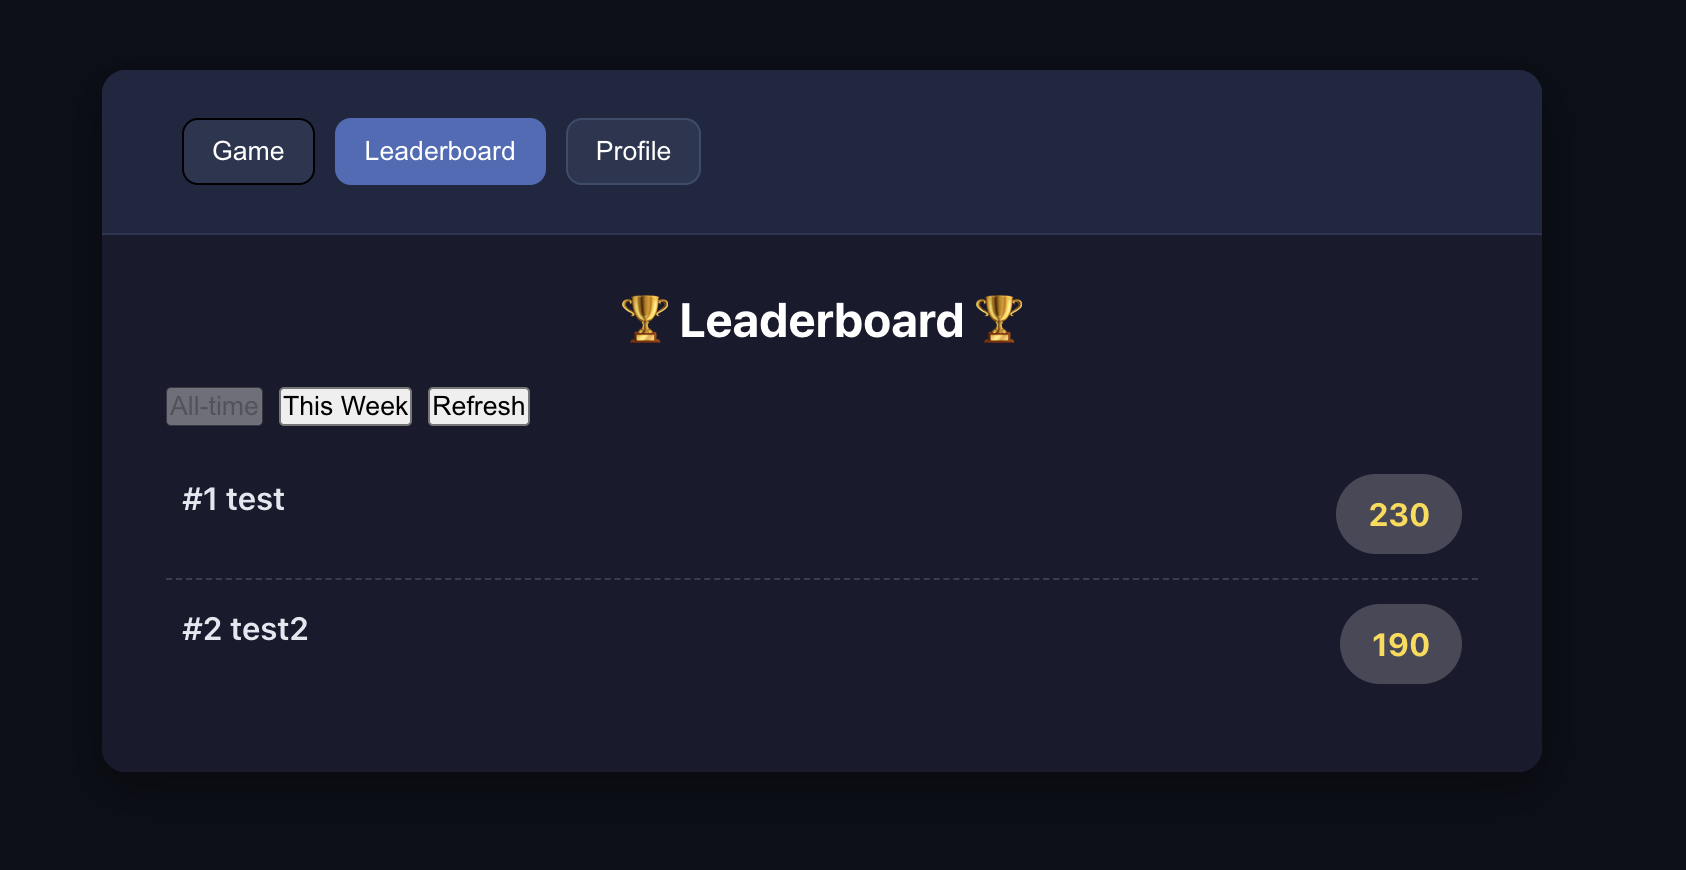
4.2 Case Study : Build an Online Snake Game
Following the SOP above, use Project5-Supabase-Demos/apps_snakegame as concrete practice: add leaderboard + user auth.

4.2.1 分析项目,识别数据需求
First, similar to the standardized process above, we can clarify requirements with AI and let AI provide a corresponding modification plan based on our project and requirements. We then implement based on that plan.
You can use the following prompt to guide AI:
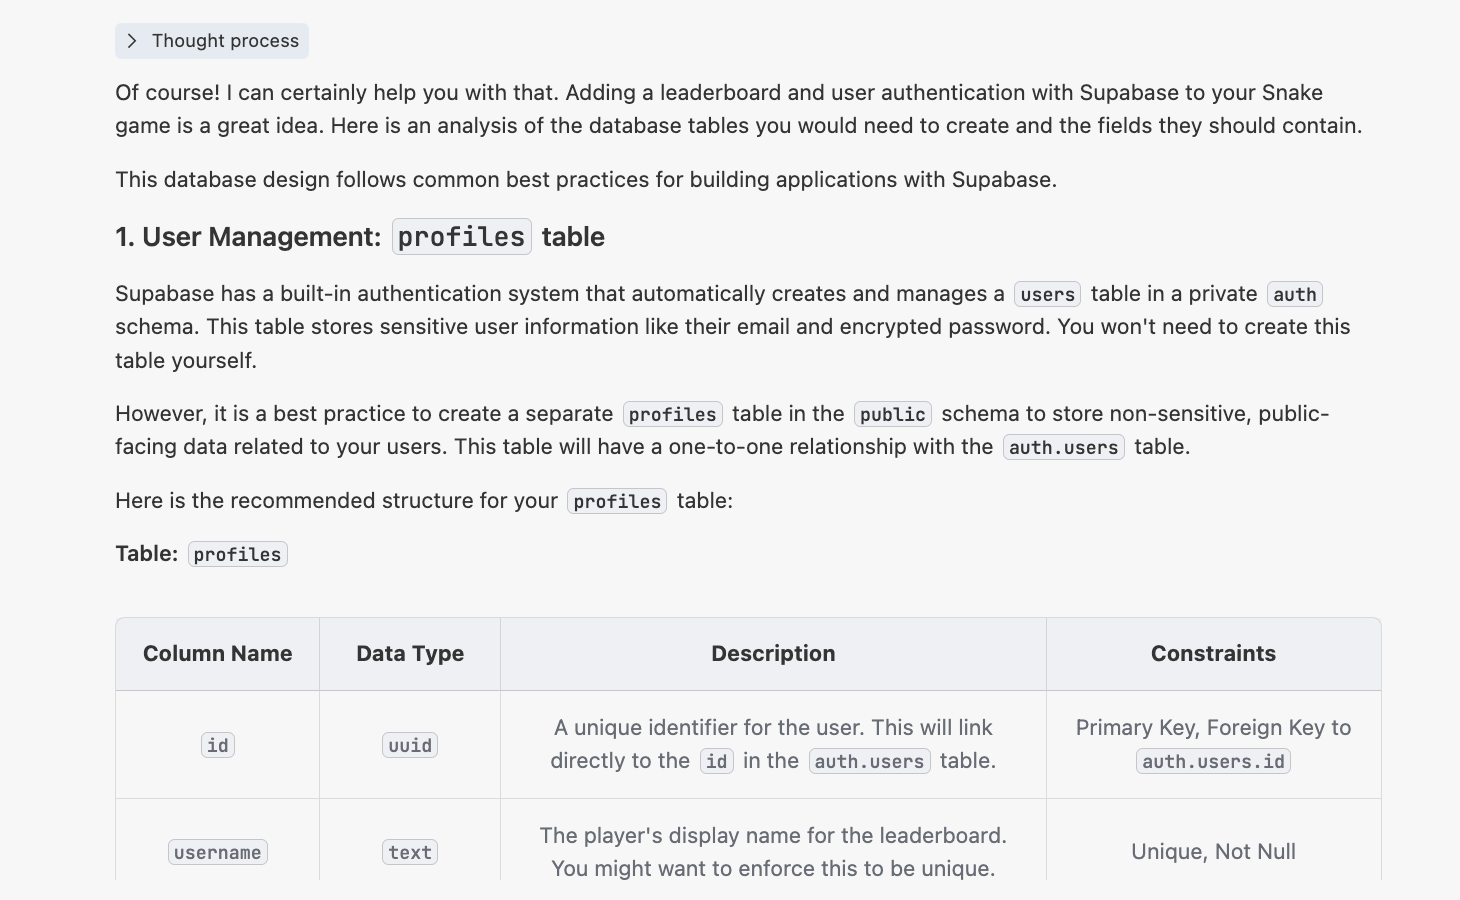
"I have a snake game. The directory is at {paste the absolute path of the snake game here}. Now I want to add an online leaderboard with Supabase, and also support a user login system. The leaderboard should display rankings by username and email.
Please help me analyze what tables I need to create to implement this feature. What fields should each table include?"
You will then get a response similar to:
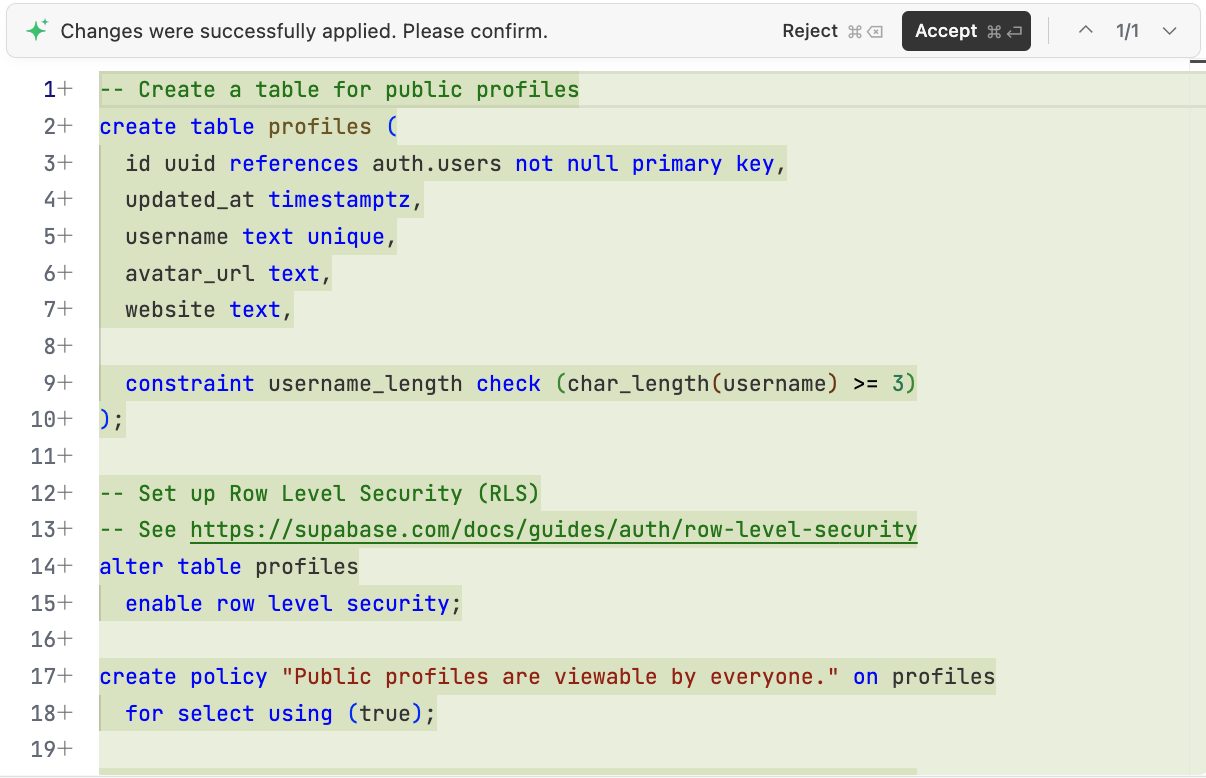
4.2.2 生成 init.sql 脚本
Then ask AI to generate scripts/init.sql for Supabase initialization:
4.2.3 改造项目代码
Then ask AI to refactor game code for:
- leaderboard as independent page
- auth via email
- registration/login required before game
If conversation context gets too long, start a fresh chat and pass init.sql as context.
If auth is unstable, reference:
Project5-Supabase-Demos/apps/project-burger-shop-auth-users-2
Successful result criteria:
- users can register and sign in
- signed-in users can view leaderboard correctly
📚 课程作业
- Integrate user auth into snake game demo.
- Integrate user auth into your own application.
5. Become Supabase Master
The above covered basic operations. Next are advanced concepts and features: why Supabase is selected in this curriculum, and how to implement more complex interactions.
You do not need to master everything immediately. Learn on demand as projects require.
5.1 Why We choose Supabase
Why choose Supabase among many backend options?
Startups face a common tension:
- want full backend control
- must ship quickly
Self-building backend from scratch often consumes months (DB/realtime/auth/API/storage/jobs/monitoring, etc.). Supabase packages these capabilities into ready-to-use services, letting teams focus scarce time on product features instead of infrastructure.
Supabase alternatives exist (PocketBase, Appwrite, etc.), but Supabase is often stronger for full SQL ecosystem maturity and community scale.
Compared with closed systems like Firebase, Supabase's open-source approach reduces vendor lock-in risk and supports self-hosting.
Selection is context-dependent:
- tiny personal experiments: ultra-light tools may be enough
- enterprise compliance scenarios: specialized enterprise identity stack may fit better
- MVP and early growth: Supabase is often sufficient and can scale with integrations (Stripe, Resend, Cloudflare, etc.)
5.2 Google & Github Login Support
Earlier we covered email sign-up/sign-in. In production UX, social login usually improves conversion and user convenience.
This section explains full details for Google and GitHub OAuth and password reset.
Reference project: Project5-Supabase-Demos/apps/project-burger-shop-auth-advanced-supabase-6
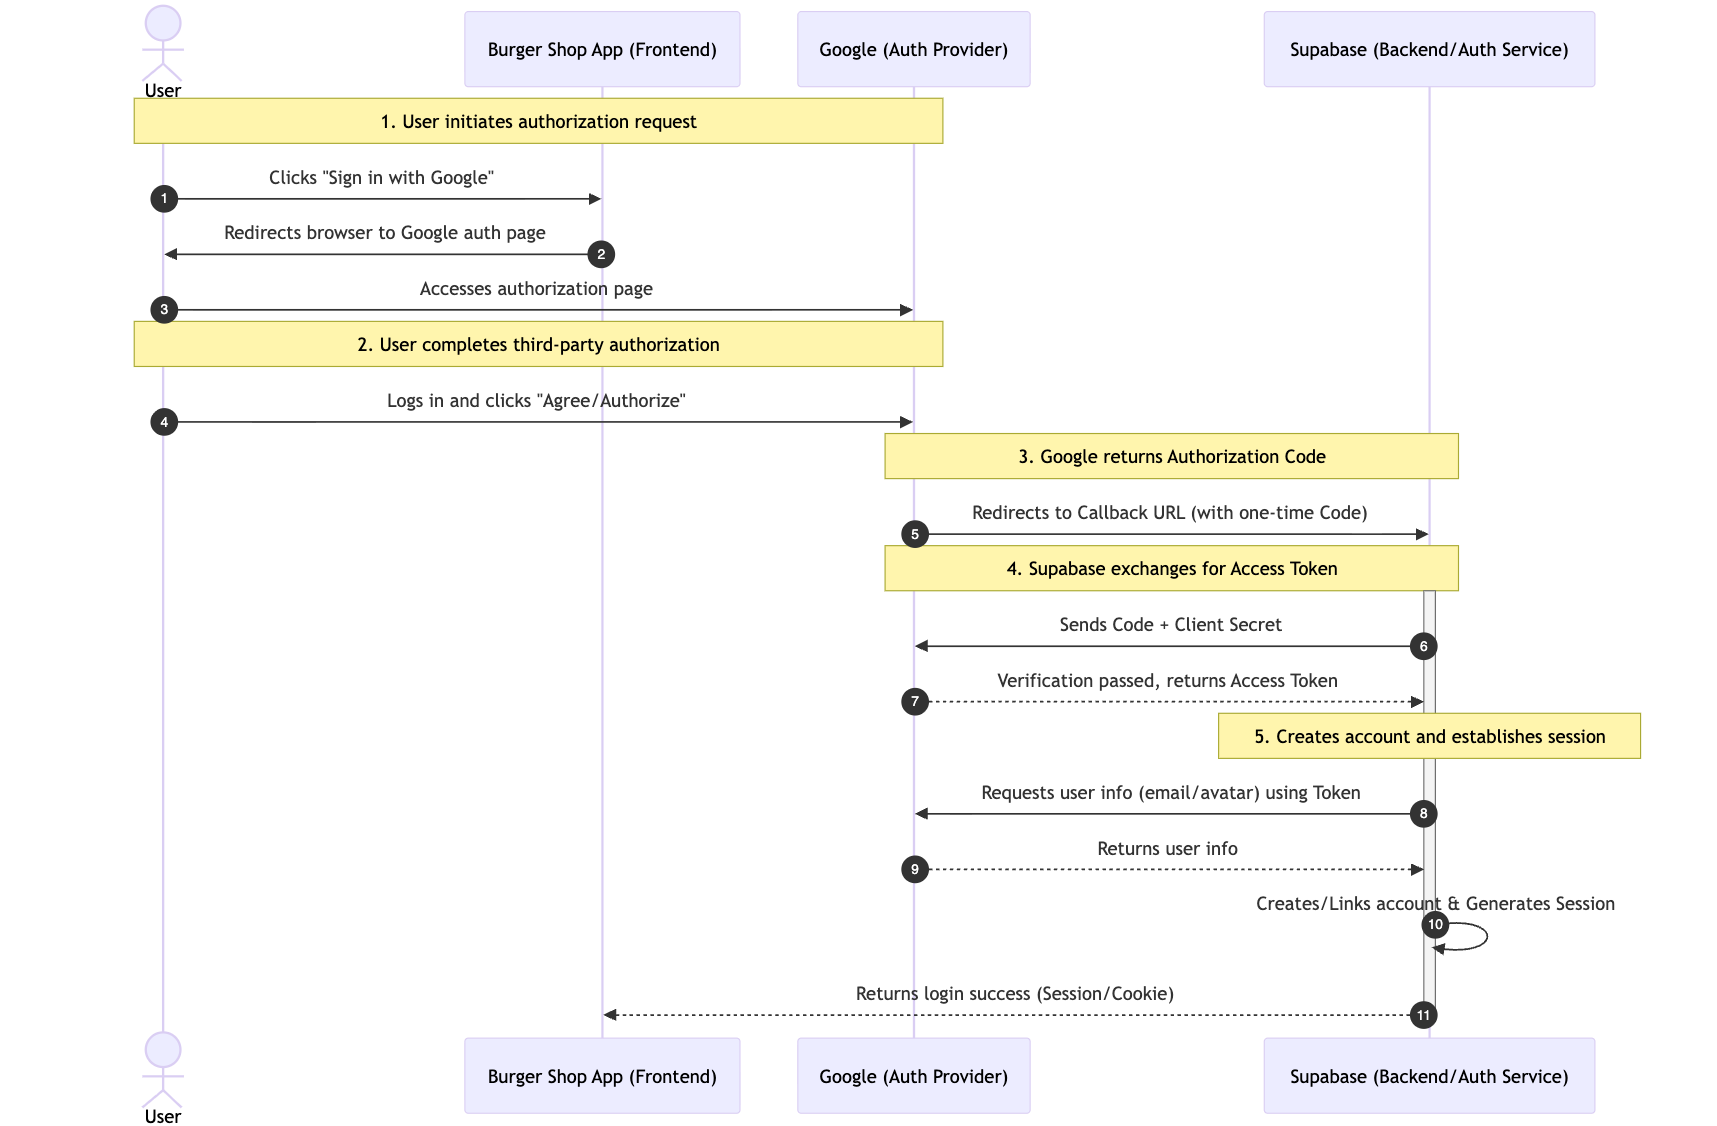
5.2.1 OAuth 流程:第三方登录是如何工作的?
Third-party login uses OAuth 2.0. Its essence is delegated authorization: users grant limited profile access without exposing provider passwords to your app.
Typical flow:
- user clicks Google sign-in button
- user is redirected to Google authorization page
- user consents; Google returns one-time authorization code via callback URL
- Supabase backend exchanges code for access token
- Supabase fetches profile, creates/links account, and establishes session
5.2.2 配置 Google Cloud 获取 Client ID 和 Secret
No matter which third-party login method you use, you normally need to configure a Client ID and Client Secret. For Google login, you first need to create an OAuth 2.0 Client ID in Google Cloud Platform to obtain these values.
- Enter Google Cloud Console:
- Visit Google Cloud Console.
- Create a new project or select an existing one.
- Configure OAuth consent screen:
- In the left navigation, go to
APIs & Services->OAuth consent screen. - Select the
Externaluser type, then clickCreate. - Fill required information such as app name and user support email.
- In
Authorized domains, add your Supabase project domain in the format*.supabase.co. - Save and continue. In the
ScopesandTest userssteps, you can skip for now and save directly. - Create credentials:
- Go to
APIs & Services->Credentials. - Click
+ CREATE CREDENTIALS, then selectOAuth client ID. - Select
Web applicationforApplication type. - Give it a name, for example
Supabase Auth. - In
Authorized redirect URIs, clickADD URIand fill your Supabase callback URL. You can find this URL in Supabase Dashboard atAuthentication->Providers->Google. The format is usuallyhttps://<your-project-id>.supabase.co/auth/v1/callback.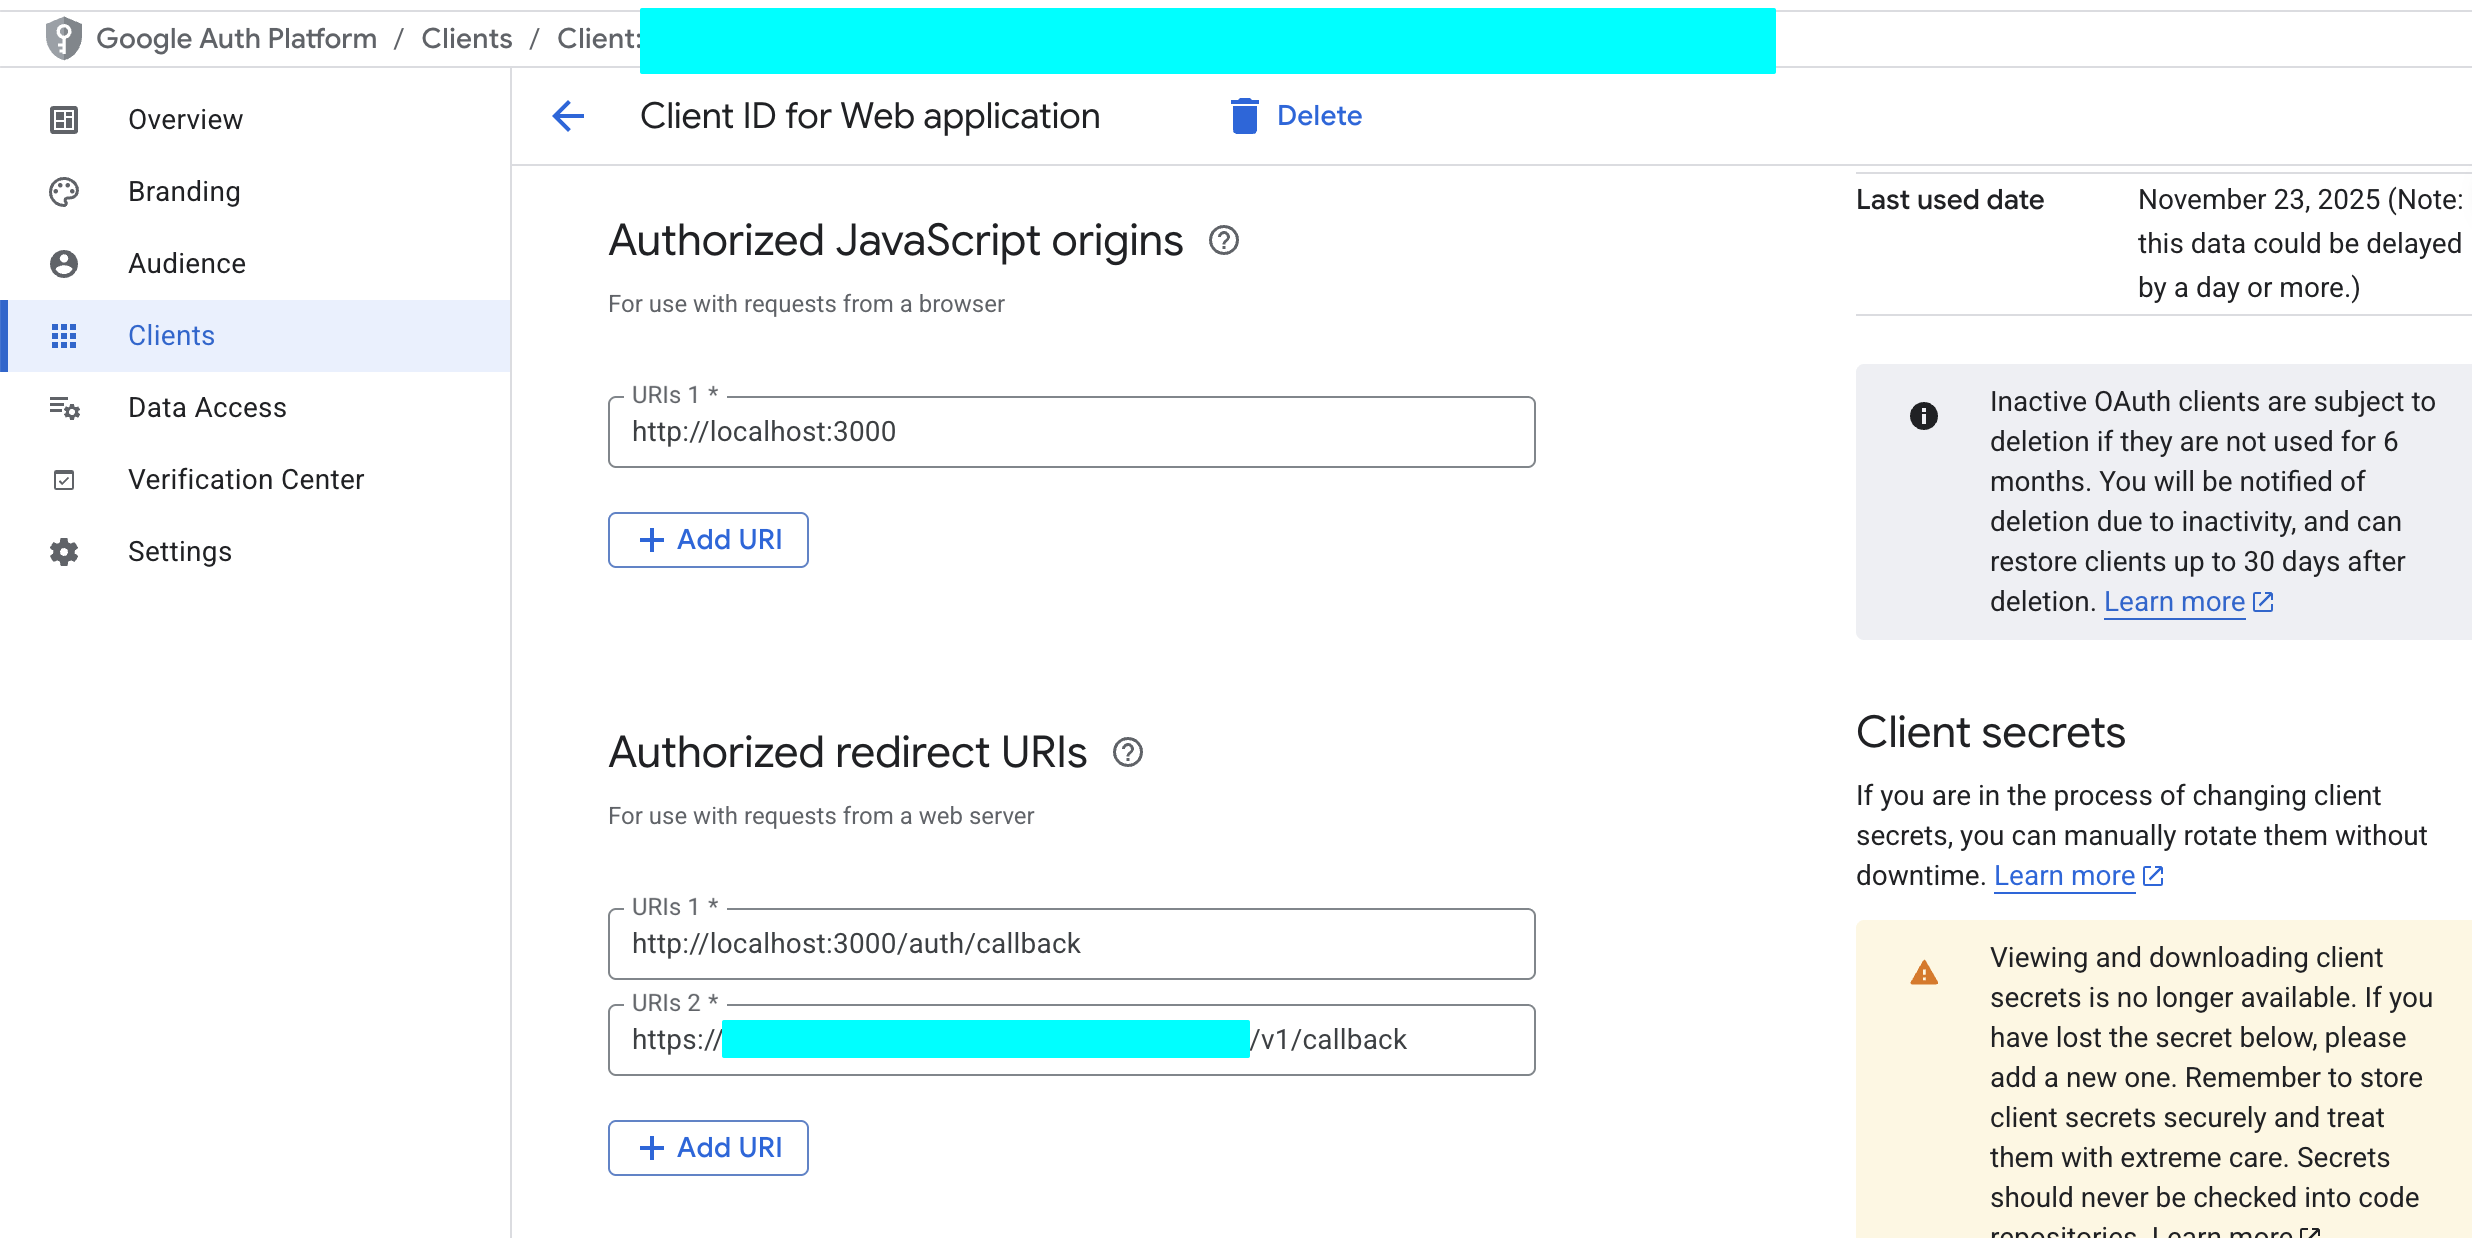
- Click
CREATE. - Get Client ID and Client Secret:
- After creation succeeds, a popup shows your Client ID and Client Secret. Be sure to copy and store them immediately.
5.2.3 配置 GitHub 获取 Client ID 和 Secret
Similarly, you need to register an OAuth application on GitHub.
Enter GitHub Developer Settings:
- Sign in to your GitHub account.
- Click your avatar in the upper-right corner and enter
Settings. - At the bottom of the left navigation, find
Developer settings.
Register a new application:
Select
OAuth Apps, then clickNew OAuth App.Fill in an app name, for example
My Burger Shop.Homepage URL: fill your online app URL, or local development URL
http://localhost:3000.Authorization callback URL: fill in your Supabase project callback URL. You can find it in Supabase Dashboard at
Authentication->Providers->GitHub. The format ishttps://<your-project-id>.supabase.co/auth/v1/callback.Click
Register application.Get Client ID and Client Secret:
After registration, the page displays your Client ID.

Click
Generate a new client secretto generate your Client Secret. Again, copy and store it immediately.
5.2.4 在 Supabase 中配置 Provider
Now configure the credentials you obtained in Supabase.
- Enter Supabase Dashboard:
- Select your project, then go to
Authentication->Providers. - Enable and configure Google:
- Find
Googleand enable it. - Paste the Client ID and Client Secret from Google Cloud into the corresponding fields.
- Click
Save. - Enable and configure GitHub:
- Find
GitHuband enable it. - Paste the Client ID and Client Secret from GitHub into the corresponding fields.
- Click
Save.
- Find
At this point, your website can already support third-party account login. You can directly ask AI to use Project5-Supabase-Demos/apps/project-burger-shop-auth-advanced-supabase-6 as reference and add user login support to your own project, integrating both GitHub and Google authentication with minimal cost.
5.2.6 密码重置实现
Password reset is a core production auth feature.
Reference project includes full implementation: project-burger-shop-auth-advanced-supabase-6
Core flow:
- user enters email; frontend calls
supabase.auth.resetPasswordForEmail()with redirect URL - Supabase sends reset email
- user clicks email link and is redirected to reset page
- user submits new password through
supabase.auth.updateUser()
You can customize reset templates in: Authentication -> Email Templates
5.3 Realtime Function
Supabase Realtime is one of its strongest capabilities. It is useful for collaborative docs, live dashboards, game lobbies, and customer-support systems.
Project: Project5-Supabase-Demos/apps/project-burger-shop-realtime-orders-3
5.3.1 数据库实时变动 Postgres Changes
Postgres Changes subscribes to row changes in specific tables/events.
Enable realtime replication with SQL:
ALTER TABLE public.chat_messages REPLICA IDENTITY FULL;
DO $$
BEGIN
  IF NOT EXISTS (
    SELECT 1 FROM pg_publication_tables
    WHERE pubname = 'supabase_realtime'
      AND schemaname = 'public'
      AND tablename = 'chat_messages'
  ) THEN
    ALTER PUBLICATION supabase_realtime ADD TABLE public.chat_messages;
  END IF;
END $$;
Client subscription example:
const sub = supabase
  .channel('chat_messages_channel')
  .on('postgres_changes', {
    event: 'INSERT',
    schema: 'public',
    table: 'chat_messages'
  }, (payload: any) => {
    console.log('New message received:', payload.new);
    const newMessage = payload.new as Message;
  })
  .subscribe((status: string) => {
    console.log('Chat subscription status:', status);
  });
Key points:
.channel(...): isolate communication scope.on('postgres_changes', ...): subscribe event source and filterpayload.new: newly inserted row content.subscribe(): activate channel
5.3.2 信息广播同步 Broadcast & Presence
For low-latency temporary states (for example cursor tracking), use Broadcast + Presence rather than DB writes.
- Presence: shared online-state synchronization
- Broadcast: temporary low-latency message passing
Presence implementation steps:
- Create presence-enabled channel
const ch = supabase.channel('lobby_presence', {
  config: {
    presence: { key: anonymousUser.id },
  }
});- Subscribe and track current user
const me = {
  id: anonymousUser.id,
  name: anonymousUser.name,
  color: anonymousUser.color
};

ch.subscribe(async (status) => {
  if (status === 'SUBSCRIBED') {
    await ch.track(me);
  }
});- Sync full online list
ch.on('presence', { event: 'sync' }, () => {
  const state = ch.presenceState();
  const flat = {};
  Object.values(state).forEach((arr) => {
    arr.forEach((u) => { flat[u.id] = { ...u }; });
  });
  setOnline(flat);
});- Listen join/leave events
ch.on('presence', { event: 'join' }, ({ key, newPresences }) => {
  console.log('User joined:', key, newPresences);
});

ch.on('presence', { event: 'leave' }, ({ key, leftPresences }) => {
  console.log('User left:', key, leftPresences);
});
Broadcast cursor example:
Sender:
const handleMouseMove = (e) => {
  const payload = {
    id: anonymousUser.id,
    x: e.clientX,
    y: e.clientY,
    name: anonymousUser.name,
    color: anonymousUser.color
  };

  channelRef.current?.send({
    type: 'broadcast',
    event: 'cursor',
    payload
  });
};

document.addEventListener('mousemove', handleMouseMove);
Receiver:
ch.on('broadcast', { event: 'cursor' }, ({ payload }) => {
  setOnline((prev) => ({
    ...prev,
    [payload.id]: {
      ...(prev[payload.id] || {}),
      x: payload.x,
      y: payload.y
    }
  }));
});
Presence keeps "who is online"; Broadcast carries temporary shared states.
5.4 Storage
A real app handles not only structured data (orders/users), but also unstructured files (avatars, product images, documents).
If such files are all stored in business servers directly, storage pressure and IO bottlenecks can become severe.
In practice, files are stored in object storage systems (S3/OSS/etc.), and apps access files through URL addresses.
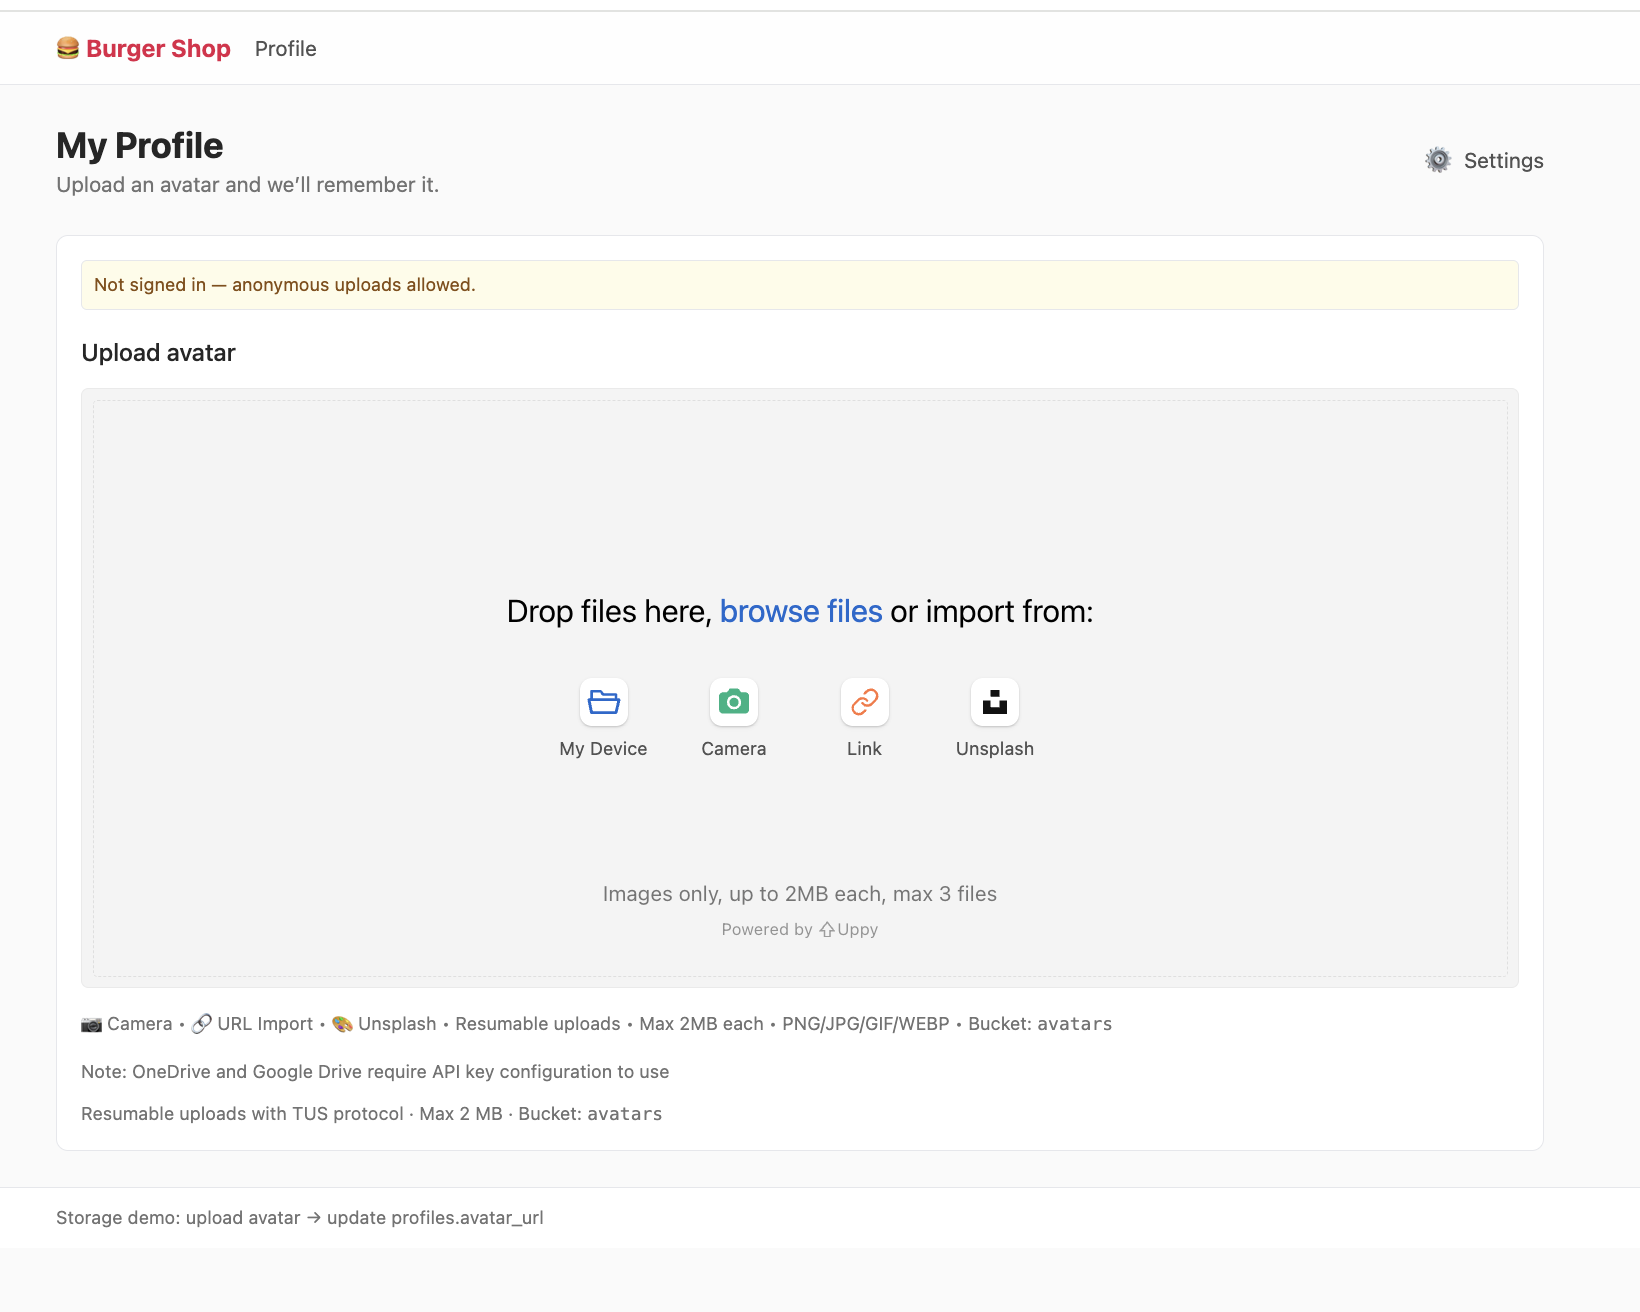
Project: project-burger-shop-storage-uploads-4
This project demonstrates avatar upload flow and uses Uppy + Tus resumable upload against Supabase upload endpoint.
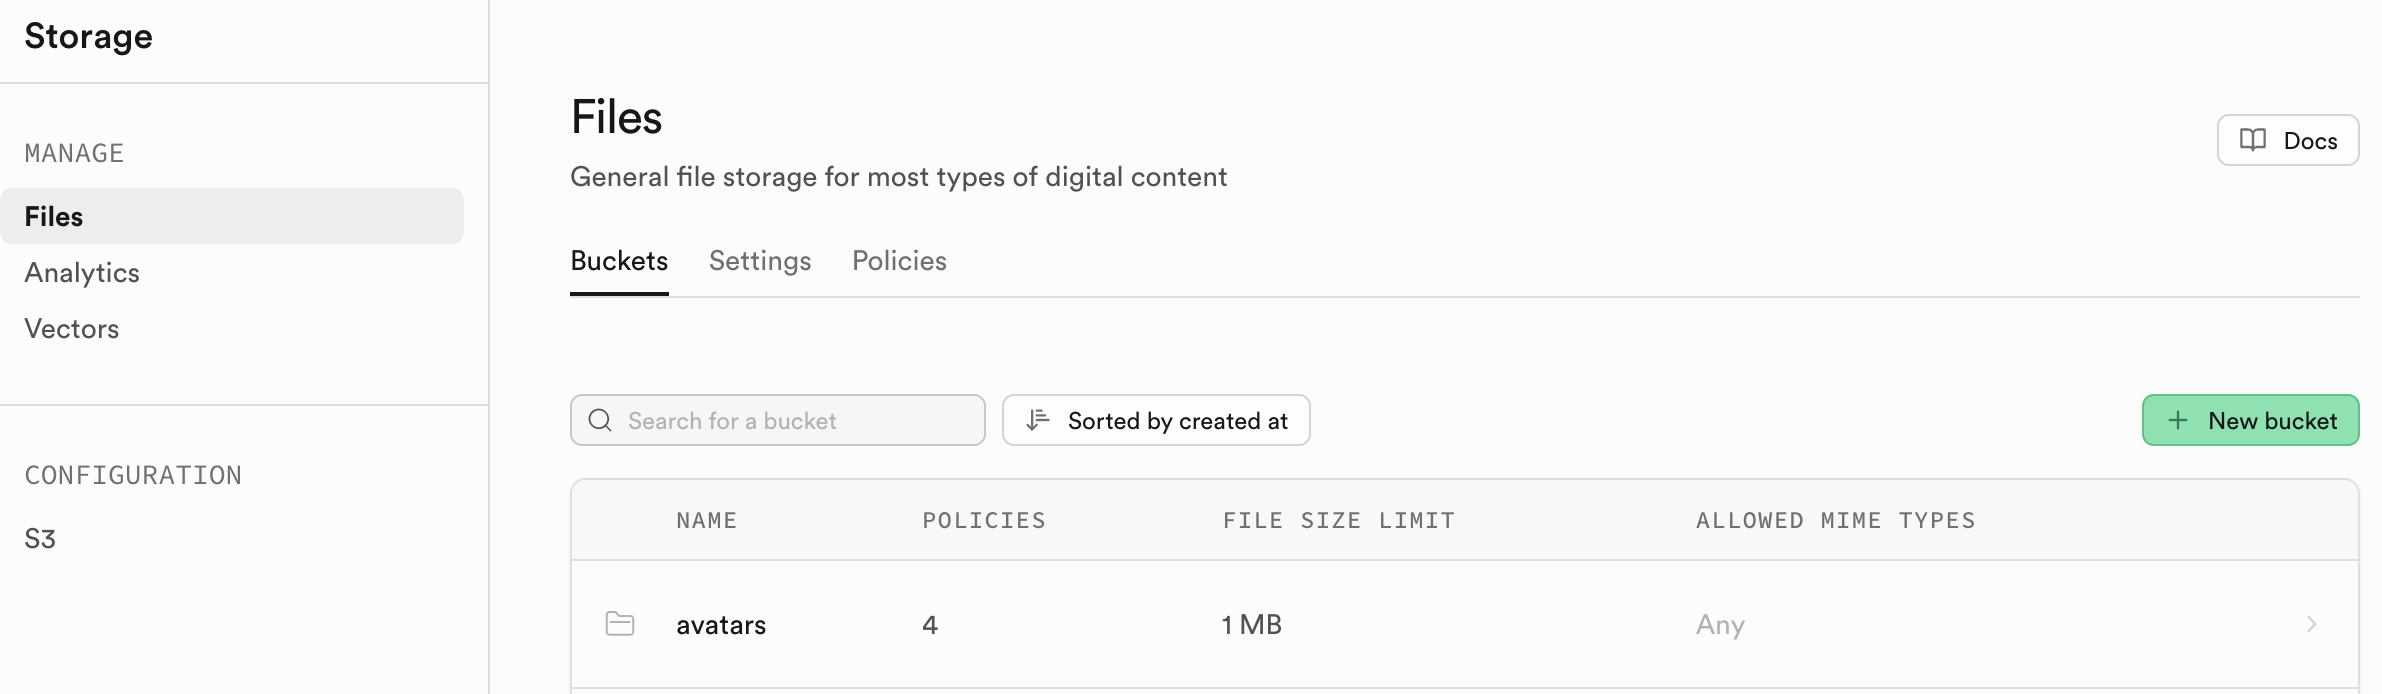
5.4.1. Bucket
Storage is organized by buckets (like folders), each with independent policies and settings.
Like DB RLS, Storage permissions are controlled with SQL policies on storage.objects and storage.buckets.
Example: only allow authenticated users to upload image files under user-specific folder in avatars bucket:
CREATE POLICY "Allow authenticated uploads to avatars bucket"
ON storage.objects FOR INSERT
TO authenticated
WITH CHECK (
  bucket_id = 'avatars' AND
  auth.uid() = (storage.foldername(name))[1]::uuid AND
  (storage.extension(name) IN ('png', 'jpg', 'jpeg'))
);

CREATE POLICY "Allow public read access to avatars"
ON storage.objects FOR SELECT
USING ( bucket_id = 'avatars' );
5.4.2 获取可访问文件 URL
In this project, create a public bucket named avatars. After upload, you get a storage path (for example public/avatar1.png) and need to convert it to HTTP-accessible URL.
Two URL strategies:
1. 公开 URL (Public URL) - 永久链接
For files in public bucket:
const { data } = supabase.storage
  .from('avatars')
  .getPublicUrl('public/avatar1.png');
const publicUrl = data.publicUrl;
Pros:
- simple fixed URL structure
- cache-friendly (CDN/browser)
Best for truly public resources (logo/public posters).
Risk:
- hotlink traffic abuse can increase bandwidth costs
2. 签名 URL (Signed URL) - 临时授权链接
Recommended for most production private/controlled assets:
const { data, error } = await supabase.storage
  .from('avatars')
  .createSignedUrl('private/user-invoice.pdf', 3600);
const signedUrl = data?.signedUrl;
Benefits:
- expiring authorization
- safer permission boundaries
- much better anti-hotlink behavior
For private assets (avatars, paid content, invoices), prefer signed URLs by default.
5.5 Edge Function
Edge Function is a core serverless pattern. "Serverless" does not mean no servers; it means you do not manage server provisioning/ops yourself. You write function logic, provider runs it on trigger and charges by usage.
Common edge-function providers:
- AWS Lambda@Edge
- Cloudflare Workers
- Vercel Edge Functions
In Supabase, Edge Functions run on Deno + TypeScript and are deployed globally for low-latency execution close to users.
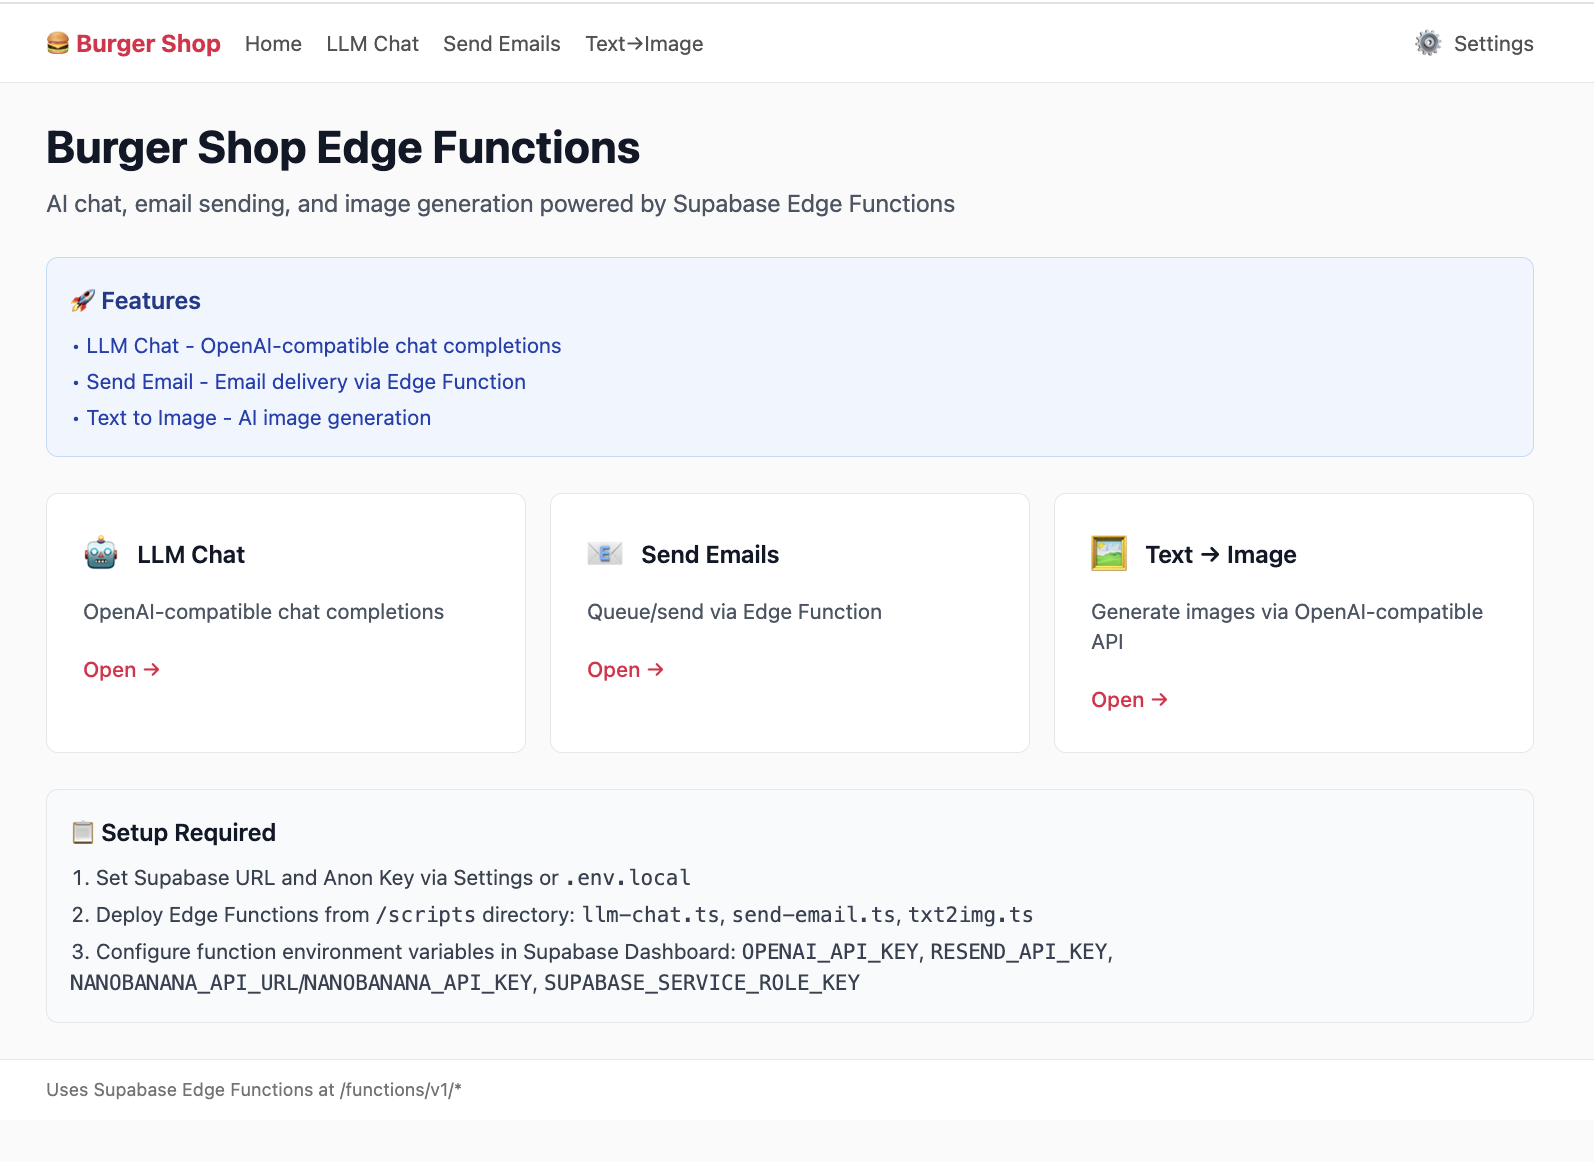
Project: Project5-Supabase-Demos/apps/project-burger-shop-edge-function-5
5.5.1 LLM Chat 案例解析
If you want ChatGPT-like features, never expose model API keys in frontend code. Use edge function as secure proxy.
// scripts/llm-chat.ts
import "jsr:@supabase/functions-js/edge-runtime.d.ts";
import { OpenAI } from "npm:openai";

const OPENAI_API_KEY = Deno.env.get("OPENAI_API_KEY");

Deno.serve(async (req) => {
  try {
    const openai = new OpenAI({ apiKey: OPENAI_API_KEY });
    const { prompt } = await req.json();

    const stream = await openai.chat.completions.create({
      model: "gpt-3.5-turbo",
      messages: [{ role: "user", content: prompt }],
      stream: true,
    });

    return new Response(stream.toReadableStream(), {
      headers: { "Content-Type": "text/event-stream" },
    });
  } catch (err) {
  }
});
Key idea: API key remains server-side in Supabase secrets.
5.5.2 创建并部署函数
Supabase provides a very user-friendly interface, so you can complete deployment without touching the command line.
- Open the Edge Functions panel:
- Sign in to your Supabase project Dashboard.
- In the left navigation, click the code-like icon and enter
Edge Functions. - Create a new function:
- Click
Create a new function.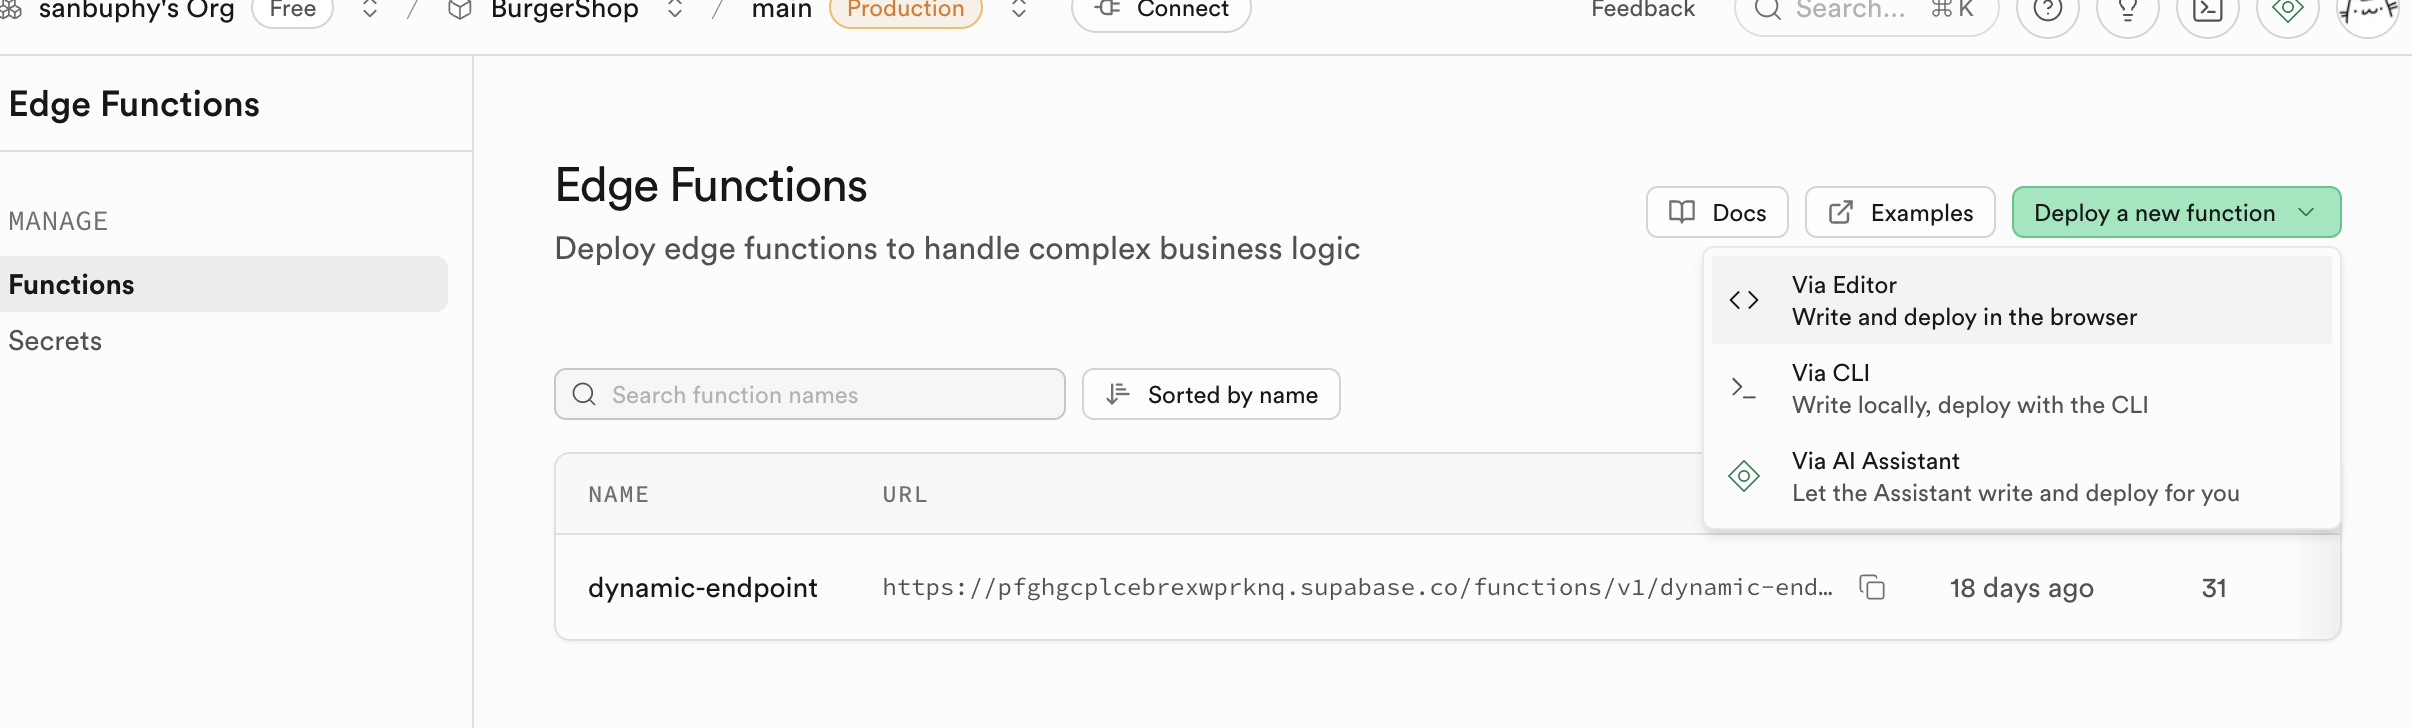
- Name the function, for example
llm-chat. - Paste code:

- In the online editor popup, delete all default placeholder code.
- Open your local
llm-chat.tsfile and copy all content. - Paste the copied code into the Supabase online editor.
- Configure environment variables (Secrets):
- Find
Secretsin the sidebar.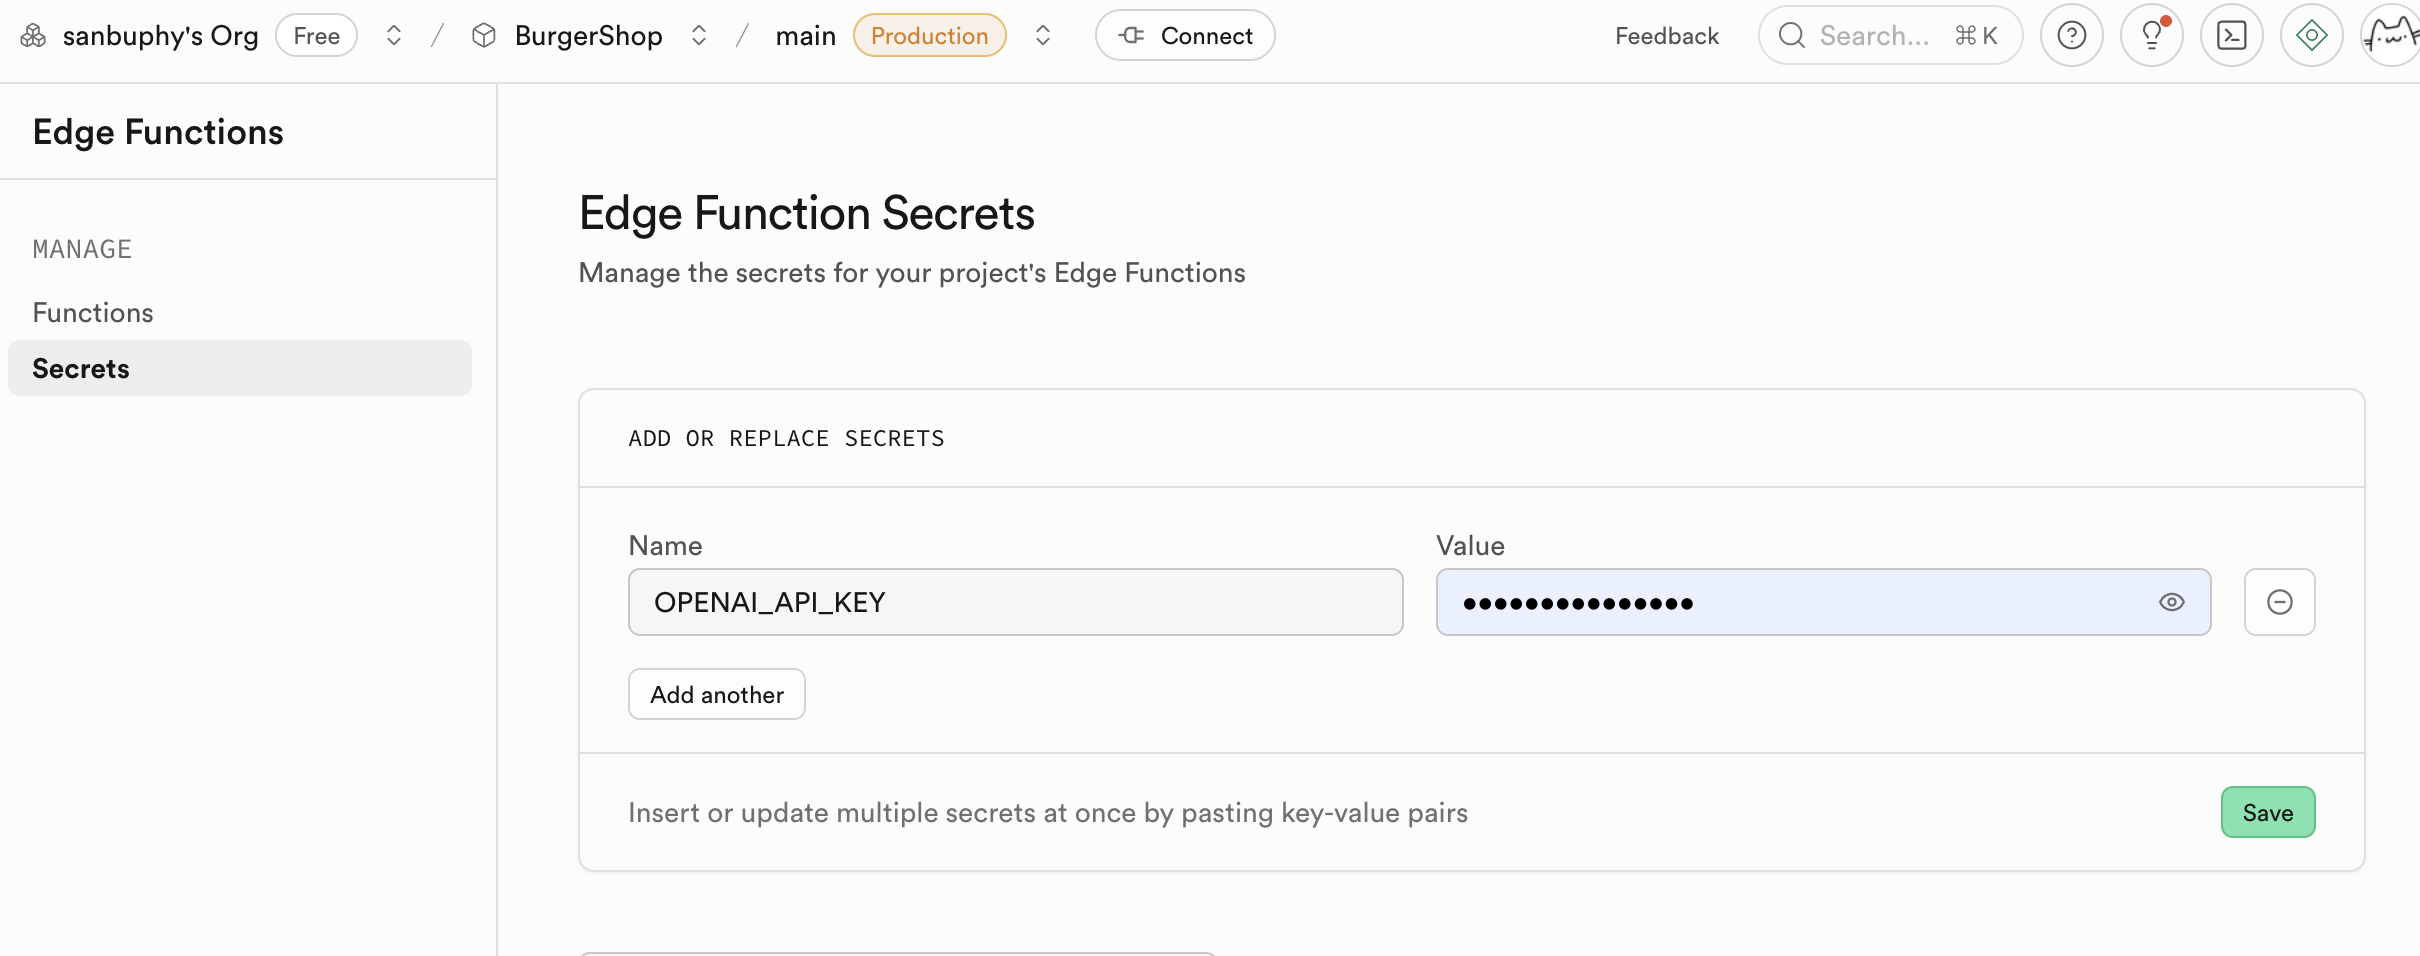
Name: enterOPENAI_API_KEY.Value: paste your own OpenAI API Key.- Click
Save. The secret set here is encrypted and securely injected into the runtime environment of your function.
- Find
If a function needs to be updated, remember to run Deploy updates in the Edge Function section. Supabase will build and deploy this function in the cloud. After a few minutes, your function can be accessed online.
Beyond being a secure proxy for language-model calls, Edge Functions are useful in far more scenarios. In fact, any task requiring server-side logic, from simple API calls and data validation to more complex computation, can be implemented with Edge Functions. It gives you a lightweight and scalable backend without managing server infrastructure.
If you want to explore more possibilities, refer to other examples in this project. For example:
- Image generation (
txt2img.ts): this function shows how to call third-party text-to-image APIs (such as Stability AI or Midjourney) through Edge Functions to generate images dynamically. This is a typical compute-intensive or external-service-secure-call scenario. Just likellm-chat, the API key is stored securely in Supabase backend. The frontend only sends text prompts and displays generated images, making the flow secure and efficient. - Send email (
send-email.ts): sending welcome emails, transaction notifications, or password-reset emails is a common requirement. Thesend-email.tsexample demonstrates integrating email services (such as Resend or SendGrid) through Edge Functions. You do not need to expose sensitive email-service API keys in client code. Just create a function and let the frontend trigger email sending through this function.
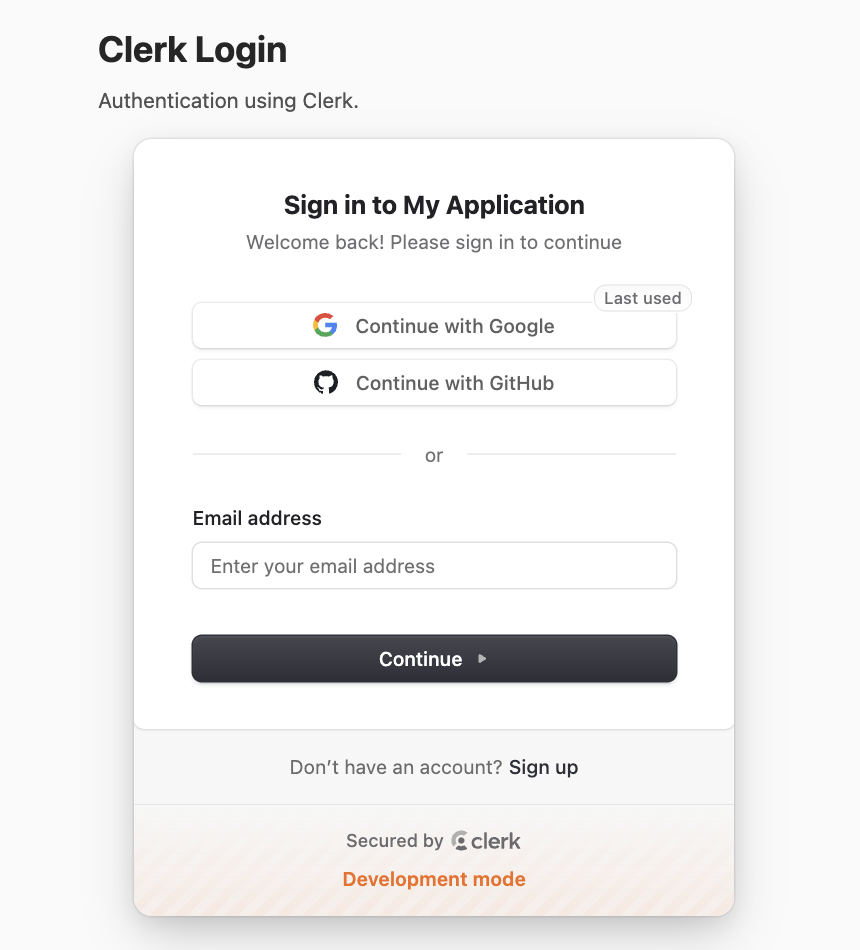
5.6 Clerk Login
Clerk is a specialized identity/auth platform. It covers registration, login, MFA, session, permission management, and more.
This part explains full integration with Supabase.
Project: project-burger-shop-auth-advanced-clerk-7
5.6.1 创建 Clerk 应用与获取密钥
Before using this project, you need a Clerk account and an application.
- Register and create:
- Visit dashboard.clerk.com and register an account.
- Click
Create application.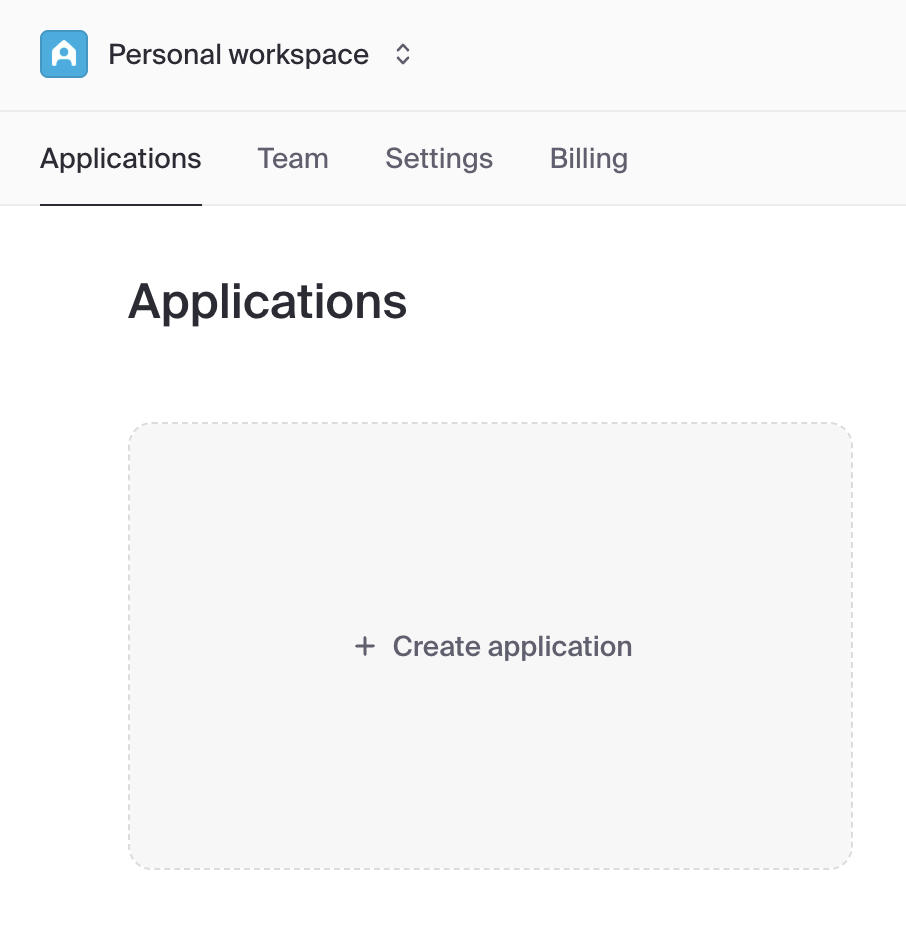
- Enter your application name (for example,
Burger Shop). - In
How will your users sign in?, keepEmail,Google, andGitHubselected by default. - Click
Create application.
- Get API keys:
After creation, you will be guided to the API Keys page.
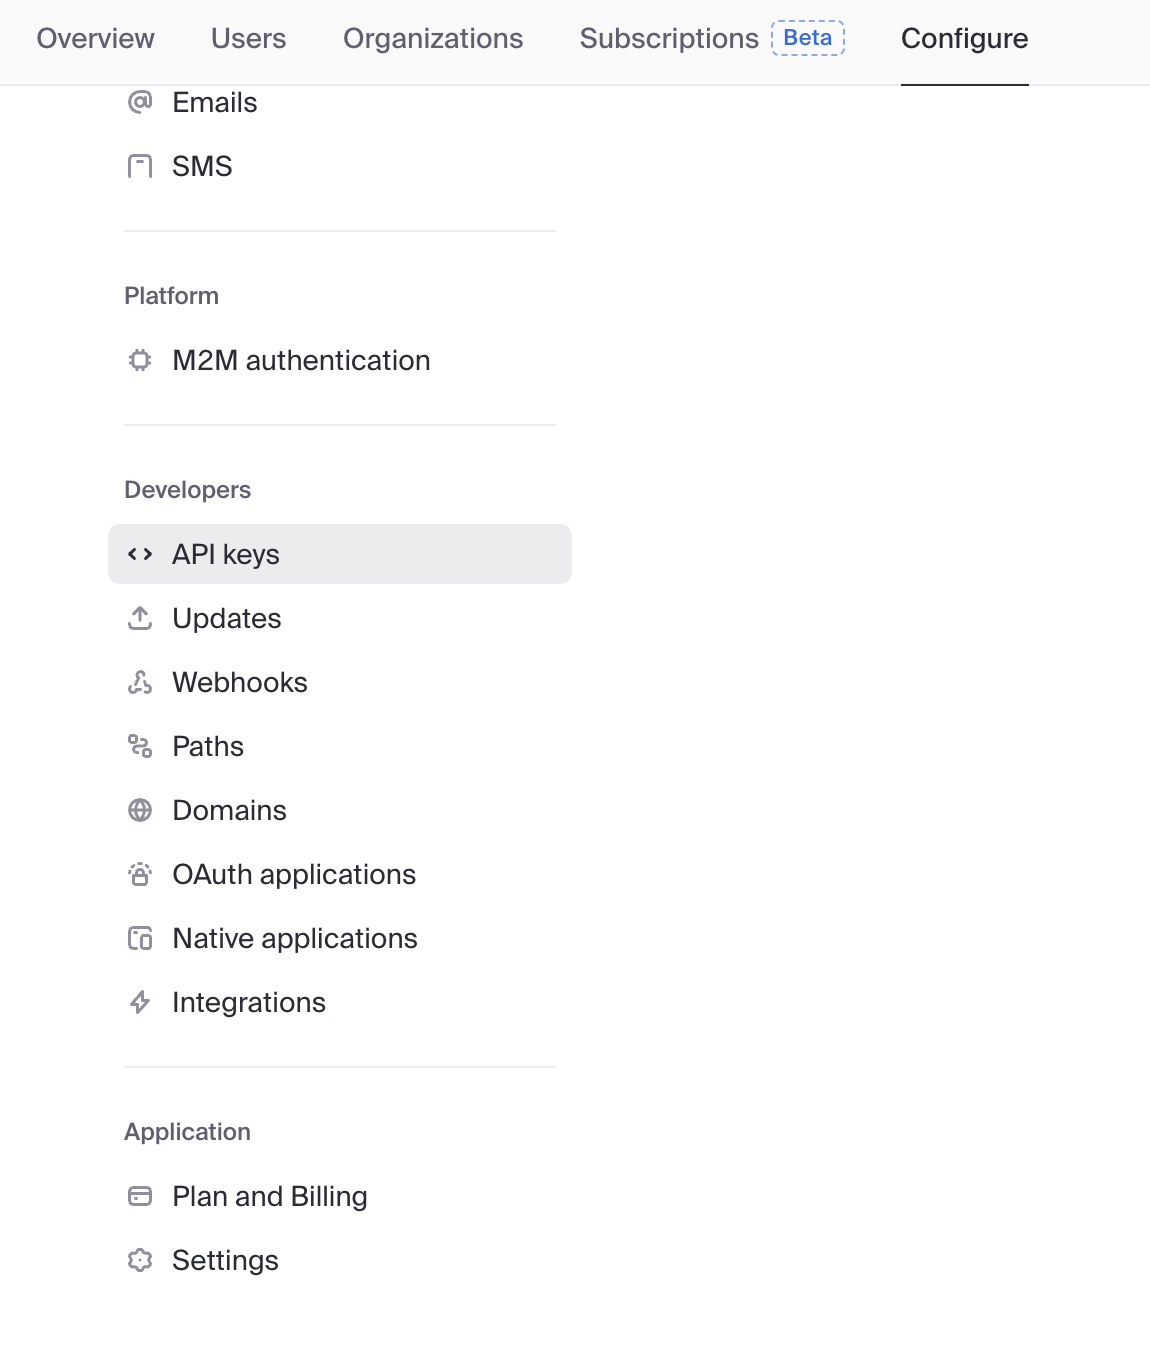
Find the Publishable key (starts with
pk_) and Secret key (starts withsk_).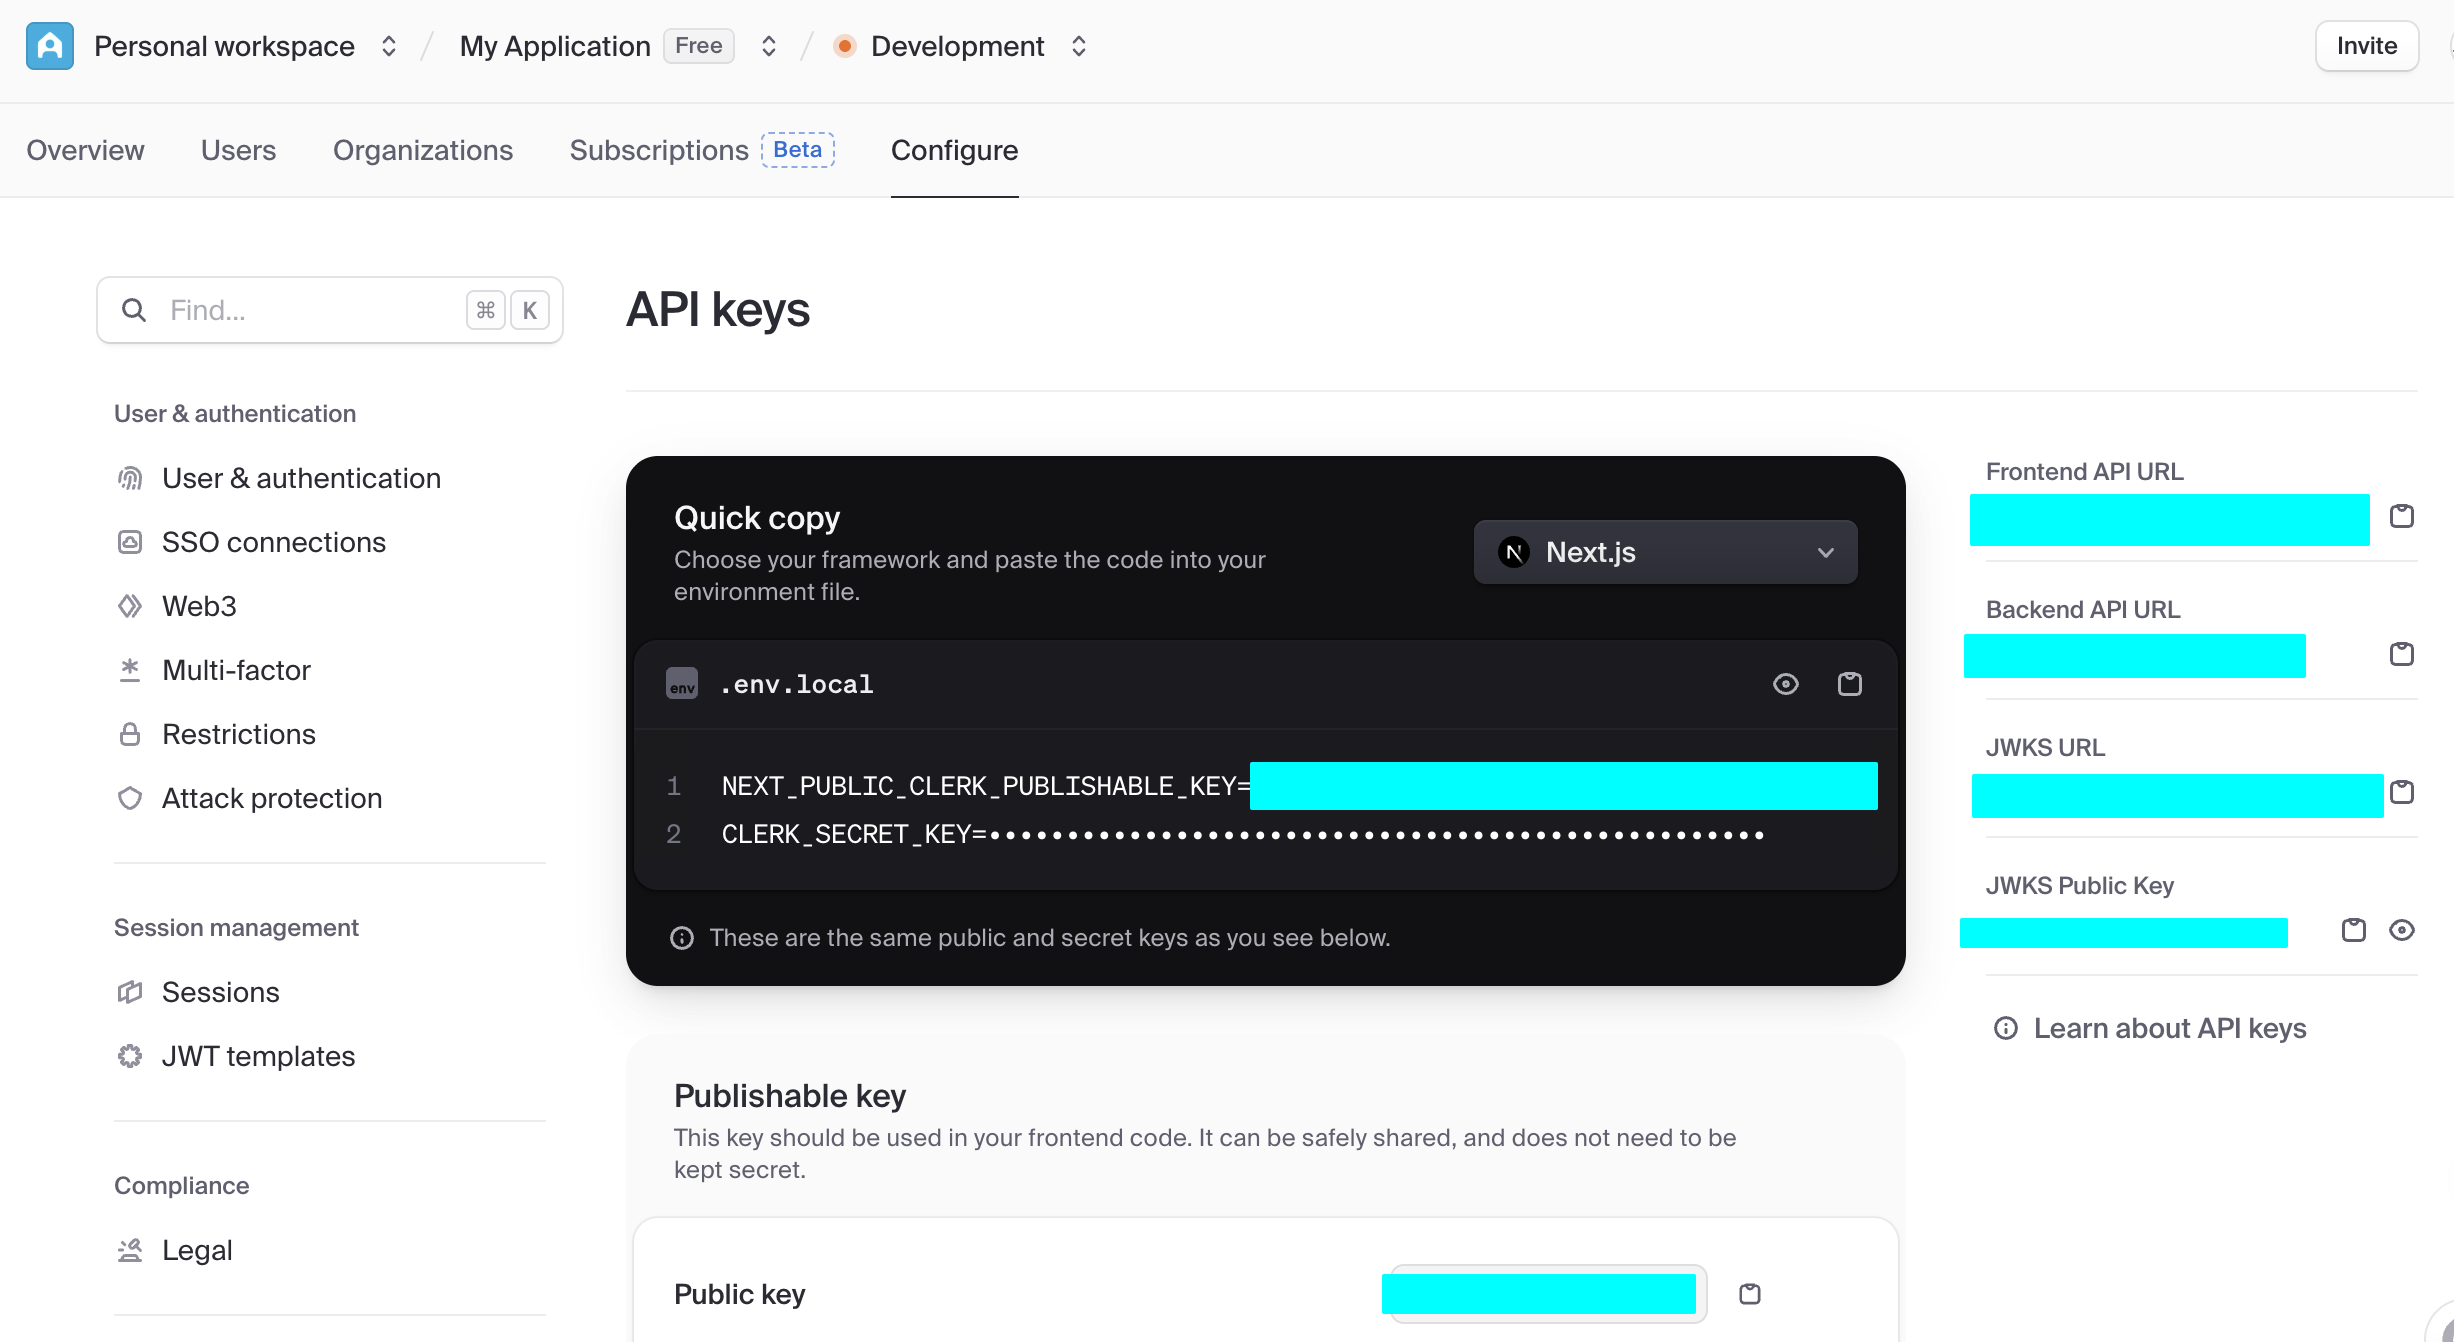
Copy them into your
.env.localfile (refer to this project's.env.example):bashNEXT_PUBLIC_CLERK_PUBLISHABLE_KEY=pk_test_... CLERK_SECRET_KEY=sk_test_...
5.6.2 配置 Supabase 和 Clerk 的原生集成
Supabase and Clerk provide native integration:
- In Clerk dashboard:
- go to Integrations
- activate Supabase integration
- copy Clerk Domain (
https://<id>.clerk.accounts.devor custom domain)
- In Supabase dashboard:
- go to Authentication -> Providers
- add Clerk provider
- paste Clerk Domain
- save
5.6.3 通过 Webhook 同步用户数据至 Supabase
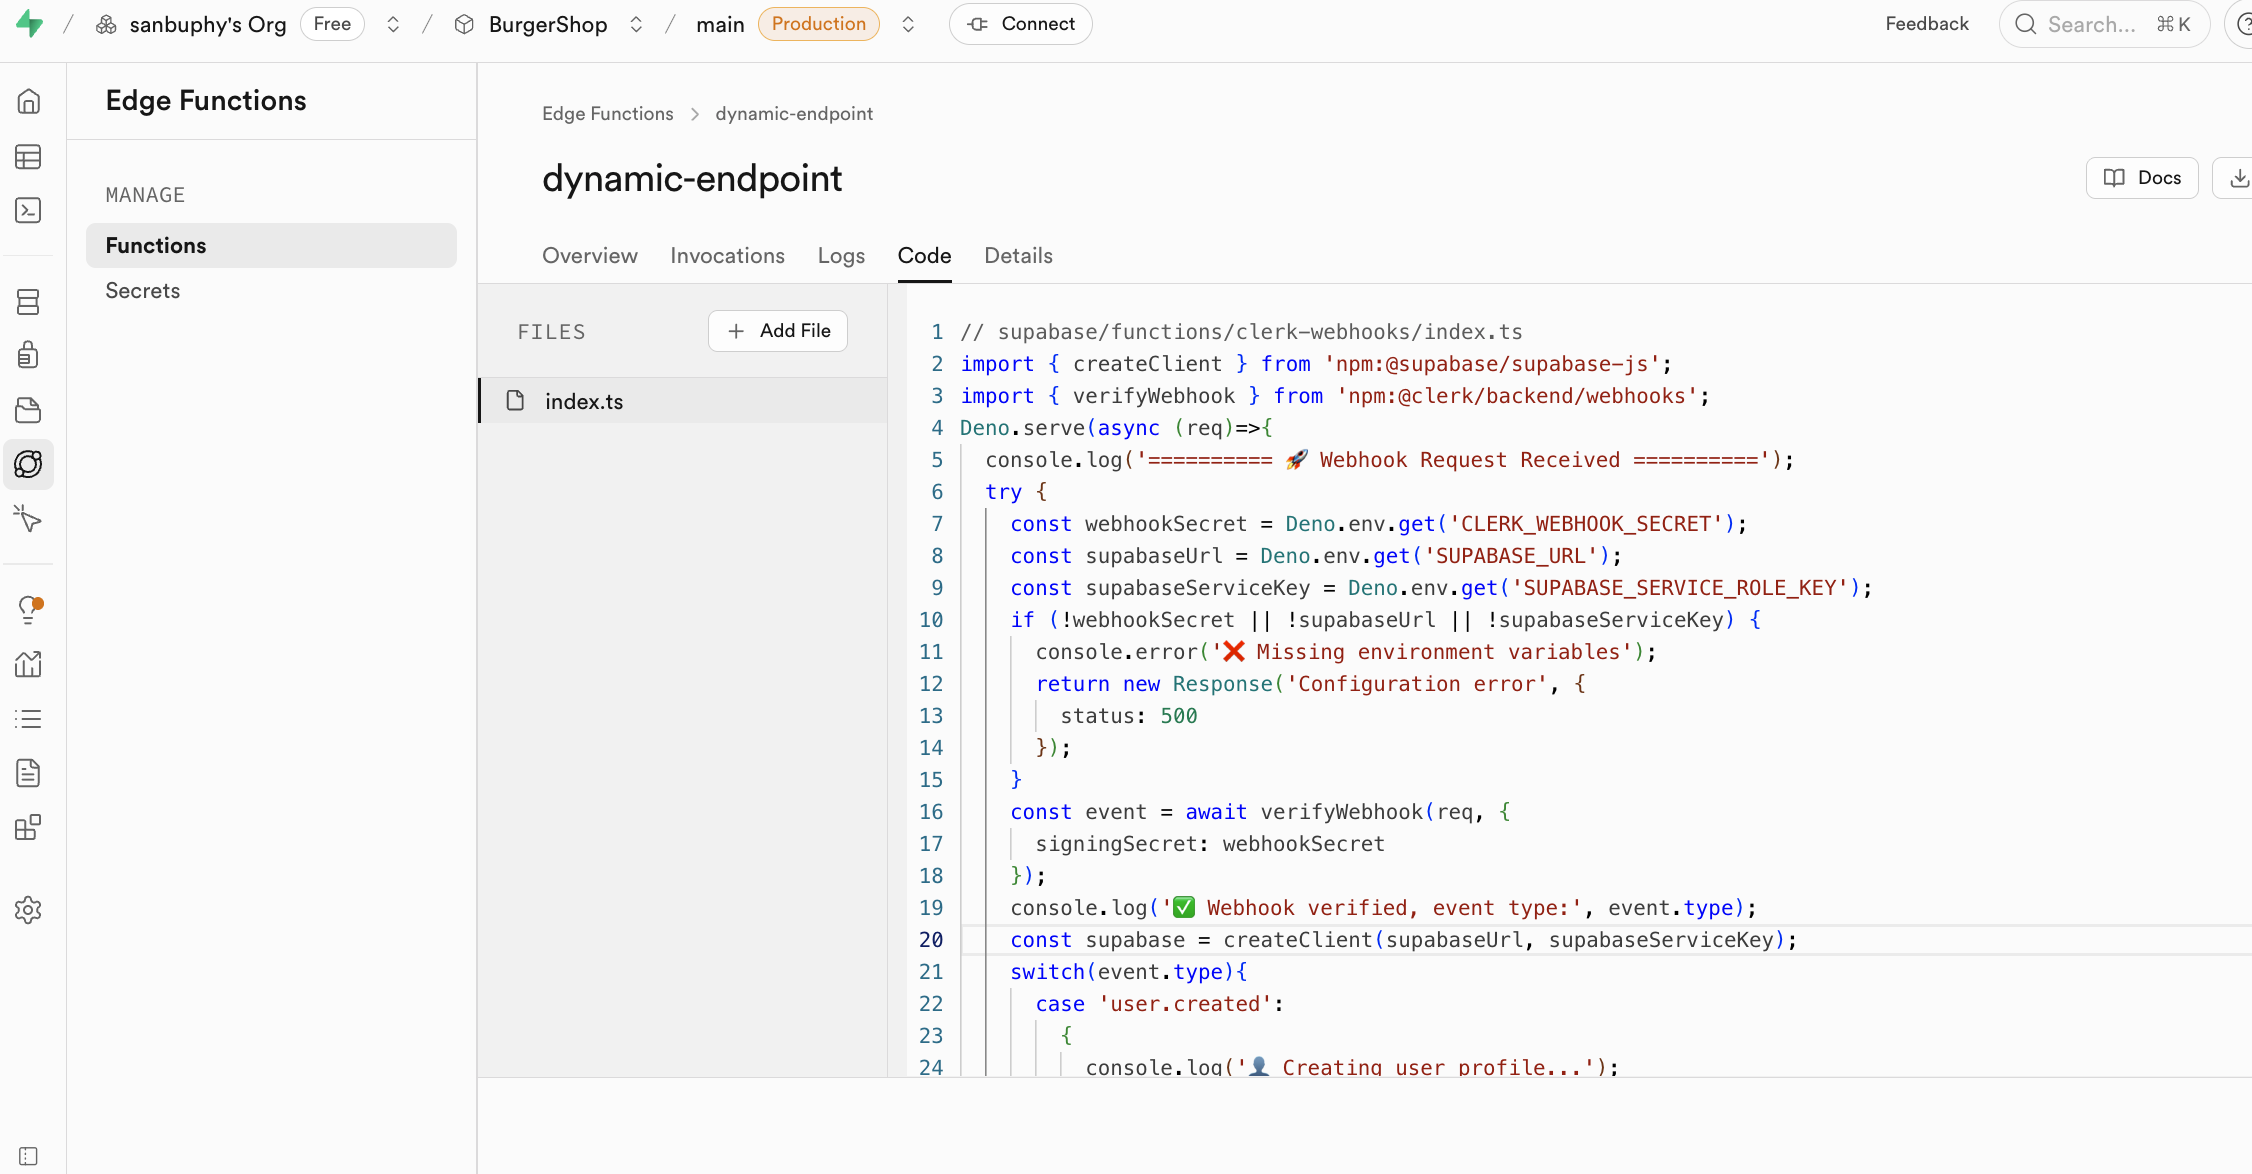
Native integration only solves authentication authorization. It does not sync already-registered Clerk users into Supabase. For easier management, we also need to keep a backup of user data in Supabase public.users for relational queries or data analysis. We can implement this with Clerk Webhooks. The full flow is:
- Clerk sends notifications: when a user registers or updates profile in Clerk, Clerk sends a POST request to the configured Webhook URL.
- Supabase receives and writes: an Edge Function receives the request, verifies the signature (for security), and then updates user data into Supabase tables.
Before we start, we need to configure the table used for synchronization:
-- File: init.sql

-- 1. Create `users` table for synced Clerk users
-- This table will store user data pushed from Clerk Webhooks.
CREATE TABLE public.users (
  id TEXT NOT NULL PRIMARY KEY, -- Corresponds to Clerk User ID
  email TEXT,
  first_name TEXT,
  last_name TEXT,
  image_url TEXT,
  created_at TIMESTAMPTZ DEFAULT NOW(),
  updated_at TIMESTAMPTZ DEFAULT NOW()
);

-- 2. Enable Row Level Security (RLS) on the table
-- This is an important security measure to ensure users cannot access any data by default.
ALTER TABLE public.users ENABLE ROW LEVEL SECURITY;

-- 3. Create RLS policies
-- Policy 1: Allow authenticated users to read their own user info.
-- `auth.jwt()->>'sub'` extracts the user ID from the JWT provided by Clerk.
CREATE POLICY "Authenticated users can view their own user record"
ON public.users FOR SELECT
TO authenticated
USING ( (SELECT auth.jwt()->>'sub') = id );

-- Policy 2: Allow users to update their own info.
CREATE POLICY "Authenticated users can update their own user record"
ON public.users FOR UPDATE
TO authenticated
USING ( (SELECT auth.jwt()->>'sub') = id );
Then enable the corresponding Edge Function in Supabase:
// File path: supabase/functions/clerk-webhooks/index.ts

import { serve } from 'https://deno.land/std@0.177.0/http/server.ts'
import { Webhook } from 'npm:svix'
import { createClient } from 'https://esm.sh/@supabase/supabase-js@2'

// Get Clerk Webhook signing secret from environment variables
const CLERK_WEBHOOK_SECRET = Deno.env.get('CLERK_WEBHOOK_SECRET')

if (!CLERK_WEBHOOK_SECRET) {
  throw new Error('CLERK_WEBHOOK_SECRET is not set in environment variables')
}
const supabaseAdmin = createClient(
  Deno.env.get('SUPABASE_URL')!,
  Deno.env.get('SUPABASE_SERVICE_ROLE_KEY')!
)

serve(async (req) => {
  try {
    // 1. Get Svix signature info from request headers
    const headers = Object.fromEntries(req.headers)
    const svix_id = headers['svix-id']
    const svix_timestamp = headers['svix-timestamp']
    const svix_signature = headers['svix-signature']

    if (!svix_id || !svix_timestamp || !svix_signature) {
      return new Response('Missing Svix headers', { status: 400 })
    }

    const payload = await req.json()
    const body = JSON.stringify(payload)

    // 2. Verify Webhook signature validity using the secret
    const wh = new Webhook(CLERK_WEBHOOK_SECRET)
    const evt = wh.verify(body, {
      'svix-id': svix_id,
      'svix-timestamp': svix_timestamp,
      'svix-signature': svix_signature,
    })

    const { id } = evt.data
    const eventType = evt.type
    console.log(`Received webhook event: ${eventType} for user: ${id}`)

    // 3. Execute database operations based on event type
    switch (eventType) {
      case 'user.created': {
        const { id, first_name, last_name, image_url, email_addresses } = evt.data
        const { error } = await supabaseAdmin.from('users').insert({
          id,
          first_name,
          last_name,
          image_url,
          email: email_addresses[0]?.email_address,
        })
        if (error) throw error
        console.log(`User ${id} created in Supabase.`)
        break
      }
      case 'user.updated': {
        const { id, first_name, last_name, image_url, email_addresses } = evt.data
        const { error } = await supabaseAdmin
          .from('users')
          .update({
            first_name,
            last_name,
            image_url,
            email: email_addresses[0]?.email_address,
            updated_at: new Date().toISOString(), // Update timestamp
          })
          .eq('id', id)
        if (error) throw error
        console.log(`User ${id} updated in Supabase.`)
        break
      }
      case 'user.deleted': {
        // For delete events, ID might be at the top level
        const deletedId = id
        if (!deletedId) {
          return new Response('Deleted user ID not found', { status: 400 })
        }
        const { error } = await supabaseAdmin.from('users').delete().eq('id', deletedId)
        if (error) throw error
        console.log(`User ${deletedId} deleted from Supabase.`)
        break
      }
    }

    return new Response('Webhook processed successfully', { status: 200 })
  } catch (err) {
    console.error('Error processing webhook:', err.message)
    return new Response(`Webhook Error: ${err.message}`, { status: 400 })
  }
})
After initializing the Supabase table and function, you still need to enable Webhooks in Clerk:
- In Clerk Dashboard -> Webhooks, add an Endpoint and fill in the Supabase Edge Function URL.
- Check events such as
user.created,user.updated, anduser.deleted.
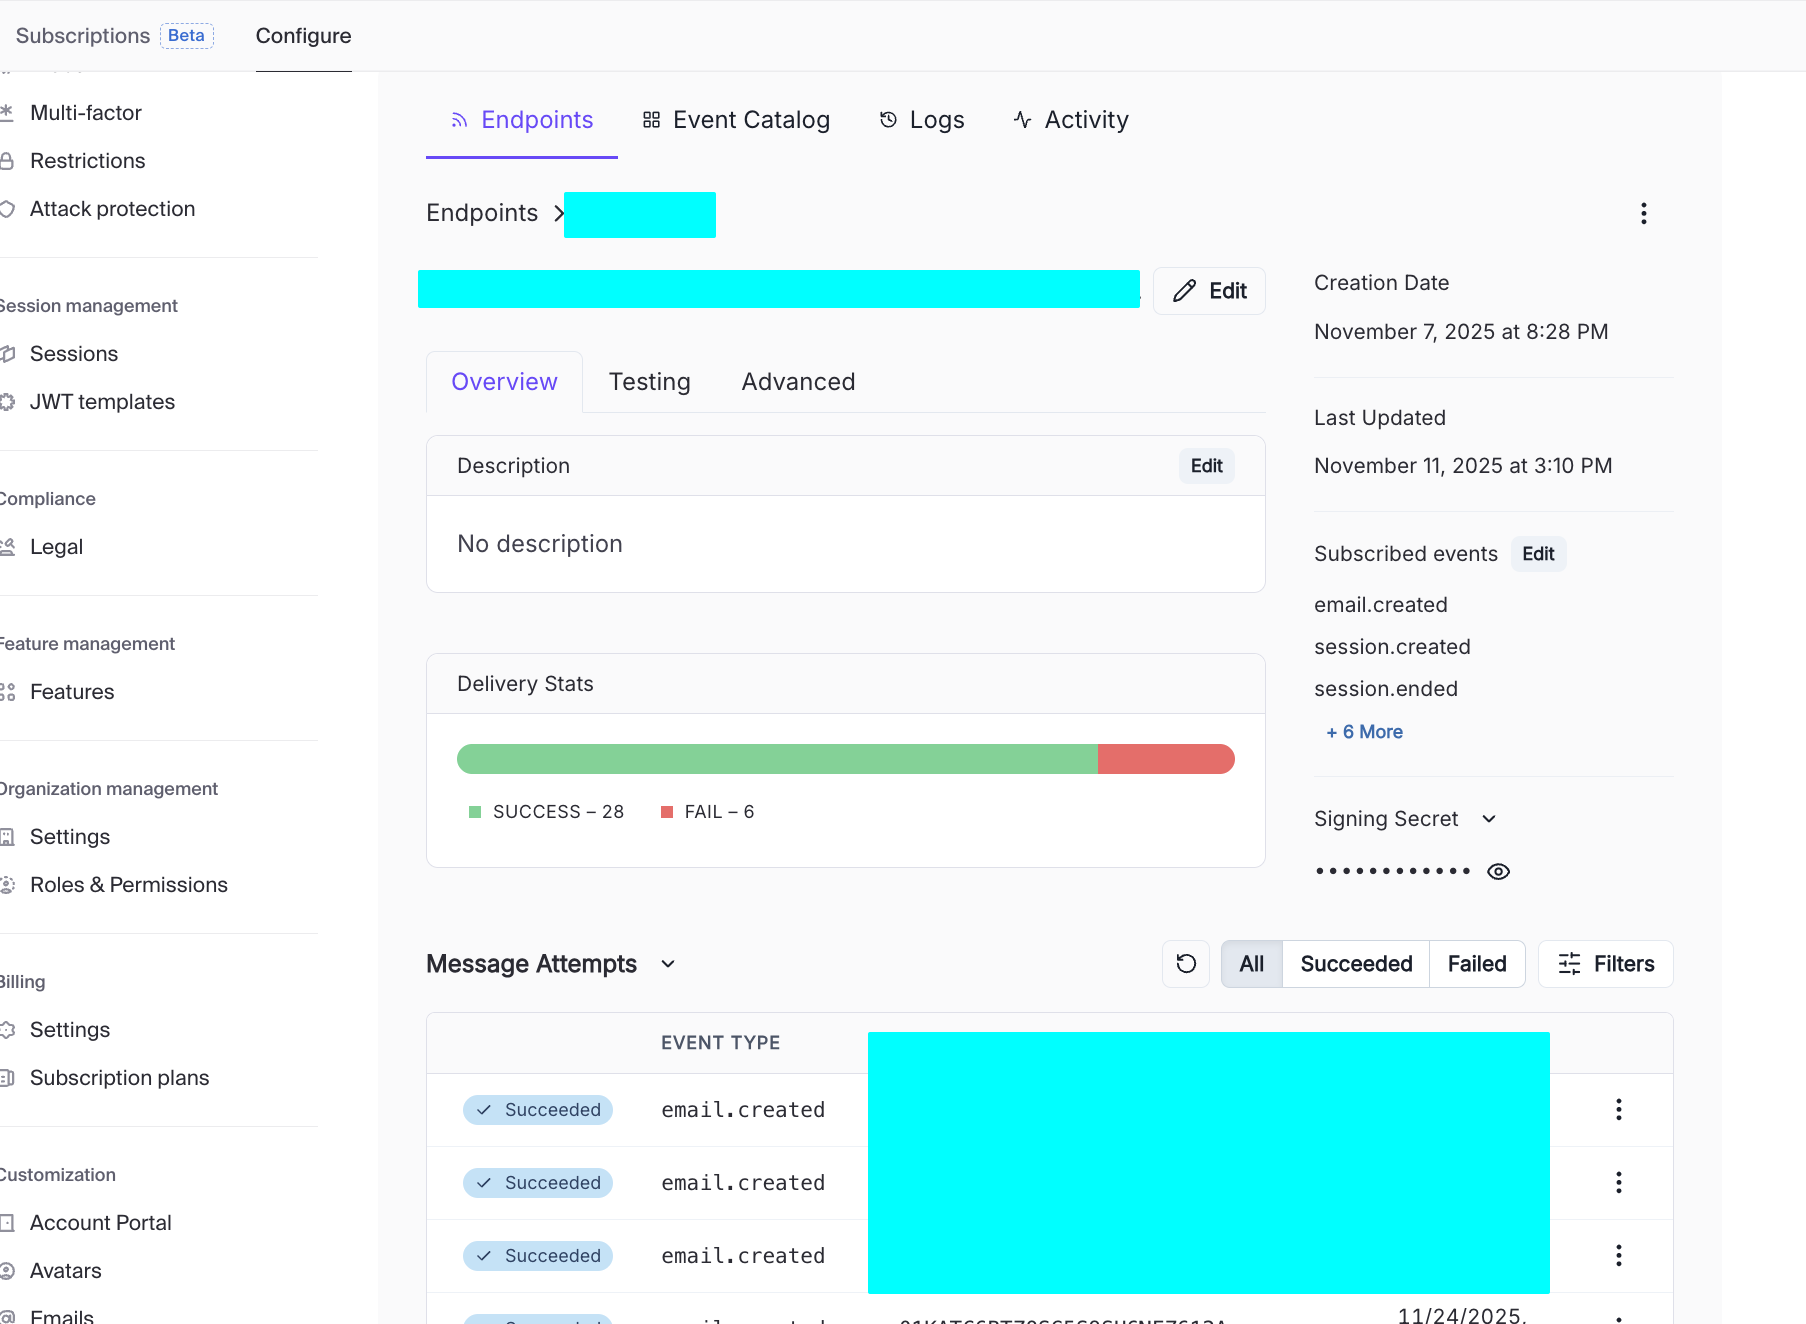
Once the setup succeeds, you can see different request attempts in Message Attempts. Click each one to inspect detailed response payloads. If a webhook call to Edge Function fails, you can quickly identify the cause from the returned details. It is recommended to compare request logs from both Clerk and Supabase to verify each function setting is correct.
5.6.4 Clerk 中的第三方登录支持
Before config, distinguish:
- development environment (local/internal testing)
- production environment (public real users)
Clerk separates these for security and policy reasons.
- Development quick verification
- In Clerk dashboard -> SSO connections -> Add connection -> For all users
- choose GitHub/Google and add
- Clerk shared credentials handle local testing quickly
- Production custom credentials
When switching to production instance, shared credentials are not enough. Configure custom OAuth credentials:
- copy callback/redirect URL from Clerk
- configure OAuth app on provider side
- paste client ID/secret back into Clerk
2.1 GitHub production steps:
- GitHub Developer Settings -> OAuth Apps -> New OAuth app
- set application name/homepage/callback URL
- generate client secret
- paste into Clerk SSO connection
2.2 Google production steps:
- Google Cloud Console -> APIs & Services -> Credentials
- create OAuth client (Web application)
- set authorized origins and redirect URI
- copy client ID/secret to Clerk
Notes:
avoid WebView login for Google OAuth
testing mode has user limits; switch publishing status to production after review
configure sub-address handling policy if needed
optionally integrate Clerk Google One Tap component
test social login
- use Clerk Account Portal sign-in page
- test GitHub/Google sign-in redirect and callback behavior
6. 从 Supabase 到更多后端开发组件(进阶)
So far we viewed backend capabilities through Supabase. From a broader engineering perspective, each Supabase module has specialized alternatives in the market.
Why understand alternatives:
- decide when all-in Supabase is enough
- replace only one module when scaling/compliance/cost changes
- broaden system design trade-off understanding
This section compares common alternatives by features, pricing, ease of use, and community traction.
同类 Baas 平台
| Platform/Service | Type | Free Tier/Pricing | Features / Use Cases |
|---|---|---|---|
| Firebase (Google) | Fully managed BaaS (Auth + Firestore + Storage + Functions + Hosting) | Spark free tier; Blaze pay-as-you-go | Most mature ecosystem, great docs, fast onboarding, strong realtime; but complex billing and stronger lock-in |
| Supabase | Open-source BaaS (Postgres + Auth + Storage + Edge Functions + Realtime) | Free: 500MB DB, 1GB storage, limited function calls; Pro by plan | SQL-first Firebase-like experience; modern DX, can self-host |
| Appwrite Cloud | Open-source all-in-one BaaS | Free basic tier, paid by resources | modern UX, unified APIs, self-host option; ecosystem smaller than Firebase/Supabase |
| Nhost | Postgres + GraphQL + Auth + Storage + Functions | Free: 1GB DB, 1GB storage, limited function calls | Similar to "Supabase + Hasura"; GraphQL-native |
| AWS Amplify | AWS full-stack backend suite | Free quotas for hosting/cognito/functions | strong enterprise reliability; steeper learning curve |
| Xata | Multi-model DB + Auth + Edge Functions | Free: 250k records, 15GB bandwidth | strong DX and UI, but less all-in-one than Firebase/Supabase |
| Convex | Managed DB + Auth + Functions (frontend-first) | Free developer tier; paid by usage | very fast MVP development; higher platform binding risk |
认证 (Auth)
| Tool/Platform | Features | Free Tier/Pricing | Fit and Trade-offs |
|---|---|---|---|
| Firebase Authentication | email/password, phone, social, anonymous, etc. | Spark up to 50k MAU | easy integration, rich docs, but Firebase lock-in |
| Auth0 (Okta) | enterprise SSO/MFA/rules/extensibility | free 25k MAU then paid | enterprise-grade but can become expensive |
| AWS Cognito | AWS-native identity service | free 10k MAU/month then pay-as-you-go | strong AWS integration, higher complexity |
| Logto | open-source auth platform | self-host free, cloud free 50k MAU | strong emerging alternative, smaller ecosystem |
| Keycloak | open-source IAM/SSO | free self-host | powerful and extensible, higher ops complexity |
文件存储 (Storage)
| Platform/Service | Type | Free Tier/Pricing | Features/Use Cases |
|---|---|---|---|
| Amazon S3 | cloud object storage | AWS free tier: 5GB + request quotas | industry standard object storage, high reliability |
| Google Cloud Storage / Firebase Storage | cloud object storage | Spark free + Blaze paid | strong Firebase integration, fine-grained rules |
| Tencent COS / Aliyun OSS | domestic cloud object storage | pay-as-you-go + newcomer quotas | strong domestic ecosystem integration |
| MinIO | open-source S3-compatible storage | free self-host | lightweight S3-compatible storage for private deployment |
| Cloudinary / Imgix | media storage + CDN | basic free plans | strong media transformation capabilities |
边缘函数 (Edge Functions)
| Platform/Service | Features | Free Tier/Pricing | Fit and Trade-offs |
|---|---|---|---|
| Cloudflare Workers | globally distributed JS/Wasm runtime | free 100k req/day | ultra-low latency edge execution |
| Vercel Edge Functions | deep Next.js integration | hobby free quotas | excellent frontend integration |
| Netlify Edge / Functions | Node functions + edge routes | free credit-based quotas | easy git-integrated deployment |
| AWS Lambda@Edge / CloudFront Functions | AWS edge compute | lambda free quotas + cloudfront pricing | powerful but more complex setup |
实时通信 (Realtime)
| Platform/Service | Features | Free Tier/Pricing | Fit and Trade-offs |
|---|---|---|---|
| Firebase Realtime DB / Firestore | realtime DB push updates | spark free + blaze paid | easy realtime listening, weaker complex querying |
| Ably | pub/sub realtime messaging platform | free 6M messages/month | robust global realtime service |
| Pusher Channels | event-push channels | sandbox free tier | quick chat/notification integrations |
| Self-host WebSocket/Socket.IO | custom realtime infra | self-host infra cost | highest flexibility, highest ops burden |
数据库
| Platform/Tool | DB Type | Free Tier/Pricing | Key Features |
|---|---|---|---|
| Neon | serverless PostgreSQL | free tier + branch compute limits | modern serverless Postgres with branching workflow |
| Aiven PostgreSQL | managed relational DB | small free plans + paid | managed operations across cloud providers |
| CockroachDB Cloud | distributed SQL (Postgres-compatible) | free storage quota | horizontal scaling and consistency |
| TiDB Cloud | distributed relational (MySQL-compatible) | free cluster quotas | strong distributed MySQL-compatible architecture |
| MongoDB Atlas | document NoSQL | free M0 cluster | flexible document modeling |
| SQLPub | multi-database platform | free request/storage quotas | one-stop multi-DB service |
Different options optimize different dimensions: flexibility, cost, ease of use, compliance, ecosystem fit, and scalability.
总结
In today's lesson, we systematically learned foundational database concepts, Supabase core definitions, and practical operation details. During later project practice, you can always come back to this document as a reference based on your specific application scenario and requirements.
Please always remember one key principle: Ship first, perfect later. You do not need to achieve everything in one step. Through continuous iteration and optimization, we can gradually approach better outcomes. Wish you smooth progress in your upcoming project practice.
📚 课后作业
- Build an application with user management + database support.
Try to include additional Supabase features (Realtime / cloud storage / Edge function).