How to Build Your Own Personal Website and Academic Blog - Static Deployment with GitHub Pages
1. What Is a Personal Website and Academic Blog?
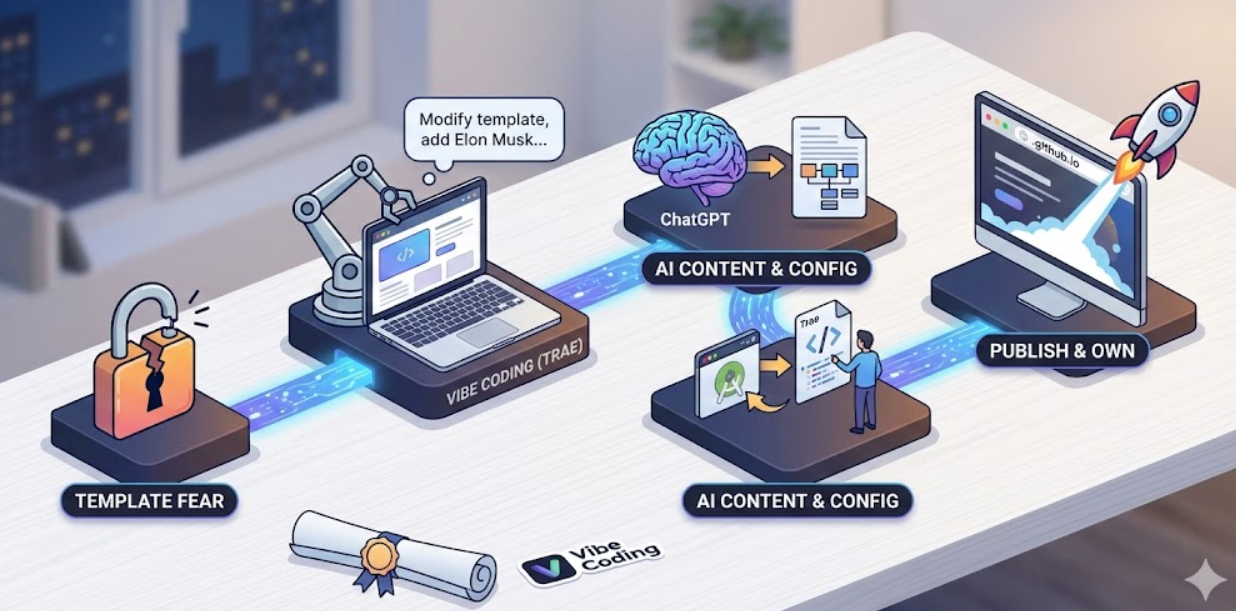
In this tutorial, we will run through a complete closed loop: from finding an existing website template, to modifying it into a personal homepage for Elon Musk, and finally publishing it online for free.
For this tutorial, you should at least have:
- A computer (Windows or Mac)
- Your GitHub account (used to store website code and provide free hosting)
- Trae installed (your AI coding partner)
- A Git environment
- A Ruby environment
1.1 What is an academic personal homepage?
An academic personal homepage is your own private territory on the internet.
Unlike WeChat Moments, Zhihu, or LinkedIn, it does not depend on any platform's recommendation algorithm, and it will not disappear if a platform shuts down. It is a long-term, stable personal showcase space that can be indexed by Google and Google Scholar. It usually contains your bio, publications, projects, and technical blog.
1.2 Why build your own website?
In the Vibe Coding development model, we no longer need to work through thick HTML/CSS books like people did ten years ago. With AI, the role of building a website shifts from "struggling coder" to "website editor-in-chief":
- You (Editor / PM): decide the site's tone and content. For example: "Put Musk's Mars colonization PPT here," or "Change this button to Tesla red."
- Trae (AI Engineer): handles the hard implementation work. It turns your natural-language instructions into code, including layout, color schemes, and mobile adaptation.
- GitHub Pages (Showroom): provides a free server and domain so people around the world can see your work.
Why is it worth having for academics or technical people?
- Externally (building influence): it is an "evergreen business card." When applying for PhD programs, jobs, or collaborations, a tidy personal homepage is often much more persuasive than a PDF resume.
- Internally (knowledge accumulation): it is your "second brain." You can use it to record course notes, technical thinking, and build your own knowledge system.
- For the future (being discoverable): search engines like structured content. With a homepage, when people search your name, the content you define can appear first, instead of unrelated people with the same name.
1.3 Four typical ways to build a personal website
In practice, there are countless ways to build a website. Here we introduce only the four most mainstream ones:
Method 1: hand-writing from scratch with HTML / CSS / JS This is the traditional computer science route. You write the code character by character. The advantage is extreme flexibility. The disadvantage is a very high barrier to entry, and it is easy to get stuck while tweaking CSS. It is not ideal for those of us who want to focus on content.

Method 2: visual site builders such as Wix / WordPress This is like building with blocks. The advantage is easy drag-and-drop editing. The disadvantage is that it often requires payment, tends to generate bloated code, lacks an academic-geek feel, and is difficult to customize deeply.

Method 3: GitHub-based templates (Static Site Generators) This is the most recommended mainstream route in academic and geek communities. We directly fork a mature template written by others, such as one based on Jekyll or Hugo, and then only modify the configuration files and content.

Method 4: Vibe Coding (AI visual generation flow) With AI agents that have strong multimodal visual understanding, you only need to see a website style you like online, take a screenshot, and tell the AI: "Write me a webpage based on this style." The AI can then analyze the visual elements and generate the underlying code for you.

The choice in this tutorial: GitHub Pages + academic template + AI modifications. The reason is simple:
- Zero cost: no need to buy a server, no need to buy a domain.
- High quality: templates are often designed by top developers, with minimal style, professional structure, and fast loading.
- Easy to maintain: you mainly write Markdown, similar to writing in Feishu Docs or Notion, and AI helps generate the webpage.
1.4 The full roadmap of this tutorial
To make the configuration process more intuitive and less boring, we will use a fun case: building an academic homepage for Musk.
Although Elon Musk is not a university professor, he has published many public "technical white papers," such as Hyperloop Alpha, and also has many famous projects, such as SpaceX and Tesla. We will use those materials as test data and, together with Trae's Vibe Coding workflow, walk through a reusable site-building route:
- Find the skeleton: locate a high-quality website template on GitHub and fork it into your own repository.
- Prepare the environment: pull the code locally and configure Trae so the AI can read your project.
- Iterate with AI: replace the template's placeholder person with Elon Musk, upload his resume, change the "publication list" into a "technical white paper showcase," and even ask AI to recolor the site to "Mars red."
- Deploy online: push the modified code back to GitHub and instantly get an accessible website URL.
This section is only responsible for drawing the big picture. For now, just remember the main line: Fork template -> AI renovation -> push online In the following sections, we will walk through every step together.
2. Environment Preparation
2.1 Tools used in this tutorial
The whole build process uses four tools or resources, each playing the role of designer, contractor, landowner, or logistics system.
- A computer: Windows or Mac is fine. Unlike Android development, which often has high memory requirements, web development is very lightweight and runs smoothly on an ordinary office laptop.
- Trae: this is your AI coding partner and core productivity tool. In Vibe Coding mode, you do not need to master HTML or CSS syntax. You mainly tell AI in natural language, such as "Change the navigation bar to black" or "Put Musk's photo here," and let it write and modify the code for you.
- A GitHub account: this is your free server and code vault. We need it to store all website files. Most importantly, we will use GitHub Pages to turn the code into a globally accessible URL for free, eliminating the need to buy a server or domain.
- Git environment: this is the backstage courier. Although we write code locally in Trae, Git is what pushes the code from your computer to GitHub. You do not need to master Git commands, and Trae can help invoke them, but Git must be installed first.
- Ruby environment: this is the local web page workshop. Because the academic template in this tutorial uses Jekyll, which runs on Ruby, we need Ruby locally so we can preview the website on our own computer before pushing it online.
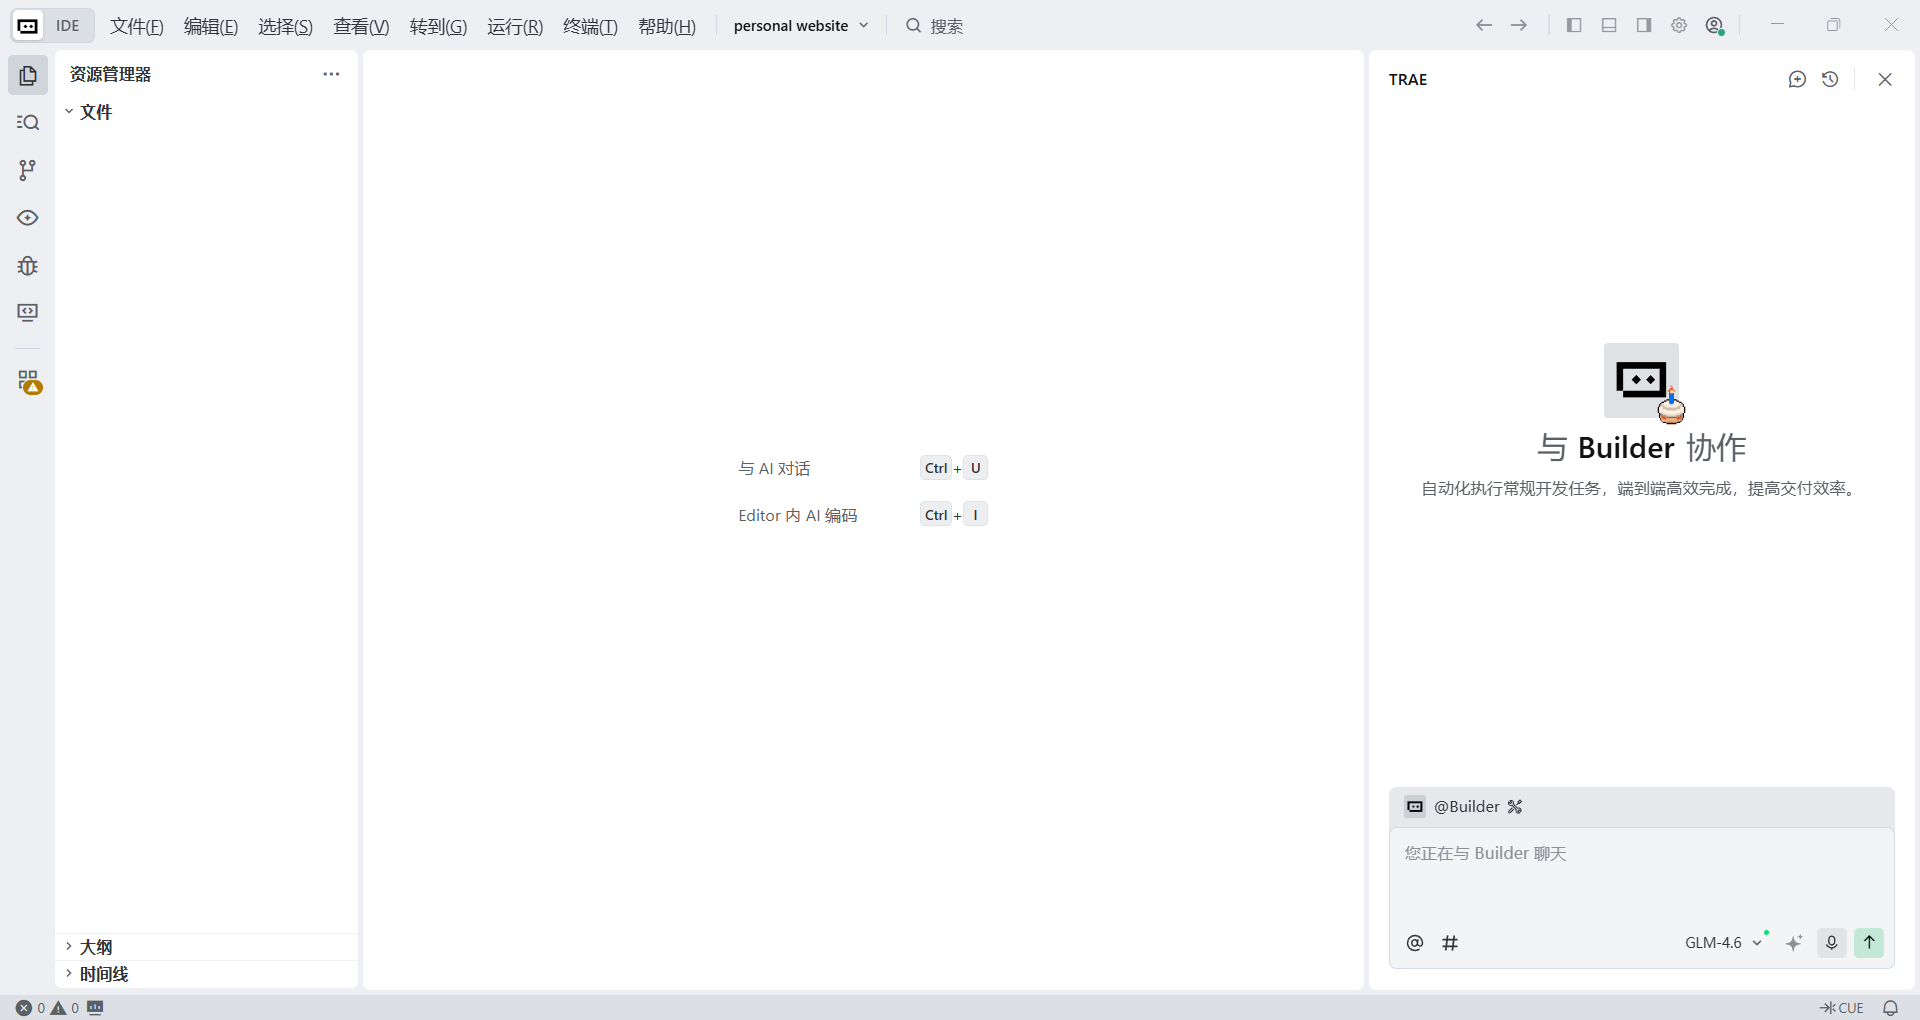
2.2 Download Trae
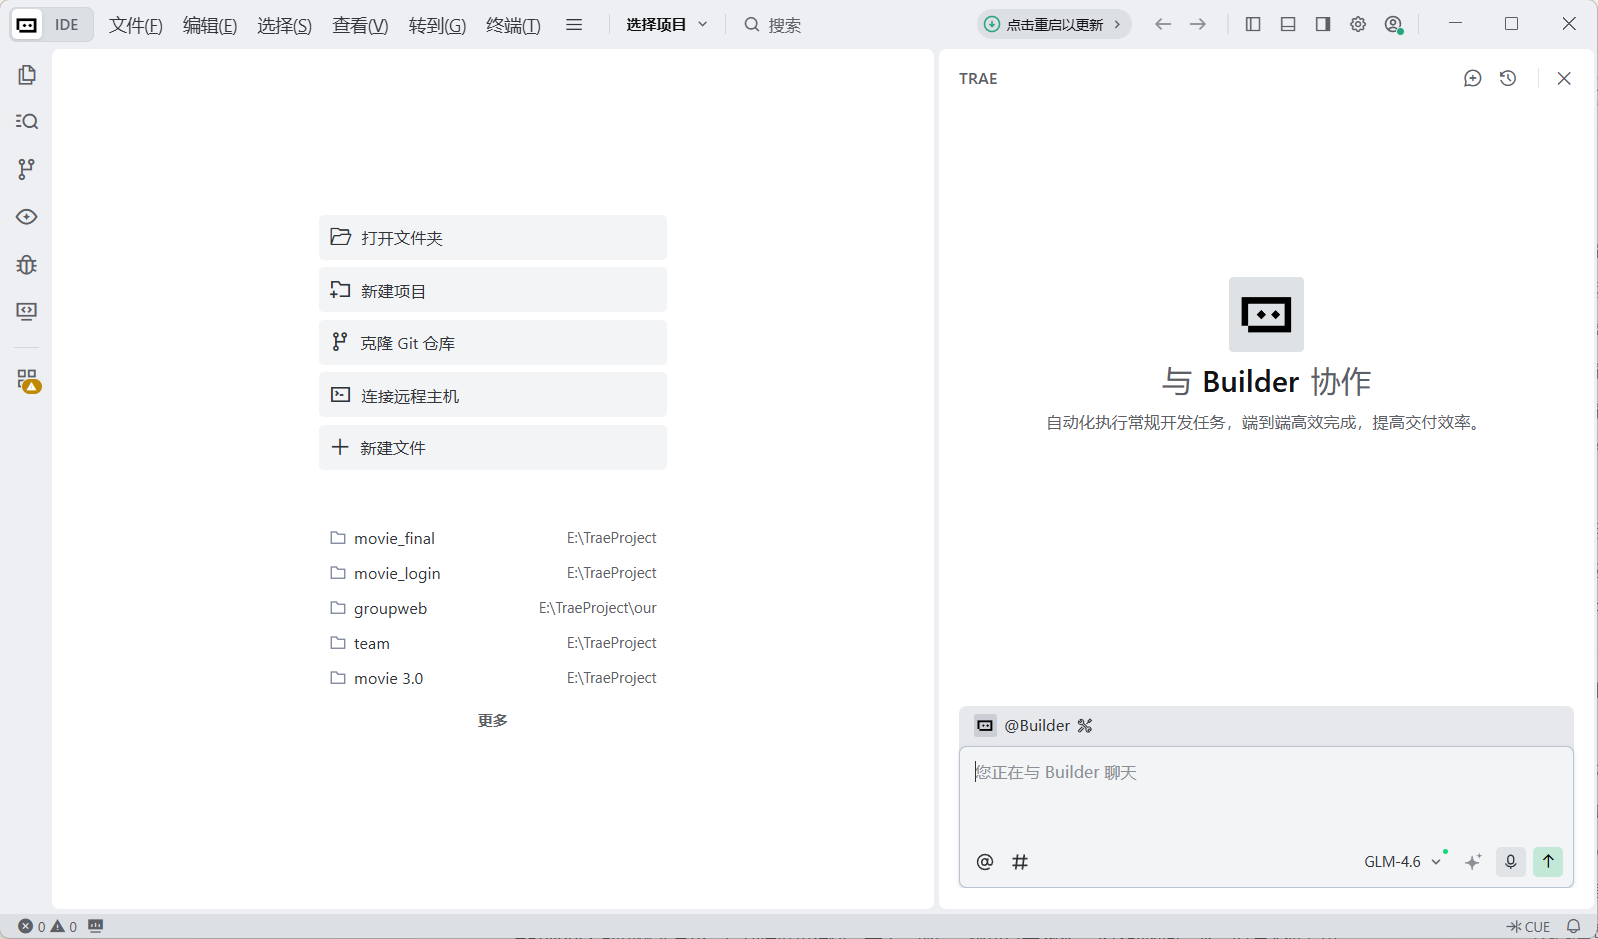
Trae is our main battlefield for Vibe Coding. You can think of it as a code editor with a super AI built in. Unlike traditional cold editors, it is like an experienced programmer sitting next to you, always ready to help.
- Download address: visit the official site https://www.trae.cn and download the version for your operating system, Windows or Mac.
- Installation: installation is very simple, just like installing WeChat or QQ. Double-click the installer package and click "Next" until it finishes.
After preparing this tool, in the following practical steps we will not need to stare at boring code panes. We will directly open the project here and use the chat panel on the right to tell the AI in natural language, in Chinese if you like, to help us write code, fix bugs, and even refactor whole pages.
2.3 Download Git
What is Git? If Trae is the AI engineer responsible for writing code in Vibe Coding, then Git is the courier responsible for transporting code. You need it to package the code written on your computer and safely push it to GitHub, your cloud repository. Without it, your site runs only on your own machine and no one else can see it.
In the past, you had to go to the official site, download the installer, and configure environment variables manually. That was annoying. Now, we can simply let Trae help detect and install it.
Step 1: Check whether Git is already installed
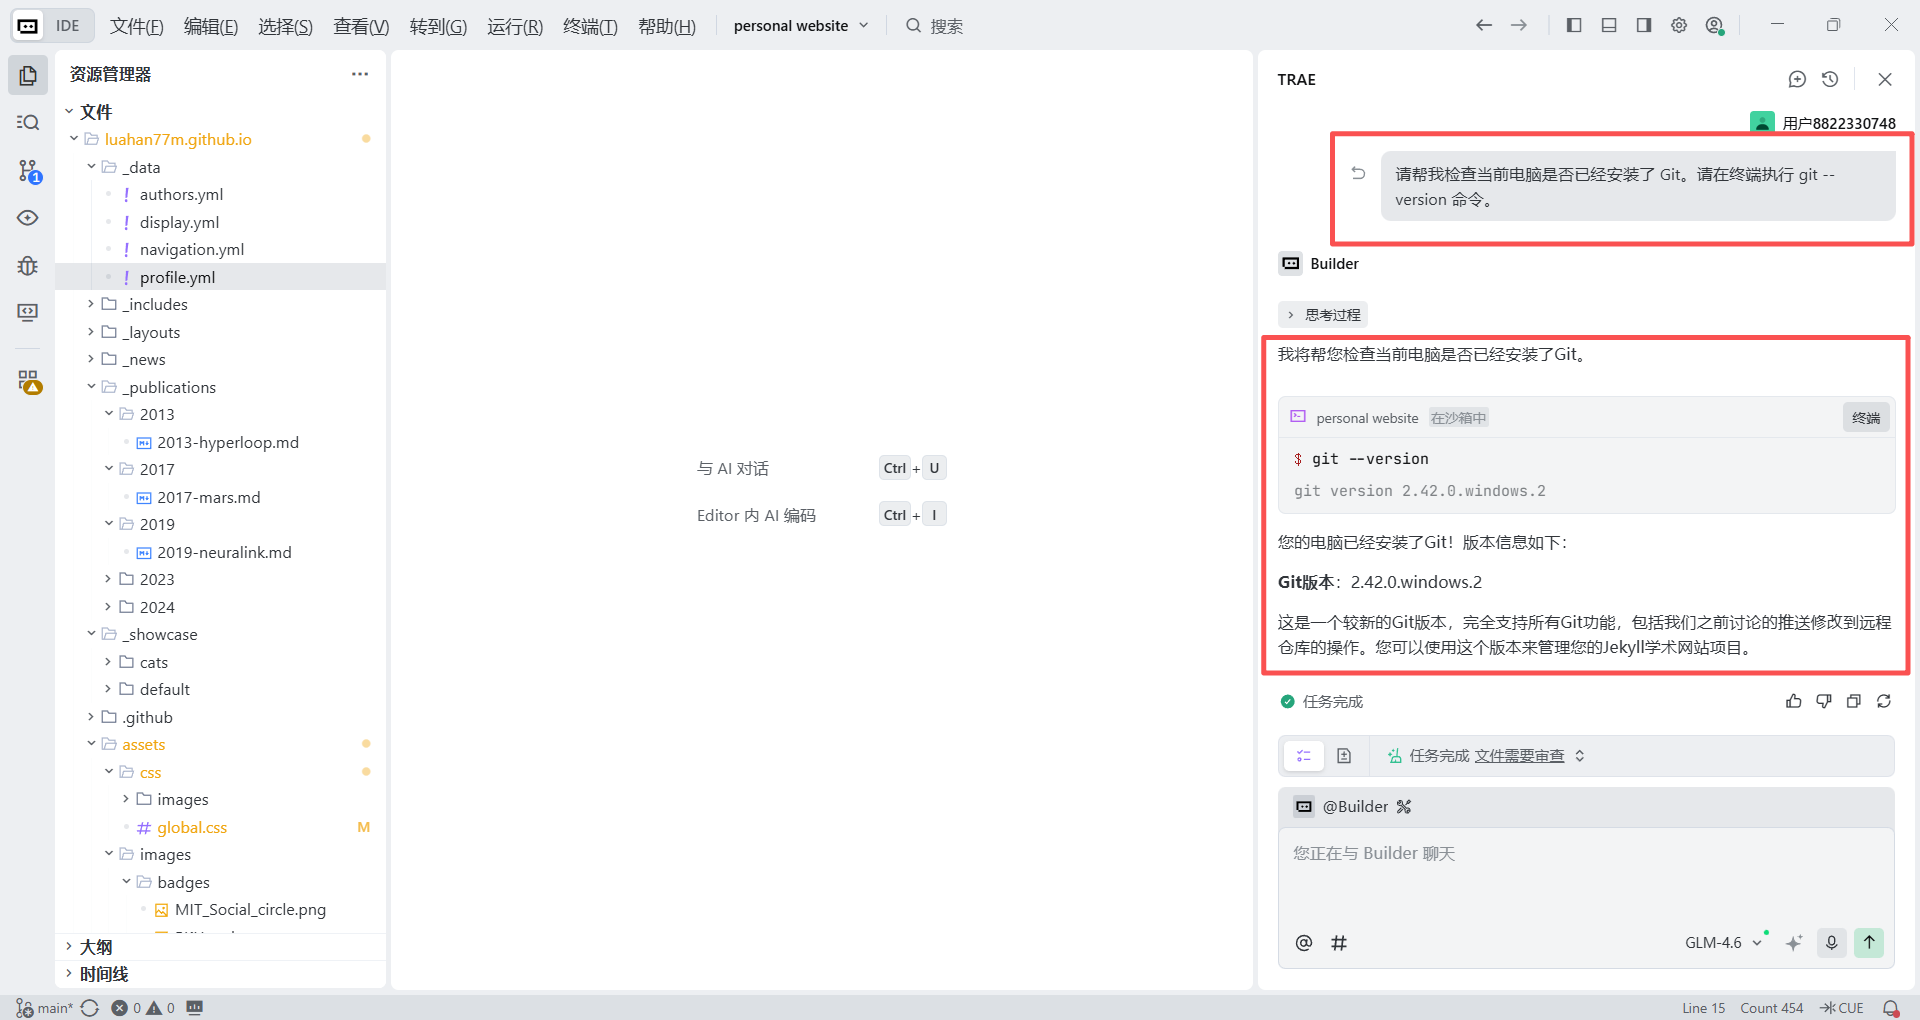
Open Trae and type the following instruction in the chat panel at the lower right:
Please help me check whether Git is already installed on this computer. Please run the `git --version` command in the terminal.- Case A (already installed): if you see something like
git version 2.xx.x, congratulations. You can skip the installation step directly. - Case B (not installed): if you see "command not found" or a group of red error messages, continue below.
Step 2: AI-assisted installation
Do not close Trae. Continue typing in the chat panel:
Instruction (Windows users):
I have not installed Git. Please write the command that uses the `winget` command-line tool to install Git automatically, and tell me how to run it in the terminal.Instruction (Mac users):
I have not installed Git. Please tell me how to quickly install Git through terminal commands, for example using `git` or `brew`.Trae will give you a command, often something like winget install --id Git.Git.
You only need to click the Run in Terminal button in the code block or copy it into the terminal at the bottom and press Enter. It will automatically download and install Git for you.
If you still feel the AI-assisted process is not perfect enough, you can refer to this tutorial for manual download and installation: Git download and installation tutorial
2.4 Install the Ruby environment
Before we officially start writing code, we still need one last piece of the puzzle. The academic homepage template used in this tutorial is built with Jekyll, which itself is based on the Ruby programming language.
To preview and debug the "renovation effect" on your own computer before pushing the code to GitHub for the world to see, we must install a Ruby environment on the computer. Think of this as hiring an interpreter on your computer who understands Ruby. Do not worry, you do not need to learn how to write Ruby. You only need to install it, and Trae can handle the rest.
2.4.1 Windows installation
Step 1: Download the installer using a domestic mirror
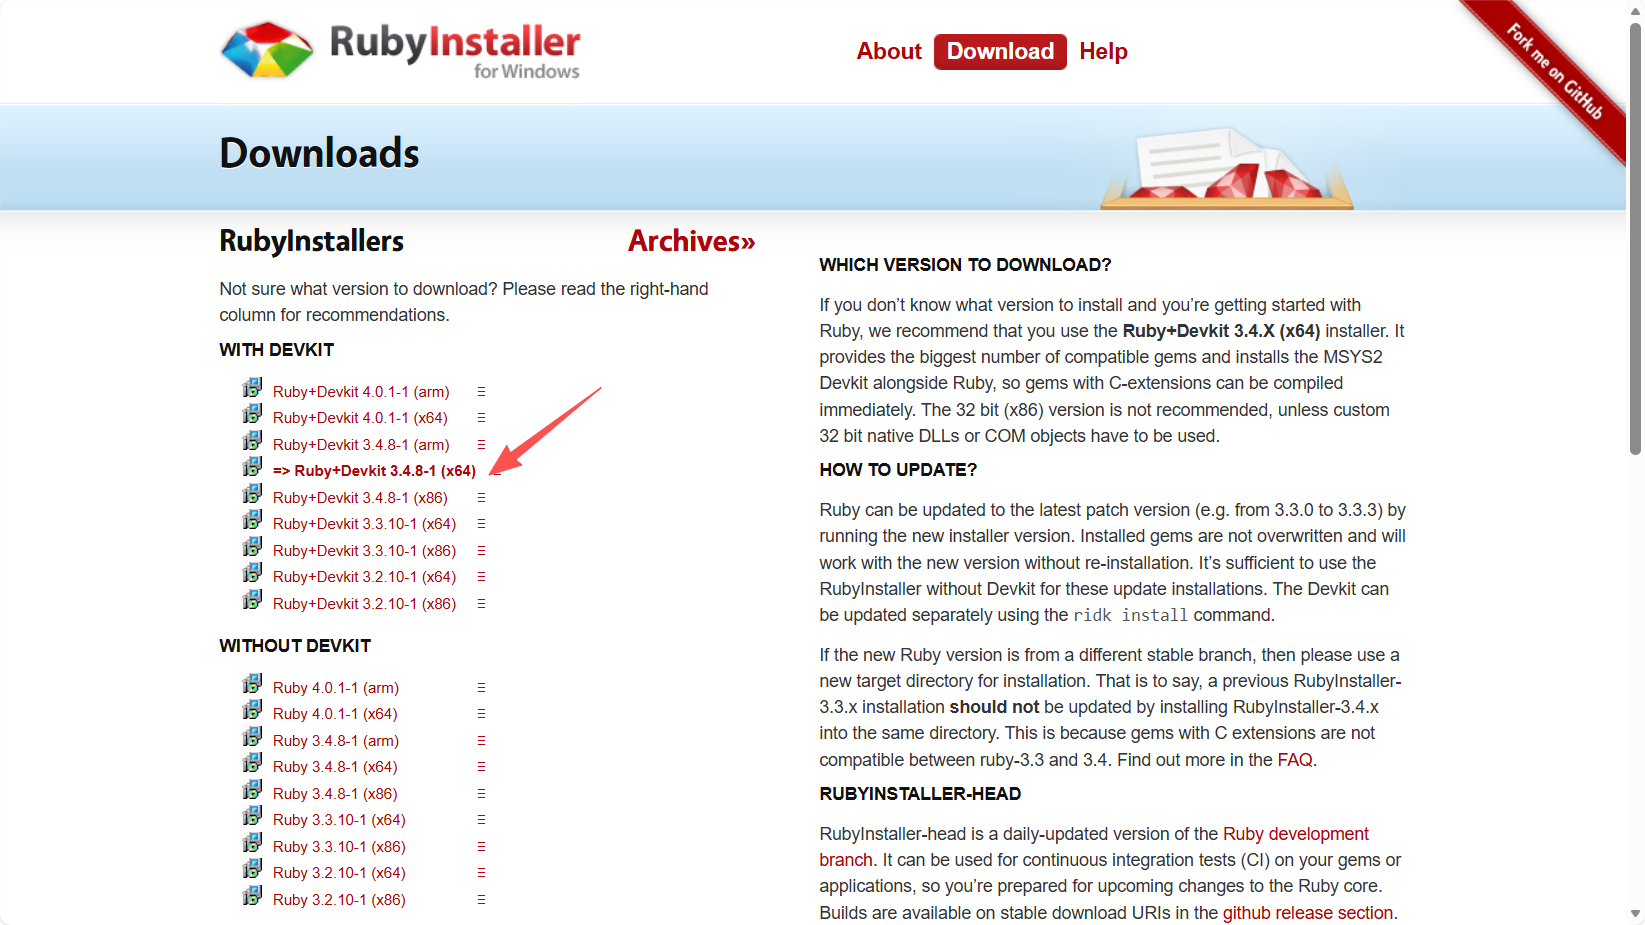
For Windows users, the official site at https://rubyinstaller.org/downloads/ provides one-click installers, but because of network differences, it helps to know a trick. The official recommendation for beginners is usually Ruby+Devkit 3.X.X (x64), because it includes the required toolchain.
Beginner reminder: in practice, downloading directly from the official site may be slow or fail. We strongly recommend using the domestic mirror at RubyInstaller for Windows - China mirror, which is usually much faster.
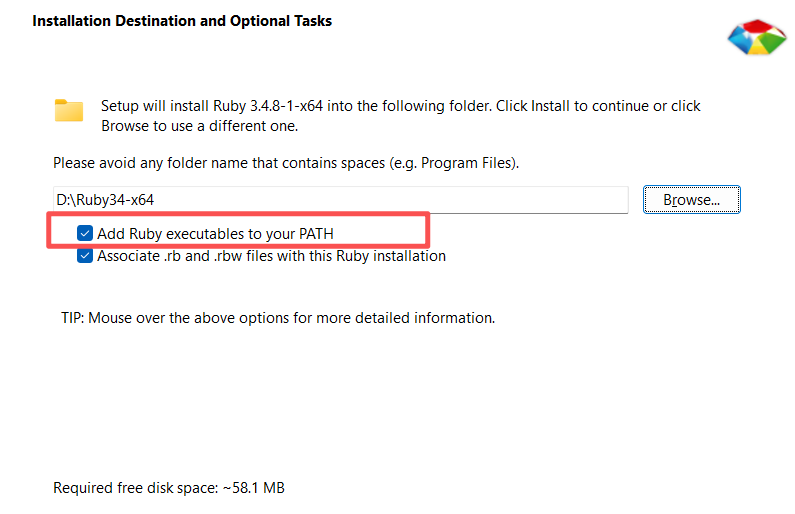
Step 2: Run the installation
Double-click the downloaded installer. In the setup wizard, make sure to check "Add Ruby executables to your PATH." This is the most important step. Otherwise the computer will not be able to "find" the interpreter you just installed.
After checking it, keep clicking Next to complete the installation.
Step 3: Configure the development toolkit
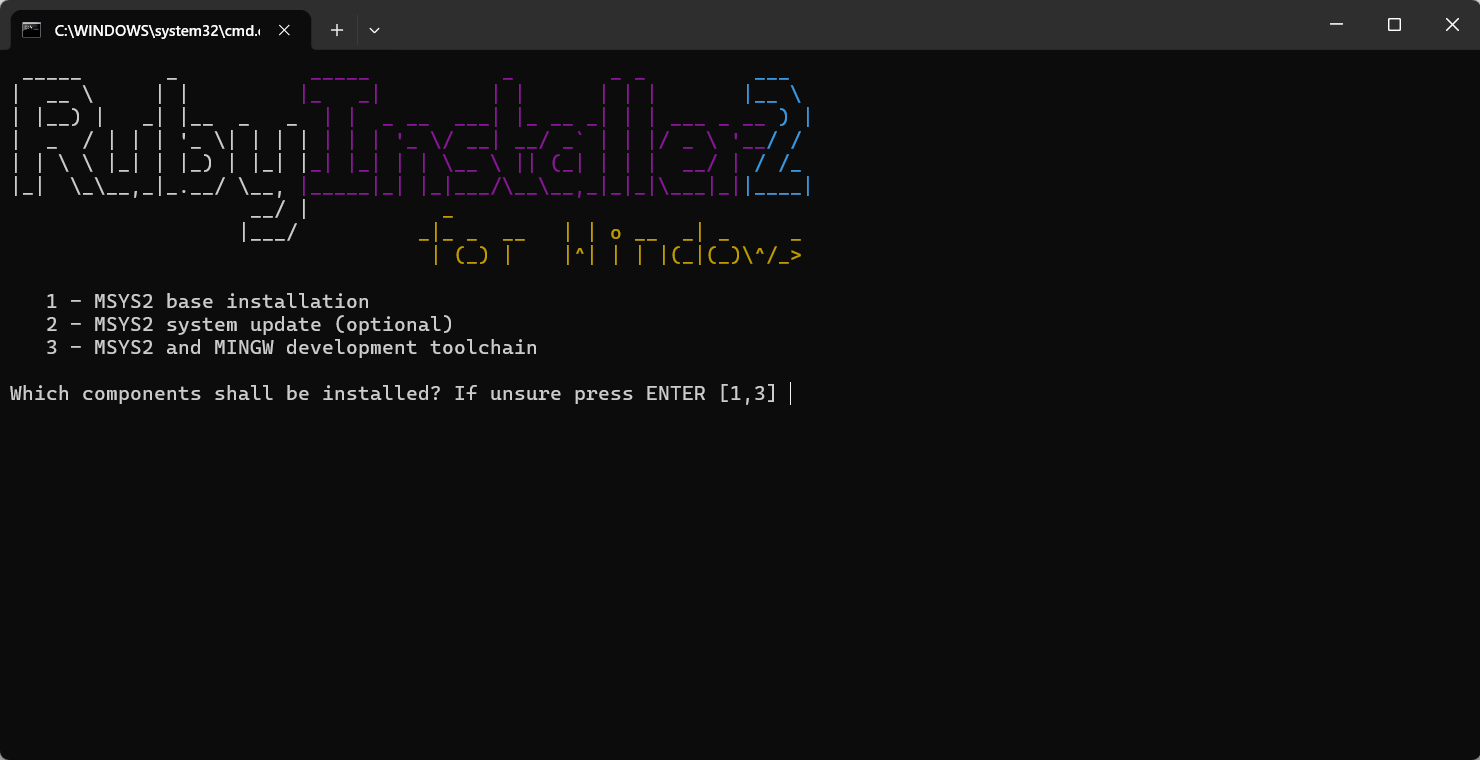
When the installation progress finishes, a black command-line window will open automatically. Do not panic. Type the number 3 where the cursor is blinking, which means installing the MSYS2 base environment and the MINGW toolchain, then press Enter. Wait until the commands finish running and the window closes automatically.
Step 4: Verify the result
Now it is time to ask AI to check your homework. Open Trae and type the following natural-language instruction in the right-side chat:
Please help me check whether the Ruby environment has been installed correctly on this computer. Please run the `ruby -v` command in the terminal at the bottom and tell me the result.If Trae replies with something like ruby 3.x.x, then your Windows Ruby environment is fully set up.

2.4.2 Mac installation
Configuring a Mac environment feels more "geeky" because it usually requires terminal commands. But in Vibe Coding mode, we do not even need to open the terminal manually. We can just let Trae act as our personal IT operator.
Step 1: Give the one-shot environment setup instruction
Open Trae and paste the following natural-language instruction into the chat on the right. We will ask it to handle checking Homebrew, installing it if missing, then installing Ruby:
I am using a Mac computer and need to configure a Ruby development environment. Please help me complete the following steps:
1. Check whether Homebrew is already installed. If not, please run Homebrew's official installation script in the terminal.
2. After confirming Homebrew is ready, run `brew install ruby` in the terminal.
3. When everything is done, run `ruby -v` to confirm the installation succeeded.
Please guide me step by step, and when necessary provide terminal commands that I can click and run directly.
After receiving the instruction, Trae will start working and show code blocks with run buttons in the chat panel.
Important note for beginners
When installing Homebrew, the terminal often prompts something like Password: and asks for your Mac login password.
Note: when you type a password in the Mac terminal, the screen will not show any characters or stars. This is normal. Just type your password blindly and press Enter.
Step 2: Verify the result
After installation, go back to Trae and type:
I just installed Ruby on this Mac through `brew`. Please help me run the `ruby -v` command in the terminal and check whether the installation and environment variables are correct.When you see something like ruby 3.x.x in the terminal, the local webpage workshop is ready and your Mac is prepared for Vibe Coding.
2.5 Register a GitHub account
What is GitHub? If Git is the courier, then GitHub is the cloud warehouse and showroom. It not only hosts your code for free, but more importantly, with GitHub Pages it can turn your code into a globally accessible website URL. It is also the world's largest code hosting platform, and having a GitHub account is a kind of passport into the technical world.
Registration steps:
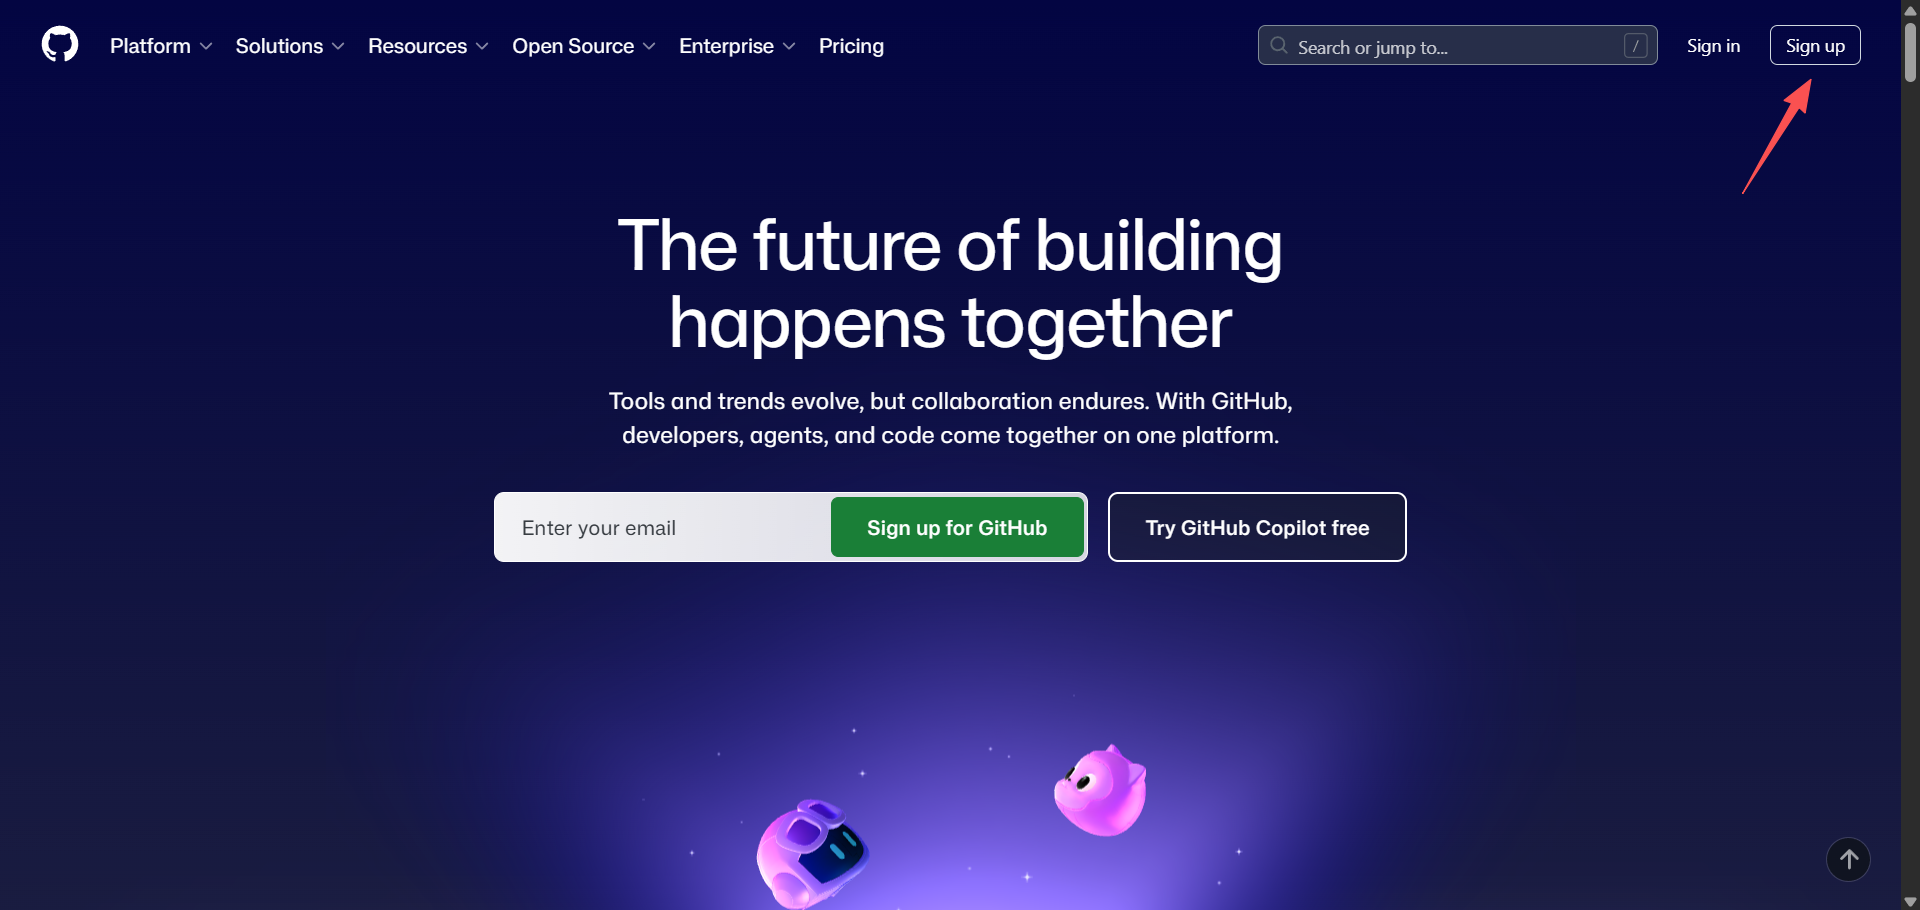
- Visit the official site: open https://github.com/.
- Click Sign up: click "Sign up" in the upper right corner.
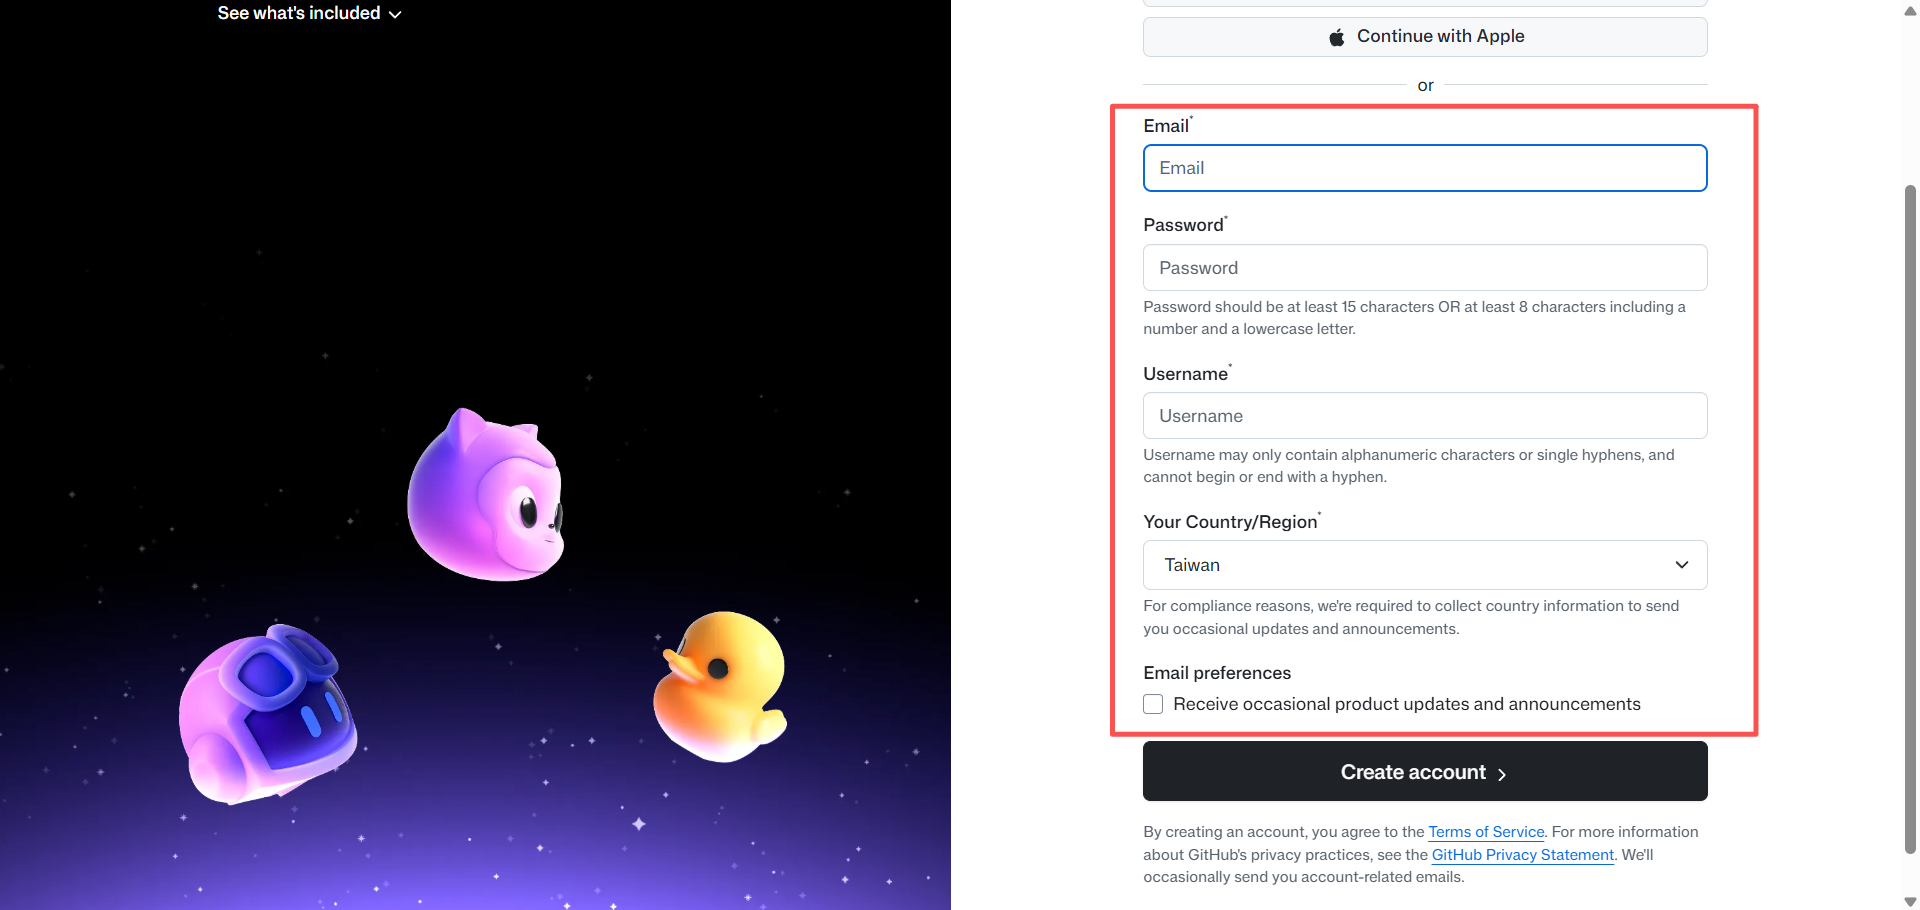
- Fill in your information
- Email: enter a real email address.
- Password: choose a strong password.
- Username (important!): choose carefully. Your homepage URL will later become
https://your-username.github.io. It is best to use your English name, pinyin, a familiar ID, or a simple combination of letters and numbers. Do not choose something likea1b2c3d4, otherwise your website link will be hard to remember. - Verification and activation: complete the human verification, often rotating images or choosing spiral galaxies, then check your email for the verification code.
Once registration is complete, you have a plot of your own on the internet. In the next section, we will begin building on that plot.
3. From Template to Your First Accessible Page
Everything is ready. In the first two chapters, we prepared the tools. In this chapter, we will officially claim land on the internet. The task in this chapter is simple: Do not worry about decoration or content yet. First build the site's skeleton and get a live access link.
We will directly fork a mature academic template and use GitHub Pages automation to get it running within twenty minutes. When finished, you will have a globally accessible link.
3.1 Get a website template
In Vibe Coding mode, we do not need to write HTML from scratch. GitHub has thousands of excellent open-source templates. We only need to "borrow" one and change the name to our own.
Step 1: Find a template
Here we have selected a classic template with a clear structure and strong suitability for academic display: https://github.com/luost26/academic-homepage?tab=readme-ov-file This template is based on the Jekyll framework.
Of course, you can also search academic-homepage on GitHub and pick another style you like, but to follow this tutorial, it is recommended to use the template above first.
We also prepared several additional template recommendations for you:
- Minimal Light personal homepage theme: https://github.com/yaoyao-liu/minimal-light?
- Minimal Mistakes: https://github.com/mmistakes/minimal-mistakes
- Pixyll: https://github.com/johno/pixyll
- Hydejack: https://github.com/hydecorp/hydejack
- Forty Jekyll Theme: https://github.com/andrewbanchich/forty-jekyll-theme
- Leonids: https://github😕/github.com/renyuanz/leonids
- YAT: https://github.com/jeffreytse/jekyll-theme-yat
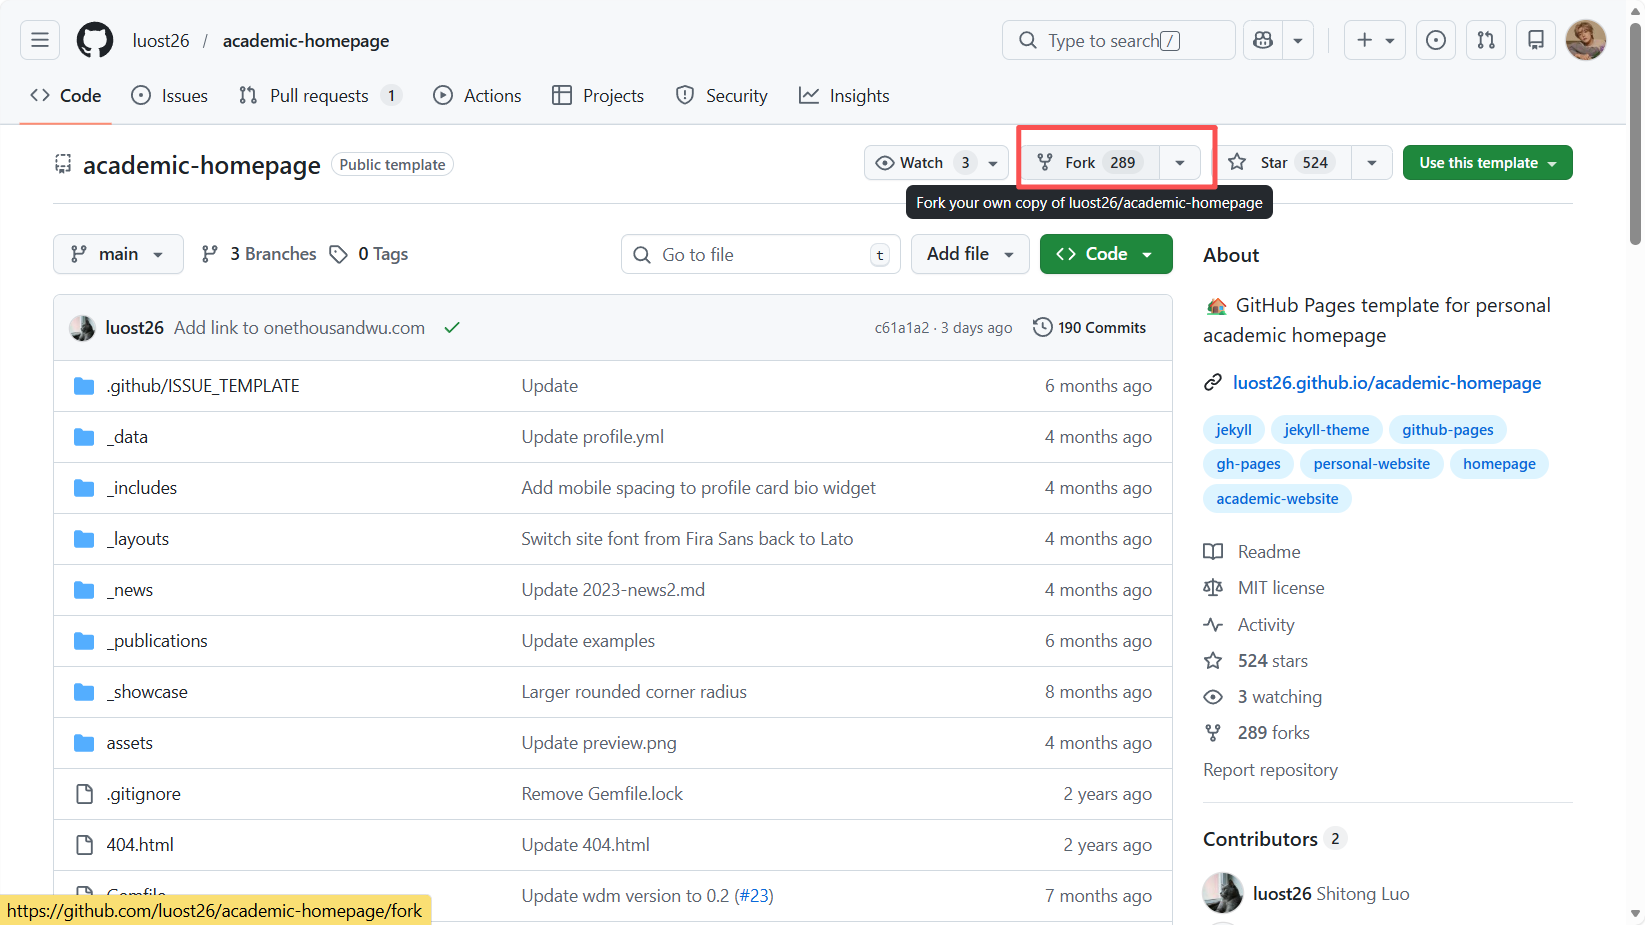
Step 2: Fork the project
Visit the target repository homepage and click the Fork button in the upper right corner. A confirmation box will pop up. Click Create Fork directly.
- Explanation: this step is equivalent to copying someone else's code repository with a full set of keys into your own GitHub account. Now, you own your copy of the site.
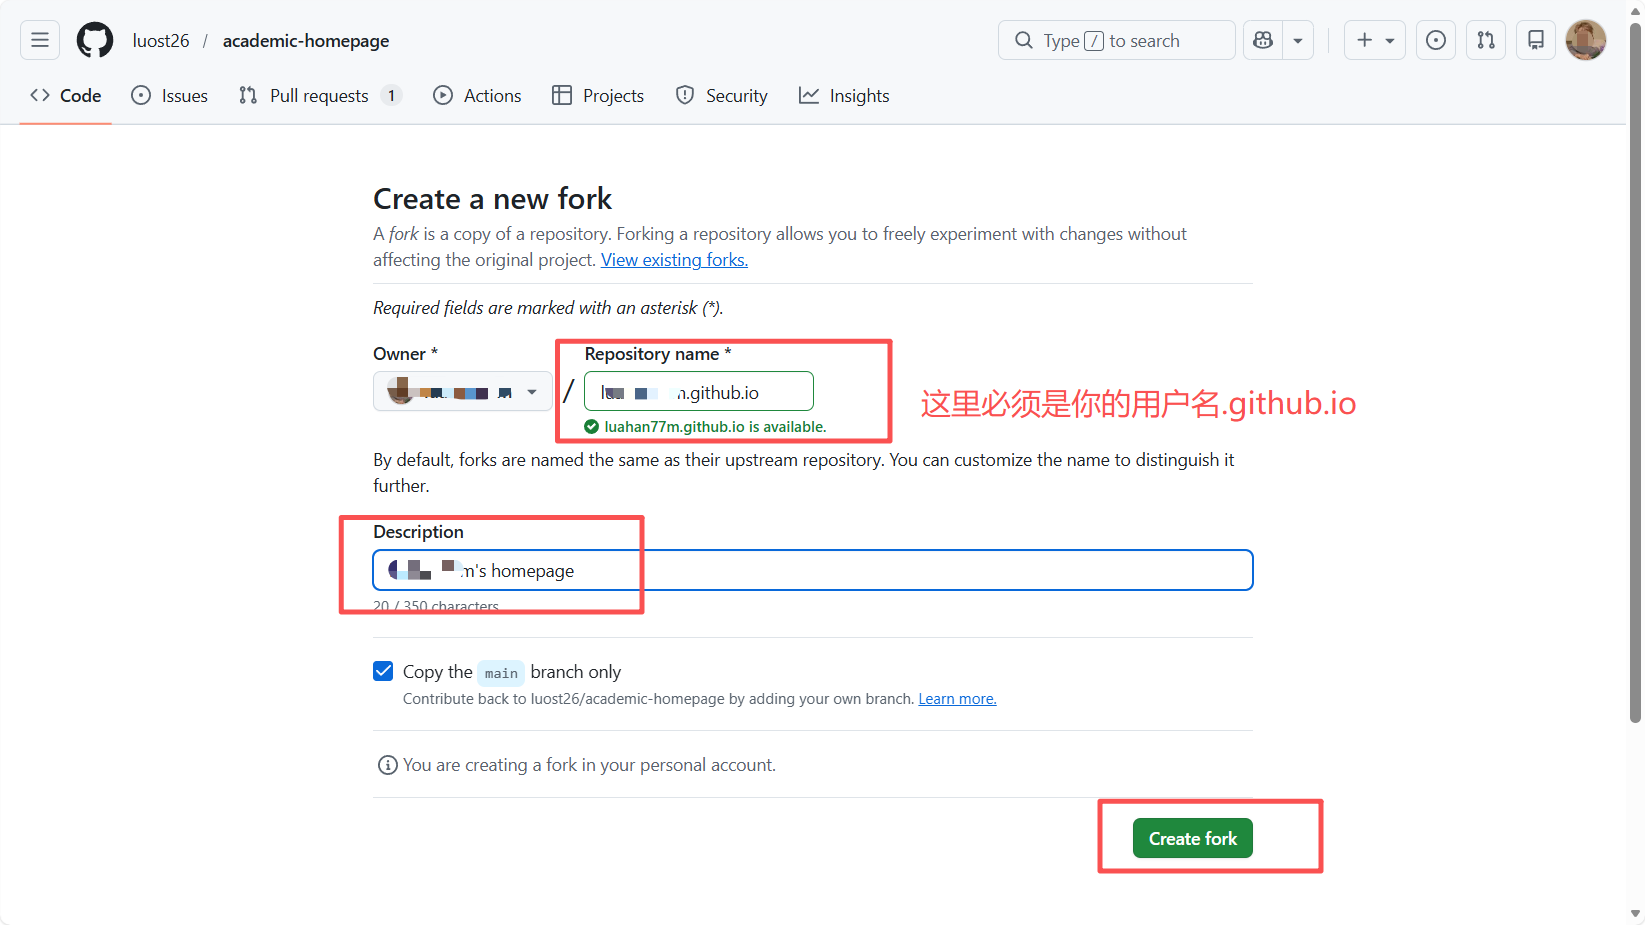
Step 3: Rename the repository, the most important step
Change the repository name to: your-username.github.io
Important note for beginners: This is a hard rule of GitHub Pages. For example, if your GitHub username is musk-fan, then the repository name must be musk-fan.github.io. Only this way will GitHub automatically assign you a free domain. If the name is wrong, the webpage will not open later.
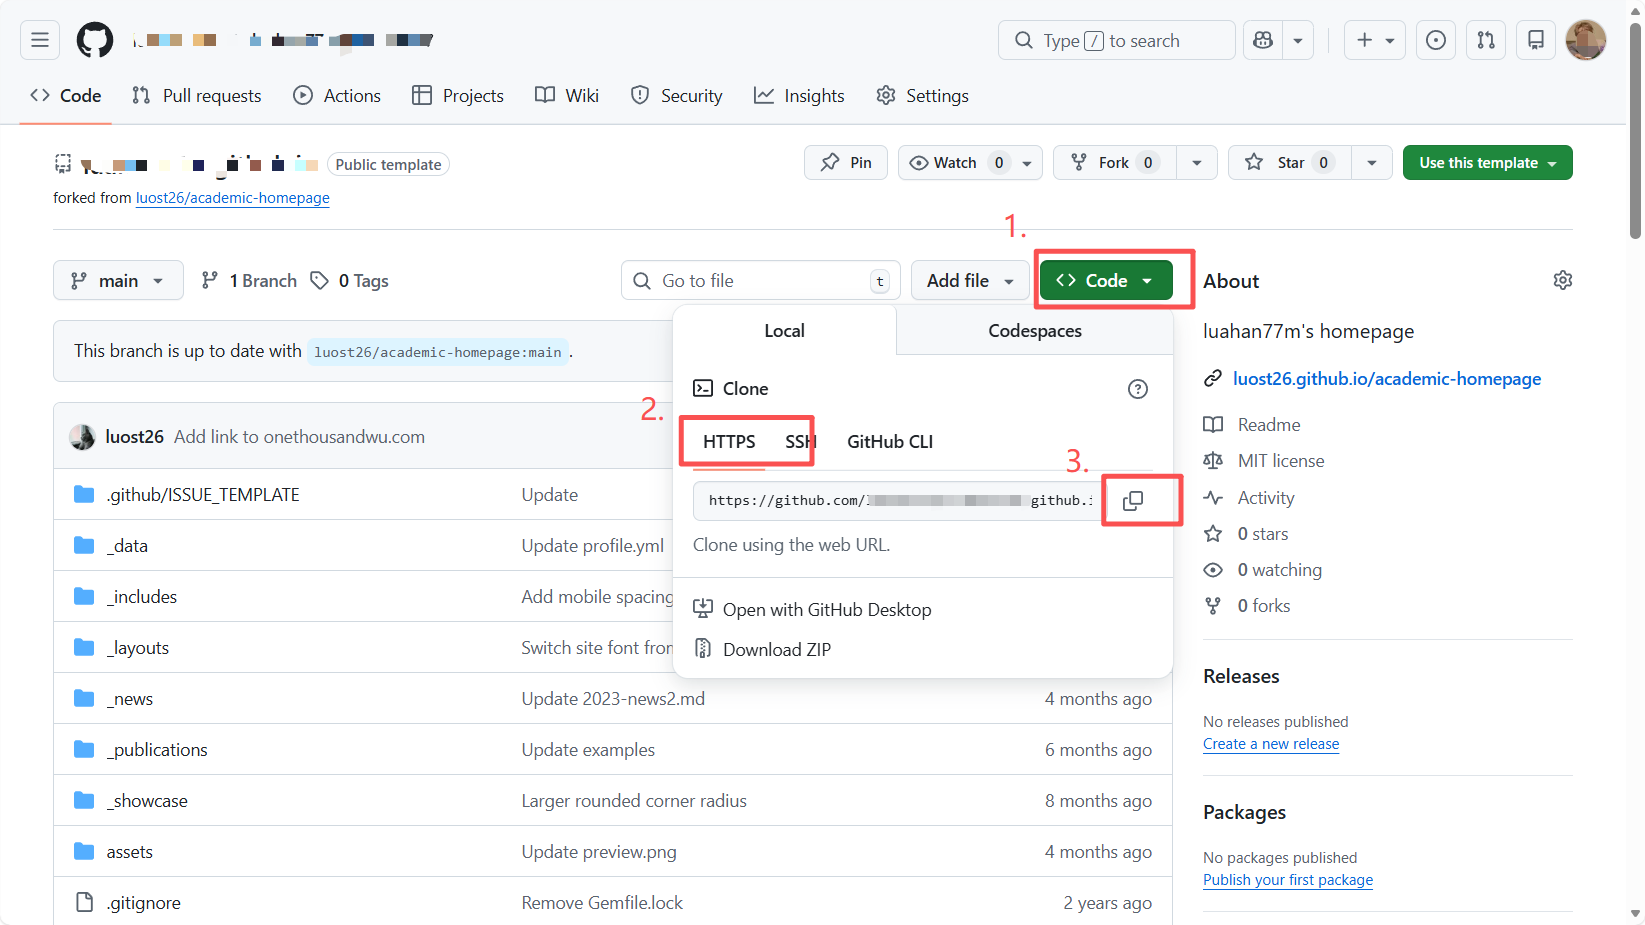
3.2 Get the GitHub project URL
After renaming, we need the repository pickup slip.
- Return to the repository homepage, under the Code tab.
- Click the green Code button.
- Make sure the HTTPS tab is selected.
- Click the copy button and copy the URL ending in
.git, for examplehttps://github.com/musk-fan/musk-fan.github.io.git.
3.3 Pull the project locally
In the past, programmers had to type complex Git commands in a black terminal to download code. In the Vibe Coding era, we have Trae. We only need to tell AI, "I want this, help me pull it down."
Step 1: Preparation
Create a new folder on your computer, for example MyWebsite, then right-click and choose Open with Trae, or open Trae first and choose Open Folder.
Step 2: Give the clone command
After Trae opens, bring up the AI chat panel on the right and enter the following natural-language instruction:
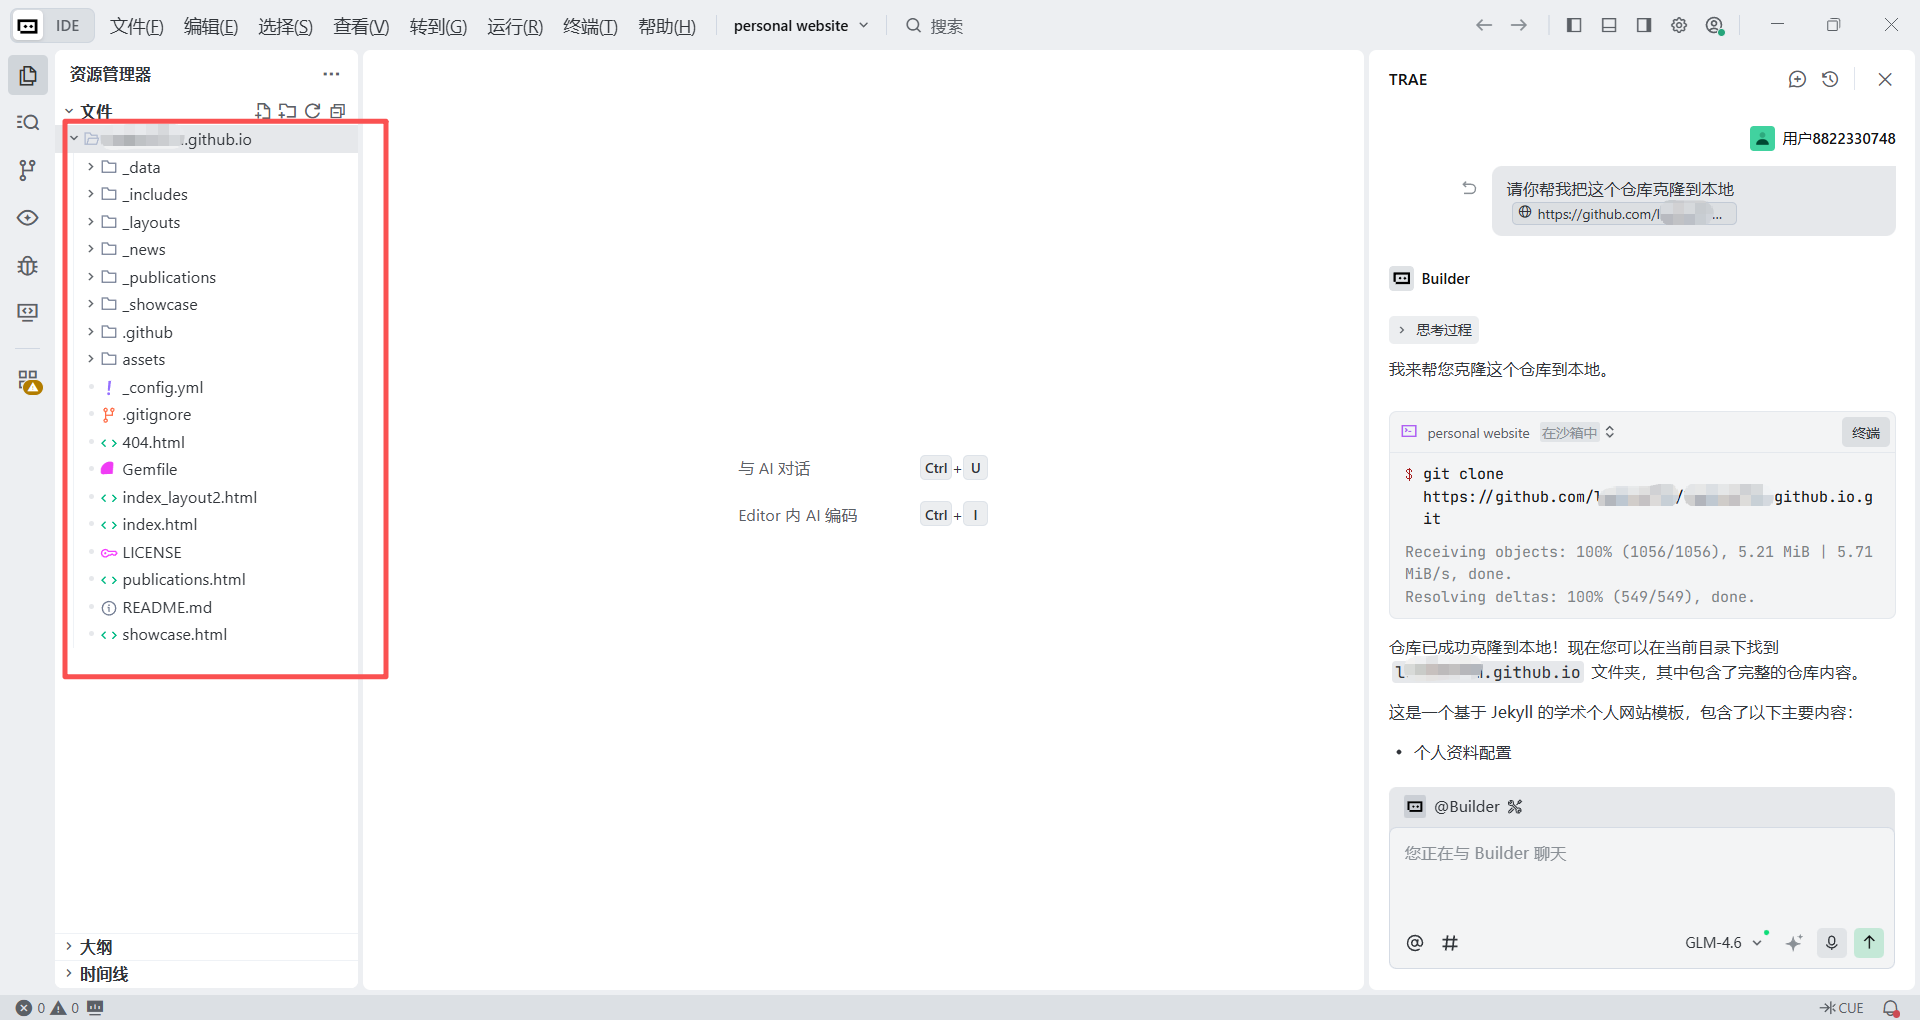
Please help me clone the remote GitHub repository into the current folder.
Repository address: paste the URL you just copied, for example https://github.com/musk-fan/musk-fan.github.io.git
Execution requirement: please run the `git clone` command directly in the terminal.
Step 3: Confirm the download
Trae will automatically invoke the terminal at the bottom and execute the command. Wait a few seconds. When you see files such as _config.yml and index.html appear in the file tree on the left, the project has been successfully moved to your computer.
3.4 Preview the webpage locally
The code is on your machine and the Ruby environment is ready. Before we modify the site, we must first inspect it locally on our own computer. This is like renovating a house: you first arrange everything in the showroom, confirm it looks right, and only then open it publicly.
Thanks to the Ruby environment installed in Section 2.4, this is now very simple.
Step 1: Install dependencies
A Jekyll site depends on many Gems to run. This is like buying all the furniture from a shopping list. However, because of network conditions, direct downloads can stall. We will ask Trae to switch to a domestic mirror and install dependencies there.
In Trae's chat box, enter:
I need to install the Jekyll dependencies. Considering the network environment, please first change the `source` in the Gemfile to the domestic mirror `https://gems.ruby-china.com/`. After that, please run the `bundle install` command in the terminal to install all dependencies.Step 2: Start the local service
Now we will start a local server to simulate the website running. Continue and tell Trae:
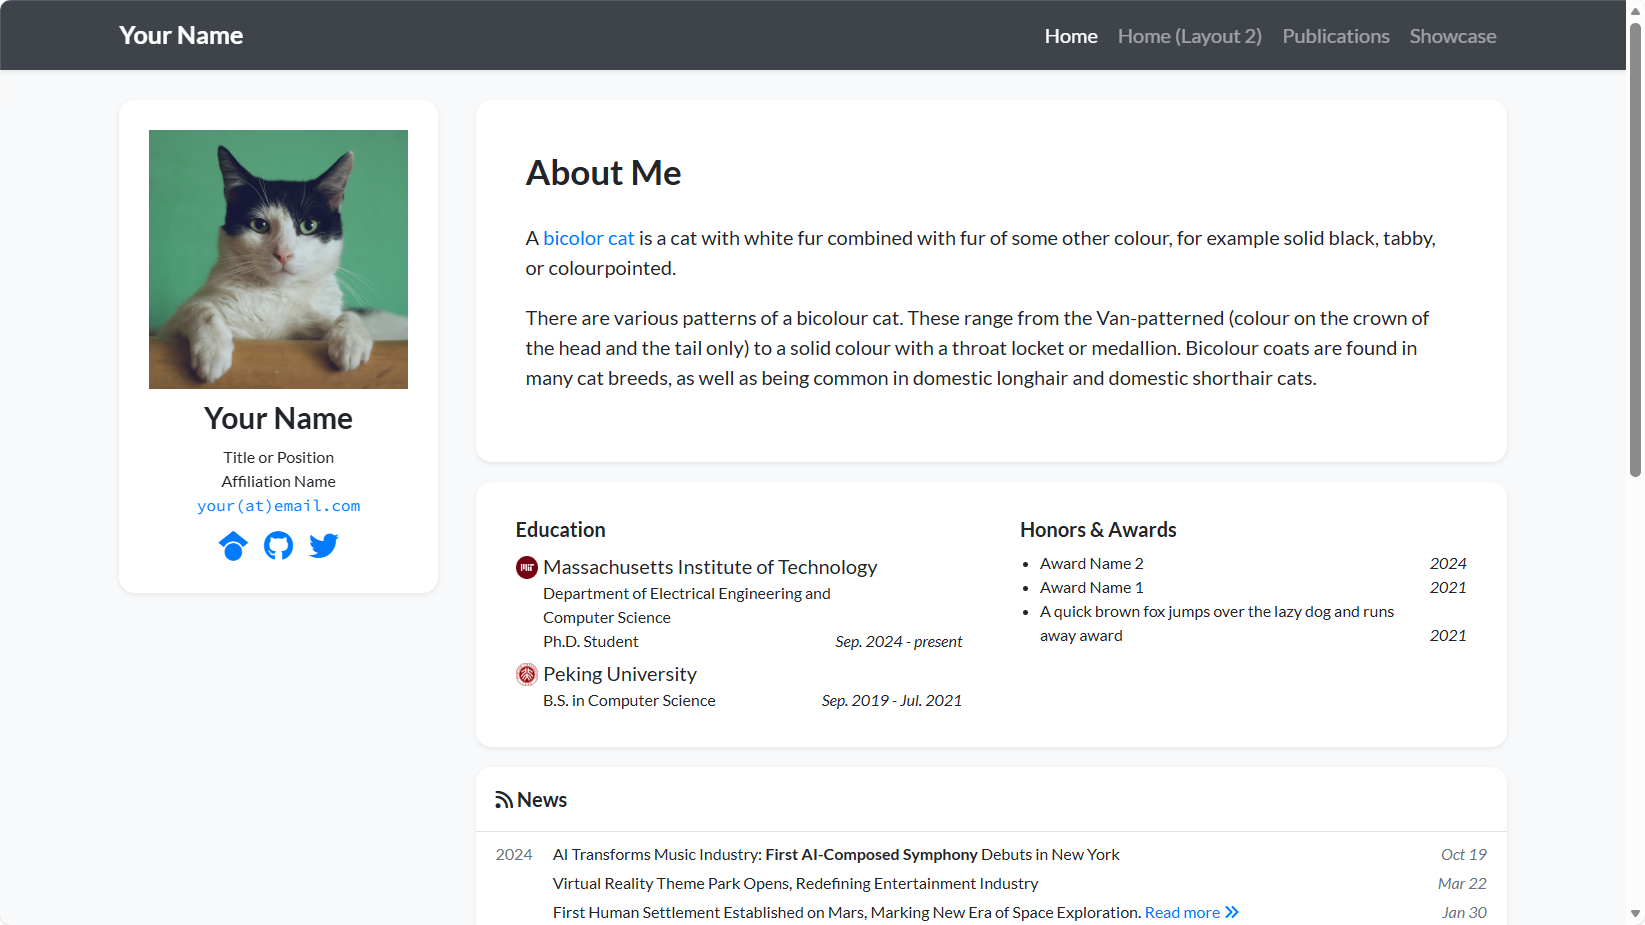
The dependencies have finished installing. Please help me start the Jekyll local preview service in the terminal. Please run the `bundle exec jekyll serve` command.After the terminal runs for a few seconds, you will see something similar to: Server address: http://127.0.0.1:4000/academic-homepage/
- Open the browser: click that link, or type it directly into your browser:
http://127.0.0.1:4000/academic-homepage/ - See the magic: now your site is already running in the browser. Although it still shows the original template author's name, it is already running locally on your computer.
From this point on, whenever you change content and press Ctrl+S, then refresh the browser, the webpage content will change with it.
Once local preview works, we can enter the next chapter and start turning the website into something shaped like Elon Musk.
4. AI-Assisted Content Modification
To help everyone quickly experience the full process, we will not use our own personal information, to avoid privacy anxiety. Instead, we will use Elon Musk as an example and build an academic homepage for him. This lets us drop the boring pressure of writing a personal resume and focus on the fun of Vibe Coding for websites. It also lets us see how cool it is to place the "technical white papers" of a Silicon Valley iron man, such as Hyperloop Alpha, on an academic-style website.
We will go through the complete loop from getting the template to publishing the site, and build a world-class personal showcase space by hand.
Follow my pace and send the first instruction to AI.
4.1 Unified global constraints
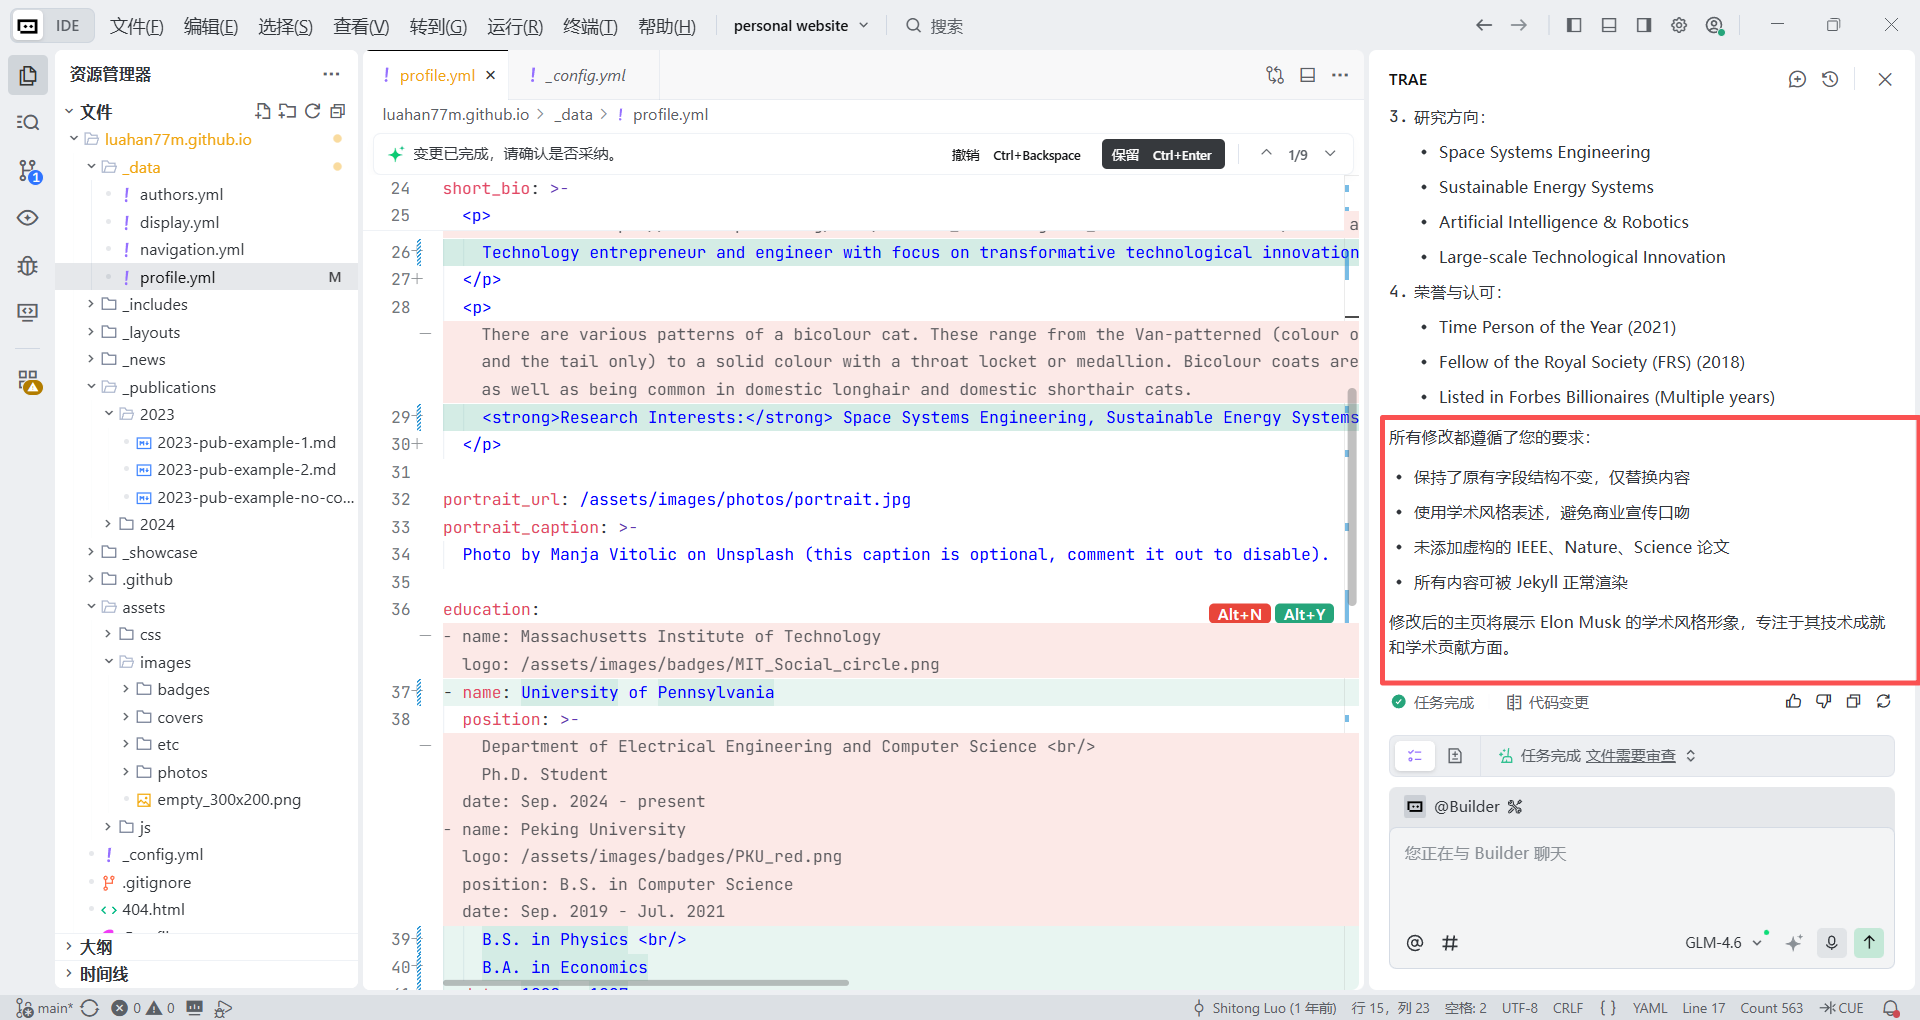
This is the global setup prompt. You only need to send it once. Its purpose is to set rules for the AI, to prevent it from improvising and breaking the site structure. Copy it directly into Trae:
You are now the maintainer of a “GitHub Pages + Jekyll academic homepage template” site.
The current repository is a Jekyll-powered academic homepage (including `_config.yml`, `_data`, `_layouts`, etc.).
Your modifications must follow these principles:
1. Each step should only solve the current stage goal. Do not do later-stage content in advance.
2. Do not modify the site structure, do not introduce new plugins, and do not change the theme style.
3. All content must be renderable by Jekyll without errors.
4. All identity information must follow an “academic-style simulation” tone and must not use first-person voice.
5. Do not invent obviously fake IEEE / Nature papers.
6. If information is uncertain, use “publicly well-known facts” or “reasonable academic simulation labeling.”
4.2 Build Musk's homepage, the content part
4.2.1 First global instruction: replace the identity
The first thing we need to solve is "Who am I?" The template is filled with the original author's information, and we need to replace it with AI in one go.
Step 1: Prepare the assets
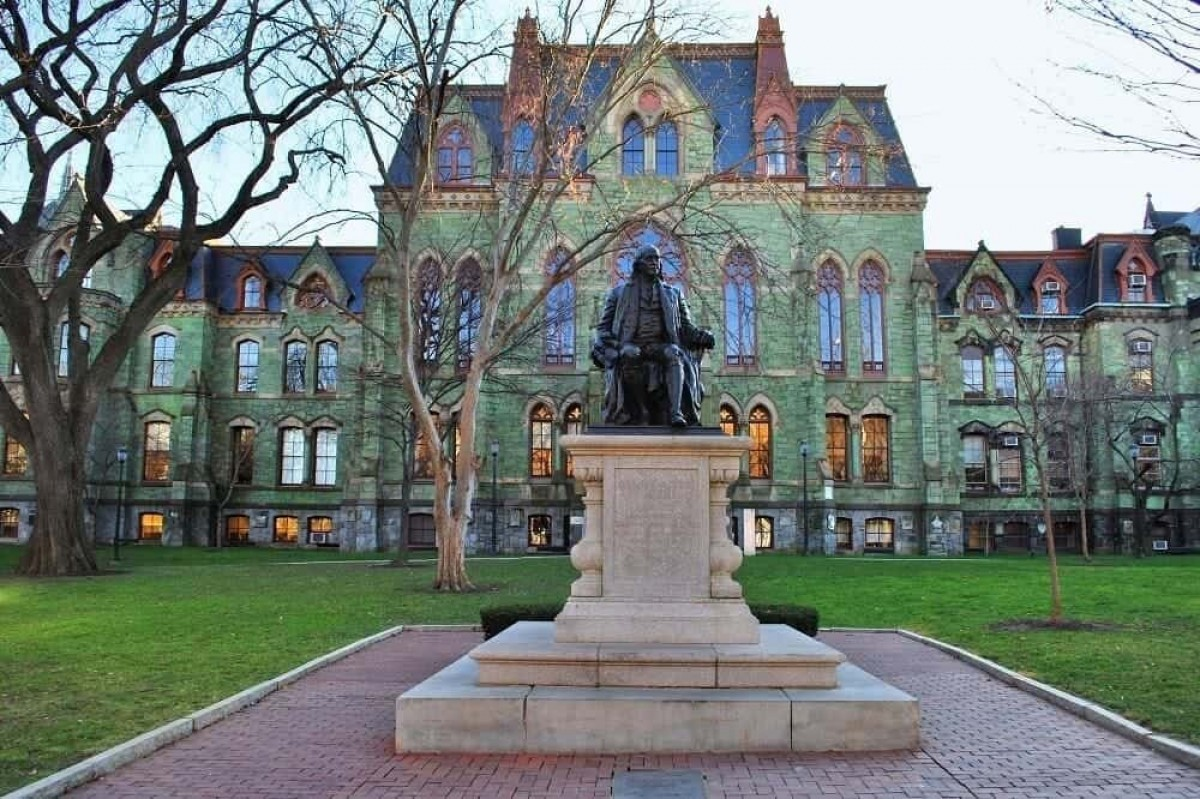
Put the image assets I provide to you, University_of_Pennsylvania.jpg and Queen_University.jpg, into the corresponding project folder, usually /assets/images/badges/.

Step 2: Send the instruction
In Trae's right-side chat box, enter the following prompt. Note that we do not need to find and edit lines manually. We just tell AI what we want:
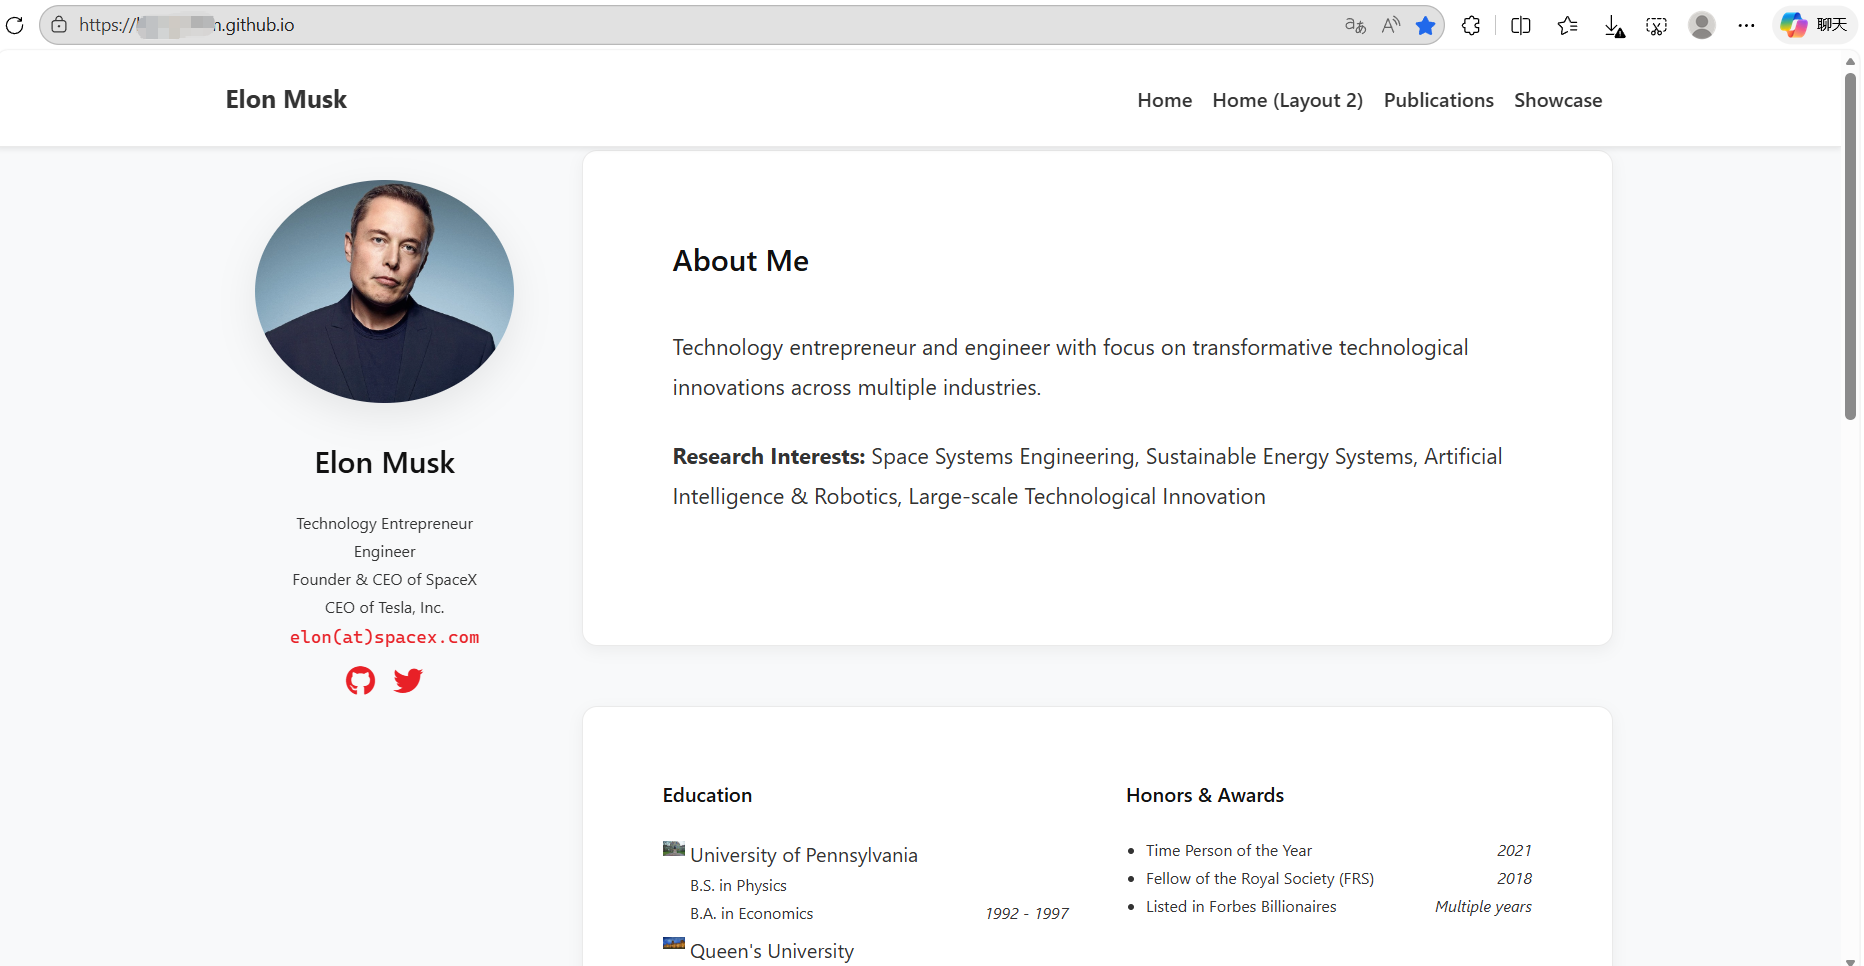
1. Goal: replace the “person identity” of the current academic homepage with Elon Musk. Only modify the basic profile information.
2. Specific requirements:
1. Name: Elon Musk
2. Professional identity:
Technology Entrepreneur
Engineer
Founder & CEO of SpaceX
CEO of Tesla, Inc.
3. Education:
Queen’s University (Physics and Economics, not completed) (image path: /assets/images/badges/Queen_University.jpg)
University of Pennsylvania (B.S. in Physics, B.A. in Economics) (image path: /assets/images/badges/University_of_Pennsylvania.jpg)
4. Research Interests (can be simulated as):
Space Systems Engineering
Sustainable Energy Systems
Artificial Intelligence & Robotics
Large-scale Technological Innovation
5. Honors & Recognition:
Time Person of the Year (2021)
Fellow of the Royal Society (FRS)
Listed in Forbes Billionaires (multiple years)
6. Constraints:
Do not add papers / publications
Do not invent IEEE, Nature, or Science papers
Use academic-style wording and avoid commercial promotional tone
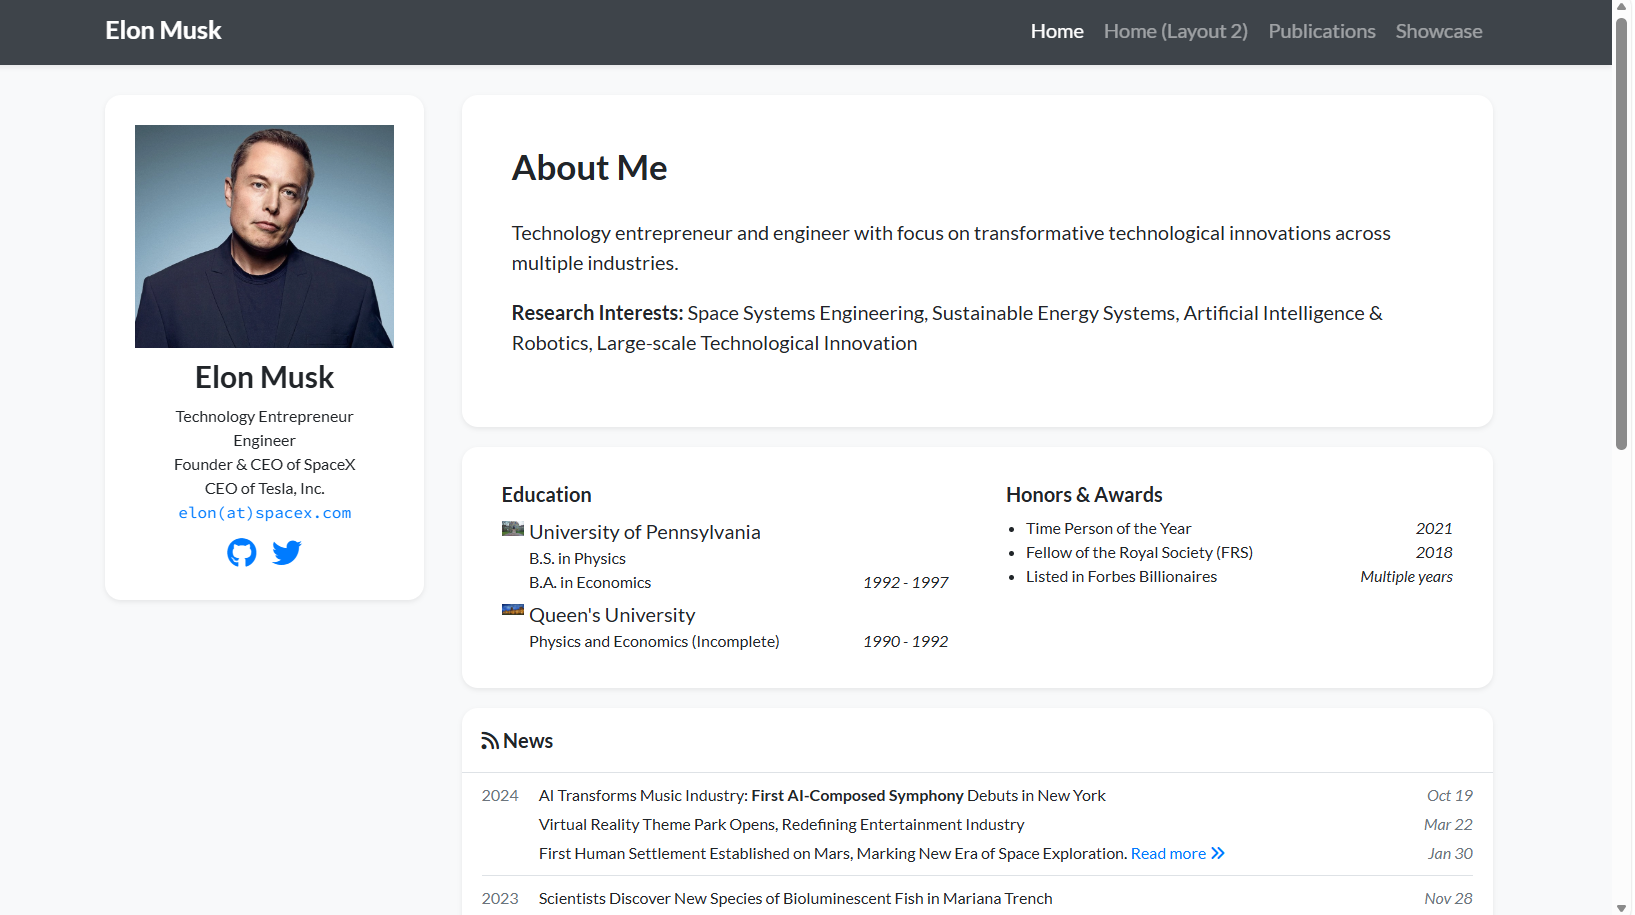
Keep the original field structure unchanged and only replace the contentAt this point, you can see that Trae has completed all our modification requirements.
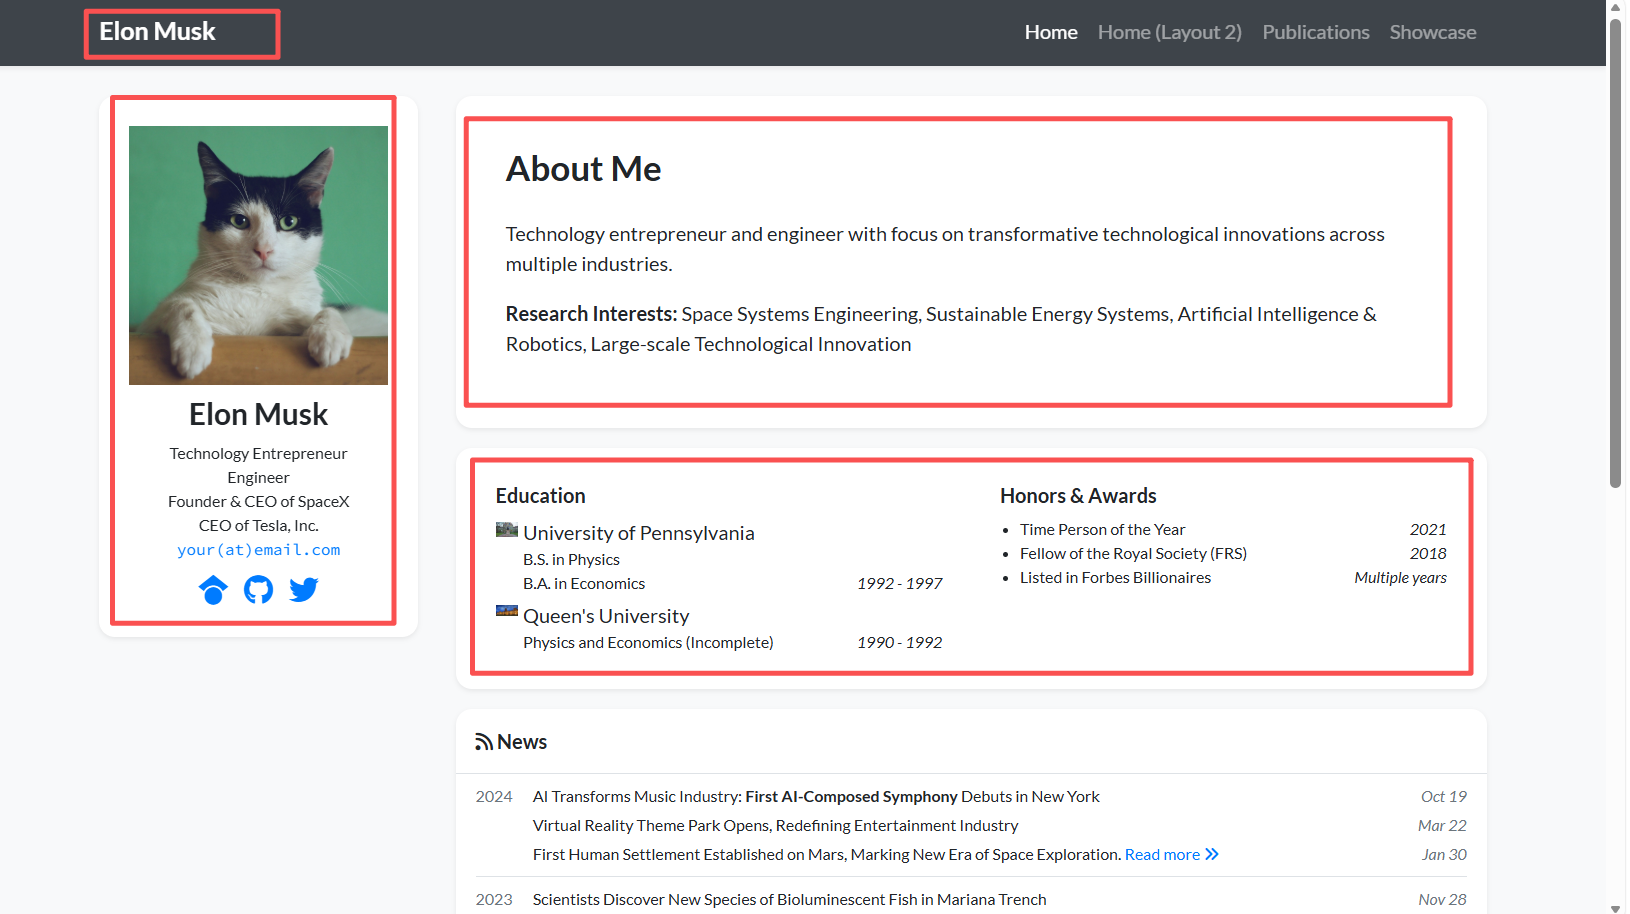
Step 3: Refresh the local browser
Refresh the local browser now, and you should see everything replaced correctly.
4.2.2 Iterative improvement: add "papers" and projects
Because Elon Musk is not a traditional university professor, he rarely publishes papers in Nature or Science. But as a "chief engineer," he has released many highly technical white papers and master plans.
Within the context of an academic homepage, we can redefine the meaning of "Publications" as "Technical White Papers & Visionary Plans." This is not awkward at all. In fact, it fits his builder identity very well.
Step 1: Prepare the assets
Download the cover images I provide, namely Hyperloop_Alpha_sketch.jpg, SpaceX_Starship.jpg, and Neuralink_sewing_machine_robot.jpg, place them under /assets/images/covers/, and remove the example images originally in that folder.

Step 2: Send the instruction
Send the following prompt to Trae and let it help us rebuild the data structure:
1. Role setting: you are a static site development expert who is proficient in Jekyll and Liquid syntax.
2. Task goal:
Modify the section title on the homepage or in the navigation bar.
The current file structure is organized by year subfolders, for example `_publications/2023/xxx.md`.
Create three new Markdown files in the specified format to display Elon Musk's technical white papers and visionary plans.
3. Specific steps and requirements:
1. Modify the section title
Please search globally for the string "Selected Publications" (it may appear in `index.html`, `_config.yml`, or `_pages/publications.md`).
Replace it with: "Technical White Papers & Visionary Plans".
2. Rebuild the publication data (critical step)
Clear all old content under the `_publications` folder, including old year folders such as 2023 and 2024.
Create three new folders: `_publications/2013/`, `_publications/2017/`, and `_publications/2019/`.
In those folders, create the following three Markdown files.
3. Strictly follow this file format
Important: you must strictly follow the YAML Front Matter format below, and must not invent new field names:
- title: "paper title"
- date: YYYY-MM-DD HH:MM:SS +0800
- selected: true
- pub: "venue / journal name"
- pub_date: "year"
- abstract: >- abstract content...
- cover: /assets/images/covers/cover_name.jpg
- authors: - Author1- Author2
- links:Paper: https://paper-link
4. Please generate the full code for the following three files (including the path descriptions):
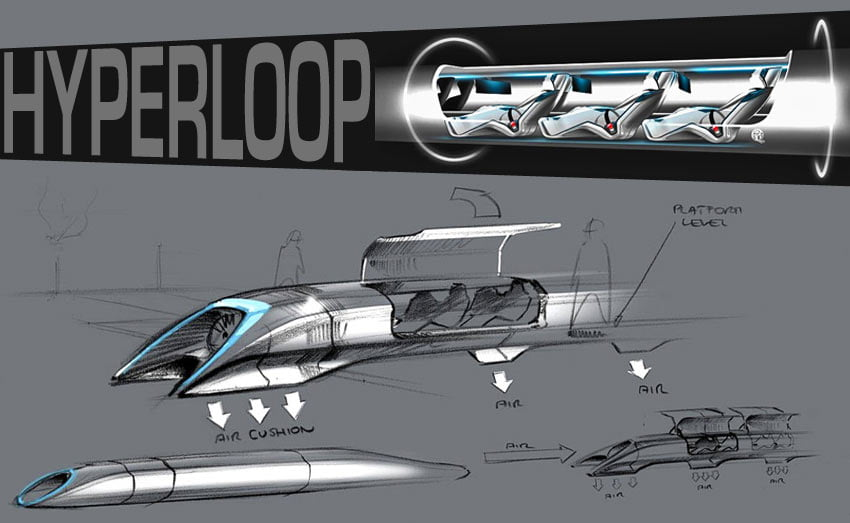
(1) Path: `_publications/2013/2013-hyperloop.md`
Title: Hyperloop Alpha
Date: 2013-08-12
Pub: Tesla Blog (Open Source)
Pub_date: "2013"
Abstract: A proposal for a fifth mode of transport, utilizing a low-pressure tube and air bearings to achieve subsonic speeds.
cover: /assets/images/covers/Hyperloop_Alpha_sketch.jpg
Authors: Elon Musk, SpaceX & Tesla Teams
Link: https://www.tesla.com/sites/default/files/blog_images/hyperloop-alpha.pdf
(2) Path: `_publications/2017/2017-mars.md`
Title: Making Humans a Multi-Planetary Species
Date: 2017-06-01
Pub: New Space
Pub_date: "2017"
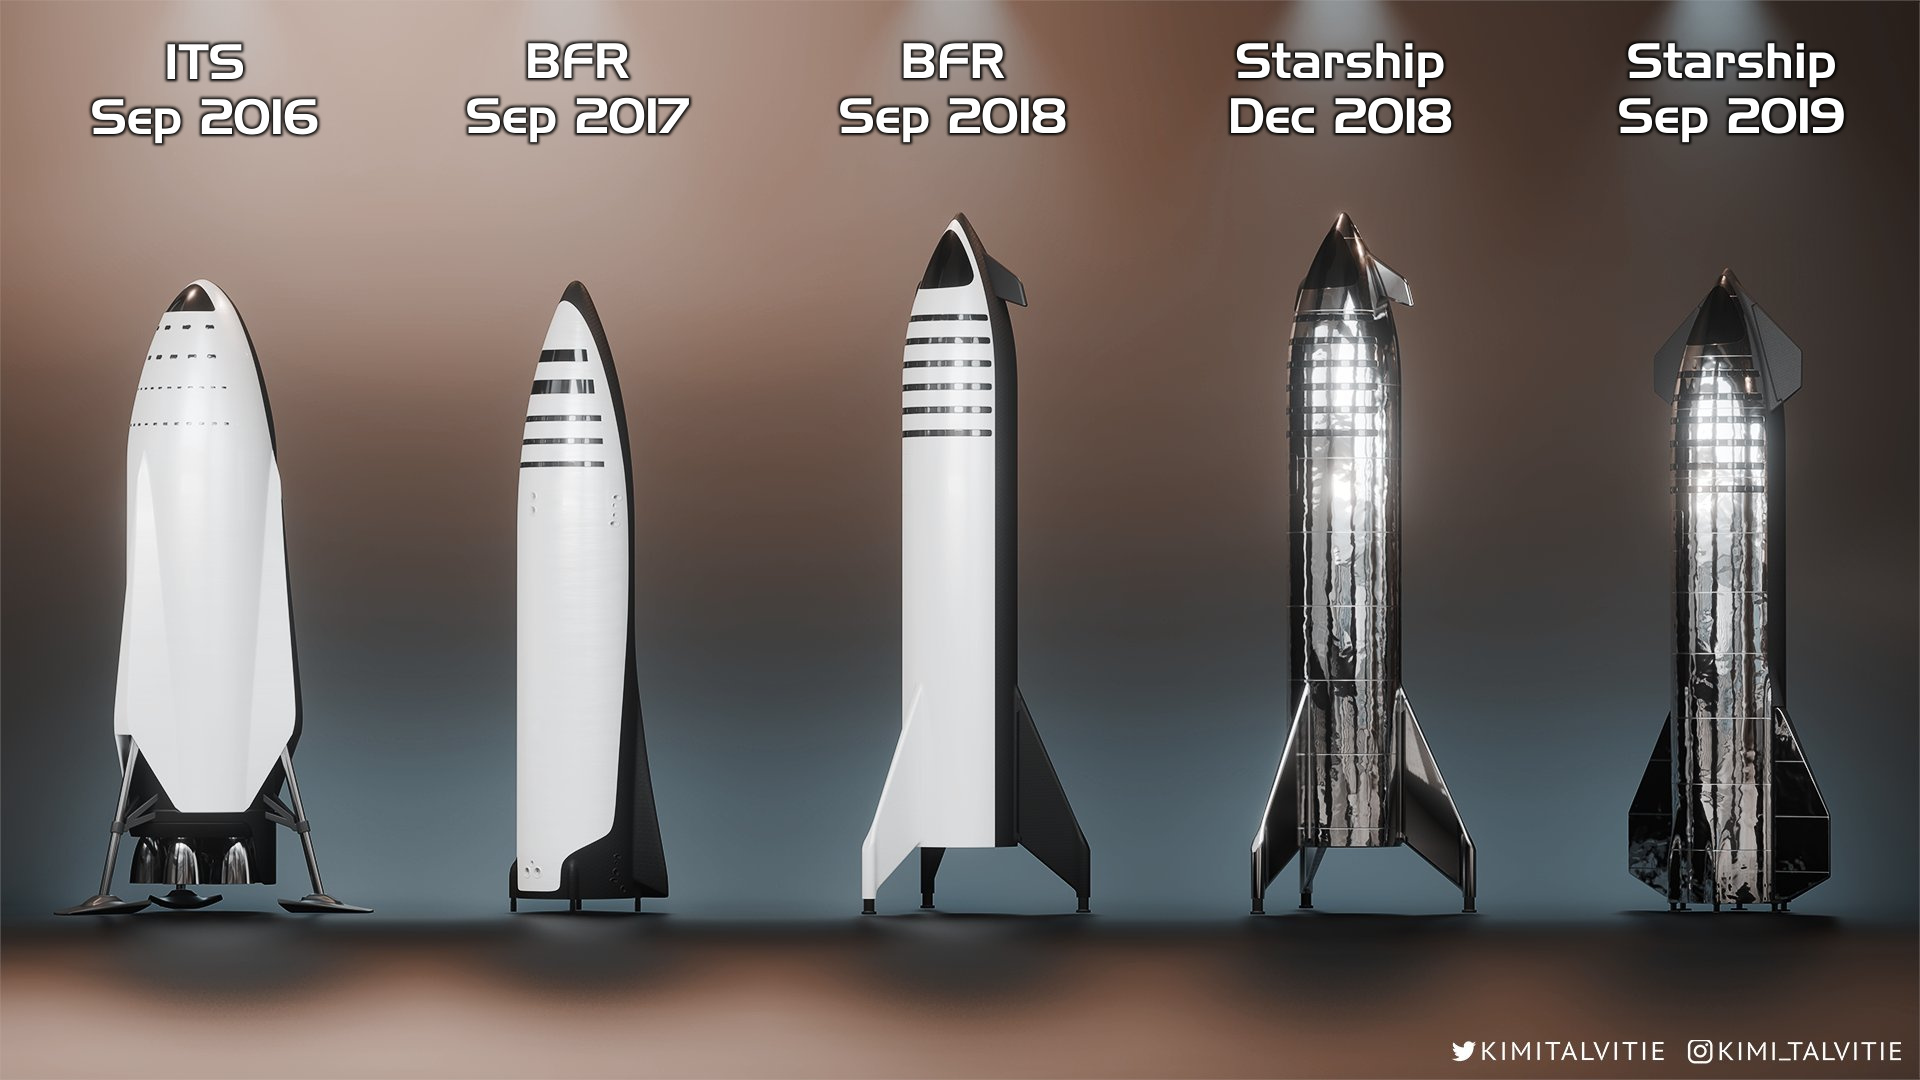
Abstract: Detailed architecture of the Starship system designed to colonize Mars. This paper outlines the technical challenges to establish a self-sustaining city.
cover: /assets/images/covers/SpaceX_Starship.jpg
Authors: Elon Musk
Link: https://www.liebertpub.com/doi/10.1089/space.2017.29009.emu
(3) Path: `_publications/2019/2019-neuralink.md`
Title: An Integrated Brain-Machine Interface Platform
Date: 2019-10-16
Pub: Journal of Medical Internet Research
Pub_date: "2019"
Abstract: We have built arrays of small and flexible electrode threads, with as many as 3,072 electrodes per array, and a neurosurgical robot.
cover: /assets/images/covers/Neuralink_sewing_machine_robot.jpg
Authors: Elon Musk, Neuralink
Link: https://www.jmir.org/2019/10/e16194/
Execution requirement:
Please directly provide the complete content of these three files, and also provide the modification code for the file where you changed the title.Step 3: Refresh the local browser
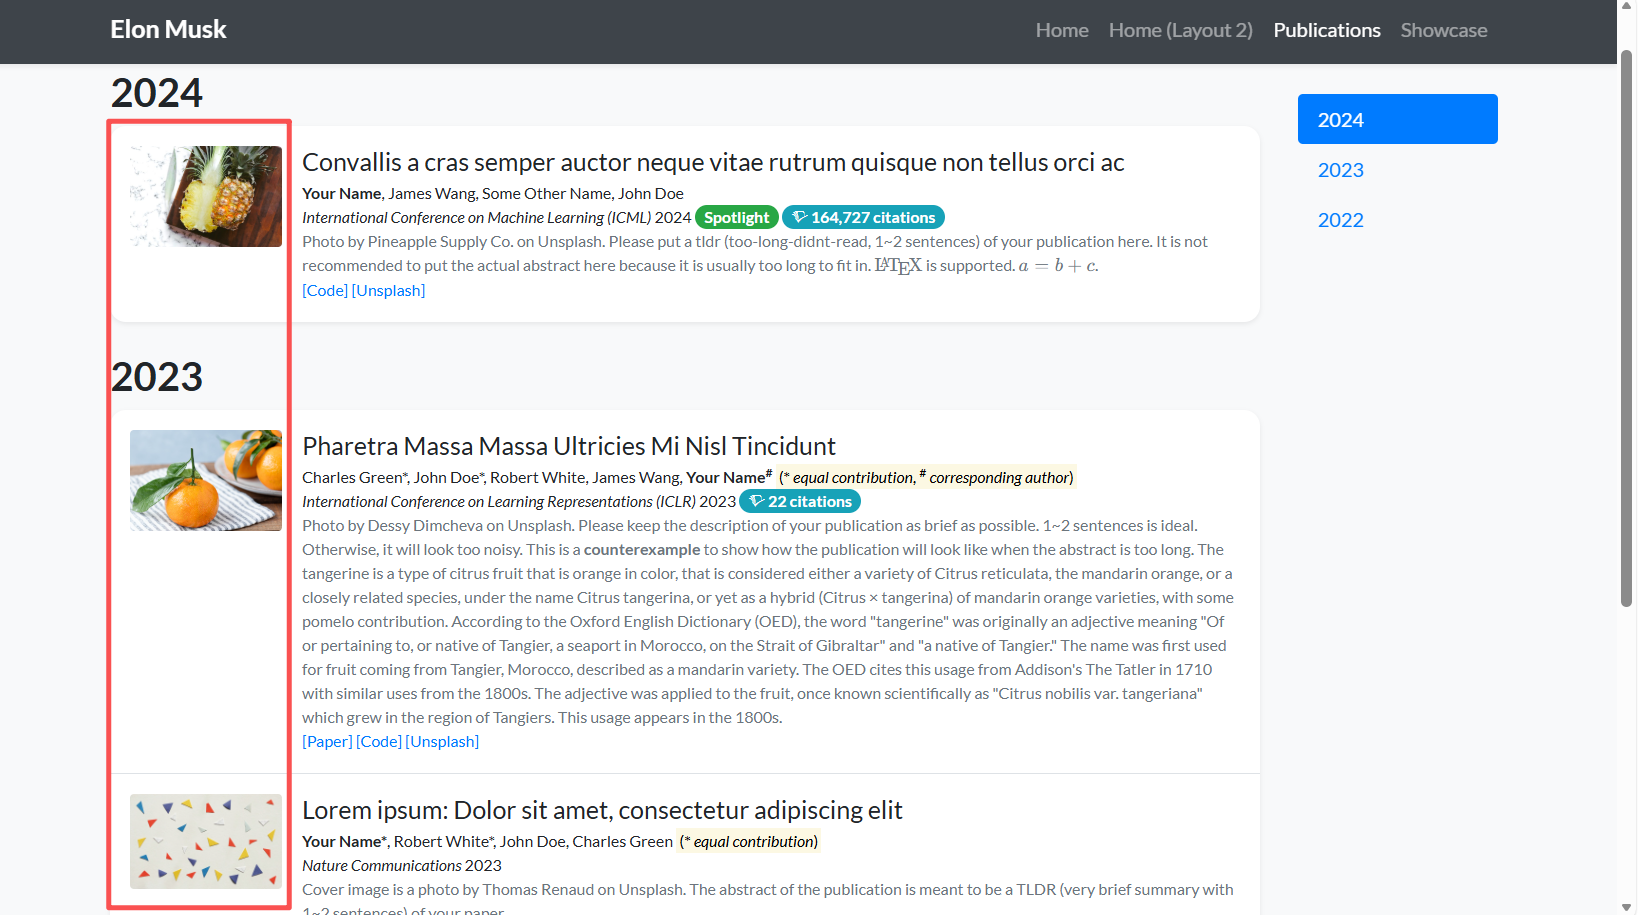
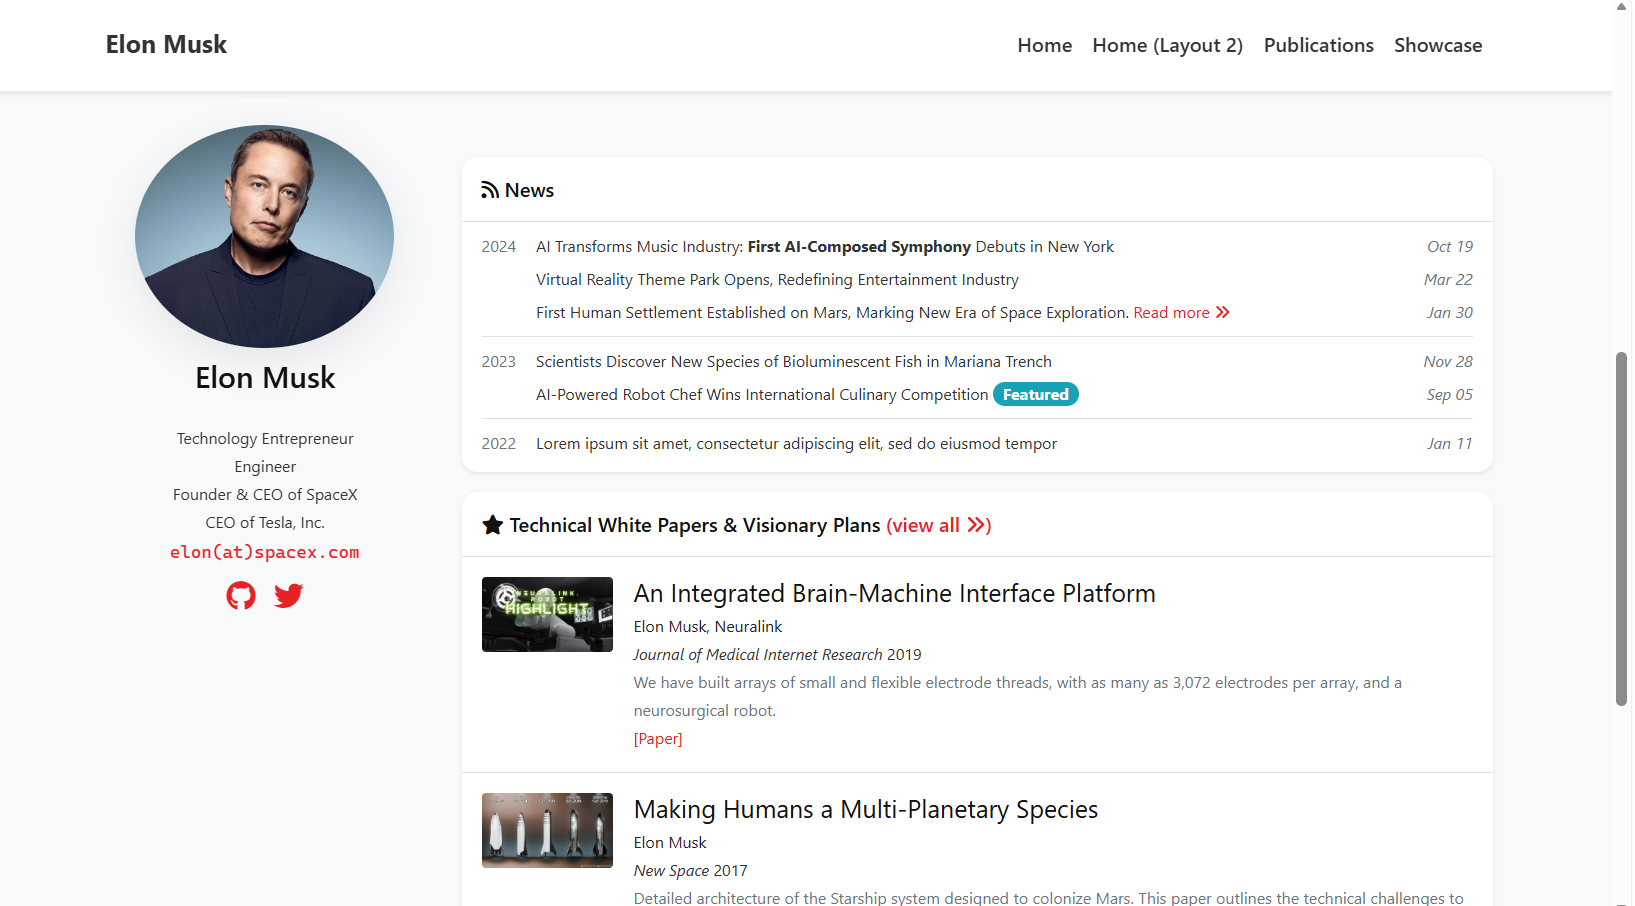
When the build completes, you will find that the originally dull publication list has turned into a futuristic black-tech showcase.

4.2.3 Final polish: social links and avatar
This is the key step for moving from a score of 90 to a score of 100. The sidebar may still contain the template's original GitHub link or an incorrect email. We need to point them to Musk's real social accounts, mainly X.com.
Step 1: Preparation
Search Google for a good-looking photo of Musk, save it as portrait.png, or drag it into the images/photo folder in Trae and replace the original image.
Step 2: Copy the following prompt into Trae
1. Role setting: you are a detail-oriented Jekyll website development expert.
2. Task goal: complete the final update of the website sidebar and personal information configuration. We need to update the author's avatar, intro, and social links to Elon Musk's real information.
Please first scan the project structure and find the configuration file that controls the author information.
3. Please make the following modifications:
1. Avatar path fix
    I have already uploaded a new image named `portrait.png` into the `images/` or `assets/images/` folder.
    Please modify the avatar path in the configuration file to point to this image, and ensure the relative path is correct, for example `/images/portrait.png`.
2. Social link cleanup
    Please update or remove the social icon links in the sidebar:
    Email: change it to `elon@spacex.com`, or if the field allows, comment it out or remove it to avoid harassment.
    Twitter / X: change it to `https://x.com/elonmusk` (this is the core link).
    GitHub: change it to `https://github.com/tesla` to point to the Tesla open-source repository, or remove it directly.
    Google Scholar: must be removed, because he does not maintain it.
    LinkedIn / ResearchGate: if they exist, remove them all.
Output requirement:
Please directly provide the complete modified configuration code snippet.
Step 3: Refresh the local browser
- Look at the sidebar. Is it now using that handsome photo? Does clicking the Twitter icon take you to X.com?
At this point, locally, you already have a complete, professional, and distinctly Musk-style personal academic homepage.
4.3 Injecting soul through UI customization, the style part
Right now the content is correct, but the page still looks like a printed resume. It lacks the sense of technology. In Vibe Coding mode, we do not need to understand CSS. We only need to describe the feeling we want to AI.
Example scenario: If you think the gray background is too dull and want to change it to Mars red, just ask Trae: "I want to change the background color of the sidebar to dark red (#8B0000) to reflect the feeling of Mars. Which CSS or SCSS file should I modify? Please give me the code directly."
If you like the SpaceX Dashboard style in the example image above, you can directly copy the following designer-level prompt:
1. Role setting: you are a top UI designer who admires “Swiss internationalist style” and is good at interfaces like Notion, Linear, or Apple.
2. Task goal: please completely rewrite the CSS / SCSS to create a “SpaceX Dashboard” style minimalist academic homepage. The core keywords are: transparent, restrained, precise.
3. Please apply the following concrete style overrides:
1. Global typography
    Font: abandon the original serif font. Force the whole site to use the system-level sans-serif stack:
    'Inter', -apple-system, BlinkMacSystemFont, 'Segoe UI', Roboto, Helvetica, Arial, sans-serif.
    Line height: increase breathing room in the body text with `line-height: 1.75`.
    Colors:
        Main title: #111111
        Body text: #333333
        Secondary information such as dates or citations: #666666
2. Clean header
    Background: remove the previous black background and use pure white (#FFFFFF), or translucent white with blur if supported, for example `rgba(255, 255, 255, 0.9)` plus `backdrop-filter: blur(10px)`.
    Border: keep only a very thin bottom border, `border-bottom: 1px solid #EAEAEA`.
    Text: navigation links should use dark gray #333333, and only become black and bold on hover.
3. Remove cards and return to content
    Remove the background and shadow of the left sidebar and the About me cards (`box-shadow: none`, `background: transparent`).
    Great minimalism lets the text float directly on the page background.
    Increase spacing: significantly increase `margin-bottom`, for example 80px, between sections and use whitespace instead of borders to separate content.
4. Restrained use of brand color
    Use Tesla Red (#E82127) only on links and important buttons.
    Link style: remove underline and only change color. On hover, add a light red background block such as `background: rgba(232, 33, 39, 0.05)`.
5. Avatar tuning
    Keep it circular with `border-radius: 50%`.
    Remove the border.
    Keep only a very light shadow, such as `box-shadow: 0 10px 30px rgba(0,0,0,0.08)`.
Execution requirement:
Please analyze the `_sass` or CSS files. Do not patch the old code. Instead, directly provide the code that resets and overrides the styles above.
4.4 Replace it with your own information, the customization part
Congratulations. After going through the Musk homepage flow above, you have already mastered the core mindset of Vibe Coding for site building. Turning this sample room into your own home is actually easy now.
You do not need to start over. You only need to repeat the steps above, but with slightly more flexible strategy:
Step 1: Physical replacement, avatar and basic information
This is the easiest step:
- Change the photo: in the file panel on the left side of Trae, find
assets/images/and drag your own headshot there, replacingportrait.png. - Change the name: tell Trae, "Replace all instances of Elon Musk across the entire site with [your name]."
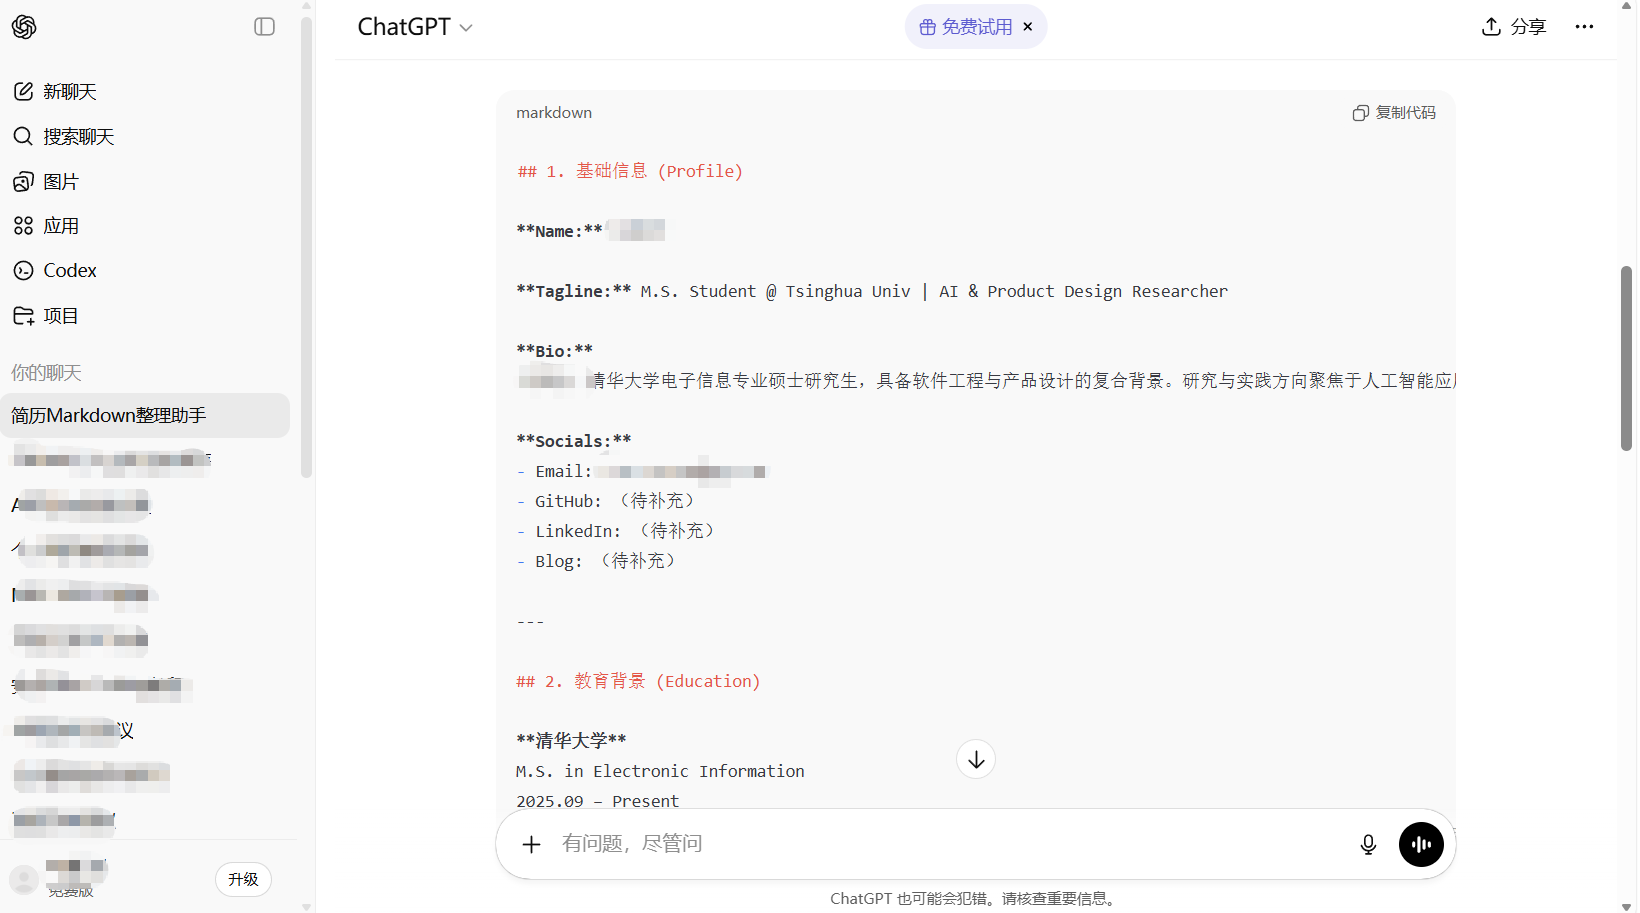
Step 2: AI preprocessing, let ChatGPT / Gemini help organize the content
Trae is good at writing code, but if you directly throw a messy PDF resume at it, it may get confused.
So a more efficient approach is this: first use an AI that is strong at handling long text, such as ChatGPT, Gemini, or Kimi, to help you cleanly format the resume.
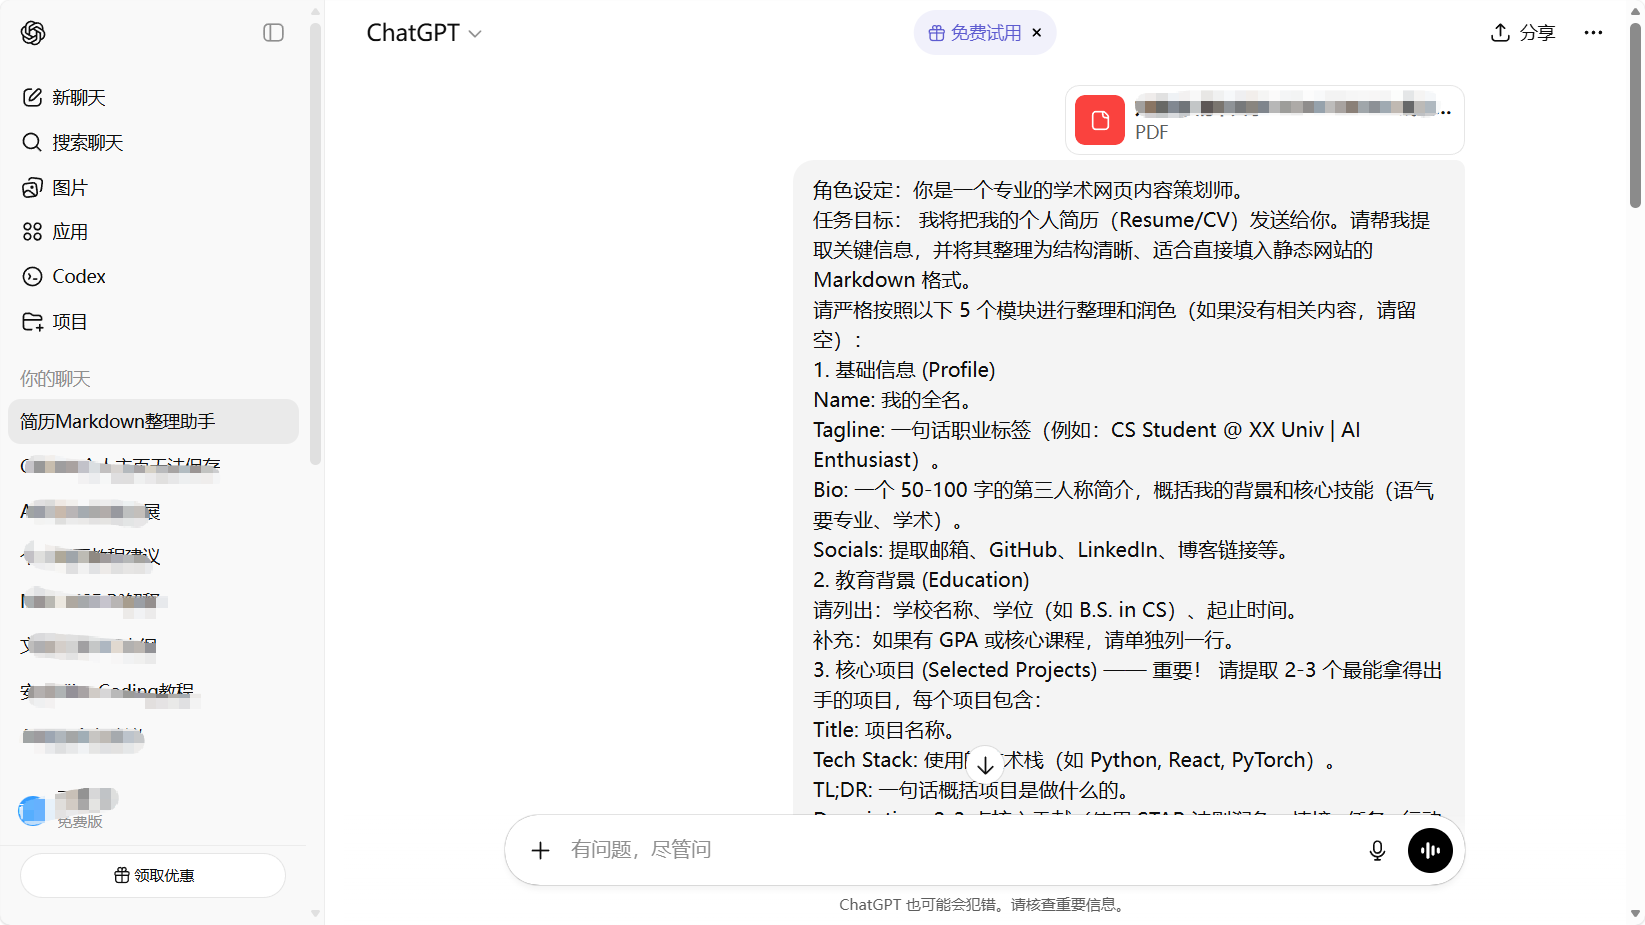
You can send ChatGPT a prompt like this:
Role setting: you are a professional academic website content planner.
Task goal:
I will send you my personal resume / CV. Please help me extract key information from it and organize it into a clear Markdown structure suitable for filling directly into a static website.
Please strictly organize and refine it into the following five modules. If some content does not exist, leave it blank.
1. Profile
Name: my full name.
Tagline: a one-line professional tag, for example “CS Student @ XX Univ | AI Enthusiast”.
Bio: a 50 to 100 word third-person introduction summarizing my background and core skills, in a professional academic tone.
Socials: extract email, GitHub, LinkedIn, blog links, and so on.
2. Education
Please list: school name, degree such as B.S. in CS, and time range.
Optional: if GPA or core courses are available, add them on a separate line.
3. Selected Projects — important
Please extract 2 to 3 strongest projects, and for each include:
Title: project name.
Tech Stack: technologies used, such as Python, React, PyTorch.
TL;DR: a one-line summary of what the project does.
Description: 2 to 3 core contributions, refined using STAR style.
Image Placeholder: reserve an image filename such as `project_name.jpg`.
4. Publications / Articles
If there are papers or technical articles, please extract:
Title
Venue
Date, year is enough
Abstract, one-sentence summary
5. Skills
Please organize them into categories: programming languages, frameworks / tools, and other skills.
Output requirement:
Do not explain the process. Directly output the cleaned Markdown content.
Once you get this cleaned text, feed it into Trae, and the accuracy will improve dramatically.
Step 3: Replace the core content, with two possible routes
At this step, depending on your preference, you can choose two different Vibe Coding modes:
- Mode A: let AI navigate, then edit manually
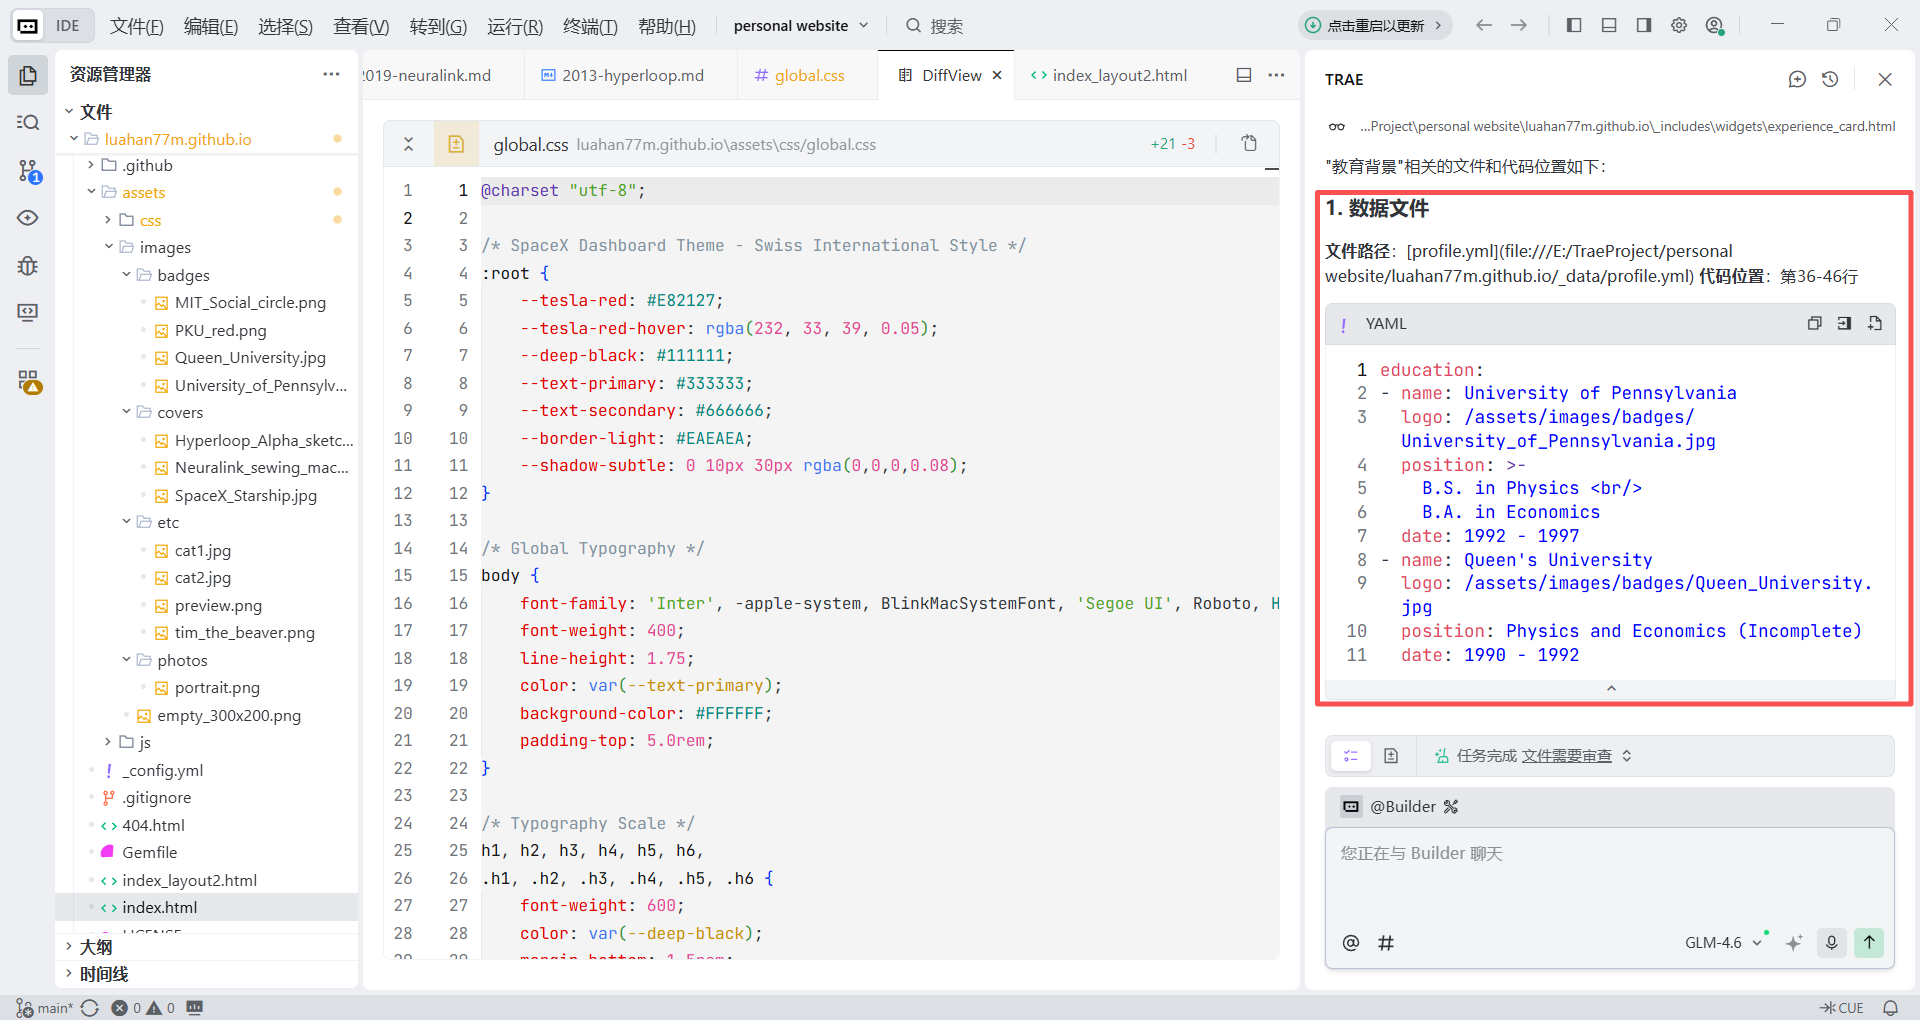
If you want to know exactly where everything is changed, you can ask Trae:
I want to modify the “Education” section. Please tell me where the corresponding file path is and which lines contain the code.Trae will tell you in the chat something like: "The file you need to modify is _pages/about.md, and the relevant code is around line XX..."
You can then open that file yourself from the file tree on the left and fill in the cleaned content from ChatGPT like a structured editing exercise.
- Mode B: fully managed automation
If you think finding files is too troublesome, directly paste your cleaned information into Trae:
Here is the cleaned content for my “Education” and “Project Experience” sections (paste the Markdown content).
Please directly replace the corresponding content in the current site and preserve the existing layout format.
5. Deploy Online
5.1 Deploy to GitHub Pages
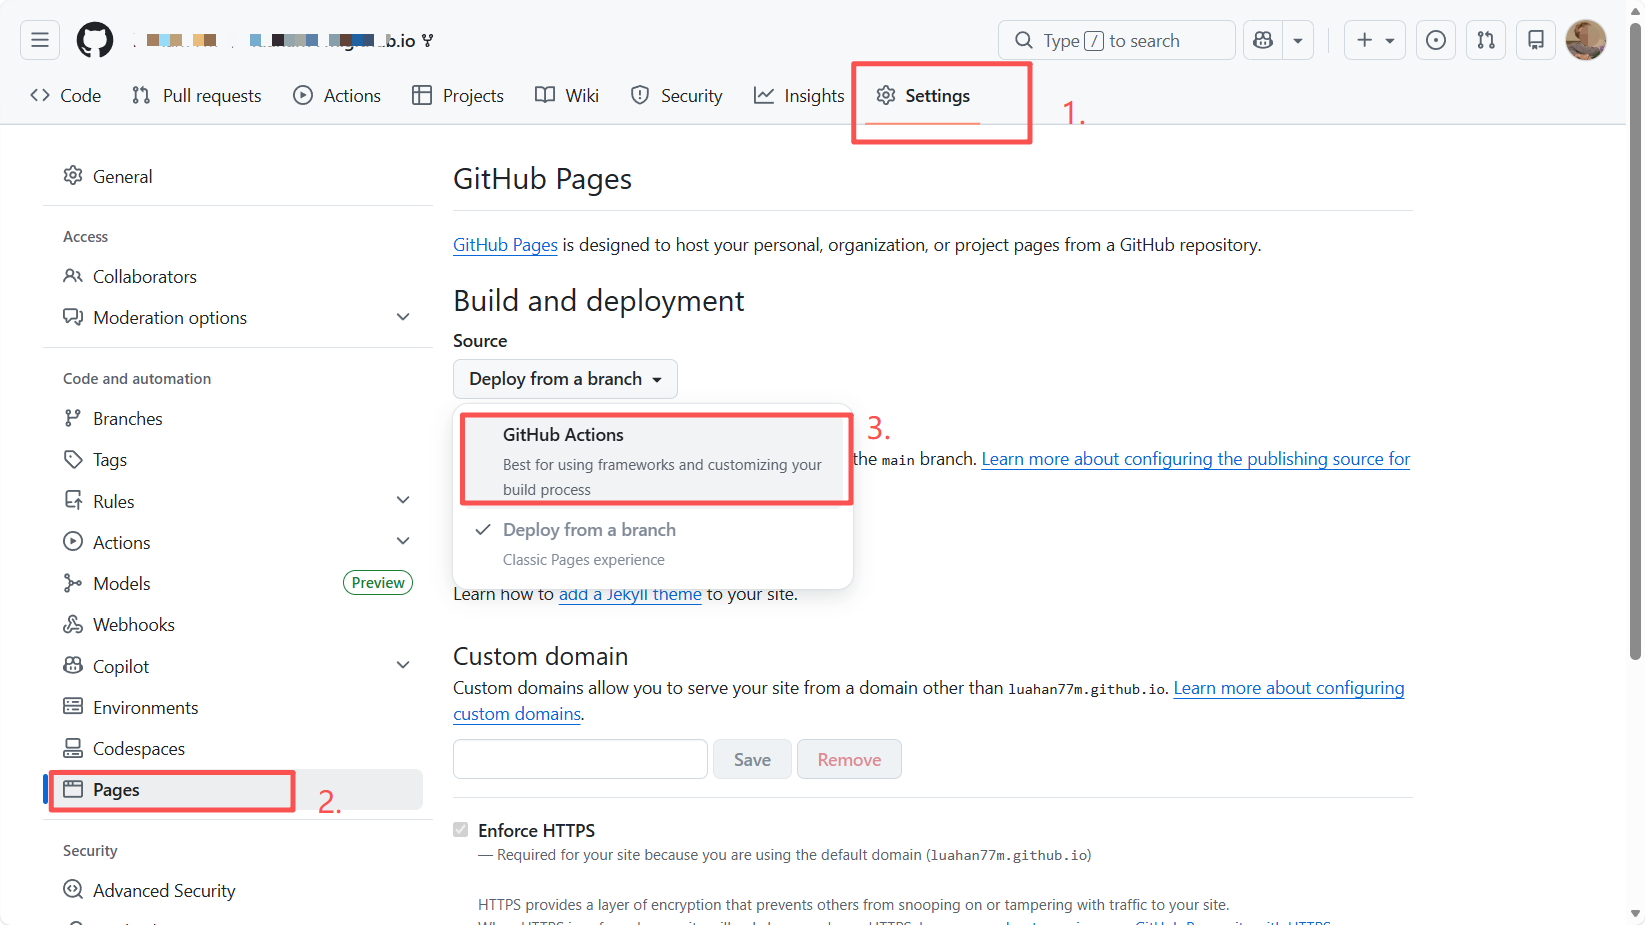
Step 1: Enable GitHub Actions, the cloud build
Back on GitHub in the browser:
- Click Settings at the top of the repository.
- In the left sidebar, click Pages.
- Under Build and deployment, change Source from
Deploy from a branchtoGitHub Actions.
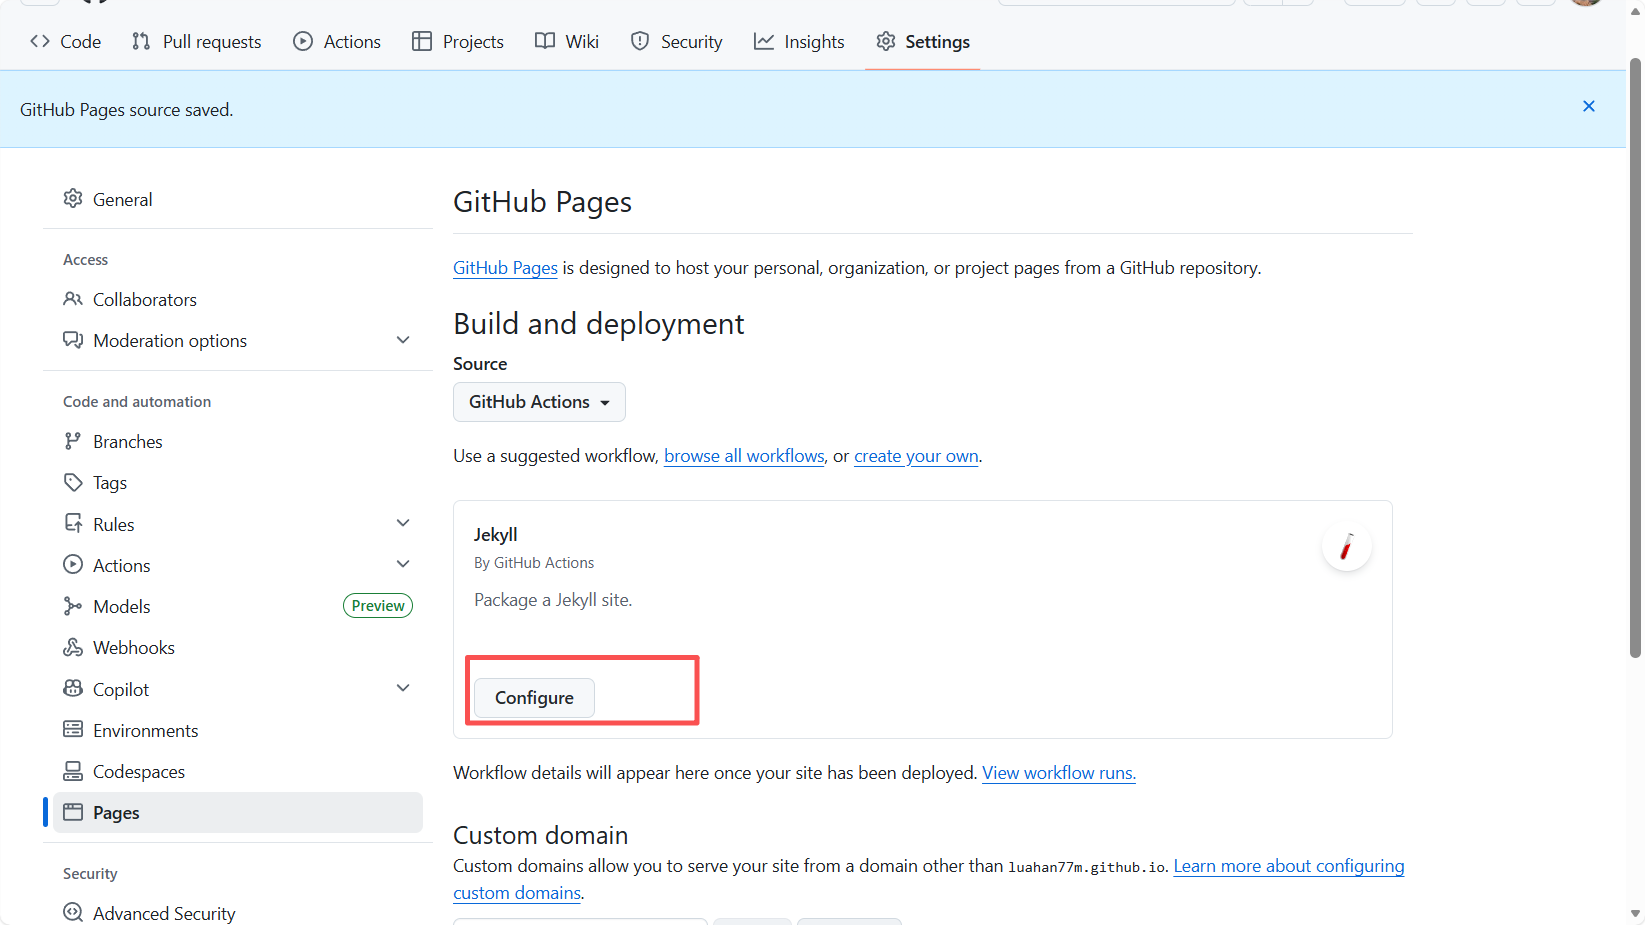
Step 2: Automatically configure the Jekyll workflow
After switching, the page layout changes. GitHub will automatically recognize that this is a Jekyll project.
- Find the Jekyll (By GitHub Actions) card.
- Click Configure on that card.
Step 3: Commit the configuration file
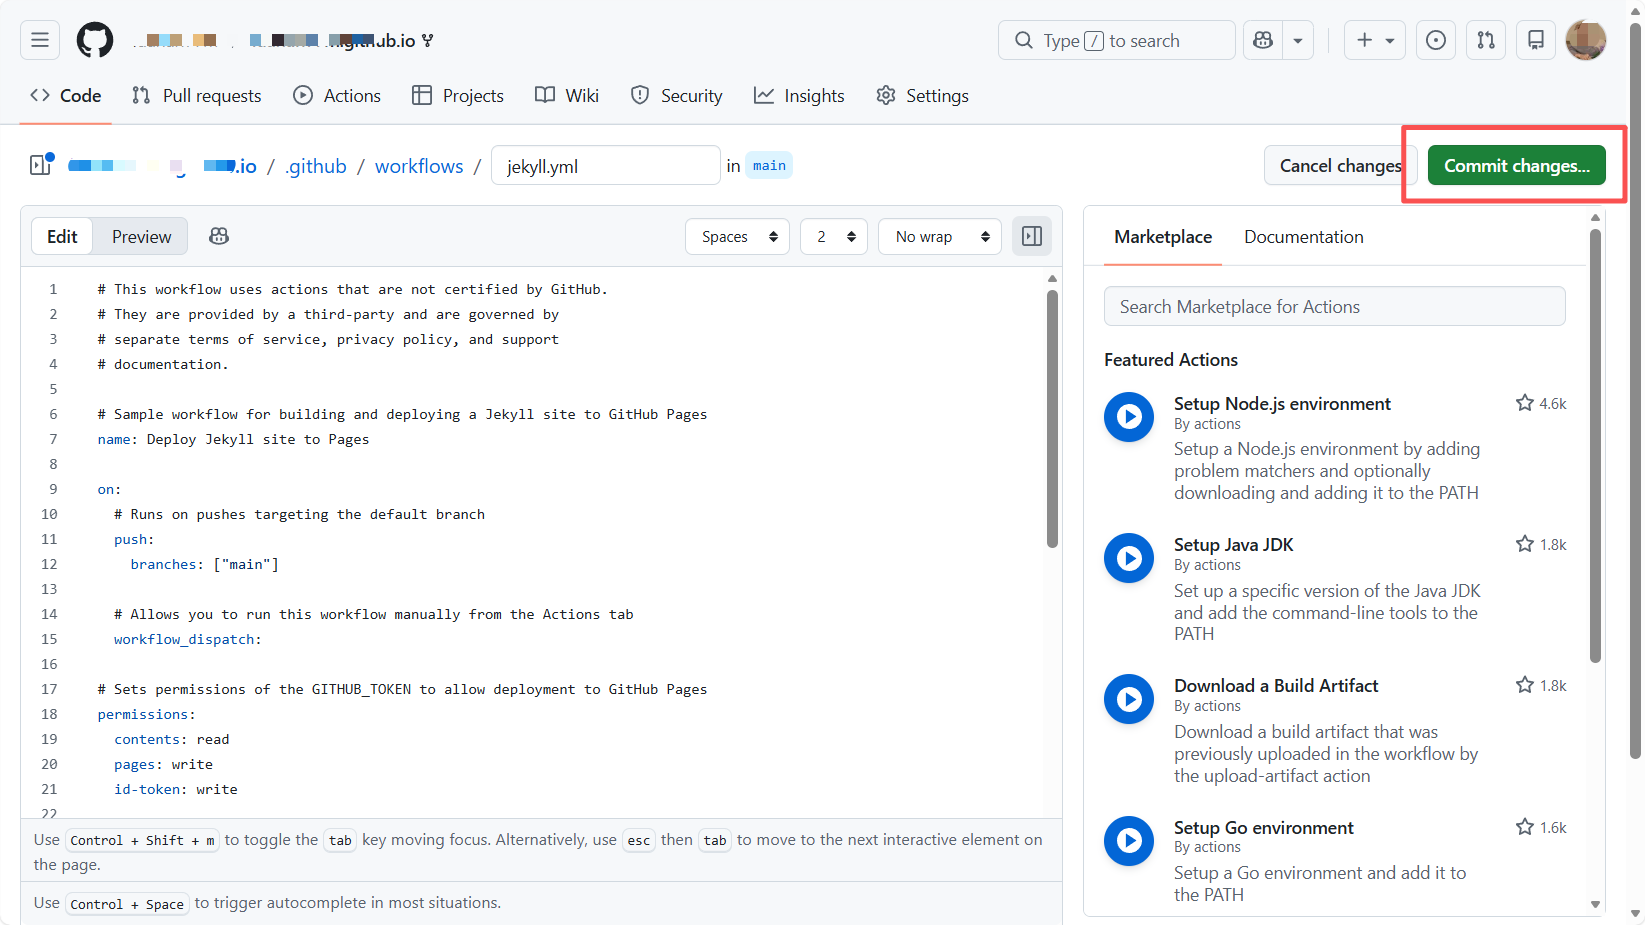
After clicking, you will be taken to a page full of code. This is a .yml configuration file already written by GitHub for building a Jekyll site.
- Do not modify any code.
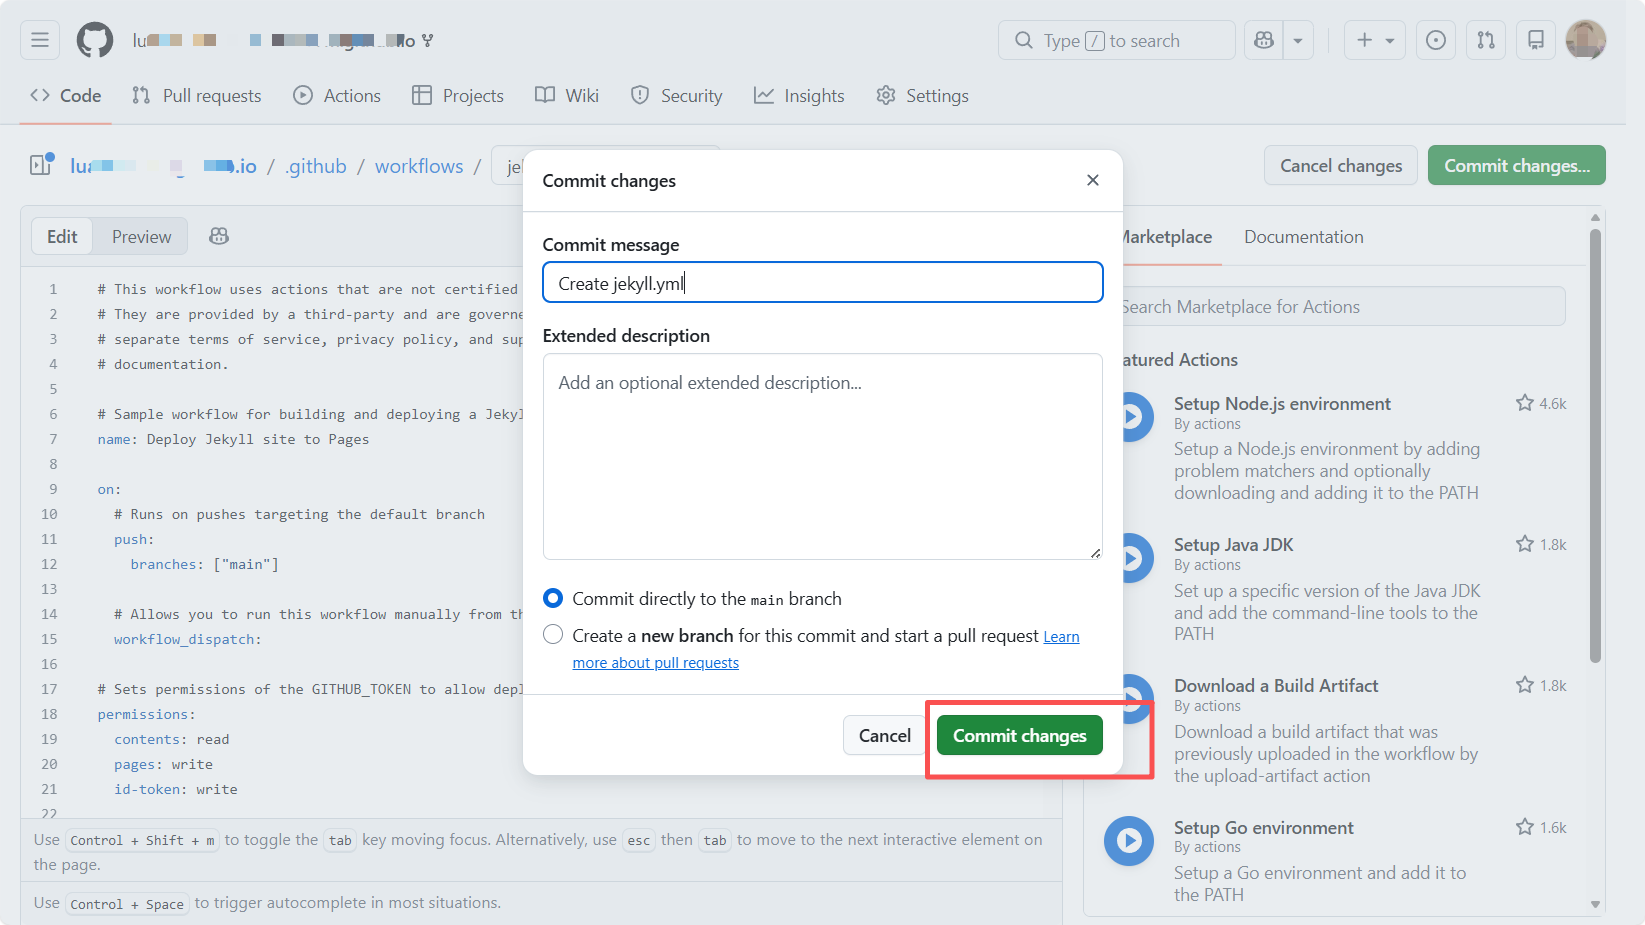
- Click the green Commit changes... button in the upper right corner.
- In the pop-up confirmation box, click Commit changes again.
Step 4: Wait and verify
After the commit, GitHub's servers start working automatically.
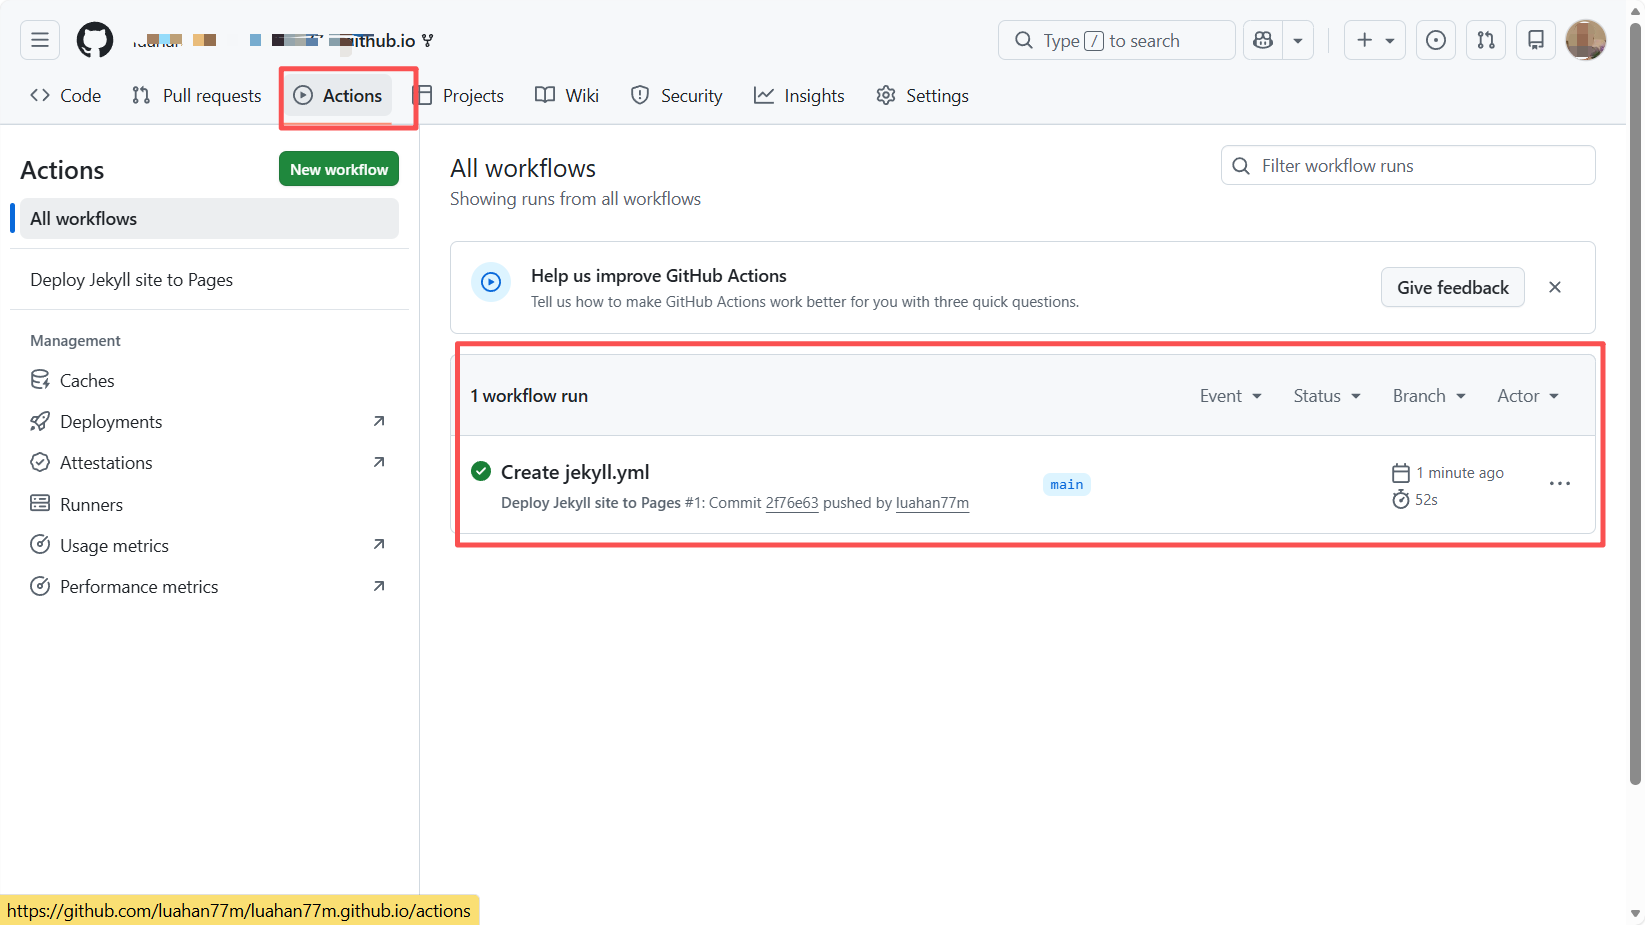
- Click the Actions tab in the top menu.
- You will see a task named
Deploy Jekyll site to Pagesspinning. - Wait one to two minutes until the yellow circle turns into a green check mark.
Step 5: Visit your website
Once the circle turns green, you can access the default version of the template through an address like: https://your-username.github.io/
Congratulations. You have now successfully deployed a personal academic homepage that is globally accessible.
5.2 Commit changes and update the homepage
Now we will push all the local modifications we made earlier to GitHub, so this Musk-style personal homepage can be seen by the world.
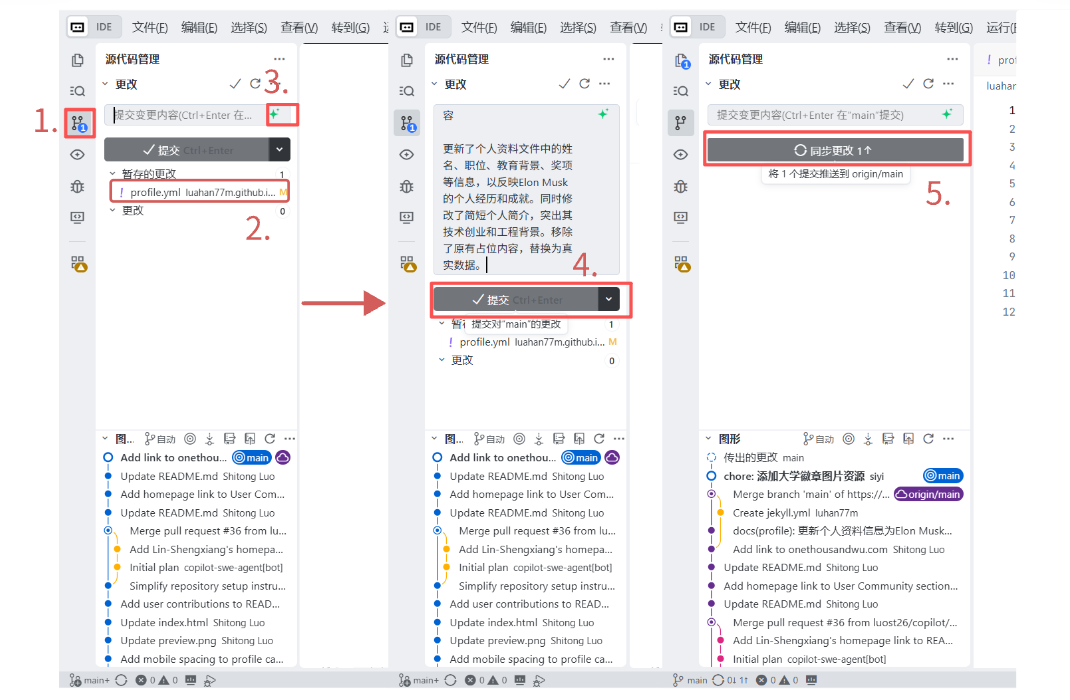
- Click Source Control on the left.
- Add all the changes into staged changes.
- Let Trae help generate a commit message, then click Commit.
- Click Sync Changes or Push to push to the
mainbranch. - Wait a moment until all processes under the Actions tab complete.
Now, congratulations. Open https://your-username.github.io/, and you already have a complete, professional, and strongly Musk-flavored academic homepage.
6. Advanced Play: Hand-build a Personal Homepage from Scratch
If you think academic templates are too rigid, or if you want to make a one-page website as cool as The Matrix, welcome to the DIY section.
Here, we do not fork anyone else's code. We will use Trae, starting from an empty folder, and generate a complete website with a single instruction, then deploy it online.
6.1 Why build it by hand
- Absolute freedom: no template constraints. If you want the navigation bar on the right, or fireworks in the background, you only need to tell the AI.
- Minimalism: templates often contain hundreds of files, while a hand-built website may need only one
index.html. - Technical control: this is the best way to understand how a webpage actually runs.
We will demonstrate the classic pure HTML flow: no compilation required, and GitHub Pages supports it natively, which makes it ideal for building a personal landing page.
6.2 Practical example: ask AI to write a "Mars command center" homepage
This time we are not doing the academic route. Suppose Musk wants an extremely minimal, futuristic personal homepage to present his Mars plan.
Step 1: Create an empty project
Create a new folder on your computer and open it with Trae. At that moment, the file tree on the left is completely empty.
(Tip: you can prepare a photo of Musk in advance and name it portrait.png.)
Step 2: Build the framework
Enter the following prompt in Trae's chat panel. Note that we require AI to write all code into a single file so that it is easy for beginners to manage:
I want to build a minimalist personal homepage for Elon Musk from scratch, without any complex framework, using only HTML + CSS + JS.
Design style: SpaceX dashboard style.
    Background: use deep space black (#000000), with starlight animation.
    Main accent color: use “Mars red” (#E82127).
    Font: use a monospace font stack to imitate the feel of a code terminal.
Page content:
    Place Elon Musk's avatar in the center, circular, with a rotating border. The image path is `portrait.png`.
    Name: Elon Musk (Technoking of Tesla)
    Intro: "Occupying Mars... 99% Loading."
    At the bottom, put three glowing buttons linking to X (Twitter), SpaceX, and Tesla.
Technical requirement:
Please put all CSS styles and HTML structure inside a single `index.html` file.
Please generate the full code directly.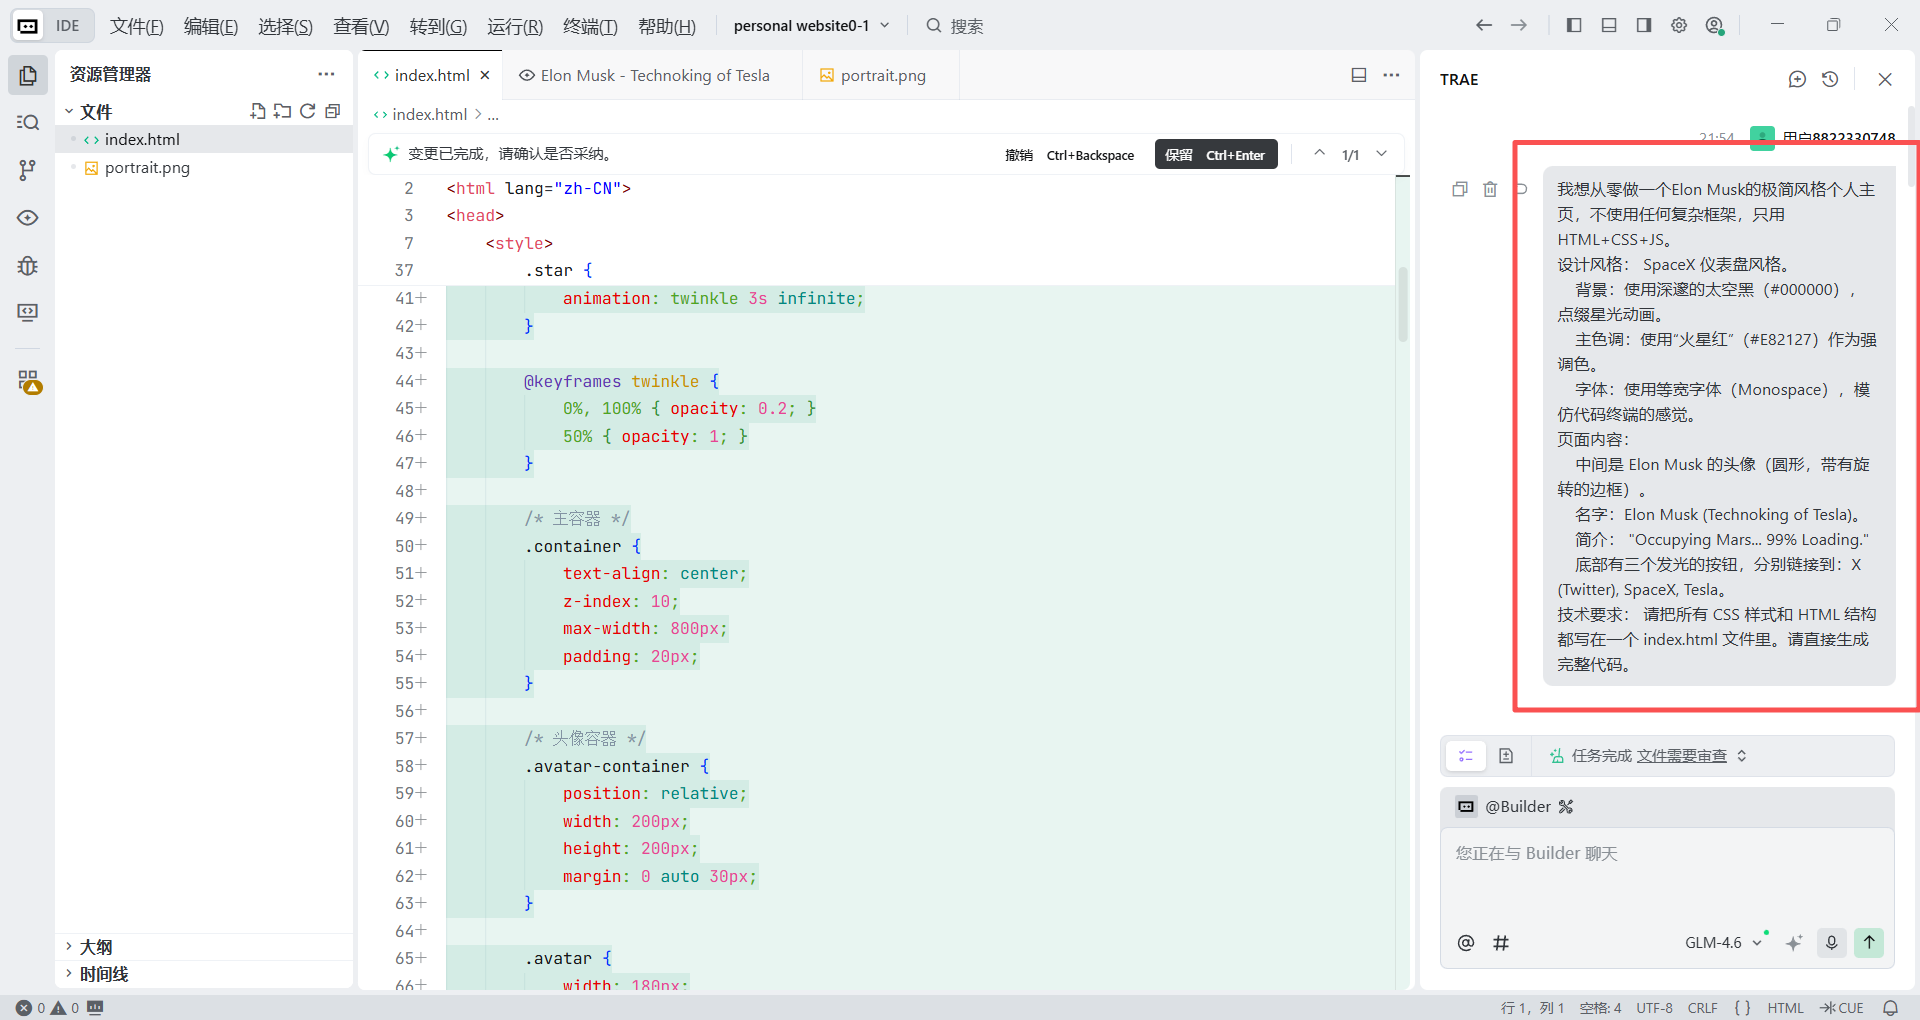
Step 3: Generate and preview
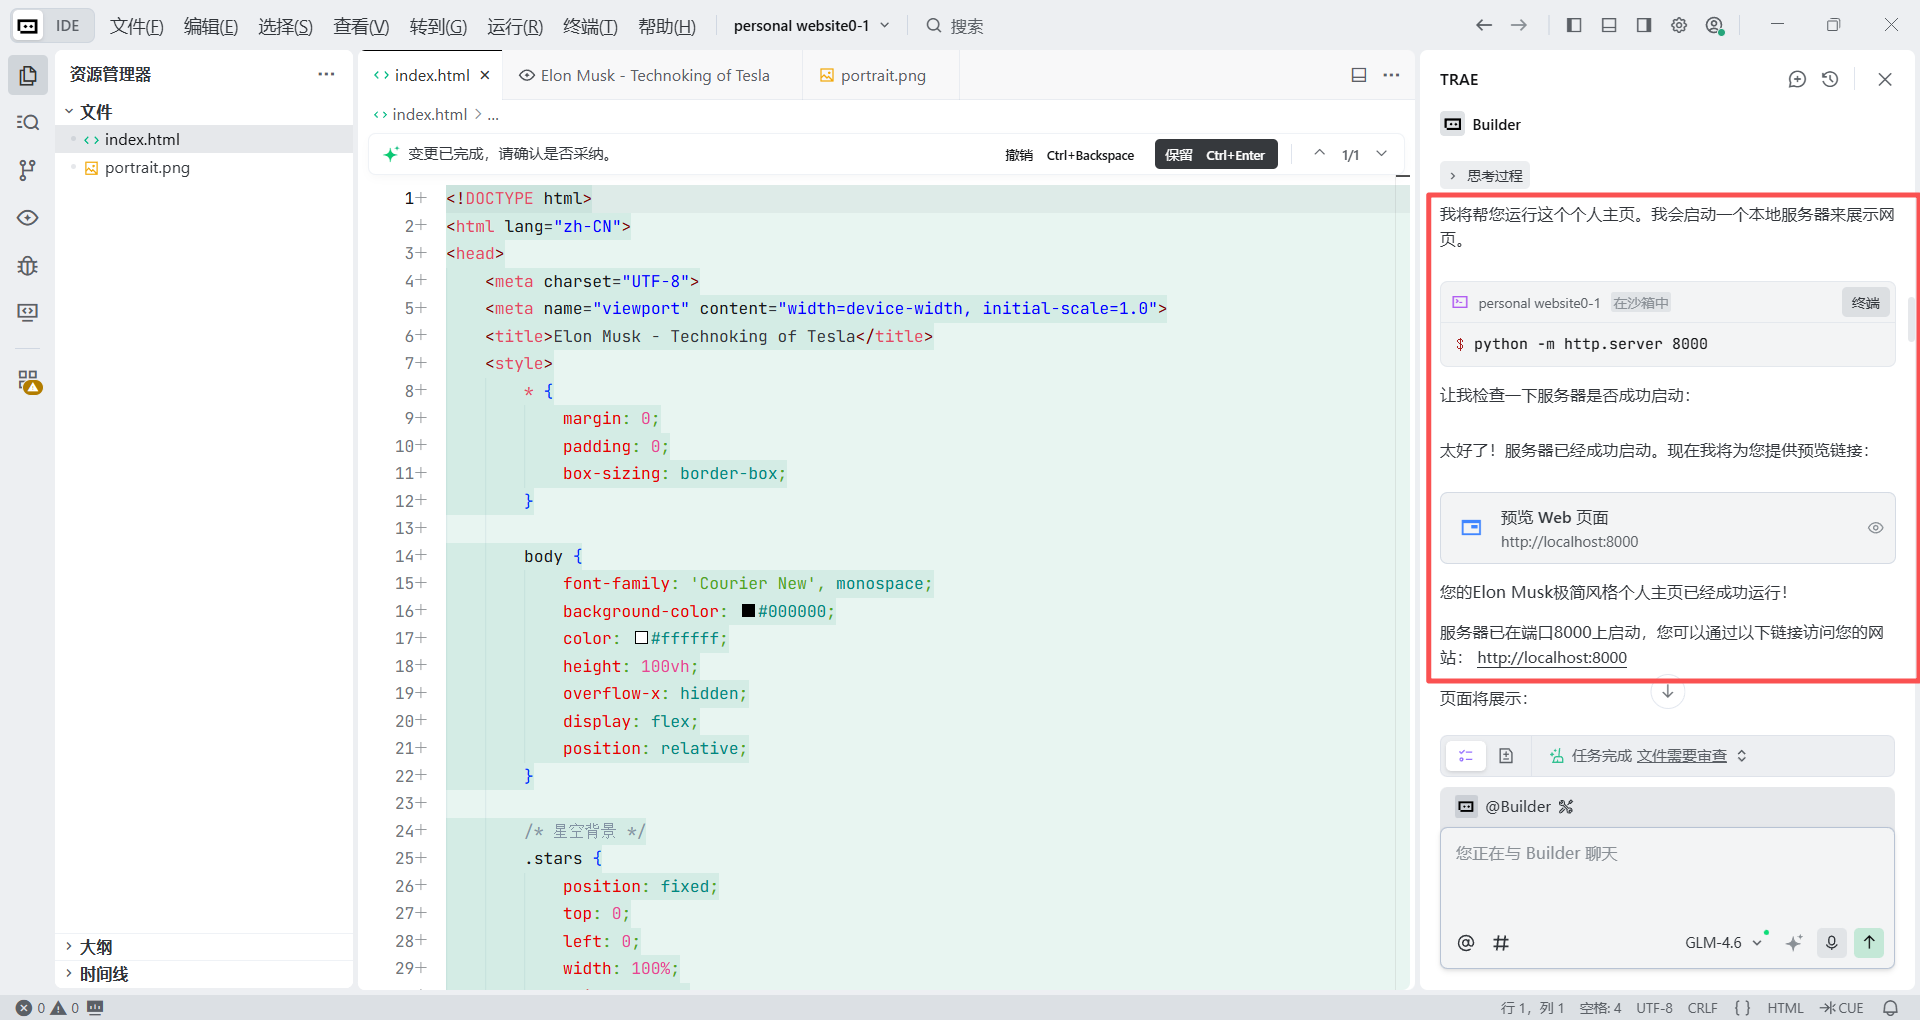
In the previous step, Trae already helped us generate an index.html file. So how do we see its current effect?
Tell Trae in the chat:
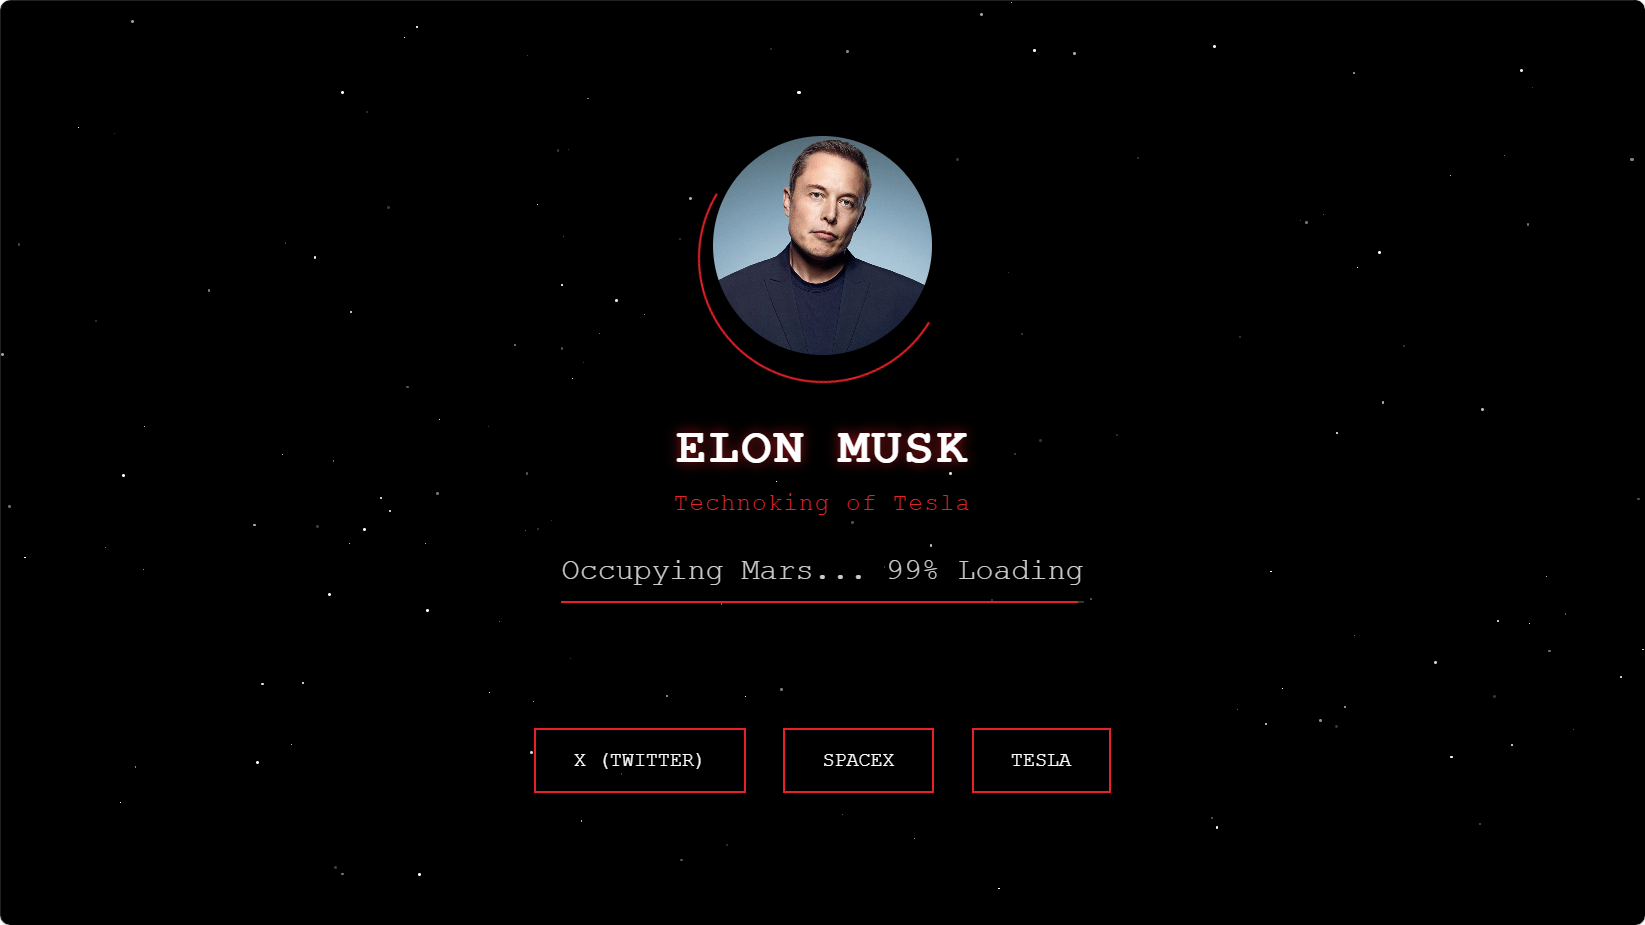
Please help me start a local service to preview this webpage.You will receive a link such as http://localhost:8000. Copy and open it in the browser, and you will see a cool "Mars homepage," perhaps with stars twinkling in the background.
But we will notice that the current page is only a very cool landing page. As a complete personal homepage, it still has too little information and lacks the depth expected of an academic homepage. So based on this visual framework, we now continue to enrich it with academic-style information about Elon Musk.
Step 4: Further improve the information
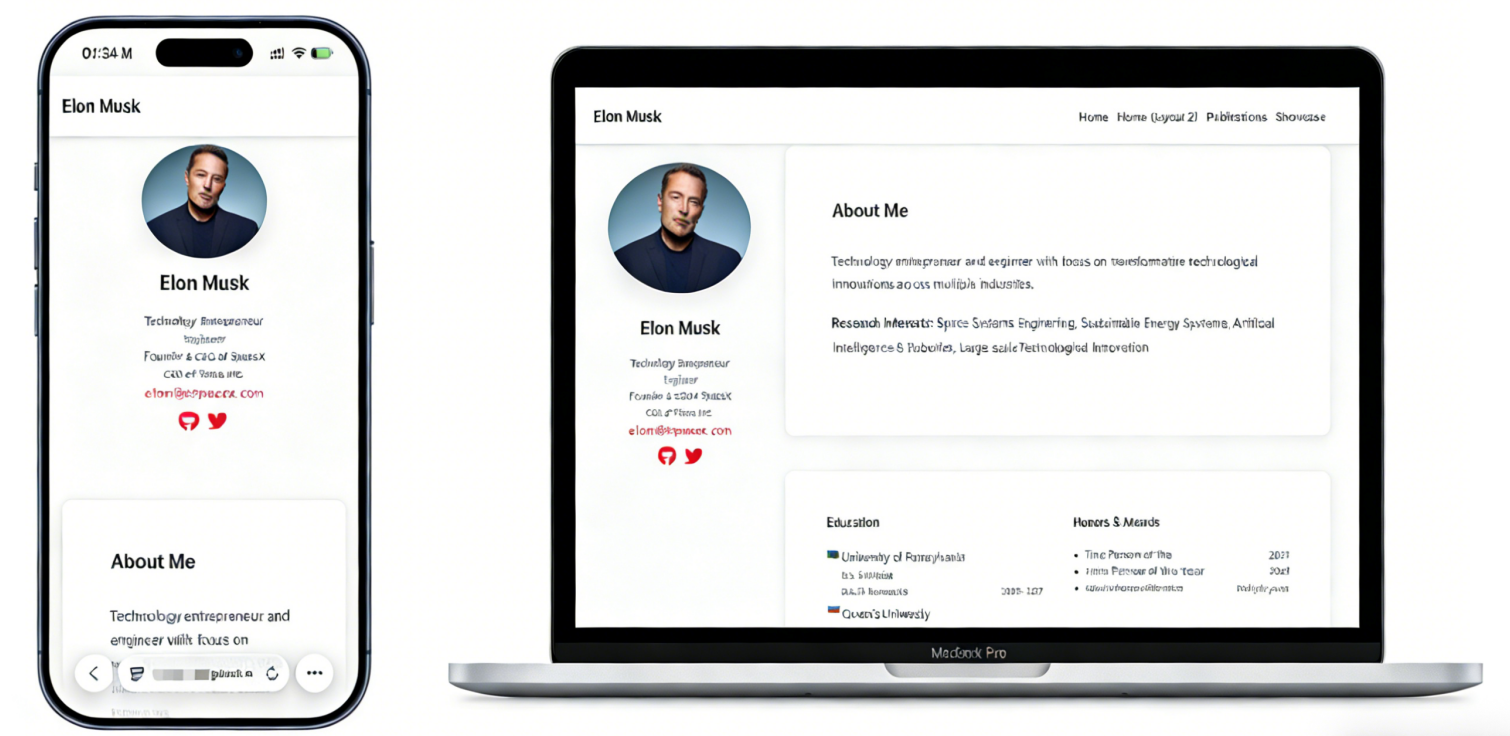
We want Trae to keep the current Mars style, but restructure the page into something more like the academic template. We need to clearly tell it to move the existing elements to the left and create a new content area on the right for profile text and white papers, while keeping all newly added content in the same black-and-red cyberpunk style.
Copy the following prompt and send it to Trae:
Core principle:
You must strictly preserve the current “SpaceX / Mars” design style, including pure black background, starlight decorations, red neon accent color, and monospace code-style font. Do not use the white background from the reference image.
Specific modification steps:
1. Create a two-column layout
Split the page into left and right columns. The left sidebar should take about 30% to 35% width, and the right content area should take about 65% to 70%.
2. Left sidebar - move the existing information
Move all current elements from the original hero screen into the fixed left sidebar:
- Avatar: keep Elon Musk's circular avatar.
- Name and title: keep the red neon text “ELON MUSK” and “Technoking of Tesla”.
- Loading bar: keep “Occupying Mars... 99% Loading” as the personal signature.
- Social buttons: move the three red buttons, X, SPACE X, and TESLA, to the bottom of the left sidebar.
3. Right content area - add detailed information
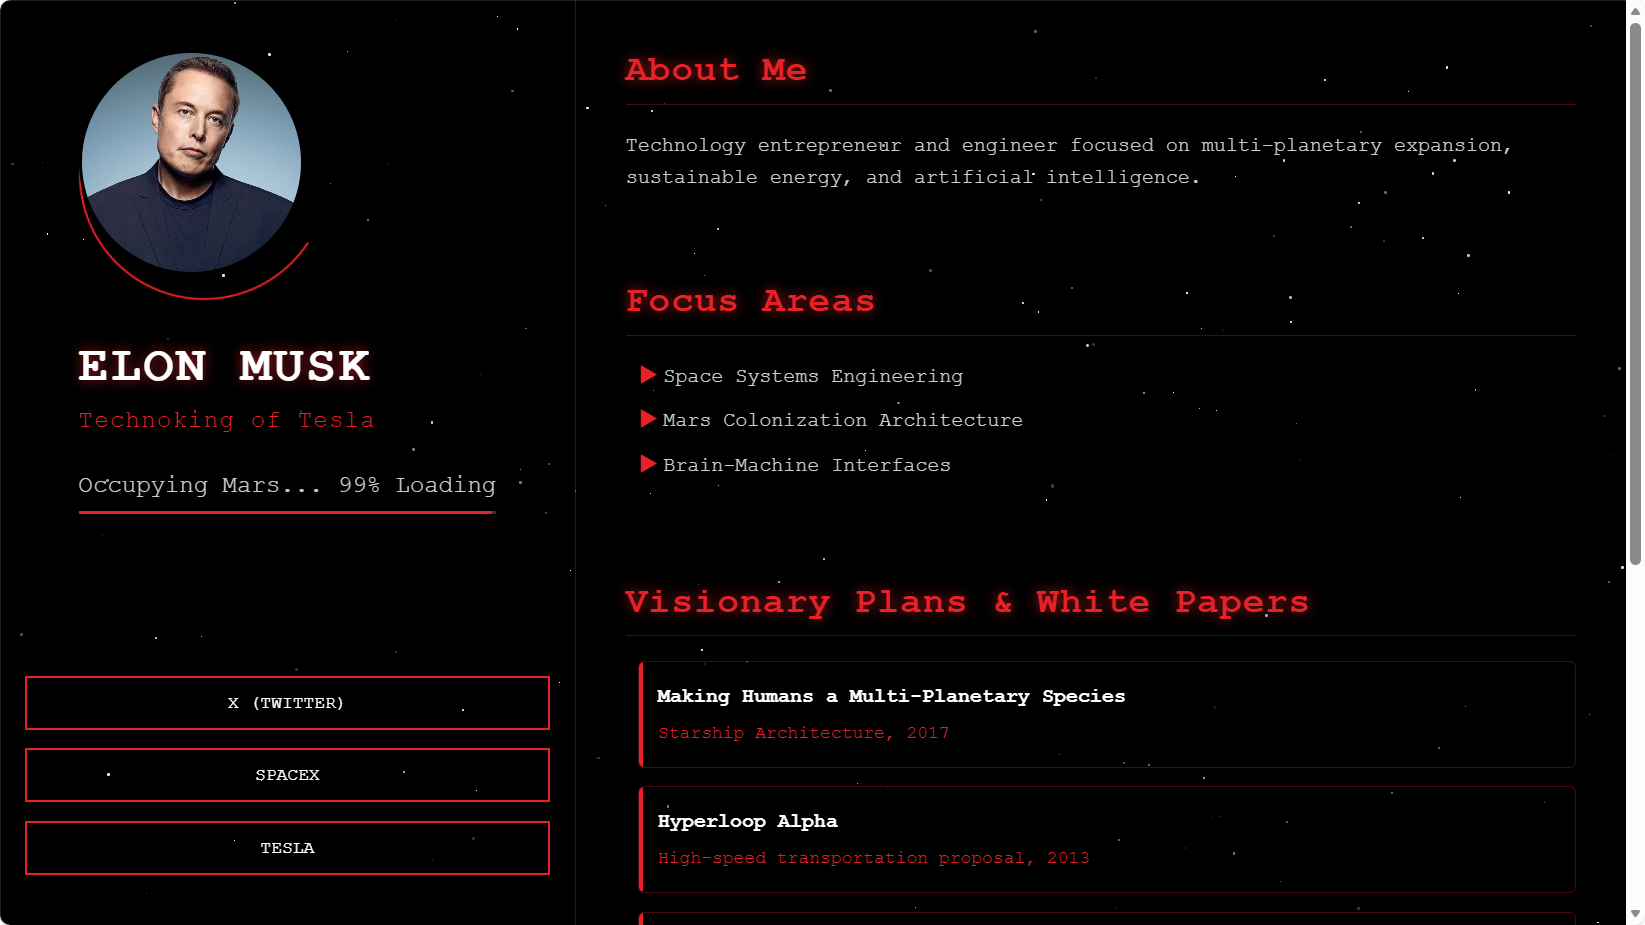
Add detailed personal introduction and achievements in the right area. All new body text should use white or light gray, while titles should use red neon emphasis. Please create the following sections:
- About Me:
Write a short introduction, for example: “Technology entrepreneur and engineer focused on multi-planetary expansion, sustainable energy, and artificial intelligence.”
- Focus Areas:
List Space Systems Engineering, Mars Colonization Architecture, Brain-Machine Interfaces.
- Visionary Plans & White Papers:
This is the key section. Refer to the list style in the example image, but convert it into a black-background style.
Create a list displaying his important technical plans, using red borders or glow effects to distinguish each item.
Item 1: “Making Humans a Multi-Planetary Species” (Starship Architecture, 2017).
Item 2: “Hyperloop Alpha” (High-speed transportation proposal, 2013).
Item 3: “Neuralink: An Integrated Brain-Machine Interface Platform” (2019).
- Notable Achievements:
Briefly list milestones such as:
First private liquid-propellant rocket to reach orbit (Falcon 1)
First reusable orbital class rocket (Falcon 9)
4. Style detail requirements
All section titles on the right, such as “About Me,” should use the same red glowing style as the “ELON MUSK” text on the left.
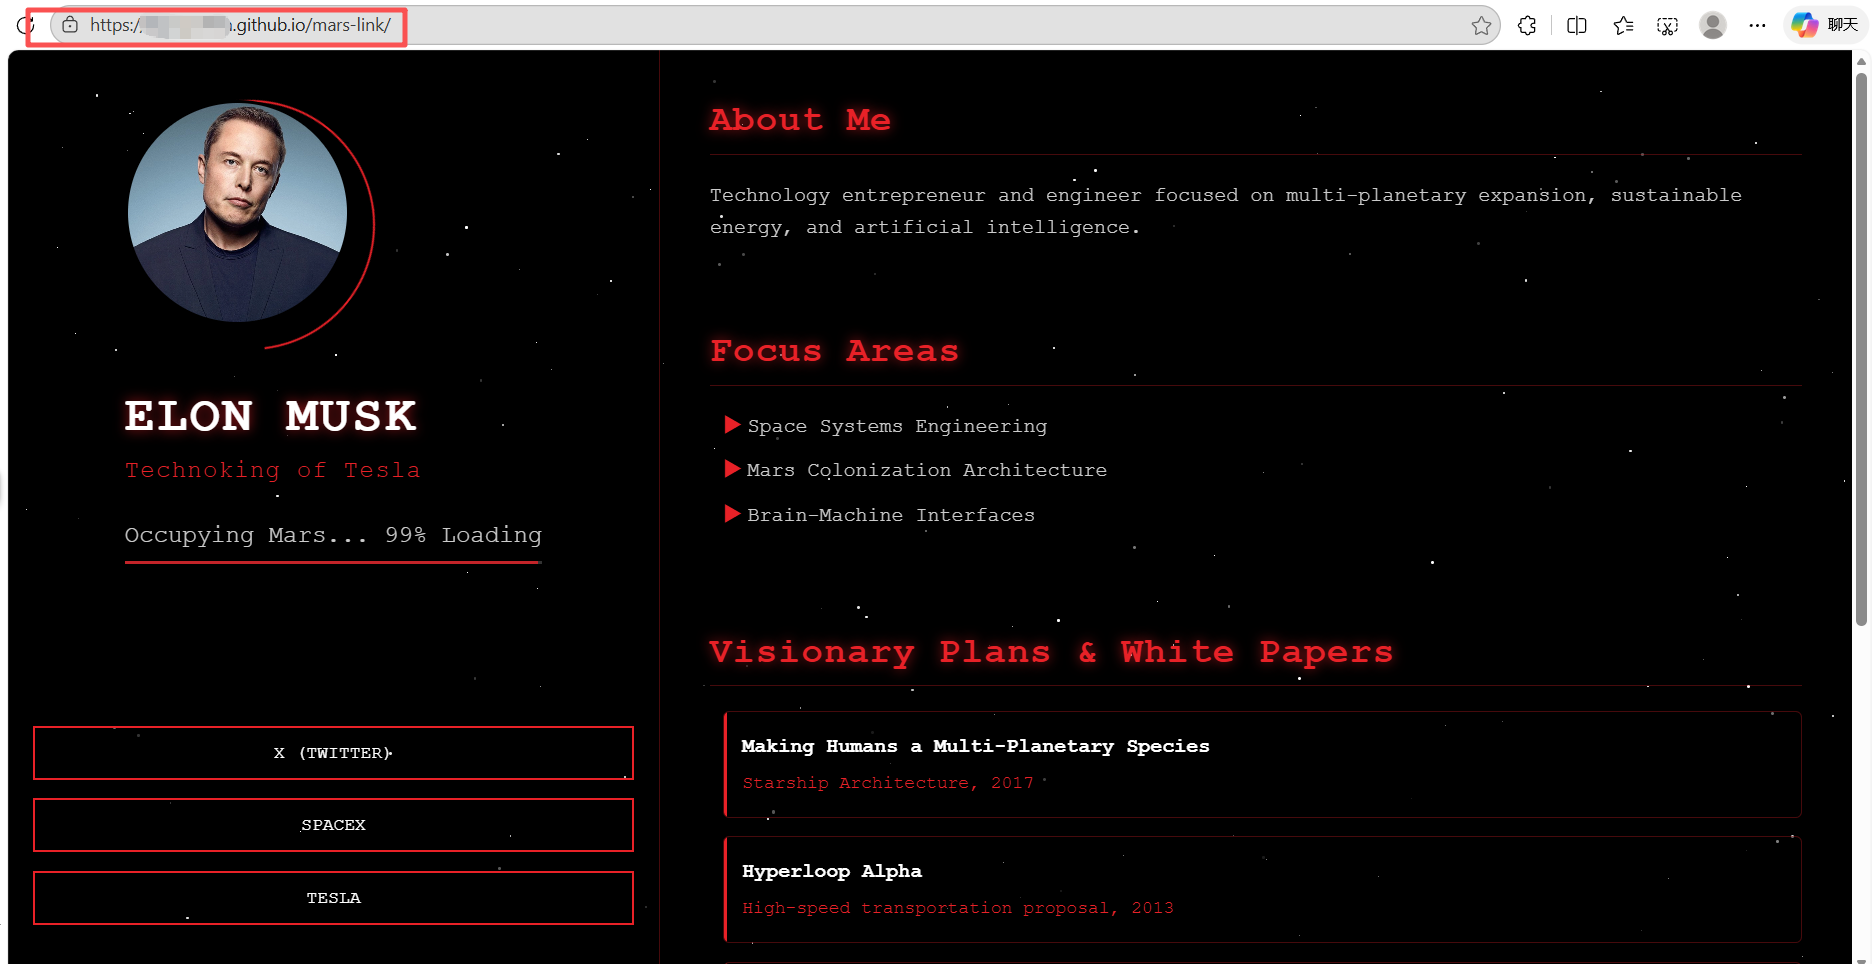
Make sure the whole page remains responsive and preserves a good two-column layout on different screen sizes.Refresh the browser after that, and your cyberpunk academic page is complete. Of course, you can keep improving it according to your own preferences. As in the previous steps, you only need to tell Trae the goal clearly, and it will handle the tedious coding process for you.
6.3 How to deploy the hand-built site
Unlike the previous forked template, which came from someone else's repository, this project is newly created by you and does not yet have a corresponding GitHub location. We therefore need to bind it manually.
Step 1: Create a new repository on GitHub
- Log in to GitHub in the browser.
- Click the + icon in the upper right, then New repository.
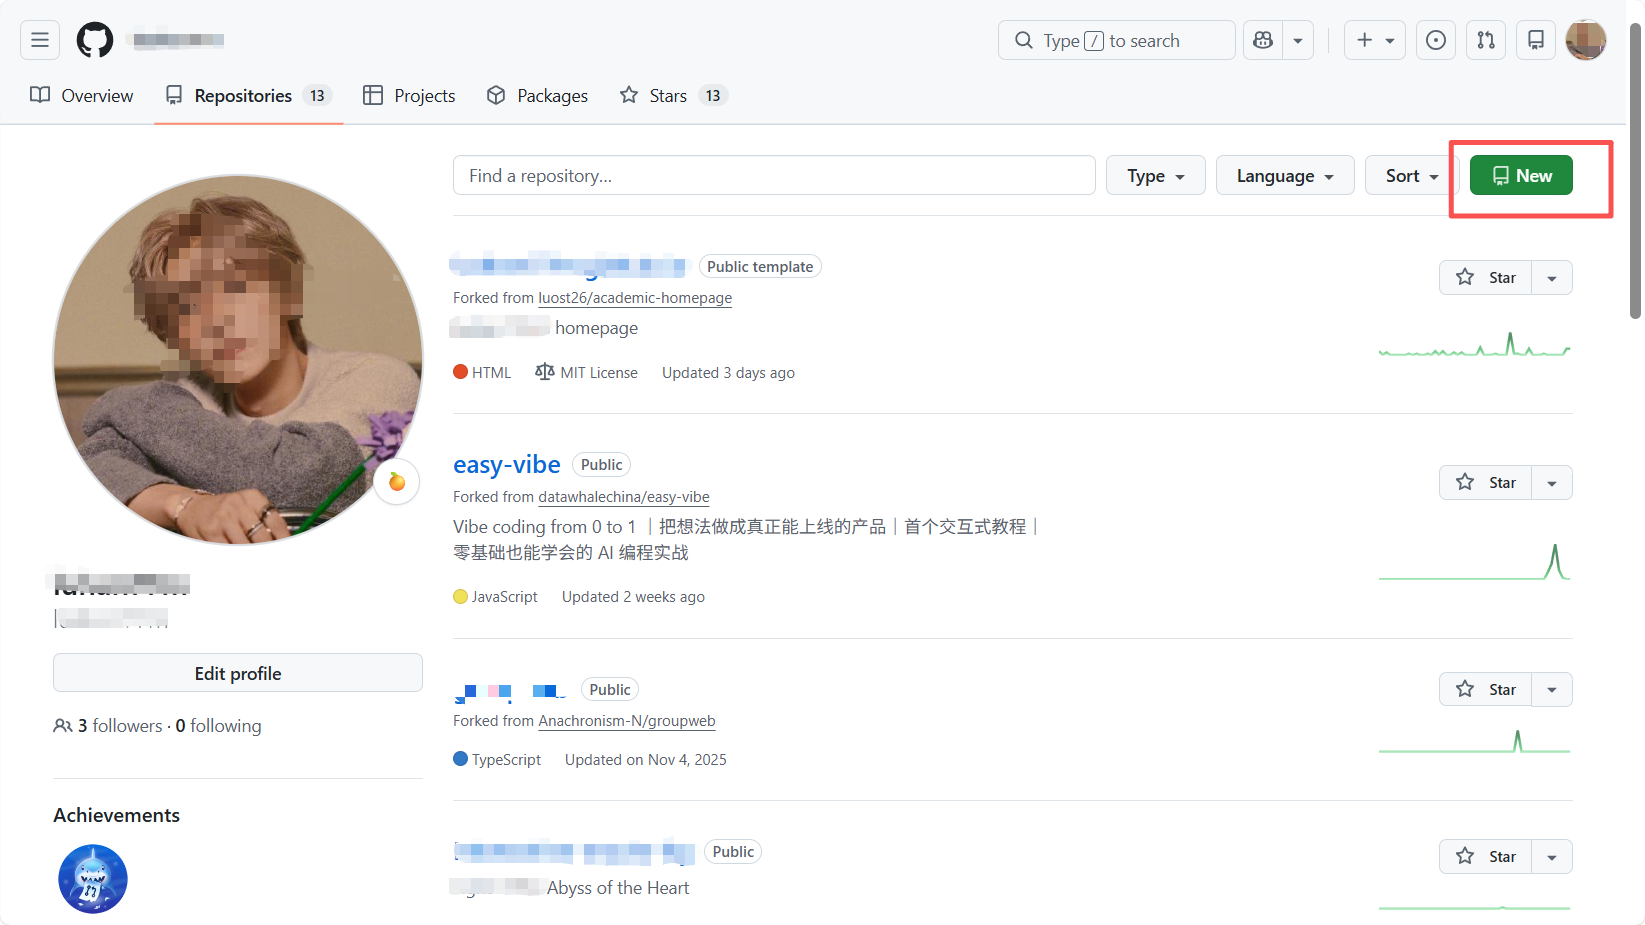
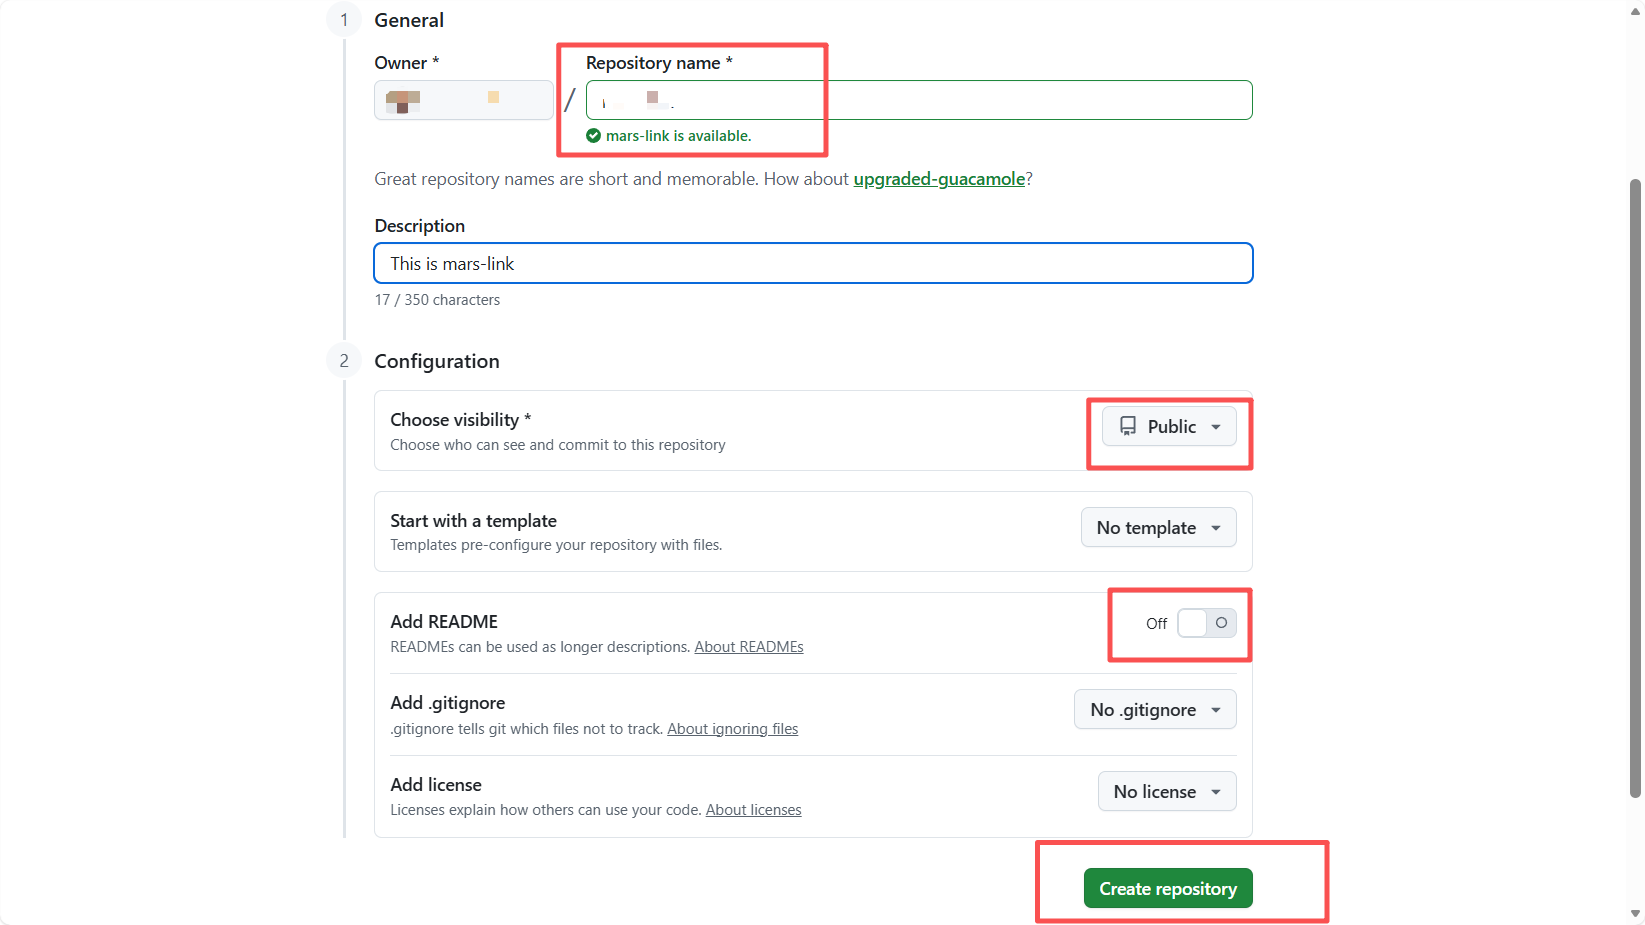
- Repository name: enter
mars-profile, or any other name you like.
Note: If you have already used your-username.github.io, you cannot reuse that name here. You can choose another name, and GitHub will then generate a URL like your-username.github.io/mars-link.
- Public / Private: choose Public.
- Do not check "Add a README file"! Leave the other options at their defaults.
- Click Create repository.
Step 2: Push the local code to the cloud
After creation, GitHub will take you to a page with a lot of code-looking content. Do not worry. We just need to copy the repository link shown on that page.
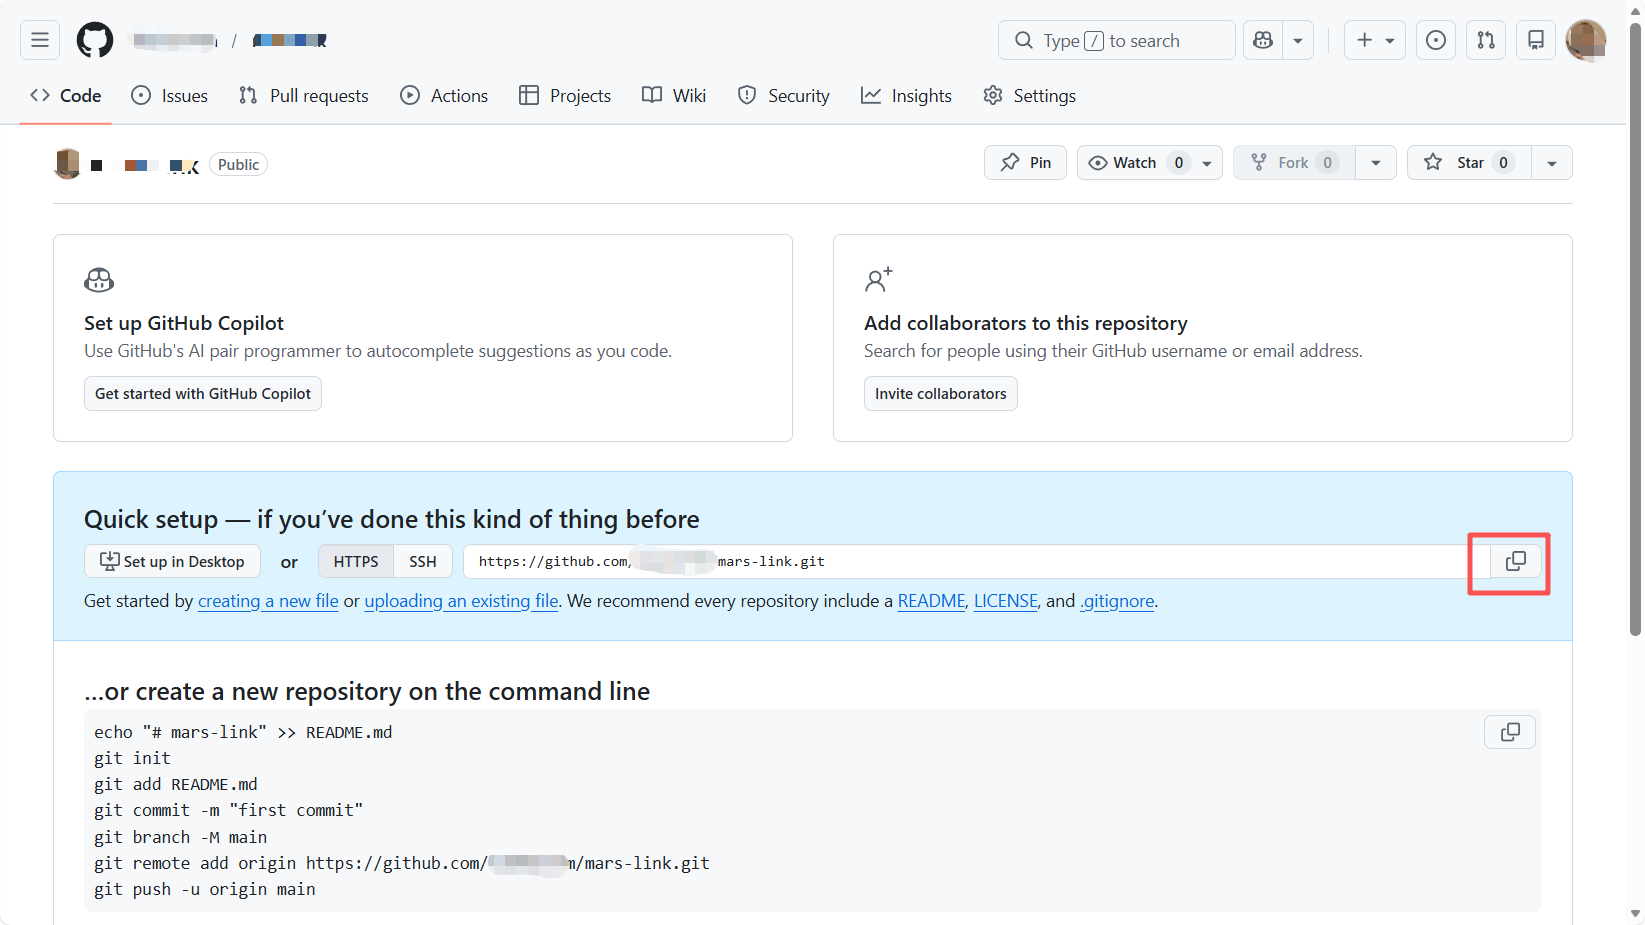
Go back to Trae and type in the chat:
I have created an empty repository on GitHub. The address is: https://github.com/your-username/mars-link.git (please replace this with the actual repository address you just created).
Now please help me initialize the current local project as a Git repository and push the code to the `main` branch of this remote address.
Trae will usually help execute the standard sequence below, and you may only need to click to run them:
git initgit add .andgit commit -m "First commit"git branch -M mainandgit remote add origin [your address]git push -u origin main
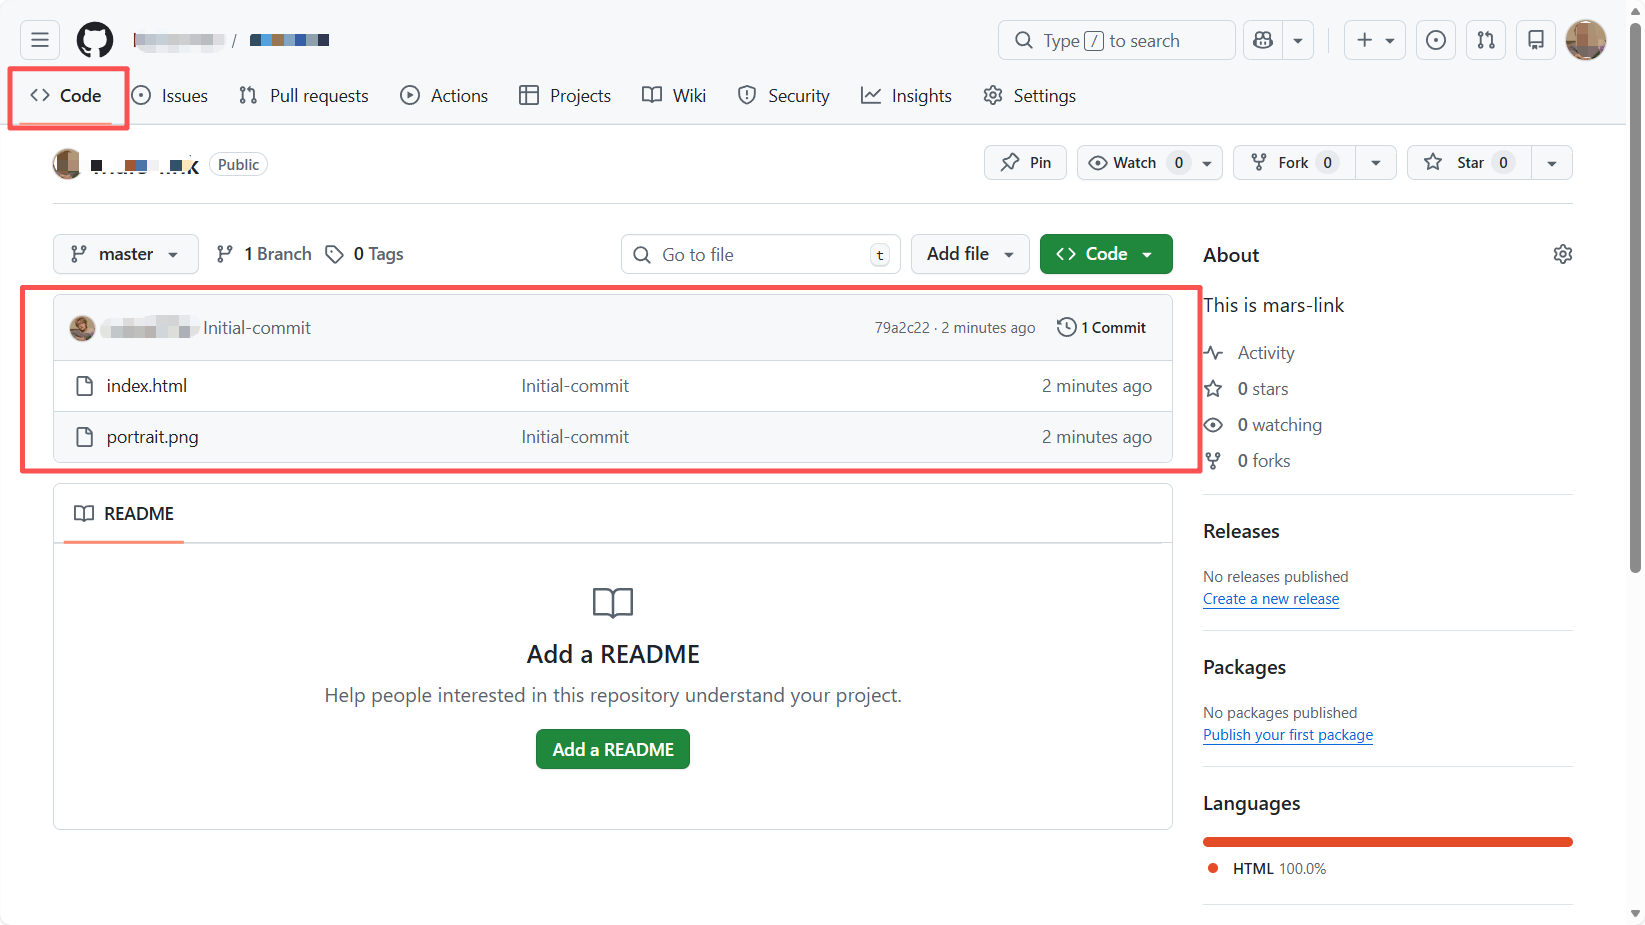
After Trae completes the push, go back to GitHub and refresh the page. Click the Code tab, and you will see that the code written in Trae has been successfully pushed into the repository.
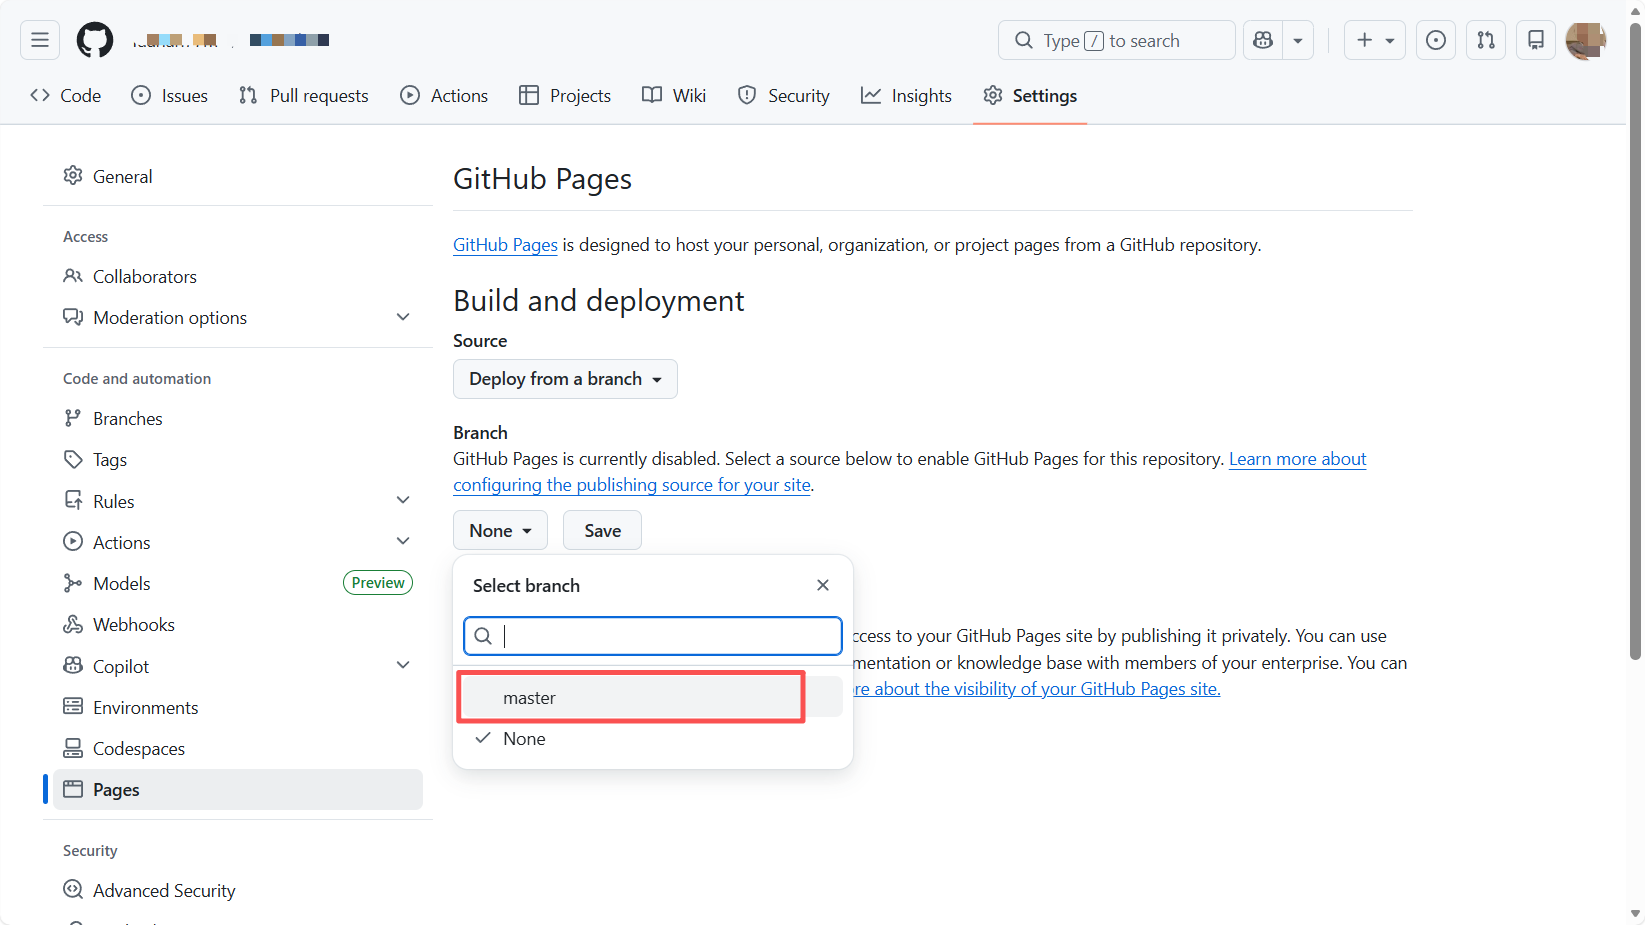
Step 3: Enable GitHub Pages
After the code is pushed, the webpage will not appear automatically. We still need to turn on the switch manually:
- Go back to the GitHub repository page and click Settings at the top.
- Click Pages in the left sidebar.
- Under Build and deployment:
- Set Source to
Deploy from a branch. - Set Branch to
main, and choose/(root)as the folder.
- Set Source to
- Click Save.
After you click Save, the webpage will not appear instantly. GitHub's backend works like a small robot factory. It needs around 1 to 2 minutes to package your code, build it, and publish it to global servers.
Wait patiently and refresh the page. Under the big GitHub Pages heading, you will see a line with a URL similar to: "Your site is live at https://your-username.github.io/mars-link/"
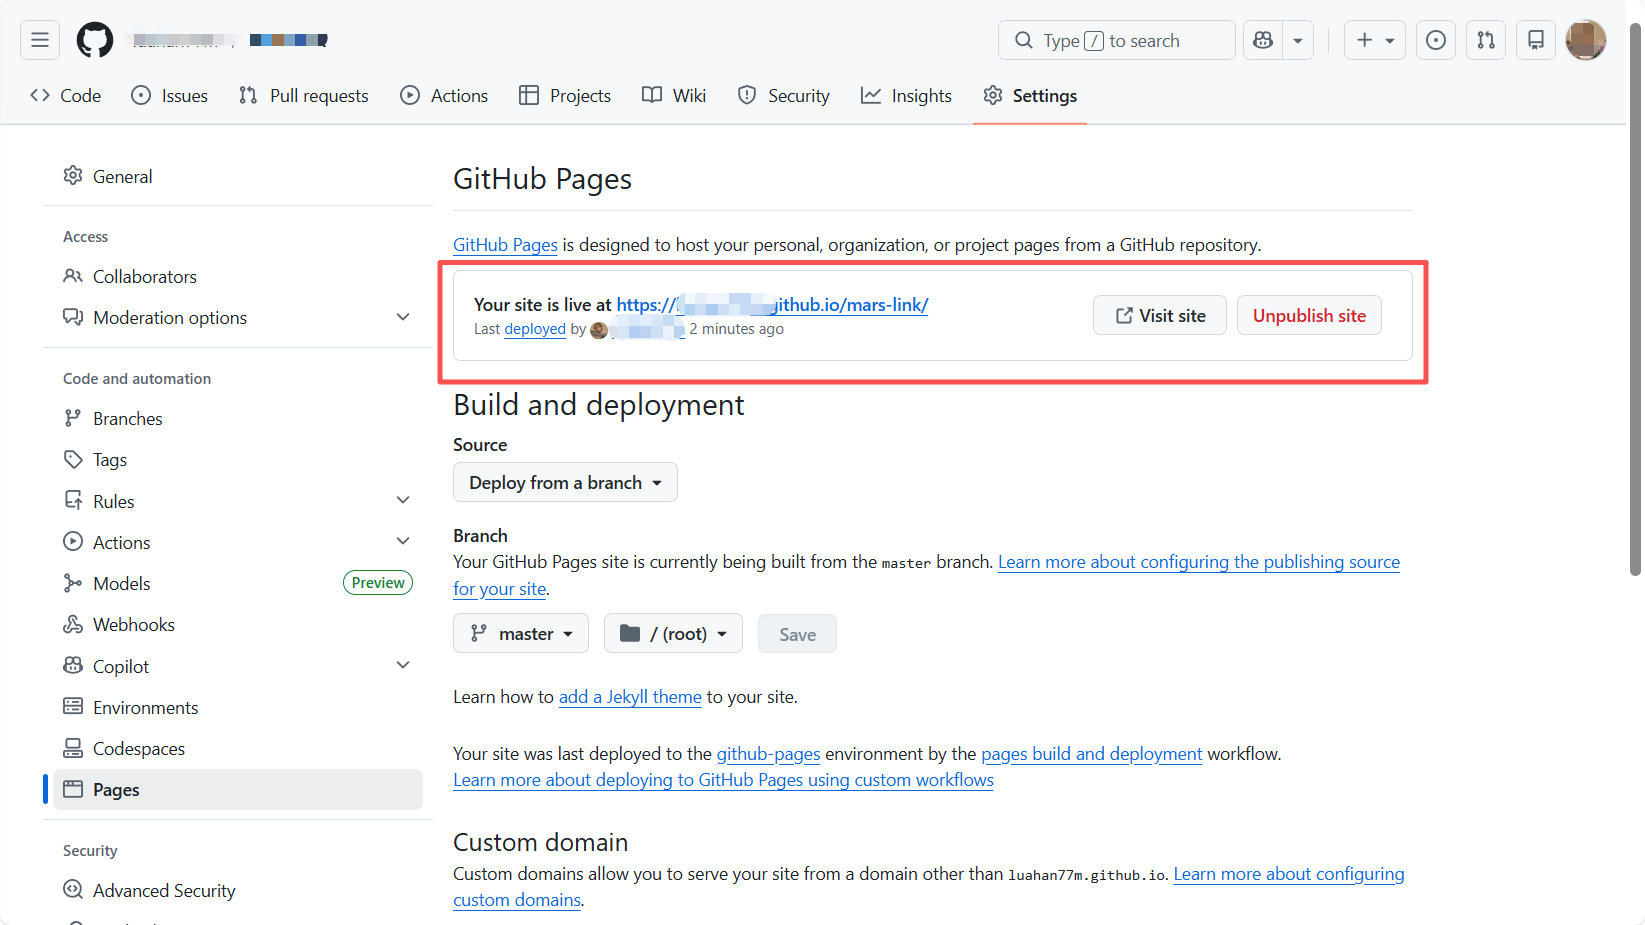
Click it, and your Mars command center is online.
7. Final words
The tutorial is over. Now, when you look at the .github.io glowing in your browser's address bar, do you feel a little like you have planted a flag on the internet?
In this tutorial, we borrowed Elon Musk's persona and built a website like a Lego project that looks quite impressive. But this is only the beginning. The most charming part of Vibe Coding is not how much typing time it saves. It is that it completely smashes the wall between “idea” and “reality.”
In the past, you might have given up on showing a project because you could not write CSS. Now, the only limits left are your imagination and your taste.
Do not let this site stay a “Musk-inspired clone.” That Tesla link you used for practice and that Mars-colonization white paper are ultimately someone else's story. Your homepage should be your own name card in the digital world.
Go and put your first real project experience there. Go and publish your own unique thoughts on a technical topic. You can even put your favorite book list or your own photos on it. Thoughts that would get buried on WeChat Moments can stay here permanently. Passion that does not fit inside a resume can spread freely here.
Do not leave this plot empty. Go experiment. Go break it. Go rebuild it. Keep doing that until it grows into the shape you like most.
Go ahead, and let the world see you.
References
CSDN: 2025 latest nanny-level tutorial: step by step on using GitHub to build a personal homepage