Chapter 3: Initial Configuration Wizard
After completing this chapter, the lobster will be able to speak.
Prerequisites: You have completed Chapter 2: OpenClaw Manual Installation.
0. Two Paths — Choose One
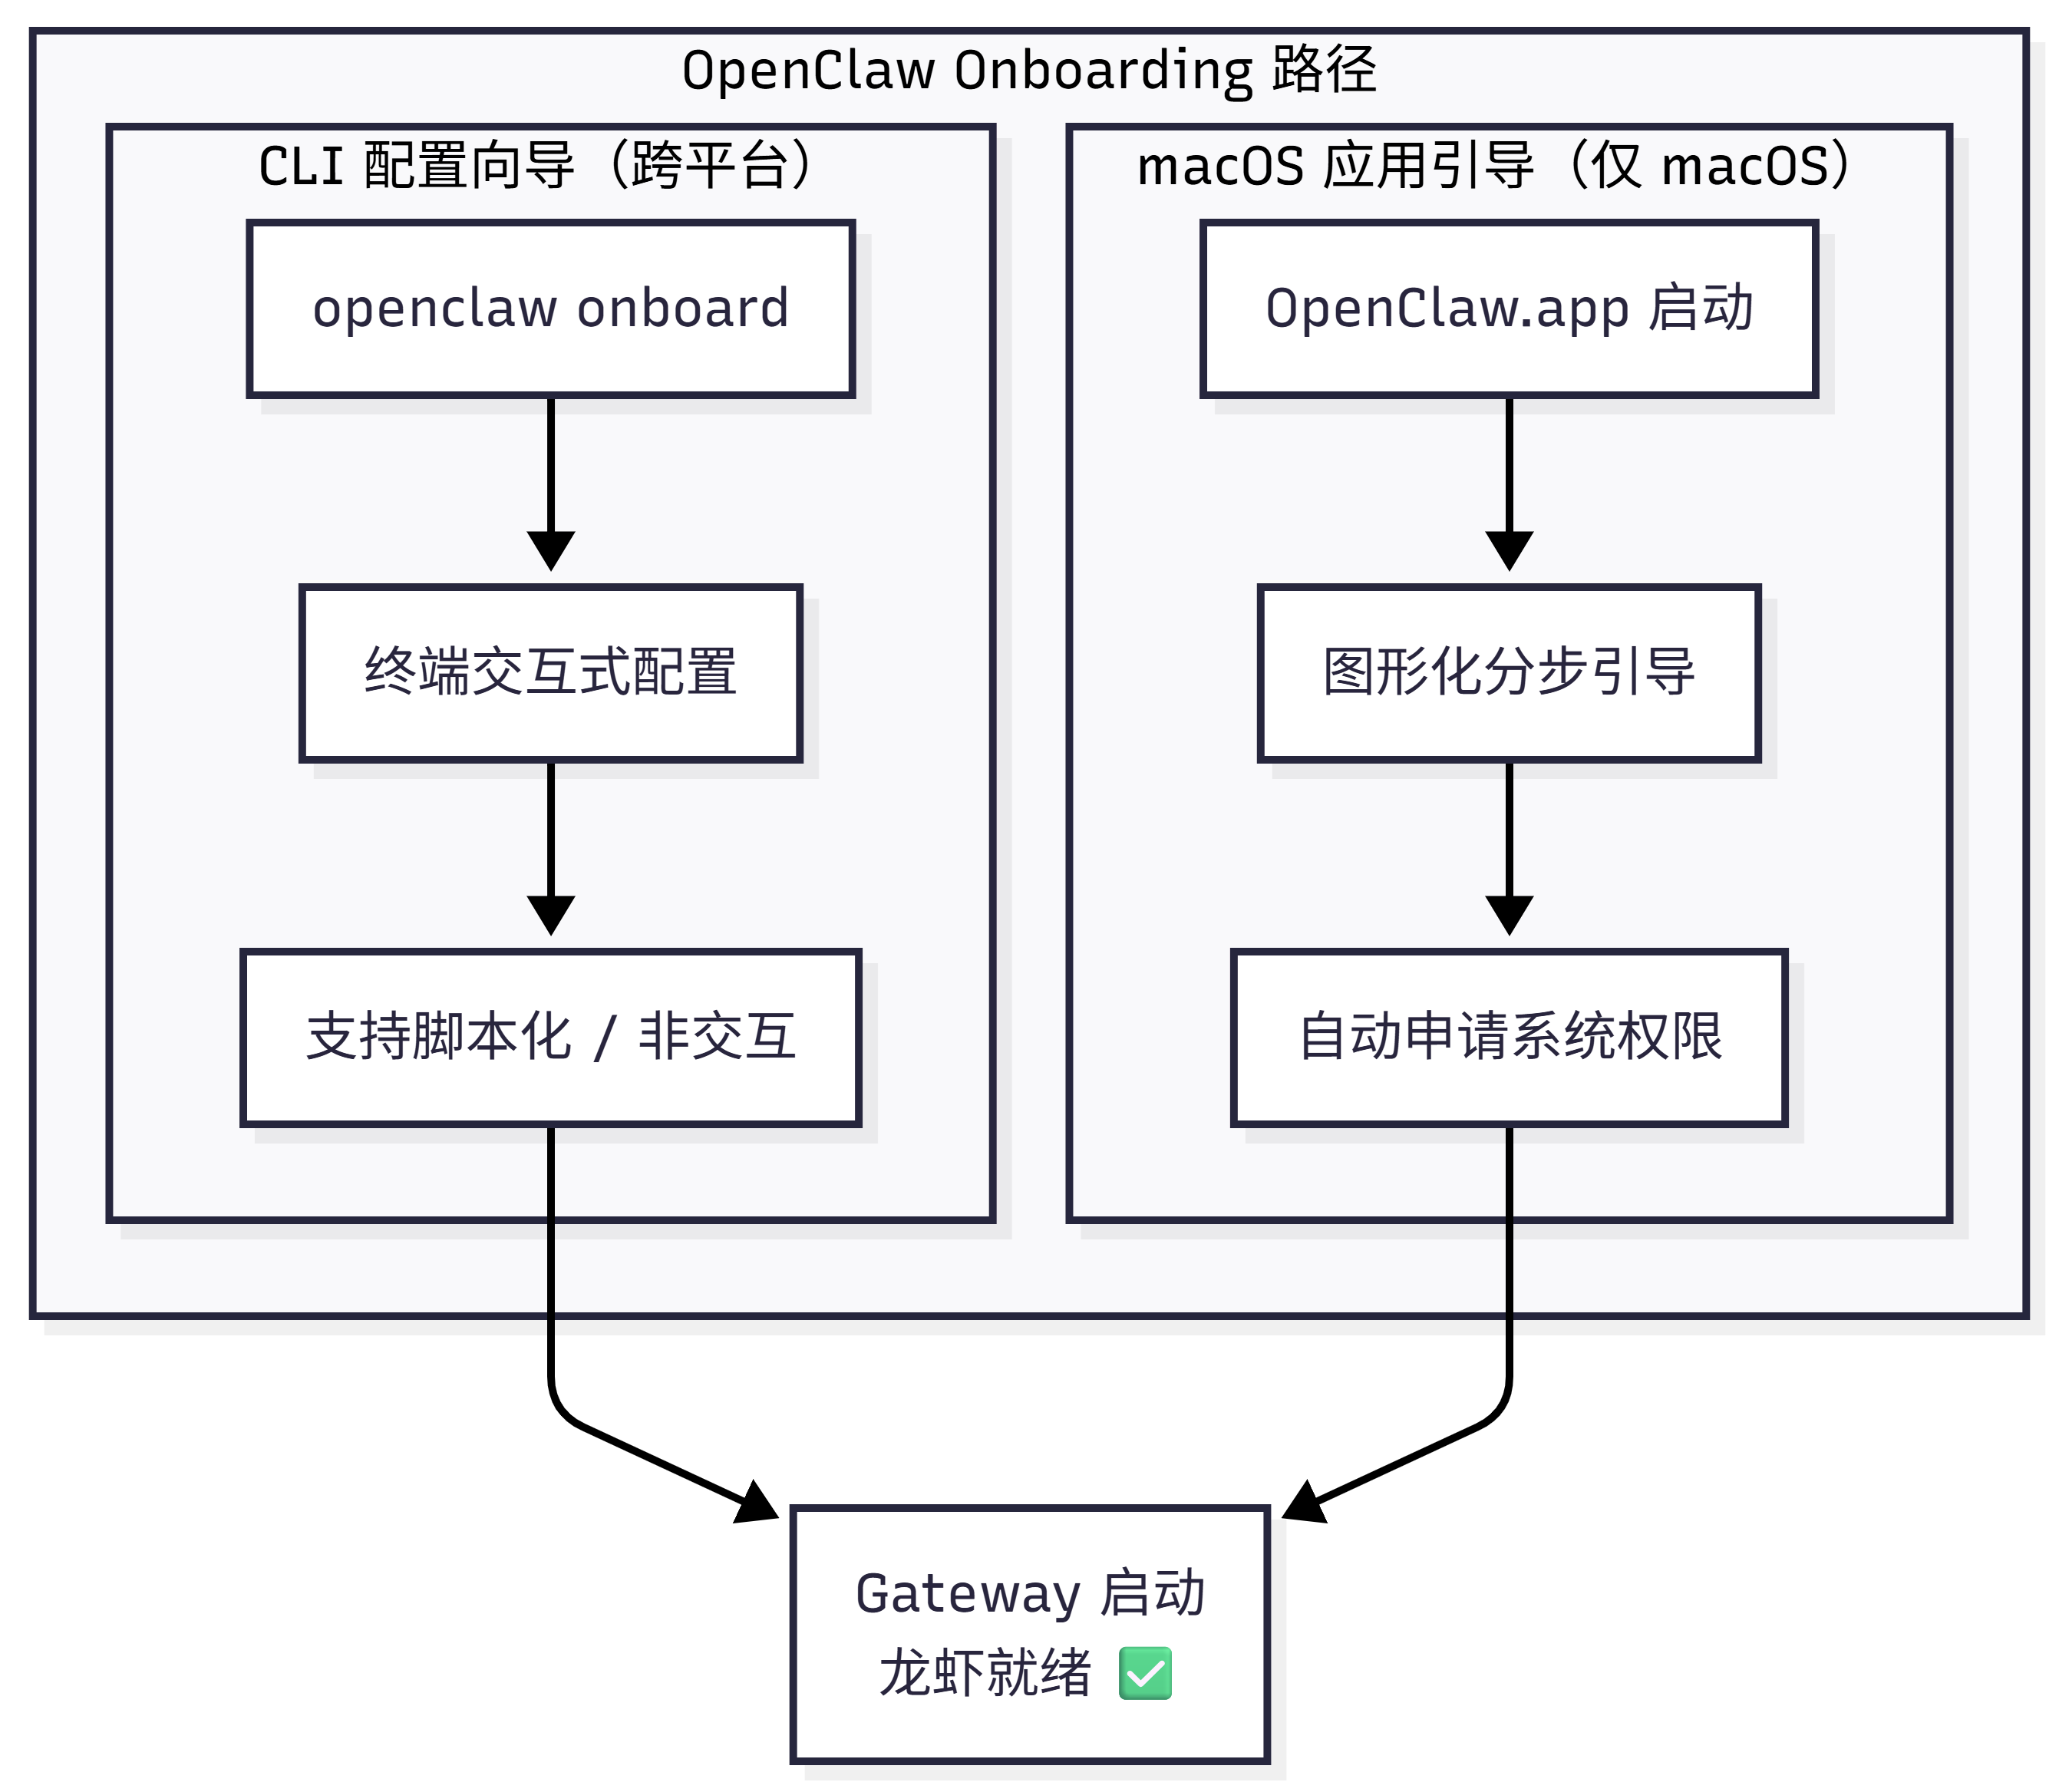
Onboarding (Configuration Wizard) helps you tell the lobster three things: which model to use, which channel to contact you through, and where to work. OpenClaw provides two paths:
flowchart TB

subgraph OB["OpenClaw Onboarding Paths"]

subgraph CLI["CLI Configuration Wizard (Cross-platform)"]
A1["openclaw onboard"]
A2["Interactive terminal configuration"]
A3["Supports scripting / non-interactive"]
A1 --> A2 --> A3
end

subgraph MAC["macOS App Guided Setup (macOS only)"]
B1["OpenClaw.app launch"]
B2["Graphical step-by-step guide"]
B3["Automatic system permission requests"]
B1 --> B2 --> B3
end

end

A3 --> C
B3 --> C

C["Gateway started
Lobster ready ✅"]| Path | Use Case | Platform |
|---|---|---|
| CLI Configuration Wizard | Need full control, remote servers, automation scripts | macOS / Linux / Windows (WSL2) |
| macOS App Guided Setup | Prefer graphical guidance, need native permissions for voice/camera | macOS only |
Already ran
openclaw onboardin Chapter 2? Basic configuration is complete! This chapter helps you understand what each step did and how to fine-tune.
1. CLI Configuration Wizard (All Platforms)
1.1 Start the Wizard
openclaw onboardWant to install the background service at the same time? Add
--install-daemonto do it all at once:bashopenclaw onboard --install-daemon
1.2 QuickStart vs Advanced
After the wizard starts, it will ask you the first question: QuickStart or Advanced?
| Option | Auto-configured Content | Best For |
|---|---|---|
| QuickStart | Local Gateway + default workspace + port 18789 + Token auth + coding tools policy | First-time users who want to chat quickly |
| Advanced | All options are customizable | Remote deployment, Tailscale, special security policies |
QuickStart Default Configuration Overview
QuickStart mode automatically applies the following defaults:
| Setting | Default Value | Description |
|---|---|---|
| Gateway location | Local machine (loopback) | Accessible from this machine only |
| Workspace | ~/.openclaw/workspace/ | Or use an existing workspace |
| Gateway port | 18789 | Standard port |
| Authentication | Token (auto-generated) | Authentication required even for local access |
| Tools policy | tools.profile: "coding" | Retains filesystem and runtime tools |
| DM isolation | session.dmScope: "per-channel-peer" | Independent session per channel |
| Tailscale | Disabled | Not exposed to Tailnet |
| Telegram/WhatsApp DM | Whitelist mode | Will prompt for your phone number |
Users with existing custom
tools.profilewill not be overwritten — the wizard respects existing configuration.
1.3 The Six Steps of the Wizard
Step 1: Model and Authentication
Choose a model provider and paste your API Key. Not sure which to pick? See Chapter 5: Model Management.
Security Note: Model Selection and Tool Safety
If your lobster will run tools (execute commands, call APIs) or process external content from Webhooks/Hooks, be aware:
- Prioritize the latest generation of strong models — weaker/older models are more susceptible to prompt injection attacks
- Maintain strict tool policies — avoid using
tools.profile: "full"(unrestricted mode) unless you fully trust all input sources - See Chapter 10: Security for details
Key Storage: Plaintext vs SecretRef
The wizard stores API Keys in plaintext in the config file by default. If you need a more secure storage method:
Interactive mode: Choose Secret Reference mode to point to an environment variable or Provider Ref (file/executable). The wizard will immediately verify that the reference is valid.
Non-interactive mode: Use --secret-input-mode ref. The provider's environment variable must already be set:
export OPENAI_API_KEY="sk-..."
openclaw onboard --secret-input-mode ref --non-interactive
Step 2: Workspace
Set the lobster's working directory (default ~/.openclaw/workspace/), where files like IDENTITY.md and MEMORY.md are stored. Existing workspace files are preserved.
Step 3: Gateway Configuration
Set the port (default 18789), bind address (default local machine only), and authentication method.
Gateway Token and SecretRef
In interactive Token mode, you can choose:
- Plaintext Token (default): Stored in the config file
- SecretRef: Manage the Token via an environment variable or external program
Using SecretRef in non-interactive mode:
openclaw onboard --gateway-token-ref-env GATEWAY_TOKEN --non-interactiveNote: If both gateway.auth.token and gateway.auth.password are configured without setting gateway.auth.mode, the background service installation will be blocked until you explicitly choose one mode.
Step 4: Channel Integration
Select the chat platforms to connect (WhatsApp, Telegram, Discord, etc.). You can skip this and add channels later with openclaw channels add. See Chapter 4 for details.
Step 5: Background Service
Install the background service to automatically start the Gateway on boot. macOS uses LaunchAgent; Linux/WSL2 uses systemd.
Notes on Background Service and SecretRef
- If Token authentication uses SecretRef, the background service installation will verify the reference is valid, but will not persist the resolved Token into the service environment
- If the configured SecretRef cannot be resolved, background service installation will be blocked with repair suggestions
- Use
openclaw doctorto automatically detect and fix service issues
Step 6: Health Check and Skill Installation
Start the Gateway, verify it is running, and install recommended skills. See Appendix D: Skill Development and Publishing Guide.
1.4 Web Search Configuration
To enable the lobster to search the web, you need to configure a search provider. Supported options:
| Provider | Description |
|---|---|
| Perplexity | AI search engine |
| Brave | Privacy-focused search |
| Gemini | Google AI search |
| Grok | xAI search |
| Kimi | Moonshot AI search |
Paste the corresponding API Key to enable it. You can also configure this later:
openclaw configure --section web2. macOS App Guided Setup
When you launch OpenClaw.app (Control UI) for the first time, it will automatically enter the graphical guided setup.
2.1 Guided Setup Steps Overview
| Step | Content | Action |
|---|---|---|
| ① | macOS security warning | Click "Allow" |
| ② | Local network discovery | Allow finding local network devices |
| ③ | Security notice | Read the trust model description |
| ④ | Choose Gateway location | Local / Remote / Configure later |
| ⑤ | System permission requests | Grant each permission |
| ⑥ | Install CLI (optional) | Install the openclaw command-line tool |
| ⑦ | Onboarding conversation | Lobster self-introduction + guide to next steps |
2.2 Security Notice (Step ③)
The app will display OpenClaw's trust model description. Read it and click Continue.
What does the trust model mean?
- Default positioning: Personal assistant, a single trusted operator boundary
- Multi-user scenarios: Need to split trust boundaries and minimize tool permissions — see Chapter 10: Security
- New local installations default to
tools.profile: "coding", retaining filesystem and runtime tools
2.3 Gateway Location Selection (Step ④)
| Option | Description |
|---|---|
| This Mac | Run Gateway on this machine; the app directly configures authentication and credentials |
| Remote | Connect to a remote Gateway (via SSH or Tailnet); does not modify local authentication |
| Configure later | Skip setup; the app remains unconfigured |
Gateway Authentication Notes
- The wizard now generates a Token even for local loopback connections, so local WebSocket clients also require authentication
- If authentication is disabled, any local process can connect — only do this on a fully trusted machine
- For multi-machine access or non-loopback bindings, always use Token authentication
2.4 System Permissions (Step ⑤)
The macOS app will request the following TCC permissions:
| Permission | Purpose |
|---|---|
| Automation | AppleScript control of other apps |
| Notifications | Push message alerts |
| Accessibility | UI interaction control |
| Screen Recording | Screenshots/screen sharing |
| Microphone | Voice input |
| Speech Recognition | Voice-to-text |
| Camera | Visual input |
| Location | Location awareness |
Permissions you don't need can be skipped and adjusted later in macOS "System Settings → Privacy & Security".
2.5 CLI Installation (Step ⑥)
Install the global openclaw CLI to enable terminal commands and scheduled tasks to work properly. Those who have already installed via Chapter 2 can skip this.
2.6 Onboarding Conversation (Step ⑦)
After setup is complete, the lobster will introduce itself and guide you through exploring features. This is a dedicated onboarding session that does not affect everyday use.
3. Custom Model Provider
Your provider isn't in the wizard's list? Select Custom Provider and fill in the following:
| Step | Content | Example |
|---|---|---|
| 1. Select compatibility type | OpenAI-compatible / Anthropic-compatible / Unknown (auto-detect) | OpenAI-compatible |
| 2. Enter Base URL | The provider's API address | https://api.mycompany.com/v1 |
| 3. Enter API Key | If required | sk-custom-... |
| 4. Enter Model ID | Model identifier | gpt-4o |
| 5. Set alias (optional) | A short, memorable name | company-gpt |
| 6. Set Endpoint ID | Distinguishes multiple custom endpoints | mycompany |
Multiple Custom Endpoints Side by Side
Each Custom Provider is distinguished by its Endpoint ID, so you can configure multiple custom endpoints simultaneously:
// Configuration example
{
  "models": {
    "providers": {
      "custom-company-a": {
        "type": "openai",
        "baseUrl": "https://api.company-a.com/v1",
        "apiKey": "sk-a-..."
      },
      "custom-company-b": {
        "type": "anthropic",
        "baseUrl": "https://api.company-b.com/v1",
        "apiKey": "sk-b-..."
      }
    }
  }
}
See Appendix G: Configuration File Reference for details.
4. Multi-Agent Configuration
OpenClaw supports running multiple independent agents under the same instance, each with its own workspace, session, and channel bindings.
4.1 Adding an Agent
openclaw agents add <name>4.2 Agent Configuration Options
| Setting | Description |
|---|---|
agents.list[].name | Agent name |
agents.list[].workspace | Workspace path (default ~/.openclaw/workspace-<agentId>) |
agents.list[].agentDir | Agent configuration directory |
Non-interactive Mode and Message Routing
Non-interactive mode flags:
openclaw agents add worker-bot \
  --model "openrouter/qwen/qwen3.6-plus:free" \
  --agent-dir ~/.openclaw/agents/worker \
  --bind "telegram:chat:12345" \
  --non-interactive
Message routing: Use the --bind parameter to bind a specific channel/conversation to a particular agent. The wizard also guides you through the binding configuration.
This allows you to have different lobsters handle different chat groups or task types.
5. Reconfiguration and Maintenance
5.1 Re-running the Wizard
openclaw configure
configuremodifies existing configuration;onboardis for initial setup. The former does not reinstall the background service.
5.2 Resetting Configuration
# Default reset: configuration, credentials, sessions
openclaw onboard --reset

# Full reset: includes workspace
openclaw onboard --reset --reset-scope full
⚠️
--resetclears existing configuration. To change only a specific setting, usingopenclaw configureis safer.
5.3 Handling Configuration Errors
If the config file is corrupted, run openclaw doctor to automatically diagnose and repair. See Chapter 8 for details.
Non-interactive Mode (Scripted Deployment)
In CI/CD or batch deployment scenarios, you can use non-interactive mode to skip all interactive prompts:
openclaw onboard \
  --non-interactive \
  --auth-choice openai-api-key \
  --install-daemon
Notes:
- The
--jsonflag does not imply non-interactive mode; it only changes the output format - In non-interactive mode, all required configuration must be provided via command-line arguments or environment variables
- When using
--secret-input-mode ref, the corresponding environment variable must already be set
6. Frequently Asked Questions
Q: Where is the config file stored?
Configuration files are stored in the ~/.openclaw/ directory, with the workspace at ~/.openclaw/workspace/. For the config file structure, see Appendix G.
Q: The wizard is done — how do I start chatting right away?
openclaw tui         # Terminal conversation
openclaw dashboard   # Browser Dashboard (no channel configuration required)
See Chapter 11 for details.
Q: What if my provider isn't in the list?
Select Custom Provider and enter the API address and key. See Section 3 of this chapter for details.
Q: Will Remote mode make changes to the remote host?
No. It only configures how the local client connects to the remote Gateway (SSH tunnel or Tailnet); the remote host is not affected. See Chapter 9 for details.
Q: Will re-running the wizard overwrite existing configuration?
No, unless you pass the --reset parameter.