
DSSM 使用示例
1. 模型简介与适用场景
DSSM(Deep Structured Semantic Model)是微软在 CIKM'2013 上提出的经典双塔模型,将用户和物品分别通过各自的 DNN Tower 映射到同一向量空间,使用余弦相似度计算匹配分数。是推荐系统召回阶段最常用的基础模型。
论文: Learning Deep Structured Semantic Models for Web Search using Clickthrough Data
模型结构
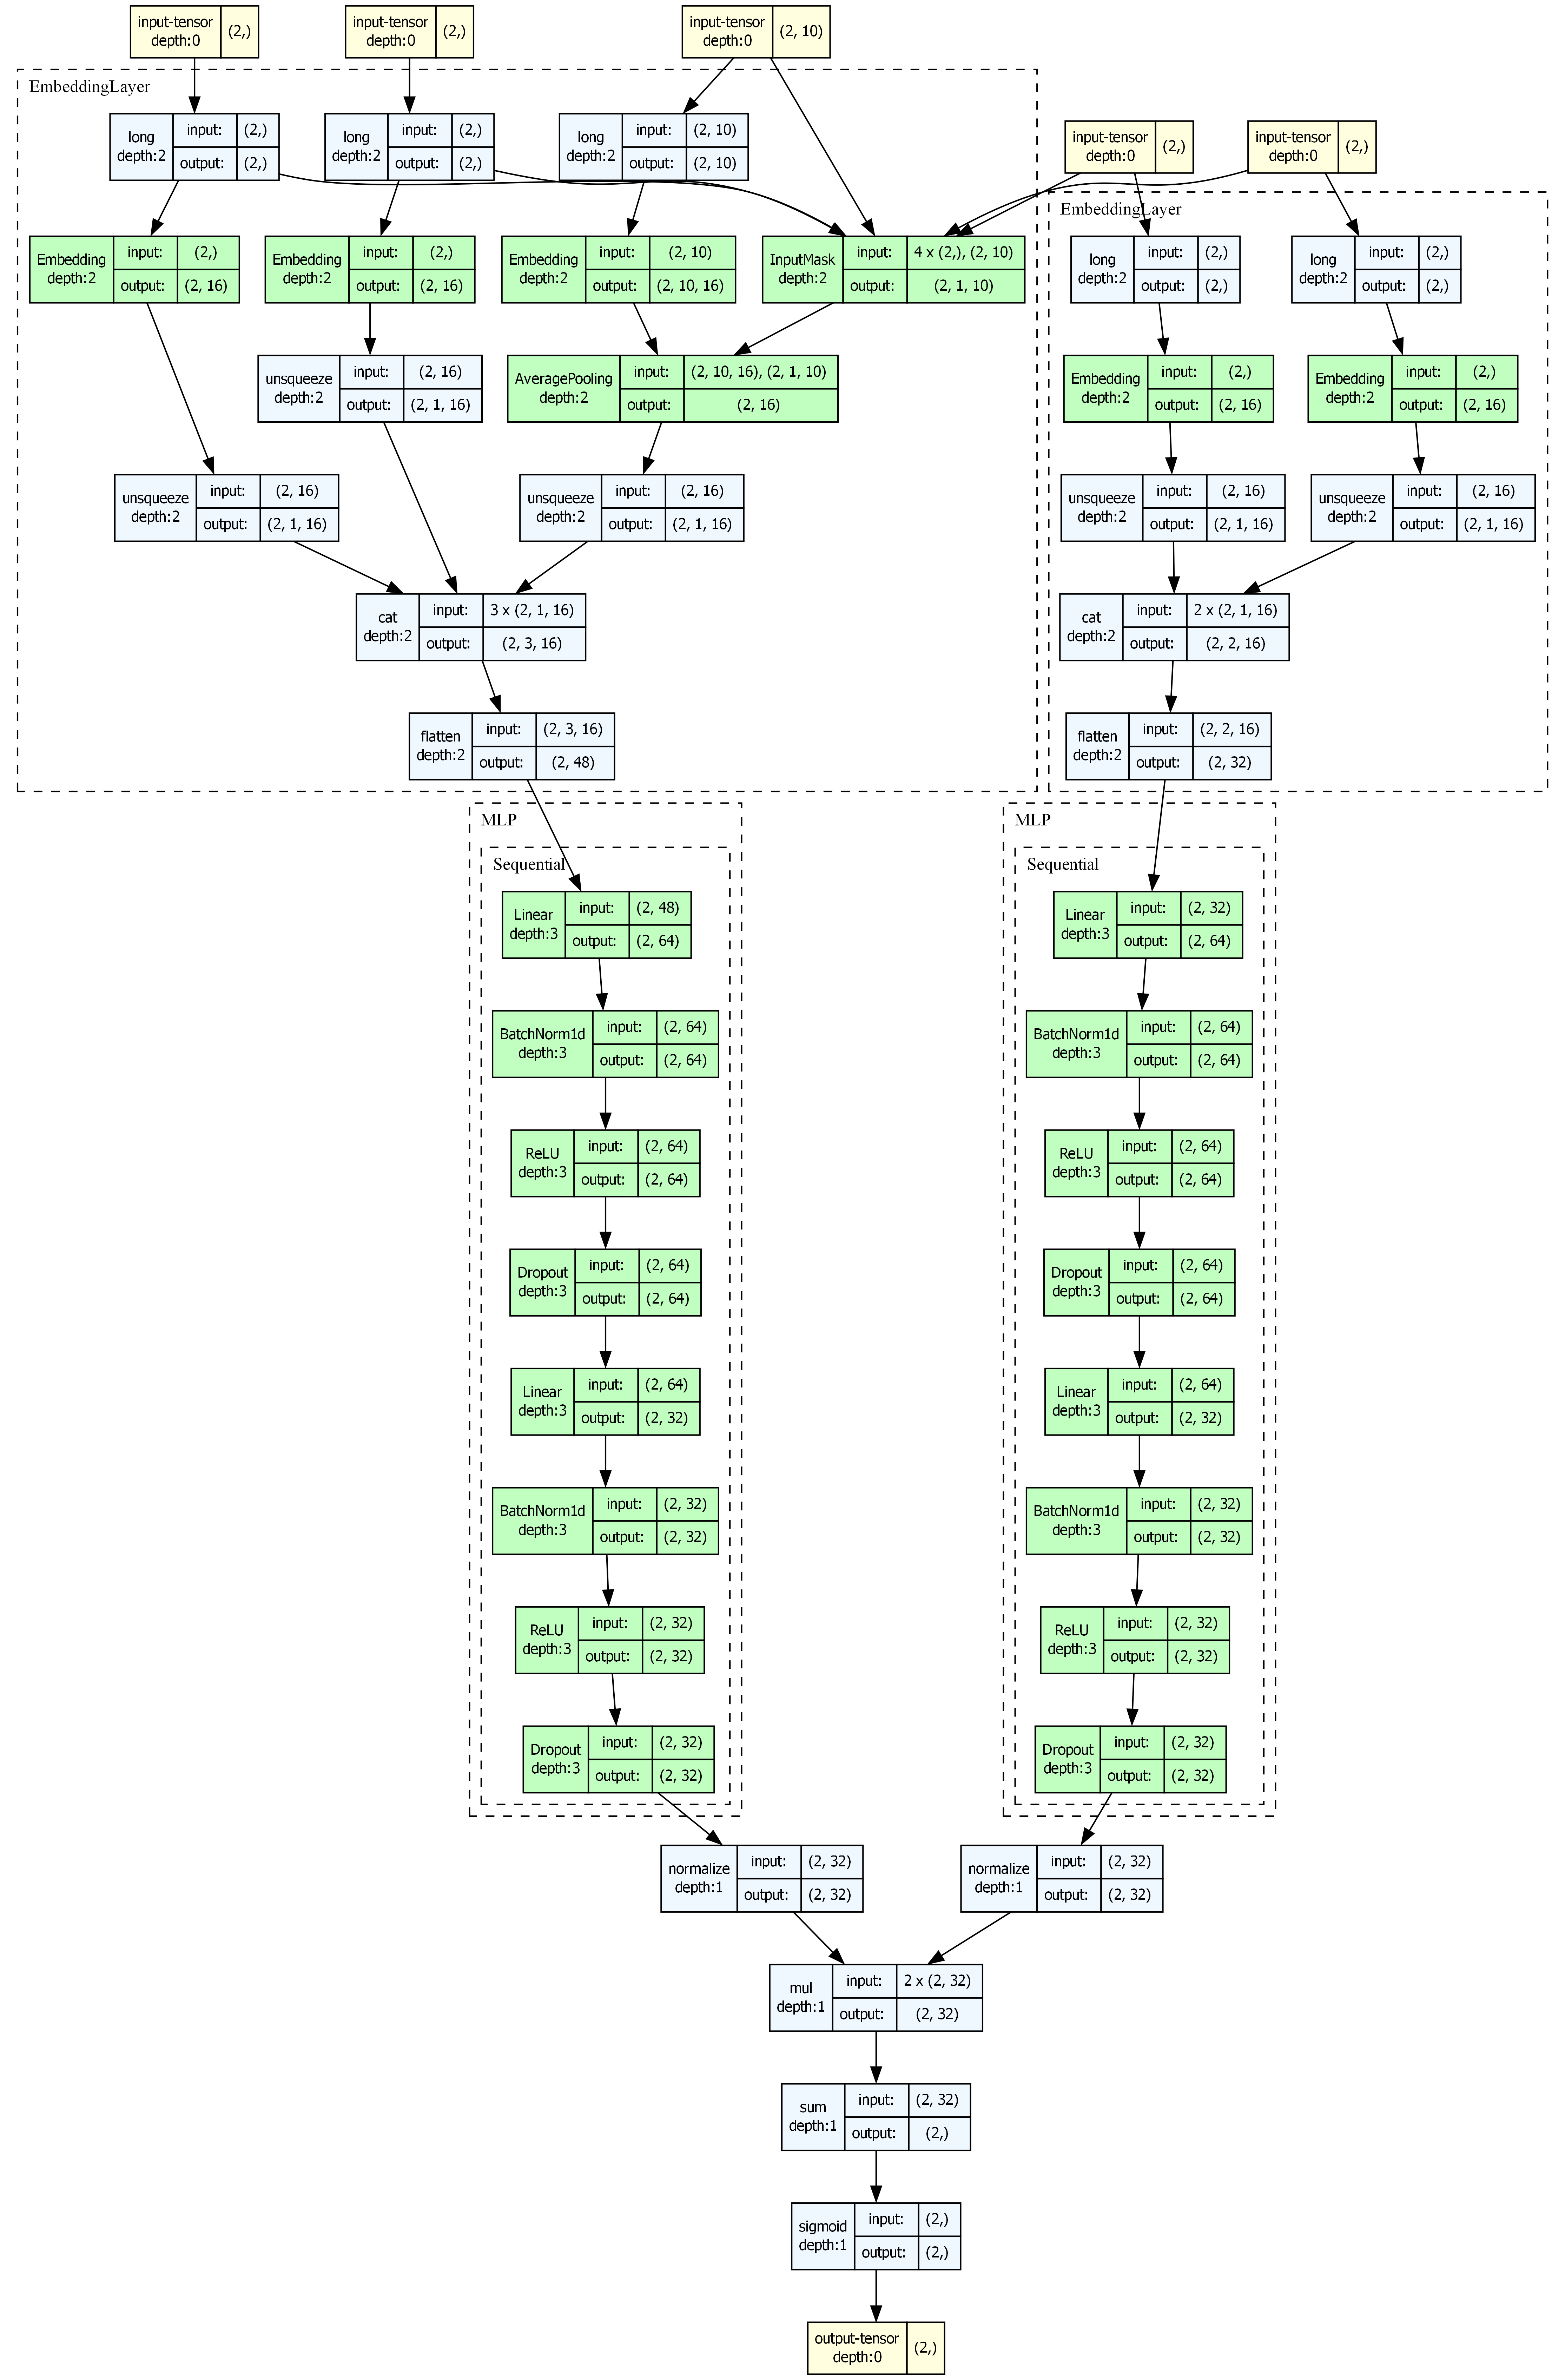
- User Tower:将用户特征映射为向量表示
- Item Tower:将物品特征映射为向量表示
- 相似度计算:通过余弦相似度 / 点积计算 User-Item 匹配分
适用场景
- 推荐系统召回阶段
- 大规模候选集快速筛选(向量检索)
- 搜索相关性匹配
- 双塔结构支持 User/Item 向量离线预计算,适合线上实时服务
2. 数据准备与预处理
本示例使用 MovieLens-1M 数据集,包含约 100 万条用户对电影的评分记录。
2.1 加载和处理数据
import os
import numpy as np
import pandas as pd
import torch
from sklearn.preprocessing import LabelEncoder

from torch_rechub.basic.features import SparseFeature, SequenceFeature
from torch_rechub.utils.data import MatchDataGenerator, df_to_dict
from torch_rechub.utils.match import gen_model_input, generate_seq_feature_match

# 加载 MovieLens 采样数据
data = pd.read_csv("examples/matching/data/ml-1m/ml-1m_sample.csv")
data["cate_id"] = data["genres"].apply(lambda x: x.split("|")[0])

# 定义离散特征
sparse_features = ['user_id', 'movie_id', 'gender', 'age', 'occupation', 'zip', 'cate_id']
user_col, item_col = "user_id", "movie_id"
2.2 特征编码
feature_max_idx = {}
for feature in sparse_features:
    lbe = LabelEncoder()
    data[feature] = lbe.fit_transform(data[feature]) + 1
    feature_max_idx[feature] = data[feature].max() + 1

# 提取用户/物品 profile
user_profile = data[["user_id", "gender", "age", "occupation", "zip"]].drop_duplicates("user_id")
item_profile = data[["movie_id", "cate_id"]].drop_duplicates("movie_id")
2.3 构建序列特征和训练数据
# 生成序列特征(用户历史行为序列)和负采样
df_train, df_test = generate_seq_feature_match(
    data, user_col, item_col,
    time_col="timestamp",
    item_attribute_cols=[],
    sample_method=1,    # 随机负采样
    mode=0,             # point-wise
    neg_ratio=3,        # 负样本比例
    min_item=0
)

# 构建模型输入
x_train = gen_model_input(df_train, user_profile, user_col, item_profile, item_col, seq_max_len=50)
y_train = x_train["label"]
x_train = {k: v for k, v in x_train.items() if k != "label"}
x_test = gen_model_input(df_test, user_profile, user_col, item_profile, item_col, seq_max_len=50)
2.4 定义特征
user_cols = ['user_id', 'gender', 'age', 'occupation', 'zip']
item_cols = ['movie_id', 'cate_id']

# 用户特征 = 用户属性 + 历史行为序列
# DSSM 不直接建模复杂时序关系,而是先把历史行为压成一个固定 user 向量
user_features = [
    SparseFeature(name, vocab_size=feature_max_idx[name], embed_dim=16)
    for name in user_cols
]
user_features += [
    SequenceFeature(
        "hist_movie_id",
        vocab_size=feature_max_idx["movie_id"],
        embed_dim=16,
        pooling="mean",           # 序列聚合方式
        shared_with="movie_id"    # 与 movie_id 共享 embedding
    )
]

# 物品特征
item_features = [
    SparseFeature(name, vocab_size=feature_max_idx[name], embed_dim=16)
    for name in item_cols
]

# 用于评估的全量物品数据
all_item = df_to_dict(item_profile)
test_user = x_test
2.5 创建 DataLoader
dg = MatchDataGenerator(x=x_train, y=y_train)
train_dl, test_dl, item_dl = dg.generate_dataloader(
    test_user, all_item, batch_size=4096, num_workers=0
)
3. 模型配置与参数说明
3.1 创建模型
from torch_rechub.models.matching import DSSM

model = DSSM(
    user_features=user_features,
    item_features=item_features,
    temperature=1.0,  # 用于全 batch in-batch 训练,不影响 point-wise BCE
    user_params={
        "dims": [256, 128, 64],
        "activation": "prelu"      # PReLU 激活函数效果更好
    },
    item_params={
        "dims": [256, 128, 64],
        "activation": "prelu"
    }
)
3.2 参数详解
| 参数 | 类型 | 说明 | 建议值 |
|---|---|---|---|
user_features | list[Feature] | 用户侧特征列表 | 用户属性 + 行为序列 |
item_features | list[Feature] | 物品侧特征列表 | 物品ID + 属性 |
temperature | float | 全 batch in-batch 交叉熵的温度,必须为正且有限;不影响 point-wise BCE | 默认 1.0,示例 0.02 |
user_params.dims | list[int] | User Tower MLP 维度 | [256, 128, 64] |
item_params.dims | list[int] | Item Tower MLP 维度 | [256, 128, 64] |
*_params.activation | str | 激活函数 | "prelu" 推荐 |
temperature由MatchTrainer的默认全 batch in-batch 路径使用。DSSM 的 point-wiseforward仍返回未缩放余弦分数的 sigmoid。
4. 训练过程与代码示例
4.1 训练模型
import os
from torch_rechub.trainers import MatchTrainer

torch.manual_seed(2022)
save_dir = "./saved/dssm/"
os.makedirs(save_dir, exist_ok=True)

trainer = MatchTrainer(
    model,
    mode=0,                        # 0: point-wise, 1: pair-wise, 2: list-wise
    optimizer_params={
        "lr": 1e-4,
        "weight_decay": 1e-6
    },
    n_epoch=10,
    device="cpu",
    model_path=save_dir
)

trainer.fit(train_dl)
4.2 训练模式说明
| mode | 训练方式 | 损失函数 | 说明 |
|---|---|---|---|
| 0 | Point-wise | BCE Loss | 对每个样本独立计算 |
| 1 | Pair-wise | BPR Loss | 需要模型返回 (pos_score, neg_score),如 FaceBookDSSM |
| 2 | List-wise | Softmax Loss | 需要模型返回 [B, 1+n_neg] logits,如 YoutubeDNN / MIND |
mode 是训练器的损失契约,不能在同一个 DSSM 实例上任意切换。本页 DSSM 的标量概率输出应使用 mode=0。
4.3 单设备 in-batch 训练
在 examples/matching 目录运行:
python run_ml_dssm.py --in_batch_neg --batch_size 256 --temperature 0.02 --device cpu使用一张 GPU 时将 --device cpu 改为 --device cuda:0。示例会自动以 neg_ratio=0 构造正交互,并使用独立的数据缓存;不加 --in_batch_neg 时保留原来的离线负采样与 BCE 训练。
其他 MovieLens 召回示例也支持 --in_batch_neg。已有代码通常只需改两处:
df_train, df_test = generate_seq_feature_match(data, user_col, item_col, "timestamp", in_batch_neg=True)
trainer = MatchTrainer(model, in_batch_neg=True)
数据生成函数会构造正样本配对;原来的模型参数、训练 mode 和推理接口保持原有形式。模型默认 forward() 仍返回原来的分数,Trainer 只在 in-batch 前向期间临时切换已有的 model.mode,并在结束后恢复。无需配置向量输出开关或改变已有预测代码。
所有公开的 matching 模型均支持该入口。MIND/ComiRec 沿用正样本对应的兴趣选择,YoutubeSBC 保留采样偏差修正;NARM/STAMP 可直接沿用下一物品 ID 的训练标签,run_sbr.py --in_batch_neg 即可开启。若自己构造会话输入,历史序列使用后补齐,y 应为真实的下一物品 ID,或者显式提供 item_feature 及对应的物品列。SASRec 原有逐位置正负序列训练保持可用,in-batch 使用最后一个有效位置对应的正物品。
向量是否归一化沿用各模型原有的打分方式:DSSM/YoutubeDNN 等使用归一化向量,YoutubeSBC 使用余弦打分,NARM/STAMP/SINE 等保留原有点积。Trainer 不统一改变模型的向量尺度,以保持训练与原有召回评估一致。
当前 in-batch 入口支持单设备(cpu 或一张 CUDA 显卡),多卡支持单独维护。
自己准备配对数据时,每行必须是一个真实的用户—物品正交互,不能混入离线负样本。调用 MatchTrainer(model, in_batch_neg=True) 即可使用默认全 batch 路径:DSSM 两塔提供归一化向量,Trainer 计算 user_emb @ item_emb.T / model.temperature,再以对角线位置 arange(B) 为标签计算交叉熵。显式用户—物品配对的训练 y 仅作占位,不决定正负;会话模型的下一物品标签则作为目标物品 ID。已有随机/困难负采样或 BPR 的显式配置保留原路径。
该简单版本把所有非对角线位置当作负样本,不屏蔽重复物品;除 YoutubeSBC 本身的修正外,不额外引入采样概率修正。同 batch 出现相同物品时可能产生假负例。batch_size 至少为 2,只有一条样本的尾批会跳过并提示;整个 epoch 都没有有效 batch 时会报错。
训练后沿用下一节的向量召回评估。正样本训练集不能直接作为 AUC 验证集;fit(..., val_dataloader=...) 的 AUC 验证仍需要真实的 0/1 标签。
5. 模型评估与结果分析
5.1 生成向量并评估
DSSM 的评估需要先生成 User 和 Item 的 Embedding 向量,再使用向量检索方式计算 Recall@K。
# 生成 User Embedding
user_embedding = trainer.inference_embedding(
    model=model, mode="user",
    data_loader=test_dl,
    model_path=save_dir
)

# 生成 Item Embedding
item_embedding = trainer.inference_embedding(
    model=model, mode="item",
    data_loader=item_dl,
    model_path=save_dir
)

print(f"User Embedding shape: {user_embedding.shape}")
print(f"Item Embedding shape: {item_embedding.shape}")
5.2 Recall@K 评估
# 需要 match_evaluation 辅助函数
# 位于 examples/matching/movielens_utils.py
from examples.matching.movielens_utils import match_evaluation

match_evaluation(
    user_embedding,
    item_embedding,
    test_user,
    all_item,
    raw_id_maps="examples/matching/data/ml-1m/saved/raw_id_maps.npy",
    topk=10,
)
6. 参数调优建议
6.1 关键调优点
- 激活函数: 使用
"prelu"通常优于"relu"(原论文推荐) - Embedding 维度: User 和 Item Tower 的最终输出维度应相同(由 dims[-1] 决定)
- 负采样比例:
neg_ratio=3~5通常效果较好 - 学习率: 匹配任务推荐较小的学习率
1e-4
6.2 向量检索与部署
训练完成后,可以将 Embedding 插入向量索引进行 ANN(近似最近邻)搜索。项目同时保留了 torch_rechub.utils.match 下的旧封装,以及 torch_rechub.serving 下的 Builder/Indexer API。
方式一:Annoy(轻量级,适合快速原型)
pip install "torch-rechub[annoy]"from torch_rechub.utils.match import Annoy
# 构建 Annoy 索引
annoy = Annoy(n_trees=10, metric='angular')
annoy.fit(item_embedding)
# 为单个用户查询 Top-10 相似物品
indices, distances = annoy.query(user_embedding[0], n=10)
print(f"Top-10 Item 索引: {indices}")
print(f"对应距离: {distances}")方式二:Faiss(本项目可选依赖为 CPU 版)
pip install "torch-rechub[faiss]"from torch_rechub.utils.match import Faiss
import numpy as np
# 确保 embedding 是 float32 numpy 数组
item_emb_np = item_embedding.cpu().numpy().astype(np.float32)
user_emb_np = user_embedding.cpu().numpy().astype(np.float32)
# 创建 Faiss 索引(支持 flat / ivf / hnsw)
faiss_index = Faiss(dim=item_emb_np.shape[1], index_type='flat', metric='l2')
faiss_index.fit(item_emb_np)
# 查询 Top-10
indices, distances = faiss_index.query(user_emb_np[0], n=10)
print(f"Top-10 Item 索引: {indices}")
# metric='l2' 时 distances 是距离,数值越小越近
# 保存 / 加载索引
faiss_index.save_index("item_faiss.index")
faiss_index.load_index("item_faiss.index")Faiss 索引类型选择(实际规模上限取决于维度、内存和检索参数,应以压测为准):
类型 特点 适用场景 flat精确搜索,无需训练 小规模或作为召回率基线 ivf倒排索引,需训练 需要在速度与召回率间权衡 hnsw图索引,无需训练 高召回率需求
方式三:Milvus(旧封装仅用于隔离的本地实验)
pip install "torch-rechub[milvus]"
# 需要先启动 Milvus 服务: https://milvus.io/docs/install_standalone-docker.md
数据删除风险
旧版 torch_rechub.utils.match.Milvus 在构造时会删除固定名称 rechub 的已有 collection,然后重新创建。不要对保存真实数据的 Milvus 实例运行下面的示例。
from torch_rechub.utils.match import Milvus
from pymilvus import connections

# 连接 Milvus 并插入 Embedding
connections.connect(alias="default", host="localhost", port="19530")
milvus = Milvus(dim=item_embedding.shape[1], host="localhost", port="19530")
milvus.fit(item_embedding)

# 查询 Top-10
indices, distances = milvus.query(user_embedding, n=10)
使用新版 Serving API(Builder/Indexer 模式)
项目还提供了更标准化的 serving 模块。当前 torch_rechub.serving 会在导入时同时加载三种后端,因此即使这里只使用 Faiss,也要先安装三组依赖:
pip install "torch-rechub[annoy,faiss,milvus]"下面示例使用 Faiss;top_k 是该 API 的参数名,返回值顺序是 (indices, distances):
from torch_rechub.serving import builder_factory

# 使用工厂函数创建 Builder(支持 "annoy" / "faiss" / "milvus")
builder = builder_factory("faiss", index_type="Flat", metric="L2")

# 构建索引并查询
with builder.from_embeddings(item_embedding) as indexer:
    indices, distances = indexer.query(user_embedding[:5], top_k=10)
    print(indices, distances)
    indexer.save("item.index")

# 从文件加载
with builder.from_index_file("item.index") as indexer:
    indices, distances = indexer.query(user_embedding[:5], top_k=10)
Serving API 的 Milvus Builder 会在上下文退出时删除临时 collection,并且不支持 from_index_file,因此当前也不是持久化生产服务封装。
7. 模型可视化
Torch-RecHub 内置了基于 torchview 的模型结构可视化工具,可以生成模型的计算图。
安装依赖
pip install torch-rechub[visualization]
# 还需要安装系统级 graphviz:
# Ubuntu: sudo apt-get install graphviz
# macOS: brew install graphviz
# Windows: choco install graphviz
可视化 DSSM 模型
from torch_rechub.utils.visualization import visualize_model

# 自动生成输入并可视化(在 Jupyter 中直接显示)
graph = visualize_model(model, depth=4)

# 保存为图片(适合论文/文档)
visualize_model(model, save_path="dssm_architecture.png", dpi=300)

# 保存为 PDF
visualize_model(model, save_path="dssm_architecture.pdf")
可视化会自动从模型中提取特征信息生成 dummy input,无需手动构造输入数据。
DSSM 架构图
8. ONNX 导出
先安装 ONNX 可选依赖,再导出模型:
pip install "torch-rechub[onnx]"导出文件可以交给兼容的 ONNX Runtime 使用;具体服务和部署流程不包含在项目中。
导出完整模型
from torch_rechub.utils.onnx_export import ONNXExporter

exporter = ONNXExporter(model, device="cpu")

# 导出完整 DSSM 模型
exporter.export("dssm_full.onnx", verbose=True)
分别导出 User Tower 和 Item Tower
双塔模型可以分别导出两个 Tower,用于独立部署:
# 导出 User Tower(线上实时推理)
exporter.export("dssm_user_tower.onnx", mode="user")

# 导出 Item Tower(离线批量计算)
exporter.export("dssm_item_tower.onnx", mode="item")
使用 ONNX Runtime 推理
import onnxruntime as ort
import numpy as np

# 加载 User Tower
session = ort.InferenceSession("dssm_user_tower.onnx")

# 查看输入信息
for inp in session.get_inputs():
    print(f"  {inp.name}: shape={inp.shape}, type={inp.type}")

# 构造输入并推理
input_feed = {}
for inp in session.get_inputs():
    shape = [dim if isinstance(dim, int) else 1 for dim in inp.shape]
    dtype = np.int64 if "int" in inp.type.lower() else np.float32
    input_feed[inp.name] = np.zeros(shape, dtype=dtype)
output = session.run(None, input_feed)
print(f"User Embedding shape: {output[0].shape}")
9. 常见问题与解决方案
Q1: User Tower 和 Item Tower 的 dims 必须相同吗?
最终输出维度(dims[-1])必须相同,因为需要计算相似度。中间层维度可以不同。
Q2: 如何加入用户行为序列特征?
使用 SequenceFeature 定义历史行为序列,通过 shared_with 参数与物品 ID 共享 Embedding:
SequenceFeature("hist_movie_id", vocab_size=n_movie,
                embed_dim=16, pooling="mean",
                shared_with="movie_id")
Q3: 线上如何高效部署 DSSM?
关键思路是 User 和 Item 解耦:
- 离线计算所有 Item Embedding,存入向量数据库(Faiss/Milvus)
- 线上用 ONNX Runtime 实时计算 User Embedding
- 通过 ANN 检索最相似的 Top-K Item
Q4: temperature 会影响当前 DSSM 吗?
默认全 batch in-batch 训练会使用它缩放 logits;point-wise BCE 不受影响,DSSM.forward() 仍不执行温度缩放。
Q5: Annoy、Faiss、Milvus 如何选择?
| 特性 | Annoy | Faiss | Milvus |
|---|---|---|---|
| 安装复杂度 | 简单 | 中等 | 需要服务 |
| 项目可选依赖 | annoy | faiss-cpu | pymilvus |
| 持久化 | 可保存索引 | 可保存索引 | 当前 Serving 上下文退出即删临时 collection |
| 当前建议 | 快速原型 | 单机实验与压测 | 仅在隔离实例验证,勿直接用于持久化生产数据 |
完整代码
import os
import numpy as np
import pandas as pd
import torch
from sklearn.preprocessing import LabelEncoder

from torch_rechub.basic.features import SparseFeature, SequenceFeature
from torch_rechub.models.matching import DSSM
from torch_rechub.trainers import MatchTrainer
from torch_rechub.utils.data import MatchDataGenerator, df_to_dict
from torch_rechub.utils.match import gen_model_input, generate_seq_feature_match, Annoy


def main():
    torch.manual_seed(2022)
    save_dir = "./saved/dssm/"
    os.makedirs(save_dir, exist_ok=True)

    # 1. 数据处理
    data = pd.read_csv("examples/matching/data/ml-1m/ml-1m_sample.csv")
    data["cate_id"] = data["genres"].apply(lambda x: x.split("|")[0])
    sparse_features = ['user_id', 'movie_id', 'gender', 'age', 'occupation', 'zip', 'cate_id']
    user_col, item_col = "user_id", "movie_id"

    feature_max_idx = {}
    for feature in sparse_features:
        lbe = LabelEncoder()
        data[feature] = lbe.fit_transform(data[feature]) + 1
        feature_max_idx[feature] = data[feature].max() + 1

    user_profile = data[["user_id", "gender", "age", "occupation", "zip"]].drop_duplicates("user_id")
    item_profile = data[["movie_id", "cate_id"]].drop_duplicates("movie_id")

    # 2. 构建序列特征
    df_train, df_test = generate_seq_feature_match(
        data, user_col, item_col, time_col="timestamp",
        item_attribute_cols=[], sample_method=1, mode=0, neg_ratio=3, min_item=0
    )
    x_train = gen_model_input(df_train, user_profile, user_col, item_profile, item_col, seq_max_len=50)
    y_train = x_train["label"]
    x_train = {k: v for k, v in x_train.items() if k != "label"}
    x_test = gen_model_input(df_test, user_profile, user_col, item_profile, item_col, seq_max_len=50)

    # 3. 定义特征
    user_cols = ['user_id', 'gender', 'age', 'occupation', 'zip']
    item_cols = ['movie_id', 'cate_id']
    user_features = [SparseFeature(name, vocab_size=feature_max_idx[name], embed_dim=16) for name in user_cols]
    user_features += [SequenceFeature("hist_movie_id", vocab_size=feature_max_idx["movie_id"], embed_dim=16, pooling="mean", shared_with="movie_id")]
    item_features = [SparseFeature(name, vocab_size=feature_max_idx[name], embed_dim=16) for name in item_cols]

    all_item = df_to_dict(item_profile)
    test_user = x_test

    # 4. 创建模型
    dg = MatchDataGenerator(x=x_train, y=y_train)
    model = DSSM(user_features, item_features, temperature=1.0,
                 user_params={"dims": [256, 128, 64], "activation": "prelu"},
                 item_params={"dims": [256, 128, 64], "activation": "prelu"})

    # 5. 训练
    trainer = MatchTrainer(model, mode=0, optimizer_params={"lr": 1e-4, "weight_decay": 1e-6},
                           n_epoch=10, device="cpu", model_path=save_dir)
    train_dl, test_dl, item_dl = dg.generate_dataloader(test_user, all_item, batch_size=4096, num_workers=0)
    trainer.fit(train_dl)

    # 6. 生成 Embedding
    user_embedding = trainer.inference_embedding(model=model, mode="user", data_loader=test_dl, model_path=save_dir)
    item_embedding = trainer.inference_embedding(model=model, mode="item", data_loader=item_dl, model_path=save_dir)
    print(f"User Embedding: {user_embedding.shape}, Item Embedding: {item_embedding.shape}")

    # 7. 使用 Annoy 进行向量召回
    annoy = Annoy(n_trees=10)
    annoy.fit(item_embedding)
    for i in range(min(5, len(user_embedding))):
        indices, distances = annoy.query(user_embedding[i], n=10)
        print(f"User {i} -> Top-10 Items: {indices}")


if __name__ == "__main__":
    main()