How to Build a Simple Android App - Native Compose Development
1 What Android Apps and Android Development Are
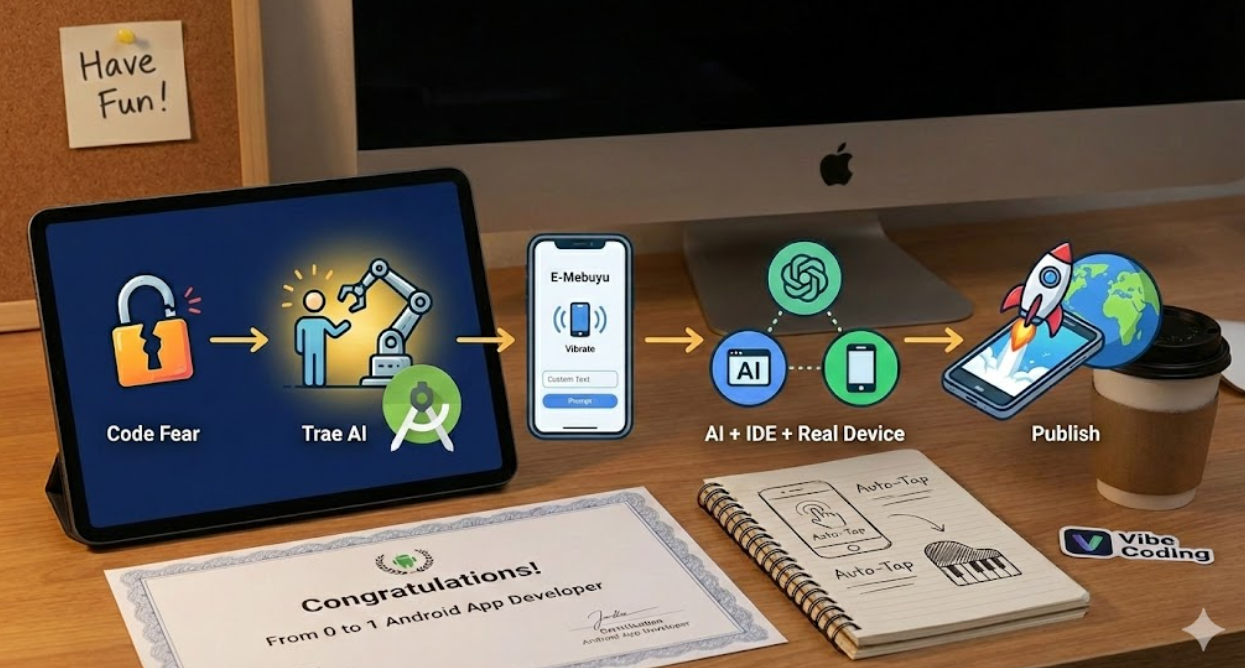
In this tutorial, we will complete a full closed loop: from an idea in your mind to a real app that can be successfully installed and run on an Android phone.
For this tutorial, you should at least have:
- A computer with decent performance (Windows or Mac)
- An Android phone (optional; if you do not have one, we will use an emulator)
- Android Studio installed (for building)
- Trae installed and registered (for AI coding)
1.1 Definition of Android App
An Android App is a native application that runs on the Android operating system. Unlike mini programs, it does not depend on a host like WeChat. It runs directly at the system level. It has its own home-screen icon, launches quickly, feels smooth, and can deeply access system-level features such as Bluetooth, sensors, and background services.
1.2 Android App Development
Android development refers to the whole process of building such applications. In the Vibe Coding development mode used in this tutorial, with AI-assisted programming, the developer's role shifts from "code writer" to "product architect":
- You (architect / PM): responsible for business logic design, prompt writing, and final acceptance of the result.
- Trae (AI engineer): responsible for executing instructions, converting natural language into standard Kotlin code and Jetpack Compose layouts, and handling syntax errors and logic details.
- Android Studio (build factory): responsible for providing the compile environment, packaging code into a runnable app, and offering emulator previews.
1.3 Common Ways to Build Android Apps
In real development, there is more than one way to build Android apps. We will not go deep here, but only provide an overall understanding.
The first way: Native Development
This is Google's official and recommended route. You directly use Kotlin and Jetpack Compose to develop. Its advantage is the best performance and full access to phone hardware.
The second way: Cross-Platform Development
For example Flutter or React Native. The core idea is "write one codebase and generate both Android and iOS apps."
The third way: Hybrid Development
In essence, this is wrapping a webpage inside an app shell. This is fast to develop, but the experience and smoothness are usually not as good as a native app, and it is difficult to build a polished, immersive small tool this way.
This tutorial's choice: native development ( Kotlin + Compose) combined with AI tools for coding.
The reason is simple: native Jetpack Compose code has a very clear structure and is highly suitable for AI to understand and generate. We do not need to handwrite code from scratch. Instead, we guide Trae with natural language to generate high-quality native code.
1.4 Android App Development Steps Covered in This Tutorial
To keep the learning process interesting, this tutorial revolves around a relaxing but technically representative case - Electronic Wooden Fish. We combine Trae's Vibe Coding mode with a route you can reuse repeatedly:
- Build understanding and environment: understand what Android apps are, install Android Studio and Trae, and configure China-friendly mirrors so the toolchain works smoothly.
- Build the project skeleton: create a blank Android project that can successfully run in the emulator.
- AI iterative development: open the project in Trae, then through conversation with AI, gradually implement the wooden fish image, tap animation, sound effects, floating text, and more.
- Real-device debugging and polishing: move beyond the emulator, install the app on your actual phone, experience real vibration feedback, and let AI help investigate bugs.
- Packaging and publishing: generate a formal APK and understand how to share or release it.
This section only draws the big picture and does not expand all commands yet. For now, just remember the main line: environment setup -> skeleton building -> AI description and generation -> real-device polishing -> packaging and delivery. In the next chapters, we will take you through each step.
2 Development Environment Setup
2.1 Tools Used in This Tutorial
During the whole development process, we use three tools together, playing the roles of "design," "construction," and "acceptance."
- Trae: this is your AI coding partner. In Vibe Coding mode, we no longer need to type code line by line. Instead, we mainly tell AI in natural language what we want, and it handles code generation and modification.
- Android Studio: this is Google's official app build factory. Although it has many buttons, in this tutorial we mainly use it to create the project skeleton and compile Trae-generated code into something installable on a phone.
- An Android device: this acts as the test terminal for viewing the result. You can connect it to your computer for real-device debugging and feel real vibration feedback. If you do not have one, Android Studio's built-in Emulator can simulate a virtual phone perfectly, which is enough for early development.
2.2 Download Trae
Trae is our main battlefield for Vibe Coding. You can think of it simply as an "AI-powered code editor."
Visit the official website https://www.trae.cn, download the version matching your computer system (Windows or Mac), and install it just like ordinary software by double-clicking the installer and following the prompts. Once this tool is ready, in later practice we will stop staring at boring code windows and instead open the project here and tell AI what to build using natural language.
2.3 Download Android Studio
We need Android Studio to provide the Android SDK and emulator required for running the app. Visit the official download page https://developer.android.com/studio?hl=zh-cn and download the package for your operating system (this tutorial is based on 2025.2.3). After downloading, install it like normal software, keeping the default options throughout.
Special reminder for beginners:
Although modern versions of Android Studio have greatly simplified configuration, it still depends on the JDK (Java Development Kit) under the hood. If this is your first time doing development, or if you encounter errors related to environment variables or SDK configuration during installation, do not panic. You can refer to this detailed setup guide: Android Studio2024版本安装环境SDK、Gradle配置
2.4 Create a New Project
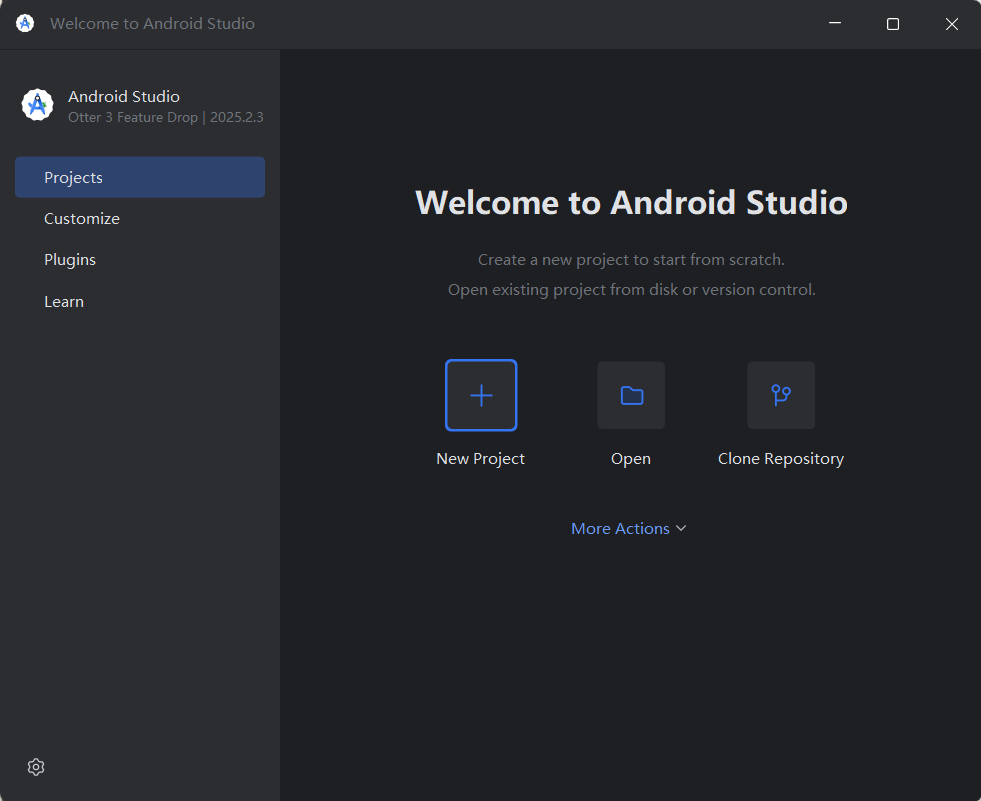
Open Android Studio and click New Project on the welcome screen.
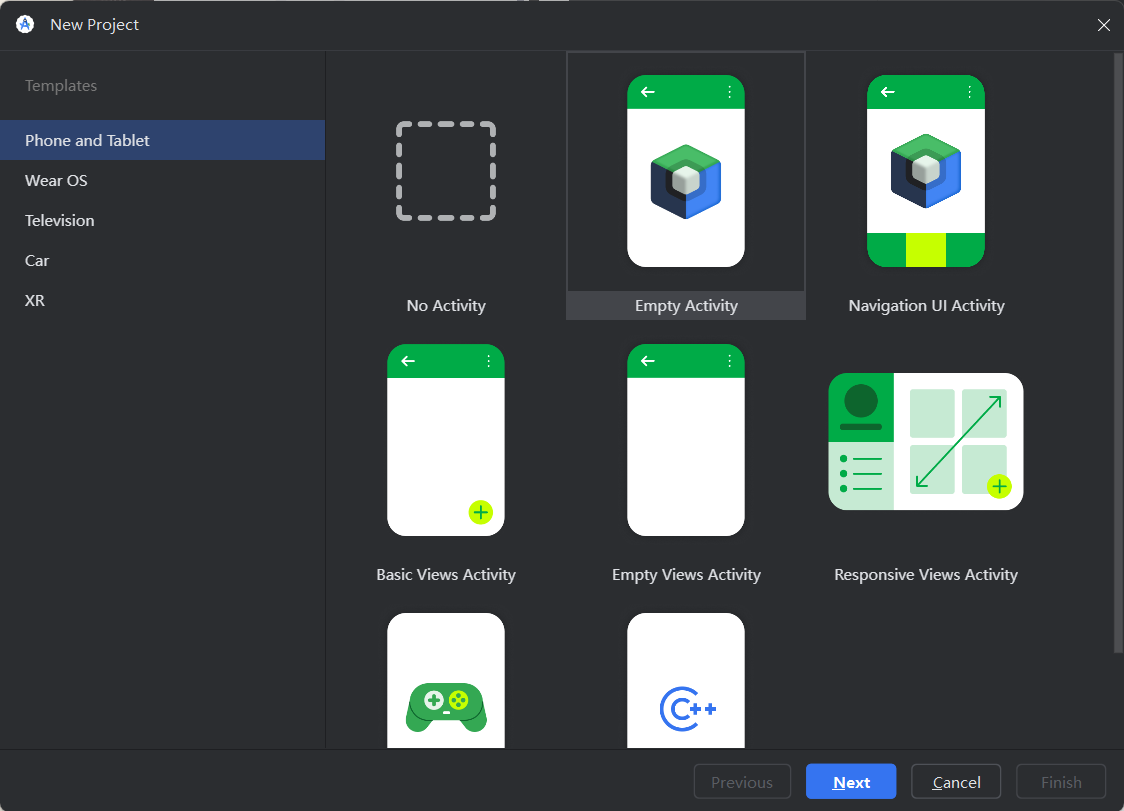
Step 1: Choose a template
In the template list, select Empty Activity (notice the Jetpack Compose icon on it).
Step 2: Fill in project configuration
Then you will see a configuration form. Fill it roughly as follows and keep the rest at default:
| Field | Recommended Value | Explanation |
|---|---|---|
| Name | My Application 1 | App name shown on the phone home screen |
| Package name | com.example.myapplication1 | Unique app identifier |
| Save location | Custom path (for example E:\AndroidProjects\Myapplication1) | Project storage location; not recommended to place on C drive |
| Minimum SDK | API 30 | Covers over 90% of active devices while balancing compatibility and features |
| Language | Kotlin (recommended) | Kotlin is Google's officially recommended language, cleaner and safer |
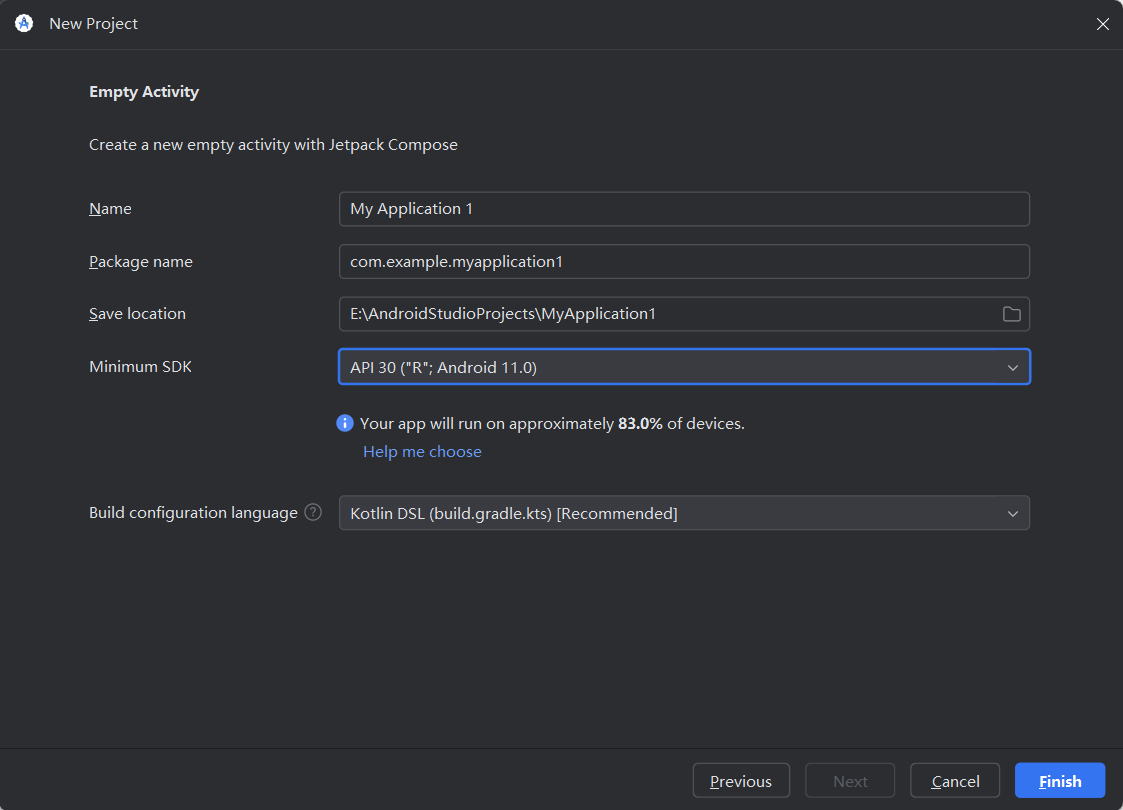
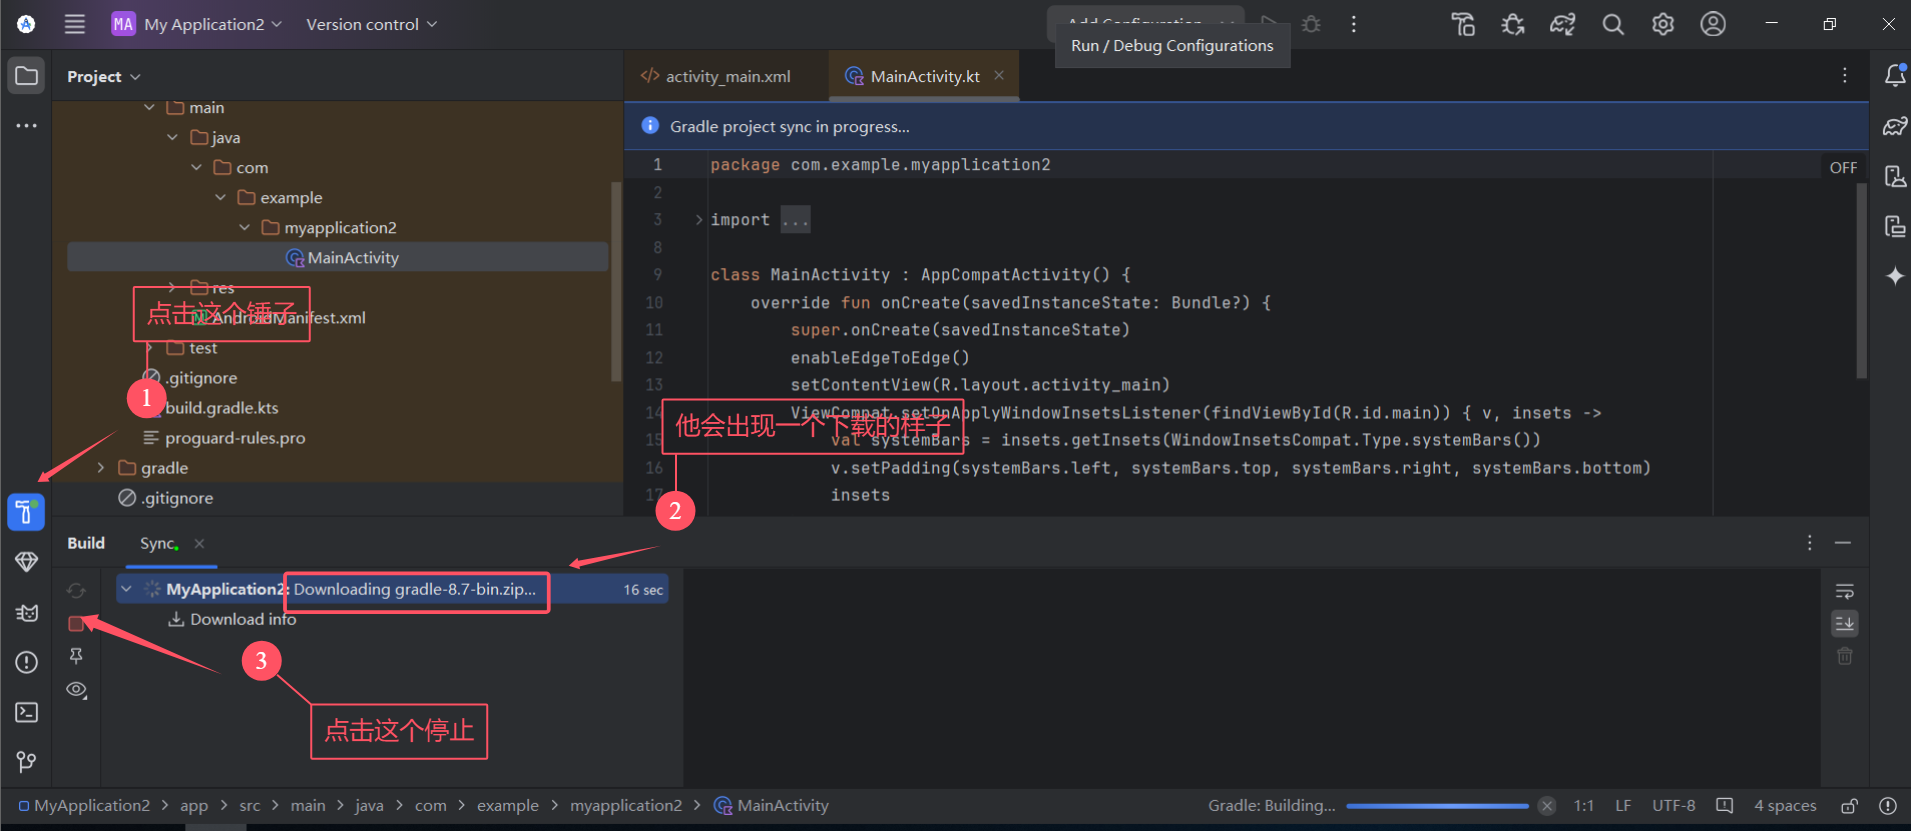
Step 3: Wait for project build
Click Finish. Android Studio will automatically download dependencies and build the project (you will see a progress bar in the bottom-right corner).
- Note: the first project creation may take several minutes. Wait patiently until the bottom progress finishes and the project file tree is fully loaded on the left.
2.5 Dependency Configuration: Gradle Download and Gradle Repository Mirrors
This is one of the few steps in the Vibe Coding workflow where manual operation is recommended. Although AI can also help modify config, environment configuration touches low-level files, so manual changes are more reliable.
Why do we need to modify the configuration?
By default, Android Studio connects to overseas servers, so downloading build tools and dependencies may take an hour or even fail. After switching to domestic mirrors, it often finishes within a few minutes. This is a one-time task that pays off forever.
- Preparation
If the bottom-right status bar of Android Studio is currently showing a progress bar like Gradle Building..., pause the ongoing dependency download first to avoid file conflicts.
- Speed up Gradle download
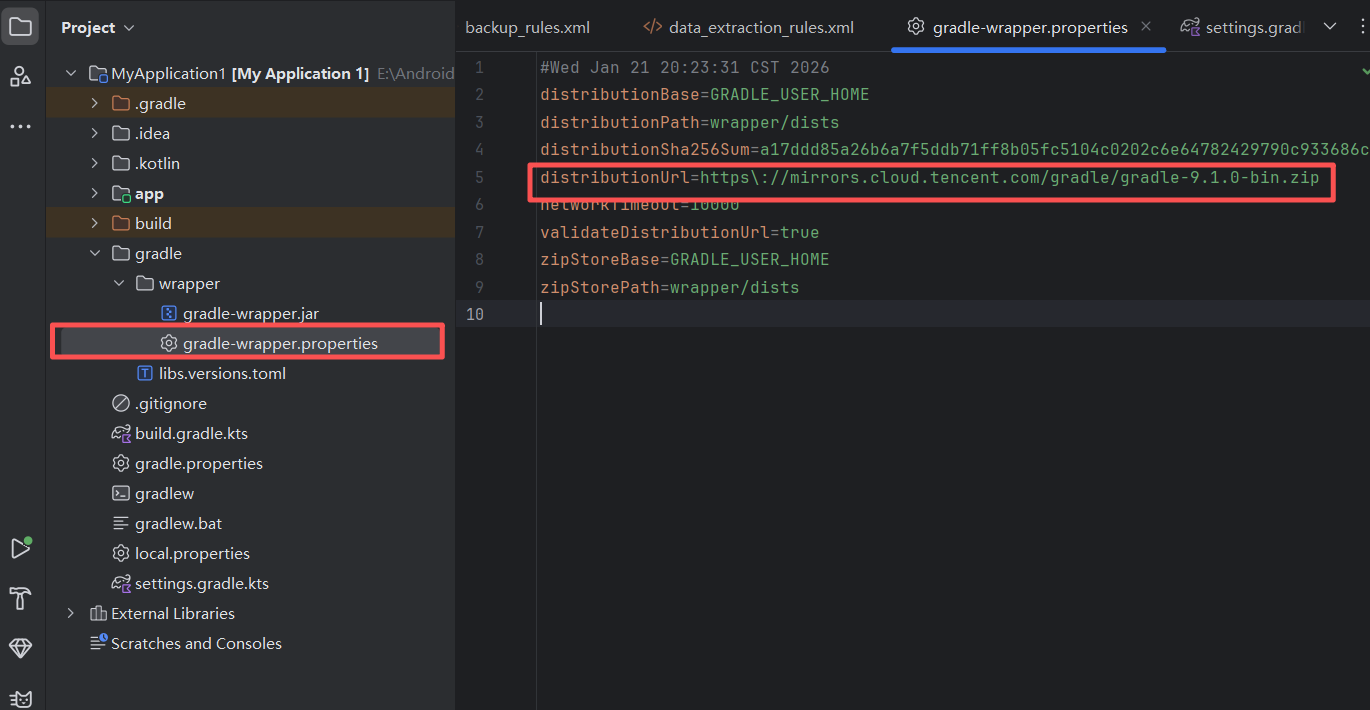
In the project file tree on the left, expand gradle -> wrapper, then open gradle-wrapper.properties. Change the download source to Tencent's mirror:
distributionUrl=https\://mirrors.cloud.tencent.com/gradle/gradle-8.7-bin.zipBe careful: you only need to replace services.gradle.org/distributions with mirrors.cloud.tencent.com/gradle. Do not change anything else.
- Speed up dependency repository download
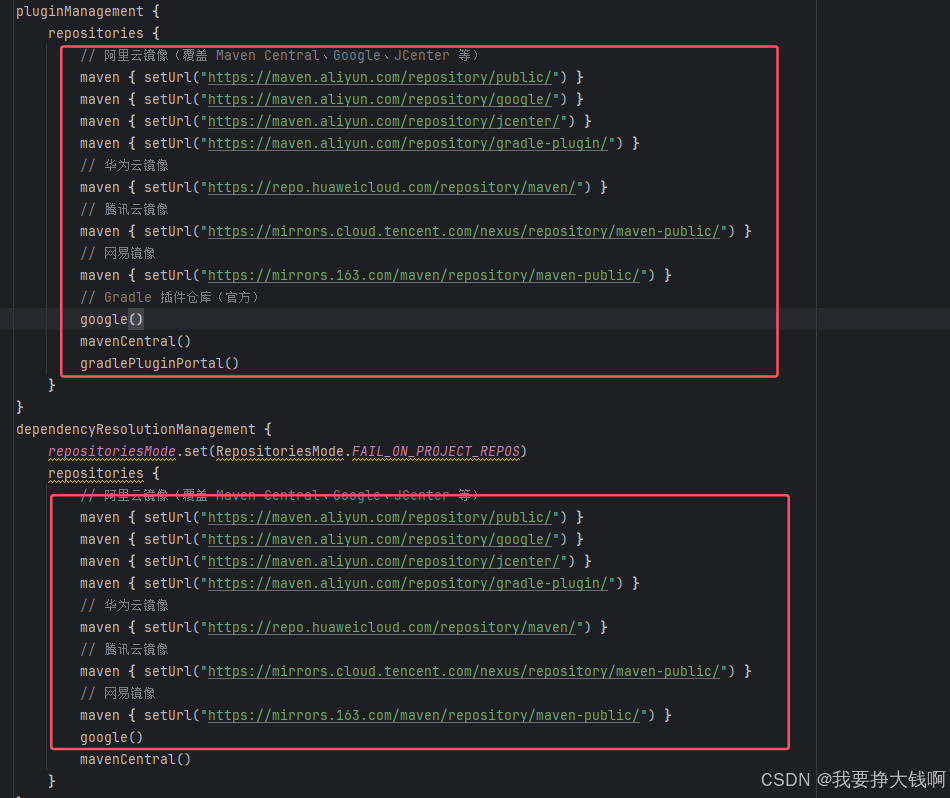
Then, open settings.gradle.kts in the project root, and replace the content inside the repositories block with the following:
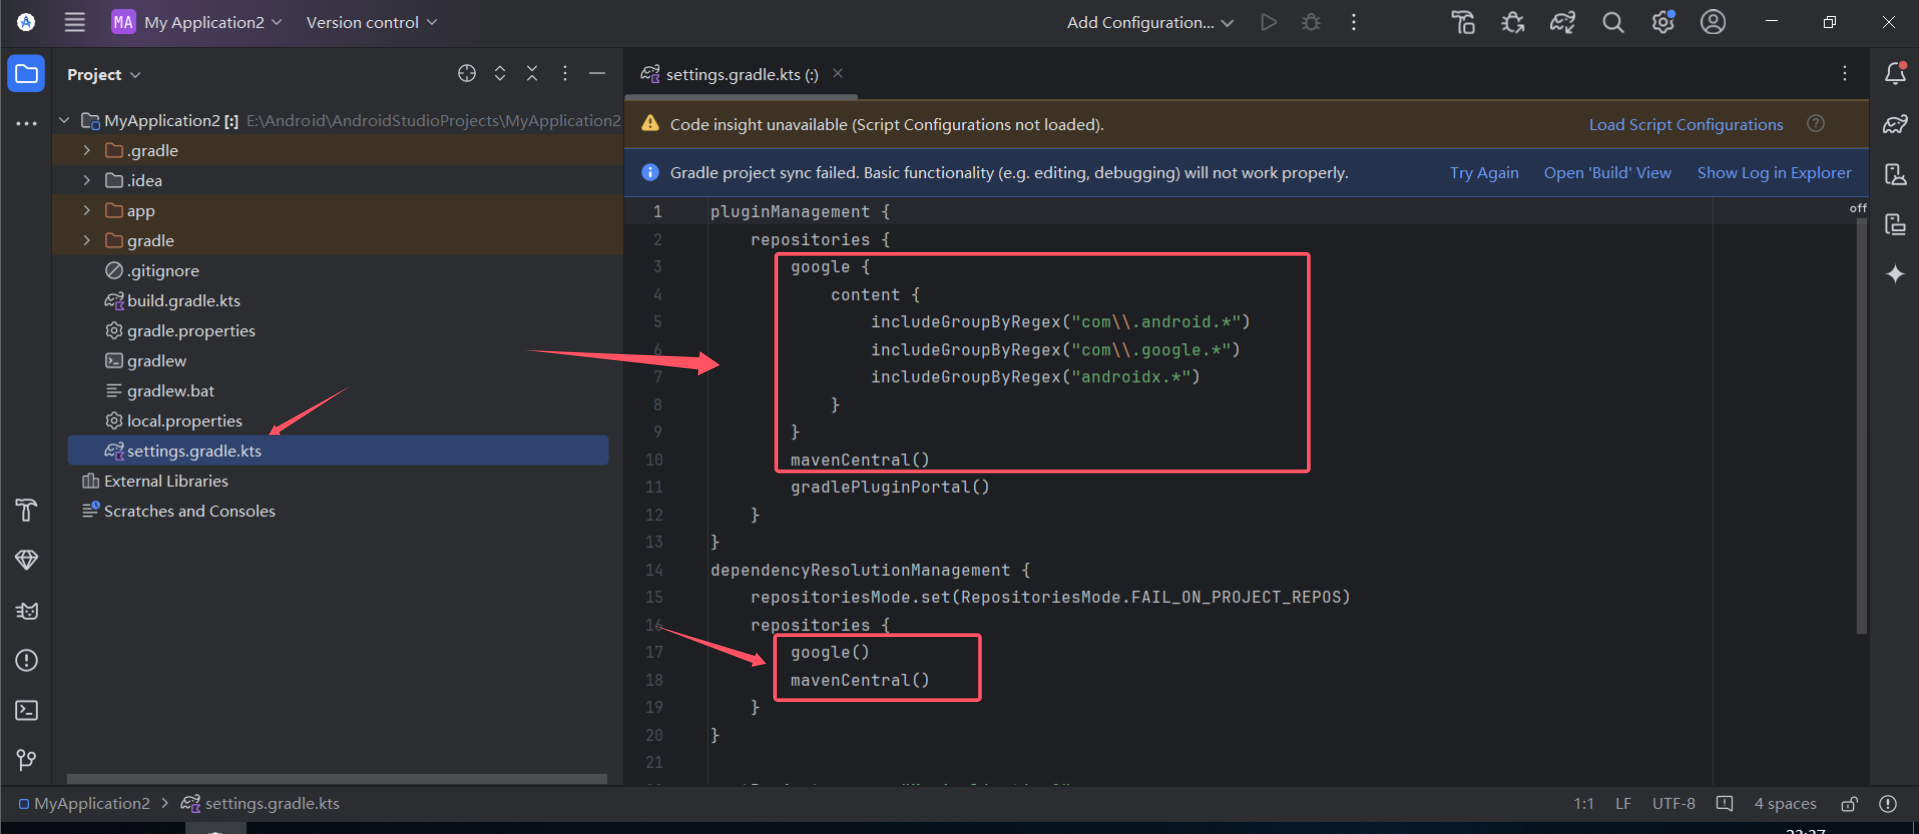
Replace the highlighted section with this code (latest source list as of 2025-02-21):
        // Aliyun mirrors (covering Maven Central, Google, JCenter, etc.)
        maven { setUrl("https://maven.aliyun.com/repository/public/") }
        maven { setUrl("https://maven.aliyun.com/repository/google/") }
        maven { setUrl("https://maven.aliyun.com/repository/jcenter/") }
        maven { setUrl("https://maven.aliyun.com/repository/gradle-plugin/") }
        // Huawei Cloud mirror
        maven { setUrl("https://repo.huaweicloud.com/repository/maven/") }
        // Tencent Cloud mirror
        maven { setUrl("https://mirrors.cloud.tencent.com/nexus/repository/maven-public/") }
        // NetEase mirror
        maven { setUrl("https://mirrors.163.com/maven/repository/maven-public/") }
It should then look like the screenshot below:
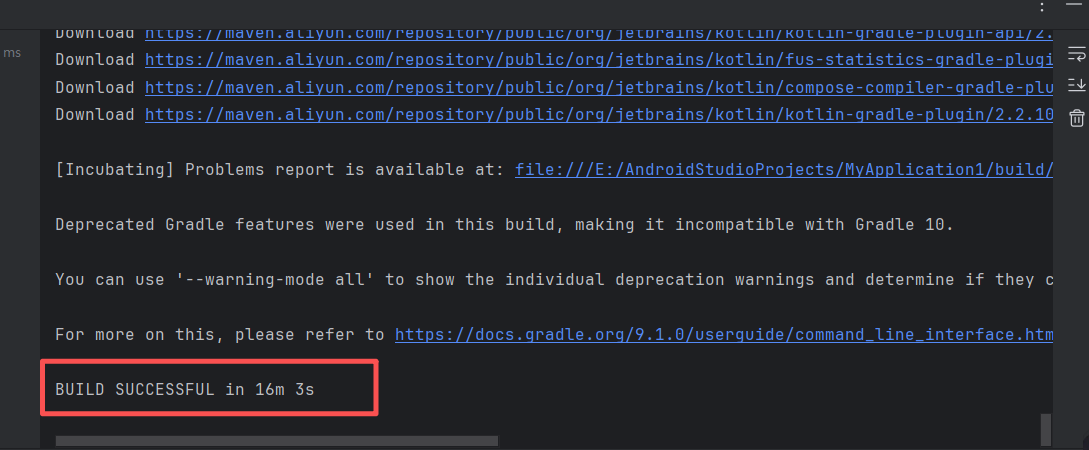
- Save and apply changes
At this point, save the file and click Try Again in the top-right corner. Android Studio will re-run the download. Wait a few minutes. When the console shows BUILD SUCCESSFUL, it means the environment setup is fully complete and we are ready to start coding.
2.6 Understand the Project Structure
After project creation succeeds, the Project panel will appear on the left. Switch to the Android view (default), and you will see key directories like this:
app/
├── manifests/
│   └── AndroidManifest.xml            <- app "ID card", declares app name and entry Activity (MainActivity)
│
├── java/
│   └── com.example.myapplication1/
│       ├── MainActivity.kt            <- app entry, builds UI with Jetpack Compose
│       │
│       └── ui/                        <- controls the overall UI style (colors, fonts)
├── res/
│   ├── drawable/                      <- image resources (for example ic_launcher.png)
│   ├── mipmap/                        <- app icon
│   ├── values/                        <- text, color, theme styles
│   │   ├── colors.xml
│   │   ├── strings.xml
│   │   └── themes.xml
│   └── xml/                           <- system-related config files (not UI)
└── build.gradle (Module: app)         <- app build config (usually untouched at beginner stage)
As beginners, we usually only need to focus on three files:
MainActivity.kt: controls behavior and decides "what appears on the screen"AndroidManifest.xml: registers components and decides "where the app starts"Theme.kt: defines the visual appearance
3 Android App Development
In the first two chapters, we already understood what Android apps are and sharpened the two key tools: Trae and Android Studio. From this section on, we leave paper discussion and enter real practice. We will adopt Vibe Coding mode to build a very popular stress-relief app from scratch - Electronic Wooden Fish. It fits the "Vibe" theme well (simple and relaxing), while also covering three core parts of Android development: UI interaction (tapping), data storage (merit count), and multimedia (sound effects).
Now, follow along and send the first instruction to AI.
3.1 The First "Master Prompt": From Zero to One
In Vibe Coding mode, we do not need to first create layout files and then write logic code as in traditional development. What we need to do is describe the requirements clearly in one shot and let AI generate the first runnable prototype.
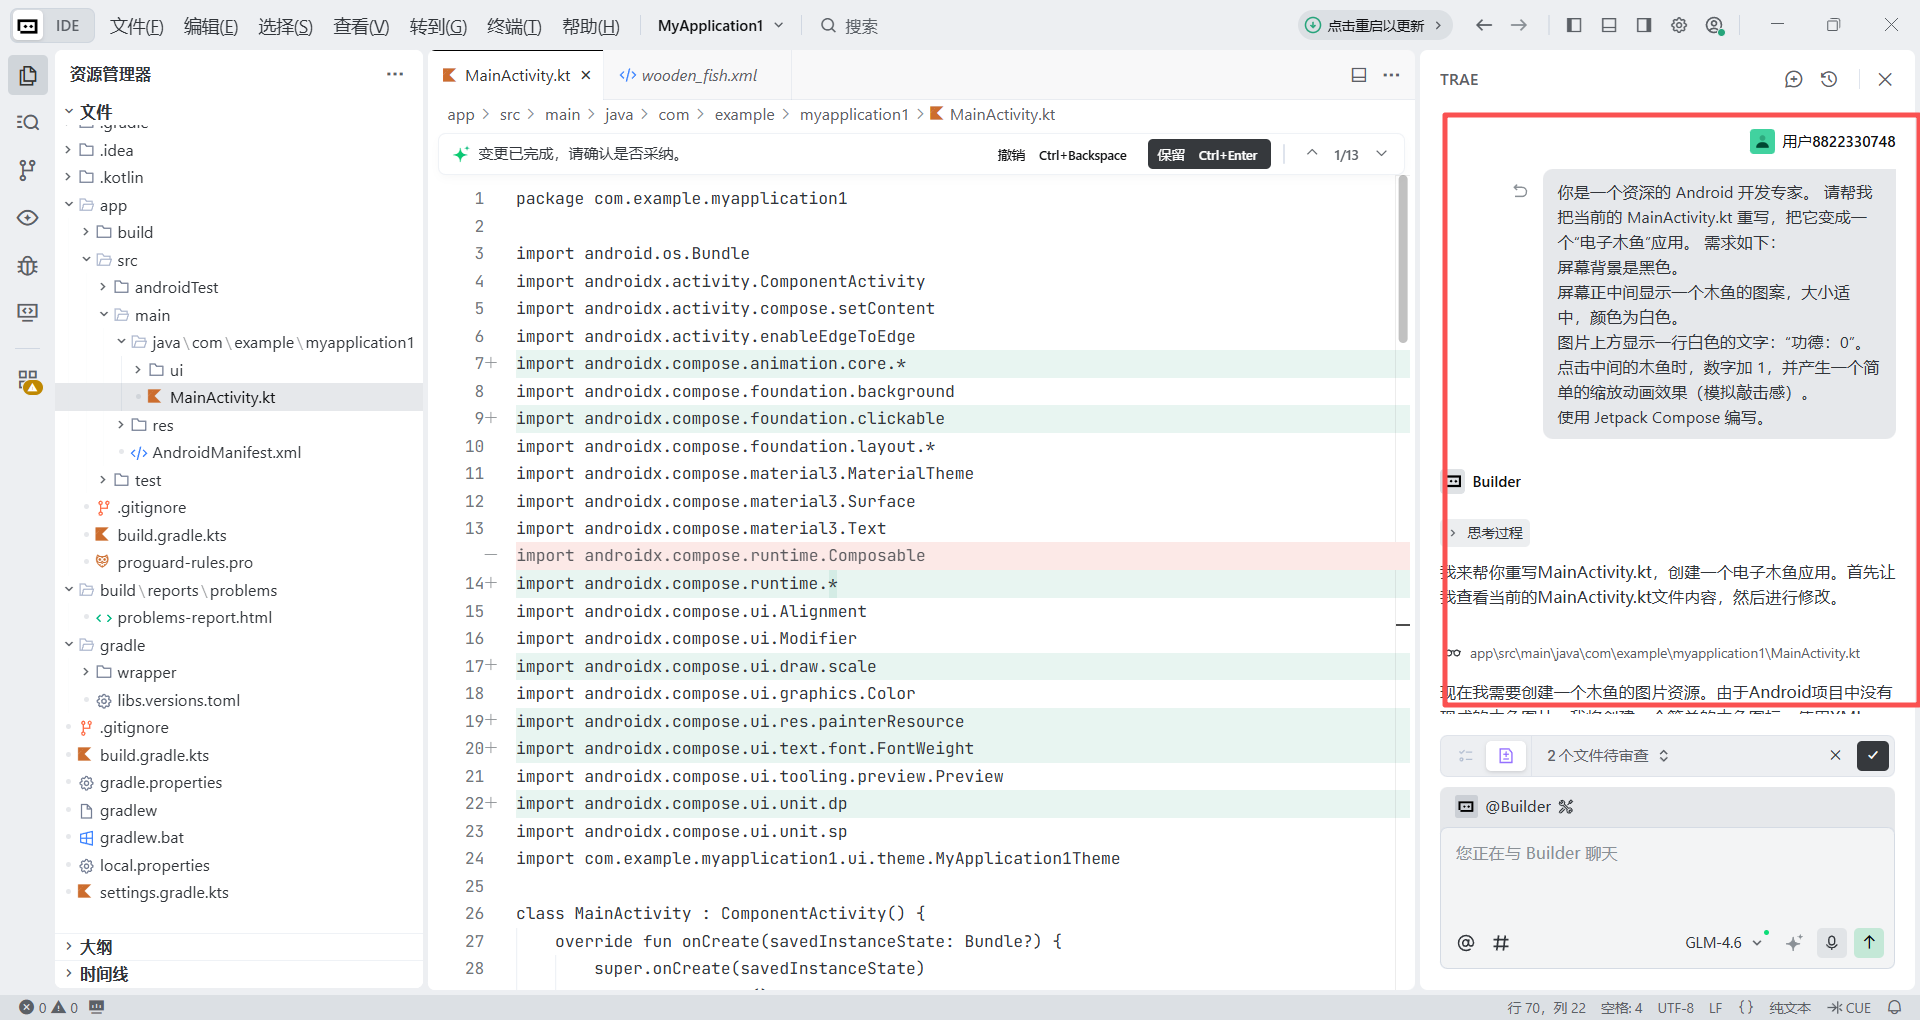
Open the project directory we just created in Trae, and in the chat panel on the right, enter the following Prompt:
You are a senior Android development expert. Please rewrite the current MainActivity.kt and turn it into an "Electronic Wooden Fish" app. Requirements:
1. The screen background is black.
2. Display a wooden fish graphic in the center of the screen, moderate in size, in white.
3. Show a line of white text above it: "Merit: 0".
4. When the wooden fish in the center is tapped, the number increases by 1 and a simple scale animation effect appears (simulating the feeling of knocking).
5. Use Jetpack Compose.
After sending it, Trae will begin analyzing your project structure. A few seconds later, it will directly generate the full code for MainActivity.kt.
- From its response, we can see its reasoning logic and interaction logic
- We can directly see which parts of the code were rewritten
- If we are not satisfied with the result, we can roll back to the previous version
3.2 Run and Preview (Emulator Debugging)
At this point, AI has completed the first round of development. But remember, what we see in Trae is only code "blueprints," not a real interactive app. Trae itself cannot directly run Android apps, so we need to rely on the Virtual Device emulator provided by Android Studio. It is like turning your computer screen into a virtual Android phone, allowing us to install the code immediately and view the real result.
Next, let us configure this "virtual phone."
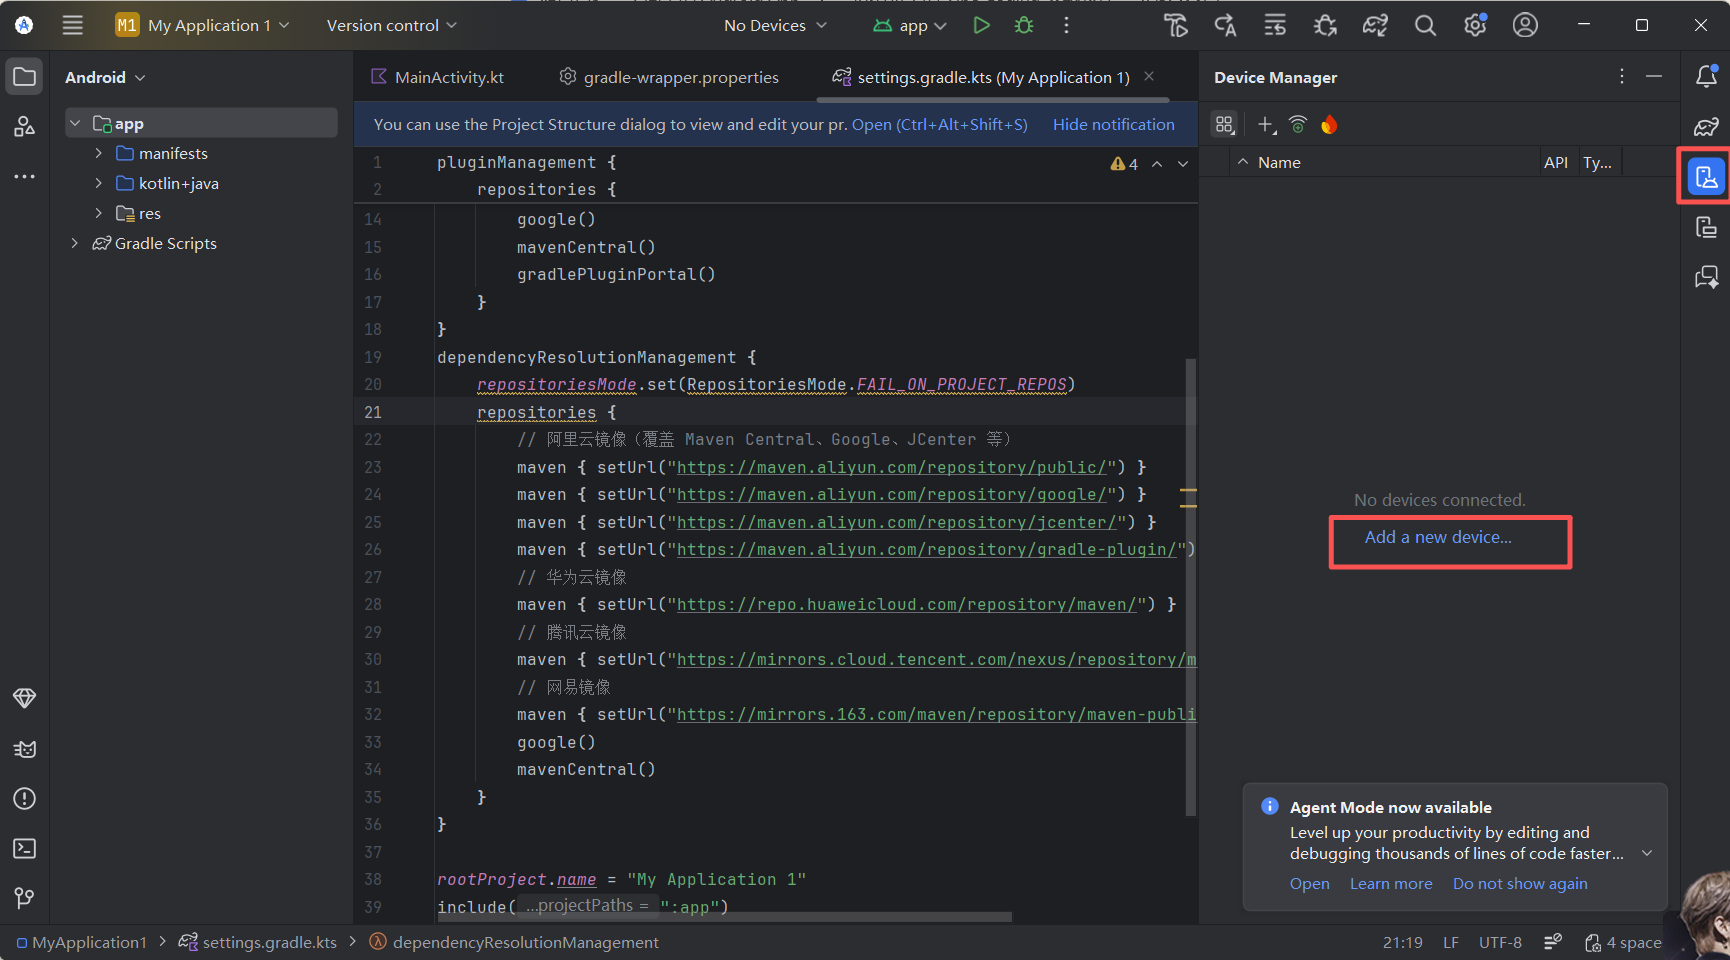
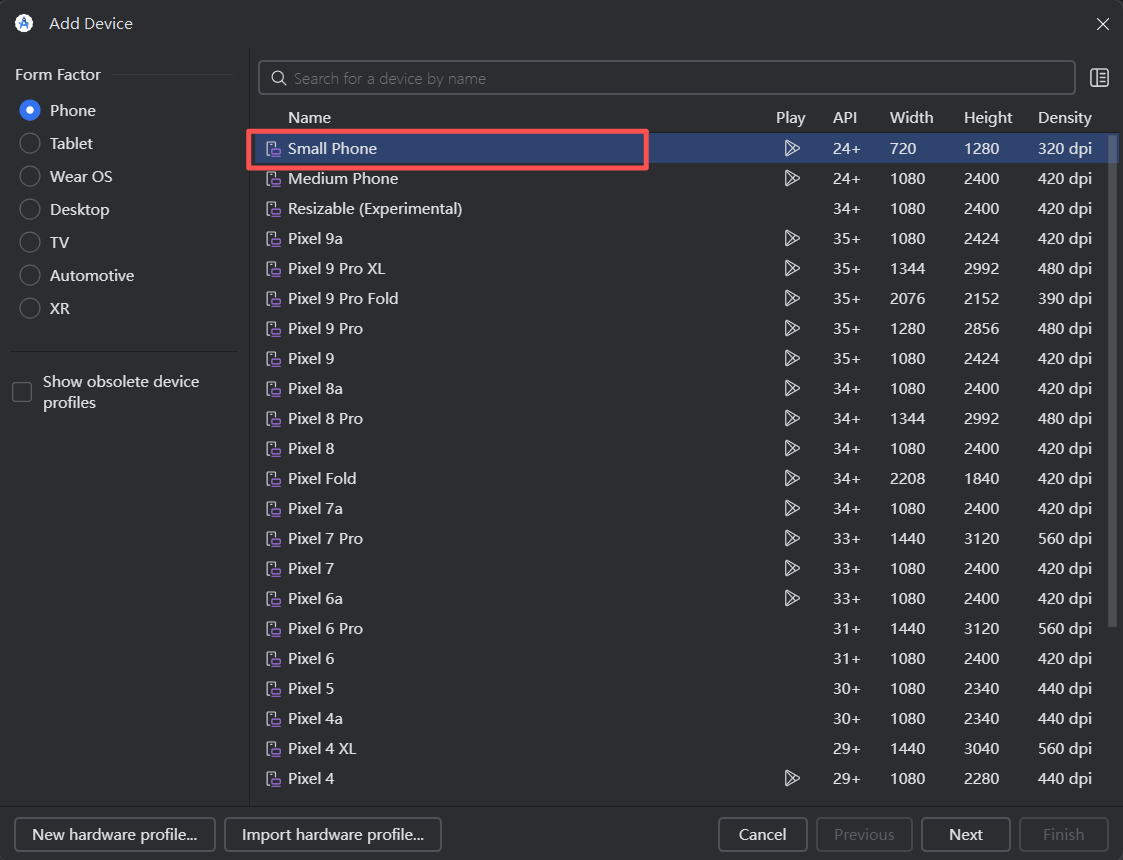
Step 1: Create the emulator
Back in Android Studio, find and click Device Manager in the right toolbar. If you cannot find it, open it from View -> Tool Windows -> Device Manager.
In the panel, click Add a new device, then choose Create Virtual Device to enter the device selection window.
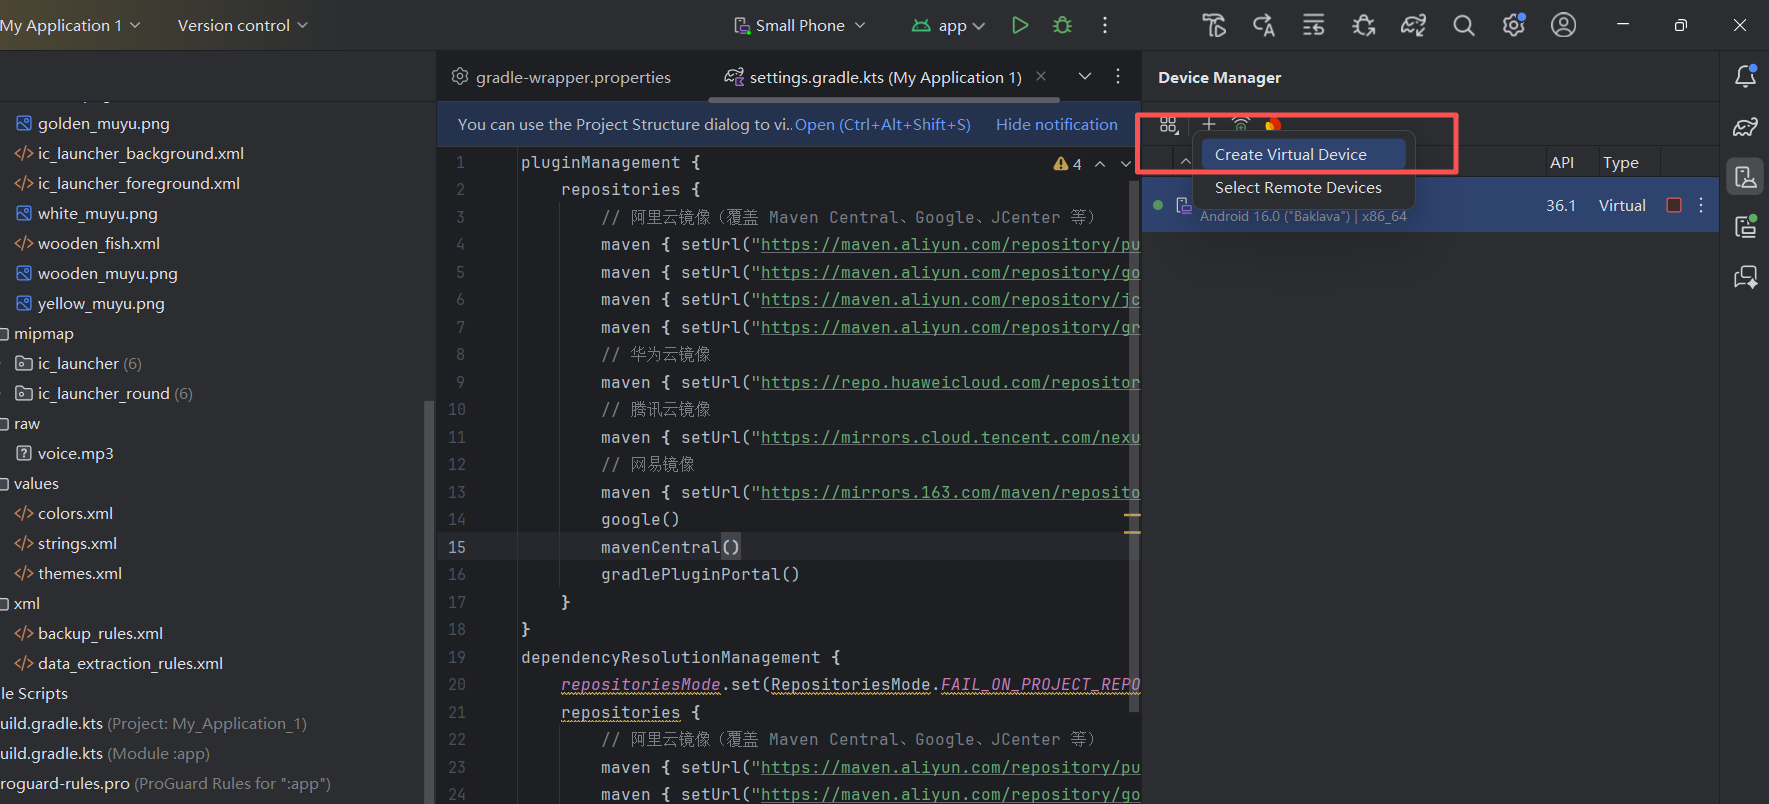
In the hardware selection window, choose Phone and then Smart Phone (medium screen size), or any other device profile you prefer such as Pixel, then click Next.
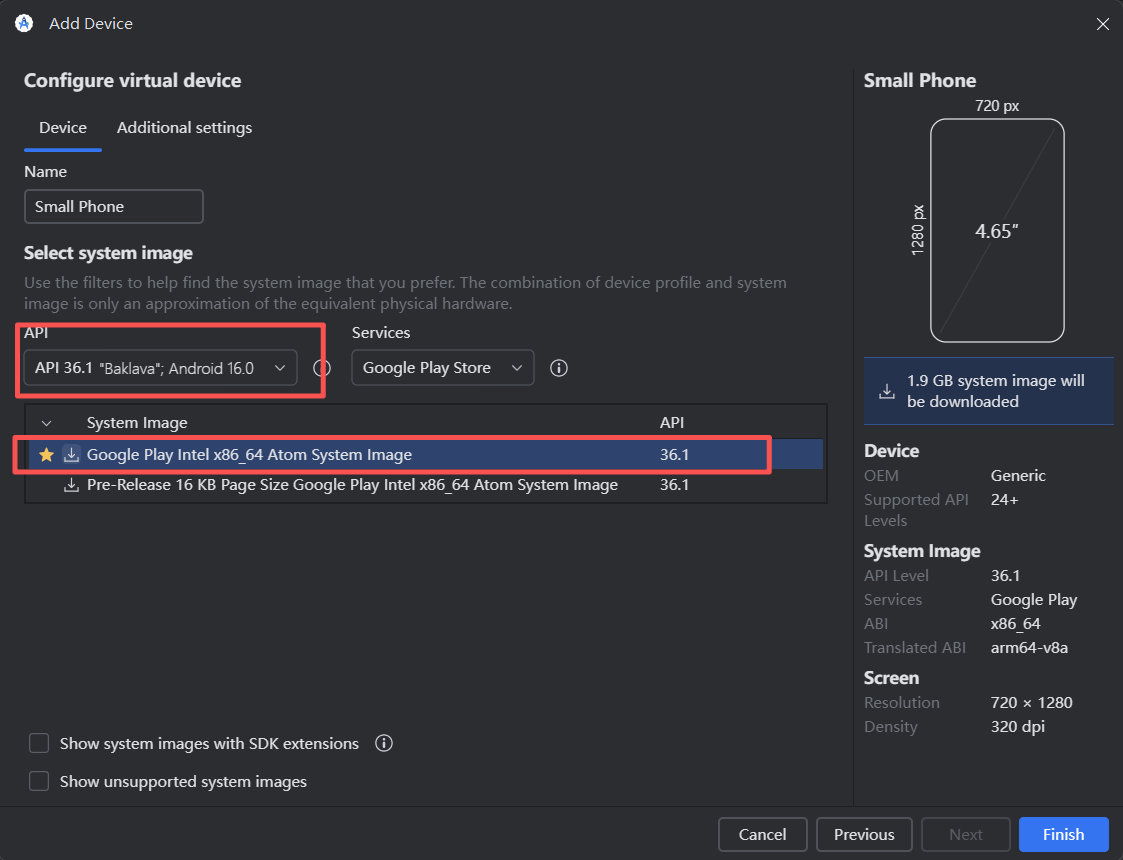
Step 2: Configure the system image
In the System Image dialog, select API 36.1. If it has not been downloaded yet, click Download first, then select it after download is complete, and click Finish.
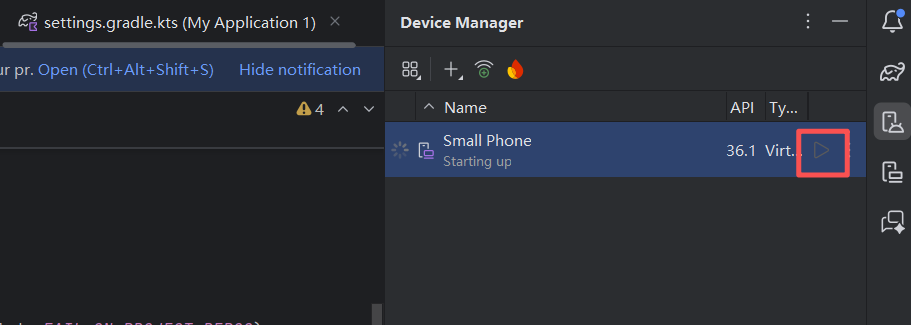
Step 3: Start the emulator
After successful creation, your new phone will appear in the device manager list. Click the triangle play button on the right. After a short wait, a phone-shaped window will pop up - this is your Android emulator.
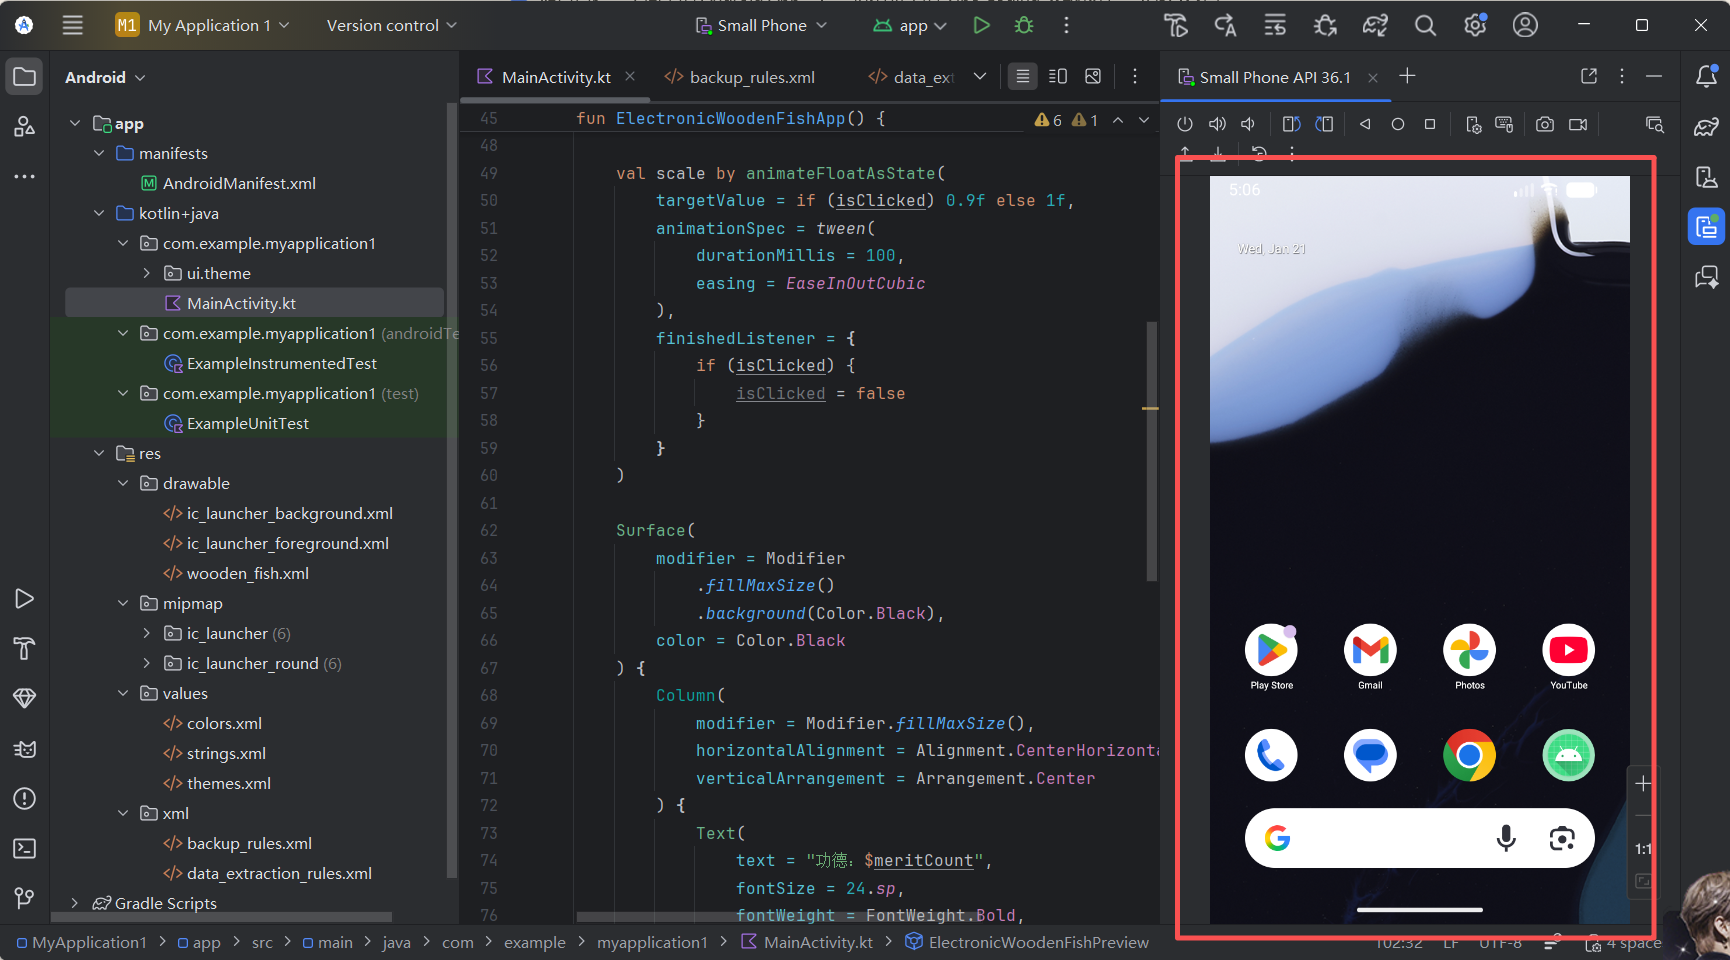
Step 4: Run the app
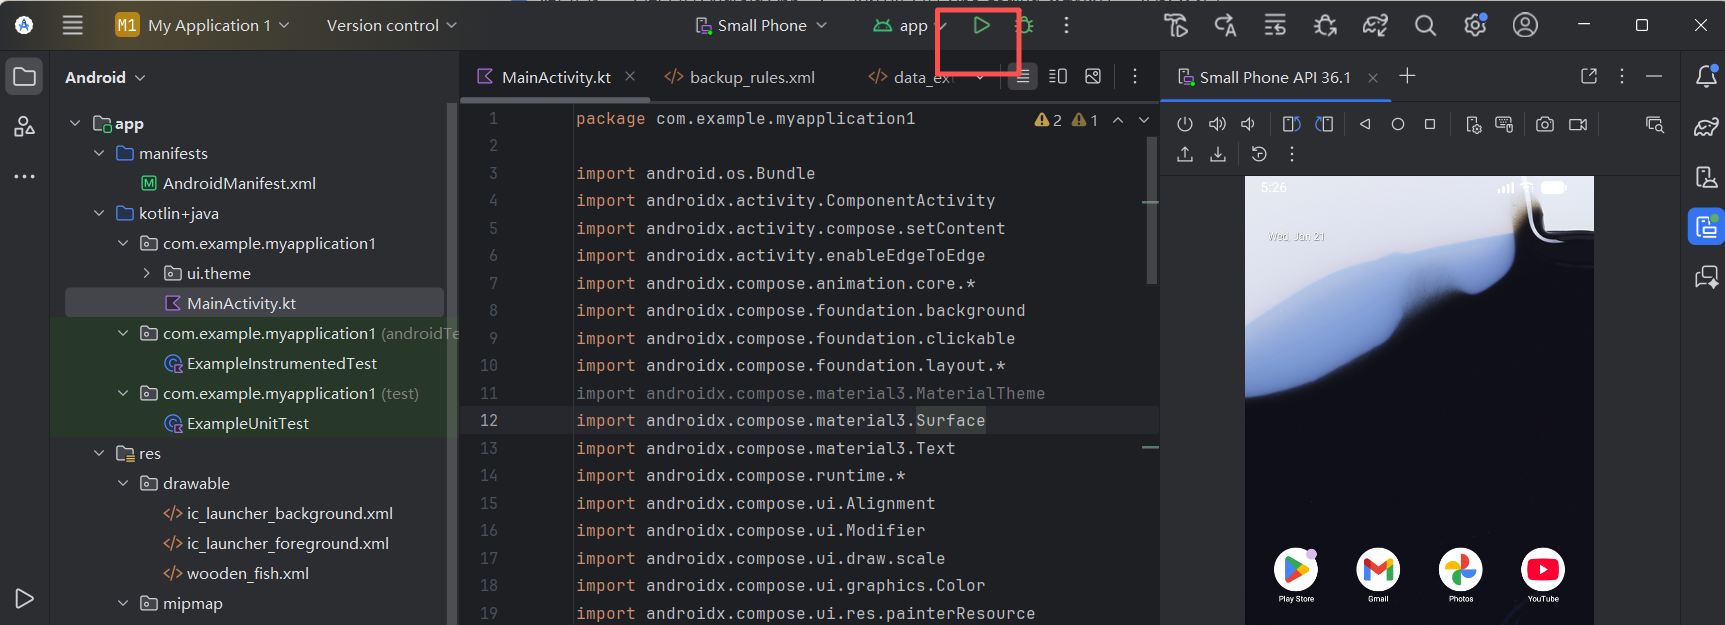
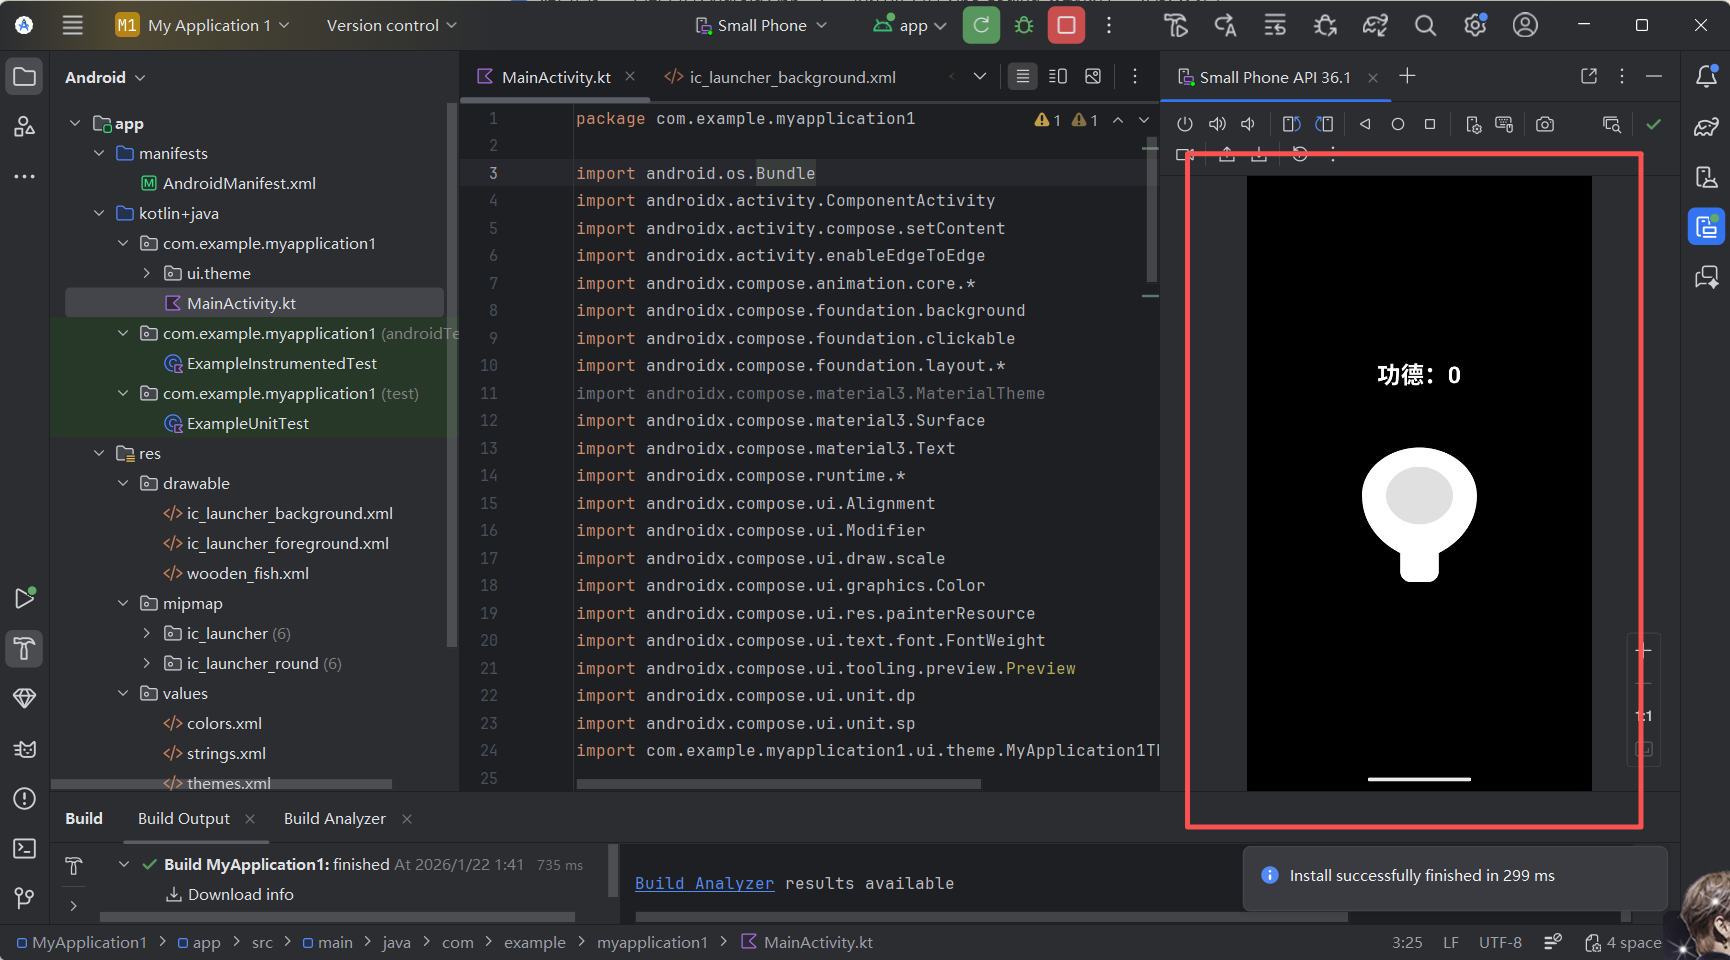
Now comes the magic moment. Make sure the emulator has started and is showing the desktop, then click the prominent green Run triangle in the top toolbar of Android Studio (or use shortcut Shift + F10). Android Studio will automatically compile the code written by Trae, package it as an app, and install it into the emulator.
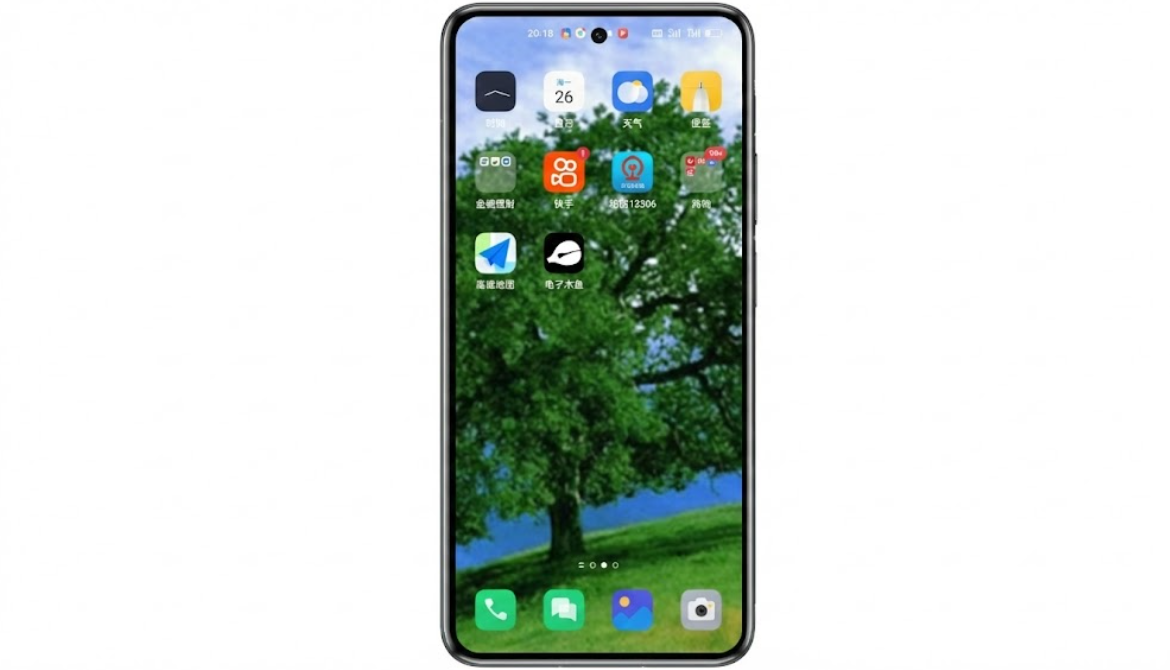
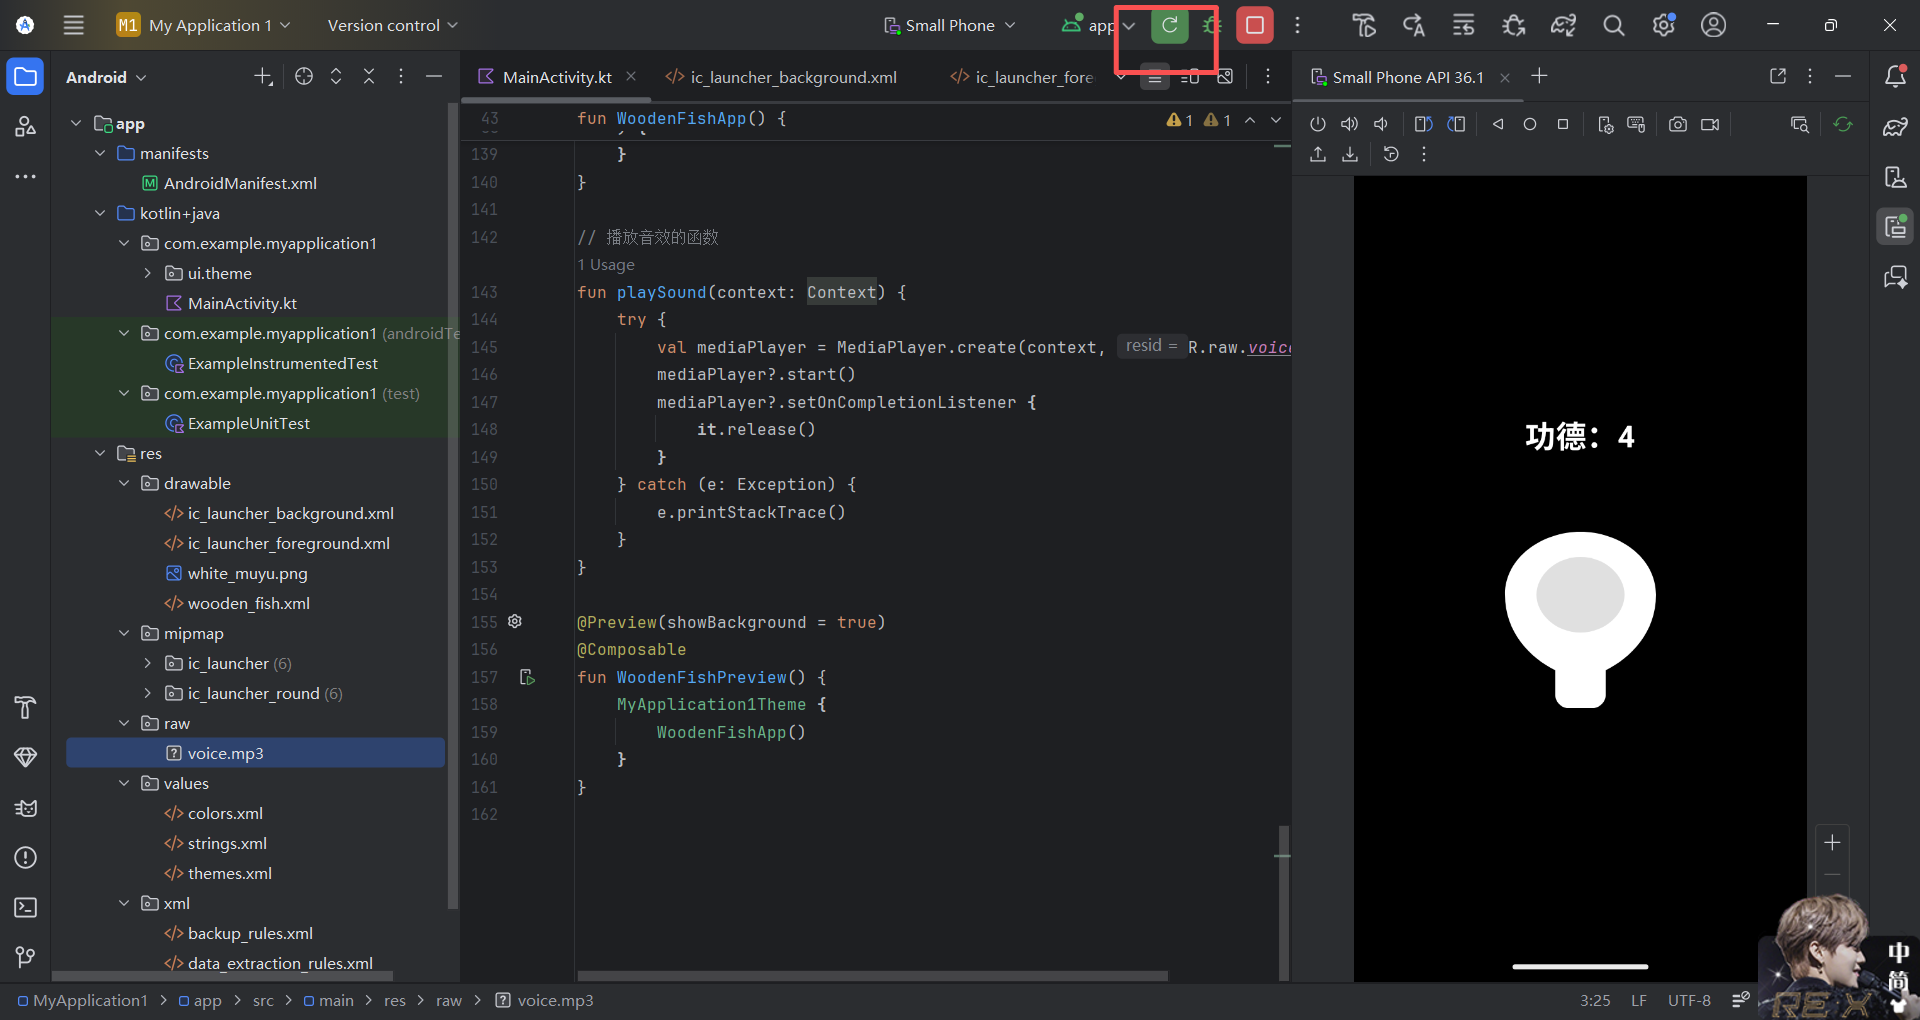
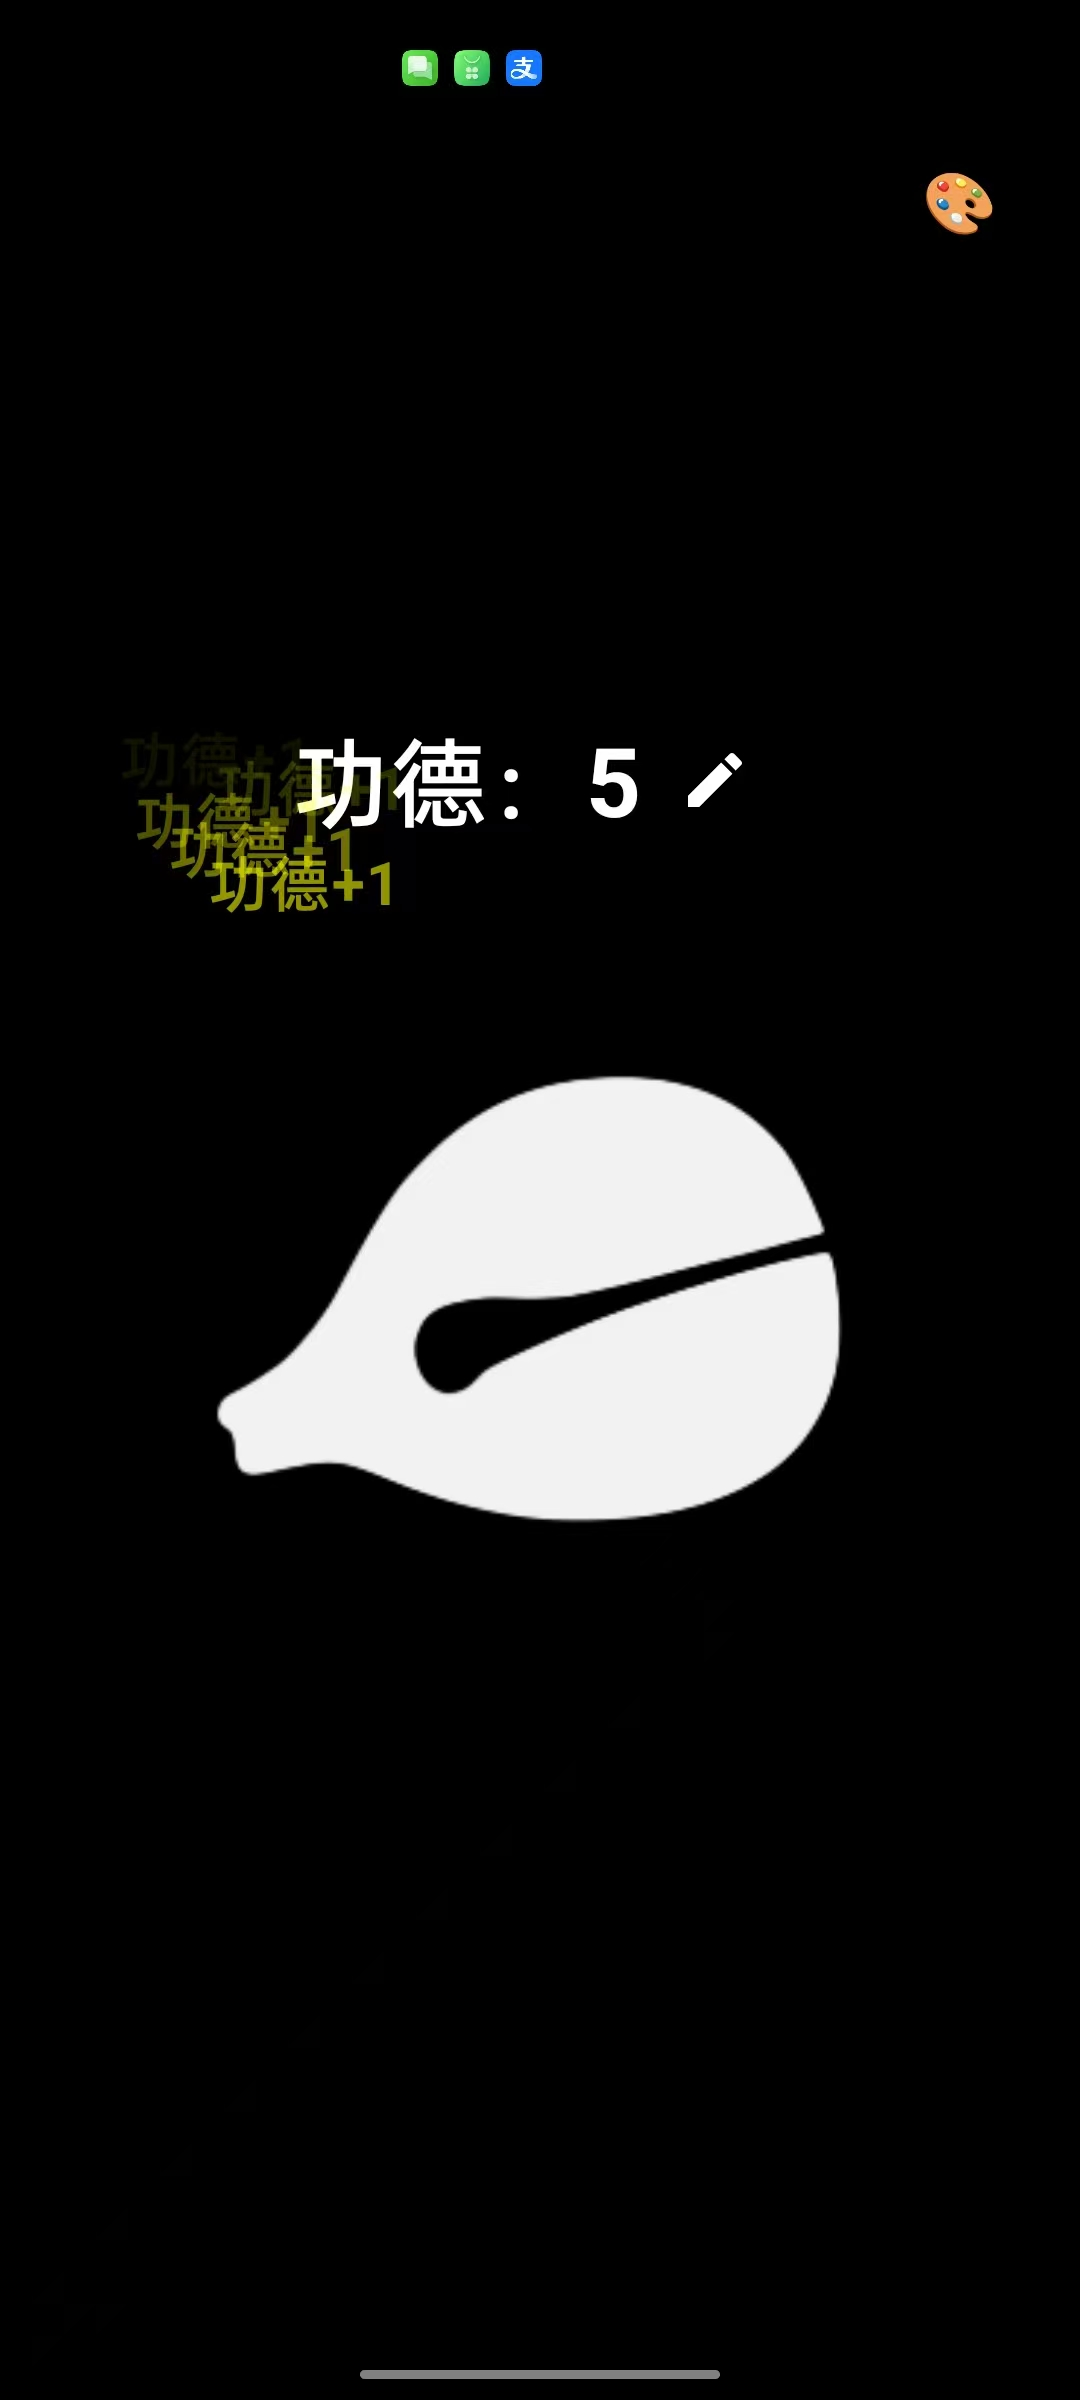
Within seconds, you should see the emulator screen light up, showing a white wooden fish graphic in the center with the text "Merit: 0" above it. Try tapping it and see whether the number increases and the animation works. This is your first Android app.
3.3 Optimization Iteration (Add Assets and Sound)
At this stage, our app already has a basic shape: tapping increases the number. But it is still just a "mute" white geometric shape, lacking fun. Next, we will make the Electronic Wooden Fish much more immersive by adding a real image and knock sound effect.
This is exactly the most attractive part of Vibe Coding mode. In traditional development, adding sound effects and more complex animations is often a beginner's nightmare. You need to manage MediaPlayer resource loading and releasing (otherwise memory leaks may happen), and also calculate animation curves. In Vibe Coding mode, you do not need to care about these low-level details at all. You only need to tell AI like a director: "change the prop and add a sound effect when tapped," and the implementation appears immediately.
Step 1: Prepare assets
You need one wooden fish image (png) and one knock sound effect (mp3).
- Image asset: copy the prepared
white_muyu.pngintoapp/src/main/res/drawable - Audio asset: in Android Studio, right-click the
resfolder in the left project panel, chooseNew -> Android Resource Directory, select raw as the resource type, click OK, then copyvoice.mp3into the newres/rawfolder. (Note: if you plan commercial release, make sure you have legal rights to all assets.)
Here are the image and sound assets I found for you. If it is inconvenient for you to search for your own, you can directly use them.

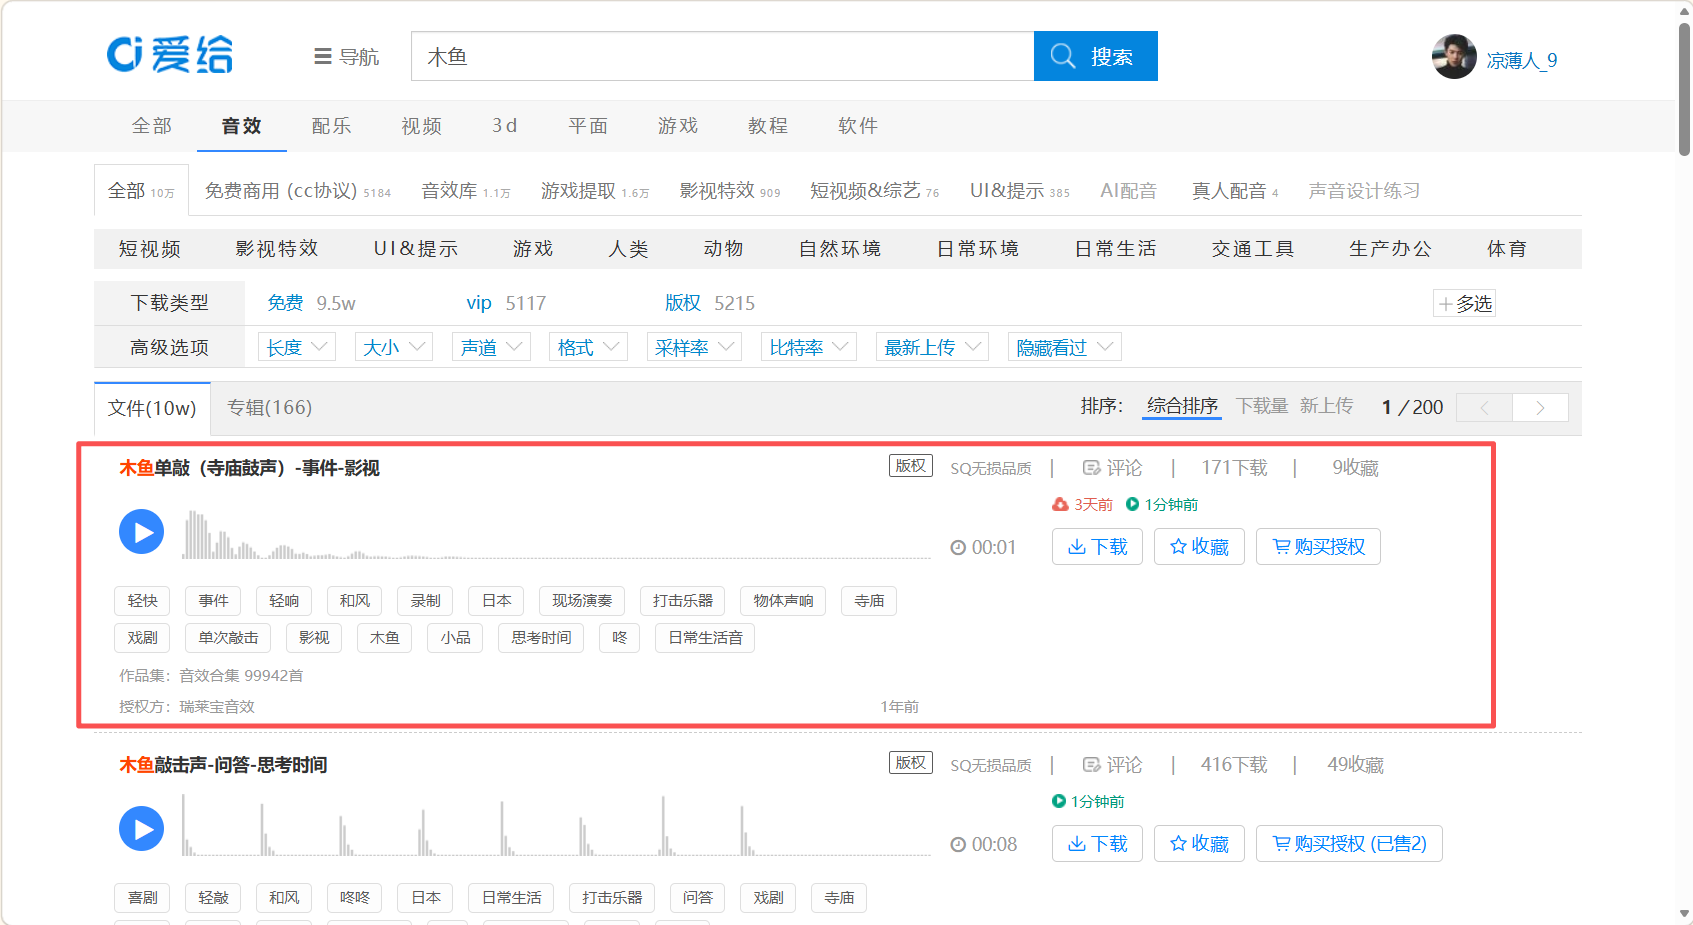
Knock sound download link: https://www.aigei.com/s?q=木鱼&type=sound
Choose the first 1-second sound effect.
Step 2: Send the iteration instruction
After the assets are ready, go back to Trae. Trae will modify the code again and handle the audio-loading and animation logic for you. You only need to tell it which assets to use. Enter this Prompt:
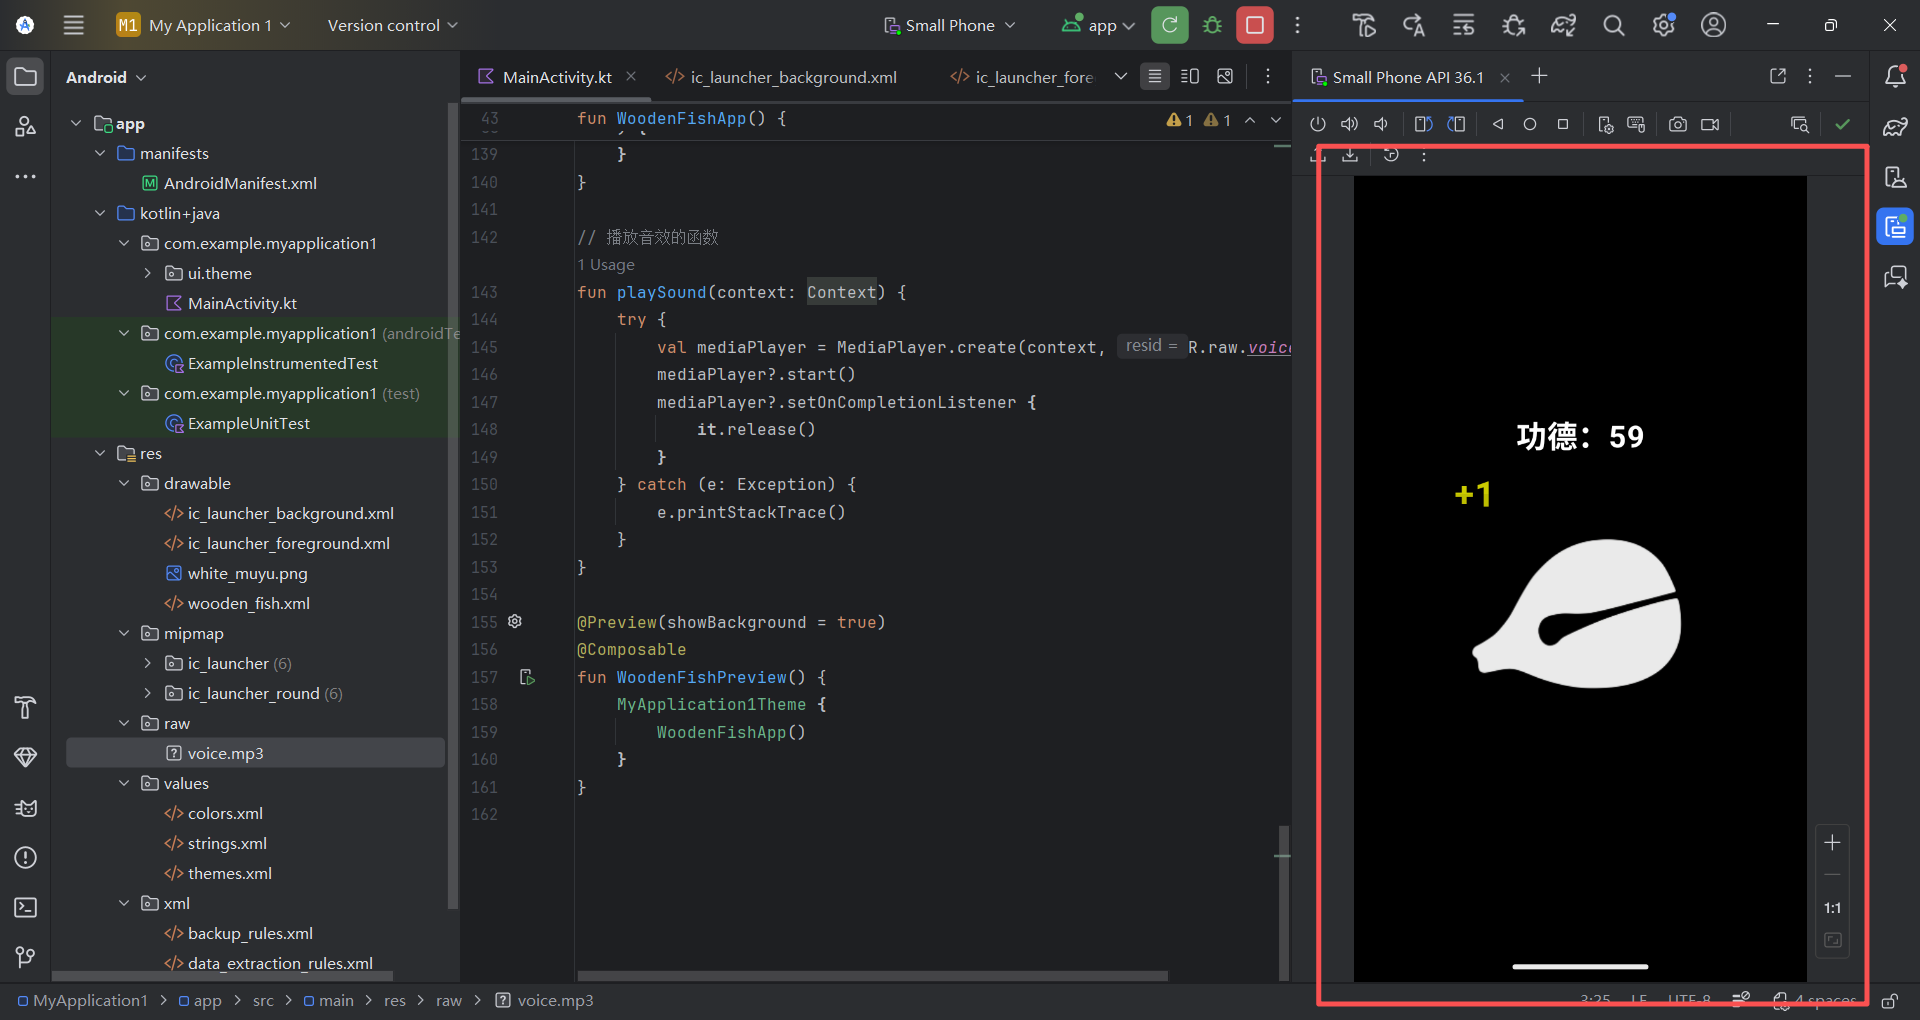
I have added the assets. The image path is res/drawable/white_muyu.png and the sound effect path is res/raw/voice.mp3. Please update the code:
1. Replace the wooden fish icon in the center with my image.
2. Play the knocking sound every time the wooden fish is tapped.
3. When tapped, show a temporary "+1" text above the wooden fish, then let it float upward and disappear (like floating score text in games).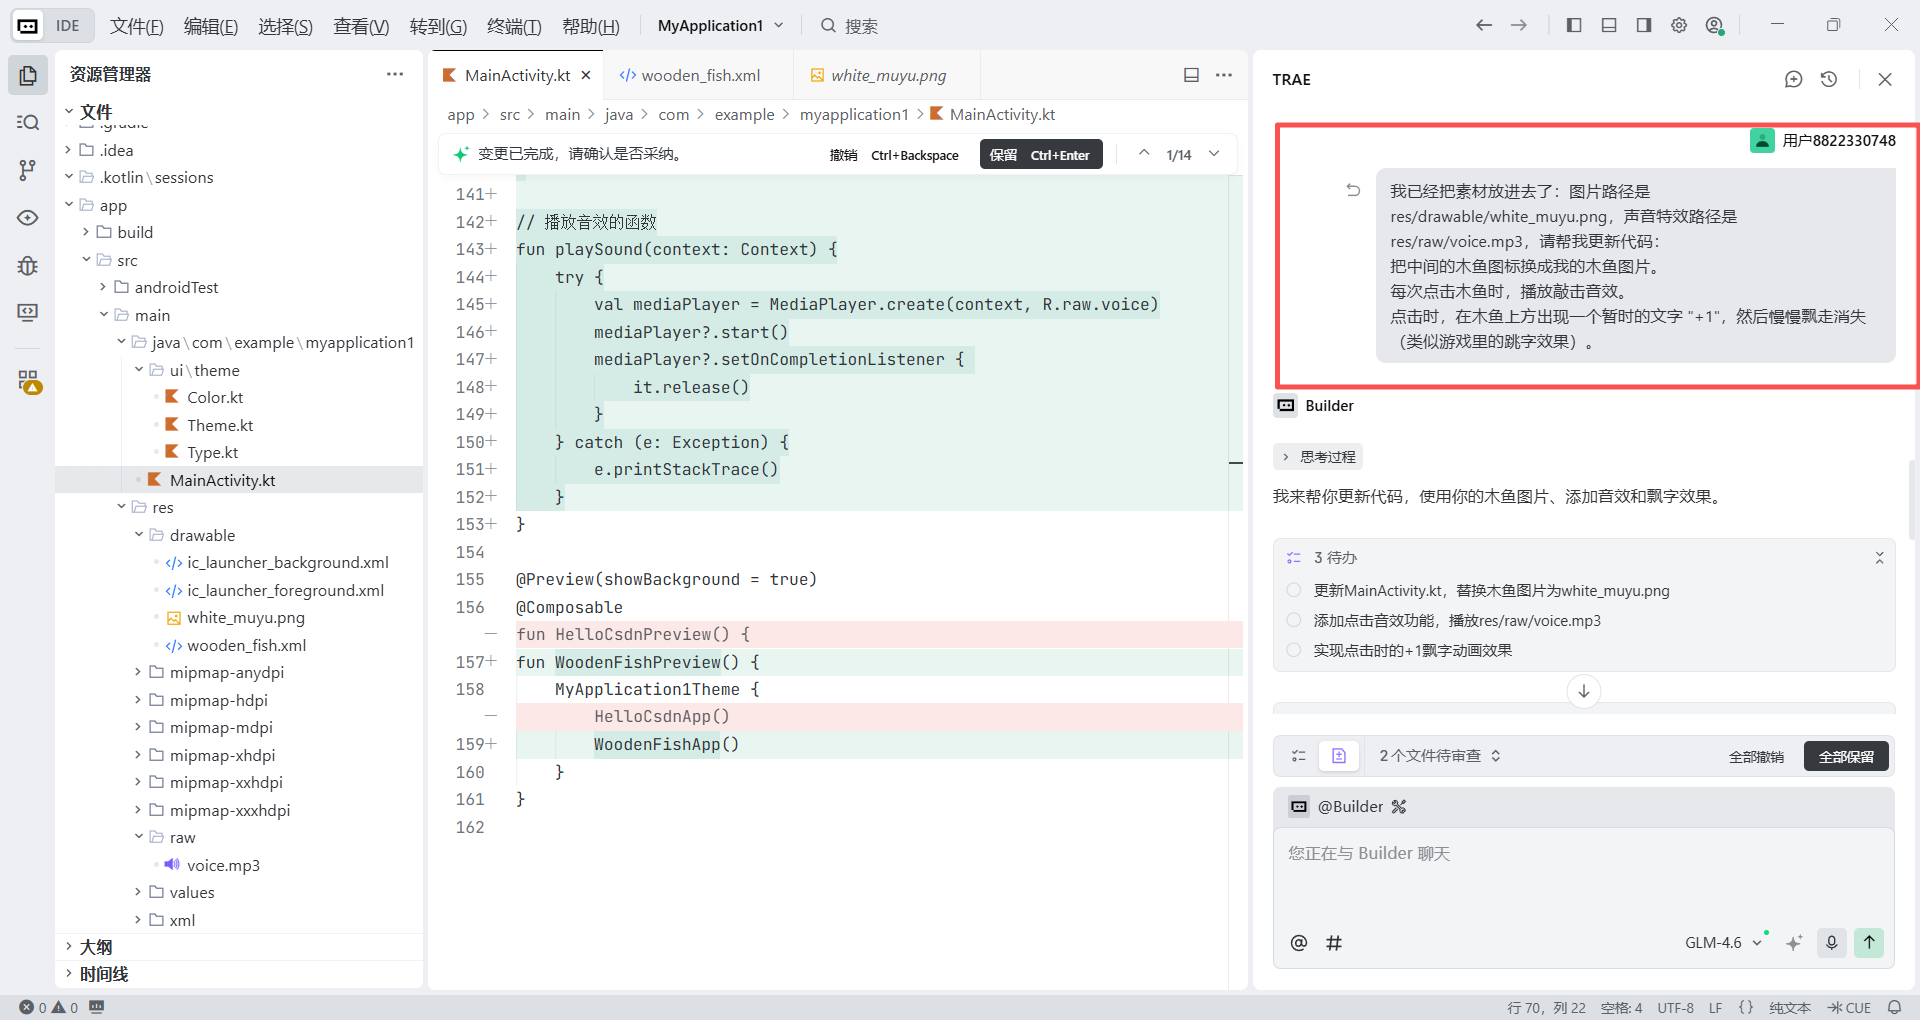
Step 3: Verify the result
After Trae finishes modifying the code, return to Android Studio and click the green Run button again (Re-run) to restart the emulator. At this point, your app will feel transformed. Try tapping continuously - you should hear a crisp "tok tok" sound and see the floating "Merit +1" text jumping out. This completes the key transition from "demo" to "product."
3.4 What If Bugs Appear? (Debugging Loop with AI)
AI-generated code is not guaranteed to be perfect on the first try, just like top engineers also cannot promise bug-free code in one shot. But in Vibe Coding mode, bugs are no longer a wall blocking you; they become stepping stones in your collaboration with AI.
Case 1: the app crashes
Suppose the app crashes immediately after clicking Run, or tapping the wooden fish does not play sound. Traditionally, you would need to search for the error code, browse dozens of technical forums, and read lots of difficult English posts. In Vibe Coding mode, you only need to do one thing - be a courier.
Steps:
- Open the log: find the Logcat panel at the bottom of Android Studio (the small cat icon).
- Locate the error: you will see scrolling logs, and the red lines are usually the key errors.
- Copy and paste: select the red English error text, copy it, and paste it into Trae: "I got this error while running. Please help me fix it."
- AI may immediately tell you something like: "This happened because vibration permission was not declared in
AndroidManifest.xml," and then give you the fixed code. You just click Apply and move on.
Case 2: the app runs, but the experience feels bad
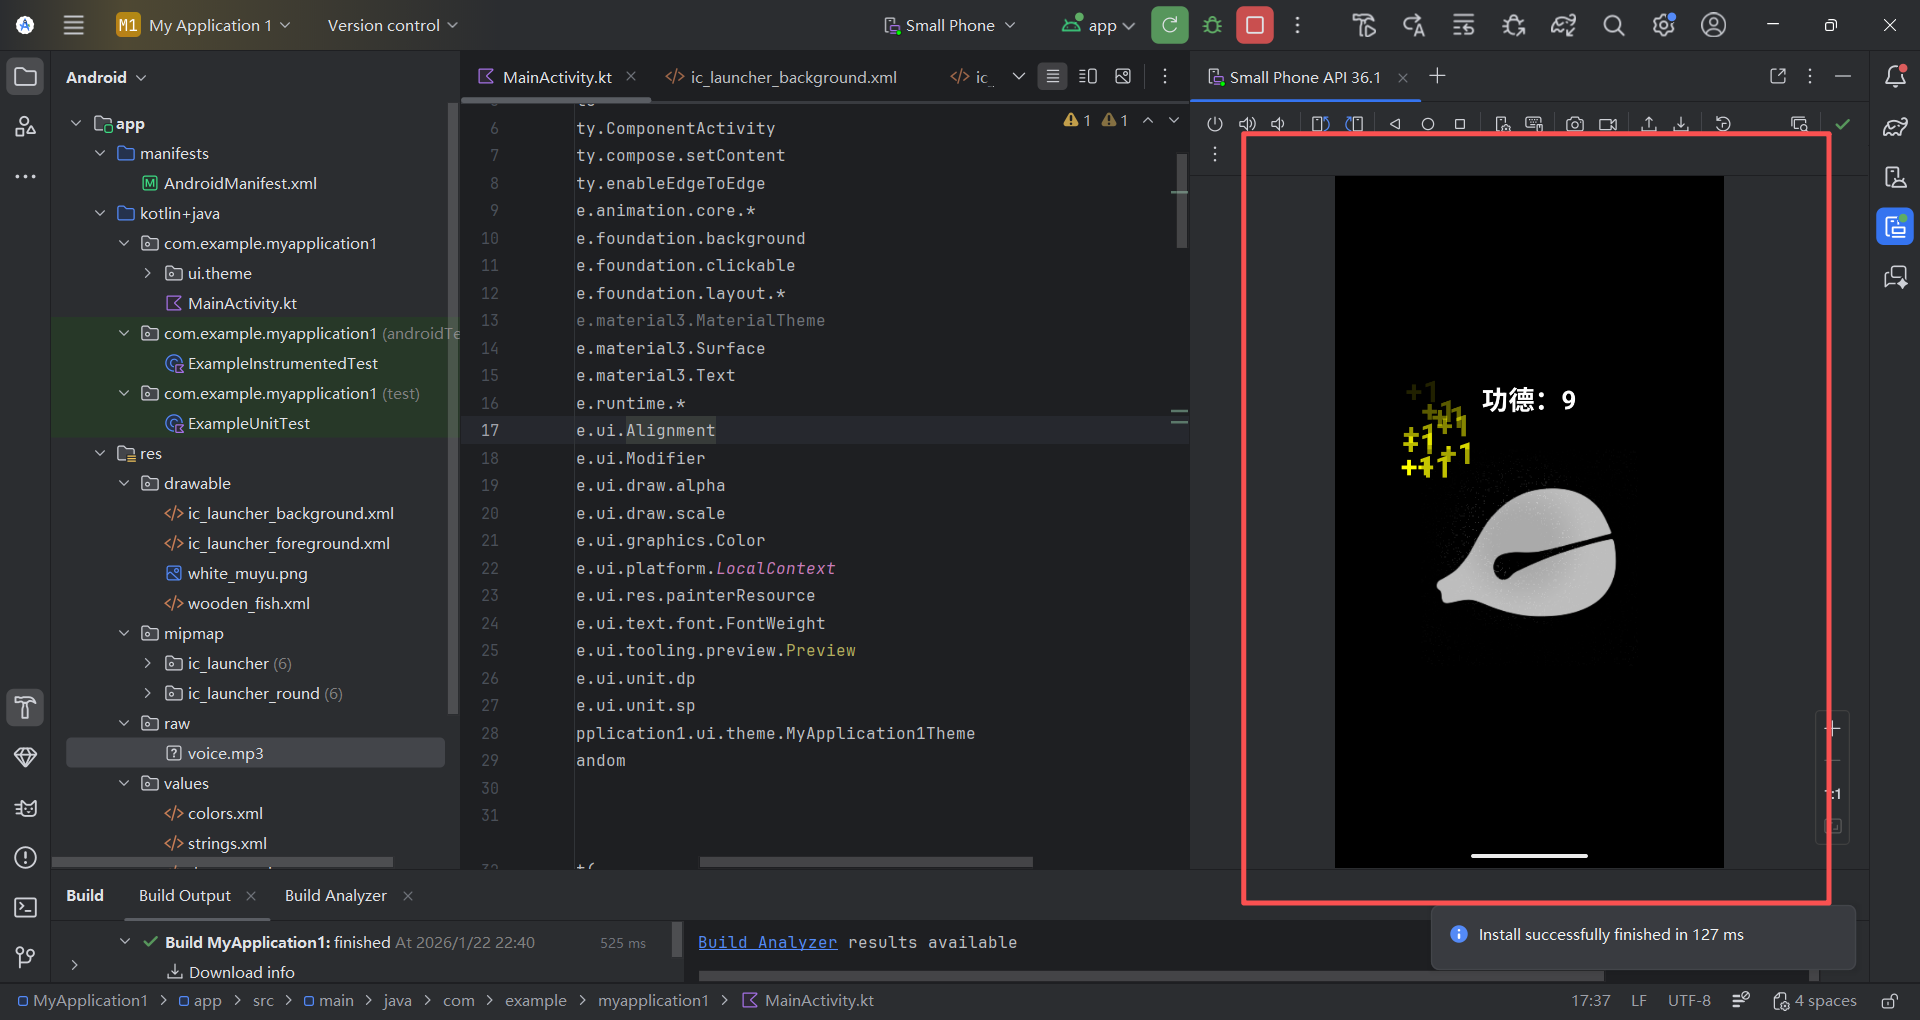
Sometimes the app does not crash, but still feels unsatisfying. For example, when tapping the wooden fish very quickly, you may notice that new "+1" animations do not show up until the previous "+1" fully disappears. That makes the feedback feel laggy and not satisfying. You do not need to study multi-threading or animation queues yourself. You only need to clearly describe that discomfort to AI.
Send this "advanced instruction" to Trae:
Please modify the current animation logic to solve the "fast tapping does not trigger" problem.
Current issue: it seems there is only one animation state, so I have to wait until the previous "+1" completely disappears before another click responds.
Requirements:
1. Replace the single animation state with a mutableStateListOf-based list.
2. Every time the wooden fish is tapped, add a new "+1" instance immediately to the list (with its own ID and initial position), regardless of whether the previous animation has finished.
3. In the UI, iterate through this list so each "+1" runs its own upward-floating + fade-out animation independently.
4. After a "+1" animation finishes, automatically remove it from the list to prevent memory leaks.
Please directly provide the updated MainActivity.kt code.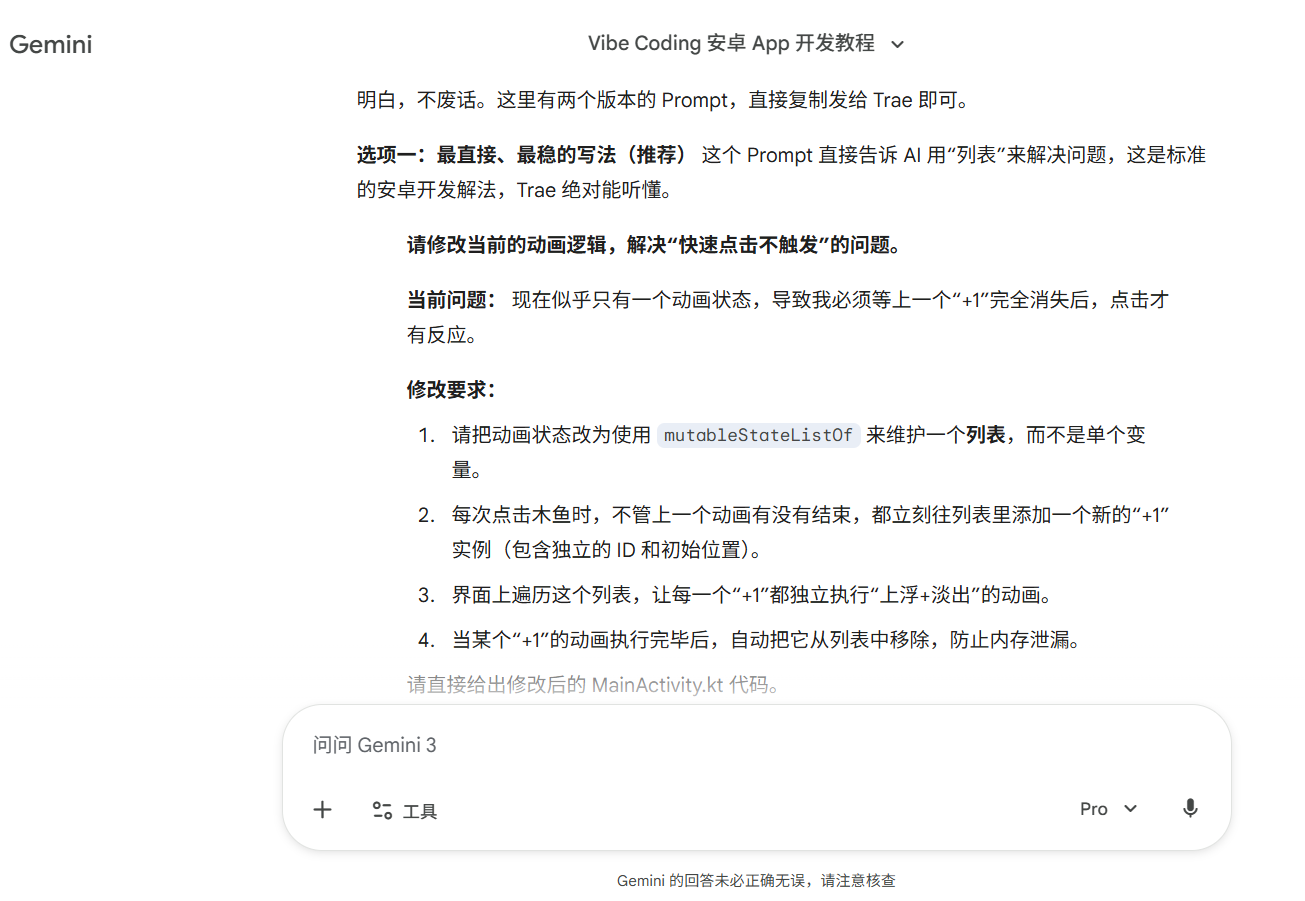
3.5 Final Result Showcase
In the previous steps, we already completed an Electronic Wooden Fish that can be seen and heard. To make it closer to a publishable app, we will use one final iteration to add touch feedback and customization. We will implement two core features: first, vibration feedback, so every tap gets a physical response from the phone motor and greatly improves immersion; second, custom text, allowing users to modify the text on screen, for example changing "Merit +1" to "Salary +1" or "Trouble -1".
Send the following carefully designed Prompt to Trae. It will handle the dialog logic, state switching, and hardware interaction in one pass:
Role: You are an Android Jetpack Compose expert.
Task: Please add "custom text" and "vibration feedback" to the existing Electronic Wooden Fish app.
Requirements:
1. Haptic Feedback
Whenever the user taps the wooden fish, in addition to sound and animation, call the phone's haptic feedback (using LocalHapticFeedback.current) to give a light tactile response.
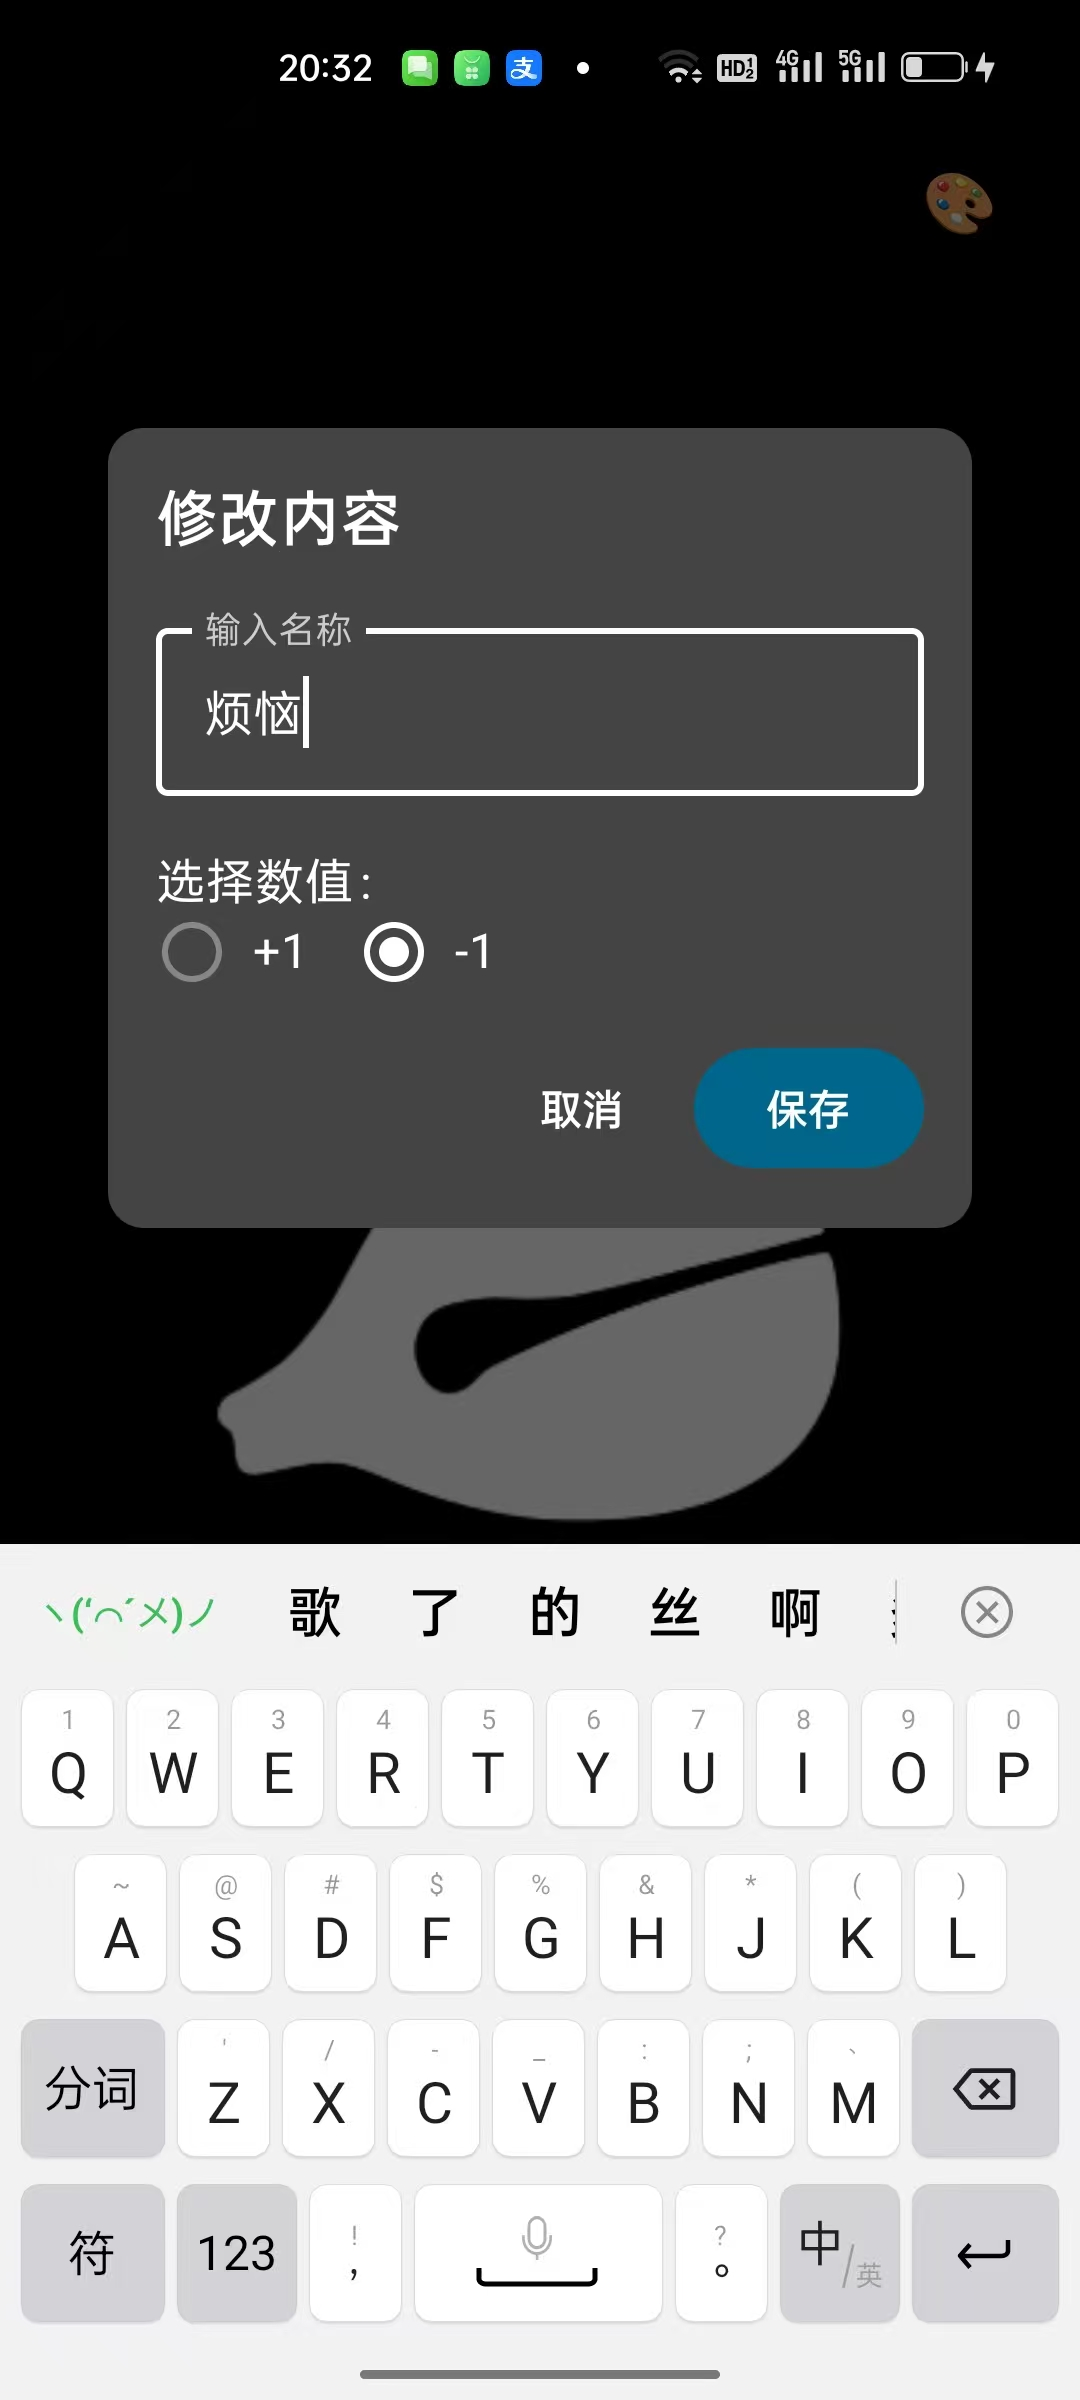
2. Custom Text Feature (UI and interaction)
Entry: Add a small edit icon next to the top text such as "Merit +1" (you can use Icons.Default.Edit).
Dialog logic: When the icon is tapped, show a dialog (Dialog/AlertDialog).
Dialog title: "Modify Content"
Input: Allow the user to enter the text they want to accumulate (default is "Merit")
Value choice: Below the input, provide two options (for example RadioButton or toggle) so the user can choose "+1" or "-1"
Save button: After clicking save, close the dialog and apply the new settings to the home screen
Data refresh: If the user updates the content, reset the top counter to 0 and start counting from zero again
3. Effect update
After saving, both the top counter text and the floating animation text shown when tapping the wooden fish should change to the user's custom format.
The floating text size should not exceed the size of the top counter text
Example: if the user enters "Salary" and chooses "+1", the top counter logic becomes +1 and the floating text becomes "Salary+1"
If the user enters "Trouble" and chooses "-1", the top counter logic becomes -1 and the floating text becomes "Trouble-1"
4. Technical requirements:
Make sure the new state (text and number) correctly affects the animation.
Please directly provide the full updated MainActivity.kt while keeping the previous sound and animation logic unchanged.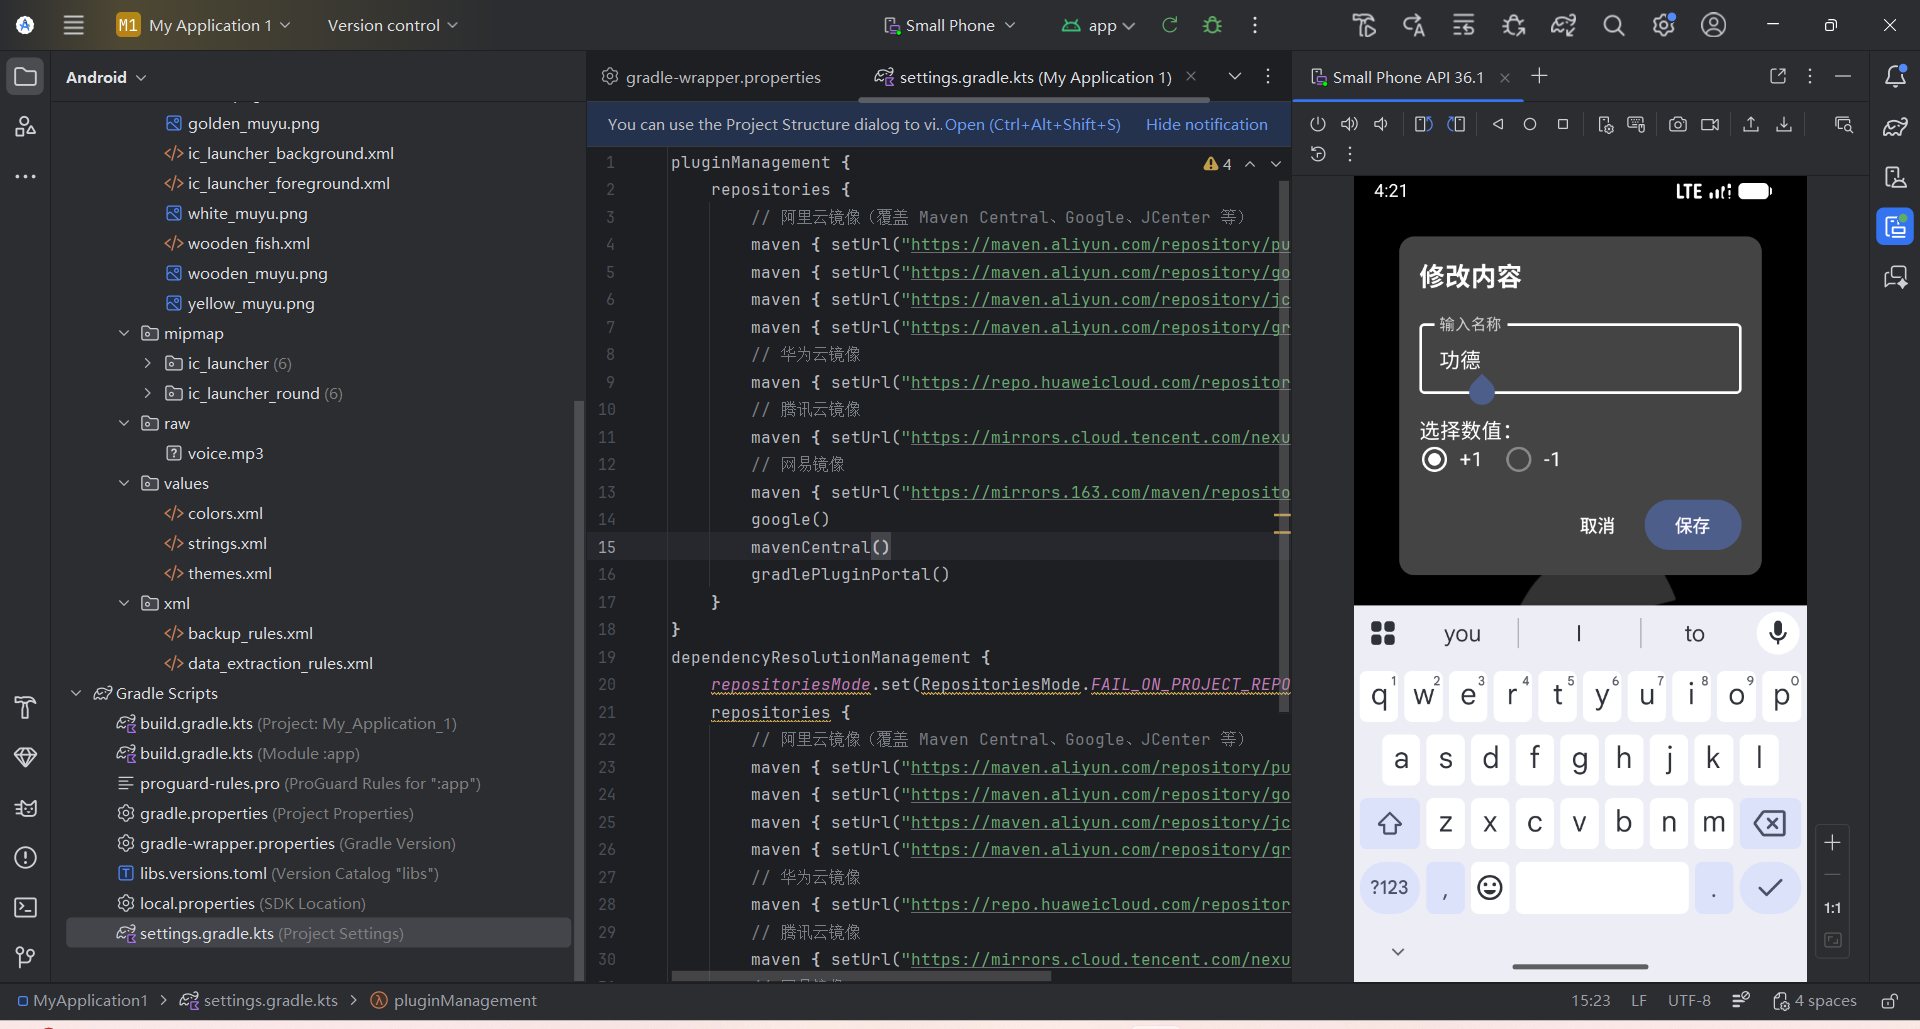
4 Real-device Debugging and Polishing
The emulator is convenient, but it cannot simulate real phone vibration or fully reflect real touch latency. To get the most accurate "feel," we need to install the app on a real Android phone. Below are two connection methods you can choose from:
- Wireless debugging (Wi-Fi): no data cable required, convenient for daily checking. But your computer and phone must be on the same Wi-Fi network.
- USB wired debugging: more stable and less likely to disconnect, suitable when the network is poor or initial installation fails.
4.1 Wireless Debugging
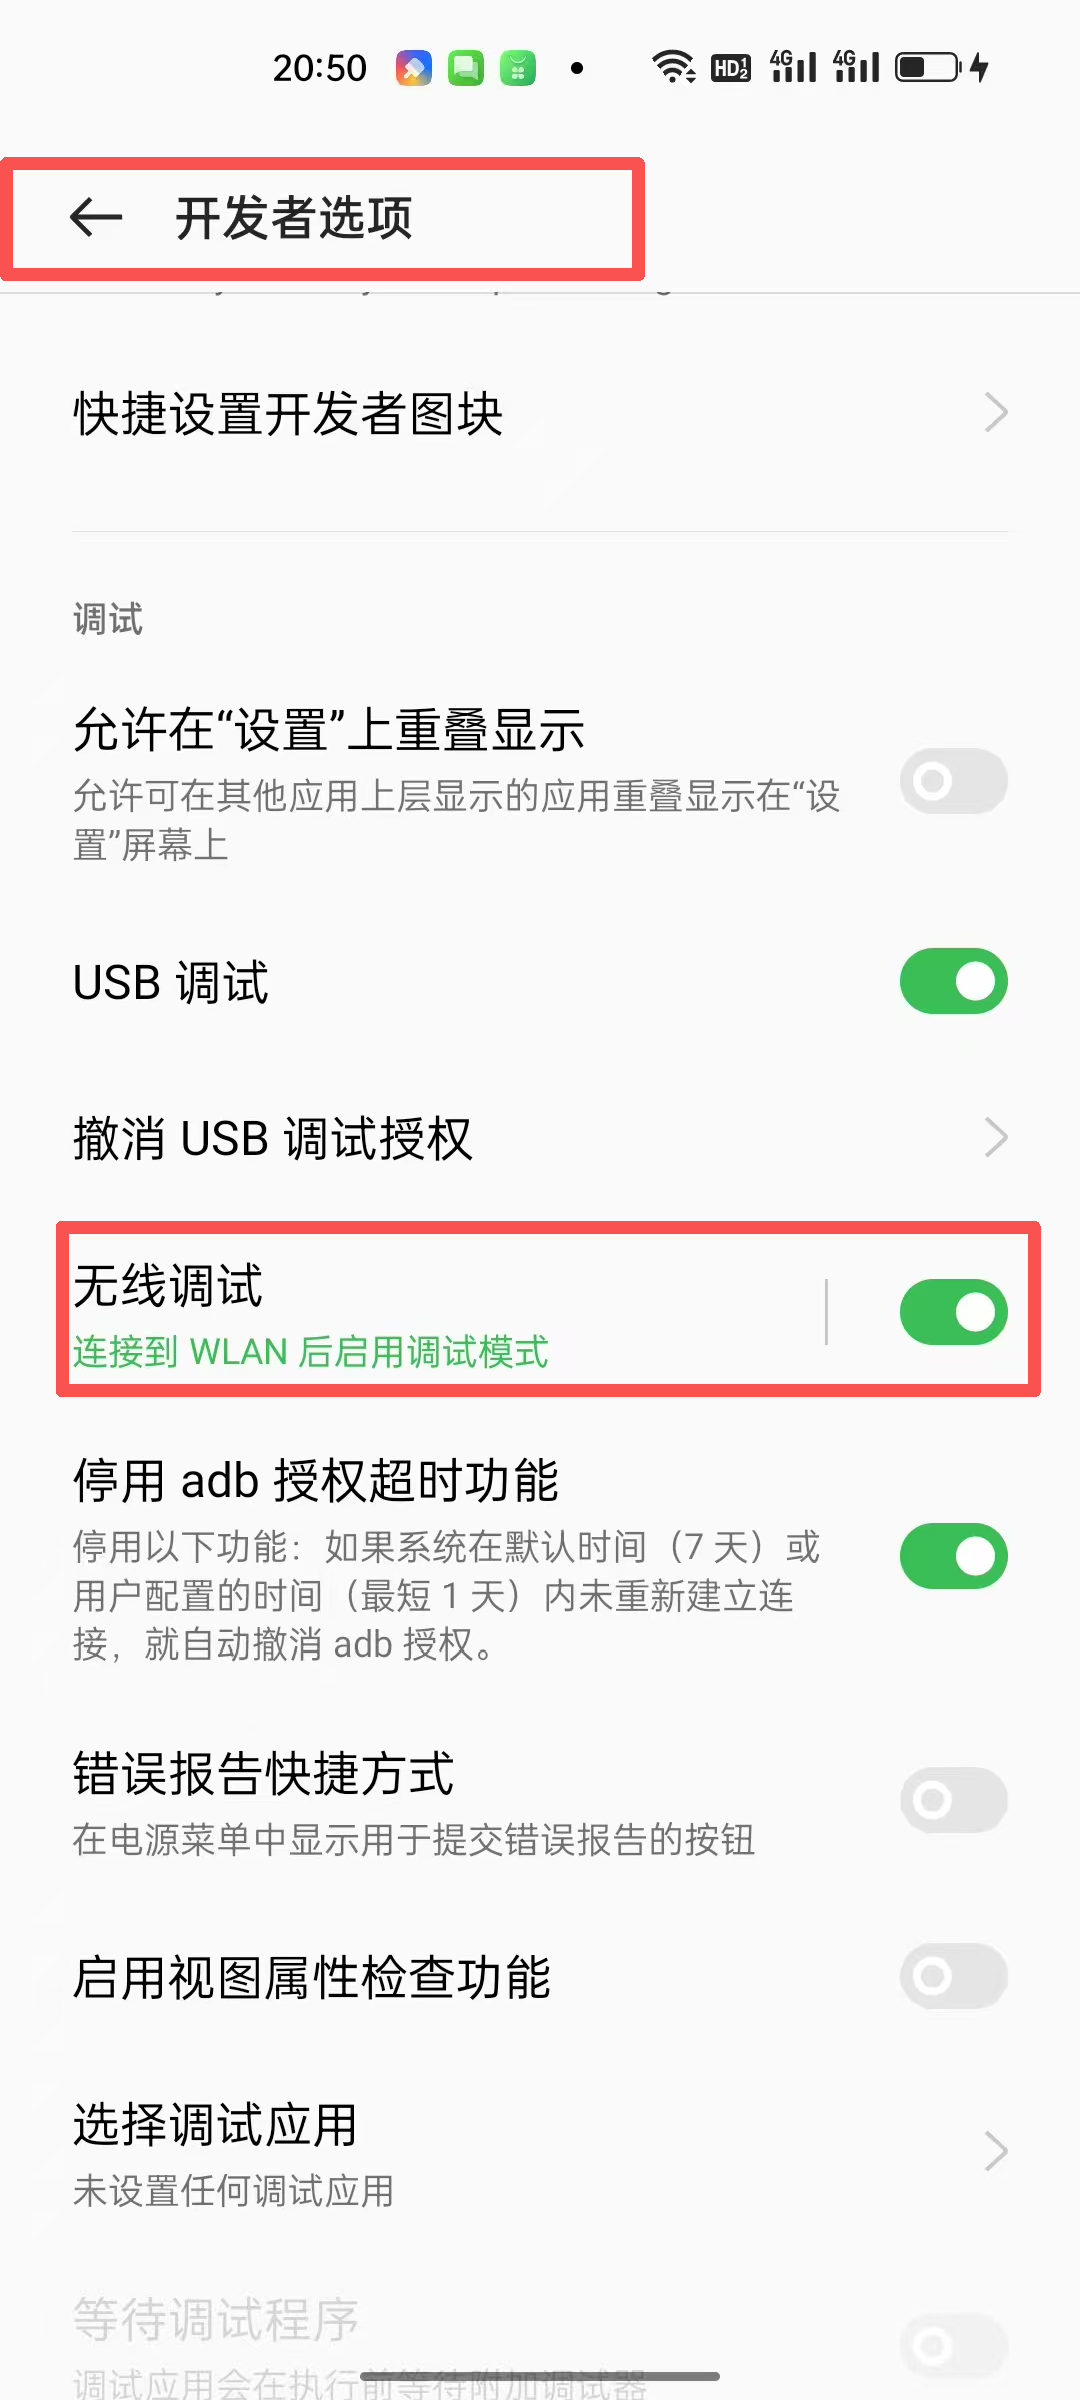
This is the most convenient method on Android 11 and above.
Step 1: Prepare the phone
- Make sure the phone and computer are on the same Wi-Fi.
- Open Developer options and enable Wireless debugging.
- Tap Wireless debugging to enter details, then choose Pair device with QR code. Your phone will open a scanner view.

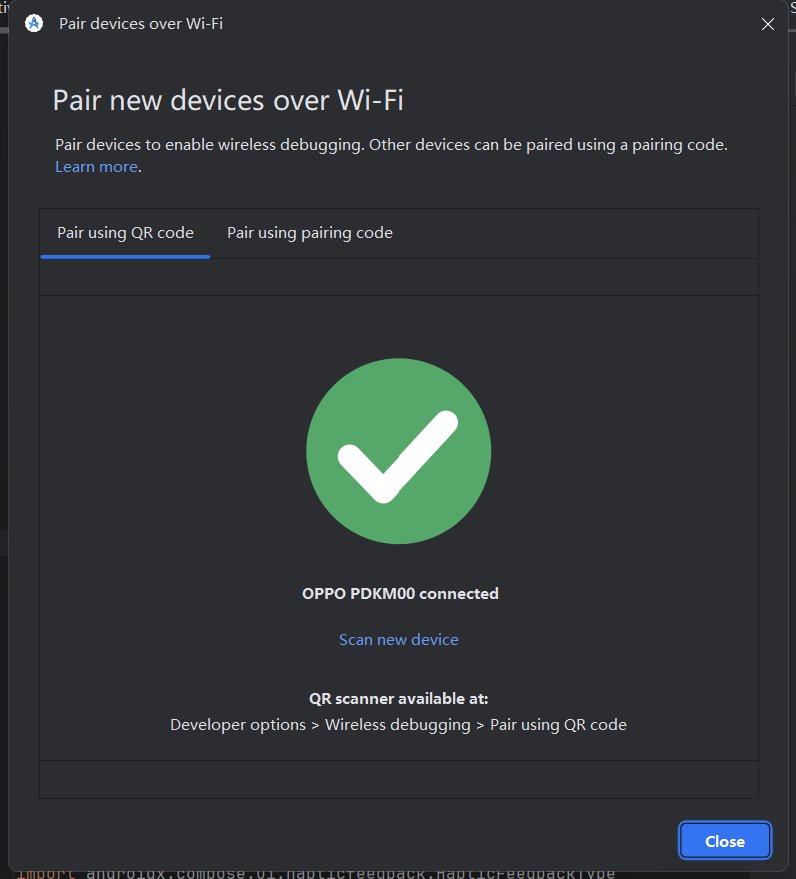
Step 2: Pair on the computer
- Back in Android Studio, click the device selector in the top toolbar.
- Choose Pair Devices Using Wi-Fi from the dropdown.
- A QR code will pop up on screen.

Step 3: Scan to connect
- Use your phone to scan the QR code on your computer screen.
- Both the phone and computer should show "pairing successful."
- At this point, Android Studio's top device bar will automatically display your phone model (for example
Google Pixel 8).
- Run the app by clicking ▶️ Run
4.2 USB Wired Debugging
If wireless connection is unstable, or your network is complicated, plugging in with a cable is always the most reliable solution. Although it is less convenient, it gives the fastest transfer speed and almost never disconnects.
4.2.1 Prepare USB Driver in Android Studio (Windows only)
Mac users can skip this step, because macOS usually recognizes the phone directly. Windows users need to make sure the computer can recognize the Android phone, which usually means installing Google's USB driver:
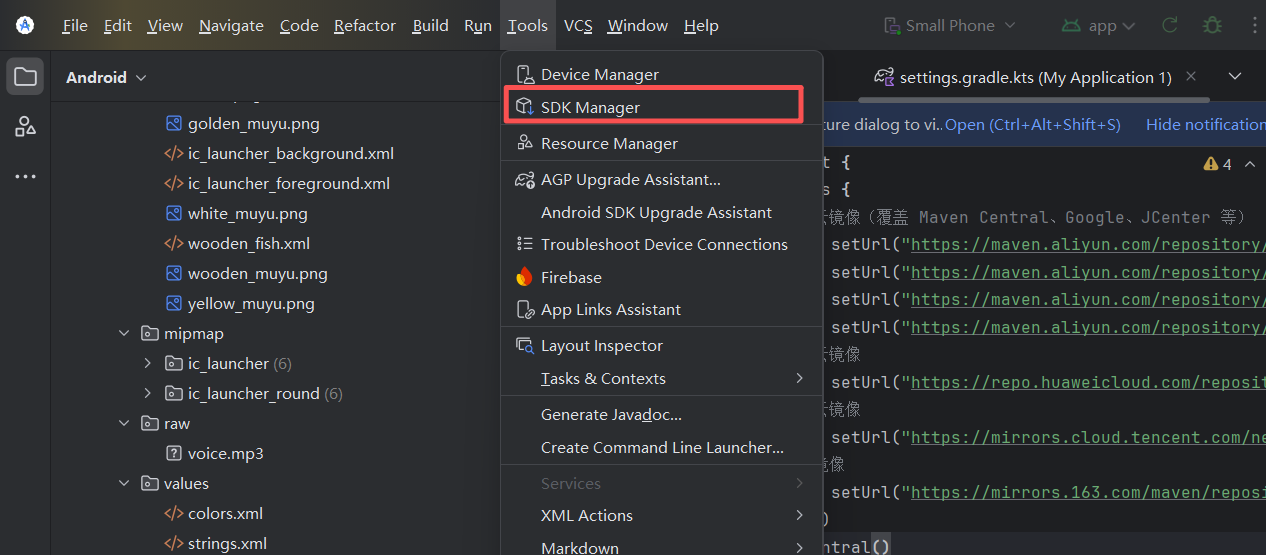
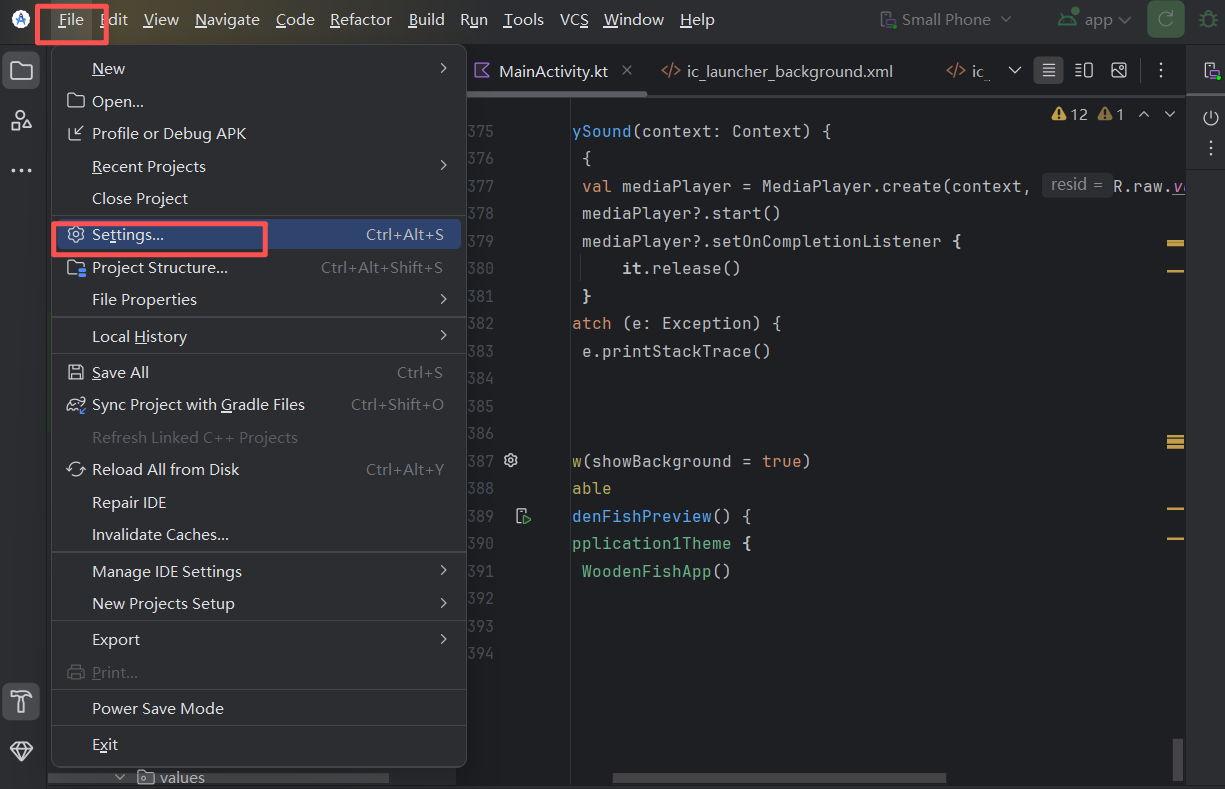
- In Android Studio, click
Tools -> SDK Manager(or find it underSettings -> Languages & Frameworks -> Android SDK) - Switch to the SDK Tools tab
- Check Google USB Driver and click Apply to download and install it

4.2.2 Download the Same SDK Version as Your Real Device
Step 1: Check the phone's Android version
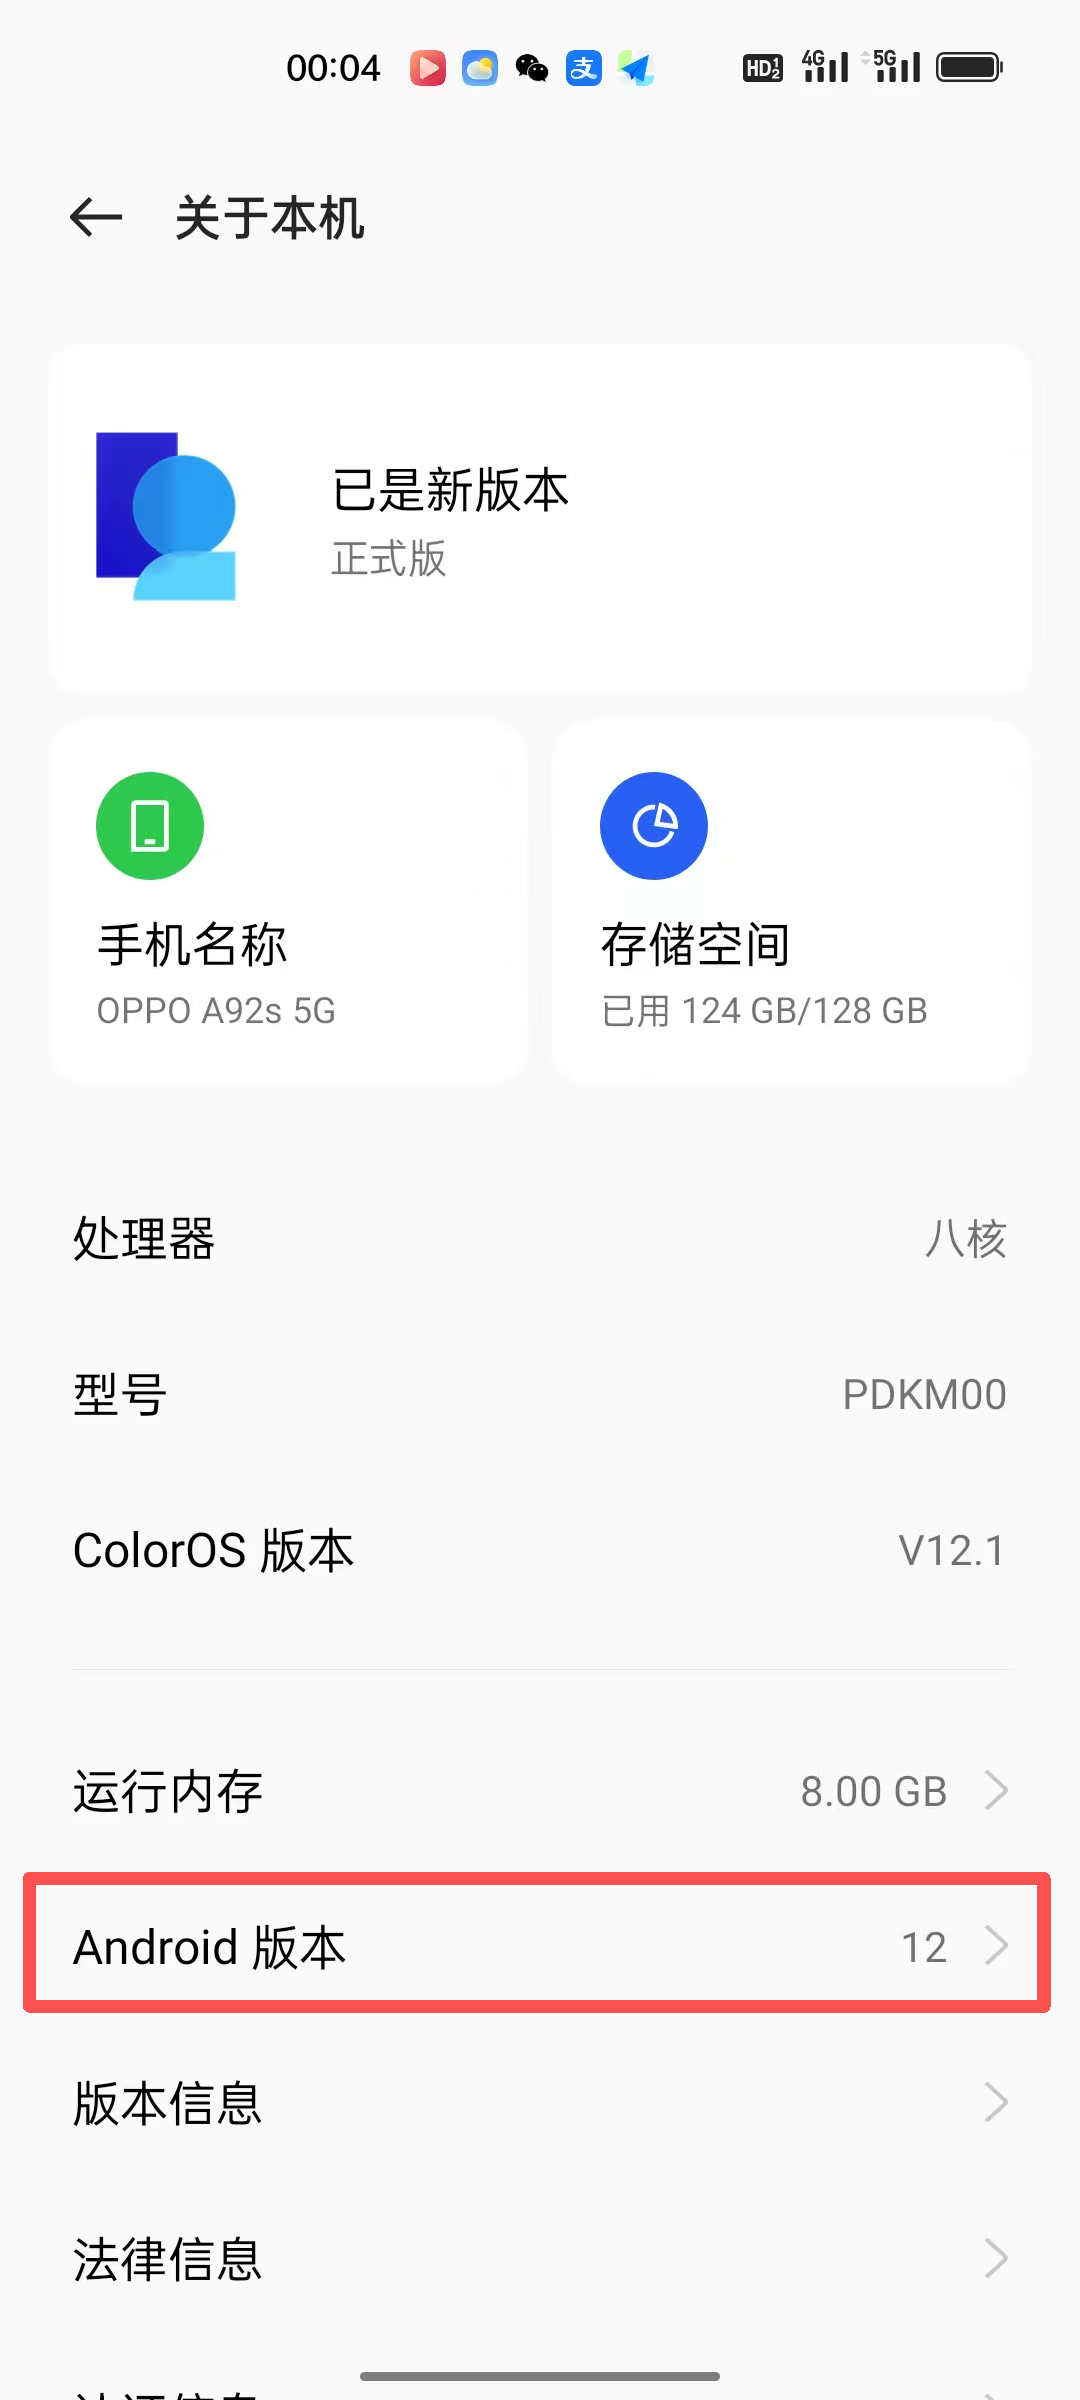
Using an OPPO phone as an example: open Settings -> About phone -> check Android version (in the example it is Android 12).
Step 2: Download that Android platform version in Android Studio
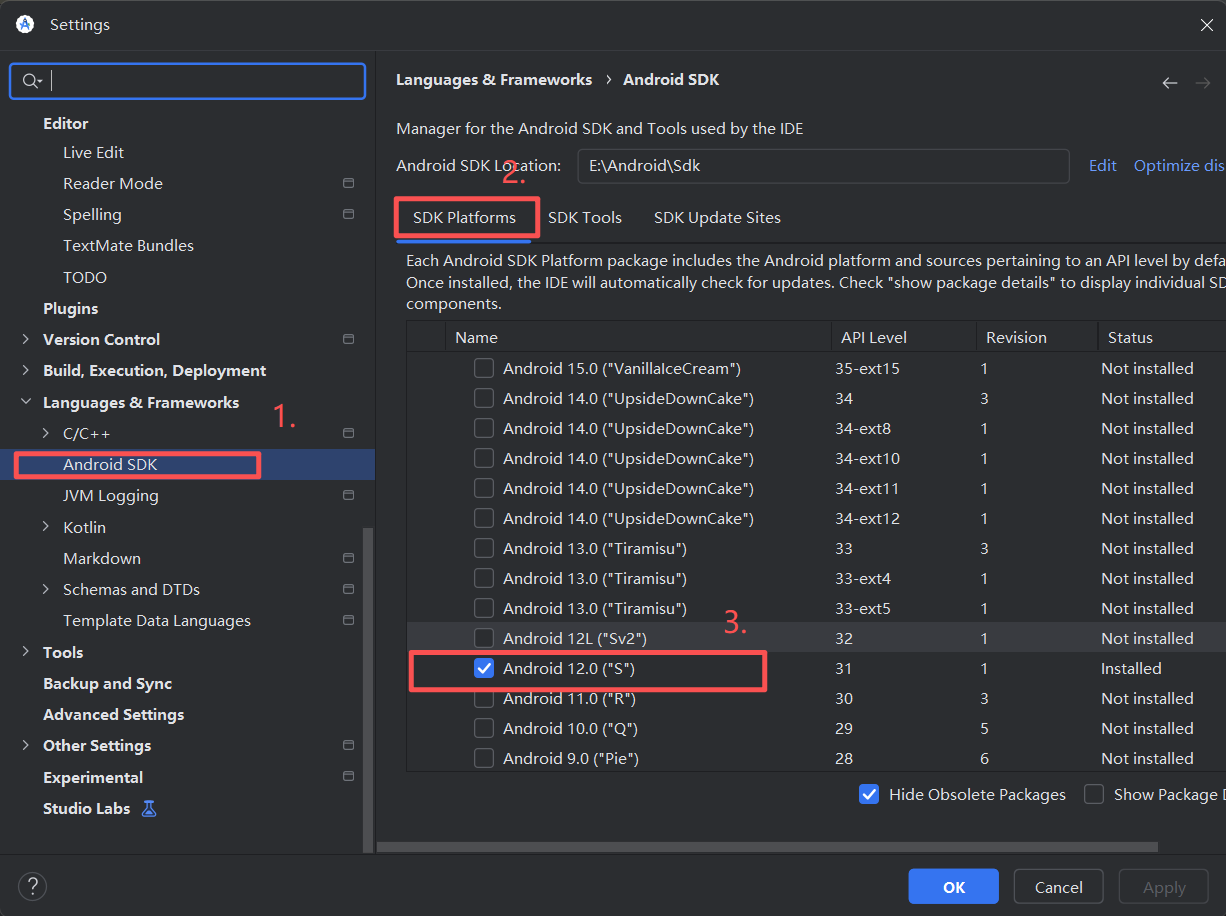
- In Android Studio, click
Tools -> SDK Manager - Stay in the default SDK Platforms tab
- Select Android 12.0 and click Apply to download
4.2.3 Enable Developer Mode on the Phone
Open your phone settings, go into developer options, and turn on USB debugging.

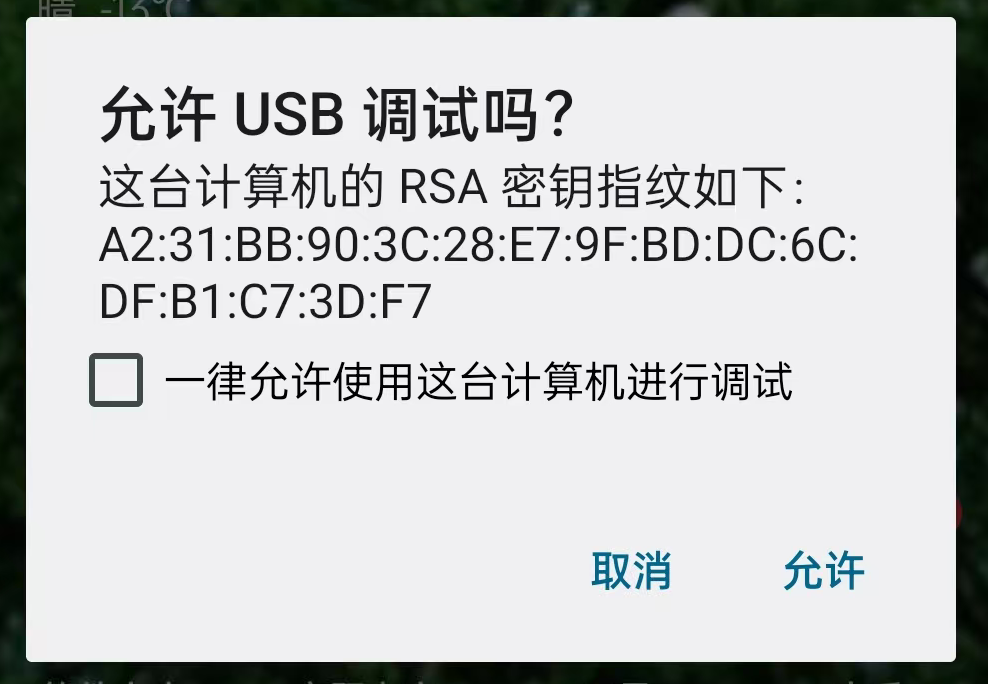
4.2.4 Install the USB Driver Authorization on the Phone
At this point, pick up your phone. It should show an important security dialog: "Allow USB debugging?" Make sure to check Always allow and then tap Allow or OK. This is the key authorization that gives the computer control for debugging.
4.2.5 Run the App on the Phone
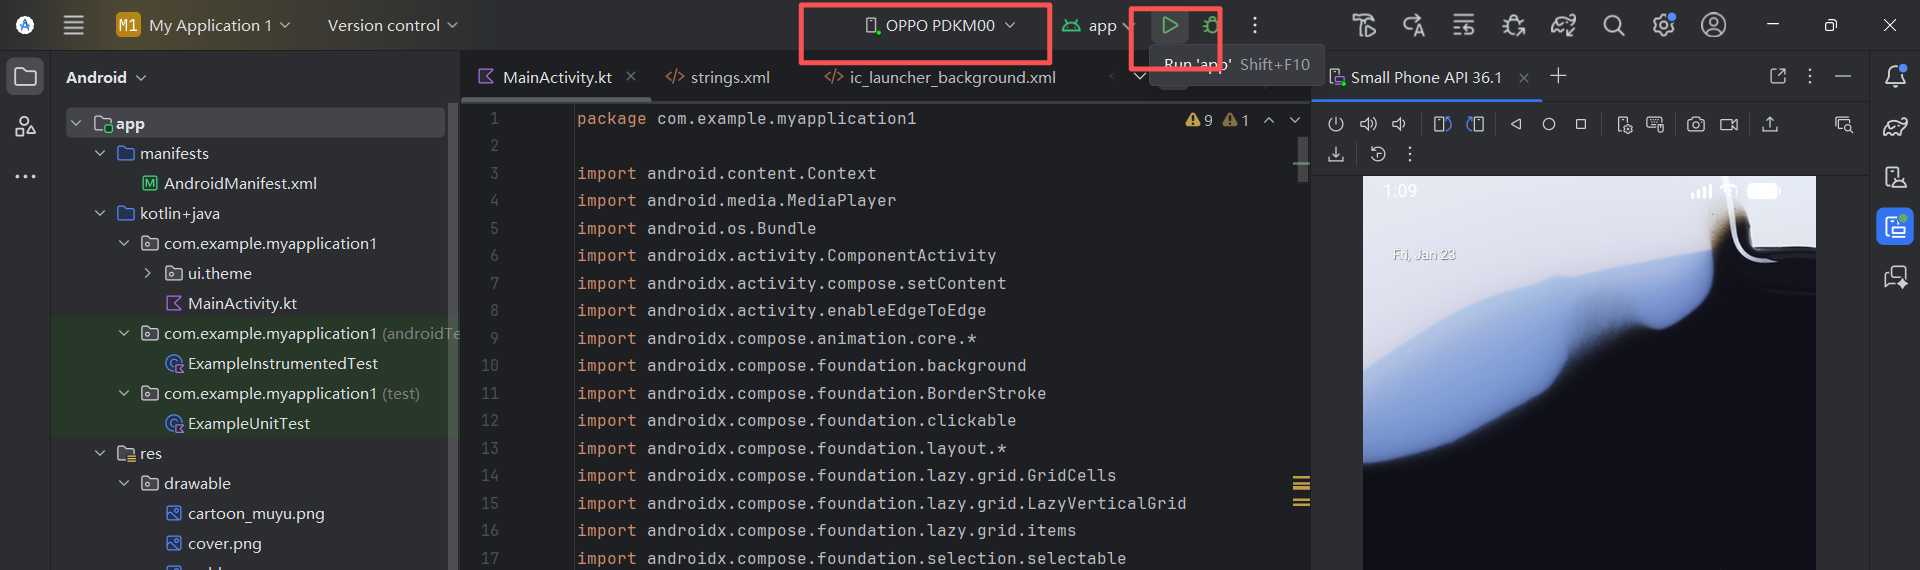
- In Android Studio's top device selector, you should now see your phone model (for example
OPPO-PDKM00) - Click ▶️ Run. Your phone will show the "Allow USB debugging?" dialog; check "Always allow" and confirm
- The app will automatically install and launch
Now try tapping the wooden fish on your phone and feel the real vibration motor response. This is the full Vibe Coding experience.
5 Package the App as APK
The code is done, and the real-device test also works. Now we need to "take the app out" of Android Studio and turn it into a file you can send to friends for installation. This process is called packaging. In Android development, packaging has two completely different modes, and we choose based on the usage scenario.
5.1 Package the Debug Version (for Quick Sharing)
If you only want to share the app with friends for a quick try, or send it to test phones for verification, the Debug version is the fastest option. It is like a "draft" - fully functional, but not formally signed, so it cannot be submitted to app stores.
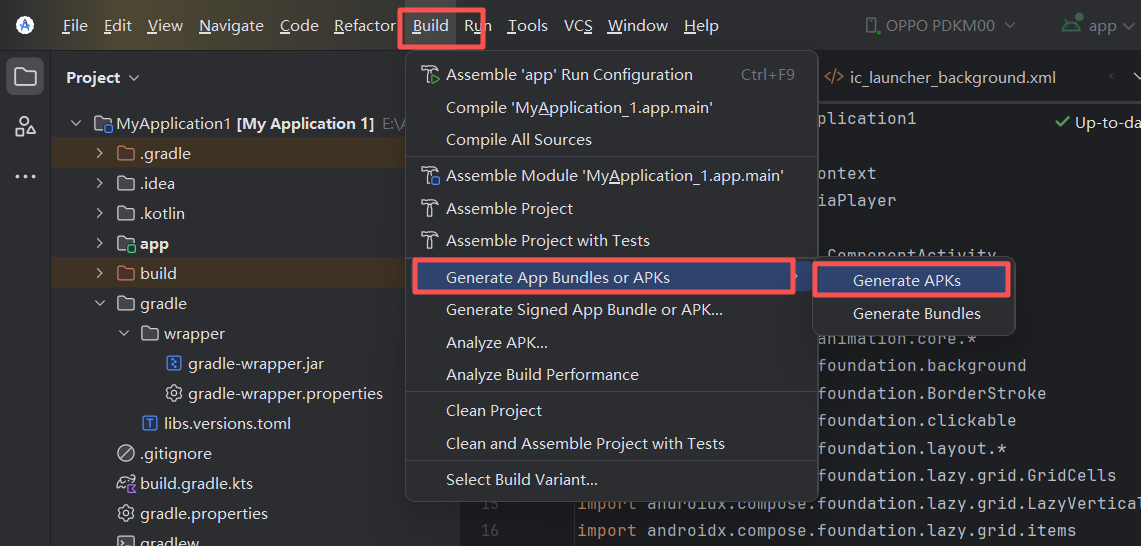
The steps are very simple: in the top menu of Android Studio, find Build, hover over Generate App Bundles or APKs, and click Generate APKs from the submenu.
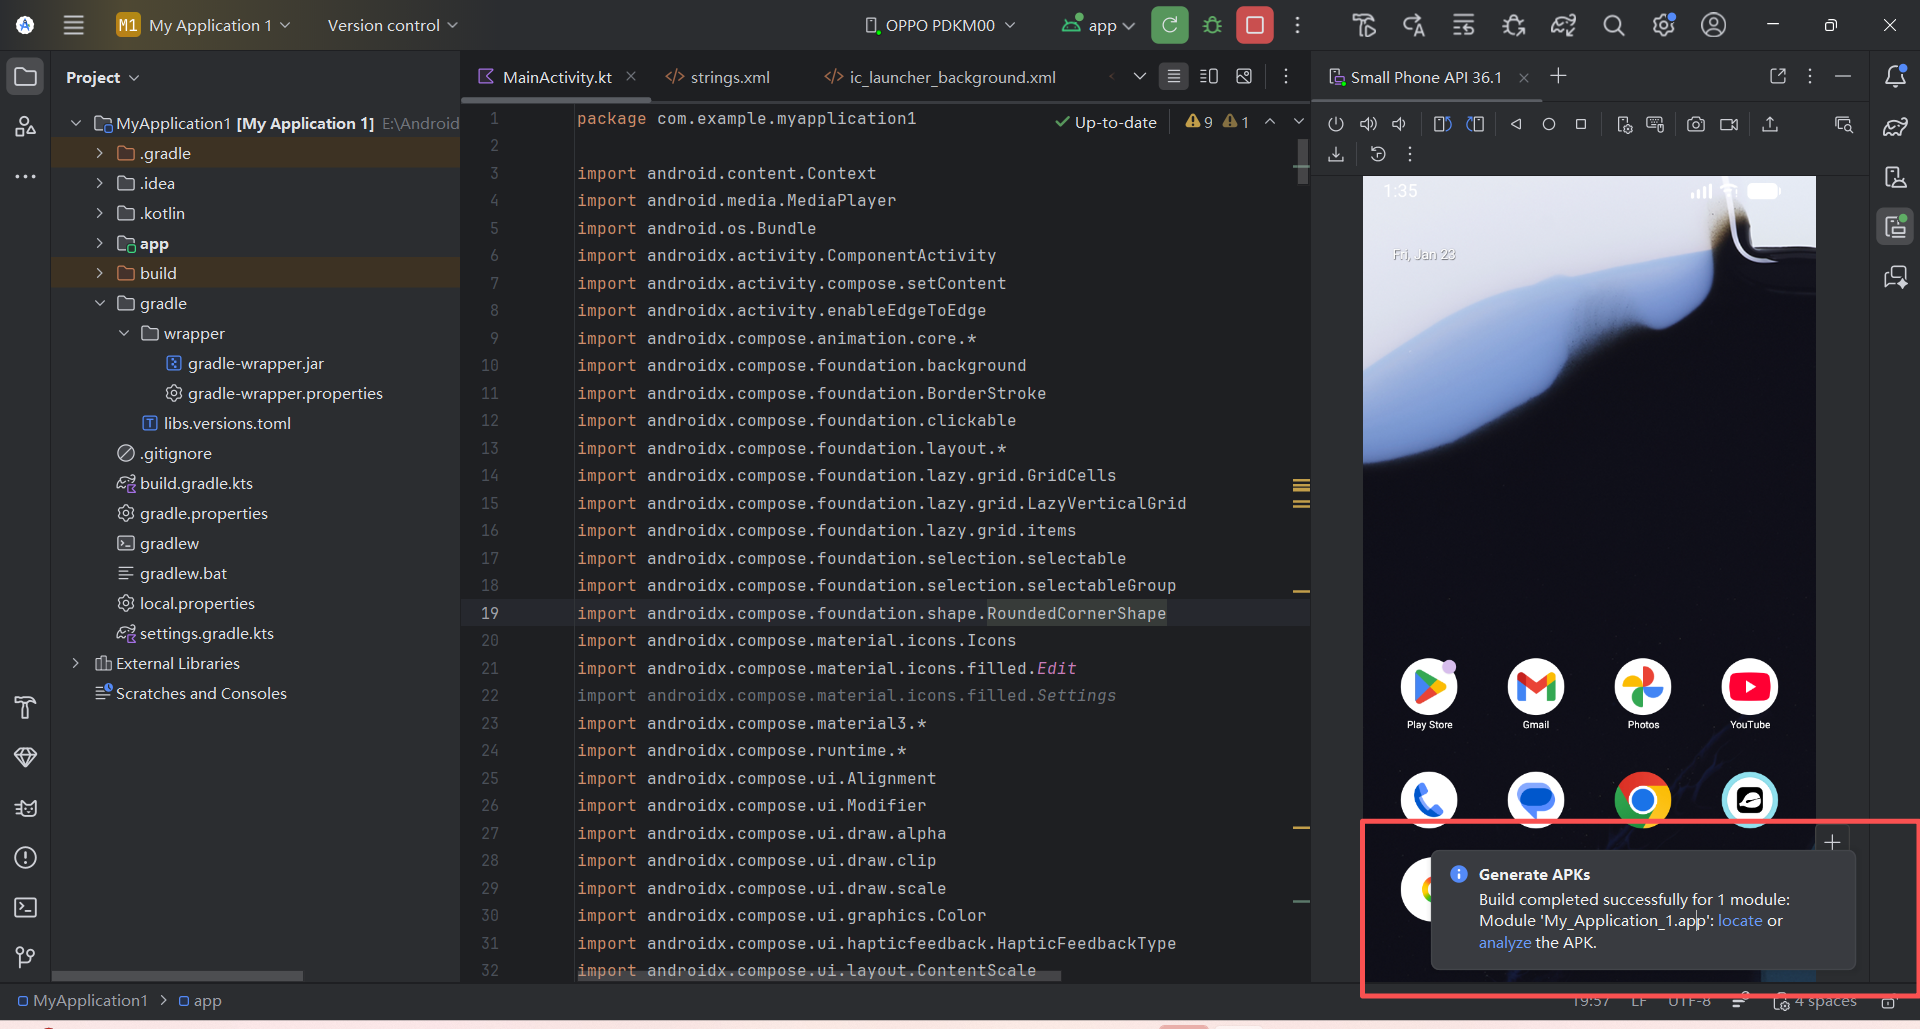
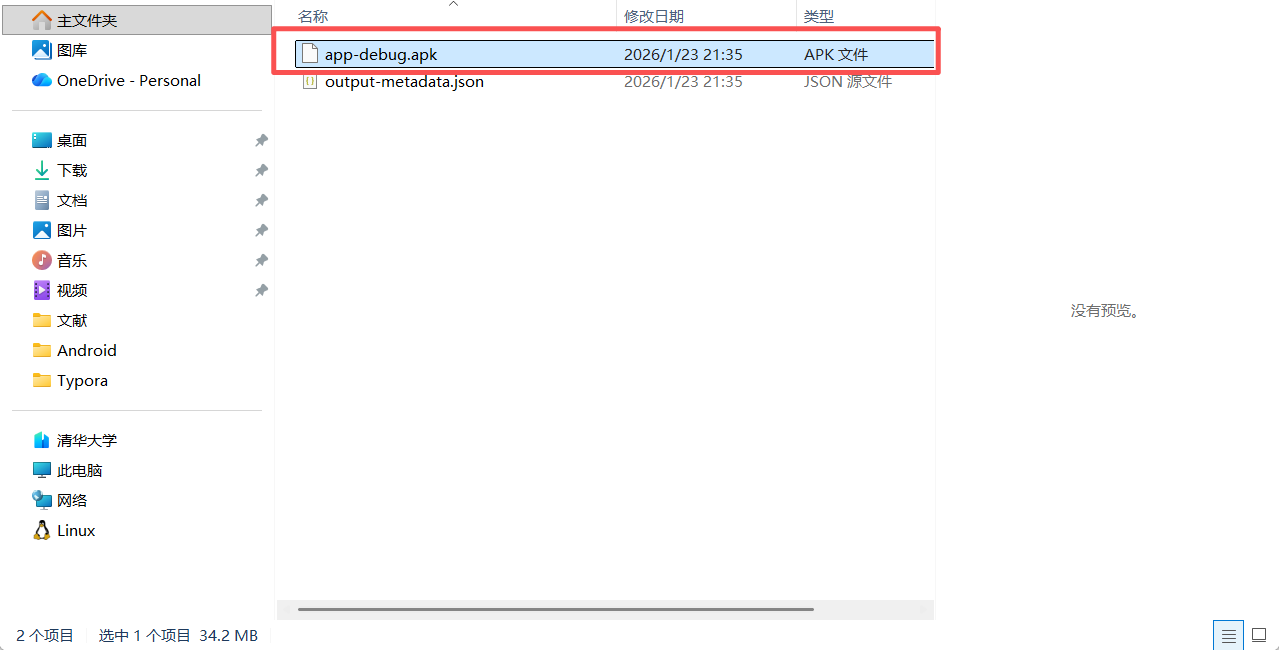
Wait about 5 seconds depending on project size. In the bottom-right console area of Android Studio, a prompt will appear. Click the blue locate link and the output folder will open automatically. The file named app-debug.apk is the package we want.
You can directly send it through WeChat or QQ to any Android phone, and the recipient can install and use it. Note that debug is not a release version.
5.2 Package the Release Version
If you want to publish the app to an app store (such as Google Play or Huawei AppGallery), or avoid the "unsafe app" warning during installation, then you must package a Release version. This version requires a unique digital signature, which is like an anti-counterfeit seal proving that you developed this app and that it has not been tampered with.
Core purpose of signing
- Determine the publisher's identity: because an app with the same package name can replace an installed program, signing prevents that from being abused
- Ensure app integrity: the signing process covers every file in the package, ensuring they are not replaced afterward
Android app signing is like attaching a seal. After the seal is attached, the app and the developer are locked together: the app is yours, and you are responsible for it. Others cannot impersonate you, and you cannot impersonate others.
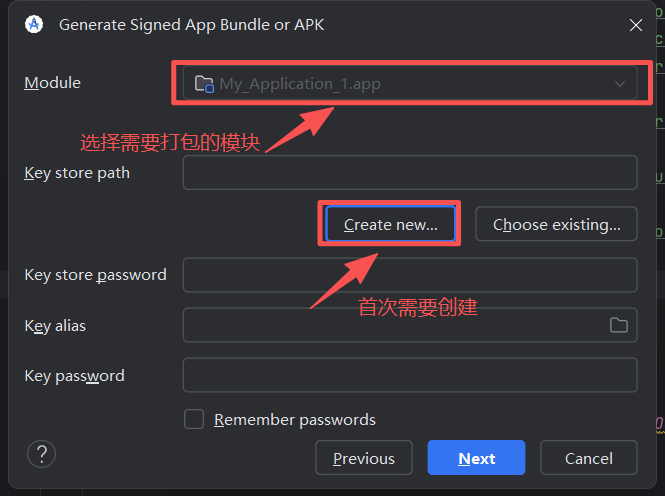
Step 1: Start the signing wizard
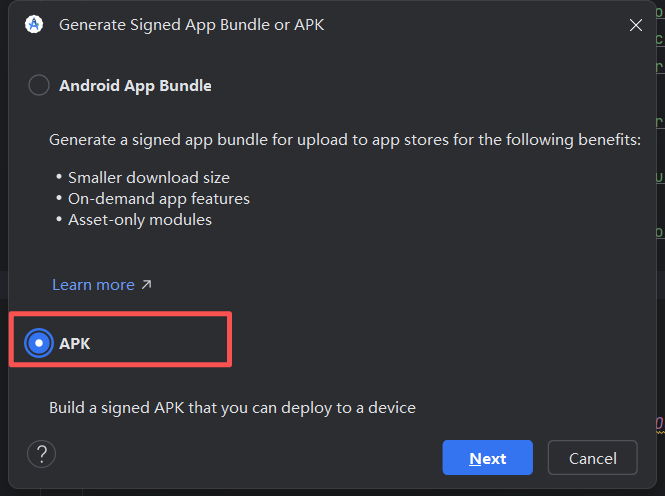
In the top menu, select Build, then click Generate Signed Bundle / APK. In the popup window, you will face two choices:
- Android App Bundle (
.aab): required by Google Play, smaller in size, but cannot be directly installed on a phone - APK: standard install package, can be installed directly
For demonstration, we choose APK first and click Next.

Step 2: Create a digital key (KeyStore)
This is where beginners get stuck most often. Because this is your first release packaging, you need to create a new keystore. Click Create new below Key store path.
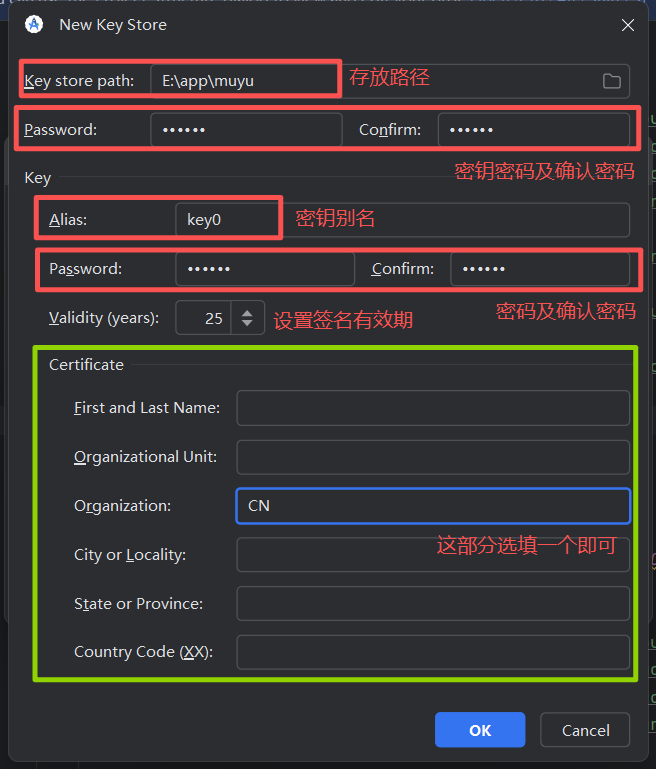
In the popup, fill in the required information, similar to registering an account. We strongly recommend that the keystore password and key alias password be the same, and that you write them down carefully. If you lose this password, your app can never be updated again in the future.
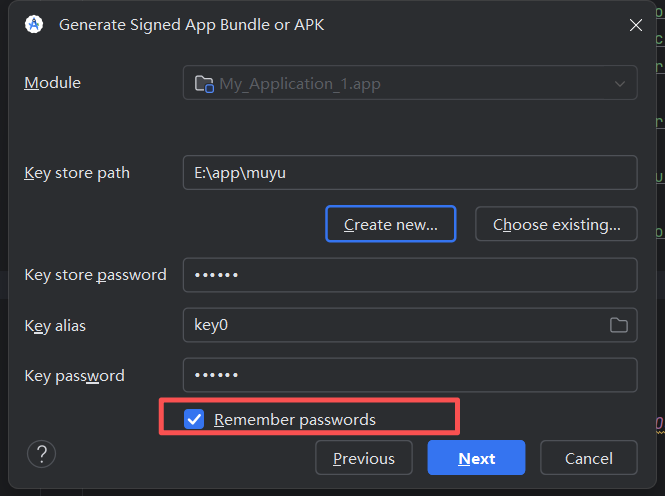
After finishing, click OK. You will return to the previous screen, and the key information you just filled in will already be populated automatically.
Step 3: Generate the formal package
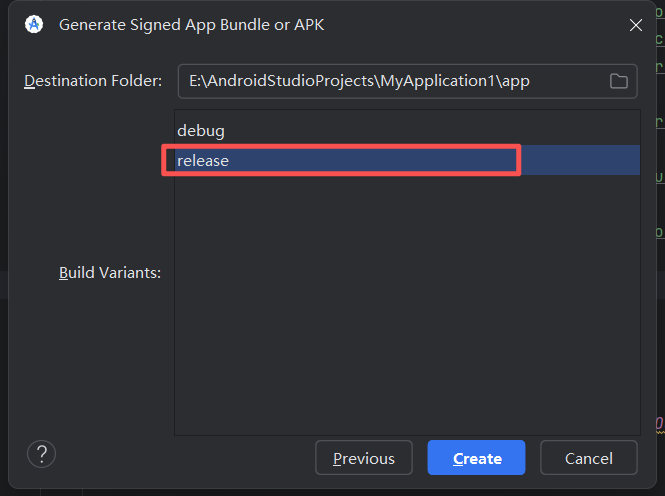
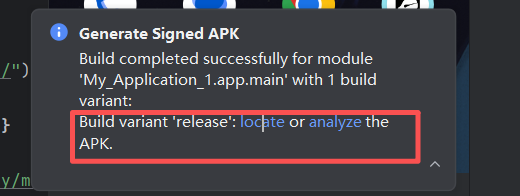
Click Next, choose release under Build Variants, and finally click Create.
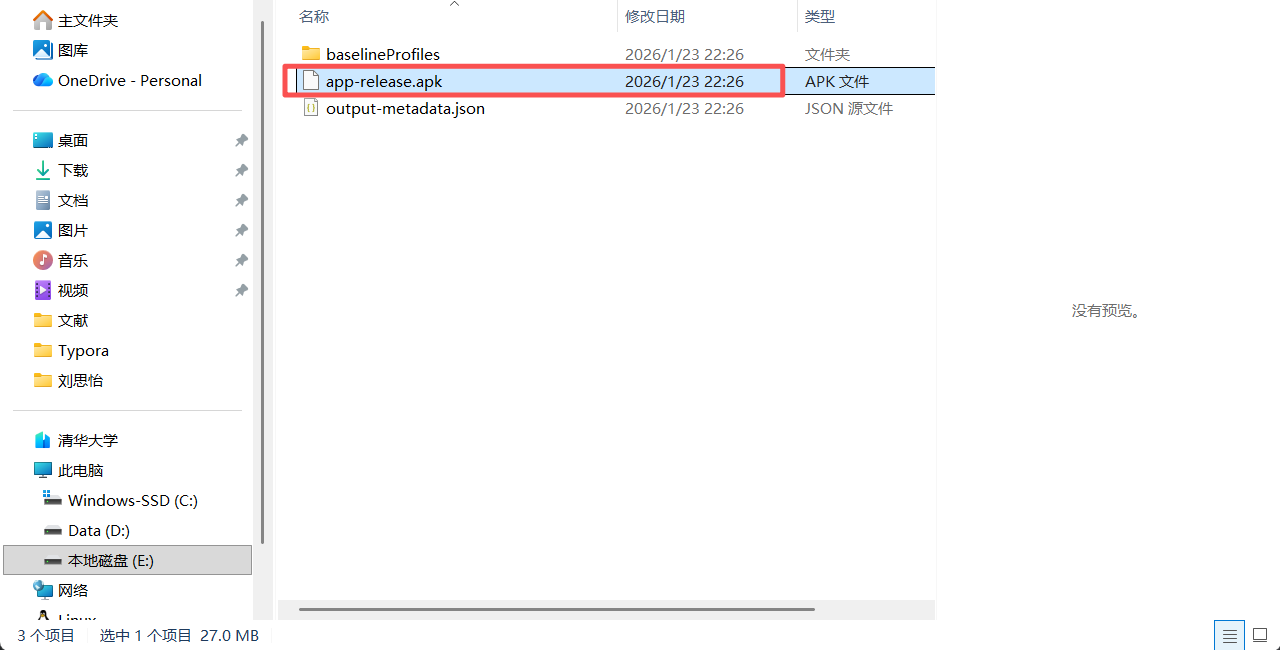
After a short wait, Android Studio will again show a "Generate Signed APK" success prompt in the bottom-right corner. Click locate, and this time you will see the digitally signed formal package in the folder (usually named app-release.apk). This file is the final product you deliver as a developer.
6 Official Release to App Stores / Markets
When your app development is finished and the Release package is ready, the next step is to publish it so more people can download and use it. Right now, the main distribution channels are divided into two categories: domestic Android app stores and overseas app stores (Google Play).
6.1 Publish to Domestic Markets
The Android ecosystem in mainland China is special. There is no single official store (because Google Play is not directly accessible). Instead, the market is split between phone-maker app stores and third-party platforms. The major manufacturer stores include Huawei, Xiaomi, OPPO, vivo, Meizu, Samsung, etc. Since they are preinstalled on devices, they have the largest traffic. The main third-party platforms include Tencent MyApp and 360 Mobile Assistant.
6.1.1 The Core Difficulty: The "Roadblock" for Individual Developers
Before registering an account, there is one very important thing you must know: domestic app markets are very strict with individual developers.
At present, almost all major domestic app stores (Huawei, Xiaomi, OV, MyApp, etc.) require a Software Copyright Registration Certificate for submission.
- What is it? It is a legal document proving that the app belongs to you.
- Cost to obtain it: you need to apply through the copyright bureau. Doing it yourself usually takes 2-3 months; using an agency for faster processing may cost from several hundred to over a thousand RMB.
- Current reality: without this certificate, your app will very likely fail review, or you may not even be able to create the app entry. In addition, categories such as news, finance, and healthcare may also require ICP filing or other qualifications.
So if your app is just a personal practice project or small tool, and you do not want to spend time and money applying for this certificate, I suggest jumping directly to Section 6.2 and considering Google Play instead, or simply sharing the APK file with friends directly.
6.1.2 Register a Developer Account
If you have already prepared the required qualifications, or have decided to publish in domestic markets, the first step is account registration. The process is similar across major platforms, usually requiring ID verification for individuals or business license verification for companies.
Below are the developer platform URLs for major app markets:
Tencent Open Platform: https://open.tencent.com/
360 Open Platform: http://dev.360.cn
Baidu Developer Platform: http://app.baidu.com
Xiaomi Open Platform: https://dev.mi.com
Huawei Developer Alliance: http://developer.huawei.com/consumer/cn
Alibaba Developer Platform: http://open.uc.cn
Alibaba distribution integrates Wandoujia, Ali Jiuyou, PP Assistant, UC App Store, Shenma Search, and YunOS App Store. You only need to register one Alibaba developer account.
Samsung Developer Platform: http://support-cn.samsung.com/App/DeveloperChina/Home/Index
OPPO Developer Alliance: http://open.oppomobile.com
vivo Developer Alliance: https://dev.vivo.com.cn
Lenovo Open Platform: http://open.lenovo.com
Meizu Developer Alliance: http://open.flyme.cn
Gionee Developer Alliance: https://open.appgionee.com
Using Tencent MyApp as an example: visit the Tencent Open Platform and click register. It is recommended to log in directly with a QQ account. Note that once a QQ account is bound, it is difficult to unbind, so it is better to use a dedicated work QQ account. Follow the prompts, choose "Individual Developer" or "Enterprise Developer," upload your ID photos, and complete face verification. After passing verification, click Create App to start.
6.1.3 Submission Flow and Required Materials
After account review is approved, you can create the app and submit it for review. You need to prepare the following "four-piece set":
- Installation package: the Release APK packaged in Chapter 5
- Text information:
- App name: must not contain sensitive words
- One-line intro: within 20 Chinese characters, simple and direct (for example: "A relaxing electronic wooden fish app")
- Detailed description: 200+ Chinese characters introducing the app's functions and usage scenarios
- Visual materials:
- App icon: high-definition PNG, usually 512x512
- App screenshots: prepare 4-5 clear screenshots of the app in use, preferably covering the main pages, usually in consistent size such as 1080x1920
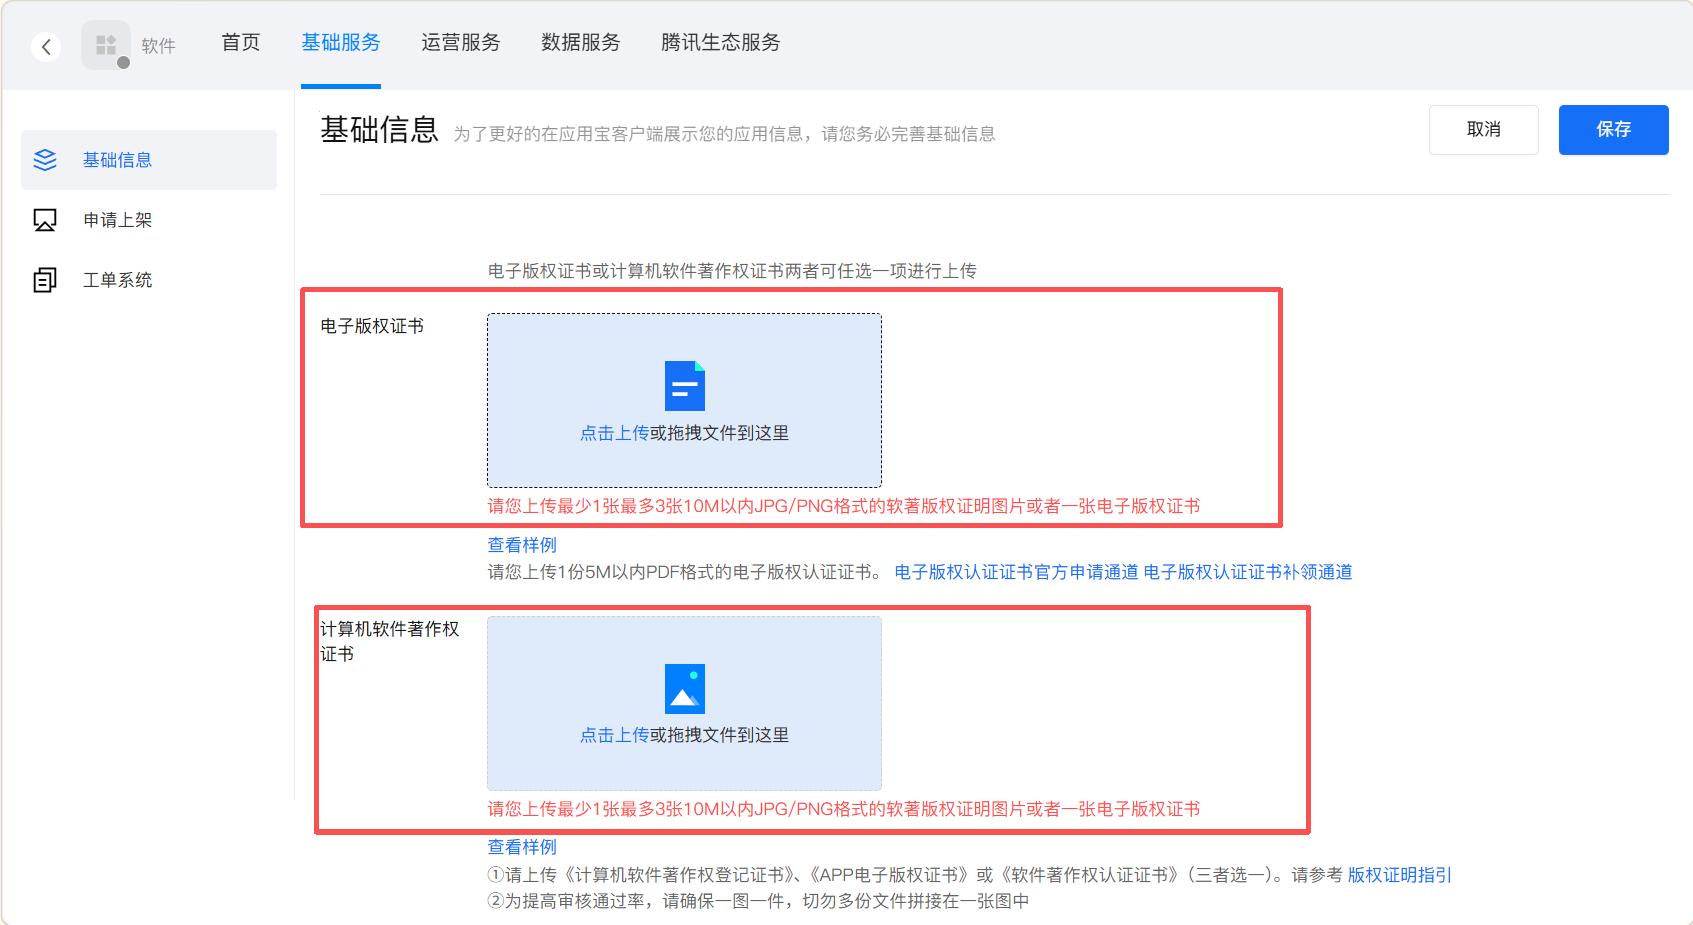
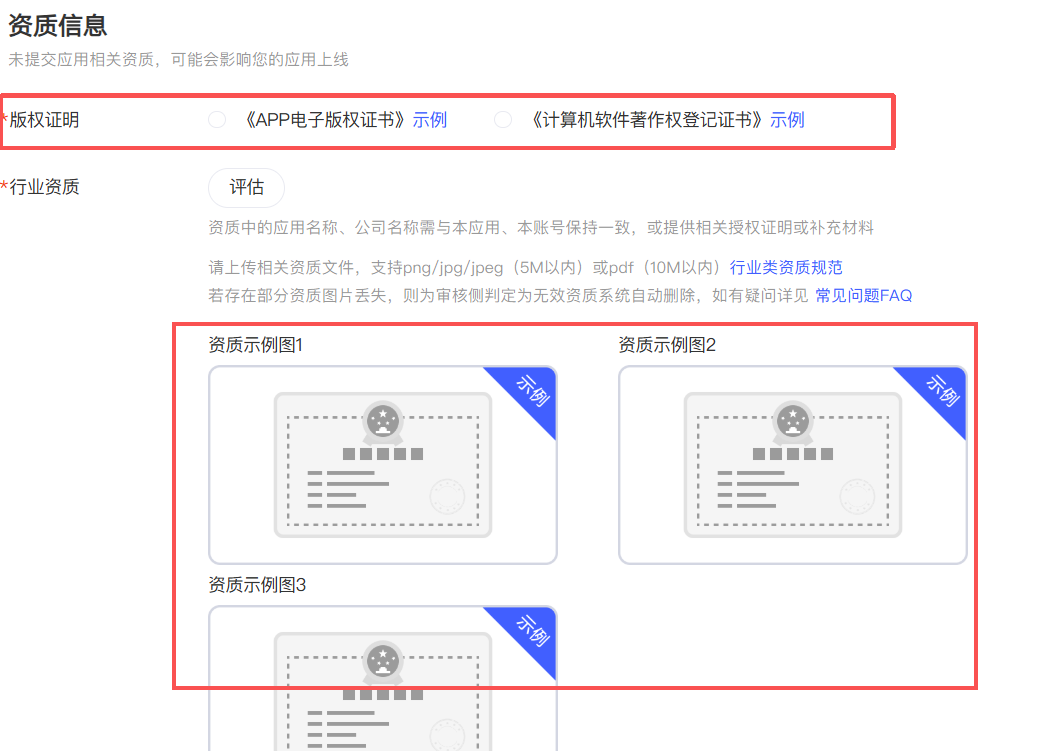
- Qualification document: upload a scanned copy of your Software Copyright Registration Certificate
Submission and review: after filling in all information and uploading the APK, click Submit for Review. The review cycle is usually 1-3 business days. During that period, pay attention to email or SMS. Reviewers may reject the submission because screenshots are unclear, descriptions are not standardized, or required qualifications are missing. In that case, you revise according to the feedback and resubmit.
6.2 Publish to Overseas Market (Google Play)
If you do not want to deal with the complexity of software copyright certificates and filings in domestic app stores, or if your target audience is global, Google Play is the best choice for individual developers.
6.2.1 Preparation
- Google account: a normal Gmail account is enough
- $25 registration fee: this is a one-time lifetime fee, and requires a credit card that supports USD payments (Visa / Mastercard)
- Reliable network access: you need to be able to access Google Play Console smoothly
- Formal installation package: note that Google Play requires the .aab (Android App Bundle) format, not APK. In Android Studio, choose Android App Bundle during packaging. The steps are almost identical to packaging APK.

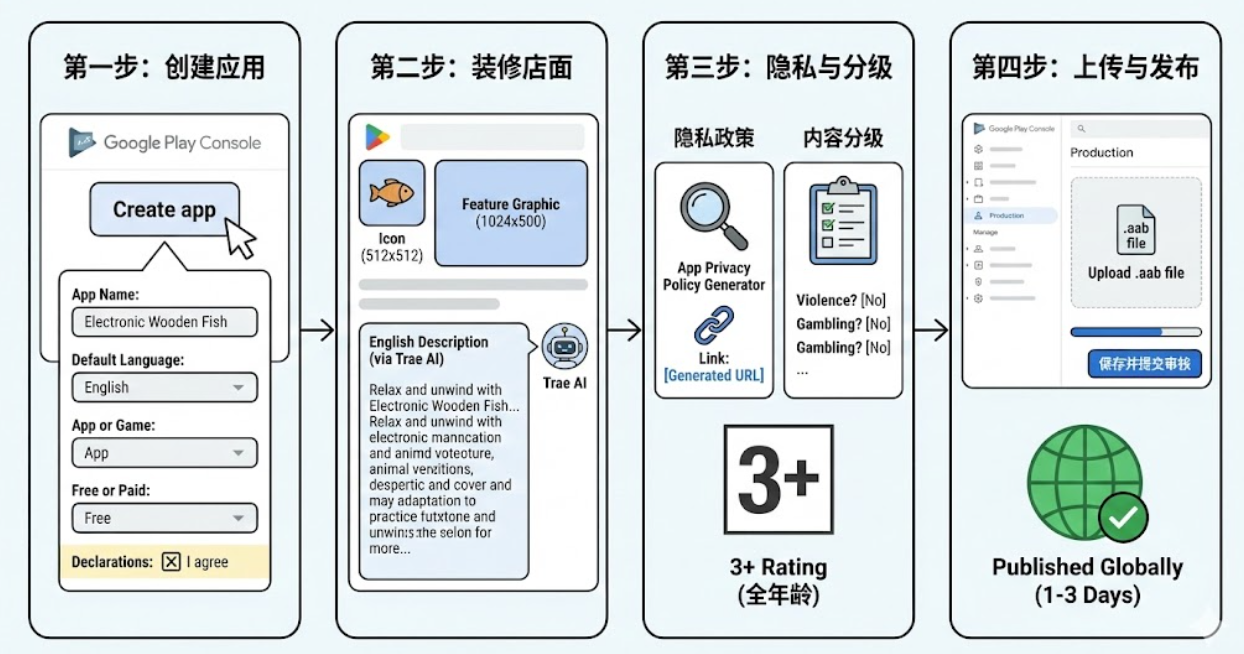
6.2.2 Google Play Console Release Process (Overview)
Because Google Play registration and payment still have some entry barriers (such as the need for an overseas credit card), this tutorial does not currently provide step-by-step screenshots. But here is the common four-step process:
Step 1: Create an app and enter the console
Click Create app, fill in the app name (Electronic Wooden Fish), choose English as the language, choose App and Free as the app type, then check the agreement. After that, you will have access to the backend.
Step 2: Decorate the store page
This is the user's first impression. You need to upload the prepared app icon (512x512) and a feature graphic (1024x500). As for the English description, you can simply ask Trae: "Please help me write an English description for publishing Electronic Wooden Fish on Google Play, in a light and relaxing tone." AI usually writes it more naturally than a direct translation.
Step 3: Privacy and content rating
- Privacy policy: search for "App Privacy Policy Generator" and generate a free link to paste in
- Content rating: fill out a simple questionnaire (for example, whether there is violence or gambling). Electronic Wooden Fish usually gets a general 3+ rating.
Step 4: Upload and publish
Under the Production menu, click Create new release, upload your .aab file, save, and submit for review. Google Play review is usually fast (1-3 days). Once approved, your app can be downloaded worldwide.
If you have already completed developer account registration, this video tutorial can guide you through the rest of the process: Android应用上传GooglePlay谷歌市场全流程教程
7 Final Notes
That brings us to the end of the tutorial. Looking at the Electronic Wooden Fish you personally created on your phone, I wonder how you feel now.
As someone trained in software engineering, I actually feel quite emotional in today's fast-developing AI era. In the past, we worked through thick programming books, learned complex syntax, struggled with environment setup, and spent half of our day fighting red error messages. But times have changed, and now we are increasingly learning how to direct AI.
Through this Vibe Coding practice, you have already experienced the full Android app development process. The technical barrier is indeed getting lower. We no longer need to grind through dry code all the time, and can spend more energy on deciding what to build. But no matter how strong the tools are, they are still just tools. Do not let this app gather dust on your phone. Keep tinkering with it, break it and fix it again. Only when you start having your own ideas and bringing them to life do you truly cross the threshold.
If this tutorial helped you feel that "building an app is not actually that hard," then I am honored to have helped bring one more new-generation builder into the development world.
I am really looking forward to your next creation. Keep going!
Hope you have fun in the world of Android development!
References
CSDN: (2024.03.04)如何打包Android Studio项目?
CSDN: Android Studio安装及配置