00-Environment
Unified environment baseline · ROCm 7.14.0 (TheRock) · Prerequisite for all subsequent chapters
Introduction
This chapter serves as the environment baseline for the entire hello-rocm project. It targets ROCm 7.14.0 (ROCm Core SDK, released 2026-07-15) and covers installation, verification, and uninstallation on both Windows and Ubuntu.
All subsequent chapters (01-Deploy, 02-Fine-tune, etc.) depend on this setup. To use a different ROCm version or GPU architecture, refer to the GPU Architecture Reference Table for substitutions.
🚀 Milestone release: ROCm officially transitions to TheRock. 7.14.0 is the most significant architectural shift since Windows / pip support arrived in 7.10.0, moving ROCm from a "monolithic bundle" toward a "modular ecosystem":
- Leaner core: the Core SDK keeps only essential runtime and development components;
- Use case-specific expansions: optional domain SDKs for AI, data science, and HPC;
- Modular installation: install only the components your workflow needs — smaller footprint, faster innovation.
This has no impact on this project's pip / uv install flow (wheels are still distributed from
repo.amd.com/rocm/whl/). If you use the Linux apt / dnf system-package path instead, note the changes to package names and install directory (see Section 2.5 · apt Install (TheRock)). See the TheRock transition guide for details.
💡 Platform recommendation: Windows supports ROCm for quick inference and experimentation, but the full ROCm toolchain (rocminfo, amd-smi, multi-GPU, containerized deployment, etc.) is best supported on Ubuntu. We recommend Ubuntu 24.04 as the primary development environment; Windows works well for lightweight inference and quick testing.
⚠️ Windows users must read: Before installation, verify that your Adrenalin Driver version and Windows version meet the requirements (see version table below), or ROCm will not function.
Version Requirements
| Item | Requirement | Download |
|---|---|---|
| ROCm | 7.14.0 (ROCm Core SDK / TheRock) | Official install page |
| PyTorch | 2.12.0 | Via uv (see below) |
| Python | 3.11 / 3.12 / 3.13 / 3.14 | Managed by uv |
| Windows Version | 11 25H2 | — |
| Adrenalin Driver (Windows) | 26.5.1 | ⬇️ Download Adrenalin 26.5.1 |
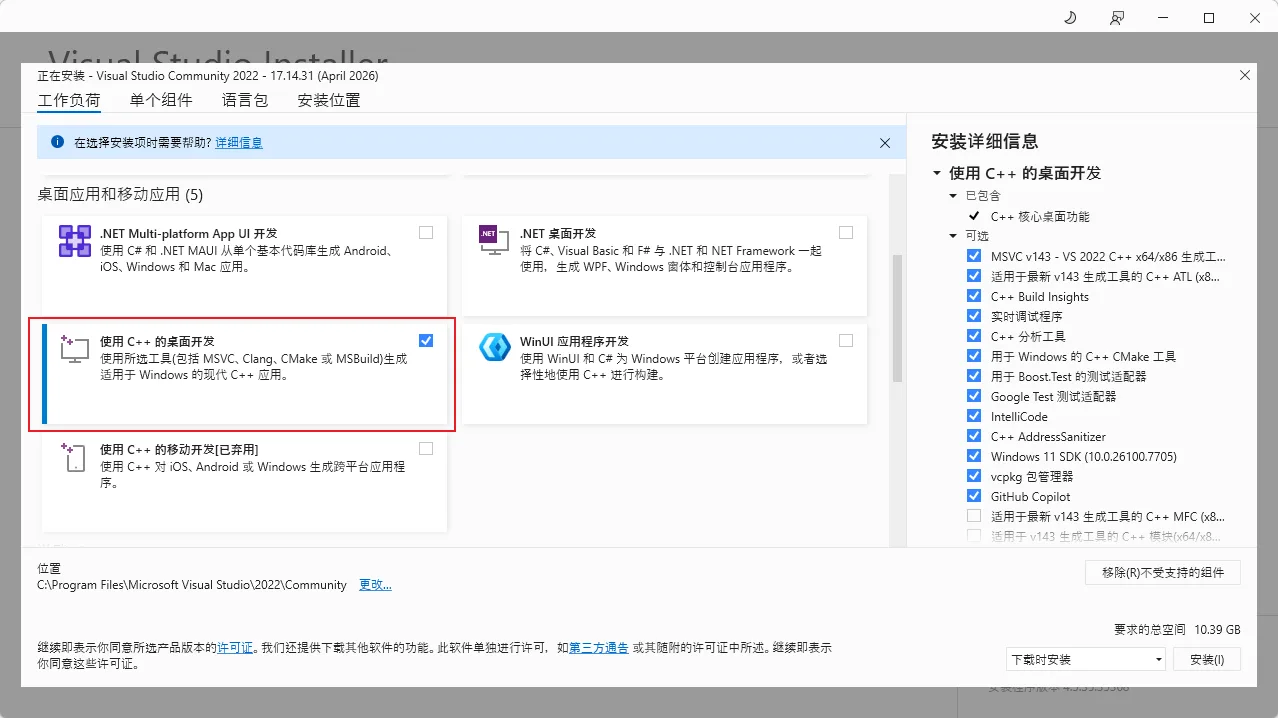
| Visual Studio 2022 (Windows) | Community, select "Desktop development with C++" | ⬇️ Download VS 2022 |
| Ubuntu | 24.04.4 (GA kernel 6.8) / 26.04 (GA kernel 7.0) | Ubuntu Downloads |
⚠️ Ryzen APU users note (Ubuntu 24.04): Ryzen APUs (gfx1150 / 1151 / 1152 / 1153 / 1103) require the OEM kernel 6.14 on Ubuntu 24.04:
sudo apt install linux-oem-24.04c, then reboot.
AI Ecosystem Compatibility
ROCm 7.14.0 provides optimized support for popular deep learning frameworks and AI inference engines (a full upgrade over 7.13.0):
| Framework / Engine | Supported Version | Notes |
|---|---|---|
| PyTorch | 2.12.0 | Profiler backend switched to rocprofiler-sdk (replaces roctracer) |
| JAX | 0.10.0 | — |
| vLLM | 0.23.0 | Inference-ready images and packages |
| SGLang | 0.5.13 | — |
| TensorFlow | 2.21 | — |
💡 These versions replace the 7.13.0-era PyTorch 2.9.1 / JAX 0.8.2 / vLLM 0.19.1 / SGLang 0.5.9. vLLM images are distributed per GPU architecture. See vLLM inference and serving.
Table of Contents
- GPU Architecture Reference Table (separate file)
- 1. Windows Installation
- 2. Ubuntu Installation
- 3. Verify Installation
- 4. Uninstall ROCm
- 5. Switching GPU Architectures
1. Windows 11 Installation
Example: Ryzen AI Max+ 395 (gfx1151)
📖 Official docs: Install ROCm on Windows | Install PyTorch
1.1 Prerequisites Check
| ✅ Check | Requirement |
|---|---|
| Windows Version | Must be Windows 11 25H2 (Settings → System → About) |
| Adrenalin Driver | Must be 26.5.1 (⬇️ Download) |
| Visual Studio 2022 (Optional) | Community edition, select "Desktop development with C++" (⬇️ Download). Required for AMD Quark or custom op compilation |
1.2 Remove Conflicting Software
- Control Panel → Programs → Uninstall a program → Remove all HIP SDK entries
1.3 Disable Windows Security Features
The following features interfere with ROCm and must be disabled:
- WDAG: Control Panel → Programs and Features → Turn Windows features on or off → Uncheck "Microsoft Defender Application Guard"
- SAC: Settings → Privacy & Security → Windows Security → App & browser control → Smart App Control settings → Off
1.4 Install uv (Python Package Manager)
This project uses uv to manage Python environments and dependencies, replacing the traditional pip + venv workflow. uv is written in Rust and is 10-100x faster.
# Windows install (PowerShell)
irm https://astral.sh/uv/install.ps1 | iex

# Or via winget
# winget install astral-sh.uv

# Verify
uv --version📖 More install methods: uv documentation
1.5 Install ROCm + PyTorch
# Install Python 3.12 (uv has built-in version management)
uv python install 3.12

# Create virtual environment
uv venv --python 3.12
.venv\Scripts\activate

# Install ROCm runtime + libraries (gfx1151 = Ryzen AI Max+ 395/390/385)
uv pip install --index-url https://repo.amd.com/rocm/whl-multi-arch/ "rocm[libraries,device-gfx1151]==7.14.0"

# Install PyTorch
uv pip install --index-url https://repo.amd.com/rocm/whl-multi-arch/ "torch[device-gfx1151]==2.12.0+rocm7.14.0" "torchvision[device-gfx1151]==0.27.0+rocm7.14.0" "torchaudio==2.11.0+rocm7.14.0"

# Install other project dependencies (if requirements.txt exists)
uv pip install -r requirements.txt⚠️ Do NOT copy ROCm DLLs to System32 — this causes conflicts.
💡 New 7.14.0 syntax: wheels are now served from a single multi-arch index
whl-multi-arch/, and you select your GPU architecture via the[device-gfxXXXX]extra (no more per-arch--index-url). Thegfx1151above corresponds to the Ryzen AI Max series (395/390/385). For other GPUs, just swap the architecture tag in the extra:
Your GPU device extras tag Ryzen AI 9 HX (PRO) 475 / 375 etc. device-gfx1150Ryzen AI 7 (PRO) 450 / 350 etc. device-gfx1152Ryzen AI 7 445 / AI 5 435 (new in 7.14.0) device-gfx1153Radeon RX 9070 XT / 9070 GRE / AI PRO R9700S device-gfx1201Radeon RX 9060 XT / 9060 XT LP / 9060 device-gfx1200Radeon RX 7900 XTX / PRO W7900 device-gfx1100Instinct MI300X / MI325X device-gfx942All architectures (larger, broadest compatibility) device-allFor example, gfx1150:
"rocm[libraries,device-gfx1150]==7.14.0"and"torch[device-gfx1150]==2.12.0+rocm7.14.0".Full reference: GPU Architecture Table or Official Compatibility Matrix.
2. Ubuntu 24.04 Installation
Example: Ryzen AI Max+ PRO 395 (gfx1151)
📖 Official docs: Install ROCm on Ubuntu | Install PyTorch
2.1 Install uv and Dependencies
sudo apt install -y libatomic1 libquadmath0

# Install uv
curl -LsSf https://astral.sh/uv/install.sh | sh

# Verify
uv --version2.2 Install ROCm + PyTorch (uv, recommended)
# Install Python 3.12
uv python install 3.12

# Create virtual environment
uv venv --python 3.12
source .venv/bin/activate

# Install ROCm runtime + libraries (gfx1151 = Ryzen AI Max+ 395/390/385)
uv pip install --index-url https://repo.amd.com/rocm/whl-multi-arch/ "rocm[libraries,device-gfx1151]==7.14.0"

# Install PyTorch
uv pip install --index-url https://repo.amd.com/rocm/whl-multi-arch/ "torch[device-gfx1151]==2.12.0+rocm7.14.0" "torchvision[device-gfx1151]==0.27.0+rocm7.14.0" "torchaudio==2.11.0+rocm7.14.0"

# Install other project dependencies (if requirements.txt exists)
uv pip install -r requirements.txt💡 For other GPUs, just swap the architecture tag in the extra (e.g.
device-gfx1150,device-gfx942,device-all) — see Section 1.5 or the GPU Architecture Table.
2.3 Alternative: One-Click Install Script
For a fully automated installation (kernel, driver, ROCm), use the project's install script:
git clone -b unified-installer https://github.com/amdjiahangpan/rocm-install-script.git
cd rocm-install-script
chmod +x install.sh
sudo ./install.sh📖 Script details and options: rocm-install-script (unified-installer branch)
2.4 Configure GPU Access Permissions (Linux)
💡 This step can be done anytime after installation; takes effect after reboot.
sudo usermod -a -G render,video "$LOGNAME"
# Log out and back in, or reboot2.5 Alternative: apt Install (TheRock)
💡 If you don't use pip / uv and prefer a system-wide install via the system package manager (apt), note that 7.14.0 introduces the TheRock packaging system — package names and the install directory have changed.
| Change | ROCm Core SDK 7.14.0 | ROCm Legacy (7.2 and earlier) |
|---|---|---|
| Install directory | /opt/rocm/core | /opt/rocm/ |
| Package prefix | amdrocm-* (e.g. amdrocm-blas) | rocm-* / roc* / hip* |
| Shared extras dir | /opt/rocm/extras-7/ | N/A |
| Package consolidation | hipBLAS + rocBLAS → amdrocm-blas, etc. | Separate packages |
sudo apt update
sudo apt install sudo wget gpg
# After adding the amdrocm repository per the official install page:

# Install all GPU architectures (larger footprint, broadest compatibility)
sudo apt install amdrocm-core-sdk7.14

# Or install for a specific architecture (smaller, requires knowing your GPU arch, e.g. gfx110x)
sudo apt install amdrocm-core-sdk7.14-gfx110x✅ Compatibility: 7.14.0 maintains ABI/API compatibility with ROCm 7.2 legacy — no recompilation required. With apt, the
amdrocmmeta package configuresupdate-alternativesand provides backward-compatible symlinks for/opt/rocm/bin,/opt/rocm/lib, and other/opt/rocm/directories. For tarball installs, updatePATH/LD_LIBRARY_PATH/ROCM_PATHto point to/opt/rocm/core.⚠️ Note:
amd-smireplaces the now-removed ROCm SMI; ASAN packages are not available in 7.14.0 and are planned for a future release.📖 Full package mapping and migration details: TheRock transition guide and official install page.
3. Verify Installation
3.1 PyTorch Check (Windows / Linux)
python -c "import torch; print('PyTorch:', torch.__version__); print('ROCm available:', torch.cuda.is_available()); print('Device:', torch.cuda.get_device_name(0) if torch.cuda.is_available() else 'N/A')"Expected output:
PyTorch: 2.12.0+rocm7.14.0
ROCm available: True
Device: AMD Radeon Graphics💡 ROCm uses HIP to provide CUDA API compatibility, so
torch.cuda.is_available()returningTrueis expected behavior.
3.2 Simple Computation Test
import torch
x = torch.randn(3, 3, device='cuda')
y = torch.randn(3, 3, device='cuda')
print(x @ y)3.3 Linux-only Tools
rocminfo | grep -E "Name:|Marketing Name:"
amd-smi monitor   # ROCm SMI was removed in 7.14.0 — use amd-smi
hipinfo # available with pip installation3.4 Troubleshooting
| Symptom | Cause | Solution |
|---|---|---|
torch.cuda.is_available() = False | Driver version mismatch | Windows: confirm Adrenalin 26.5.1; Linux: confirm inbox / OEM kernel (Ryzen APUs need linux-oem-24.04c) |
No GPU detected (Linux) | Not in render/video group | sudo usermod -a -G render,video $LOGNAME + reboot |
| DLL load error (Windows) | SAC/WDAG not disabled | See Section 1.3 |
4. Uninstall ROCm
Windows
Simply delete the .venv folder (via File Explorer, or in CMD):
rmdir /s /q .venvTo uninstall Adrenalin driver: Control Panel → Programs → Uninstall a program → AMD Software
Ubuntu
rm -rf .venv5. Switching GPU Architectures
Since 7.14.0, wheels are served from a single multi-arch index https://repo.amd.com/rocm/whl-multi-arch/, and you select the architecture via the [device-gfxXXXX] extra. Simply replace the architecture tag in the install command with the corresponding value:
| GPU Example | LLVM Target | device extras tag |
|---|---|---|
| MI355X / MI350X / MI350P | gfx950 | device-gfx950 |
| MI300X / MI325X | gfx942 | device-gfx942 |
| RX 9070 XT / 9070 GRE / AI PRO R9700S | gfx1201 | device-gfx1201 |
| RX 9060 XT / 9060 XT LP / 9060 | gfx1200 | device-gfx1200 |
| RX 7900 XTX / PRO W7900 | gfx1100 | device-gfx1100 |
| Radeon PRO W6800 / V620 | gfx1030 | device-gfx1030 |
| Ryzen AI Max 395 | gfx1151 | device-gfx1151 |
| Ryzen AI PRO 400 / AI 9 HX 475 | gfx1150 | device-gfx1150 |
| Ryzen AI 200 PRO / AI 7 350 | gfx1152 | device-gfx1152 |
| Ryzen AI 7 445 / AI 5 435 (new in 7.14.0) | gfx1153 | device-gfx1153 |
| All architectures | — | device-all |
For example, to switch to gfx942 (MI300X):
uv pip install --index-url https://repo.amd.com/rocm/whl-multi-arch/ "rocm[libraries,device-gfx942]==7.14.0"
uv pip install --index-url https://repo.amd.com/rocm/whl-multi-arch/ "torch[device-gfx942]==2.12.0+rocm7.14.0" "torchvision[device-gfx942]==0.27.0+rocm7.14.0" "torchaudio==2.11.0+rocm7.14.0"💡 For the apt system-package path, use the architecture-specific meta package instead (e.g.
amdrocm-core-sdk7.14-gfx110x) — see Section 2.5.
Full reference: GPU Architecture Table
📖 Official documentation: