02-Fine-tune
🔧 ROCm LLM Fine-Tuning in PracticeFrom dataset construction to LoRA fine-tuning and weight merging
This chapter collects and organizes materials, general tutorials, and model-specific experiment notes for LLM fine-tuning on AMD GPU / ROCm environments. It helps learners understand and practice the full fine-tuning workflow — from environment setup and dataset construction to LoRA fine-tuning and weight merging.
Model Examples
| Example | Description | Document |
|---|---|---|
| Qwen3-0.6B-LoRA | LoRA fine-tuning with Qwen3-0.6B, combined with SwanLab for training visualization | View note |
| Qwen3.5-4B-LoRA | LoRA fine-tuning with Qwen3.5-4B, combined with SwanLab for training visualization | View note |
| Gemma4-E4B-LoRA | Single-GPU LoRA fine-tuning of Gemma 4 E4B-it with ModelScope and AI-ModelScope/emotion | View note |
Contributions and suggestions are welcome — help us add more model examples for edge deployment and AMD GPU fine-tuning experiments.
General Fine-Tuning Tutorial
In LLM applications, prompt engineering is efficient but sometimes insufficient. When tasks require highly customized behavior, vertical-domain expertise, or small models performing difficult tasks, fine-tuning is often essential. This tutorial covers the full supervised fine-tuning (SFT) workflow using transformers + peft.
This tutorial is based on the AMD Ryzen AI Max+ 395 hardware. Although this machine is primarily designed for LLM inference, its compute capability is also suitable for small-scale fine-tuning tasks. We demonstrate how to fine-tune an LLM with minimal code under limited resources.
Note: Apart from the environment setup section, this tutorial only covers the core concepts and workflow of fine-tuning. For runnable fine-tuning code, refer to the model-specific tutorials under the
Fine-tunedirectory in this repository.
Environment Setup
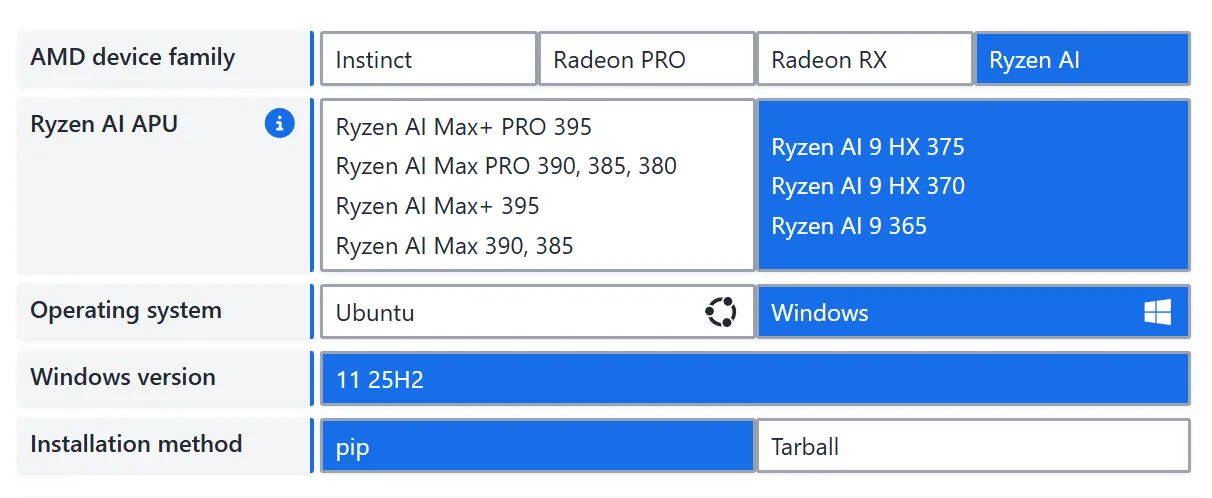
This section covers the Python virtual environment and training dependency installation. For ROCm base installation, Windows/Ubuntu prerequisites, driver versions, Visual Studio requirements, and GPU architecture mapping, refer to 00-Environment.
For Windows + Ryzen AI Max+ 395 users, see Windows 11 Installation and Install ROCm + PyTorch. ROCm 7.12.0 and later support installing ROCm-related libraries into a Python virtual environment via pip / uv pip, greatly simplifying the installation process.
Next, using AMD Ryzen AI Max+ 395 (gfx1151) on Windows as an example, we show how to set up the fine-tuning environment. In this tutorial, uv serves only as a replacement for conda/venv and as the pip installation entrypoint — do not use uv add / uv sync to manage ROCm PyTorch.
Step 1: Create and Activate a Python Virtual Environment
Git Bash:
uv venv --python=3.13
source .venv/Scripts/activatePowerShell:
uv venv --python=3.13
.venv\Scripts\Activate.ps1Step 2: Install ROCm Runtime and Libraries
uv pip install --index-url https://repo.amd.com/rocm/whl/gfx1151/ "rocm[libraries,devel]"After installation, use the hipinfo command to verify ROCm. If GPU information is displayed, the installation was successful:
--------------------------------------------------------------------------------
device#                           0
Name:                             AMD Radeon(TM) 8060S Graphics
pciBusID:                         244
pciDeviceID:                      0
pciDomainID:                      0
multiProcessorCount:              20
maxThreadsPerMultiProcessor:      2048
isMultiGpuBoard:                  0
clockRate:                        2900 Mhz
memoryClockRate:                  800 Mhz
memoryBusWidth:                   512
totalGlobalMem:                   107.87 GB
totalConstMem:                    2147483647

···

arch.has3dGrid:                   1
arch.hasDynamicParallelism:       0
gcnArchName:                      gfx1151
maxAvailableVgprsPerThread:       256 DWORDs
peers:
non-peers:                        device#0

memInfo.total:                    107.87 GB
memInfo.free: 107.72 GB (100%)Step 3: Install PyTorch
To install PyTorch under the ROCm environment, refer to the ROCm PyTorch Installation Guide. Installation command:
uv pip install --index-url https://repo.amd.com/rocm/whl/gfx1151/ torch torchvision torchaudioAfter installation, verify PyTorch:
python -c "import torch; print(torch.__version__); print(torch.version.hip); print(torch.cuda.is_available())"If torch.__version__ includes ROCm version information, torch.version.hip is not None, and torch.cuda.is_available() prints True, PyTorch is correctly configured for ROCm.
Step 4: Install Fine-Tuning Dependencies
Install transformers, peft, and other libraries:
uv pip install -r requirements.txtIf you need a Chinese mirror for regular PyPI packages:
uv pip install --index-url https://pypi.tuna.tsinghua.edu.cn/simple -r requirements.txtStep 5: Download a Model
Download model weight files. Replace please-change-me below with the local path where you want to save the model.
Note: Make sure the path has enough storage space. This step uses Qwen/Qwen3-0.6B as an example; you can replace it with any other model that supports fine-tuning.
from modelscope import snapshot_download
model_dir = snapshot_download('Qwen/Qwen3-0.6B', cache_dir='please-change-me', revision='master')

print(f"Model downloaded to: {model_dir}")SFT Dataset Construction
What is Supervised Fine-Tuning (SFT)?
Modern LLMs typically go through three training stages: pretraining, supervised fine-tuning, and reinforcement learning from human feedback. Pretraining is the fundamental source of an LLM's capabilities — virtually all the knowledge an LLM covers comes from pretraining data. However, pretraining gives the model abilities that still need to be activated. A pretrained LLM is like a well-read but literal-minded scholar who can fluently continue any text but doesn't truly understand the intent behind questions — it simply "recites from memory." Therefore, a second step is needed to teach this well-read model how to use its knowledge. This is SFT (Supervised Fine-Tuning). In SFT, both input and output are provided to the model so it learns to fit the mapping from input to output — similar to giving both questions and answers so the model learns the problem-solving process. In the traditional NLP era, models were typically fine-tuned for each specific task (e.g., sentiment classification). With powerful LLMs, we generally train for "general instruction-following ability" via instruction tuning, where training inputs are diverse user instructions and outputs are the desired responses.
For example, a training sample might be:
input: What's today's weather forecast?
output: According to the forecast, today will be sunny turning partly cloudy, with a high of 26°C and a low of 9°C. The large temperature difference means you should dress warmly.SFT aims to give the model generalized instruction-following ability across diverse instruction types and styles. A typical SFT instruction dataset has three fields:
{
    "instruction": "The user instruction",
    "input": "Supplementary input needed for the instruction; empty if none",
    "output": "The expected model response"
}For example, to translate "今天天气真好" into English:
{
    "instruction": "Translate the following text into English:",
    "input": "今天天气真好",
    "output": "Today is a nice day!"
}Additionally, SFT often uses a specific format to help the model learn a paradigm different from pretraining. For example, LLaMA's SFT format is:
### Instruction:\n{{content}}\n\n### Response:\nWhere content is the actual user instruction — a concatenation of both the instruction and input fields forming a complete executable instruction. For the translation example above, LLaMA would receive:
### Instruction:\nTranslate the following text into English: 今天天气真好\n\n### Response:\nAnd the target output would be:
### Instruction:\nTranslate the following text into English: 今天天气真好\n\n### Response:\nToday is a nice day!Constructing a Fine-Tuning Dataset
To fine-tune an LLM for a specific downstream task, we need to format training data as described above and preprocess the dataset. Here, we use a role-playing task (having the LLM role-play as Zhen Huan, responding in her tone and style) as an example.
We use dialogues extracted from the TV drama "Legend of Zhen Huan" to build the training dataset. The extracted dialogues follow the format:
instruction: the dialogue context;
input: left empty;
output: Zhen Huan's response.The fine-tuning dataset can be downloaded here: https://github.com/KMnO4-zx/huanhuan-chat/blob/master/dataset/train/lora/huanhuan.json
from datasets import Dataset
import pandas as pd
from transformers import AutoTokenizer, AutoModelForCausalLM, DataCollatorForSeq2Seq, TrainingArguments, Trainer

# Convert JSON to a Dataset
df = pd.read_json('./huanhuan.json')  # Modify path as needed
ds = Dataset.from_pandas(df){
'instruction': '小姐,别的秀女都在求中选,唯有咱们小姐想被撂牌子,菩萨一定记得真真儿的——',
'input': '',
'output': '嘘——都说许愿说破是不灵的。'
}Next, we define a data processing function that uses the Qwen3-0.6B tokenizer to process training text and feed it to the model for training.
As mentioned, different LLMs have different instruction formats. During training, we must follow the LLM's predefined format for good results. Let's first inspect Qwen3-0.6B's instruction format:
Note: Use
tokenizer.get_chat_template()to view a model's instruction format.
# Load model tokenizer
tokenizer = AutoTokenizer.from_pretrained('your model path', trust_remote=True)

# Print the chat template
messages = [
    {"role": "system", "content": "===system_message_test==="},
    {"role": "user", "content": "===user_message_test==="},
    {"role": "assistant", "content": "===assistant_message_test==="},
]

text = tokenizer.apply_chat_template(
    messages,
    tokenize=False,
    add_generation_prompt=True,
    enable_thinking=True
)
print(text)<|im_start|>system
===system_message_test===<|im_end|>
<|im_start|>user
===user_message_test===<|im_end|>
<|im_start|>assistant
<think>
</think>
===assistant_message_test===<|im_end|>
<|im_start|>assistantBased on the instruction format above, here is the dataset processing function:
def process_func(example):
    MAX_LENGTH = 1024  # Maximum sequence length of 1024 tokens
    input_ids, attention_mask, labels = [], [], []  # Initialize return values
    # Adapt to chat_template
    instruction = tokenizer(
        f"<s><|im_start|>system\n现在你要扮演皇帝身边的女人--甄嬛<|im_end|>\n"
        f"<|im_start|>user\n{example['instruction'] + example['input']}<|im_end|>\n"
        f"<|im_start|>assistant\n<think>\n\n</think>\n\n",
        add_special_tokens=False
    )
    response = tokenizer(f"{example['output']}", add_special_tokens=False)
    # Concatenate instruction and response input_ids, append eos token
    input_ids = instruction["input_ids"] + response["input_ids"] + [tokenizer.pad_token_id]
    # Attention mask indicating positions the model should attend to
    attention_mask = instruction["attention_mask"] + response["attention_mask"] + [1]
    # Use -100 for instruction positions so loss is not computed for them
    labels = [-100] * len(instruction["input_ids"]) + response["input_ids"] + [tokenizer.pad_token_id]
    if len(input_ids) > MAX_LENGTH:  # Truncate if exceeding max length
        input_ids = input_ids[:MAX_LENGTH]
        attention_mask = attention_mask[:MAX_LENGTH]
        labels = labels[:MAX_LENGTH]
    return {
        "input_ids": input_ids,
        "attention_mask": attention_mask,
        "labels": labels
}This completes the fine-tuning dataset construction workflow. Next, we'll learn about Parameter-Efficient Fine-Tuning (PEFT) and use it to fine-tune an LLM.
Parameter-Efficient Fine-Tuning (PEFT)
What is PEFT?
Currently, the mainstream fine-tuning approaches include full fine-tuning and parameter-efficient fine-tuning. Full fine-tuning updates all model parameters during SFT, requiring significant compute resources and high cost. To address this, the community developed PEFT methods that insert new layers into the model and only update a small number of parameters during fine-tuning.
The most popular PEFT method is LoRA (Low-Rank Adaptation). LoRA inserts low-rank matrix layers as trainable parameters and only updates these during fine-tuning. Since LoRA fine-tuning typically only needs the model to learn relatively simple tasks on top of pretraining, updating only the inserted parameters can still achieve good results. Moreover, LoRA's low-rank matrices are decompositions of the original parameters — during inference, LoRA weights can be merged back into the original model through matrix computation, avoiding any inference speed degradation. For more details on LoRA, see the LoRA section in Happy LLM.
LoRA has become the mainstream method for fine-tuning LLMs, especially under resource constraints and limited supervised training data.
Using PEFT for LoRA Fine-Tuning
peft is Hugging Face's official PEFT framework supporting multiple efficient fine-tuning methods including LoRA.
# Configure LoRA parameters
from peft import LoraConfig, TaskType, get_peft_model

config = LoraConfig(
    task_type=TaskType.CAUSAL_LM,  # Task type: CLM for SFT tasks
    target_modules=["q_proj", "k_proj", "v_proj", "o_proj", "gate_proj", "up_proj", "down_proj"],  # Target modules for LoRA
    inference_mode=False,  # Training mode
    r=8,  # LoRA rank (dimension)
    lora_alpha=32,  # LoRA alpha; see LoRA paper for details
    lora_dropout=0.1  # Dropout rate
)task_type: Task type. SFT is a causal language modeling task, so useCAUSAL_LM.target_modules: Which layers to insert LoRA into (this example covers all 7 linear layers in attention + FFN).inference_mode=False: Training mode — bypass layers are trainable.r=8: Bypass intermediate dimension. Larger values mean more expressive power and more parameters.lora_alpha=32: Bypass output scaling factor, acts as a "learning rate multiplier."lora_dropout=0.1: 10% dropout on the bypass to prevent overfitting.
Fine-Tuning Configuration
# Configure training arguments
args = TrainingArguments(
    output_dir="./output",  # Output directory
    per_device_train_batch_size=16,  # Training batch size per device
    gradient_accumulation_steps=2,  # Gradient accumulation steps
    logging_steps=10,  # Log every 10 steps
    num_train_epochs=3,  # Number of training epochs
    save_steps=100,  # Save checkpoint every 100 steps
    learning_rate=1e-4,  # Learning rate
    save_on_each_node=True,  # Save on each node
    gradient_checkpointing=True,  # Enable gradient checkpointing
    report_to="none",  # Disable external reporting
)
# Train with Trainer
trainer = Trainer(
    model=model,
    args=args,
    train_dataset=tokenized_id,
    data_collator=DataCollatorForSeq2Seq(tokenizer=tokenizer, padding=True),
    callbacks=[swanlab_callback]
)
# Start training
trainer.train()output_dirspecifies the path for all intermediate checkpoints and the final model;per_device_train_batch_size=16feeds 16 samples per GPU per step;gradient_accumulation_steps=2updates weights every 2 steps, giving an effective global batch size of 16×2=32, enabling larger batches on smaller GPUs;num_train_epochs=3runs through the entire training set three times;learning_rate=1e-4sets the parameter update step size;save_steps=100andlogging_steps=10save a recoverable checkpoint every 100 steps and log every 10 steps for monitoring and resuming;gradient_checkpointing=Truetrades compute for memory by discarding intermediate activations during the forward pass, roughly halving memory usage and allowing longer sequences;save_on_each_node=Trueensures each node has a complete copy in multi-node training, avoiding single points of failure;report_to="none"disables external experiment tracking to reduce dependencies.
Merging LoRA Weights
LoRA fine-tuning only saves the LoRA adapter parameters. For inference, load the LoRA parameters and merge them with the base model:
from transformers import AutoModelForCausalLM, AutoTokenizer
import torch
from peft import PeftModel

mode_path = 'base model path'  # Path to the base model
lora_path = 'LoRA checkpoint path'  # Path to the LoRA checkpoint

# Load tokenizer
tokenizer = AutoTokenizer.from_pretrained(mode_path)

# Load model
model = AutoModelForCausalLM.from_pretrained(mode_path, device_map="auto",torch_dtype=torch.bfloat16, trust_remote_code=True)

# Load LoRA weights
model = PeftModel.from_pretrained(model, model_id=lora_path)

prompt = "Who are you?"
inputs = tokenizer.apply_chat_template(
                                    [{"role": "user", "content": "Assume you are Zhen Huan, a woman by the emperor's side."},{"role": "user", "content": prompt}],
                                    add_generation_prompt=True,
                                    tokenize=True,
                                    return_tensors="pt",
                                    return_dict=True,
                                    enable_thinking=False
                                )
inputs = inputs.to("cuda")


gen_kwargs = {"max_length": 2500, "do_sample": True, "top_k": 1}
with torch.no_grad():
    outputs = model.generate(**inputs, **gen_kwargs)
    outputs = outputs[:, inputs['input_ids'].shape[1]:]
    print(tokenizer.decode(outputs[0], skip_special_tokens=True))