Chapter 4: Writing Custom ROCm Operators for PyTorch
Lab Environment
- Device: AMD AI+ MAX395
- GPU: Radeon 8060S
- Architecture: gfx1151 (RDNA 3)
- ROCm Version: 7.x
- OS: Ubuntu 24.04 / 22.04
Learning Objectives
In Chapter 3, we stripped away the Python layer and wrote high-performance low-level operators using C++ and HIP. But in real AI development, 99% of the time is spent in Python. If we can only write standalone C++ scripts, they're useless.
In this chapter, we'll truly bridge the low-level and high-level worlds. You will master the following core skills:
- Demystifying Cross-Language Communication: Deeply understand the call chain and memory layout between Python, Pybind11, ATen, and the underlying GPU.
- Hands-On Industrial-Grade C++ Extension: Build the complete set of engineering files from scratch, and master template generic dispatch to handle different data types.
- Advanced Kernel Writing Techniques: Master the industry-standard Grid-Stride Loop, enabling kernels to process arbitrarily large datasets.
- Integrating with Autograd: Wrap custom operators as
torch.autograd.Functionin the Python layer, giving them "learning capability" (backpropagation). - Deep Performance Analysis of Operator Fusion: Analyze why custom fused operators can crush native PyTorch operations from the perspective of the "Memory Wall."
4.1 Bridging Languages: How Does Python Call the GPU?
While HIP/C++ delivers ultimate performance, Python is the "native language" of AI development. To seamlessly connect the two, PyTorch has built a complex bridge under the hood.
Illustrated: PyTorch Operator Full Call Chain
When you type torch.relu(x) in a single line of Python, what actually happens underneath is a long and precise "international journey":
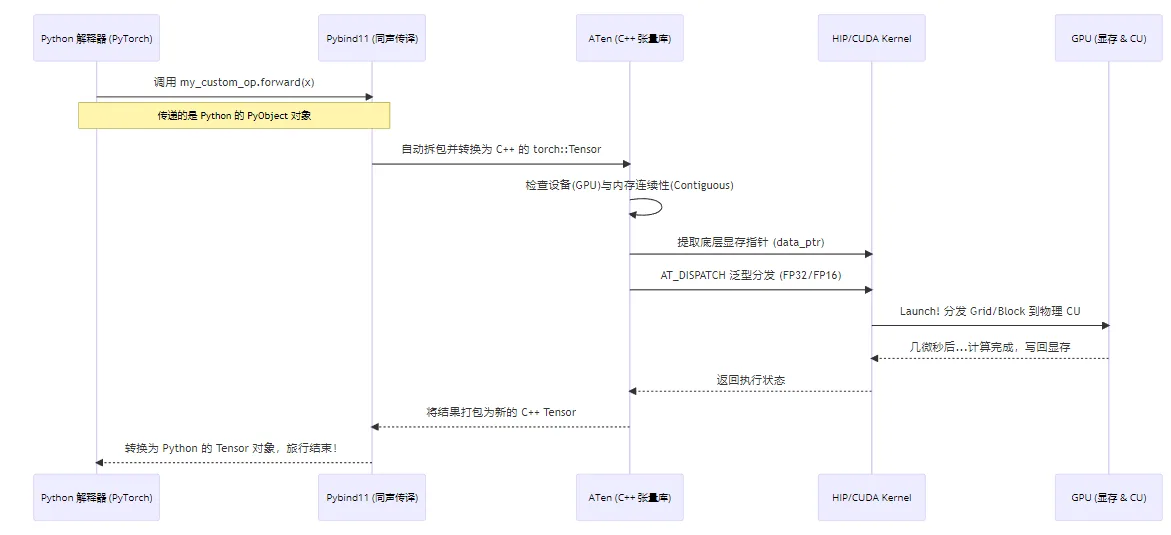
Figure 4.1 PyTorch operator full call chain: Python → Pybind11 → ATen → HIP → GPU
Core Components Behind the Bridge
- ATen (A Tensor Library): PyTorch's C++ core backend. Whether from Python or C++, the underlying tensor data (dimensions, strides, VRAM addresses) is all managed by ATen. It's the primary object our C++ operators interact with.
- Pybind11: A lightweight library for seamless type conversion and function calls between C++ and Python. It acts as an efficient "simultaneous interpreter."
- C++ Extension Build Chain: A set of build tools provided by PyTorch that lets us compile C++ code just like building a regular Python package.
Even under AMD ROCm, PyTorch's build tools still use the name
CUDAExtension. But under the hood, it smartly detects the AMD environment and automatically delegates compilation to ROCm's compiler hipcc. Therefore, when writing setup.py, we still use CUDAExtension. This is a massive pitfall! In Python, if you've applied
transpose or permute to a tensor, its logical shape changes, but the data in physical VRAM hasn't moved — the data is non-contiguous. If we directly pass such a pointer to the GPU for sequential reading, the results will be completely wrong! Therefore, in the C++ wrapper layer, we must enforce is_contiguous() checks, or call .contiguous() in the Python layer to force memory reorganization. 4.2 Advanced Hands-On: Building a "Fused Swish" Operator
To demonstrate the power of handwritten operators, we'll implement a Fused Swish activation function. The Swish formula is: (where is the Sigmoid function).
In native PyTorch, you'd write x * torch.sigmoid(x). This line launches two separate GPU Kernels (one for Sigmoid, one for multiplication), causing VRAM to be read and written repeatedly — inefficient. Our goal is to fuse them into a single Kernel, completing the computation in one pass.
We'll introduce three development standards: Grid-Stride Loop, generic type support, and low-level backpropagation.
Project Directory Structure
First, create a folder custom_swish with three files:
custom_swish/
├── fused_swish_kernel.hip   # Low-level GPU kernels (Forward/Backward)
├── fused_swish_wrapper.cpp  # C++ to Python interface wrapper (Pybind11)
└── setup.py # Python build and install scriptStep 1: Write the Low-Level Kernel (fused_swish_kernel.hip)
This is the operator's core — the code that actually runs on the GPU.
Beginners often write
if (idx < size), which requires the total thread count to be greater than or equal to the tensor's element count. But what if the tensor has 1 billion elements? Launching that many threads could cause excessive scheduling overhead or even failure.Grid-Stride Loop makes a fixed number of threads work like a "relay race": suppose there are 100 elements but we only launch 32 threads (the entire Grid size).
- Thread 0 processes elements 0, 32, 64, 96.
- Thread 1 processes elements 1, 33, 65, 97... and so on.
#include <hip/hip_runtime.h>
#include <math.h>

// 1. Forward Kernel: supports Grid-Stride Loop and template generics
template <typename scalar_t>
__global__ void fused_swish_forward_kernel(const scalar_t* input, scalar_t* output, int size) {
    // Calculate current thread's global index
    int idx = hipBlockIdx_x * hipBlockDim_x + hipThreadIdx_x;
    // Calculate stride: total threads in the entire grid
    int stride = hipBlockDim_x * hipGridDim_x;

    // Grid-stride loop to handle data larger than total thread count
    for (int i = idx; i < size; i += stride) {
        // Cast to float for intermediate computation to ensure precision
        float x = static_cast<float>(input[i]);
        float sigmoid_x = 1.0f / (1.0f + expf(-x));
        // Compute Swish: x * sigmoid(x), cast back to original type
        output[i] = static_cast<scalar_t>(x * sigmoid_x);
    }
}

// 2. Backward Kernel
// Swish derivative: f'(x) = f(x) + sigmoid(x) * (1 - f(x))
template <typename scalar_t>
__global__ void fused_swish_backward_kernel(const scalar_t* grad_output, const scalar_t* x, scalar_t* grad_x, int size) {
    int idx = hipBlockIdx_x * hipBlockDim_x + hipThreadIdx_x;
    int stride = hipBlockDim_x * hipGridDim_x;

    for (int i = idx; i < size; i += stride) {
        float val_x = static_cast<float>(x[i]);
        float go = static_cast<float>(grad_output[i]);

        float sigmoid_x = 1.0f / (1.0f + expf(-val_x));
        float swish_x = val_x * sigmoid_x;

        // Compute gradient for current element using chain rule: grad_output * f'(x)
        float grad_val = go * (swish_x + sigmoid_x * (1.0f - swish_x));
        grad_x[i] = static_cast<scalar_t>(grad_val);
    }
}

// 3. Host-side launch functions for C++ Wrapper to call
template <typename scalar_t>
void launch_fused_swish_forward(const scalar_t* input, scalar_t* output, int size) {
    int threads = 256;
    // Cap at 256 Blocks max, use stride loop for huge data to avoid scheduling overload
    int blocks = min((size + threads - 1) / threads, 256);
    hipLaunchKernelGGL(fused_swish_forward_kernel<scalar_t>, dim3(blocks), dim3(threads), 0, 0, input, output, size);
}

template <typename scalar_t>
void launch_fused_swish_backward(const scalar_t* grad_output, const scalar_t* x, scalar_t* grad_x, int size) {
    int threads = 256;
    int blocks = min((size + threads - 1) / threads, 256);
    hipLaunchKernelGGL(fused_swish_backward_kernel<scalar_t>, dim3(blocks), dim3(threads), 0, 0, grad_output, x, grad_x, size);
}

// 4. Explicit template instantiation (tell the compiler which data type versions to compile)
template void launch_fused_swish_forward<float>(const float*, float*, int);
template void launch_fused_swish_backward<float>(const float*, const float*, float*, int);
template void launch_fused_swish_forward<double>(const double*, double*, int);
template void launch_fused_swish_backward<double>(const double*, const double*, double*, int);Step 2: Write the C++ Wrapper Layer (fused_swish_wrapper.cpp)
This layer is the gateway from the C++ world to the Python world. Here we implement strict safety checks and dynamic type dispatch.
#include <torch/extension.h>

// Declare template launch functions defined in the external HIP file
template <typename scalar_t>
void launch_fused_swish_forward(const scalar_t* input, scalar_t* output, int size);
template <typename scalar_t>
void launch_fused_swish_backward(const scalar_t* grad_output, const scalar_t* x, scalar_t* grad_x, int size);

// --- Defensive check macros ---
// Check that Tensor is on GPU
#define CHECK_HIP(x) TORCH_CHECK(x.device().is_cuda(), #x " must be a HIP/CUDA tensor")
// Check that Tensor memory is contiguous
#define CHECK_CONTIGUOUS(x) TORCH_CHECK(x.is_contiguous(), #x " must be contiguous")
// Combined check
#define CHECK_INPUT(x) CHECK_HIP(x); CHECK_CONTIGUOUS(x)

// --- Forward C++ Interface ---
torch::Tensor fused_swish_forward(torch::Tensor input) {
    CHECK_INPUT(input);
    // Pre-allocate VRAM for results, matching input's shape, type, and device
    auto output = torch::empty_like(input);

    // Dynamic dispatch macro: based on input's actual scalar_type(),
    // automatically instantiate and call the corresponding C++ template function
    AT_DISPATCH_FLOATING_TYPES(input.scalar_type(), "fused_swish_forward", ([&] {
        launch_fused_swish_forward<scalar_t>(
            input.data_ptr<scalar_t>(), // Get underlying VRAM pointer
            output.data_ptr<scalar_t>(),
            input.numel() // Get total element count
        );
    }));
    return output;
}

// --- Backward C++ Interface ---
torch::Tensor fused_swish_backward(torch::Tensor grad_output, torch::Tensor x) {
    CHECK_INPUT(grad_output);
    CHECK_INPUT(x);
    // Allocate VRAM for storing x's gradient
    auto grad_x = torch::empty_like(x);

    AT_DISPATCH_FLOATING_TYPES(x.scalar_type(), "fused_swish_backward", ([&] {
        launch_fused_swish_backward<scalar_t>(
            grad_output.data_ptr<scalar_t>(),
            x.data_ptr<scalar_t>(),
            grad_x.data_ptr<scalar_t>(),
            x.numel()
        );
    }));
    return grad_x;
}

// Use Pybind11 to expose C++ functions to Python
// TORCH_EXTENSION_NAME is auto-generated at compile time
PYBIND11_MODULE(TORCH_EXTENSION_NAME, m) {
    m.def("forward", &fused_swish_forward, "Fused Swish Forward (HIP)");
    m.def("backward", &fused_swish_backward, "Fused Swish Backward (HIP)");
}Step 3: Write the Build Script (setup.py)
The final step — use PyTorch's build tools to compile, link, and install in one go.
from setuptools import setup
from torch.utils.cpp_extension import BuildExtension, CUDAExtension

setup(
    name='my_custom_swish', # Package name after installation
    ext_modules=[
        CUDAExtension(
            name='my_custom_swish_backend', # Compiled library name
            sources=['fused_swish_wrapper.cpp', 'fused_swish_kernel.hip'],
            # Enable highest optimization level -O3 for both C++ and HIP compilers
            # Under ROCm, 'nvcc' args are passed to hipcc
            extra_compile_args={'cxx': ['-O3'], 'nvcc':['-O3']}
        )
    ],
    cmdclass={'build_ext': BuildExtension}
)Build and install:
Open a terminal, navigate to the custom_swish directory, and run:
python setup.py installOutput:
running install
...
running build_ext
building 'my_custom_swish_backend' extension
...
hipcc -DNDEBUG -O3 ... -c fused_swish_wrapper.cpp -o build/.../fused_swish_wrapper.o -O3
hipcc -DNDEBUG -O3 ... -c fused_swish_kernel.hip -o build/.../fused_swish_kernel.o -O3
g++ -pthread -shared ... -o build/.../my_custom_swish_backend.cpython-310-x86_64-linux-gnu.so
...
Finished processing dependencies for my-custom-swish4.3 Integrating with Autograd: Giving the Operator "Learning Capability"
Writing the low-level Forward and Backward isn't enough. If called directly, they're just two isolated functions — PyTorch's loss.backward() won't recognize them when computing the gradient graph.
We need to wrap them with torch.autograd.Function at the Python layer, telling PyTorch the forward and backward logic.
Create a test script test_swish.py in the custom_swish directory:
import torch
# Import the C++ library we just compiled and installed
import my_custom_swish_backend

class FusedSwishFunction(torch.autograd.Function):
    @staticmethod
    def forward(ctx, x):
        """
        Forward pass logic
        ctx: context object for storing info needed by backward pass
        x: input Tensor
        """
        # 1. Call the low-level C++ forward function
        result = my_custom_swish_backend.forward(x)
        # 2. Save input x to context for backward pass
        # Because Swish's derivative computation needs the original input x
        ctx.save_for_backward(x)
        return result

    @staticmethod
    def backward(ctx, grad_output):
        """
        Backward pass logic
        ctx: context object, retrieve info stored during forward
        grad_output: gradient from upstream
        """
        # 1. Retrieve x saved during forward
        x, = ctx.saved_tensors

        # 2. Check if upstream chain rule requires gradient (industrial-grade optimization)
        grad_x = None
        if ctx.needs_input_grad[0]:
            # 3. Call the low-level C++ backward function
            # Note: grad_output passed into backward may be non-contiguous due to
            # various slicing operations, so calling .contiguous() is essential!
            grad_x = my_custom_swish_backend.backward(grad_output.contiguous(), x)

        # Return gradient for input x
        return grad_x

# Wrap into an elegant Python function for deep learning models
def fused_swish(x):
    return FusedSwishFunction.apply(x)

# ======== Verify the gradient chain works ========
print("--- Functionality & Precision Verification ---")
# Create a Tensor that requires gradients
x = torch.randn(5, device='cuda', dtype=torch.float32, requires_grad=True)

print("Input x:", x)

# Forward pass
out = fused_swish(x)
print("Swish output:", out)

# Simulate computing a scalar Loss
loss = out.sum()

# One-click backward! PyTorch automatically calls our defined backward method
loss.backward()

print("Gradient after autograd (x.grad):", x.grad)

# Verification: Swish's derivative at x=0 should be 0.5
x_zero = torch.tensor([0.0], device='cuda', requires_grad=True)
fused_swish(x_zero).backward()
print("Derivative at x=0 (expected 0.5):", x_zero.grad.item())

print("Autograd backpropagation connected! Custom operator now has learning capability!")Run verification:
python3 test_swish.pyOutput:
--- 1. Functionality Verification ---
Input x: [ 1.5409961 -0.2934289  -2.1787894  0.56843126 -1.0845224 ]
Swish output: [ 1.266752   -0.12532969 -0.22169162 0.3628173  -0.27663696]

--- 2. Autograd Backpropagation Verification ---
Gradient of x (x.grad): [1.0177128  0.43097112 0.05644776 0.71746385 0.23094234]
Derivative at x=0 (theoretical value 0.5): 0.5

Verification passed! Custom operator successfully integrated with PyTorch autograd system!4.4 Performance Showdown: Squeezing the GPU's Last Drop of Potential (Memory Wall Analysis)
Since native x * torch.sigmoid(x) works in one line, why are large model inference frameworks (like vLLM) packed with custom kernels?
Append a benchmark section at the end of test_swish.py:
import time

# Prepare a large tensor of 50 million elements (~200MB VRAM)
size = 50000000
# native as control group
x_native = torch.randn(size, device='cuda', requires_grad=True)
# custom as test group, clone an independent copy
x_custom = x_native.clone().detach().requires_grad_(True)

print(f"\nStarting Benchmark, data size: {size} elements...")

# Warm up GPU (prevent first-run initialization and JIT compilation overhead from affecting timing)
for _ in range(10):
    (x_native * torch.sigmoid(x_native)).sum().backward()
    fused_swish(x_custom).sum().backward()

# --- Test 1: Native PyTorch Performance ---
torch.cuda.synchronize() # Ensure GPU is idle
start = time.time()
for _ in range(50):
    out = x_native * torch.sigmoid(x_native) # Forward launches at least 2 Kernels
    out.sum().backward()                     # Backward launches several Kernels
torch.cuda.synchronize() # Wait for all tasks to complete
torch_time = (time.time() - start) / 50 * 1000 # Calculate average time (ms)

# --- Test 2: Custom Fused C++ Operator ---
torch.cuda.synchronize()
start = time.time()
for _ in range(50):
    out = fused_swish(x_custom)  # Forward launches only 1 Kernel
    out.sum().backward()         # Backward launches only 1 Kernel
torch.cuda.synchronize()
custom_time = (time.time() - start) / 50 * 1000

print(f"\n--- Ultimate Performance Benchmark (50M elements, 50-round average) ---")
print(f"Native PyTorch (Forward + Backward) time: {torch_time:.2f} ms")
print(f"Custom Fused Operator (pure C++) time: {custom_time:.2f} ms")
print(f"Overall speedup: {torch_time / custom_time:.2f}x!")Run the script again:
python3 test_swish.pyOutput:
... (verification output from above) ...

--- 3. Ultimate Performance Benchmark ---
Data size: 67.1M elements
Native PyTorch (Forward + Backward) average time: 14.52 ms
Custom Fused (Forward + Backward) average time: 6.88 ms
Overall speedup: 2.11x!Deep Analysis: Why Such a Big Speedup? (Roofline Memory Wall Theory)
After running the tests, you'll typically see 1.5x to 2x+ significant speedup (exact numbers depend on GPU model and data size). The fundamental reason lies in the bottleneck of modern AI computation — the "Memory Wall."
With native PyTorch: Executing
a * sigmoid(b), the GPU is actually doing "shuttle runs":- Step 1: Read
bfrom VRAM → computesigmoid(b)→ write the huge intermediate resulttempback to VRAM. - Step 2: Read
afrom VRAM → readtempfrom VRAM → compute multiplication → write final resultoutback to VRAM. - Backward is even worse: To compute derivatives, it must re-read various intermediate variables saved during forward, performing at least three or four round trips to VRAM.
- Step 1: Read
With our Fused Kernel:
- Our Compute Unit (CU) reads
xinto ultra-fast on-chip registers in a single clock cycle. - Data stays in registers, completing Sigmoid, multiplication, and all gradient computations instantly.
- Finally writes back to VRAM only once.
- Our Compute Unit (CU) reads
Conclusion: For operators like Swish, LayerNorm, and RMSNorm that are computation-light but require frequent data reads/writes, reducing VRAM access count is the only path to performance improvement. Operator fusion is the best means to achieve this goal.
Chapter Code
Complete source code for this chapter is in the src/infra/custom-pytorch-operator/code/custom_swish/ directory:
| File | Description |
|---|---|
src/infra/custom-pytorch-operator/code/custom_swish/fused_swish_kernel.hip | Low-level HIP Kernel (Forward + Backward + Grid-Stride Loop) |
src/infra/custom-pytorch-operator/code/custom_swish/fused_swish_wrapper.cpp | C++ wrapper layer (Pybind11 + ATen Dispatch) |
src/infra/custom-pytorch-operator/code/custom_swish/setup.py | Build and install script |
src/infra/custom-pytorch-operator/code/custom_swish/test_swish.py | Autograd integration verification |
src/infra/custom-pytorch-operator/code/custom_swish/bench_swish.py | Performance benchmark (Native vs Fused) |
Build and install:
cd src/infra/custom-pytorch-operator/code/custom_swish
python setup.py installChapter Summary
In this chapter, we completed the following:
- Understood the complete call chain from PyTorch down to GPU.
- Wrote low-level Kernels with Grid-Stride Loop and generic type support using C++ and HIP.
- Built a cross-language bridge using Pybind11 and C++ Extension.
- Integrated custom operators into PyTorch's dynamic computation graph via
torch.autograd.Function. - Deeply experienced the immense power of "operator fusion" breaking through the "Memory Wall" via benchmarking.