Embracing the New Era of AMD AI Computing
System Environment: Ubuntu 24.04 / 22.04 · ROCm 7.2+ · PyTorch 2.9+
Learning Objectives
This chapter aims to help you understand three things:
- What your AMD device can do — A panoramic view of AI capabilities from Ryzen AI local NPU, to Radeon discrete GPUs and Instinct accelerators
- What ROCm is — Why it's an AI "infrastructure" rather than just a "driver"
- Hands-on practice — Running ResNet training and Qwen 2.5 large model inference with PyTorch on AMD platforms
1.1 What Can Your AMD GPU Do?
In the past, talking about AI was almost synonymous with "NVIDIA + CUDA." This landscape has now been disrupted — AMD has formed a complete AI product line from low-power AI PCs, to desktop/workstation GPUs, to data center accelerators, all unified under the ROCm software stack.
1.1.1 Panoramic View: From AI PC to Discrete GPUs
AMD's AI hardware can be roughly divided into three tiers:
1) AI PC: Ryzen AI (NPU + GPU)
Taking the 2026 Ryzen AI 400 series as an example, NPU compute power can reach up to 60 TOPS, meeting or even exceeding Microsoft's Copilot+ PC requirement of 40 TOPS.
A typical Ryzen AI 400 chip internally contains:
| Component | Function | Typical Applications |
|---|---|---|
| Zen 5 CPU Cores | General-purpose computing, data preprocessing | Data preprocessing, logic control |
| RDNA 3.5/4 Integrated GPU | Medium-scale model training, small model inference | 7B-level inference, LoRA fine-tuning, image/video generation |
| XDNA 2 NPU | Efficient local AI inference tasks | Speech recognition, real-time translation, Copilot+ features |
2) Desktop/Workstation: Radeon RX / Radeon Pro
For most developers, an accessible choice is the Radeon RX 7000 / 9000 series (RDNA 3 / RDNA 4):
| Type | Representative Models | Features |
|---|---|---|
| Gaming Cards | Radeon RX 7700, RX 9070, etc. | Great value, suitable for developers and individual users |
| Professional Cards | Radeon AI PRO / Radeon Pro W series | More VRAM, better stability, suitable for professional work |
RDNA 4 AI Acceleration Highlights:
- 2 AI accelerators integrated per Compute Unit
- AI compute performance improved by over 4x (compared to previous-gen RDNA 3)
- Thousand-TOPS-class operations (some 9000 series cards, with 16GB+ VRAM)
Typical Desktop/Workstation Use Cases:
- Local Stable Diffusion / ComfyUI full pipeline
- Medium-scale (7B–14B) LLM inference and LoRA fine-tuning
- Image classification, detection, and segmentation training tasks
3) Data Center: Instinct MI Series
If you're doing large-scale training or deploying 70B or even 400B-level models, AMD's Instinct MI300X / MI350X / MI355X series is the primary hardware:
Instinct Series Core Advantages:
| Feature | Description | Application Value |
|---|---|---|
| Massive VRAM | Up to 192GB HBM high-bandwidth memory | Supports ultra-long context large models (e.g., Qwen3-Coder-Next 80B) |
| Advanced Precision | Supports FP8 precision, 256k context length | Meets the needs of latest code models and multimodal models |
| Deep Optimization | ROCm 7 has operator-level optimizations for Llama 3.x, GLM, DeepSeek, etc. | Significantly improves training and inference throughput |
Use Cases:
- Large model training (70B+)
- Multi-GPU / multi-node inference clusters
- Enterprise AI service platforms
1.1.2 ROCm Ecosystem Status: It's More Than Just a "Driver"
Many people think "installing ROCm is just installing a driver," but ROCm is more like a complete open-source AI computing platform, similar to the "CUDA ecosystem" but the AMD version.
What is ROCm?
ROCm (Radeon Open Compute) mainly consists of several layers:
In one sentence: ROCm = AMD's version of the CUDA ecosystem + even more open
Key Points of ROCm 7.2
Based on 2026 official information and media reports, ROCm 7.2 has several important changes for developers:
| # | Feature | Description |
|---|---|---|
| 1 | Dual-platform Official Support | Windows (Adrenalin 26.1.1) + Linux (Ubuntu, etc.) one-click installation |
| 2 | Extended Consumer Support | No longer limited to data centers, now officially supports Radeon RX 7000/9000 + Ryzen AI 300/400 |
| 3 | Deep Optimization for PyTorch | Kernel-level optimization for Llama, GLM, DeepSeek, and other models — "install and use" |
| 4 | Deep Integration with Ubuntu | Native support starting from Ubuntu 26.04 LTS, providing a long-term stable AI environment |
1.2 PyTorch on ROCm: Seamless Integration
This section focuses on three core questions:
| Question | Description |
|---|---|
| How to install? | Version selection behind pip install (stable / Nightly / Windows) |
| Is it really compatible? | Why torch.cuda.is_available() returns True on AMD |
| What can it run? | Hands-on: ResNet Training Demo + Qwen 2.5 Inference Demo |
1.2.1 Installation: The Secrets Behind pip install (Official / Nightly Selection)
Version Tier Overview
PyTorch on ROCm packages can generally be divided into three tiers:
1. Stable Release — AMD Official Recommendation
AMD recommends using repo.radeon.com ROCm WHL files, rather than the PyTorch.org versions (which are not fully tested by AMD).
Prerequisites:
- Python 3.12 environment
- Ubuntu 24.04 / 22.04
Step 1: Update pip
# Install pip (if not already installed)
sudo apt install python3-pip -y

# Update pip and wheel
pip3 install --upgrade pip wheelStep 2: Download and Install PyTorch for ROCm
Ubuntu 22.04 example:
# Download WHL files
wget https://repo.radeon.com/rocm/manylinux/rocm-rel-7.2/torch-2.9.1%2Brocm7.2.0.lw.git7e1940d4-cp312-cp312-linux_x86_64.whl
wget https://repo.radeon.com/rocm/manylinux/rocm-rel-7.2/torchvision-0.24.0%2Brocm7.2.0.gitb919bd0c-cp312-cp312-linux_x86_64.whl
wget https://repo.radeon.com/rocm/manylinux/rocm-rel-7.2/triton-3.5.1%2Brocm7.2.0.gita272dfa8-cp312-cp312-linux_x86_64.whl
wget https://repo.radeon.com/rocm/manylinux/rocm-rel-7.2/torchaudio-2.9.0%2Brocm7.2.0.gite3c6ee2b-cp312-cp312-linux_x86_64.whl

# Uninstall old versions (if they exist)
pip3 uninstall torch torchvision triton torchaudio

# Install new versions
pip3 install torch-2.9.1+rocm7.2.0.lw.git7e1940d4-cp312-cp312-linux_x86_64.whl \
  torchvision-0.24.0+rocm7.2.0.gitb919bd0c-cp312-cp312-linux_x86_64.whl \
  torchaudio-2.9.0+rocm7.2.0.gite3c6ee2b-cp312-cp312-linux_x86_64.whl \
triton-3.5.1+rocm7.2.0.gita272dfa8-cp312-cp312-linux_x86_64.whlNote: When installing in a non-virtual Python 3.12 environment, you must add the
--break-system-packagesflag.
Step 3: Verify Installation
# Verify PyTorch is correctly installed
python3 -c 'import torch' 2> /dev/null && echo 'Success' || echo 'Failure'

# Verify GPU is available
python3 -c 'import torch; print(torch.cuda.is_available())'

# Display GPU device name
python3 -c "import torch; print(f'device name [0]:', torch.cuda.get_device_name(0))"

# Display full PyTorch environment info
python3 -m torch.utils.collect_envExpected Output:
Success
True
device name [0]: AMD Radeon 8060S # or other supported AMD GPUUse Case: Production environments and daily training (AMD official recommendation)
2. Docker Installation (Optional)
Using Docker provides better portability and pre-built container environments.
Install Docker:
sudo apt install docker.ioPull and Run the PyTorch Docker Image (Ubuntu 24.04):
# Pull image
sudo docker pull rocm/pytorch:rocm7.2_ubuntu24.04_py3.12_pytorch_release_2.9.1

# Start container
sudo docker run -it \
  --cap-add=SYS_PTRACE \
  --security-opt seccomp=unconfined \
  --device=/dev/kfd \
  --device=/dev/dri \
  --group-add video \
  --ipc=host \
  --shm-size 8G \
rocm/pytorch:rocm7.2_ubuntu24.04_py3.12_pytorch_release_2.9.1You can use the
-vflag to mount a host data directory into the container.
3. Windows-Specific ROCm SDK Wheels
For PyTorch on Windows + ROCm 7.2, AMD officially provides complete wheel links:
- First install the ROCm SDK components (Python 3.12 environment);
- Then install the torch/torchvision/torchaudio wheels with the
+rocmsdk20260116tag.
Typical command (CMD example):
pip install --no-cache-dir ^
  https://repo.radeon.com/rocm/windows/rocm-rel-7.2/torch-2.9.1%2Brocmsdk20260116-cp312-cp312-win_amd64.whl ^
  https://repo.radeon.com/rocm/windows/rocm-rel-7.2/torchaudio-2.9.1%2Brocmsdk20260116-cp312-cp312-win_amd64.whl ^
https://repo.radeon.com/rocm/windows/rocm-rel-7.2/torchvision-0.24.1%2Brocmsdk20260116-cp312-cp312-win_amd64.whlHow to Choose an Installation Method?
| Your Needs | Recommended Approach | Description |
|---|---|---|
| Stability (Linux) | repo.radeon.com WHL files | AMD official recommendation, fully tested |
| Quick Deployment | Docker image | Pre-built environment, ready to use, cross-platform |
| New Hardware Early Access | Nightly ROCm wheels | New hardware support + new features, occasional rough edges |
| Windows Users | AMD Official ROCm SDK | Windows + Radeon + Ryzen AI environment |
1.2.2 Compatibility Revealed: torch.cuda.is_available() Returns True on AMD?
Many people are surprised when they first install PyTorch on an AMD GPU and find that torch.cuda.is_available() returns True. This is not a bug — it's a compatibility design.
import torch
print(torch.cuda.is_available())
print(torch.cuda.get_device_name(0))
print(torch.version.hip)Results:
torch.cuda.is_available()surprisingly returns True;torch.cuda.get_device_name(0)displays Radeon RX 9070 XT, Radeon PRO W7900, or Instinct MI300X, etc.;torch.version.hipshows something like7.2.26015-fc0010cf6a.
Why does torch.cuda return True on AMD?
- The PyTorch ecosystem (Hugging Face, etc.) relies on
torch.cuda.*APIs to detect GPUs- For compatibility, the ROCm backend reuses the
cudanamespace- Under the hood, it actually runs HIP/ROCm — no code modifications needed
Conclusion: On AMD platforms:
torch.cuda.*means "GPU acceleration is available, backed by ROCm/HIP"torch.version.rocmis where you actually check the ROCm version
1.2.3 Hands-on 1: ResNet Image Classification Training Demo
Goal: Below is a ResNet18 + CIFAR10 training demo that runs directly on AMD GPUs. The code logic is adapted from AMD's official ROCm blog example, slightly simplified and annotated.
Environment Preparation
Ensure you have the following in your current Python environment:
- PyTorch with ROCm support installed
- The following dependencies installed:
pip install torchvision datasets matplotlibComplete Training Script
# file: src/infra/embrace-amd-ai/code/resnet_cifar10_amd.py
import random
import datetime
import torch
import torchvision
from datasets import load_dataset
import matplotlib.pyplot as plt


def get_dataloaders(batch_size=256):
    dataset = load_dataset("cifar10")
    dataset.set_format("torch")

    train_loader = torch.utils.data.DataLoader(
        dataset["train"], shuffle=True, batch_size=batch_size
    )
    test_loader = torch.utils.data.DataLoader(
        dataset["test"], batch_size=batch_size
    )
    return train_loader, test_loader


def get_transform():
    mean = torch.tensor([0.4914, 0.4822, 0.4465]).view(1, 3, 1, 1)
    std = torch.tensor([0.2023, 0.1994, 0.2010]).view(1, 3, 1, 1)

    def transform(x):
        if x.ndim == 4 and x.shape[1] != 3:
            x = x.permute(0, 3, 1, 2)
        x = x.float() / 255.0
        x = (x - mean.to(x.device)) / std.to(x.device)
        return x

    return transform


def build_model():
    model = torchvision.models.resnet18(num_classes=10)
    loss_fn = torch.nn.CrossEntropyLoss()
    optimizer = torch.optim.Adam(model.parameters(), lr=0.01, weight_decay=1e-4)
    return model, loss_fn, optimizer


def train_model(model, loss_fn, optimizer, train_loader, test_loader, transform, num_epochs):
    print(f"Number of GPUs: {torch.cuda.device_count()}")
    print([torch.cuda.get_device_name(i) for i in range(torch.cuda.device_count())])
    device = torch.device("cuda" if torch.cuda.is_available() else "cpu")

    model.to(device)
    accuracy = []
    t0 = datetime.datetime.now()

    for epoch in range(num_epochs):
        print(f"Epoch {epoch+1}/{num_epochs}")
        t0_epoch_train = datetime.datetime.now()

        model.train()
        train_losses, n_examples = [], 0
        for batch in train_loader:
            batch = {k: v.to(device) for k, v in batch.items()}

            optimizer.zero_grad()
            preds = model(transform(batch["img"]))
            loss = loss_fn(preds, batch["label"])
            loss.backward()
            optimizer.step()

            train_losses.append(loss.detach())
            n_examples += batch["label"].shape[0]

        train_loss = torch.stack(train_losses).mean().item()
        t_epoch_train = datetime.datetime.now() - t0_epoch_train

        model.eval()
        with torch.no_grad():
            t0_epoch_test = datetime.datetime.now()
            test_losses, n_test_examples, n_test_correct = [], 0, 0
            for batch in test_loader:
                batch = {k: v.to(device) for k, v in batch.items()}

                preds = model(transform(batch["img"]))
                loss = loss_fn(preds, batch["label"])

                test_losses.append(loss)
                n_test_examples += batch["img"].shape[0]
                n_test_correct += (batch["label"] == preds.argmax(dim=1)).sum()

            test_loss = torch.stack(test_losses).mean().item()
            test_accuracy = n_test_correct / n_test_examples
            t_epoch_test = datetime.datetime.now() - t0_epoch_test
            accuracy.append(test_accuracy.cpu())

        print(f"  Epoch time: {t_epoch_train+t_epoch_test}")
        print(f"  Examples/second (train): {n_examples/t_epoch_train.total_seconds():0.4g}")
        print(f"  Examples/second (test): {n_test_examples/t_epoch_test.total_seconds():0.4g}")
        print(f"  Train loss: {train_loss:0.4g}")
        print(f"  Test loss: {test_loss:0.4g}")
        print(f"  Test accuracy: {test_accuracy*100:0.4g}%")

    total_time = datetime.datetime.now() - t0
    print(f"Total training time: {total_time}")
    return accuracy


def main():
    torch.manual_seed(0)
    random.seed(0)

    model, loss, optimizer = build_model()
    train_loader, test_loader = get_dataloaders()
    transform = get_transform()

    test_accuracy = train_model(
        model, loss, optimizer, train_loader, test_loader, transform, num_epochs=8
    )

    plt.plot(test_accuracy)
    plt.xlabel("Epoch")
    plt.ylabel("Test Accuracy")
    plt.title("ResNet18 on CIFAR10 (AMD ROCm)")
    plt.savefig("resnet_cifar10_amd.png")
    print("Training complete, accuracy curve saved as resnet_cifar10_amd.png")


if __name__ == "__main__":
main()How to Run
python resnet_cifar10_amd.pyOutput
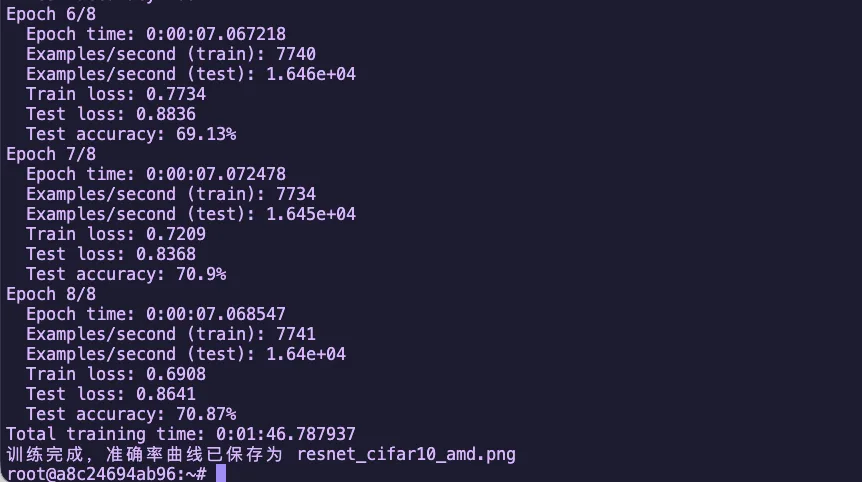
Figure 1.1 ResNet18 CIFAR10 Training Accuracy Curve
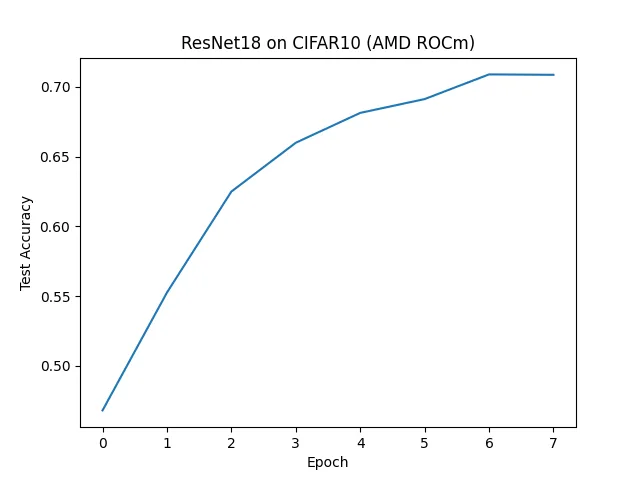
Figure 1.2 ResNet18 CIFAR10 Training Results (AMD ROCm)
1.2.4 Hands-on 2: Qwen 2.5 Model Inference Demo (vLLM + ROCm)
Goal: This section demonstrates how to run Alibaba's Qwen2.5 series large model inference on AMD GPUs via vLLM + ROCm 7.
Note: This example uses Qwen2.5-7B-Instruct, suitable for both desktop Radeon and data center Instinct series GPUs.
Step 1: Start vLLM Environment with Docker
Using Docker provides a quick pre-configured vLLM + ROCm environment:
docker run -it \
  --network=host \
  --device=/dev/kfd \
  --device=/dev/dri \
  --group-add=video \
  --ipc=host \
  --cap-add=SYS_PTRACE \
  --security-opt seccomp=unconfined \
  --shm-size 8G \
  -v $(pwd):/workspace \
  --name vllm \
rocm/vllm-dev:rocm7.2_navi_ubuntu24.04_py3.12_pytorch_2.9_vllm_0.14.0rc0Parameter Description:
| Parameter | Description |
|---|---|
--network=host | Use host network for easy service access |
--device=/dev/kfd --device=/dev/dri | Mount GPU devices |
--group-add=video | Add to video group for GPU access |
--ipc=host --shm-size 8G | Shared memory configuration for multi-process communication |
-v $(pwd):/workspace | Mount current directory to container's /workspace |
Step 2: Environment Preparation
After entering the container, install base libraries:
pip install transformers accelerateStep 3: Download Model (Using ModelScope)
Install ModelScope:
pip install modelscopeEnter python in the terminal to start interactive mode:
from modelscope import snapshot_download

# Download to current directory
model_dir = snapshot_download('Qwen/Qwen2.5-7B-Instruct', cache_dir='./')
print(f"Model downloaded to: {model_dir}")Example output:
Model downloaded to: ./Qwen/Qwen2___5-7B-InstructStep 4: Start vLLM Inference Service
python -m vllm.entrypoints.openai.api_server \
  --model ./Qwen/Qwen2___5-7B-Instruct \
  --host 0.0.0.0 \
  --port 3000 \
  --dtype float16 \
  --gpu-memory-utilization 0.9 \
  --swap-space 16 \
  --disable-log-requests \
  --tensor-parallel-size 1 \
  --max-num-seqs 64 \
  --max-num-batched-tokens 32768 \
  --max-model-len 32768 \
--distributed-executor-backend mpParameter Description:
| Parameter | Description |
|---|---|
--model | Model path |
--dtype float16 | Use half-precision floating point |
--gpu-memory-utilization 0.9 | GPU VRAM utilization |
--swap-space 16 | Swap space size (GB) |
--max-model-len 32768 | Maximum context length |
Step 5: Test the Inference Service
Send a request with curl:
curl -s http://127.0.0.1:3000/v1/chat/completions \
  -H "Content-Type: application/json" \
  -d '{
    "model": "./Qwen/Qwen2___5-7B-Instruct",
    "messages": [
      {"role": "system", "content": "You are a helpful assistant."},
      {"role": "user", "content": "Introduce Qwen2.5-7B-Instruct in one sentence."}
    ],
    "temperature": 0.7,
    "max_tokens": 256
}' | jq .Expected Results
If everything works correctly, you'll receive a JSON response containing the answer generated by the Qwen2.5 model:
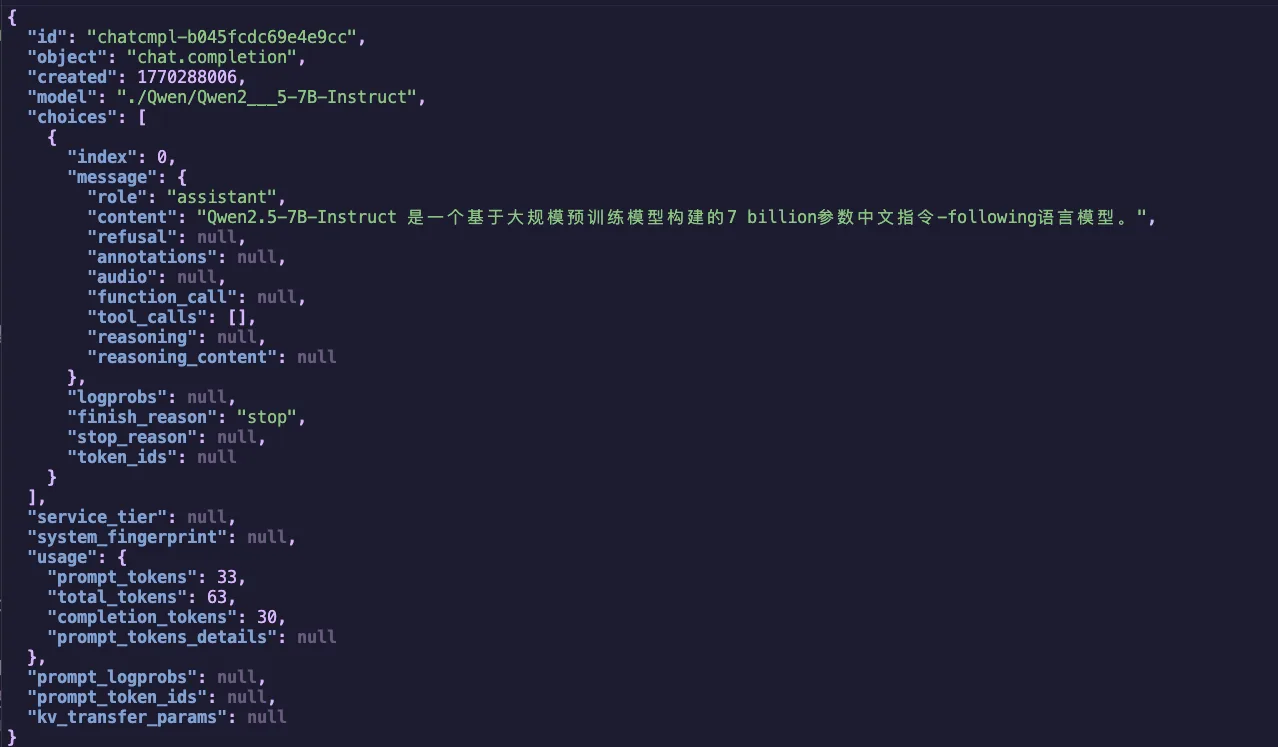
Figure 1.3 Qwen2.5-7B-Instruct vLLM Inference Result
1.2.5 Hands-on 3: Qwen 2.5 Native PyTorch Inference
Goal: This section demonstrates how to run Qwen2.5 model inference on AMD GPUs directly using PyTorch + Transformers, without relying on inference frameworks like vLLM.
Use Case: Scenarios that require more flexible control, research into model internals, or simple single-GPU inference.
Step 1: Environment Preparation
Ensure the necessary dependencies are installed:
pip install torch transformers accelerateStep 2: Create Inference Script
Create file qwen_pytorch_inference.py:
# file: src/infra/embrace-amd-ai/code/qwen_pytorch_inference.py
import torch
import time
from transformers import AutoModelForCausalLM, AutoTokenizer

# Model path
MODEL_PATH = "./Qwen/Qwen2___5-7B-Instruct"
DEVICE = "cuda:0"


def run_inference():
    print(f"=== AMD ROCm PyTorch Inference Test ===")

    if torch.cuda.is_available():
        props = torch.cuda.get_device_properties(0)
        print(f"Using device: {torch.cuda.get_device_name(0)} ({props.total_memory / 1024**3:.1f} GB)")
    else:
        print("[Warning] No ROCm/CUDA device detected, will run on CPU (extremely slow)")

    print("\n[1/3] Loading Tokenizer...")
    try:
        tokenizer = AutoTokenizer.from_pretrained(MODEL_PATH, local_files_only=True, trust_remote_code=True)
    except Exception as e:
        print(f"[Error] Tokenizer loading failed: {e}")
        return

    print("\n[2/3] Loading model weights (BFloat16)...")
    st = time.time()
    try:
        model = AutoModelForCausalLM.from_pretrained(
            MODEL_PATH,
            torch_dtype=torch.bfloat16,
            device_map=DEVICE,
            trust_remote_code=True,
        )
    except Exception as e:
        print(f"[Fatal Error] Model loading failed: {e}")
        print("If this is an out-of-memory error, try using a quantized model.")
        return

    print(f"Model loading time: {time.time() - st:.2f} seconds")

    prompt = "Hello, please use this high-performance GPU to write a seven-character quatrain about AMD GPU's rise."
    messages = [
        {"role": "system", "content": "You are a talented poet."},
        {"role": "user", "content": prompt}
    ]

    print("\n[3/3] Starting inference...")

    text = tokenizer.apply_chat_template(messages, tokenize=False, add_generation_prompt=True)
    model_inputs = tokenizer([text], return_tensors="pt").to(DEVICE)

    st = time.time()
    with torch.no_grad():
        generated_ids = model.generate(
            model_inputs.input_ids,
            max_new_tokens=512,
            temperature=0.7,
            top_p=0.9,
            pad_token_id=tokenizer.eos_token_id
        )
    et = time.time()

    input_len = model_inputs.input_ids.shape[1]
    output_ids = generated_ids[:, input_len:]
    response = tokenizer.batch_decode(output_ids, skip_special_tokens=True)[0]

    tokens_gen = output_ids.shape[1]
    speed = tokens_gen / (et - st)

    print("\n" + "="*20 + " Generated Result " + "="*20)
    print(response)
    print("="*50)
    print(f"Generation speed: {speed:.2f} tokens/s")
    print(f"VRAM usage: {torch.cuda.max_memory_allocated() / 1024**3:.2f} GB")


if __name__ == "__main__":
    import os
    os.environ["TORCH_ROCM_AOTRITON_ENABLE_EXPERIMENTAL"] = "1"
run_inference()Step 3: Run Inference
python qwen_pytorch_inference.pyExpected Output
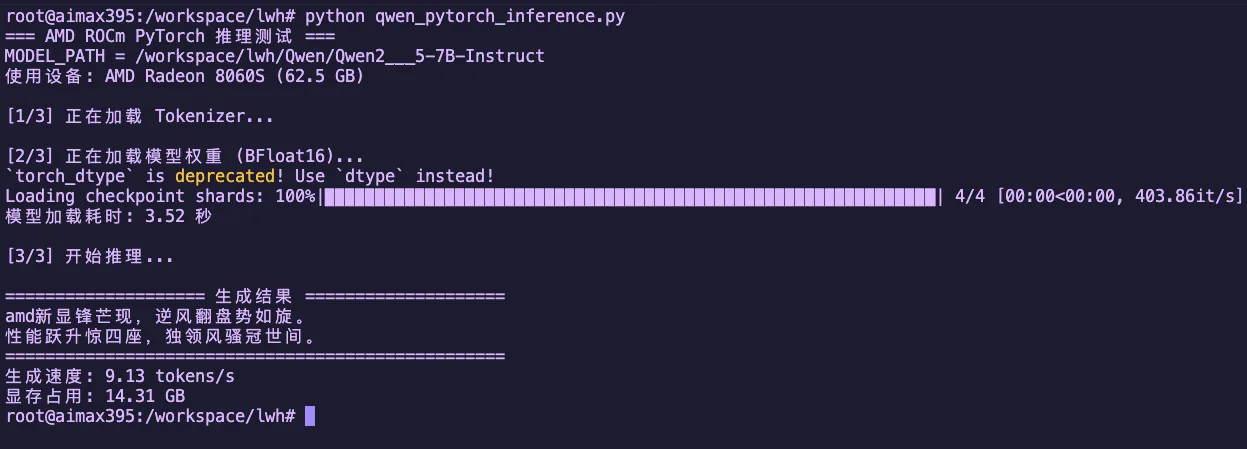
Figure 1.4 Qwen2.5-7B-Instruct Native PyTorch Inference Result
Chapter Code
Complete source code for this chapter is in the src/infra/embrace-amd-ai/code/ directory:
| File | Description |
|---|---|
resnet_cifar10_amd.py | ResNet18 + CIFAR10 training demo |
qwen_pytorch_inference.py | Qwen 2.5 native PyTorch inference demo |
Chapter Summary
In this chapter, we covered:
- Surveyed the AMD AI hardware product line: from Ryzen AI (NPU + GPU), Radeon discrete GPUs, to Instinct data center accelerators.
- Understood the layered architecture of the ROCm software stack and its role in AI computing.
- Completed PyTorch environment installation and verification on AMD GPUs, understanding the
torch.cudacompatibility design. - Practiced ResNet image classification training and Qwen 2.5 large model inference (vLLM + native PyTorch).
Reference Resources
- AMD ROCm 7.2 Officially Released: Supporting Multiple New Hardware, Optimizing Instinct AI Performance
- AMD Expands AI Leadership Across Client, Graphics, and Data Center
- AI Acceleration with AMD Radeon Graphics Cards
- AMD ROCm 7.2 Update Reports
- Day 0 Support for Qwen3-Coder-Next on AMD Instinct GPUs
- ROCm 7 Software
- Ubuntu to Natively Support AMD ROCm Software
- Install PyTorch via PIP (Linux ROCm)
- Install PyTorch via PIP (Windows ROCm)
- ResNet for image classification using AMD GPUs