ブラウザAIアシスタント拡張機能の作り方:ワンクリックでWebページを要約
第1章:ブラウザ拡張機能とChrome拡張機能開発とは
このチュートリアルでは、完全なクローズドループを完成させます:AI駆動のChromeブラウザ拡張機能をゼロから構築します。閲覧中の任意のWebページの内容を読み取り、AIを使用してワンクリック要約を生成できます。拡張機能の開発、デバッグを自ら完了し、Chrome Web Storeへの公開方法も学びます。
このチュートリアルにあたり、少なくとも以下を用意してください:
- Chromeブラウザ(内蔵AIを使用する場合、バージョン138以上を推奨)
- コードエディタ(VS Code / Cursor / Trae)
- (オプション)OpenAIまたはClaude API Key
1.1 ブラウザ拡張機能とは
ブラウザ拡張機能を使ったことがあるはずです:広告ブロッカー、翻訳ツール、パスワードマネージャー...これらはブラウザの「追加装備」のようなもので、Webを閲覧しながらスーパーパワーを与えてくれます。
想像してみてください:5000語の技術ブログ記事を開き、拡張機能ボタンを1回クリックすると、数秒後にサイドパネルに簡潔な要約が表示されます。これこそが私たちが構築するものです。

1.2 Chrome拡張機能の基本アーキテクチャ
Chrome拡張機能(Manifest V3ベース)は、それぞれ役割を持ついくつかのコア部分で構成されています:
- マニフェストファイル(
manifest.json):拡張機能の「IDカード」で、名前、権限、エントリファイルなどを宣言。 - Service Worker(バックグラウンドスクリプト):拡張機能の「脳」で、イベントの処理とAPIの呼び出しをバックグラウンドで行う。継続的には実行されず、必要に応じて起動。
- Content Script:拡張機能の「目」で、Webページに注入され、DOMコンテンツを読み取り可能。
- Side Panel:拡張機能の「顔」で、ブラウザ右側にUIを表示し、ユーザーがAI要約結果を確認。
- Options Page:ユーザーがAPI Keyや関連設定を構成可能。
これらのワークフローは以下のようになります:
ユーザーが拡張機能アイコンをクリック
    -> サイドパネルが開く
    -> ユーザーが「要約」ボタンをクリック
    -> サイドパネルがService Workerに通知
    -> Service WorkerがContent Scriptにページテキストの読み取りを依頼
    -> Content Scriptがページコンテンツを返す
    -> Service WorkerがコンテンツをAI APIに送信
    -> AIが要約を返す
    -> Service Workerが要約をサイドパネルに送信して表示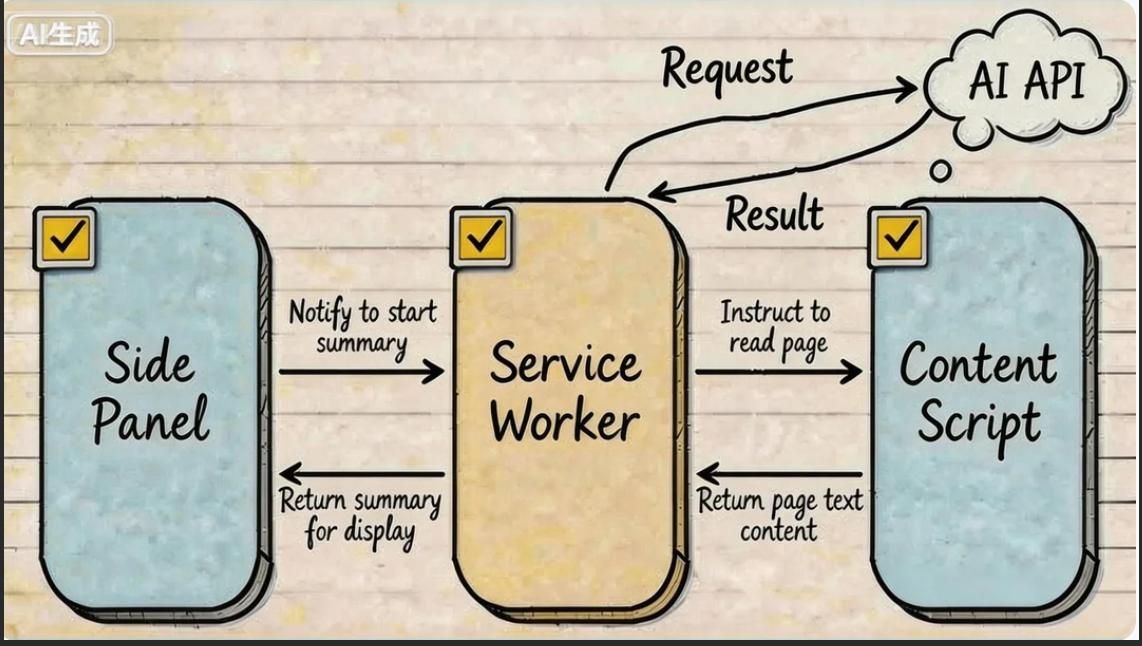
1.3 2つのAIオプション:クラウドAPI vs ブラウザ内蔵AI
拡張機能にはAI機能にアクセスする2つの方法があります:
オプションA:クラウドAI APIの呼び出し(OpenAI / Claude)
- メリット:強力なモデル能力、すべてのデバイスをサポート
- デメリット:API Keyが必要、インターネット必須、使用コストあり
- 最適:高品質な要約、より複雑なコンテンツの処理
オプションB:Chrome内蔵AI(Summarizer API)の使用
Chrome 138から、GoogleはGemini NanoベースのAI機能をブラウザに直接内蔵しました。その1つがSummarizer APIです - 完全にローカルで動作し、API Key不要、インターネット不要、完全に無料です。
- メリット:無料、プライバシーに優しい、API Key不要
- デメリット:Chrome 138以上が必要、より良いハードウェアが必要(VRAM 4GB以上またはRAM 16GB以上)、モデル能力はクラウドAIより弱い
- 最適:プライバシーを重視し、支払いを避け、十分なハードウェアを持つユーザー
このチュートリアルでは両方のオプションを実装し、自分の状況に応じて選択できます。
1.4 チュートリアルのロードマップ
「AI Page Summarizer」というChrome拡張機能をゼロから構築します。以下のステップに従います:
- 拡張機能のスケルトン構築:Manifest V3プロジェクト構造を作成し、Chromeに読み込む
- コア機能の実装:Content Scriptがページを読み取り + Service WorkerがAI APIを呼び出し + サイドパネルが結果を表示
- Chrome内蔵AIの統合:Summarizer APIを使用して無料ローカル要約を提供
- テストとデバッグ:Chrome拡張機能のデバッグ手法を学ぶ
- Chrome Web Storeへの公開:パッケージ化して審査に提出
第2章:拡張機能スケルトンの構築
2.1 プロジェクト構造の作成
AIコーディングアシスタント(Cursor / Trae / Claude Code)を開き、ai-page-summarizerという空のフォルダーを作成し、チャットボックスに以下を入力:
Please help me create a Chrome browser extension project using Manifest V3.
The project name is ai-page-summarizer, and its function is to summarize webpage content with AI.
Please create the following file structure:

ai-page-summarizer/
├── manifest.json          # MV3マニフェストファイル
├── background.js          # Service Workerバックグラウンドスクリプト
├── content.js             # コンテンツスクリプト(Webページテキストを読み取り)
├── sidepanel.html         # サイドパネルHTML
├── sidepanel.js           # サイドパネルロジック
├── sidepanel.css          # サイドパネルスタイリング
├── options.html           # 設定ページ
├── options.js             # 設定ページロジック
└── icons/                 # アイコンフォルダー

manifest.jsonの要件:
1. manifest_version: 3
2. Permissions: storage, activeTab, scripting, sidePanel
3. backgroundにservice_worker: "background.js"を使用
4. default path sidepanel.htmlでside_panelを設定
5. actionにdefault iconとtitleを設定
AIが完全なプロジェクトスケルトンを生成します。各ファイルの役割を見てみましょう。
2.2 manifest.json:拡張機能の「IDカード」
これはChrome拡張機能で最も重要なファイルです。ブラウザに拡張機能の概要、必要な権限、含まれるコンポーネントを伝えます:
{
  "manifest_version": 3,
  "name": "AI Page Summarizer",
  "version": "1.0",
  "description": "Use AI to summarize any webpage in one click",
  "permissions": ["storage", "activeTab", "scripting", "sidePanel"],
  "background": {
    "service_worker": "background.js"
  },
  "action": {
    "default_title": "AI Page Summarizer",
    "default_icon": {
      "16": "icons/icon-16.png",
      "48": "icons/icon-48.png",
      "128": "icons/icon-128.png"
    }
  },
  "side_panel": {
    "default_path": "sidepanel.html"
  },
  "options_page": "options.html",
  "icons": {
    "16": "icons/icon-16.png",
    "48": "icons/icon-48.png",
    "128": "icons/icon-128.png"
  }
}
権限の説明:
storage:ユーザーのAPI Keyなどのデータを保存可能にactiveTab:ユーザーが閲覧中の現在のタブにアクセス可能に(ユーザー操作後のみなので非常に安全)scripting:コンテンツ読み取りのためのスクリプト注入を可能にsidePanel:ChromeサイドパネルAPIの使用を可能に

2.3 アイコンの準備
Chrome拡張機能には3つのサイズのアイコンが必要です:16x16、48x48、128x128。AIに生成を依頼:
Please help me generate three simple Chrome extension icons (16x16, 48x48, 128x128),
with a rounded rectangle, gradient purple background, and a white AI lightning symbol in the center.
Save them in the icons/ directory as icon-16.png, icon-48.png, and icon-128.png.
2.4 拡張機能をChromeに読み込む
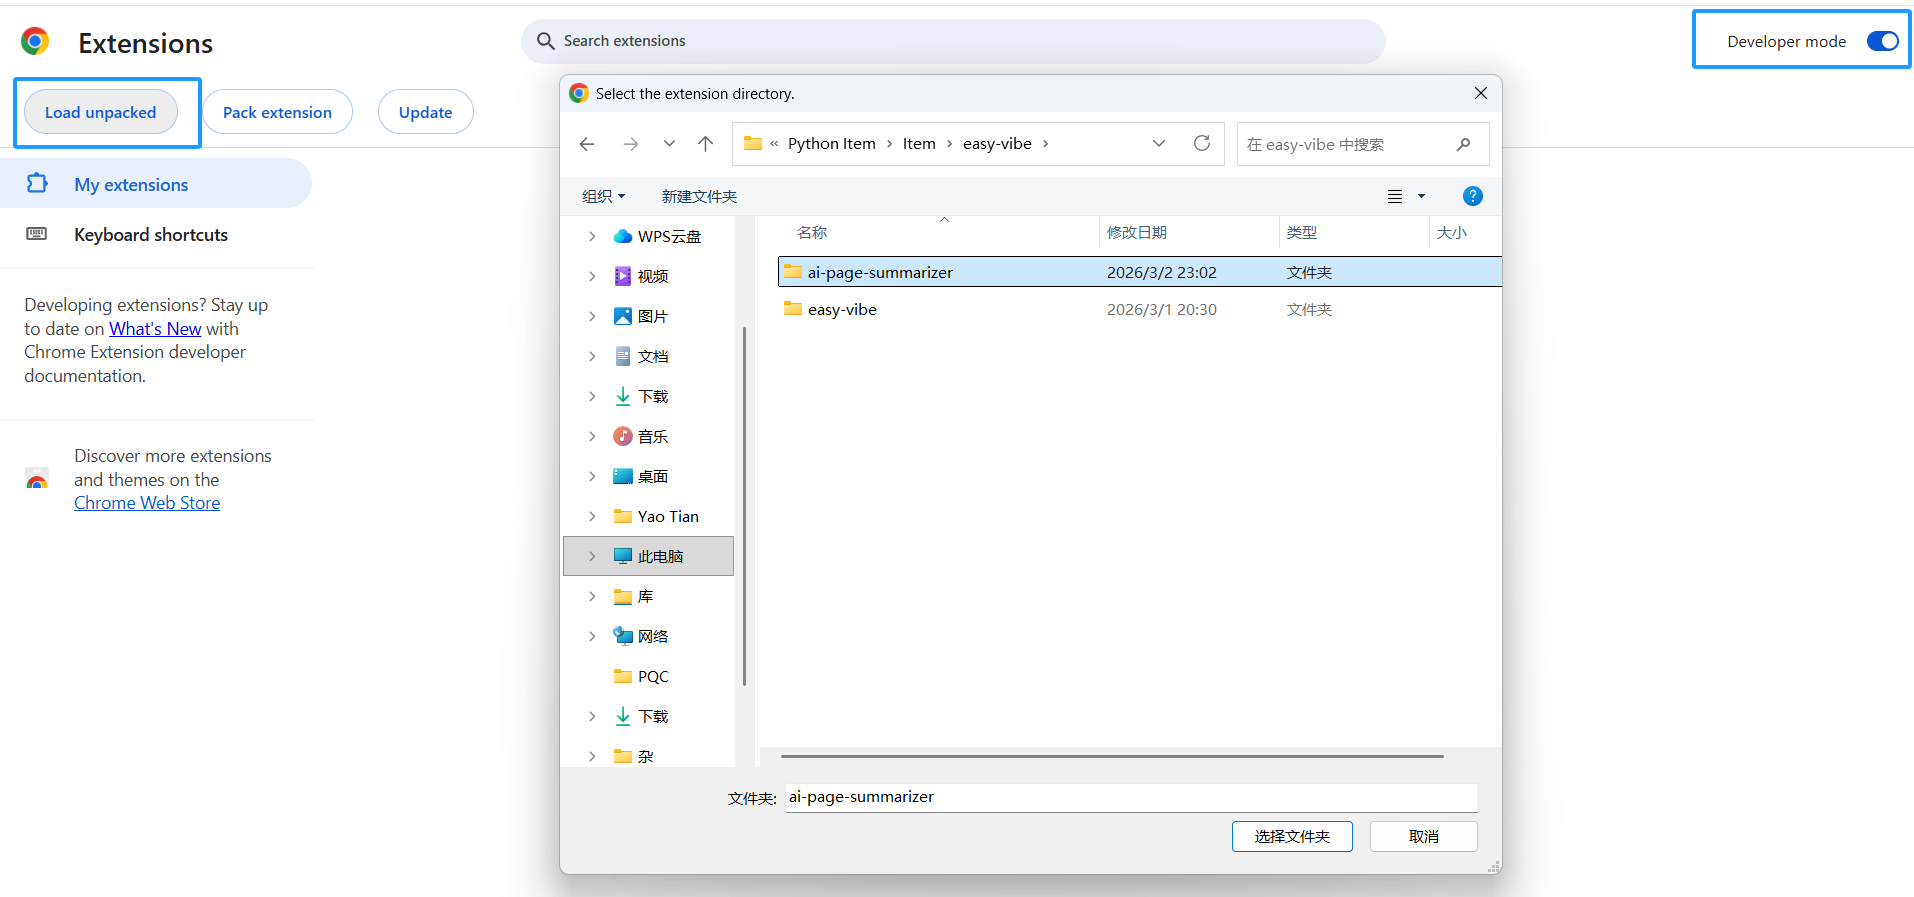
コードを書く前に、この「空の殻」拡張機能をChromeに読み込み、以降の変更をすぐにプレビューできるようにします:
- Chromeを開き、アドレスバーに
chrome://extensions/を入力 - 右上のデベロッパーモードをオンにする
- パッケージ化されていない拡張機能を読み込むをクリック
ai-page-summarizerフォルダーを選択
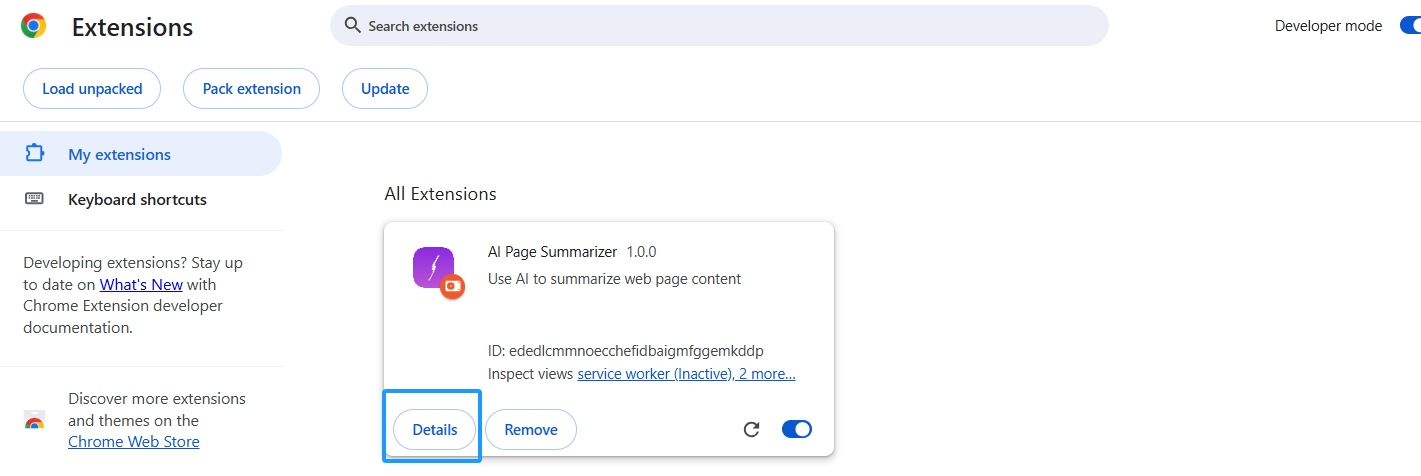
リストに拡張機能が表示され、Chromeツールバーにアイコンが表示されます。
ヒント:コードを変更するたびに、
chrome://extensions/に戻り、拡張機能カードの更新ボタン(🔄)をクリックして更新。
第3章:コア機能の実装 - ページ読み取り + AI要約
3.1 Content Script:ページテキストの読み取り
Content ScriptはWebページに注入されるスクリプトです。ページDOMに直接アクセスできます。これを使用してページテキストを抽出します。
AIにcontent.jsの作成を依頼:
Please help me write content.js with the following functions:
1. Listen for messages from Service Worker
2. When receiving a "getPageContent" message, extract the current page text content
3. Extraction logic: get document.body.innerText, and also get the page title and URL
4. Return the extracted content via sendResponse
AIはこのようなコードを生成:
// content.js
chrome.runtime.onMessage.addListener((request, sender, sendResponse) => {
if (request.action === 'getPageContent') {
const content = document.body.innerText || document.body.textContent
sendResponse({
content: content.trim(),
title: document.title,
url: window.location.href
})
}
return true // メッセージチャネルを開いたままにする
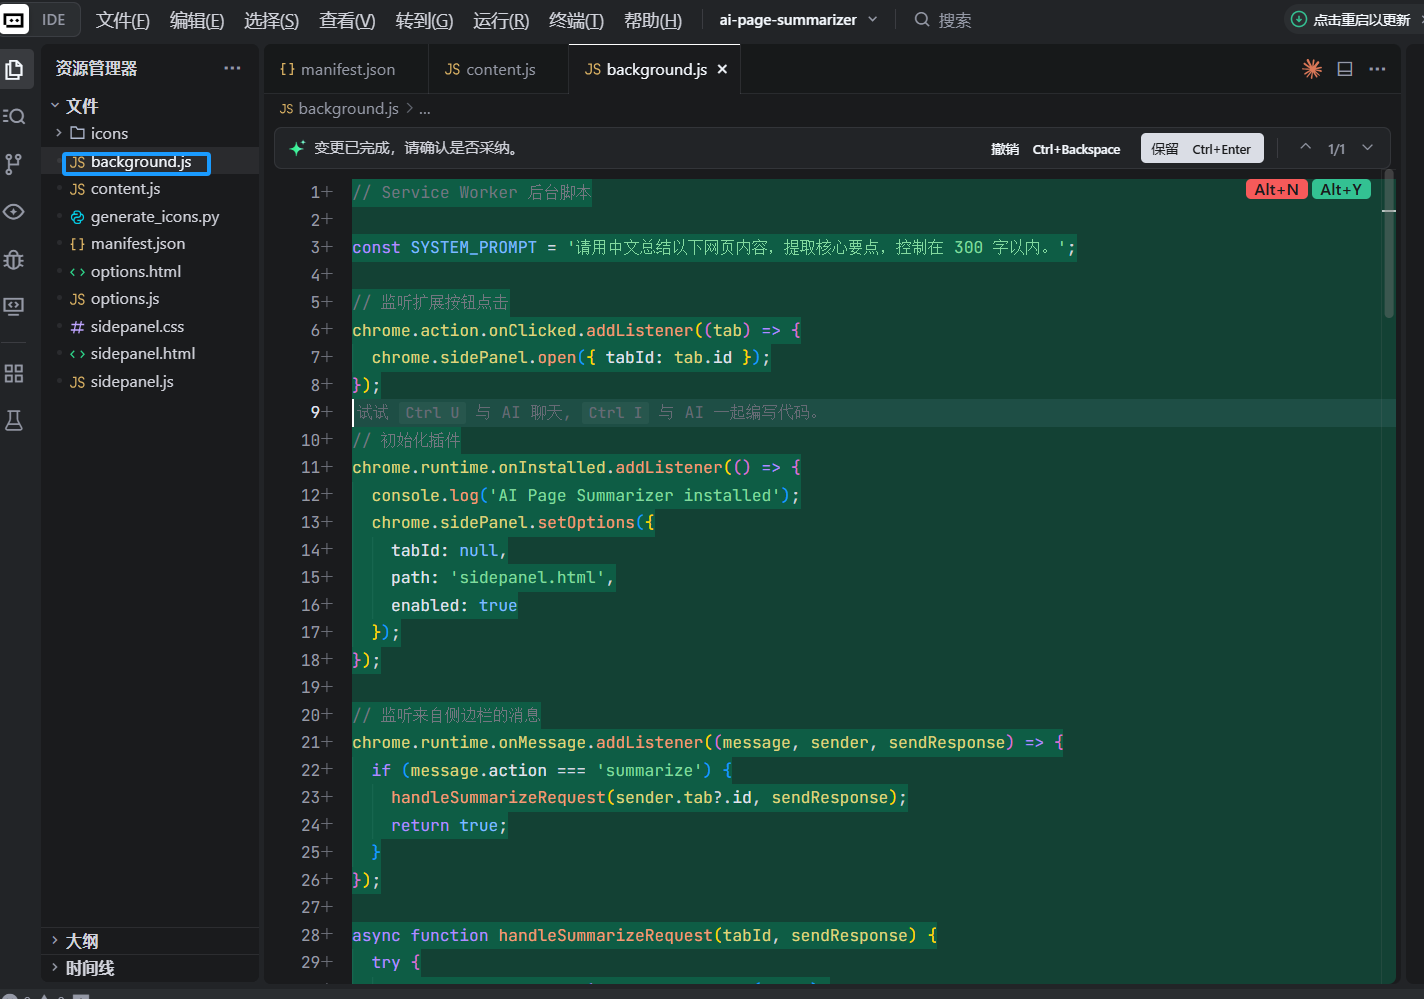
})3.2 Service Worker:AI APIの呼び出し
Service Workerは拡張機能の「脳」です。コンポーネント間の通信を調整し、外部AI APIを呼び出します。
AIにbackground.jsの作成を依頼:
Please help me write background.js with the following functions:
1. When the user clicks the extension icon, open the side panel
2. Listen for "summarize" messages from the side panel
3. After receiving the message, send "getPageContent" to the content script in the current tab to get page content
4. After receiving the page content, read the user's configured API Key and model selection from chrome.storage.local
5. Call the corresponding AI API according to the configuration (support OpenAI and Claude)
6. Send the AI summary back to the side panel

For OpenAI, call https://api.openai.com/v1/chat/completions and use model gpt-4o-mini
For Claude, call https://api.anthropic.com/v1/messages and use model claude-sonnet-4-20250514
System prompt: Please summarize the following webpage content in Japanese, extract the key points, and keep it within 300 characters.
核心コードは以下のようになります:
// background.js

// ユーザーがアイコンをクリックしたときにサイドパネルを開く
chrome.sidePanel.setPanelBehavior({ openPanelOnActionClick: true })

// サイドパネルからのメッセージをリッスン
chrome.runtime.onMessage.addListener((request, sender, sendResponse) => {
  if (request.action === 'summarize') {
    handleSummarize(request.tabId).then(sendResponse)
    return true // 非同期レスポンス
  }
})

async function handleSummarize(tabId) {
  // 1. ページコンテンツを取得
  const [response] = await chrome.tabs.sendMessage(tabId, {
    action: 'getPageContent'
  })

  // 2. ユーザー設定を読み取り
  const { apiKey, provider } = await chrome.storage.local.get([
    'apiKey', 'provider'
  ])

  if (!apiKey) {
    return { error: 'Please configure your API Key in the settings page first' }
  }

  // 3. AI APIを呼び出し
  const summary = provider === 'claude'
    ? await callClaude(response.content, apiKey)
    : await callOpenAI(response.content, apiKey)

  return { summary, title: response.title }
}
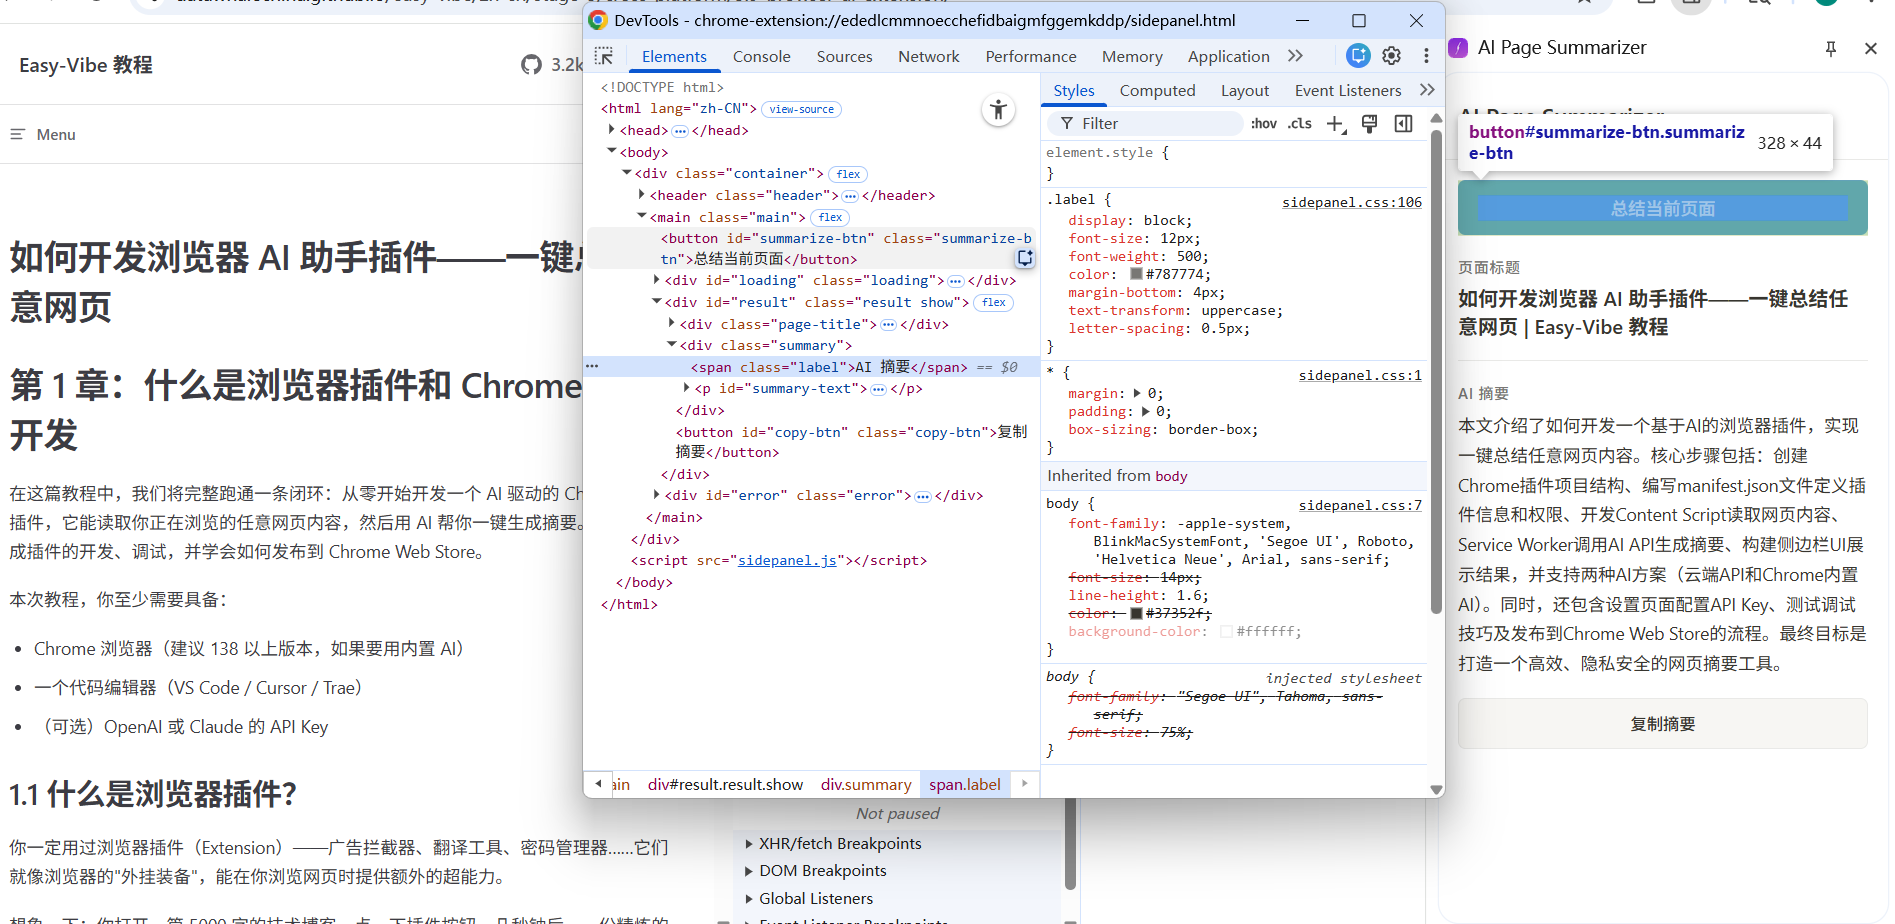
3.3 Side Panel UI:要約結果の表示
サイドパネルはユーザーのメインインタラクションUIです。AIにサイドパネルのHTML、CSS、JSの作成を依頼:
Please help me write these three files for the side panel:

sidepanel.html:
- 上部にプラグイン名「AI Page Summarizer」を表示
- 青い「現在のページを要約」ボタン
- ローディングアニメーションエリア(デフォルトで非表示)
- ページタイトルとAI要約を表示する結果表示エリア
- 下部に「要約をコピー」ボタン

sidepanel.css:
- Notionのタイポグラフィに似た、クリーンでモダンなデザイン
- サイドパネルに合わせた幅の適応
- ボタンにホバーエフェクト
- CSSでローディングアニメーションを実装

sidepanel.js:
- 「要約」ボタンクリック時、現在のタブIDを取得
- background.jsにsummarizeメッセージを送信
- ローディングアニメーションを表示
- 結果受信後にローディングを非表示にし、要約を表示
- 「コピー」ボタンでnavigator.clipboard.writeTextを使用してテキストをコピー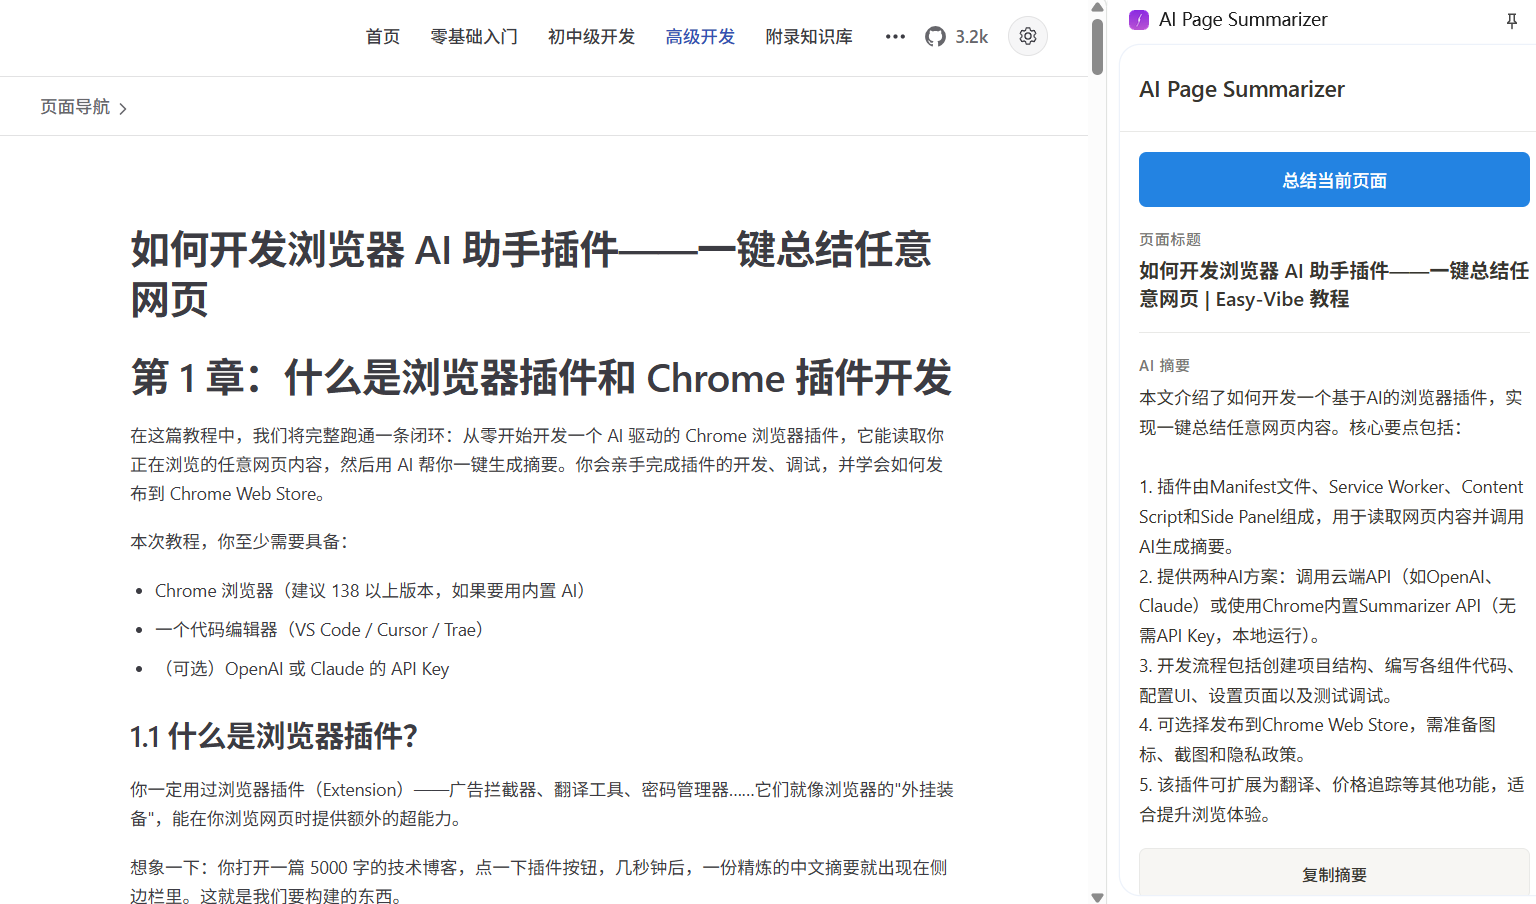
3.4 設定ページ:API Keyの設定
ユーザーが独自のAPI Keyを入力する場所が必要です。AIに設定ページの作成を依頼:
Please help me write options.html and options.js:
- AIプロバイダーを選択するドロップダウン(OpenAI / Claude)
- API Key用のパスワード入力(type="password")
- 「保存」ボタン
- chrome.storage.local.setで設定を保存
- ページ読み込み時にストレージから保存済み設定を読み取り、フォームに自動入力
- 保存後に「設定が保存されました」と表示セキュリティリマインダー:API Keyは
chrome.storage.localに保存され、ローカルデバイスにのみ保持されます。しかし、この拡張機能をChrome Web Storeに公開して他の人が使用する場合、より安全なアプローチはバックエンドプロキシサーバーを構築し、API Keyがクライアント側に直接露出しないようにすることです。

第4章:Chrome内蔵AIの使用(API Key不要)
Chrome 138から、GoogleはGemini NanoベースのAI機能をブラウザに直接内蔵しました。私たちのケースに最も適しているのはSummarizer APIです - 完全にローカルで動作し、API Key不要、インターネット不要、無料です。
4.1 ブラウザサポートの確認
内蔵AIにはハードウェア要件があります:
- デスクトップChrome 138以上(Windows 10以上、macOS 13以上、Linux、ChromeOS)
- 22 GBの利用可能なストレージ容量(モデルダウンロード用)
- GPU VRAM 4GB以上、またはシステムRAM 16GB以上(CPUコア4以上)
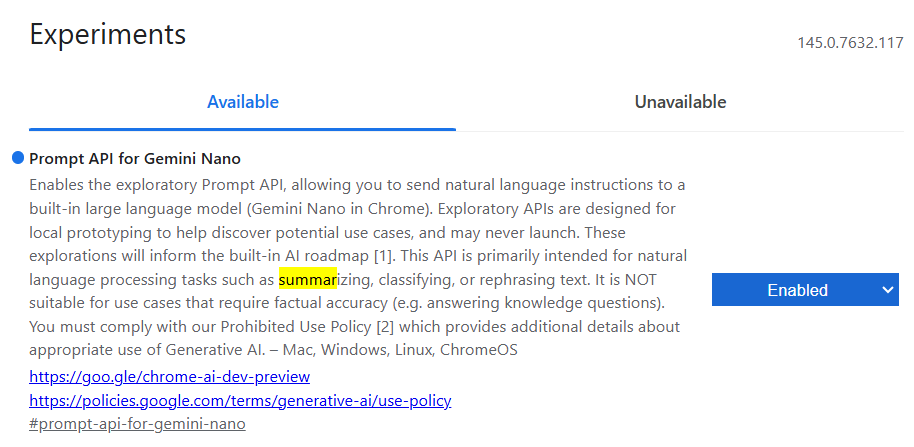
Chromeアドレスバーにchrome://flagsを入力し、Summarization関連のフラグを検索し、Enabledになっていることを確認。
- Chrome 131-137では、このスイッチはSummarization APIと呼ばれる。
- Chrome 138-144では、Summarization API for Gemini Nanoに名称変更。
- Chrome 145以上では、Summarization API for Gemini Nanoは削除され、要約機能はPrompt API for Gemini Nanoに統合。
4.2 Summarizer APIの使用
AIにbackground.jsに内蔵AIサポートを追加するよう依頼:
Please help me add Chrome built-in Summarizer API support in background.js:
1. Add a summarizeWithBuiltinAI function
2. First check whether Summarizer.availability() returns 'readily-available'
3. If available, create a summarizer instance, configure type as 'key-points', format as 'markdown', and length as 'medium'
4. Call summarizer.summarize() to summarize
5. In handleSummarize, add a branch for provider === 'builtin'
核心コード:
async function summarizeWithBuiltinAI(text) {
  // 利用可能性を確認
  const availability = await Summarizer.availability()
  if (availability !== 'readily-available') {
    throw new Error('Chrome built-in AI is not available. Please check browser version and hardware requirements.')
  }

  // サマライザーを作成
  const summarizer = await Summarizer.create({
    type: 'key-points',
    format: 'markdown',
    length: 'medium'
  })

  // 要約を実行
  const summary = await summarizer.summarize(text, {
    context: 'This is a webpage article'
  })

  return summary
}
4.3 設定ページの更新
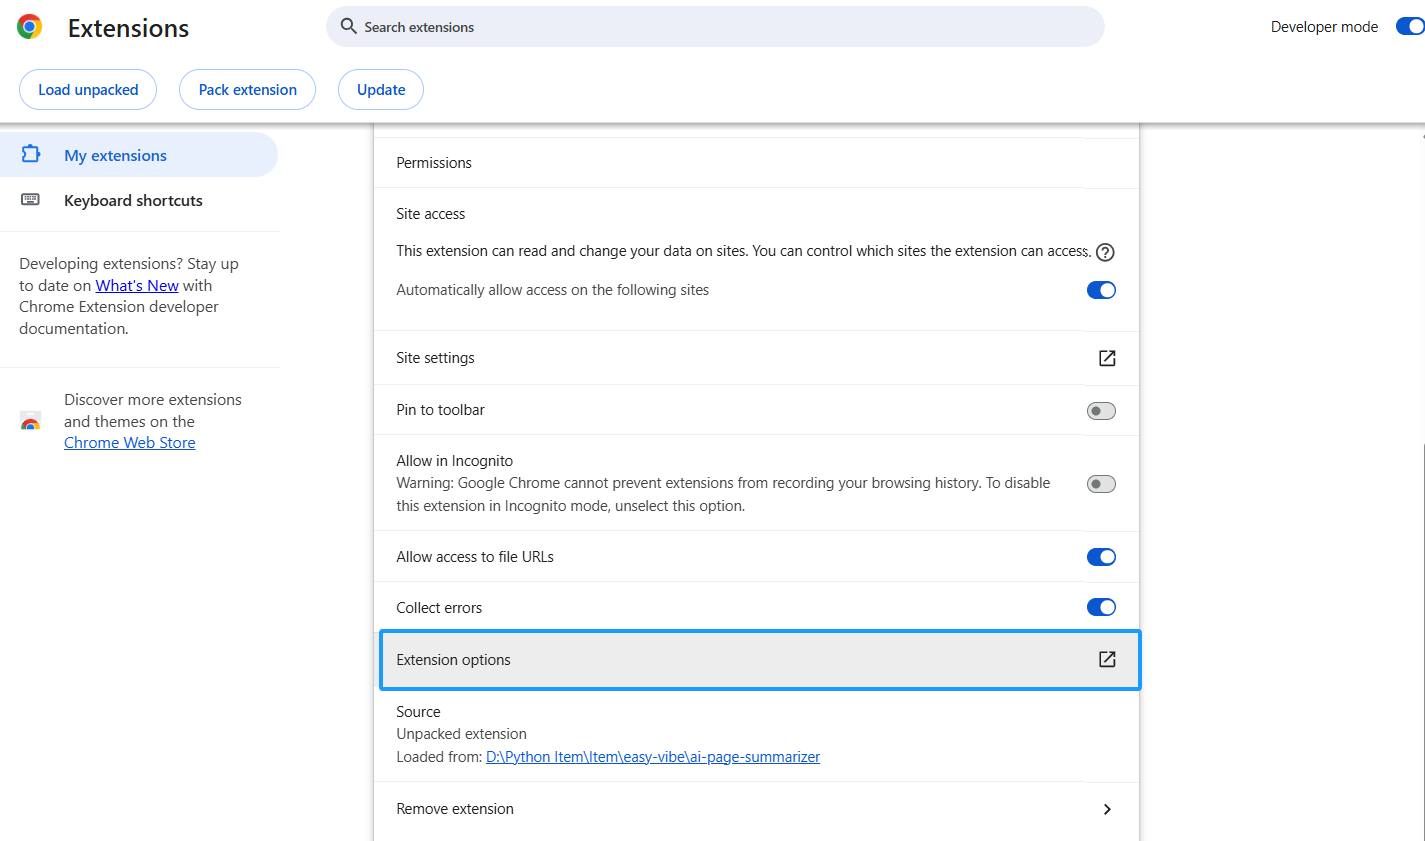
options.htmlのプロバイダードロップダウンに「Chrome内蔵AI(無料、API Key不要)」オプションを追加。ユーザーが選択すると、API Key入力を非表示にします。
Please help me modify options.html and options.js:
1. Add an option "Chrome built-in AI (free, no API Key needed)" to the provider dropdown, with value "builtin"
2. Hide the API Key input when builtin is selected
3. Show the API Key input when OpenAI or Claude is selected
第5章:テストとデバッグ
5.1 ローカルテストワークフロー
Chrome拡張機能のデバッグは通常のWebページのデバッグとは少し異なります:
Service Workerのデバッグ:
chrome://extensions/を開く- 拡張機能を見つけ、Service Workerリンクをクリック
- 専用のDevToolsウィンドウが開き、
console.log出力とネットワークリクエストを確認可能
Side Panelのデバッグ:
- サイドパネルを開く
- サイドパネルコンテンツ内で右クリック
- 検証を選択
- サイドパネル用のDevToolsが開く
Content Scriptのデバッグ:
- 任意のWebページでF12キーでDevToolsを開く
- Consoleパネルで、左上の実行コンテキストドロップダウンをクリック
- 拡張機能名を選択
- Content Scriptからの
console出力を確認可能
5.2 一般的なトラブルシューティング
| 問題 | 考えられる原因 | 解決策 |
|---|---|---|
| アイコンをクリックしても反応しない | Service Workerエラー | Service Worker DevTools Consoleを確認 |
| ページコンテンツを取得できない | Content Scriptが注入されていない | ページを更新して再試行、manifestのmatches設定を確認 |
| API呼び出しが失敗する | API Keyが間違っているか期限切れ | 設定ページでAPI Keyを再入力 |
| サイドパネルが空白 | sidepanel.htmlのパスが間違っている | manifestのside_panel.default_pathを確認 |
第6章:Chrome Web Storeへの公開(オプション)
拡張機能を他の人と共有したい場合、Chrome Web Storeに公開できます。
6.1 公開の準備
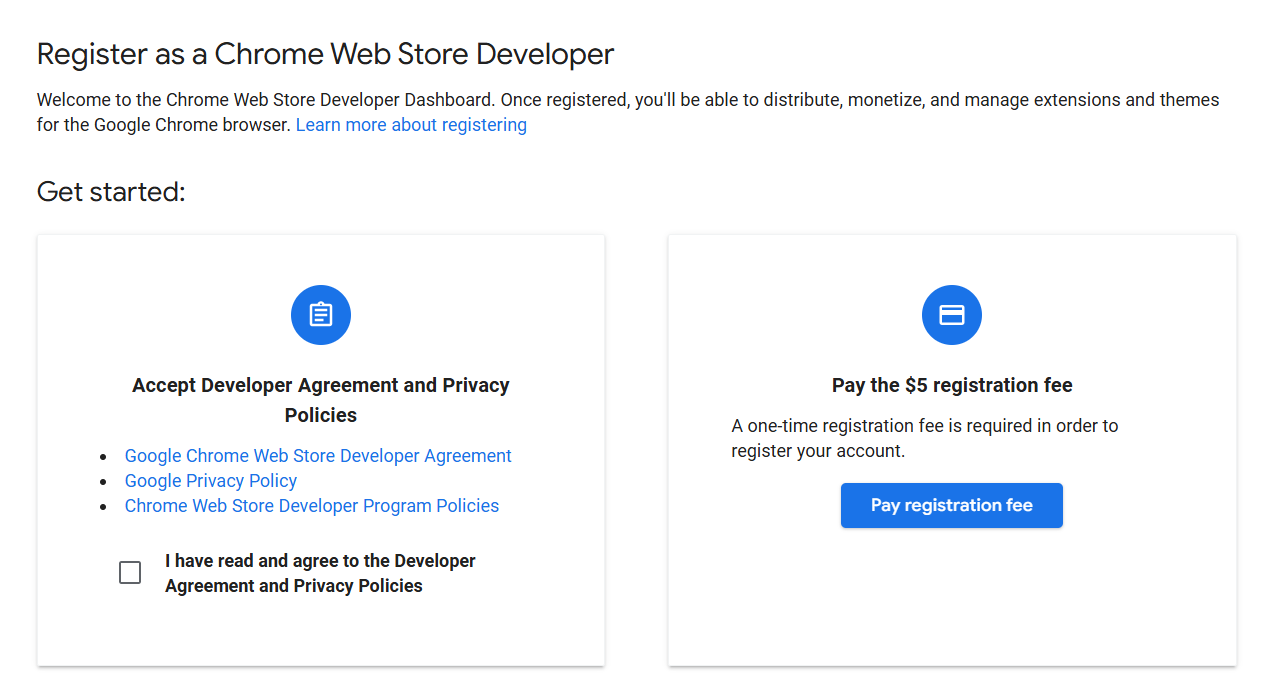
- 開発者アカウントの登録:Chrome Web Store Developer Dashboardにアクセスし、一回限りの$5の登録料を支払う
- 2段階認証の有効化:Googleアカウントで公開前に2段階認証を有効にする必要がある
- アセットの準備:
- 拡張機能アイコン:128x128 PNG
- 少なくとも1枚のスクリーンショット:1280x800推奨
- 詳細な機能説明
- プライバシーポリシーの説明(拡張機能がユーザーデータを処理する場合)
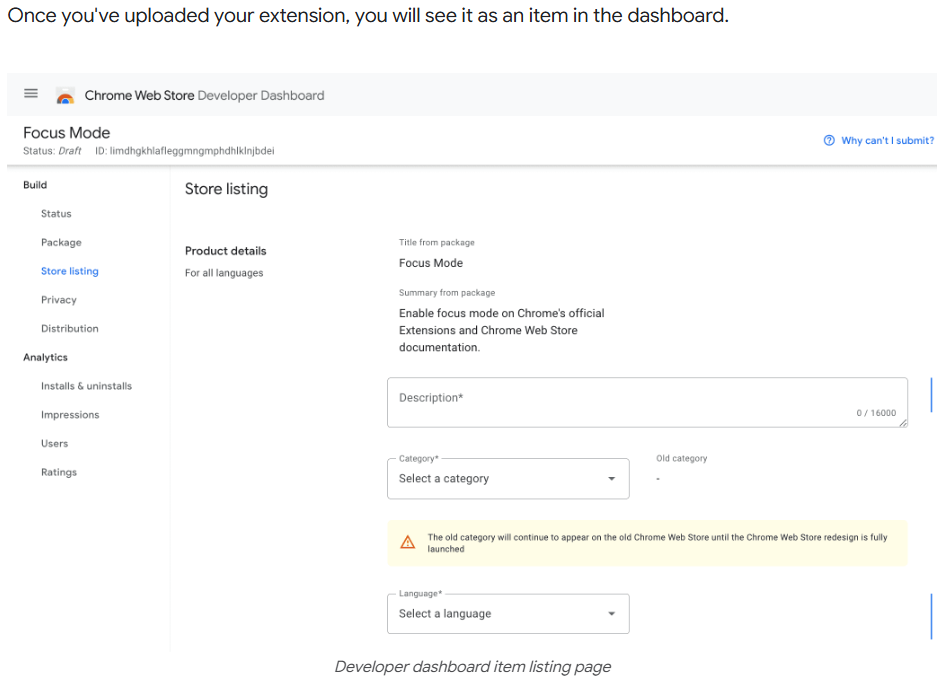
6.2 パッケージ化とアップロード
- 拡張機能フォルダーを
.zipファイルに圧縮(.crxではない) - Developer DashboardでNew Itemをクリック
.zipファイルをアップロード- ストア情報を入力(名前、説明、スクリーンショット、カテゴリなど)
- プライバシー慣行を入力(拡張機能が収集するユーザーデータを宣言)
- 審査に提出をクリック
Googleは提出された拡張機能を審査します。通常、数営業日かかります。要求する権限が少なく、説明が明確であるほど、審査は通常速く進みます。
第7章:まとめ
おめでとうございます!AI駆動のブラウザ拡張機能をゼロから構築しました。振り返りましょう:
- Chrome拡張機能のManifest V3アーキテクチャを理解
- Content Scriptを使用してWebページコンテンツを読み取り
- Service Workerを使用してAI APIを呼び出し、要約を生成
- Side Panelを使用して要約結果を表示
- API KeyなしでChrome内蔵AIを使用する方法も学習
ブラウザ拡張機能開発は非常に興味深い分野です - インターネット上の任意のWebページを「強化」できます。ページ要約だけでなく、同じアーキテクチャでさらに多くのものを構築できます:
応用方向:
- 翻訳アシスタント:外国語Webページをワンクリックで翻訳
- 読書注釈:ページをハイライト・注釈し、クラウドに保存
- 価格追跡:ECサイトページの価格変動を監視し、ユーザーに通知
- コード解説:GitHubでコードを選択し、AIに自動的に解説させる
Chrome内蔵AIの登場により、ハードルはさらに下がりました - API Keyさえ不要でAI搭載拡張機能を構築できます。ブラウザAI機能が成長し続けるにつれて、この分野の想像空間はさらに広がります。
ブラウザにスーパーパワーを与えましょう!