如何構建瀏覽器 AI 助手擴展:一鍵摘要任何網頁
第一章:瀏覽器擴展與 Chrome 擴展開發是什麼
在本教程中,我們將完成一個完整的閉環:從零構建一個 AI 驅動的 Chrome 瀏覽器擴展。它能夠閱讀你正在瀏覽的任何網頁內容,然後使用 AI 一鍵生成摘要。你將親自完成擴展的開發、調試,並學會如何將其發佈到 Chrome Web Store。
學習本教程,你至少需要準備:
- Chrome 瀏覽器(如果你想使用內建 AI,建議 138+ 版本)
- 一個代碼編輯器(VS Code / Cursor / Trae)
- (可選)一個 OpenAI 或 Claude API Key
1.1 什麼是瀏覽器擴展?
你一定用過瀏覽器擴展:廣告攔截器、翻譯工具、密碼管理器……它們就像是瀏覽器的「額外裝備」,讓你在瀏覽網頁時擁有超能力。
想像一下:你打開一篇 5000 字的技術博客,點一下擴展按鈕,幾秒鐘後側邊面板就出現了一份簡潔的中文摘要。這正是我們要構建的東西。

1.2 Chrome 擴展的基本架構
Chrome 擴展(基於 Manifest V3)由幾個核心部分組成,各司其職:
- Manifest 文件(
manifest.json):擴展的「身分證」,聲明其名稱、權限、入口文件等。 - Service Worker(背景腳本):擴展的「大腦」,在背景處理事件和調用 API。它不會持續運行,而是在需要時啟動。
- Content Script(內容腳本):擴展的「眼睛」,注入到網頁中,能夠讀取 DOM 內容。
- Side Panel(側邊面板):擴展的「門面」,在瀏覽器右側顯示 UI,用戶在這裡看到 AI 摘要結果。
- Options Page(設置頁):讓用戶配置 API Key 和相關設置。
它們的工作流程如下:
用戶點擊擴展圖標
    -> 側邊面板打開
    -> 用戶點擊「摘要」按鈕
    -> 側邊面板通知 Service Worker
    -> Service Worker 讓 Content Script 讀取頁面文字
    -> Content Script 返回頁面內容
    -> Service Worker 將內容發送給 AI API
    -> AI 返回摘要
    -> Service Worker 將摘要發回側邊面板顯示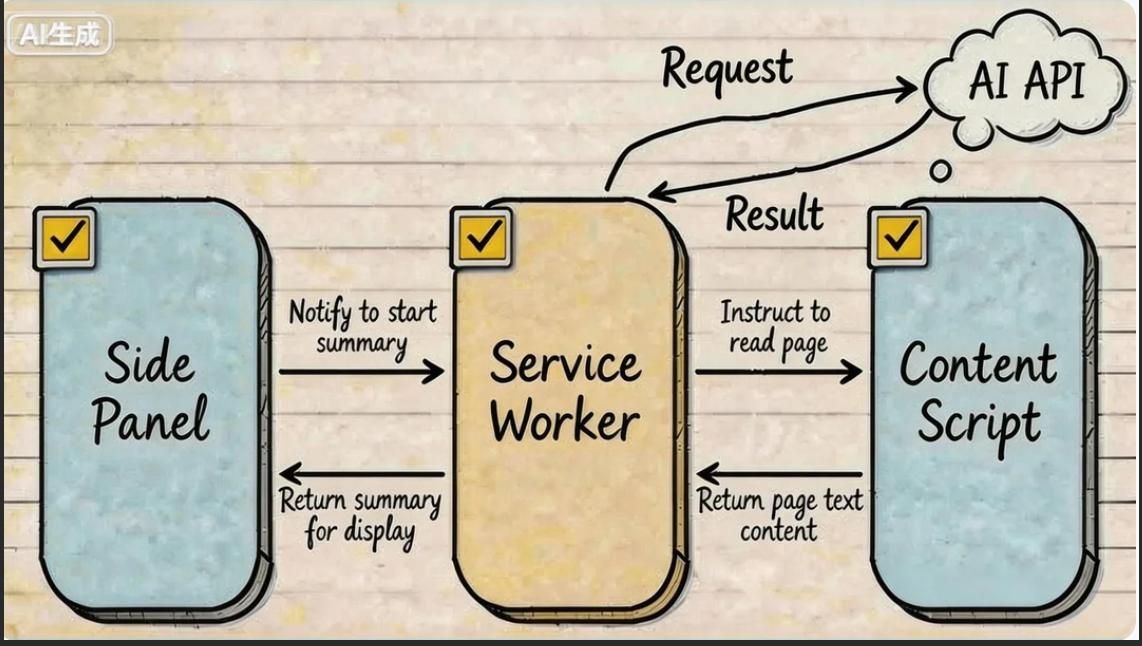
1.3 兩種 AI 方案:雲端 API vs 瀏覽器內建 AI
我們的擴展有兩種方式獲取 AI 能力:
方案 A:調用雲端 AI API(OpenAI / Claude)
- 優點:模型能力強大,支援所有設備
- 缺點:需要 API Key,需要網路,有使用成本
- 最適合:高品質摘要和處理更複雜的內容
方案 B:使用 Chrome 內建 AI(Summarizer API)
從 Chrome 138 開始,Google 將基於 Gemini Nano 的 AI 能力直接內建到了瀏覽器中。其中一個就是 Summarizer API——它完全在本地運行,無需 API Key,無需網路,完全免費。
- 優點:免費、保護隱私、無需 API Key
- 缺點:需要 Chrome 138+,較好的硬體(4GB+ VRAM 或 16GB+ RAM),模型能力弱於雲端 AI
- 最適合:注重隱私、不想付費、硬體條件足夠的用戶
本教程將同時實現兩種方案,你可以根據自己的情況選擇。
1.4 教程路線圖
我們將從零構建一個名為 「AI Page Summarizer」 的 Chrome 擴展,按以下步驟進行:
- 搭建擴展骨架:創建 Manifest V3 項目結構並載入到 Chrome 中
- 實現核心功能:Content Script 讀取頁面 + Service Worker 調用 AI API + 側邊面板顯示結果
- 整合 Chrome 內建 AI:使用 Summarizer API 提供免費的本地摘要
- 測試和調試:學習 Chrome 擴展的調試技巧
- 發佈到 Chrome Web Store:打包並提交審核
第二章:搭建擴展骨架
2.1 創建項目結構
打開你的 AI 編碼助手(Cursor / Trae / Claude Code),創建一個名為 ai-page-summarizer 的空資料夾,然後在聊天框中輸入:
Please help me create a Chrome browser extension project using Manifest V3.
The project name is ai-page-summarizer, and its function is to summarize webpage content with AI.
Please create the following file structure:

ai-page-summarizer/
├── manifest.json          # MV3 manifest file
├── background.js          # Service Worker background script
├── content.js             # Content script (reads webpage text)
├── sidepanel.html         # Side panel HTML
├── sidepanel.js           # Side panel logic
├── sidepanel.css          # Side panel styling
├── options.html           # Settings page
├── options.js             # Settings page logic
└── icons/                 # Icons folder

Requirements for manifest.json:
1. manifest_version: 3
2. Permissions: storage, activeTab, scripting, sidePanel
3. Use service_worker: "background.js" for background
4. Configure side_panel with default path sidepanel.html
5. Configure default icon and title for action
AI 會為你生成完整的項目骨架。讓我們看看每個文件的作用。
2.2 manifest.json:擴展的「身分證」
這是 Chrome 擴展中最重要的文件。它告訴瀏覽器擴展是什麼、需要什麼權限、包含哪些組件:
{
  "manifest_version": 3,
  "name": "AI Page Summarizer",
  "version": "1.0",
  "description": "Use AI to summarize any webpage in one click",
  "permissions": ["storage", "activeTab", "scripting", "sidePanel"],
  "background": {
    "service_worker": "background.js"
  },
  "action": {
    "default_title": "AI Page Summarizer",
    "default_icon": {
      "16": "icons/icon-16.png",
      "48": "icons/icon-48.png",
      "128": "icons/icon-128.png"
    }
  },
  "side_panel": {
    "default_path": "sidepanel.html"
  },
  "options_page": "options.html",
  "icons": {
    "16": "icons/icon-16.png",
    "48": "icons/icon-48.png",
    "128": "icons/icon-128.png"
  }
}
權限說明:
storage:讓擴展能存儲數據,如用戶的 API KeyactiveTab:讓擴展能訪問用戶當前查看的標籤頁(僅在用戶交互後,因此非常安全)scripting:讓擴展能向頁面注入腳本以讀取內容sidePanel:讓擴展能使用 Chrome 側邊面板 API

2.3 準備圖標
Chrome 擴展需要三種尺寸的圖標:16x16、48x48 和 128x128。你可以讓 AI 幫你生成:
Please help me generate three simple Chrome extension icons (16x16, 48x48, 128x128),
with a rounded rectangle, gradient purple background, and a white AI lightning symbol in the center.
Save them in the icons/ directory as icon-16.png, icon-48.png, and icon-128.png.
2.4 將擴展載入 Chrome
在編寫代碼之前,讓我們先將這個「空殼」擴展載入 Chrome,這樣後續每次修改都可以立即預覽:
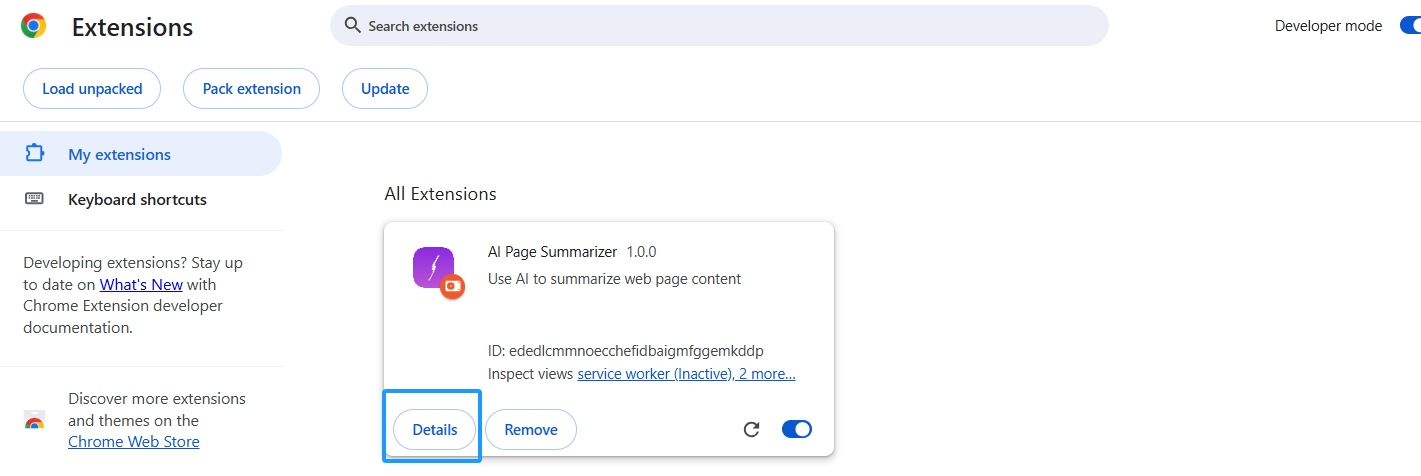
- 打開 Chrome,在地址欄輸入
chrome://extensions/ - 在右上角開啟「開發者模式」
- 點擊「載入未封裝項目」
- 選擇你的
ai-page-summarizer資料夾
你會看到擴展出現在列表中,其圖標也會顯示在 Chrome 工具列上。
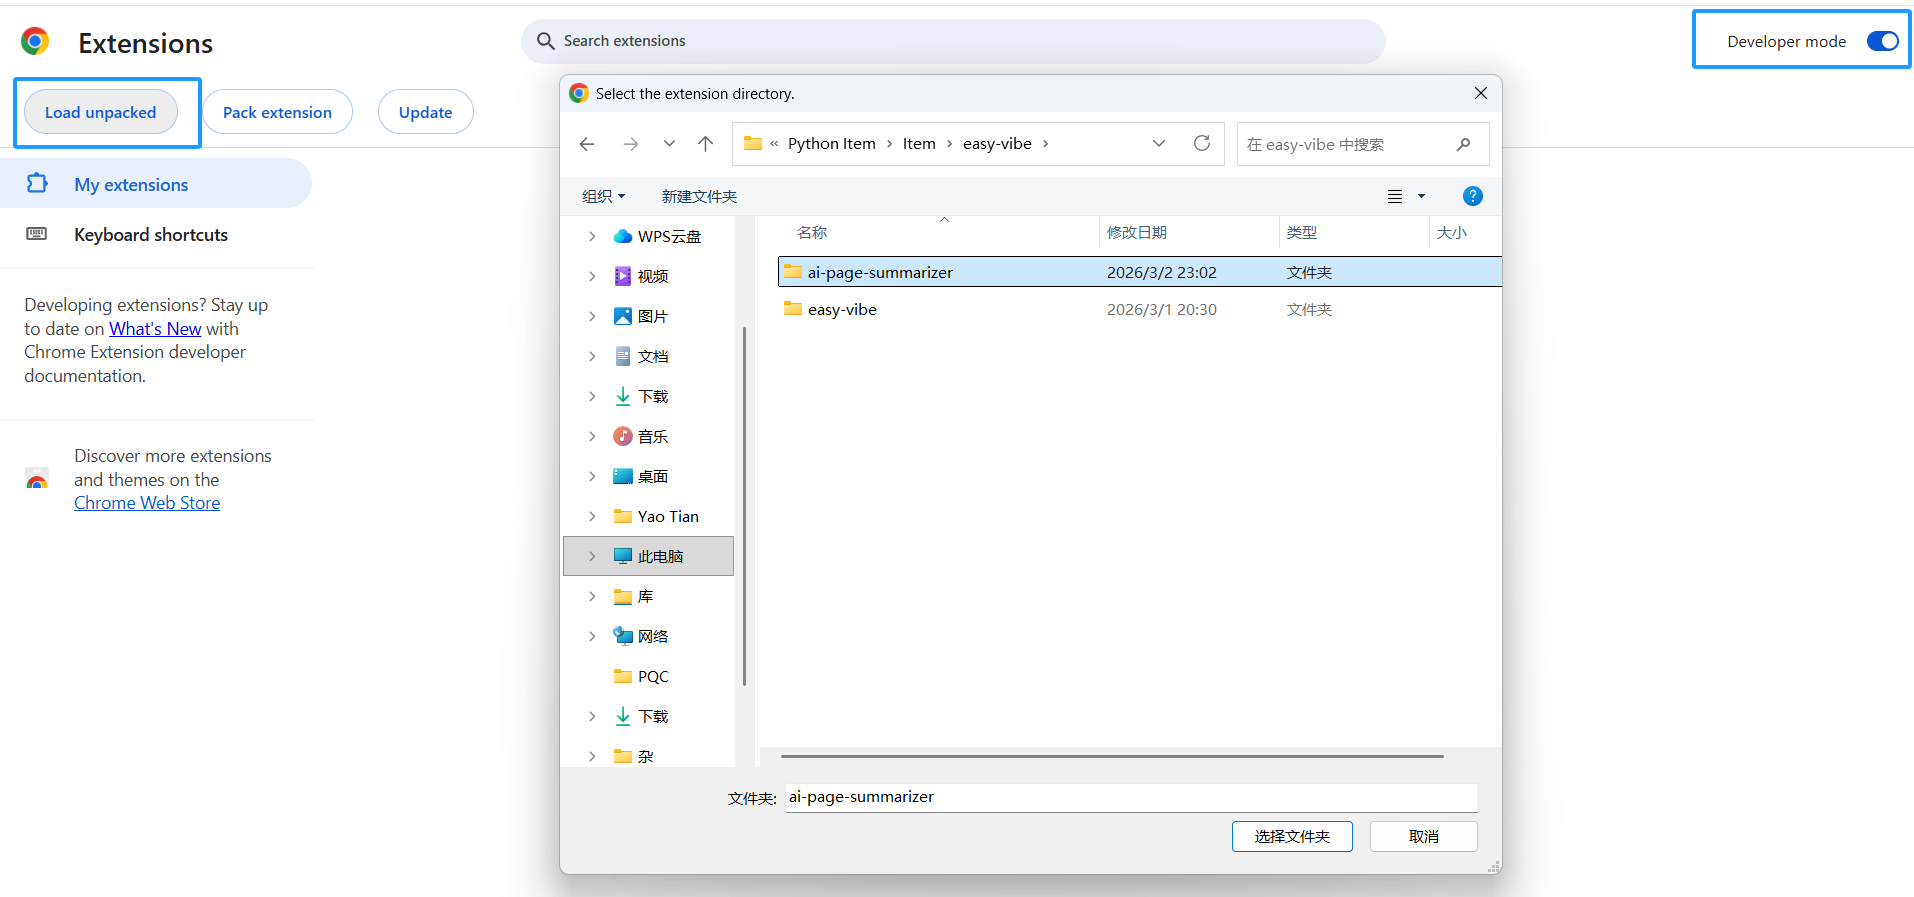
提示:每次修改代碼後,回到
chrome://extensions/並點擊擴展卡片上的重新整理按鈕(🔄)來更新它。
第三章:實現核心功能 - 讀取頁面 + AI 摘要
3.1 Content Script:讀取頁面文字
Content Script 是注入到網頁中的腳本。它能直接訪問頁面的 DOM。我們用它來提取頁面文字。
讓 AI 編寫 content.js:
Please help me write content.js with the following functions:
1. Listen for messages from Service Worker
2. When receiving a "getPageContent" message, extract the current page text content
3. Extraction logic: get document.body.innerText, and also get the page title and URL
4. Return the extracted content via sendResponse
AI 會生成類似這樣的代碼:
// content.js
chrome.runtime.onMessage.addListener((request, sender, sendResponse) => {
if (request.action === 'getPageContent') {
const content = document.body.innerText || document.body.textContent
sendResponse({
content: content.trim(),
title: document.title,
url: window.location.href
})
}
return true // 保持訊息通道開啟
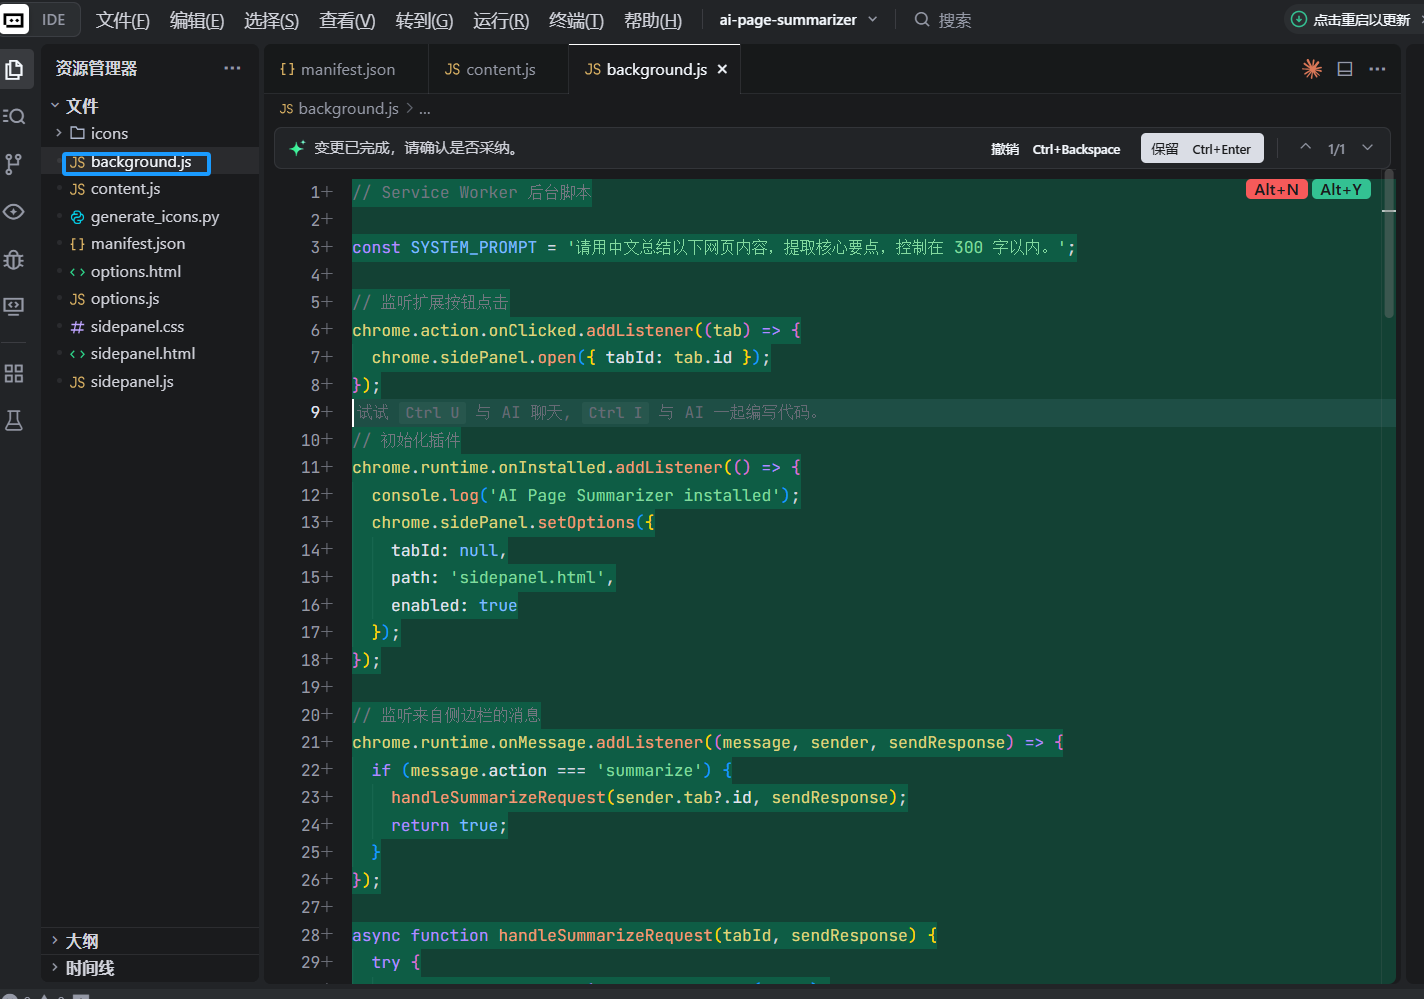
})3.2 Service Worker:調用 AI API
Service Worker 是擴展的「大腦」。它協調各組件之間的通訊,並調用外部 AI API。
讓 AI 編寫 background.js:
Please help me write background.js with the following functions:
1. When the user clicks the extension icon, open the side panel
2. Listen for "summarize" messages from the side panel
3. After receiving the message, send "getPageContent" to the content script in the current tab to get page content
4. After receiving the page content, read the user's configured API Key and model selection from chrome.storage.local
5. Call the corresponding AI API according to the configuration (support OpenAI and Claude)
6. Send the AI summary back to the side panel

For OpenAI, call https://api.openai.com/v1/chat/completions and use model gpt-4o-mini
For Claude, call https://api.anthropic.com/v1/messages and use model claude-sonnet-4-20250514
System prompt: Please summarize the following webpage content in Chinese, extract the key points, and keep it within 300 Chinese characters.
核心代碼如下:
// background.js

// 用戶點擊圖標時打開側邊面板
chrome.sidePanel.setPanelBehavior({ openPanelOnActionClick: true })

// 監聽來自側邊面板的訊息
chrome.runtime.onMessage.addListener((request, sender, sendResponse) => {
  if (request.action === 'summarize') {
    handleSummarize(request.tabId).then(sendResponse)
    return true // 異步回應
  }
})

async function handleSummarize(tabId) {
  // 1. 獲取頁面內容
  const [response] = await chrome.tabs.sendMessage(tabId, {
    action: 'getPageContent'
  })

  // 2. 讀取用戶設置
  const { apiKey, provider } = await chrome.storage.local.get([
    'apiKey', 'provider'
  ])

  if (!apiKey) {
    return { error: 'Please configure your API Key in the settings page first' }
  }

  // 3. 調用 AI API
  const summary = provider === 'claude'
    ? await callClaude(response.content, apiKey)
    : await callOpenAI(response.content, apiKey)

  return { summary, title: response.title }
}
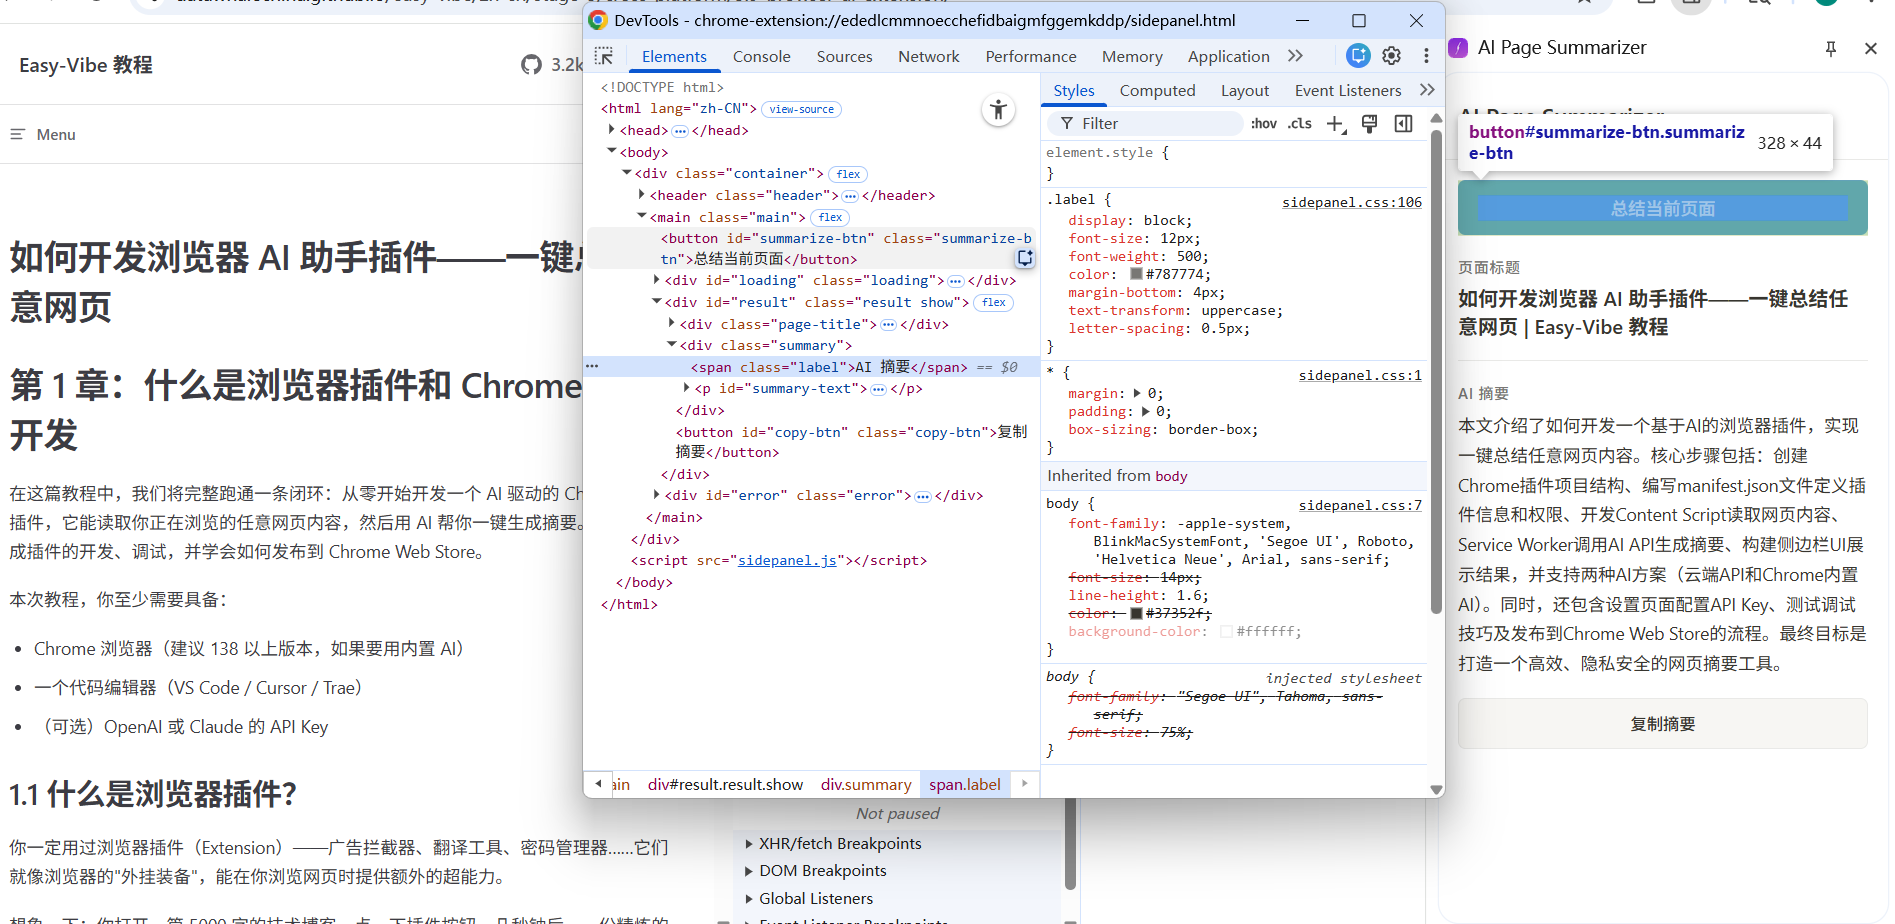
3.3 Side Panel UI:顯示摘要結果
側邊面板是用戶的主要交互 UI。讓 AI 編寫側邊面板的 HTML、CSS 和 JS:
Please help me write these three files for the side panel:

sidepanel.html:
- Show the plugin name "AI Page Summarizer" at the top
- A blue "Summarize Current Page" button
- A loading animation area (hidden by default)
- A result display area showing the page title and AI summary
- A "Copy Summary" button at the bottom

sidepanel.css:
- Clean modern design, similar to Notion typography
- Width adapts to the side panel
- Buttons have hover effects
- Loading animation implemented with CSS

sidepanel.js:
- When clicking the "Summarize" button, get the current tab ID
- Send a summarize message to background.js
- Show loading animation
- Hide loading and display summary after receiving result
- Use navigator.clipboard.writeText in the "Copy" button to copy text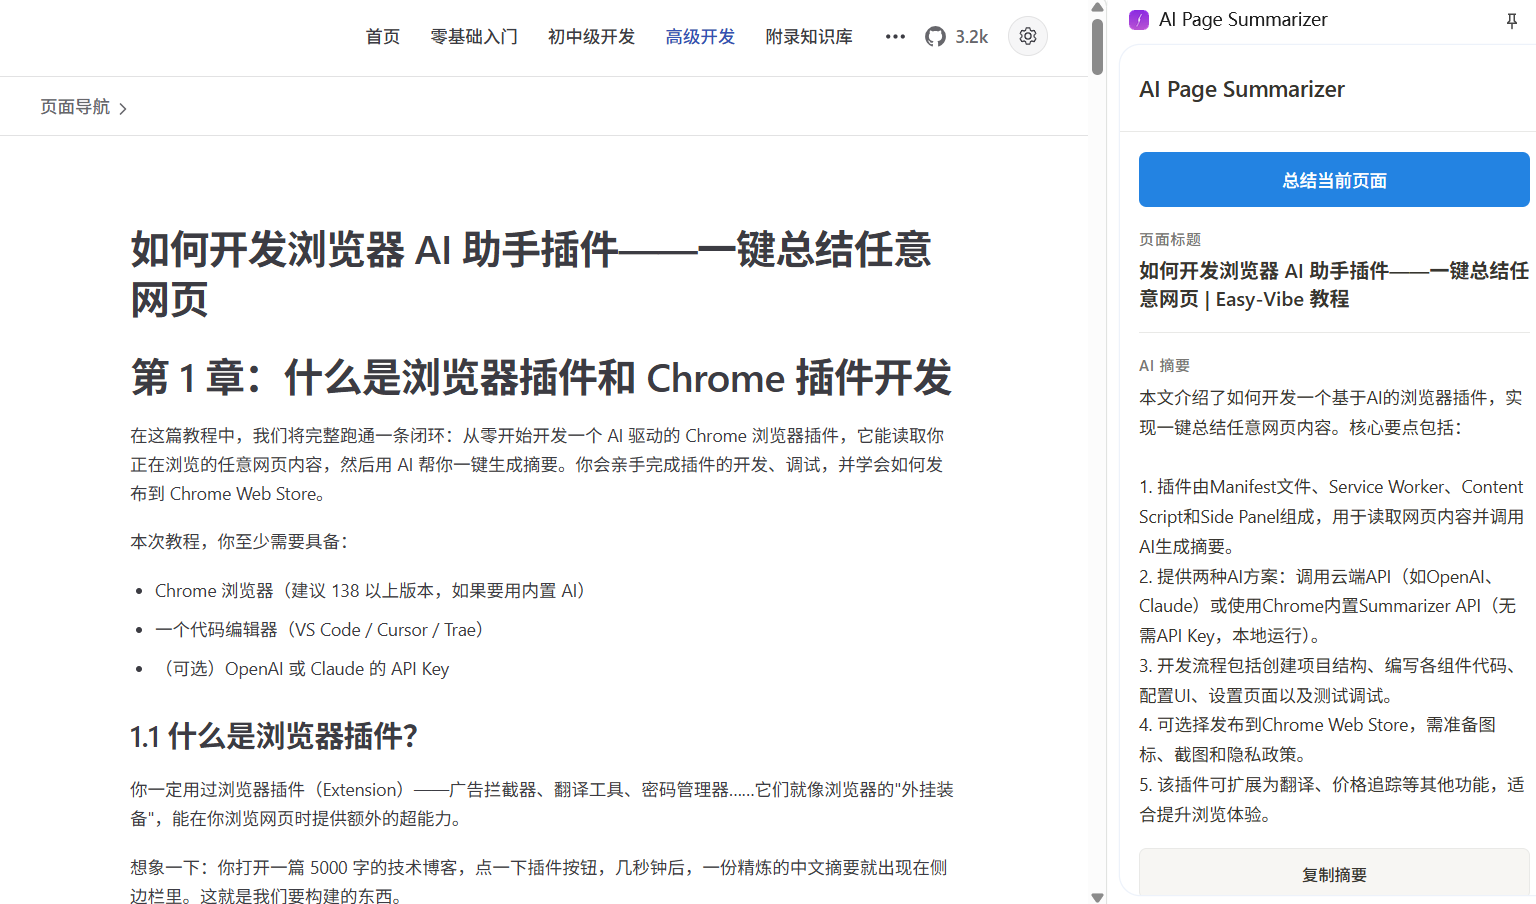
3.4 設置頁面:配置 API Key
用戶需要一個地方來輸入自己的 API Key。讓 AI 編寫設置頁面:
Please help me write options.html and options.js:
- A dropdown to choose AI provider (OpenAI / Claude)
- A password input for API Key (type="password")
- A "Save" button
- Save config with chrome.storage.local.set
- Read saved config from storage and fill the form on page load
- Show "Settings saved" after saving安全提醒:API Key 存儲在
chrome.storage.local中,只保留在本地設備上。但如果你想將這個擴展發佈到 Chrome Web Store 供他人使用,更安全的做法是搭建一個後端代理伺服器,這樣 API Key 就不會直接暴露在客戶端。

第四章:使用 Chrome 內建 AI(無需 API Key)
從 Chrome 138 開始,Google 將基於 Gemini Nano 的 AI 能力直接內建到了瀏覽器中。最適合我們場景的是 Summarizer API——它完全在本地運行,無需 API Key,無需網路,而且免費。
4.1 檢查瀏覽器支援
內建 AI 有硬體要求:
- 桌面版 Chrome 138+(Windows 10+、macOS 13+、Linux、ChromeOS)
- 22 GB 可用存儲空間(用於模型下載)
- 4GB+ GPU VRAM,或 16GB+ 系統記憶體搭配 4 核以上 CPU
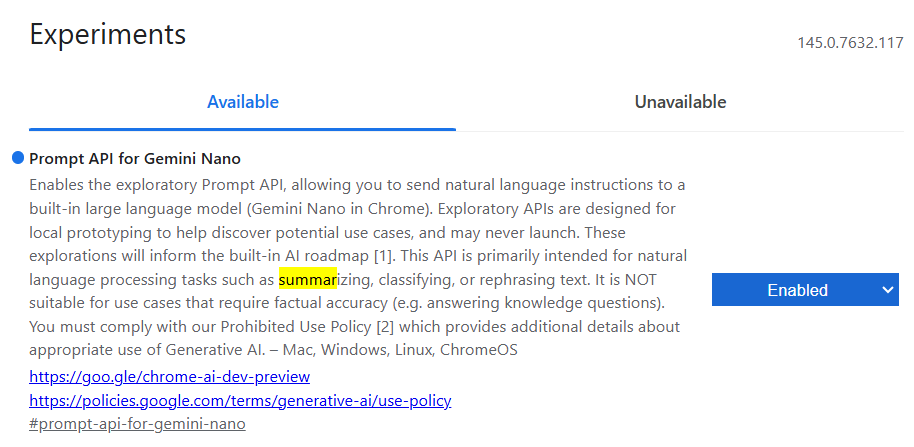
在 Chrome 地址欄輸入 chrome://flags,搜索與 Summarization 相關的標誌,確保其為 Enabled。
- 在 Chrome 131-137 中,此開關名為 Summarization API。
- 在 Chrome 138-144 中,更名為 Summarization API for Gemini Nano。
- 在 Chrome 145+ 中,Summarization API for Gemini Nano 已被移除,其摘要功能整合到了 Prompt API for Gemini Nano 中。
4.2 使用 Summarizer API
讓 AI 在 background.js 中添加內建 AI 支援:
Please help me add Chrome built-in Summarizer API support in background.js:
1. Add a summarizeWithBuiltinAI function
2. First check whether Summarizer.availability() returns 'readily-available'
3. If available, create a summarizer instance, configure type as 'key-points', format as 'markdown', and length as 'medium'
4. Call summarizer.summarize() to summarize
5. In handleSummarize, add a branch for provider === 'builtin'
核心代碼:
async function summarizeWithBuiltinAI(text) {
  // 檢查可用性
  const availability = await Summarizer.availability()
  if (availability !== 'readily-available') {
    throw new Error('Chrome built-in AI is not available. Please check browser version and hardware requirements.')
  }

  // 創建摘要器
  const summarizer = await Summarizer.create({
    type: 'key-points',
    format: 'markdown',
    length: 'medium'
  })

  // 執行摘要
  const summary = await summarizer.summarize(text, {
    context: 'This is a webpage article'
  })

  return summary
}
4.3 更新設置頁面
在 options.html 的供應商下拉選單中添加一個「Chrome 內建 AI(免費,無需 API Key)」選項。當用戶選擇它時,隱藏 API Key 輸入框,因為不再需要了。
Please help me modify options.html and options.js:
1. Add an option "Chrome built-in AI (free, no API Key needed)" to the provider dropdown, with value "builtin"
2. Hide the API Key input when builtin is selected
3. Show the API Key input when OpenAI or Claude is selected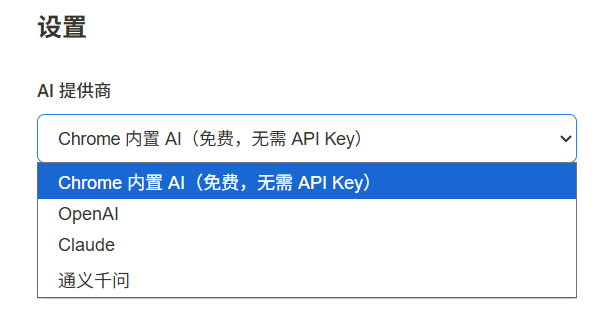
第五章:測試和調試
5.1 本地測試流程
調試 Chrome 擴展與調試普通網頁有些不同:
調試 Service Worker:
- 打開
chrome://extensions/ - 找到你的擴展,點擊 Service Worker 連結
- 會打開一個專用的 DevTools 視窗,你可以在這裡看到
console.log輸出和網路請求
調試 Side Panel:
- 打開側邊面板
- 在側邊面板內容中右鍵點擊
- 選擇「檢查」
- 這會打開側邊面板的 DevTools
調試 Content Script:
- 在任何網頁上按 F12 打開 DevTools
- 在 Console 面板中,點擊左上角的執行上下拉下拉選單
- 選擇你的擴展名稱
- 然後你就可以看到 Content Script 的
console輸出了
5.2 常見問題排查
| 問題 | 可能原因 | 解決方案 |
|---|---|---|
| 點擊圖標沒有反應 | Service Worker 錯誤 | 檢查 Service Worker 的 DevTools Console |
| 無法獲取頁面內容 | Content Script 未注入 | 重新整理頁面後重試,檢查 manifest 中的 matches 配置 |
| API 調用失敗 | API Key 錯誤或已過期 | 在設置頁面重新輸入 API Key |
| 側邊面板空白 | sidepanel.html 路徑錯誤 | 檢查 manifest 中的 side_panel.default_path |
第六章:發佈到 Chrome Web Store(可選)
如果你想將擴展分享給其他人,可以發佈到 Chrome Web Store。
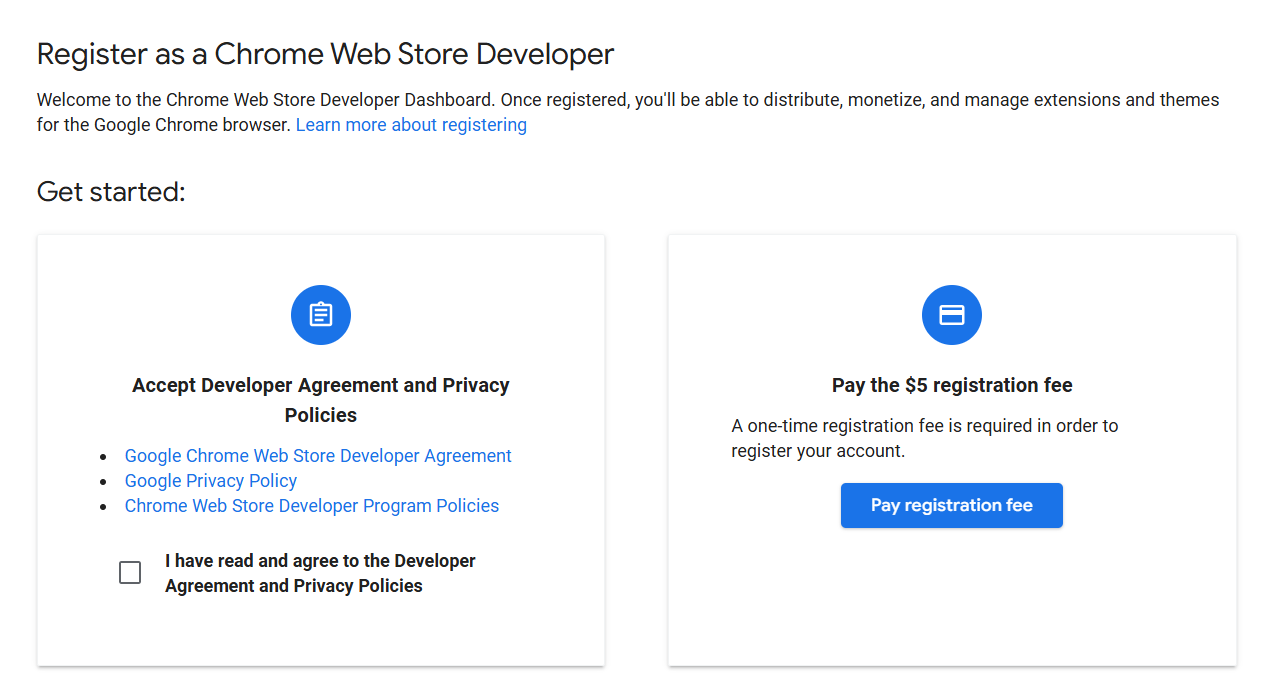
6.1 發佈準備
- 註冊開發者帳號:訪問 Chrome Web Store Developer Dashboard 並支付一次性 $5 的註冊費
- 啟用兩步驟驗證:你的 Google 帳號必須在發佈前啟用兩步驟驗證
- 準備素材:
- 擴展圖標:128x128 PNG
- 至少一張截圖:建議 1280x800
- 詳細的功能描述
- 隱私政策說明(如果你的擴展會處理用戶數據)
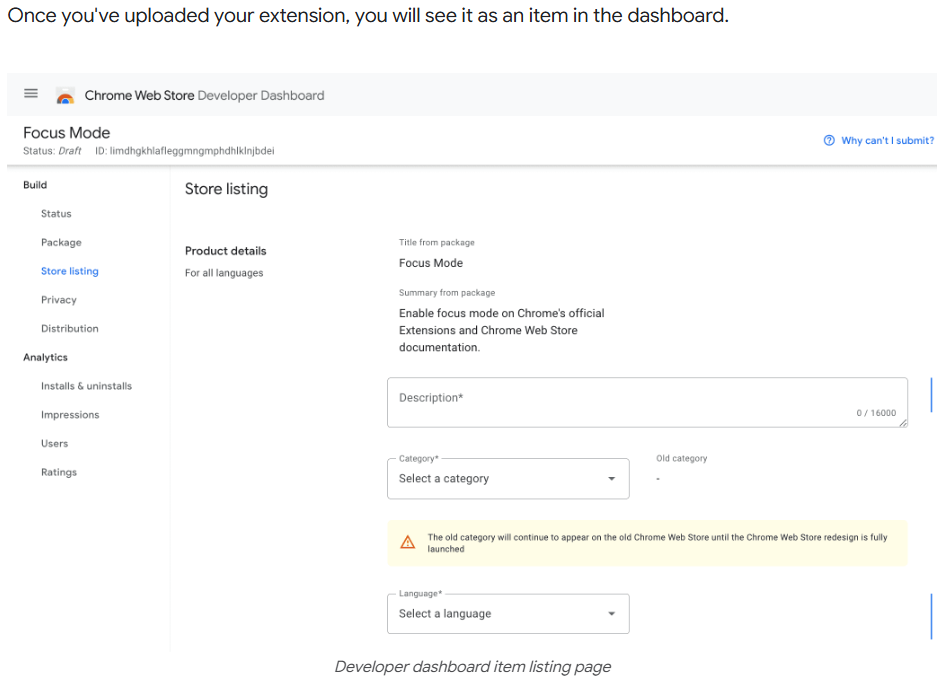
6.2 打包上傳
- 將擴展資料夾壓縮為
.zip文件(不是.crx) - 在 Developer Dashboard 中點擊 New Item
- 上傳
.zip文件 - 填寫商店資訊(名稱、描述、截圖、類別等)
- 填寫隱私聲明(聲明你的擴展收集了哪些用戶數據)
- 點擊 Submit for Review
Google 會對提交的擴展進行審核,通常需要數個工作日。你請求的權限越少、描述越清晰,審核通常越快。
第七章:總結
恭喜!你已經從零構建了一個 AI 驅動的瀏覽器擴展。讓我們回顧一下做了什麼:
- 理解了 Chrome 擴展的 Manifest V3 架構
- 使用 Content Script 讀取了網頁內容
- 使用 Service Worker 調用 AI API 生成摘要
- 使用 Side Panel 顯示了摘要結果
- 還學會了在無需任何 API Key 的情況下使用 Chrome 內建 AI
瀏覽器擴展開發是一個非常有趣的領域——它能讓你「增強」互聯網上的任何網頁。除了摘要頁面,你還可以用類似的架構構建更多東西:
進階方向:
- 翻譯助手:一鍵將外語網頁翻譯成中文
- 閱讀標註:在頁面上高亮和標註,然後保存到雲端
- 價格追蹤:監控電商頁面的價格變化並通知用戶
- 代碼解釋器:在 GitHub 上選中代碼,讓 AI 自動解釋
Chrome 內建 AI 的到來進一步降低了門檻——你甚至不需要 API Key 就能構建 AI 驅動的擴展。隨著瀏覽器 AI 能力的不斷增長,這個領域的想像空間只會越來越大。
去為你的瀏覽器裝備超能力吧!