VS Code拡張機能の作り方:AIプロジェクトアシスタントを作ろう
第1章:VS Code拡張機能開発とは
このチュートリアルでは、完全なクローズドループを完成させます。ゼロからVS Code拡張機能を構築し、あなたのAIプロジェクトアシスタントとして動作させます。ワンクリックでのプロジェクトテンプレート生成、選択したファイルやコードスニペットに対するAIチャット、複数ファイルのQ&A分析、カスタムショートカットを備えています。開発、デバッグを完了し、VS Code Marketplaceへの公開方法も学びます。
このチュートリアルに取り組む前に、以下の環境が必要です:
- Node.js環境(バージョン18.0以上)
- VS Codeエディタ(バージョン1.90以上)
- AIコーディングアシスタント(Cursor / Trae / Claude Code)
- (オプション)GitHub Copilotサブスクリプション(Language Model API用)
Vibe Codingのエンドツーエンド:AIコーディングアシスタントを使って大部分のコードを生成します。あなたはコア概念とアーキテクチャを理解し、自然言語で要件を記述するだけで済みます。
1.1 VS Code拡張機能でできること
あなたは毎日VS Code拡張機能を使っています。Prettierがコードをフォーマットし、GitLensがGit履歴を表示し、GitHub Copilotがコード記述を支援しています。これらの拡張機能は本質的にTypeScript/JavaScriptで書かれたプログラムであり、VS Code APIを通じてエディタを拡張しています。
VS Code拡張機能は多くの人が想像する以上のことができます:
- 新しいUI要素の追加:サイドバーパネル、ステータスバー情報、カスタムWebviewページ
- ファイルとコードの処理:ファイルの読み取り、変更、作成、コード構造の分析
- 外部サービスの統合:APIの呼び出し、データベースへの接続、CI/CDの統合
- エディタ機能の拡張:カスタム言語サポート、コード補完、診断
- AI機能の追加:Chat Participant APIでAIアシスタントを作成、Language Model APIでモデルを呼び出し
1.2 VS Code拡張機能のコアアーキテクチャ
VS Code拡張機能は、エディタのメインプロセスとは独立したExtension Hostプロセスで実行されます。つまり、拡張機能がクラッシュしても、エディタ自体には影響しません。
典型的な拡張機能には以下のコア部分があります:
- package.json(マニフェスト):拡張機能の「身分証明書」。名前、エントリファイル、コントリビューションポイント(
commands、menus、keybindingsなど)を宣言 - extension.ts(エントリファイル):拡張機能の「頭脳」。
activate()とdeactivate()をエクスポート - コントリビューションポイント:package.jsonで拡張機能がVS Codeに提供するもの(コマンド、メニュー項目、キーバインディング、ビューなど)
- VS Code API:エディタ機能を操作するためのTypeScript APIセット
VS Codeエディタ
    │
    ├── Extension Host(拡張機能プロセス)
    │   ├── あなたの拡張機能
    │   │   ├── package.json  -> 「何ができるか」を宣言
    │   │   ├── extension.ts  -> 「どうやるか」を実装
    │   │   └── その他のモジュール -> 具体的な機能コード
    │   ├── 他の拡張機能 A
    │   └── 他の拡張機能 B
    │
    └── エディタメインプロセス(UIレンダリング)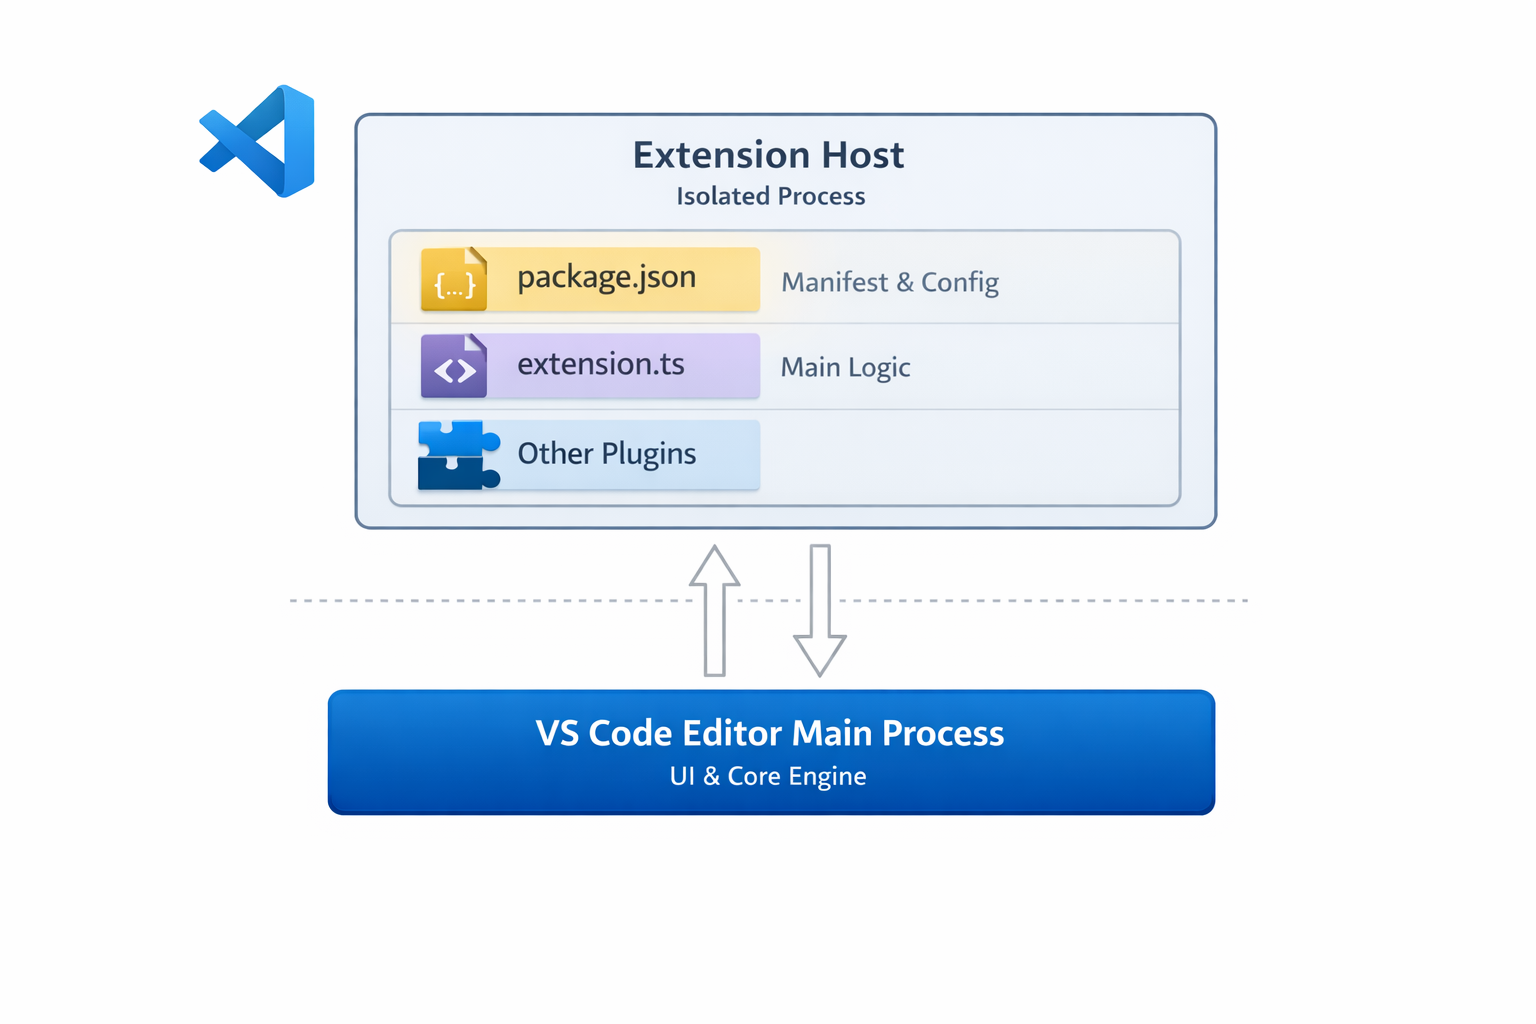
1.3 どんな拡張機能を作るのか?
「AI Project Bot」という名前のVS Code拡張機能を構築します。以下の機能を備えたAIプロジェクトアシスタントです:
| 機能 | 説明 |
|---|---|
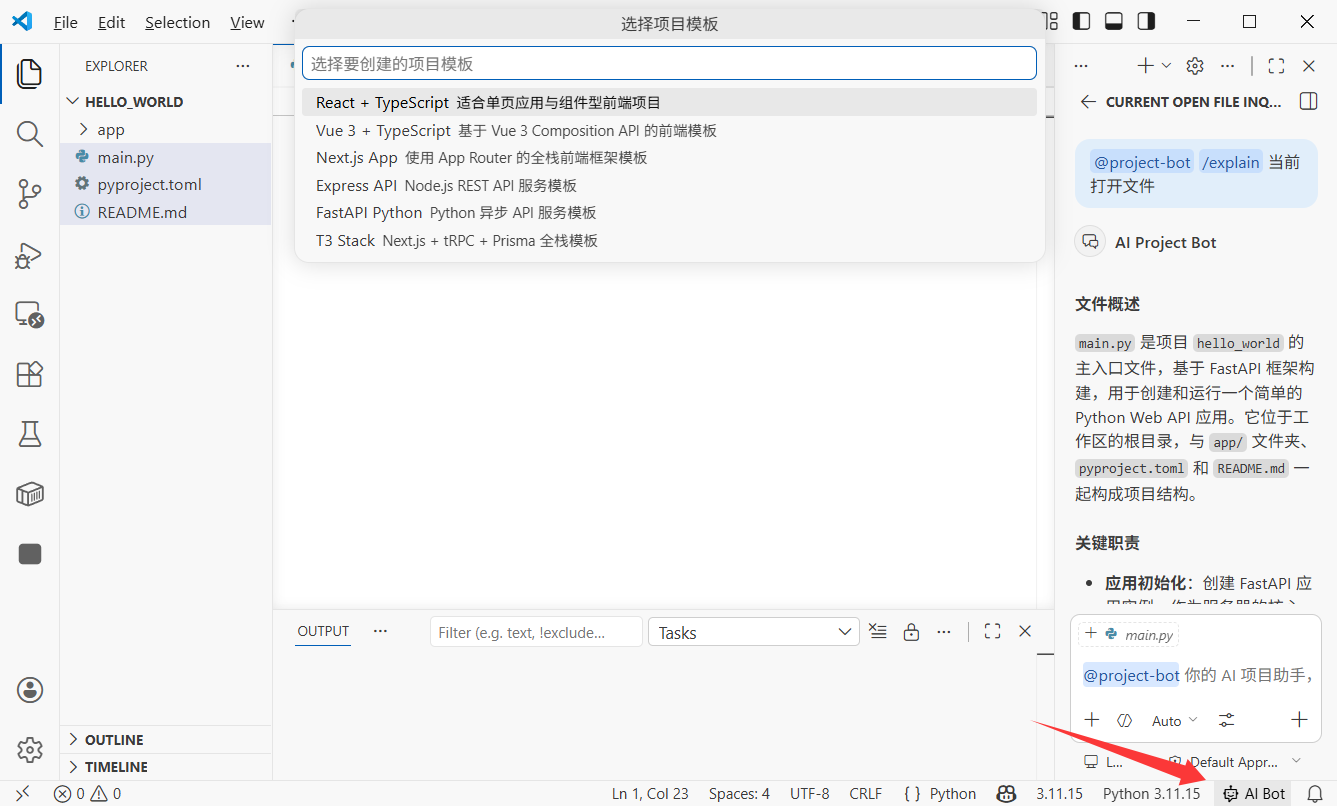
| プロジェクトテンプレート | サイドバーにテンプレート一覧を表示、ワンクリックでプロジェクトスキャフォールドを生成 |
| AIチャット | VS Code Chat内の@project-bot参加者によるプロジェクトQ&A |
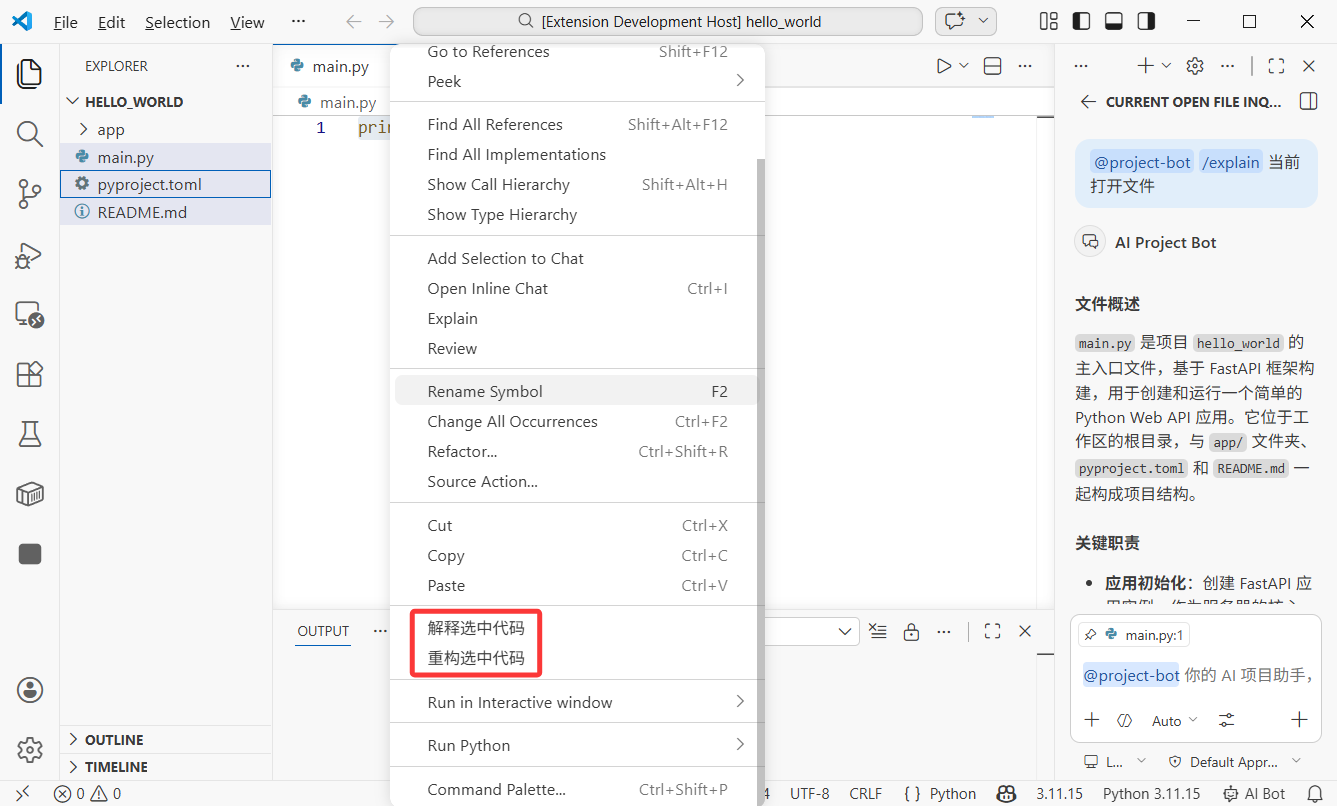
| ファイル/スニペットチャット | 選択したコードやファイルを右クリックしてAIに送信し、分析・説明・リファクタリング |
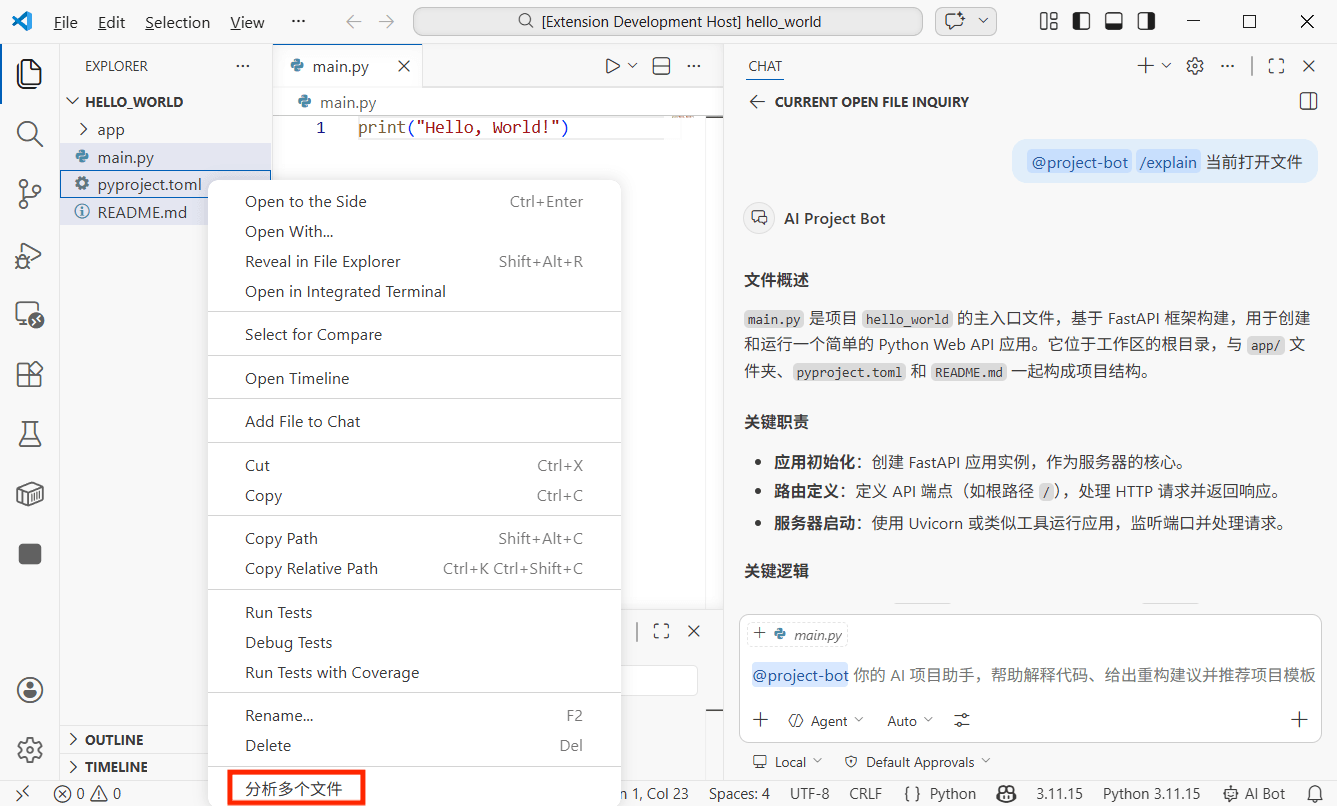
| 複数ファイルQ&A | エクスプローラーで複数ファイルを選択し、AIに関係性やロジックを分析 |
| ショートカット | カスタムキーバインディングで一般的な操作を素早く実行 |
1.4 チュートリアルロードマップ
以下のステップで進めます:
- 拡張機能プロジェクトの作成(3分):プロジェクトをスキャフォールドし、コアファイルを理解
- プロジェクトテンプレートの実装(5分):TreeViewを使ってサイドバーにテンプレートを表示し、プロジェクトを生成
- AI Chat参加者の実装(5分):Chat Participant APIで
@project-botを作成 - ファイル/スニペットチャットと複数ファイルQ&Aの実装(5分):右クリックメニュー+複数選択分析
- ショートカットとUX改善の追加(3分):キーバインディングとステータスバーのヒント
- Marketplaceへの公開(オプション):パッケージ化して提出
第2章:拡張機能プロジェクトの作成(3分)
2.1 スキャフォールドでプロジェクトを生成
VS Codeは公式にYeomanスキャフォールドツールを提供しています。AIに以下を実行させます:
VS Code拡張機能スキャフォールドツールをインストールし、プロジェクトを作成してください:
1. Yeomanとgenerator-codeをインストール:npm install -g yo generator-code
2. yo codeを実行し、以下を選択:
   - Type: New Extension (TypeScript)
   - Name: ai-project-bot
   - Identifier: ai-project-bot
   - Description: AIプロジェクトアシスタント - テンプレート生成、インテリジェントチャット、複数ファイルQ&A
   - Package manager: npm
3. プロジェクトディレクトリに移動し、依存関係をインストール
生成される構造:
ai-project-bot/
├── .vscode/
│ ├── launch.json # デバッグ設定(F5でデバッグ開始)
│ └── tasks.json # ビルドタスク
├── src/
│ └── extension.ts # 拡張機能のエントリファイル
├── package.json # 拡張機能マニフェスト(最も重要なファイル)
├── tsconfig.json # TypeScript設定
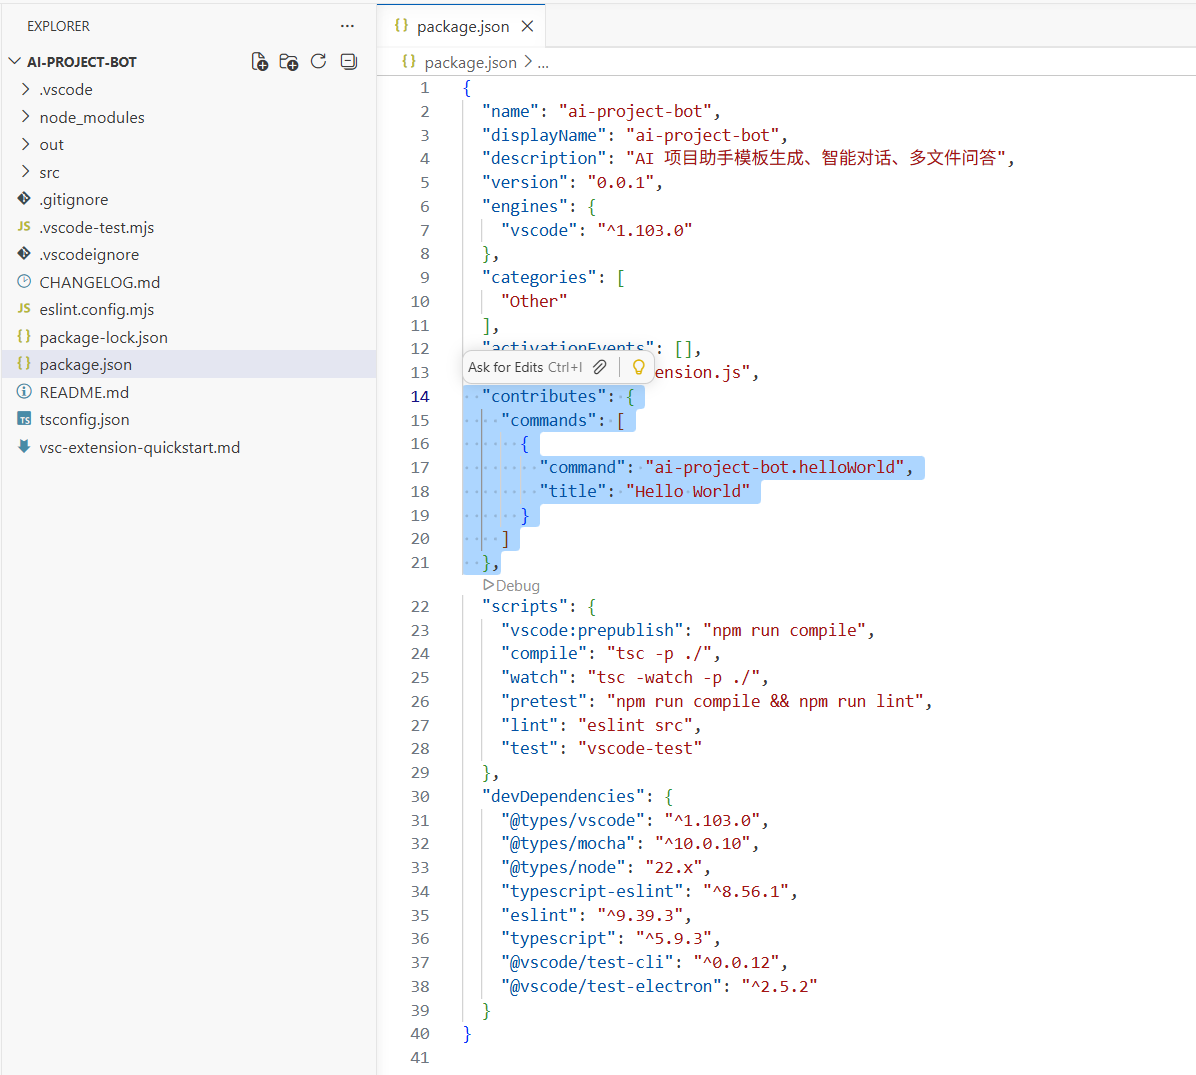
└── vsc-extension-quickstart.md # クイックスタートガイド(削除可能)2.2 package.jsonを理解する:拡張機能の「身分証明書」
package.jsonはVS Code拡張機能のコアファイルです。通常のnpmフィールドに加えて、contributesで拡張機能がVS Codeに提供するすべてを宣言します:
{
  "name": "ai-project-bot",
  "displayName": "AI Project Bot",
  "description": "AI project assistant - template generation, intelligent chat, multi-file Q&A",
  "version": "0.0.1",
  "engines": { "vscode": "^1.90.0" },
  "activationEvents": [],
  "main": "./out/extension.js",
  "contributes": {
    "commands": [],
    "menus": {},
    "keybindings": [],
    "viewsContainers": {},
    "views": {},
    "chatParticipants": []
  }
}
主要フィールド:
| フィールド | 目的 |
|---|---|
engines.vscode | サポートする最低VS Codeバージョン |
activationEvents | 拡張機能がいつ有効化されるか(空の場合はオンデマンド有効化) |
main | コンパイル済みエントリファイルへのパス |
contributes | すべてのコントリビュート機能(コマンド、メニュー、キーバインディング、ビューなど) |
2.3 extension.tsを理解する:拡張機能の「頭脳」
src/extension.tsを開くと、2つのコア関数が見えます:
import * as vscode from 'vscode'

// 拡張機能が有効化されたときに呼び出される(最初のコマンド実行、特定ファイルを開くなど)
export function activate(context: vscode.ExtensionContext) {
  console.log('AI Project Bot activated!')

  // コマンド、ビュー、チャット参加者などを登録
  const disposable = vscode.commands.registerCommand(
    'ai-project-bot.helloWorld',
    () => {
      vscode.window.showInformationMessage('Hello from AI Project Bot!')
    }
  )

  context.subscriptions.push(disposable)
}

// 拡張機能が無効化されたときに呼び出される(例:VS Code終了時)
export function deactivate() {}
コア概念:
activate(context):拡張機能の初期化、ここですべての機能を登録context.subscriptions:自動クリーンアップリスト。VS Codeは無効化時に登録されたアイテムを破棄vscode.commands.registerCommand:コマンドパレット(Ctrl+Shift+P)から呼び出し可能なコマンドを登録
2.4 デバッグを開始
F5を押すと、VS Codeが新しいExtension Development Hostウィンドウを開きます。これは拡張機能が読み込まれた新しいVS Codeインスタンスです。
新しいウィンドウでCtrl+Shift+Pを押し、「Hello World」と入力すると、メッセージポップアップが表示されます。これは拡張機能が動作していることを意味します。
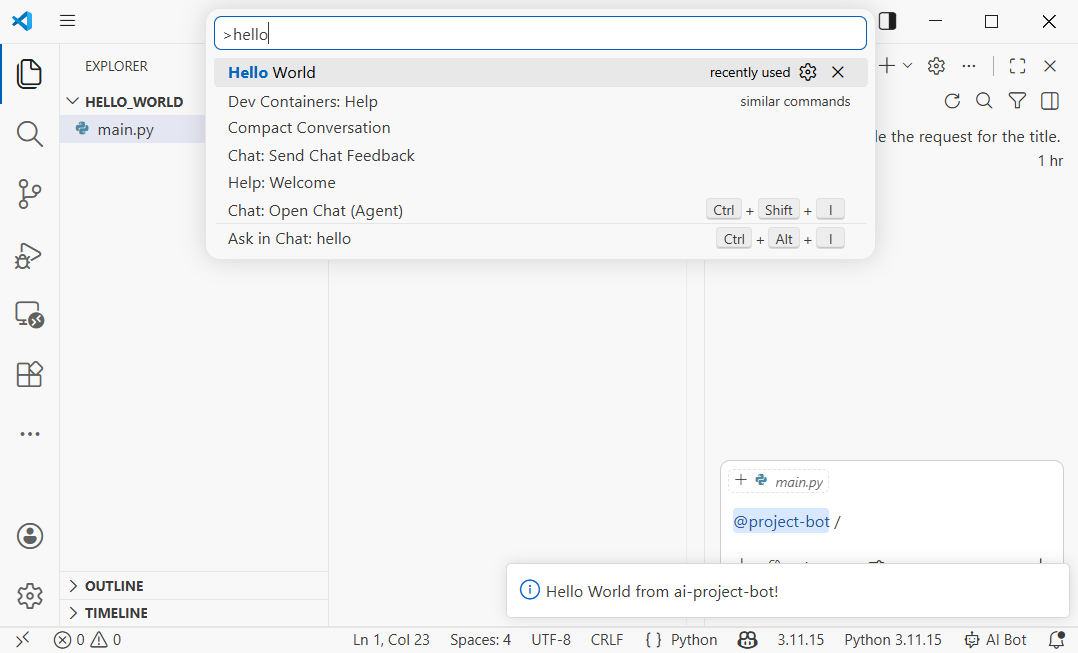
デバッグのヒント:コード変更後、Extension Development HostでCtrl+Shift+P -> Developer: Reload Windowを押すと、拡張機能を素早くリロードできます。
第3章:プロジェクトテンプレートの実装(5分)
3.1 テンプレートシステムの設計
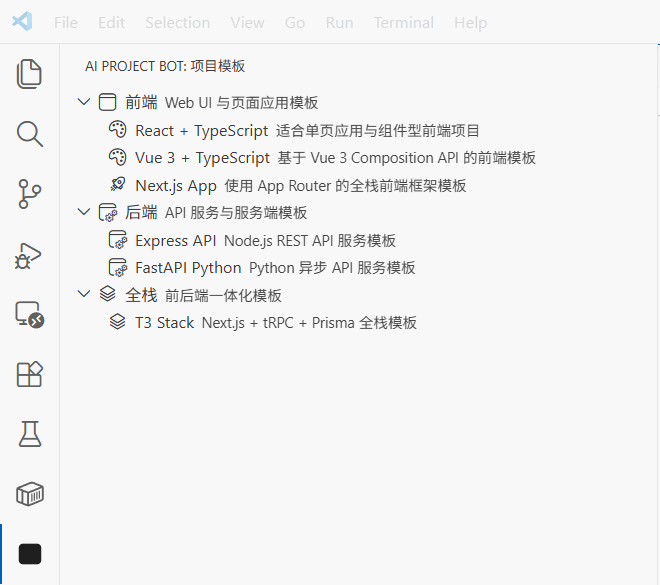
VS Codeサイドバーに「プロジェクトテンプレート」パネルを追加し、ユーザーがテンプレートを閲覧してワンクリックでプロジェクトスケルトンを生成できるようにします。これはVS CodeのTreeView APIを使用します。
AIに実装を依頼します:
ai-project-botにプロジェクトテンプレートを実装してください:
1. package.jsonにコントリビューションポイントを追加:
- viewsContainers.activitybarにid "project-bot"、title "AI Project Bot"の新しい項目を追加
- その下にid "projectTemplates"、name "Project Templates"のビューを追加
- コマンド"ai-project-bot.createFromTemplate"、title "Create Project from Template"を追加
2. src/templates/templateProvider.tsを作成:
- TreeDataProviderを実装し、テンプレートカテゴリとテンプレートを含む:
- フロントエンド:React + TypeScript、Vue 3 + TypeScript、Next.js App
- バックエンド:Express API、FastAPI Python
- フルスタック:T3 Stack (Next.js + tRPC + Prisma)
- 各テンプレートアイテムに名前、説明、アイコンを表示
3. src/templates/scaffolder.tsを作成:
- createProjectFromTemplate関数を実装
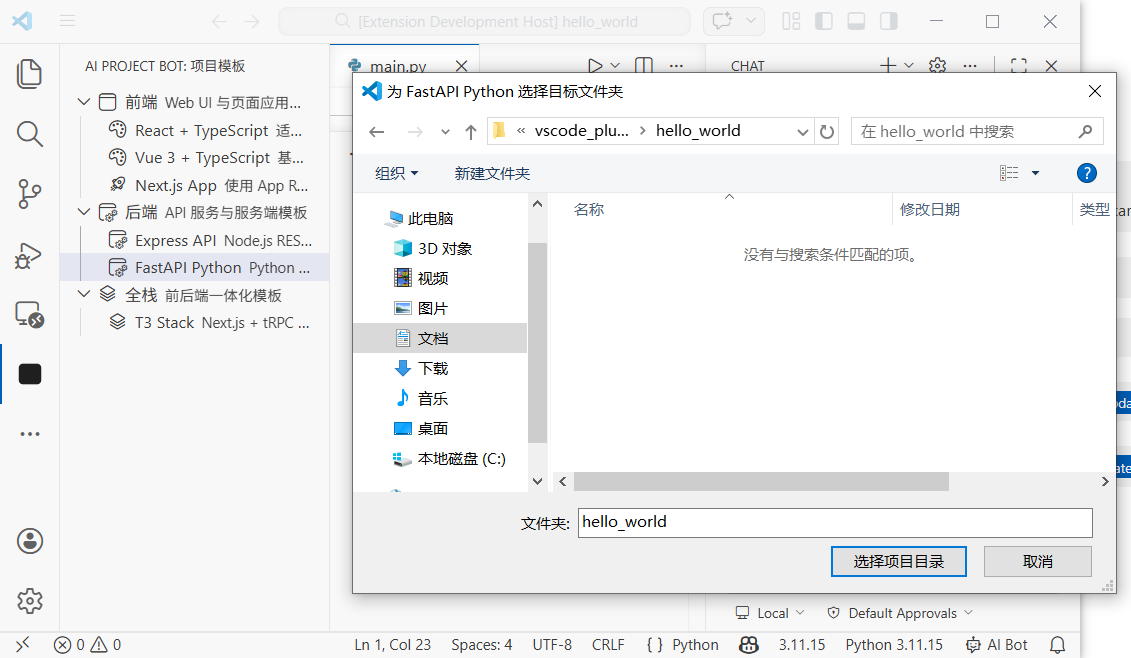
- ユーザーにターゲットフォルダーを選択させる
- テンプレートタイプに応じてプロジェクト構造を生成3.2 package.jsonでビューを宣言
まずpackage.jsonにサイドバービューのコントリビューションを追加します:
{
  "contributes": {
    "viewsContainers": {
      "activitybar": [
        {
          "id": "project-bot",
          "title": "AI Project Bot",
          "icon": "resources/bot-icon.svg"
        }
      ]
    },
    "views": {
      "project-bot": [
        {
          "id": "projectTemplates",
          "name": "Project Templates"
        }
      ]
    },
    "commands": [
      {
        "command": "ai-project-bot.createFromTemplate",
        "title": "Create Project from Template",
        "icon": "$(add)"
      }
    ],
    "menus": {
      "view/title": [
        {
          "command": "ai-project-bot.createFromTemplate",
          "when": "view == projectTemplates",
          "group": "navigation"
        }
      ]
    }
  }
}
この設定は3つのことを行います:
- アクティビティバーに「AI Project Bot」アイコンエントリを追加
- そのエントリの下に「Project Templates」ビューを作成
- ビューのタイトルバーにプロジェクト作成用の「+」ボタンを追加
3.3 TreeDataProviderの実装
TreeDataProviderは、VS Codeがツリーデータを埋めるために使用するインターフェースです。getTreeItem(1つのノードの表示情報)とgetChildren(子ノードリスト)が必要です。
コアコード:
// src/templates/templateProvider.ts
import * as vscode from 'vscode'

interface Template {
  name: string
  description: string
  category: string
  command: string // プロジェクト生成コマンド、例:"npx create-react-app"
}

const TEMPLATES: Template[] = [
  { name: 'React + TypeScript', description: 'React project built with Vite', category: 'Frontend', command: 'npm create vite@latest {{name}} -- --template react-ts' },
  { name: 'Vue 3 + TypeScript', description: 'Vue 3 project built with Vite', category: 'Frontend', command: 'npm create vite@latest {{name}} -- --template vue-ts' },
  { name: 'Next.js App', description: 'Next.js App Router full-stack project', category: 'Frontend', command: 'npx create-next-app@latest {{name}} --typescript --app' },
  { name: 'Express API', description: 'Express + TypeScript REST API', category: 'Backend', command: 'npx create-express-api {{name}}' },
  { name: 'FastAPI Python', description: 'Python FastAPI backend project', category: 'Backend', command: 'pip install fastapi uvicorn' },
]

// ツリーノード:カテゴリまたはテンプレート
class TemplateItem extends vscode.TreeItem {
  constructor(
    public readonly label: string,
    public readonly collapsibleState: vscode.TreeItemCollapsibleState,
    public readonly template?: Template
  ) {
    super(label, collapsibleState)
    if (template) {
      this.description = template.description
      this.tooltip = `${template.name}\n${template.description}\nCommand: ${template.command}`
      this.contextValue = 'template'
      this.command = {
        command: 'ai-project-bot.createFromTemplate',
        title: 'Create Project',
        arguments: [template]
      }
    }
  }
}

export class TemplateProvider implements vscode.TreeDataProvider<TemplateItem> {
  getTreeItem(element: TemplateItem): vscode.TreeItem {
    return element
  }

  getChildren(element?: TemplateItem): TemplateItem[] {
    if (!element) {
      // ルート:カテゴリ一覧を返す
      const categories = [...new Set(TEMPLATES.map(t => t.category))]
      return categories.map(
        cat => new TemplateItem(cat, vscode.TreeItemCollapsibleState.Expanded)
      )
    }
    // 子:カテゴリ内のテンプレート
    return TEMPLATES
      .filter(t => t.category === element.label)
      .map(t => new TemplateItem(t.name, vscode.TreeItemCollapsibleState.None, t))
  }
}
3.4 ビューの登録とコマンドの作成
extension.tsでTreeViewとプロジェクト作成コマンドを登録します:
// src/extension.ts
import { TemplateProvider } from './templates/templateProvider'

export function activate(context: vscode.ExtensionContext) {
  // テンプレートビューを登録
  const templateProvider = new TemplateProvider()
  vscode.window.registerTreeDataProvider('projectTemplates', templateProvider)

  // プロジェクト作成コマンドを登録
  const createCmd = vscode.commands.registerCommand(
    'ai-project-bot.createFromTemplate',
    async (template) => {
      if (!template) {
        // テンプレートが渡されていない場合(コマンドパレットから呼び出し)、ユーザーに選択させる
        const pick = await vscode.window.showQuickPick(
          TEMPLATES.map(t => ({ label: t.name, description: t.description, template: t })),
          { placeHolder: 'Choose a project template' }
        )
        if (!pick) return
        template = pick.template
      }

      // プロジェクト名の入力
      const name = await vscode.window.showInputBox({
        prompt: 'Enter project name',
        placeHolder: 'my-awesome-project'
      })
      if (!name) return

      // ターゲットフォルダーの選択
      const folder = await vscode.window.showOpenDialog({
        canSelectFolders: true,
        openLabel: 'Select target folder'
      })
      if (!folder) return

      // 作成コマンドを実行
      const terminal = vscode.window.createTerminal('AI Project Bot')
      terminal.show()
      const cmd = template.command.replace('{{name}}', name)
      terminal.sendText(`cd "${folder[0].fsPath}" && ${cmd}`)

      vscode.window.showInformationMessage(`Creating ${template.name} project: ${name}`)
    }
  )

  context.subscriptions.push(createCmd)
}
F5を押してデバッグを開始します。アクティビティバーにAI Project Botが表示されます。テンプレート一覧を展開し、任意のテンプレートをクリックしてプロジェクトを作成できます。
第4章:AI Chat参加者の実装(5分)
4.1 Chat Participant APIとは?
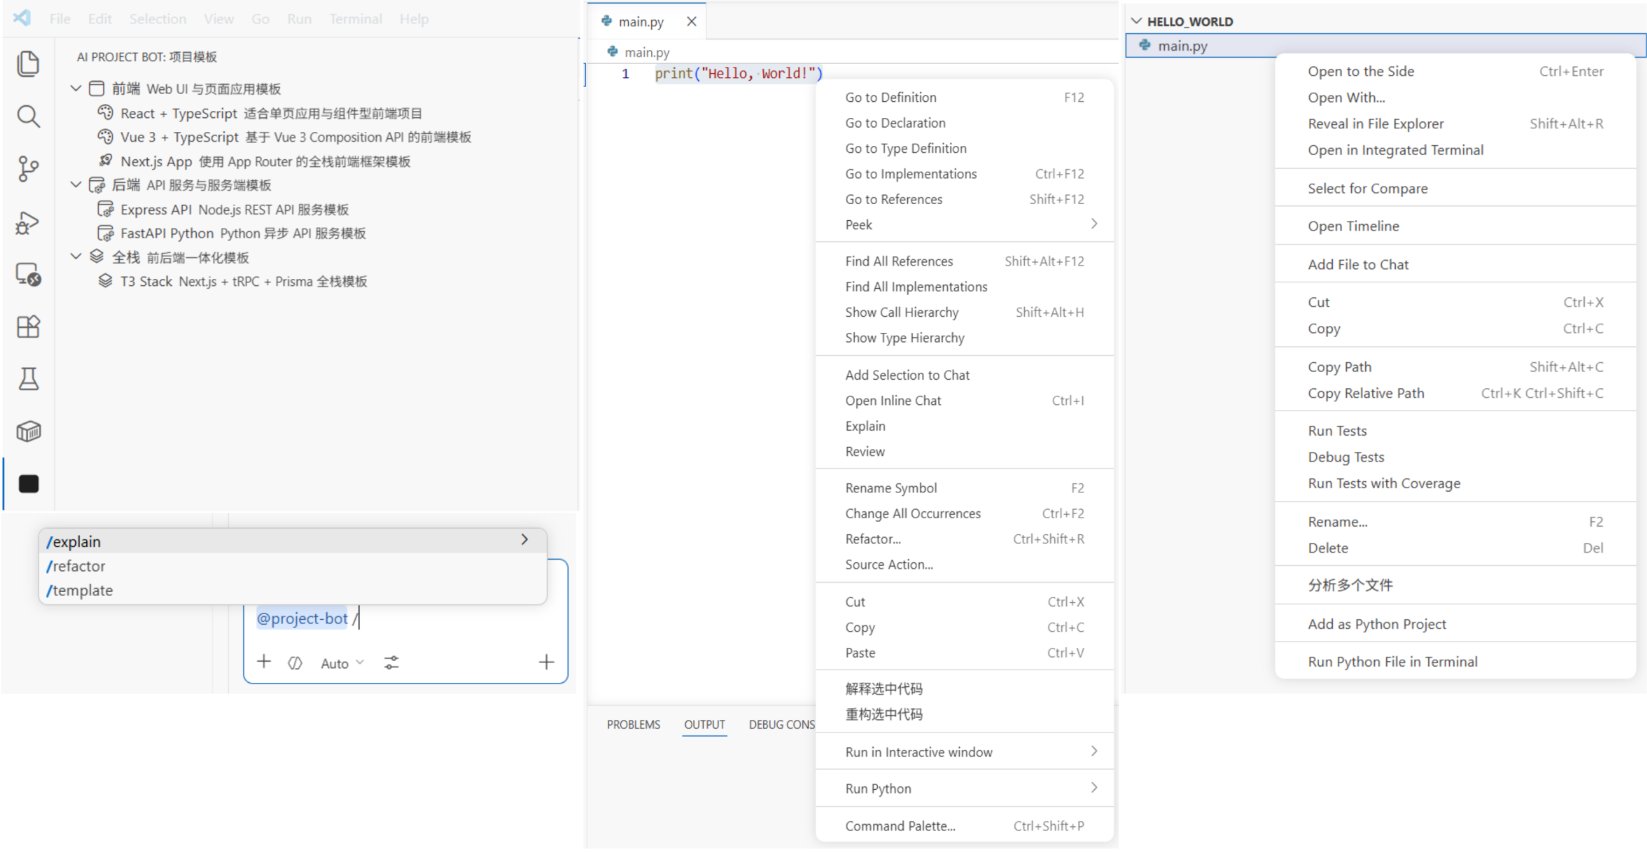
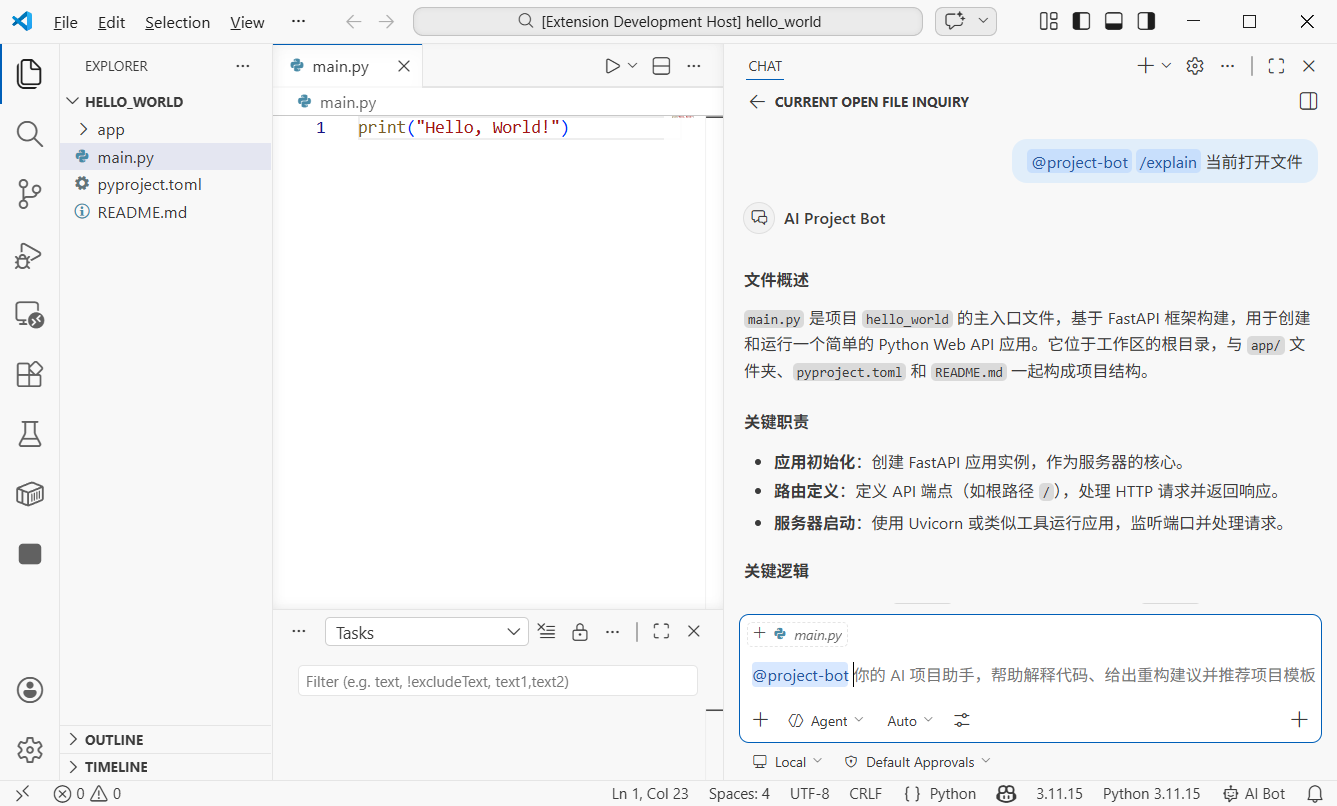
VS Code 1.90以降、拡張機能はChat Participant APIを使用してChatパネルに独自のAIアシスタントを作成できます。ユーザーが@project-bot help me analyze this project architectureと入力すると、拡張機能がメッセージを受信し、モデル生成のレスポンスを返します。
コア概念:
- 参加者(Participant):Chatパネルでのあなたのアシスタントの識別子。
@nameで呼び出し - スラッシュコマンド:参加者がサポートするクイックコマンド。例:
/explain、/refactor - Language Model API:VS Code内蔵モデル(例:Copilot GPT-4o)を呼び出し
- ストリーム:
stream.markdown()を通じて段階的にレスポンスを出力
4.2 package.jsonでChat参加者を宣言
contributesに以下を追加します:
{
  "contributes": {
    "chatParticipants": [
      {
        "id": "ai-project-bot.projectBot",
        "name": "project-bot",
        "fullName": "AI Project Bot",
        "description": "Your AI project assistant for code analysis, architecture explanation, and solution generation",
        "isSticky": true
      }
    ]
  }
}
isSticky: trueは、一度選択されると、以降のメッセージがデフォルトでこの参加者に送信されることを意味します。毎回@project-botと入力する必要はありません。
4.3 Chat参加者ハンドラーの実装
AIにコアロジックを書かせます:
src/chat/chatParticipant.tsを作成し、Chat Participantを実装してください:
1. 参加者"ai-project-bot.projectBot"を登録
2. 3つのスラッシュコマンドをサポート:
   - /explain:選択したコードまたは現在のファイルを説明
   - /refactor:リファクタリング提案を提供
   - /template:適切なテクノロジースタックテンプレートを推奨
3. Language Model APIでVS Code内蔵モデルを使用
4. ストリーミングモードでレスポンスを返す(stream.markdown)
コアコード:
// src/chat/chatParticipant.ts
import * as vscode from 'vscode'

export function registerChatParticipant(context: vscode.ExtensionContext) {
  const participant = vscode.chat.createChatParticipant(
    'ai-project-bot.projectBot',
    async (request, chatContext, stream, token) => {
      // 利用可能なモデルを選択
      const models = await vscode.lm.selectChatModels({ family: 'gpt-4o' })
      const model = models[0]

      if (!model) {
        stream.markdown('No language model available. Please make sure GitHub Copilot is installed.')
        return
      }

      // スラッシュコマンドに応じてシステムプロンプトを構築
      let systemPrompt = 'You are a professional project development assistant.'

      if (request.command === 'explain') {
        systemPrompt = 'You are a code explanation expert. Please explain user code in concise Chinese, including purpose, logic flow, and key design decisions.'
      } else if (request.command === 'refactor') {
        systemPrompt = 'You are a code refactoring expert. Analyze user code and provide specific refactoring suggestions with improved code examples.'
      } else if (request.command === 'template') {
        systemPrompt = 'You are a tech stack selection expert. Recommend suitable tech stacks and project templates based on user requirements.'
      }

      // メッセージを構築
      const messages = [
        vscode.LanguageModelChatMessage.User(systemPrompt),
        vscode.LanguageModelChatMessage.User(request.prompt)
      ]

      // ストリーム出力
      const response = await model.sendRequest(messages, {}, token)
      for await (const chunk of response.stream) {
        stream.markdown(chunk)
      }

      return { metadata: { command: request.command || '' } }
    }
  )

  // スラッシュコマンドを登録
  participant.slashCommandProvider = {
    provideSlashCommands: () => [
      { name: 'explain', description: 'Explain code function and logic' },
      { name: 'refactor', description: 'Provide refactoring suggestions and improvements' },
      { name: 'template', description: 'Recommend suitable project templates and tech stacks' }
    ]
  }

  // フォローアップ提案を登録
  participant.followupProvider = {
    provideFollowups: (result) => {
      if (result.metadata?.command === 'explain') {
        return [
          { prompt: 'Can you draw a flowchart?', label: 'Generate flowchart' },
          { prompt: 'Any potential bugs here?', label: 'Check potential issues' }
        ]
      }
      return []
    }
  }

  context.subscriptions.push(participant)
}extension.tsで登録を呼び出します:
import { registerChatParticipant } from './chat/chatParticipant'

export function activate(context: vscode.ExtensionContext) {
  // ... 前のテンプレート登録コード ...
  registerChatParticipant(context)
}Chatパネルで@project-bot /explain what does this code do?と入力すると、拡張機能がモデルを呼び出して説明を生成します。
第5章:ファイル/スニペットチャットと複数ファイルQ&A(5分)
5.1 右クリックメニュー:選択したコードをAIに送信
エディタでコードを選択し、コンテキストメニューからAIに送信できるようにします。これはVS Codeのコンテキストメニューコントリビューションポイントを使用します。
package.jsonに追加:
{
  "contributes": {
    "commands": [
      {
        "command": "ai-project-bot.explainSelection",
        "title": "AI: Explain Selected Code"
      },
      {
        "command": "ai-project-bot.refactorSelection",
        "title": "AI: Refactor Selected Code"
      }
    ],
    "menus": {
      "editor/context": [
        {
          "command": "ai-project-bot.explainSelection",
          "when": "editorHasSelection",
          "group": "ai-project-bot@1"
        },
        {
          "command": "ai-project-bot.refactorSelection",
          "when": "editorHasSelection",
          "group": "ai-project-bot@2"
        }
      ]
    }
  }
}
設定のポイント:
when: "editorHasSelection":テキストが選択されているときのみメニューを表示group: "ai-project-bot@1":メニューのグループ化と順序(@1、@2)
5.2 選択コード分析の実装
// src/commands/selectionCommands.ts
import * as vscode from 'vscode'

export function registerSelectionCommands(context: vscode.ExtensionContext) {
  // 選択したコードを説明
  const explainCmd = vscode.commands.registerCommand(
    'ai-project-bot.explainSelection',
    async () => {
      const editor = vscode.window.activeTextEditor
      if (!editor) return

      const selection = editor.selection
      const selectedText = editor.document.getText(selection)
      const fileName = editor.document.fileName.split('/').pop()
      const startLine = selection.start.line + 1
      const endLine = selection.end.line + 1

      // コンテキストを含むプロンプトを構築
      const prompt = [
        `Please explain the following code (from ${fileName}, lines ${startLine}-${endLine}):`,
        '```',
        selectedText,
        '```',
        'Please explain: 1) what this code does 2) core logic 3) possible improvements'
      ].join('\n')

      // Language Model APIを呼び出し
      const models = await vscode.lm.selectChatModels({ family: 'gpt-4o' })
      if (!models.length) {
        vscode.window.showErrorMessage('No language model available')
        return
      }

      // 出力パネルに結果を表示
      const outputChannel = vscode.window.createOutputChannel('AI Project Bot')
      outputChannel.show()
      outputChannel.appendLine(`\n--- Code Explanation (${fileName}:${startLine}-${endLine}) ---\n`)

      const messages = [
        vscode.LanguageModelChatMessage.User(prompt)
      ]
      const response = await models[0].sendRequest(messages, {})
      for await (const chunk of response.stream) {
        outputChannel.append(chunk)
      }
    }
  )

  context.subscriptions.push(explainCmd)
}
5.3 複数ファイルQ&A:ファイル関係を一括分析
最も強力な機能の1つです:エクスプローラーで複数ファイルを選択し、AIに一括で関係性とロジックを分析させます。
package.jsonにエクスプローラーコンテキストメニューを追加:
{
  "contributes": {
    "commands": [
      {
        "command": "ai-project-bot.analyzeFiles",
        "title": "AI: Analyze Relationships of Selected Files"
      }
    ],
    "menus": {
      "explorer/context": [
        {
          "command": "ai-project-bot.analyzeFiles",
          "when": "explorerResourceIsFile",
          "group": "ai-project-bot"
        }
      ]
    }
  }
}
複数ファイル分析コマンドを実装:
// src/commands/multiFileAnalysis.ts
import * as vscode from 'vscode'

export function registerMultiFileCommands(context: vscode.ExtensionContext) {
  const analyzeCmd = vscode.commands.registerCommand(
    'ai-project-bot.analyzeFiles',
    async (clickedFile: vscode.Uri, selectedFiles: vscode.Uri[]) => {
      // selectedFilesにはすべての選択ファイルが含まれる
      const files = selectedFiles || [clickedFile]

      if (files.length < 2) {
        vscode.window.showWarningMessage('Please select at least 2 files for analysis')
        return
      }

      // すべての選択ファイルを読み込む
      const fileContents: string[] = []
      for (const file of files) {
        const content = await vscode.workspace.fs.readFile(file)
        const fileName = vscode.workspace.asRelativePath(file)
        fileContents.push(
          `--- ${fileName} ---\n${Buffer.from(content).toString('utf8')}`
        )
      }

      const prompt = [
        `Please analyze relationships among these ${files.length} files:`,
        '',
        ...fileContents,
        '',
        'Please explain:',
        '1. Responsibilities of each file',
        '2. Dependency/call relationships among them',
        '3. Data flow (if any)',
        '4. Architectural suggestions or potential issues'
      ].join('\n')

      // モデルを呼び出し結果を表示
      const models = await vscode.lm.selectChatModels({ family: 'gpt-4o' })
      if (!models.length) {
        vscode.window.showErrorMessage('No language model available')
        return
      }

      const outputChannel = vscode.window.createOutputChannel('AI Project Bot')
      outputChannel.show()
      outputChannel.appendLine(`\n--- Multi-file Analysis (${files.length} files) ---\n`)

      const messages = [
        vscode.LanguageModelChatMessage.User(prompt)
      ]
      const response = await models[0].sendRequest(messages, {})
      for await (const chunk of response.stream) {
        outputChannel.append(chunk)
      }
    }
  )

  context.subscriptions.push(analyzeCmd)
}使い方:エクスプローラーでCtrl(MacではCmd)を押しながら複数ファイルを選択し、右クリックして「AI: Analyze Relationships of Selected Files」を選択します。AIがすべての選択ファイルを読み込み、分析結果を返します。
第6章:ショートカットとUX最適化(3分)
6.1 カスタムキーバインディング
ショートカットは効率の鍵です。package.jsonに追加:
{
  "contributes": {
    "keybindings": [
      {
        "command": "ai-project-bot.explainSelection",
        "key": "ctrl+shift+e",
        "mac": "cmd+shift+e",
        "when": "editorTextFocus && editorHasSelection"
      },
      {
        "command": "ai-project-bot.refactorSelection",
        "key": "ctrl+shift+r",
        "mac": "cmd+shift+r",
        "when": "editorTextFocus && editorHasSelection"
      },
      {
        "command": "ai-project-bot.createFromTemplate",
        "key": "ctrl+shift+n",
        "mac": "cmd+shift+n",
        "when": ""
      }
    ]
  }
}when条件:
| 条件 | 意味 |
|---|---|
editorTextFocus | カーソルがエディタ内にある |
editorHasSelection | テキストが選択されている |
explorerViewletVisible | エクスプローラーパネルが表示されている |
!editorReadonly | ファイルが読み取り専用でない |
複数の条件は&&で接続され、すべて満たされる必要があります。
6.2 ステータスバーのヒント
ユーザーがいつでも拡張機能の動作を確認できるよう、ステータスバーにクイックエントリを追加します:
// src/statusBar.ts
import * as vscode from 'vscode'

export function createStatusBarItem(context: vscode.ExtensionContext) {
  const statusBar = vscode.window.createStatusBarItem(
    vscode.StatusBarAlignment.Right,
    100
  )
  statusBar.text = '$(hubot) AI Bot'
  statusBar.tooltip = 'Click to open AI Project Bot'
  statusBar.command = 'ai-project-bot.createFromTemplate'
  statusBar.show()

  context.subscriptions.push(statusBar)
}$(hubot)はVS Code内蔵のアイコン構文です。すべてのアイコンはCodiconライブラリで見つけられます。
第7章:Marketplaceへの公開(オプション)
7.1 公開の準備
VS Code拡張機能はvsceでパッケージ化および公開されます:
vsceをインストールしてください:npm install -g @vscode/vsce公開前に以下を準備します:
- Azure DevOpsアカウント:dev.azure.comで登録し、組織を作成
- Personal Access Token(PAT):Azure DevOpsで権限Marketplace -> Manageで作成
- Publisher ID:VS Code MarketplaceでパブリッシャーIDを作成
7.2 package.jsonメタデータの改善
公開前にメタデータを追加します:
{
  "publisher": "your-publisher-id",
  "repository": {
    "type": "git",
    "url": "https://github.com/yourname/ai-project-bot"
  },
  "categories": ["AI", "Other"],
  "keywords": ["ai", "project", "template", "chat"],
  "icon": "resources/icon.png",
  "galleryBanner": {
    "color": "#1e1e2e",
    "theme": "dark"
  }
}また、Marketplaceの説明用にREADME.mdと、バージョン履歴用にCHANGELOG.mdが必要です。
7.3 パッケージ化と公開
# .vsixにパッケージ化(手動インストールファイル)
vsce package

# Marketplaceに公開
vsce publishパッケージ化後、ai-project-bot-0.0.1.vsixが生成されます。このファイルを友人に送り、VS Codeの「Install from VSIX」からインストールできます。
公式Marketplaceへの公開はvsce publishを実行します。拡張機能は通常数分以内に表示されます。
ヒント:初回公開はレビューが必要な場合があります。READMEを明確にし、スクリーンショットを充実させることで、承認がスムーズになります。
第8章:最後に
おめでとうございます!ゼロから完全に機能するVS Code拡張機能を構築しました。振り返り:
- Yeomanスキャフォールドで拡張機能プロジェクトを作成し、
package.jsonとextension.tsの役割を理解 - TreeView APIでサイドバーのプロジェクトテンプレート一覧を実装し、ワンクリックでプロジェクト作成
- Chat Participant APIで
@project-botAIアシスタントを作成し、スラッシュコマンドとストリーミングレスポンスを含む - 右クリックコード選択分析を実装
- 複数ファイル関係分析を実装
- カスタムショートカットとステータスバーのヒントを追加
VS Code拡張機能開発の想像空間は広大です。あなたが毎日使っている便利な拡張機能の背後にある技術は、まさに今学んだものです。
高度な方向性:
- カスタムWebviewパネル:HTML/CSS/JSで完全にカスタムUIを構築。視覚的なアーキテクチャ図やインタラクティブなコードレビューインターフェースなど
- Language Model Tools:AIから呼び出し可能なカスタムツールを登録。データベースの照会やAPIリクエストの実行など
- 診断とCodeLens:AI提案、パフォーマンスヒント、セキュリティ警告をインライン表示
- カスタム言語サポート:DSLや特定の設定フォーマットに対するシンタックスハイライト、補完、診断を提供
- リモート開発統合:SSH、コンテナ、WSLで拡張機能を動作させる
あなたのエディタ、あなたのルール。