如何構建 VS Code 擴展:打造你的 AI 專案助理
第 1 章:VS Code 擴展開發是什麼
在本教學中,我們將完成一個完整的閉環:從零開始構建一個 VS Code 擴展,作為你的 AI 專案助理,具備一鍵生成專案模板、對選定檔案或程式碼片段進行 AI 聊天、多檔案問答分析以及自訂快捷鍵等功能。你將完成開發、除錯,並學習如何發佈到 VS Code Marketplace。
在本教學中,你至少需要具備:
- Node.js 環境(版本 18.0+)
- VS Code 編輯器(版本 1.90+)
- 你的 AI 程式設計助理(Cursor / Trae / Claude Code)
- (選用)GitHub Copilot 訂閱(用於語言模型 API)
Vibe Coding 端到端:我們將使用 AI 程式設計助理來生成大部分程式碼。你只需要理解核心概念和架構,然後用自然語言描述需求。
1.1 VS Code 擴展能做什麼?
你每天都在使用 VS Code 擴展。Prettier 格式化你的程式碼,GitLens 顯示 Git 歷史記錄,GitHub Copilot 幫助你編寫程式碼。這些擴展本質上是用 TypeScript/JavaScript 編寫的程式,透過 VS Code API 來擴展編輯器。
VS Code 擴展能做的事情遠超許多人的想像:
- 新增 UI 元素:側邊欄面板、狀態列資訊、自訂 Webview 頁面
- 處理檔案和程式碼:讀取、修改和建立檔案;分析程式碼結構
- 整合外部服務:呼叫 API、連接資料庫、整合 CI/CD
- 擴展編輯器功能:自訂語言支援、程式碼補全、診斷
- 新增 AI 功能:使用 Chat Participant API 建立 AI 助理,使用 Language Model API 呼叫模型
1.2 VS Code 擴展的核心架構
VS Code 擴展運行在一個獨立的 Extension Host 進程中,與編輯器主進程分離。這意味著即使擴展崩潰,編輯器本身也不會受到影響。
一個典型的擴展包含以下核心部分:
- package.json(清單檔案):擴展的「身分證」,宣告名稱、入口檔案、貢獻點(
commands、menus、keybindings等) - extension.ts(入口檔案):擴展的「大腦」,匯出
activate()和deactivate() - 貢獻點(Contribution Points):在 package.json 中向 VS Code 貢獻的內容(命令、選單項、快捷鍵、檢視等)
- VS Code API:用於操作編輯器功能的 TypeScript API 集合
VS Code 編輯器
    │
    ├── Extension Host(擴展進程)
    │   ├── 你的擴展
    │   │   ├── package.json  -> 宣告「我能做什麼」
    │   │   ├── extension.ts  -> 實作「怎麼做」
    │   │   └── 其他模組 -> 具體功能程式碼
    │   ├── 其他擴展 A
    │   └── 其他擴展 B
    │
    └── 編輯器主進程(UI 渲染)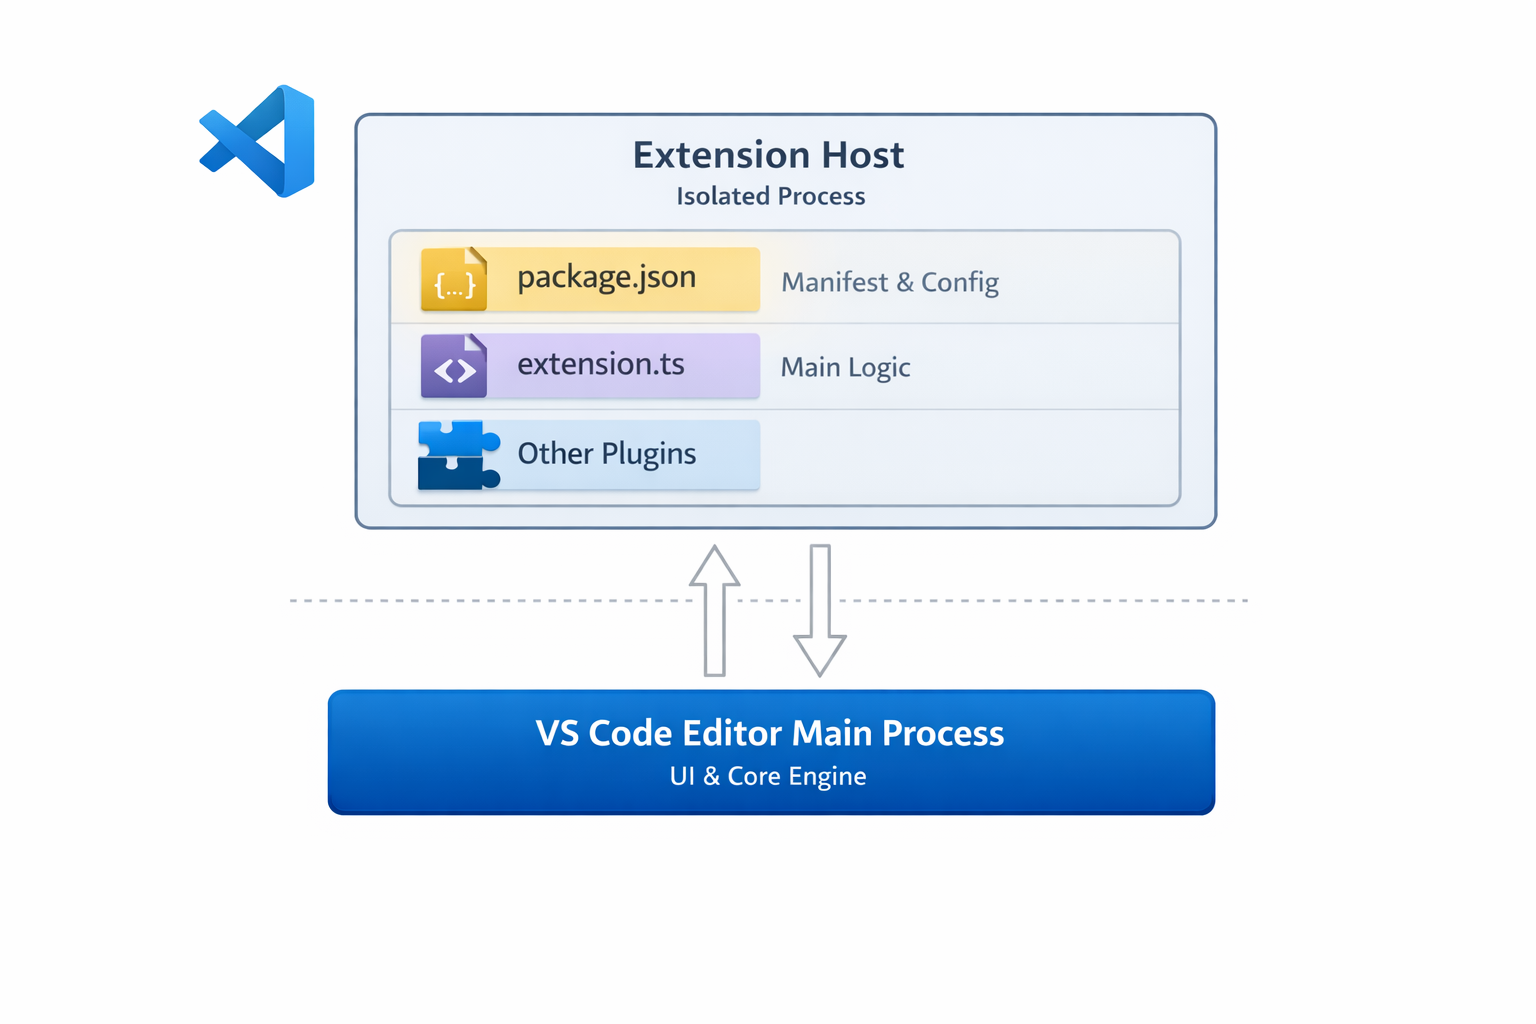
1.3 我們要構建什麼擴展?
我們將構建一個名為 "AI Project Bot" 的 VS Code 擴展,這是一個 AI 專案助理,具有以下功能:
| 功能 | 說明 |
|---|---|
| 專案模板 | 側邊欄顯示模板列表,一鍵生成專案骨架 |
| AI 聊天 | 在 VS Code Chat 中的 @project-bot 參與者,用於專案問答 |
| 檔案/片段聊天 | 右鍵選中程式碼或檔案並發送給 AI 進行分析/解釋/重構 |
| 多檔案問答 | 在檔案總管中多選檔案,讓 AI 分析關係和邏輯 |
| 快捷鍵 | 自訂鍵盤快捷鍵,快速觸發常用操作 |
1.4 教學路線圖
我們將按以下步驟完成整個流程:
- 建立擴展專案(3 分鐘):使用腳手架建立專案並了解核心檔案
- 實作專案模板(5 分鐘):使用 TreeView 在側邊欄顯示模板並生成專案
- 實作 AI Chat 參與者(5 分鐘):透過 Chat Participant API 建立
@project-bot - 實作檔案/片段聊天和多檔案問答(5 分鐘):右鍵選單 + 多選分析
- 新增快捷鍵和 UX 優化(3 分鐘):鍵盤快捷鍵和狀態列提示
- 發佈到 Marketplace(選用):打包和提交
第 2 章:建立擴展專案(3 分鐘)
2.1 使用腳手架生成專案
VS Code 官方提供了 Yeoman 腳手架工具。讓 AI 執行:
請幫我安裝 VS Code 擴展腳手架工具並建立專案:
1. 安裝 Yeoman 和 generator-code:npm install -g yo generator-code
2. 執行 yo code 並選擇:
   - 類型:New Extension (TypeScript)
   - 名稱:ai-project-bot
   - 識別符:ai-project-bot
   - 說明:AI 專案助理 - 模板生成、智慧聊天、多檔案問答
   - 套件管理器:npm
3. 進入專案目錄並安裝依賴
生成的結構:
ai-project-bot/
├── .vscode/
│ ├── launch.json # 除錯配置(F5 啟動除錯)
│ └── tasks.json # 建置任務
├── src/
│ └── extension.ts # 擴展入口檔案
├── package.json # 擴展清單(最重要的檔案)
├── tsconfig.json # TypeScript 配置
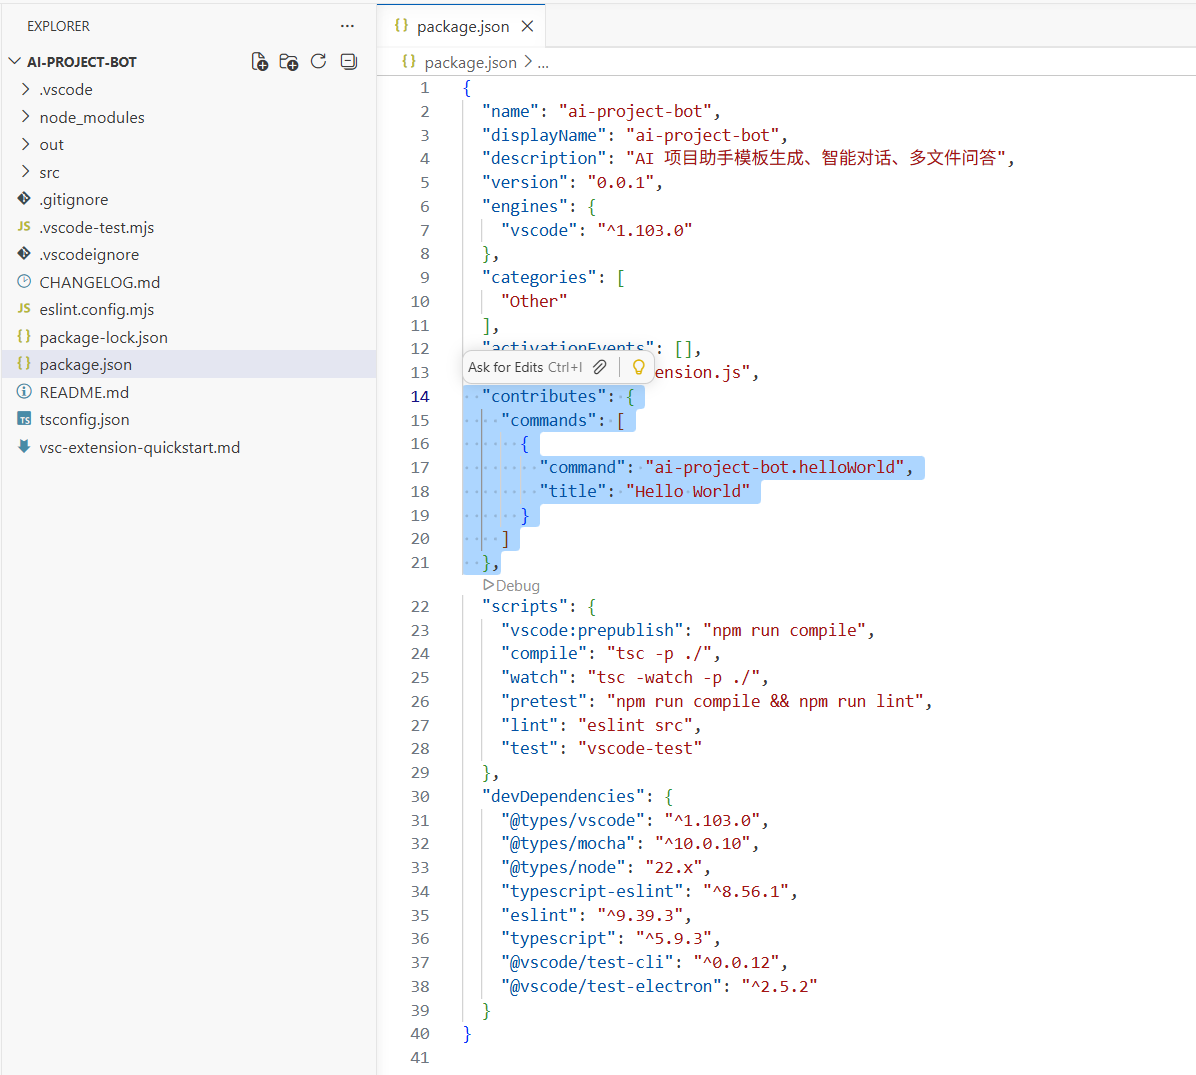
└── vsc-extension-quickstart.md # 快速入門指南(可刪除)2.2 了解 package.json:擴展的「身分證」
package.json 是 VS Code 擴展的核心檔案。除了普通的 npm 欄位外,它還有 contributes 來宣告你的擴展向 VS Code 貢獻的所有內容:
{
  "name": "ai-project-bot",
  "displayName": "AI Project Bot",
  "description": "AI project assistant - template generation, intelligent chat, multi-file Q&A",
  "version": "0.0.1",
  "engines": { "vscode": "^1.90.0" },
  "activationEvents": [],
  "main": "./out/extension.js",
  "contributes": {
    "commands": [],
    "menus": {},
    "keybindings": [],
    "viewsContainers": {},
    "views": {},
    "chatParticipants": []
  }
}
關鍵欄位:
| 欄位 | 用途 |
|---|---|
engines.vscode | 最低支援的 VS Code 版本 |
activationEvents | 擴展何時啟動(空值表示按需啟動) |
main | 編譯後的入口檔案路徑 |
contributes | 所有貢獻的功能(命令、選單、快捷鍵、檢視等) |
2.3 了解 extension.ts:擴展的「大腦」
開啟 src/extension.ts,你會看到兩個核心函式:
import * as vscode from 'vscode'

// 當擴展被啟動時呼叫(首次執行命令、開啟特定檔案等)
export function activate(context: vscode.ExtensionContext) {
  console.log('AI Project Bot activated!')

  // 註冊命令、檢視、聊天參與者等
  const disposable = vscode.commands.registerCommand(
    'ai-project-bot.helloWorld',
    () => {
      vscode.window.showInformationMessage('Hello from AI Project Bot!')
    }
  )

  context.subscriptions.push(disposable)
}

// 當擴展被停用時呼叫(例如 VS Code 關閉時)
export function deactivate() {}
核心概念:
activate(context):擴展初始化,在這裡註冊所有功能context.subscriptions:自動清理列表;VS Code 在停用時會清理已註冊的項目vscode.commands.registerCommand:註冊可從命令面板(Ctrl+Shift+P)呼叫的命令
2.4 開始除錯
按下 F5,VS Code 會開啟一個新的 Extension Development Host 視窗。這是一個載入了你的擴展的全新 VS Code 實例。
在新視窗中,按 Ctrl+Shift+P,輸入 "Hello World",你會看到一則訊息彈出。這表示你的擴展正在運行。
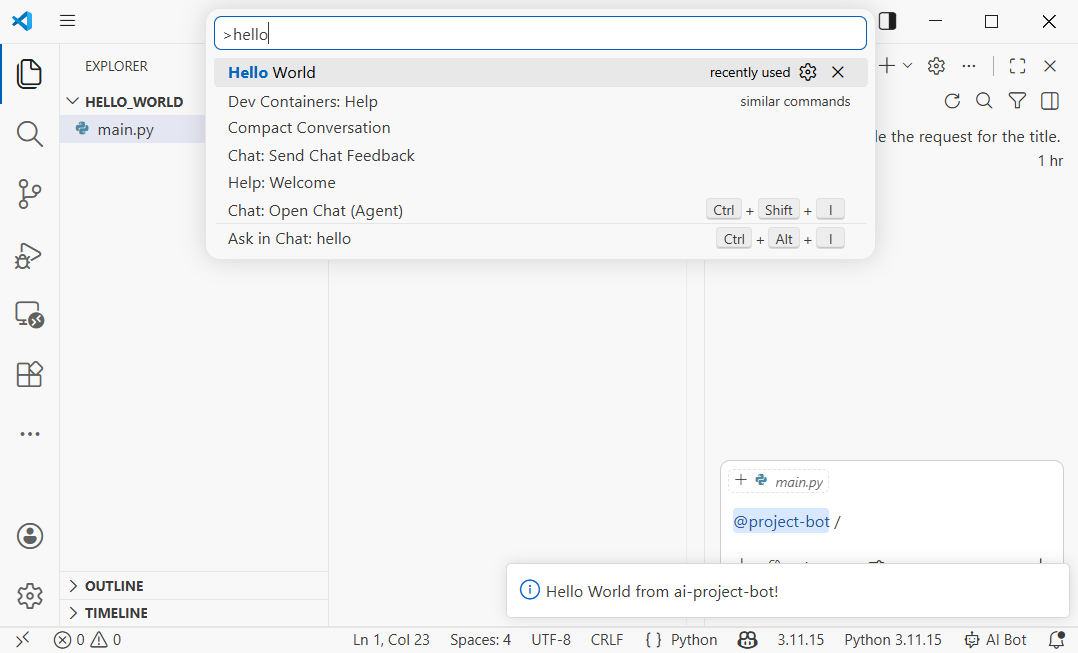
除錯提示:修改程式碼後,在 Extension Development Host 中按 Ctrl+Shift+P -> Developer: Reload Window 可快速重新載入擴展。
第 3 章:實作專案模板(5 分鐘)
3.1 設計模板系統
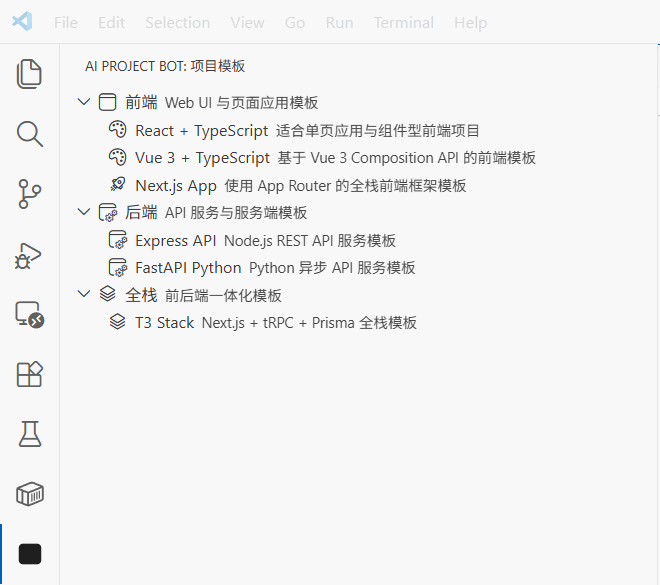
我們想在 VS Code 側邊欄新增一個「專案模板」面板,讓使用者可以瀏覽模板並一鍵生成專案骨架。這需要使用 VS Code 的 TreeView API。
讓 AI 實作:
請幫我在 ai-project-bot 中實作專案模板:
1. 在 package.json 中新增貢獻點:
- 在 viewsContainers.activitybar 中新增一個 id 為 "project-bot"、標題為 "AI Project Bot" 的項目
- 在其下新增一個 id 為 "projectTemplates"、名稱為 "Project Templates" 的檢視
- 新增命令 "ai-project-bot.createFromTemplate",標題為 "Create Project from Template"
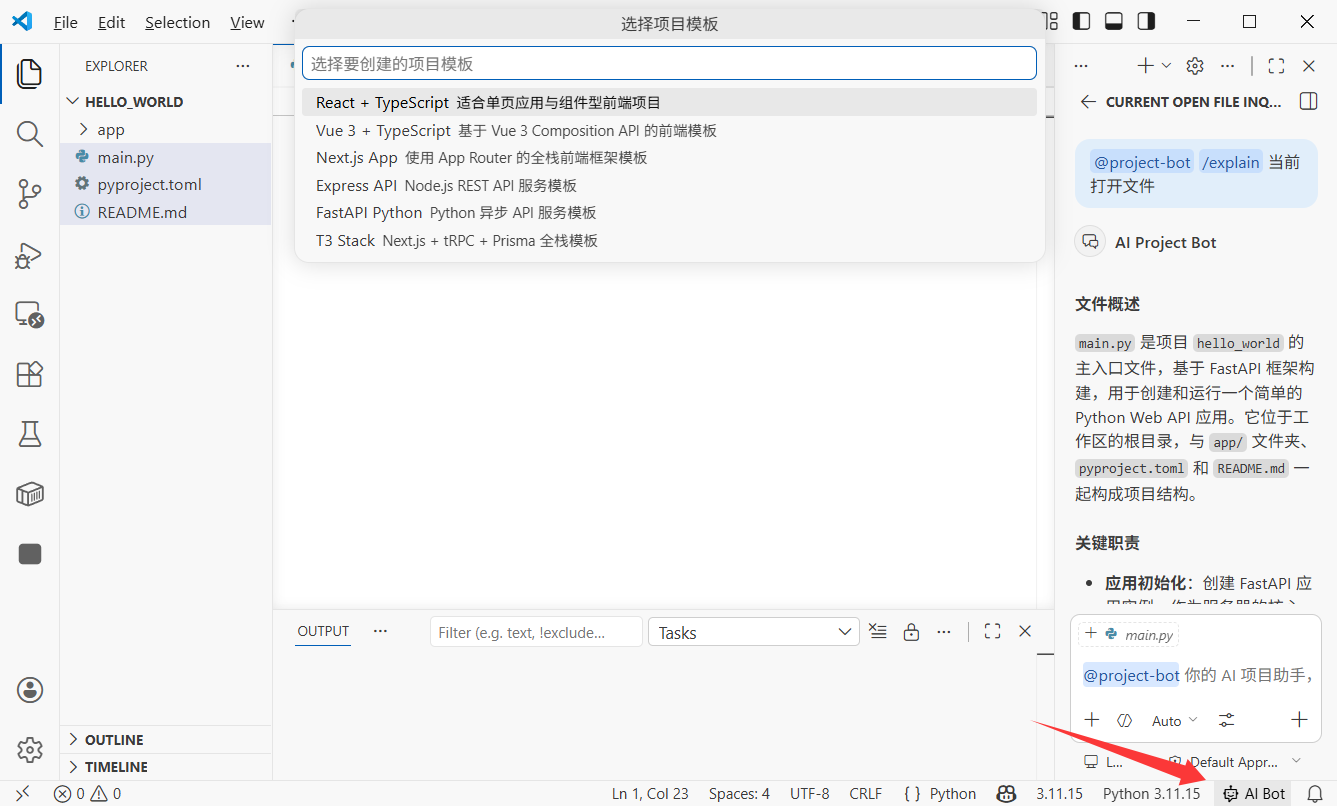
2. 建立 src/templates/templateProvider.ts:
- 實作 TreeDataProvider,包含模板分類和模板:
- 前端:React + TypeScript、Vue 3 + TypeScript、Next.js App
- 後端:Express API、FastAPI Python
- 全端:T3 Stack(Next.js + tRPC + Prisma)
- 每個模板項目顯示名稱、說明和圖示
3. 建立 src/templates/scaffolder.ts:
- 實作 createProjectFromTemplate 函式
- 讓使用者選擇目標資料夾
- 根據模板類型生成專案結構3.2 在 package.json 中宣告檢視
首先在 package.json 中新增側邊欄檢視貢獻:
{
  "contributes": {
    "viewsContainers": {
      "activitybar": [
        {
          "id": "project-bot",
          "title": "AI Project Bot",
          "icon": "resources/bot-icon.svg"
        }
      ]
    },
    "views": {
      "project-bot": [
        {
          "id": "projectTemplates",
          "name": "Project Templates"
        }
      ]
    },
    "commands": [
      {
        "command": "ai-project-bot.createFromTemplate",
        "title": "Create Project from Template",
        "icon": "$(add)"
      }
    ],
    "menus": {
      "view/title": [
        {
          "command": "ai-project-bot.createFromTemplate",
          "when": "view == projectTemplates",
          "group": "navigation"
        }
      ]
    }
  }
}
這個配置做了三件事:
- 在活動列中新增一個 "AI Project Bot" 圖示入口
- 在該入口下建立一個 "Project Templates" 檢視
- 在檢視標題列新增一個 "+" 按鈕用於建立專案
3.3 實作 TreeDataProvider
TreeDataProvider 是 VS Code 用來填充樹狀資料的介面。我們需要 getTreeItem(單個節點的顯示資訊)和 getChildren(子節點列表)。
核心程式碼:
// src/templates/templateProvider.ts
import * as vscode from 'vscode'

interface Template {
  name: string
  description: string
  category: string
  command: string // 生成專案的命令,例如 "npx create-react-app"
}

const TEMPLATES: Template[] = [
  { name: 'React + TypeScript', description: 'React project built with Vite', category: 'Frontend', command: 'npm create vite@latest {{name}} -- --template react-ts' },
  { name: 'Vue 3 + TypeScript', description: 'Vue 3 project built with Vite', category: 'Frontend', command: 'npm create vite@latest {{name}} -- --template vue-ts' },
  { name: 'Next.js App', description: 'Next.js App Router full-stack project', category: 'Frontend', command: 'npx create-next-app@latest {{name}} --typescript --app' },
  { name: 'Express API', description: 'Express + TypeScript REST API', category: 'Backend', command: 'npx create-express-api {{name}}' },
  { name: 'FastAPI Python', description: 'Python FastAPI backend project', category: 'Backend', command: 'pip install fastapi uvicorn' },
]

// 樹狀節點:分類或模板
class TemplateItem extends vscode.TreeItem {
  constructor(
    public readonly label: string,
    public readonly collapsibleState: vscode.TreeItemCollapsibleState,
    public readonly template?: Template
  ) {
    super(label, collapsibleState)
    if (template) {
      this.description = template.description
      this.tooltip = `${template.name}\n${template.description}\nCommand: ${template.command}`
      this.contextValue = 'template'
      this.command = {
        command: 'ai-project-bot.createFromTemplate',
        title: 'Create Project',
        arguments: [template]
      }
    }
  }
}

export class TemplateProvider implements vscode.TreeDataProvider<TemplateItem> {
  getTreeItem(element: TemplateItem): vscode.TreeItem {
    return element
  }

  getChildren(element?: TemplateItem): TemplateItem[] {
    if (!element) {
      // 根節點:返回分類列表
      const categories = [...new Set(TEMPLATES.map(t => t.category))]
      return categories.map(
        cat => new TemplateItem(cat, vscode.TreeItemCollapsibleState.Expanded)
      )
    }
    // 子節點:分類下的模板
    return TEMPLATES
      .filter(t => t.category === element.label)
      .map(t => new TemplateItem(t.name, vscode.TreeItemCollapsibleState.None, t))
  }
}
3.4 註冊檢視和建立命令
在 extension.ts 中註冊 TreeView 和專案建立命令:
// src/extension.ts
import { TemplateProvider } from './templates/templateProvider'
export function activate(context: vscode.ExtensionContext) {
// 註冊模板檢視
const templateProvider = new TemplateProvider()
vscode.window.registerTreeDataProvider('projectTemplates', templateProvider)
// 註冊建立專案命令
const createCmd = vscode.commands.registerCommand(
'ai-project-bot.createFromTemplate',
async (template) => {
if (!template) {
// 如果沒有傳入模板(從命令面板呼叫),讓使用者選擇
const pick = await vscode.window.showQuickPick(
TEMPLATES.map(t => ({ label: t.name, description: t.description, template: t })),
{ placeHolder: 'Choose a project template' }
)
if (!pick) return
template = pick.template
}
// 詢問專案名稱
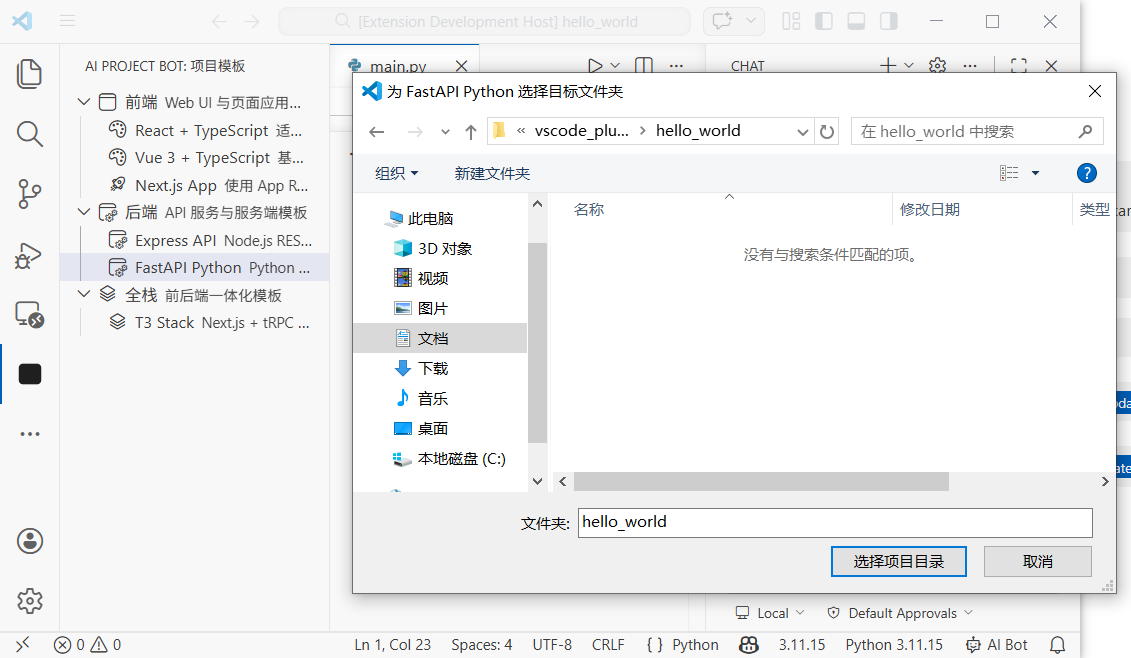
const name = await vscode.window.showInputBox({
prompt: 'Enter project name',
placeHolder: 'my-awesome-project'
})
if (!name) return
// 詢問目標資料夾
const folder = await vscode.window.showOpenDialog({
canSelectFolders: true,
openLabel: 'Select target folder'
})
if (!folder) return
// 執行建立命令
const terminal = vscode.window.createTerminal('AI Project Bot')
terminal.show()
const cmd = template.command.replace('{{name}}', name)
terminal.sendText(`cd "${folder[0].fsPath}" && ${cmd}`)
vscode.window.showInformationMessage(`Creating ${template.name} project: ${name}`)
}
)
context.subscriptions.push(createCmd)
}現在按 F5 除錯。你會在活動列中看到 AI Project Bot。展開模板列表,點擊任何模板即可建立專案。
第 4 章:實作 AI Chat 參與者(5 分鐘)
4.1 什麼是 Chat Participant API?
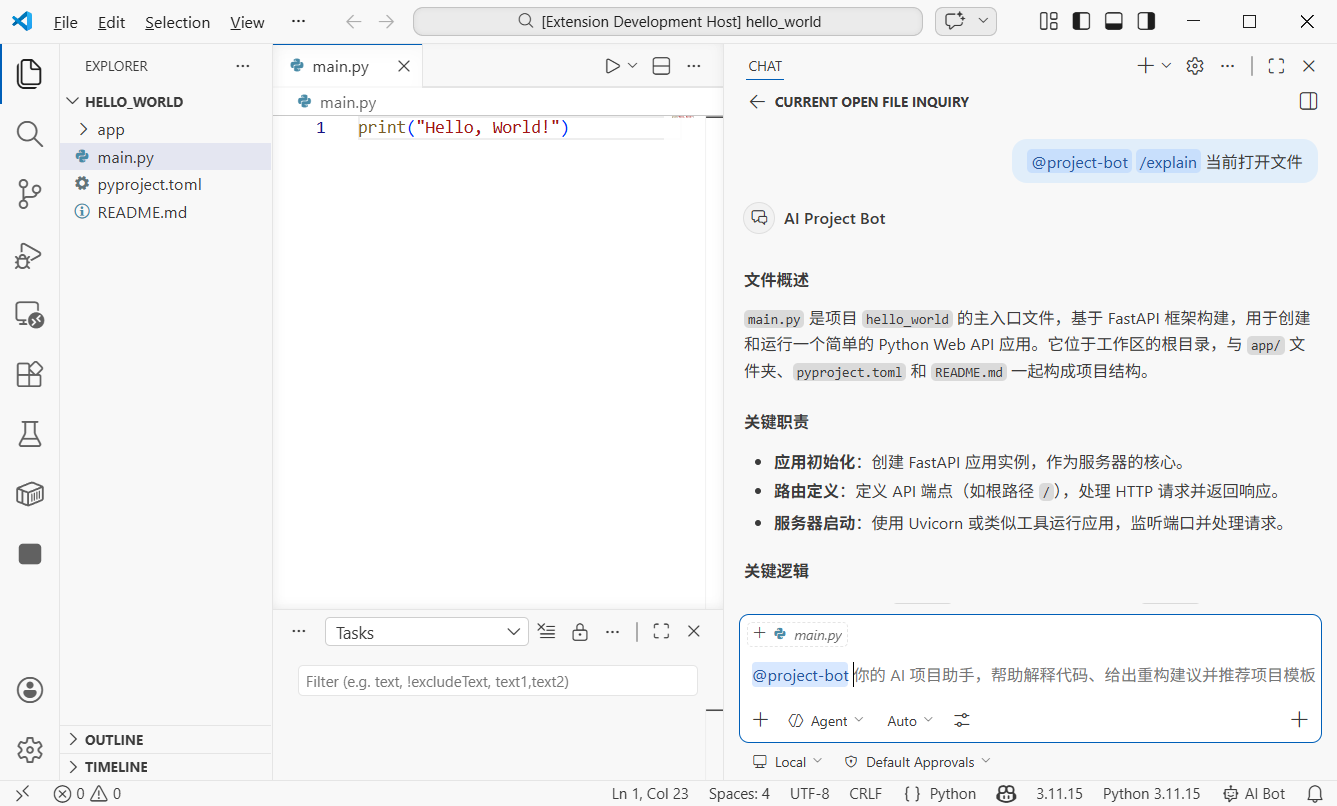
從 VS Code 1.90 開始,擴展可以使用 Chat Participant API 在 Chat 面板中建立自己的 AI 助理。如果使用者輸入 @project-bot help me analyze this project architecture,你的擴展就會收到訊息並返回模型生成的回應。
核心概念:
- Participant:你在 Chat 面板中的助理身分,使用
@name呼叫 - Slash Commands:參與者支援的快速命令,例如
/explain、/refactor - Language Model API:呼叫 VS Code 內建模型(例如 Copilot GPT-4o)
- Stream:透過
stream.markdown()漸進式輸出回應
4.2 在 package.json 中宣告 Chat Participant
在 contributes 中新增:
{
  "contributes": {
    "chatParticipants": [
      {
        "id": "ai-project-bot.projectBot",
        "name": "project-bot",
        "fullName": "AI Project Bot",
        "description": "Your AI project assistant for code analysis, architecture explanation, and solution generation",
        "isSticky": true
      }
    ]
  }
}
isSticky: true 表示一旦選中,後續訊息預設發送給這個參與者,不需要每次都輸入 @project-bot。
4.3 實作 Chat Participant 處理器
讓 AI 編寫核心邏輯:
請幫我建立 src/chat/chatParticipant.ts 並實作 Chat Participant:
1. 註冊參與者 "ai-project-bot.projectBot"
2. 支援三個斜線命令:
   - /explain:解釋選中的程式碼或目前檔案
   - /refactor:提供重構建議
   - /template:推薦合適的技術棧模板
3. 使用 Language Model API 搭配 VS Code 內建模型
4. 以串流模式返回回應(stream.markdown)
核心程式碼:
// src/chat/chatParticipant.ts
import * as vscode from 'vscode'

export function registerChatParticipant(context: vscode.ExtensionContext) {
  const participant = vscode.chat.createChatParticipant(
    'ai-project-bot.projectBot',
    async (request, chatContext, stream, token) => {
      // 選擇可用的模型
      const models = await vscode.lm.selectChatModels({ family: 'gpt-4o' })
      const model = models[0]

      if (!model) {
        stream.markdown('No language model available. Please make sure GitHub Copilot is installed.')
        return
      }

      // 根據斜線命令建構系統提示
      let systemPrompt = 'You are a professional project development assistant.'

      if (request.command === 'explain') {
        systemPrompt = 'You are a code explanation expert. Please explain user code in concise Chinese, including purpose, logic flow, and key design decisions.'
      } else if (request.command === 'refactor') {
        systemPrompt = 'You are a code refactoring expert. Analyze user code and provide specific refactoring suggestions with improved code examples.'
      } else if (request.command === 'template') {
        systemPrompt = 'You are a tech stack selection expert. Recommend suitable tech stacks and project templates based on user requirements.'
      }

      // 建構訊息
      const messages = [
        vscode.LanguageModelChatMessage.User(systemPrompt),
        vscode.LanguageModelChatMessage.User(request.prompt)
      ]

      // 串流輸出
      const response = await model.sendRequest(messages, {}, token)
      for await (const chunk of response.stream) {
        stream.markdown(chunk)
      }

      return { metadata: { command: request.command || '' } }
    }
  )

  // 註冊斜線命令
  participant.slashCommandProvider = {
    provideSlashCommands: () => [
      { name: 'explain', description: 'Explain code function and logic' },
      { name: 'refactor', description: 'Provide refactoring suggestions and improvements' },
      { name: 'template', description: 'Recommend suitable project templates and tech stacks' }
    ]
  }

  // 註冊後續建議
  participant.followupProvider = {
    provideFollowups: (result) => {
      if (result.metadata?.command === 'explain') {
        return [
          { prompt: 'Can you draw a flowchart?', label: 'Generate flowchart' },
          { prompt: 'Any potential bugs here?', label: 'Check potential issues' }
        ]
      }
      return []
    }
  }

  context.subscriptions.push(participant)
}
在 extension.ts 中呼叫註冊:
import { registerChatParticipant } from './chat/chatParticipant'

export function activate(context: vscode.ExtensionContext) {
  // ... 之前的模板註冊程式碼 ...
  registerChatParticipant(context)
}
現在在 Chat 面板中輸入 @project-bot /explain what does this code do?,你的擴展就會呼叫模型並生成解釋。
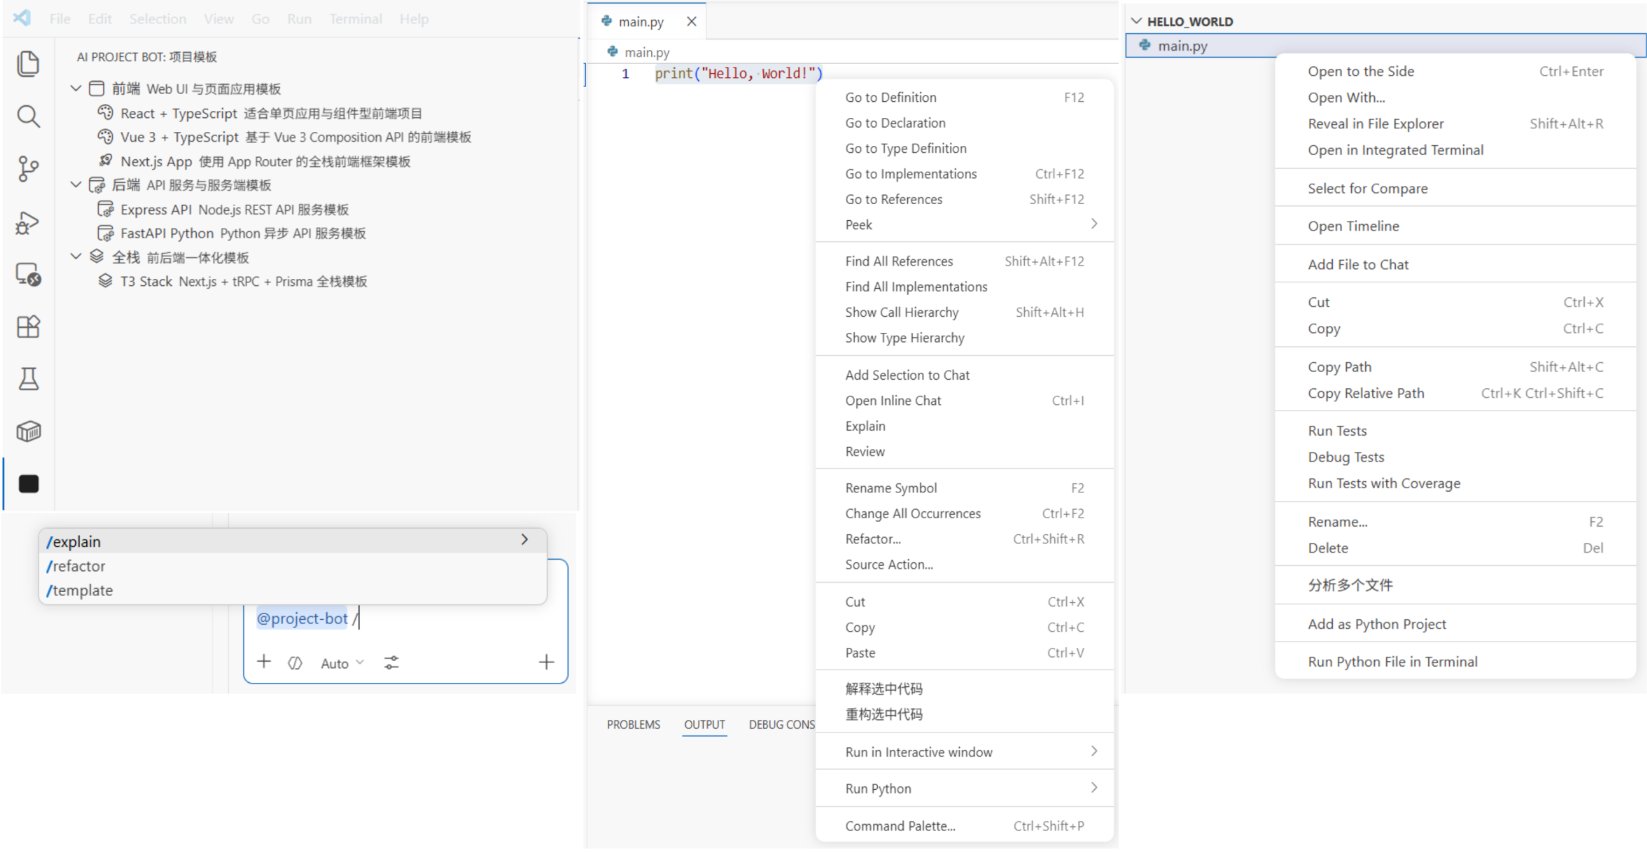
第 5 章:檔案/片段聊天和多檔案問答(5 分鐘)
5.1 右鍵選單:將選中的程式碼發送給 AI
我們希望使用者能在編輯器中選中程式碼,然後從右鍵選單發送給 AI。這需要使用 VS Code 的 Context Menu 貢獻點。
在 package.json 中新增:
{
  "contributes": {
    "commands": [
      {
        "command": "ai-project-bot.explainSelection",
        "title": "AI: Explain Selected Code"
      },
      {
        "command": "ai-project-bot.refactorSelection",
        "title": "AI: Refactor Selected Code"
      }
    ],
    "menus": {
      "editor/context": [
        {
          "command": "ai-project-bot.explainSelection",
          "when": "editorHasSelection",
          "group": "ai-project-bot@1"
        },
        {
          "command": "ai-project-bot.refactorSelection",
          "when": "editorHasSelection",
          "group": "ai-project-bot@2"
        }
      ]
    }
  }
}
關鍵配置說明:
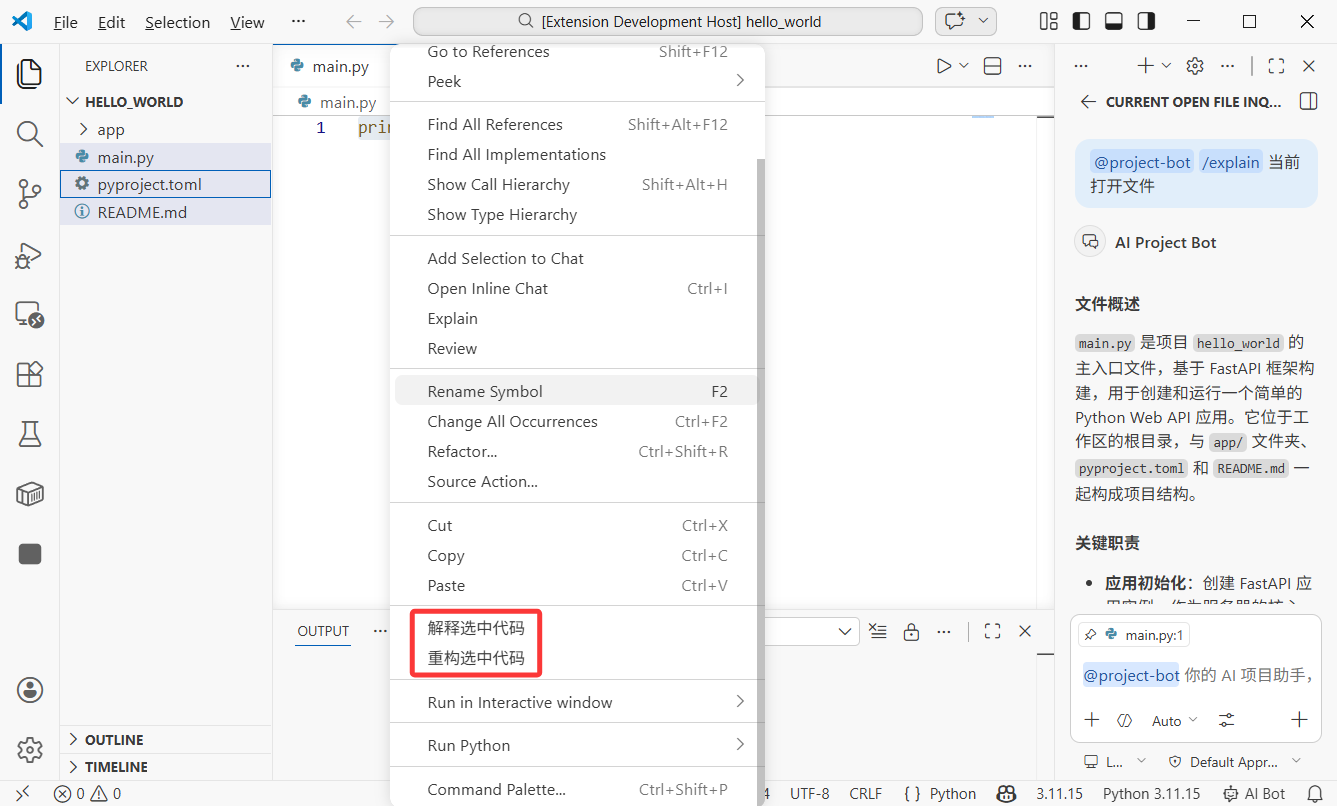
when: "editorHasSelection":僅在有文字被選中時顯示選單group: "ai-project-bot@1":選單分組和排序(@1、@2)
5.2 實作選中程式碼分析
// src/commands/selectionCommands.ts
import * as vscode from 'vscode'

export function registerSelectionCommands(context: vscode.ExtensionContext) {
  // 解釋選中的程式碼
  const explainCmd = vscode.commands.registerCommand(
    'ai-project-bot.explainSelection',
    async () => {
      const editor = vscode.window.activeTextEditor
      if (!editor) return

      const selection = editor.selection
      const selectedText = editor.document.getText(selection)
      const fileName = editor.document.fileName.split('/').pop()
      const startLine = selection.start.line + 1
      const endLine = selection.end.line + 1

      // 帶上下文建構提示
      const prompt = [
        `Please explain the following code (from ${fileName}, lines ${startLine}-${endLine}):`,
        '```',
        selectedText,
        '```',
        'Please explain: 1) what this code does 2) core logic 3) possible improvements'
      ].join('\n')

      // 呼叫 Language Model API
      const models = await vscode.lm.selectChatModels({ family: 'gpt-4o' })
      if (!models.length) {
        vscode.window.showErrorMessage('No language model available')
        return
      }

      // 在輸出面板中顯示結果
      const outputChannel = vscode.window.createOutputChannel('AI Project Bot')
      outputChannel.show()
      outputChannel.appendLine(`\n--- Code Explanation (${fileName}:${startLine}-${endLine}) ---\n`)

      const messages = [
        vscode.LanguageModelChatMessage.User(prompt)
      ]
      const response = await models[0].sendRequest(messages, {})
      for await (const chunk of response.stream) {
        outputChannel.append(chunk)
      }
    }
  )

  context.subscriptions.push(explainCmd)
}
5.3 多檔案問答:批次分析檔案關係
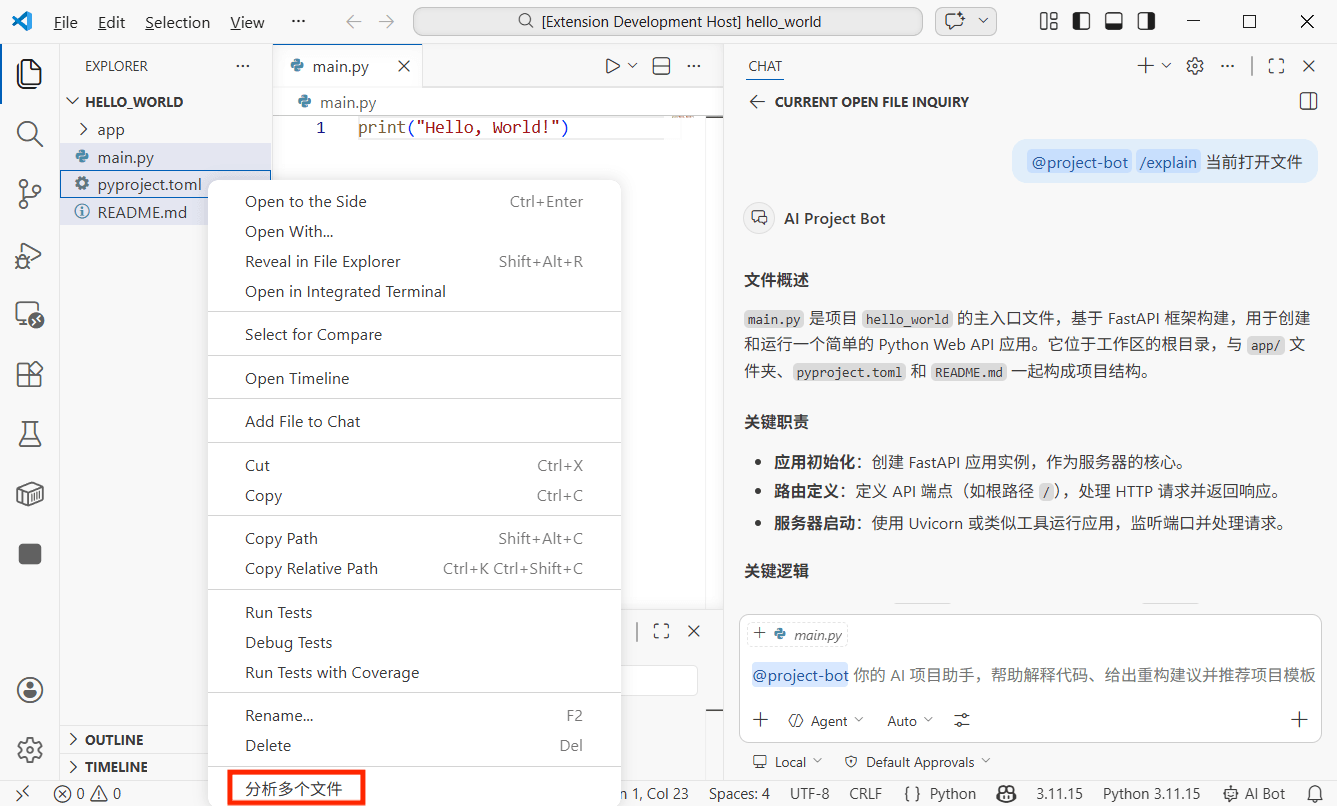
這是最強大的功能之一:在檔案總管中多選檔案,讓 AI 一鍵分析關係和邏輯。
在 package.json 中新增檔案總管右鍵選單:
{
  "contributes": {
    "commands": [
      {
        "command": "ai-project-bot.analyzeFiles",
        "title": "AI: Analyze Relationships of Selected Files"
      }
    ],
    "menus": {
      "explorer/context": [
        {
          "command": "ai-project-bot.analyzeFiles",
          "when": "explorerResourceIsFile",
          "group": "ai-project-bot"
        }
      ]
    }
  }
}
實作多檔案分析命令:
// src/commands/multiFileAnalysis.ts
import * as vscode from 'vscode'

export function registerMultiFileCommands(context: vscode.ExtensionContext) {
  const analyzeCmd = vscode.commands.registerCommand(
    'ai-project-bot.analyzeFiles',
    async (clickedFile: vscode.Uri, selectedFiles: vscode.Uri[]) => {
      // selectedFiles 包含所有選中的檔案
      const files = selectedFiles || [clickedFile]

      if (files.length < 2) {
        vscode.window.showWarningMessage('Please select at least 2 files for analysis')
        return
      }

      // 讀取所有選中的檔案
      const fileContents: string[] = []
      for (const file of files) {
        const content = await vscode.workspace.fs.readFile(file)
        const fileName = vscode.workspace.asRelativePath(file)
        fileContents.push(
          `--- ${fileName} ---\n${Buffer.from(content).toString('utf8')}`
        )
      }

      const prompt = [
        `Please analyze relationships among these ${files.length} files:`,
        '',
        ...fileContents,
        '',
        'Please explain:',
        '1. Responsibilities of each file',
        '2. Dependency/call relationships among them',
        '3. Data flow (if any)',
        '4. Architectural suggestions or potential issues'
      ].join('\n')

      // 呼叫模型並顯示結果
      const models = await vscode.lm.selectChatModels({ family: 'gpt-4o' })
      if (!models.length) {
        vscode.window.showErrorMessage('No language model available')
        return
      }

      const outputChannel = vscode.window.createOutputChannel('AI Project Bot')
      outputChannel.show()
      outputChannel.appendLine(`\n--- Multi-file Analysis (${files.length} files) ---\n`)

      const messages = [
        vscode.LanguageModelChatMessage.User(prompt)
      ]
      const response = await models[0].sendRequest(messages, {})
      for await (const chunk of response.stream) {
        outputChannel.append(chunk)
      }
    }
  )

  context.subscriptions.push(analyzeCmd)
}
使用方法:在檔案總管中,按住 Ctrl(Mac 上是 Cmd)多選檔案,右鍵選擇「AI: Analyze Relationships of Selected Files」。AI 會讀取所有選中的檔案並返回分析結果。
第 6 章:快捷鍵和 UX 優化(3 分鐘)
6.1 自訂鍵盤快捷鍵
快捷鍵是效率的關鍵。在 package.json 中新增:
{
  "contributes": {
    "keybindings": [
      {
        "command": "ai-project-bot.explainSelection",
        "key": "ctrl+shift+e",
        "mac": "cmd+shift+e",
        "when": "editorTextFocus && editorHasSelection"
      },
      {
        "command": "ai-project-bot.refactorSelection",
        "key": "ctrl+shift+r",
        "mac": "cmd+shift+r",
        "when": "editorTextFocus && editorHasSelection"
      },
      {
        "command": "ai-project-bot.createFromTemplate",
        "key": "ctrl+shift+n",
        "mac": "cmd+shift+n",
        "when": ""
      }
    ]
  }
}
when 條件:
| 條件 | 含義 |
|---|---|
editorTextFocus | 游標在編輯器中 |
editorHasSelection | 有文字被選中 |
explorerViewletVisible | 檔案總管面板可見 |
!editorReadonly | 檔案不是唯讀 |
多個條件用 && 連接,表示必須同時滿足。
6.2 狀態列提示
新增一個狀態列項目,讓使用者隨時知道擴展正在運行:
// src/statusBar.ts
import * as vscode from 'vscode'

export function createStatusBarItem(context: vscode.ExtensionContext) {
  const statusBar = vscode.window.createStatusBarItem(
    vscode.StatusBarAlignment.Right,
    100
  )
  statusBar.text = '$(hubot) AI Bot'
  statusBar.tooltip = 'Click to open AI Project Bot'
  statusBar.command = 'ai-project-bot.createFromTemplate'
  statusBar.show()

  context.subscriptions.push(statusBar)
}
$(hubot) 是 VS Code 內建圖示語法。你可以在 Codicon 圖示庫 中找到所有圖示。
第 7 章:發佈到 Marketplace(選用)
7.1 準備發佈
VS Code 擴展使用 vsce 打包和發佈:
請幫我安裝 vsce:npm install -g @vscode/vsce發佈前需要準備:
- Azure DevOps 帳號:在 dev.azure.com 註冊並建立組織
- 個人存取權杖(PAT):在 Azure DevOps 中建立,權限選擇 Marketplace -> Manage
- 發佈者 ID:在 VS Code Marketplace 中建立發佈者身分
7.2 完善 package.json 元資料
發佈前新增元資料:
{
  "publisher": "your-publisher-id",
  "repository": {
    "type": "git",
    "url": "https://github.com/yourname/ai-project-bot"
  },
  "categories": ["AI", "Other"],
  "keywords": ["ai", "project", "template", "chat"],
  "icon": "resources/icon.png",
  "galleryBanner": {
    "color": "#1e1e2e",
    "theme": "dark"
  }
}
你還需要一個 README.md 作為 Marketplace 說明,以及一個 CHANGELOG.md 作為版本歷史。
7.3 打包和發佈
# 打包為 .vsix(手動安裝檔案)
vsce package

# 發佈到 Marketplace
vsce publish
打包後,你會得到 ai-project-bot-0.0.1.vsix。你可以將這個檔案發送給朋友,他們可以透過 VS Code 的「Install from VSIX」進行安裝。
若要正式發佈到 Marketplace,執行 vsce publish;擴展通常在幾分鐘內就會上線。
提示:首次發佈可能需要審核。確保 README 清晰且截圖完整,以加速審核通過。
第 8 章:總結
恭喜!你已經從零開始構建了一個功能完整的 VS Code 擴展。回顧一下:
- 使用 Yeoman 腳手架建立了擴展專案,了解了
package.json和extension.ts的角色 - 使用 TreeView API 實作了側邊欄專案模板列表和一鍵建立專案
- 使用 Chat Participant API 建立了
@project-botAI 助理,包括斜線命令和串流回應 - 實作了右鍵程式碼選中分析
- 實作了多檔案關係分析
- 新增了自訂快捷鍵和狀態列提示
VS Code 擴展開發的想像空間非常廣闊。你每天使用的實用擴展,其背後的技術正是你剛剛學到的。
進階方向:
- 自訂 Webview 面板:使用 HTML/CSS/JS 構建完全自訂的 UI,例如視覺化架構圖和互動式程式碼審查介面
- Language Model Tools:註冊可被 AI 呼叫的自訂工具,例如查詢資料庫或執行 API 請求
- 診斷和 CodeLens:在行內顯示 AI 建議、效能提示和安全警告
- 自訂語言支援:為 DSL 或特定配置格式提供語法高亮、補全和診斷
- 遠端開發整合:讓擴展在 SSH、容器和 WSL 中正常運作
你的編輯器,你做主。