
商品资料标题与卖点
使用 文本生成Add AI Capabilities to a Prototype
Chapter overview
🎯Learning Objectives
Estimated Time
About 1–2 days
Expected Output
Add one or two real AI capabilities to a prototype
A web prototype that can call a text, image, speech, or video service
1. Decide which feature to connect
The e-commerce content workspace from the previous chapter already has product information and a “Generate copy” button. Its result still comes from mock data, so our first job is to make that button actually work.
The flow is straightforward: the user enters a product name, material, and selling points, clicks the button, and receives a piece of product copy. Both the input and the result are text, so we need a model that can generate text.
If your page has a different feature, it will need a different capability. For example:
- Uploading a product photo and identifying its color and style requires image understanding.
- Making a poster from product information requires image generation.
- Turning a recording into meeting notes first requires speech-to-text, followed by a text model that organizes the transcript.
- Turning an article into playable audio requires text-to-speech.
- Making a product photo move requires image-to-video generation.
Before choosing a service, look at the page once more: what will the user submit, and what do they expect to see at the end? Once those two points are clear, it is usually easy to tell whether you need a text, image, speech, or video model.
商品照片颜色与款式
使用 图片理解会议录音文字记录
使用 语音转文字商品图片商品短片
使用 视频生成一个功能也可以串起两种能力
商品照片→图片理解→商品信息→文本生成→卖点文案
1.1 One feature may need several steps
Not every feature can be completed by one model in one call. “Upload a product photo and generate selling points,” for example, first requires the application to understand the product in the image and then write copy from that result. “Answer questions from company files” similarly requires the application to find relevant material before it composes an answer.
You do not need to start with model names when breaking down the task. Follow the user's flow instead: which step understands existing content, which step creates new content, and which step only retrieves information? When necessary, connect two or three capabilities in sequence.
AI should handle only the parts for which it is suitable. Login, payment, file storage, and page navigation follow explicit rules and should still be implemented with ordinary program logic.
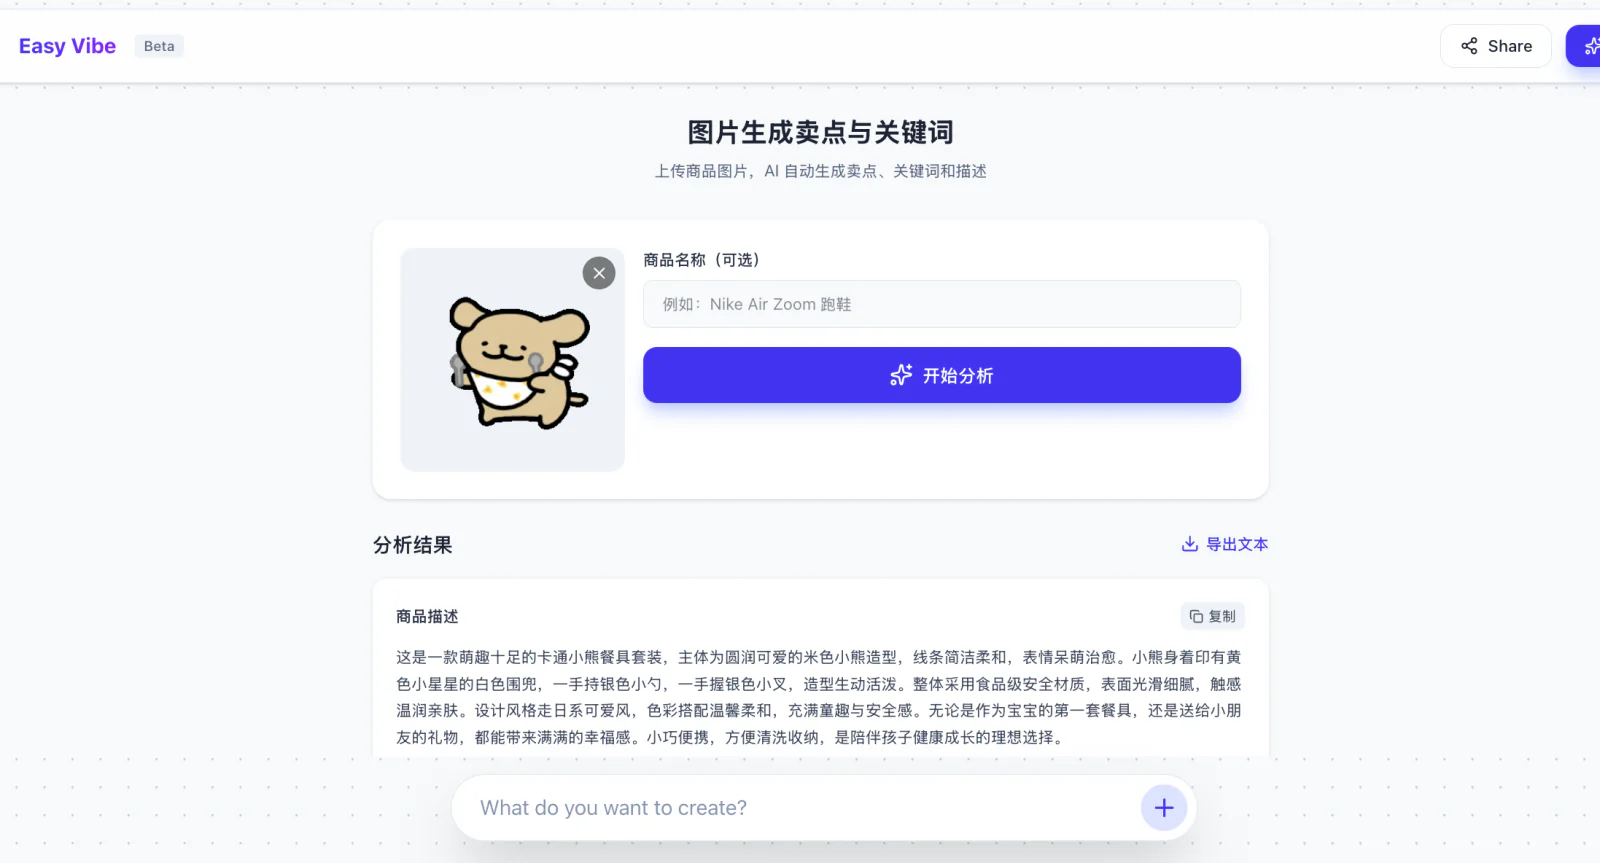
In this prototype, the user first uploads a product image. The page identifies the product information, then creates a description and selling points that the user can continue editing.
1.2 What to look for in a service console
Once we have decided to generate text, we can open a service platform such as DeepSeek, SiliconFlow, Volcengine Ark, or MiniMax. The platform provides the account, billing, and API entry point; the model we select handles the actual request.
You do not need to study every console menu for your first integration. Find these four things:
- Create an API key that the application can use to call the service.
- Record the model ID you plan to use.
- Find the smallest curl or JavaScript example in the official documentation.
- Check the quota, price, and request limits.
The application sends the product data to the model through an API. If the documentation provides a JavaScript or Python SDK, you can use that instead; it is simply a convenient wrapper around the request code. The sentence “Write a title and selling points from this product information” inside the request is the prompt sent to the model.
The platform name, model ID, and API address are not the same thing. Use the address and model ID from the official code example. Do not paste the URL of the platform's online playground into your program.
1.3 Leave unfamiliar APIs for later
The console may also list Embedding, Rerank, Function Calling, OCR, and content-moderation endpoints. Embedding and Rerank are useful for a knowledge base; OCR is useful for reading PDFs and receipts; Function Calling lets a model use external tools such as search or a database.
You do not need to learn all of them now. First connect one API that directly supports a feature on your page. Return to the appropriate documentation when the product actually needs another capability.
2. Try the generated result first
Before writing API code, test the model in the platform's online playground. We are not merely checking whether it “can write product copy.” We need to know whether it can return a result in the format our page requires.
2.1 The user only needs to describe the goal
In the online playground, begin as a real user would:
text
I want to list a lightweight commuter backpack made from black nylon.
It is mainly for everyday commuting.
Please write a short product title and three selling points.
Once this becomes a page, the user may not even need to organize that paragraph. They can fill in the product name, material, and color, then click “Generate copy.” The program reads those fields and adds fixed instructions to the request: do not invent prices or sales figures, keep the title short, and return the result in a specified format.
Each user should not have to repeat these rules. If the page displays a title, summary, and selling points separately, the program can ask the model to return three JSON fields: title, summary, and selling_points. The user's input remains natural while the page can read the result reliably.
For the first test, try several products and deliberately omit one field. Check whether the model invents missing information. If the format is unstable, adjust the fixed instructions added by the program instead of asking users to learn prompt engineering.
2.2 Connect the API to the page
The official documentation usually provides a curl, JavaScript, or Python example. Give that example to your AI IDE together with the feature you want, and ask it to connect the request to your existing page.
text
Add a “Generate copy” button to the product details page.

When the user clicks it, send the current product information to the API below,
then show the generated copy on the page.

Do not put the API key in the browser. Show a message while waiting and when the request fails.
When it is ready, tell me what to configure and how to start and test it.

Here is the official API example:
<paste a curl or SDK example without a real key>
With the page location and official example in front of it, the AI IDE does not need to guess the API format. First make sure one request returns normally. When you later add image, speech, or video support, you can replace the feature description and the official example.
3. Send the first request from the official example
After the prompt works, send it from code. Open the official documentation and look for “Quick Start” or “API Reference.” Service documentation varies in appearance, but your first call only requires four facts: the request address, where to put the API key, the value of model, and the smallest official example.
Copy the official curl, JavaScript, or Python example first, changing only the model ID and test content. Run it in the terminal and obtain one normal response before putting it into the project. If the page integration later fails, you will at least know that the account, key, and model are working.
Also inspect the returned value. Text usually sits inside a JSON field, an image may return a URL, speech may return binary data directly, and video often returns a task number first. The page you build next depends on what the endpoint actually returns.
3.1 Ask AI to help read long documentation
You do not have to read a long API document from beginning to end. Give the page you are reading to the AI IDE and ask it to find only what is needed for the first call:
text
Read this API documentation: <documentation link>

I want to call it with JavaScript. Show me the simplest example,
where to put the API key and model, and how to read the generated result.
Use only parameters documented on this page.
4. Your first visit to the service console
Creating a key, selecting a model, and viewing usage normally happen in the service console. Menu names differ, but the work is much the same.
4.1 Create a key and confirm that the request reached the platform
An API key is the credential your application uses to call the model. Store it in a local environment variable after creating it. Do not paste it into screenshots, chat messages, or browser code. If you think it has leaked, revoke it in the console immediately and create a new one.
After sending the first request, open the Usage or Billing page and look for a new record. This page also shows your balance and quota. When a request fails, first determine whether the code sent nothing, the platform rejected the call, or the account has no remaining quota.
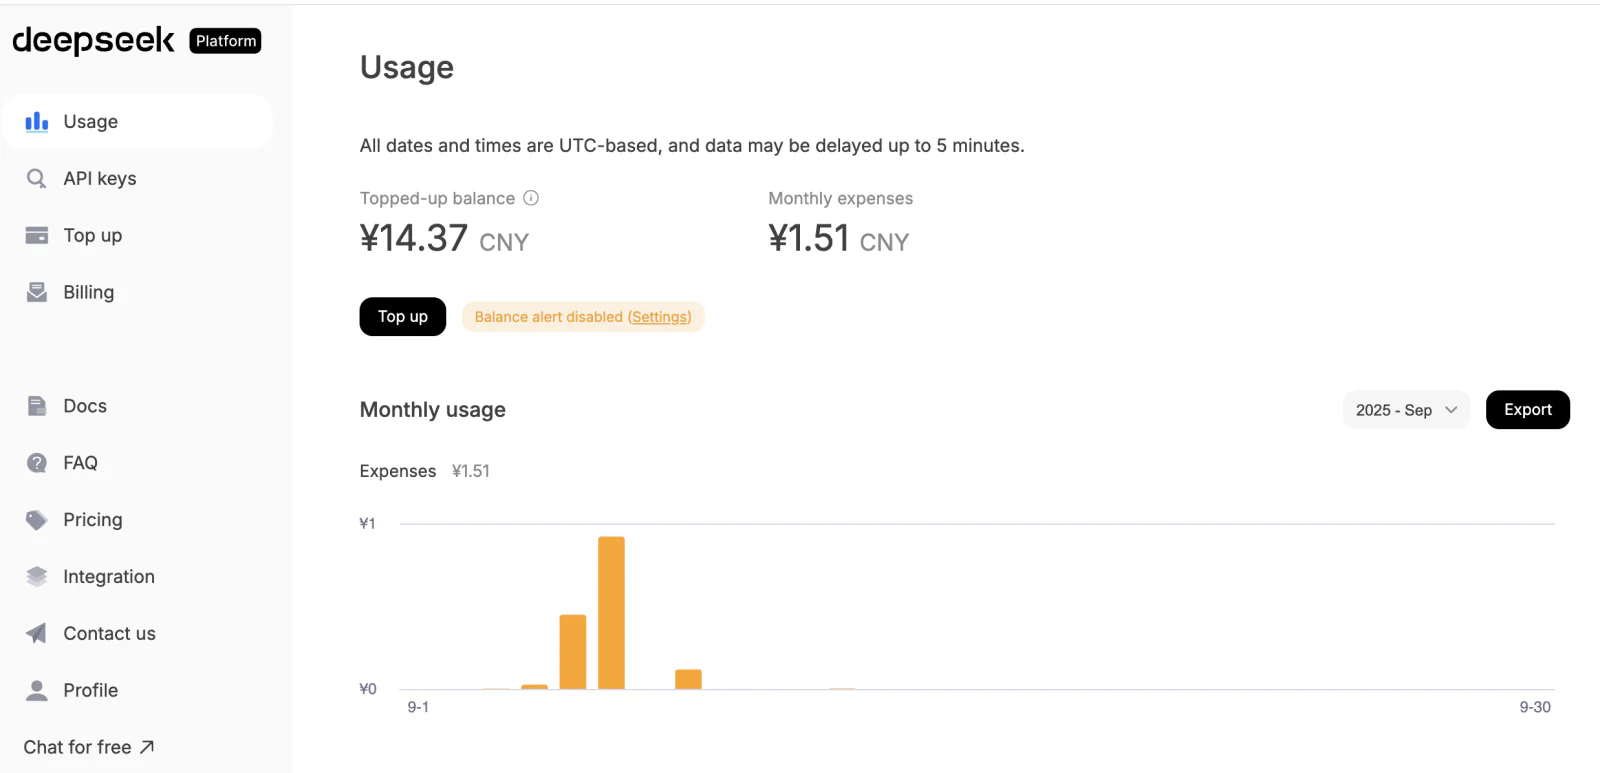
DeepSeek's Usage page shows request volume, cost, and the remaining balance.
If the error contains a Request ID or Trace ID, save it. Many calls may occur at the same time; this identifier helps you find the failed call in the logs.
4.2 Select a model and copy its exact calling name
The model catalog or Models page shows which text, image, speech, and video models the platform currently offers. Open the details and copy the model ID used in code; it may differ from the display name on the page.
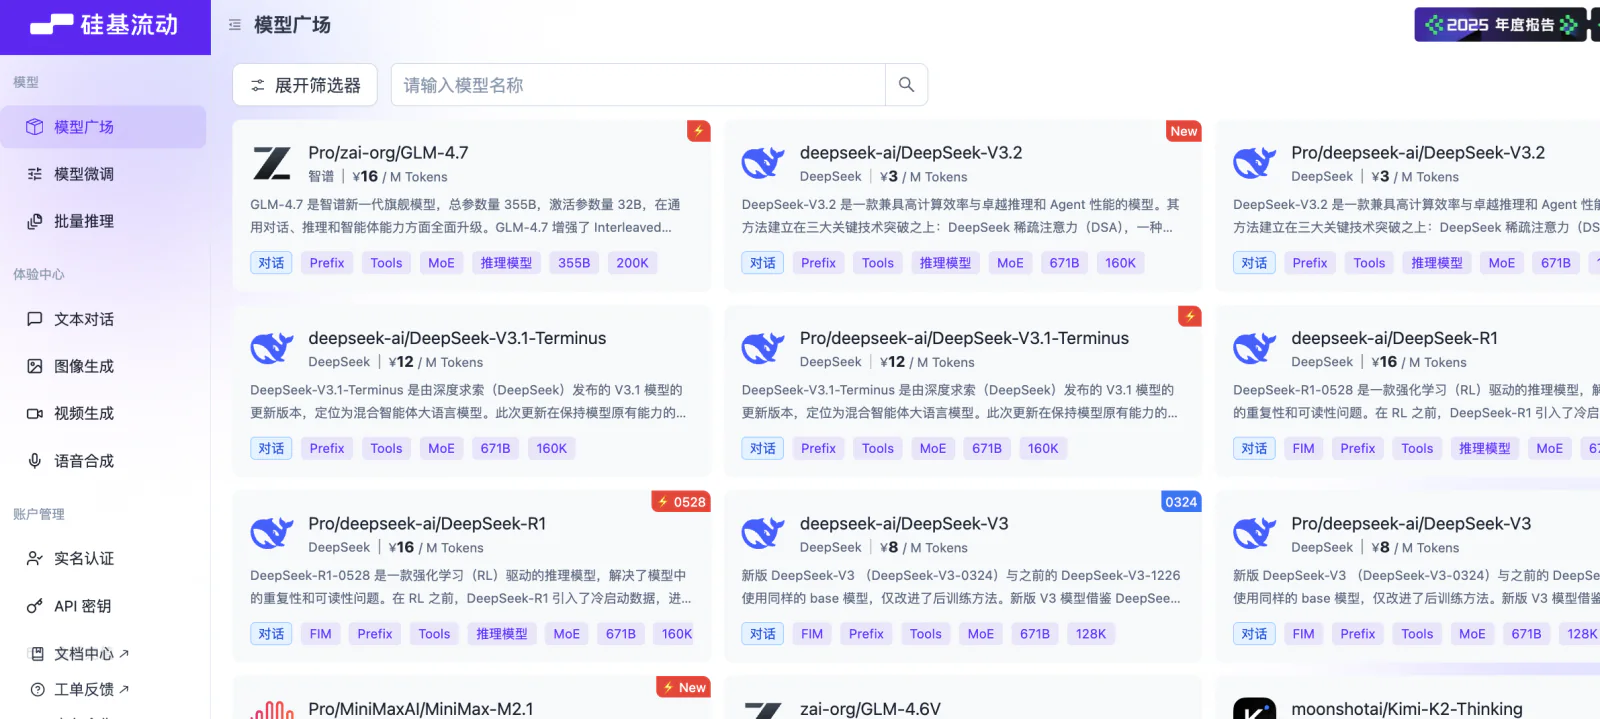
SiliconFlow's catalog can be filtered by text, image, video, and speech.
Some platforms also require you to select a region or create a deployment before they provide a base URL and endpoint. Follow the platform's quick-start guide in that case. Do not use the console page URL as the API address.
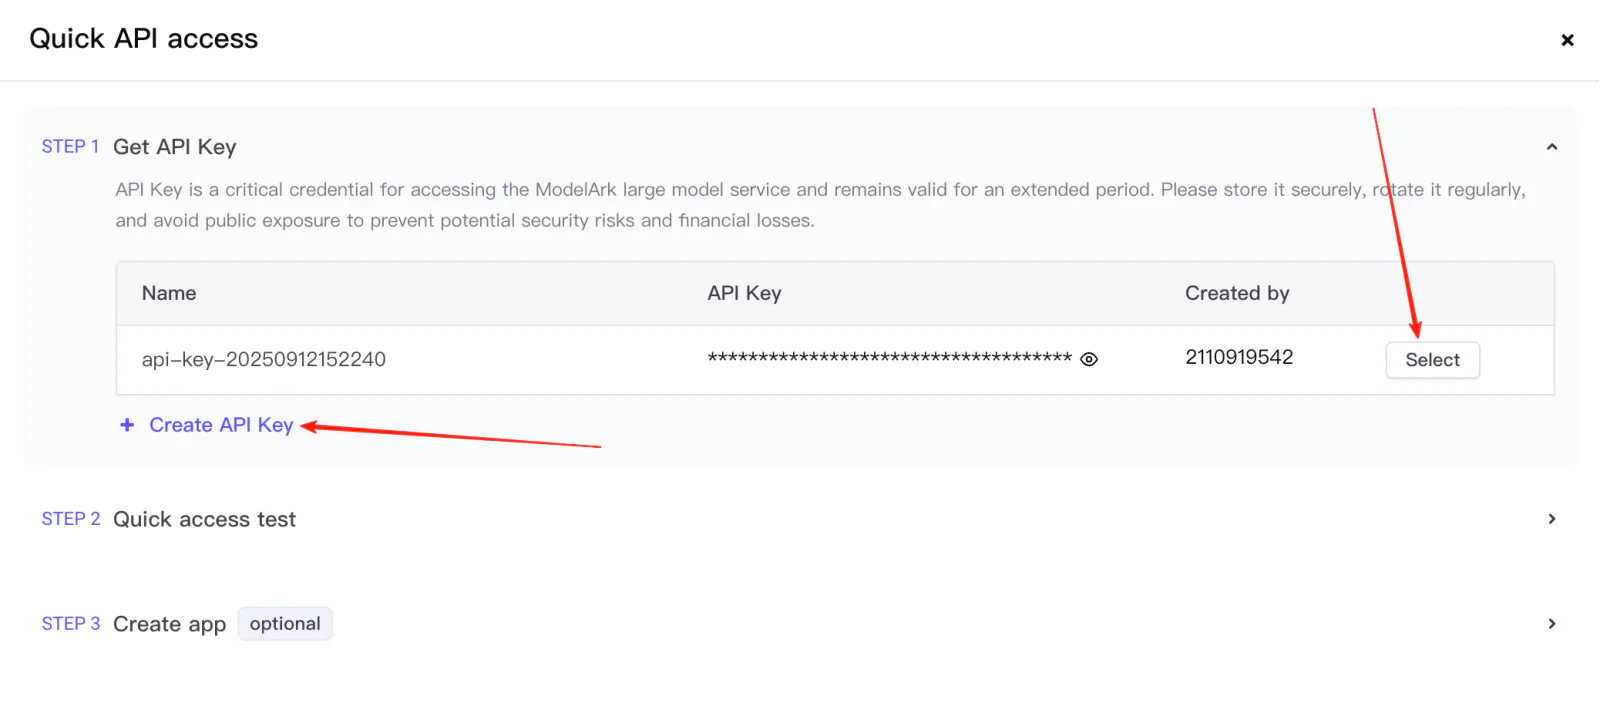
Volcengine Ark places key creation, model selection, and a runnable example in the same quick-start flow.
4.3 Usage limits and long-running tasks
Text endpoints often list RPM and TPM: the number of requests and tokens allowed per minute. Image, speech, and video services may also limit concurrency, meaning the number of jobs that can run at the same time. Exceeding a limit normally produces a 429 response. Wait and retry later instead of repeatedly clicking the button.
Long-running tasks such as video generation do not return the file immediately. They first return a task ID. The application can use it to query progress, or provide a callback or webhook so the platform can notify the server when the job finishes. A final file ID or temporary download URL may expire, so a production application must decide whether to copy the file into its own storage.
The documentation will also mention parameters such as max_tokens, temperature, and stream. Keep the official defaults for the first version. Increase max_tokens only if the output is cut off, and enable stream only if you need to display content as it arrives. Look up an individual parameter in the model's documentation when you need it; there is no reason to change everything at once.
5. Move from the official example to the page
Once the smallest terminal example returns a result, connect it to the prototype in this order:
- Put the key in an environment file such as
.env.localthat will not be committed to Git. - Call the model from a server or Serverless Function.
- Let the page call your own
/api/...endpoint instead of carrying a third-party key. - Add waiting, success, and failure states to the button.
- Return to the Usage page and confirm that the operation produced a real request.
text
Browser page
    │ sends only business input
    ▼
Your /api endpoint ── reads the API key from a server environment variable
    │
    ▼
AI service ── returns text, JSON, a file, or a task_id
Keep API keys safe
Do not place an API key in Vue, React, or ordinary front-end HTML code. Even a variable whose name starts with VITE_ or NEXT_PUBLIC_ may be bundled into the browser. For a public deployment, call the model from a backend, Serverless Function, or protected gateway.
5.1 Some endpoints do not return immediately
Short text, image understanding, and short audio transcription usually return in a single request, so the page can show “Generating.” Conversations and live speech may stream their response, letting the page display each piece as it arrives.
Image and video generation often run asynchronously. The first request returns only a task_id; later requests check whether the job is queued, processing, successful, or failed. These jobs can take tens of seconds, so the page should not remain on an unchanging loading message.
6. Connect text generation first
The DeepSeek API documentation provides a text endpoint compatible with widely used SDKs. Models change over time, so copy the current ID from the model list before integrating it.
Begin by sending one request with curl. It uses the same product details as the online-playground test, which makes the two results easier to compare.
bash
curl https://api.deepseek.com/chat/completions \
  -H "Content-Type: application/json" \
  -H "Authorization: Bearer ${DEEPSEEK_API_KEY}" \
  -d '{
    "model": "deepseek-v4-flash",
    "messages": [
      {"role": "system", "content": "Return JSON with title, summary, and selling_points. selling_points must contain three items. Do not invent prices, sales figures, or product effects."},
      {"role": "user", "content": "I want to list a black nylon commuter backpack. Write a short title, one introduction, and three selling points."}
    ],
    "stream": false
  }'
Set the key in an environment variable, then run the command in the terminal. Once it returns normally, give the same official example and the integration prompt from Section 2 to the AI IDE. Keep just one button and one fixed product in the first version. Connect the full form only after the page can display a real result.
Test with two products
Change the product name, material, and color, then generate again. If both results match their respective input and the page displays them correctly, the smallest integration is working. Next, remove one field and check whether the model invents a price, effect, or sales figure. You can also temporarily use a wrong key to make sure the page displays an error.
Finally, open the Usage page and confirm that these calls appear. Text on the page does not by itself prove that it came from the API; leftover mock data can look just as convincing.
7. Image understanding with Qwen3-VL
A vision model receives an image and a question. Ask for the information the page actually needs. A vague question such as “What is in this picture?” usually produces a broad description that is difficult to use.
text
Look at this product photo. Tell me what the item is, its main color,
and any visible material and structural details. Copy any text in the image.

Say when something is unclear. Do not guess the brand, price, or sales figures.
Return JSON so I can display the result on the page.
The SiliconFlow model catalog can be filtered to show currently available vision models. This section uses Qwen/Qwen3-VL-8B-Instruct to illustrate the input structure; confirm the current model ID before running it.
python
import base64
import os
from openai import OpenAI

client = OpenAI(
    api_key=os.environ["SILICONFLOW_API_KEY"],
    base_url="https://api.siliconflow.cn/v1"
)

with open("product.jpg", "rb") as image_file:
    image_data = base64.b64encode(image_file.read()).decode("utf-8")

response = client.chat.completions.create(
    model="Qwen/Qwen3-VL-8B-Instruct",
    messages=[{
        "role": "user",
        "content": [
            {"type": "text", "text": "Look at this product photo. Return JSON with its category, color, visible material and structure, and text in the image. Do not guess anything that is unclear."},
            {"type": "image_url", "image_url": {
                "url": f"data:image/jpeg;base64,{image_data}"
            }}
        ]
    }]
)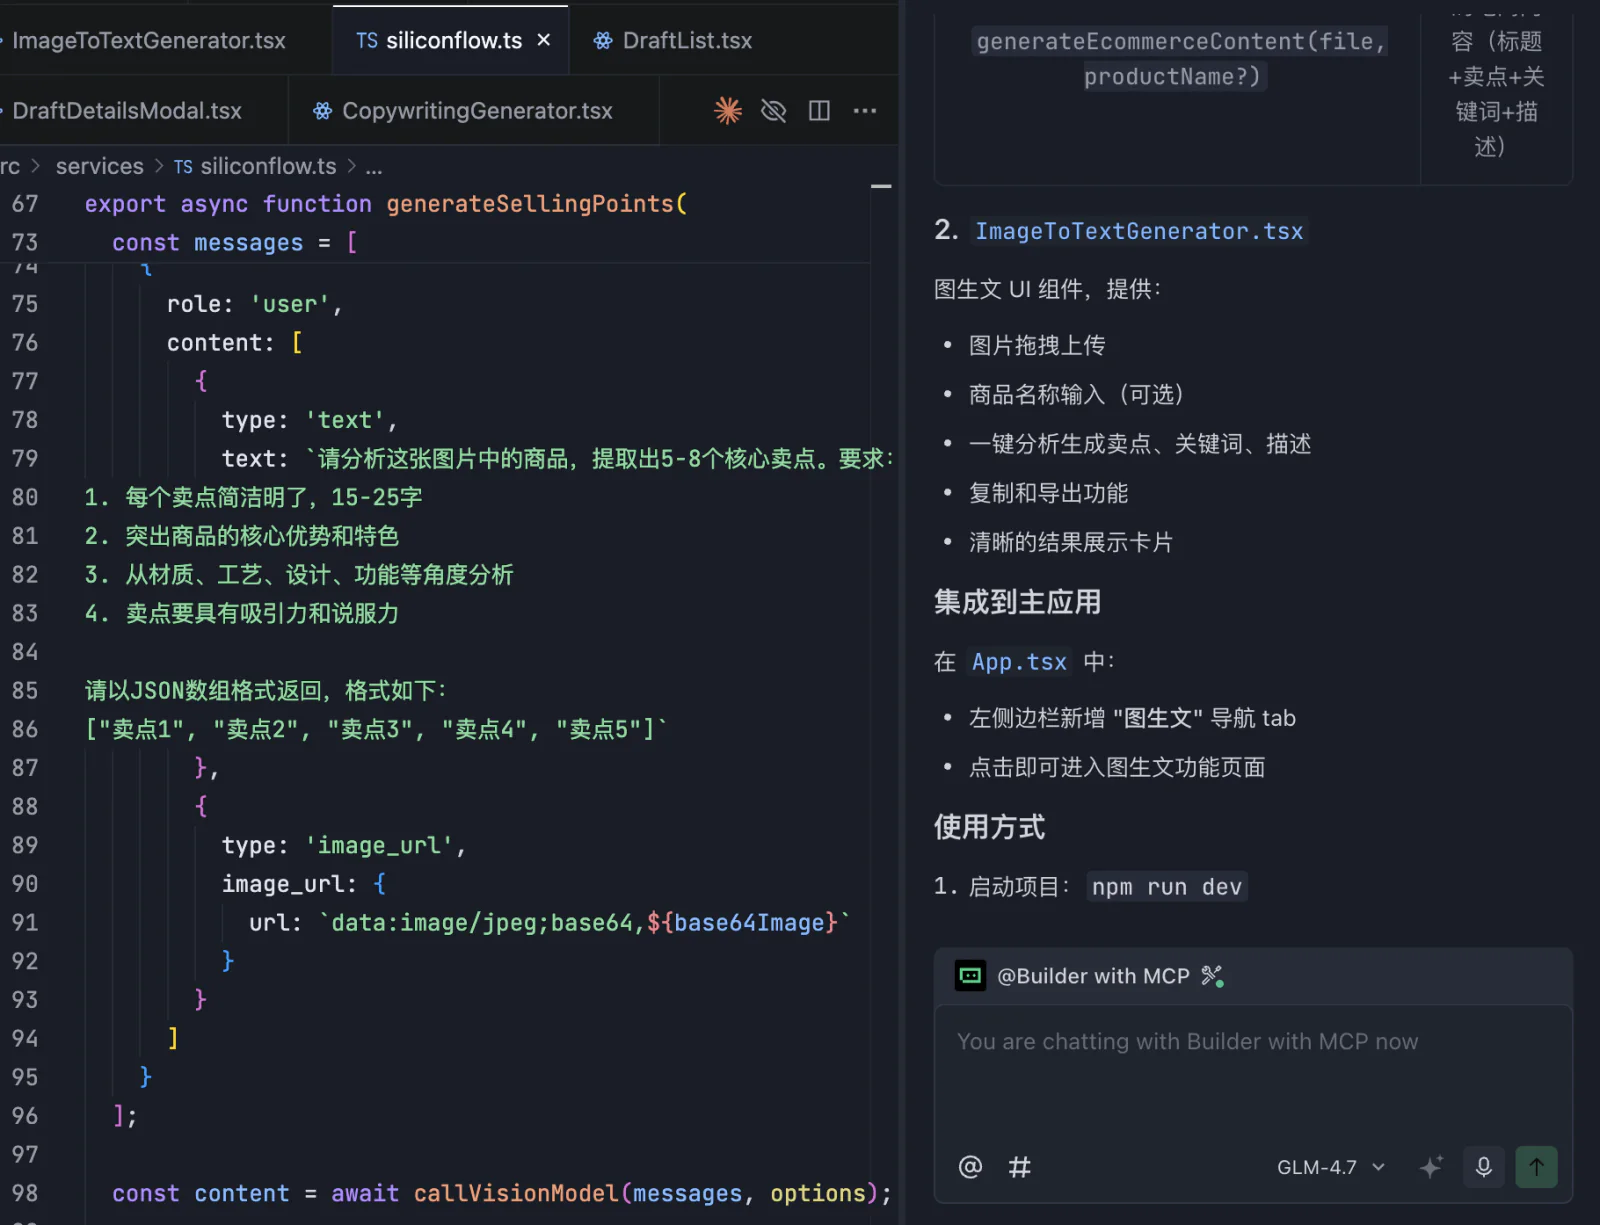
Letting the user confirm the identified product information before generating copy usually makes errors easier to spot than generating the final copy directly from the image.
8. Generate and edit product images
Seedream can generate an image from text or edit a reference image. The biggest risk in product photography is an attractive result in which the product itself has changed. In addition to the background, composition, and lighting, state explicitly which parts must remain unchanged.
text
Turn the black backpack in the reference image into a vertical product poster.
Place it in the center of a light-gray surface with soft lighting,
and leave some room above it for a title.
Do not add text, a logo, or a price. Do not change the zippers, straps, or pockets.
This prompt explains the image's purpose, product position, visual style, and protected details. After the first generation, check the backpack for distortion before judging the background and composition. Do not begin by piling many style terms into the prompt.
Copy the current image model ID and smallest request from the Volcengine Ark console. Do not keep an old tutorial version number in production code.
bash
curl -X POST https://ark.cn-beijing.volces.com/api/v3/images/generations \
  -H "Content-Type: application/json" \
  -H "Authorization: Bearer ${ARK_API_KEY}" \
  -d '{
    "model": "<copy the current image model ID from the console>",
    "prompt": "Turn the black backpack in the reference image into a clean vertical product poster. Do not add text, a logo, or a price, and do not change the structure of the backpack.",
    "image": ["https://example.com/product-reference.png"],
    "response_format": "url",
    "stream": false,
    "watermark": false
  }'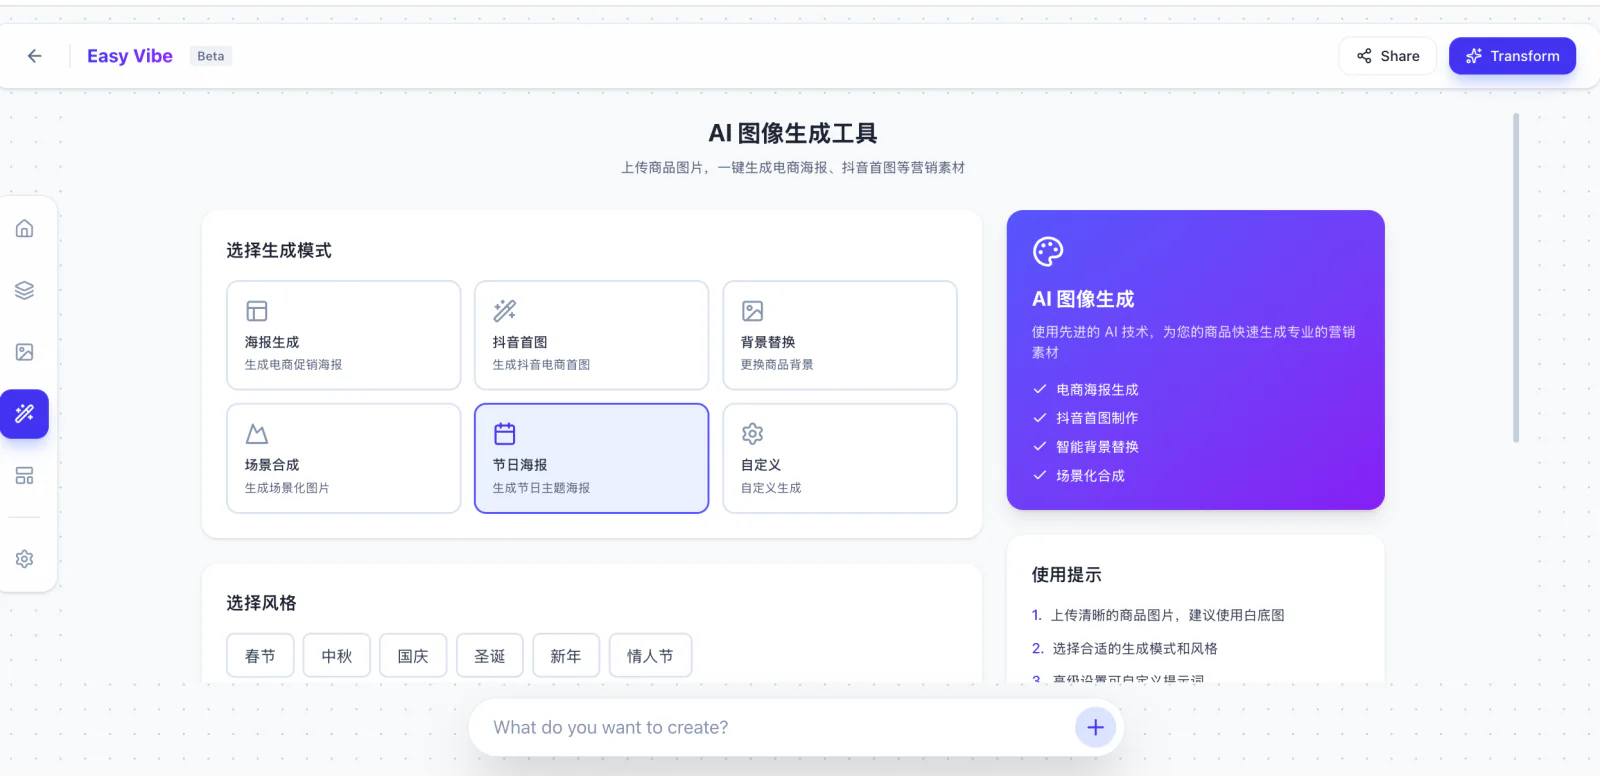
Image URLs often expire. A prototype can display one directly, but a production application should decide whether to copy the image into its own storage under the service's terms, and should record the prompt, model version, and generation time.
9. Speech recognition and synthesis are different APIs
“Add speech” covers at least two directions:
- ASR / STT turns a user's speech or audio file into text.
- TTS turns text into playable speech.
They have different inputs, outputs, and page interactions. Do not combine them behind one vague “Speech API” button.
9.1 Speech-to-text: upload audio and return a transcript
The SiliconFlow transcription documentation uploads a file as multipart/form-data, unlike the JSON requests above.
bash
curl --request POST \
  --url https://api.siliconflow.cn/v1/audio/transcriptions \
  -H "Authorization: Bearer ${SILICONFLOW_API_KEY}" \
  -F "file=@meeting.mp3" \
  -F "model=FunAudioLLM/SenseVoiceSmall"
When you give the official example to the AI IDE, describe the page feature like this:
text
Add an “Upload and transcribe” button to the current page.

After the user uploads an mp3, m4a, or wav file, call the API below from the server,
then put the returned transcript in an editable text box.
Keep the API key in an environment variable and let the user retry after an upload or transcription error.

Here is the official example:
<paste the curl example above>
9.2 Text-to-speech may return audio rather than JSON
The MiniMax T2A HTTP documentation provides synchronous speech synthesis. Its current example uses speech-2.8-hd; always confirm the model and voice on the platform.
For speech synthesis, the “prompt” mainly consists of the spoken script and voice settings. Rewrite numbers, English abbreviations, and pauses for speech before selecting the voice, speed, volume, emotion, and output format. Do not send a whole page of Markdown, URLs, and button labels to the narrator.
bash
curl --request POST \
  --url https://api.minimax.io/v1/t2a_v2 \
  --header "Authorization: Bearer ${MINIMAX_API_KEY}" \
  --header "Content-Type: application/json" \
  --data '{
    "model": "speech-2.8-hd",
    "text": "This is a preview of the product introduction.",
    "stream": false,
    "output_format": "hex",
    "language_boost": "auto",
    "voice_setting": {
      "voice_id": "<copy the voice_id from the voice list>",
      "speed": 1,
      "vol": 1,
      "pitch": 0
    },
    "audio_setting": {
      "sample_rate": 32000,
      "bitrate": 128000,
      "format": "mp3",
      "channel": 1
    }
  }'
A speech page normally also needs Preview, Stop, Generate again, and Download controls. Streaming TTS uses WebSocket or streaming HTTP and plays each audio segment as it arrives.
Voice and privacy
Before uploading a recording, explain its purpose, retention period, and deletion method. Voice cloning requires the explicit permission of the voice owner. Do not use recordings of public figures or other people when their source and permission are unclear.
10. Video generation: create a task, then wait for the result
Video generation usually uses an asynchronous API. The MiniMax video generation guide divides the process into three steps: create a job and receive a task_id, query its status to obtain a file_id, then request the download address.
10.1 Explain how the scene changes
An image describes one frame; a video prompt must also say what happens during the next few seconds. State the product's starting position, order of movement, camera direction, and duration:
text
Show this black backpack on a light-gray display stand for six seconds.
Move the camera slowly from the front toward the right, then move slightly closer.
Keep the video vertical. Do not change the backpack or add people, text, or a logo.
If the prompt contains many actions, begin with one shot and one main movement. Asking for rotation, opening, zooming, and scene changes in a short video makes it harder to keep the product consistent.
10.2 Creation and status checking are separate requests
bash
# Step 1: create the task
curl --request POST \
  --url https://api.minimax.io/v1/video_generation \
  --header "Authorization: Bearer ${MINIMAX_API_KEY}" \
  --header "Content-Type: application/json" \
  --data '{
    "model": "MiniMax-Hailuo-2.3",
    "prompt": "Show this black backpack on a light-gray display stand. Move the camera slowly from the front toward the right, then move slightly closer. Do not change the backpack or add people, text, or a logo.",
    "duration": 6,
    "resolution": "1080P"
  }'

# Step 2: query status with the task_id returned above
curl --request GET \
  --url "https://api.minimax.io/v1/query/video_generation?task_id=<TASK_ID>" \
  --header "Authorization: Bearer ${MINIMAX_API_KEY}"
The page should display at least Preparing, Queueing, Processing, Success, and Fail. Poll at intervals and define when to stop. A production service can use the documented callback_url so the platform notifies your server when the state changes.
Video and real-person assets
When generating video from a real person's photo or voice, a trademark, or copyrighted material, confirm the permission and platform rules. Some services also require face verification, asset registration, or content moderation. These are not technical steps that should be bypassed in the browser.
11. Diagnose common problems
| Symptom | Check first |
|---|---|
401 / 403 | Whether the key is correct, has permission, and is in the correct request header |
404 | Whether the base URL, endpoint, or model ID has changed |
429 | RPM, TPM, concurrency, or the account's usage tier |
400 | Required parameters, file type, JSON structure, and size limits |
5xx / timeout | Service status, timeout settings, and retry strategy |
| The task stays queued | Concurrency, task-status query, quota, and service load |
| The page reports success but shows nothing | Response field path, binary handling, and an expired temporary URL |
| It works locally but fails online | Environment variables, CORS, Serverless timeout, and regional network access |
Keep four pieces of information while debugging: the time, request type, HTTP status, and Request ID or Trace ID. Never write the API key, a complete user recording, or sensitive business data into logs.
12. 📚 Chapter assignment
动手练习
Add one AI capability to your prototype
Choose one button on the page that genuinely needs AI. The first version only needs one capability; you do not have to add text, image, speech, and video all at once.
- Find the current model ID and smallest example in the official documentation.
- Give the example to the AI IDE and connect it to the button on the page.
- Store the API key in a server environment variable and add waiting and failure messages.
- Make a real call, then confirm in Usage or the logs that it reached the service.
When it works, save one screenshot and explain in one sentence what AI helps the user do on this page. Confirm permission before using someone else's image, voice, or real-person material.
Next step
The next chapter places these capabilities back into a complete product flow. We will add data, states, and user feedback so that a single API call becomes a prototype people can use repeatedly.