Starting from NanoBanana: Build Your Own Asset Production Agent
Chapter 1: Generate Your First Image Asset in 1 Minute
Before we dive into design, style, or prompting, let's generate the first image with the fewest steps possible.
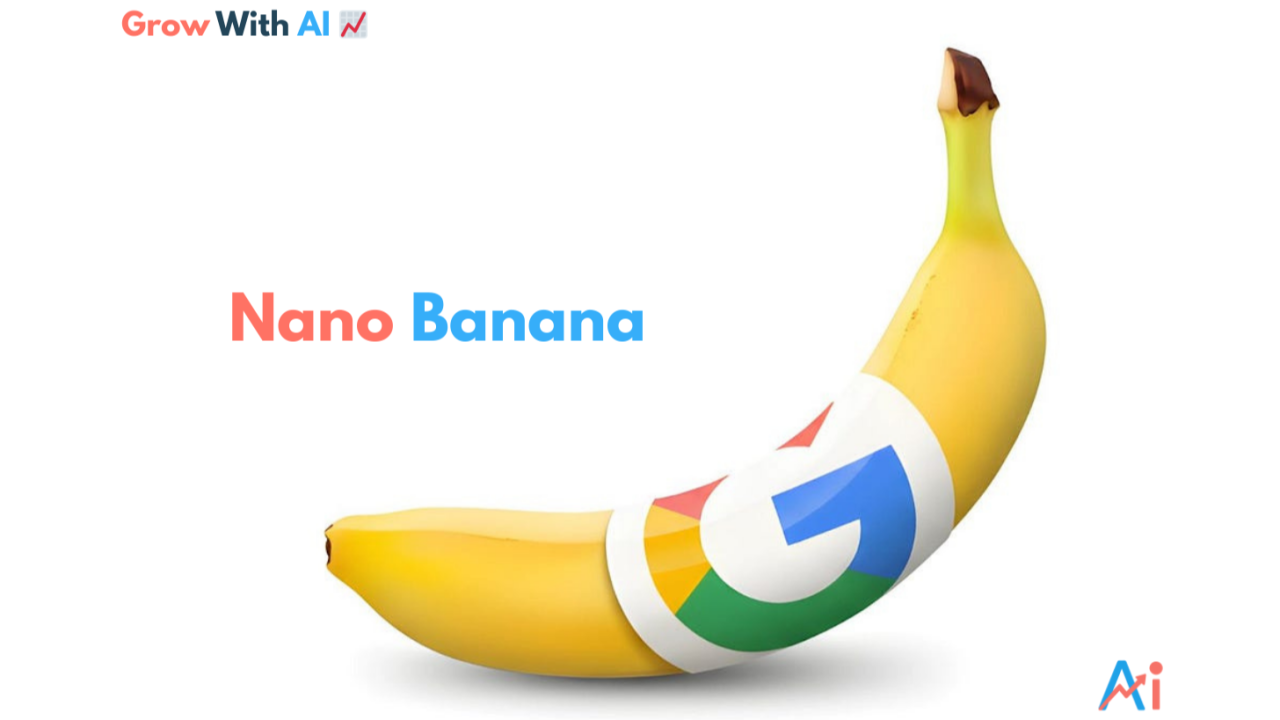
1.1 Meet NanoBanana
Before we discuss design styles and prompt engineering, let's address something even more important: confirming that you can actually generate an image.
Today's mainstream large models already possess image generation and editing capabilities. These models are commonly known as generative models.
To keep the process as simple as possible, this tutorial uses a model that already has stable image generation and editing capabilities — NanoBanana. It is an image generation model released by Google, officially named Gemini 3.1 Flash Image Preview, which supports generating images directly through natural language and also supports editing existing images.
In terms of capabilities, it is not fundamentally different from other models you may have heard of (such as GPT-4o, Claude, Qwen, Midjourney, etc.): you provide a description, and the model generates the result.
You can think of it as a "paintbrush." In this chapter, we only care about one thing: 👉 Whether this paintbrush can make its first stroke in your hands.
In practice, NanoBanana can be used directly through official platforms like Google AI Studio, or integrated into development workflows via API. This tutorial uses the API approach. The NanoBanana 2 model has also been released, and you can try using the latest large model.
1.2 "Hello World" Level Generation
Before you start, you only need to complete these three steps:
- Create a new folder in Trae
- Create a new Python file
- Paste the complete code below
Trae will automatically handle the required environment setup and dependency installation — no additional configuration needed.
The code uses NanoBanana's API Key. We won't go into the application process here — as long as you can obtain and fill in the corresponding parameters, you're good. At this stage, we don't aim to understand every line of code, just that it runs successfully.
# /// script
# dependencies = [
# "gradio>=4.0.0",
# "pillow>=10.0.0",
# "requests>=2.31.0",
# ]
# ///
import gradio as gr
import requests
import base64
from PIL import Image
import io
import os
import time
import re
from typing import Optional, Dict, Any, List
# Configure API information
NANOBANANA_API_URL: str = "YOUR API URL"
NANOBANANA_API_KEY: str = "YOUR API KEY"
OUTPUT_DIR: str = "outputs"
# Ensure output directory exists
os.makedirs(OUTPUT_DIR, exist_ok=True)
def image_to_base64_data_uri(image: Image.Image) -> str:
"""
Convert a PIL image to an OpenAI API compatible data URI format.
"""
buffer = io.BytesIO()
# Convert to PNG for compatibility
image.save(buffer, format="PNG")
encoded = base64.b64encode(buffer.getvalue()).decode('utf-8')
return f"data:image/png;base64,{encoded}"
def base64_to_image(base64_str: str) -> Optional[Image.Image]:
"""
Convert a pure base64 string to a PIL Image.
"""
try:
image_bytes = base64.b64decode(base64_str)
return Image.open(io.BytesIO(image_bytes))
except Exception as e:
print(f"Base64 decoding failed: {e}")
return None
def extract_base64_from_response(content: Any) -> Optional[str]:
"""
Core parsing logic: Extract image Base64 data from API response content.
Compatible with both Markdown format and structured list format.
"""
if not content:
return None
base64_data = None
# 1. Try structured extraction (List)
# Corresponding response format: [{"type": "image_url", "image_url": {"url": "data:..."}}]
if isinstance(content, list):
for part in reversed(content): # Search in reverse, latest images are usually at the end
if isinstance(part, dict):
# Check image_url or output_image field
img_field = part.get("image_url") or part.get("image") or part.get("output_image")
if isinstance(img_field, dict):
url = img_field.get("url", "")
if url.startswith("data:image/") and "," in url:
return url.split(",", 1)[1].strip()
# If no structured images in list, try concatenating text from list items to find Markdown
text_parts = [
str(p.get("text", ""))
for p in content
if isinstance(p, dict) and p.get("type") in ["text", "input_text"]
]
content_str = "".join(text_parts)
else:
content_str = str(content)
# 2. Try Markdown regex extraction (String)
# Corresponding response format: "Here is your image: "
pattern = re.compile(r"!\[.*?\]\((data:image/[^;]+;base64,[^)]+)\)", re.IGNORECASE)
match = pattern.search(content_str)
if match:
data_url = match.group(1)
if "," in data_url:
return data_url.split(",", 1)[1].strip()
return None
def synthesize(prompt: str, input_image: Optional[Image.Image]) -> Optional[Image.Image]:
"""
Call the Nanobanana API for generation.
"""
if not prompt or not prompt.strip():
gr.Warning("Please enter a prompt")
return None
print(f">>> Starting task: {prompt[:50]}...")
headers = {
"Content-Type": "application/json",
"Authorization": f"Bearer {NANOBANANA_API_KEY}"
}
# Build payload conforming to OpenAI Vision / Chat standard
messages = []
if input_image is not None:
# Image-to-image / multimodal input mode
print(">>> Input image detected, using multimodal mode")
img_base64 = image_to_base64_data_uri(input_image)
messages.append({
"role": "user",
"content": [
{"type": "text", "text": prompt},
{"type": "image_url", "image_url": {"url": img_base64}}
]
})
else:
# Text-to-image mode
messages.append({
"role": "user",
"content": prompt
})
payload = {
"messages": messages,
# Use the model verified in the first code section
"model": "gemini-2.5-flash-image",
# Optional parameters, depending on API support
"stream": False
}
try:
# Increase timeout, image generation is usually slower
response = requests.post(NANOBANANA_API_URL, headers=headers, json=payload, timeout=120)
# Check HTTP status
if response.status_code != 200:
error_msg = f"API request failed: {response.status_code} - {response.text}"
print(error_msg)
gr.Error(error_msg)
return None
result = response.json()
# Debug: Print first part of response for debugging
print(f"API raw response (truncated): {str(result)[:200]}...")
# Extract Content
content = None
if "choices" in result and len(result["choices"]) > 0:
content = result["choices"][0].get("message", {}).get("content")
if not content:
gr.Warning("No content field in API response")
return None
# Use the previously verified logic to extract Base64
base64_str = extract_base64_from_response(content)
if base64_str:
output_image = base64_to_image(base64_str)
if output_image:
return output_image
# If no image was extracted, the model may have refused or only returned text
text_content = str(content) if not isinstance(content, list) else " ".join([str(x) for x in content])
gr.Info(f"No image generated, model returned text: {text_content[:100]}...")
return None
except requests.exceptions.Timeout:
gr.Error("Request timed out, please try again later")
return None
except Exception as e:
import traceback
traceback.print_exc()
gr.Error(f"An unknown error occurred: {str(e)}")
return None
# Gradio interface configuration
with gr.Blocks(title="Nanobanana Image Generator") as app:
gr.Markdown("# 🍌 Nanobanana Text/Image to Image")
gr.Markdown("Based on Gemini-2.5-Flash-Image model, supports text-to-image and image-to-image.")
with gr.Row():
with gr.Column():
prompt_input = gr.Textbox(
label="Prompt",
placeholder="e.g.: A cyberpunk cat holding a neon sign...",
lines=3
)
image_input = gr.Image(
label="Reference Image (optional, for image-to-image)",
type="pil",
height=300
)
submit_btn = gr.Button("Start Generation", variant="primary")
with gr.Column():
image_output = gr.Image(label="Generation Result", format="png")
submit_btn.click(
fn=synthesize,
inputs=[prompt_input, image_input],
outputs=image_output
)
if __name__ == "__main__":
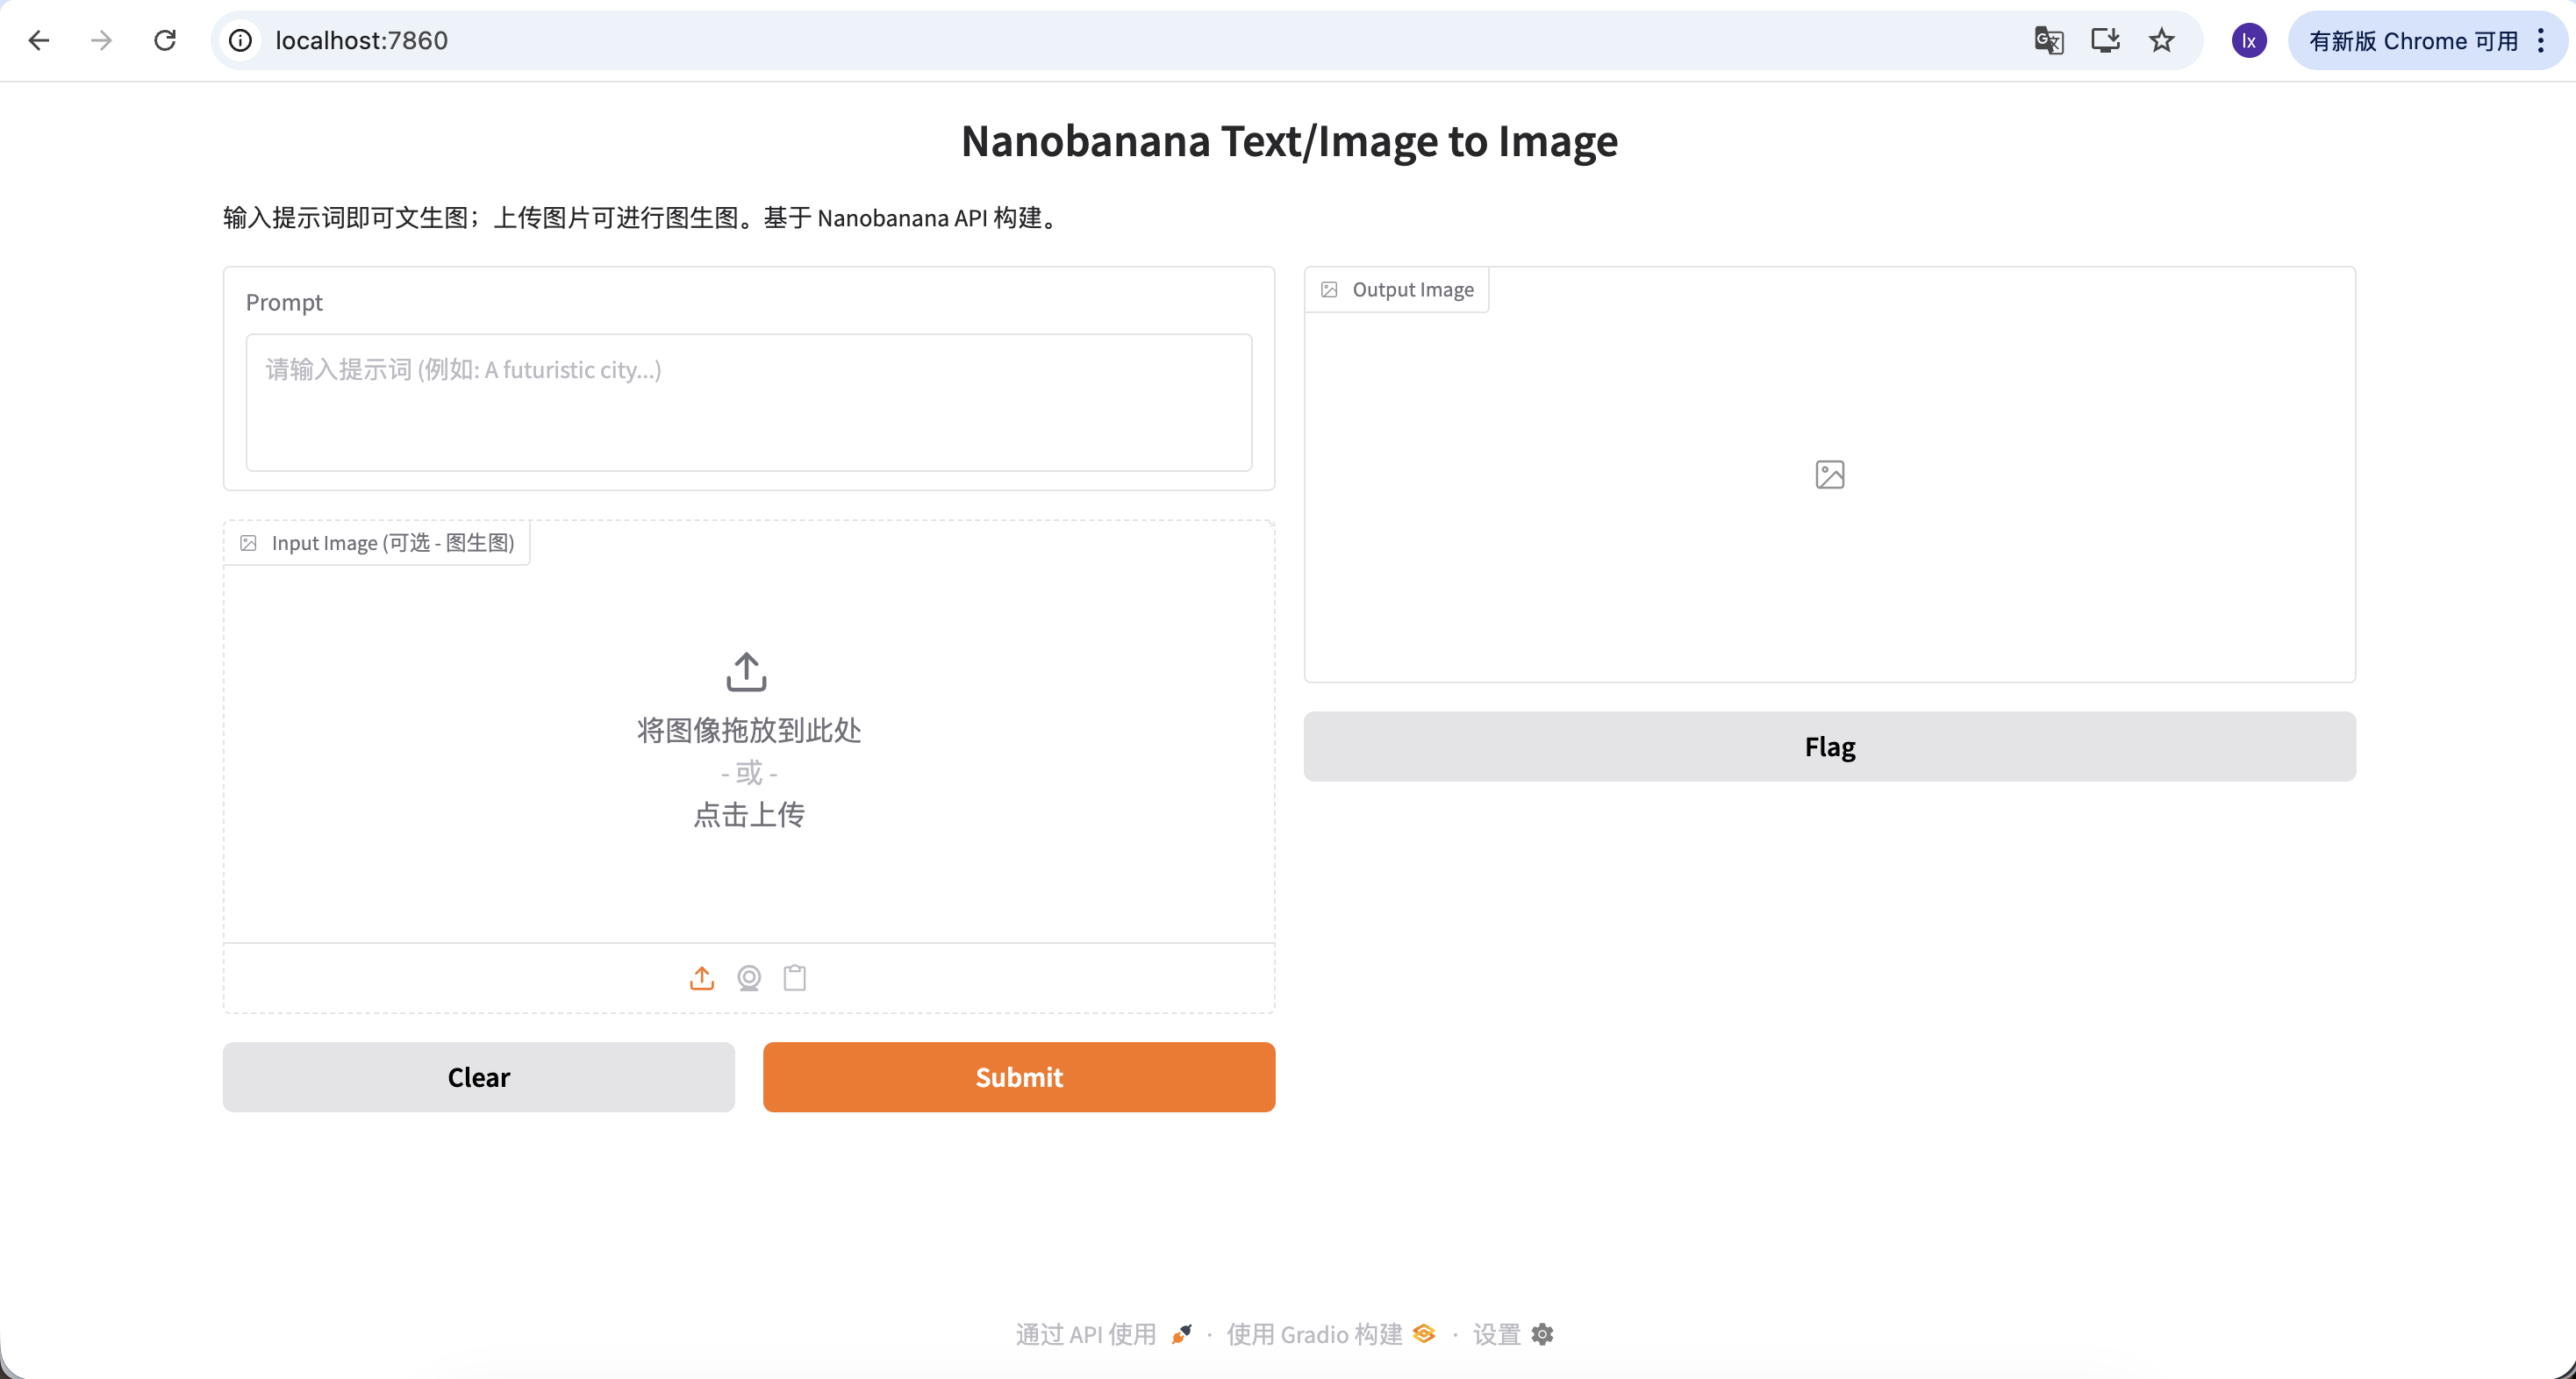
app.launch(share=True)When Trae indicates a successful run, click the local link it provides (usually http://127.0.0.1:7860).
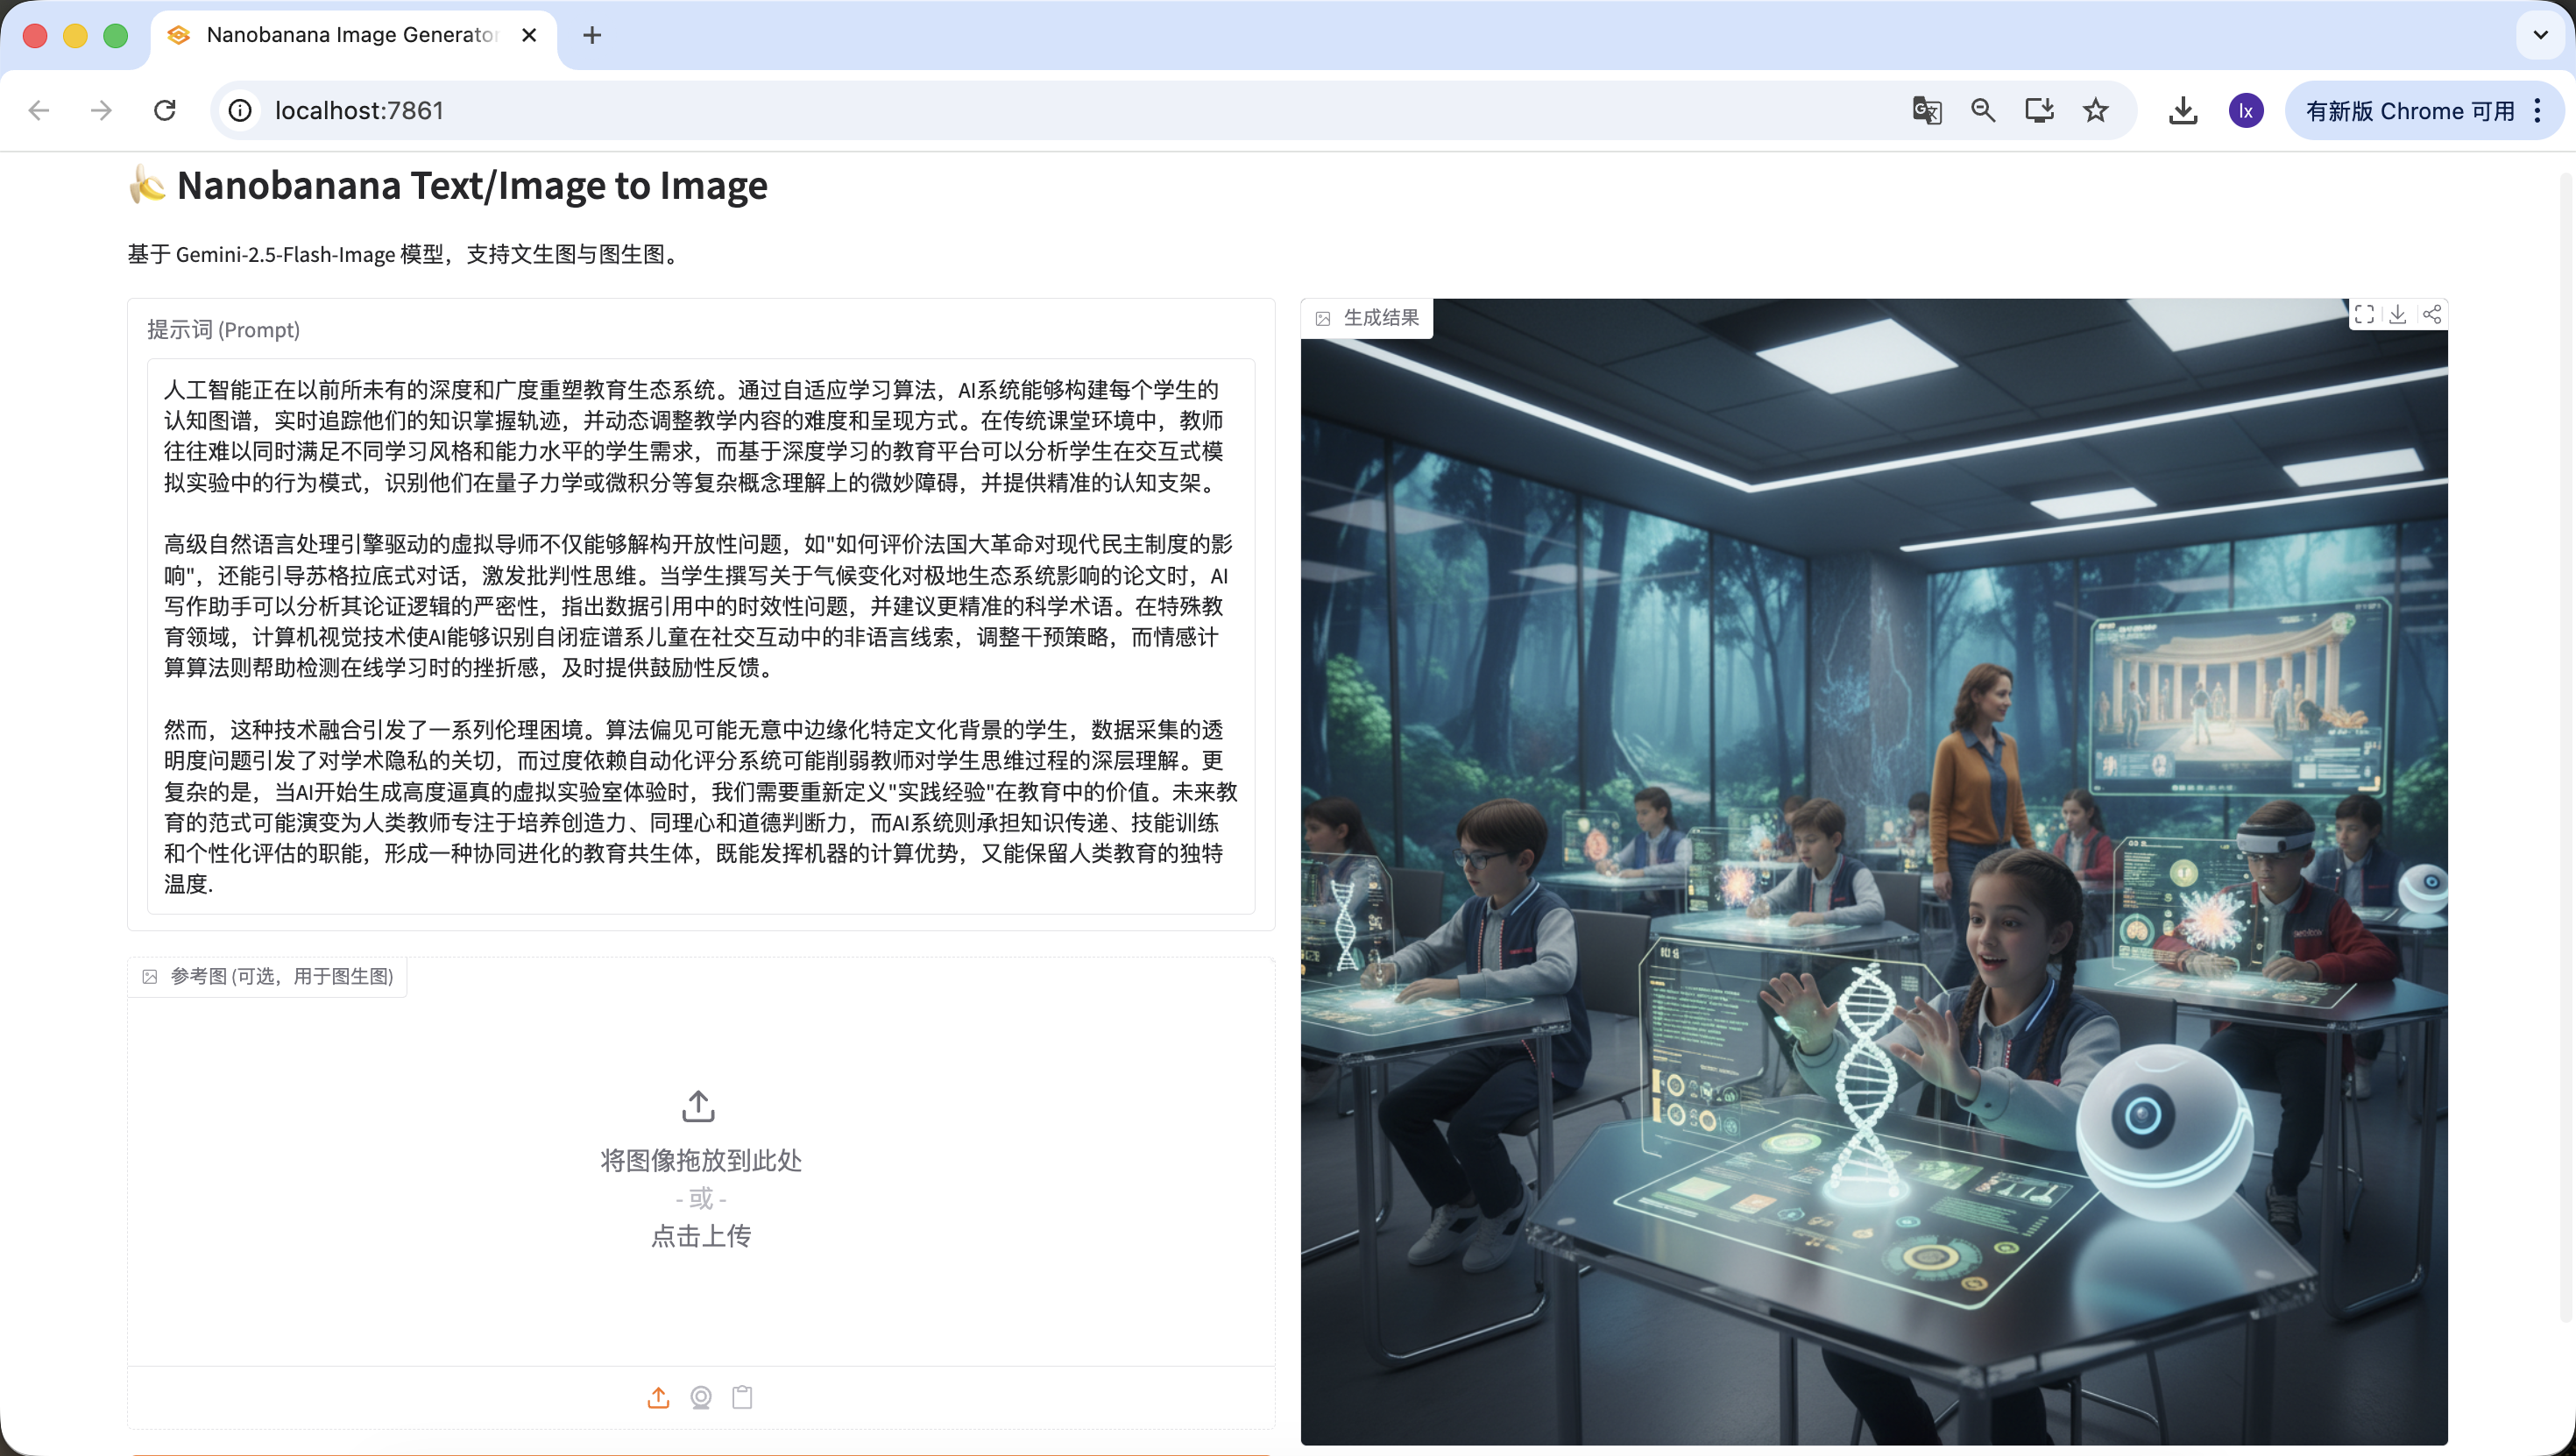
If everything is working correctly, you'll see a functional AI drawing interface.
This interface may look simple, but it already has the two most core capabilities of commercial-grade drawing tools: text-to-image and image-to-image.
- Left side: Command Area (Input Zone) — this is where you give instructions.
- Prompt (text box): Enter your creative description (English is recommended).
- Input Image (reference image box):
- Text-to-image mode: Keep this empty.
- Image-to-image mode: Drag a local image here, and the AI will use it as a base for creation.
- Submit button: Click to send your instruction and start generation.
- Right side: Display Area (Output Zone) — where the magic happens, generated results will appear here.
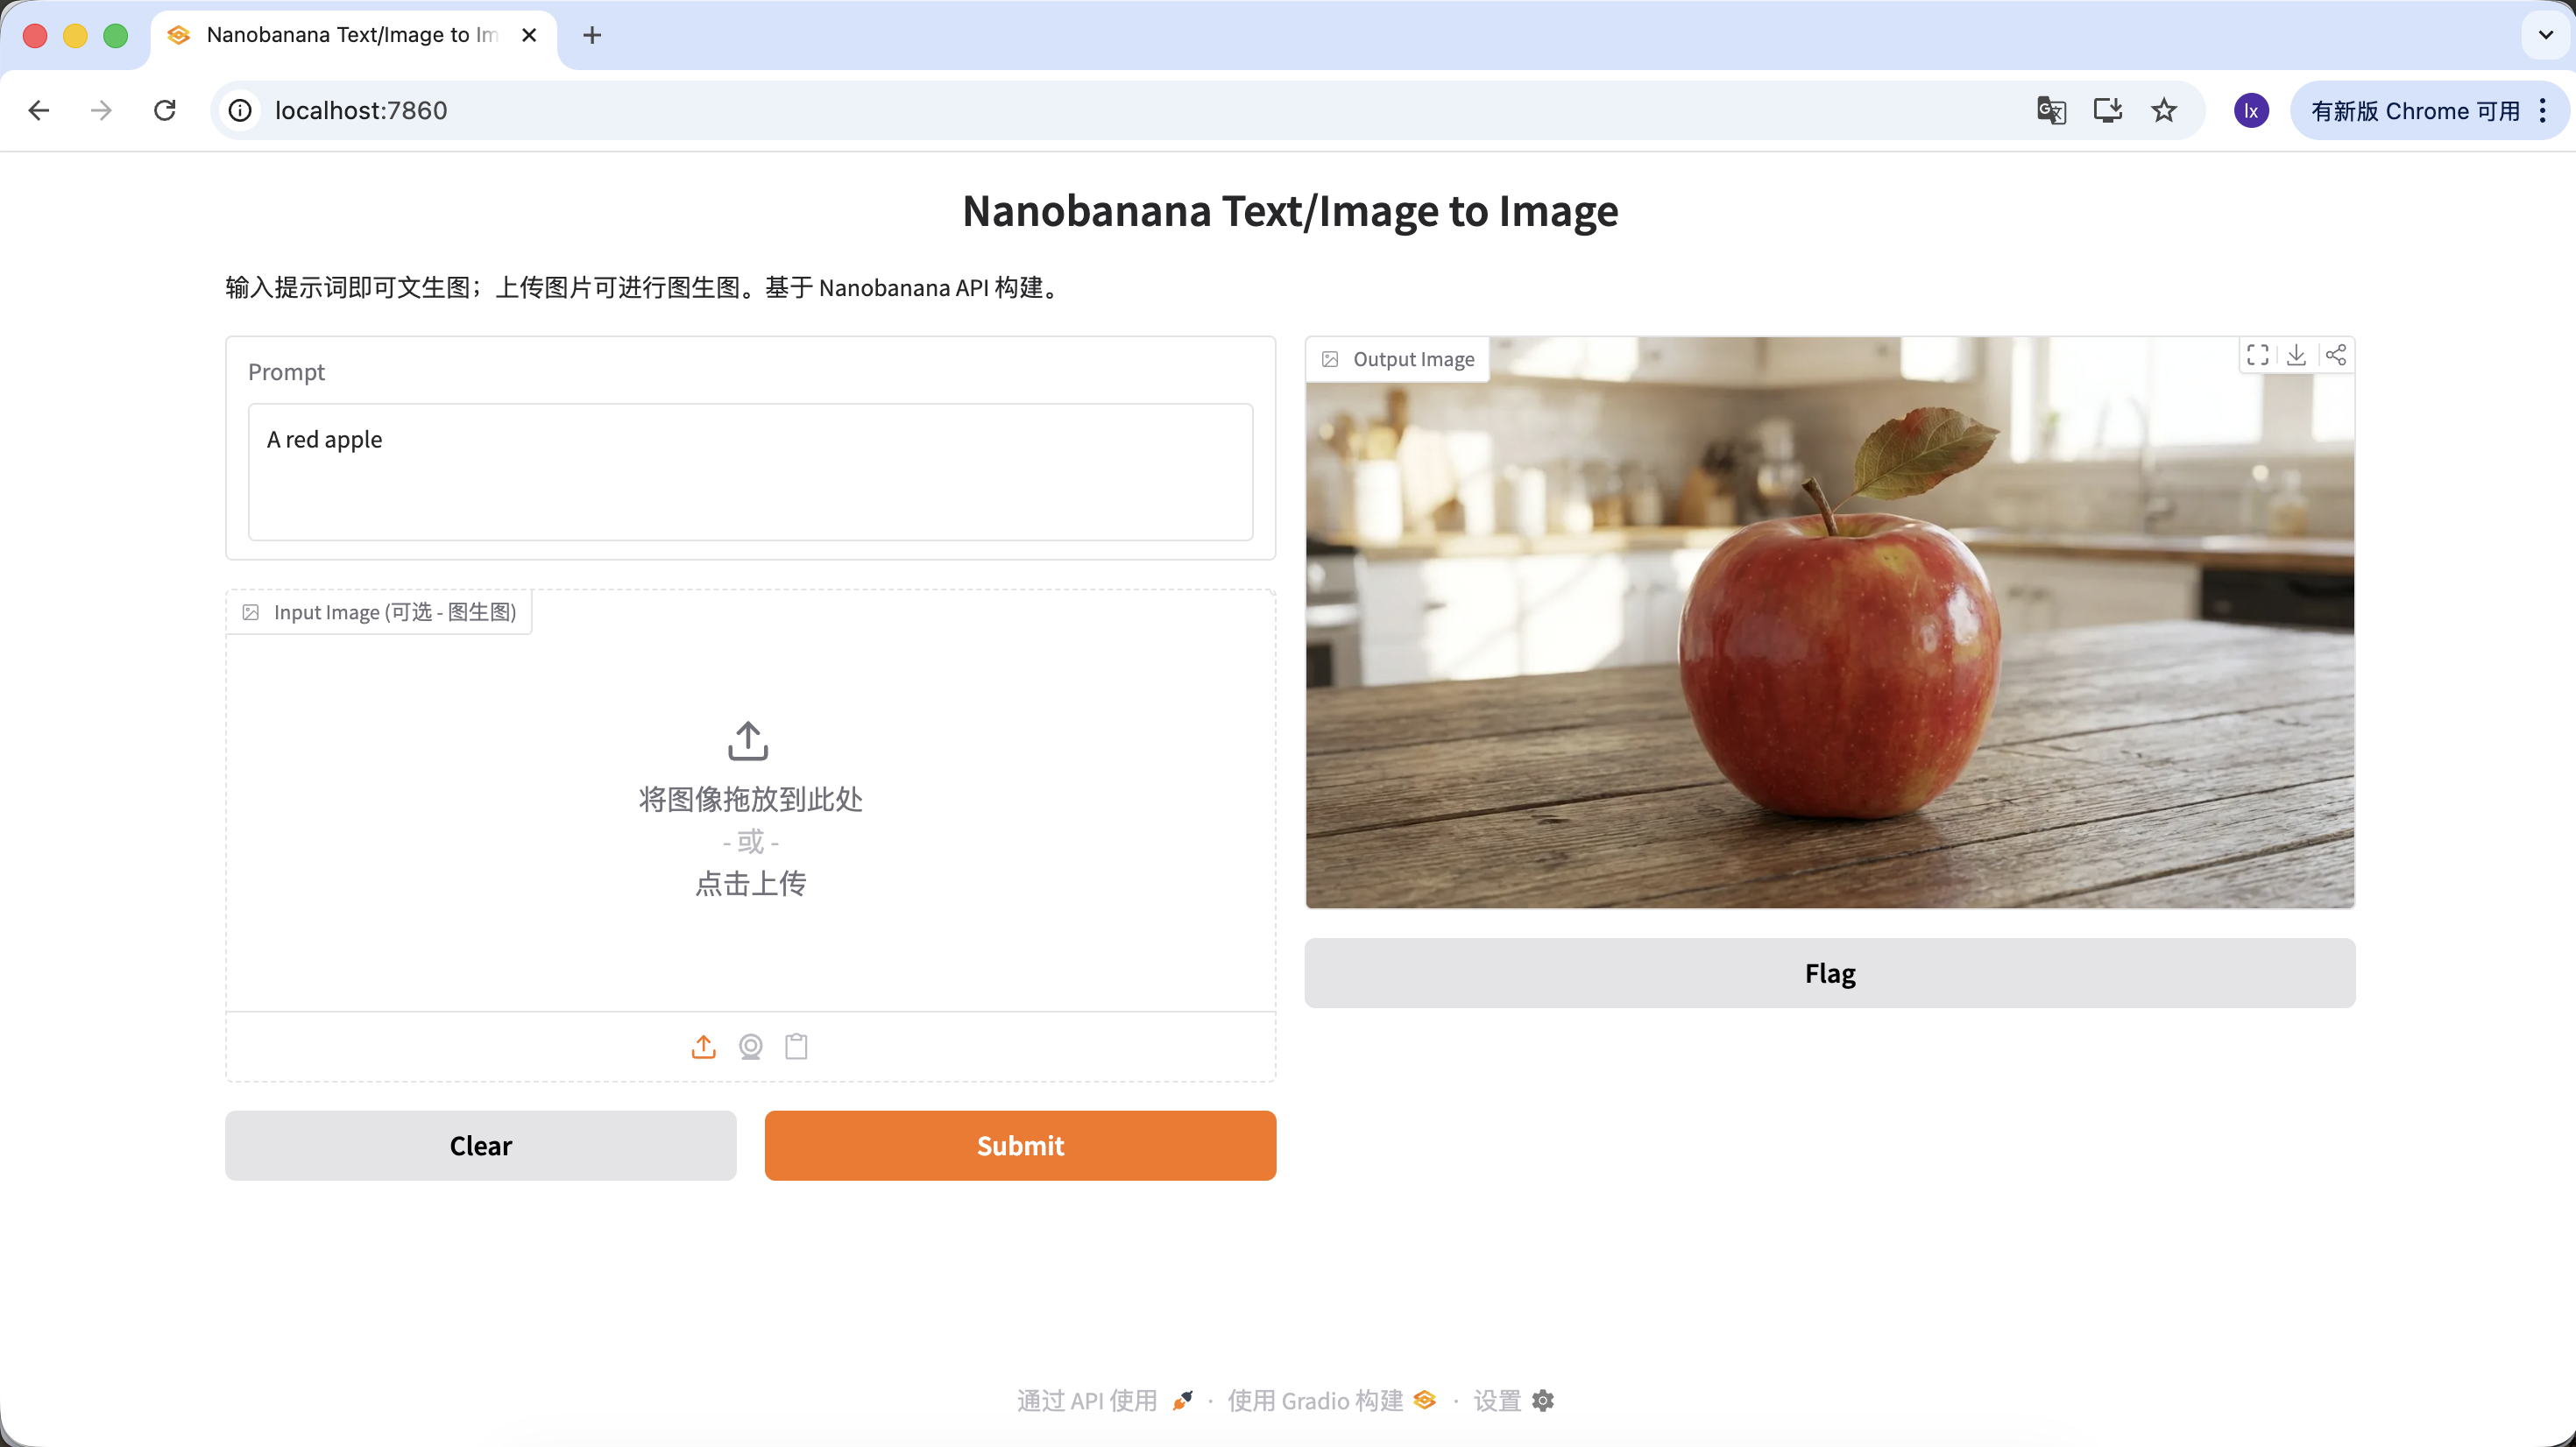
Now we can try generating your first image!
The prompt used in this example is:
A red apple
This is a deliberately simplified example that doesn't include any style or parameter descriptions.
Actual Process
After running the code, the process can be summarized in three steps:
- Send the text description to the model
- The model generates the corresponding image
- The image is saved as a local file
After a few seconds, you'll see the generated result locally. Since model generation is random, the same prompt will produce different results. You can generate multiple times and choose your favorite image.
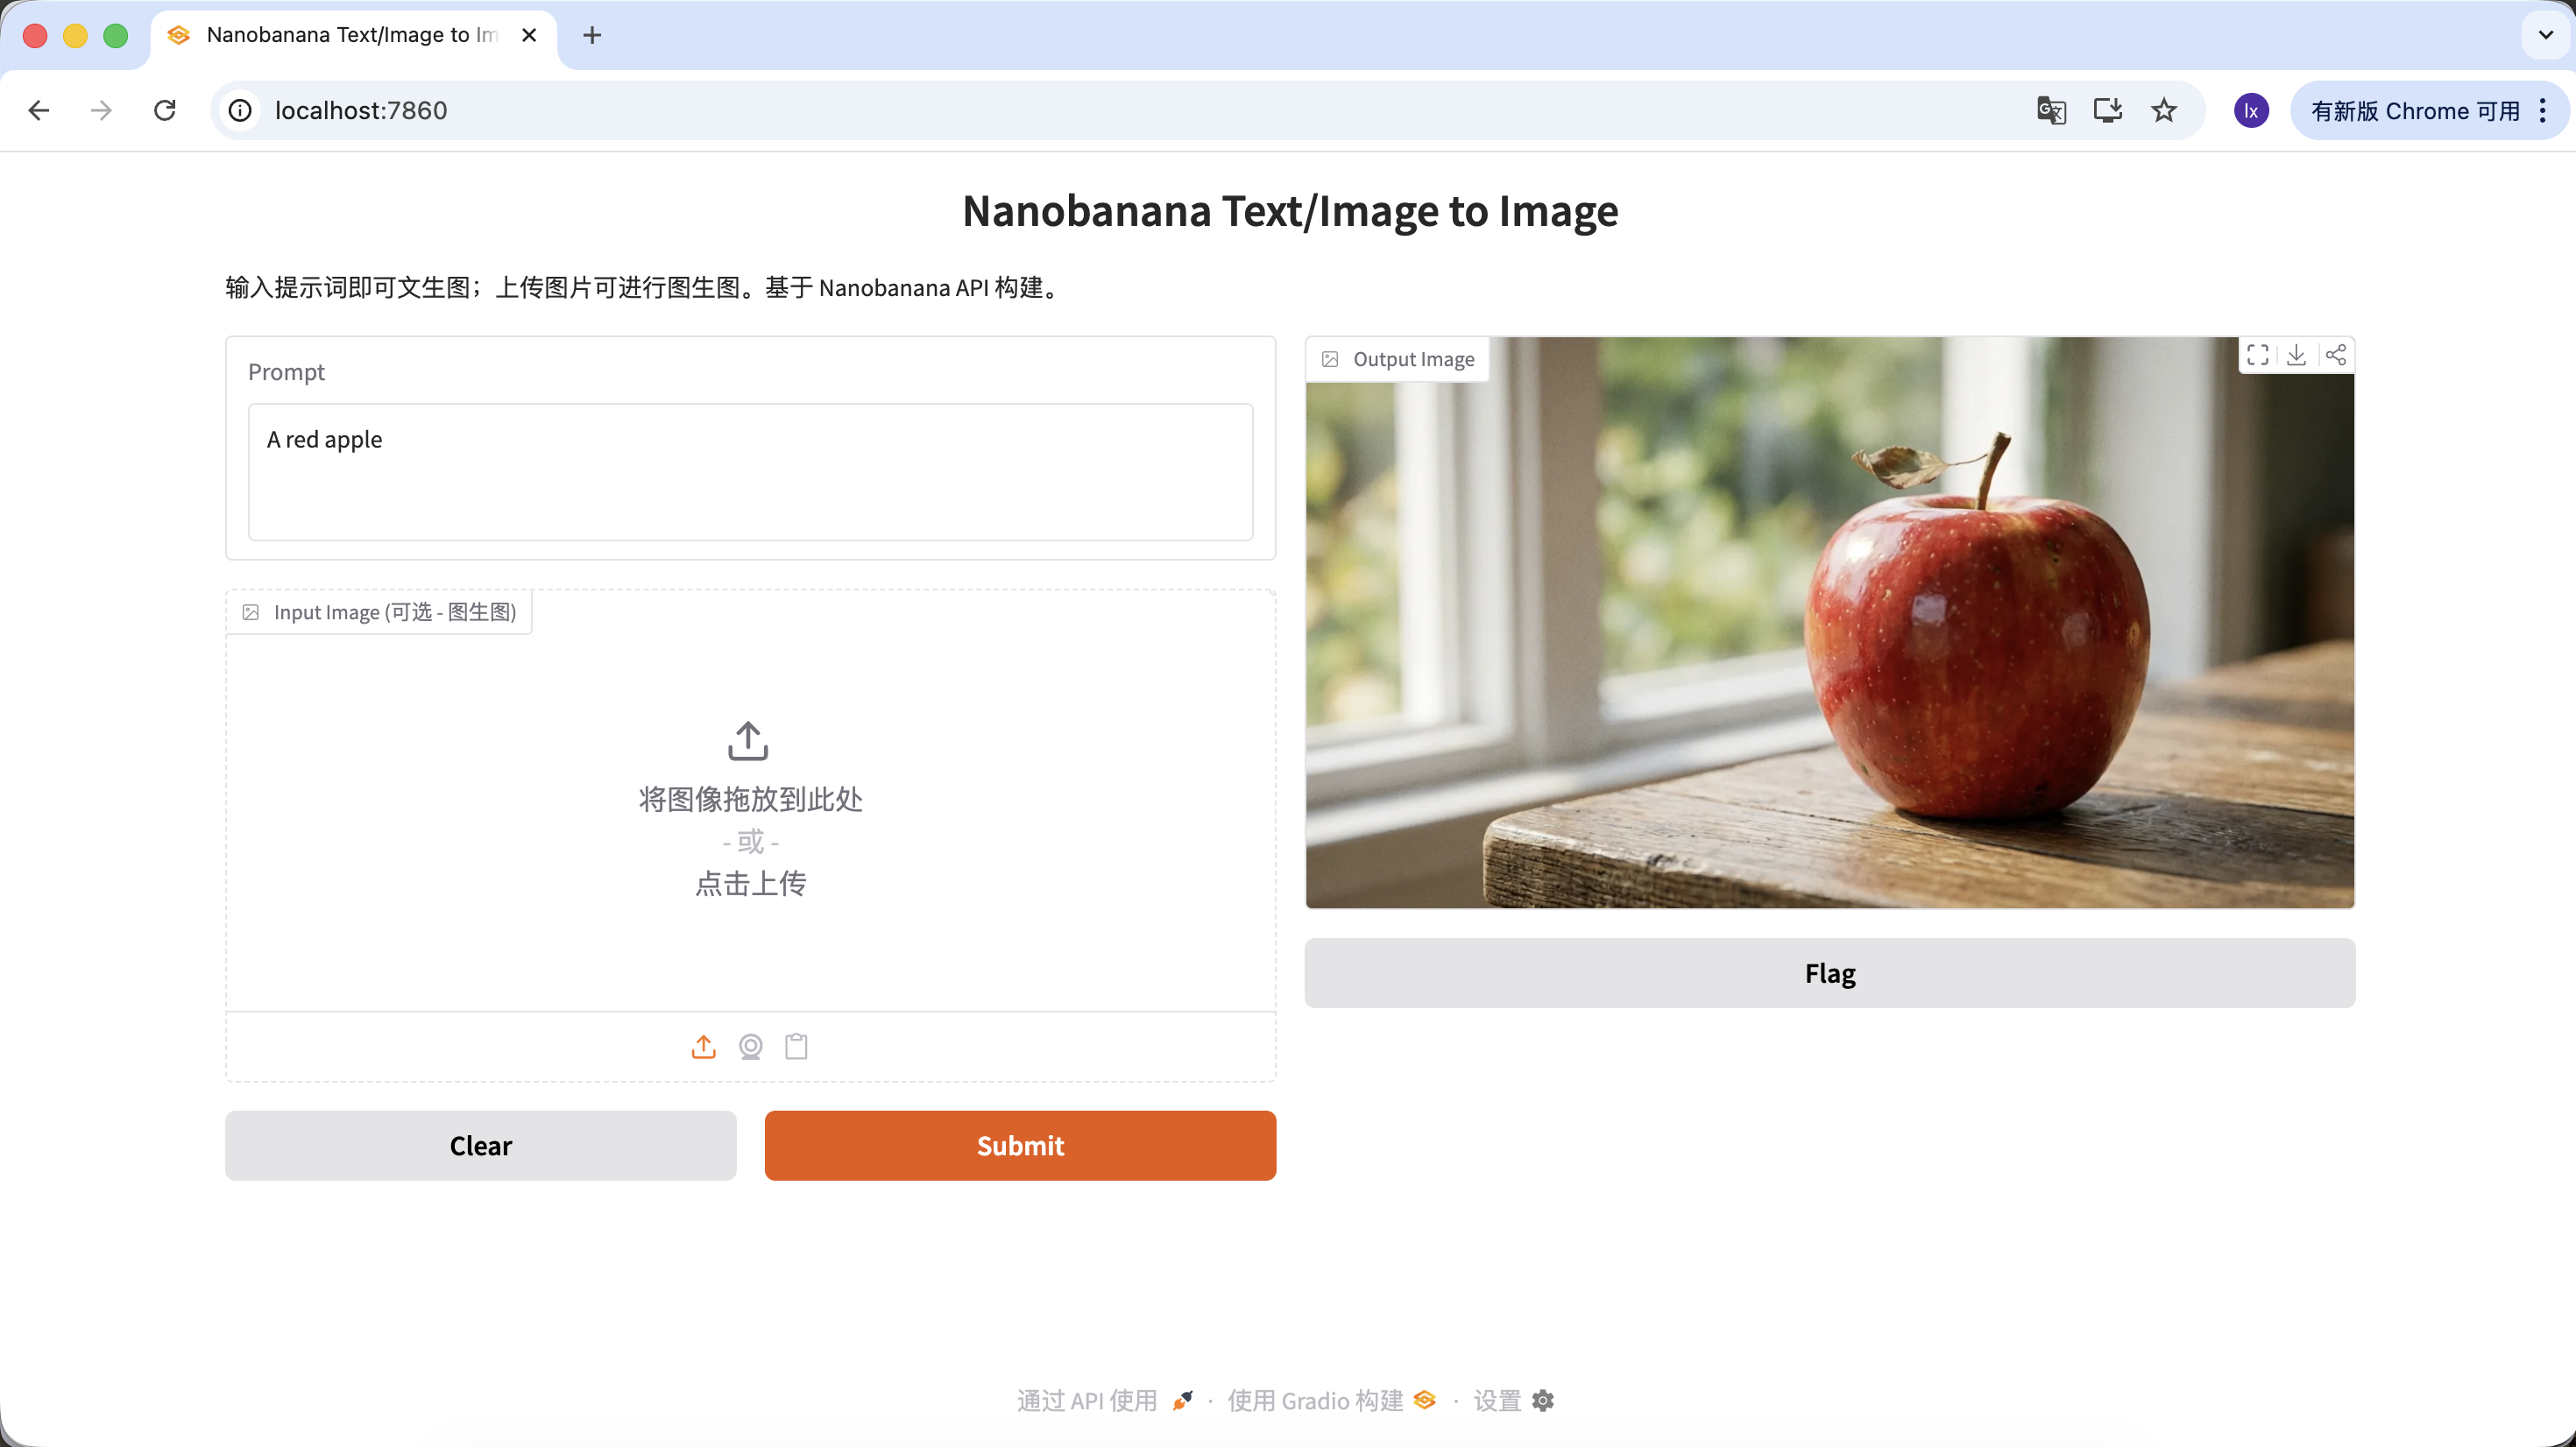
You can also enrich your prompt by giving it more description and constraints. For example, the following prompt will produce a more distinctive image.
"A hyper-realistic close-up of a fresh red apple with water droplets on its skin, sitting on a dark rustic wooden table. Cinematic dramatic lighting, rim light, shallow depth of field, bokeh background, 8k resolution, macro photography."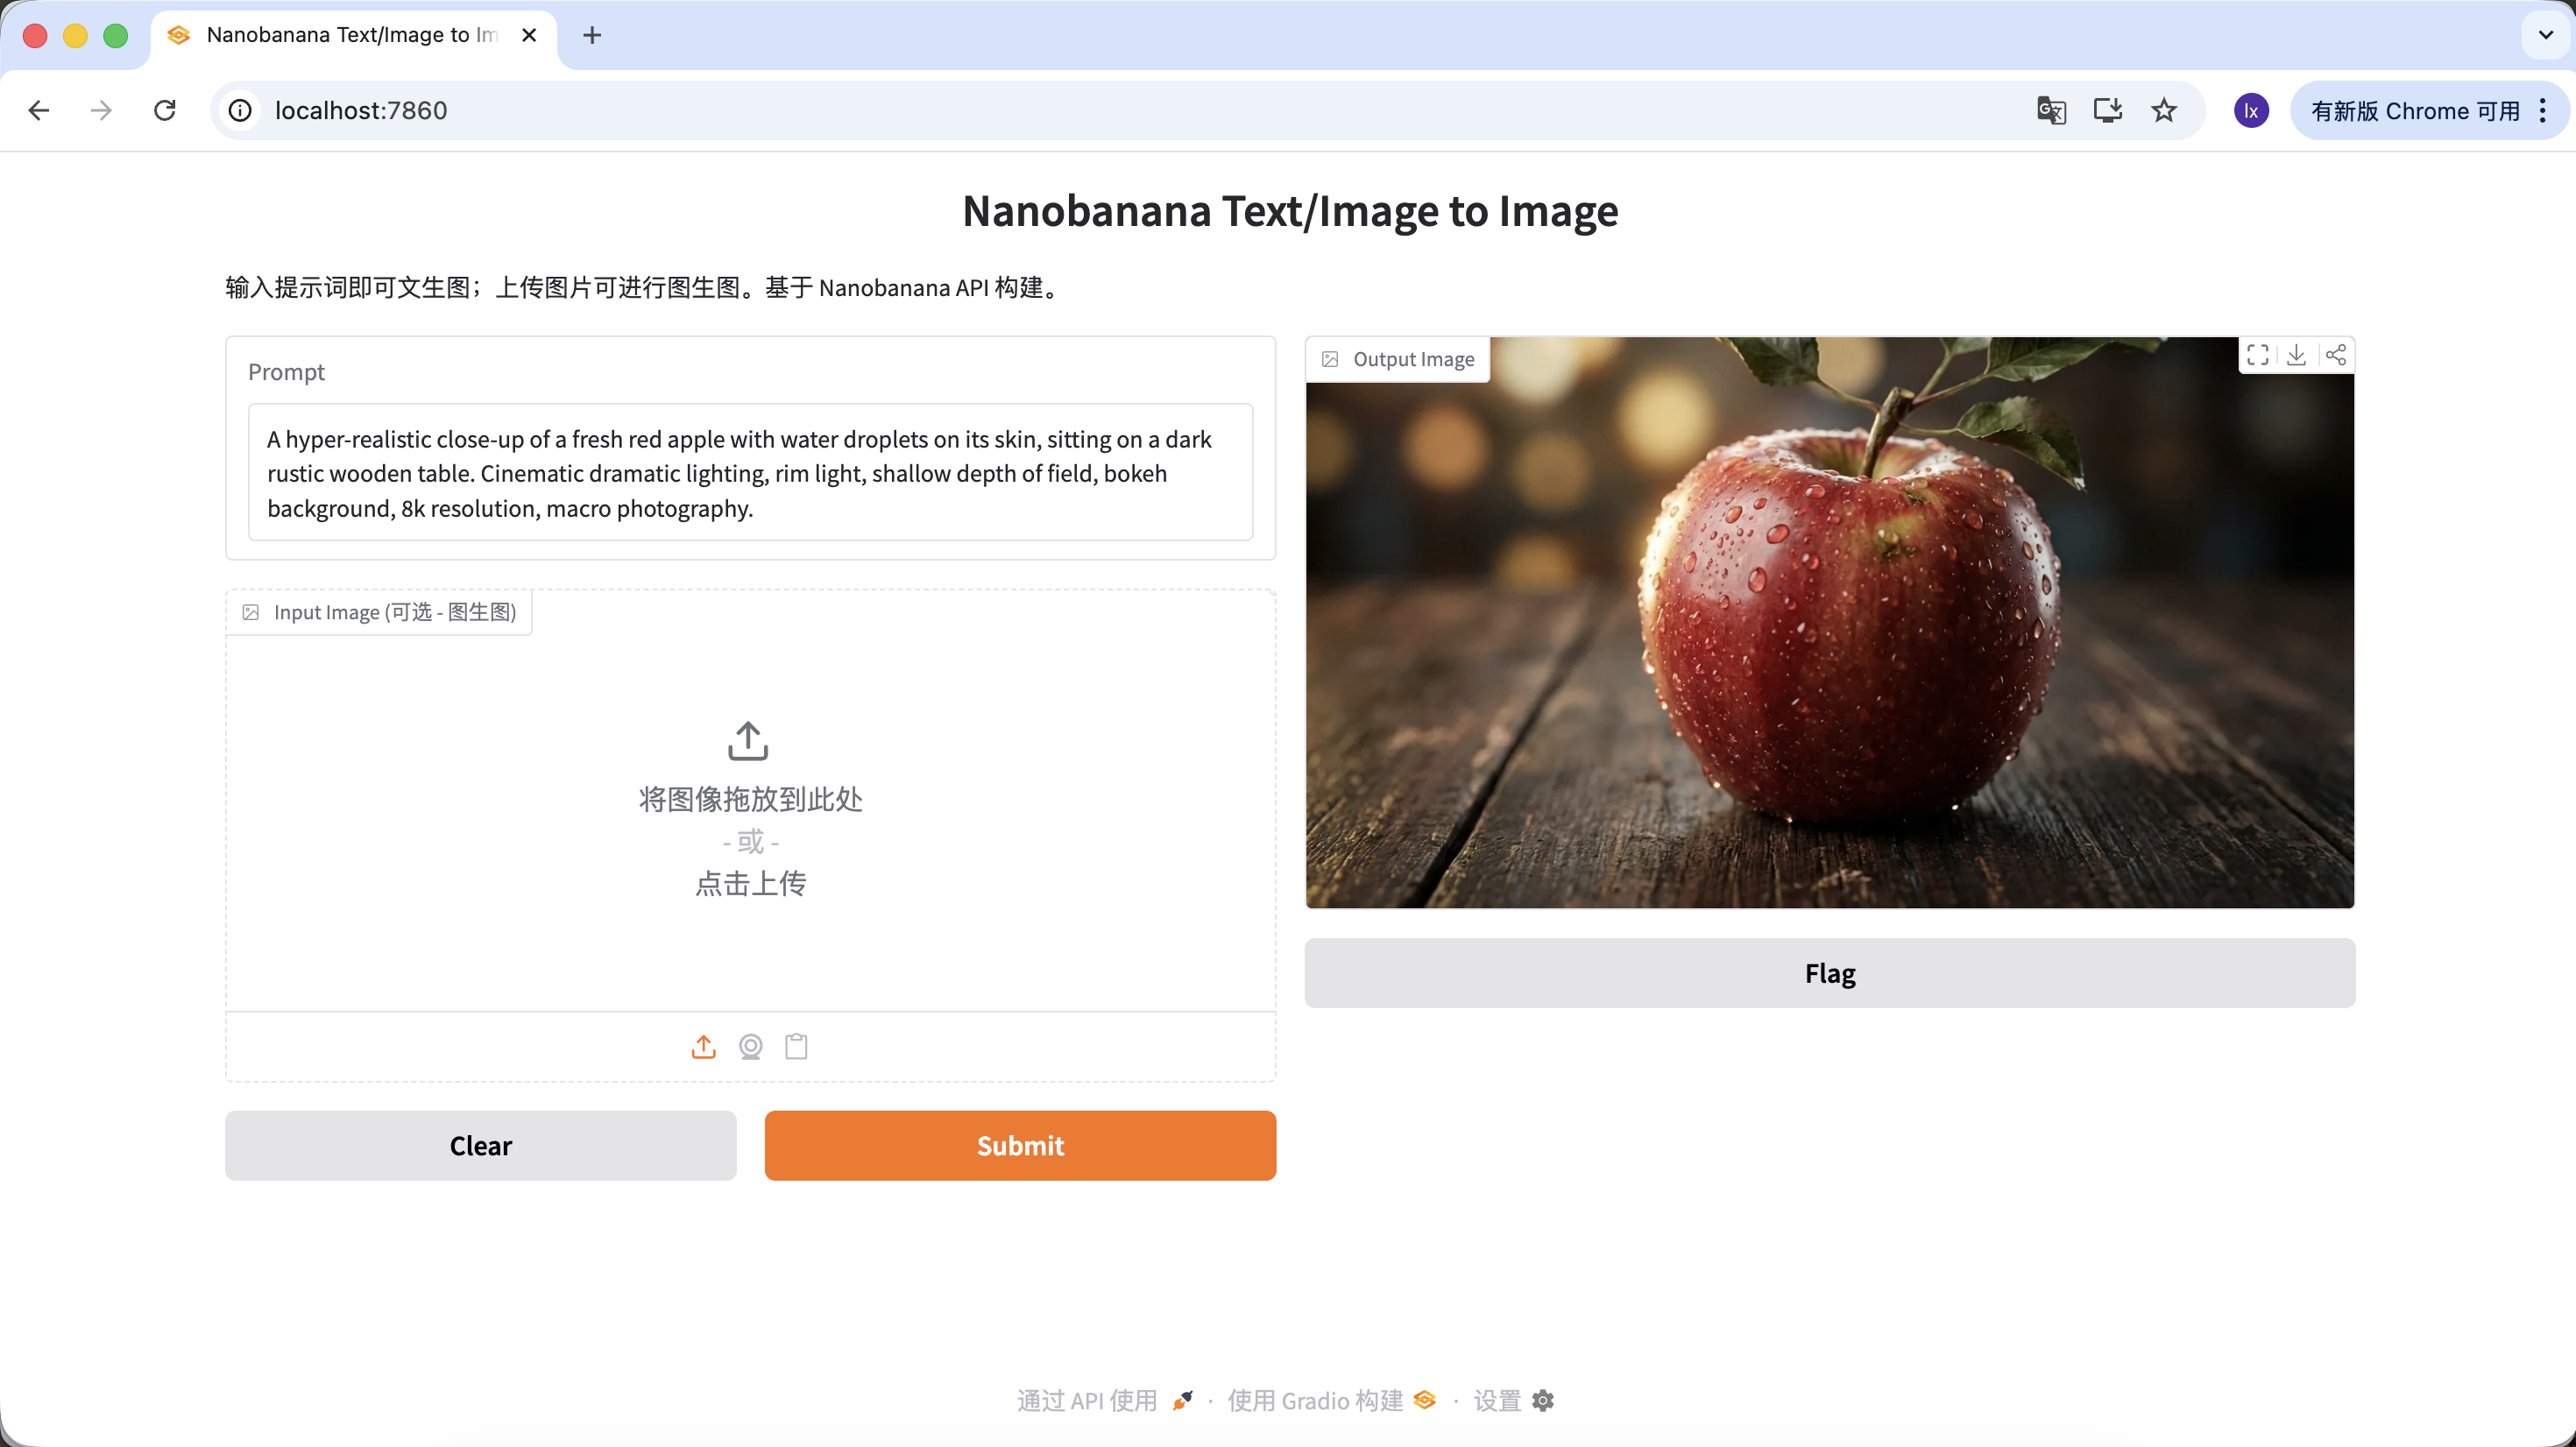
Click download in the Output Image area to save the image locally.
1.3 Common Asset Generation Scenarios for Image Models
In real-world work, large model image generation is more often used for efficiently producing design assets rather than creating individual art pieces.
When you look at the popular cases from design-focused marketing accounts, you'll find that most of their output falls into two categories:
- Text-to-image (from 0 to 1)
- Reference-based image generation (from 1 to N)
One: Text-to-Image — Quickly Obtaining Design Assets
This category focuses on efficiency. When you need to fill in design gaps (such as empty states, avatars, illustrations), AI essentially serves as an instantly generated image library.
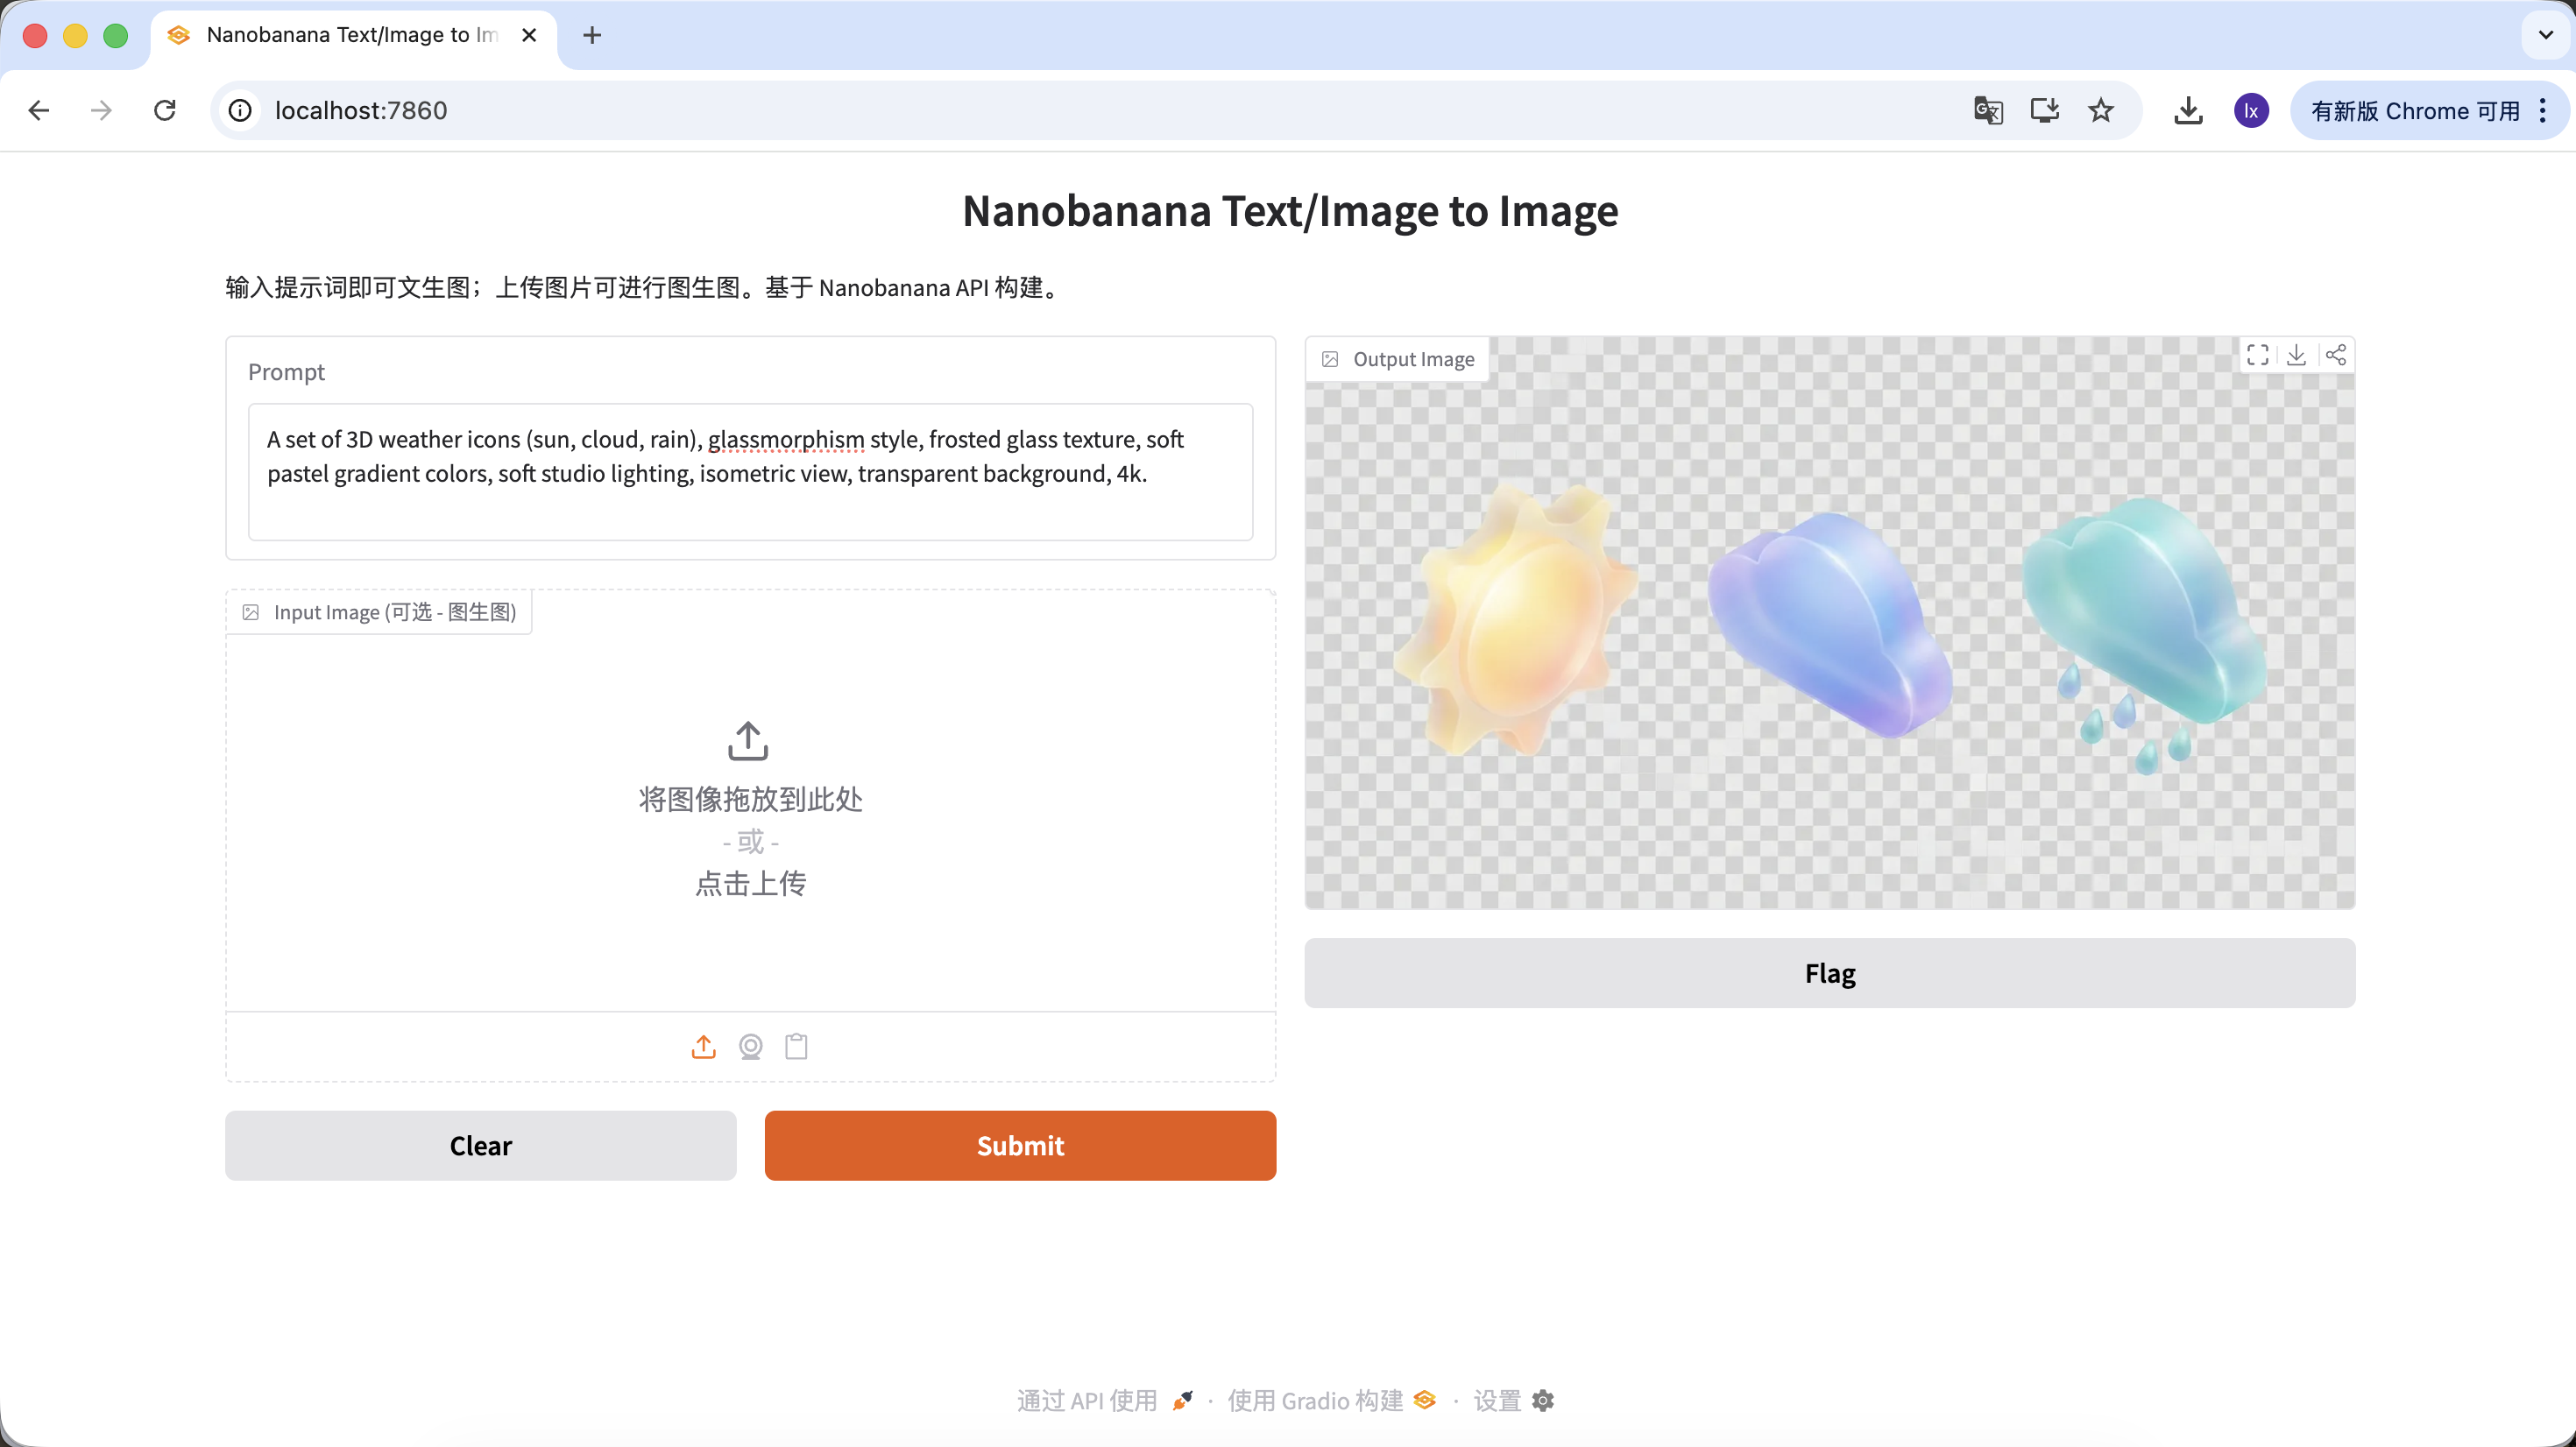
Generating UI Design Assets
- Popular trend: Glassmorphism and clay-style 3D icons commonly seen on Dribbble
- Common presentation: Transparent materials, edge glow, candy-colored function or weather icons
Example Prompt:
A set of 3D weather icons (sun, cloud, rain), glassmorphism style, frosted glass texture, soft pastel gradient colors, soft studio lighting, isometric view, transparent background, 4k.
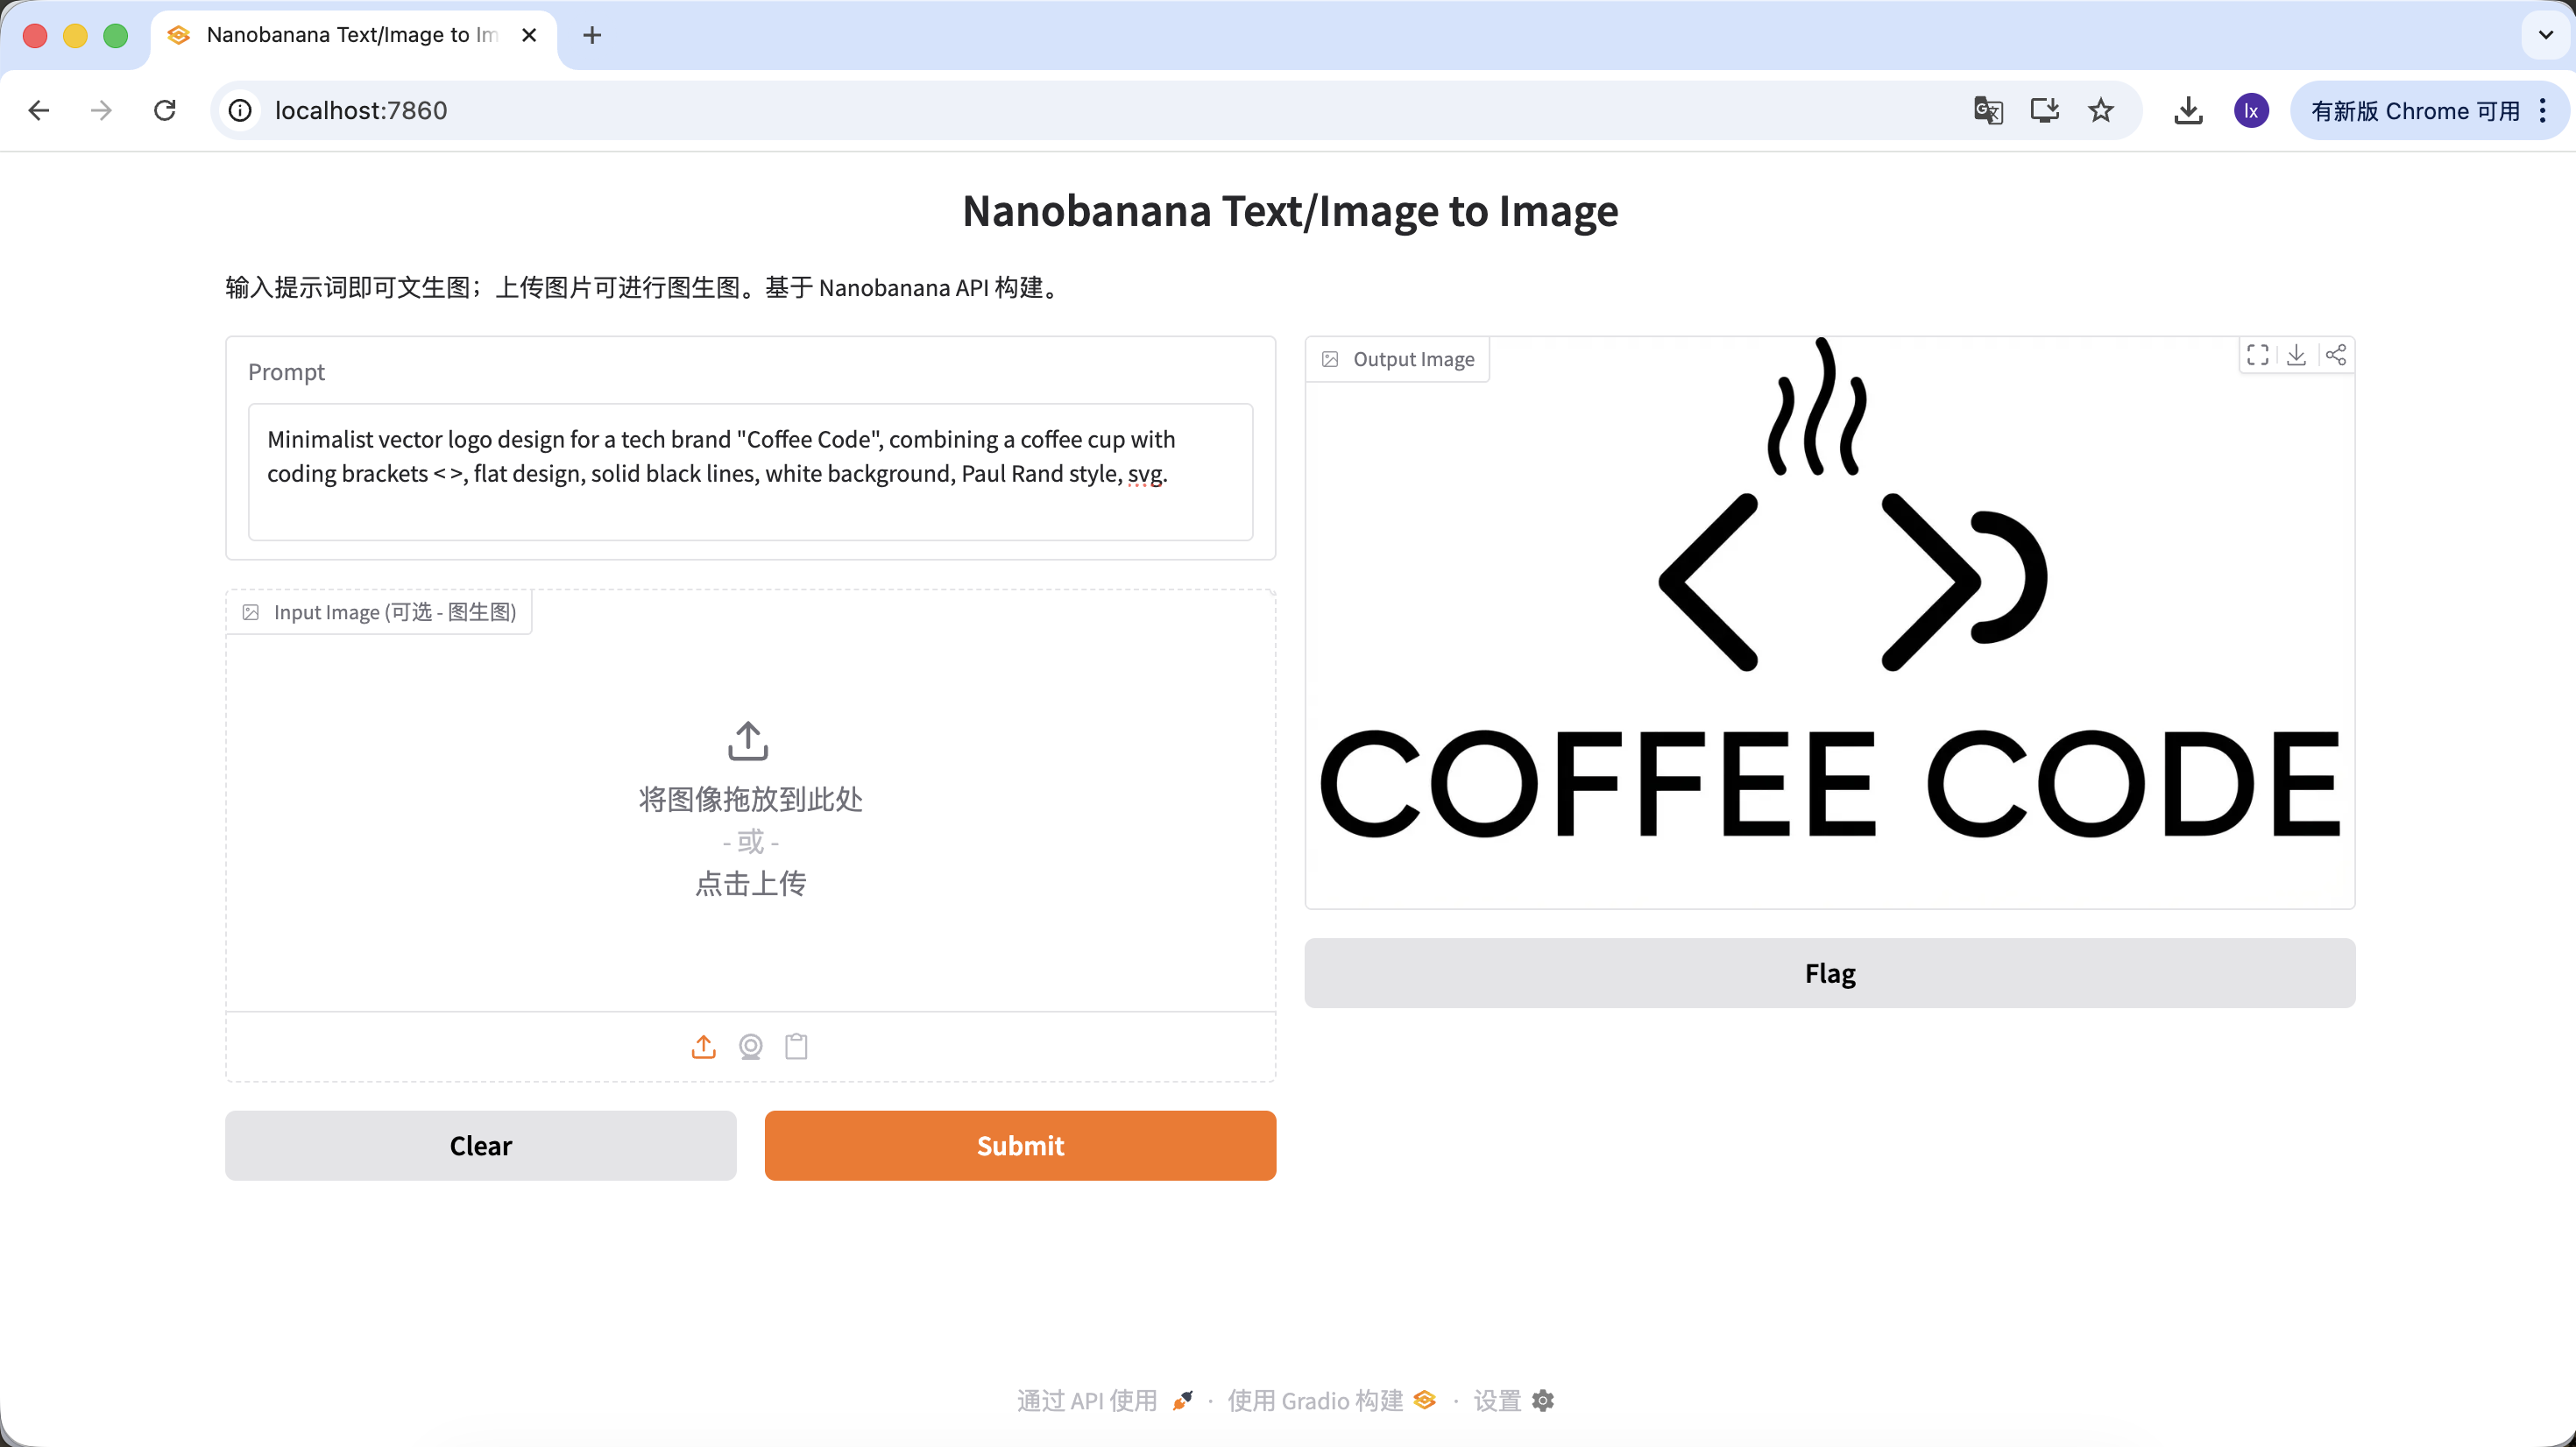
Generating Logos
- Popular trend: Minimalist lines, geometric combinations for tech-style logos
- Common presentation: Black and white color scheme, negative space design, clear brand identity
Example Prompt:
Minimalist vector logo design for a tech brand "Coffee Code", combining a coffee cup with coding brackets < >, flat design, solid black lines, white background, Paul Rand style, svg.
Generating Website User Avatars
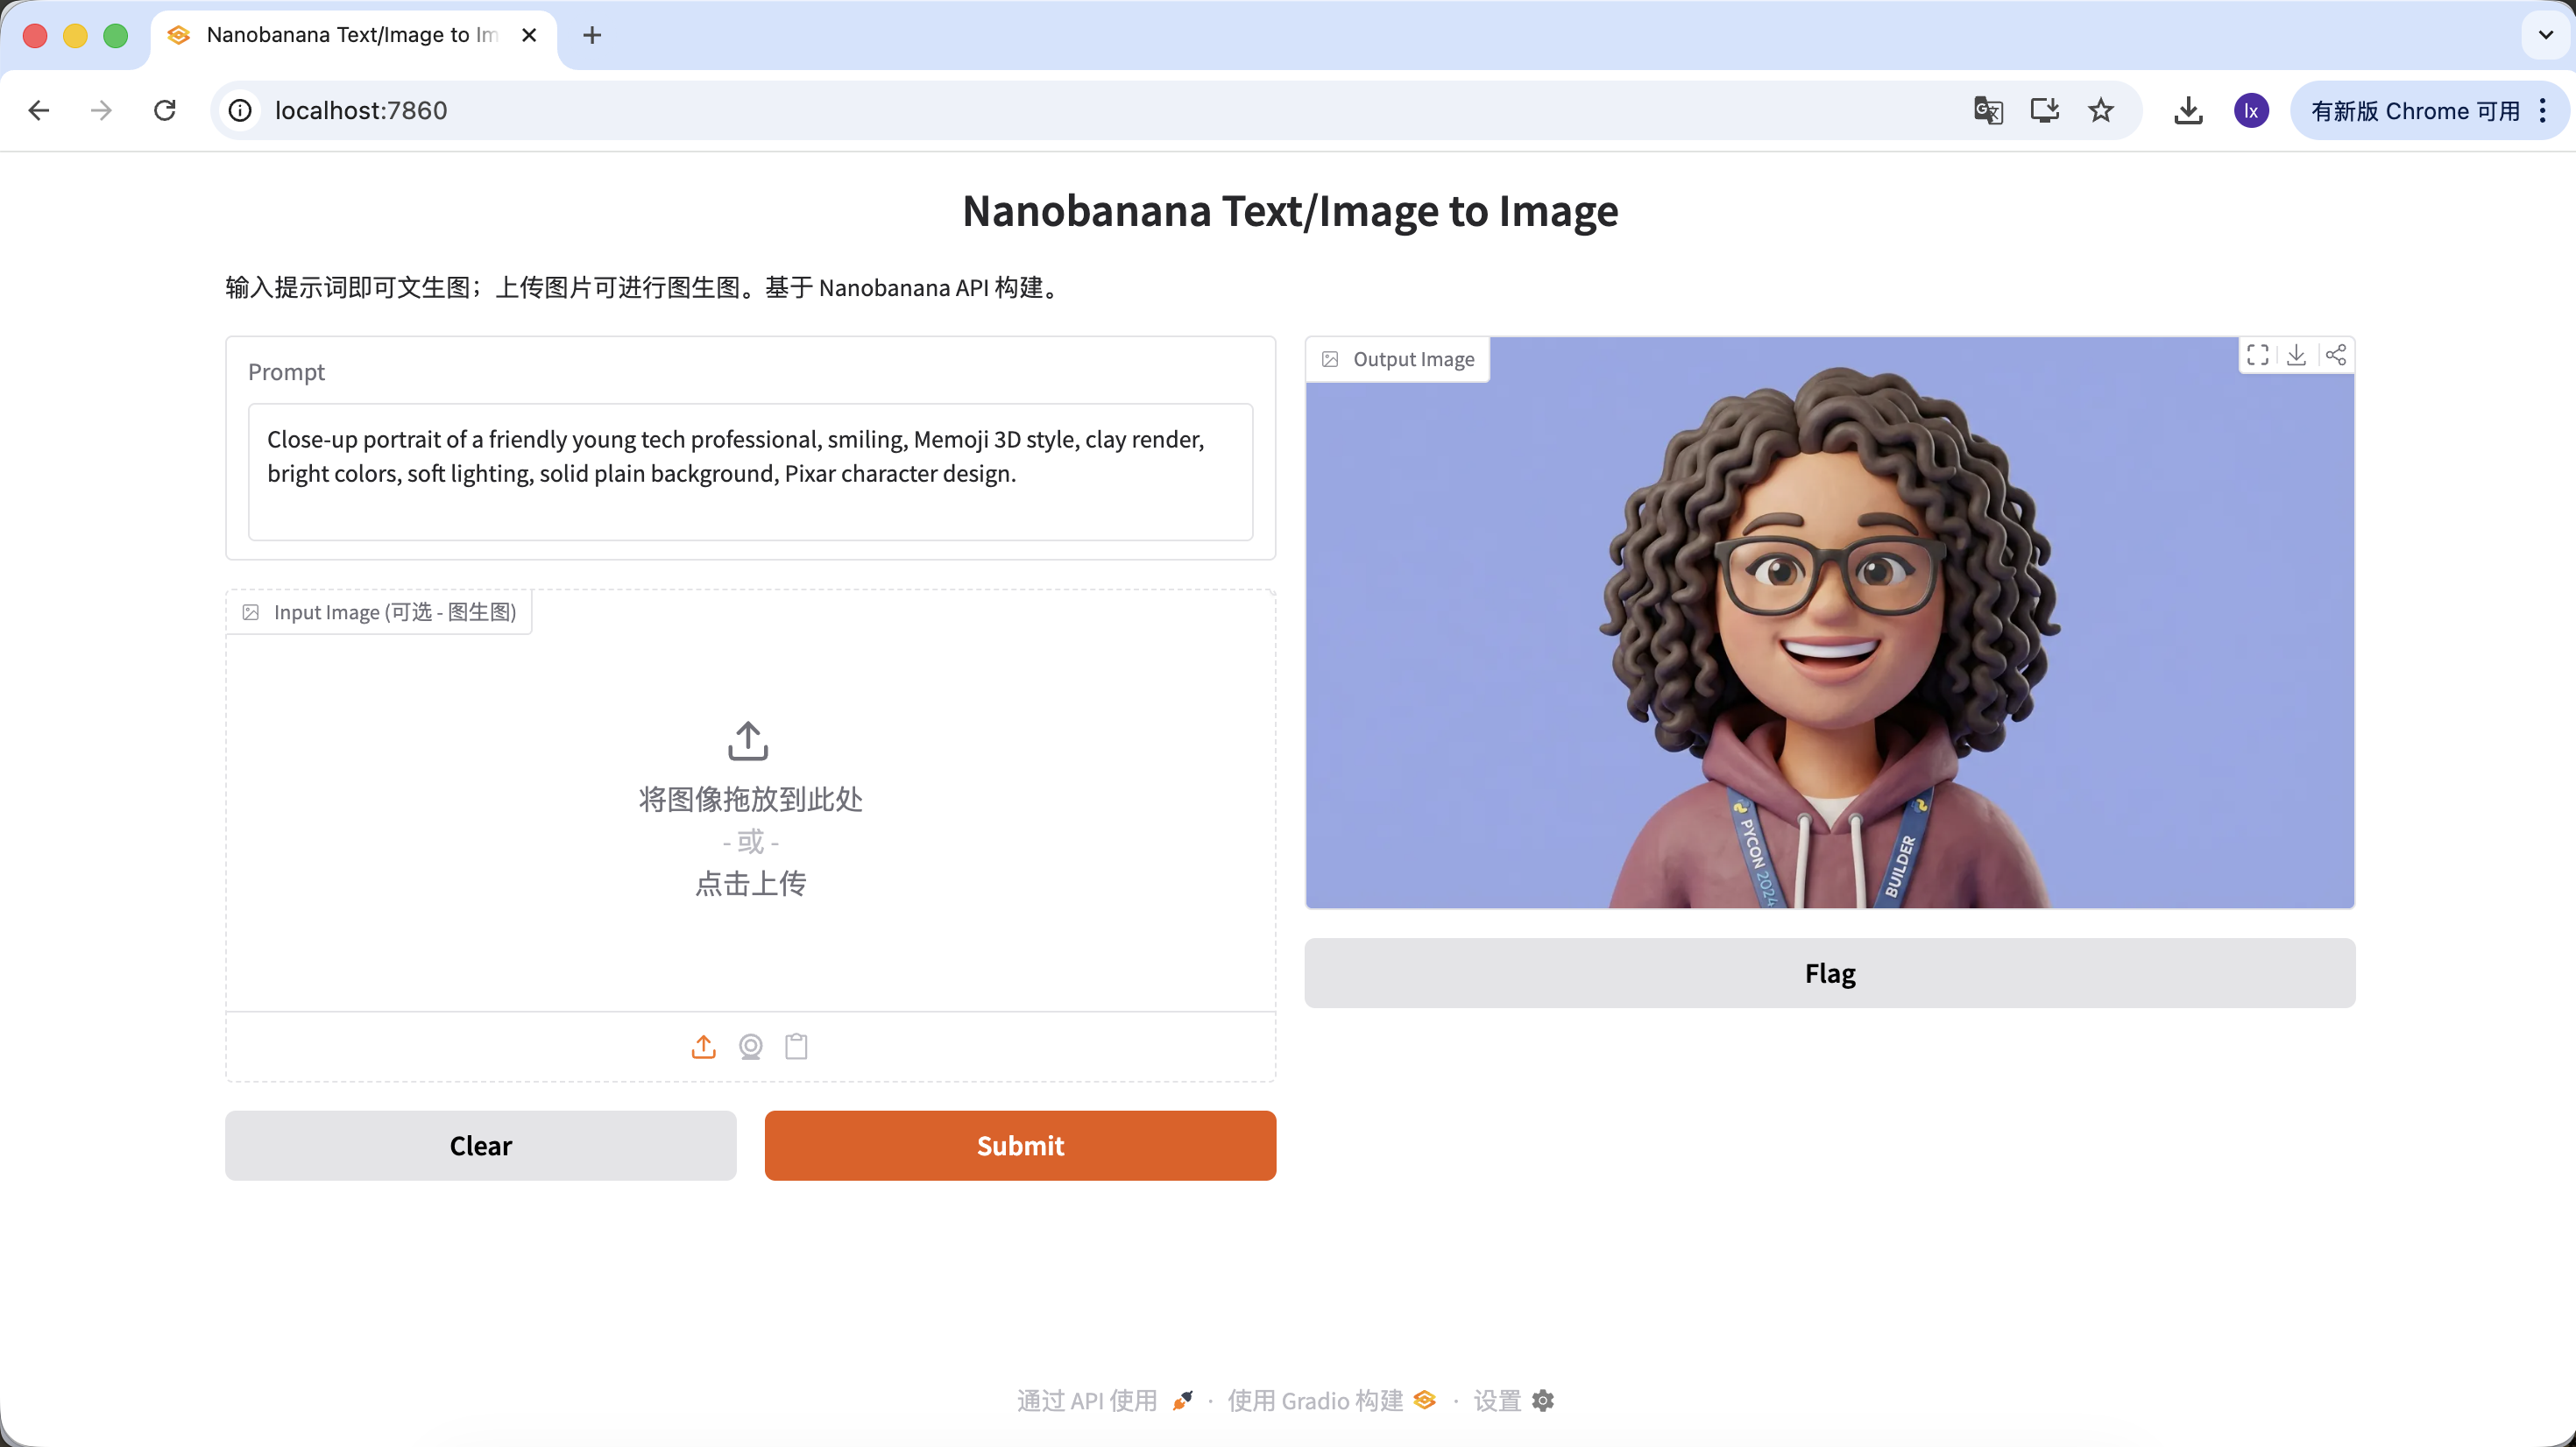
- Popular trend: 3D virtual avatars commonly used on SaaS websites to avoid real-person copyright issues
- Common presentation: Friendly expressions, cartoon proportions, leaning towards Pixar or Memoji style
Example Prompt:
Close-up portrait of a friendly young tech professional, smiling, Memoji 3D style, clay render, bright colors, soft lighting, solid plain background, Pixar character design.
Generating Article Illustrations
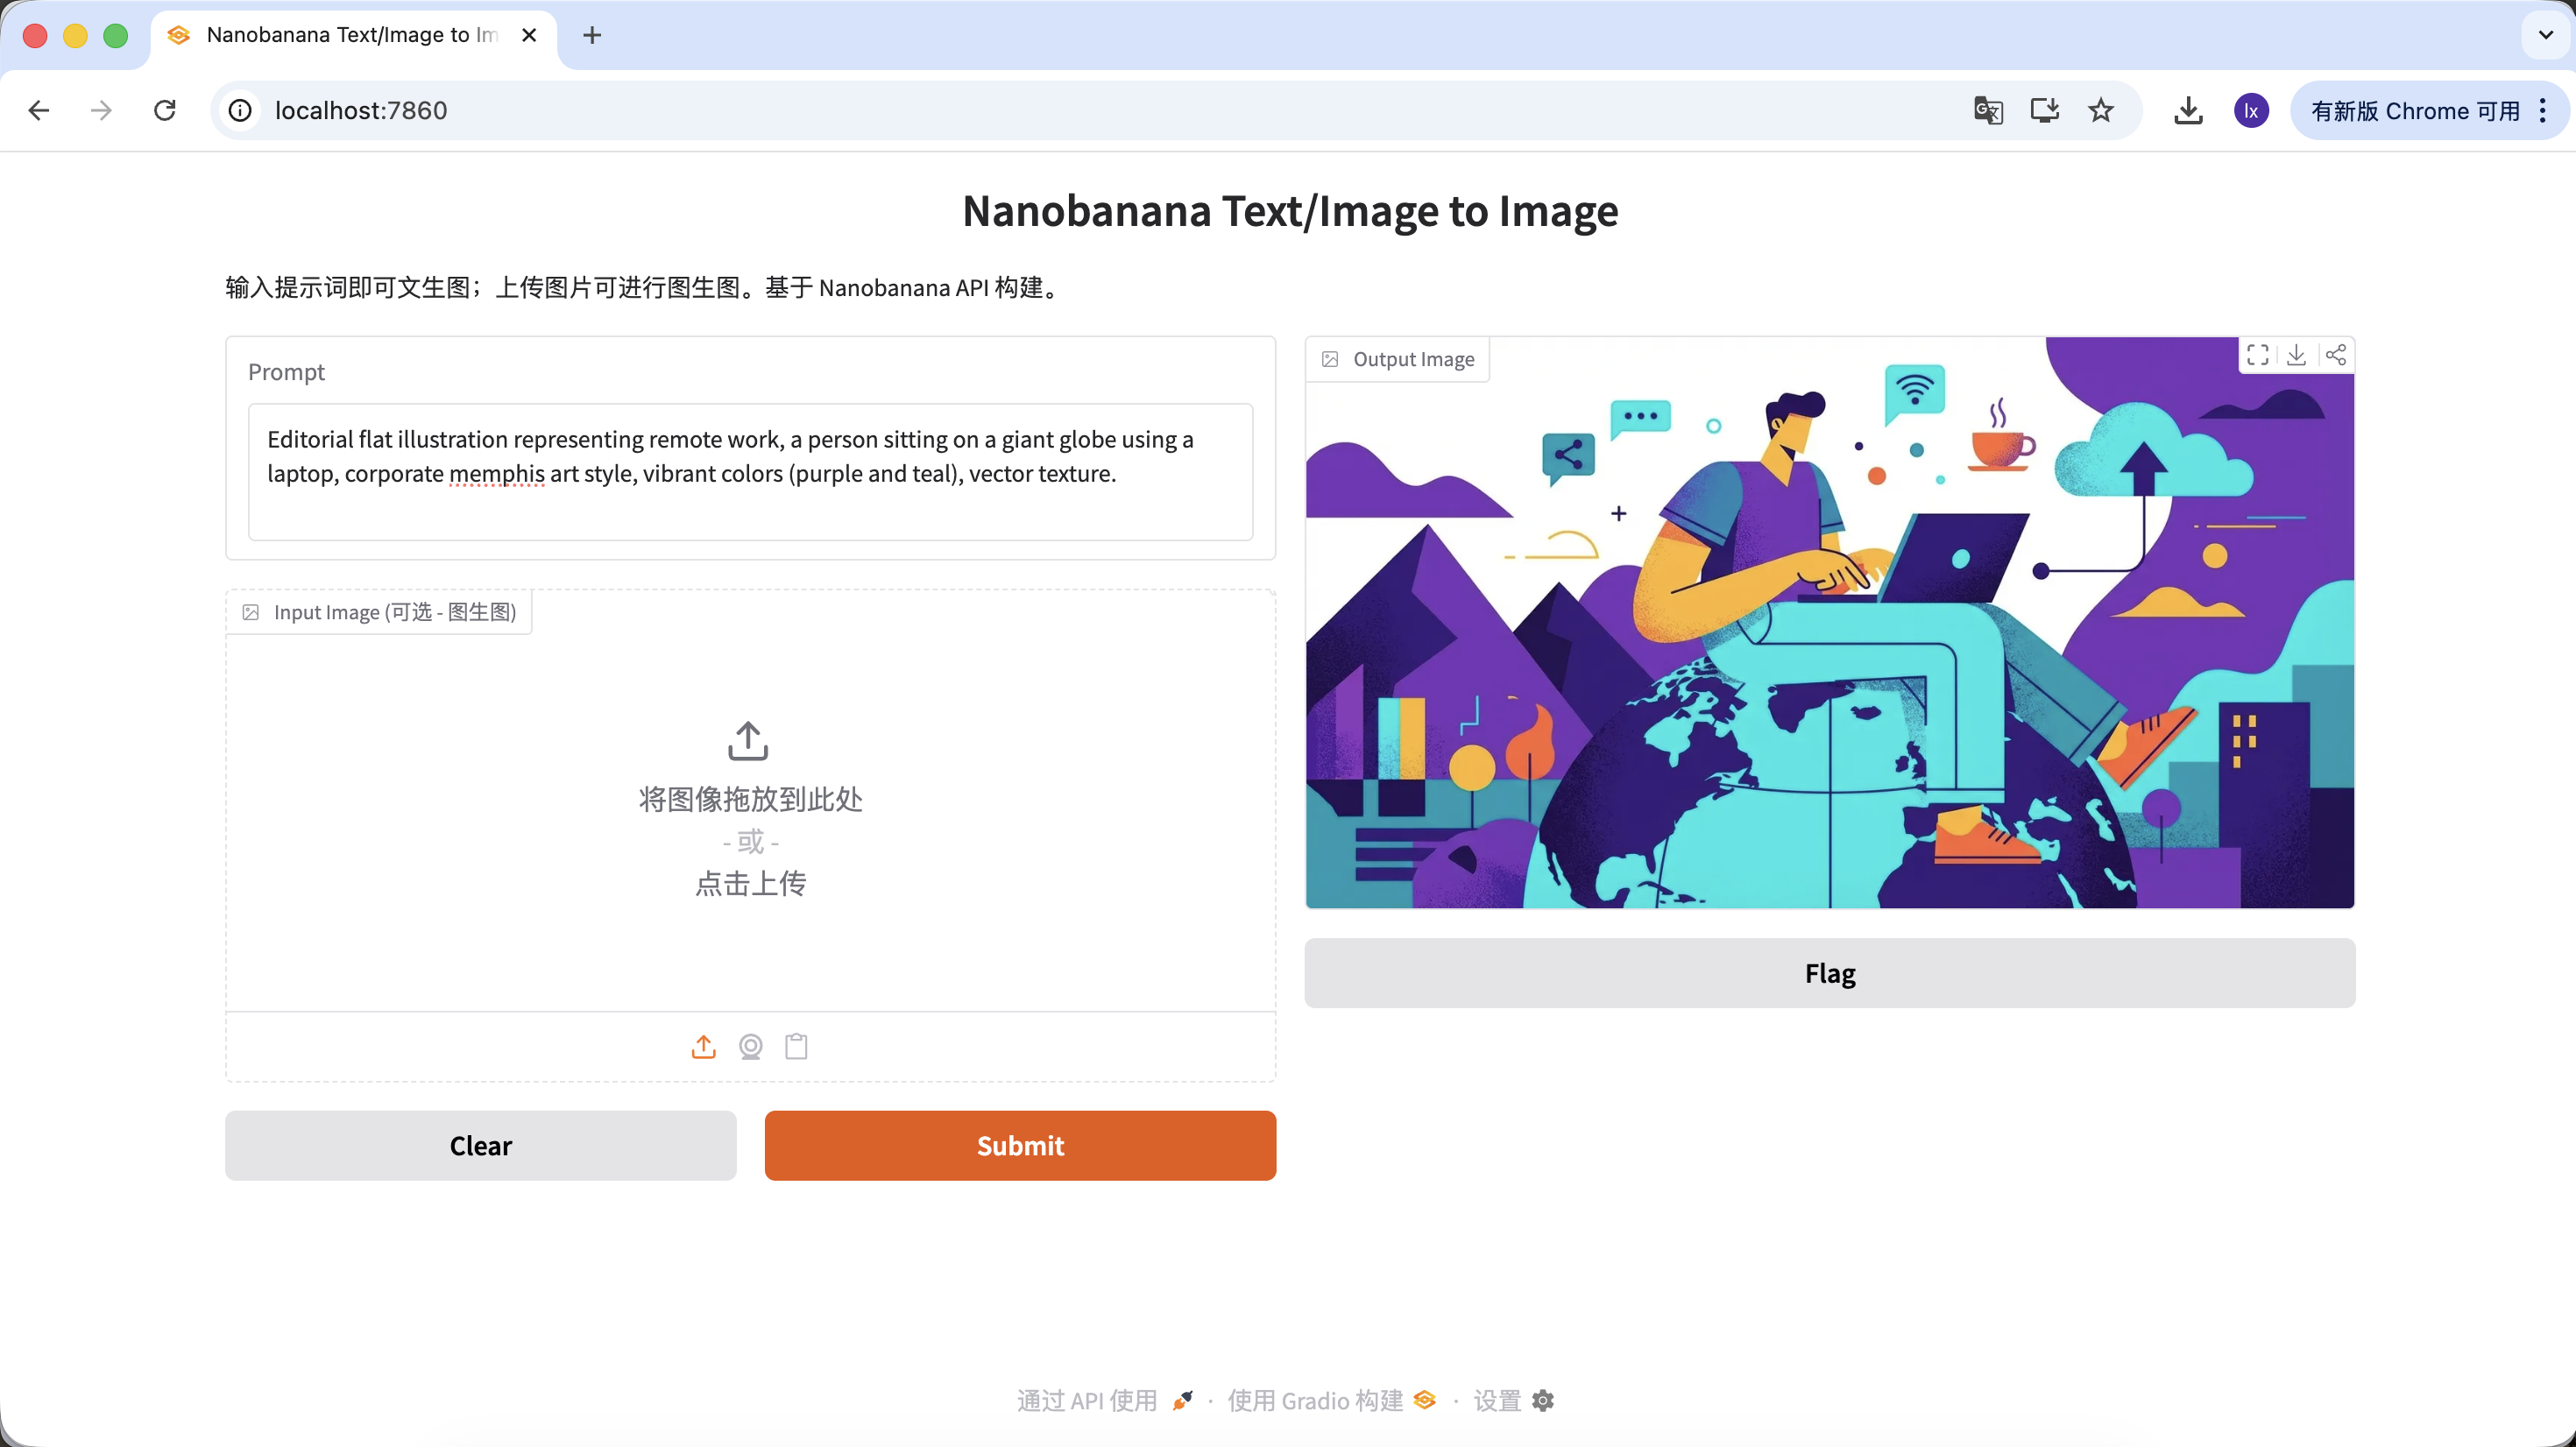
- Popular trend: Abstract flat illustrations commonly seen on tech company blogs
- Common presentation: Purple-blue color scheme, exaggerated character proportions, floating UI elements
Example Prompt:
Editorial flat illustration representing remote work, a person sitting on a giant globe using a laptop, corporate memphis art style, vibrant colors (purple and teal), vector texture.
Two: Reference-Based Image Generation — Maintaining Visual Consistency
This category focuses more on scalability. It's used when you already have a satisfactory main visual and need to generate an entire set of consistently styled assets.
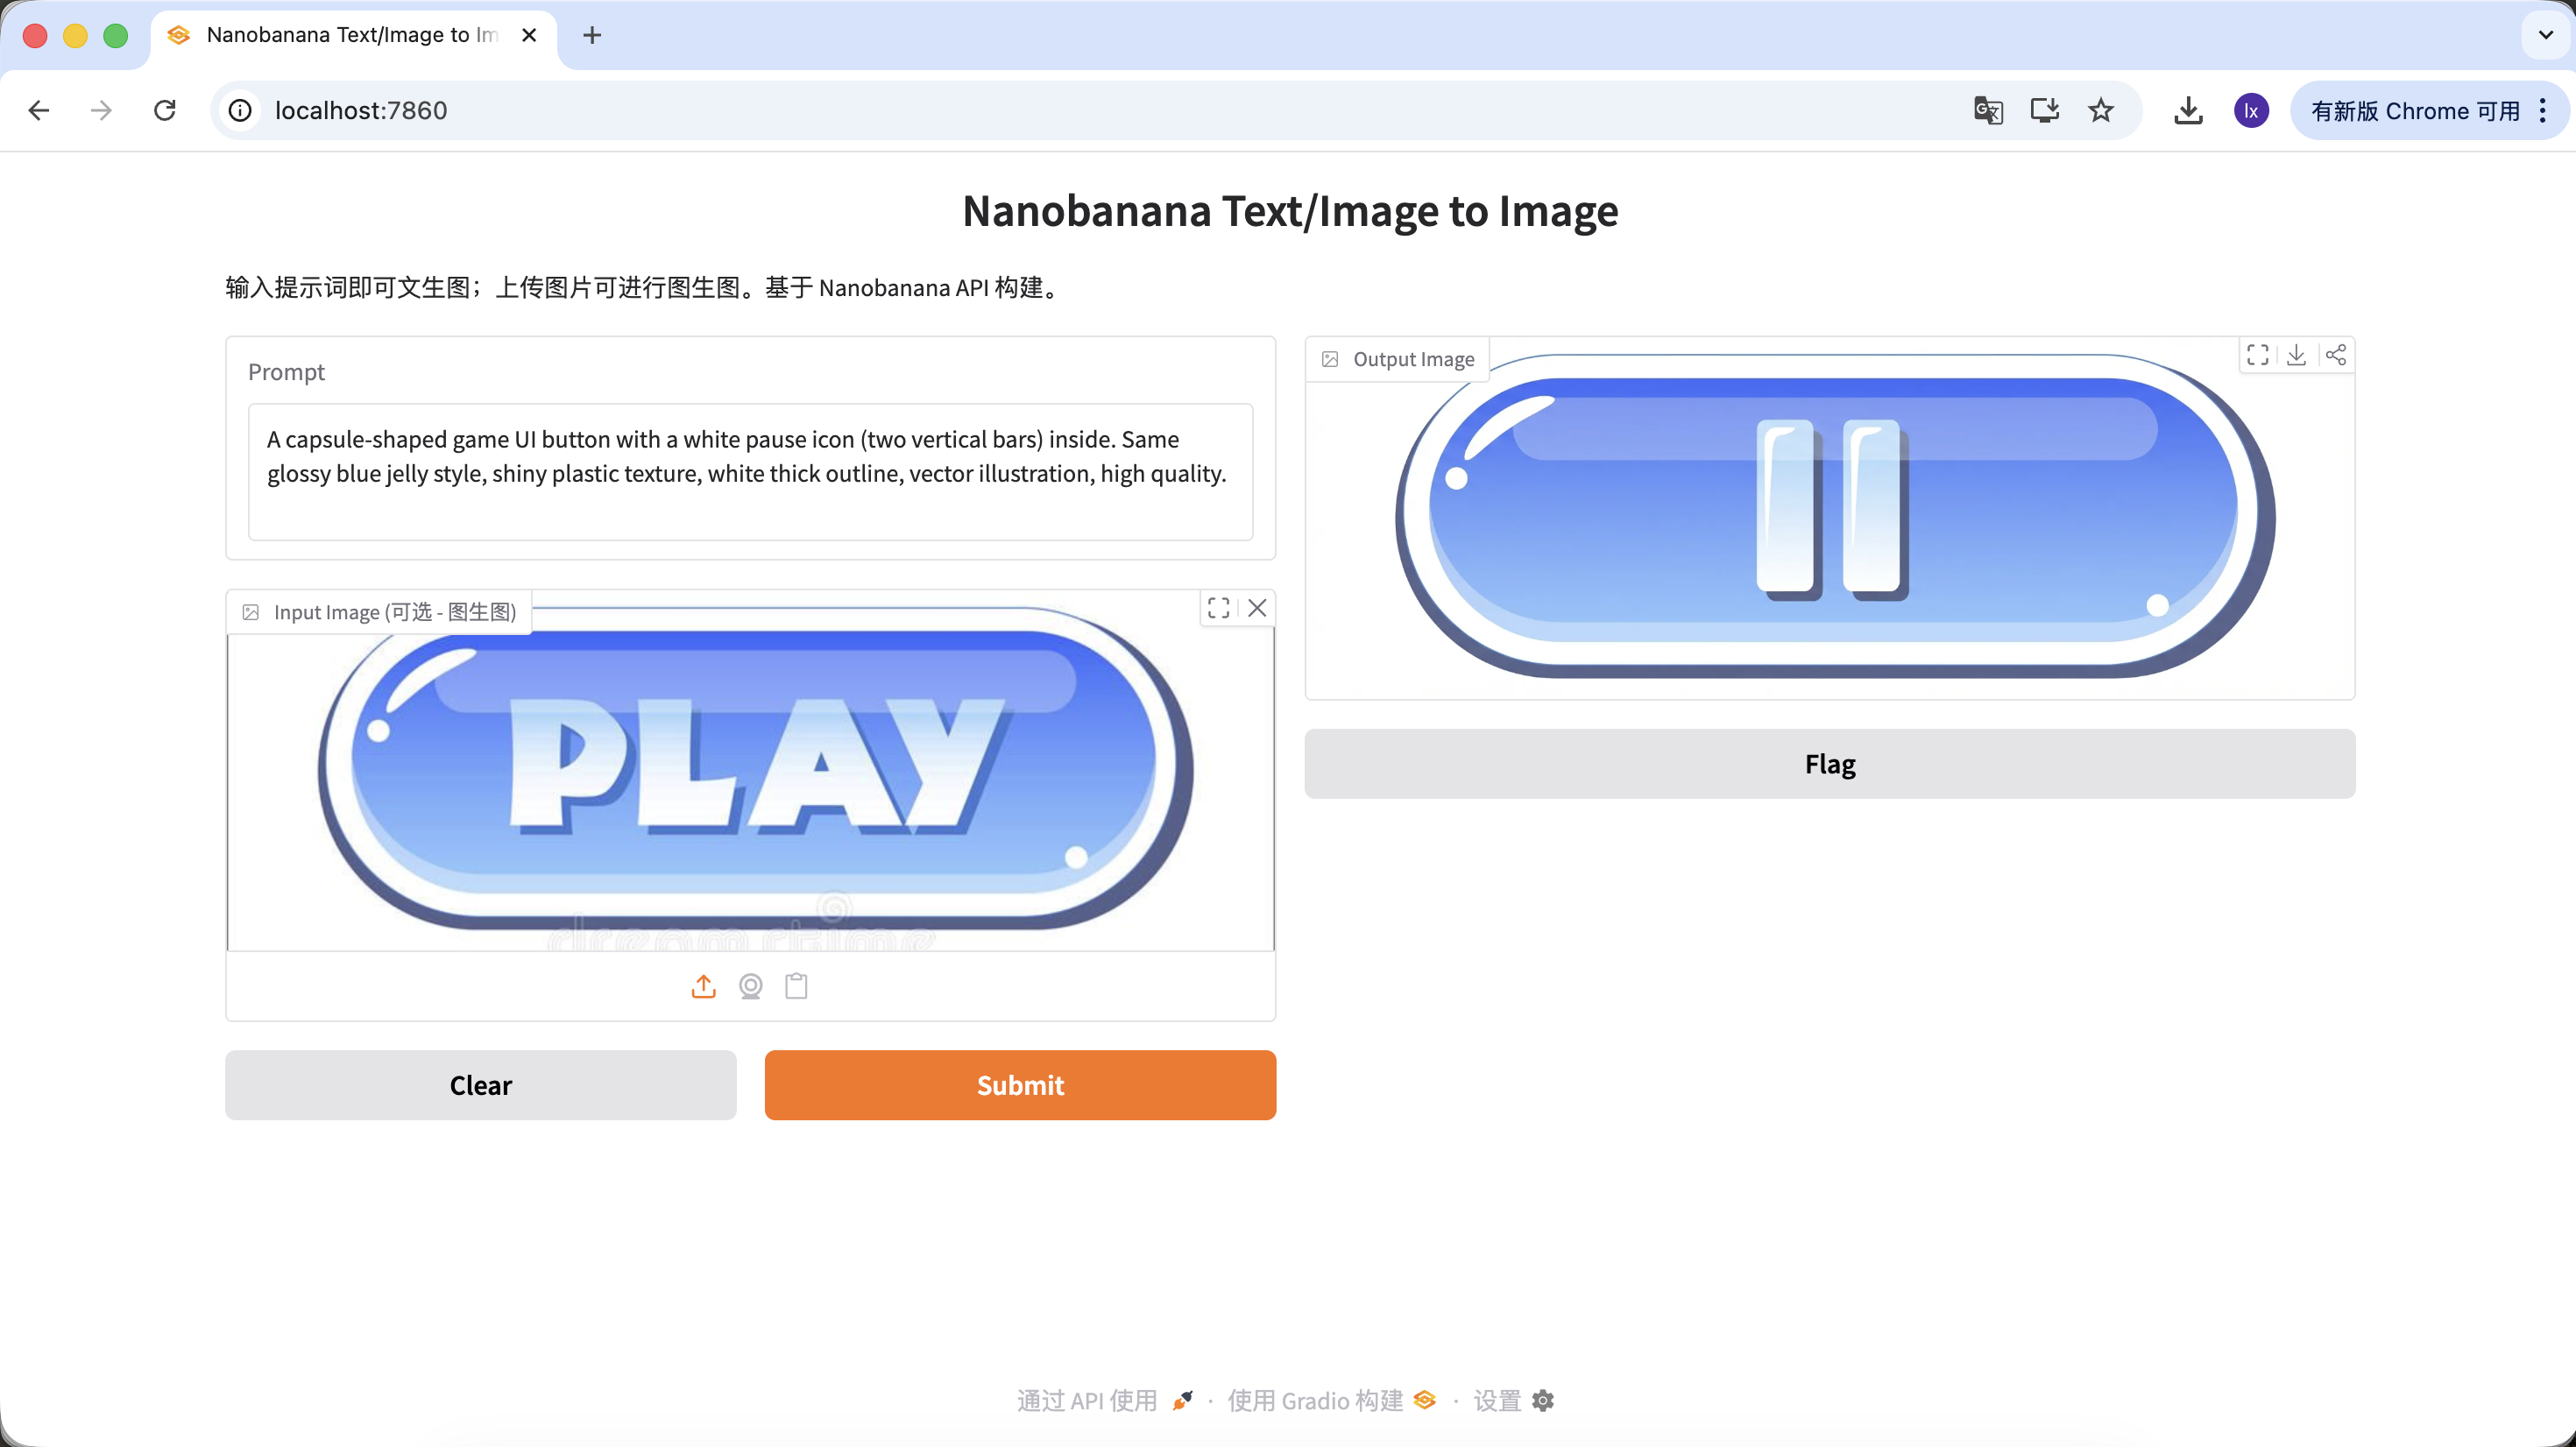
A Set of Buttons or Interactive Assets Similar to the Main Visual
In game development, UI consistency is crucial. Suppose you already have a "PLAY" button for your main interface and now need to expand it into a complete set of uniformly styled function buttons (such as pause, settings, home). Relying solely on hand-drawing makes it difficult to ensure that each button is perfectly consistent in gloss, perspective, and color values.
Basic Operation Flow:
- Save the existing blue "PLAY" button image

- Drag it into the Input Image area as a reference template for subsequent generation
- Keep the style description in the prompt unchanged, only modify the main subject content
With this flow, as long as you replace the subject description, you can get buttons with different functions but consistent styles.
Example Prompt:
Variant A: Pause Button (Icon Type)
A capsule-shaped game UI button with a white pause icon (two vertical bars) inside. Same glossy blue jelly style, shiny plastic texture, white thick outline, vector illustration, high quality.
Variant B: Settings Button (Complex Icon)
A capsule-shaped game UI button with a white gear icon (settings symbol) inside. Same glossy blue jelly style, shiny plastic texture, white thick outline, vector illustration, high quality.

Variant C: Replay Button (Shape Change)
If you need to change the button shape, you can directly describe the shape in the prompt. The model will attempt to change the structure while preserving the material characteristics.
A round game UI button with a white circular arrow icon (replay symbol) inside. Same glossy blue jelly style, shiny plastic texture, white thick outline, vector illustration, high quality.
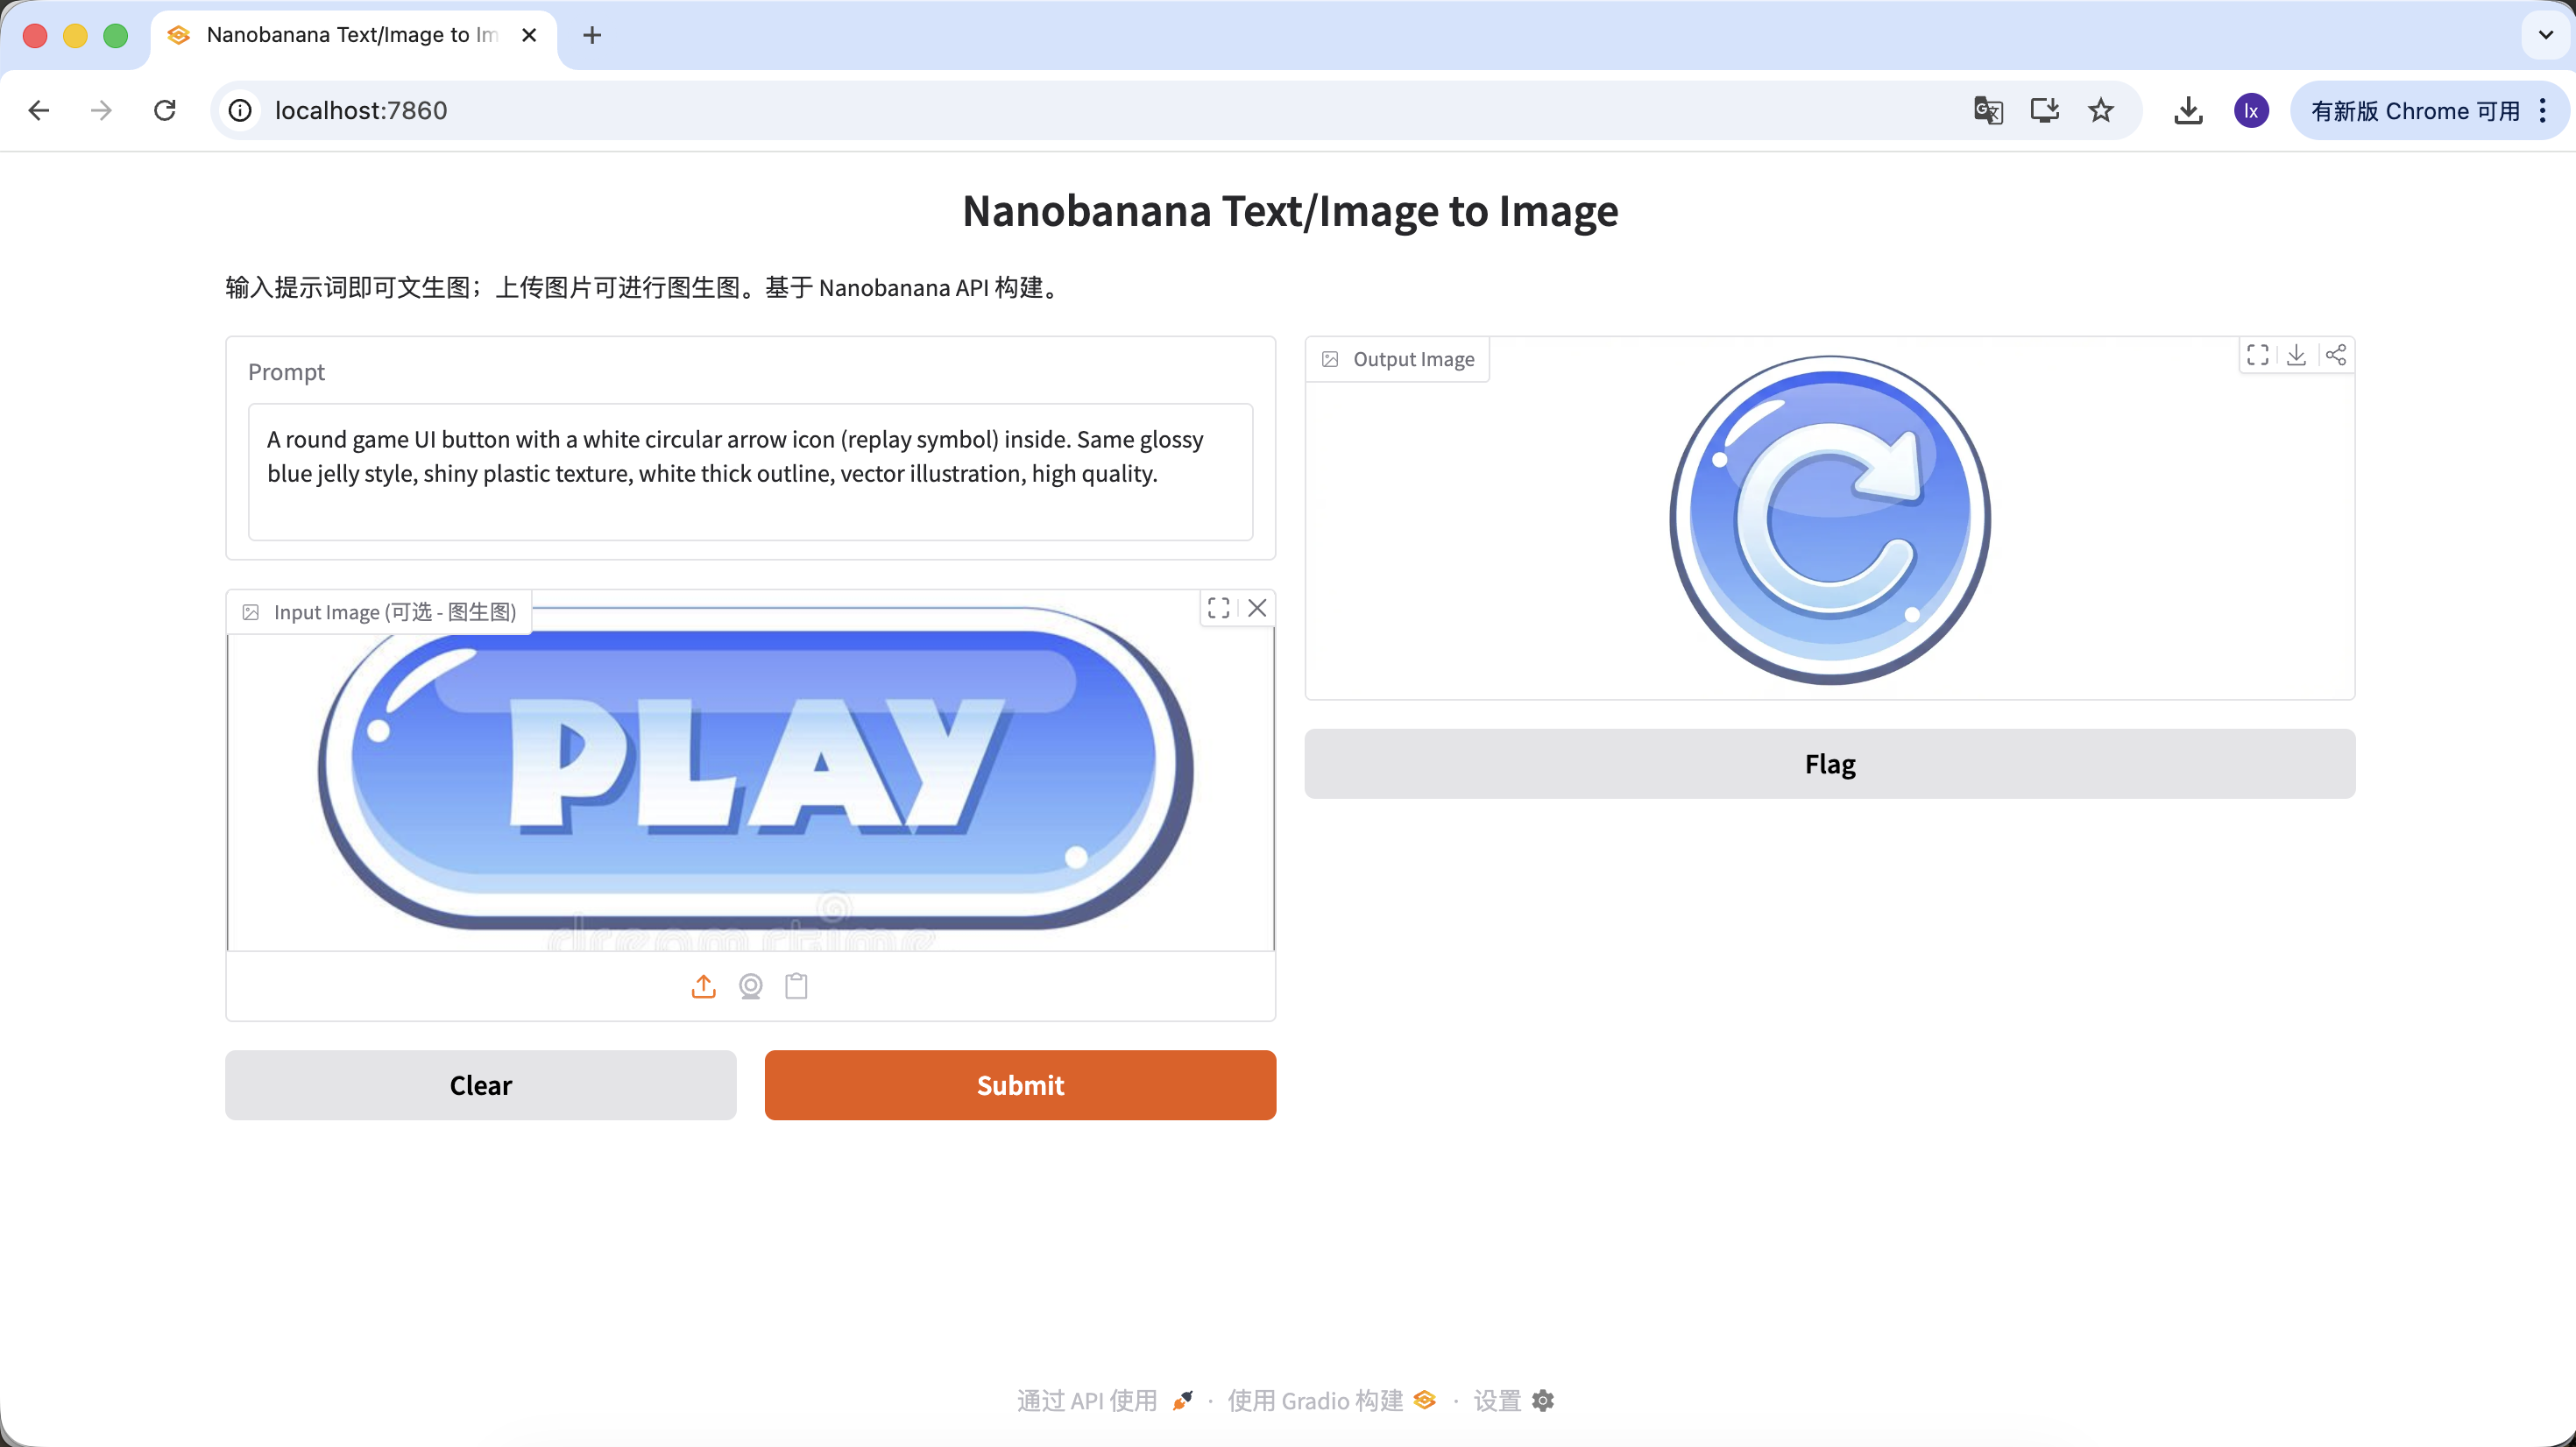
Through this set of operations, you can not only replace button functions and icons but even change button shapes, while all generated results remain highly consistent in material, color scheme, and lighting. This is exactly the core value of large models in design asset generation scenarios.
Chapter 2: A More Obedient Image Generation Assistant — Using Lovart as an Example
In the first part, we directly called NanoBanana through code and experienced the basic "input and generate" process. This approach works fine when requirements are simple. But when generation tasks start to include more constraints, such as:
- Needing multiple consistently styled images
- Needing to repeatedly adjust based on existing results
- Needing to dynamically modify the generation direction based on user input
The single-call approach gradually becomes insufficient.
This is where you need to introduce AI Agent (Intelligent Agent). This section uses Lovart as an example to show how the overall workflow changes when an image generation model has a "thinking layer." Note! This is not an advertisement, just helping everyone quickly grasp the convenience of AI Agents~
2.0 Introduction to Lovart: Your AI Design Agent
Lovart is an Agent-based design tool on the web. Compared to ordinary image generation tools, it adds a layer of "thinking and planning" before generation.

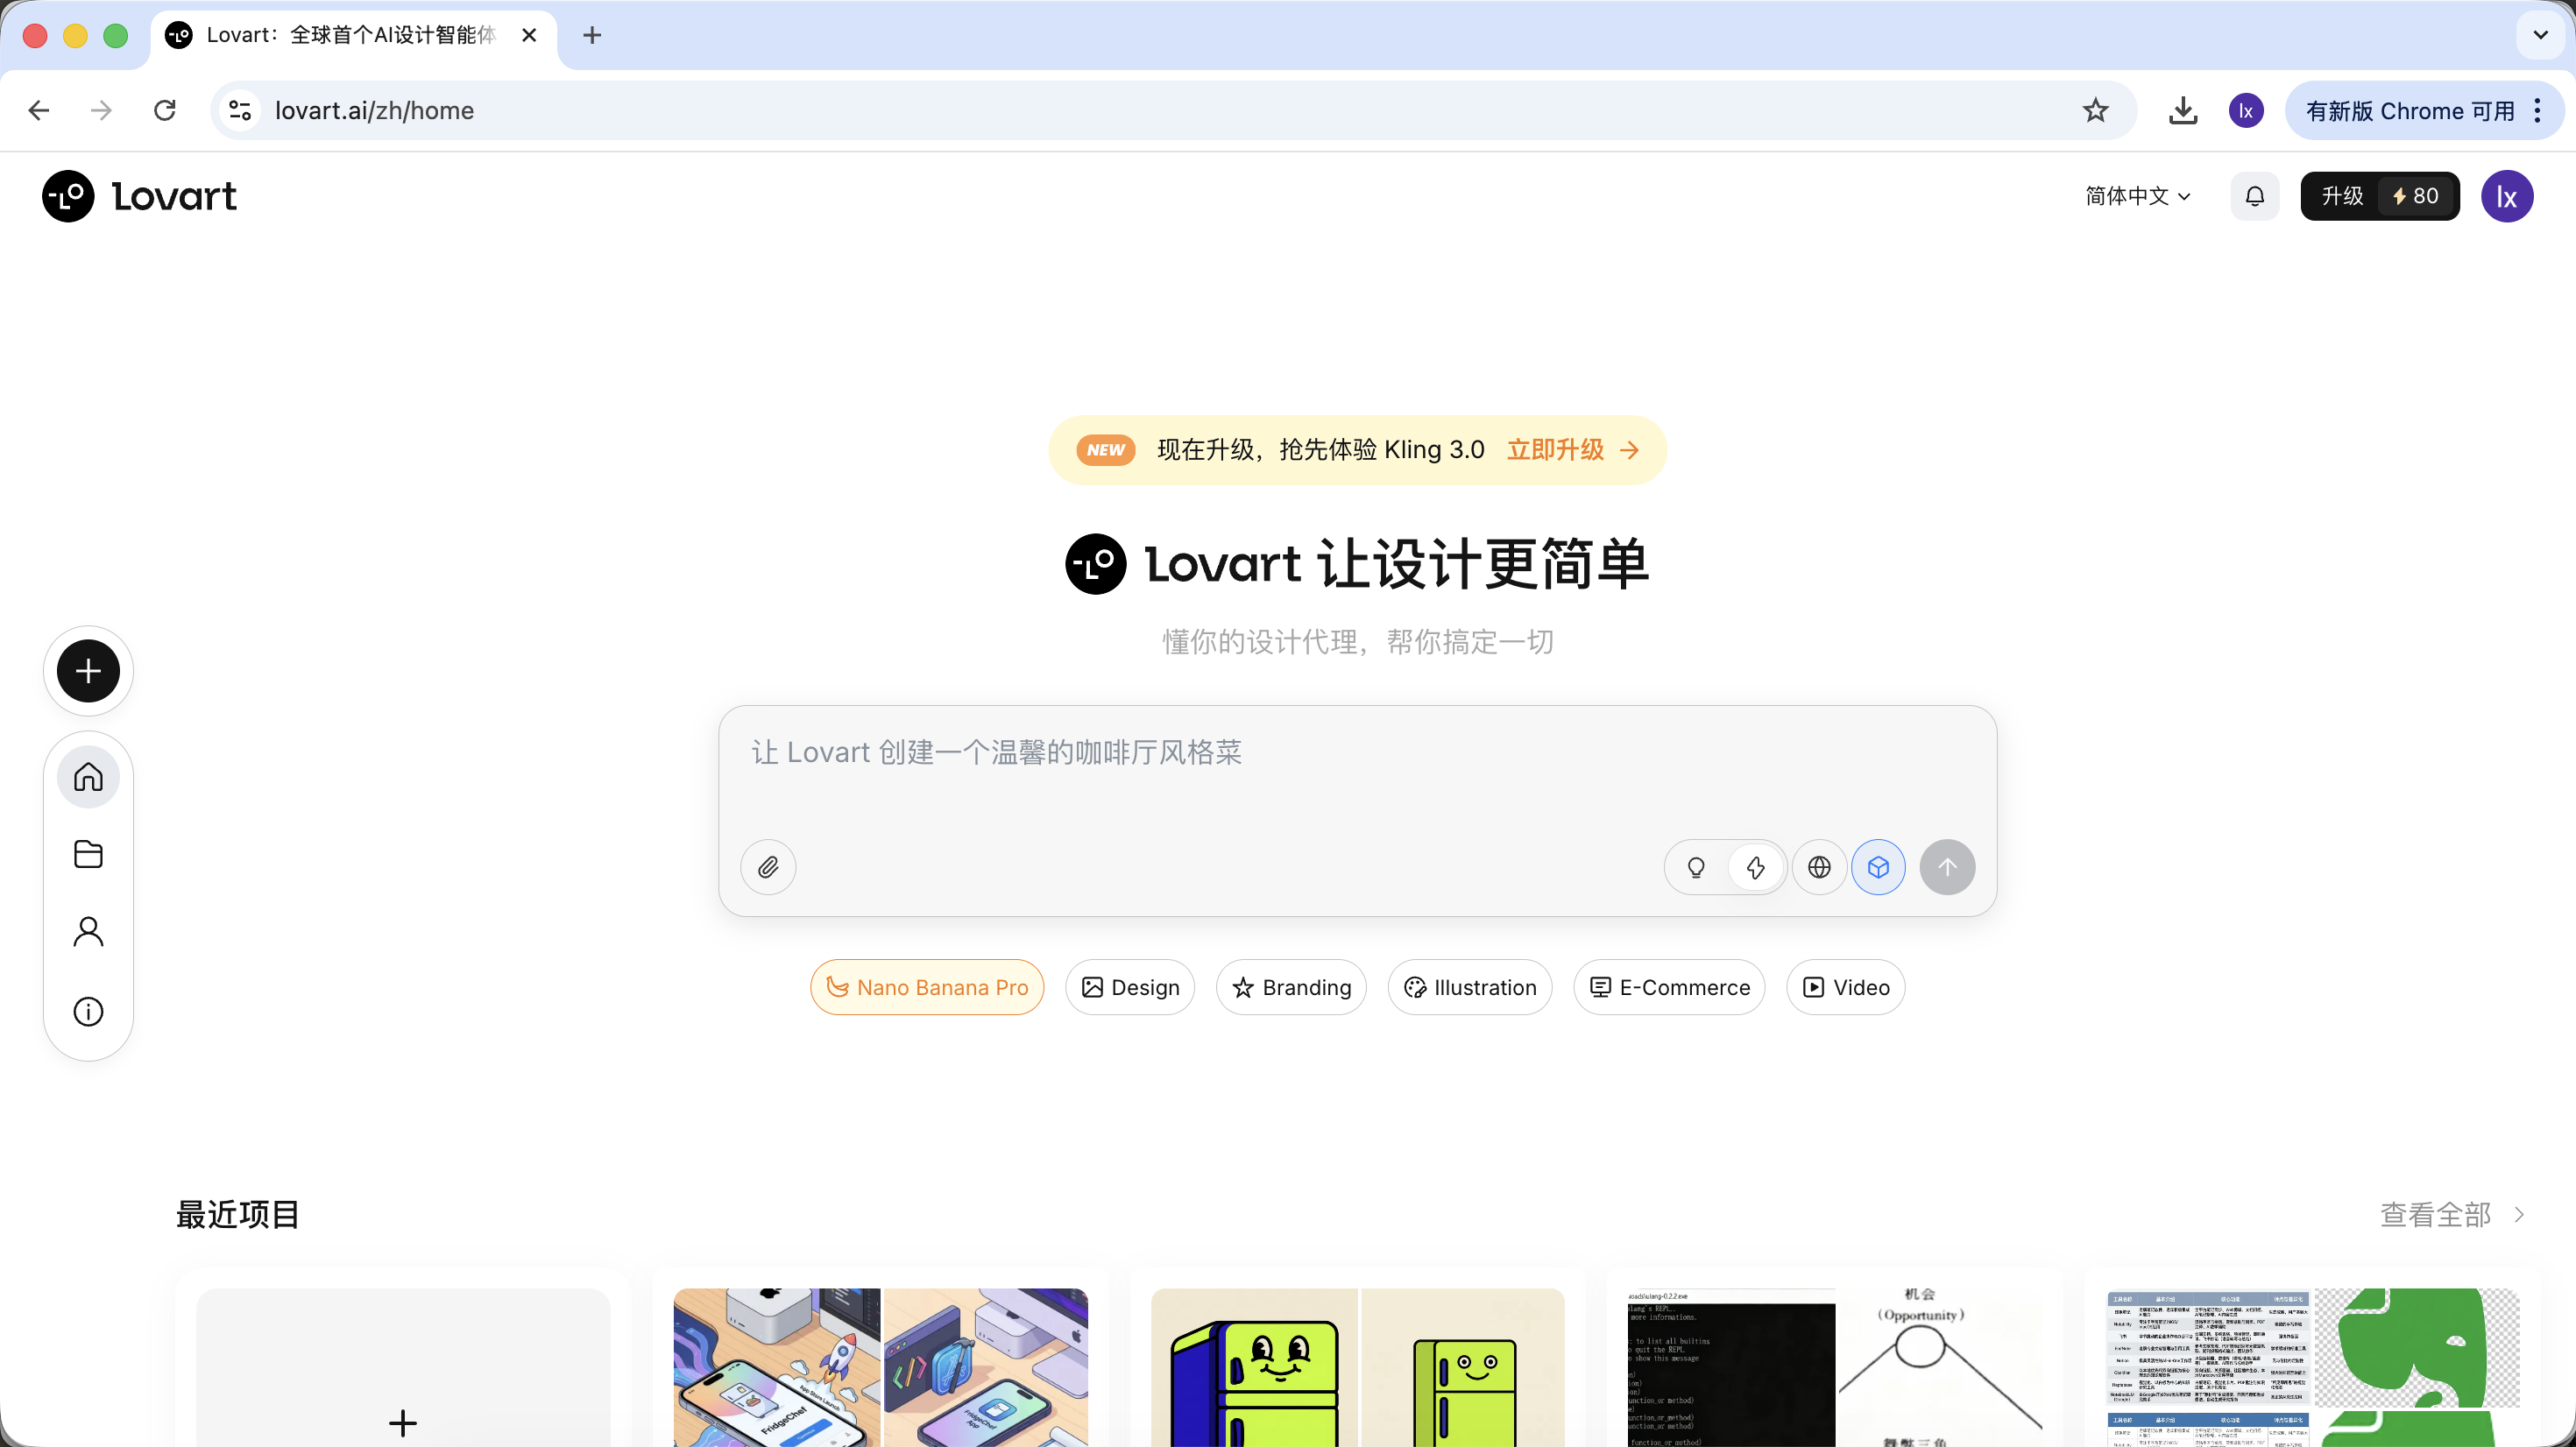
After entering Lovart, you mainly need to understand the following controls:
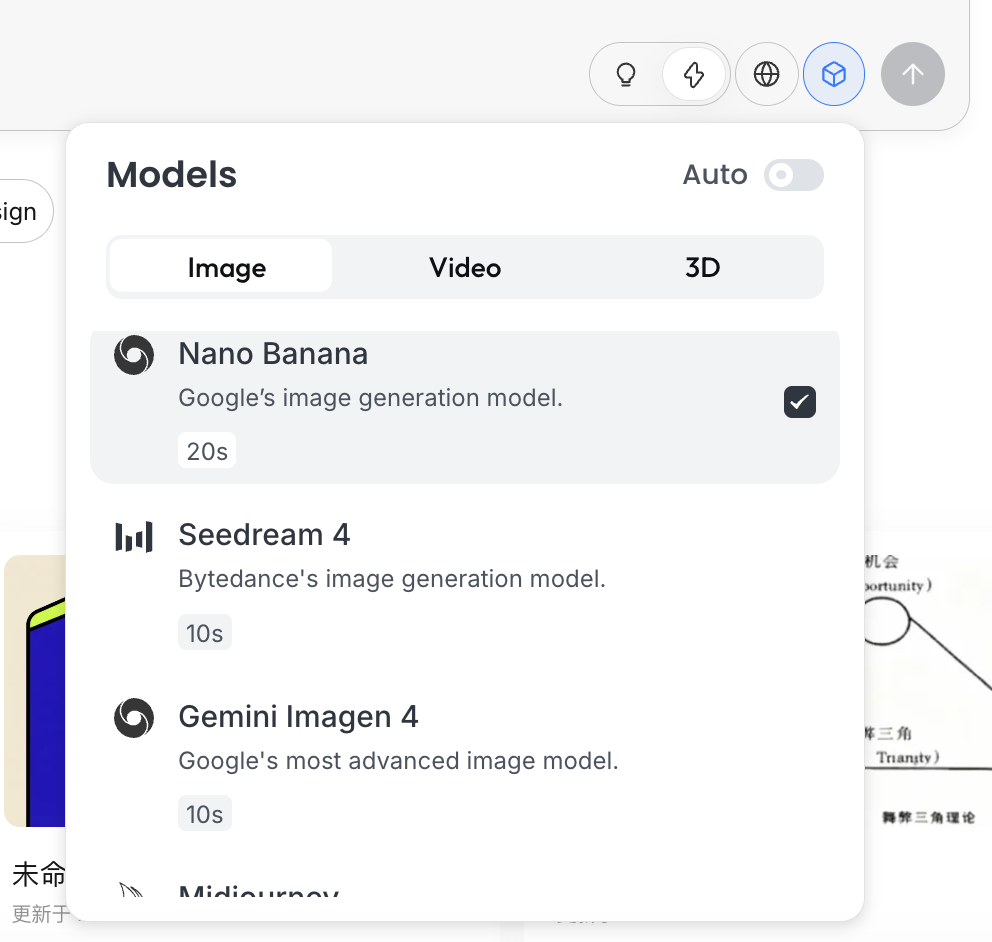
Model Selection
Click the cube icon below the input box to view the currently available generation models (such as GPT Image, Flux, etc.).
To maintain consistency with the previous examples, this section still uses NanoBanana as the underlying generation model.
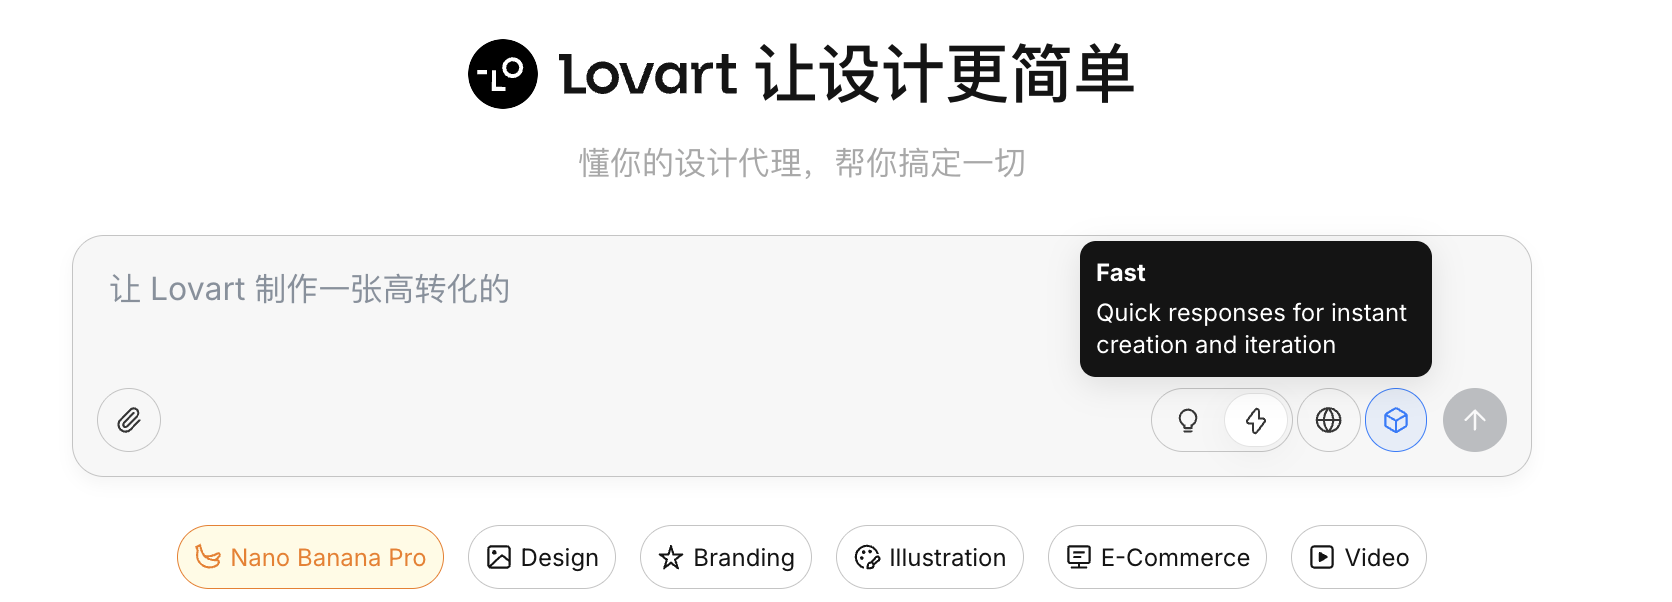
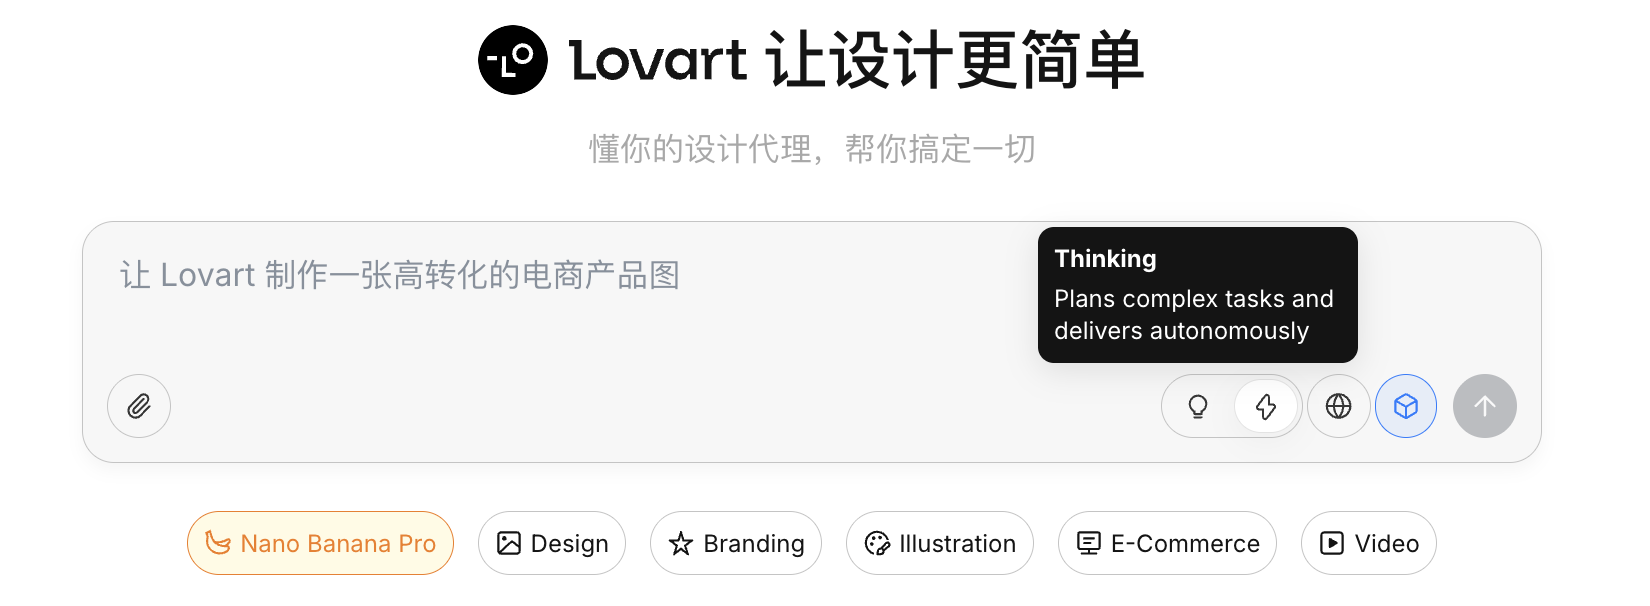
Thinking Mode
This is Lovart's core toggle:
- Fast Mode (⚡): Close to native API, fast response, suitable for single, clearly instructed generation
- Thinking Mode (💡): Agent mode, AI first breaks down requirements, rewrites prompts, then executes generation
Web Access
After enabling the globe icon, the Agent can retrieve web information during the generation process (such as design trends, color schemes) as supplementary input.
2.1 Why Isn't the Native API Enough?
Even though you can already generate decent quality images through Python, the native API still has limitations in complex tasks. The key reason is that the native API is inherently imperative. When you ask it to generate a specific object, it can execute directly; but when the input becomes "plan a complete set of game assets," it won't proactively decompose the goal into multiple executable steps.
Lovart's core difference lies in its Agent mechanism. Between user input and the image generation model, it adds a layer of logic for understanding and planning: first identifying user intent, then decomposing tasks, rewriting prompts, and only then executing generation.
2.2 Hands-on Demo: Create a Set of IP Sticker Pack in 5 Minutes
Let's use "making a set of programmer duck IP sticker pack" as an example to see how the Agent participates in the entire process.
Phase One: Planning (Agent's Thinking Capability)
The Problem with Native API: You need to think about character design and emotional states yourself, and write individual prompts for each image.
Lovart's Approach:
- Turn on 💡 Thinking Mode
- Enter a single instruction:
Design a set of programmer duck IP sticker pack, flat style, cute
The AI won't immediately start drawing. Instead, it first searches the web for related programmer duck designs. It then outputs a decomposed plan, automatically generating scenes like Debug, Coffee Break, Panic, etc., with corresponding visual descriptions for each.
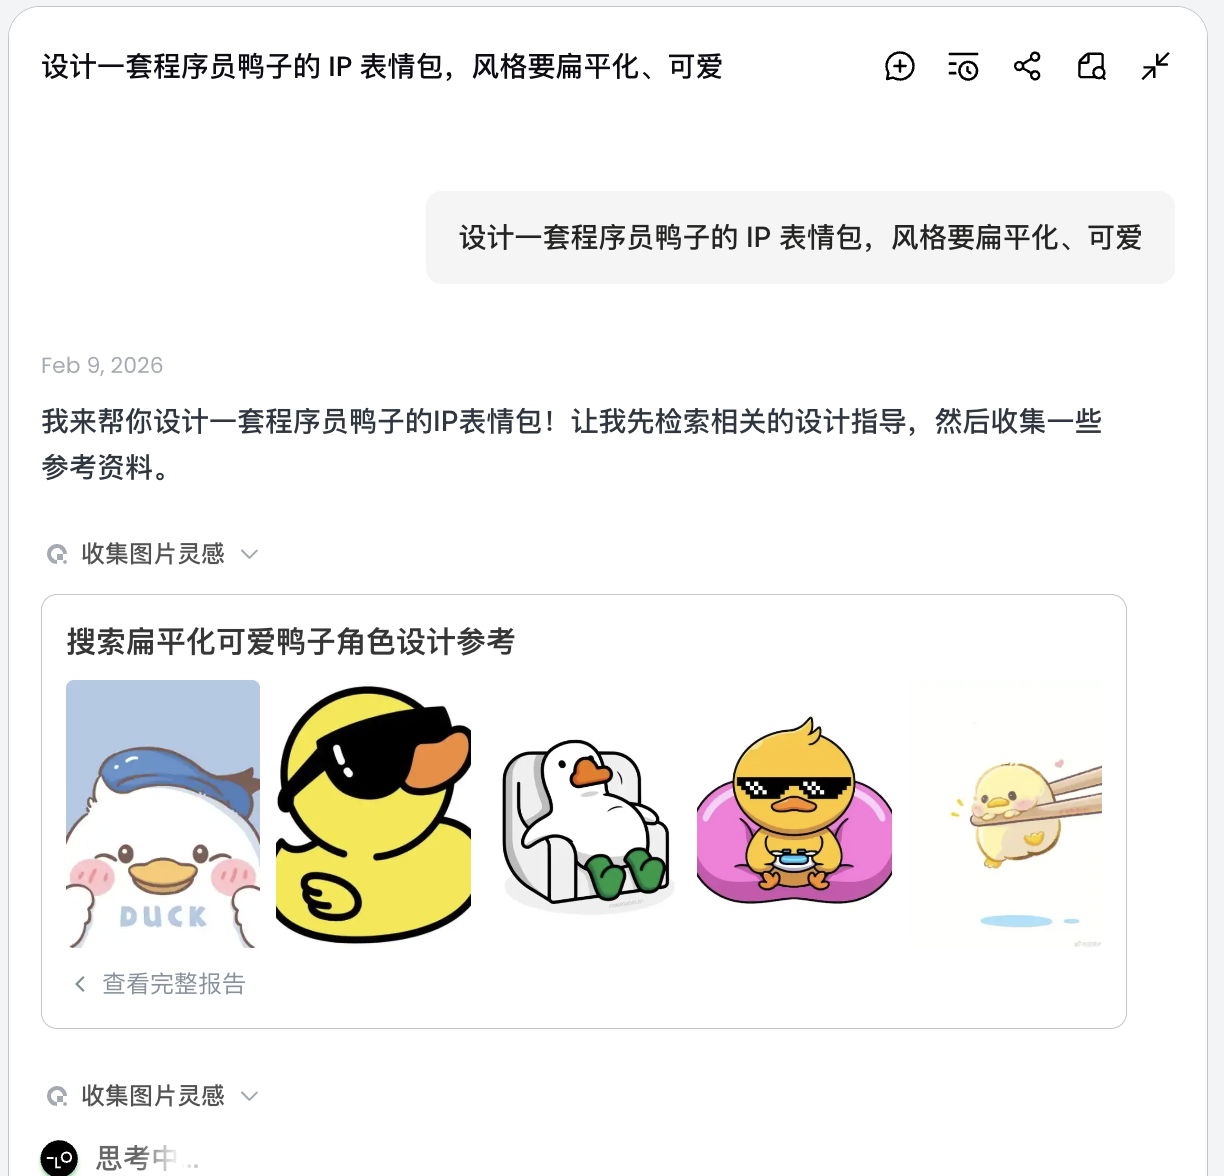
In this step, the AI transforms from "executor" to "planner." After the AI finishes analyzing your requirements, you can see various styles and content of programmer duck images in Lovart's canvas area. You can start filtering for the styles you like.

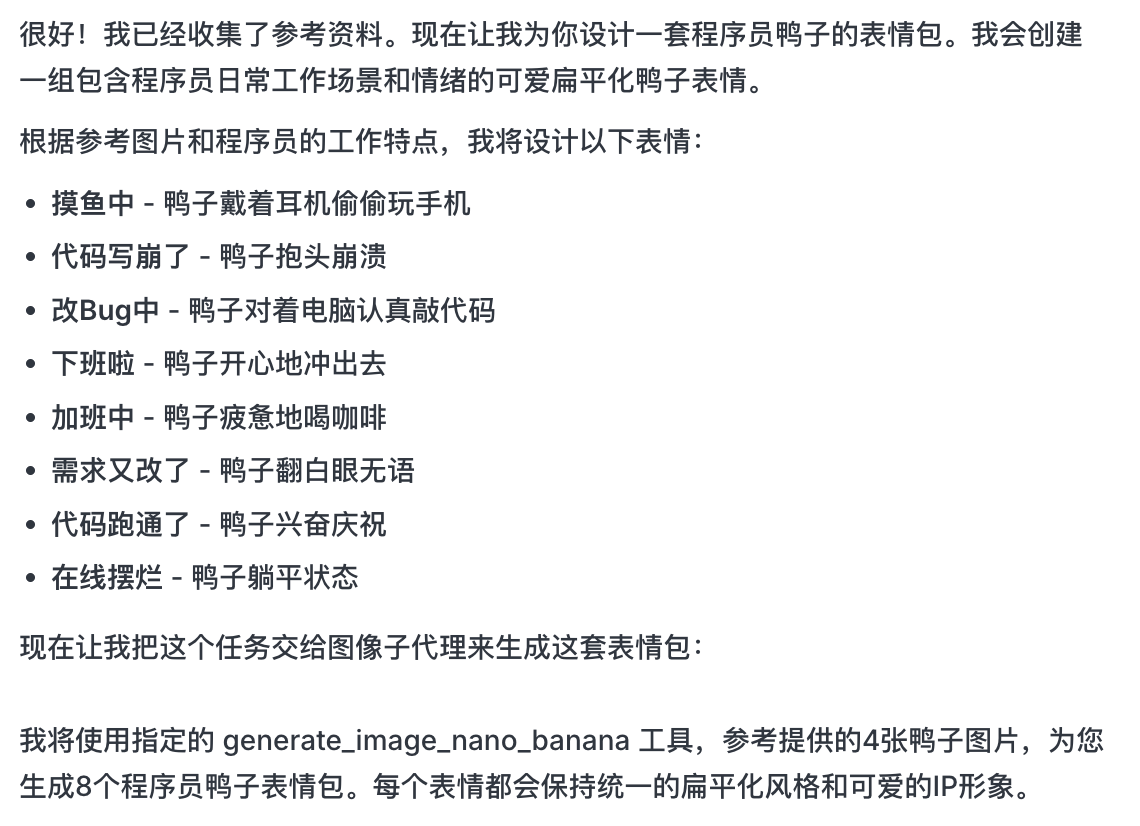
Phase Two: Consistency (Reference-Based Visual Anchoring)
Images in Lovart are not just results — they also participate in subsequent generation.
Complete Reference Image
- Select the most satisfactory "standard duck" from the sketches, click on the corresponding image in the canvas area
- The image will automatically appear in the conversation area as a Reference
- Enter a new action (such as happy) and generate
The generated result will inherit the color scheme, proportions, and details of the master template.
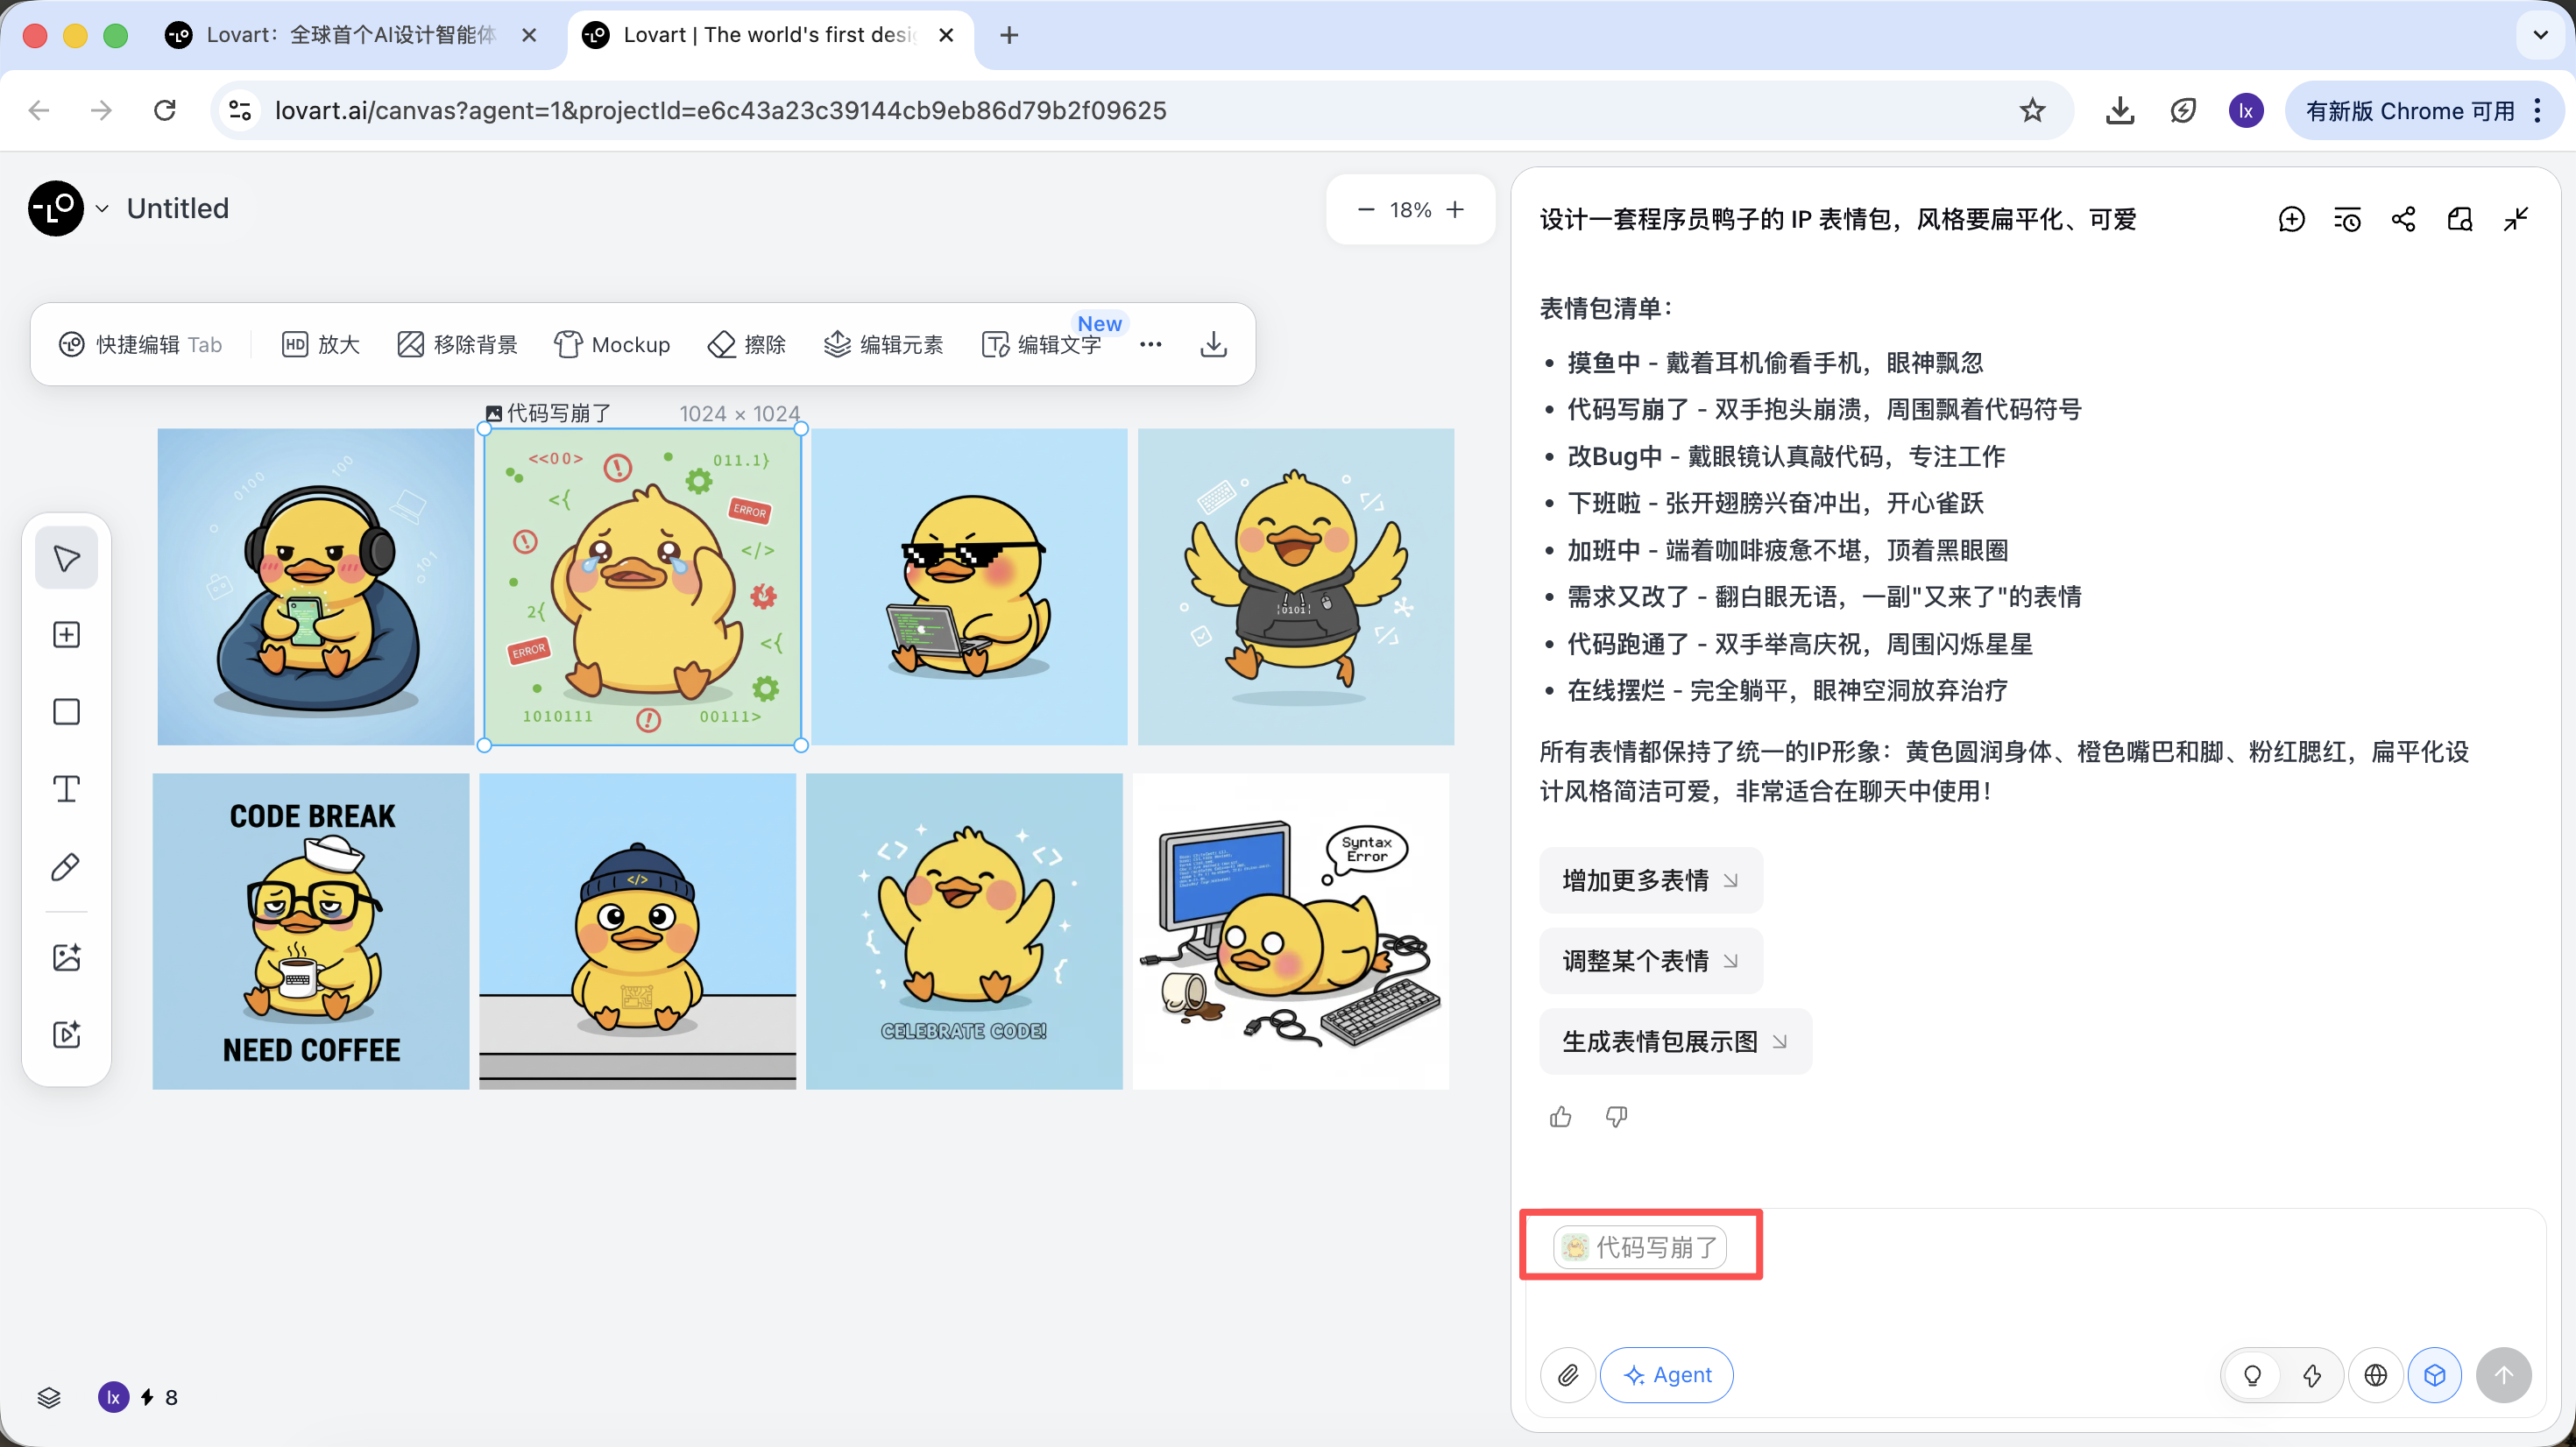
Partial Reference / Multi-Image Integration
Besides using an entire image as a reference, Lovart also supports:
- Selecting only a partial area of an image (for example, only referencing the hat or expression)
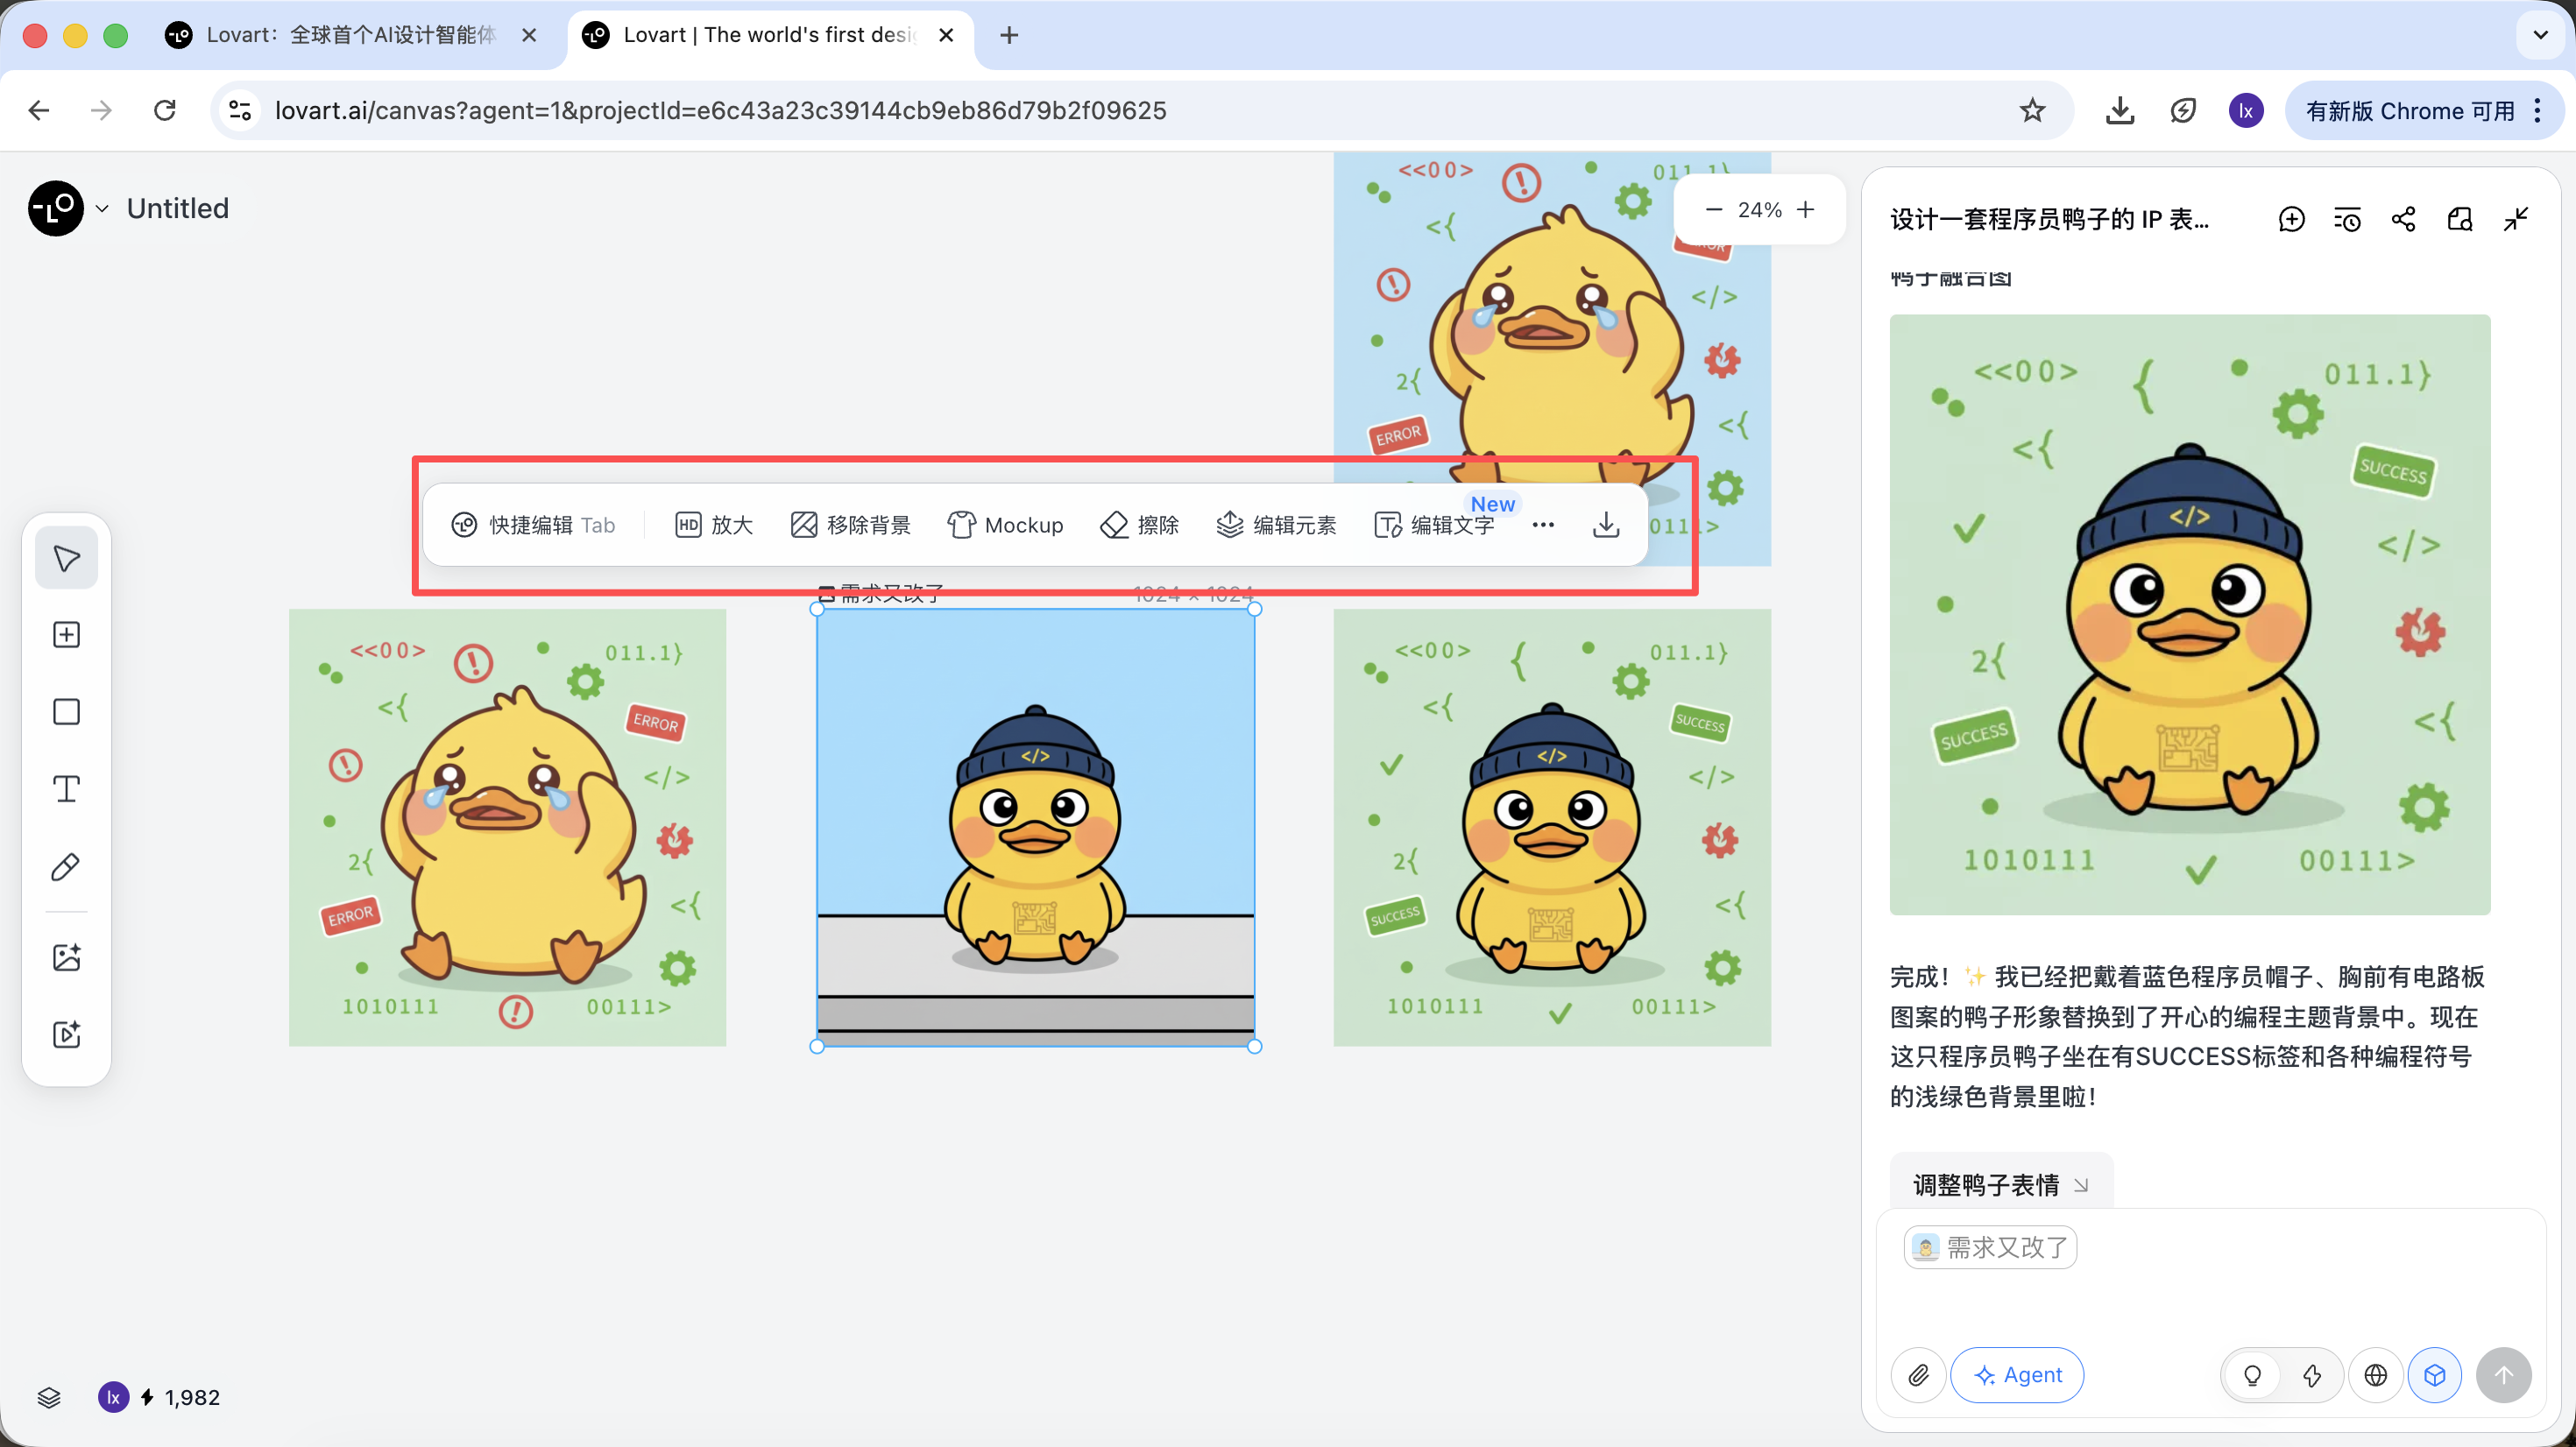
Click the tab bar on the left side of the canvas area, select the "Mark" button, and mark the target area on the image. This content will automatically sync to the conversation box. For example, here we can choose to change the background color.
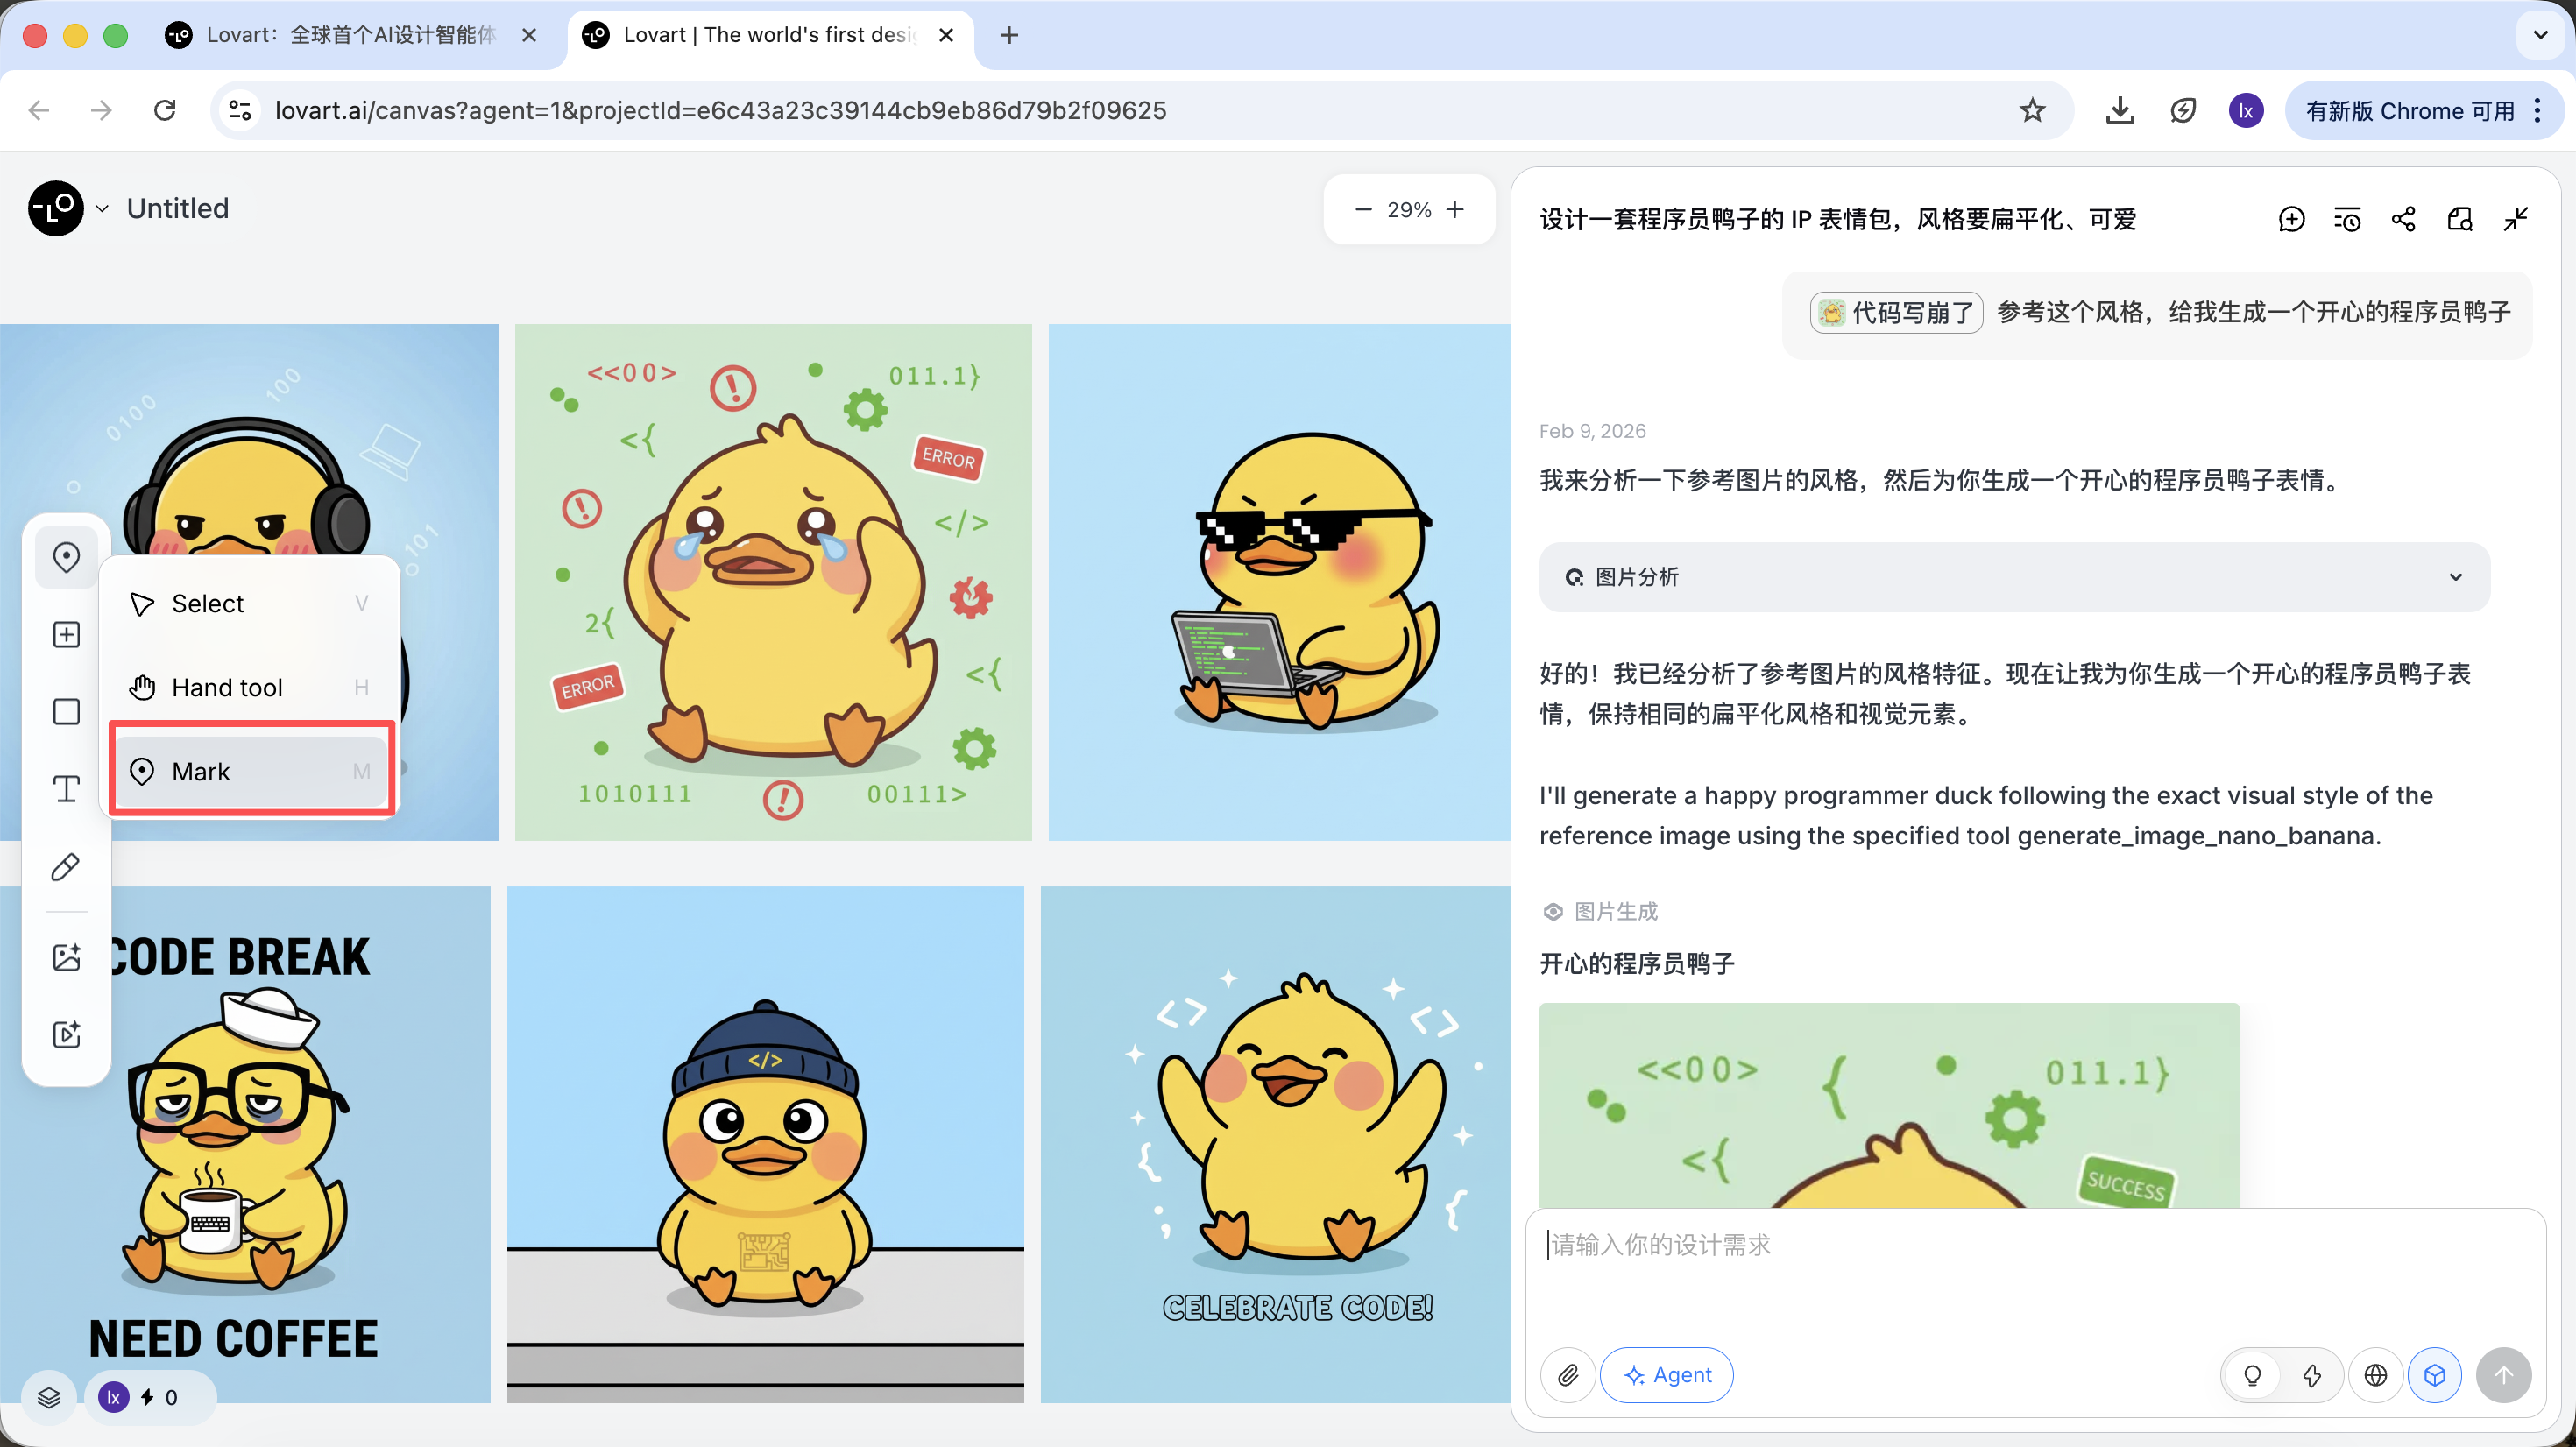
You can see that the newly generated image only changed the background color, which is consistent with our input requirement.
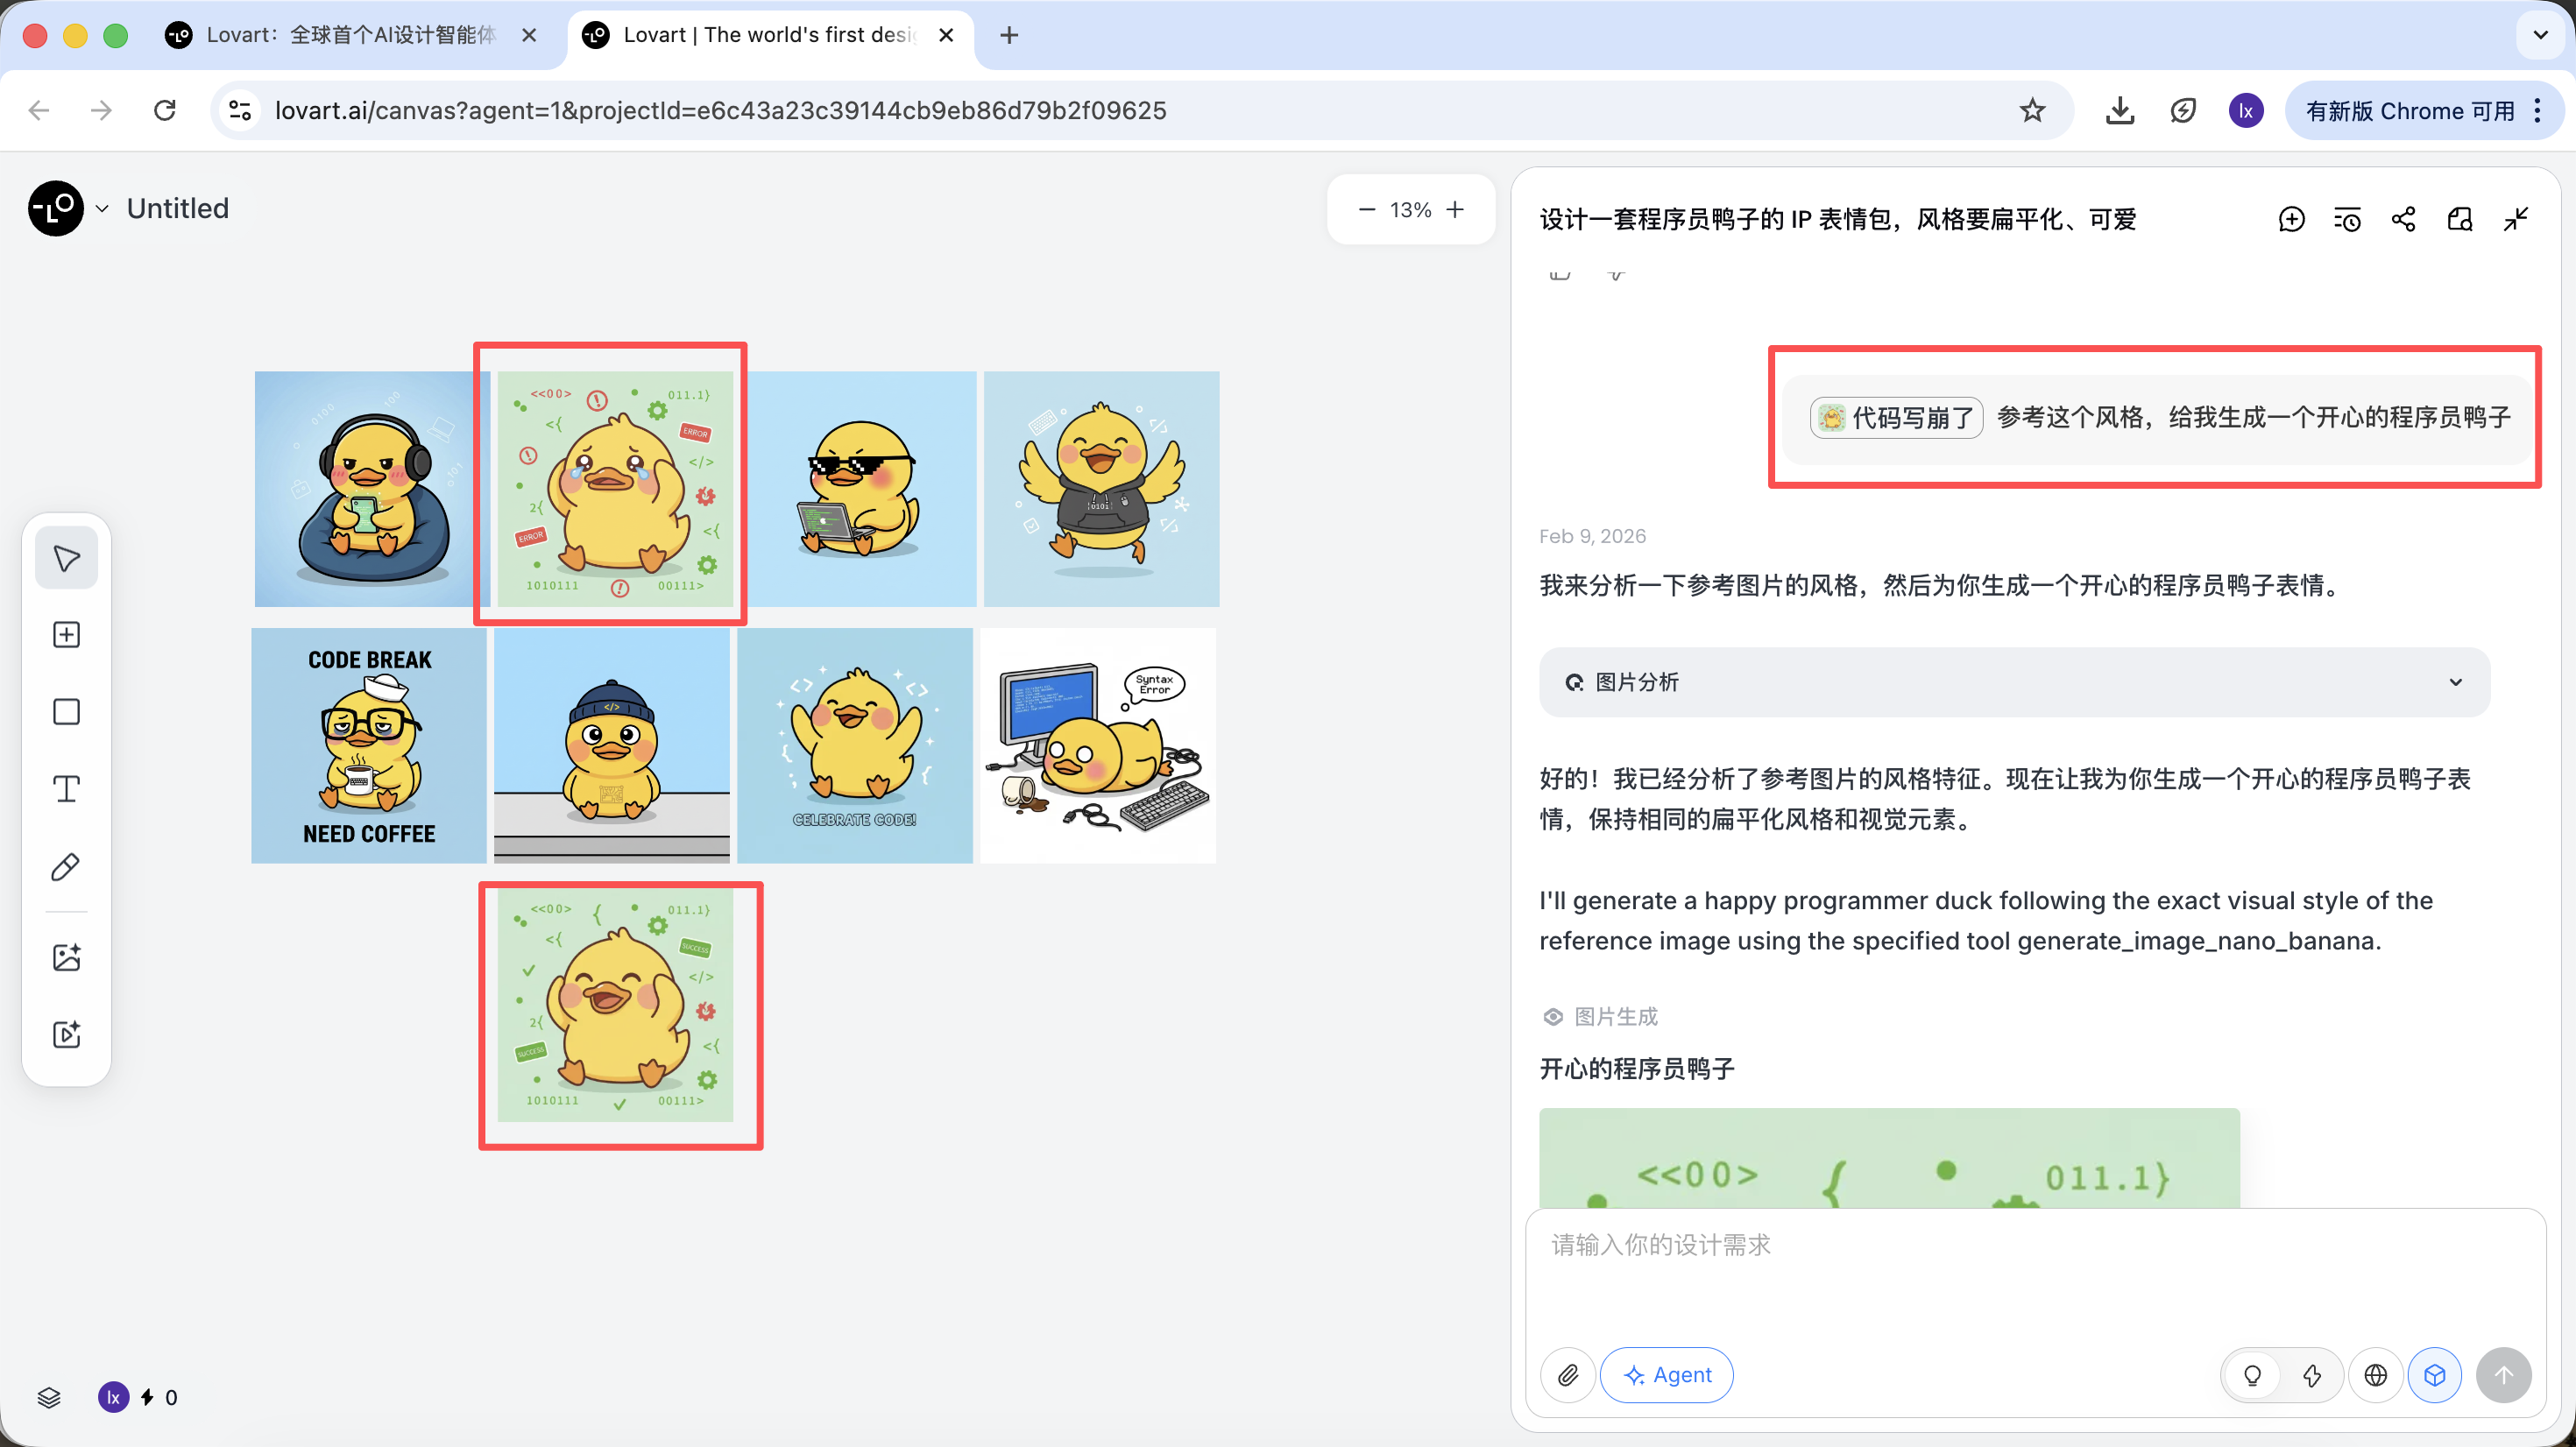
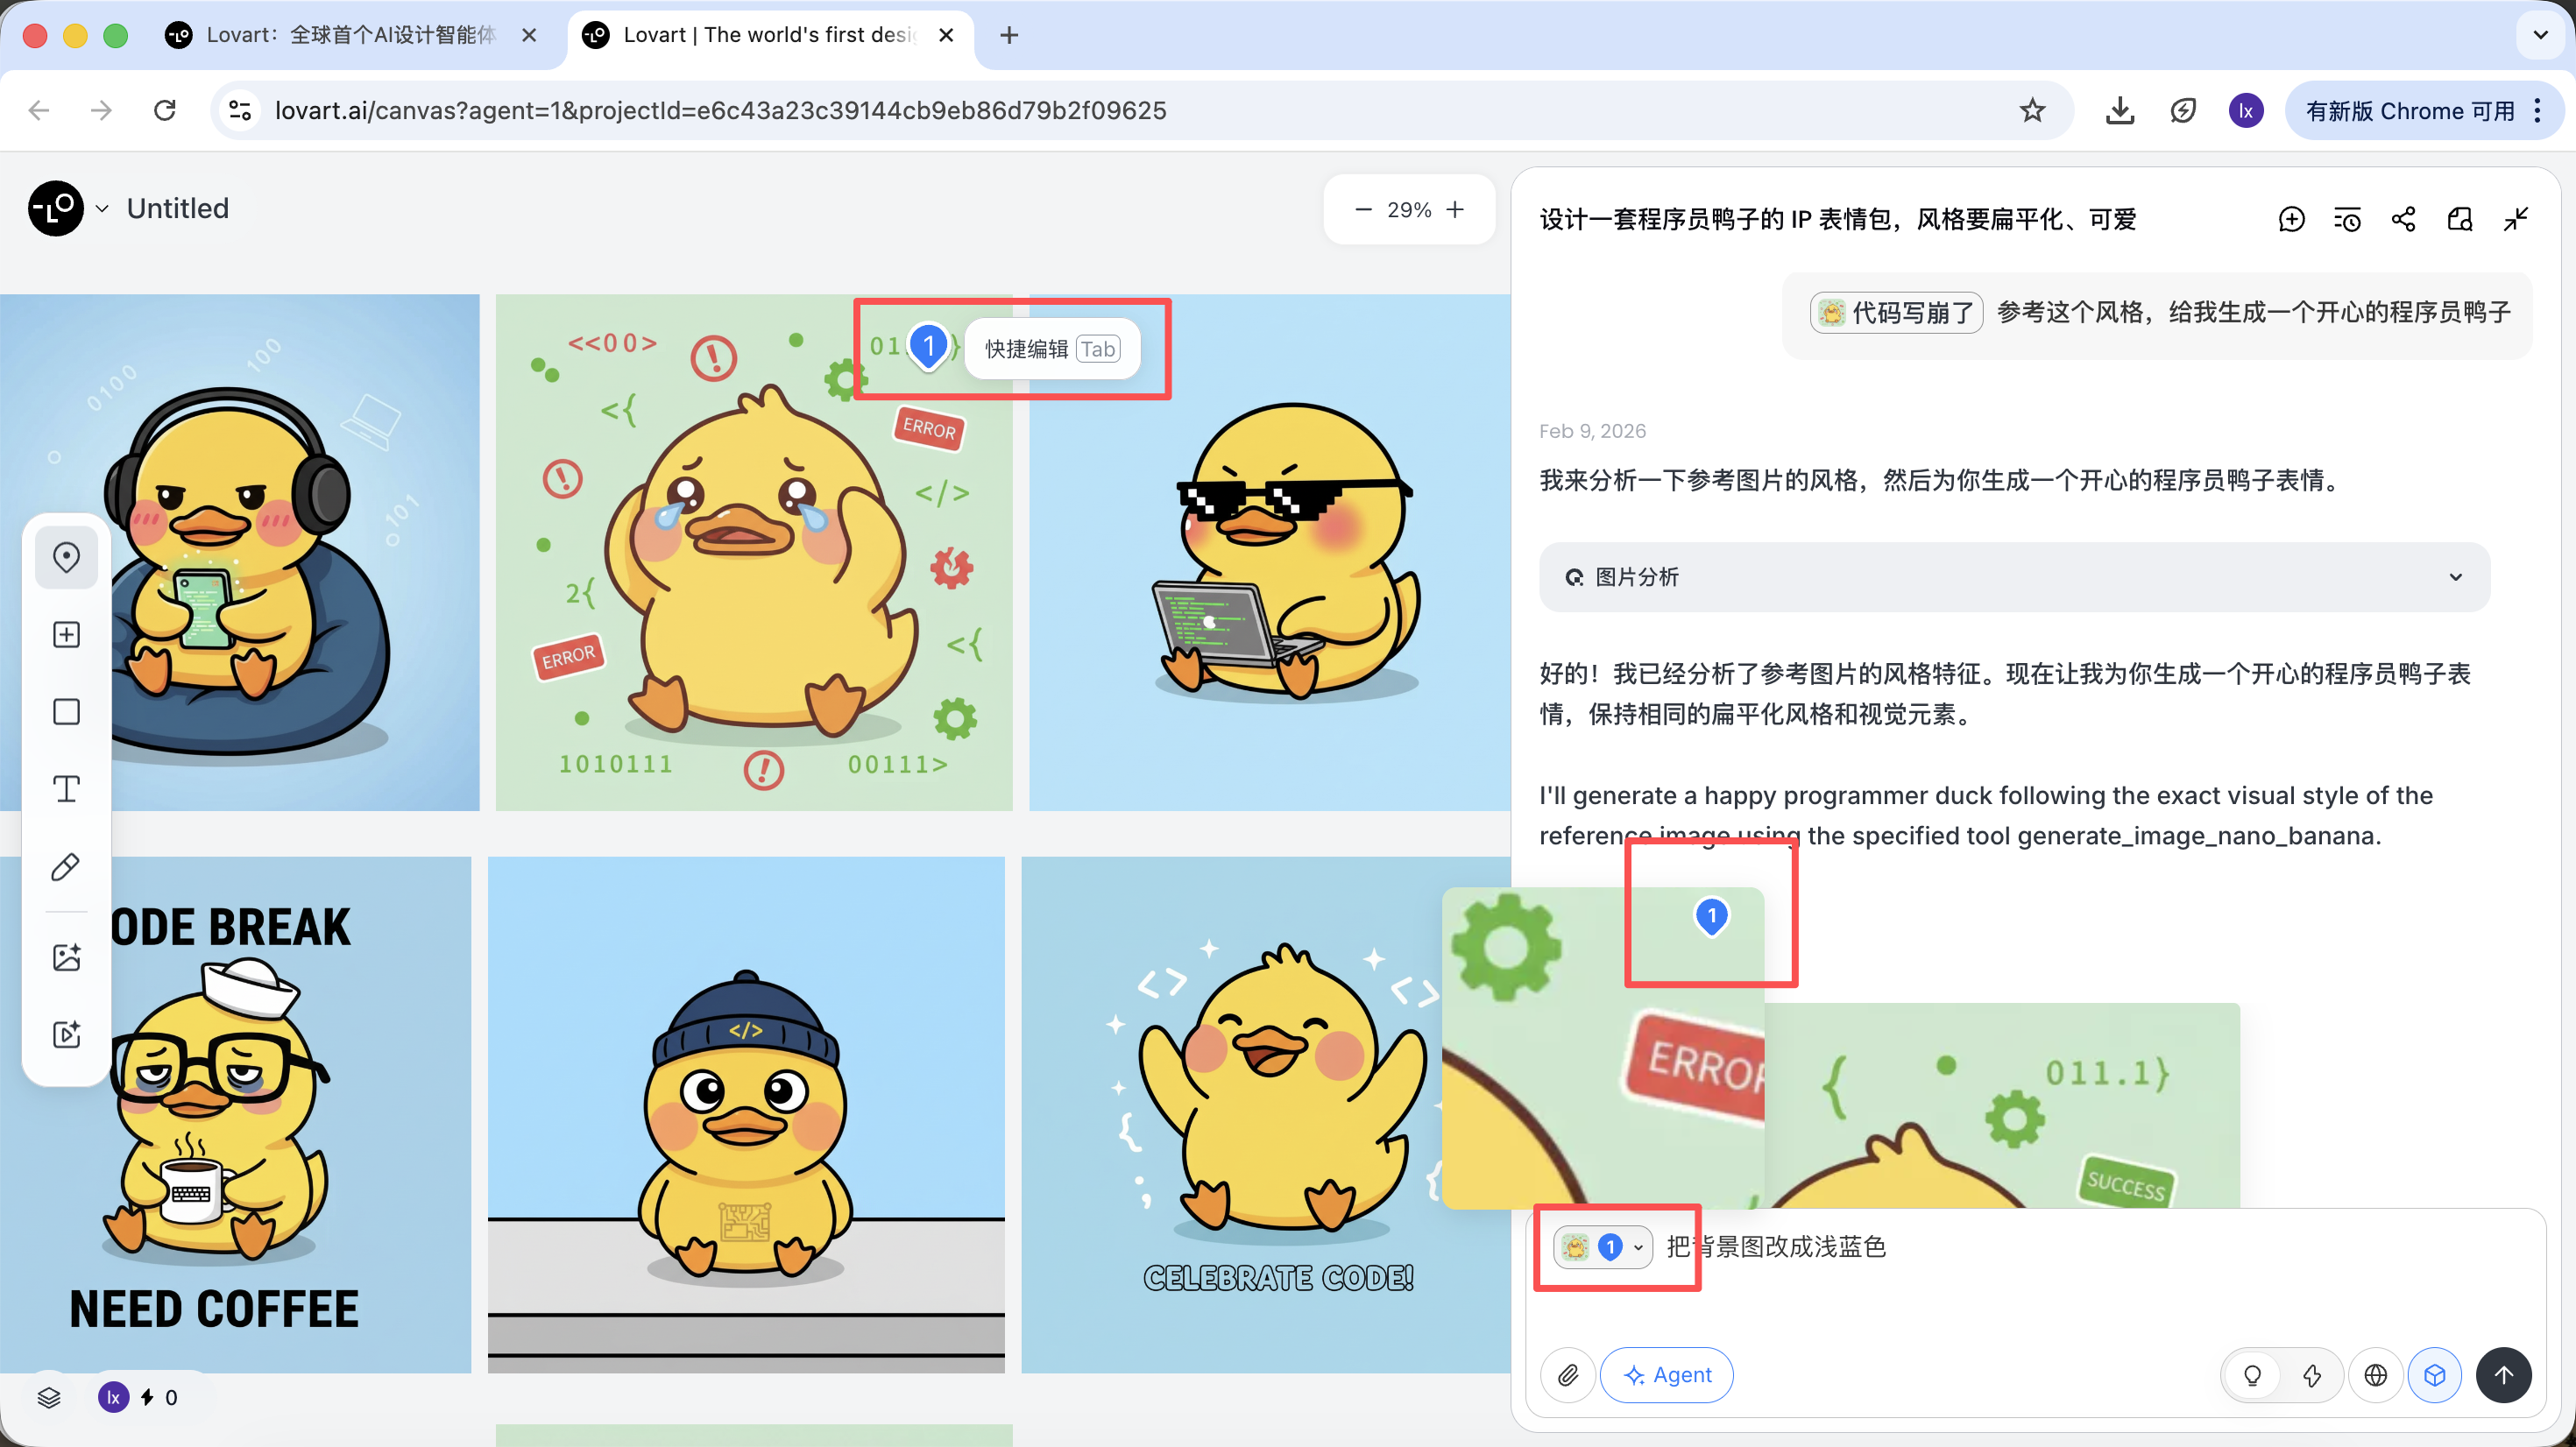
- Referencing sub-elements from multiple images separately, then combining them to generate new results
For example: you can keep the character from image A as the main subject, while only replacing the hat with the style from image B. The Agent will automatically integrate these visual constraints in the background.
Taking the programmer duck as an example, we can choose to keep the duck character from the first image and replace it as the main subject element in the second image.

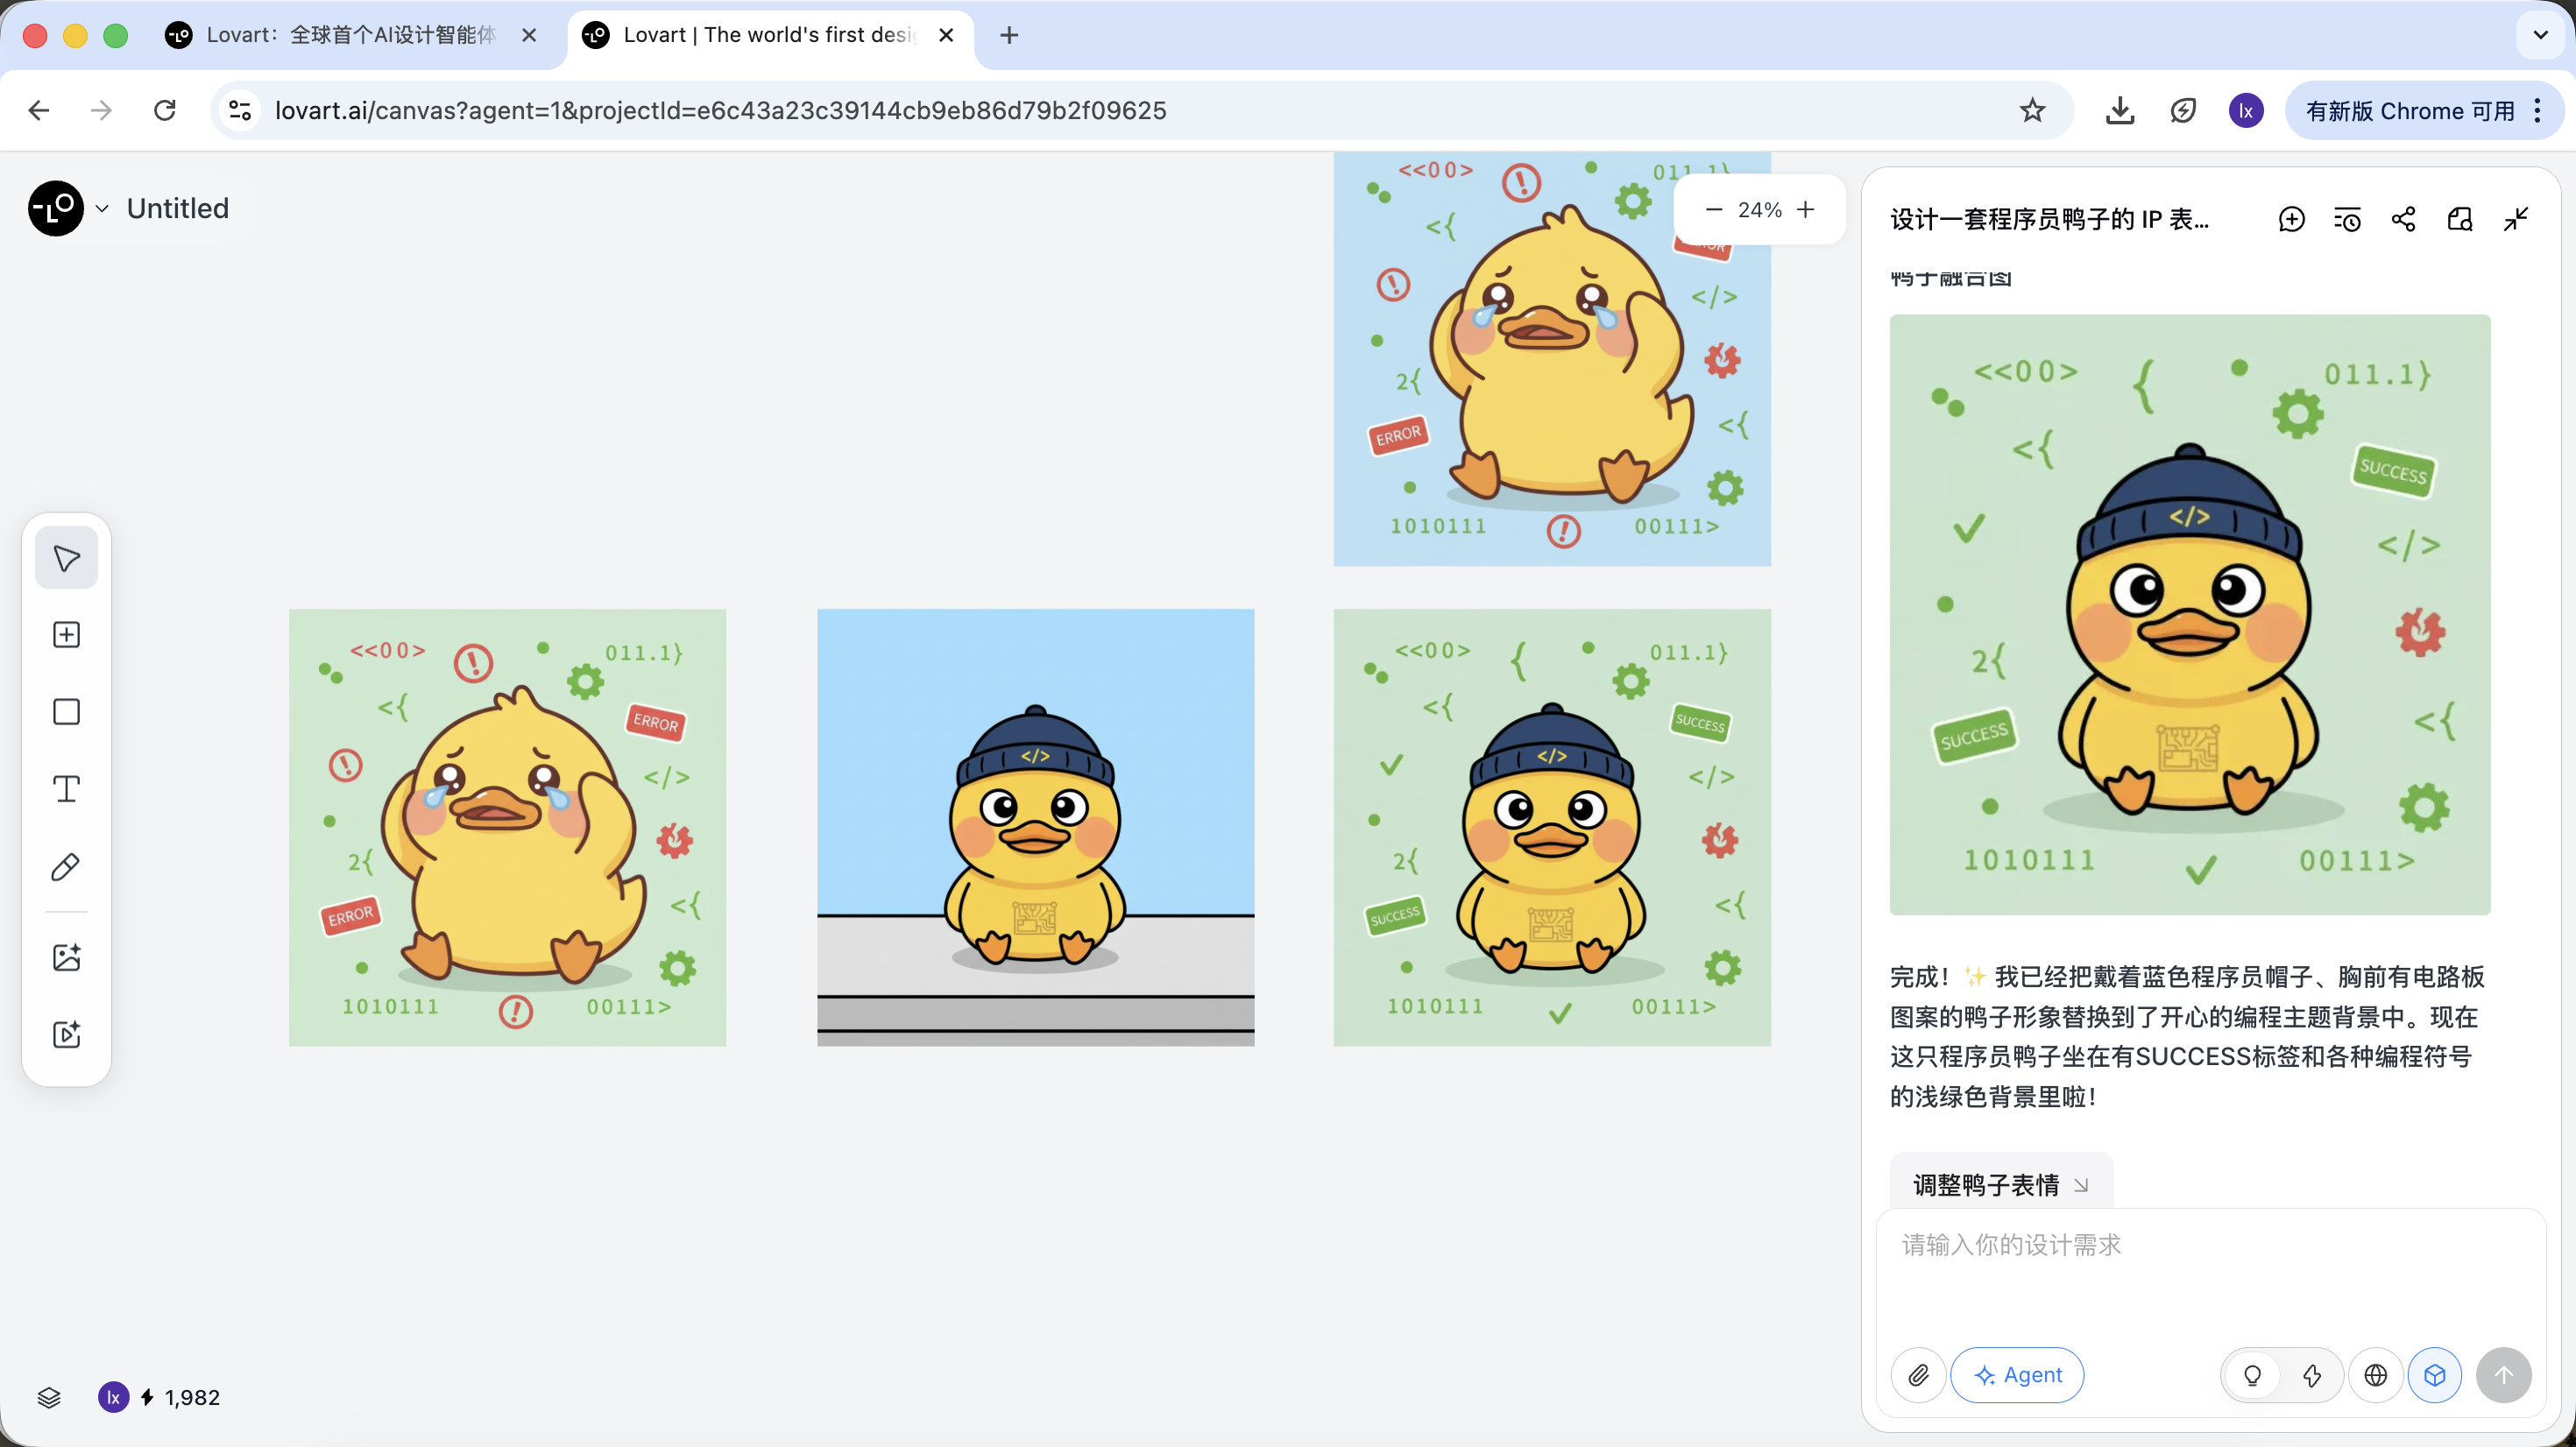
The final effect is quite remarkable. You can also try other combinations!
Phase Three: Delivery (Agent's Tool Calling)
After generation is complete, you can directly perform: upscale, remove background, erase, and other operations.
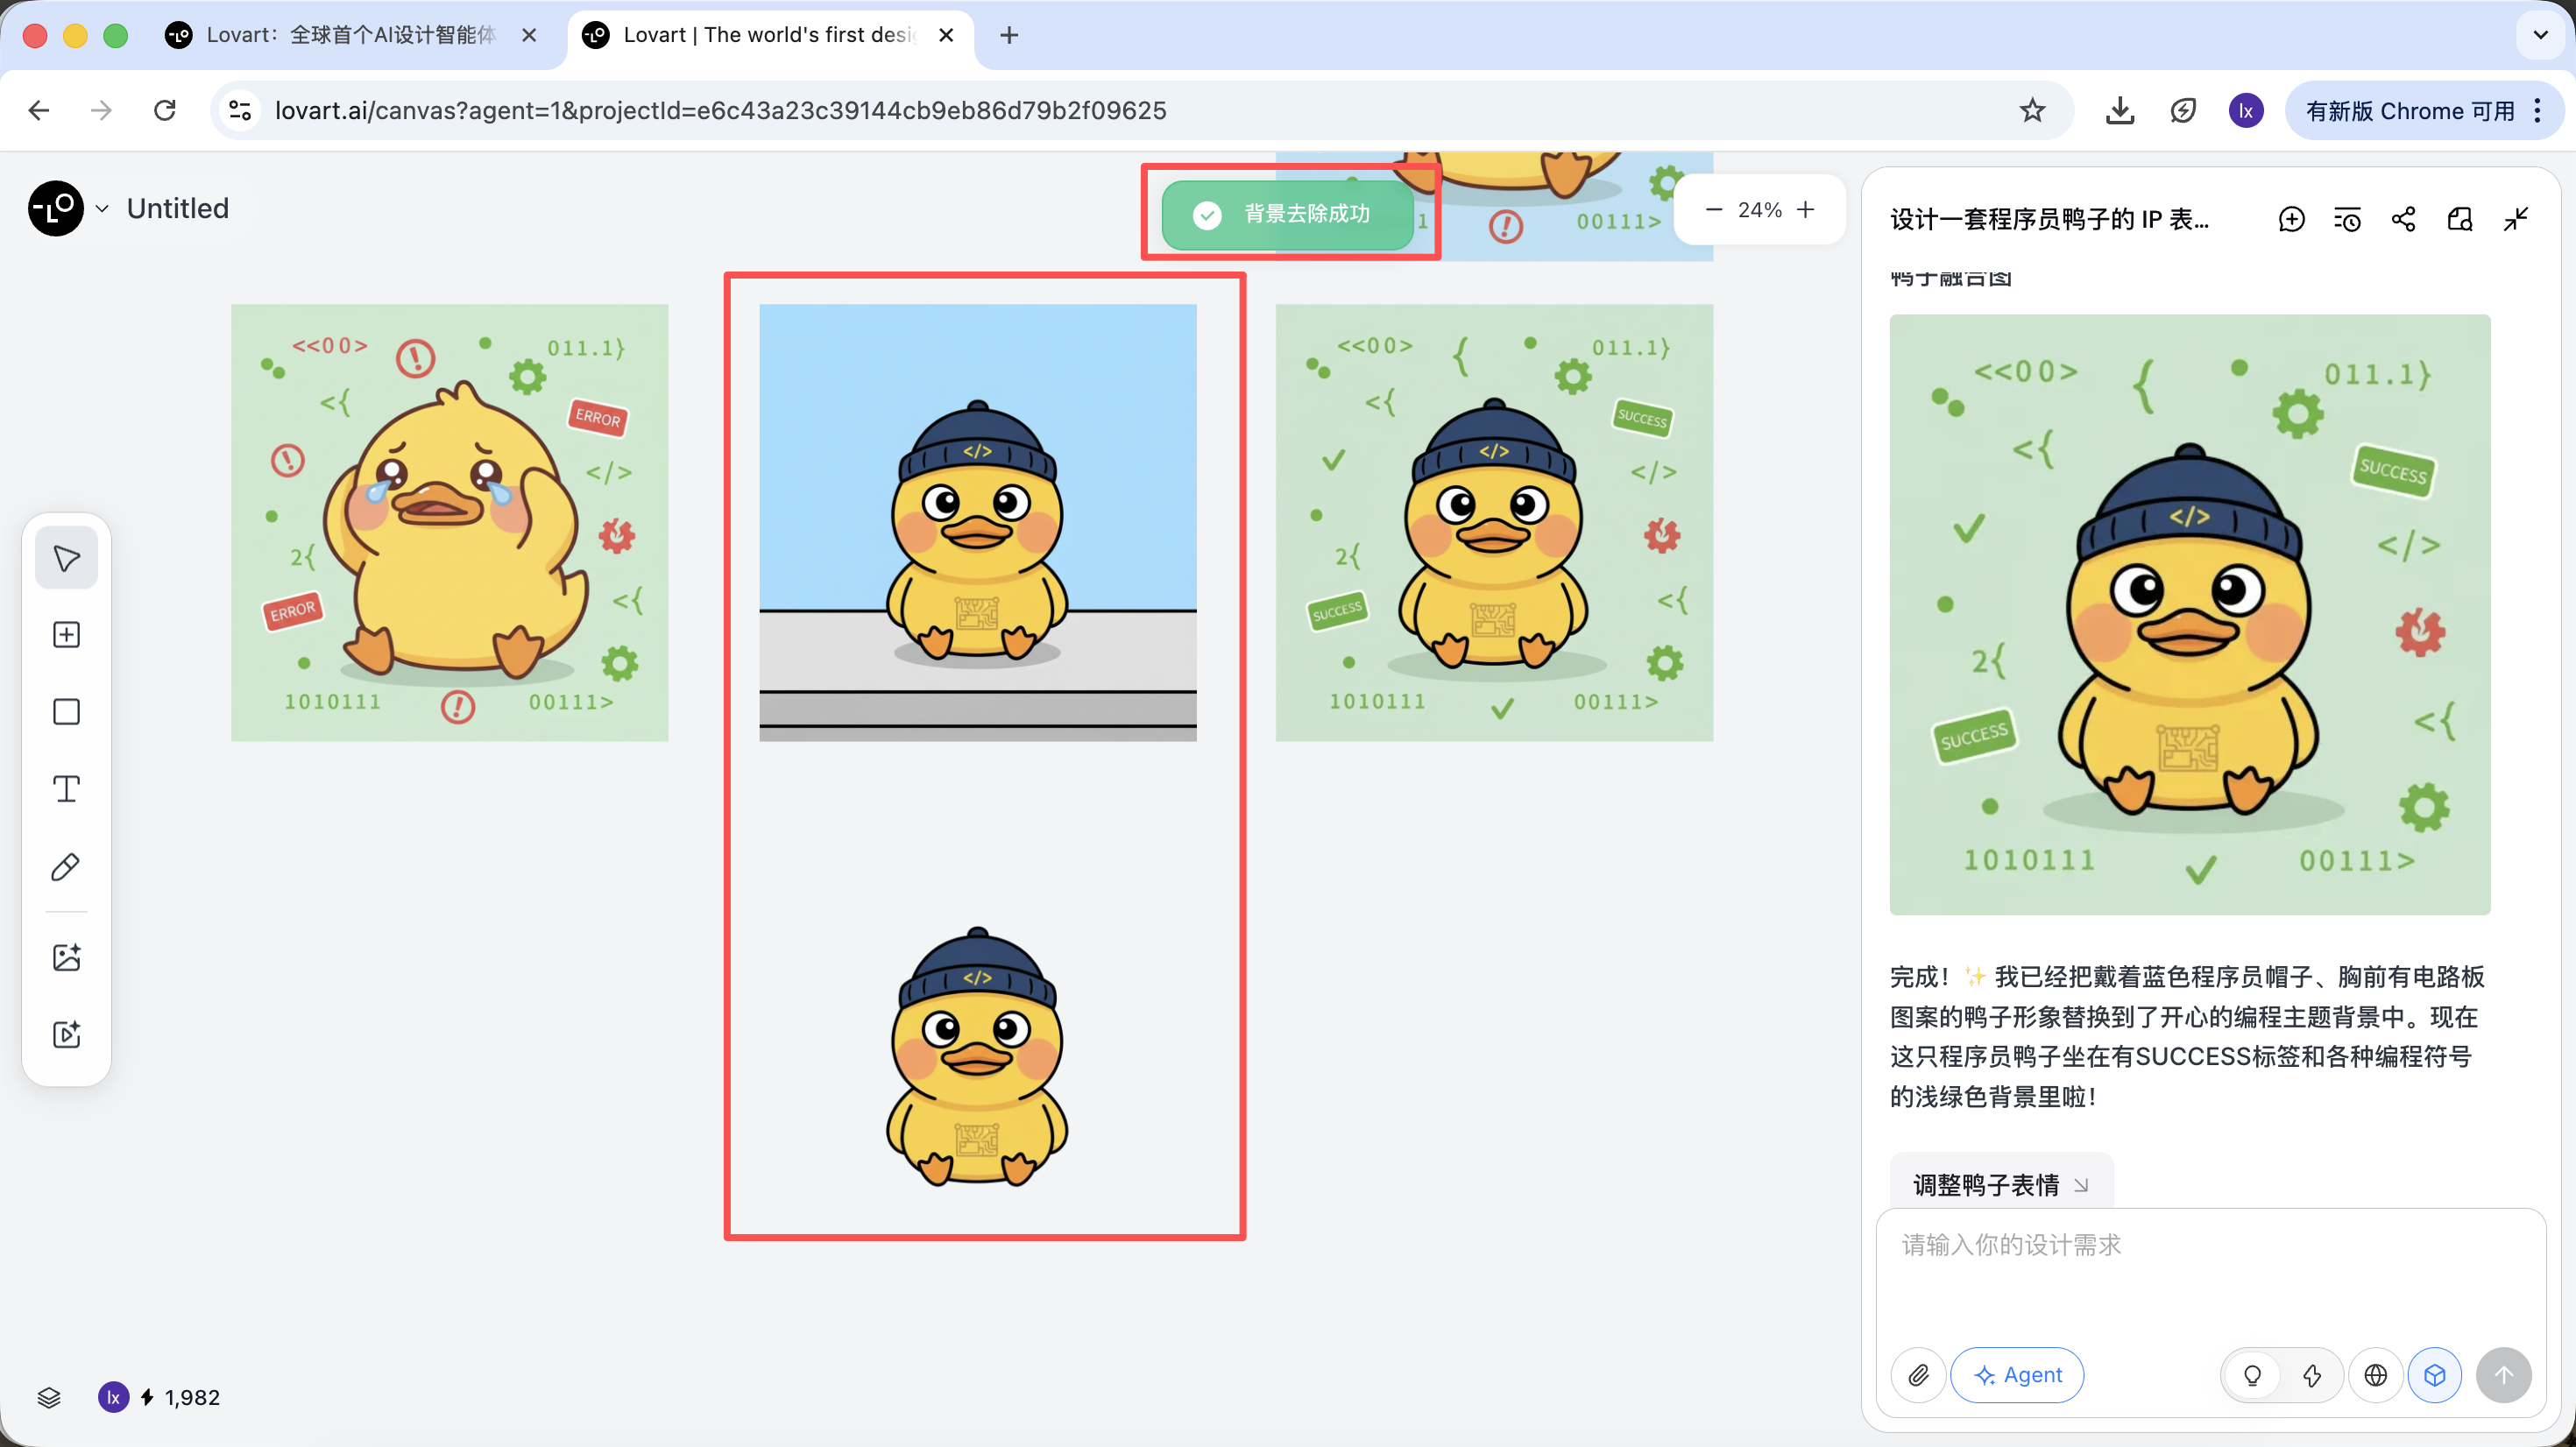
These are not simple filters — they are results from the Agent automatically orchestrating different tools.
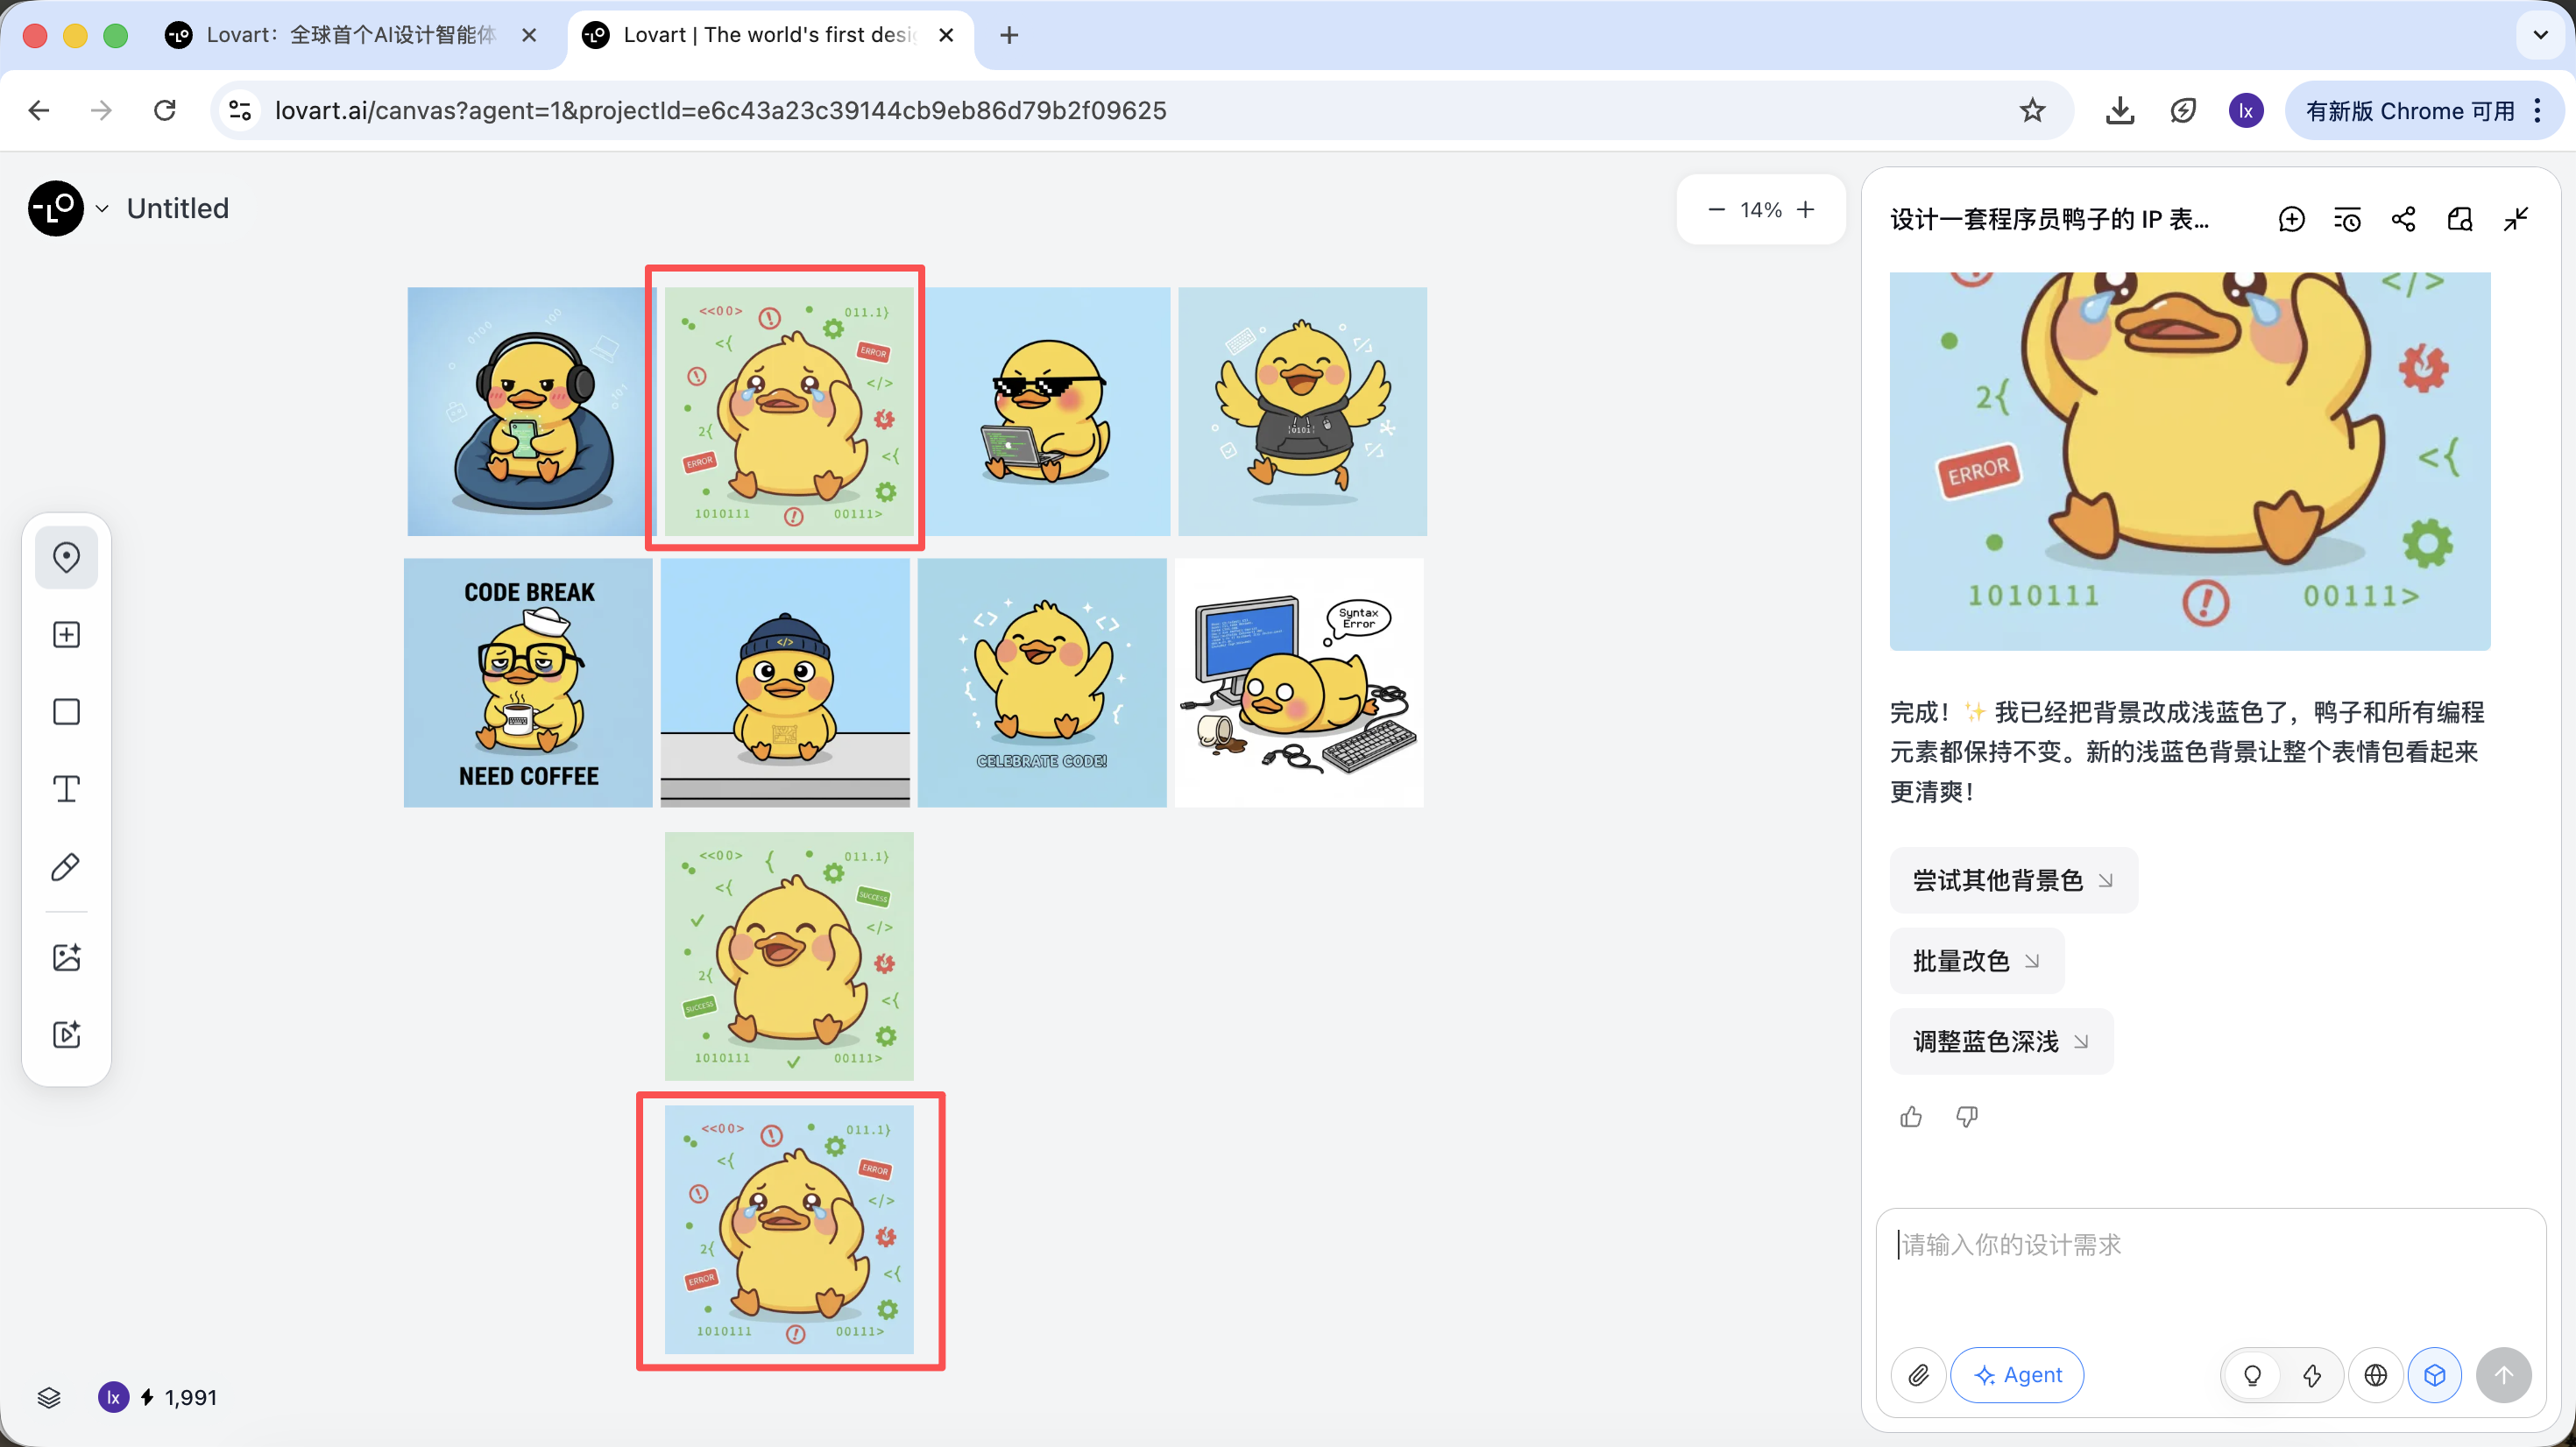
Once the base style is determined, you can very quickly generate a series of sticker pack images.
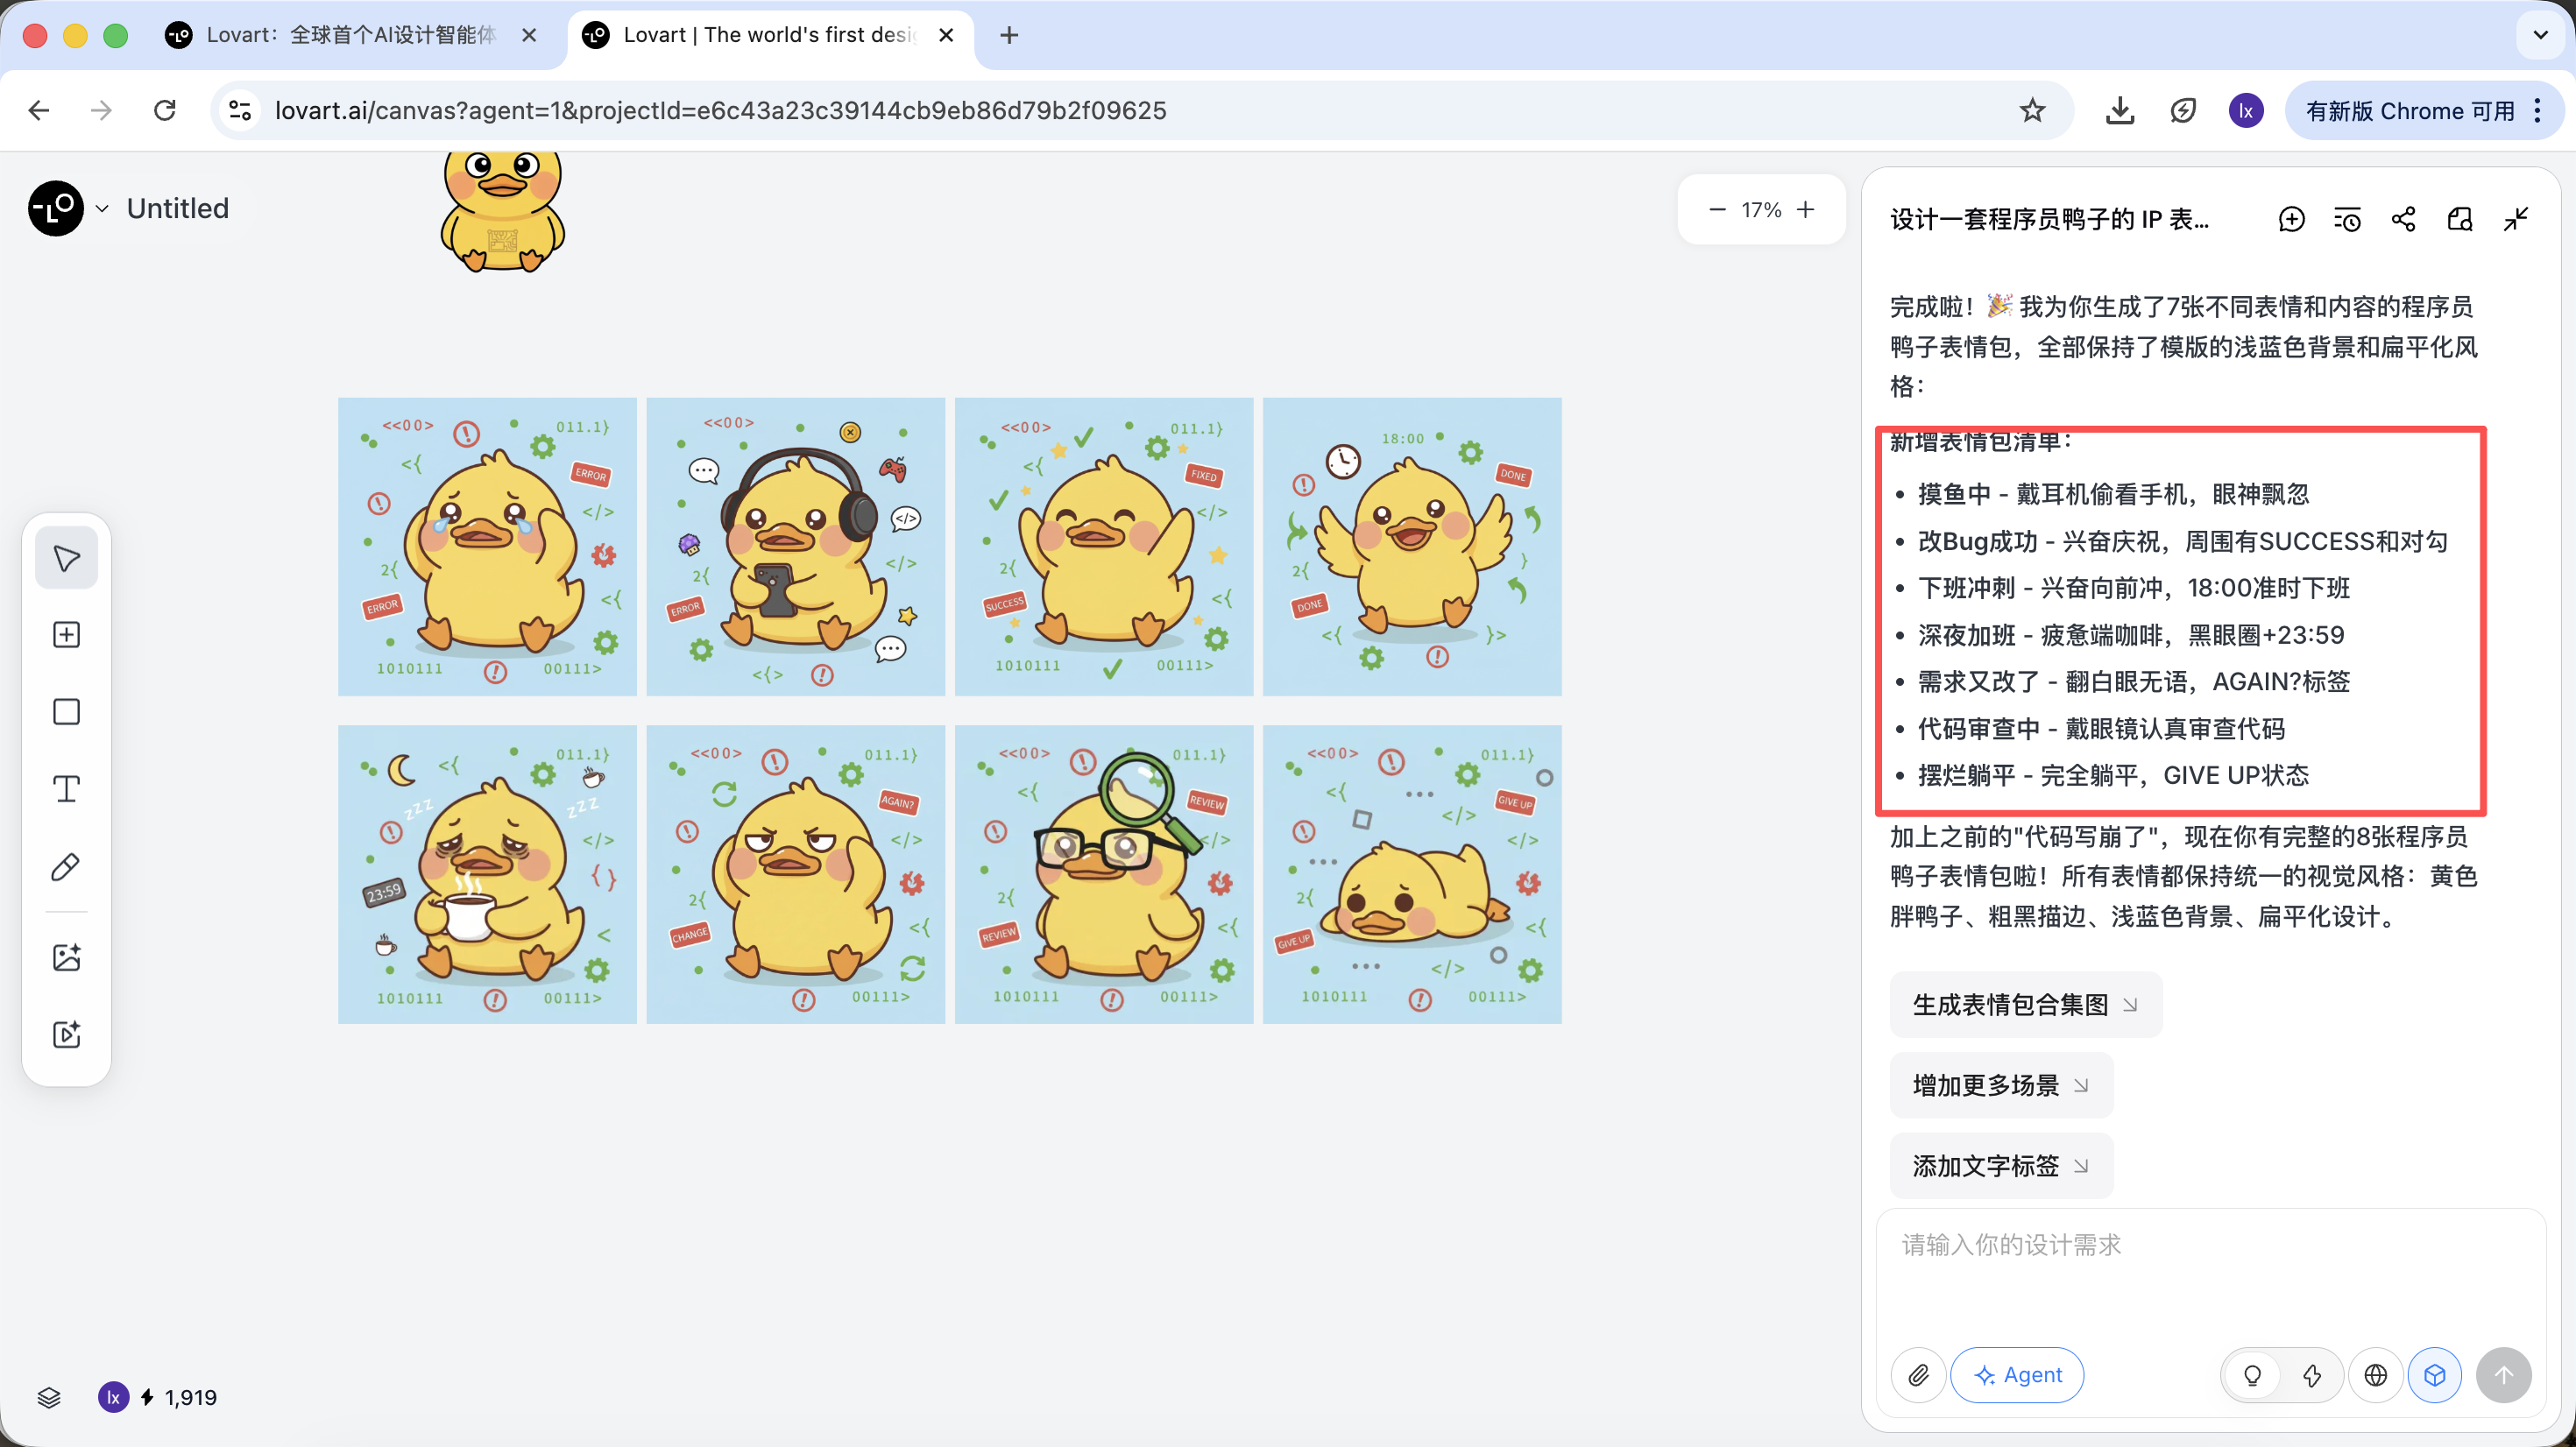
What we ultimately get are production-ready assets that can be directly delivered, not just a display image.
2.3 Usage and Pricing Information
Lovart uses a subscription-based pricing model, where different plans correspond to different usage quotas and feature permissions. Please refer to the official website for specific details.
This tutorial does not recommend or compare any specific plans; if you have actual usage needs, you can choose to upgrade based on your personal situation. Currently, payment via Alipay and other methods is supported.
Summary
Lovart doesn't replace the underlying model — rather, through its Agent mechanism, it upgrades image generation from "single execution" to "continuous workflow."
When tasks start involving planning, consistency, and delivery, the advantages of such tools become very apparent.
Chapter 3: Build Your Own Smart Drawing Assistant
Besides directly using Lovart, we can also implement a simplified version of a drawing assistant ourselves.
This chapter uses "automatic article illustration" as an example, starting from a real problem and gradually building an Agent with thinking capabilities.
3.1 The Problem: Why Doesn't Sending Articles Directly to Image Models Work?
Directly inputting a long article into NanoBanana and asking for an illustration usually doesn't produce ideal results. The reason isn't that the model "can't draw well," but rather that it's not good at understanding long texts.
Image generation models are better suited for handling short, clear visual descriptions. When the input becomes an article containing structure, key points, and contextual relationships, the model can't determine which content truly needs to be expressed in the image. This often leads to results that deviate from the main topic or only capture scattered details, lacking overall summarization ability.
Essentially, image models only have "execution" capability but lack the process of analyzing and making trade-offs about text.
3.2 Solution: Use an Agent to Separate "Understanding" from "Execution"
The key to solving this problem is not more complex prompts, but rather thinking things through before drawing. Therefore, we introduce an independent "thinking layer" into the generation process and use it to build the simplest usable Agent.
This Agent has only one core goal: make the final generated image as close as possible to the user's true expressive intent.
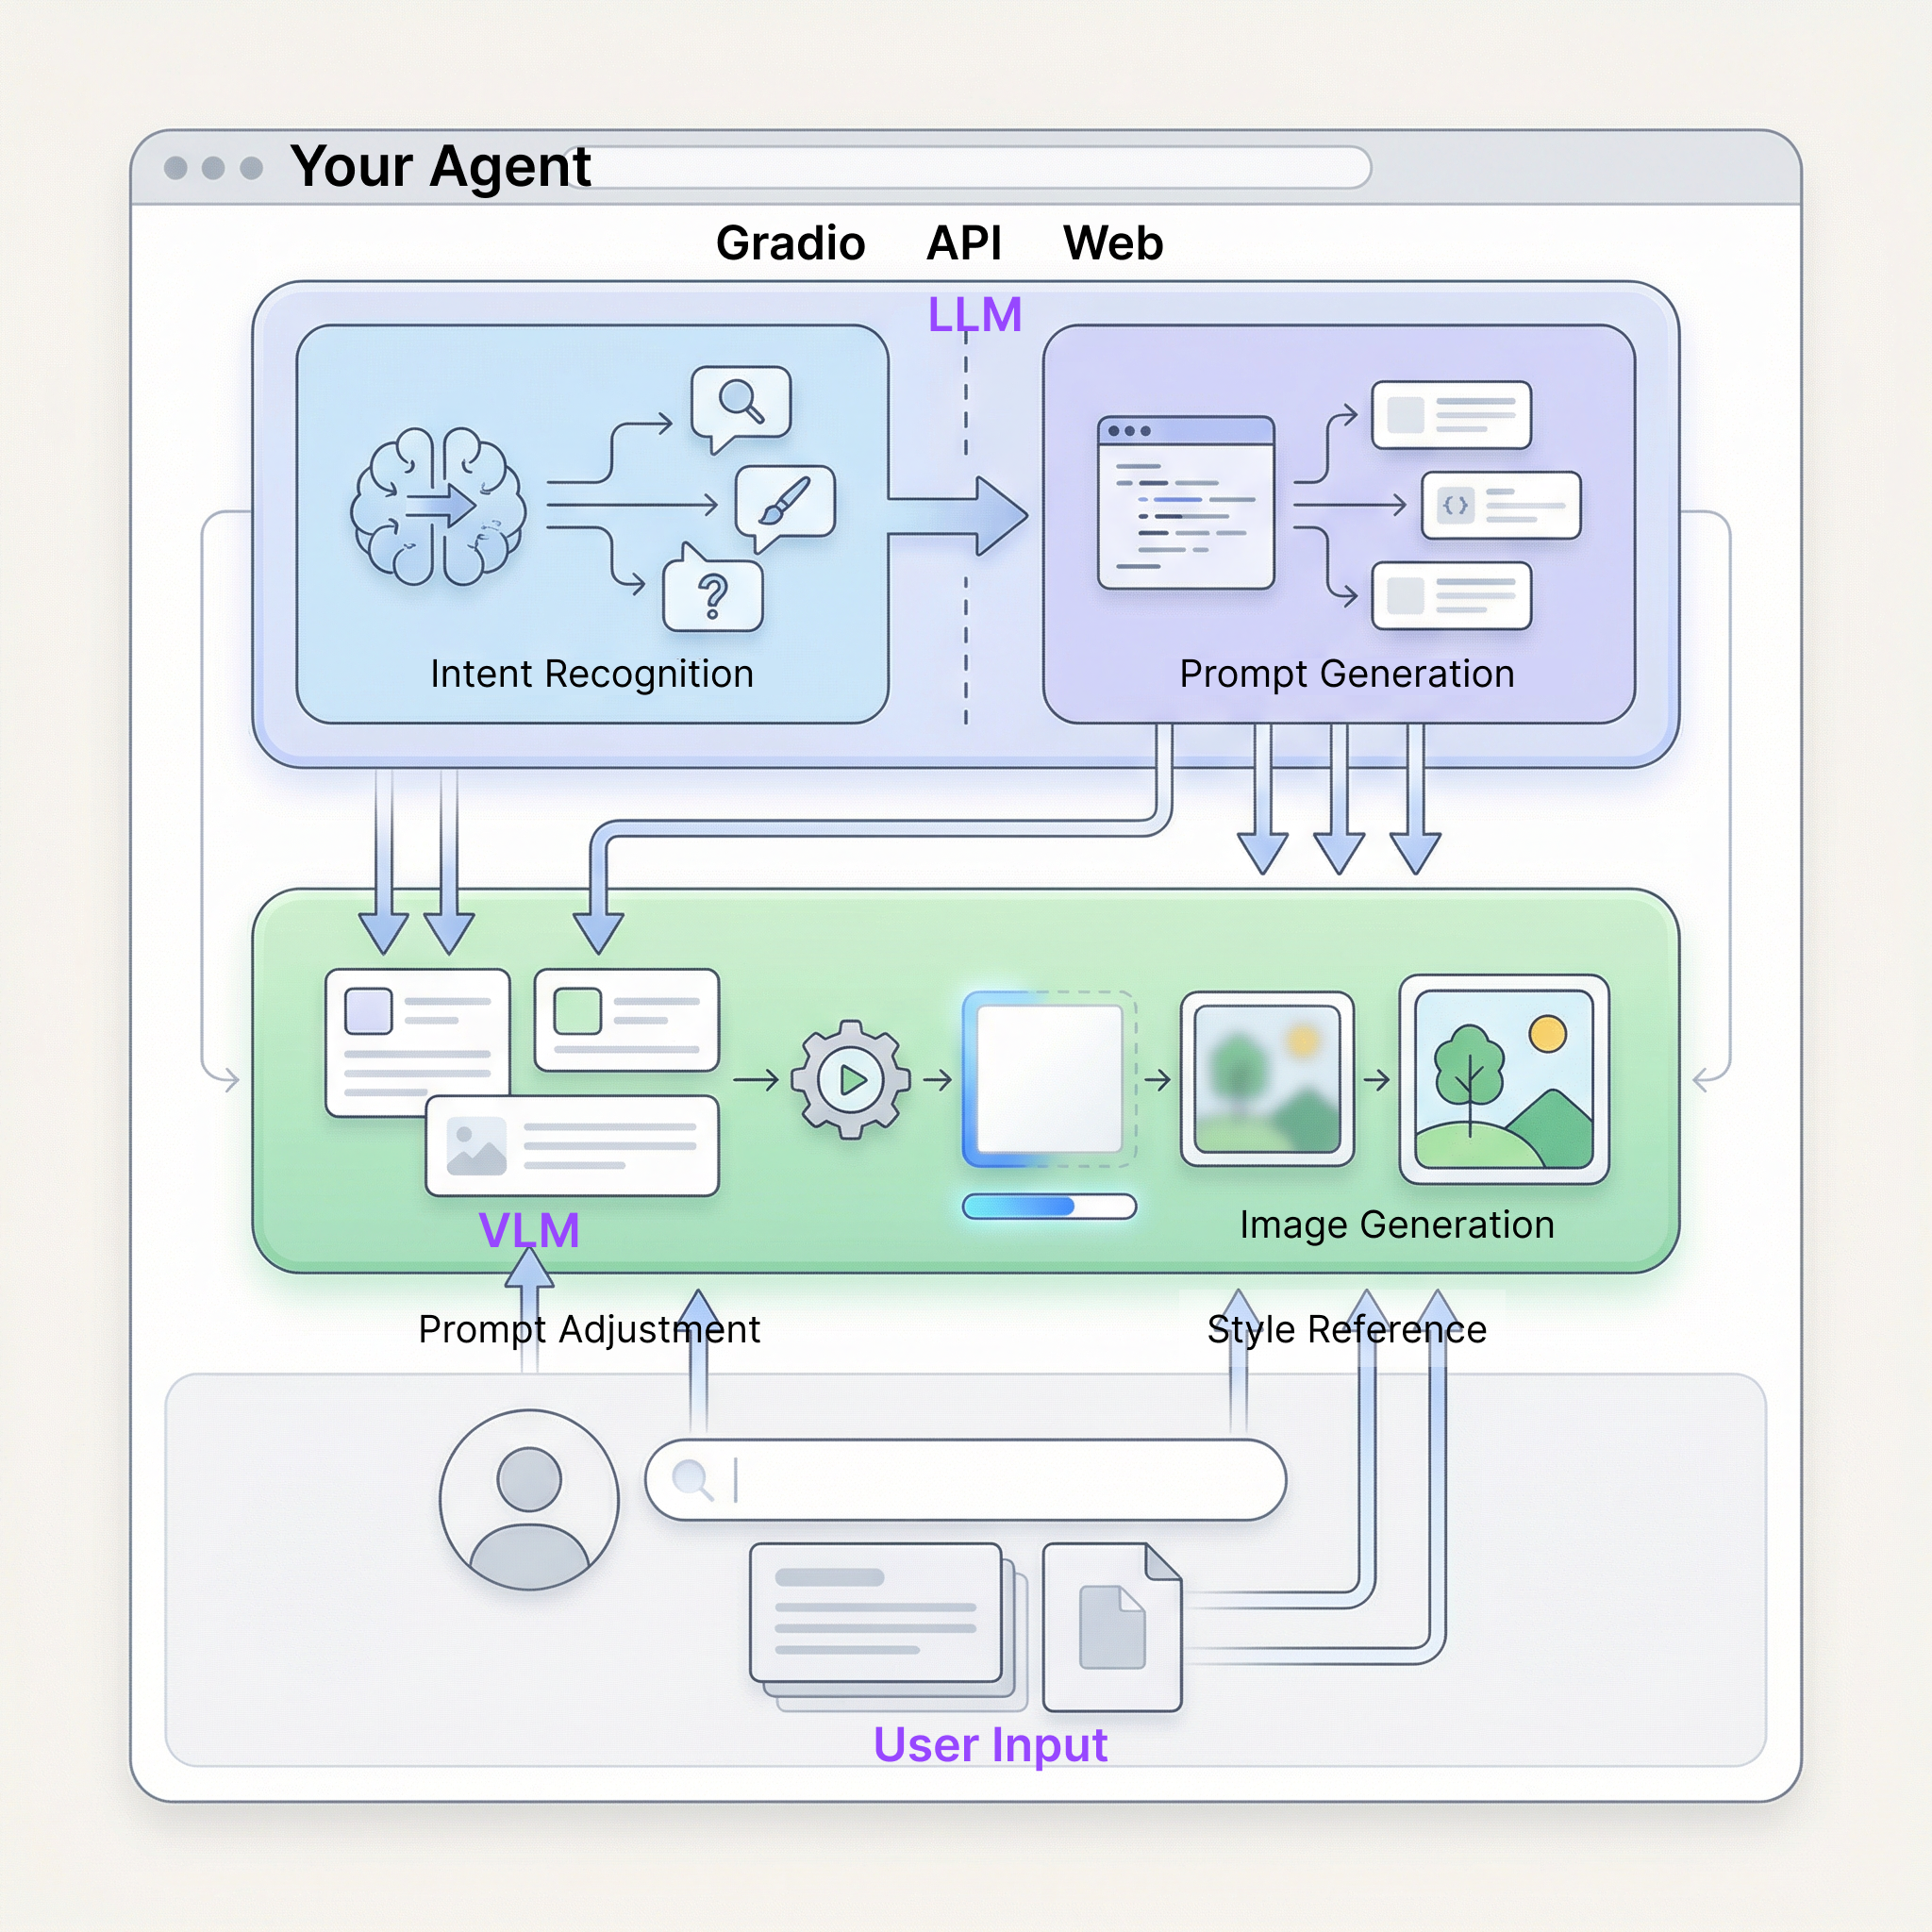
The overall process can be summarized as: Long text input → Language model understanding and judgment → Generate appropriate visual prompts → Image model executes generation → Output image
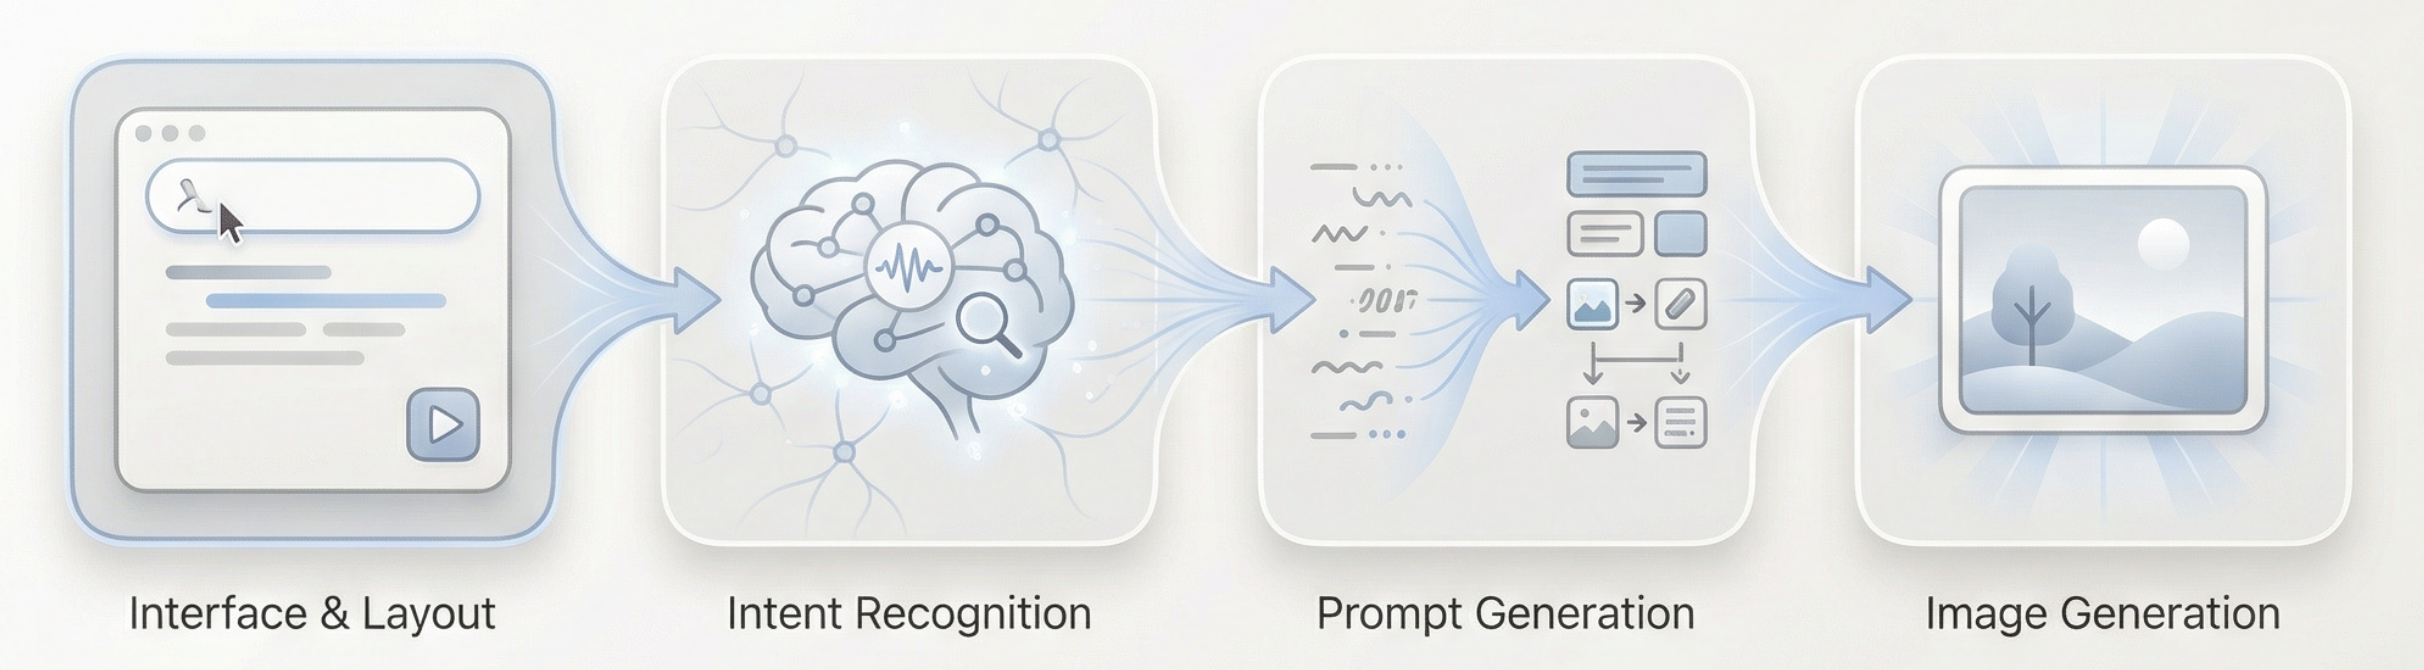
So how can the Agent we build understand the user's intent?
Here we choose to create a simplified "thinking layer" with three different intents: invalid input, direct image generation, and long text requiring understanding.
In this Agent, the division of labor among various roles can be summarized in four points:
- Language Model as the Decision Core It is responsible for understanding article content, judging user input intent, and distributing tasks to appropriate generation paths, deciding "what to do next" and how to generate image prompts.
- Image Model as the Executor The image model doesn't participate in understanding or judgment — it only receives well-organized visual instructions and focuses on completing image rendering.
- User as an Intervening Guide Besides directly inputting text, users can also manually adjust generated prompts during the process, or add reference images to assist generation, thereby guiding and fine-tuning the final result.
- Gradio and Backend API as the Overall Infrastructure They are responsible for connecting the interface, model calls, and result display, ensuring the entire Agent can run stably as a complete web application.
3.3 Preparation: Getting the APIs
Looks interesting, right! To run through the above process, we only need to prepare two types of APIs.
Hand: NanoBanana API (Image Generation)
Directly reuse the API Key and API URL already configured in Chapter 1 — no additional setup needed.
Brain: SiliconFlow API (Text Thinking)
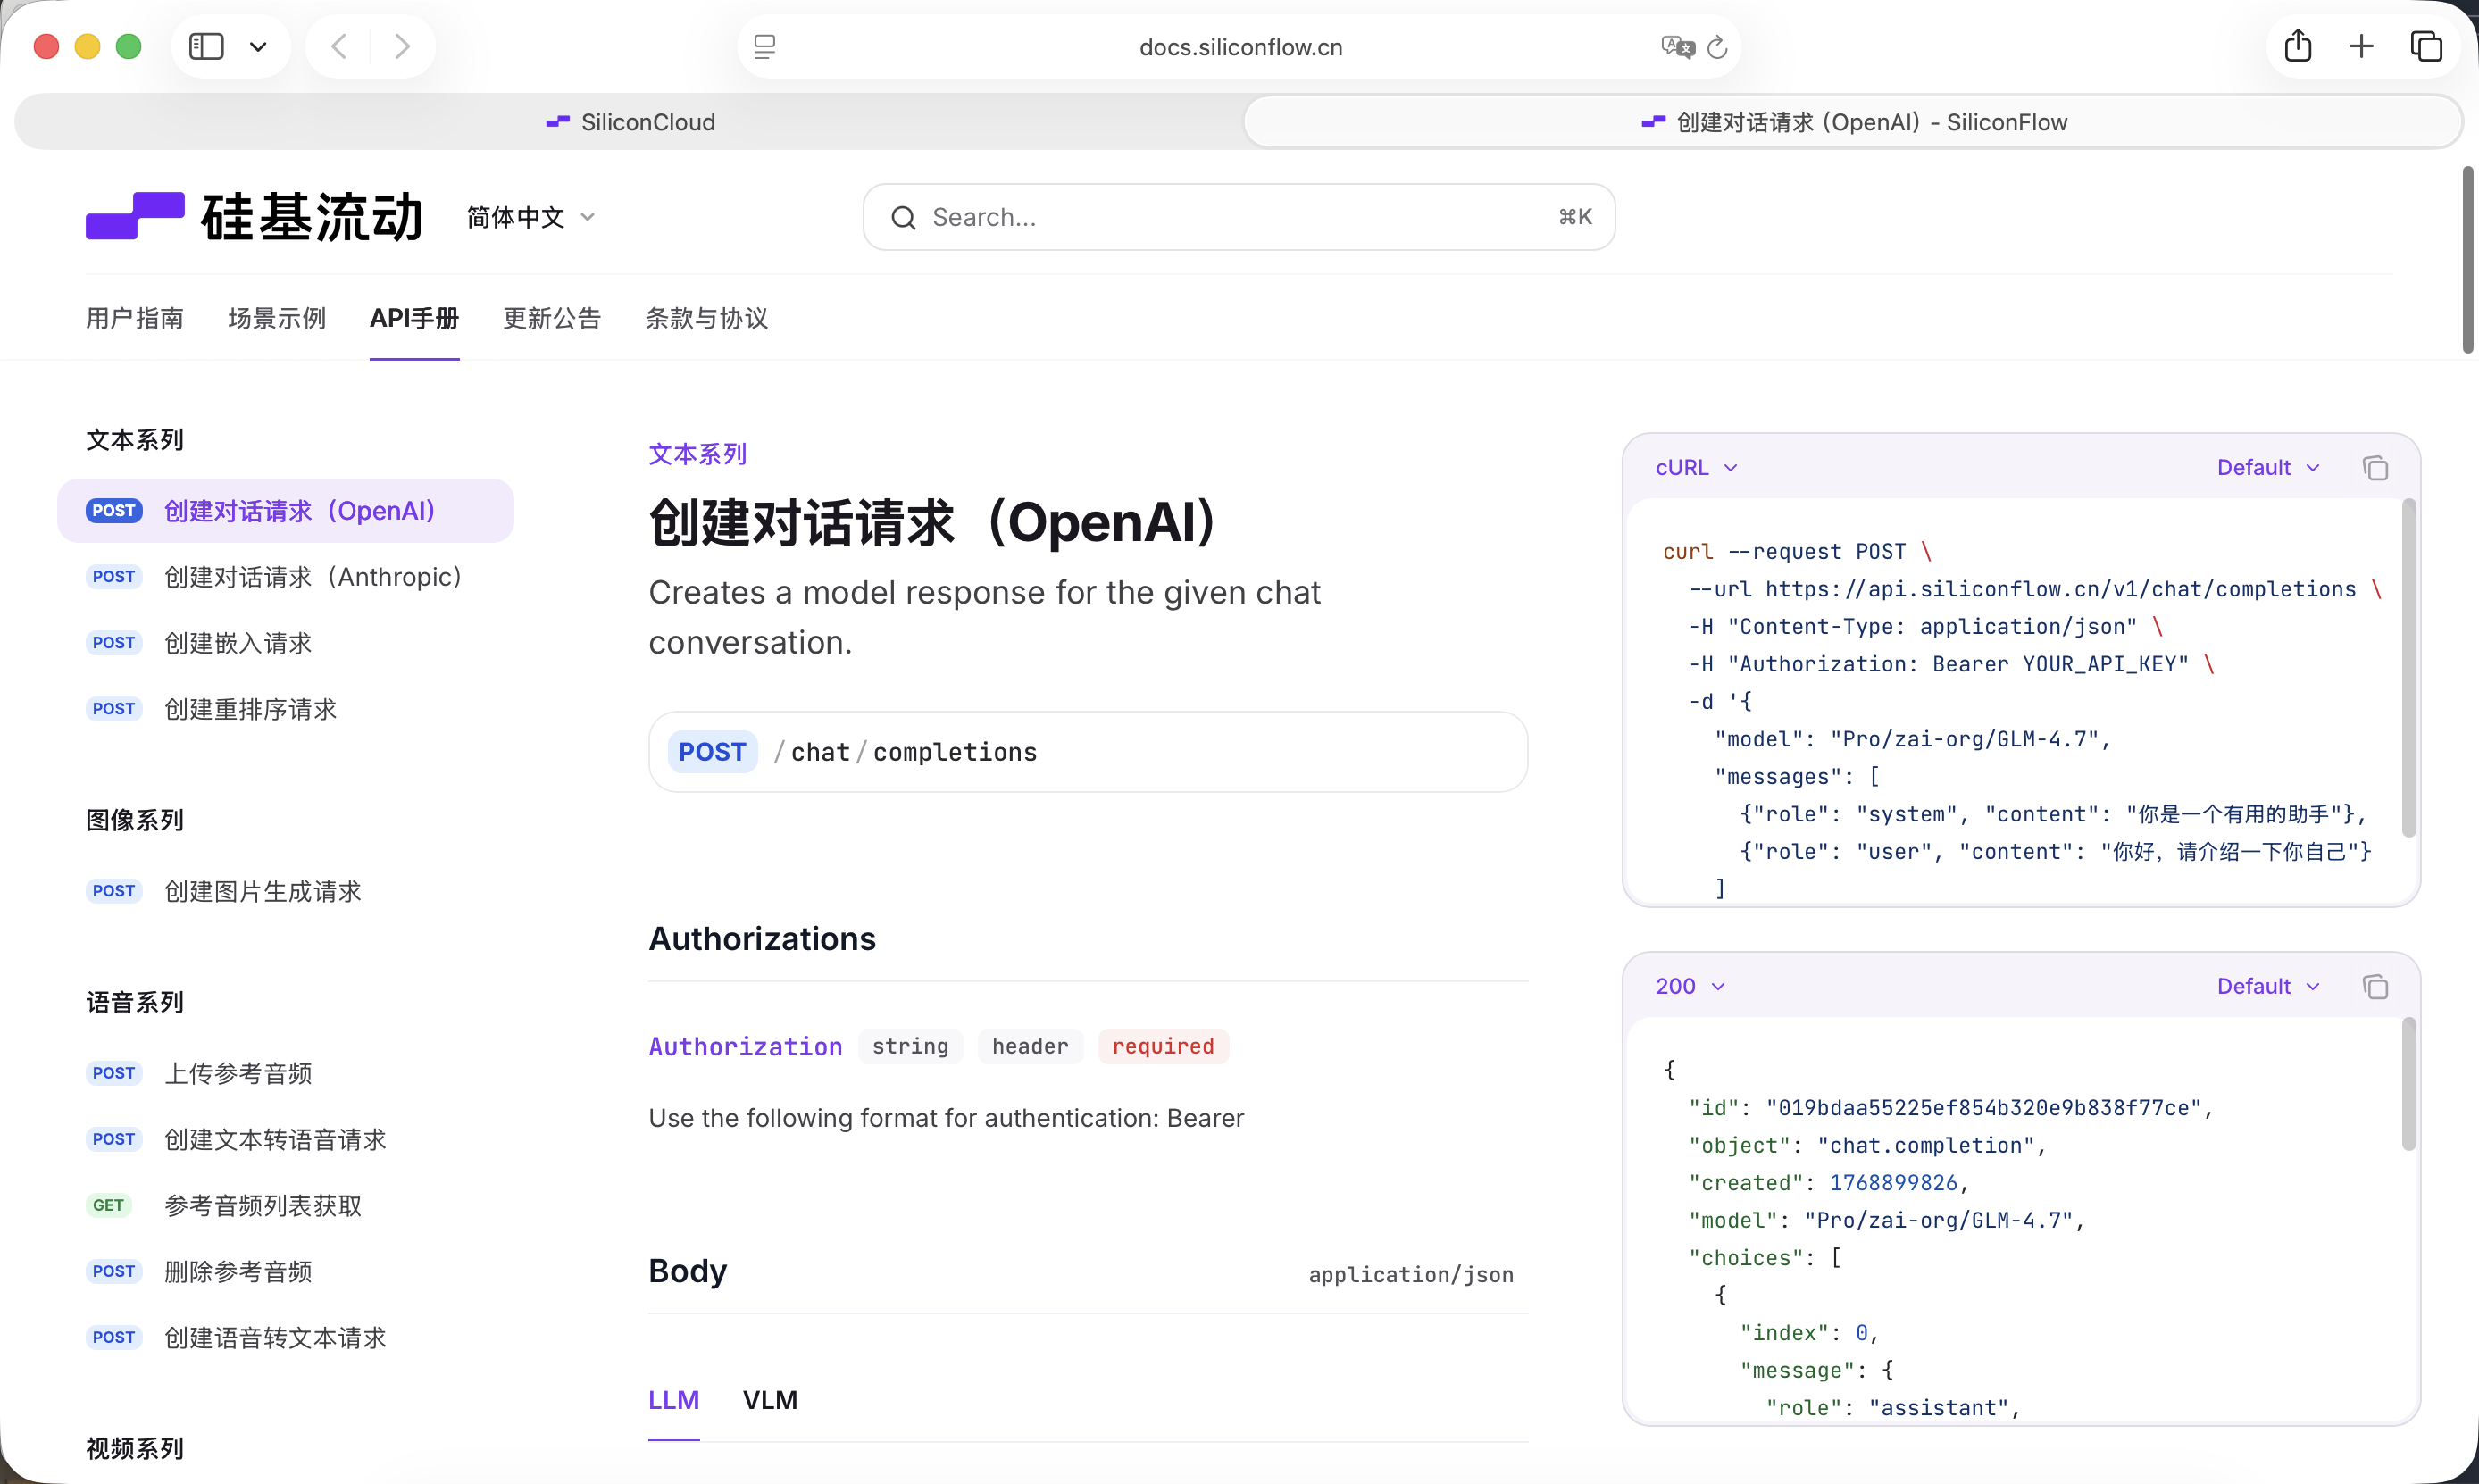
We need a large language model to serve as the "thinking layer." This tutorial uses the model service provided by SiliconFlow: https://cloud.siliconflow.cn
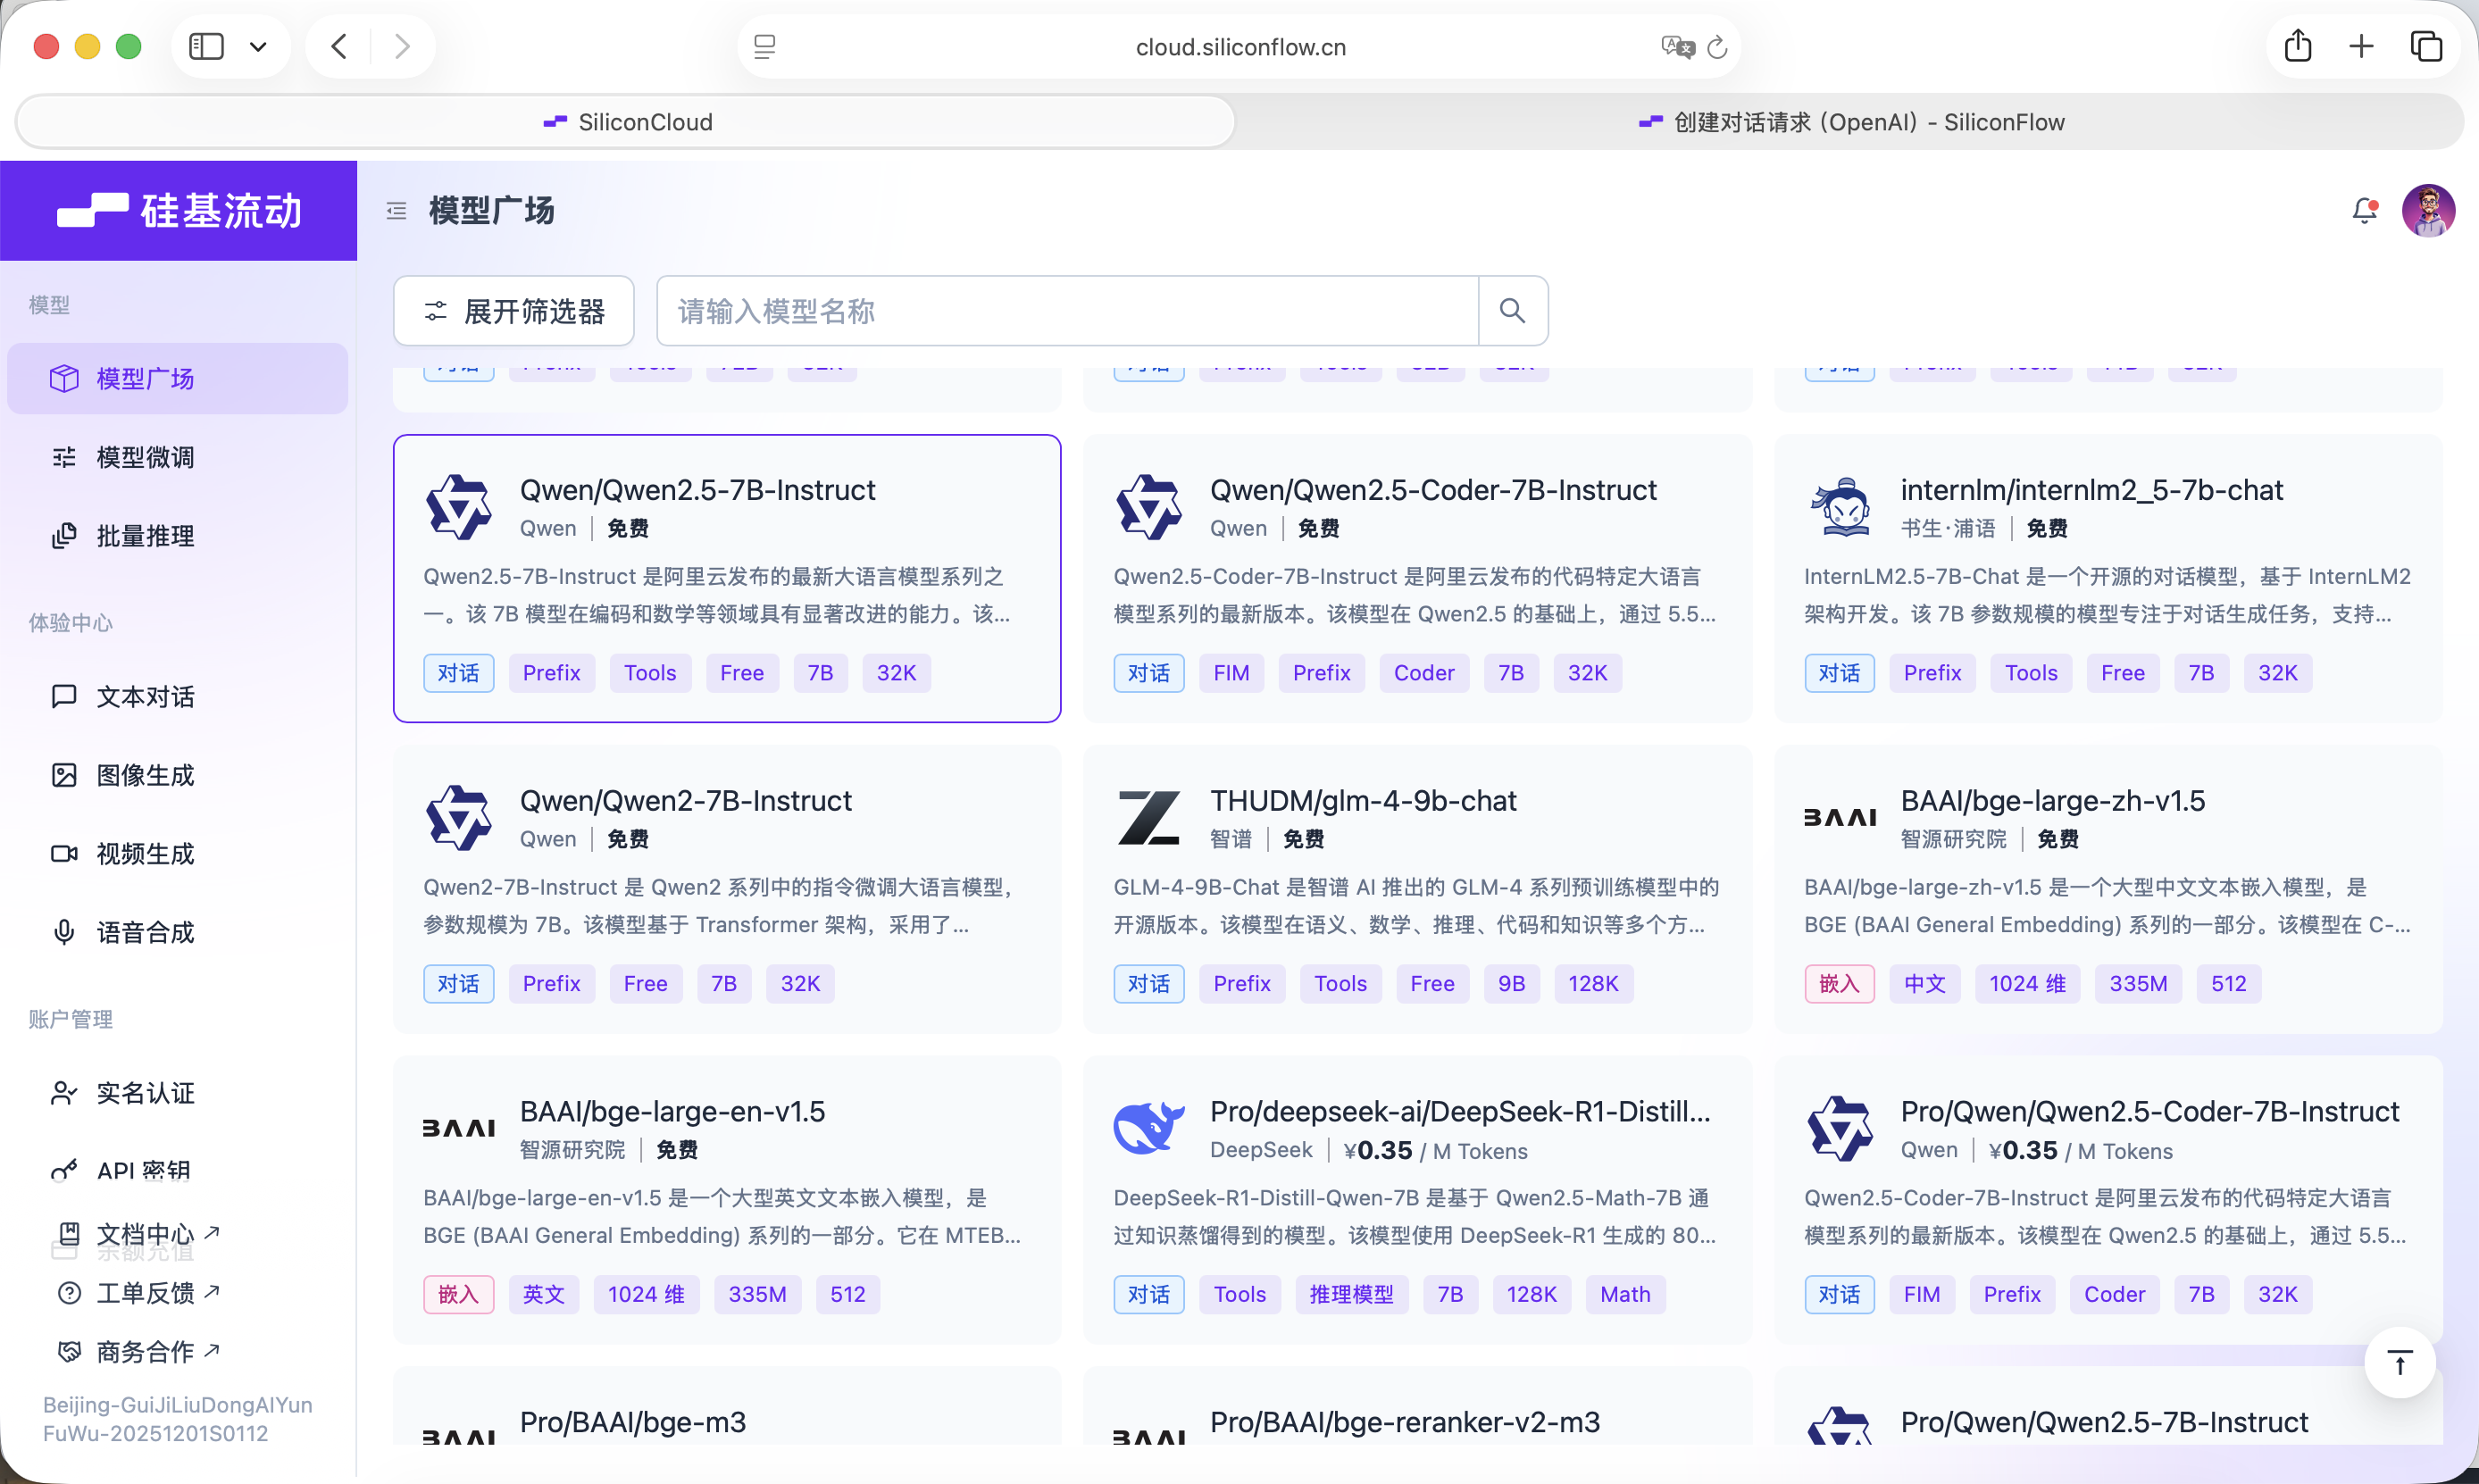
SiliconFlow provides interfaces compatible with the OpenAI API specification, which can be easily called through standard network requests in your project. Here we choose the free Qwen2.5-7B-Instruct model. Everything needed for the call is already written into the Prompt below. Before starting, you only need to register an account on the official website and create an API Key.
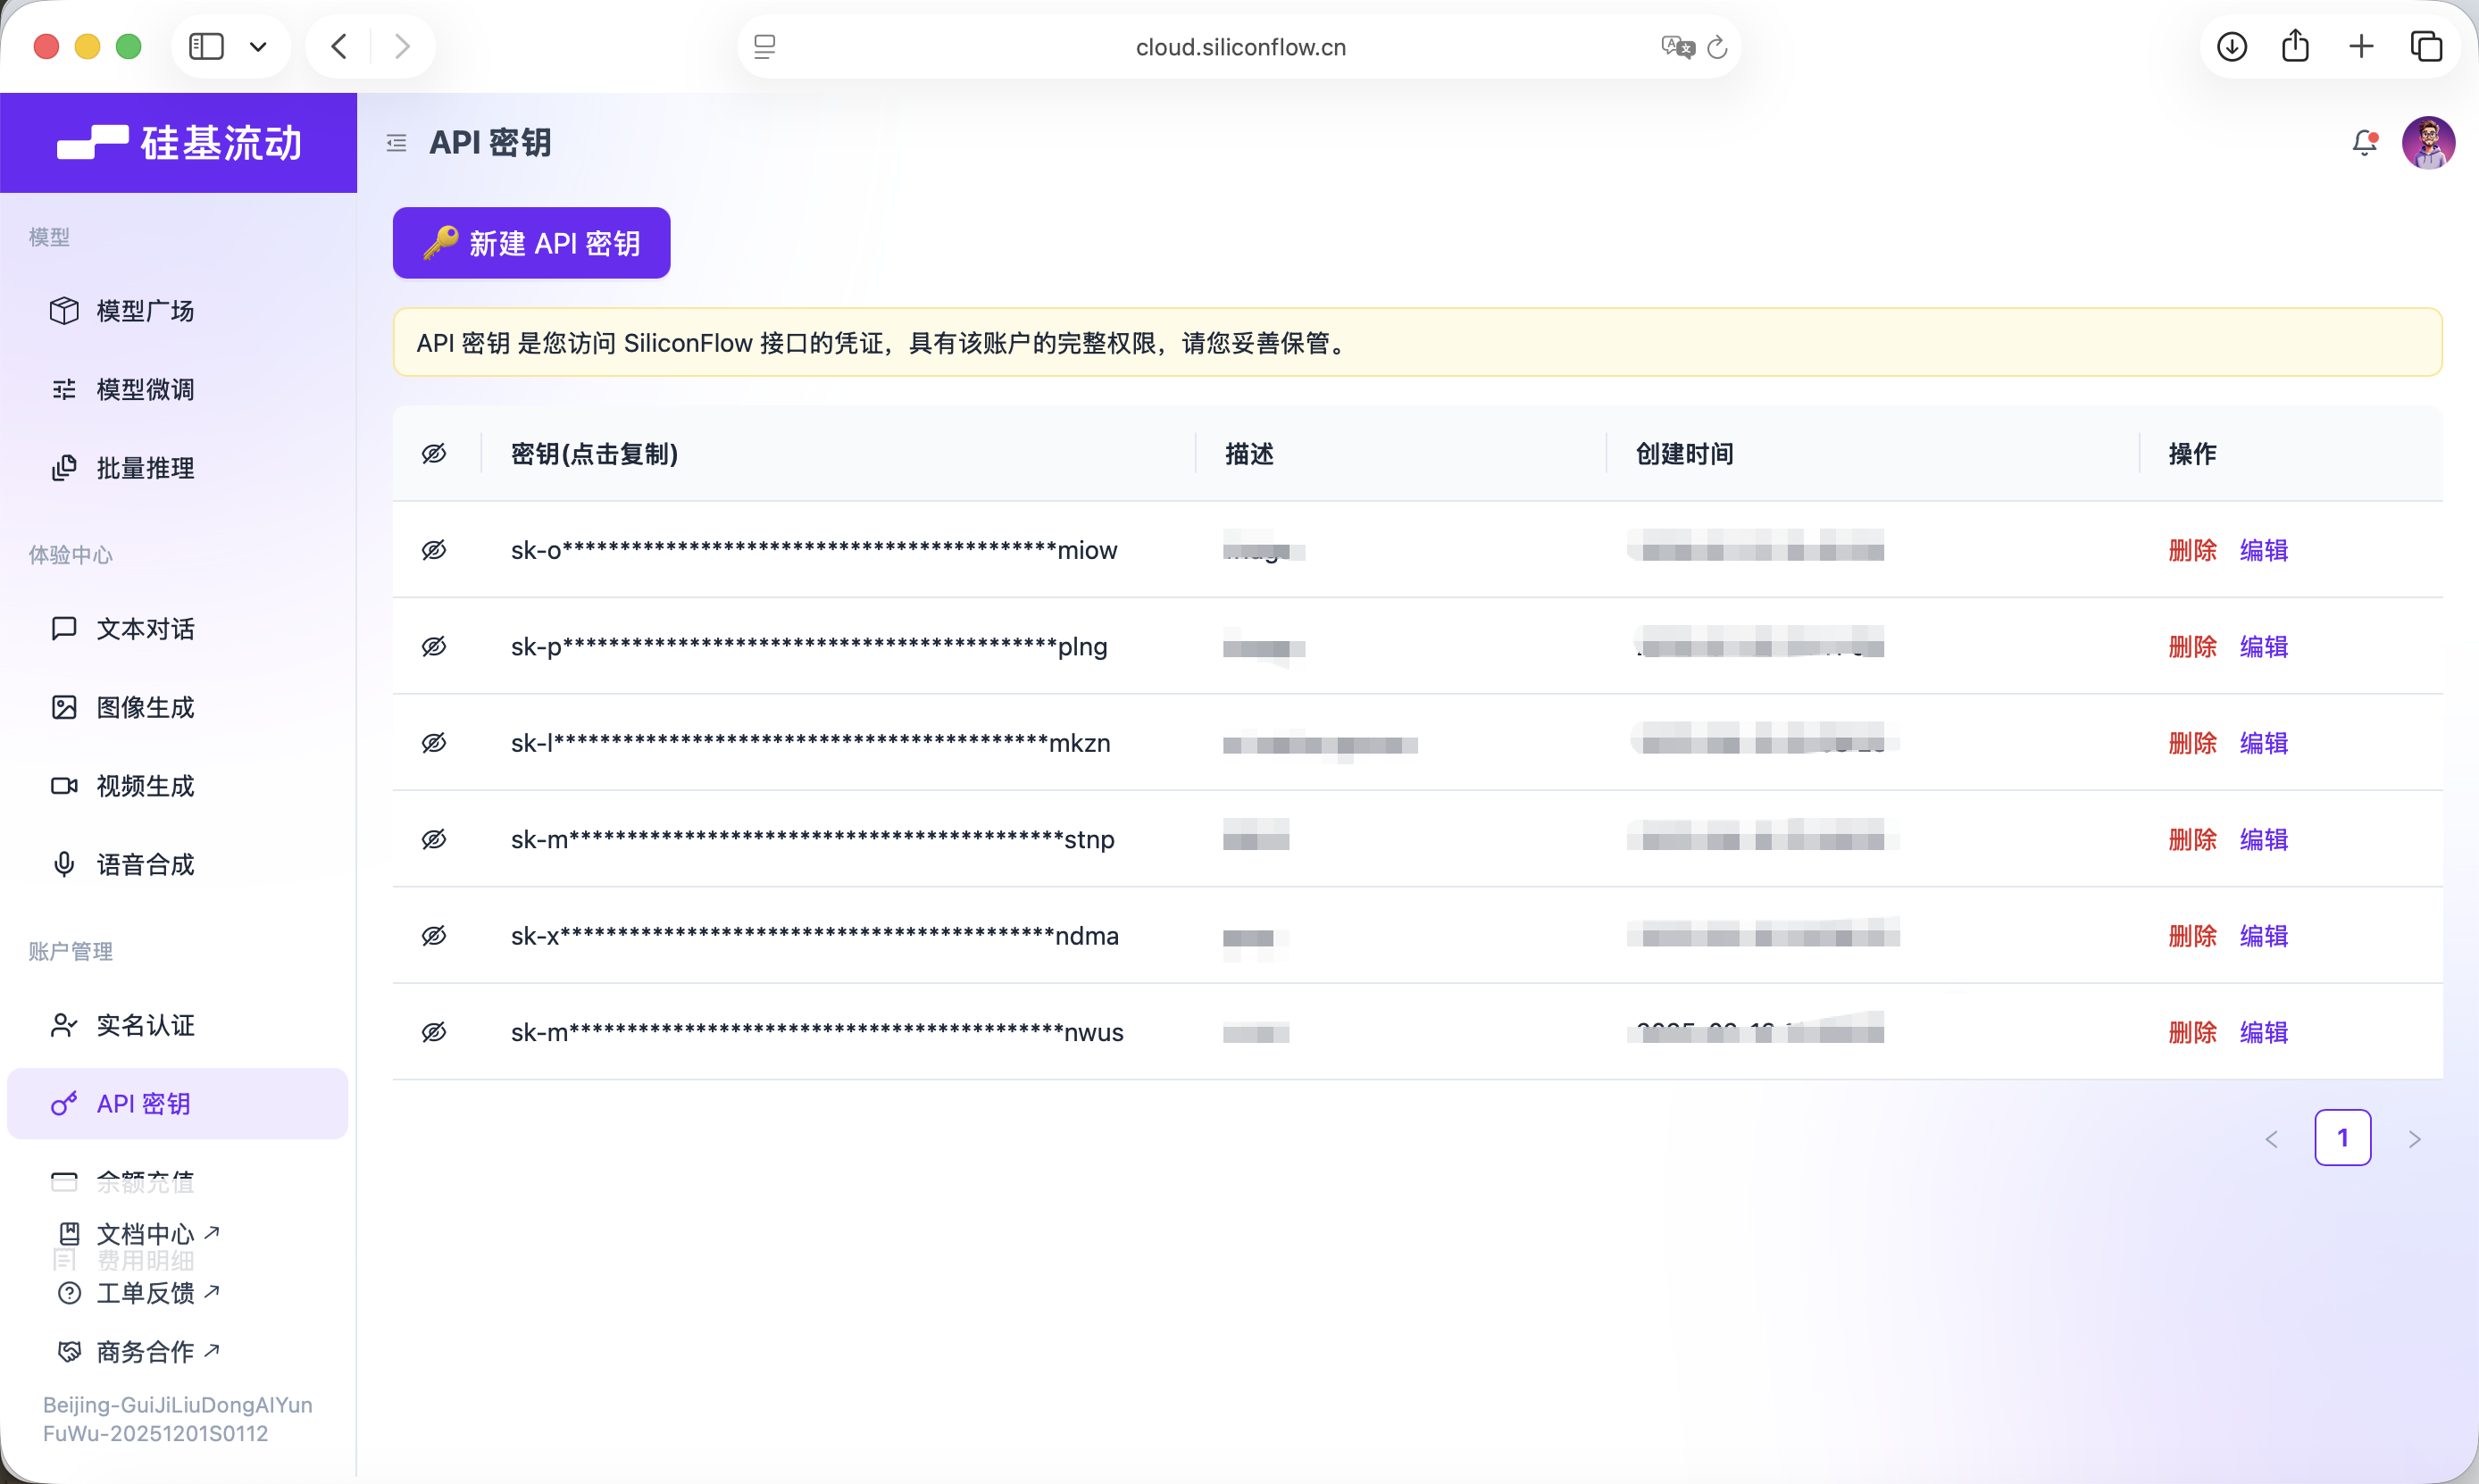
This Key will be used for subsequent model calls.
3.4 Building the Agent:
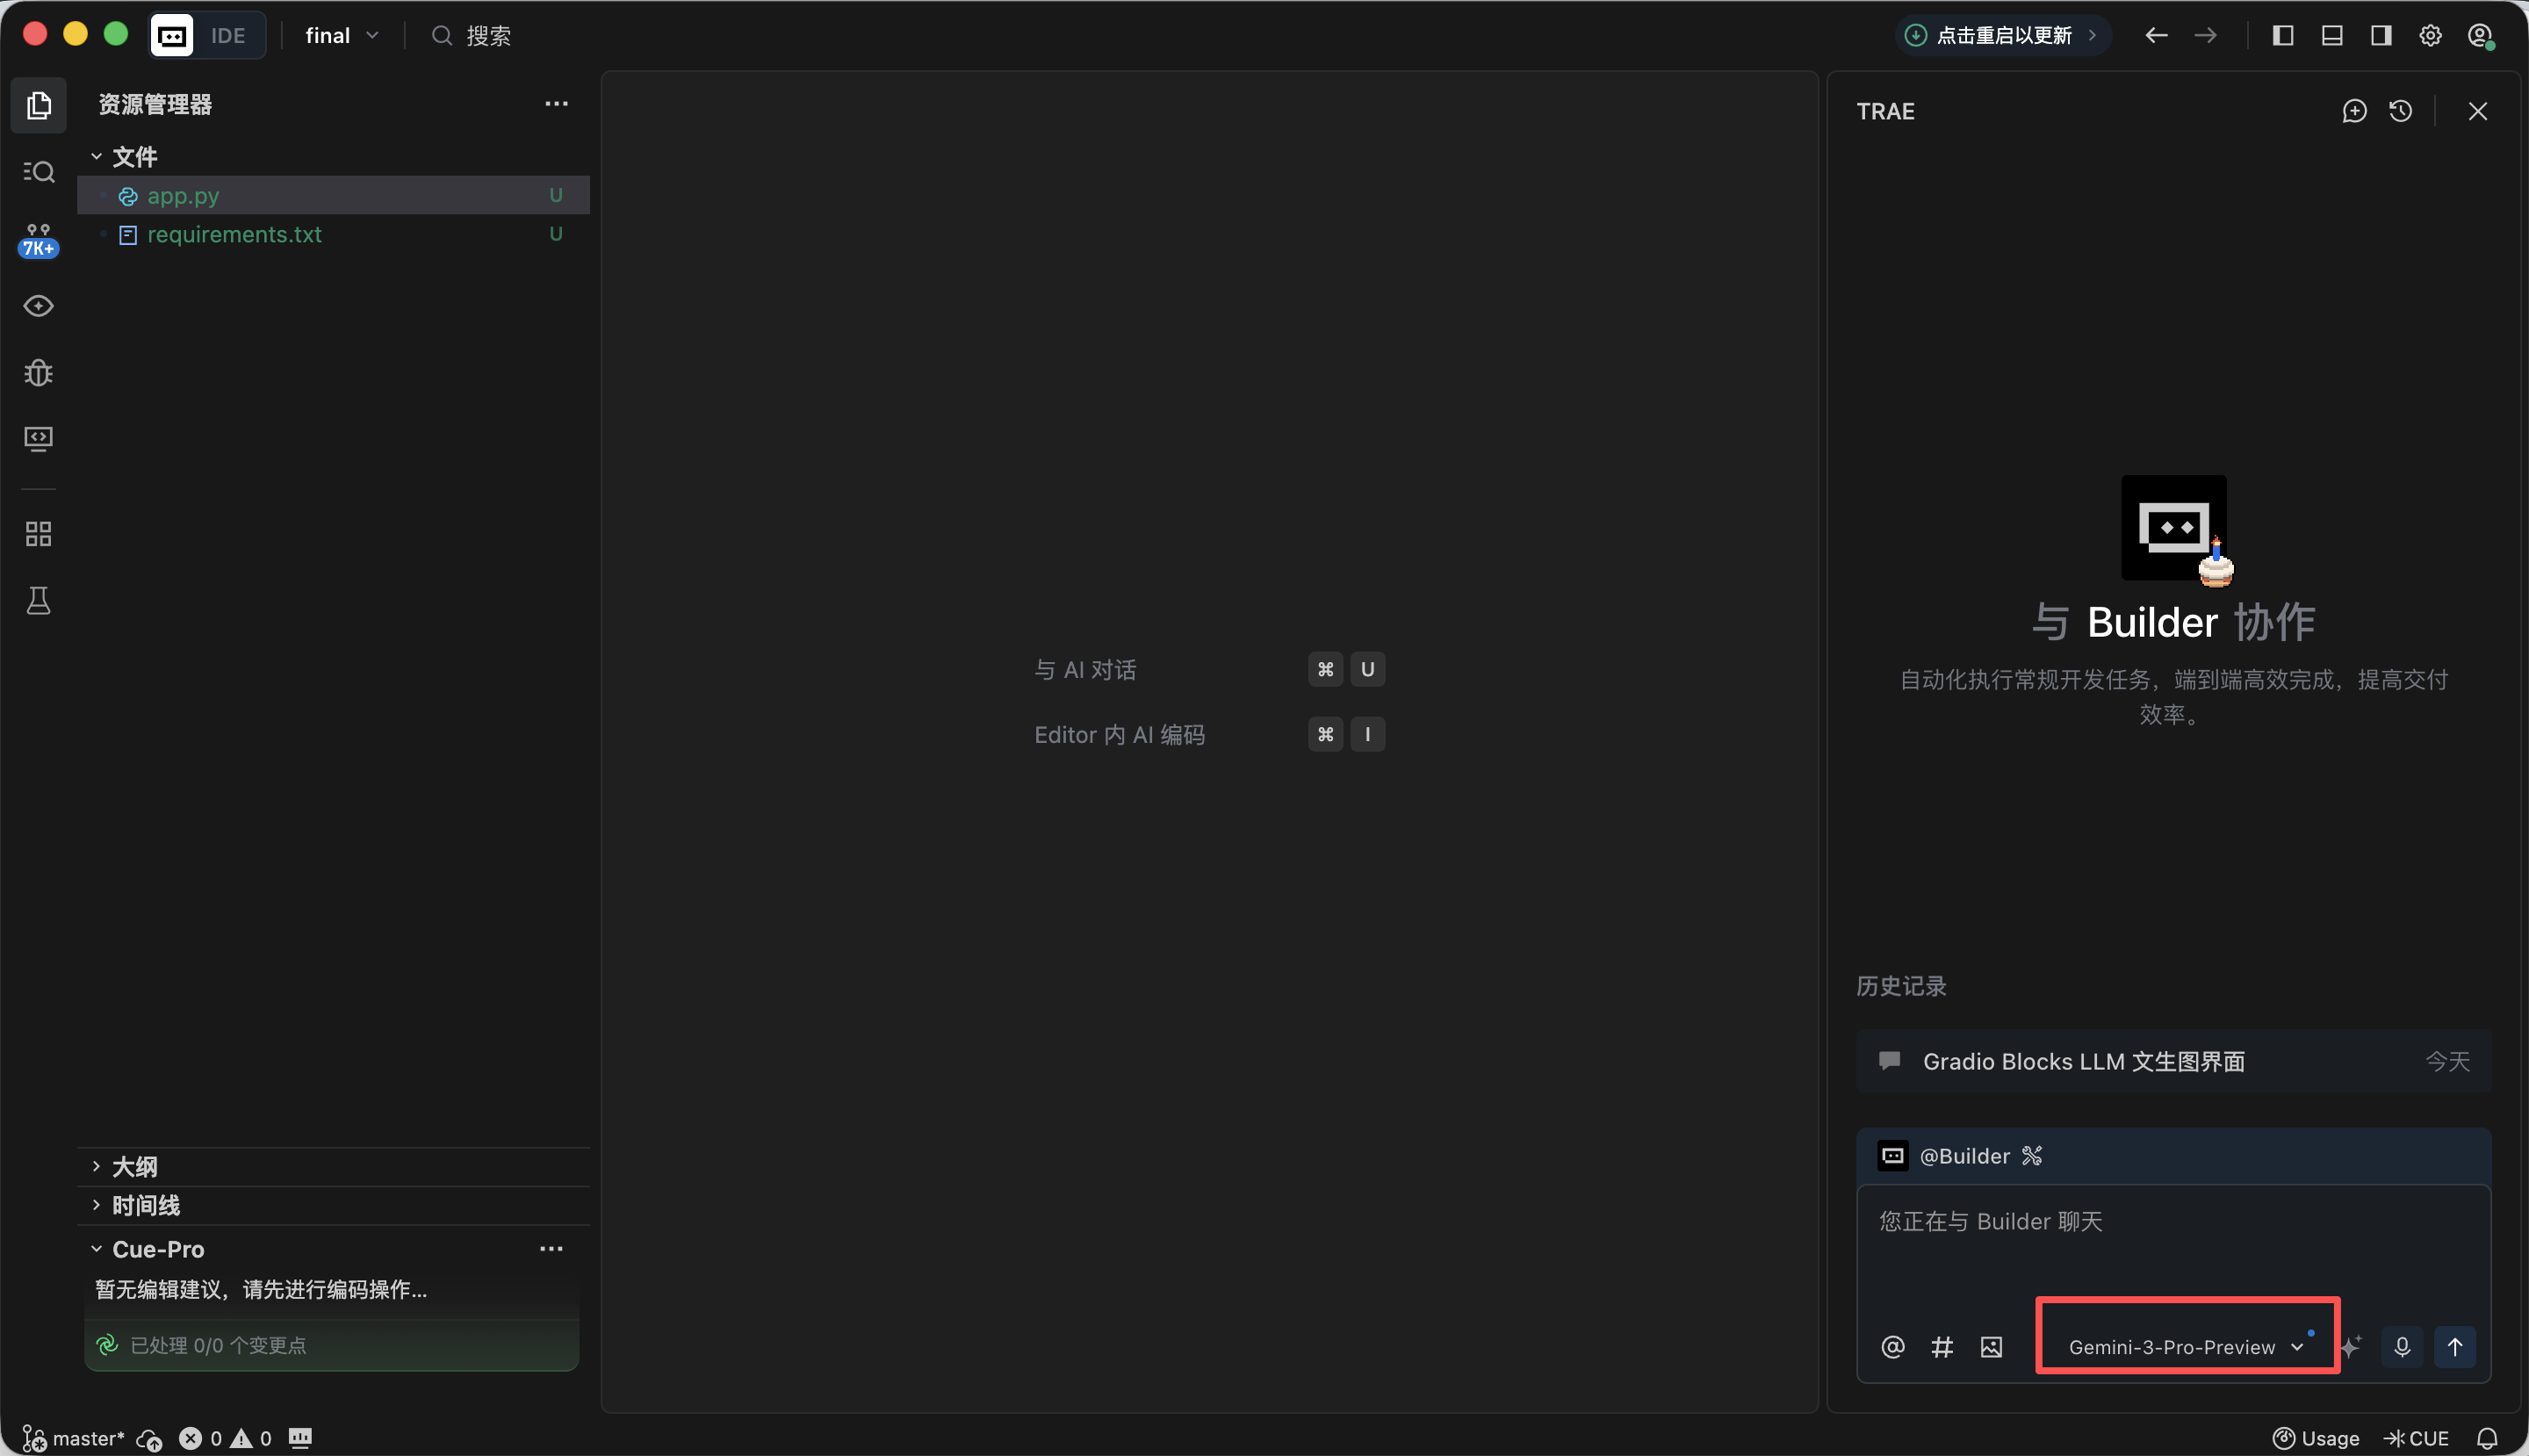
This experiment primarily uses Trae to help us write code. This tutorial uses the Gemini-3-Pro-Preview model. The overall approach is: create a new project, copy the complete Prompt below into the dialog box and submit it, gradually replace the API KEYs, then run the code and complete testing.
Phase 1: Gradio Blocks Basic Framework and Interface Layout
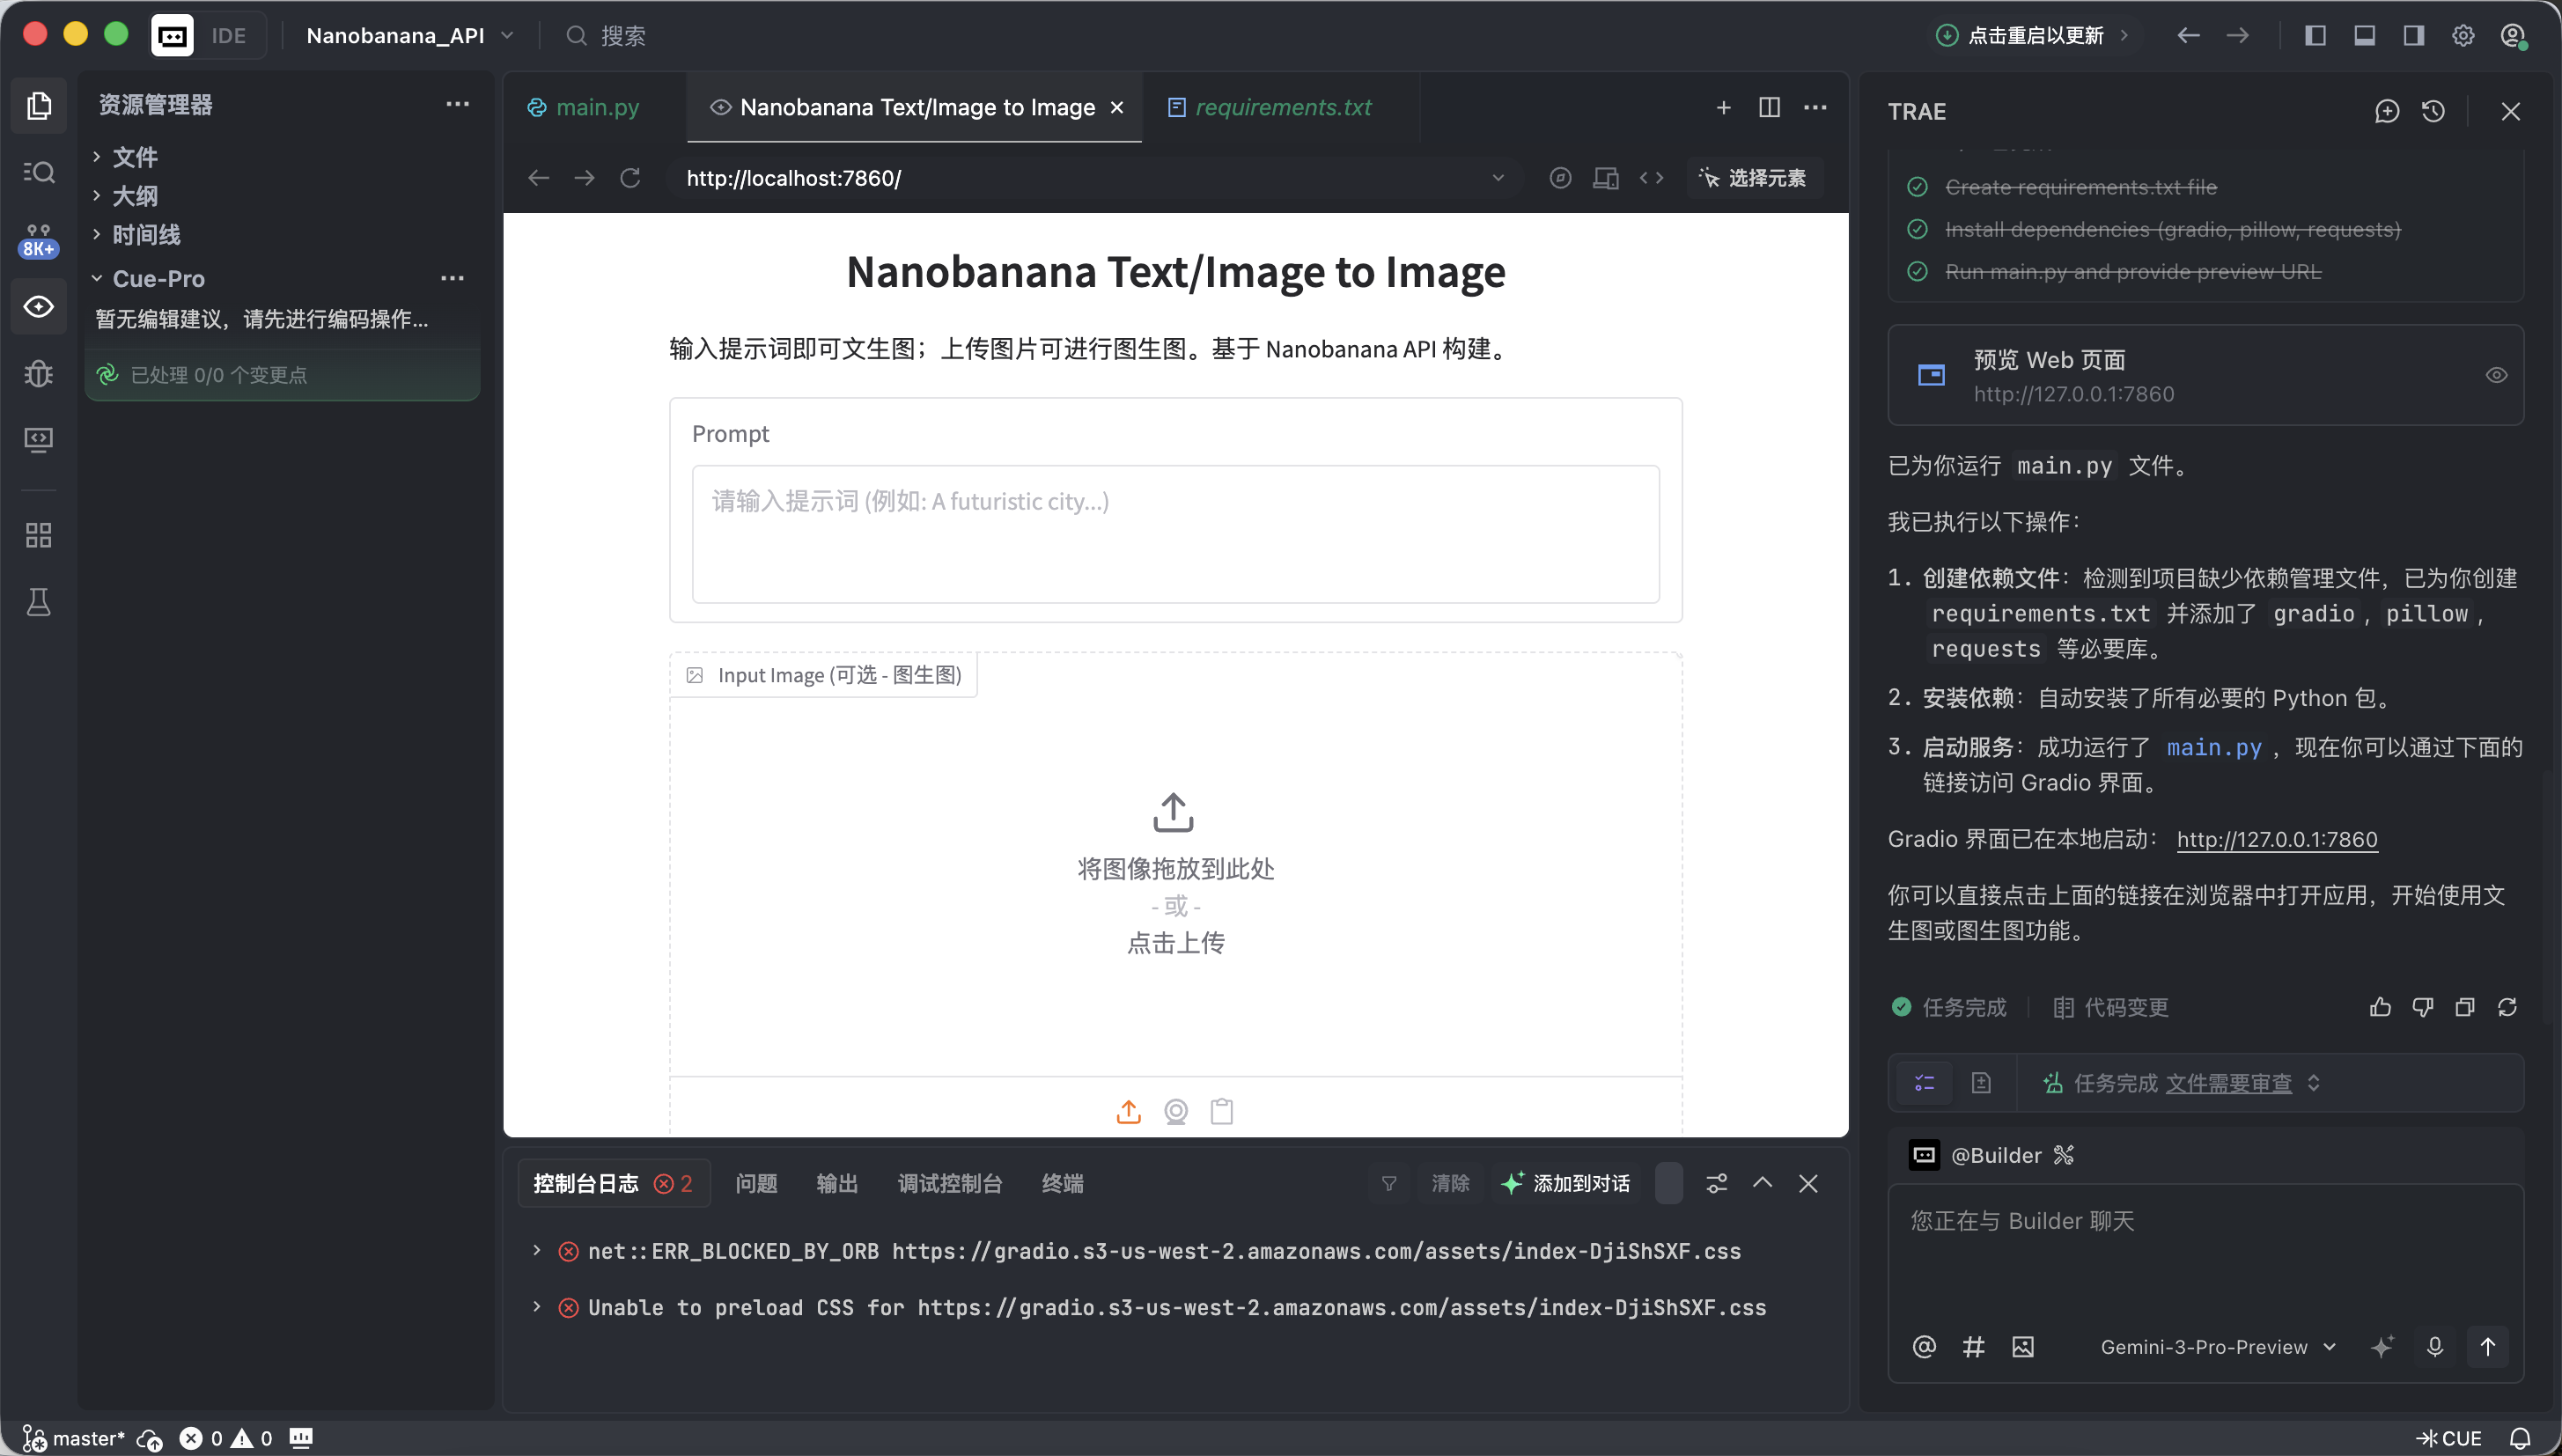
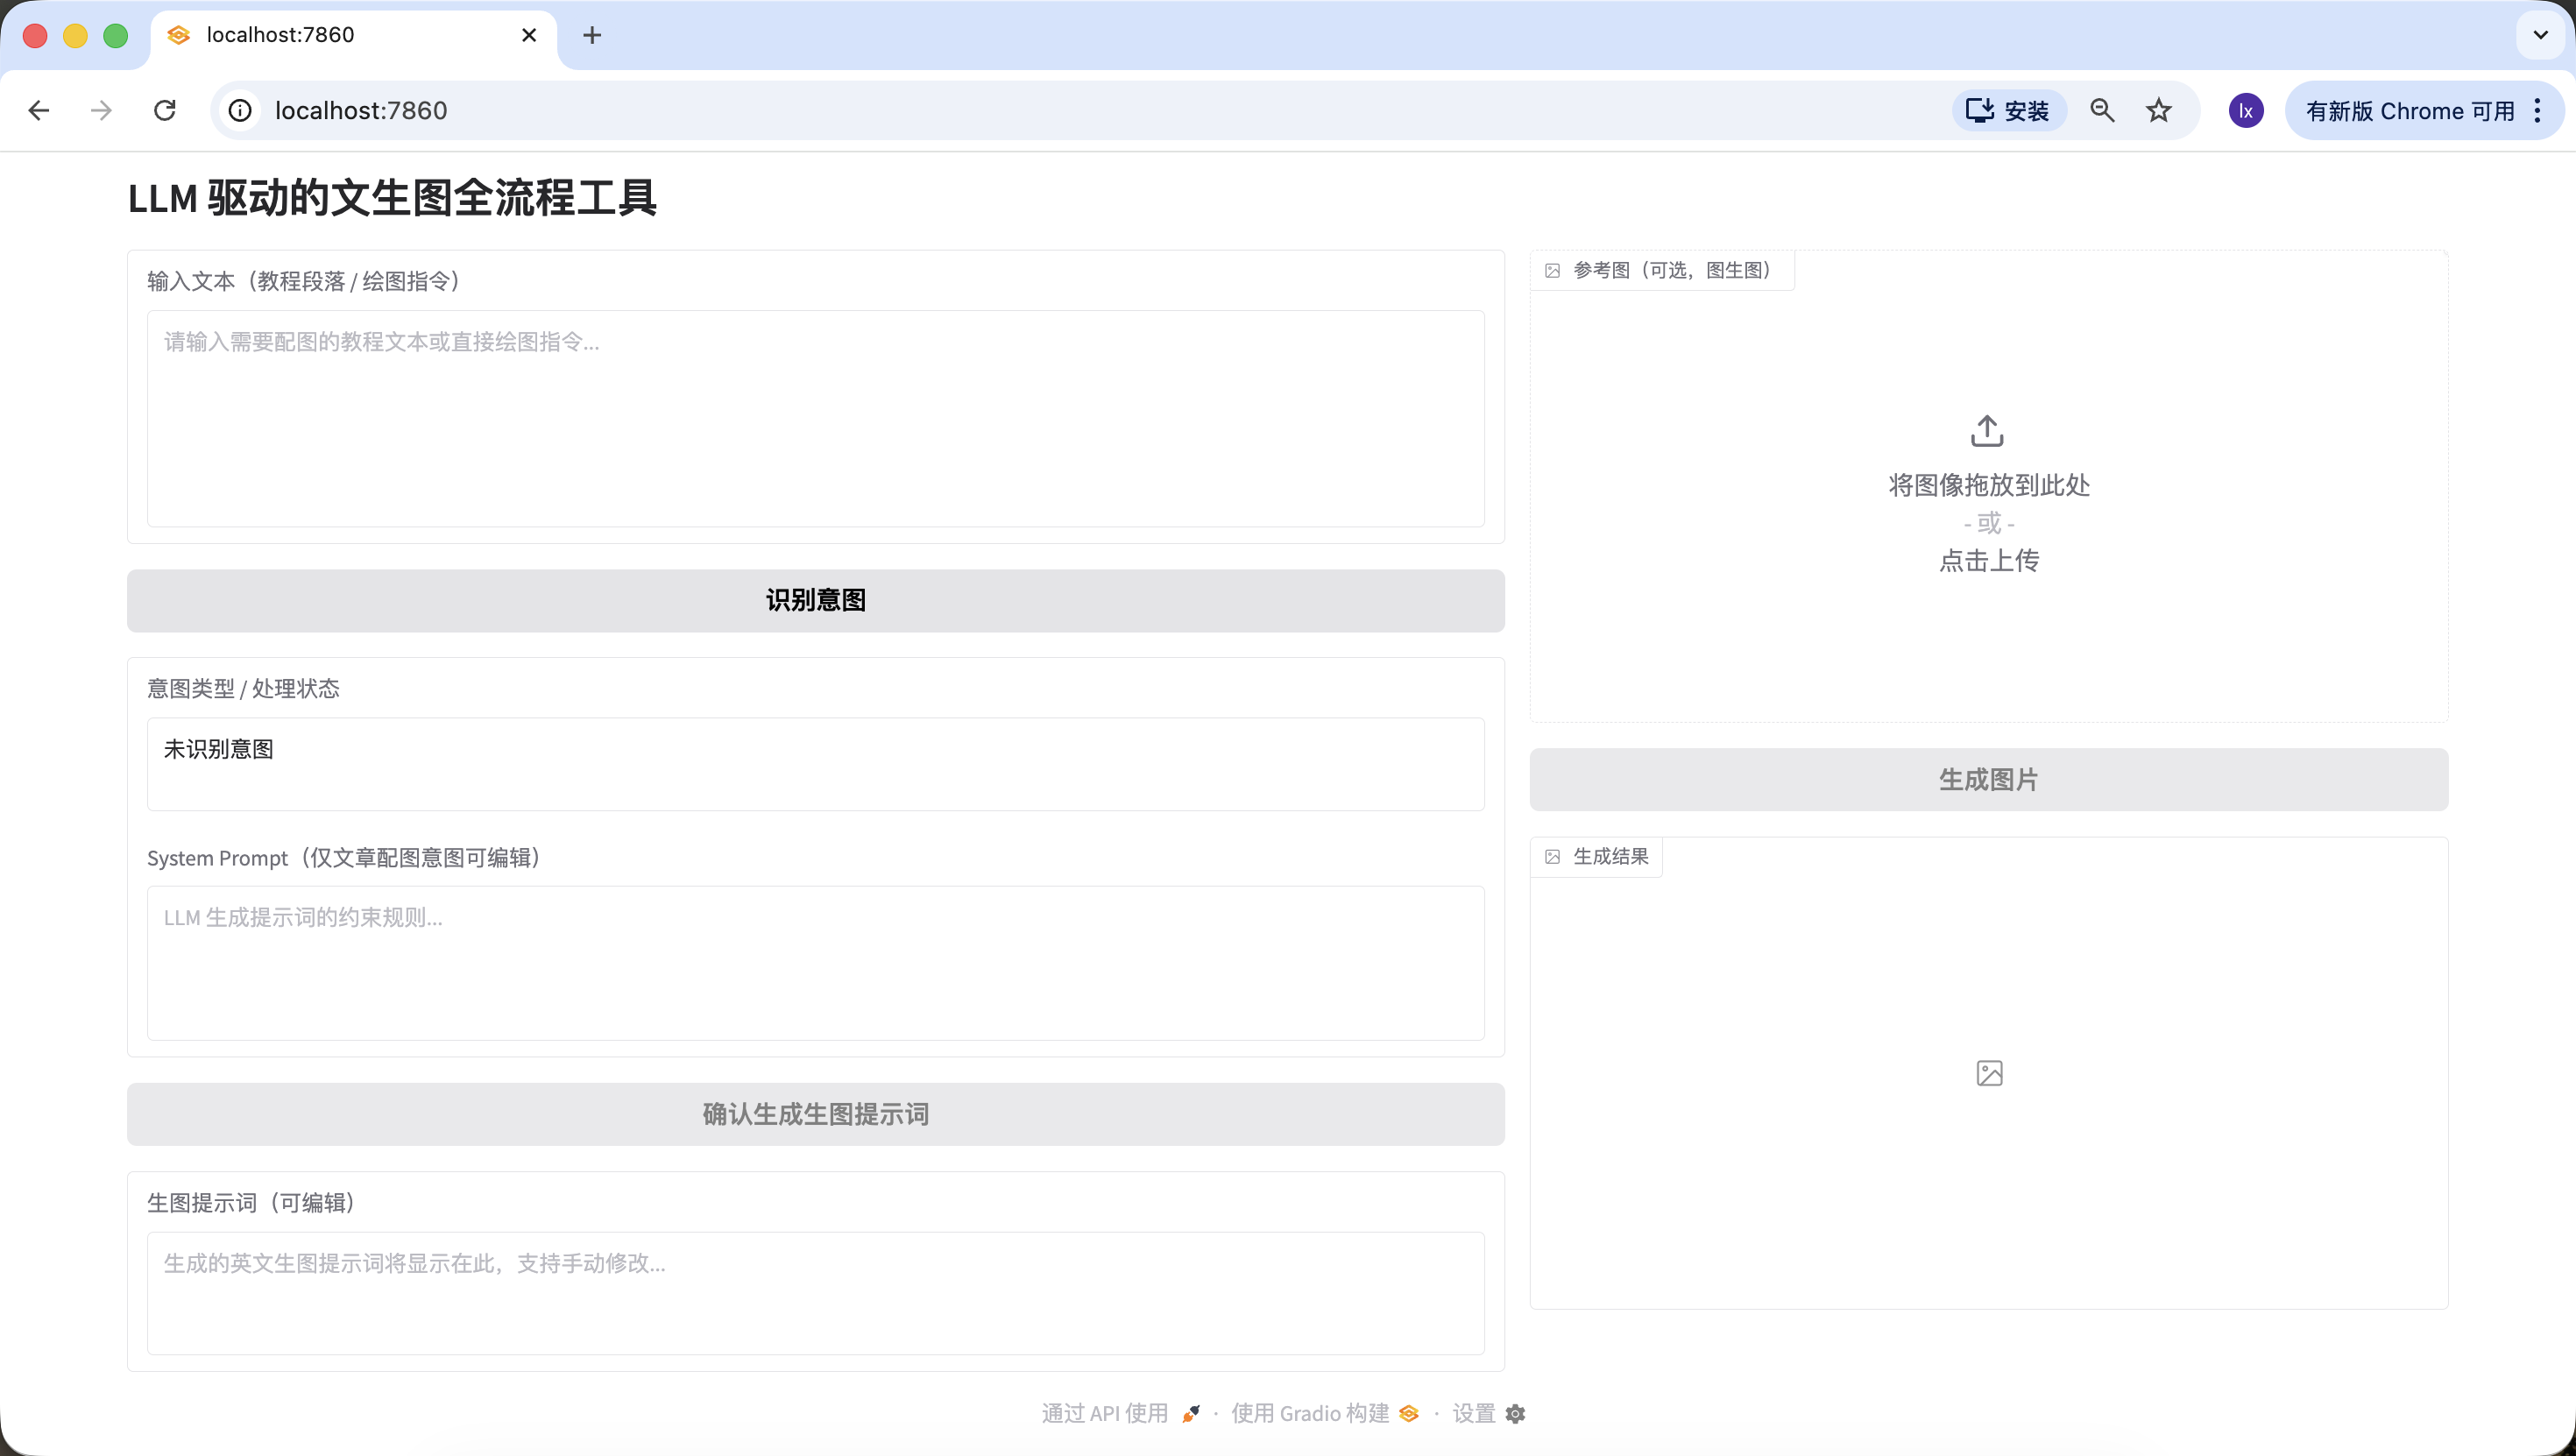
In this phase, our main goal is to first build an "appearance" for the entire Agent, implementing the frontend page design. Copy the following Prompt into the Trae dialog box to implement it, and you'll get a local URL (usually http://127.0.0.1:7860) where you can view the interface and verify the implementation.
Module 1: Gradio Blocks Basic Framework and Interface Layout
1. Task Objective
Based on Gradio 4.0.0+ Blocks layout, implement the basic interface for the "LLM + Nanobanana text-to-image" project, strictly following the fixed left-right split layout, initializing all UI components and setting correct initial states.

2. Tech Stack Requirements
Must use Gradio 4.0.0+ Blocks mode development, Interface mode is prohibited;
Dependencies: gradio>=4.0.0, pillow>=10.0.0 (import only, image processing logic not implemented yet);
Code must be a complete runnable Python file with all necessary import statements.

3. Interface Layout Rules (Core Constraints, Integrating Practical Details)
Overall Layout:
Page title: LLM-Driven Text-to-Image Full-Process Tool;
Fixed left-right split: left side takes 60% width, right side takes 40% width, using gr.Row and gr.Column to implement ratio control.
Left 60% (Prompt Generation Process Area) Component List:
input_text: gr.Textbox, label "Input Text (Tutorial Paragraph / Drawing Instruction)", lines=6, placeholder "Please enter the tutorial text that needs illustration or a direct drawing instruction...";
identify_intent_btn: gr.Button, value="Identify Intent", initial state normally clickable;
intent_status: gr.Textbox, label "Intent Type / Processing Status", lines=2, interactive=False, initial value "Intent not identified";
system_prompt: gr.Textbox, label "System Prompt (Editable only for article illustration intent)", lines=4, interactive=False, placeholder "LLM constraint rules for prompt generation...";
confirm_prompt_btn: gr.Button, value="Confirm Generate Image Prompt", interactive=False (initially disabled to prevent accidental clicks);
generation_prompt: gr.Textbox, label "Image Generation Prompt (Editable)", lines=3, interactive=True, initial value empty, placeholder "Generated English image prompt will be displayed here, supports manual editing...".
Right 40% (Nanobanana Image Generation Function Area) Component List:
ref_image: gr.Image, label "Reference Image (Optional, for Image-to-Image)", type=filepath, height=300, allows upload;
generate_btn: gr.Button, value="Generate Image", interactive=False (initially disabled, cannot click without a prompt);
result_image: gr.Image, label="Generation Result", type=pil, height=300, initial empty, interactive=False.

4. Interaction Logic Requirements
All component interactive initial states strictly follow the above configuration, dynamically updated by functions later;
Button disabled states should be visually apparent (grayed out) to prevent user misoperation.

5. Output Requirements
Generate complete Python code that only implements interface layout and component initialization, without any business logic;
Clear code comments, component naming consistent with the practical version (input_text/identify_intent_btn, etc.);
Code is directly runnable, interface structure matches the description exactly.
After opening http://127.0.0.1:7860 in your browser, you can see that Trae has generated the following webpage according to our requirements, which is roughly consistent with our requirements, and you can proceed to the next step of generation.
Phase 2: LLM Intent Recognition Module (Siliconflow API)
In daily use of VLM for drawing, there are typically three common input scenarios:
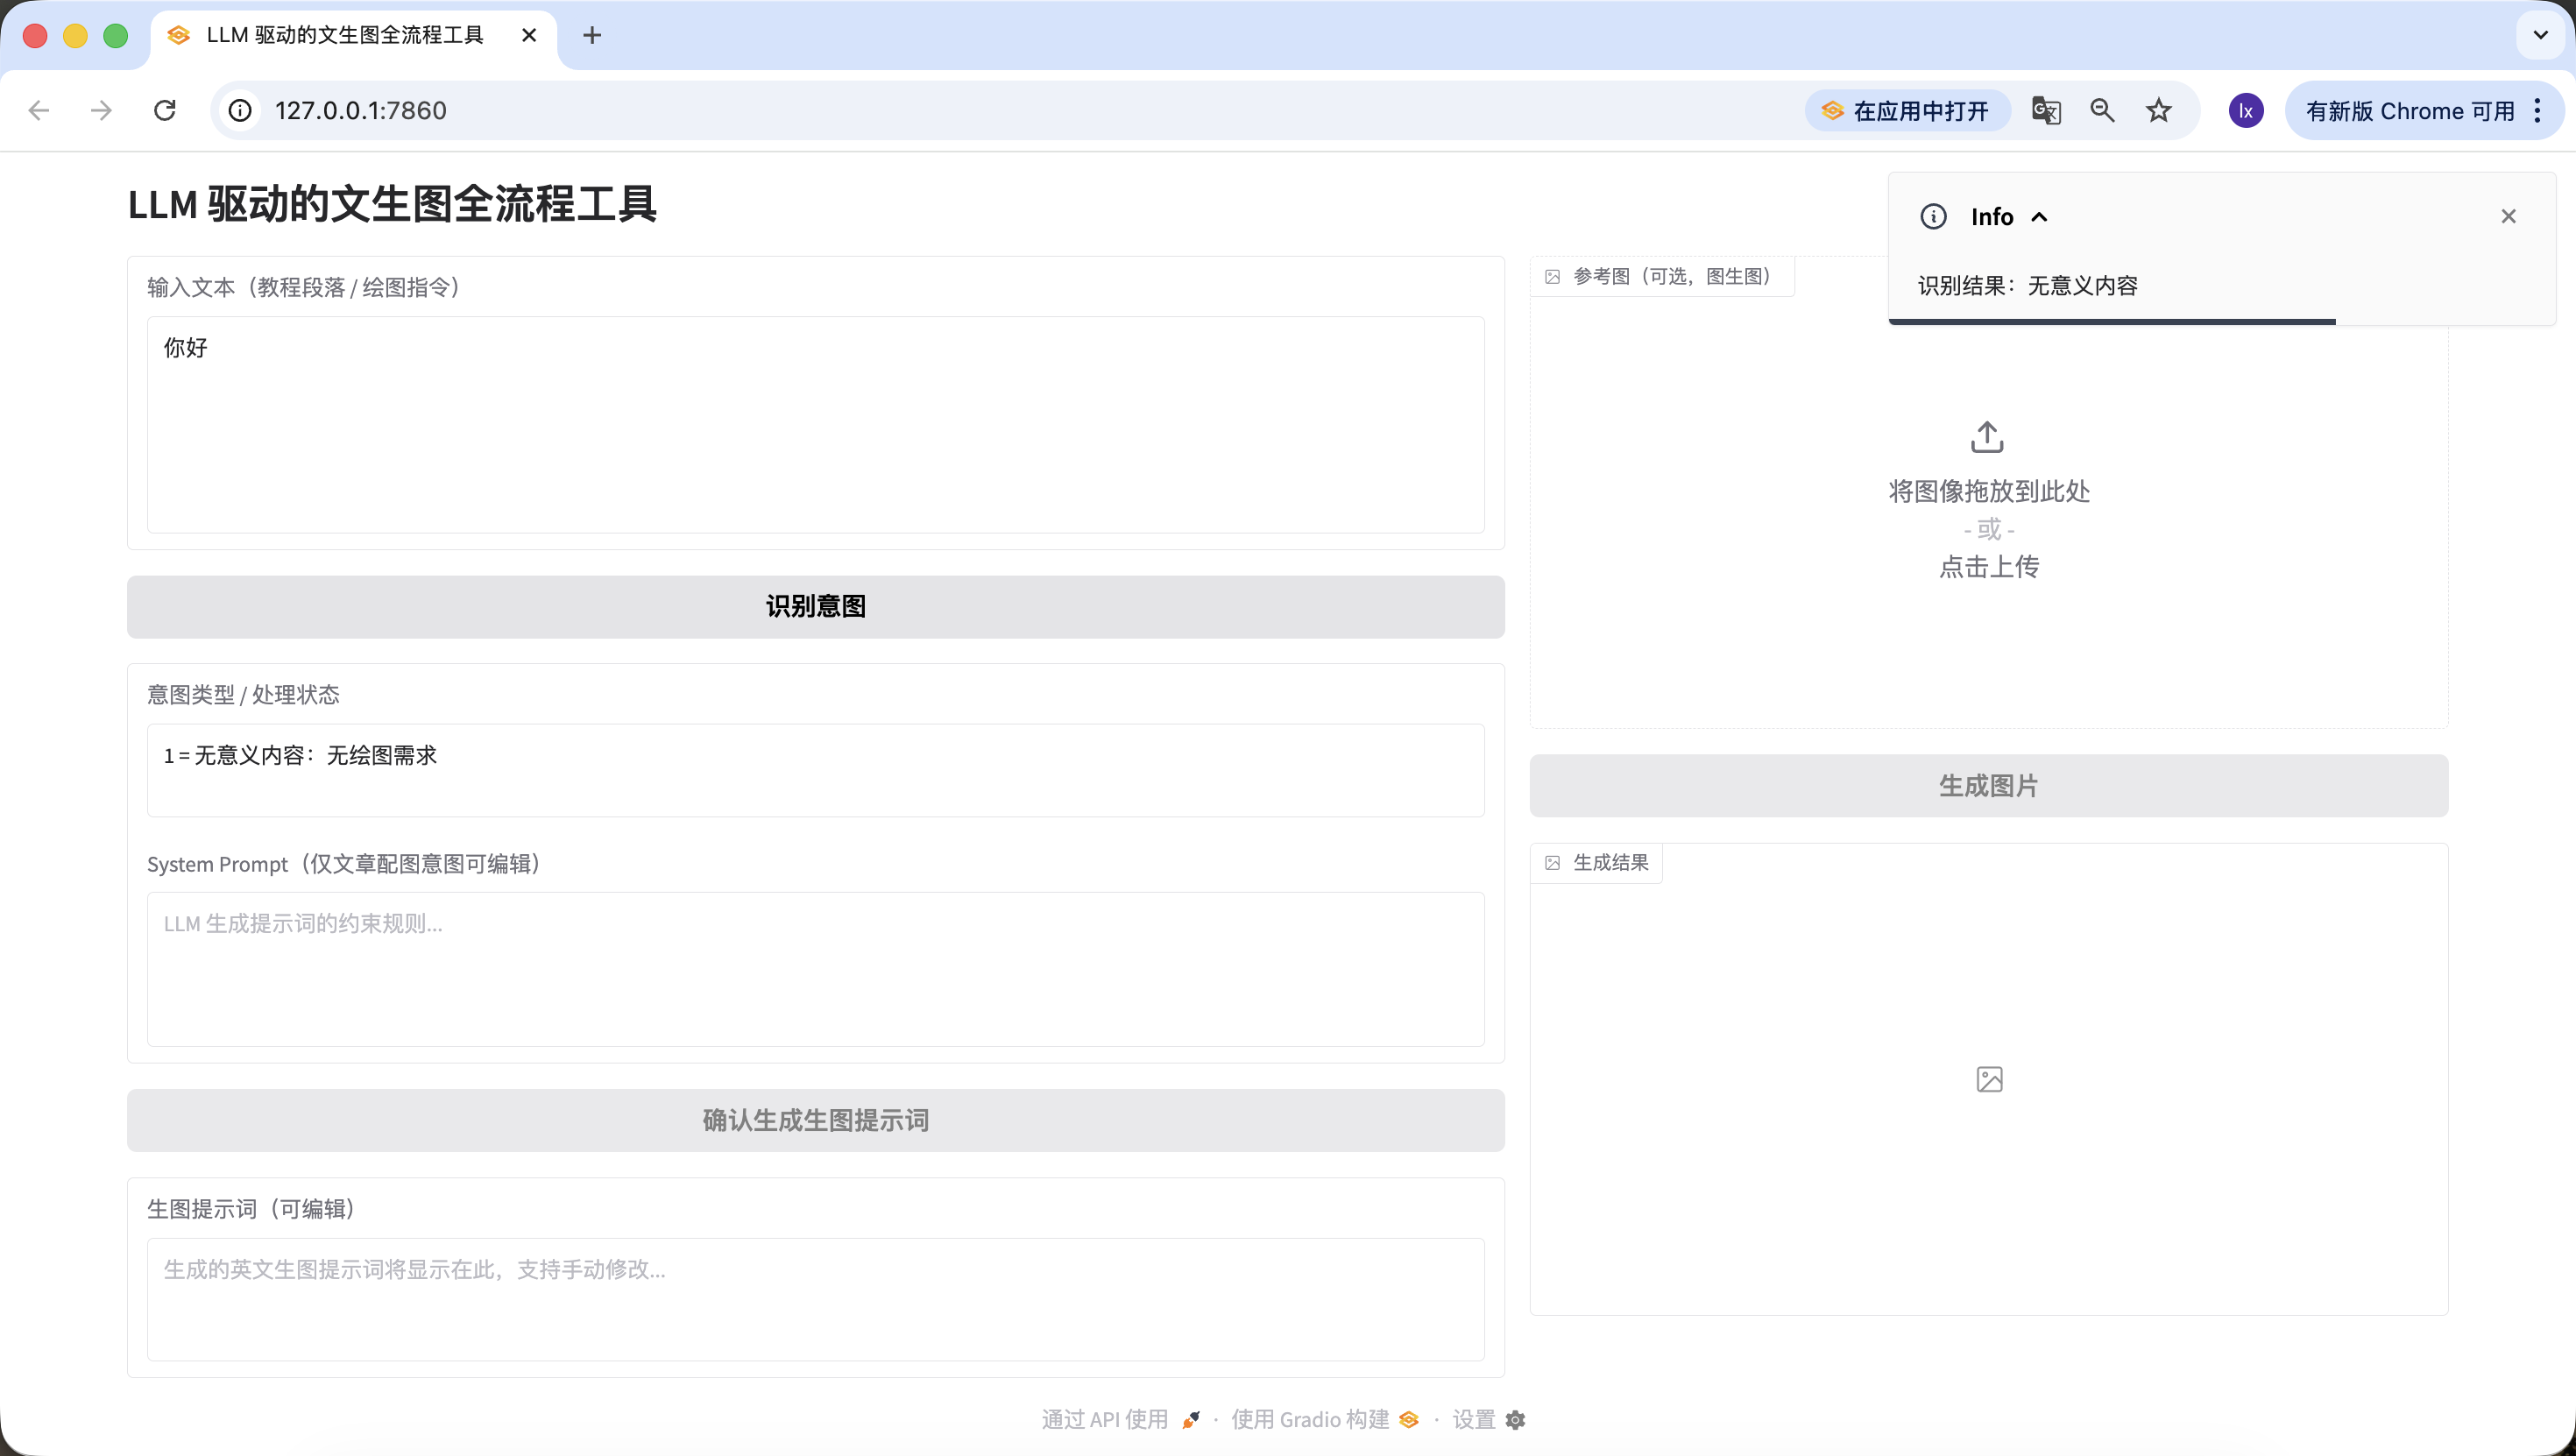
- Meaningless content, such as "hello," "did you eat today," etc., which cannot produce corresponding images.
- Articles/long text, with more words, such as a structured article of about 200 words, which requires first understanding the article's structure and content, then considering how to generate an image that fully summarizes the text.
- Direct drawing instructions, such as "help me draw a dog taking a bath," where the requirement is already very specific and the image can be generated directly.
Same as before, copy the following Prompt into the Trae dialog box to implement it, and fill in the API obtained from previous steps.
Module 2: LLM Intent Recognition Module (Siliconflow API)
1. Task Objective
Based on the implemented Gradio interface, add click logic for the "Identify Intent" button, call the Siliconflow API to complete intent recognition, and link component states.

2. Tech Stack Requirements
Based on Gradio 4.0.0+ Blocks;
Dependencies: requests>=2.31.0, openai;
Output complete runnable Python file, including Module 1 interface + this module's logic.

3. Core Business Rules (Absolutely Must Not Deviate)
Intent Classification Rules (Only 3 categories, strictly return number + description)
1 = Meaningless content: only small talk, greetings, irrelevant conversation, no drawing or illustration needs (e.g., "hello" "did you eat");
2 = Article / Long text illustration need: user inputs a complete article, tutorial, paragraph, explanatory text, content is narrative / explanatory / instructional, implicitly implying the need to generate an illustration for this content, user doesn't need to explicitly say "illustrate this text";
3 = Direct drawing instruction: user inputs a short, clear drawing command, no long text background, directly requesting to draw something specific (e.g., "draw an Apple-style cat").
LLM Call Constraints (Integrating Practical Template)
Interface address: https://api.siliconflow.cn/v1/chat/completions;
Model: Qwen/Qwen2.5-7B-Instruct;
temperature=0.1;
Unified code definition:
python
Run
LLM_BASE_URL = "https://api.siliconflow.cn/v1"
LLM_API_KEY = ""  # User replaces themselves
LLM_MODEL = "Qwen/Qwen2.5-7B-Instruct"# Practical verified intent recognition template (hardcoded in code)
INTENT_PROMPT_TEMPLATE = """You need to identify the intent of the user's input text, only return one of the following 3 categories (format: number + description):
1 = Meaningless content; 2 = Article / Long text illustration need; 3 = Direct drawing instruction.

User input: {user_input}

Recognition result:
Only extract the number and description from the result, no additional content allowed."""

4. Component Linking Rules
Result is 1: intent_status displays "1 = Meaningless content: no drawing need", system_prompt remains disabled, confirm_prompt_btn disabled;
Result is 2: intent_status displays "2 = Article / Long text illustration need: generate illustration for input content", enable system_prompt and fill default rules, activate confirm_prompt_btn;
Result is 3: intent_status displays "3 = Direct drawing instruction: generate image based on instruction", system_prompt disabled and filled with default rules, activate confirm_prompt_btn.

5. Exception Handling
API exceptions, parsing exceptions all give friendly prompts, no crashes, components restore to initial state.

6. Output Requirements
Generate complete runnable code, just replace LLM_API_KEY to use, logic clear with complete comments, intent recognition template strictly uses the practical version.
Refresh the previous http://127.0.0.1:7860 URL and start testing whether it can correctly detect the three scenarios.
- Meaningless content, you can try entering "hello," "thanks," etc., and find that it can be correctly identified.
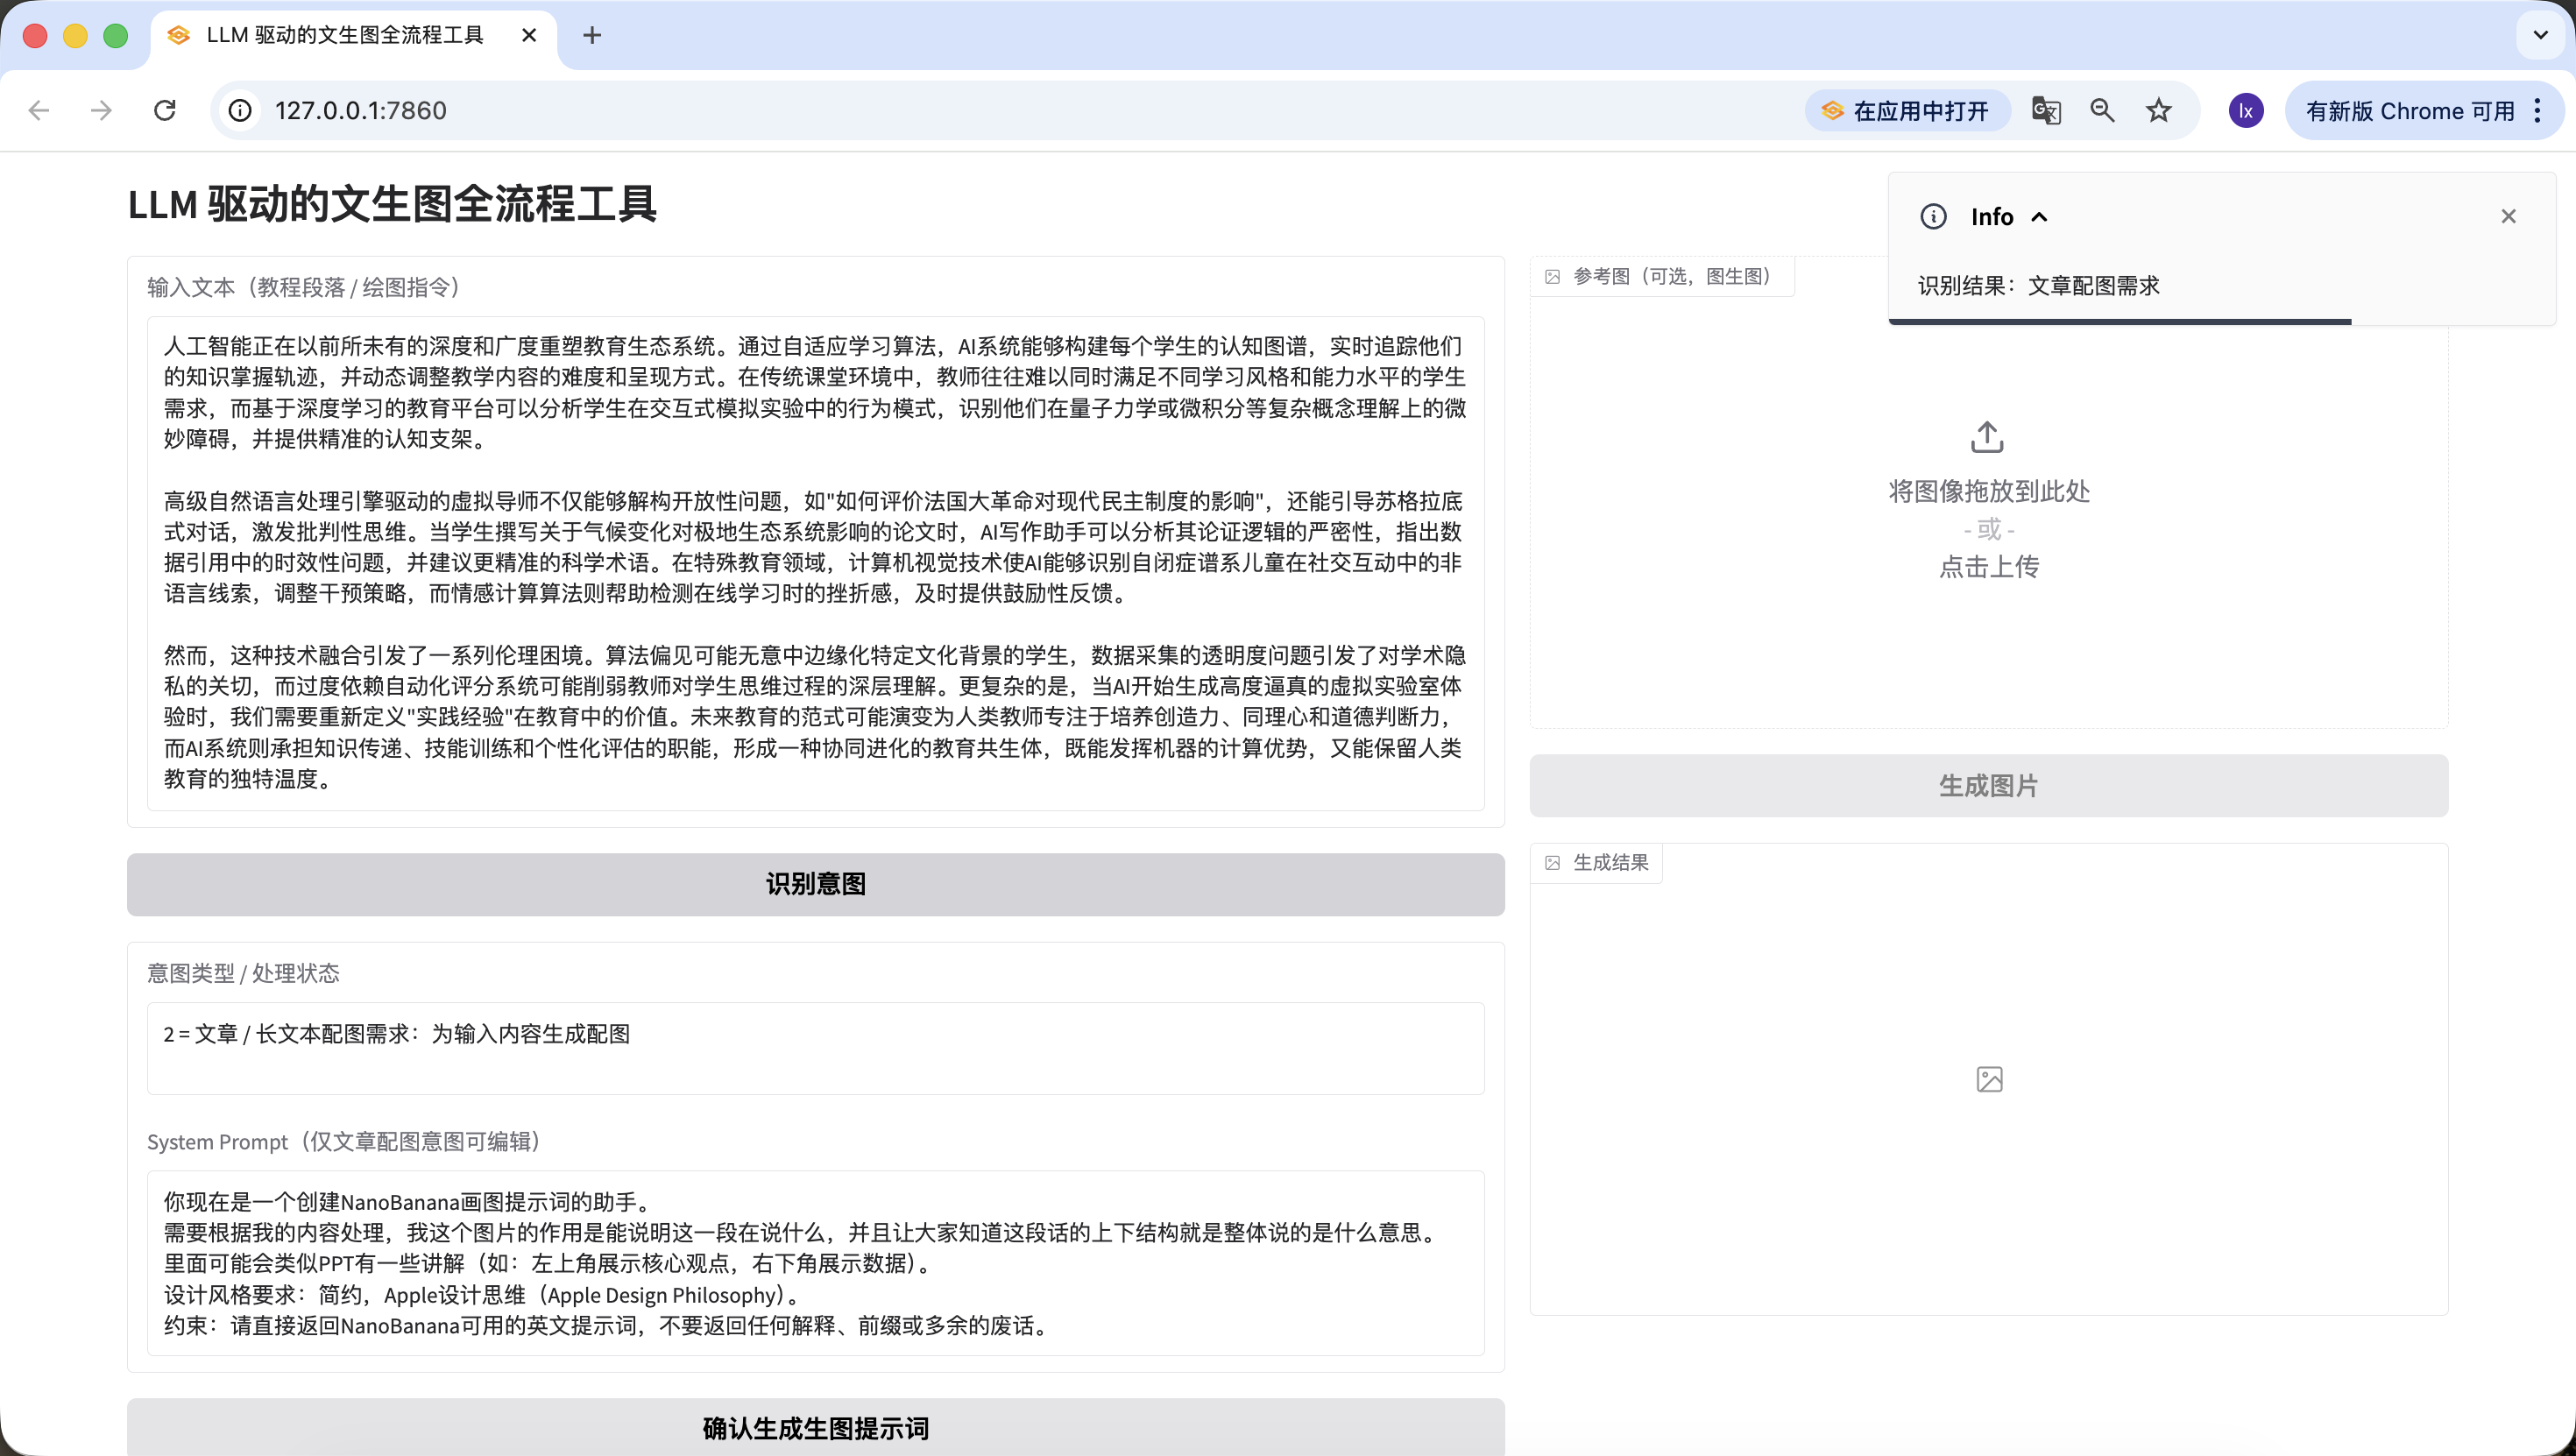
- Article/long text, here we used a passage generated by Doubao describing artificial intelligence. You can also try using your own essay paragraphs for testing.
Artificial intelligence is reshaping the education ecosystem with unprecedented depth and breadth. Through adaptive learning algorithms, AI systems can build cognitive maps for each student, track their knowledge mastery trajectory in real-time, and dynamically adjust the difficulty and presentation of teaching content. In traditional classroom environments, teachers often struggle to simultaneously meet the needs of students with different learning styles and ability levels, while deep learning-based education platforms can analyze students' behavioral patterns in interactive simulation experiments, identify their subtle obstacles in understanding complex concepts like quantum mechanics or calculus, and provide precise cognitive scaffolding.

Advanced natural language processing engine-driven virtual tutors can not only deconstruct open-ended questions like "How to evaluate the impact of the French Revolution on modern democratic systems," but also guide Socratic dialogue to stimulate critical thinking. When students write essays about the impact of climate change on polar ecosystems, AI writing assistants can analyze the rigor of their argumentation logic, point out timeliness issues in data citations, and suggest more precise scientific terminology. In special education, computer vision technology enables AI to recognize non-verbal cues from children on the autism spectrum during social interactions and adjust intervention strategies, while affective computing algorithms help detect frustration during online learning and provide timely encouraging feedback.

However, this technological integration raises a series of ethical dilemmas. Algorithmic bias may inadvertently marginalize students from certain cultural backgrounds, transparency issues in data collection raise concerns about academic privacy, and over-reliance on automated grading systems may weaken teachers' deep understanding of students' thinking processes. More complexly, when AI begins generating highly realistic virtual laboratory experiences, we need to redefine the value of "practical experience" in education. The future education paradigm may evolve into human teachers focusing on cultivating creativity, empathy, and moral judgment, while AI systems assume the functions of knowledge transmission, skill training, and personalized assessment, forming a co-evolving educational symbiosis that both leverages machine computational advantages and preserves the unique warmth of human education.
Also successfully detected~
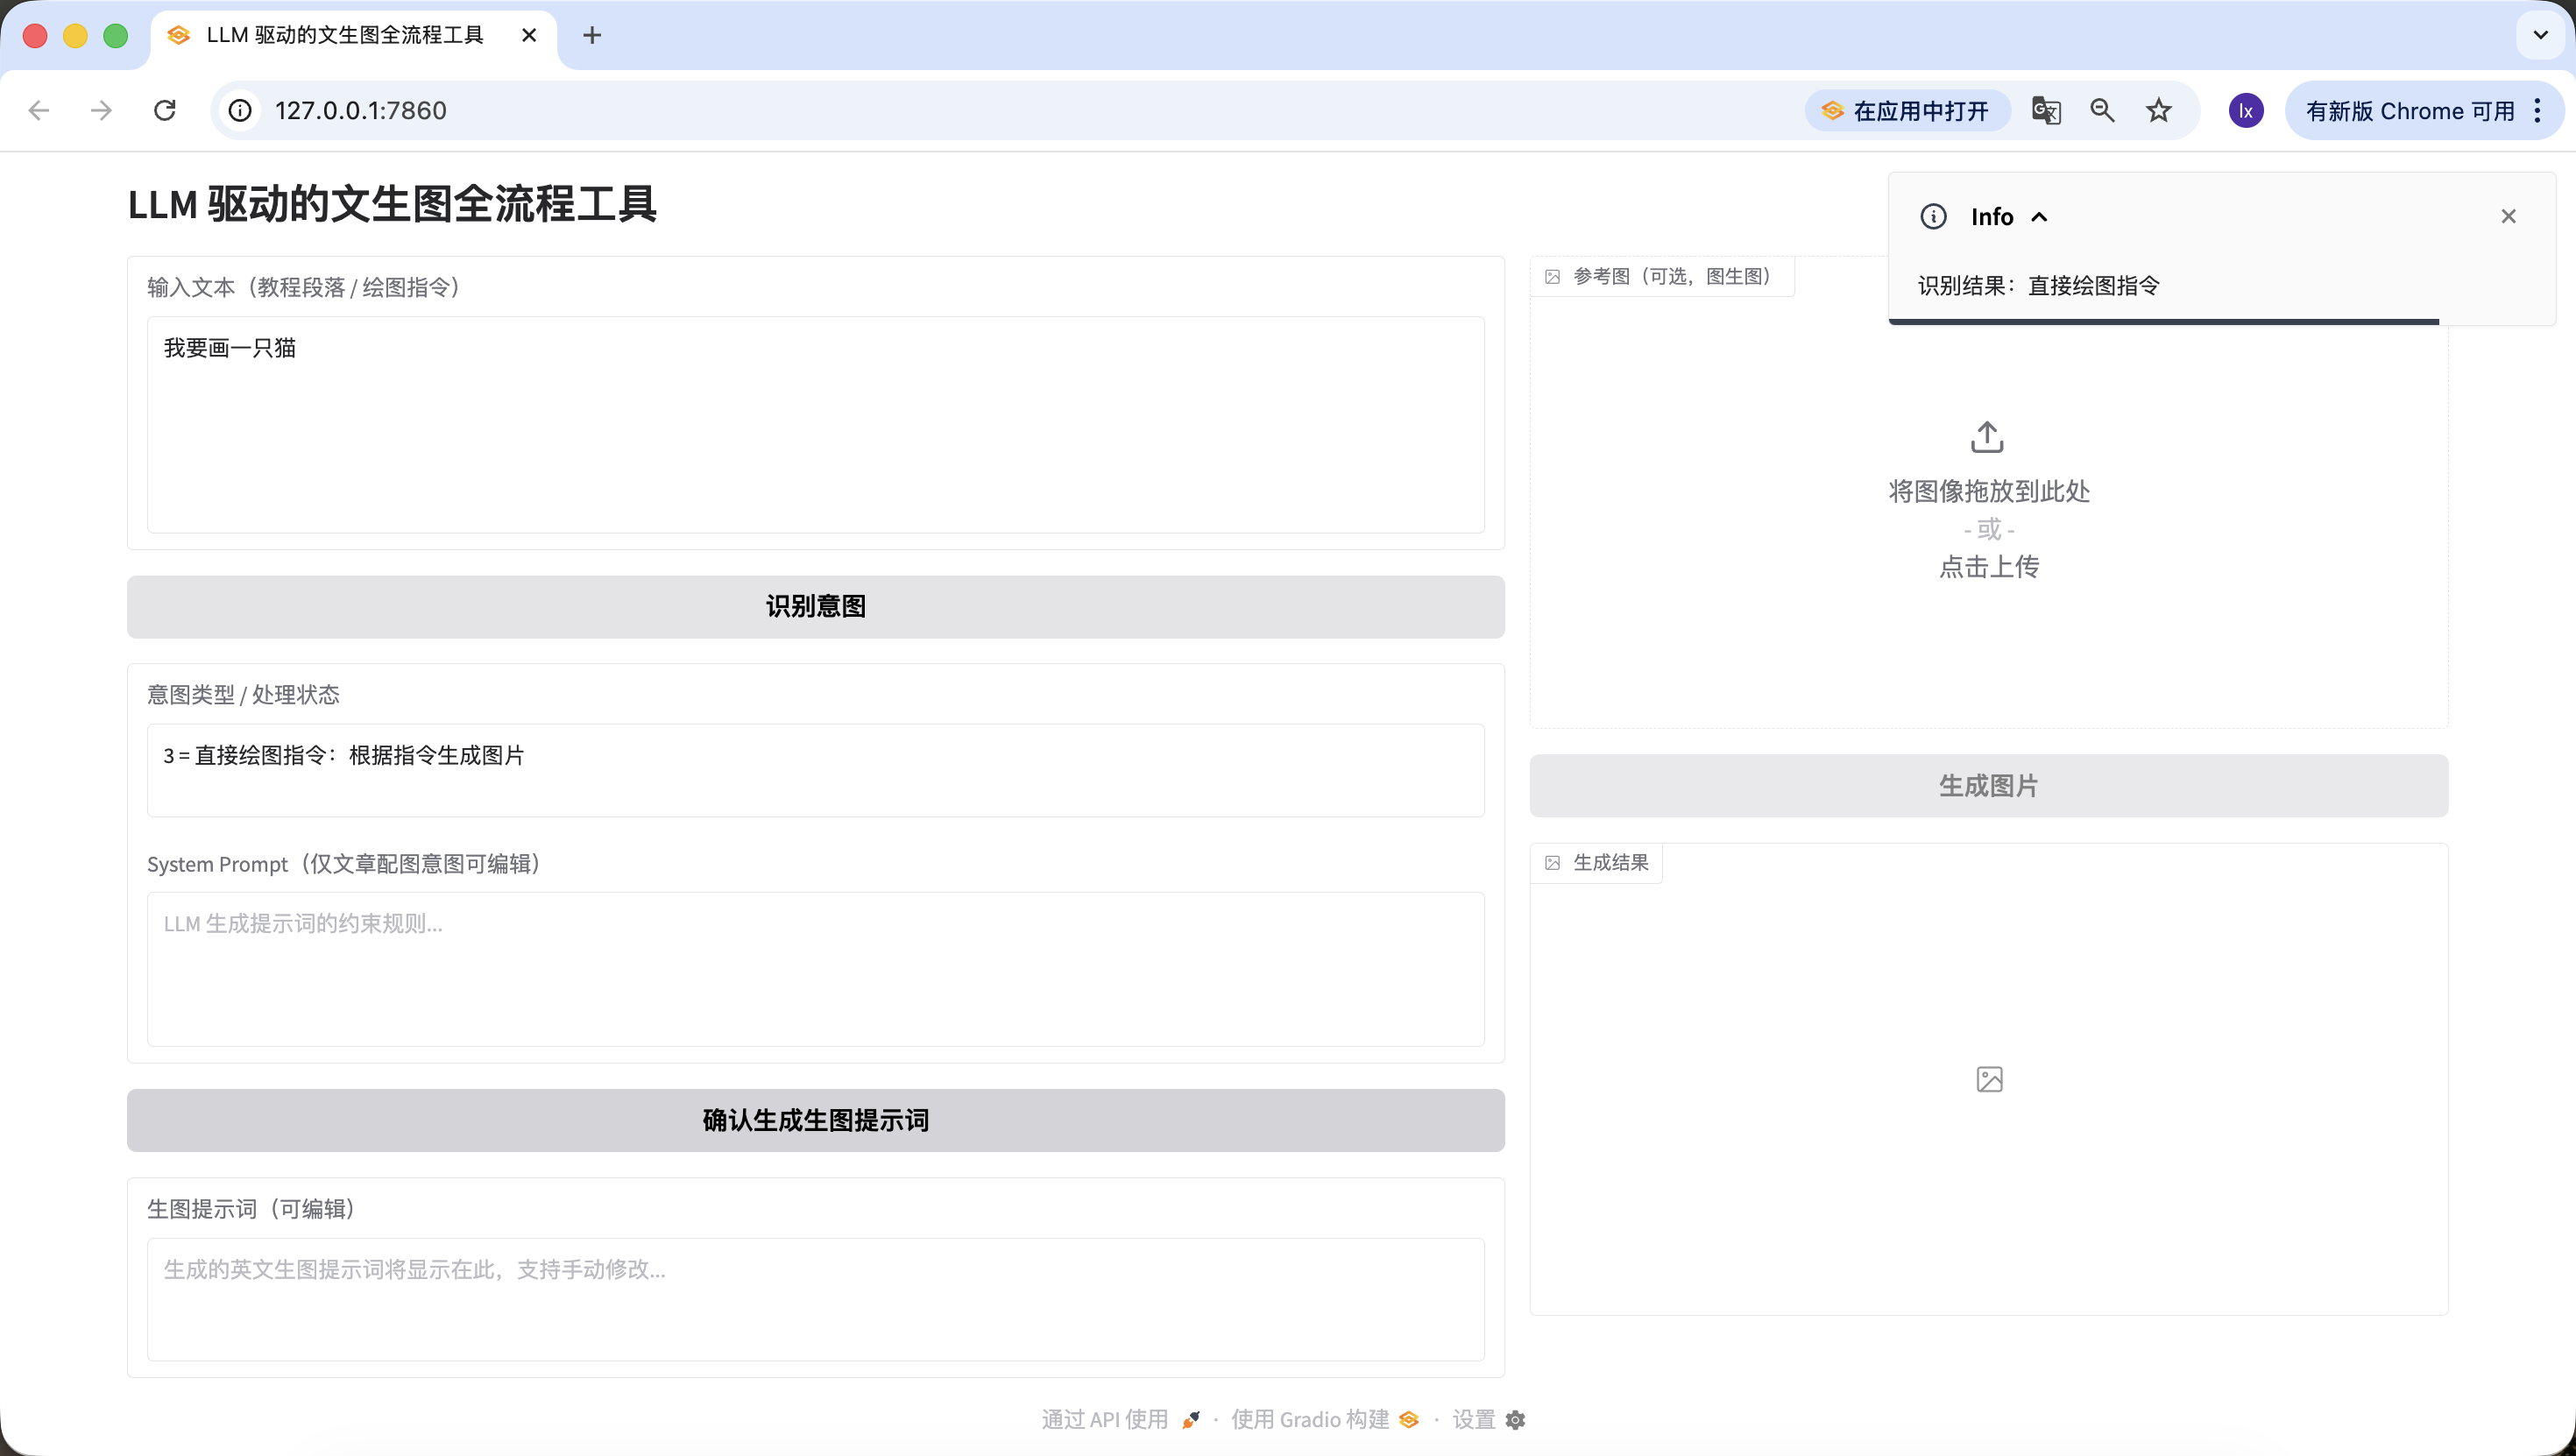
- Direct drawing instruction, here we entered "I want to draw a cat," which was also accurately detected.
At this point, we have successfully implemented the second phase — intent recognition.
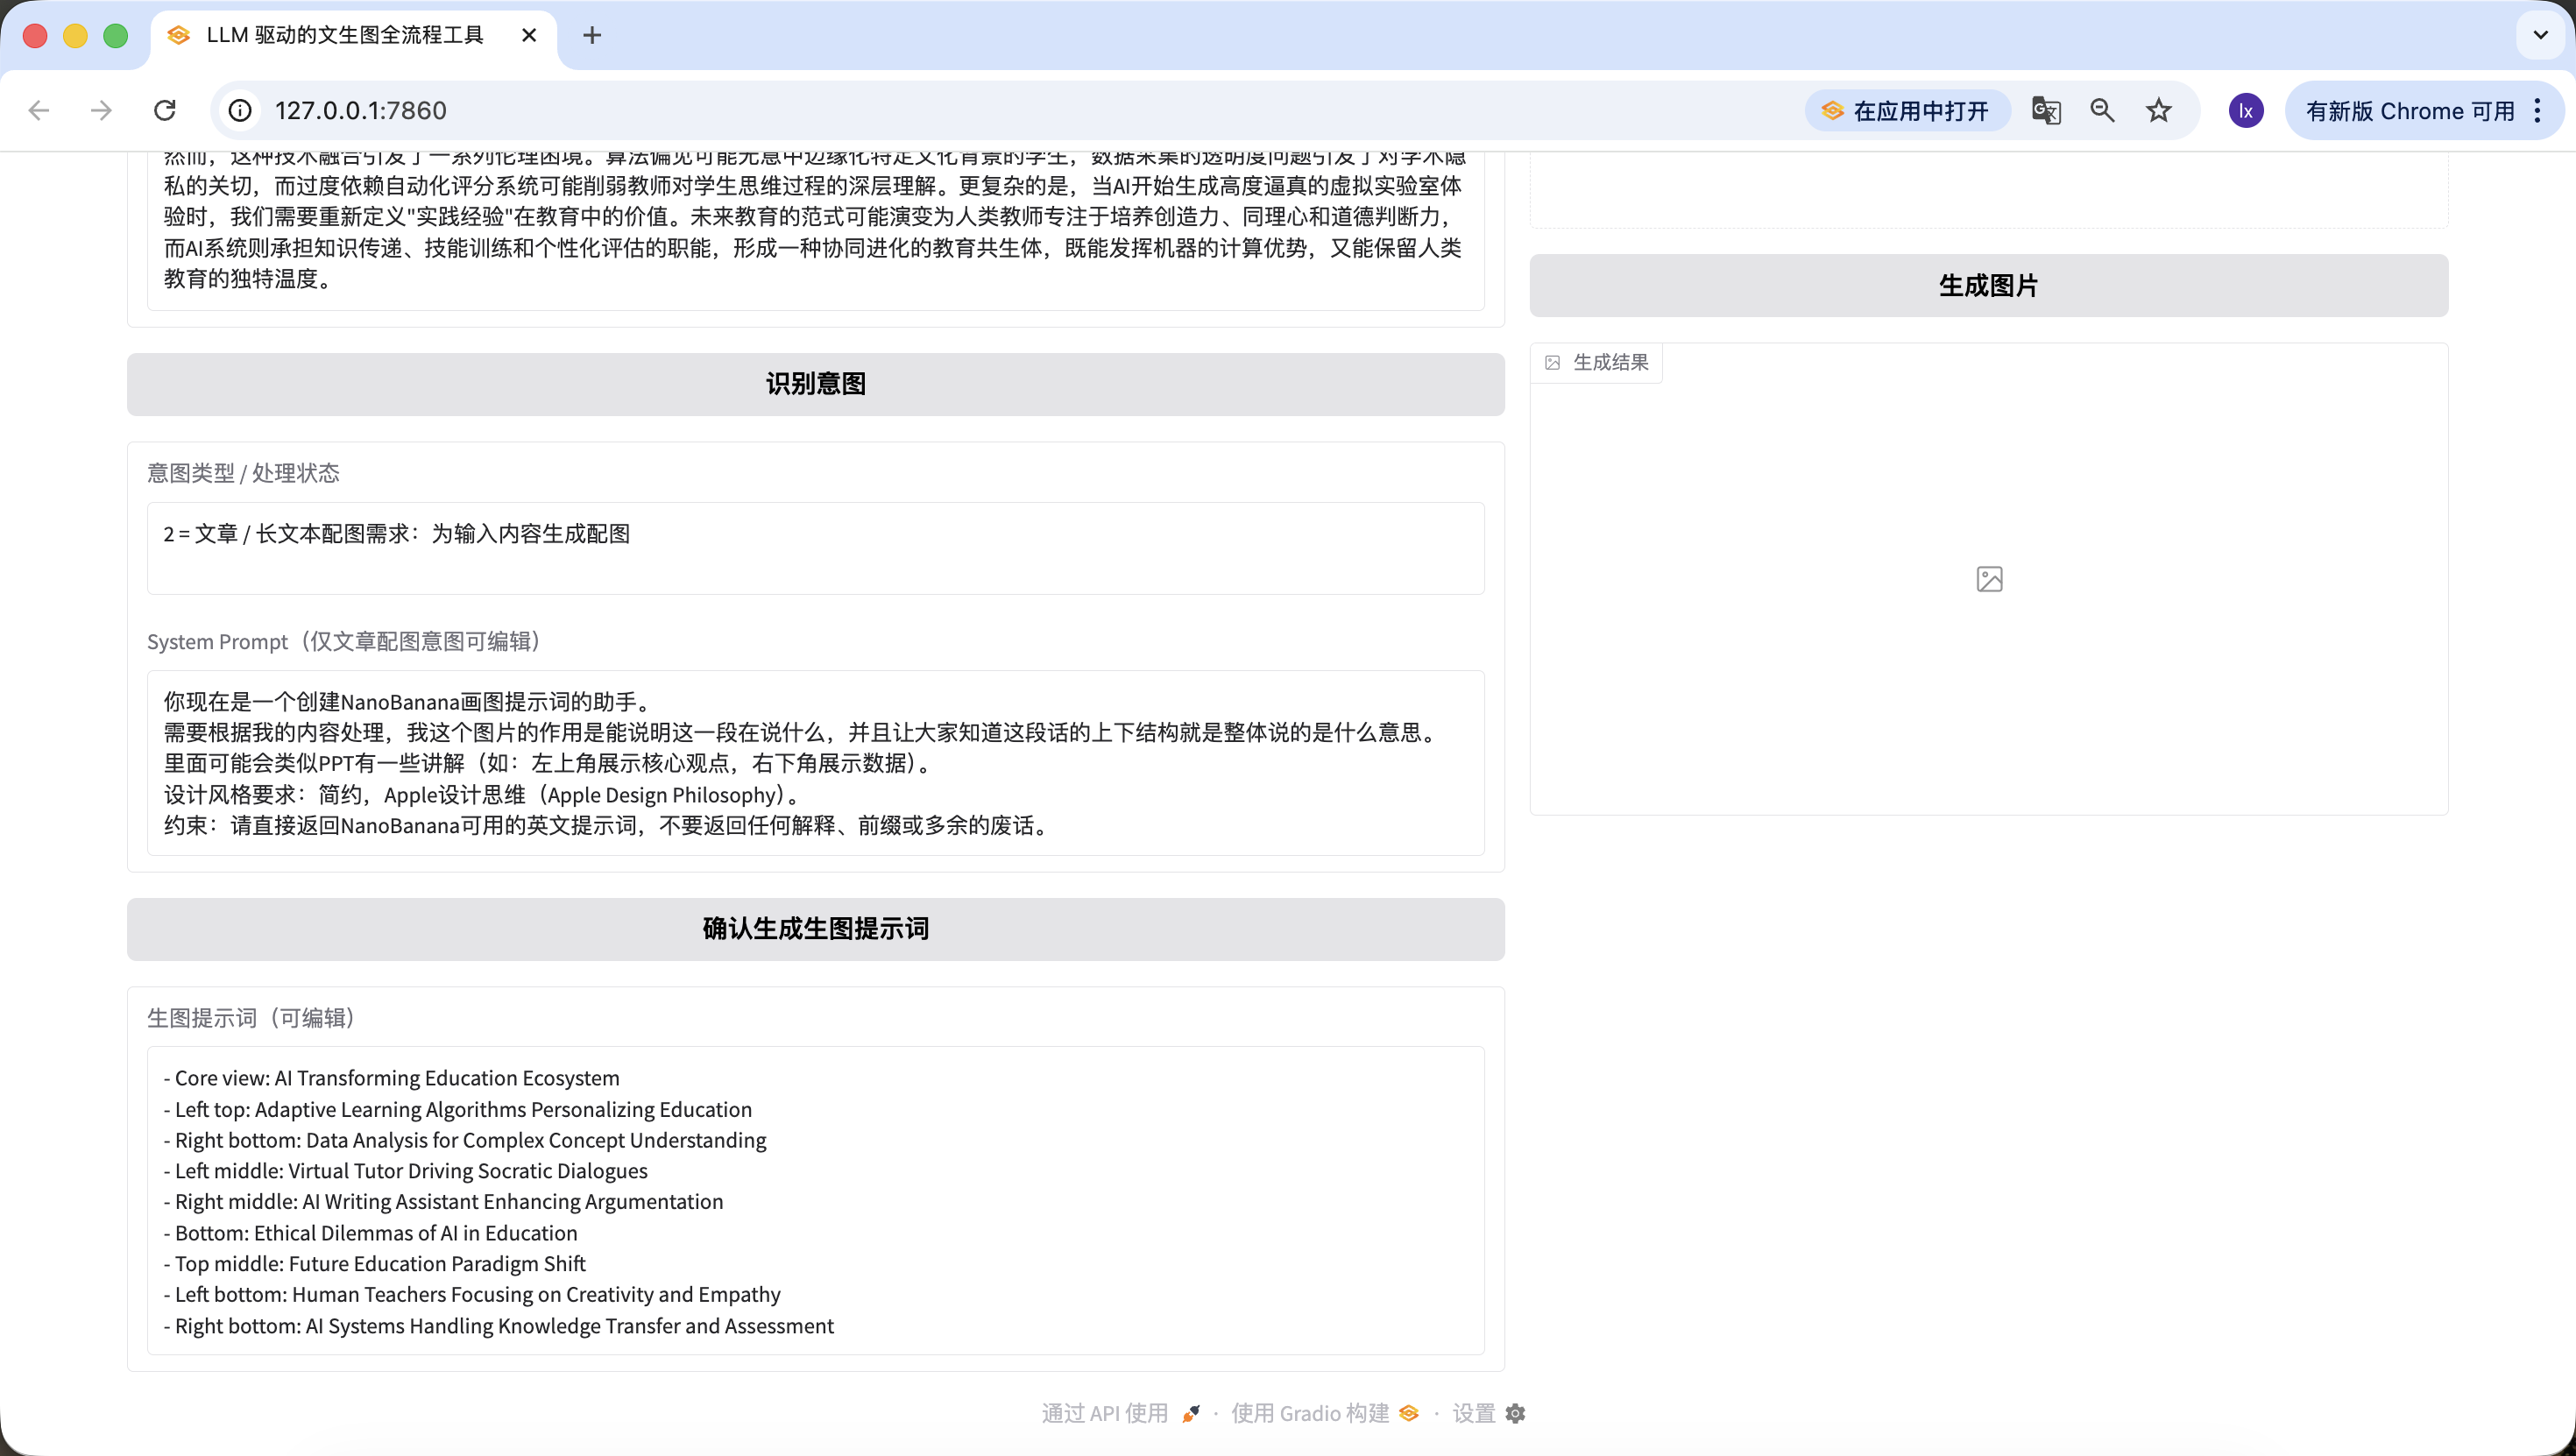
Phase 3: Image Prompt Generation Module (LLM Second Call)
After intent recognition, for articles or long text, there's still a very important step — generating drawing prompts, and this is the key focus of this Agent.
Module 3: Image Prompt Generation Module (LLM Second Call)
1. Task Objective
Based on intent recognition, implement the "Confirm Generate Image Prompt" button logic, call LLM to optimize text into English visual prompts suitable for drawing, fill into the edit box and link the "Generate Image" button.

2. Tech Stack Requirements
Same as Module 2, output complete code = Module 1 + Module 2 + this module;
Share the LLM_BASE_URL, LLM_API_KEY, LLM_MODEL defined in Module 2, no new keys needed.

3. Core Business Rules (Integrating Practical Prompt Assembly Logic)
Prompt Generation Input Rules (Must Strictly Follow)
Image prompt generation is no longer simple string concatenation, but building a standard Chat message list, code structure as follows:
python
Run
messages=[# System role: the final confirmed/edited system_prompt content from the web page{"role": "system", "content": final_system_prompt},# User role: carries data to be processed, clarifies task objective{"role": "user", "content": f"Please generate visual prompts for the following content:\n\n{user_input}"}]
When intent is 2: System content takes the user-edited system_prompt final version;
When intent is 3: System content takes the default rules filled in disabled state
user_input is the original text the user initially entered in the input_text box.
Practical Verified System Prompt Preset (Hardcoded in Code)
python
Run
SYSTEM_PROMPT_DEFAULT = """You are now an assistant for creating NanoBanana drawing prompts.
You need to process based on my content. The purpose of this image is to illustrate what this passage is saying, and let everyone understand the overall structure of this text.
It may include some PPT-like annotations (e.g., top left shows core viewpoint, bottom right shows data).
Design style requirements: minimalist, Apple Design Philosophy.
Constraint: Please directly return English prompts usable by NanoBanana, do not return any explanations, prefixes, or unnecessary words."""
LLM Call Constraints
Share the same LLM_BASE_URL, LLM_API_KEY, LLM_MODEL with Module 2;
temperature=0.7 (ensure prompt creativity and adaptability);
max_tokens=200 (limit output length, matching prompt constraints);
Strictly use the above standard Chat message list structure, string concatenation is prohibited.
Example Input/Output (Core Reference)
Example Input 1 (Article Illustration Intent): Original text: "How AI is changing education: With the development of AI technology, the role of teachers has shifted from knowledge transmitters to guides, AI assistants can help students complete personalized learning, and human-machine collaboration in classrooms has become the norm." Final System Prompt: SYSTEM_PROMPT_DEFAULT (unmodified) Expected output: "Minimalist illustration, Apple Design Philosophy, 1024x1024. Top left shows 'AI + Education' core concept, bottom right shows data of teacher-student-AI collaboration, soft color palette, clean lines, no redundant elements."
Example Input 2 (Direct Drawing Instruction): Original text: "Draw an Apple-style cat sitting next to a MacBook" Final System Prompt: SYSTEM_PROMPT_DEFAULT (disabled state) Expected output: "Minimalist cat, Apple style, 1024x1024, sitting next to a silver MacBook, clean white background, soft shadows, geometric shapes, no extra details."
Prompt Output Mandatory Constraints
Pure English, no Chinese;
Must include Apple Design Philosophy/Apple style + 1024x1024;
Length 50-200 characters, verified in code;
No additional explanations, prefixes, or unnecessary words, only return the prompt itself.

4. Component Linking Rules
Generation successful: fill prompt into generation_prompt box, activate generate_btn, append "Prompt generated successfully, can edit then generate image" to intent_status;
Generation failed: show specific reason (such as API call failure, length not met), generate_btn remains disabled, generation_prompt box empty;
User manually edits / clears generation_prompt box:
When cleared, automatically disable generate_btn;
When non-empty, keep generate_btn activated.

5. Exception Handling
API call failure: friendly prompt "Prompt generation failed: {specific error message}", no crash;
Prompt validation failure: clearly state reason (such as "Apple style not included" "length only 40 characters"), allow retry;
Response parsing failure: prompt "Unable to parse LLM return result, please retry".

6. Output Requirements
Complete runnable code, just replace LLM_API_KEY to use;
Clear code structure, complete comments, beautiful and concise interface;
Strictly implement standard Chat message list structure, parameters and example logic consistent;
Include prompt length and content validation logic, friendly error messages.
Similarly, test with the text from the second phase.
It's worth noting that the preset System Prompt for generating image prompts here is:
You are now an assistant for creating NanoBanana drawing prompts. You need to process based on my content. The purpose of this image is to illustrate what this passage is saying, and let everyone understand the overall structure of this text. It may include some PPT-like annotations (e.g., top left shows core viewpoint, bottom right shows data). Design style requirements: minimalist, Apple Design Philosophy. Constraint: Please directly return English prompts usable by NanoBanana, do not return any explanations, prefixes, or unnecessary words.
If you want to switch to another preset template, you can modify it in the earlier prompt, or directly modify it through conversation in Trae.
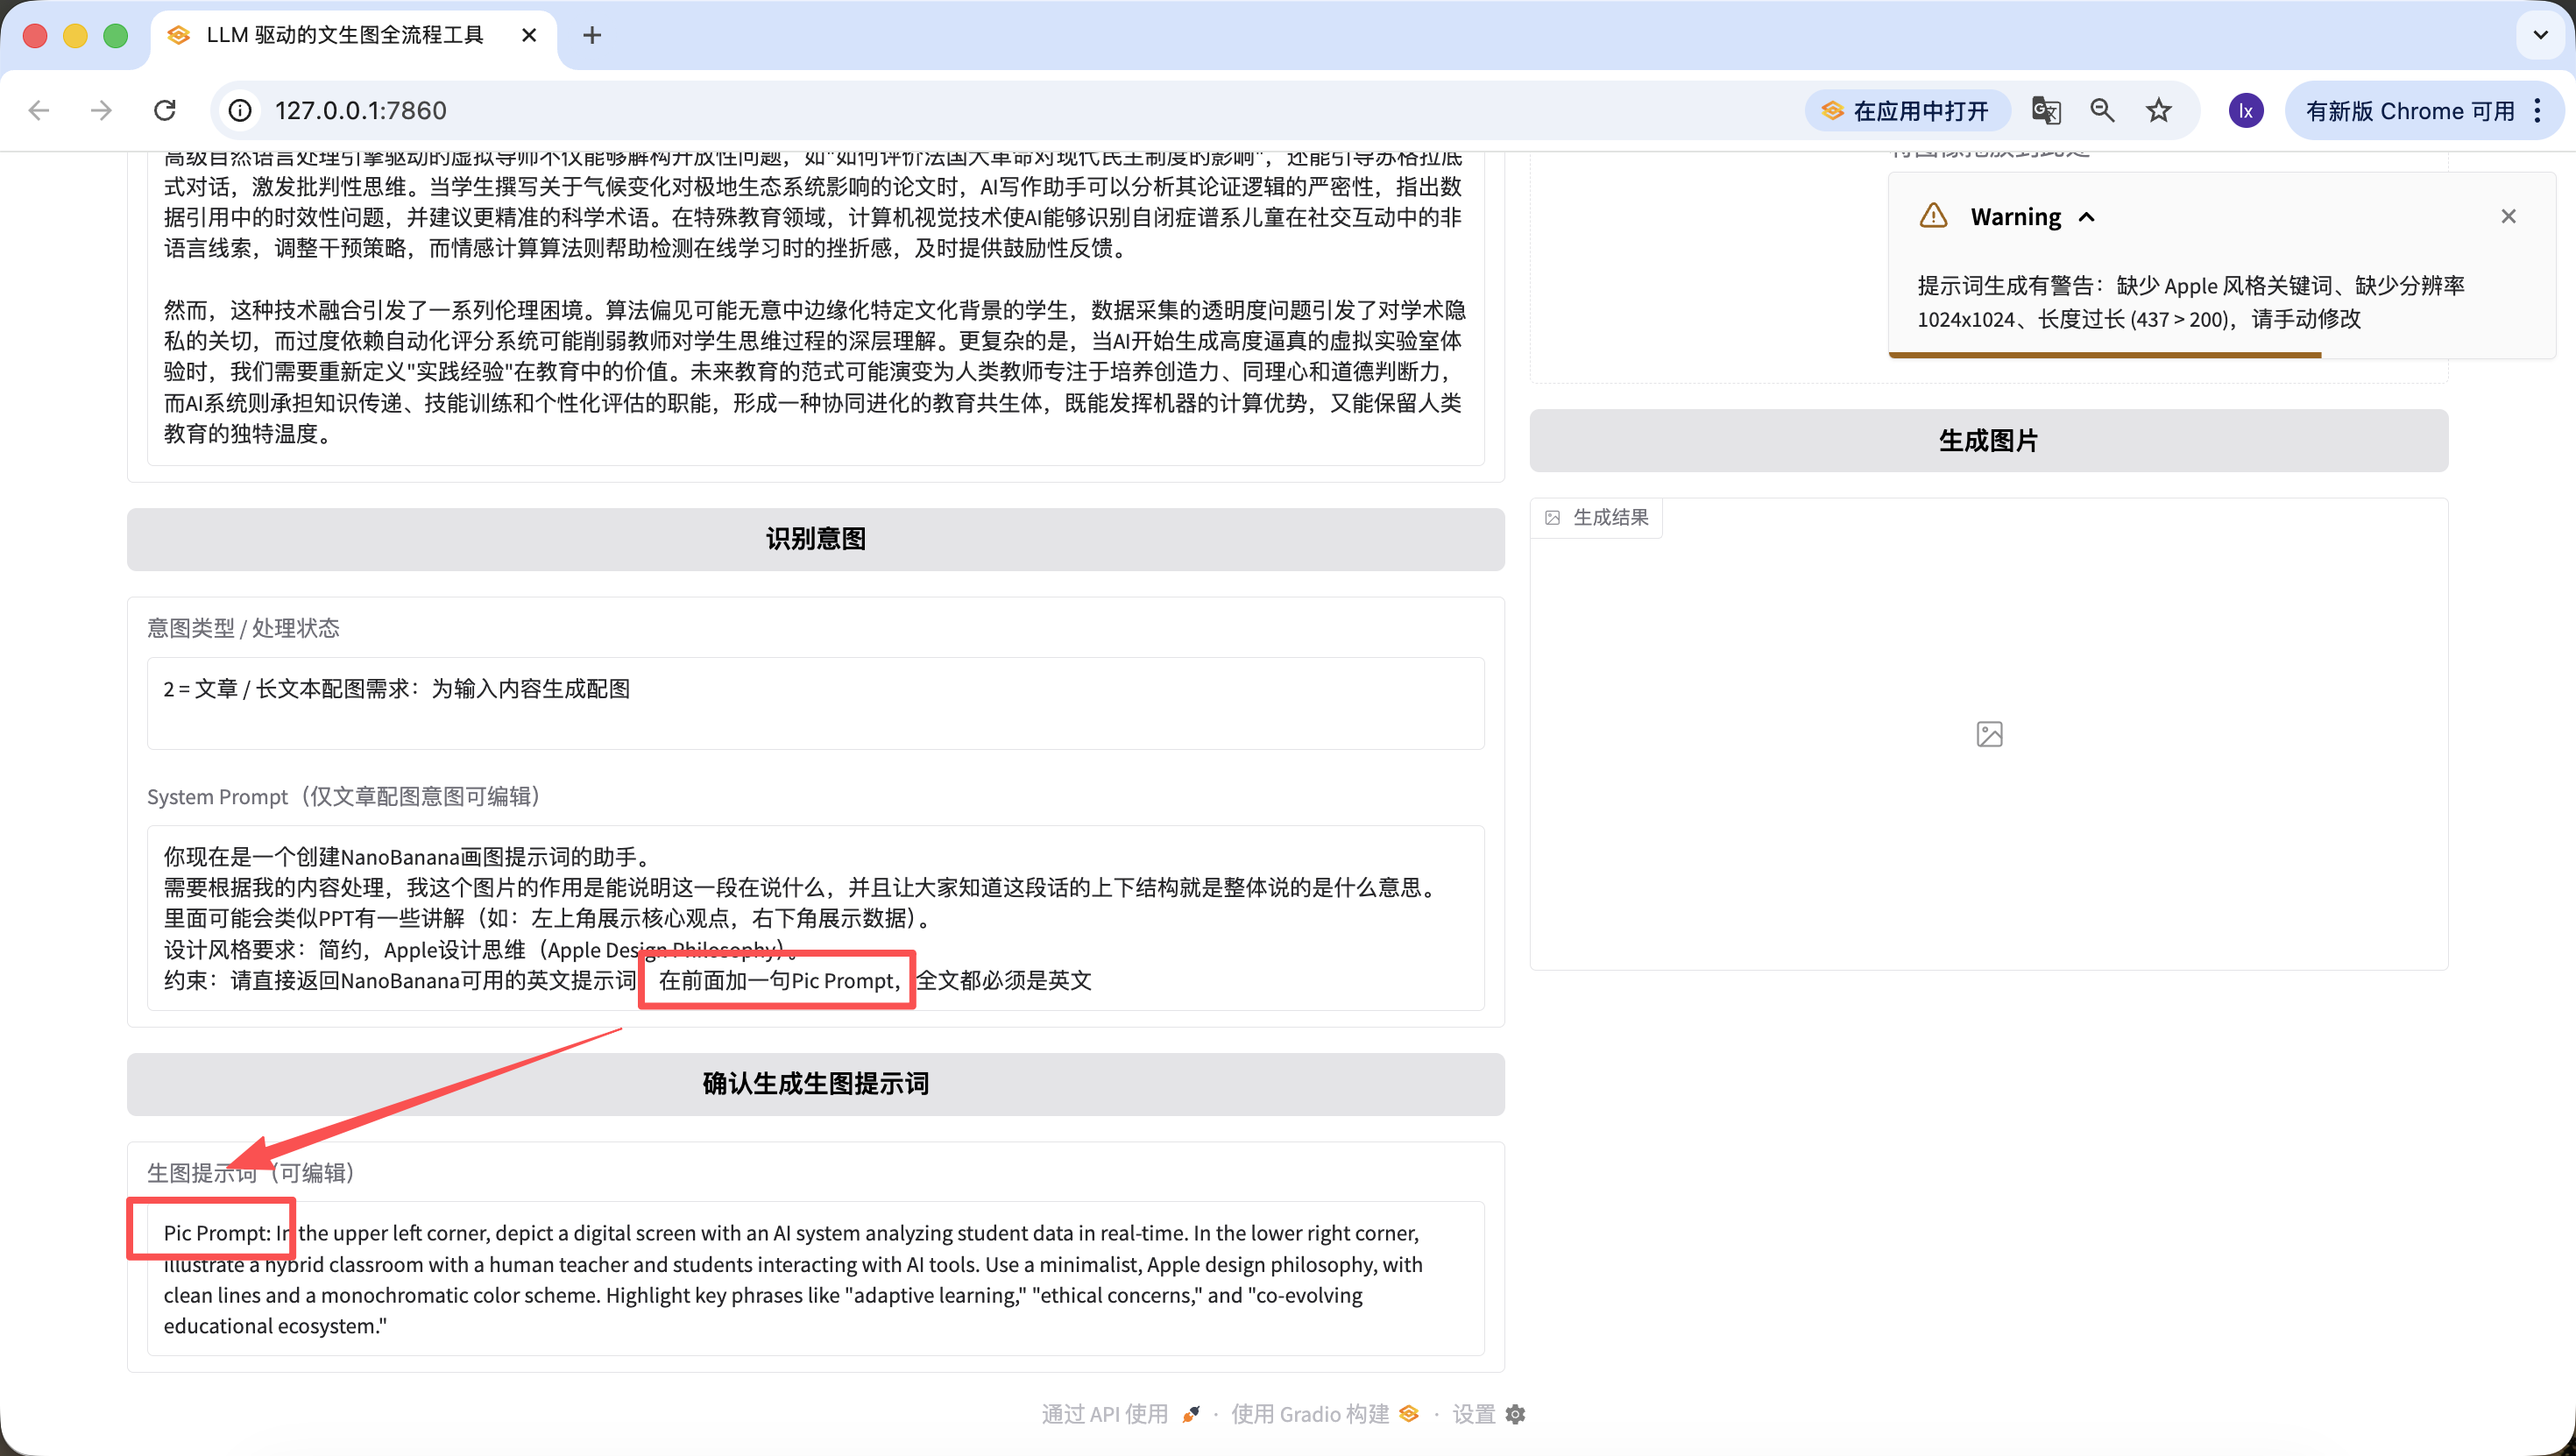
Besides modifying the underlying code, we can also quickly edit on the web page. For example, I added a sentence here, "add 'Pic Prompt' at the beginning," and you can see that the newly generated prompt also includes it at the front. This design is to make it easy to quickly modify the System Prompt for generating prompts, helping us quickly switch styles.
Phase 4: Nanobanana Text-to-Image / Image-to-Image Module
Finally, we've reached the last step — without connecting to an image generation model, it's not a complete Agent!
Module 4: Nanobanana Text-to-Image / Image-to-Image Module (Final Version)
1. Task Objective
Implement the "Generate Image" button logic, call the real Nanobanana API, support text-to-image / image-to-image, parse Base64 and display images.
2. Tech Stack Requirements
Based on Gradio 4.0.0+ Blocks;
Dependencies: requests, pillow, base64, io, re;
Complete code = Module 1+2+3 + this module.
3. Core API Configuration (Practical Verified Hardcoded)
Hardcoded configuration:
python
Run
# Hardcoded API configuration
NANOBANANA_API_URL = "https://api.zyai.online/v1/chat/completions"
NANOBANANA_MODEL = "gemini-2.5-flash-image"
NANOBANANA_API_KEY = "" # User replaces themselves
Authentication: Header Authorization: Bearer {NANOBANANA_API_KEY}.
4. Image Preprocessing Requirements (Must Implement)
Implement function image_to_base64_data_uri (ref_image_path), core logic:
Convert PIL image to PNG format;
Auto-scale to 1024x1024 resolution;
Convert transparent channel to white background;
Encode as Base64, return format: data:image/png;base64,....
5. Request Construction Rules (Strictly Follow Practical Branch Logic)
Core Function Definition
Implement function generate_image (prompt, ref_image_path):
Parameters: prompt (generation_prompt box content), ref_image_path (ref_image uploaded file path);
Returns: PIL Image (displayed in result_image) or error message.
Logic Branch 1: Pure Text-to-Image (ref_image_path is empty)
python
Run
messages = [{"role": "user", "content": prompt}]
Logic Branch 2: Image-to-Image (ref_image_path has value)
python
Run
# First call image preprocessing function
image_base64 = image_to_base64_data_uri(ref_image_path)
messages = [{"role": "user","content": [{"type": "text", "text": prompt},{"type": "image_url", "image_url": {"url": image_base64}}]}]
6. Response Parsing Requirements (Must Be Compatible with Two Formats)
Extract image Base64 from choices[0].message.content, supporting:
Structured JSON returned image_url field;
Markdown format ;
Unified extraction of Base64 encoding, decode then convert to PIL Image return.
7. Component Linking and Exception Handling
Generation successful: display PIL Image in result_image, intent_status prompts "Image generation successful";
Generation / parsing / upload failure: display clear text message in intent_status (such as "Base64 parsing failed" "API call timed out"), no crash.
8. Output Requirements
Complete runnable code, just replace LLM_API_KEY and NANOBANANA_API_KEY to run directly, full process available, branch logic strictly matches practical version.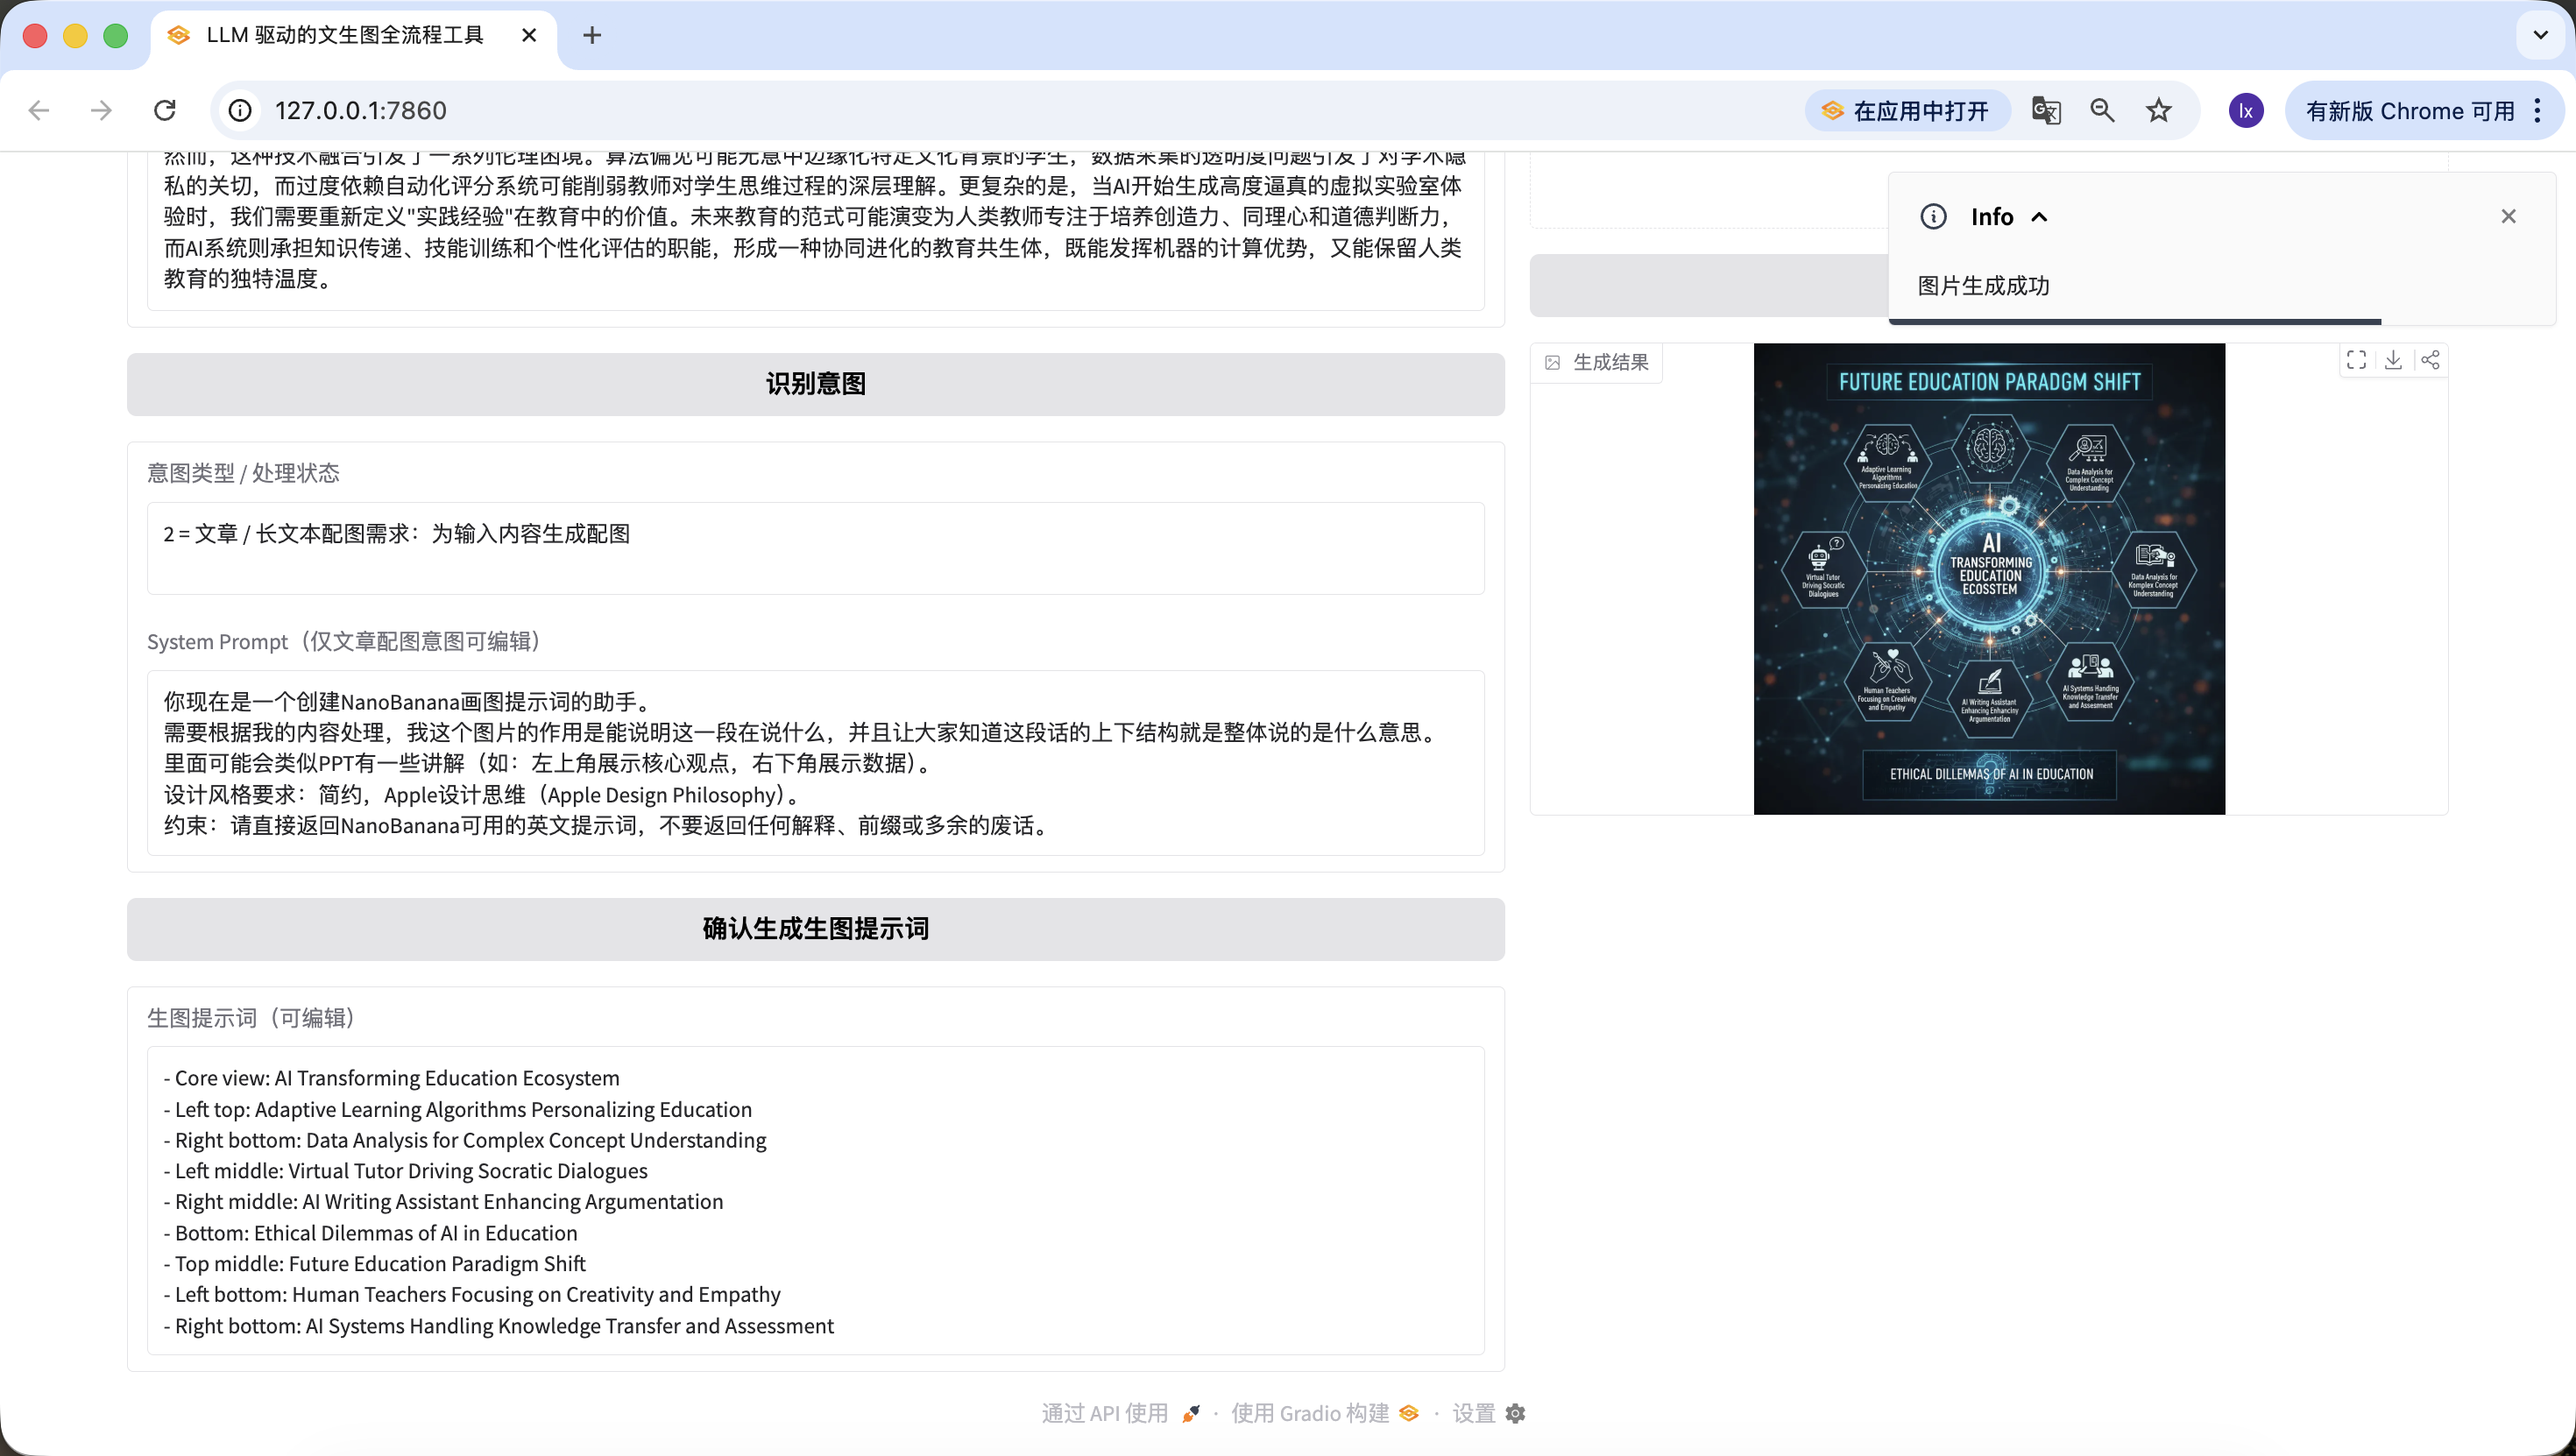
How exciting! We've finally successfully generated the first image from this Agent. Look closely at the generated image — it matches our text and prompts. At this point, you've basically implemented your own Agent!
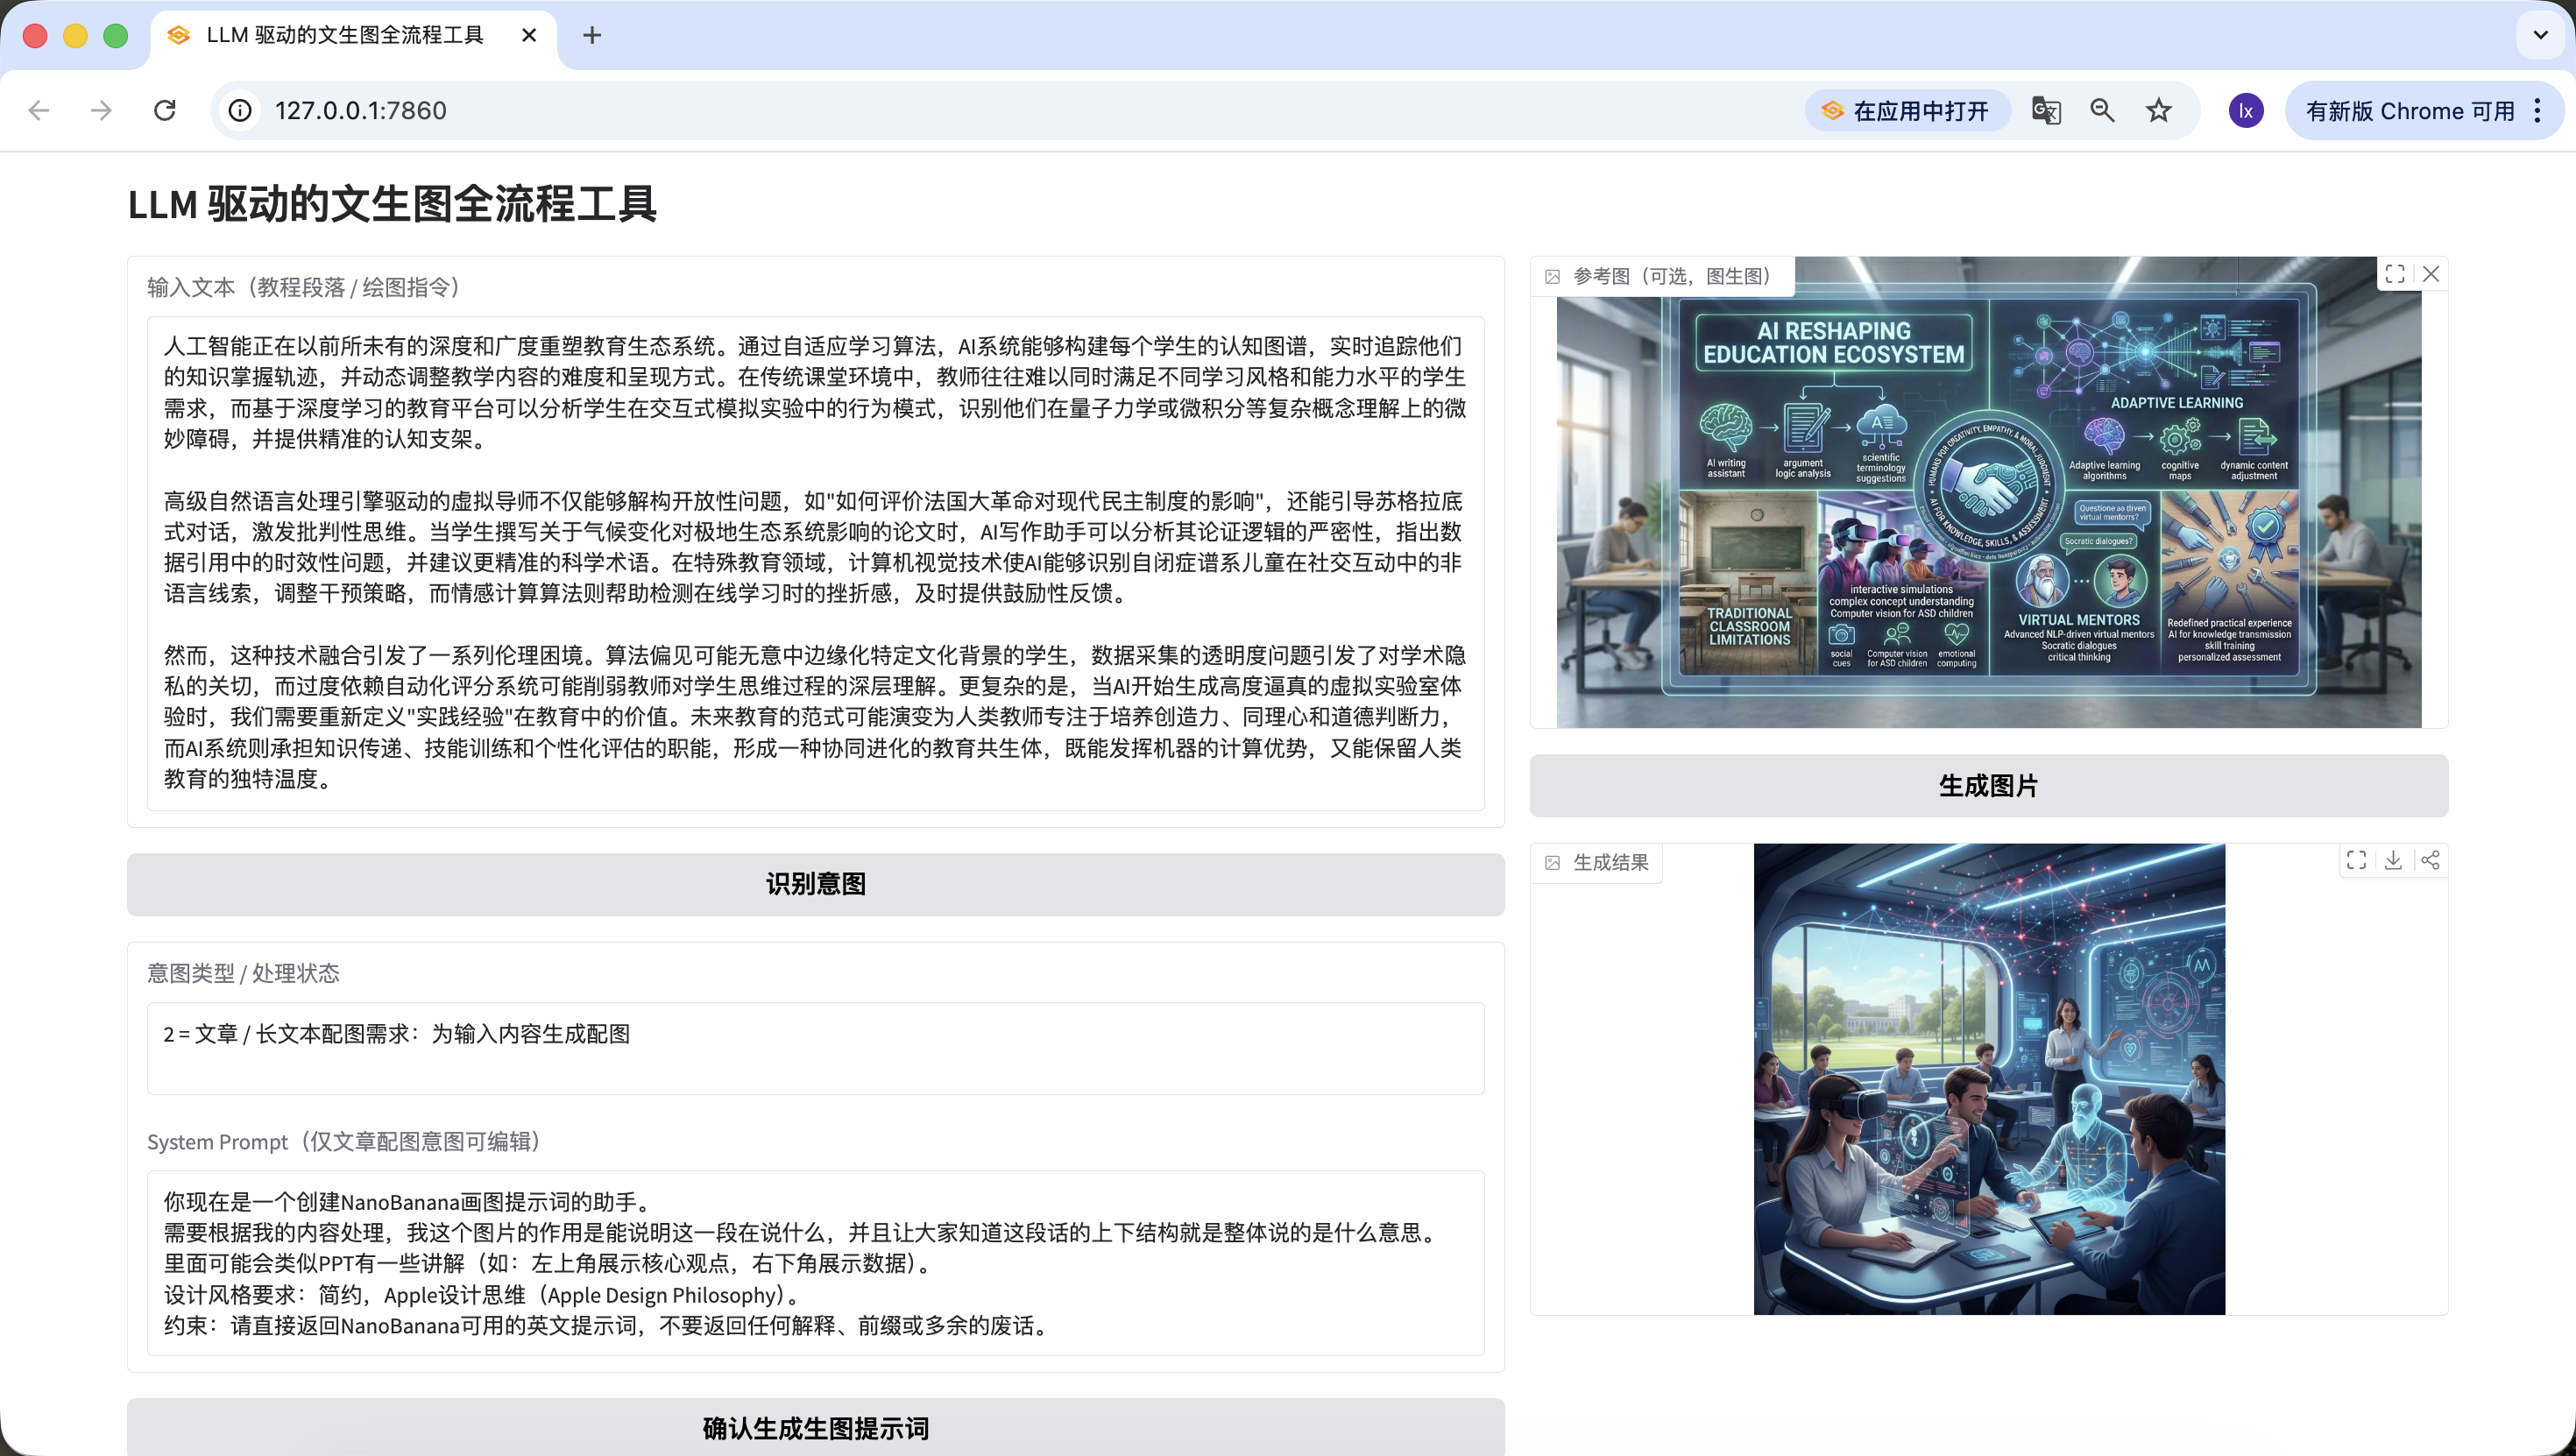
We've also added image-to-image functionality — upload your favorite image, and the AI will automatically reference its style.
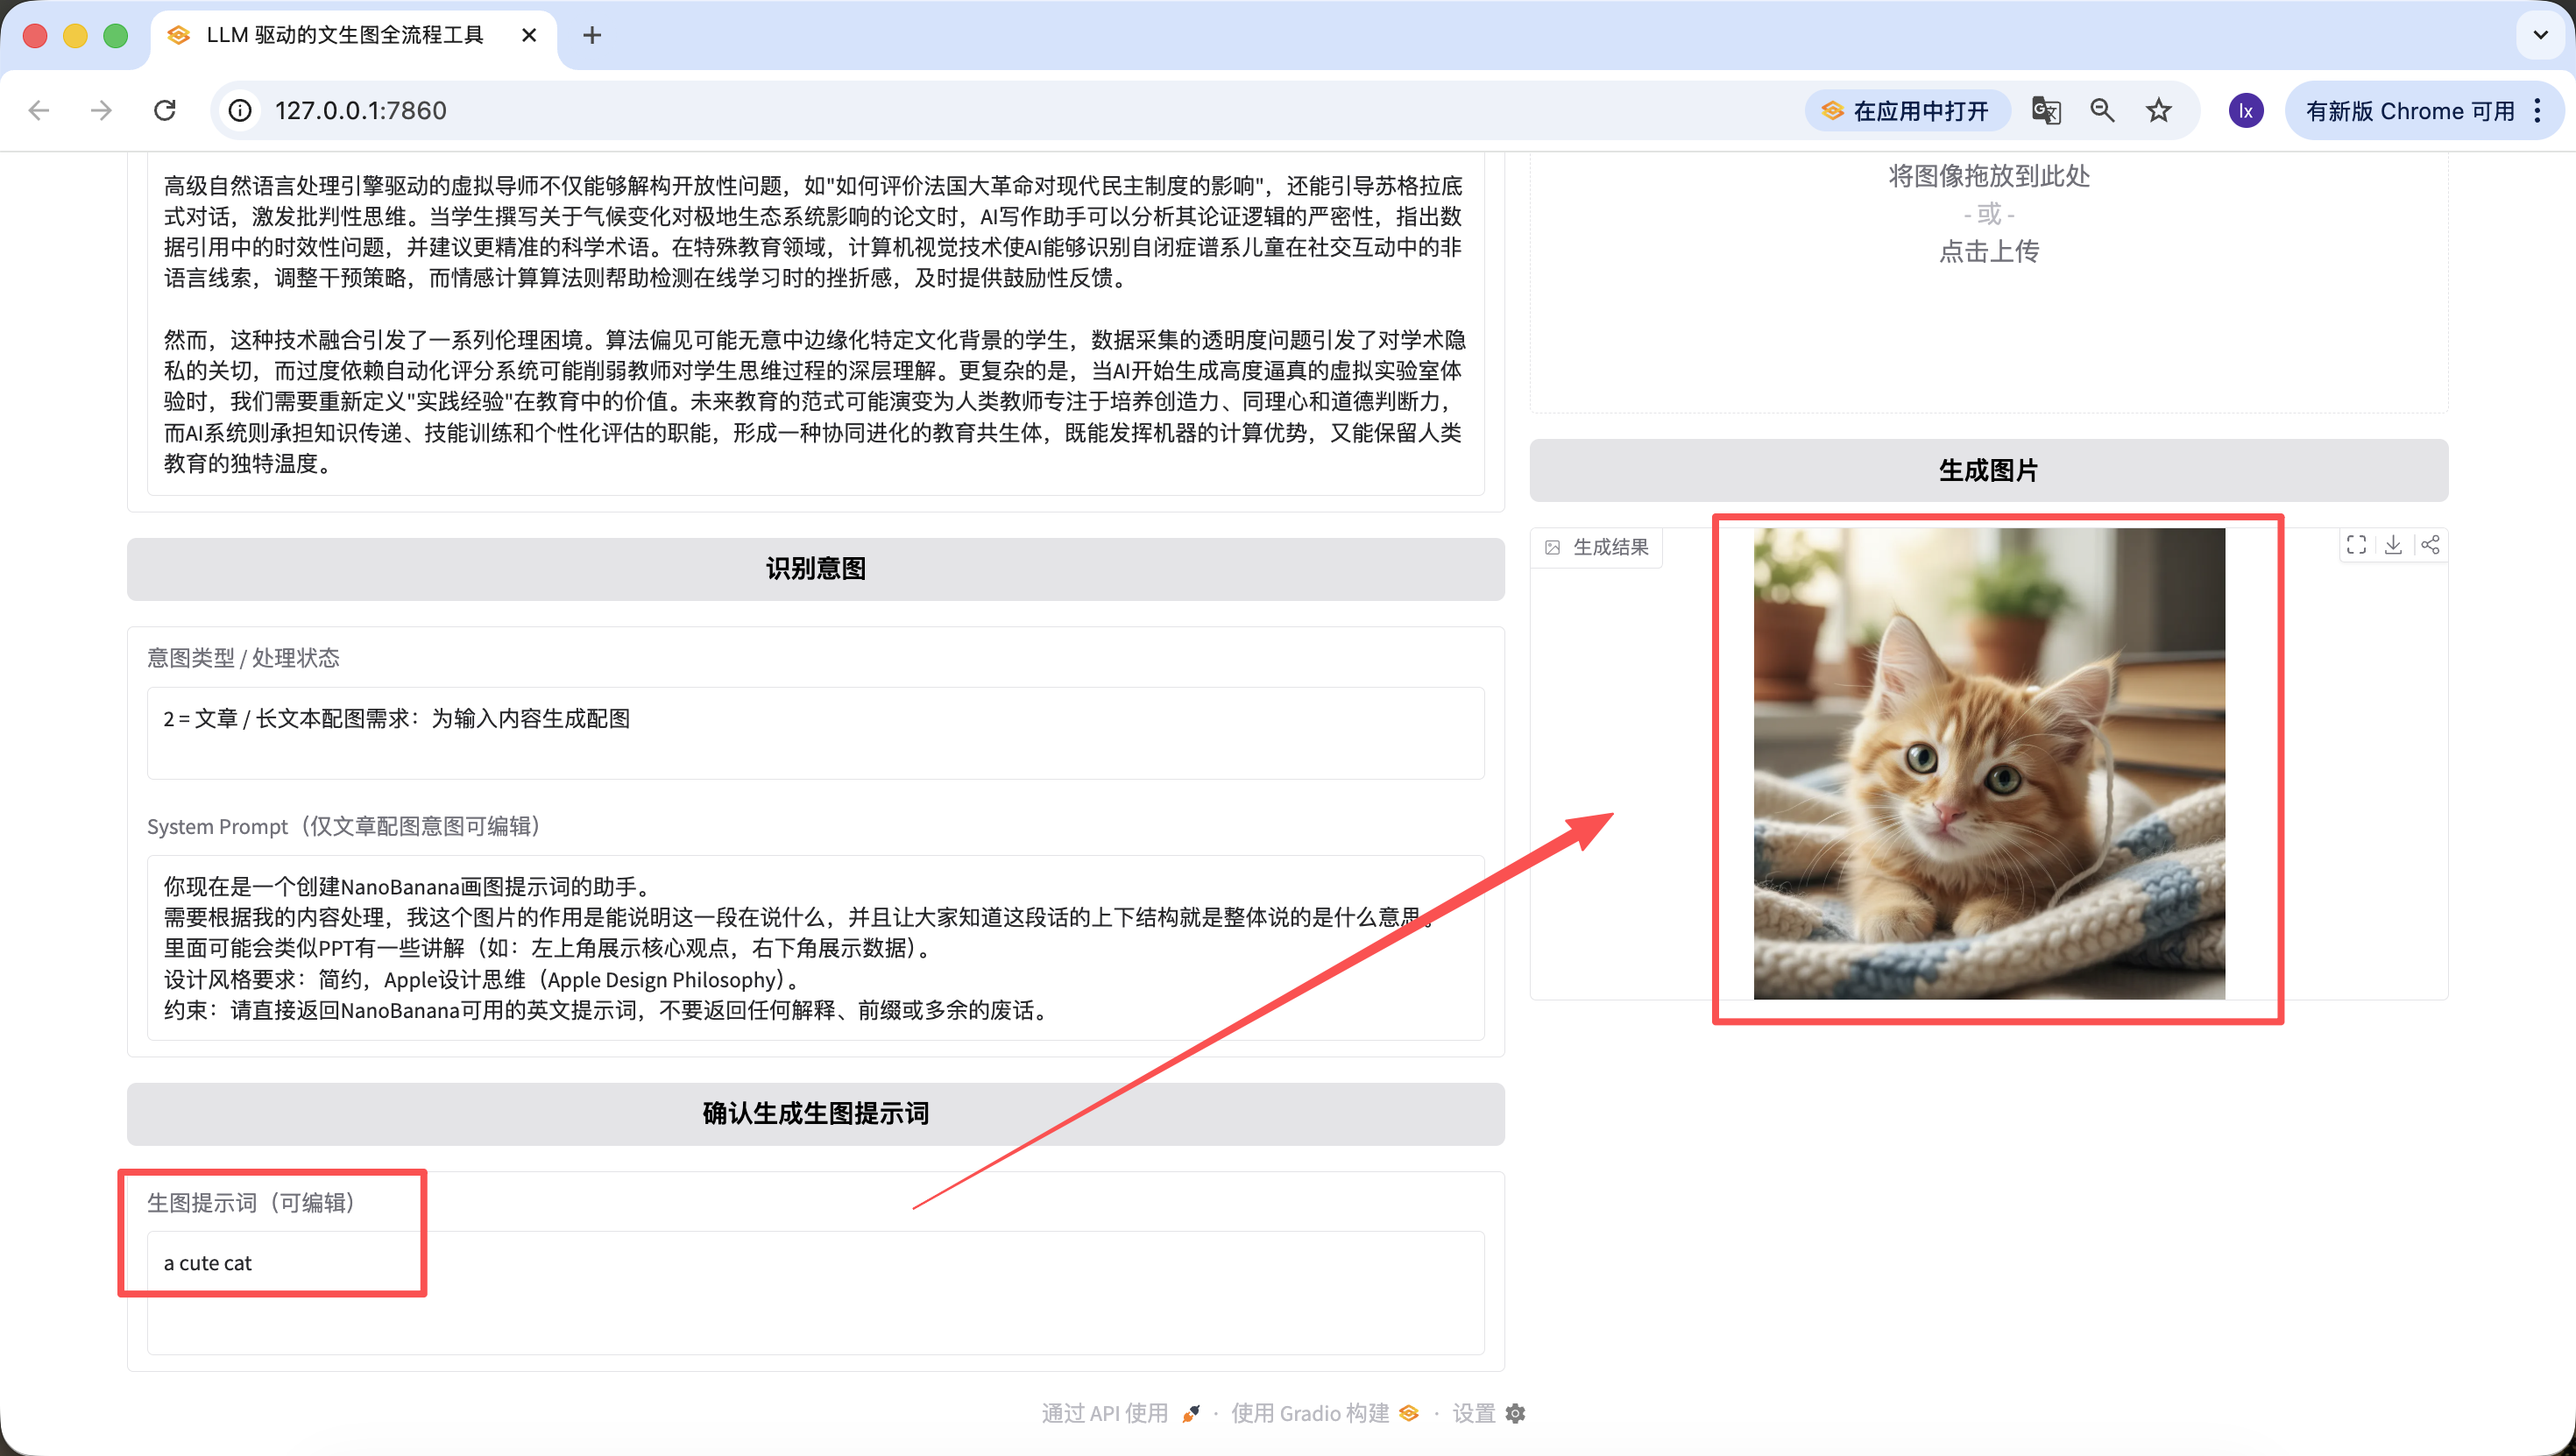
It's worth mentioning that the prompts generated in previous steps can also be edited on the web page, and we use the prompt at the time the button is finally clicked as the final version. Even if I change it to "a cute cat" here, the final generated image will only be a cute kitten.
Chapter 4: Summary
Woohoo! Finally finished writing.
Honestly, even I couldn't help but breathe a long sigh of relief when I finished the last line, let alone you who have been following along all the way here. Being able to run through this entire process completely is already impressive in itself. It means you really put your hands on the keyboard and got things done step by step. Bravo!
While writing this content, I kept thinking about what we really want to leave you with. The answer is actually not model names, parameters, or some fixed formula — it's about helping you gradually build a sense for: which things can be safely entrusted to AI for understanding and planning, and which places just need you to decide the direction. Once this division of labor is established, many generation processes that originally seemed complex will start to flow naturally.
Looking back, this path is actually not complicated. Figure out the problem you want to solve, hand the long text to the language model for decomposition, then pass the organized visual intent to the drawing model for rendering, and finally package this entire process into your own little assistant. At this point, you're no longer just "using a model" — you're building a system that can work alongside you long-term. And that is exactly what this tutorial most wants to give you.
But you've already done great! I believe that having learned this far, you already have a preliminary grasp of Vibe Coding. Give yourself a little break and rest up!