发布目录选错,或创空间仓库根目录没有 index.html。
Publish Your Vibe Coding Project on ModelScope
Your webpage finally works. The next step is to put it somewhere that classmates, friends, or real users can open directly.
You could rent a server and configure a domain, HTTPS, and deployment yourself. You can also host the work on an established open-source community and spend less time on operations. This lesson takes the second route and publishes the website on ModelScope.
ModelScope is an open-source community initiated by Alibaba together with the CCF Open Source Development Committee. Alongside more than 200,000 open-source models and 30,000 datasets, it provides Studios for showing applications. For us, the practical advantage is simple: we can give a project a free, shareable address without first becoming server administrators.
This guide was checked against the current Studio pages, official Skills, and command-line material on August 11, 2026. Button positions may change, but the main route remains: create a Static Studio, upload the build output, deploy, and open the Studio link.
A Studio can run Gradio, Streamlit, and Docker applications. It also supports a static type for an already-built website. If the final site consists of index.html, CSS, JavaScript, and images, this is the correct type.
After deployment, the public page has an address similar to:
text
https://modelscope.cn/studios/your-name/your-studioChoose the correct publishing method
| Your project | Studio type | What to do before publishing |
|---|---|---|
| Plain HTML, CSS, and JavaScript | Static | No build is needed; prepare the website files |
| Vue, React, Vite, Svelte, and similar projects | Static | Build locally and upload only the contents of dist or build |
| Gradio application | Gradio | Prepare app.py and requirements.txt |
| Streamlit application | Streamlit | Prepare the Streamlit entry file and dependencies |
| Custom backend, system packages, or startup process | Docker | Write a Dockerfile and listen on the port required by the platform |
This chapter focuses on the first two rows. Do not upload Vue or React source code as a Static site. A visitor's browser cannot run npm install and npm run build for you.
Recommended: publish with an official Skill
ModelScope maintains ModelScope Skills. The two most relevant Skills are:
| Skill | Purpose | When to use it |
|---|---|---|
ms-hub | A general ModelScope entry point for repositories, models, datasets, Studios, MCP, and the Skills Center | When connecting to ModelScope for the first time or performing general Studio operations |
ms-studio-deploy | Publishes a local project to a Studio, including project detection, Studio creation, Git synchronization, deployment, log inspection, and diagnosis | The preferred option for publishing or updating a local website |
ms-studio-deploy inspects the project files to select a runtime. A directory whose root contains a built index.html is recognized as static. A Static Studio does not run npm run build, so framework projects must still be built locally first.
Install the Skills
Install the ModelScope SDK, the general Skill, and the Studio deployment Skill:
bash
python -m pip install -U modelscope
modelscope skills add @ModelScope/ms-hub @ModelScope/ms-studio-deploy
If your modelscope command does not contain a skills subcommand, use the official installation script:
bash
curl -fsSL https://modelscope.cn/skills/install.sh | bash -s -- @ModelScope/ms-hub
curl -fsSL https://modelscope.cn/skills/install.sh | bash -s -- @ModelScope/ms-studio-deploy
Skills are installed in ~/.agents/skills/ by default. Codex, Cursor, Claude Code, and other Agent Skills-compatible tools can discover them there. Start a new agent session after installation so the tool refreshes its Skill list.
Publish with the Skill
According to the official ms-studio-deploy guide, you do not need to execute every create, push, deploy, and log command yourself. Prepare three things:
- Install
ms-studio-deployand start a new agent session. - Open the directory you intend to publish. Its root must contain
index.html. - Configure a ModelScope Access Token on your computer.
For the first use, open the Access Token page and set the token in your terminal:
bash
export MODELSCOPE_API_KEY="your-token"For plain HTML, open the website directory directly. For Vue, React, or Vite, build the project and enter the output directory:
bash
npm run build
cd dist
The example uses Vite's dist directory. If your project produces build, open that directory instead.
Now open this directory in Codex, Cursor, Claude Code, or another tool that supports Agent Skills.
The shortest prompt
Say only:
text
Use the ms-studio-deploy Skill to publish this website to a Static Studio on ModelScope. Send me the URL when it works.The Skill checks index.html and the login configuration first. If it needs to create a Studio, it asks for a name and whether it should be public or private. A private Studio is a safer first choice.
If you want to provide the details at once, use:
text
Use the ms-studio-deploy Skill to publish this directory to a Static Studio on the ModelScope China site.
Name the Studio my-portfolio and make it private first. Check its status and logs after deployment.
If deployment fails, diagnose the logs, fix the problem, and deploy again. Return the working URL.
What the AI does next
The official Skill organizes the work as:
text
detect project type → choose China or international site → read account details
→ create or reuse a Studio → inspect sensitive files → synchronize to master
→ trigger deployment → inspect status and logs → diagnose and repair → return the URL
When asked whether the Studio should be public or private, choose private for the first deployment and make it public only after the page passes inspection. Static websites do not require paid hardware. If another runtime requires paid resources, the Skill must obtain your explicit approval first.
The token is used for API authentication and Git pushes. Never place it in frontend code, README files, prompts, or shareable screenshots.
Manual route: Step 0 — prepare the publishable site
The Skill route is faster. The manual route below helps you understand the Studio interface and remains useful if your agent tool is unavailable.
Case A: plain HTML website
The smallest directory looks like this. index.html must be at the root of the content being published:
text
my-site/
├── index.html
├── styles.css
├── app.js
└── images/
    └── cover.jpg
Test it through a local HTTP server before publishing:
bash
cd my-site
python3 -m http.server 8000
Open http://localhost:8000. Do not rely only on double-clicking index.html, because file:// and real HTTP access handle modules, cross-origin requests, and paths differently.
Case B: Vue, React, Vite, and similar projects
Install dependencies and build first:
bash
npm install
npm run build
Common output directories are:
| Tool or framework | Common output directory |
|---|---|
| Vite, Vue with Vite, React with Vite | dist/ |
| Create React App | build/ |
| Vue CLI | dist/ |
Publish the contents of the output directory so index.html appears directly at the Studio repository root:
text
Correct: index.html
Wrong:   dist/index.html
If CSS, JavaScript, or images return 404 after deployment, try a relative asset base in a Vite project:
js
// vite.config.js / vite.config.ts
export default {
  base: './'
}
Build again afterward. A single-page application can also use hash routing, such as /#/about, because a static host may not rewrite every path to index.html.
Manual route: Step 1 — open Studio and sign in
Open ModelScope Studio. The top of the page presents the route from creating and building a Studio to publishing and sharing it.
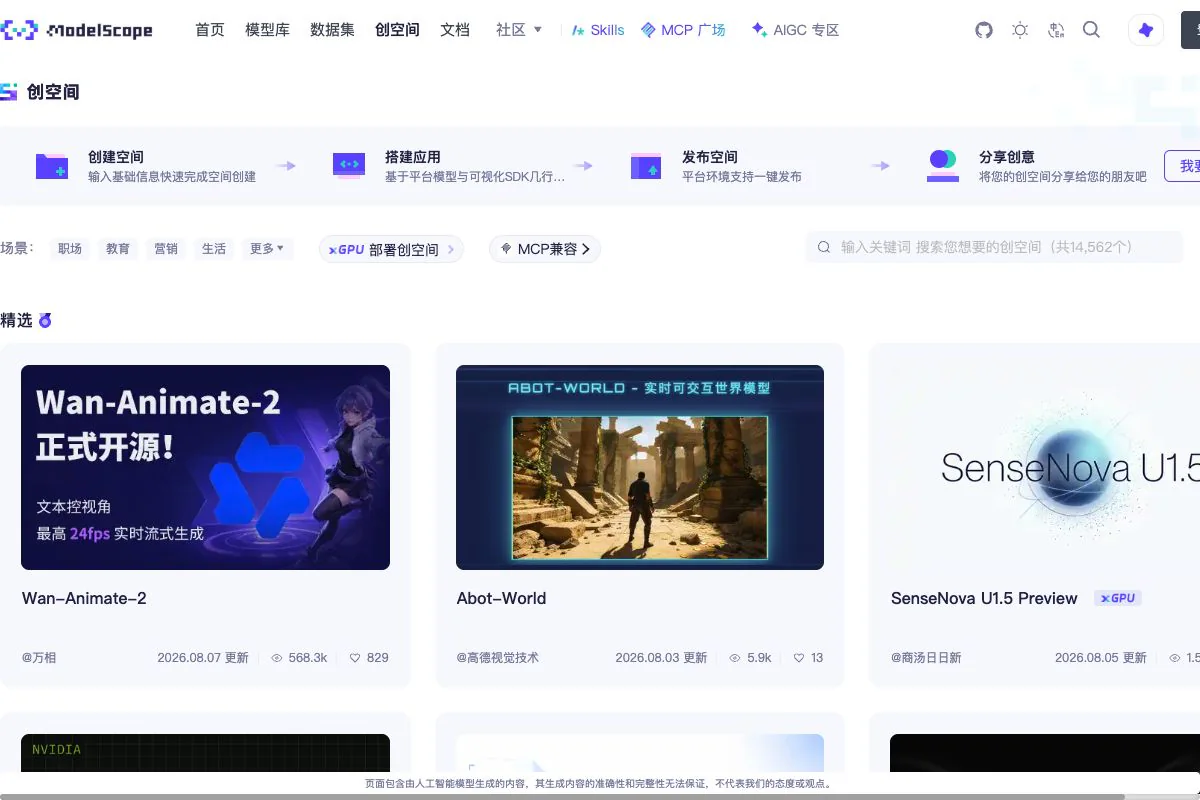
Select the create button or open Create Studio. If you are signed out, ModelScope asks you to sign in or register. The China site at modelscope.cn and the international site at modelscope.ai do not share accounts, tokens, or content. The China site is usually the practical choice for users in China.
Manual route: Step 2 — fill in the basic information
Fill in the basic information on the creation page:
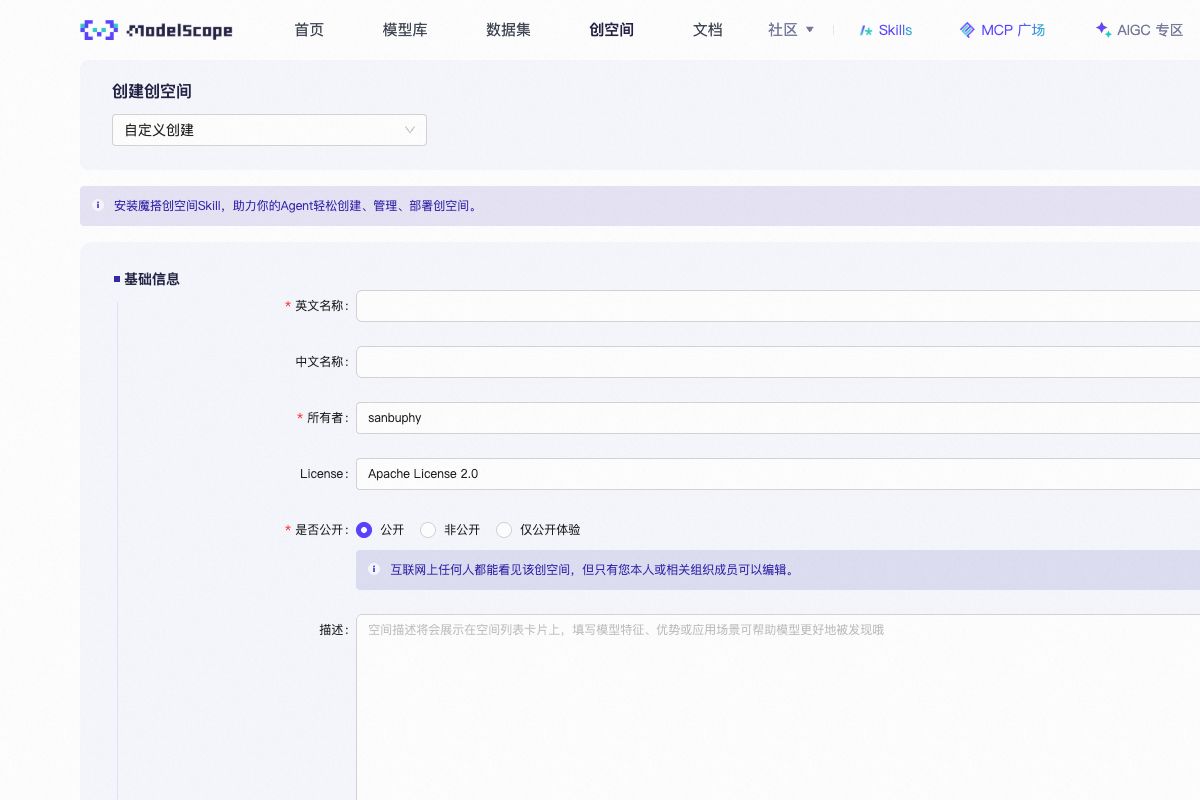
- Owner or organization: determines the owner segment in the URL.
- Studio name: use lowercase letters, numbers, and hyphens, such as
my-portfolio. - Display name and description: explain the site in words a visitor can understand.
- Visibility: begin privately and make it public after inspection.
- License: choose according to the project.
Confirm the form and wait for the Studio detail page to open.
Manual route: Step 3 — upload the website files
The following image shows the Files page of a running Static Studio. index.html appears directly at the repository root alongside README.md.
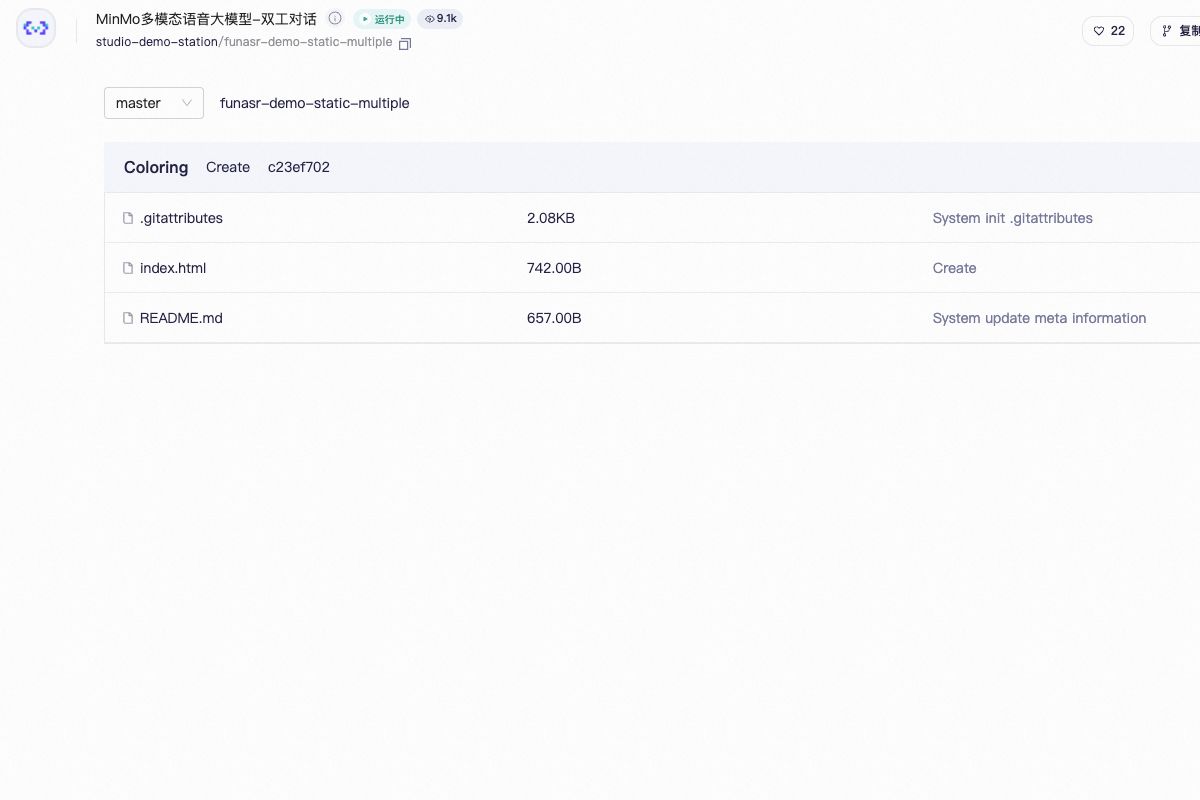
Open the Files page and upload index.html, CSS, JavaScript, and images. After upload, the root must contain index.html; do not wrap the published files in an extra dist, build, or project folder.
Manual upload is suitable for a plain HTML site or a project with only a few files. If there are many files or frequent updates, return to ms-studio-deploy and let it perform the Git synchronization.
Manual route: Step 4 — select Static in deployment settings
After uploading the files, open the Studio deployment settings and select Static as the SDK type. The page explains that Static is intended for an existing HTML site; the same area also lists Gradio, Streamlit, and Docker.
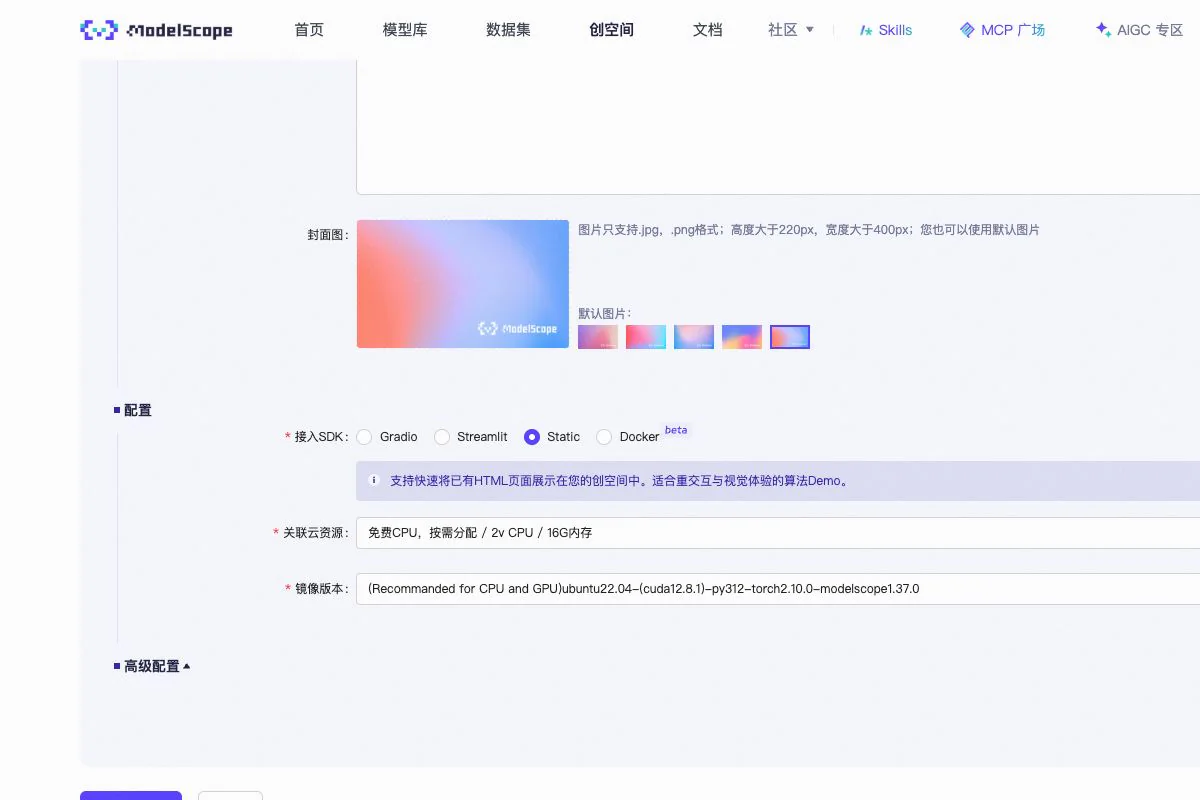
Check once more that index.html is at the repository root, then save the deployment settings.
A website that needs a database, a secret API key, or server-side computation is not a purely static site. Use Gradio, Streamlit, Docker, or a separate backend instead. A key written in frontend JavaScript cannot remain secret.
Manual route: Step 5 — wait for deployment and inspect
Saving the deployment settings usually starts a deployment. If it does not, use the deploy, restart, or rerun control on the Studio page. Wait for the status to become running and open an address like:
text
https://modelscope.cn/studios/your-name/your-studioCheck the final page carefully:
- Does the home page open?
- Are CSS, JavaScript, and images loaded?
- Does the browser console contain 404, CORS, or JavaScript errors?
- Does the page remain usable at a mobile width?
- If the Studio is public, can a signed-out browser window open the copied URL?
If the Studio is private, make it public only after the page works, then test the public address in a signed-out window.
Manual route: Step 6 — update a published site
After modifying the source, test locally and build again. Return to the Files page, replace the old files with the new contents of dist or build, and redeploy.
text
change source → test locally → build again → replace Studio files
→ redeploy → inspect the final URL
For Vite, React, and Vue, continue to upload only build output. Do not upload node_modules, development configuration, or the complete source project. Once updates become frequent, use the Skill route instead.
Use the Skill for troubleshooting too
网页哪里不对?
选择最接近的现象,复制提示词交给 AI;Skill 会继续检查、修复和部署。
404
当前现象页面 404 或空白
检查当前发布目录和远端文件结构,修正后重新同步并部署。
直接发给 AI
请使用 ms-studio-deploy 检查当前创空间为什么出现 404 或空白页。确认仓库根目录是否有 index.html,修正发布目录后重新同步、部署,并把最终链接发给我。
Sources
- ModelScope Studio (page and screenshots checked August 11, 2026)
- ModelScope developer community event review
- Official
ms-hubinstructions - Official
ms-studio-deploySkill - ModelScope Hub client
- Public Static Studio example