🎮 WeChat Jump Automation YOLOv10 AMD ROCm Edition
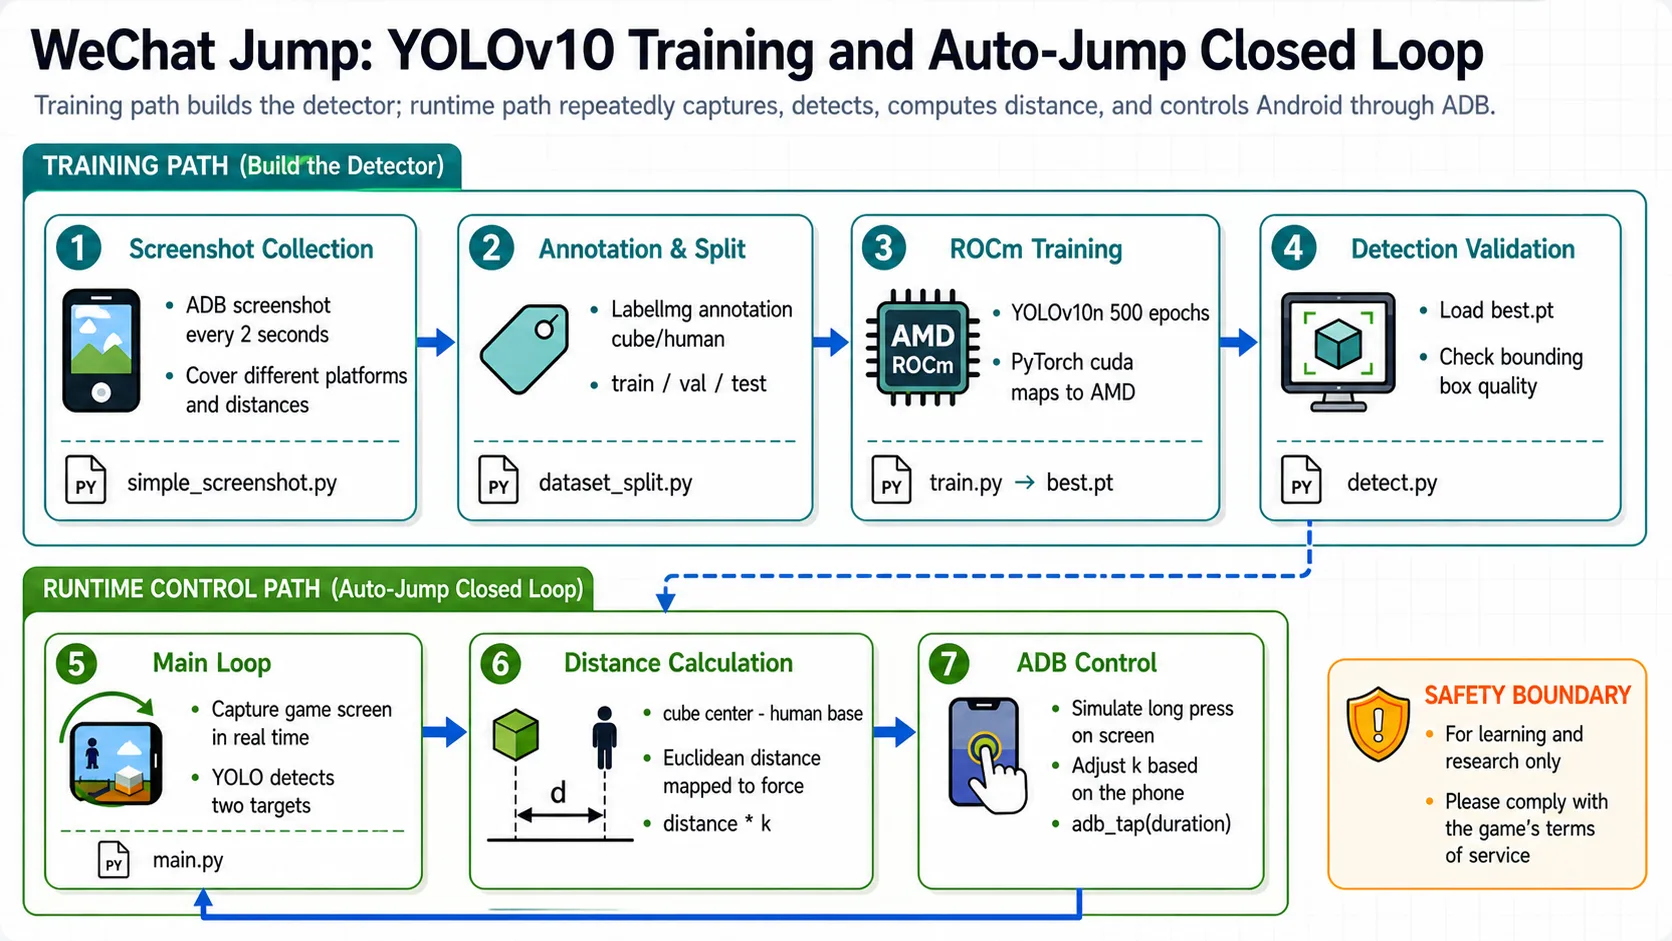
WeChat Jump Automation is an automated tool for the WeChat Jump game based on YOLOv10 object detection. It uses computer vision to recognize the character and target platforms in the game, automatically calculates distances, and controls the phone to make precise jumps. This project now supports training and inference on the AMD ROCm platform, including support for Ryzen AI series chips.
WeChat Jump Project Link: Link
YOLOv10 WeChat Jump Training and Control Loop
OK, next I will guide you step-by-step to implement the training and usage process for WeChat Jump automation. Let's experience it together!
Step 1: Environment Setup
Base environment:
----------------
Windows 11 / Ubuntu 24.04
python 3.12
rocm 7.12.0
pytorch 2.9.1
----------------📖 For ROCm + PyTorch base environment installation, see 00-Environment. Continue below after completing that setup.
Install project-specific dependencies:
# After activating your virtual environment
uv pip install -r requirements_rocm_windows.txtThis project has been tested on Ryzen AI MAX 395/370. For compatibility with other Radeon series, please check https://rocm.docs.amd.com/en/7.12.0-preview/compatibility/compatibility-matrix.html
Install ADB Tools
ADB (Android Debug Bridge) is a command-line tool used for communicating with Android devices.
Installation on Windows:
- Official Download: https://developer.android.com/tools/releases/platform-tools
- After downloading and extracting, add the extracted path to the system environment variables
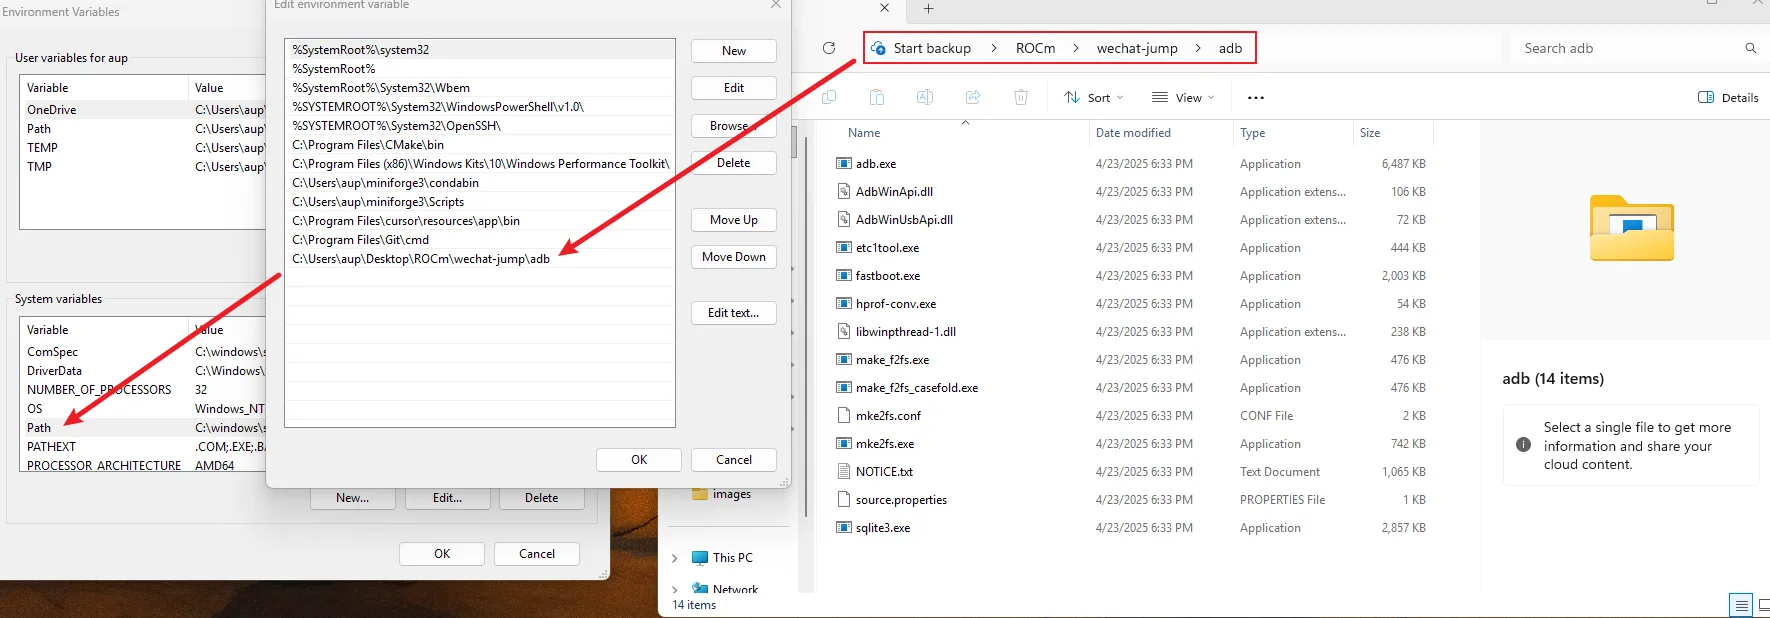
Example of environment variable configuration
Installation on macOS:
# Use the provided installation script
chmod +x install_adb_mac.sh
./install_adb_mac.sh

# Or install manually
brew install android-platform-toolsAndroid Phone Setup
- Enable Developer Options
- Enable USB Debugging
- Connect to computer and authorize ADB debugging
- Verify connection:
adb devices
Step 2: Data Preparation
2.1 Automatic Screenshot Collection
First, we need to collect game screenshots as training data. Run the automatic screenshot script:
# Automatically collect training data screenshots
python simple_screenshot.pyThe script will automatically take a screenshot every 2 seconds and save to the dataset/screenshot_dataset/ directory. Press Ctrl+C to stop.
It is recommended to collect at least 200-500 screenshots from different game scenarios, including:
- Jump scenes at different distances
- Platforms of different shapes
- Different angles and lighting conditions
2.2 Data Annotation
Use the labelimg tool to annotate screenshots:
# Launch annotation tool
labelimgAnnotation steps:
- Open the
dataset/screenshot_dataset/directory - Select YOLO format
- Annotate two classes:
- Class 0 (cube): Target platform
- Class 1 (human): Character
- Save annotation files to
dataset/yolo_label/directory
After annotation is complete, each image will have a corresponding .txt annotation file with the following format:
0 0.5 0.3 0.1 0.15  # class x_center y_center width height (normalized coordinates)
1 0.2 0.7 0.05 0.12.3 Dataset Split
Use the dataset_split.py script to split the dataset into training, validation, and test sets:
# Split dataset (default ratio: 80% training, 10% validation, 10% test)
python dataset_split.pyThe script will automatically split data into the yolo_dataset/ directory:
yolo_dataset/
├── images/
│   ├── train/    # Training images
│   ├── val/      # Validation images
│   └── test/     # Test images
└── labels/
		├── train/    # Training labels
		├── val/      # Validation labels
└── test/ # Test labelsStep 3: Model Training
3.1 Prepare Dataset Configuration File
Create a data.yaml file in the yolo_dataset/ directory:
path: ./yolo_dataset
train: images/train
val: images/val
test: images/test

names:
	0: cube
1: human3.2 Start Training
Run the training script:
python train.pyThe training script will:
- Load the pre-trained YOLOv10n model
- Use ROCm acceleration for training (automatically use
cudadevice) - Train for 500 epochs
- Save the best model to
runs/detect/train/weights/best.pt
Training parameter descriptions:
- Model: YOLOv10n (lightweight model, suitable for mobile and edge devices)
- Input Size: 640x640
- Training Epochs: 500
- Device: Automatically use ROCm (cuda)
Training time depends on dataset size and hardware performance. It typically takes 1-3 hours on Ryzen AI devices
3.3 Model Testing
After training is complete, you can use detect.py to test the model:
# Test the trained model
python detect.pyStep 4: Use the Automation Tool
4.1 Run the Main Program
After training is complete, run the main program to start game automation:
python main.pyThe main program will:
- Load the trained model (
./runs/detect/train/weights/best.pt) - Automatically take screenshots of the game screen
- Use the YOLO model to detect the character and target platform
- Calculate distance and automatically jump
- Display detection results in real-time
4.2 Parameter Adjustment
In main.py, you can adjust the jump coefficient k:
jump.jump(k=1.3) # Adjust the coefficient based on phone resolution; larger screens require larger k valuesReference coefficients for different phone resolutions:
- 1080p:
k=1.3 - 1440p:
k=1.5 - Adjust based on actual testing
4.3 Core Algorithm
1. Object Detection
Use YOLOv10 model to detect in the game:
- Target platform position (Class 0: cube)
- Character position (Class 1: human)
2. Distance Calculation
# Calculate Euclidean distance between two target centers
distance = np.sqrt((cube_box[0] - humen_box[0]) ** 2 +
(cube_box[1] - (humen_box[1] + humen_box[3] * 0.5)) ** 2)3. Jump Control
# Calculate press time based on distance to simulate jump
press_time = int(distance * k)  # k is the jump coefficient
jump.adb_tap(x, y, duration_ms=press_time)Final Thoughts
The WeChat Jump automation project demonstrates how to use deep learning technology to solve practical problems. Through the YOLOv10 object detection model, we can accurately identify key elements in the game and implement automation control through ADB. This project now supports the AMD ROCm platform, enabling more developers to experience the charm of deep learning on AMD hardware.
Project Features
- 🤖 Intelligent Recognition: Use YOLOv10 model to accurately recognize the character and target platform in the game
- 📏 Distance Calculation: Calculate the force required for jumping through Euclidean distance
- 📱 ADB Control: Automatically control Android phones to take screenshots and simulate clicks
- 🎯 High Accuracy: Object detection based on deep learning with high recognition accuracy
- 🔄 Automation: One-click execution with fully automated operation
Performance Metrics
- Object detection accuracy: >99.5%
- Jump success rate: >90%
- Average response time: <2.5 seconds
Notes
⚠️ Disclaimer: This project is for learning and research purposes only. Using this tool may violate game terms of service. Use at your own risk.
Troubleshooting
1. ADB connection failed
# Restart ADB service
adb kill-server
adb start-server2. Model file not found
- Ensure model training is complete
- Check if the model path is correct (default:
./runs/detect/train/weights/best.pt)
3. Screenshot failed
- Check if USB debugging is enabled on the phone
- Confirm ADB permissions have been granted
- Verify connection:
adb devices
4. Inaccurate jumping
- Adjust the jump coefficient
kvalue - Check the model detection results
- Ensure the dataset quality is good enough
⭐ If this project helps you, please give it a star!