Building Your First AI Travel Assistant on AMD 395 AI PC
Introduction
If you've ever struggled with planning a trip — browsing countless travel guides, comparing various routes, and calculating whether your budget is sufficient — this tutorial will guide you through something really cool: using AI on your own computer to plan your trips.
We'll be using the AMD 395 AI PC. It features the AMD Ryzen™ AI 9 HX 395 processor, equipped with a powerful NPU (Neural Processing Unit) and GPU, built on the AMD ROCm platform, capable of running 30B-parameter large language models. More importantly, all computation happens locally — your travel preferences, budget information, and other private data never leave your machine.
About the Demo Environment: This tutorial uses the Linglong AI Workstation (powered by AMD 395 processor) as the demo platform, because it comes pre-installed with AI management tools like "ZhiLing Assistant" for quick setup. All features of the AMD 395 processor apply equally to other AI PCs with the same processor — three local model deployment options are provided below.
This tutorial will walk you through building a smart travel planning assistant from scratch. It can:
- Automatically plan daily itineraries based on your destination and budget
- Call the Amap (Gaode Maps) API to search for real attractions and weather information
- Save the complete travel plan as a well-formatted Markdown document
You don't need any prior AI development experience — just follow along step by step. We'll use some tools: the HelloAgents framework (a tool that simplifies Agent application development) and the MCP protocol (a standard that allows AI to call various external services), but you don't need to know about them in advance — we'll explain everything as we go.
Ready? Let's get started.
Step 1: Running a Large Model on AMD 395 AI PC
The Powerful Computing Power of AMD 395 AI PC
AMD Ryzen™ AI 9 HX 395 is a processor purpose-built by AMD for AI applications. Its core advantages include:
- Powerful NPU (Neural Processing Unit): Specifically optimized for AI inference tasks
- High-Performance GPU: Based on AMD RDNA™ architecture, supporting large-scale parallel computing
- AMD ROCm Platform: An open-source GPU computing platform compatible with mainstream AI frameworks
- Large Memory Support: Capable of running 30B+ parameter large language models
If you've used ChatGPT, you know that each conversation actually sends your question to OpenAI's servers and waits for a response. But on the AMD 395 AI PC, the entire AI runs right on the machine in front of you — no internet required, no privacy leaks, and no worries about sudden price hikes or rate limiting from cloud APIs. This is a major advantage for scenarios involving sensitive travel information.
Choose the Deployment Option That Suits You
Whether you're on Windows, Mac, or Linux, the AMD 395 processor lets you run large language models locally. Here are three mainstream options — choose based on your needs:
| Tool | Supported Platforms | Features | Recommended For |
|---|---|---|---|
| Ollama | Windows/Mac/Linux | CLI tool, lightweight, simple model management | Developers comfortable with CLI |
| LM Studio | Windows/Mac/Linux | GUI, visual operation, beginner-friendly | Users who prefer a graphical interface |
| Linglong "ZhiLing Assistant" | Linglong AI Workstation | Pre-installed, one-click deployment, optimized for AMD 395 | Linglong Workstation users |
About ROCm: AMD ROCm is an open-source GPU computing platform, similar to NVIDIA's CUDA. When the above tools run on AMD 395, they automatically leverage ROCm for accelerated inference. You don't need to install ROCm manually — the tools automatically detect and utilize GPU resources.
Option 1: Using Ollama (Recommended for CLI Users)
Ollama is like a minimalist "model butler." You only need a few commands and it will download models and start services for you — no complex configuration needed. If you're comfortable working with the command line and want a lightweight tool, Ollama is a great choice. It has excellent support for AMD GPUs and will automatically use ROCm for accelerated inference.
Step 1: Install Ollama
First, go to Ollama's official website to download the installer for your system: https://ollama.com/download
- If you're on Windows (Windows 10 or later required), download the
.exefile and double-click to install — just like any regular software. - If you're on Mac (macOS 14 Sonoma or later required), download the
.dmgfile and drag it to your Applications folder. - If you're on Linux, open a terminal, copy and paste this command, then press Enter:bash
curl -fsSL https://ollama.com/install.sh | sh
After installation, open a terminal (Windows users open PowerShell, Mac and Linux users open Terminal) and type the following command to verify:
ollama --versionIf you see a version number (e.g., ollama version 0.x.x), the installation was successful.
Step 2: Download and Run the Model
Now let Ollama download the model. In your terminal, type:
ollama run qwen2.5:32bAfter pressing Enter, Ollama will automatically download the Qwen2.5 model (approximately 18GB — like downloading a few HD movies, so it takes a while). Once the download is complete, the model starts automatically. At this point, Ollama is already utilizing your AMD 395's GPU and NPU for acceleration — you don't need any additional configuration.
Once the model starts, you'll see a conversation prompt >>>. Try typing:
>>> Hello, introduce yourselfIf the model responds (something like "I am Qwen..."), everything is working. Press Ctrl+D (or Command+D on Mac) to exit the conversation.
Step 3: Run the Model as a Service
The previous approach lets you chat with the model directly in the terminal, but we'll need to call the model from Python code later, so we need Ollama to run as a "service" in the background.
Open a new terminal window (keep the original one open) and type:
ollama serveNow Ollama is running in the background, waiting for Python code to call it. It has started a local server at http://127.0.0.1:11434. You can open this address in your browser — if you see "Ollama is running," the service is up.
Remember this address: http://127.0.0.1:11434/v1 — you'll need it when writing code. Also, the model name should be qwen2.5:32b (matching the name you downloaded earlier).
Option 2: Using LM Studio (Recommended for GUI Users)
If you're not comfortable with the command line and prefer point-and-click, LM Studio is for you. It provides a beautiful graphical interface where you can download models, load them onto the GPU, and start services — all visually. It's as intuitive as using a chat application.
Step 1: Download and Install LM Studio
Go to the LM Studio website: https://lmstudio.ai/
You'll see a large download button that automatically detects your system (Windows, Mac, or Linux) — just click to download. The installation is standard: double-click the installer and follow the prompts.
Step 2: Search and Download a Model
After installation, open LM Studio. You'll see a clean interface with a menu on the left and a search bar in the center.
Type qwen2.5 (or qwen3) in the search bar and press Enter. LM Studio will search the Hugging Face model repository. You'll see a bunch of results with somewhat long names — don't worry.
We recommend selecting a model with 32b-instruct in the name, such as qwen2.5-32b-instruct-q4. The q4 here means "4-bit quantization" — the model has been compressed to use less VRAM and run faster, with a slight reduction in precision (perfectly sufficient for our travel planning task).
Once you find a suitable model, click the download button (a downward arrow icon) on the right. The model is approximately 18GB; download time depends on your internet speed. You can monitor progress at the bottom of the interface.
Step 3: Load the Model onto the GPU
After the model finishes downloading, click the "Chat" tab in the left menu.
At the top of the interface, you'll see a "Select a model to load" dropdown menu. Click it, find the model you just downloaded, and select it.
Configuration options will appear at the bottom. Find the "GPU Offload" slider (number of layers offloaded to GPU) and drag it all the way to the right, or set a large value (e.g., 40 layers or more). This ensures the model runs as much as possible on the AMD 395's GPU, leveraging ROCm for accelerated inference. LM Studio automatically detects your AMD GPU — no manual ROCm configuration needed.
Then click the "Load Model" button. Wait a few seconds — you'll see the model status change to "Loaded" and VRAM usage increase, indicating the model has been loaded into the GPU.
Step 4: Test It Out
Now you can try chatting with the model in the chat interface. Type "Hello, introduce yourself" in the input box and press Enter. If the model responds, everything is working.
Step 5: Start the Local API Server
Once testing is successful, click the "Local Server" tab in the left menu.
Here you'll see a "Select a model" dropdown — select the model you loaded earlier. Then click the large "Start Server" button.
After a few seconds, the server status will change to "Running," showing the server address: http://127.0.0.1:1234/v1.
Note this address down — you'll need it when writing code. The model name is whatever you selected (e.g., qwen2.5-32b-instruct).
LM Studio is now running in the background, waiting for Python code to call it. You can minimize this window and continue to the next step.
Option 3: Using Linglong "ZhiLing Assistant" (Linglong Workstation Users Only)
Note: This option is only available for the Linglong AI Workstation (powered by AMD 395 processor). This workstation comes pre-installed with the "ZhiLing Assistant" model management tool, providing a convenient graphical deployment experience for beginners. If you're using another device with an AMD 395 processor, please choose Option 1 or Option 2 above.
"ZhiLing Assistant" is a model management tool pre-installed on the Linglong AI Workstation (a third-party vendor product), similar to an app store on a phone but specifically for downloading and managing AI models.
1. Open ZhiLing Assistant
Visit in your browser: http://127.0.0.1:5100/
You'll see three core features:
- Model Library: Pre-loaded with popular open-source models, supporting one-click download and launch
- Custom: Support for adding any custom model in GGUF format
- Local Models: Manage downloaded models with options to start, stop, and test conversations
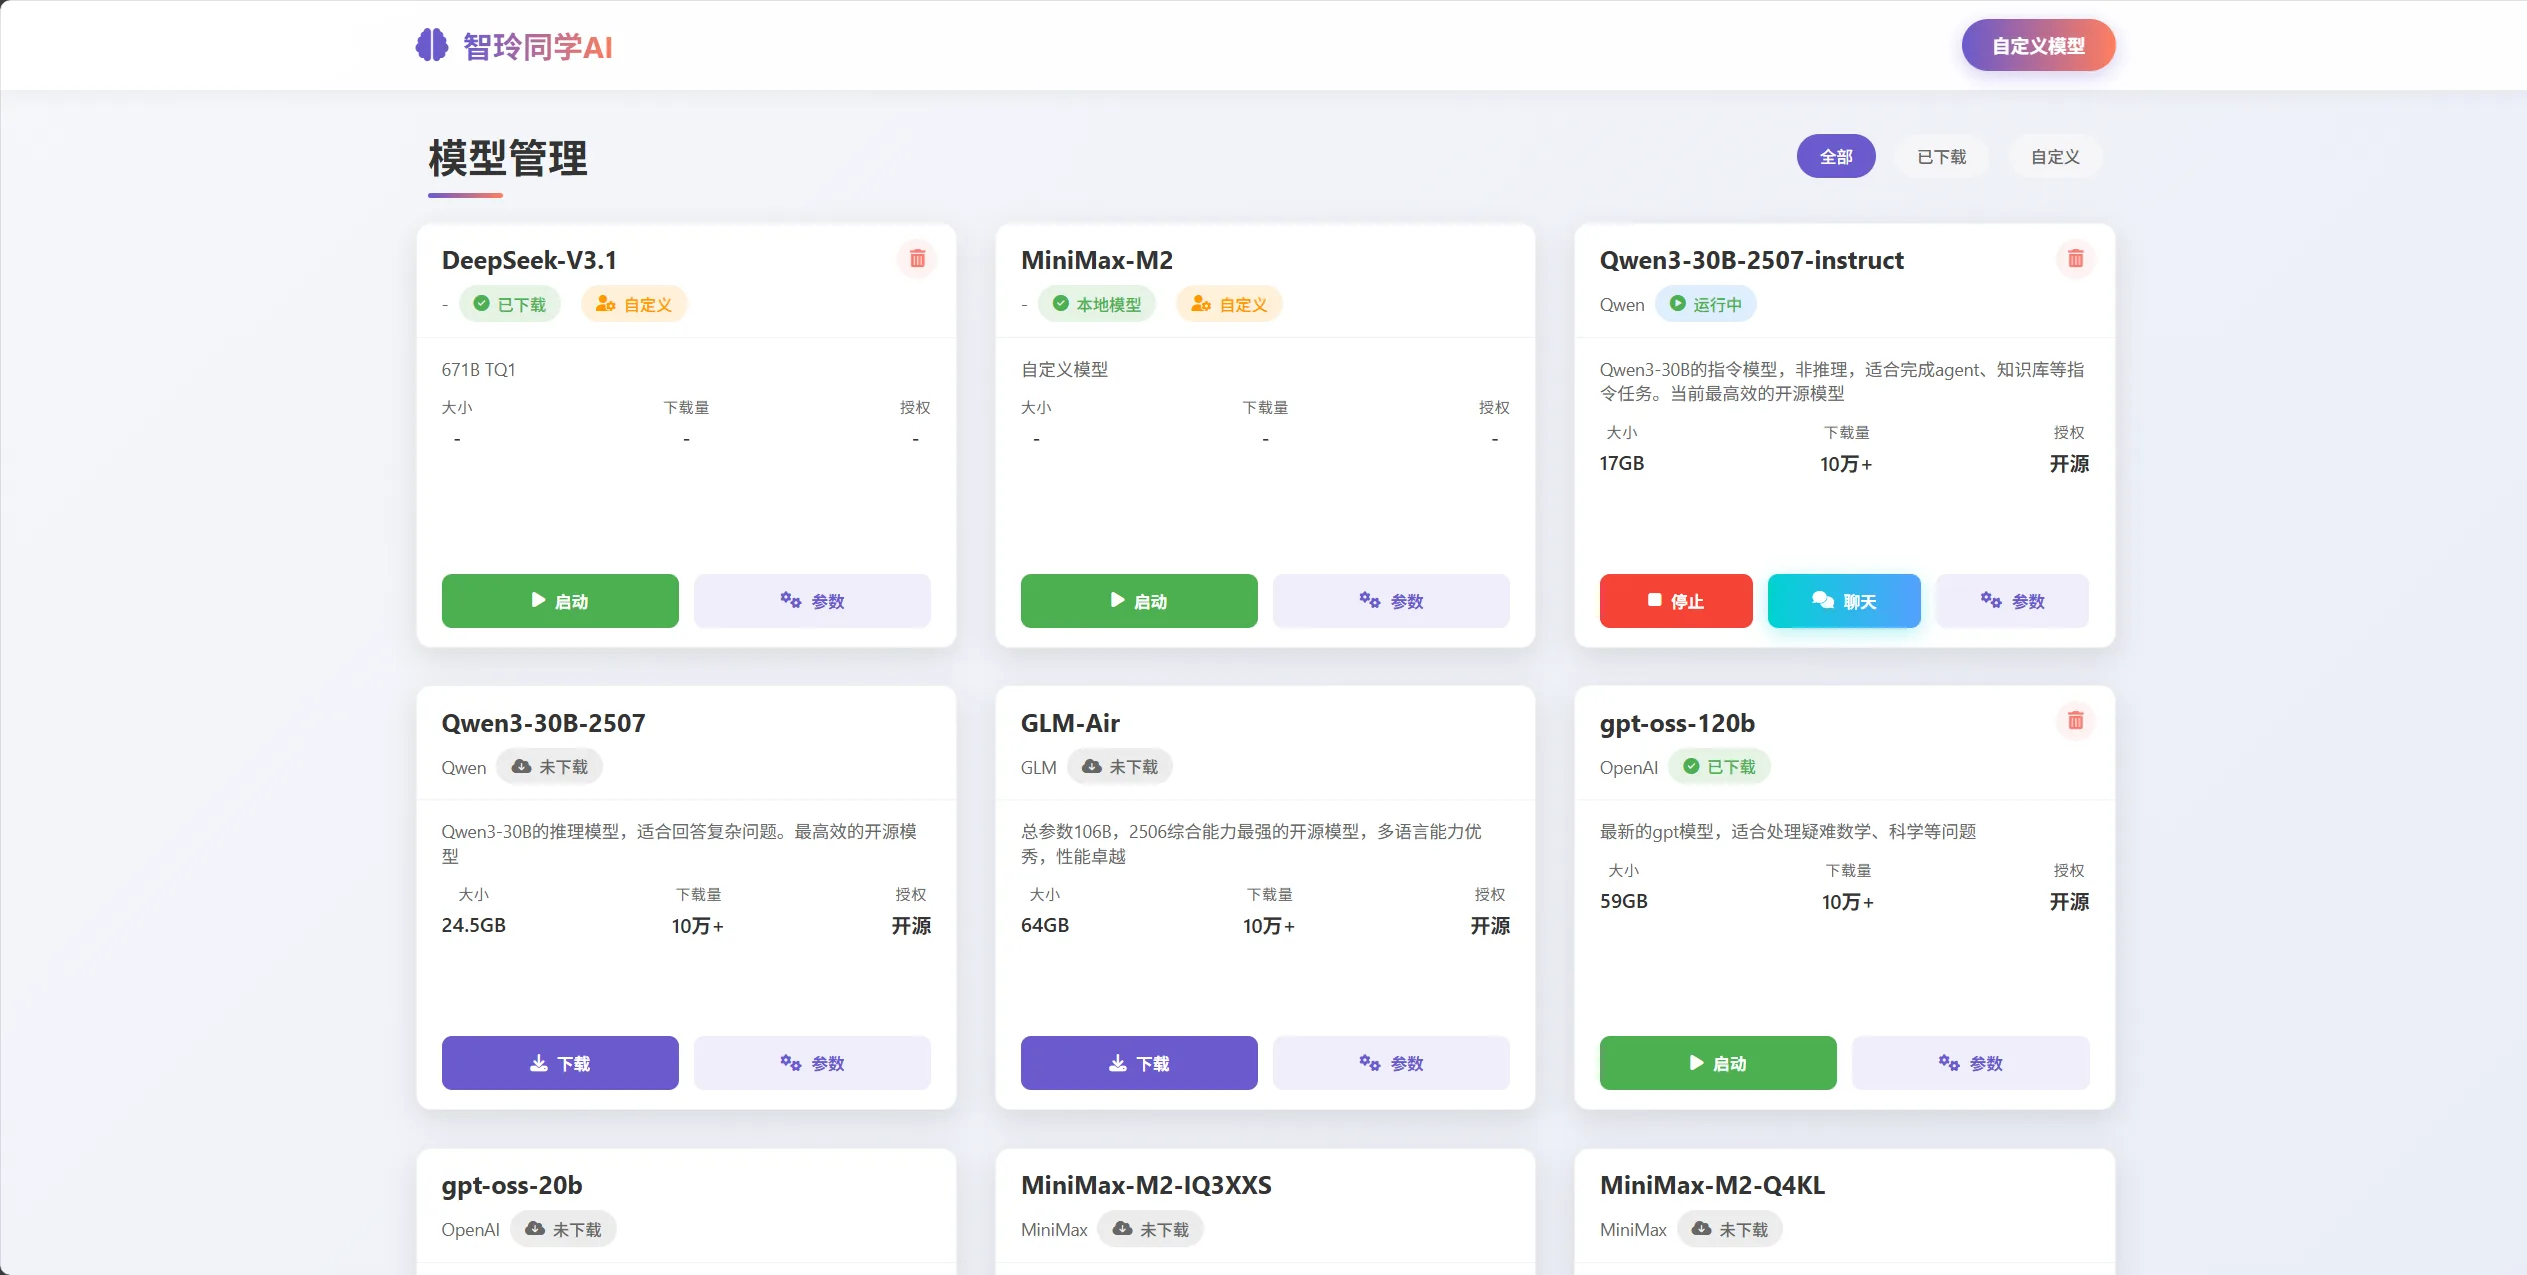
Figure 1: ZhiLing Assistant Model Management Interface (Linglong Workstation)
2. Download the Qwen3-30B Model
As shown in Figure 1, find "Qwen3-30B-2507-instruct" (an Alibaba Cloud open-source model optimized for Chinese) in the model library and click "Download." The model file is approximately 18GB; download time depends on your internet speed.
3. Start the Model
After the download is complete, click the "Start" button. After a few seconds, the status changes to "Running," showing the address: http://127.0.0.1:1234/v1
4. Test the Model
In the "Chat" tab, type "What model are you?" to test the conversation feature.
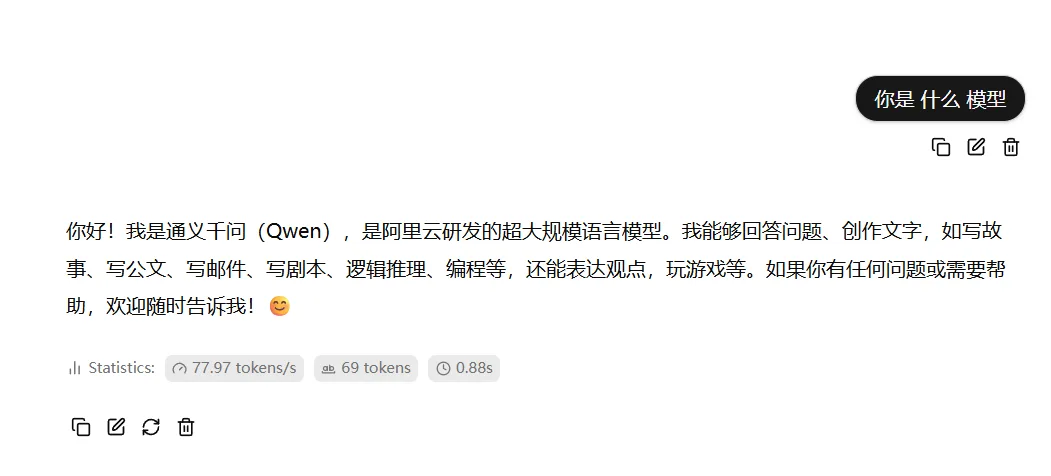
Figure 2: Model Download and Launch Process (Linglong Workstation)
Confirm the Model Is Ready
Regardless of which option you chose, confirm the following after deployment:
✅ Model successfully started: Can interact normally in the chat interface ✅ API address recorded: The code we write later needs to connect to this address ✅ GPU acceleration enabled: The AMD 395's GPU/NPU is accelerating inference (check VRAM usage in Task Manager or the tool's interface)
Common API addresses:
- Ollama:
http://127.0.0.1:11434/v1 - LM Studio:
http://127.0.0.1:1234/v1 - ZhiLing Assistant:
http://127.0.0.1:1234/v1
Technical Note: When these tools run on AMD 395, they automatically invoke GPU resources via ROCm for accelerated inference. ROCm is AMD's open-source GPU computing platform, similar to NVIDIA's CUDA, supporting mainstream AI frameworks like PyTorch and TensorFlow. You don't need to manually configure ROCm — the tools handle the underlying acceleration logic automatically.
Step 2: Understanding the MCP Protocol
Why Do We Need MCP?
Before we start writing code, let's spend a few minutes understanding a concept: the MCP protocol. Don't be intimidated by the word "protocol" — it's actually quite simple.
Imagine your AI assistant is like a brilliant secretary, but it can only think and talk — it can't check the weather, book hotels, or search for attractions on its own. To enable these capabilities, the traditional approach is to write a bunch of "instruction manuals" — how to connect to a weather API, how to call a maps service, how to read and write files. Every new feature requires a new manual.
The MCP protocol was created to solve this problem. It acts as a "universal adapter," turning various external services (weather queries, map searches, file operations) into tools that AI can directly understand and use. You just tell the AI "there's an MCP tool available," and it can automatically discover what the tool does, then call it whenever needed.
For example, the "Amap MCP Server" we'll use this time provides 16 tools: attraction search, weather query, route planning, geocoding, and more. You don't need to write code for each function — just connect to the server, and the AI will decide on its own when to check the weather and when to search for attractions.
How MCP Works
Let's look at how the entire process works. Suppose you ask the AI: "Help me plan a 3-day trip to Hangzhou."
First, the AI thinks: "To plan a trip, I need to know Hangzhou's weather." It discovers it has a tool called amap_maps_weather, so it calls it with the parameter city=Hangzhou. The MCP server receives the request, calls the Amap API, and returns weather data. After receiving the weather information, the AI continues thinking: "Next, I need to search for attractions in Hangzhou." So it calls the amap_maps_text_search tool with keywords=attractions, city=Hangzhou. Once the search results come back, the AI combines the weather and attraction information to generate a detailed travel plan.
Throughout this process, you only need to state one requirement — everything else is decided by the AI: when to call tools, what parameters to pass, and how to synthesize information. That's the magic of the MCP protocol.
Step 3: Installing Tools and Preparing the API Key
This section assumes you already have Python installed. If not, you can search for installation tutorials on your own. Here's a high-traffic tutorial for reference: Python Installation and Environment Configuration Complete Guide (Windows and Mac)
Installing the HelloAgents Framework
Now that the model is running, we need to install a framework called HelloAgents. It's a tool specifically designed for building AI Agent applications, enabling complex functionality with minimal code. There's also a companion beginner tutorial on LLM Agents at Building Agents from Scratch — refer to it if you want to dive deeper into Agent concepts.
Open a command line (PowerShell or CMD will do) and type:
pip install hello-agents==0.2.8After installation completes, verify:
python -c "import hello_agents; print(hello_agents.__version__)"If you see 0.2.8 as the output, installation was successful.
Installing the uv Tool
Next, we need to install a tool called uv. It's a Python package manager that we'll use to run the Amap MCP server.
pip install uvAfter installation, you'll have a uvx command available in your terminal. This command can quickly run various Python applications without manual installation and configuration.
Applying for an Amap API Key
For our travel assistant to search for real attractions and weather, we need to call the Amap API. Don't worry — Amap provides free services; you just need to register an account.
Visit the Amap Open Platform: https://lbs.amap.com/
After registering, enter the console and create a new application as shown in Figure 3. Select "Web Service" as the application type, and you'll receive an API Key — copy it down for later use.
Figure 3: Amap API Application
First Connection Test
Before writing the complete program, let's write a quick test to make sure we can successfully connect to the model running on the AMD 395 AI PC. Create a file called test_connection.py and enter the following code:
from hello_agents.core.llm import HelloAgentsLLM
import sys

# Connect to the local model on AMD 395 AI PC
llm = HelloAgentsLLM(
    provider="amd395",  # Can use any identifier
    model="Qwen3-30B-2507-instruct",  # Must match the model name launched in the model management tool
    base_url="http://127.0.0.1:1234/v1",  # Default port is 1234 (may need adjustment based on your setup)
    api_key="amd395",  # For local services, any non-empty string works
    verbose=False  # Disable verbose logging
)

# Test connection
messages = [{"role": "user", "content": "Hello, please introduce yourself."}]

print("AMD 395 AI PC Response:")
print("-" * 50)

response_text = ""
for chunk in llm.think(messages):
    response_text += chunk

print("\n" + "-" * 50)
print(f"\nFull response length: {len(response_text)} characters")Run this script:
python test_connection.pyIf you see the model's response, everything is working. If you get an error, check whether the model in ZhiLing Assistant is still running.
Step 4: Writing the Code to Let AI Plan Your Trip
Create the Project File
Create a new file called travel_planner_mcp.py — we'll build the code step by step.
Part 1: Import Libraries and Configuration
First, import the required tools and configure the logging level (to reduce noise):
"""
AMD395 × HelloAgents × MCP Hands-on: Smart Travel Planning Assistant
"""

import os
import logging
from hello_agents import SimpleAgent
from hello_agents.core.llm import HelloAgentsLLM
from hello_agents.tools import MCPTool

# Configure logging (reduce noise)
logging.basicConfig(level=logging.WARNING, format='%(message)s')
logging.getLogger('openai').setLevel(logging.ERROR)
logging.getLogger('httpx').setLevel(logging.ERROR)Part 2: Creating the Multi-Agent System Class
Why Do We Need a Multi-Agent Architecture?
Before writing the code, we need to understand a key question: Why can't a single Agent do all the work?
The answer is: SimpleAgent can only reliably call one tool at a time. If you ask a single Agent to check weather, search attractions, and generate a plan all at once, it might:
- Call only one tool and stop
- Call tools in a chaotic order
- Repeatedly disconnect from MCP
So we adopt a multi-Agent collaboration architecture:
- Attraction Search Agent: Only responsible for searching attractions (calls
amap_maps_text_search) - Weather Query Agent: Only responsible for querying weather (calls
amap_maps_weather) - Itinerary Planning Agent: Doesn't call tools — only responsible for synthesizing information into a plan
This way, each Agent does one thing and does it well.
Let's create a MultiAgentTravelPlanner class to manage these Agents:
import logging

# Configure logging (reduce noise)
logging.basicConfig(level=logging.WARNING, format='%(message)s')
logging.getLogger('openai').setLevel(logging.ERROR)
logging.getLogger('httpx').setLevel(logging.ERROR)


class MultiAgentTravelPlanner:
    """Multi-Agent Travel Planning System"""

    def __init__(self, amap_api_key: str):
        """Initialize the multi-Agent system"""
        print("\n🔄 Initializing Multi-Agent Travel Planning System...")

        # 1. Connect to the local model on AMD 395 AI PC
        print("  ├─ Connecting to AMD 395 AI PC...")
        self.llm = HelloAgentsLLM(
            model="Qwen3-30B-2507-instruct",
            base_url="http://127.0.0.1:1234/v1",
            api_key="amd395"
        )

        # Test connection
        try:
            messages = [{"role": "user", "content": "Hello"}]
            response = ""
            for chunk in self.llm.think(messages):
                response += chunk
            print("  ├─ ✓ Model connection successful")
        except Exception as e:
            print(f"  └─ ✗ Model connection failed: {e}")
            raise

        # 2. Create shared MCP tool (key: create only once, shared by multiple Agents)
        print("  ├─ Creating shared Amap MCP tool...")
        self.amap_tool = MCPTool(
            name="amap",
            description="Amap (Gaode Maps) service",
            server_command=["uvx", "amap-mcp-server"],
            env={"AMAP_MAPS_API_KEY": amap_api_key},
            auto_expand=True
        )
        print("  ├─ ✓ MCP tool created successfully")

        # 3. Create Attraction Search Agent (only responsible for searching attractions)
        print("  ├─ Creating Attraction Search Agent...")
        self.attraction_agent = SimpleAgent(
            name="Attraction Search Expert",
            llm=self.llm,
            system_prompt="""You are an attraction search expert.

Your task: Use the amap_maps_text_search tool to search for attractions in the specified city.

Output format: Please briefly list attraction names and addresses."""
        )
        self.attraction_agent.add_tool(self.amap_tool)

        # 4. Create Weather Query Agent (only responsible for querying weather)
        print("  ├─ Creating Weather Query Agent...")
        self.weather_agent = SimpleAgent(
            name="Weather Query Expert",
            llm=self.llm,
            system_prompt="""You are a weather query expert.

Your task: Use the amap_maps_weather tool to query weather conditions for the specified city.

Output format: Please briefly describe weather conditions, temperature, and wind strength."""
        )
        self.weather_agent.add_tool(self.amap_tool)

        # 5. Create Itinerary Planning Agent (doesn't call tools, only synthesizes information)
        print("  ├─ Creating Itinerary Planning Agent...")
        self.planner_agent = SimpleAgent(
            name="Itinerary Planning Expert",
            llm=self.llm,
            system_prompt="""You are an itinerary planning expert.

Your task: Based on attraction information and weather information, generate a detailed travel plan.

Output format (Markdown):
# {City} N-Day Travel Plan

## Trip Overview
- Destination: ...
- Duration: ...
- Total Budget: ...

## Weather Conditions
(Fill in based on weather information)

## Detailed Itinerary
### Day 1: ...
- Morning: ...
- Afternoon: ...
- Evening: ...
- Budget: ... CNY

### Day 2: ...
...

## Budget Summary
...

## Travel Tips
..."""
        )

print(f" └─ ✓ Multi-Agent system initialized successfully\n")What does this code do?
- Connect to AMD 395 AI PC: Creates an LLM connection shared by all Agents
- Create a shared MCP tool:
self.amap_toolis an instance variable that stays active throughout the class lifecycle and won't disconnect - Create 3 specialized Agents:
- Attraction Search Agent: Only calls
amap_maps_text_search - Weather Query Agent: Only calls
amap_maps_weather - Itinerary Planning Agent: Doesn't call tools, only synthesizes information
- Attraction Search Agent: Only calls
Part 3: Multi-Agent Collaboration Workflow
Now let's add a plan_travel method to the MultiAgentTravelPlanner class, enabling the 3 Agents to collaborate:
    def plan_travel(self, destination: str, days: int, budget: float, preferences: str = ""):
        """
        Plan a trip using multi-Agent collaboration

        Workflow:
        1. Attraction Search Agent → Search attractions
        2. Weather Query Agent → Query weather
        3. Itinerary Planning Agent → Synthesize information and generate plan
        """
        print("=" * 80)
        print("【Starting Multi-Agent Collaborative Travel Planning】")
        print("=" * 80)
        print(f"Destination: {destination}")
        print(f"Duration: {days} days")
        print(f"Budget: {budget} CNY")
        print(f"Preferences: {preferences if preferences else 'None'}")
        print("=" * 80)
        print()

        # Step 1: Attraction Search Agent searches for attractions
        print("📍 Step 1: Attraction Search Agent working...")
        keywords = preferences if preferences else "attractions"
        attraction_query = f"Please use the amap_maps_text_search tool to search for {keywords}-related attractions in {destination}, return the top 10 results"
        print(f"   Query: {attraction_query}")
        attraction_response = self.attraction_agent.run(attraction_query)
        print(f"   ✓ Attraction search complete\n")

        # Step 2: Weather Query Agent queries weather
        print("🌤️  Step 2: Weather Query Agent working...")
        weather_query = f"Please use the amap_maps_weather tool to query weather information for {destination}"
        print(f"   Query: {weather_query}")
        weather_response = self.weather_agent.run(weather_query)
        print(f"   ✓ Weather query complete\n")

        # Step 3: Itinerary Planning Agent synthesizes information and generates plan
        print("📋 Step 3: Itinerary Planning Agent synthesizing information...")
        print("   (This step may take 30-60 seconds, please be patient...)")

        planner_query = f"""Please generate a detailed {days}-day travel plan for {destination}:

【Basic Information】
- Destination: {destination}
- Duration: {days} days
- Total Budget: {budget} CNY
- Preferences: {preferences if preferences else "None"}

【Weather Conditions】
{weather_response[:500]}...

【Available Attractions】
{attraction_response[:800]}...

【Requirements】
1. Generate a detailed itinerary for {days} days
2. Arrange 2-3 main attractions per day
3. Include accommodation, dining, and transportation suggestions
4. Allocate budget reasonably
5. Output in Markdown format

Please begin generating the plan:"""

        print(f"   Generating plan (approximately 30 seconds)...")
        result = self.planner_agent.run(planner_query)
        print(f"   ✓ Itinerary planning complete\n")

return resultWhat does this code do? We wrote a detailed requirements description for the Agent, telling it which city to plan for, how many days, what budget, and what preferences. More importantly, we told it how to do it: first check weather, then search attractions, then synthesize the information.
After receiving this task, the Agent thinks on its own: "Alright, I need to first call the amap_maps_weather tool to check the weather." It automatically generates the parameter city=Hangzhou, calls the tool, and gets weather data. Then it continues thinking: "Now I know the weather. Next, I need to search for attractions. The user likes natural scenery and historical culture, so I can search for keywords like 'West Lake' and 'Lingyin Temple'." So it calls the amap_maps_text_search tool.
Finally, the Agent combines weather information, attraction lists, opening hours, ticket prices, and other information to generate a beautiful travel plan.
Part 4: Saving the Planning Results
Finally, we save the planning results as a Markdown file:
def save_to_markdown(content: str, destination: str, days: int):
    """Save the itinerary to a Markdown file"""
    filename = f"{destination}_{days}day_trip_MCP.md"

    with open(filename, "w", encoding="utf-8") as f:
        f.write(f"*This itinerary was automatically generated by AMD 395 AI PC × HelloAgents × MCP*\n\n")
        f.write("---\n\n")
        f.write(content)

    print(f"\n✓ Itinerary saved to file: {filename}")
    return filename


def main():
    """Main function"""
    print("=" * 80)
    print("AMD 395 AI PC × HelloAgents × MCP Hands-on: Smart Travel Planning Assistant")
    print("=" * 80)

    # Configure Amap API Key
    amap_api_key = "your_api_key_here"  # Replace with your own API Key

    if not amap_api_key or amap_api_key == "your_api_key_here":
        print("\n✗ Error: Amap API Key not configured")
        print("\nPlease edit the script and fill in your API Key")
        print("Apply here: https://lbs.amap.com/")
        return

    print(f"\n✓ Amap API Key configured: {amap_api_key[:8]}...{amap_api_key[-4:]}")

    try:
        # Create Multi-Agent Travel Planning System
        planner = MultiAgentTravelPlanner(amap_api_key)

        # Plan the trip
        result = planner.plan_travel(
            destination="Hangzhou",
            days=3,
            budget=3000,
            preferences="Natural scenery and historical culture"
        )

        # Output results
        print("\n" + "=" * 80)
        print("【Planning Complete】")
        print("=" * 80)
        print(result)

        # Save to file
        save_to_markdown(result, "Hangzhou", 3)

        print("\n" + "=" * 80)
        print("✓ Travel planning complete!")
        print("=" * 80)

    except Exception as e:
        print(f"\n✗ Error occurred: {e}")
        import traceback
        traceback.print_exc()


if __name__ == "__main__":
main()The complete code file is done! The entire script is about 300 lines, but the logic is clear: configure → connect to model → create MCP tool → create Agents → run task → save results.
Running the Program
After saving the file, run it in the command line:
python travel_planner_mcp.pyYou'll see a series of outputs. First, the model connection:
================================================================================
AMD 395 AI PC × HelloAgents × MCP Hands-on: Smart Travel Planning Assistant
================================================================================

✓ Amap API Key configured: 25dfaf05...8029

🔄 Initializing Multi-Agent Travel Planning System...
  ├─ Connecting to AMD 395 AI PC...
  ├─ ✓ Model connection successful
  ├─ Creating shared Amap MCP tool...
  ├─ ✓ MCP tool created successfully
  ├─ Creating Attraction Search Agent...
  ├─ Creating Weather Query Agent...
  ├─ Creating Itinerary Planning Agent...
  └─ ✓ Multi-Agent system initialized successfully

================================================================================
【Starting Multi-Agent Collaborative Travel Planning】
================================================================================
Destination: Hangzhou
Duration: 3 days
Budget: 3000 CNY
Preferences: Natural scenery and historical culture
================================================================================

📍 Step 1: Attraction Search Agent working...
   Query: Please use the amap_maps_text_search tool to search for natural scenery and historical culture-related attractions in Hangzhou
   ✓ Attraction search complete

🌤️  Step 2: Weather Query Agent working...
   Query: Please use the amap_maps_weather tool to query weather information for Hangzhou
   ✓ Weather query complete

📋 Step 3: Itinerary Planning Agent synthesizing information...
   (This step may take 30-60 seconds, please be patient...)
   Generating plan (approximately 30 seconds)...
   ✓ Itinerary planning complete

================================================================================
【Planning Complete】
================================================================================
# Hangzhou 3-Day Travel Plan
...(full itinerary content)

✓ Itinerary saved to file: Hangzhou_3day_trip_MCP.md

================================================================================
✓ Travel planning complete!
================================================================================The entire process takes approximately 30-60 seconds, depending on how much the Agent thinks and how many tool calls it makes. In the end, you'll get a detailed travel plan saved in the Hangzhou_3day_trip_MCP.md file.
Open this file and you'll find that the attractions are all real, with addresses and opening hours queried in real-time from the Amap API.
Conclusion
What You Just Accomplished
If you followed this tutorial step by step, congratulations! You just built a smart travel planning assistant on your own computer. More importantly, you learned three things:
The first is running AI locally. You no longer depend on cloud services like ChatGPT or Claude — you have an AI brain that's entirely your own. It's available 24/7, won't disconnect due to network issues, and won't lag because of rate limiting. Your travel preferences, budget information, and itineraries all stay on your computer, never uploaded anywhere.
The second is letting AI use tools. Previously, AI could only chat — if you asked "What's the weather in Hangzhou today?" it could only guess based on training data. But now, your AI can call the Amap API itself and get real-time weather data. This capability is enabled through the MCP protocol — a standard that lets AI connect to various external services.
The third is rapidly building applications with frameworks. Using the HelloAgents framework, you completed a full travel assistant in under 300 lines of code. Writing it from scratch might take thousands of lines. That's the value of a framework — it simplifies complex things so you can focus on what truly matters.
If You Want to Go Further
This travel assistant is just a starting point. If you want to make it more powerful, try these:
Enable it to query more information. The Amap MCP Server provides 16 tools — we only used weather query and attraction search. You could have it plan routes (cycling, walking, or driving), check distances between locations, or even reverse-geocode coordinates. Just tell the Agent about these tools in the prompt, and it will call them when needed.
Have it handle more complex tasks. Try planning a multi-city itinerary like "Beijing → Shanghai → Hangzhou," or generating a travel journal from your photos. This requires adjusting prompts to tell the Agent how to think and break the task into steps.
Give it a more powerful brain. The AMD 395 AI PC supports running larger models — if you have VRAM to spare, try Qwen3-70B. More parameters mean stronger comprehension, resulting in more detailed and reasonable itineraries.
Let more people use it. Currently this program only runs in the command line, but you could build a web version with FastAPI or a graphical interface with Streamlit. That way your family and friends can use your travel assistant too.
Troubleshooting
MCP tool connection failed? Make sure you've installed the uv tool (pip install uv). If it still doesn't work, try manually running uvx amap-mcp-server to see what error appears. Most of the time it's a network issue — uv needs internet access to download the MCP server.
AI-generated itinerary seems unreliable? This is usually a prompt issue. You can write more detail in the system_prompt — for example, explicitly state "You must use tools to query real data, do not fabricate information," or provide a sample itinerary as reference.
Want to use it from another computer? Just share the AMD 395 AI PC's IP address. For example, if the IP is 192.168.1.100, change the base_url in the code on other computers to http://192.168.1.100:1234/v1. As long as they're on the same local network, they can access it.
Why Choose Local AI
Finally, let me share why it's worth the effort to run AI locally.
Cloud APIs are certainly convenient — register an account, get a key, a few lines of code and you're done. But they have three problems: First, privacy — every message you send is uploaded to the provider's servers, and you never truly know how they'll be handled. Second, cost — each API call looks cheap at a few cents, but for frequently used applications, the expenses add up. Third, restrictions — cloud services may rate-limit you, raise prices, or suddenly shut down, leaving you with no control.
Local AI is different. The AMD 395 AI PC is a one-time investment — after that, no matter how many times you call it or how sensitive the data you process, there are no additional fees and no privacy concerns. More importantly, with the AMD ROCm platform, you have full autonomy to adjust model parameters, modify prompts, and swap different models. This machine is yours, the AI is yours, and everything is under your control.
That's the value of local AI. It's not just a technical choice — it's a rethinking of privacy, cost, and autonomy.
I hope this tutorial has been helpful. If you have any questions or ideas, feel free to reach out. Enjoy your AI journey! 🎉
References
If you'd like to dive deeper into the related technologies, these resources will help:
AMD AI Academy: https://www.amd.com/en/developer/resources/training/amd-ai-academy.html
HelloAgents Framework: https://github.com/jjyaoao/HelloAgents An AI Agent framework designed for beginners, with detailed Chinese documentation and rich examples.
MCP Protocol Documentation: https://modelcontextprotocol.io/ An AI tool communication standard introduced by Anthropic, becoming an industry consensus.
Qwen Model Series: https://github.com/QwenLM/Qwen Alibaba Cloud's open-source large language model series, excellent in Chinese, with Function Calling support.
Amap Open Platform: https://lbs.amap.com/ Provides map, weather, route planning, and other API services with free quotas available.
Thank you for reading this tutorial. If you found it useful, feel free to share it with more friends interested in local AI.