From Databases to Supabase
In the previous lesson, we learned the basics of UI design tools Mastergo and Figma, how to use GitHub for code management and version control, and how to deploy websites via Zeabur to make our applications accessible to more users.
To help you better connect with what you've already learned, before we dive into the new content about design tools and deployment in this lesson, let's quickly review the core knowledge points from the previous lesson with a few simple questions:
- What are frontend design tools, and what are the definitions and usage of Figma and MasterGo?
- The basic methods for converting design mockups into code.
- What is GitHub, how to configure SSH, and how to create your first repository.
- What does deployment mean, how to use Zeabur, and how to deploy code from GitHub or locally to the public internet for others to access.
If any of the above questions still feel unclear, we recommend reviewing the previous lesson's documentation and lecture notes. Feel free to ask questions in the WeChat study group at any time.
In this lesson, we will learn how to take an APP/website from "just running" to something closer to a real online product: in addition to using a database to manage various data changes during program execution, we also need a complete user system (registration, login, permissions, etc.) and other key backend capabilities. We will use Supabase as the main backend service platform, first implementing the two foundational features of "database + user system" with it, and then using Supabase's components as a reference to further understand the core modules typically included in modern cloud service backends, as well as the specific functions and logic of each module.
What You Will Learn
- What is data, what is a database, and common database types and usage methods
- What is Supabase, and how to use Supabase for basic database operations
- How to use Supabase to add basic user management features to your application
- Learn Supabase advanced features: realtime, storage, edge functions
- Learn how to add Google and GitHub login support to Supabase
- A basic application that supports user registration/login and can store data in an online database
- A reusable Supabase backend code template (database + user management, etc.) that can be directly applied to subsequent projects
1. What is a Database
1.1 What is Data
In the digital world, data is everywhere. Simply put, data is a carrier of information. Your friends' contact details, a WeChat article, a short video, a game character's level — these are all data. In our application, data is all the information that needs to be recorded and managed, such as user profiles, order history, program settings, etc.
Generally, data has different representations in programs. The simplest is variables — we can use different variables to record simple numbers:
# Python variable definition examples

# Integer variable: stores age information
age = 30

# Boolean variable: stores status (whether active)
is_active = True  # True means active, False means inactive

# List variable: stores a set of score data
scores = [85, 92, 78, 90]  # Contains 4 integer elements representing different scores

# Dictionary variable: stores multiple related information of a user
user_info = {
    "age": 30,           # Key "age" corresponds to the value of age
    "height": 1.80,      # Key "height" corresponds to the value of height (unit: meter)
    "login_count": 156   # Key "login_count" corresponds to the value of login times
}
For complex data like the aforementioned user profiles and order history, we can use more complex tables to represent the data:
| user_id | name | |
|---|---|---|
| 1001 | Alice | alice@example.com |
| 1002 | Bob | bob@example.com |
| order_id | user_id | amount | status |
|---|---|---|---|
| 901 | 1001 | 29.99 | completed |
| 902 | 1002 | 15.50 | pending |
However, for data with complex structures, hierarchical relationships, or variable fields, we can use JSON format for description — it is the universal intermediate data format of the internet that almost all programs can read and parse, making cross-system data transfer very convenient. For example, an order may contain multiple items, and each item has its own name, quantity, and price. Representing this with traditional tables would be cumbersome: you'd either need to split it into "orders table" and "items table" with foreign key fields to show the "order contains items" relationship, or use redundant fields like "item 1 name, item 1 price, item 2 name..." in a single table, which can't accommodate a variable number of items. JSON can directly use nested structures to clearly express the "order - items - item attributes" hierarchy, making it both intuitive and flexible.
{
  "order_id": 901,
  "user_id": 1001,
  "amount": 29.99,
  "status": "completed",
  "items": [
    { "sku": "BG-001", "name": "Beef Burger", "quantity": 1, "price": 18.00 },
    { "sku": "SD-003", "name": "French Fries", "quantity": 1, "price": 6.99 },
    { "sku": "DK-002", "name": "Cola", "quantity": 1, "price": 5.00 }
  ],
  "shipping_address": {
    "street": "123 Kejiyuan Road",
    "city": "Shenzhen",
    "zip_code": "518057"
  }
}
Going further, if we consider data encoded as vectors, vector data is typically a numerical representation obtained by processing unstructured data like text, images, or audio through AI models (such as Embedding models). Its representation might look like:
[0.123, -0.456, 0.789, ..., -0.234] (an array composed of hundreds or even thousands of floating-point numbers)
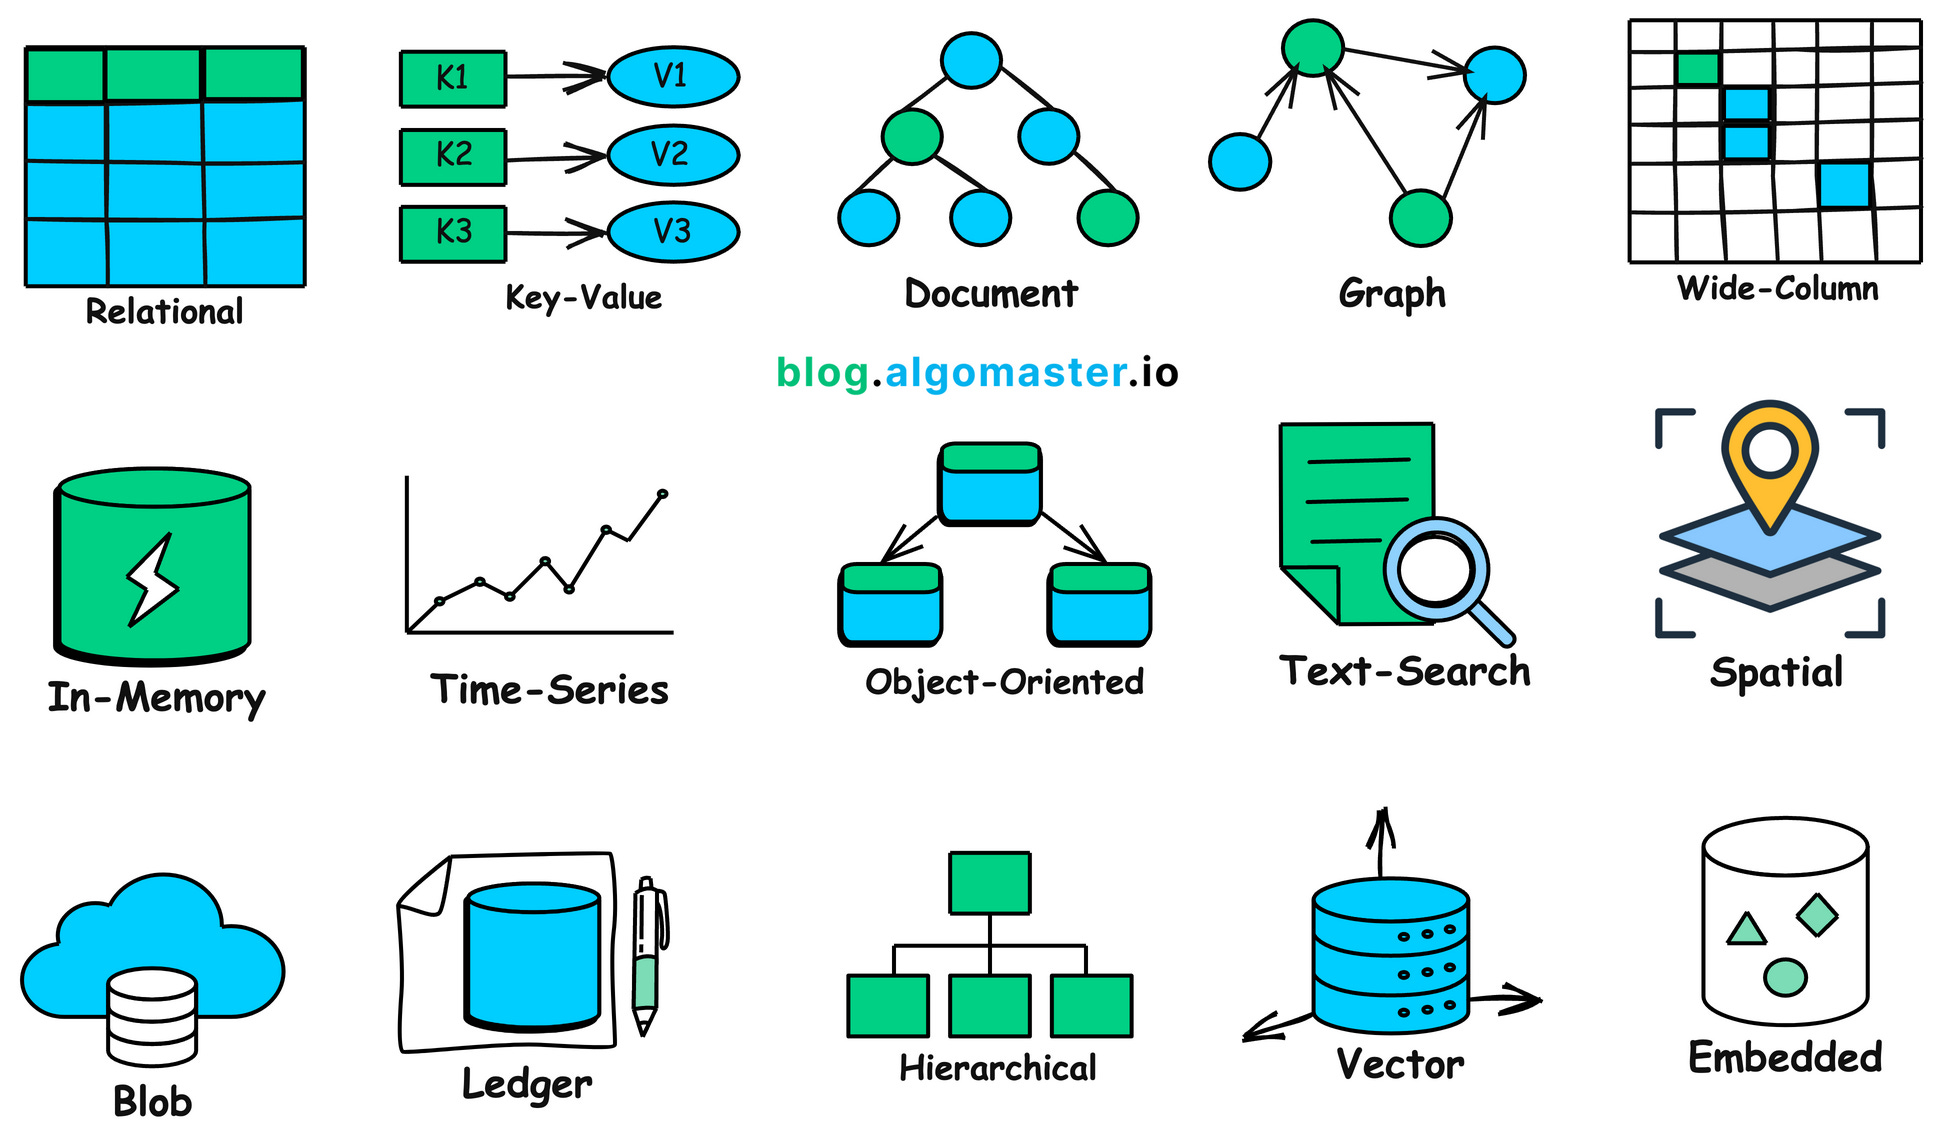
In summary, there are many different forms and purposes of data in the real world worth analyzing in detail, and each type of data may require a specialized database for storage. See the figure below for details — doesn't it seem like a lot?
1.2 Why We Need Databases
We've already learned that real-world data often has complex structures. To efficiently store and use this data, we need a dedicated program or container to manage it — this is the original purpose of databases. A database is essentially a special program whose core function is to organize data in a standardized way, store it securely, manage it systematically, and support efficient querying and retrieval.
Imagine what would happen to application data without a database. When users close their browser or exit the app, all temporarily loaded information would be directly lost; we'd be unable to permanently save user states (such as login information, personalized settings), nor could we share critical data between users (such as product inventory, order records). We need a mechanism to help us store all our data!
What's more flexible is that database deployment can be chosen as needed: it can be deployed on local servers to meet data localization management needs, or deployed to the cloud. Cloud databases support elastic scaling, can expand capacity as data volume and access volume grow, handle massive data and high concurrency, and even with significant user growth, can still ensure a normal user experience.
In summary, databases with their efficient persistent storage, fine-grained management, and fast query capabilities primarily solve the following core problems:
- Persistent Data Storage: Without a database, data exists only in the application's memory. Once the application is closed, the data is lost. Databases solve this problem by persistently storing data on storage media like hard drives, ensuring long-term data preservation and reducing the risk of data loss.
- Convenient Data Querying and Analysis: Databases provide powerful query languages (such as SQL) that allow users to easily and efficiently perform complex queries, filtering, and analysis on massive amounts of data, helping businesses make more informed decisions. Without a database, finding specific information from a large number of disorganized files would be an extremely time-consuming and difficult task.
- Support for High Performance and High Concurrency Access: Databases use technologies such as index optimization, query caching, connection pooling, and distributed architecture to respond to query requests in milliseconds and support concurrent access from thousands of users. This is critical for modern internet applications (such as e-commerce flash sales, social network real-time feeds), ensuring system response speed and user experience. Without a database's high-performance support, systems would experience severe latency or even crash when facing massive user requests.
- Ensuring Data Integrity and Consistency: Databases use a series of mechanisms (such as constraints, triggers) to ensure data accuracy and consistency. This means data in the database must comply with predefined rules — for example, a user's age must be a number, order numbers must be unique — effectively preventing illegal or invalid data from being generated.
- Ensuring Data Security: Databases provide powerful security mechanisms, including user authentication, access control, and data encryption, to protect data from unauthorized access, modification, or destruction. To handle unexpected situations such as hardware failure, human error, or malicious attacks, databases also provide data backup and recovery features. Through regular backups, data can be restored in a timely manner when lost or corrupted, ensuring business continuity.
1.3 Relational Databases vs. Non-Relational Databases
We've already covered the core value, deployment methods, and elastic advantages of databases. When making a practical choice, the first thing to face is the two core categories of databases: relational databases and non-relational databases (NoSQL). We can understand their differences with two simple paragraphs:
A relational database is like a rigorously structured Excel spreadsheet where all data must be pre-formatted (defining Schema content, such as requiring a name and age, where the name must be text and the age must be a number), and different tables are connected through foreign key fields (identifiers used to link different tables, like ID numbers). Its advantage is that data is precise and reliable, particularly suitable for scenarios like bank transfers and inventory management where errors cannot occur. The downside is that adjusting the structure is relatively cumbersome, and performance is limited with massive data volumes.
A non-relational database is like a flexible folder that can store documents, images, or key-value pairs (a "word-definition" structure similar to a dictionary) in various formats, without needing to pre-define the structure of each piece of data. It's easier to handle rapidly changing requirements and ultra-large-scale data (such as massive social media posts), and scaling (adding servers to improve performance) is more convenient, but it sacrifices some cross-table query capabilities (the ability to organize information across different data tables) and consistency guarantees (ensuring data is always accurate and non-contradictory), making it suitable for internet applications with higher fault tolerance requirements.
So, how should you choose a database in practice? Summarized by scenario, relational databases are commonly found in financial transactions, inventory management, order processing, accounting systems, and other scenarios requiring strong consistency, complex transaction processing, and frequent balanced read-write access. Non-relational databases are more suitable for social media content storage, real-time log analysis, IoT massive data ingestion, recommendation system feature reads and writes, and other high-concurrency, unbalanced read-write patterns with flexible structure requirements.
However, for enterprises at an early stage, there's no need to spend a lot of time thinking about which database to use. Current databases are very mature product services. The most direct approach is to consult different cloud service providers (providers that offer IT resources and technical services such as servers, storage, databases, software, and computing power). We can directly engage with cloud service official sales teams to match suitable database solutions based on our product business needs. The convenient path for building enterprise applications is to prioritize working with professional vendors. (Note: Enterprise-level services are typically more expensive. We recommend researching and comparing multiple options first, or choosing to purchase servers and deploy open-source database programs yourself as an alternative.)
We can also refer to a cloud provider's database selection recommendation to choose different database types based on scenarios. You can compare database specifications from different cloud providers to select the most suitable one.
| Database Type | Database Name | Price | Applicable Scenarios |
|---|---|---|---|
| Relational Database | RDS MySQL Edition | Low | Basic Edition: Learning and small websites; High Availability Edition: Medium-sized database scenarios with certain business pressure; Cluster Edition: Business cannot tolerate interruptions, high access pressure |
| RDS SQL Server Edition | High | Basic Edition: Testing and small commercial websites; High Availability Edition: Enterprise-level commercial websites; Cluster Edition: Enterprise business cannot tolerate interruptions, high access pressure | |
| RDS PostgreSQL Edition | Lowest | Basic Edition: Learning and small websites; High Availability Edition: Medium-sized database scenarios with certain business pressure; Cluster Edition: Business cannot tolerate interruptions, high access pressure scenarios, with performance generally higher than MySQL | |
| RDS PPAS Edition | High | General: Compatible with Oracle business but with lower business pressure, virtualization can meet needs; Dedicated: For business requiring dedicated physical machines, generally high-concurrency Oracle-type business | |
| DRDS | Medium | Entry Edition: 4 Core 8G, affordable price, suitable for small and medium online business; Enterprise Edition: 16 Core 32G, good complex SQL response, suitable for ultra-high concurrency online business; Supreme Edition: 32 Core 64G, best complex SQL execution response, provides ultra-large specification options | |
| NoSQL Database | Redis | Medium | Dual-machine hot standby Redis: Generally used as persistent database to improve business availability; Cluster version Redis: Generally used as cache layer to accelerate application access, solving read pressure that ordinary databases cannot handle |
| MongoDB Edition | Medium | Single node instance: Suitable for development, testing, and other non-enterprise core data storage scenarios; Replica set instance: Suitable for scenarios with higher read performance requirements for databases in certain business scenarios, such as reading-oriented websites, order query systems with more reads than writes, or temporary activity and other sudden business needs; Sharded cluster instance: Based on multiple replica sets (each replica set following the three-replica mode) composed sharded cluster instance, providing higher read performance requirements, delivering high-speed read performance for real-time online business |
It's hard to understand just by reading. Let's use a specific "blog article" scenario to see how the same data is stored in a relational database (SQL) versus different types of non-relational databases (NoSQL).
Suppose we have a blog platform that needs to store the following information:
- Users: User ID, username, email
- Posts: Post ID, title, content, author ID
- Comments: Comment ID, comment content, commenter ID, associated post ID
- Tags: Tag ID, tag name
- Post-tag relationships: Multiple tags associated with a single post, multiple posts associated with a single tag
Relational Database (SQL) Example
In a SQL database, we would store different types of data in separate tables and link them through "foreign keys." This structure is clear, standardized, and reduces data redundancy.
Taking "content platform article management" as an example, we wouldn't mix "users, posts, comments, tags" together. Instead, we'd split them into 5 tables, each with a single function. Each table has clear "responsibility boundaries" and strict structure definitions (Schema):
userstable (stores user information)
| user_id (Primary Key) | username | |
|---|---|---|
| 101 | Alice | alice@example.com |
| 102 | Bob | bob@example.com |
poststable (stores post information)
| post_id (Primary Key) | title | content | author_id (Foreign Key) |
|---|---|---|---|
| 1 | Introduction to SQL | This is an article about SQL databases... | 101 |
| 2 | Getting Started with NoSQL | NoSQL provides flexible data models... | 102 |
commentstable (stores comment information)
| comment_id (Primary Key) | body | commenter_id (Foreign Key) | post_id (Foreign Key) |
|---|---|---|---|
| 1001 | Great writing! | 102 | 1 |
| 1002 | Learned something new. | 101 | 2 |
| 1003 | Any more examples? | 101 | 1 |
tagstable (stores tags)
| tag_id (Primary Key) | tag_name |
|---|---|
| 51 | Database |
| 52 | Technology |
| 53 | Beginner |
post_tagstable (stores the many-to-many relationship between posts and tags, demonstrating join table characteristics)
| post_id (Foreign Key) | tag_id (Foreign Key) |
|---|---|
| 1 | 51 |
| 1 | 52 |
| 2 | 51 |
| 2 | 52 |
| 2 | 53 |
To query "the complete information of Alice's post 'Introduction to SQL' (post_id=1) (including post content, author, comments, tags)," you need to execute a multi-table join (JOIN) query, linking 5 tables through foreign keys and aggregating the data. The SQL statement is as follows:
SELECT
    p.title,
    p.content,
    u.username AS author,
    c.body AS comment,
    t.tag_name AS tag
FROM
    posts p
JOIN
    users u ON p.author_id = u.user_id
LEFT JOIN
    comments c ON p.post_id = c.post_id
LEFT JOIN
    post_tags pt ON p.post_id = pt.post_id
LEFT JOIN
    tags t ON pt.tag_id = t.tag_id
WHERE
    p.post_id = 1;
This query spans 5 tables, aggregating all related data together. This is the core advantage of relational databases: through normalization and join operations, you can flexibly perform various complex queries while ensuring data consistency and minimal redundancy.
Non-Relational Database (NoSQL) Example
NoSQL databases (such as MongoDB, Redis) have the opposite design philosophy from SQL. They don't emphasize data splitting and normalization, and typically aggregate all business-related data together to reduce join operations during queries, thereby improving read performance.
Among NoSQL databases, Document Database is one of the most commonly used types, with MongoDB being a typical representative. It uses "documents" as the basic storage unit. Here, "document" doesn't mean what we normally think of as "article," but rather a JSON-like data structure (MongoDB actually uses BSON format, supporting more data types): no need to pre-define a unified Schema (data structure), each document's fields can be flexibly added or removed, and field types can be freely adjusted, perfectly adapting to scenarios with variable data formats.
In a document database, a post and all its related information (such as comments, tags) are typically stored in a single document (the document format is similar to JSON, with flexible field definitions and no need for a pre-defined Schema). The core logic is "store the complete information for a business scenario in one document," avoiding multi-source data stitching during queries.
An example document in the posts collection:
{
  "_id": 1,
  "title": "Introduction to SQL",
  "content": "This is an article about SQL databases...",
  "author": {
    "user_id": 101,
    "username": "Alice",
    "email": "alice@example.com"
  },
  "tags": [
    "Database",
    "Technology"
  ],
  "comments": [
    {
      "comment_id": 1001,
      "body": "Great writing!",
      "commenter": {
        "user_id": 102,
        "username": "Bob"
      }
    },
    {
      "comment_id": 1003,
      "body": "Any more examples?",
      "commenter": {
        "user_id": 101,
        "username": "Alice"
      }
    }
  ]
}
The advantage of this design is very intuitive: when you need to get "the complete information of the first post (including author, comments, tags)," you only need to query this one document via _id:1, and the database can return all data in a single read, without needing to execute 3-4 table join operations like SQL, greatly improving read efficiency.
However, there's also an obvious trade-off: since data is "aggregated and stored," data redundancy is inevitable — for example, author "Alice"'s username is embedded in every post document she writes. If one day "Alice" changes her username to "Alice_New," you would theoretically need to iterate through all post documents containing her information and update the author.username field one by one. This is not only cumbersome but could also result in some documents failing to update due to network or server issues, creating a situation where "the same user has inconsistent usernames across different posts."
In practice, however, this redundancy is often "acceptable": for "read-heavy, write-light" scenarios like blogs, news, and e-commerce product details (where users view content far more often than authors change usernames), trading a small amount of redundancy for "extreme read performance" is the better choice. For "write-heavy, read-light" scenarios (such as frequent user information updates), you need to weigh business requirements to decide whether to use a document database.
The above is a brief introduction to different databases. If you're interested in more specific database types, you can refer to the following resources to try different types of databases.
Examples of SQL databases: Db2, MySQL, PostgreSQL, YugabyteDB, CockroachDB, Oracle Database, Azure SQL Database
Examples of NoSQL databases: Redis, CouchDB, MongoDB, Cassandra, Elasticsearch, BigTable, Neo4j, HBase
2. Supabase
Earlier we introduced several common types of databases and their suitable use cases. However, in real projects, a database is typically just one fundamental module in the backend system. Beyond storing and querying data, you also need to solve a whole set of problems: user registration and login, permission verification, file upload and storage, external API interfaces, and even scheduled tasks and real-time notifications. Just choosing the right database won't make your application "immediately ready for production" — there's still a large amount of tedious backend engineering work in between.
So, we need to consider a bigger picture: Backend Services. A complete application is typically composed of "frontend + backend": the frontend handles page display and user interaction, while the backend handles data storage, user login, business logic processing, etc. In the past, developers often needed to set up their own servers, configure databases, design and implement APIs, and manually handle permission management, security policies, scalability, and monitoring and operations — the entire process was both repetitive and time-consuming. To solve this repetitive work, the industry introduced BaaS (Backend as a Service): packaging common backend functions like databases, user authentication, file storage, and real-time capabilities into a cloud platform, where developers can directly call these capabilities through SDKs/APIs without building and operating infrastructure from scratch.
Against this backdrop, Supabase can be seen as a representative of the new generation of BaaS. It uses PostgreSQL as its core database and integrates a complete set of backend capabilities on top of it, including Auth, Storage, Realtime, Edge Functions, Vector, etc., providing developers with a "Postgres-centric, one-stop backend platform." Next, from this perspective, let's upgrade from "just choosing a database" to "choosing a complete backend development platform," and see specifically what work Supabase can help us skip and how it dramatically shortens the distance from prototype to usable product.
2.1 Step-by-Step Guide
After clearly understanding Supabase's overall positioning, we will follow the operation path of the Supabase console to break down the specific core capabilities it provides and the core responsibilities of each capability. We will cover each option in Supabase in detail to help you quickly get started with basic Supabase operations.

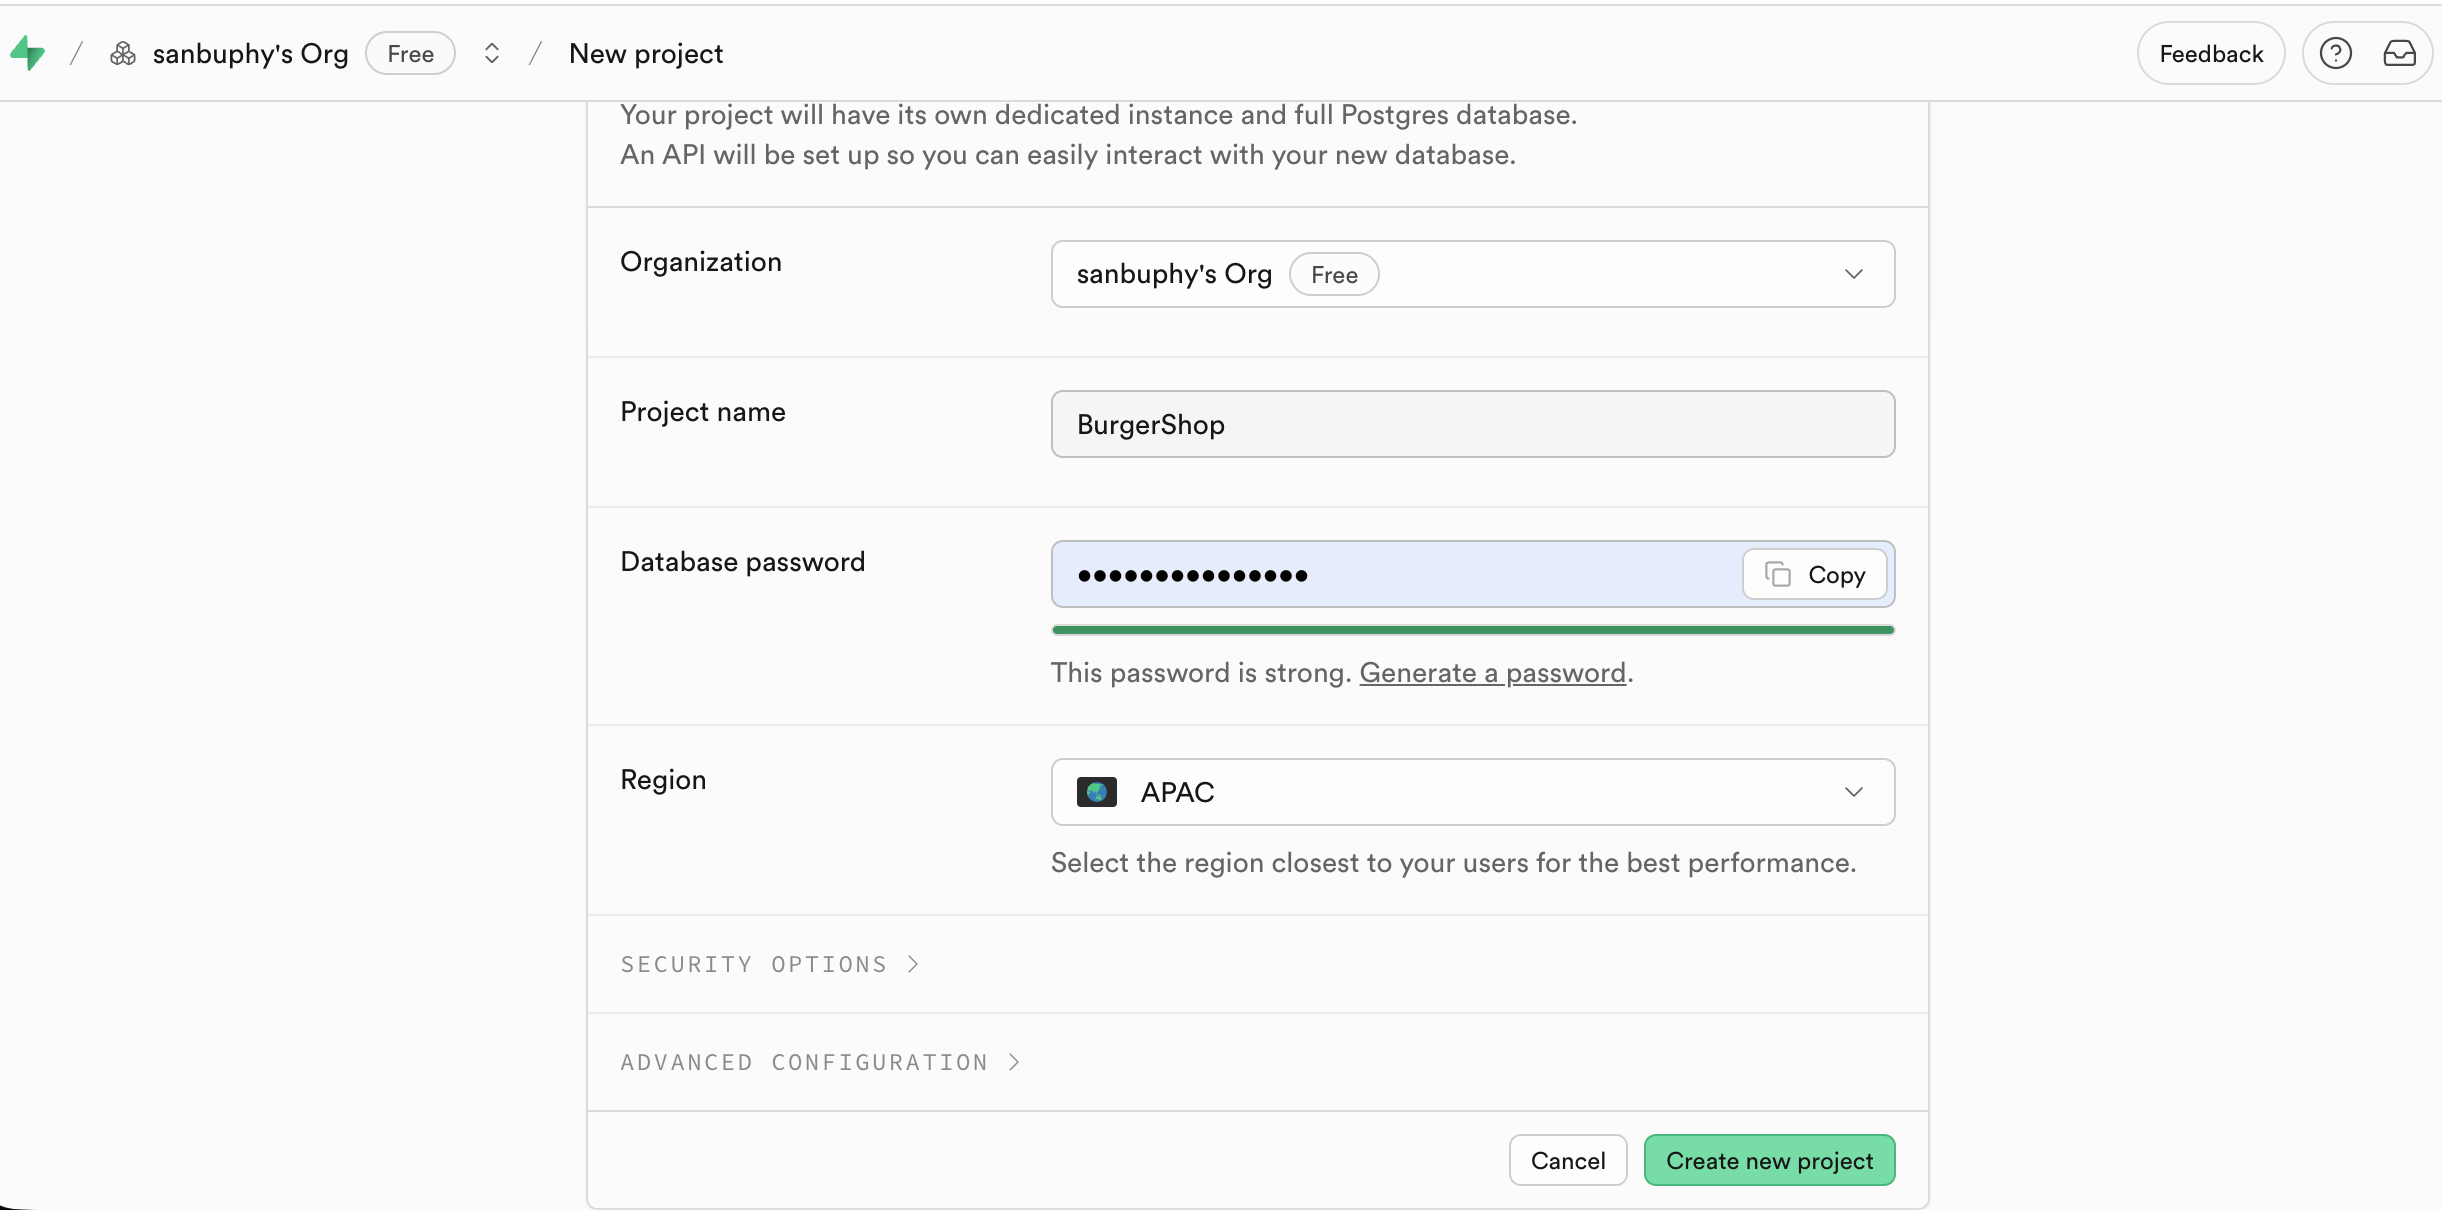
After visiting the Supabase official website and logging in, click "New project" on the console homepage to enter the creation process.
Enter the required configuration: Project Name and database password. For the region, simply choose the one closest to your target users.
After successful creation, the left sidebar of the console will display all core function modules (Table Editor, SQL Editor, Database, Authentication, etc.). Subsequent operations will revolve around these modules.
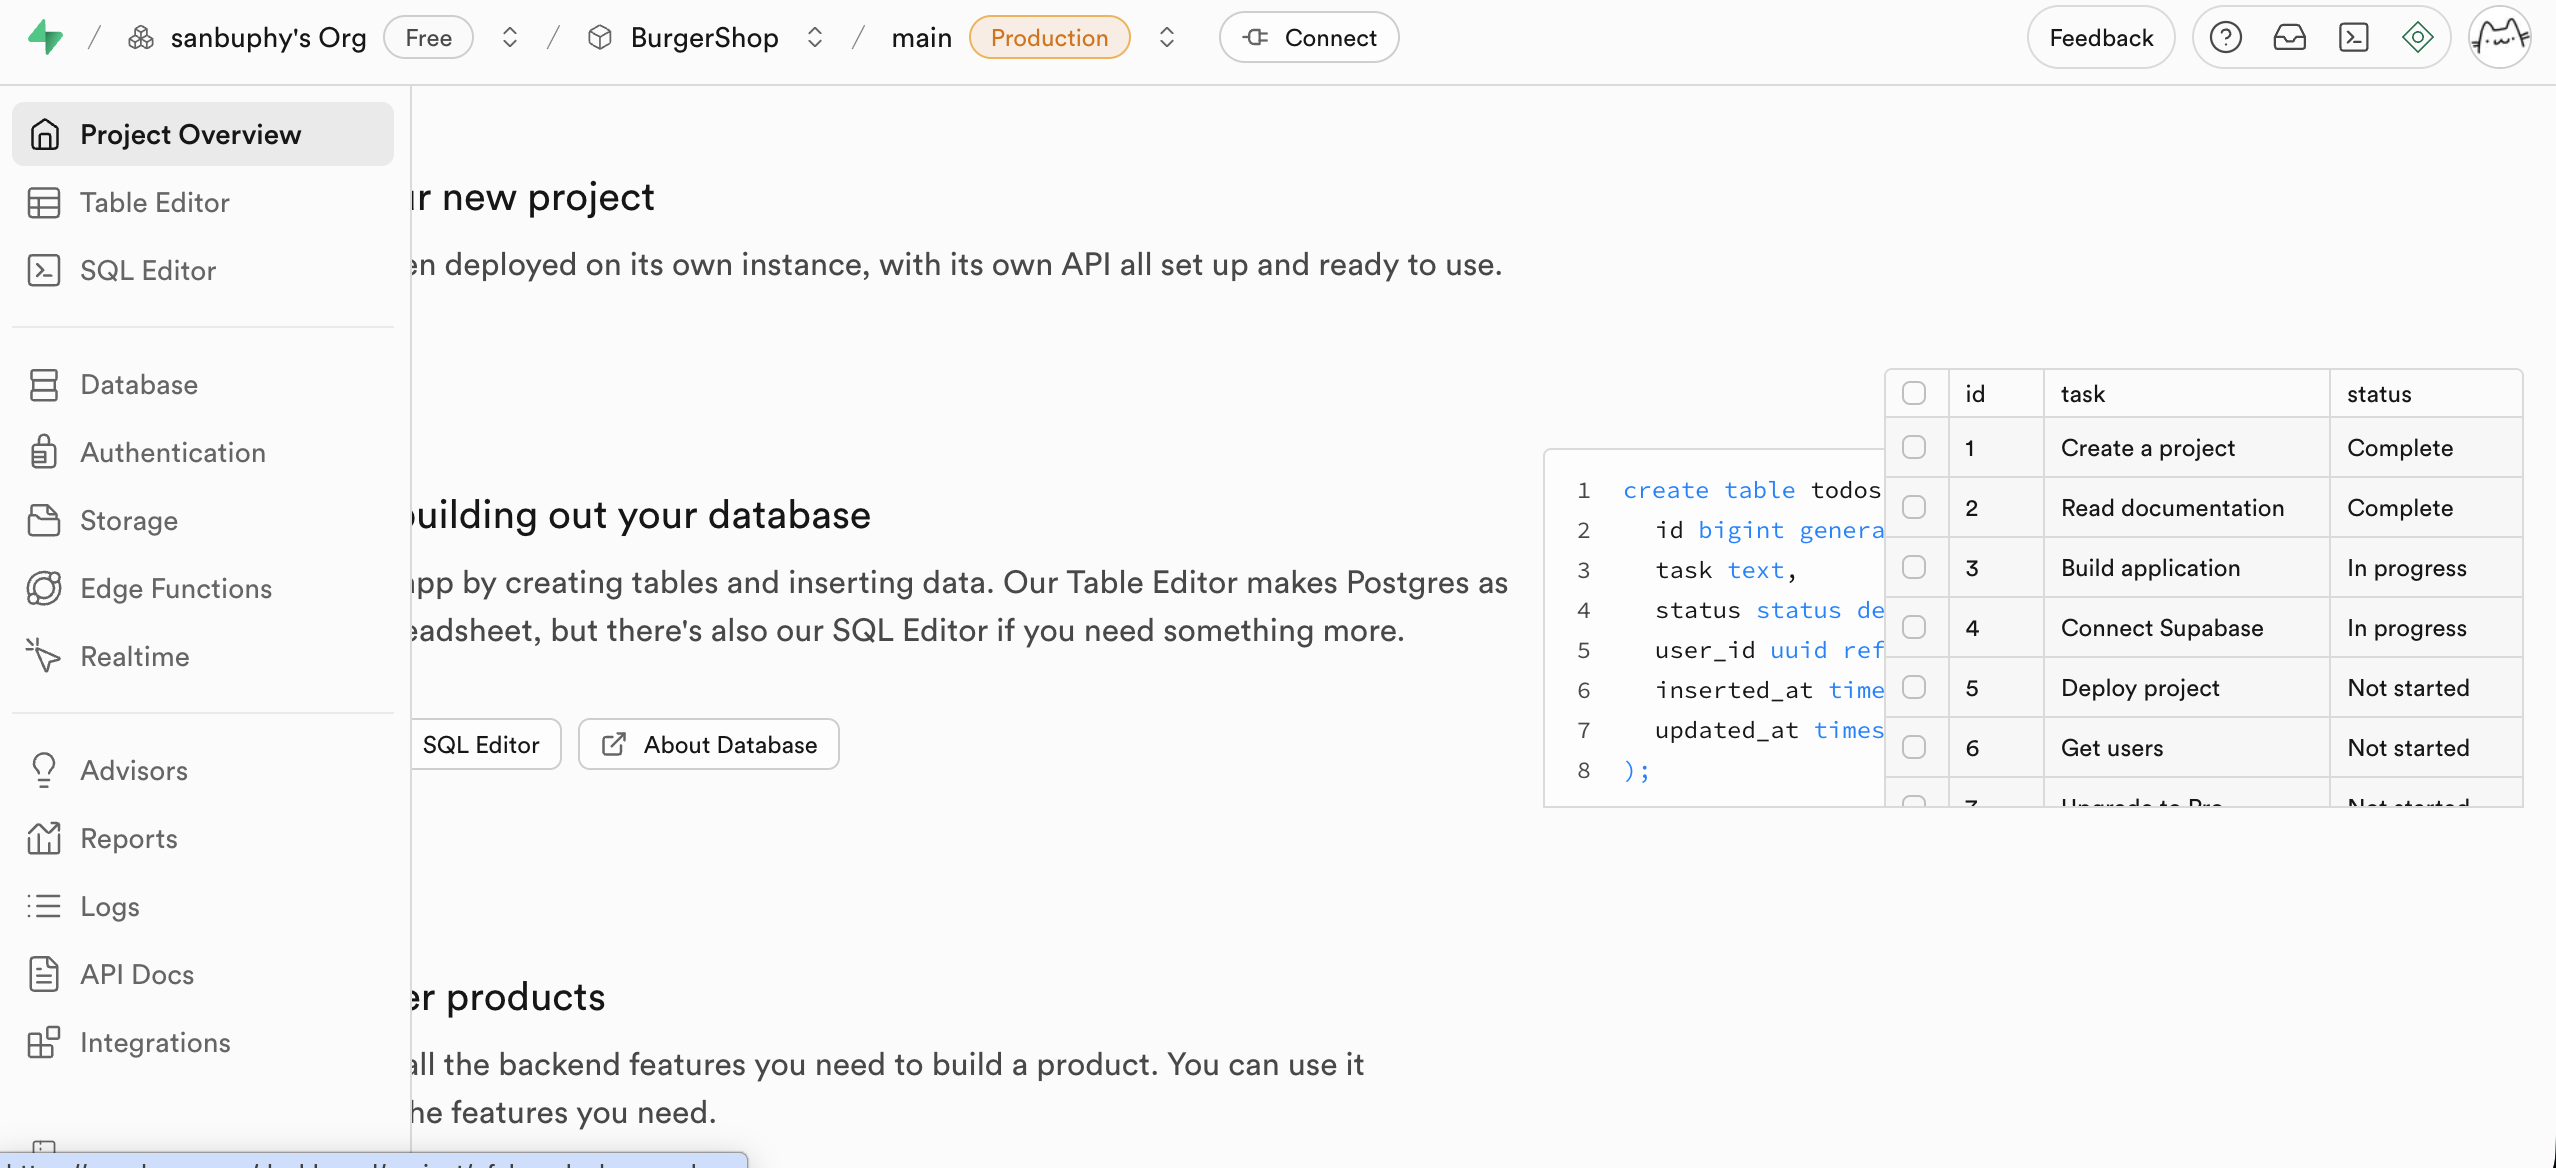
Table Editor
The Table Editor can be thought of as Supabase's visual data table editor. It allows you to directly view and modify data in the database just like operating Excel, without writing SQL statements — you only need mouse interaction to modify data content.
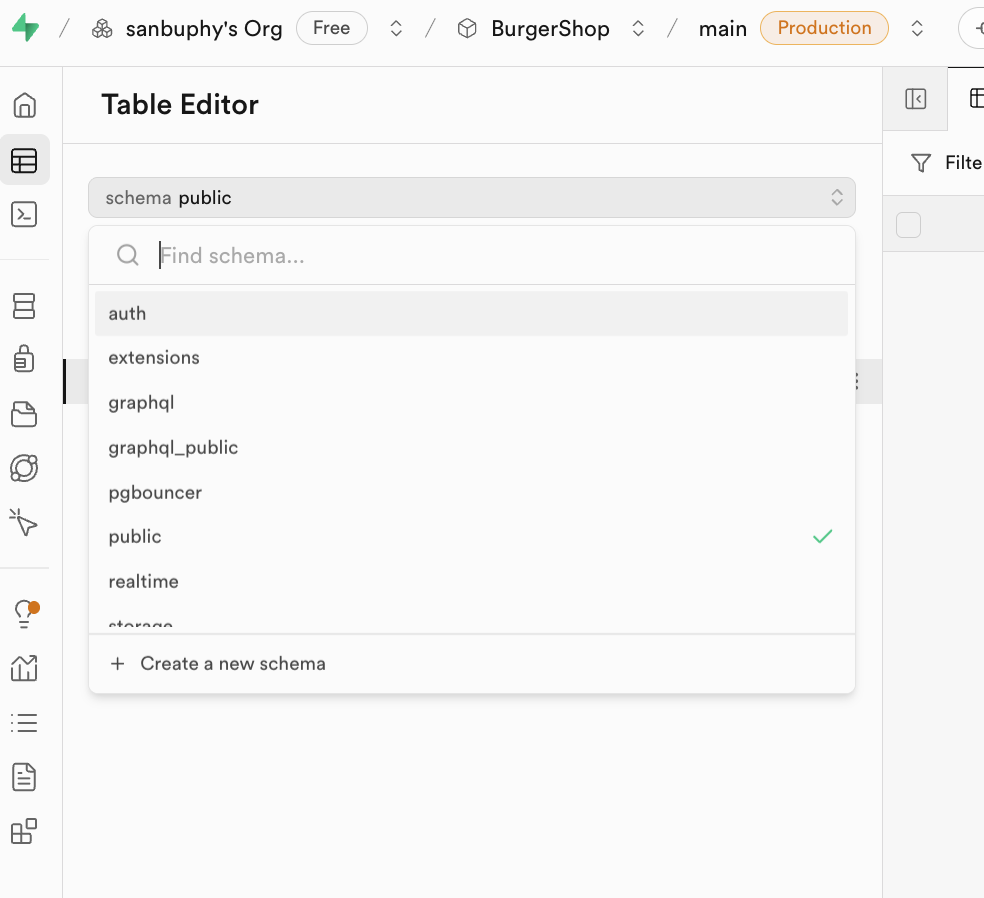
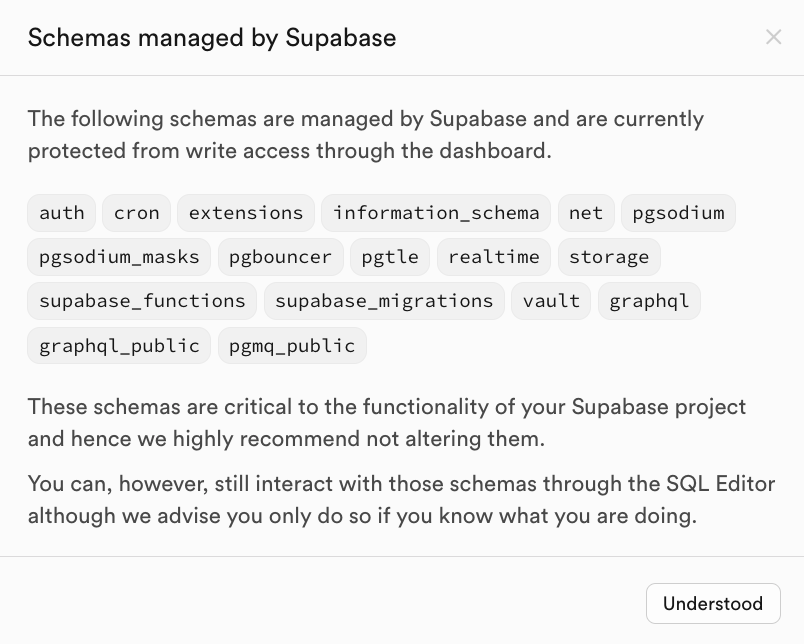
What's worth noting is the Schema. A Schema can be understood as a "resource container" within the database, used for grouping and managing tables, views, functions, indexes, and other resources. Its two main purposes are: first, avoiding naming conflicts (tables with the same name can exist under different Schemas), and second, implementing permission isolation (such as only allowing specific users to access tables under a certain Schema).
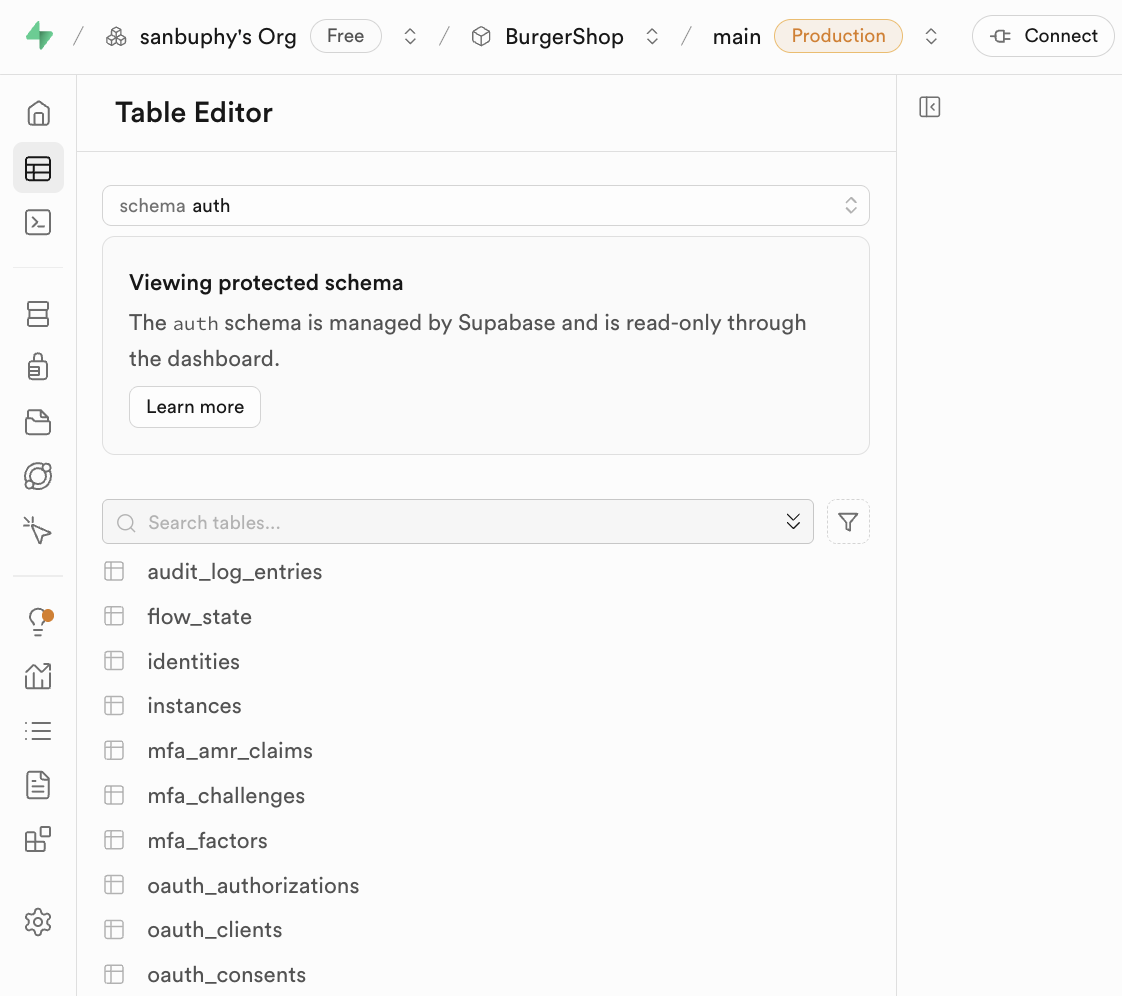
Click the Schema dropdown at the top of the editor to switch between different containers. In daily development, you generally only need to focus on two types:
public: The default public resource container. Business tables created by developers (such as "articles table" and "comments table") are all stored here.auth: The dedicated container for user authentication. Itsuserstable automatically stores all registered user information (such as user ID, email, login time). It's not recommended to manually modify default tables under this Schema to avoid affecting authentication functionality.
SQL Editor
The SQL Editor serves as Supabase's SQL statement executor, allowing you to directly operate the database using code. You can have a large language model generate SQL statements directly, paste them into the input area on the right, and click RUN to create or modify tables. You can also directly see the filtered table data in the Results section.
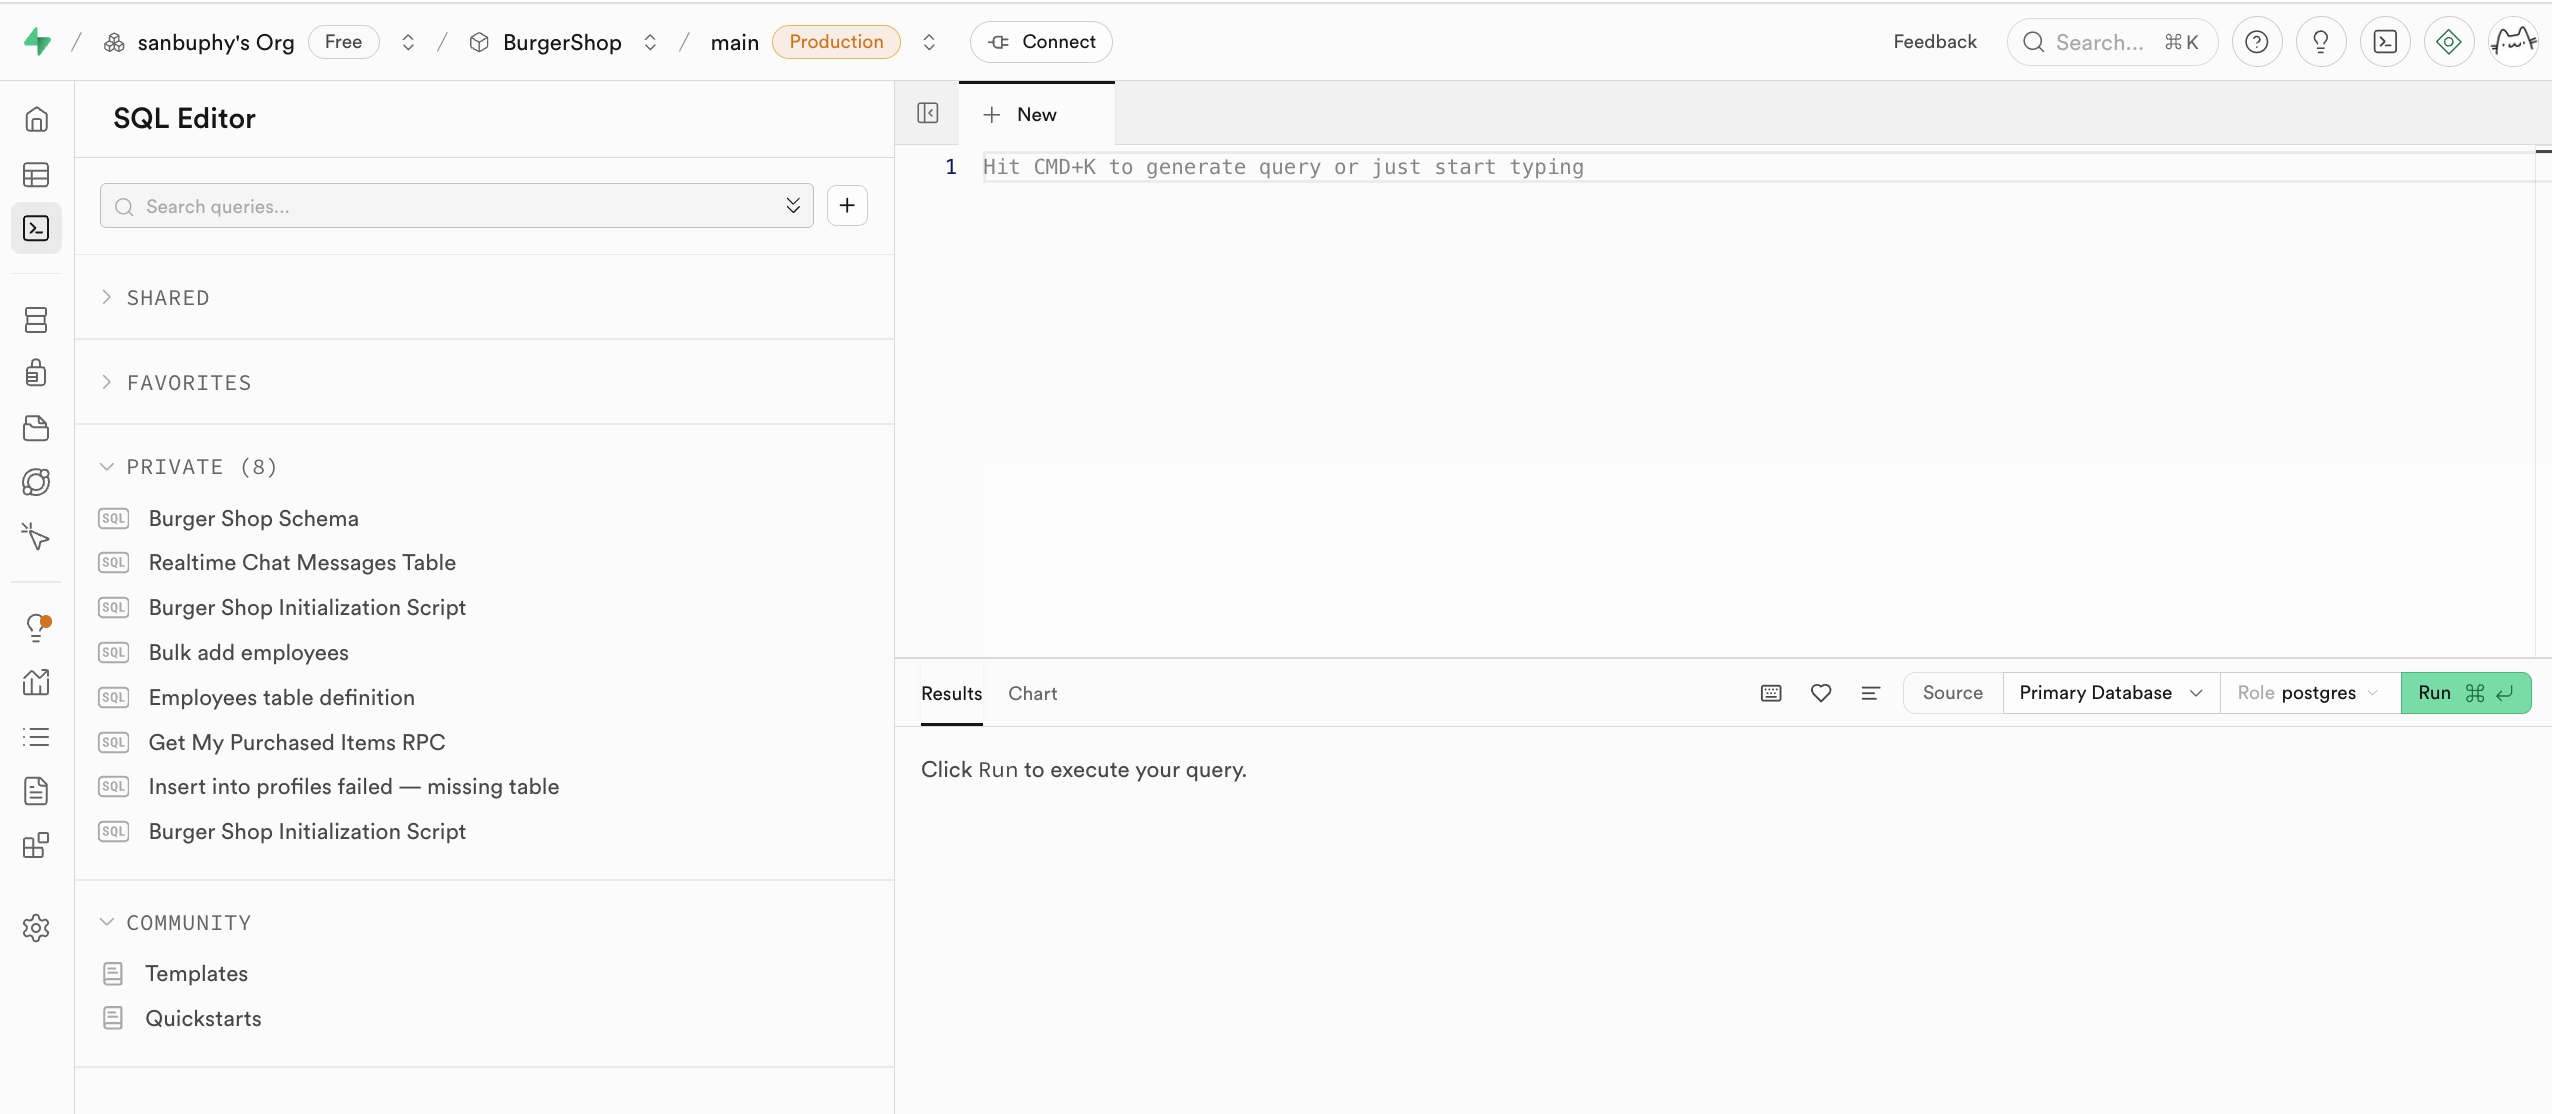
After running RUN, you can find the newly created data table in the Table Editor's public schema. The executed statements will be saved in the PRIVATE section on the left, and you can even click the heart icon below to bookmark a particular query or creation statement.
Database Management Center
Database is Supabase's database management center, supporting visual viewing and management of all data tables, and understanding the relationships between different tables through their connections (i.e., foreign key constraints, representing reference relationships between data).
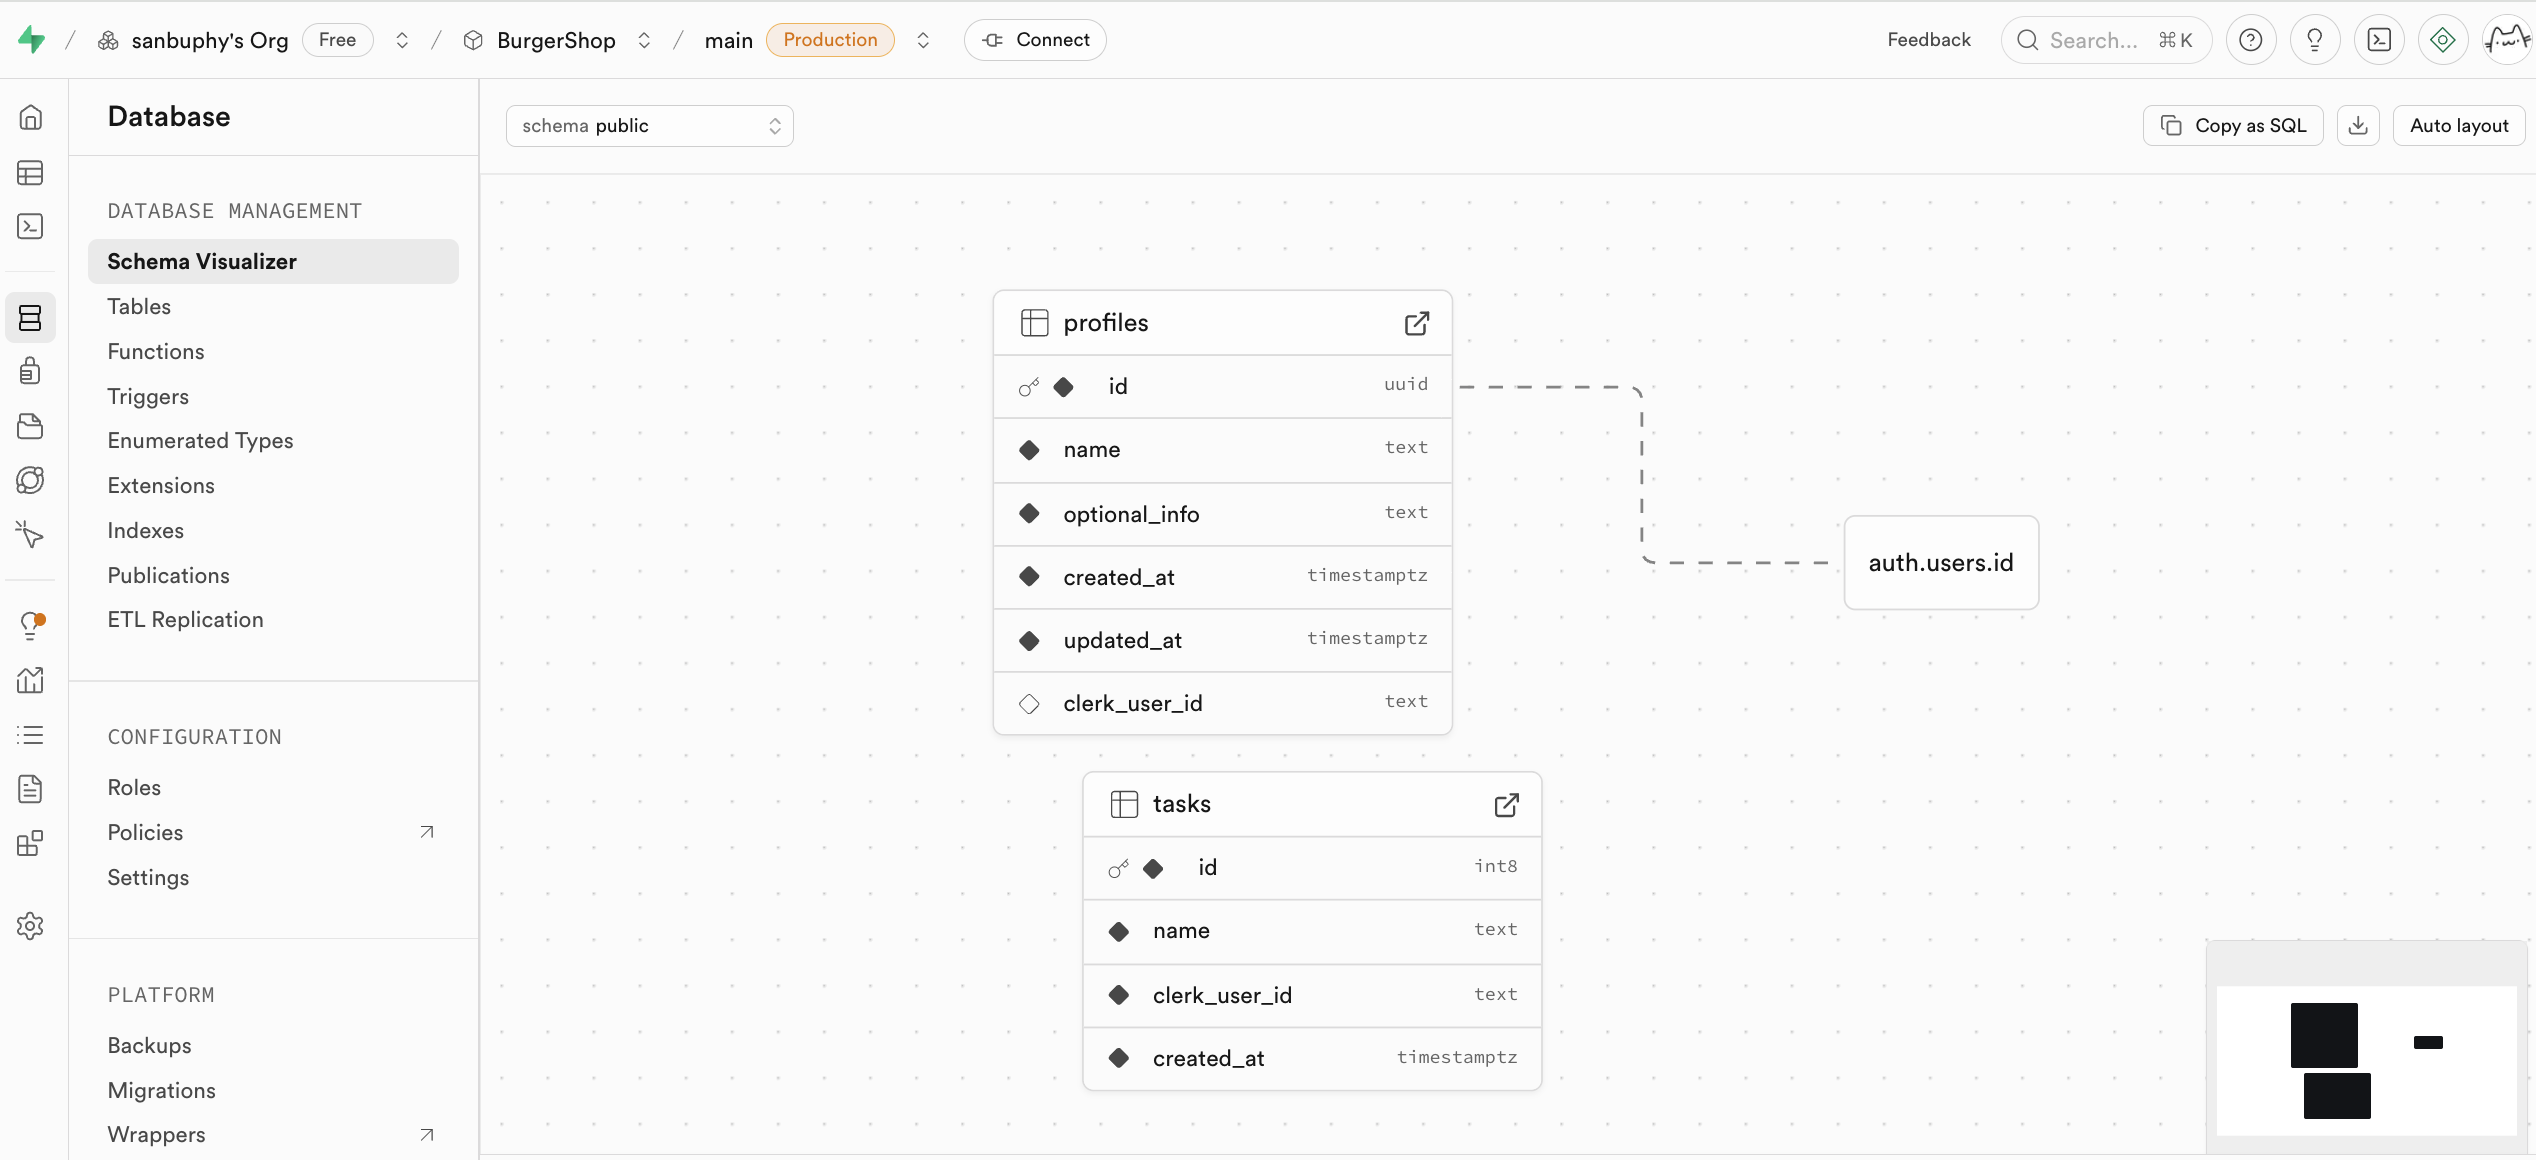
If you want to manually create a new table, you can directly create one in the Tables section. We'll cover this in detail in the subsequent tutorial.

Authentication
Authentication manages user registration, login, and permissions. Default user management system data is stored here. It provides out-of-the-box user registration, login, password reset, email verification, and other features, and supports third-party OAuth login (such as WeChat, GitHub, Google, etc.). All user data is automatically synced to the auth.users table in the database.
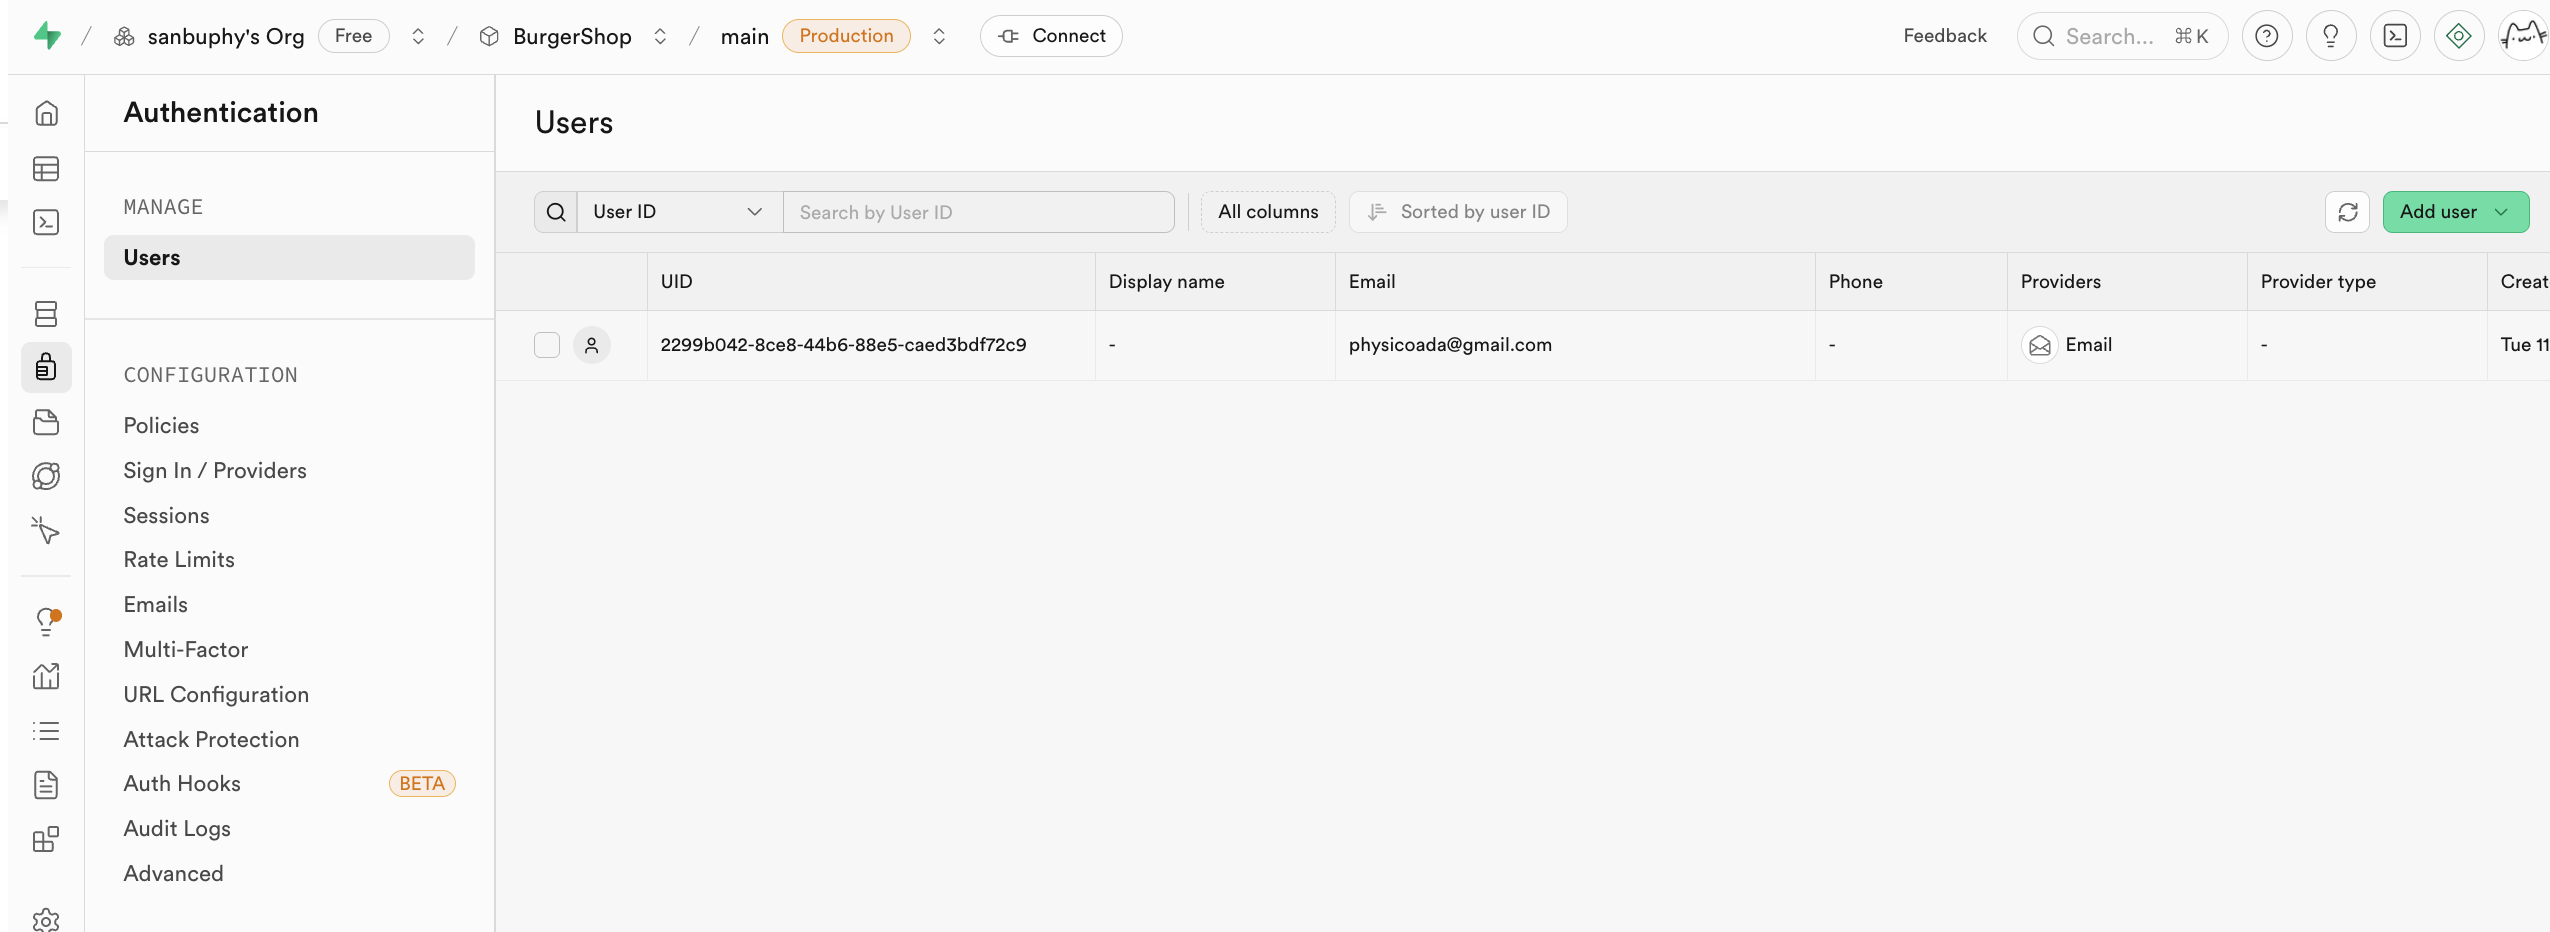
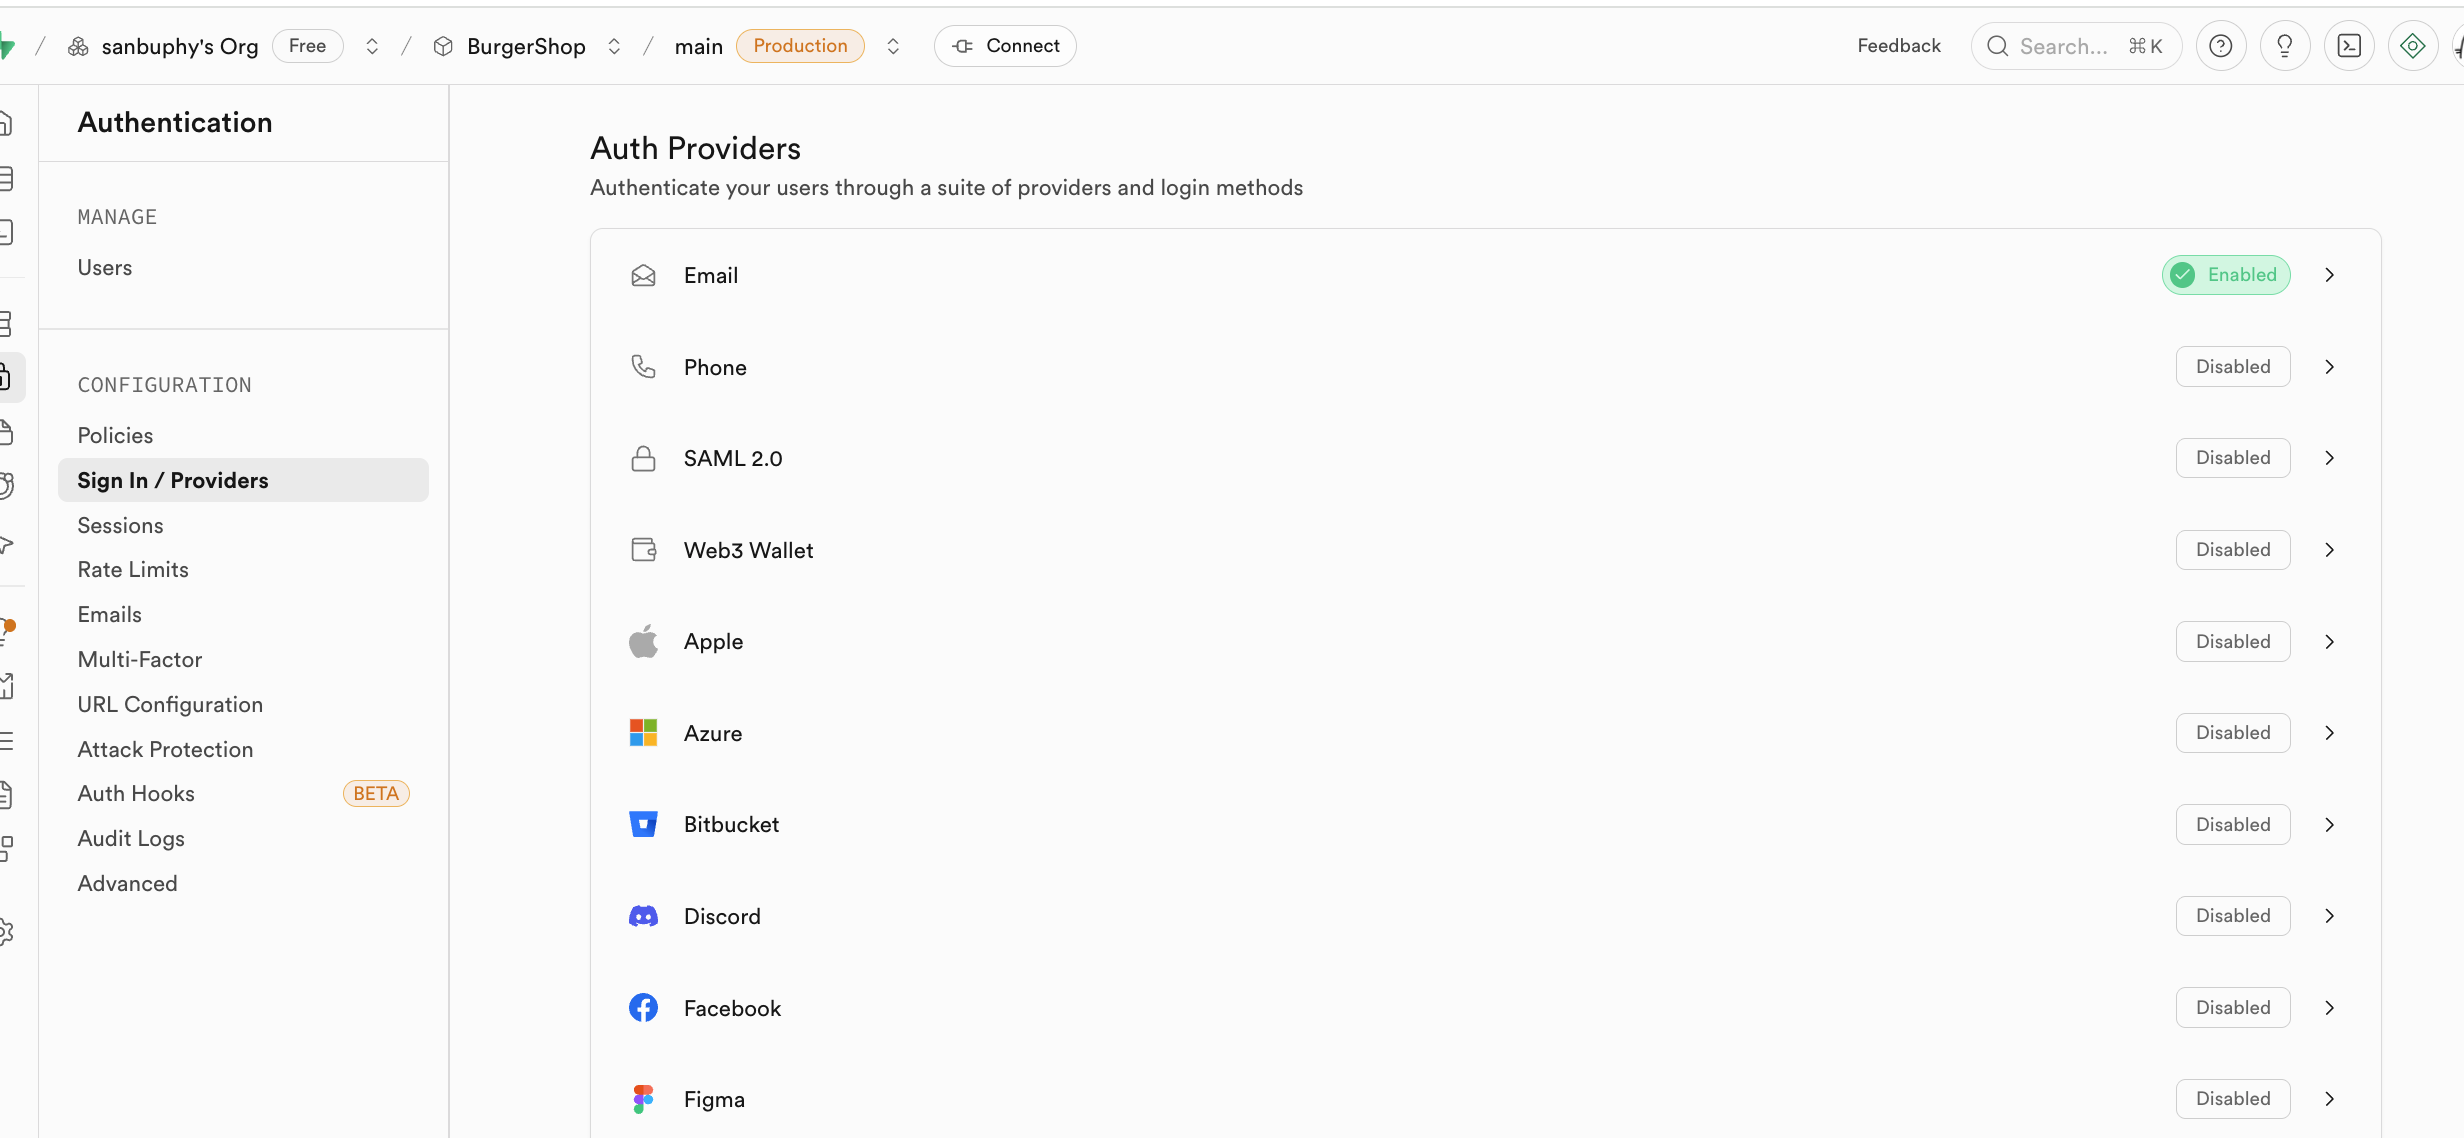
You can find different login entry points supported by Supabase in the Provider options. Email is used by default. If you want to use GitHub or Google accounts for login, additional configuration is required, which we'll cover in detail in the lessons below.
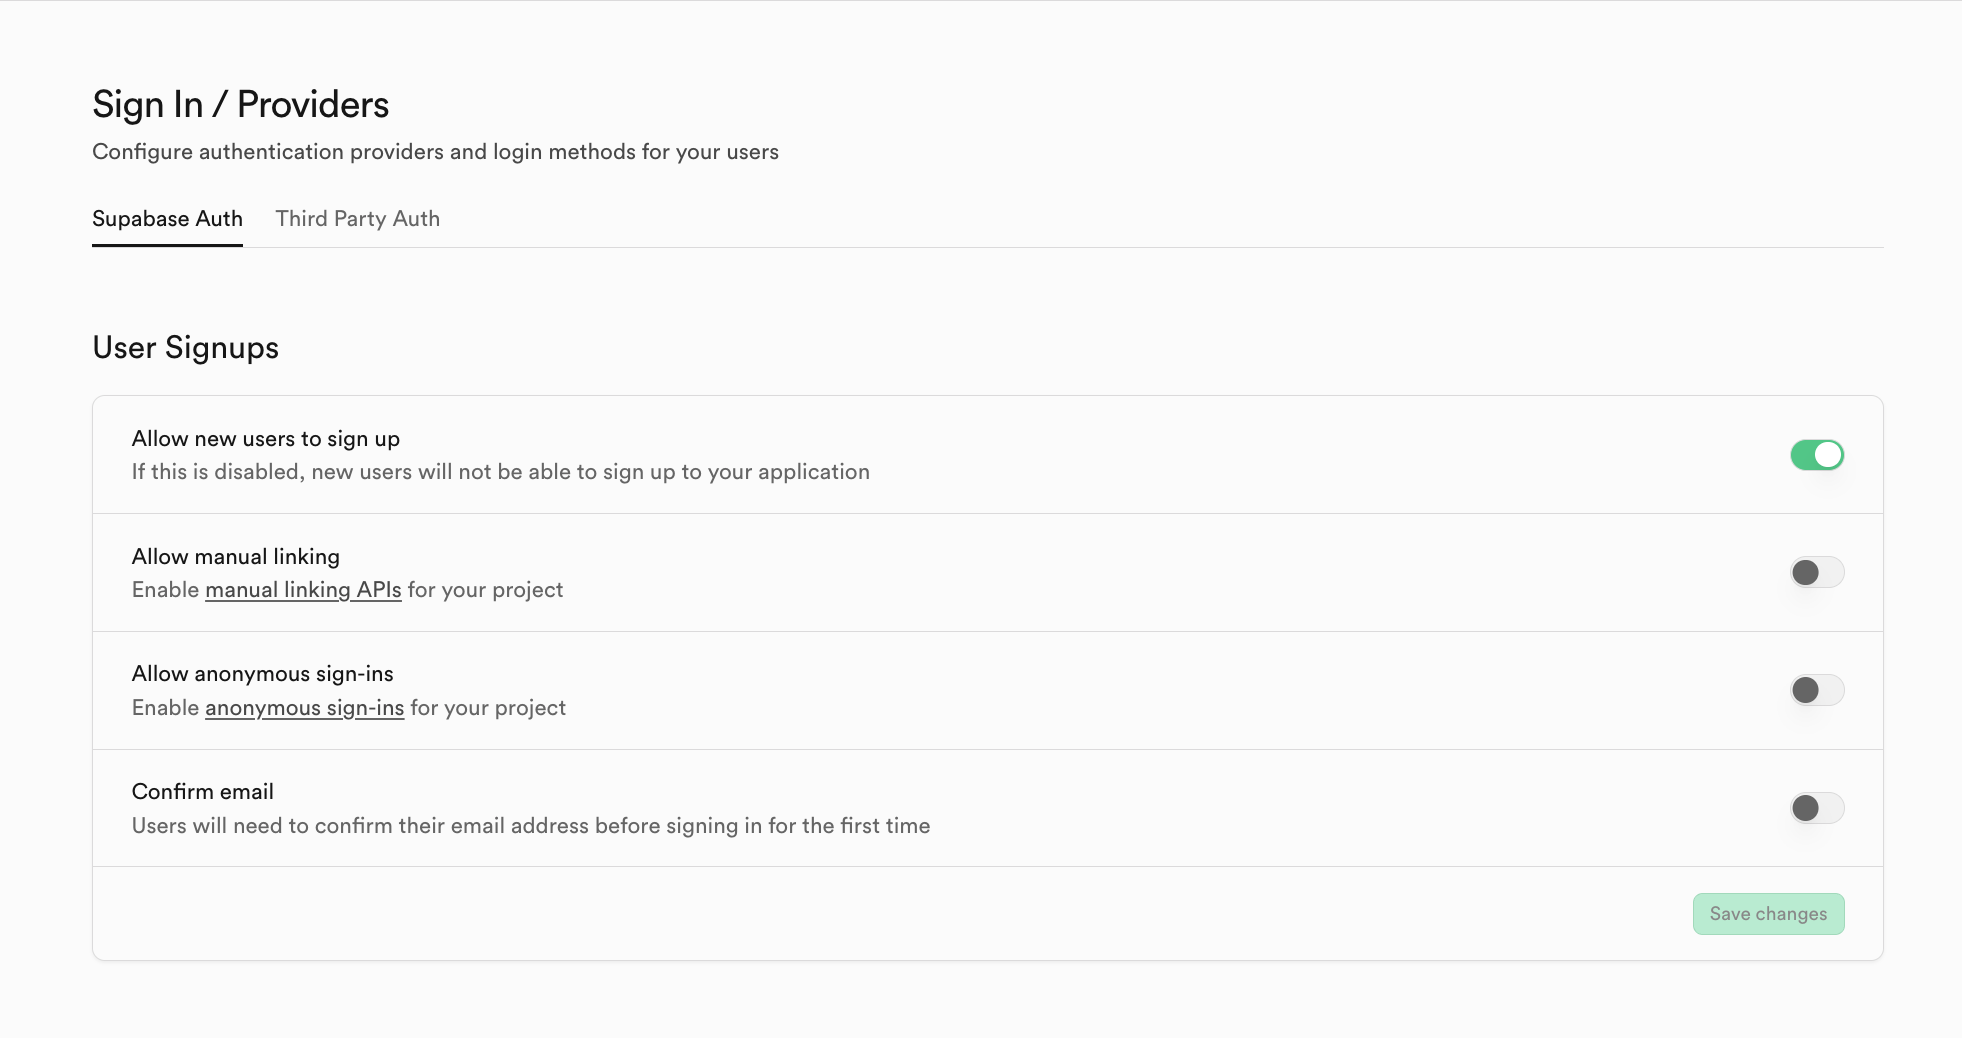
The Sign In / Providers section also includes controls for registration email behavior. If you don't want every email registration to require the user to accept an invitation before becoming a user, you can disable the mandatory Confirm email requirement.
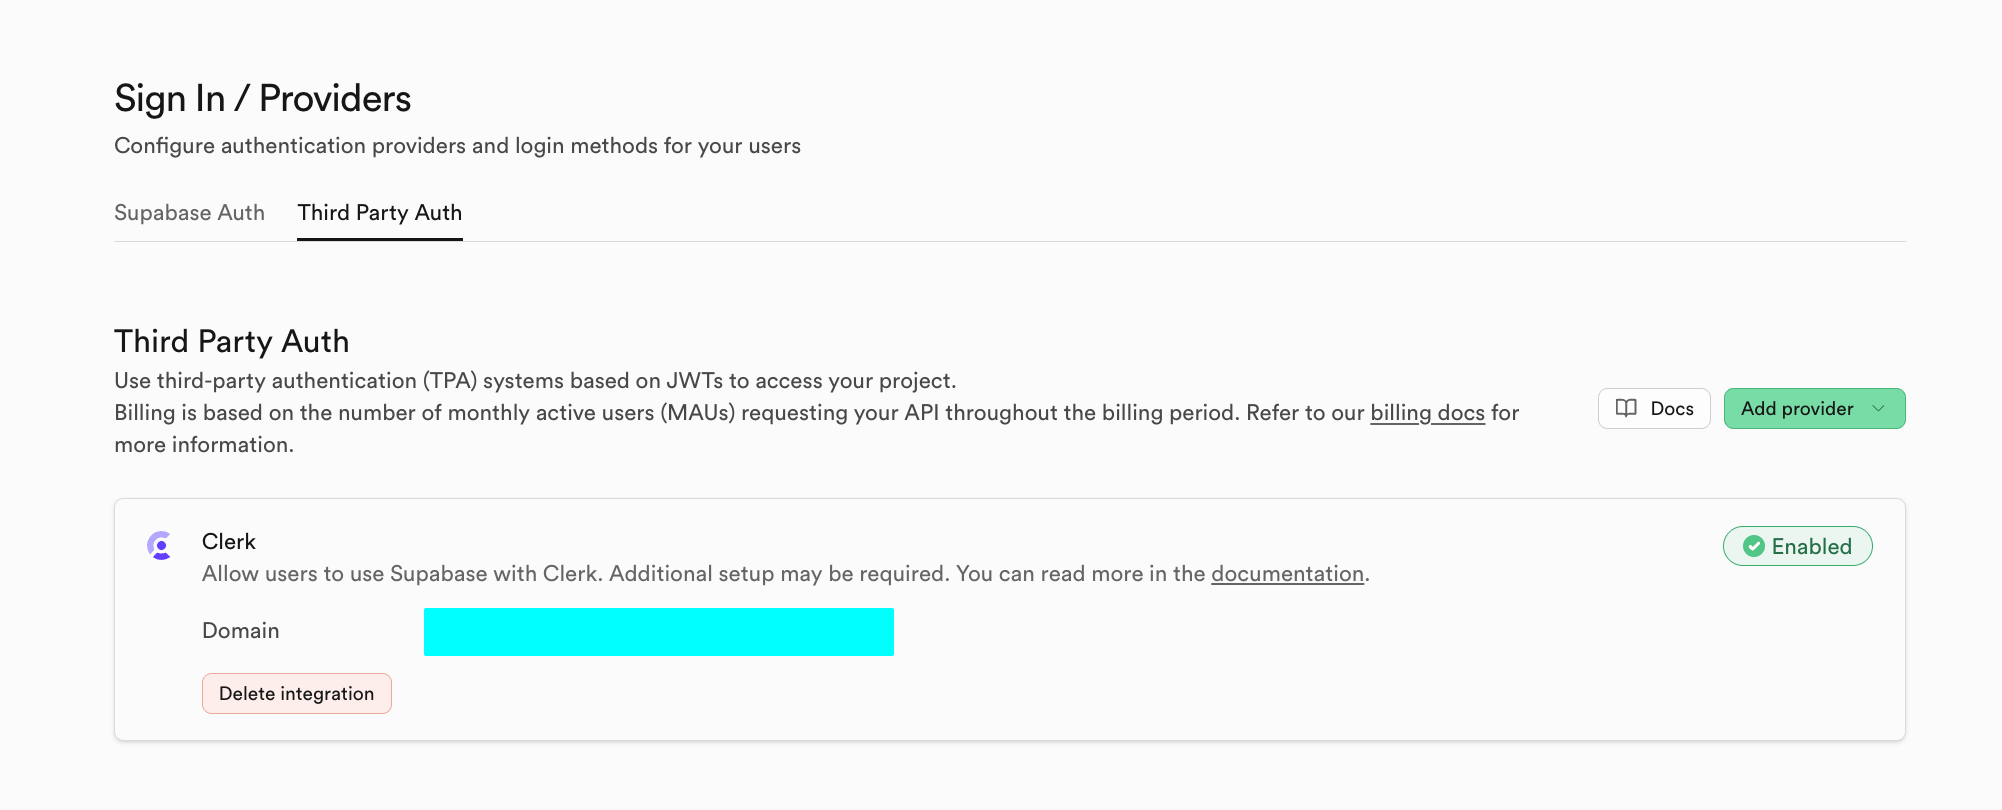
If you want to switch to a different auth system provider other than Supabase, you can click Third Party Auth. For example, you can use Clerk as a third-party system provider.
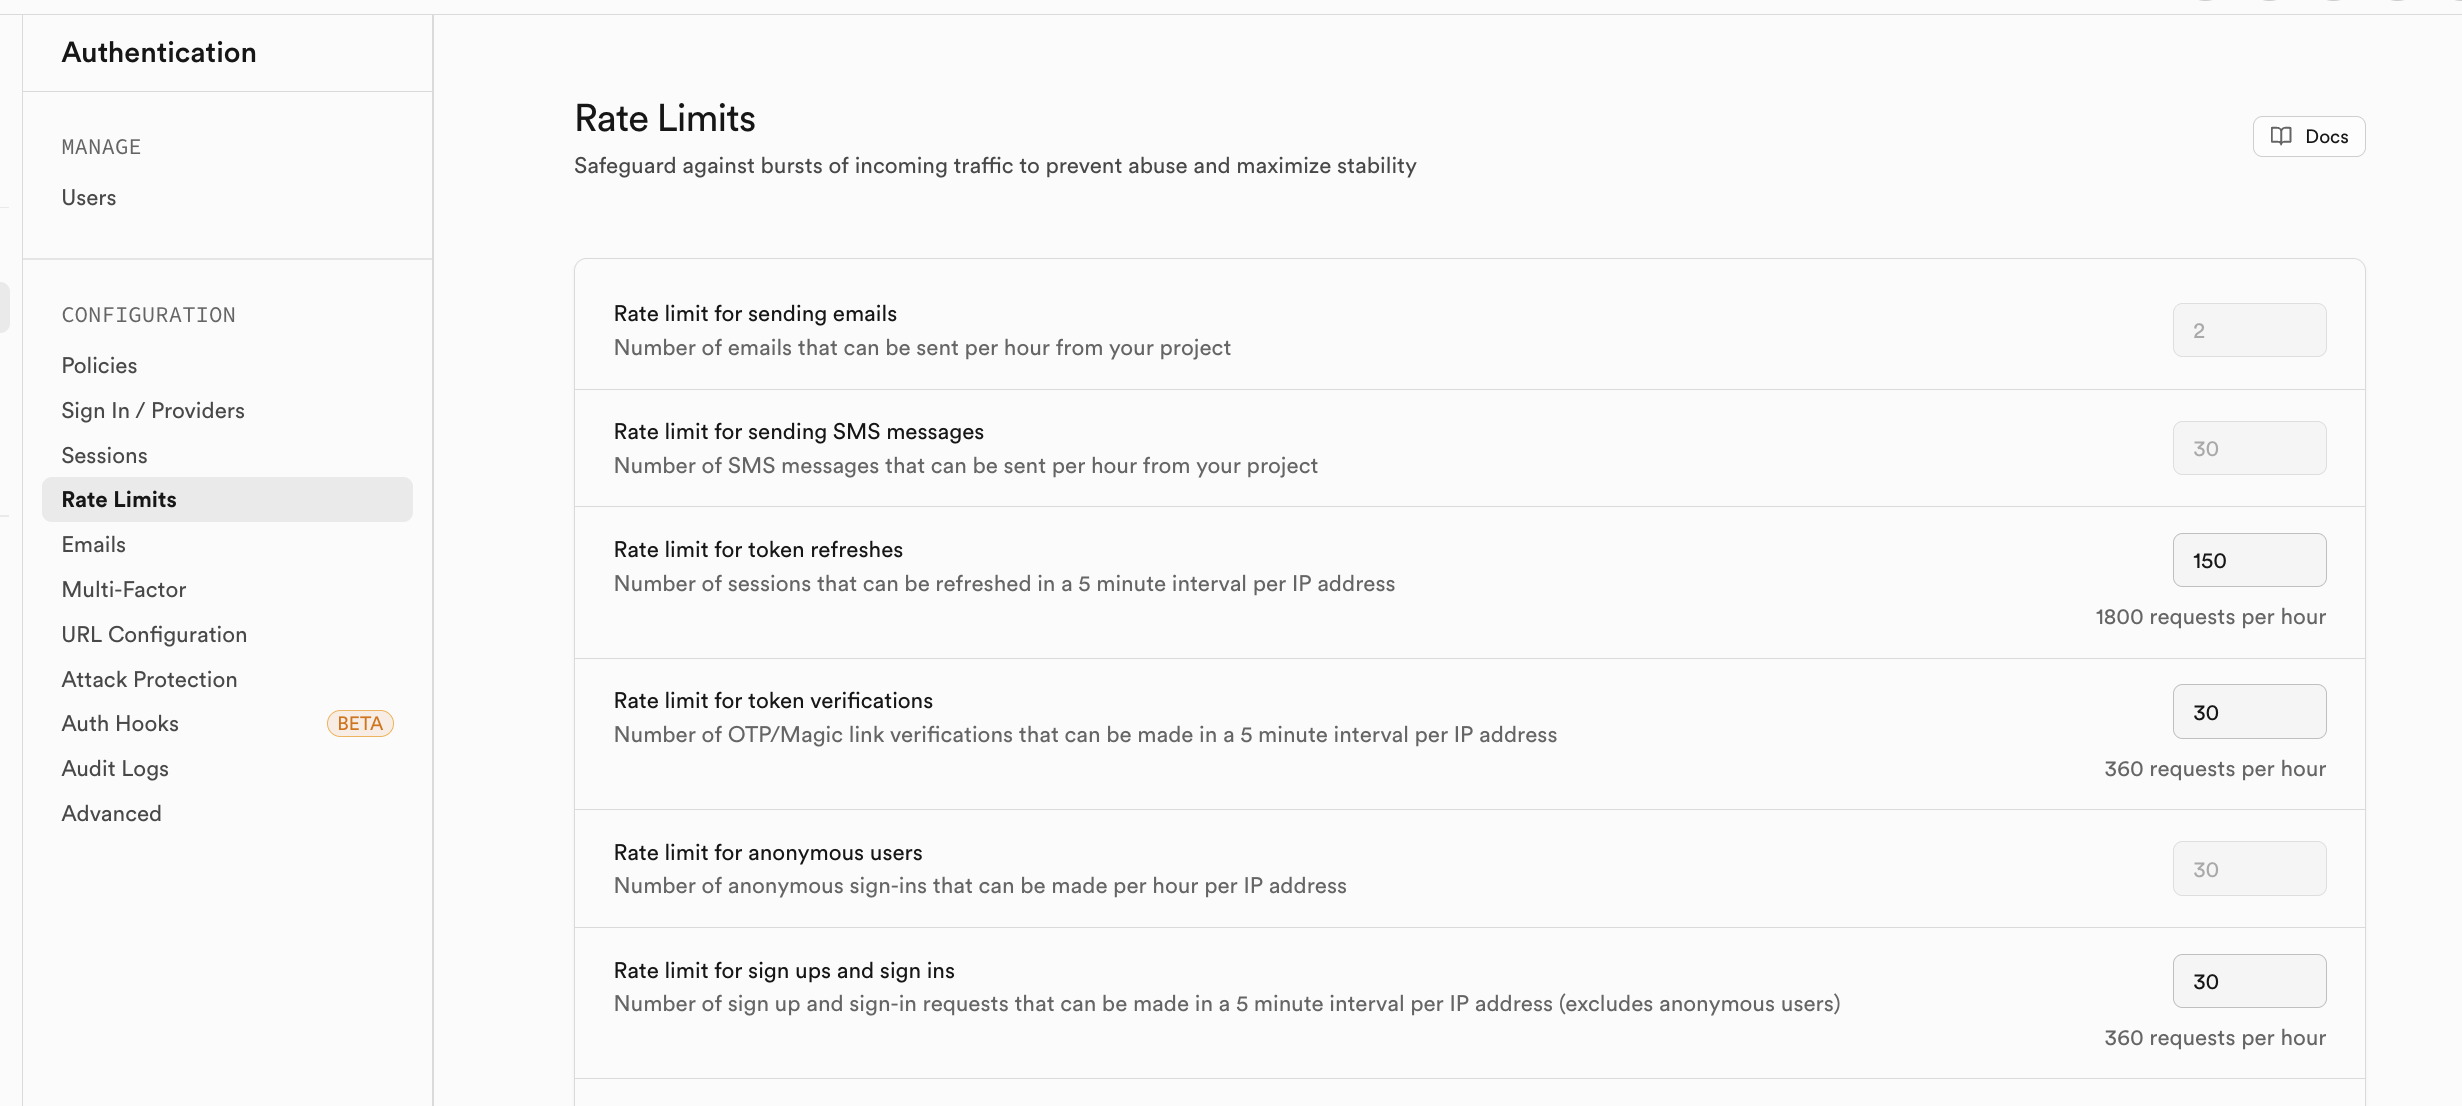
If you're concerned about excessive access volume from registered users in the short term, you can enable corresponding rate limiting strategies in Rate Limits:
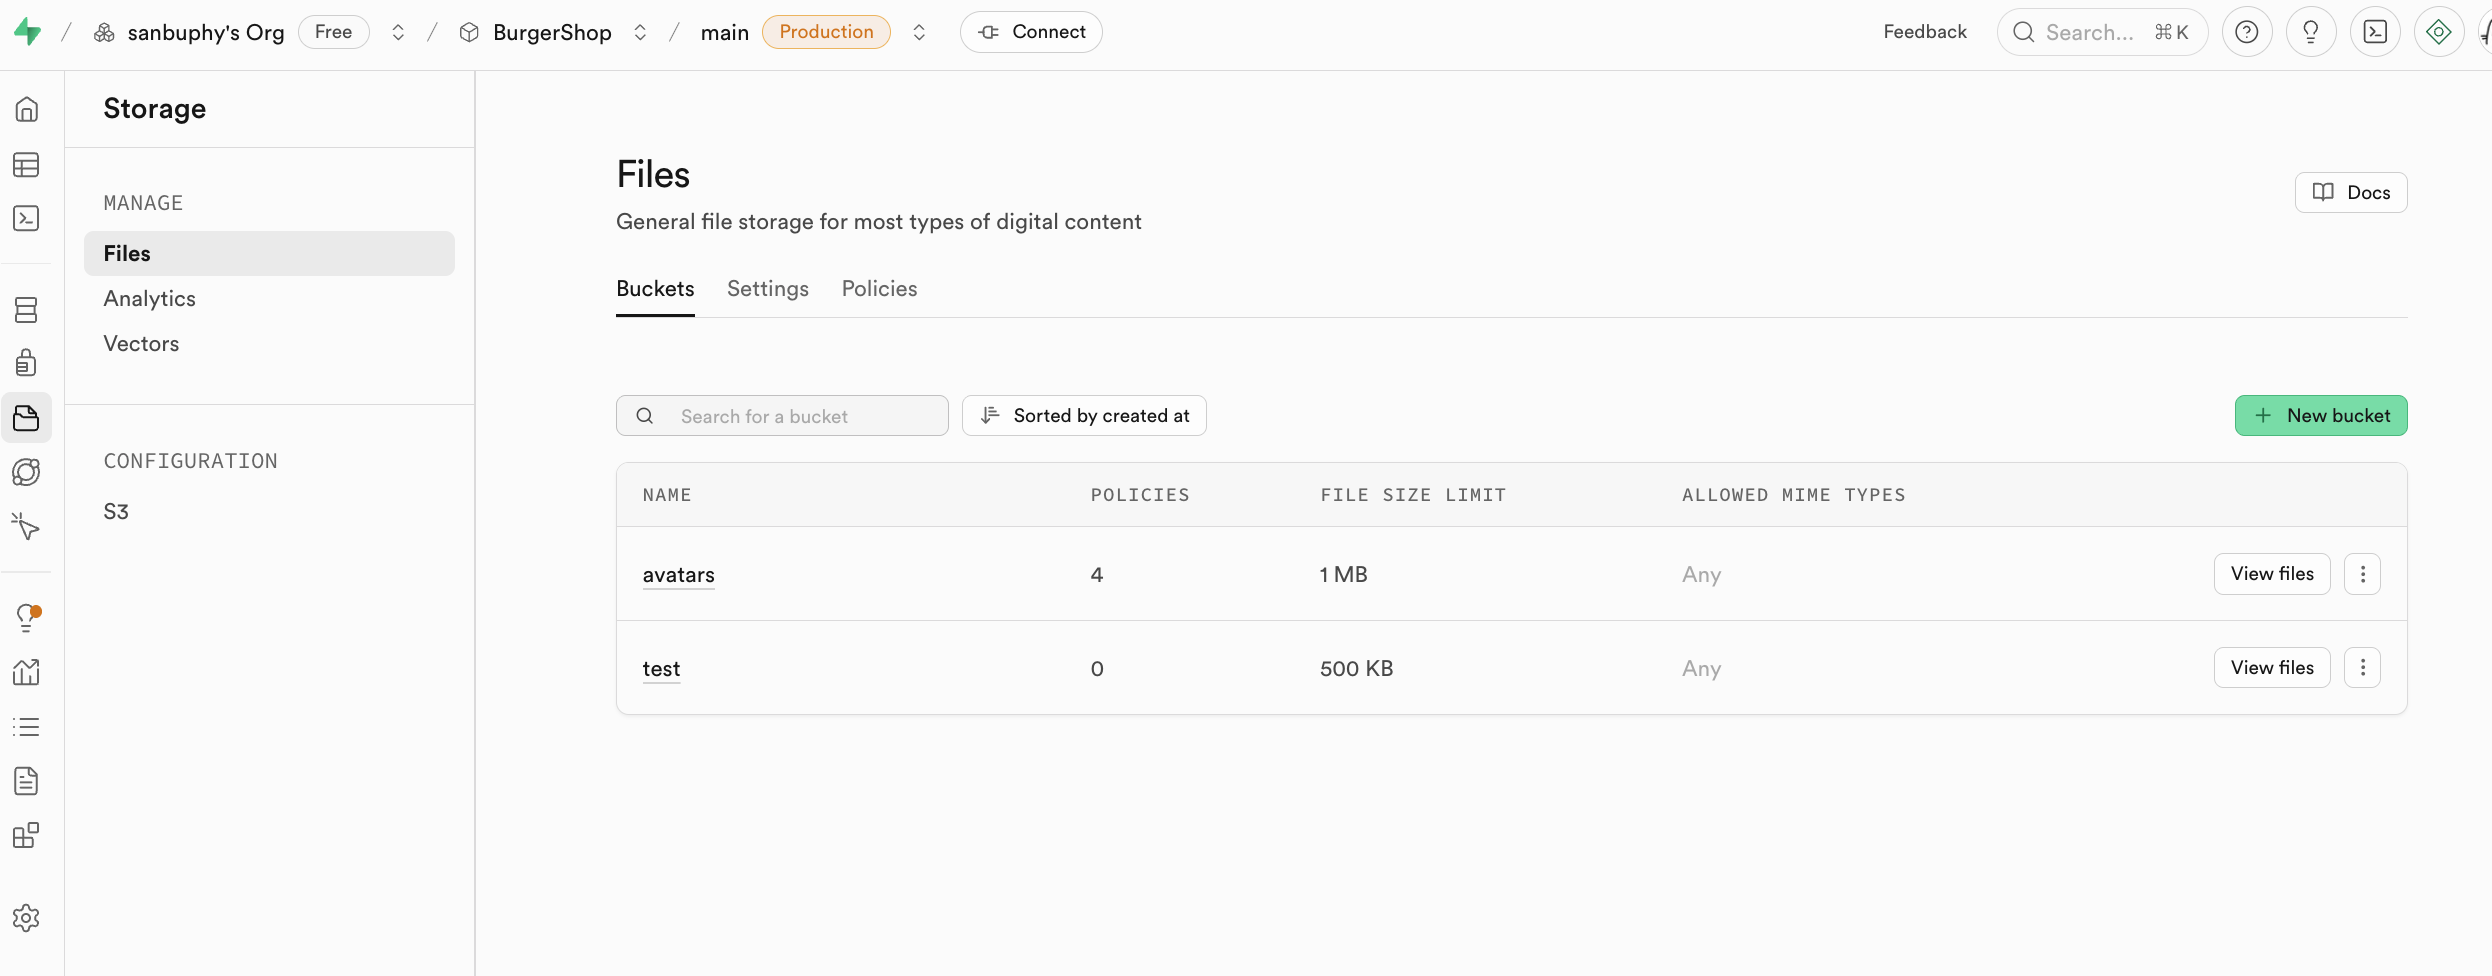
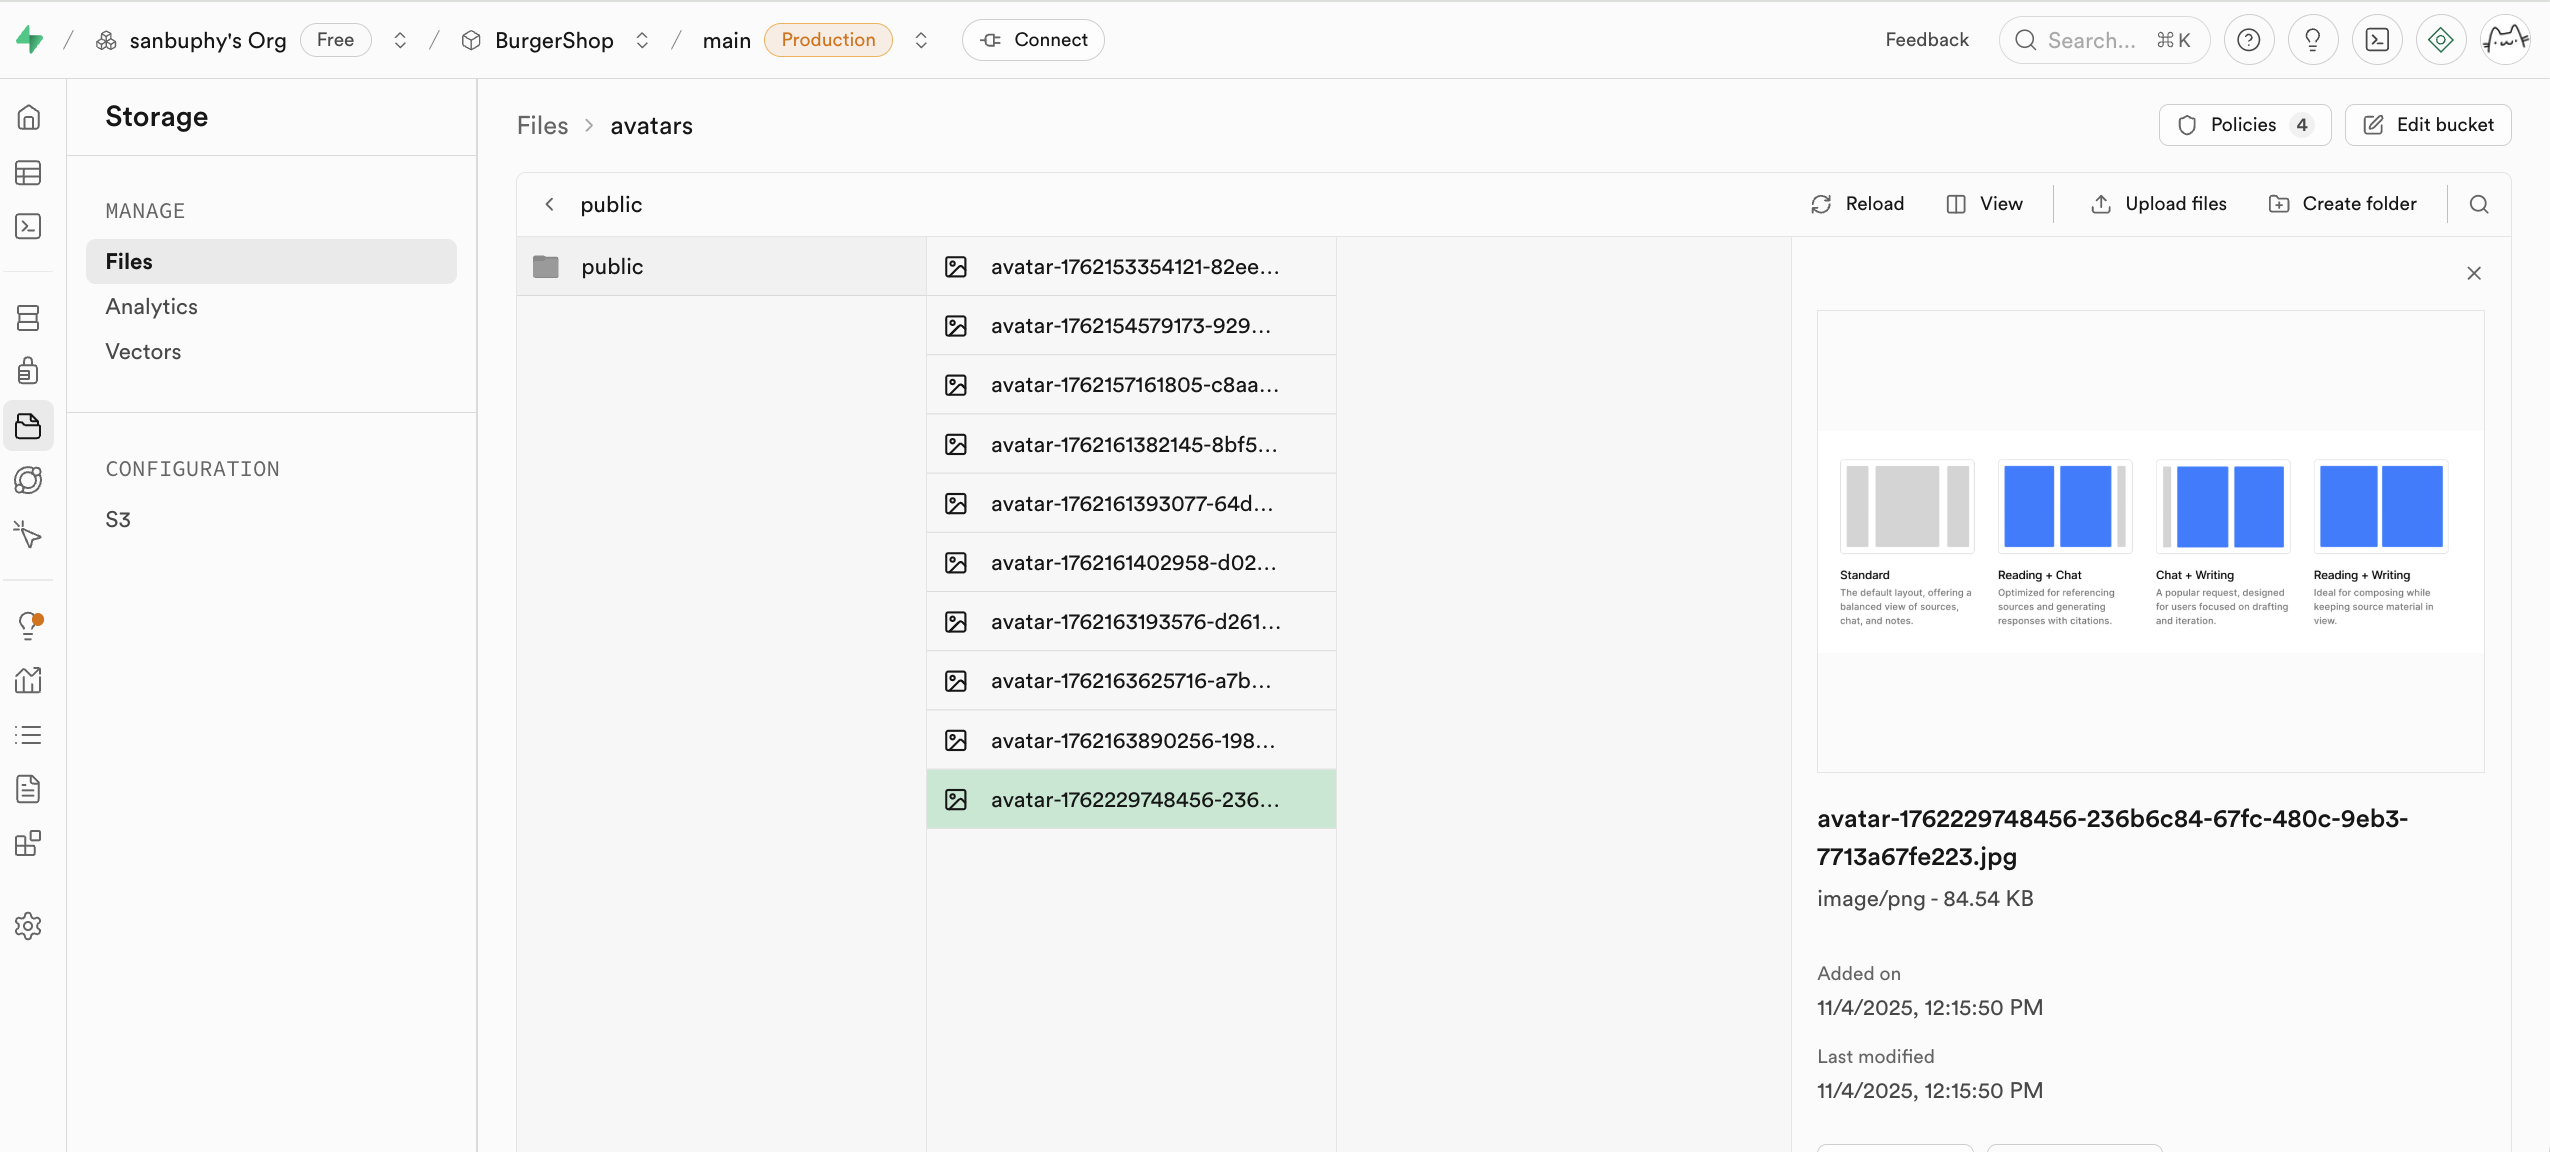
Storage
Storage is Supabase's storage system, compatible with Amazon Cloud's S3 concept. It can be used to store any type of files (such as images, videos, documents, audio, etc.) and provides access permission management (public or private) and download link generation (permanent links or temporary links). You can conveniently manage file uploads and downloads for users in your application, seamlessly integrating with Supabase's authentication system for fine-grained access control.
We'll cover the specific usage of Storage in the advanced project section of this lesson.
If you want to use S3-related protocols for operations, you can directly use the corresponding configuration:
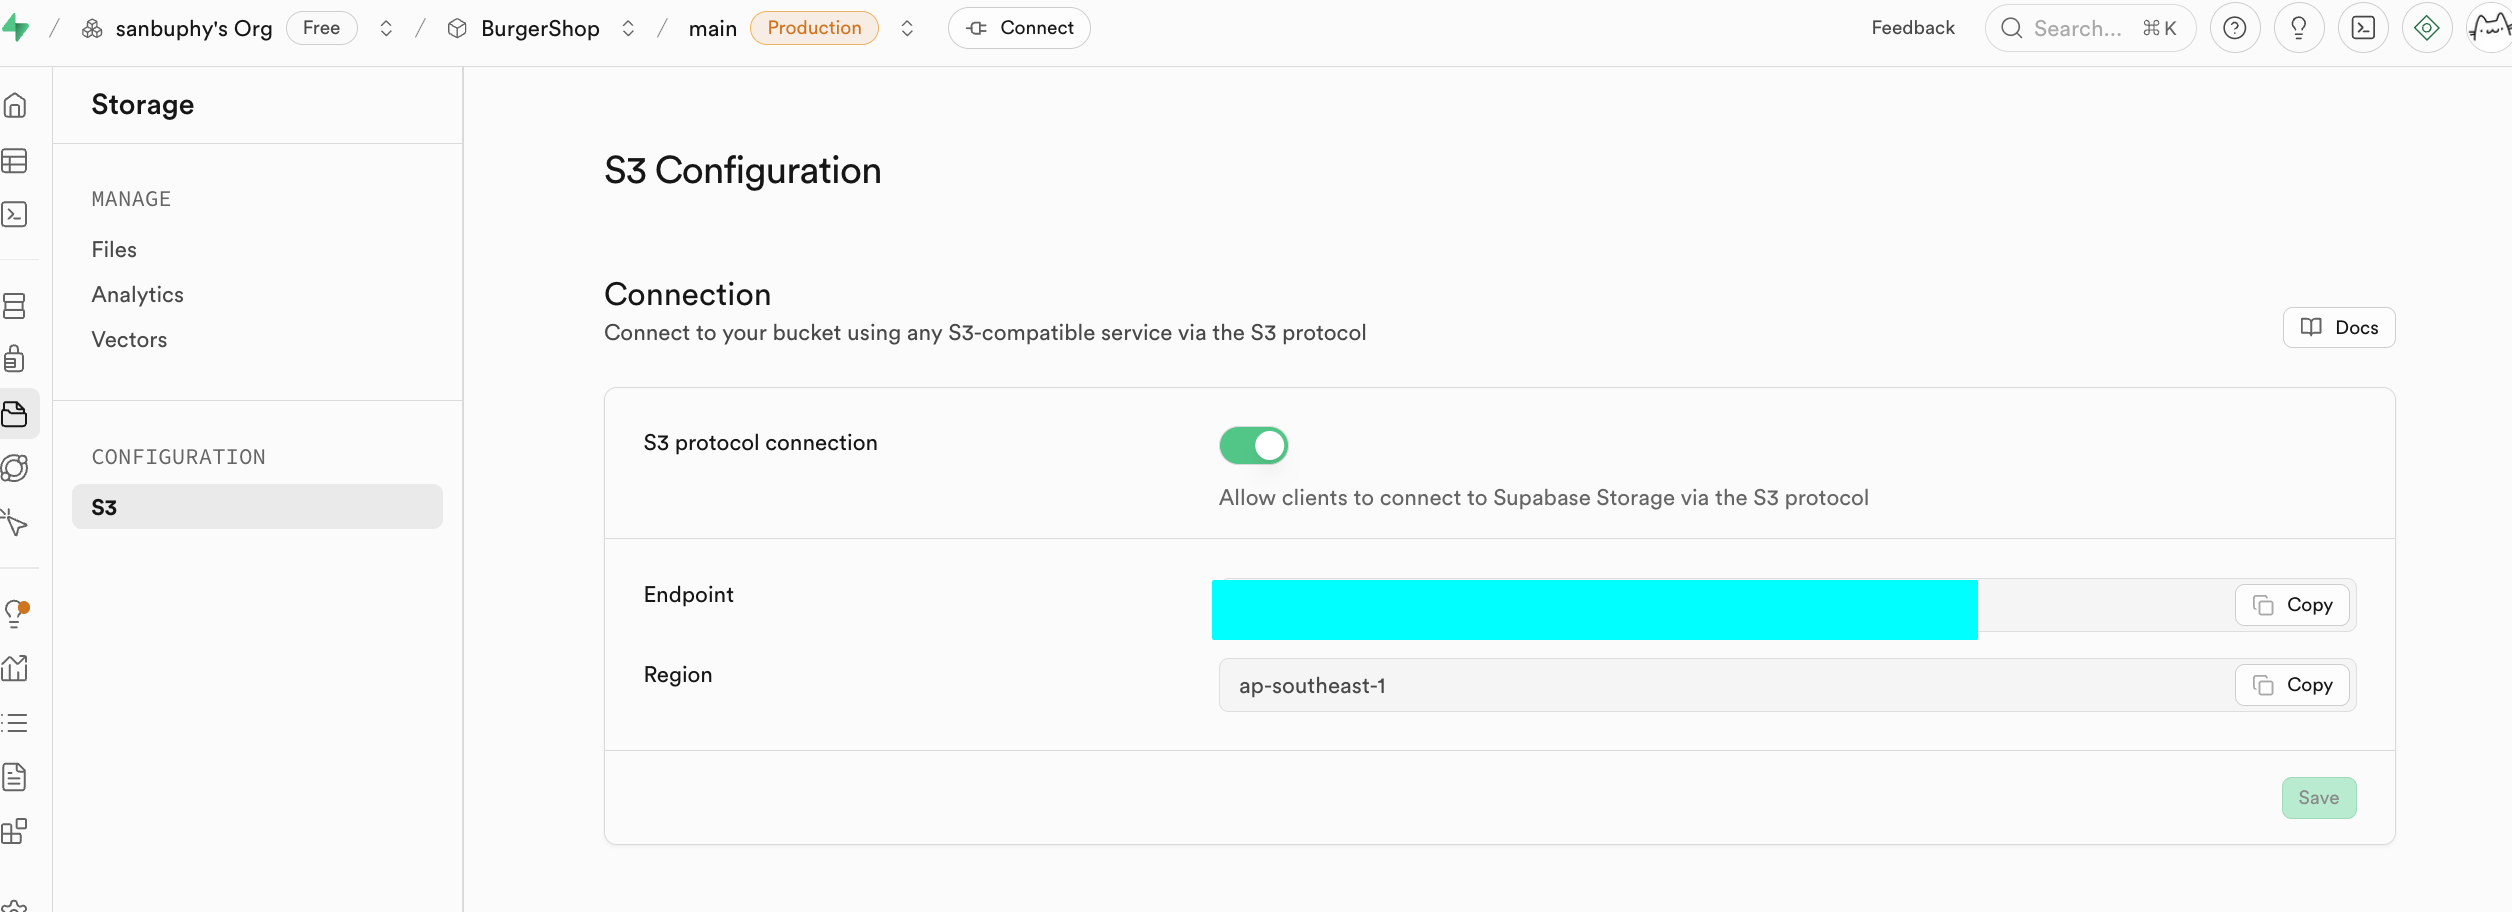
Amazon Cloud (Amazon Web Services, or AWS) is Amazon's cloud computing platform (like a large network server room where you can rent computing and storage resources on demand). S3 (Simple Storage Service) is AWS's dedicated file storage service (similar to an infinite cloud drive that can store images, videos, backups, and various other files). It's currently the most popular object storage service and has become the de facto industry standard.
Why make it S3-compatible API?: S3 has existed for nearly 20 years, and there are a large number of existing tools, SDKs, and documentation on the market. Being S3-compatible means you can directly use these resources without building various related tools from scratch, enabling rapid business launch.
Edge Functions
If you don't want to deploy a backend but want to use database and function operations, you can use Edge Functions to build backend core capabilities without self-managed servers. These are Supabase's globally distributed server-side functions. Simply put, they let you write and deploy backend code in the cloud without purchasing and managing your own backend servers. These functions are deployed on edge nodes of the global network and automatically run at the location closest to your users, significantly reducing network latency and providing extreme response speed. You can create, edit, and deploy them directly in the Supabase dashboard, making the entire development process very convenient.
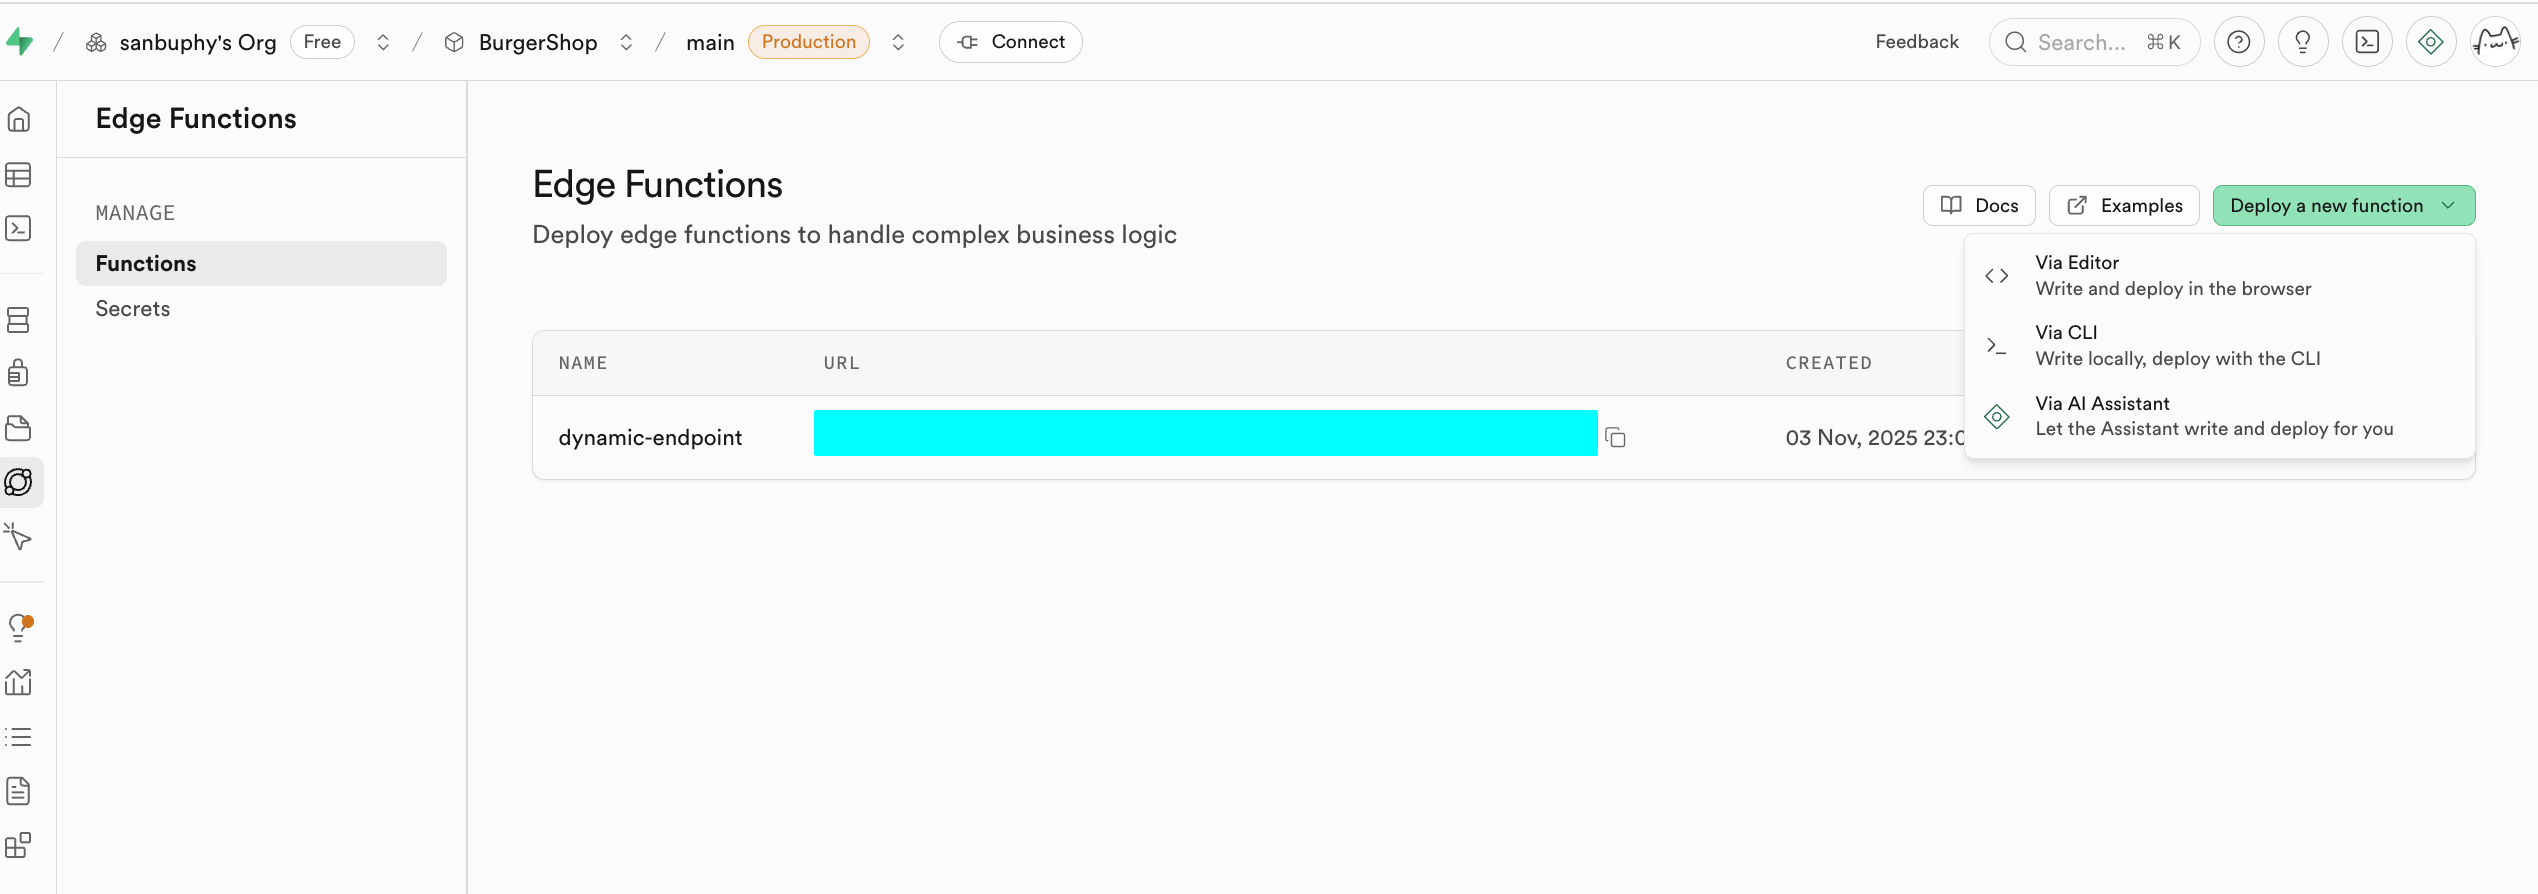
A core use case for Edge Functions is serving as a secure middleware layer to protect your sensitive information and authentication keys. Calling third-party services (such as OpenAI, Stripe) directly from frontend code would expose your API Key, creating significant security risks. With Edge Functions, your frontend application only communicates with your Supabase functions, and all secrets are kept only within Supabase.
Edge Functions use keys exposed in secrets as environment variables, loaded via Deno.env.get, to enable calls to third-party services. This way, sensitive keys are never exposed on the client side (your browser), completely eliminating the risk of theft.

When requesting a Supabase Edge Function, you need to include the corresponding Supabase key in the request headers. Here's a minimal example:
// Core configuration (replace with your actual information)
const projectId = "your-supabase-project-id";
const functionName = "target-edge-function-name";
const supabaseKey = "Supabase anon_key";

// Call the function
async function callEdgeFunction() {
  const url = `https://${projectId}.supabase.co/functions/v1/${functionName}`;

  try {
    const response = await fetch(url, {
      method: "POST",
      headers: {
        "Content-Type": "application/json",
        "Authorization": `Bearer ${supabaseKey}` // Key: include key for authentication
      },
      body: JSON.stringify({ order_id: "123", action: "refund" }) // Custom request data
    });

    const result = await response.json();
    console.log("Call successful:", result);
  } catch (error) {
    console.error("Call failed:", error.message);
  }
}

// Execute the call
callEdgeFunction();
Additionally, Edge Functions seamlessly integrate with Supabase's user authentication system. When a logged-in user calls a function, their identity information is passed to the function. This allows you to easily identify the current user within the function and perform permission control based on their identity. More importantly, when the function operates on the database, it automatically follows the Row Level Security policies you've set, ensuring users can only access and modify data they're authorized to work with, making it easy to build secure multi-user applications.
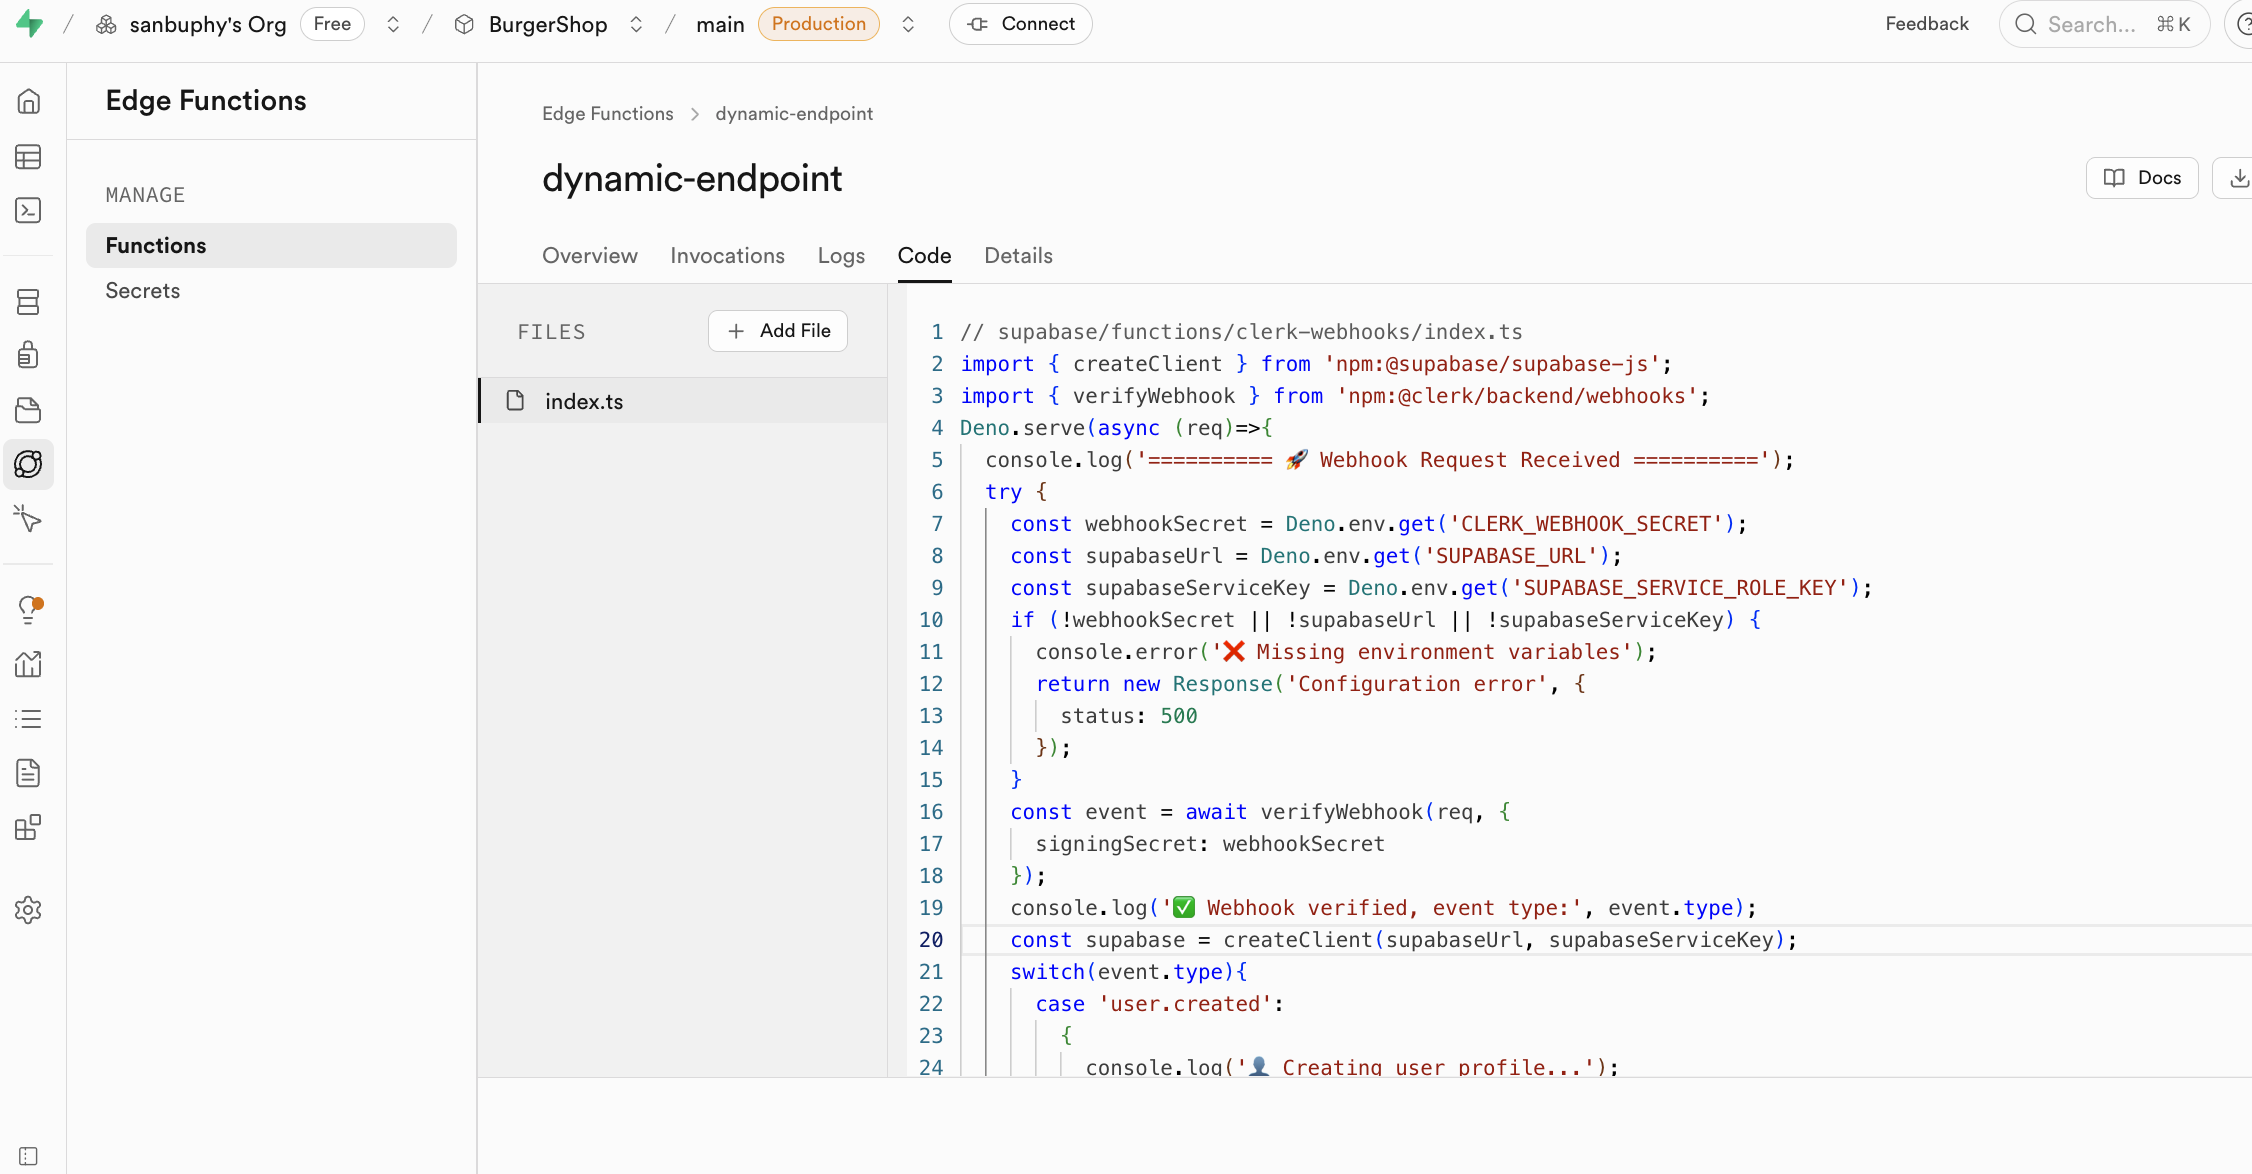
Edge Functions have a wide range of application scenarios and can handle various backend tasks. They're well-suited for listening to Webhook events from third-party services (such as successful payments, code commits, etc.) and automatically executing corresponding data processing logic. You can also use them to send email notifications, generate PDF reports, create custom API interfaces to encapsulate complex business logic, or execute any computing tasks you want completed on the server side, greatly expanding your application's capabilities.
A specific common example: the authentication tool Clerk. Clerk is only used for handling authentication-related operations like user login, registration, and information updates, and doesn't directly manage your business database. If you want to sync these authentication dynamics to the business database, you need to trigger Webhook events to request Edge Functions. Edge Functions can listen for Webhook signals from Clerk, automatically execute data synchronization logic, and keep user information in the Supabase database aligned with Clerk's login status in real time, all without deploying an independent backend.
Realtime Data Sync Engine
Realtime is Supabase's real-time data synchronization engine. It allows your application to instantly receive database change notifications without repeatedly polling APIs. When data in the database undergoes INSERT, UPDATE, or DELETE operations, Realtime pushes these changes in real time to all connected clients via WebSocket. This is essential for building applications that require real-time interaction.
Realtime primarily includes three core features, covering the vast majority of real-time scenarios:
- Postgres Changes: Directly listen to database table changes. You can precisely subscribe to specific tables, specific events (insert, delete, update), and even receive notifications based on filter conditions, perfectly integrating with Row Level Security policies to ensure users only receive data changes they have permission to view.
- Broadcast: Allows clients to send low-latency temporary messages to each other through channels. This is ideal for implementing chat rooms, real-time cursor tracking, online game state synchronization, and similar features.
- Presence: Used for tracking and syncing online user status. You can use it to easily implement "who's online," "X people are currently viewing," and other features, perfect for collaborative applications.
We'll cover this section in detail in subsequent project-based learning.
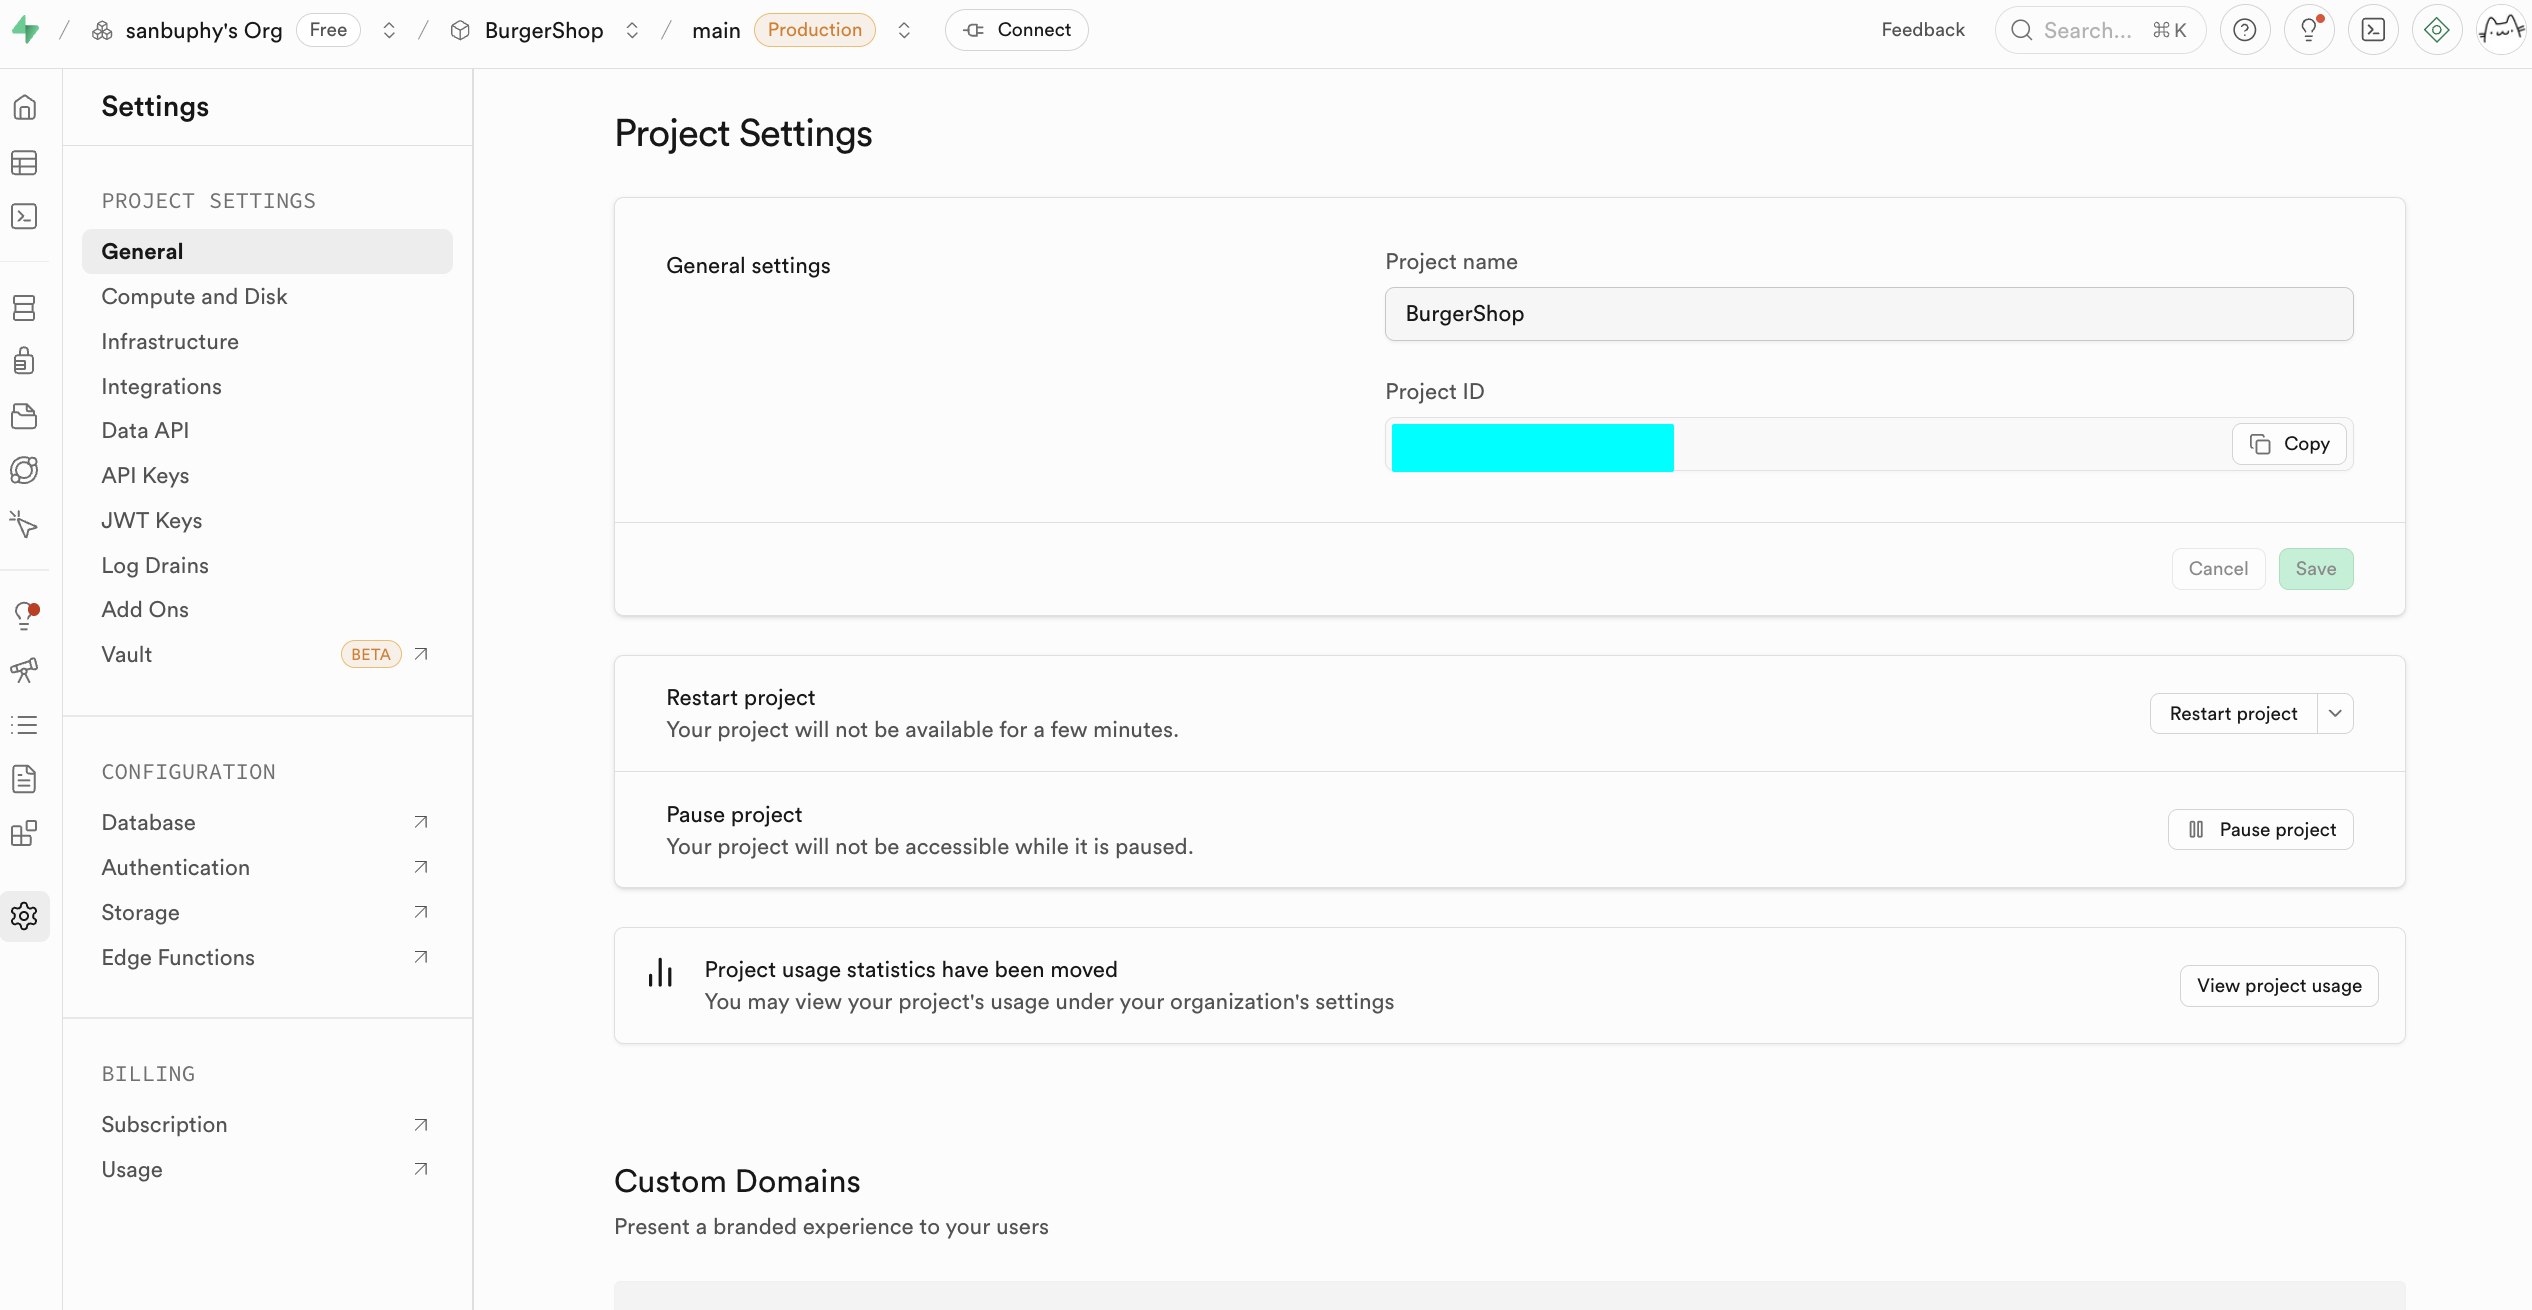
Project Settings
Project Settings is the advanced configuration section for your Supabase project. Here you can implement deep scheduling of computing resources and fine-grained configuration of underlying parameters for various features.
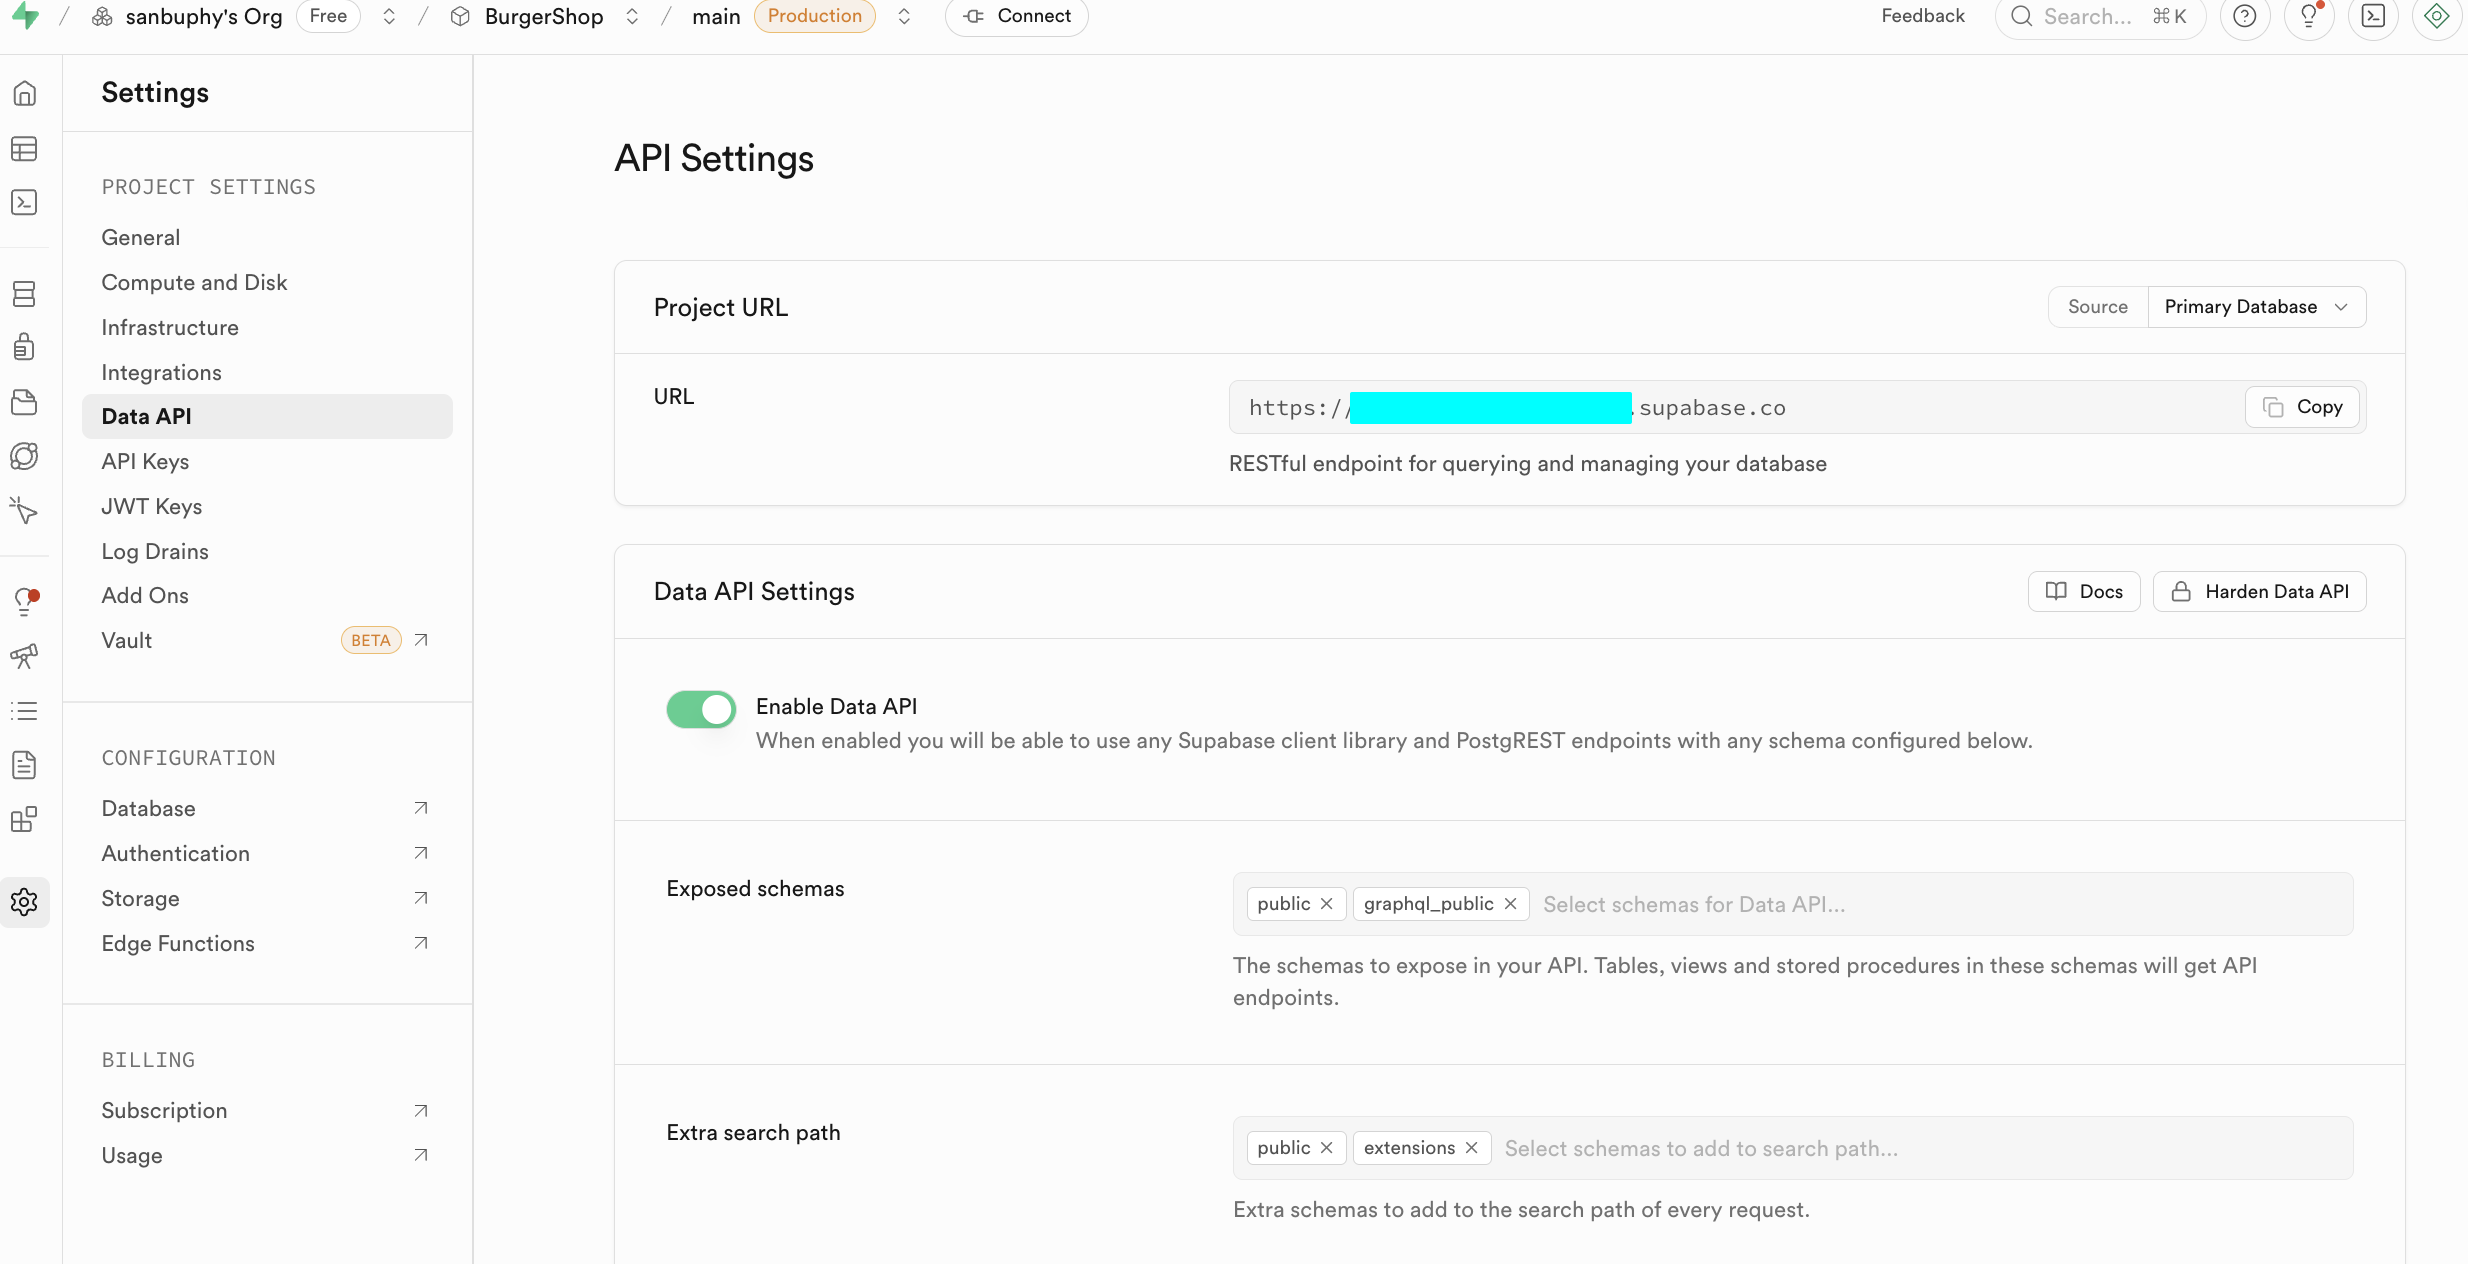
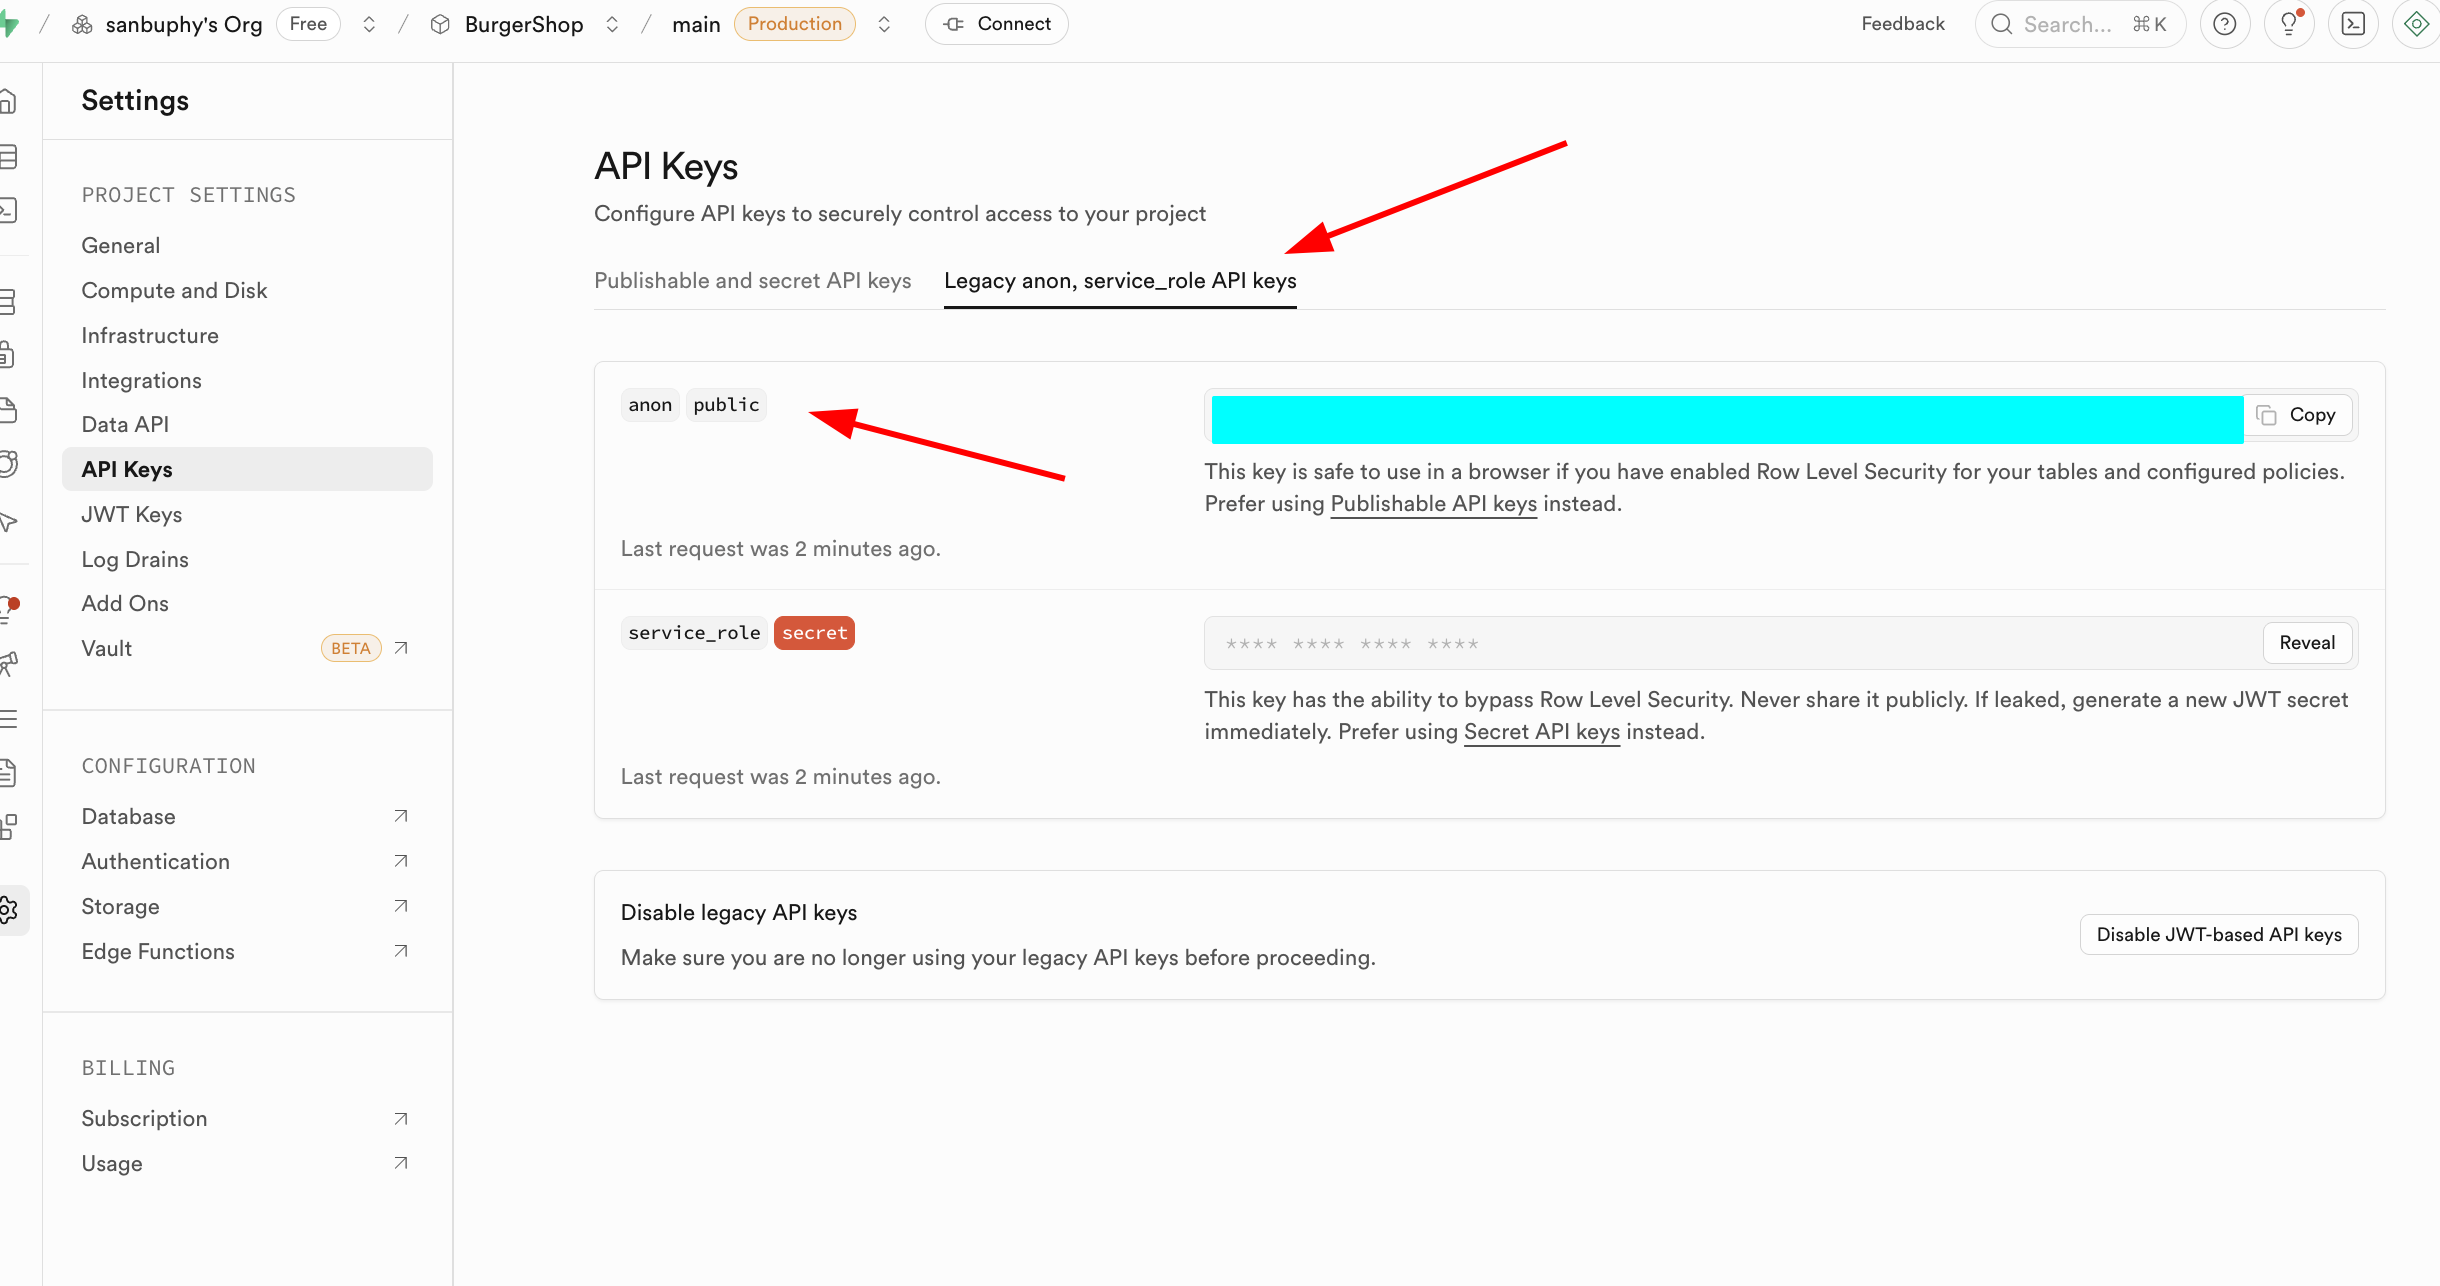
At the beginner stage, we only need to focus on the following two core sections. One is the Data API, where we can obtain the key "Supabase URL" — it's a RESTful endpoint in the format https://xxx.supabase.co, serving as the "entry address" for all data query, insert, update, and delete operations. The frontend or server side needs to use this URL to initialize the Supabase client and establish a connection with the database.
The other important section is API Keys. Select the "Legacy anon, service_role API keys" tab. The anon public key is an important credential for frontend scenarios. Its permissions are strictly limited by RLS and can only access data that users are authorized for. The service_role key is a "server-side high-privilege key" with the ability to bypass Row Level Security, capable of executing batch data operations, system-level configuration, and other sensitive operations. It must absolutely never be shared publicly. If leaked, you must immediately generate a new key and update server-side configurations.
Other configuration items don't need to be explored in depth at the current stage. You can explore them one by one when there are advanced usage needs later.
2.1 Creating Your First SQL Data Table
The above was an introduction to the Supabase interface. Next, we'll dive into the core database operations of Supabase.
There are two main ways to create data tables in Supabase. You can choose based on your needs:
- (Recommended) Use a large language model to generate SQL statements adapted for Supabase, and paste and execute them directly in the SQL Editor (the SQL statement executor introduced earlier). This is efficient and quick, and we'll focus on this operation process in the next section.
- Create through visual operations: Find the Database module in the left sidebar, click to enter and select Tables in the sidebar, then click the "New table" button on the right to create a data table through the graphical interface.
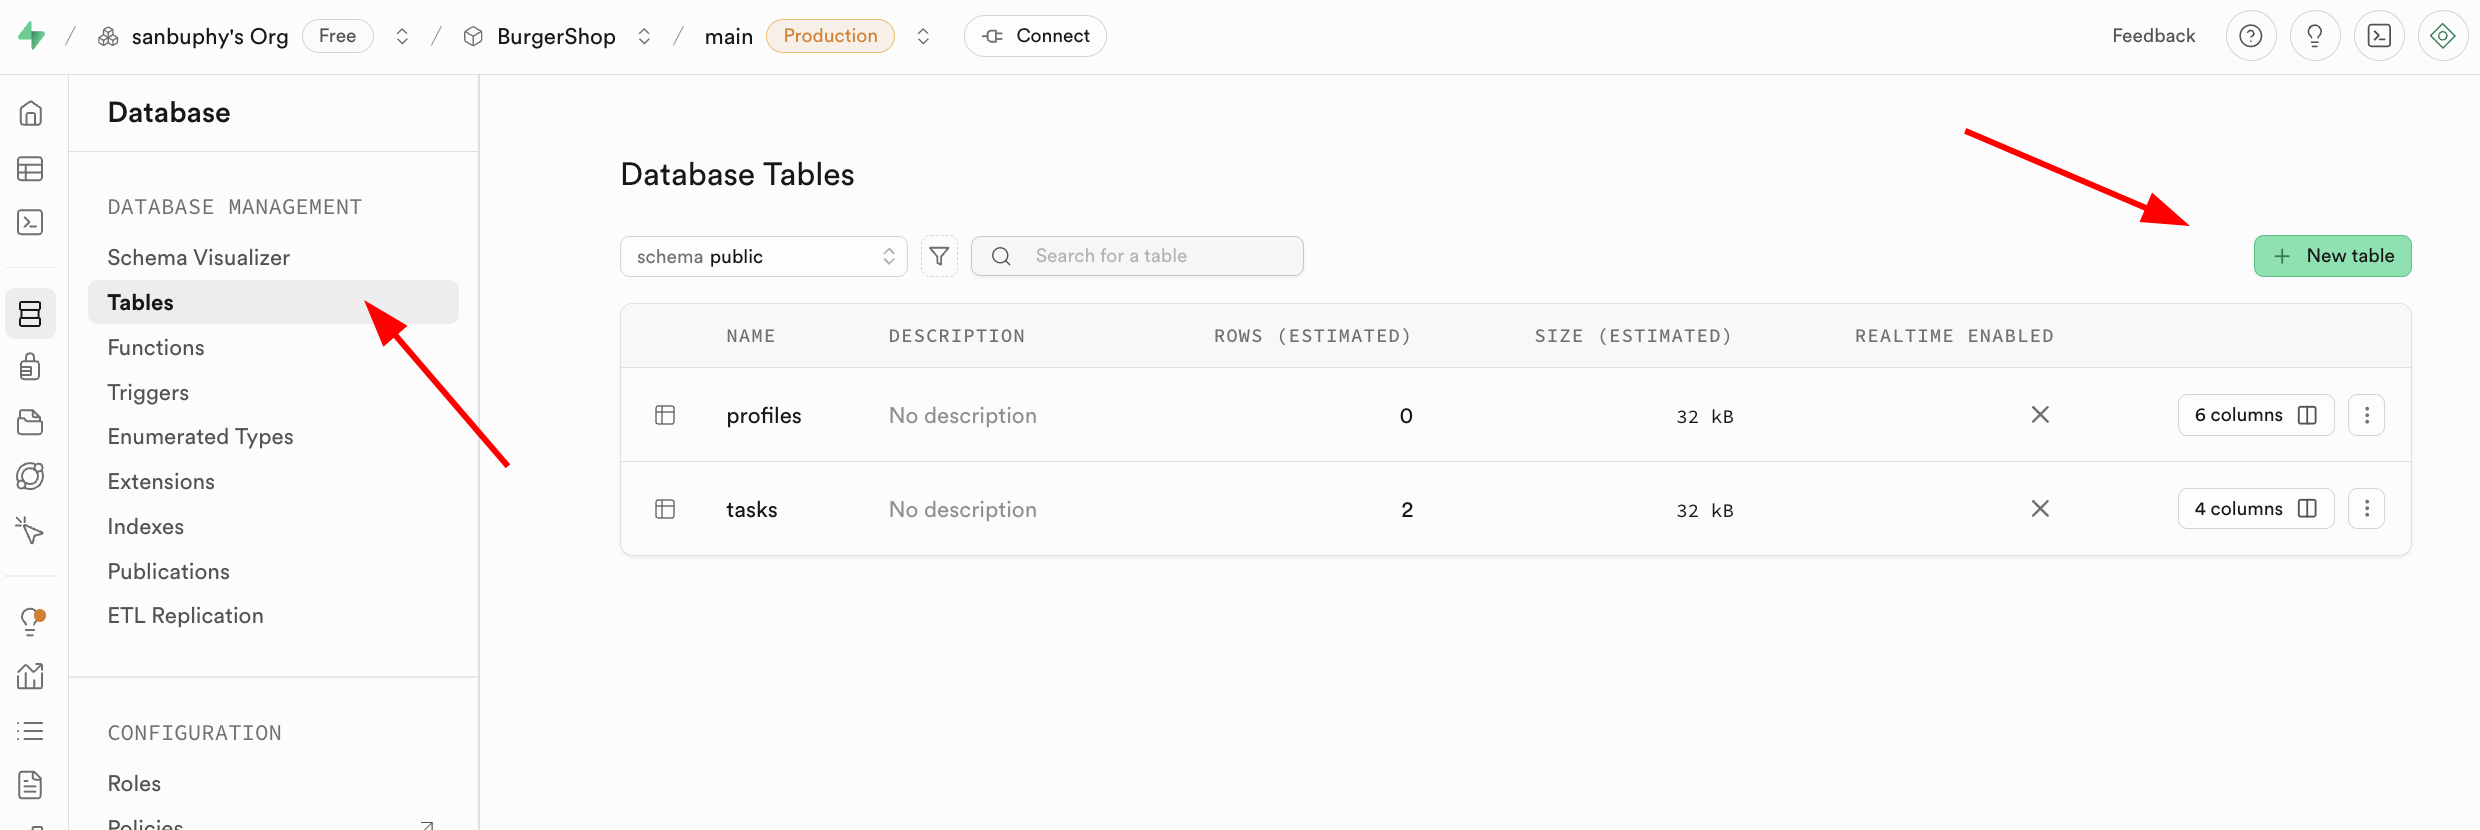
Note that the corresponding data table name and data types to be stored can be specified in the Columns section below.
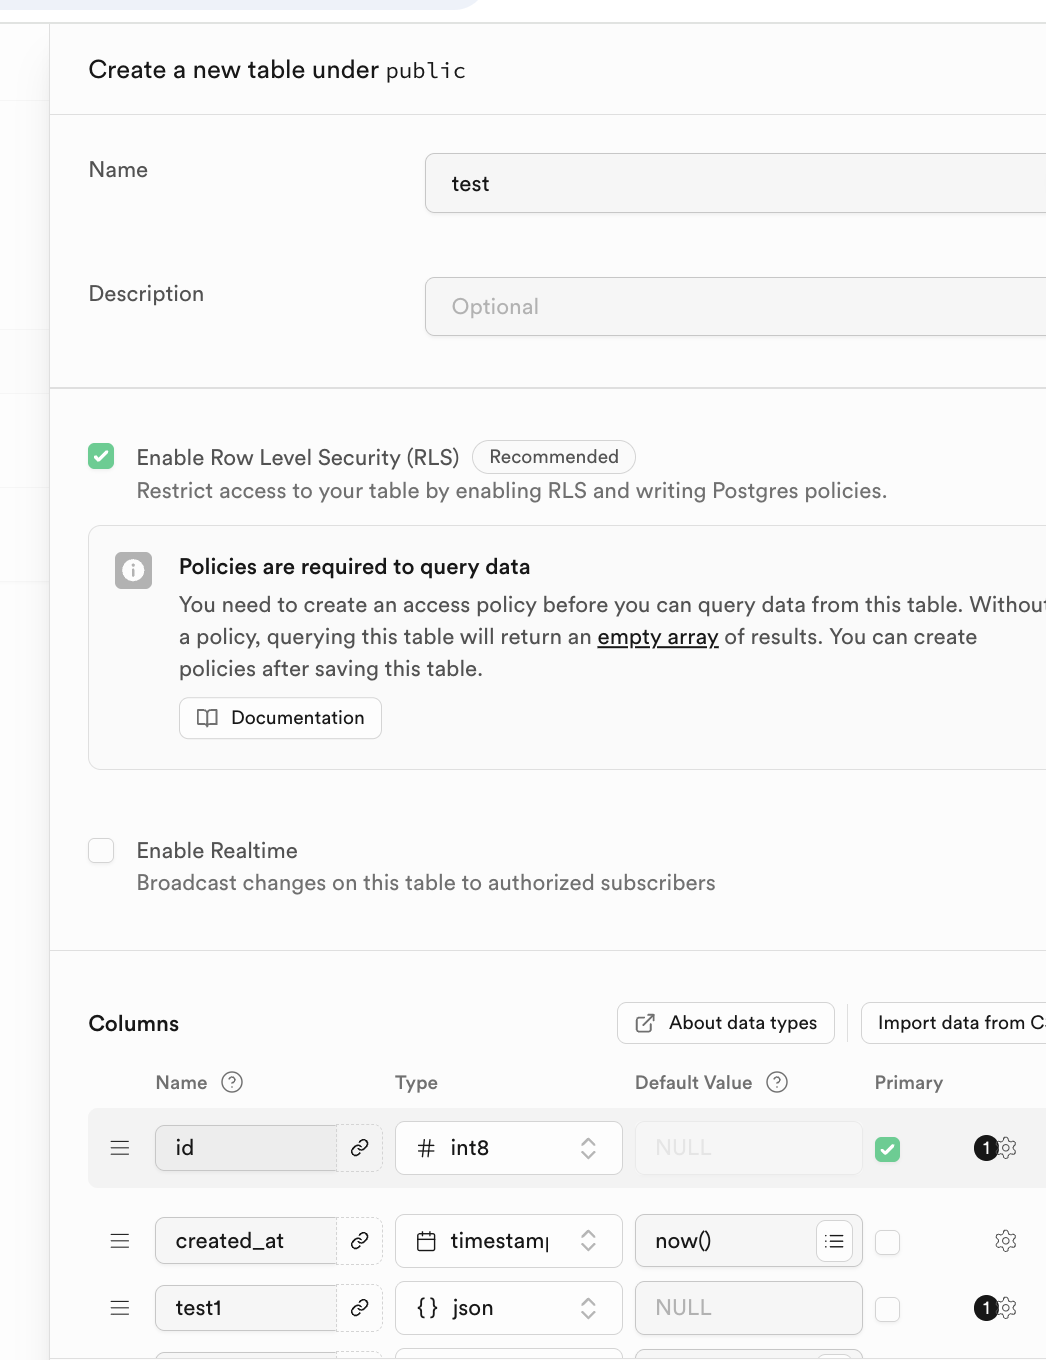
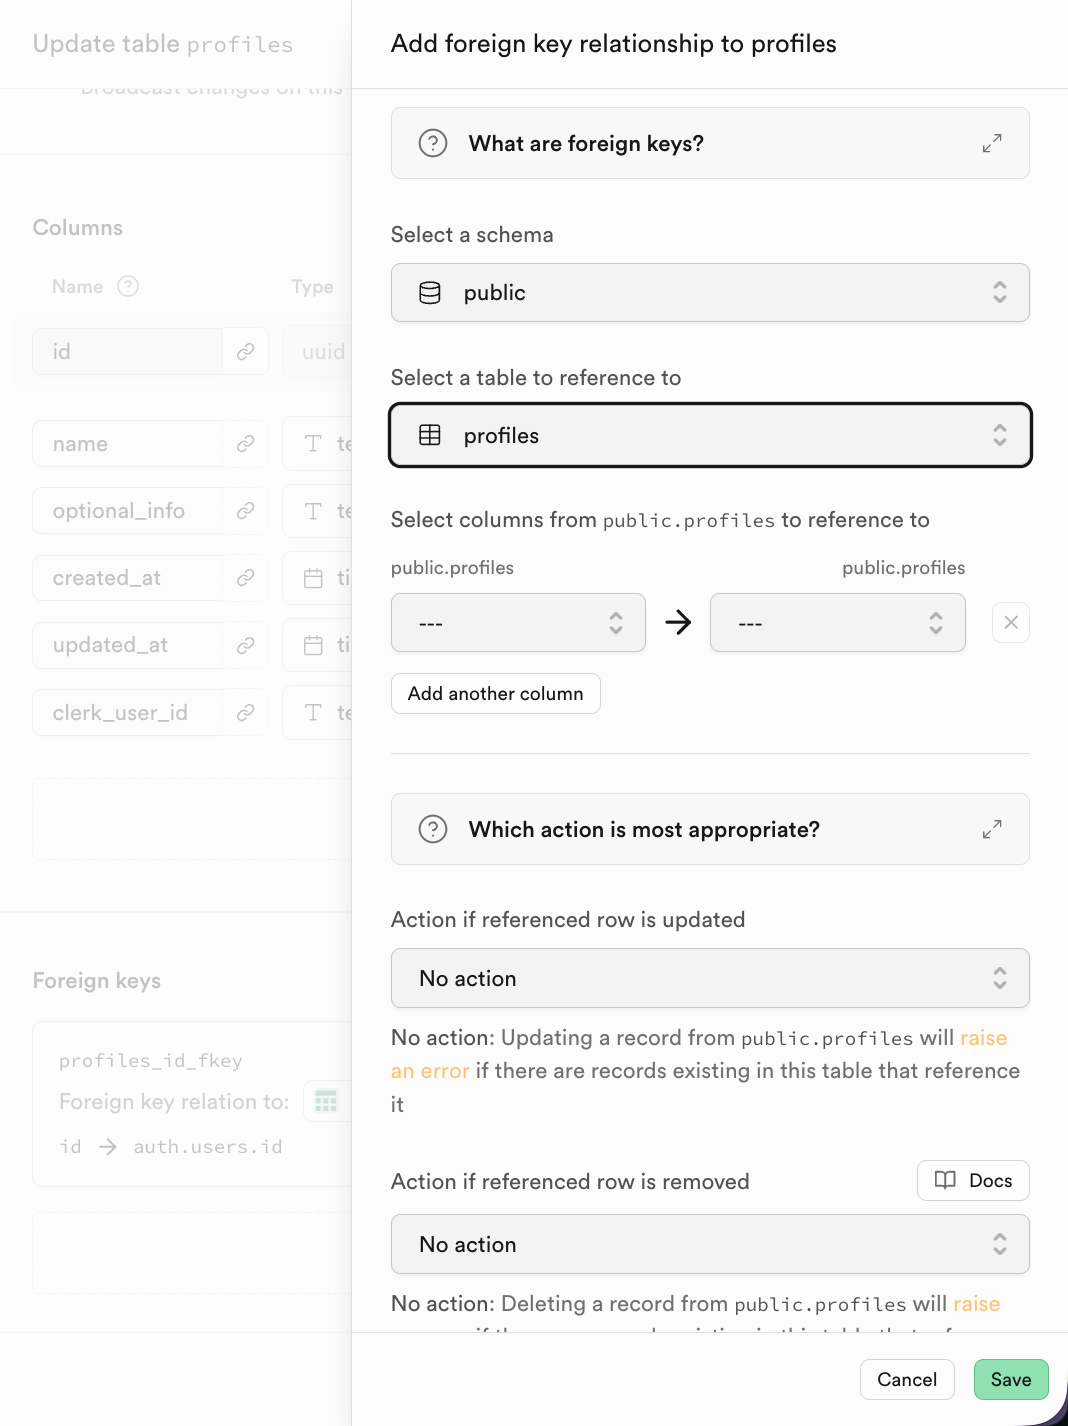
For relational databases, an important characteristic is the relationships between tables. You can find Foreign keys below and click to create the corresponding relationships:
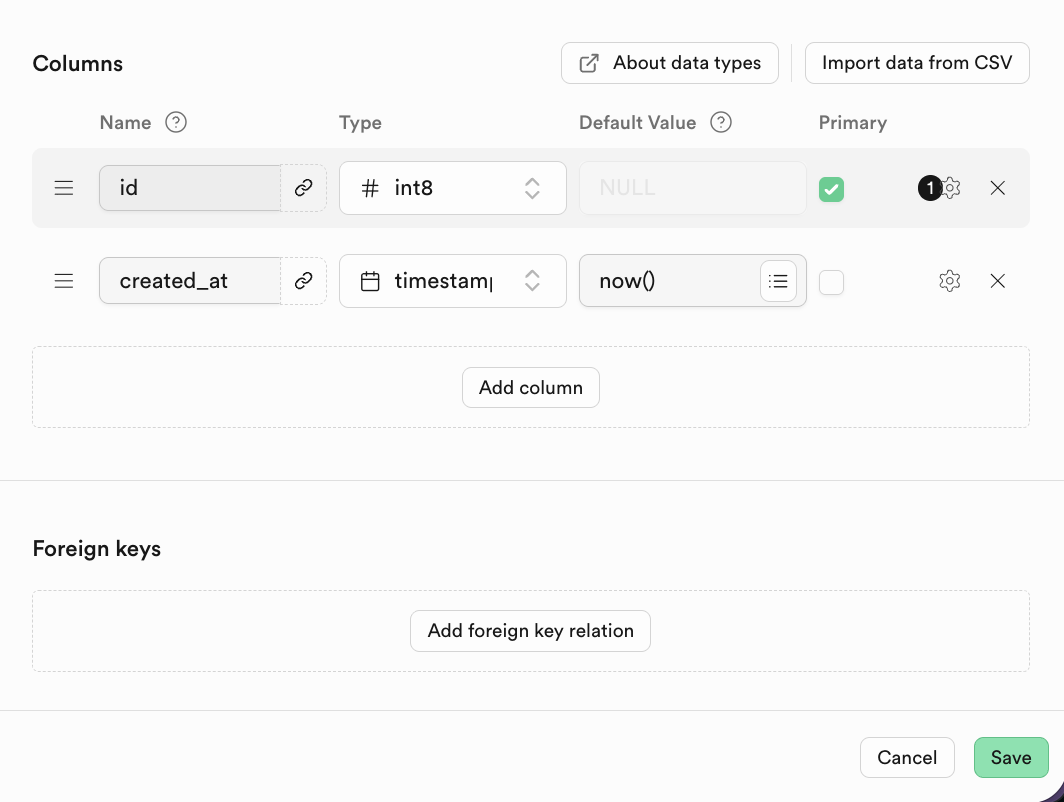
A Foreign key expresses the relationship between tables: a field or set of fields whose value in the current table (child table) references the primary key value of another table (parent table).
For example, when creating a students table, we can define a foreign key like this: (The class_id column is a foreign key. This foreign key references the class_id column in the classes table.)
CREATE TABLE students (
    student_id INT PRIMARY KEY,
    student_name VARCHAR(50),
    class_id INT,
    FOREIGN KEY (class_id) REFERENCES classes(class_id)
);
More specifically, we can visually observe the structure of the corresponding tables:
Classes table: This table records information about all classes, and each class has a unique class ID. The class ID is the primary key of this table, serving as each class's unique identifier.
| class_id | class_name |
|---|---|
| 101 | Grade 1, Class 1 |
| 102 | Grade 1, Class 2 |
Students table: This table records information about all students. Each student belongs to a specific class, right? So how do we know which student is in which class?
We can add a column to the students table called class_id.
| student_id | student_name | class_id |
|---|---|---|
| 2024001 | Zhang San | 101 |
| 2024002 | Li Si | 102 |
| 2024003 | Wang Wu | 101 |
In this example, the class_id column in the students table is the foreign key.
In Supabase, after clicking to add a Foreign Key, you can directly select the corresponding column of the related table.
2.3 SQL Editor Introduction and Basic Database Operations
Next, we'll execute a series of SQL scripts step by step to familiarize ourselves with common CRUD (Create, Read, Update, Delete) operations in SQL. You can copy each step's code into the SQL Editor, execute it, and observe the results.
You can find all the test SQL files in this directory:
https://github.com/THU-SIGS-AIID/Project5-Supabase-Demos/tree/main/apps/sql-examples
2.3.1 CREATE - Creating Table Structure
The CREATE TABLE statement is used to define the schema for a new table, including its columns, corresponding data types, and any constraints. Simply put, it creates a data table.
-- Step 1: Create the 'orders' table
-- This file is fully independent and creates a sample table for later steps.
CREATE TABLE IF NOT EXISTS orders (
id serial PRIMARY KEY,
user_id int NOT NULL, -- User ID
status text NOT NULL, -- Order status (e.g. paid, pending)
amount numeric(10, 2) NOT NULL, -- Order total amount
details jsonb, -- Item and extra details as JSON
placed_at timestamptz DEFAULT now(), -- Order creation time
is_paid boolean DEFAULT false -- Paid flag
);
-- Expected Output:
-- Orders table created if it did not exist.
-- No data inserted. (Querying returns zero rows for now.)
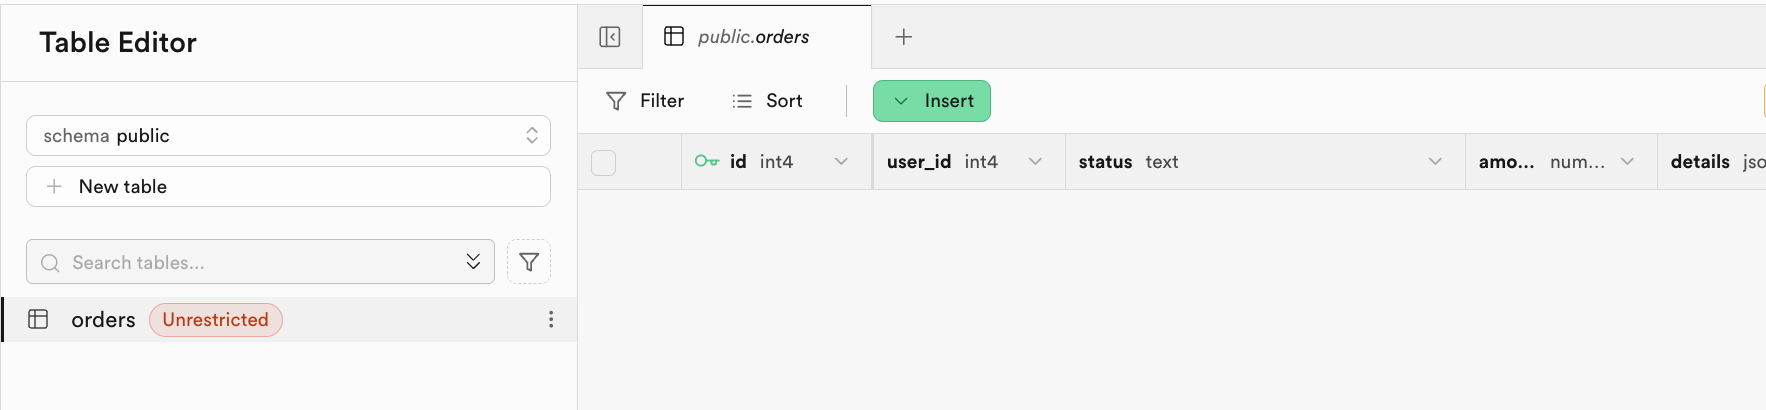
-- If table already exists, no error occurs.After successful execution, the system will indicate that the script is complete. You can see the corresponding table created in the Table Editor:
2.3.2 INSERT - Populating Initial Data
After the table structure is created, the next step is to add data rows to the table using the INSERT INTO statement.
-- Step 2: Insert initial rows into the orders table
-- Provides realistic, varied data for demo/testing. All values are self-contained.
INSERT INTO orders (user_id, status, amount, details, placed_at, is_paid) VALUES
(2001, 'pending', 23.50, '{"items":[{"sku":"BGR001","name":"Beef Burger","qty":1,"price":12.00}]}', now() - interval '2 days', false),
(2002, 'paid', 50.00, '{"items":[{"sku":"BGR002","name":"Chicken Burger","qty":2,"price":10.00},{"sku":"DRK001","name":"Lemonade","qty":2,"price":5.00}]}', now() - interval '1 day', true),
(2003, 'cancelled', 15.00, '{"items":[{"sku":"FRY001","name":"French Fries","qty":3,"price":5.00}], "reason":"Not available"}', now() - interval '45 days', false),
(2004, 'paid', 22.98, '{"items":[{"sku":"BGR003","name":"Veggie Burger","qty":2,"price":9.99}], "promo":"SUMMER22"}', now() - interval '10 days', true),
(2005, 'pending', 18.75, '{"items":[{"sku":"SAL001","name":"Salad","qty":1,"price":6.75},{"sku":"BGR001","name":"Beef Burger","qty":1,"price":12.00}]}', now() - interval '7 hours', false),
(2006, 'paid', 8.00, '{"items":[{"sku":"DRK002","name":"Cola","qty":2,"price":4.00}]}', now() - interval '3 hours', true),
(2007, 'refunded', 14.50, '{"items":[{"sku":"BGR003","name":"Veggie Burger","qty":1,"price":9.99},{"sku":"FRY001","name":"French Fries","qty":1,"price":4.51}], "refund_reason":"Late delivery"}', now() - interval '15 days', false),
(2008, 'paid', 26.99, '{"items":[{"sku":"BGR002","name":"Chicken Burger","qty":2,"price":10.00},{"sku":"DRK001","name":"Lemonade","qty":1,"price":6.99}]}', now() - interval '12 days', true),
(2009, 'pending', 9.99, '{"items":[{"sku":"BGR003","name":"Veggie Burger","qty":1,"price":9.99}]}', now() - interval '30 minutes', false),
(2010, 'paid', 19.89, '{"items":[{"sku":"BGR001","name":"Beef Burger","qty":1,"price":12.00},{"sku":"DRK002","name":"Cola","qty":2,"price":3.95}]}', now() - interval '5 days', true),
(2011, 'cancelled', 0.00, '{"items":[], "reason":"User cancelled"}', now() - interval '2 days', false);
-- Expected Output:
-- After running this script, SELECT * FROM orders will show about 11 rows with varied user_id, status, amount, details (JSON), placed_at, and is_paid fields.
-- For example:
-- | id | user_id | status | amount | is_paid | placed_at |
-- |----|---------|-----------|--------|---------|---------------------|
-- | 1 | 2001 | pending | 23.50 | false | 2025-10-28 13:40:00Z|
-- | 2 | 2002 | paid | 50.00 | true | ... |
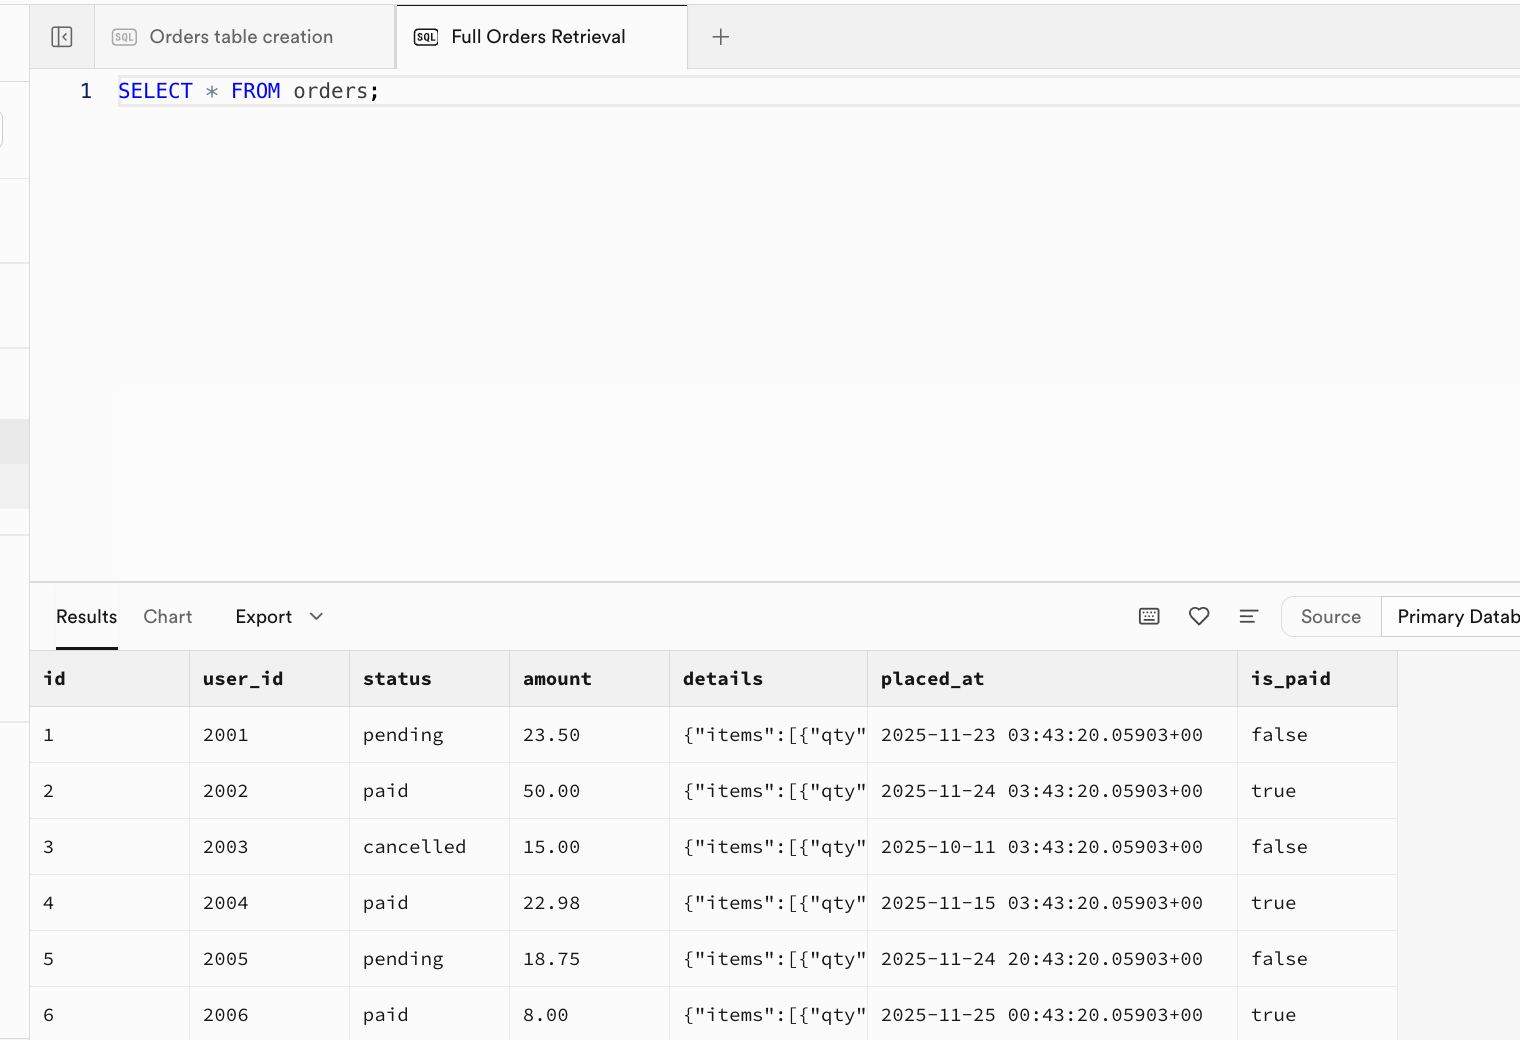
-- |... | ... | ... | ... | ... | ... |After successful execution, initial data has been inserted into the table. You can go to the Table Editor interface and refresh to see the results, or open a new window in the SQL Editor interface and execute the query SELECT * FROM orders; to view the results:
2.3.3 SELECT - Reading and Querying Data
The SELECT statement is used to retrieve data from tables. By using different clauses, you can achieve precise filtering, sorting, and formatting of data. Let's execute the following statements step by step to view the results:
-- Step 3: SELECT query examples for the orders table

-- Example 1: Select all fields for all orders
SELECT * FROM orders;
-- Expected Output: Returns all rows and fields. Columns: id, user_id, status, amount, details, placed_at, is_paid.

-- Example 2: Select only pending orders
SELECT id, user_id, amount FROM orders WHERE status = 'pending';
-- Expected Output: All rows with status 'pending'; columns: id, user_id, amount.

-- Example 3: Select specific fields and filter by payment status
SELECT id, status, is_paid, amount FROM orders WHERE is_paid = true;
-- Expected Output: All rows where is_paid is true; columns: id, status, is_paid, amount.

-- Example 4: Extract all item names from the details (JSON) for each order
SELECT id, details -> 'items' AS item_list FROM orders;
-- Expected Output: Each row shows id and an array from JSON with item details.- Example 1: Returns all rows and columns in the
orderstable, similar to the output in step 2. - Example 2: Returns only orders with status 'pending', containing only the specified columns:
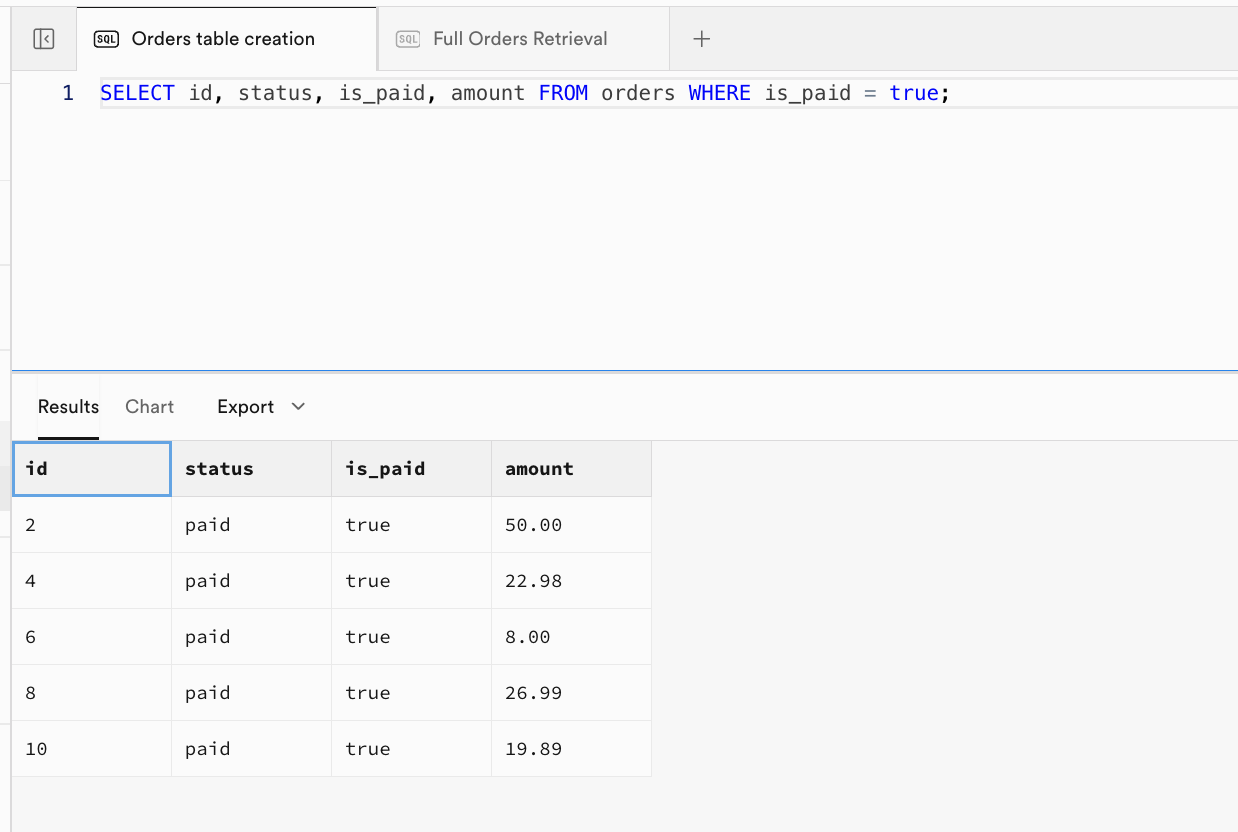
- Example 3: Returns only paid orders with the specified columns:
| id | status | is_paid | amount |
|---|---|---|---|
| 2 | paid | true | 50.00 |
| 4 | paid | true | 22.98 |
| 6 | paid | true | 8.00 |
| 8 | paid | true | 26.99 |
| 10 | paid | true | 19.89 |
- Example 4: Returns each order's
idand theitemsarray extracted from thedetailsfield:
| id | item_list |
|---|---|
| 1 | [{"qty":1,"sku":"BGR001","name":"Beef Burger","price":12}] |
| 2 | [{"qty":2,"sku":"BGR002","name":"Chicken Burger","price":10},{"qty":2,"sku":"DRK001","name":"Lemonade","price":5}] |
| 3 | [{"qty":3,"sku":"FRY001","name":"French Fries","price":5}] |
| ... | ... |
2.3.4 INSERT - Inserting a Single Record
In section 2.3.2, we demonstrated batch data insertion at the beginning. Now let's see how to insert a single new record.
-- Step 4: INSERT a new order (single row)
-- Example: Add a new paid order for user 2012 with one Chicken Burger
INSERT INTO orders (user_id, status, amount, details, is_paid)
VALUES (
  2012, 'paid', 9.99,
  '{"items":[{"sku":"BGR002","name":"AIID Burger","qty":100,"price":1000}]}',
  true
);
-- Expected Output:
-- Before (table fragment):
-- | id | user_id | status | amount | is_paid |
-- | ...|   ...   |  ...   |  ...   |  ...    |
--
-- After (last row):
-- | id | user_id | status | amount | is_paid |
-- | xx |  2012   |  paid  |  9.99  |  true   |
-- (where xx = next serial value)
Now when you query the data again with SELECT * FROM orders;, you can see the orders table has successfully gone from 11 records to 12 records.
2.3.5 UPDATE - Modifying Existing Data
In real work, we frequently need to update data in tables. We can use the UPDATE statement to modify existing records in a table.
-- Step 5: UPDATE example
-- Example: Mark order with id=1 as paid and update its status
UPDATE orders SET status = 'paid', is_paid = true WHERE id = 1;
-- Expected Output:
-- Before (row with id=1):
-- | id | status  | is_paid |
-- | 1  | pending |  false  |
-- After (row with id=1):
-- | id | status | is_paid |
-- | 1  | paid   |  true   |
-- All other rows remain unchanged.
2.3.6 DELETE - Deleting Data
The DELETE statement can be used to remove records from a table and combine conditions to modify specified portions of data.
-- Step 6: DELETE example
-- Example: Delete orders older than 2 days to clean up old data
DELETE FROM orders WHERE placed_at < now() - interval '2 days';
-- Expected Output:
-- Before (filtered for affected rows):
-- | id | status    | placed_at           |
-- |  3 | shipped   | 2025-10-13 ...     |  <-- will be deleted
--
-- After:
-- No such rows remain. SELECT * FROM orders WHERE placed_at < now()-interval '2 days' yields zero rows.
-- Other rows in orders table are unaffected.
Before executing, you can first run SELECT id, status, placed_at FROM orders WHERE placed_at < now() - interval '2 days'; to view the filtered results from the data table. After running the DELETE command, executing the same SELECT query SELECT id, status, placed_at FROM orders WHERE placed_at < now() - interval '2 days'; will return an empty result, indicating that these rows have been successfully deleted.
2.4 Row Level Security
After learning the basic database operations, we need to dive deeper into a core concept that ensures data security — RLS (Row Level Security).
Let's first consider a key question in practical scenarios: How do we achieve "isolated access" to data? For example, allowing only User A to see their own data while preventing them from seeing User B's information. Or, even if a certain role has database access permissions, how do we prevent them from accidentally operating or leaking other users' sensitive data?
RLS was born precisely to solve these data security and isolation needs. It allows developers to define fine-grained security policies for database tables, precisely controlling which users can access and modify which rows of data based on user identity information (such as user ID, role permissions, etc.).
A typical example: For the orders table (orders), we can define an RLS policy — "Only when the user_id column of a record in the orders table exactly matches the currently logged-in user's ID can that user query that order data," thereby achieving the core requirement of "users can only see their own orders."
When you enable RLS for a table, all data operation requests for that table (including SELECT queries, INSERT inserts, UPDATE modifications, DELETE deletions) will trigger RLS verification: the operation can only proceed if it passes at least one security policy check. If no policy allows the operation, or if the request doesn't meet any policy's conditions, the database will directly reject the operation, blocking unauthorized access at the foundation level.
In Supabase, RLS is deeply integrated with the user authentication system, making it even more convenient to use. Supabase provides a dedicated function auth.uid() that directly returns the unique ID (in UUID format) of the "currently logged-in user making the request." Using this function, we can easily write policies to achieve precise association between "data rows and user identity" (such as the "order user_id matches current user ID" mentioned earlier).
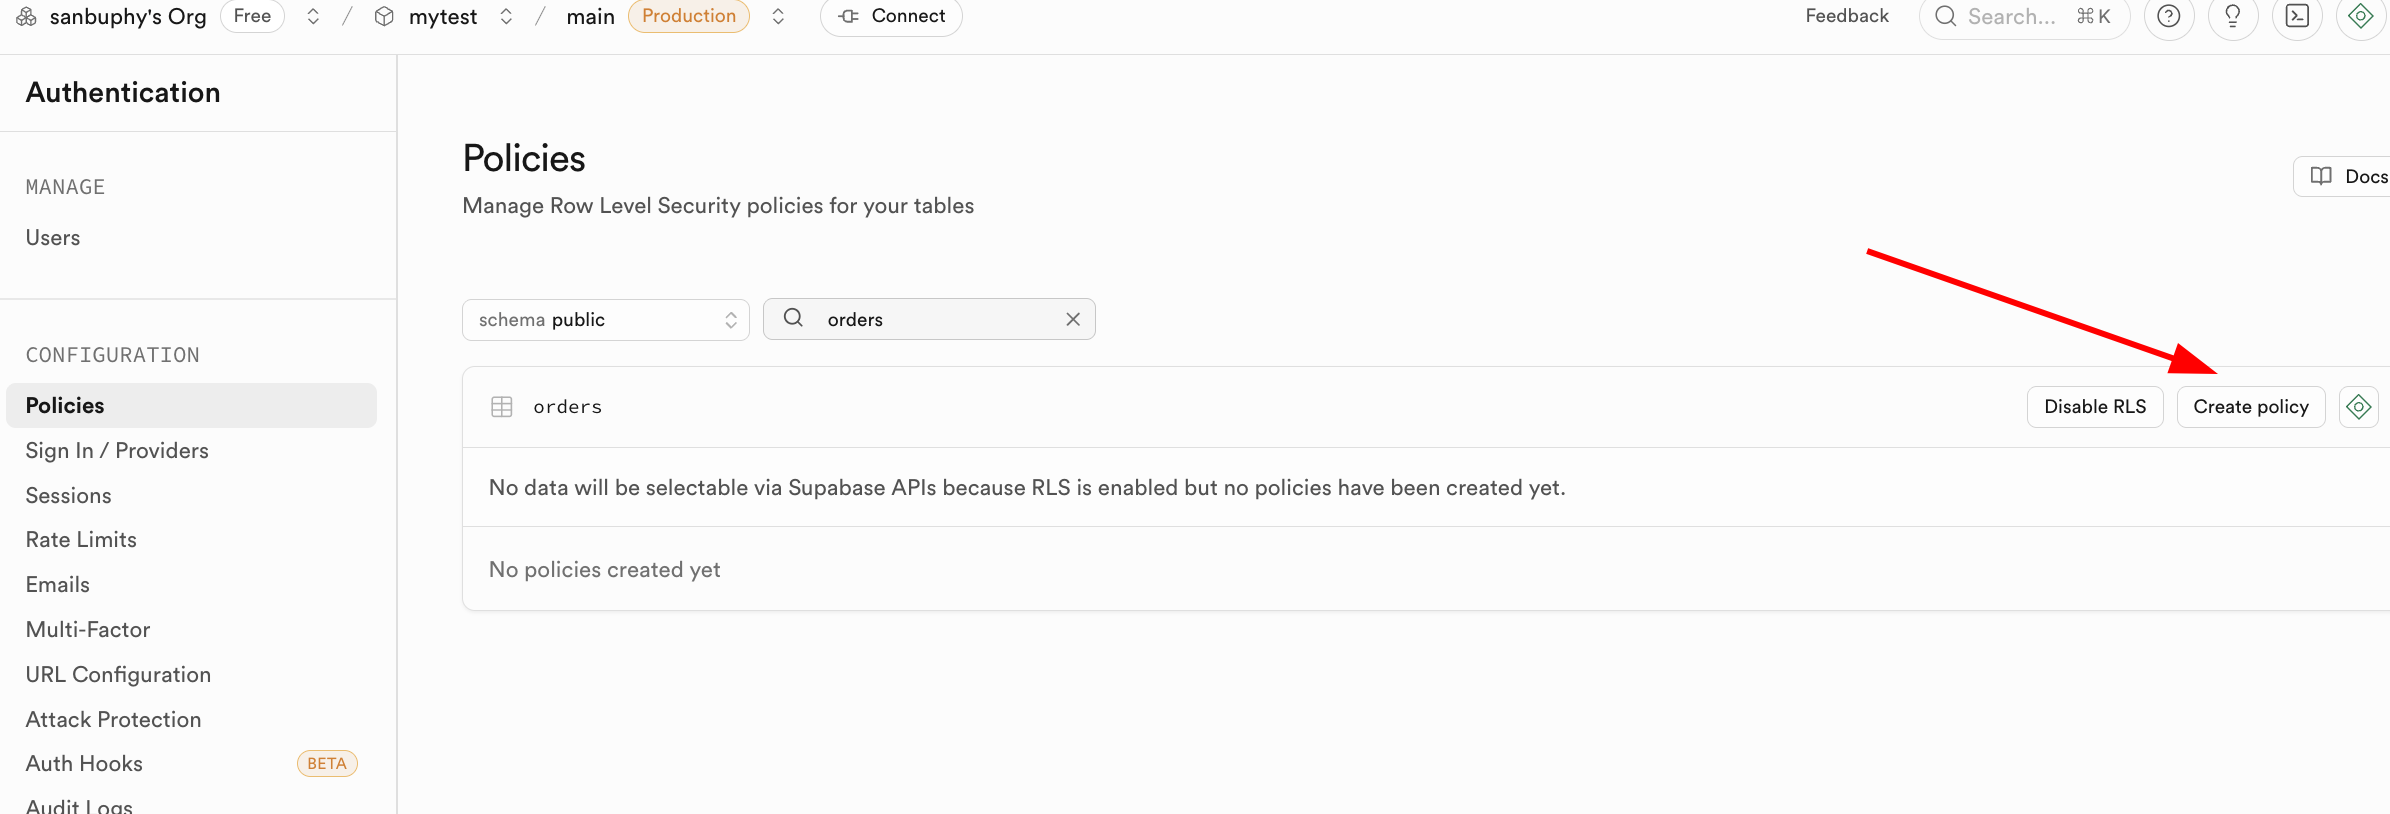
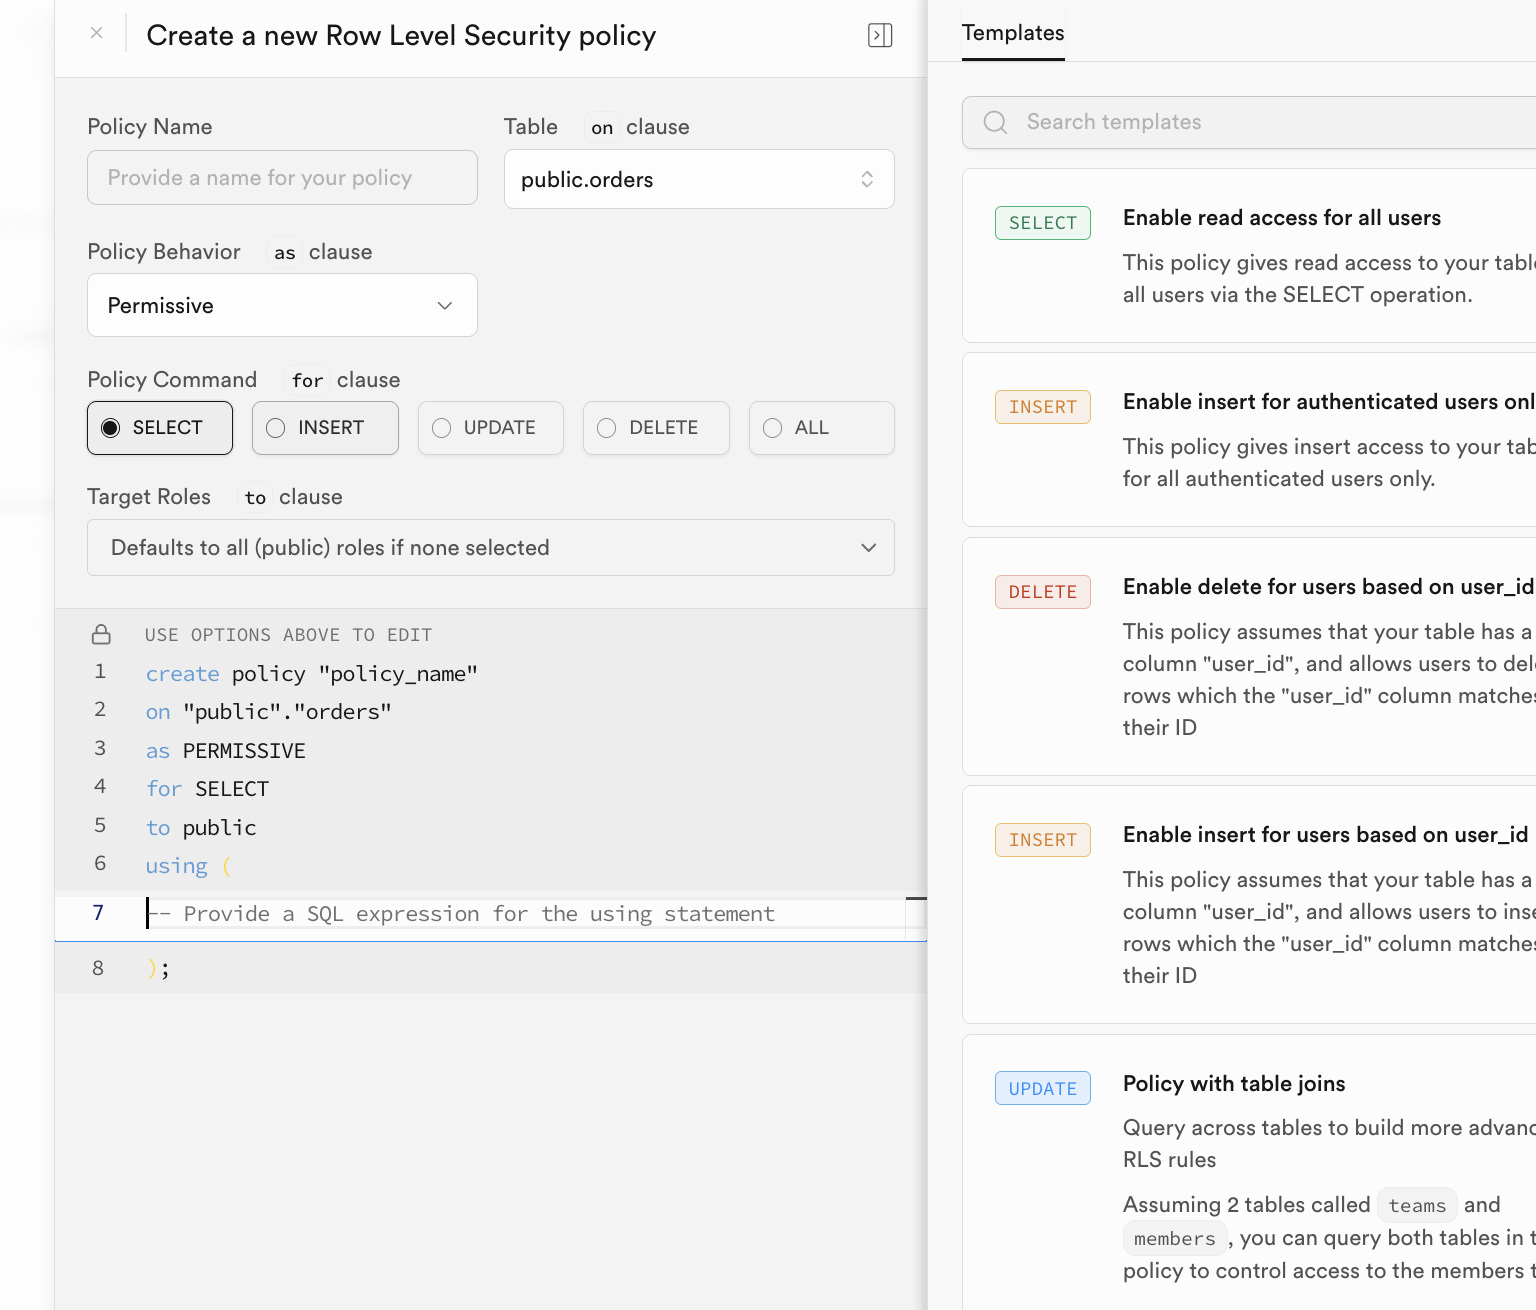
There are flexible ways to enable RLS policies. You can directly configure and enable policies through the "RLS" button in the Supabase database management interface:
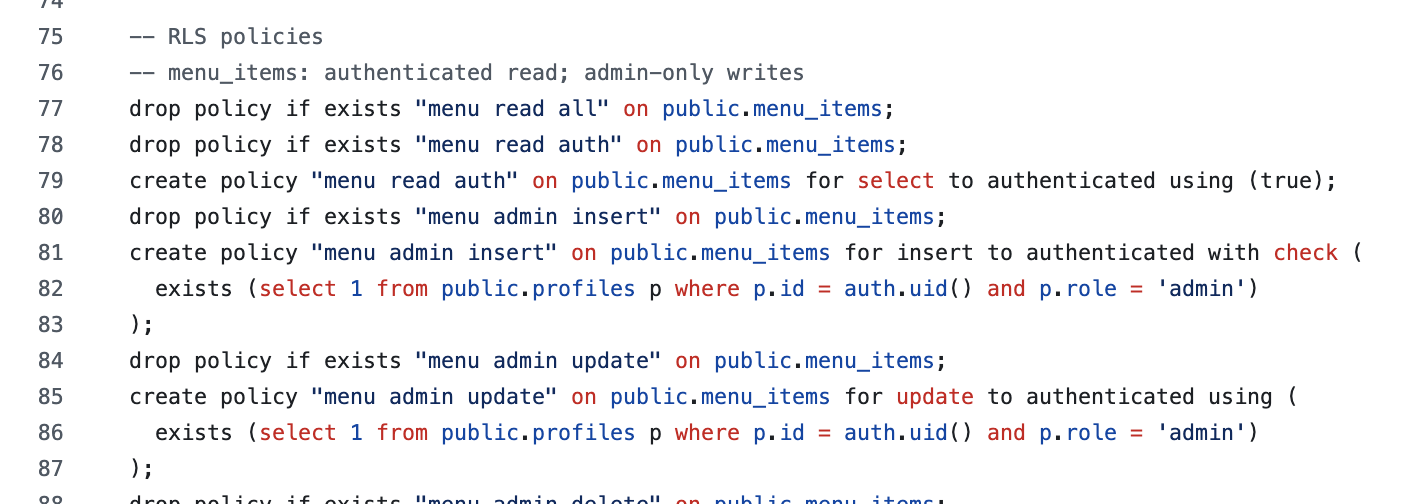
Manual configuration can be cumbersome. Typically, we automatically consider embedding corresponding RLS policies when creating and initializing data tables. We only need to execute statements like the following in the SQL Editor to automatically enable Row Level Security for the corresponding data table.
3. Your First SQL Application
Having mastered basic database operations and the core logic of RLS, we're finally entering the hands-on practice section of this tutorial. The lengthy learning preparation was to make the subsequent process of "building an application from 0 to 1" clearer. Next, using a "burger shop order management" scenario, we'll walk you through common Supabase operations step by step: from application and Supabase connection configuration, to database and login feature integration, progressively learning different operational logic.
3.1 Clone and Run the Supabase Demo Project
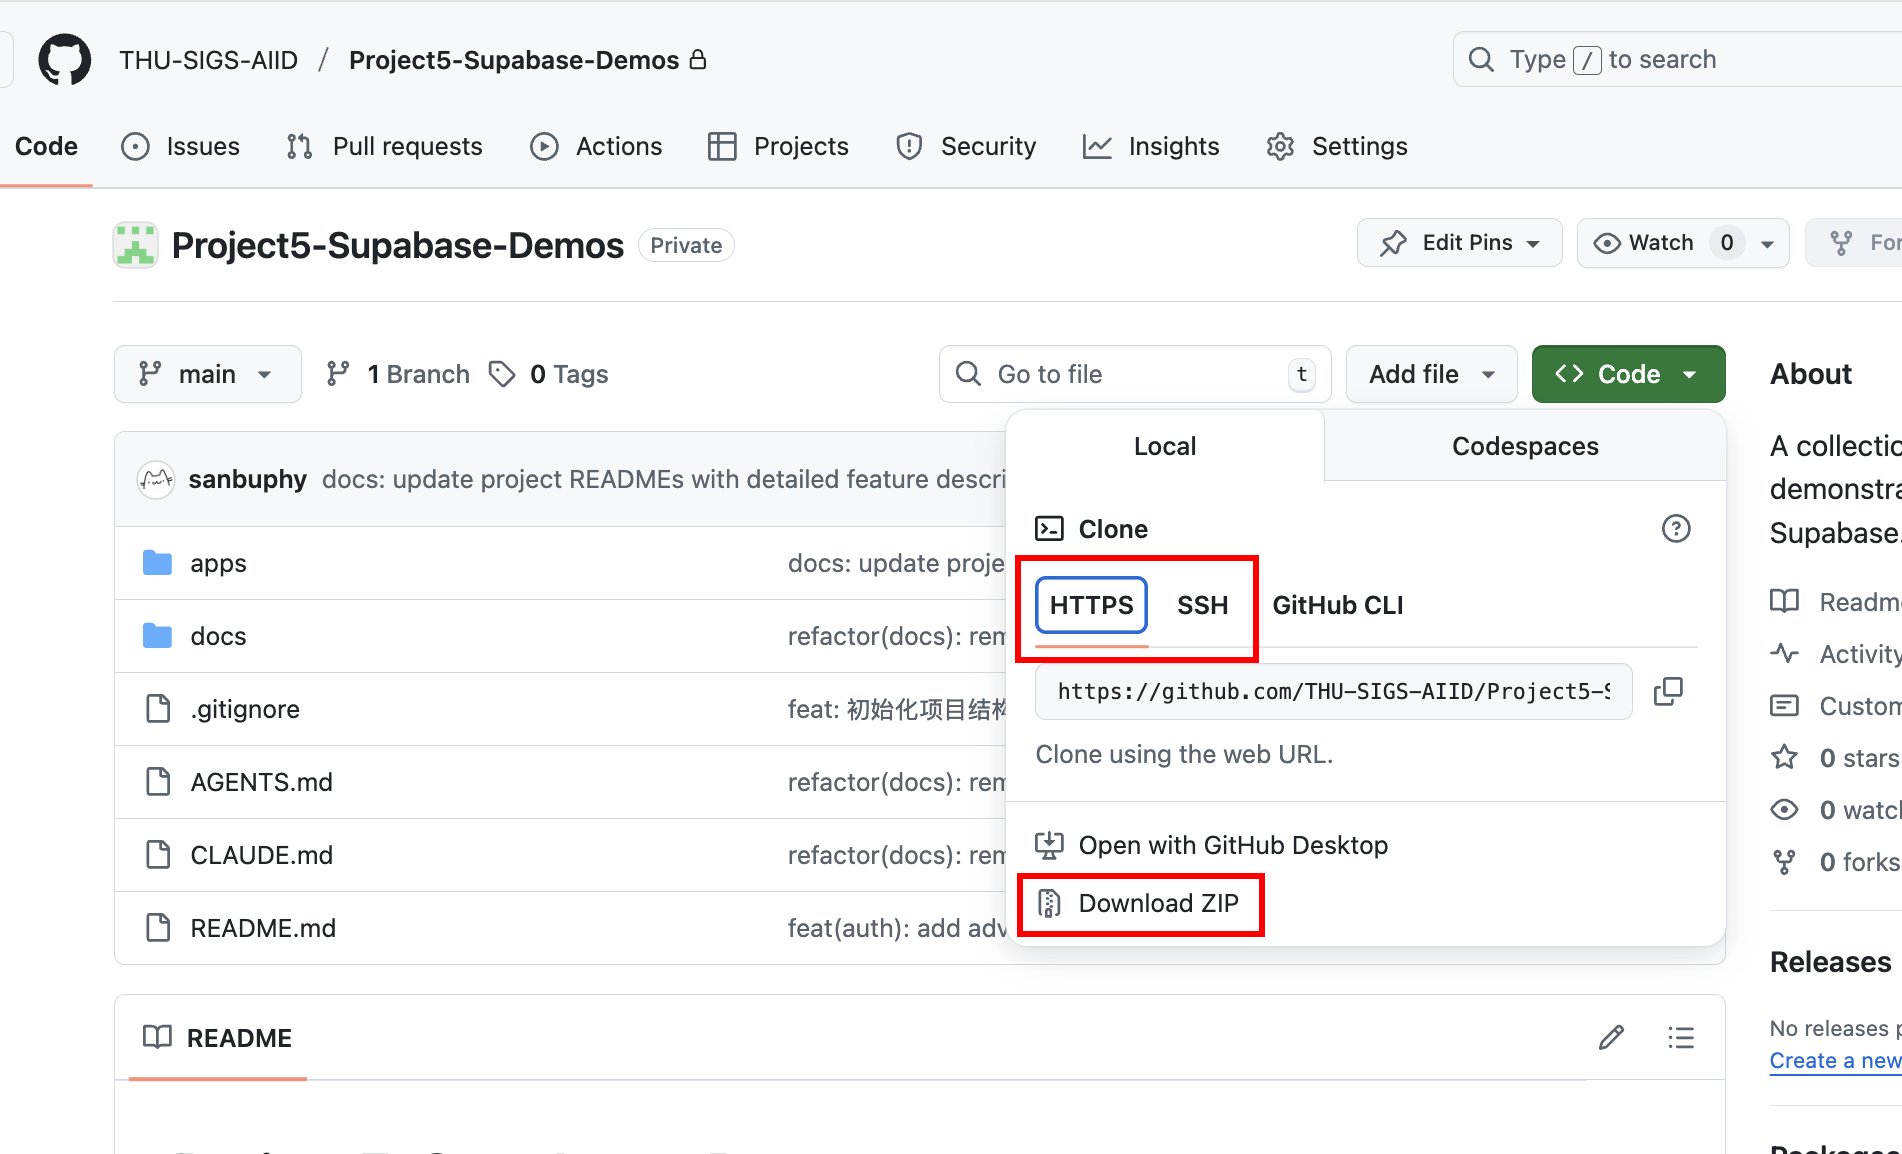
To get started with hands-on practice, you first need to obtain the accompanying demo code repository. You can have Trae or Claude Code help you git clone the following repository: https://github.com/THU-SIGS-AIID/Project5-Supabase-Demos
If you've configured SSH keys, it's recommended to use the SSH address for cloning (git@github.com:THU-SIGS-AIID/Project5-Supabase-Demos.git) for enhanced security. If SSH or HTTPS connections encounter network issues, you can directly click "Download ZIP" on the repository page to get a compressed file — extract it to see the complete code.
After cloning, you can also have Trae or Claude Code help you start the project. For example, directly state in the Agent interface: Help me start project 1 in this project, or copy the absolute path of the project you want to start and paste it to the large language model to start it directly.
3.2 Project 1 - Burger Shop Menu CRUD
Next, let's enter the hands-on section — using project-burger-shop-menu-crud-1 as an example. We'll learn how to initialize the Supabase database with a single click using SQL scripts, and complete the connection configuration between the local project and the Supabase database so the frontend can properly read and write menu data.
Creating the Database Using Scripts
First, we need to create the relevant data tables in Supabase. In the Project 1 directory, you'll find a folder named scripts containing an init.sql database script file. It helps us automatically create all database-related resources (including table structures, initial data, etc.). We'll frequently use this file for table initialization in the database.
......

-- ============================================================================
-- 2. Create Menu Items Table
-- ============================================================================

create table if not exists public.menu_items (
  id uuid primary key default gen_random_uuid(),
  name text not null,
  description text,
  category text check (category in ('burger','side','drink')) default 'burger',
  price_cents int not null check (price_cents > 0),
  available boolean default true,
  emoji text,
  created_at timestamptz not null default now(),
  updated_at timestamptz not null default now()
);

-- Comments for documentation
comment on table public.menu_items is 'Burger shop menu items for CRUD demo';
comment on column public.menu_items.id is 'Unique identifier for each menu item';
comment on column public.menu_items.name is 'Display name of the menu item';
comment on column public.menu_items.description is 'Detailed description of the menu item';
comment on column public.menu_items.category is 'Category: burger, side, or drink';
comment on column public.menu_items.price_cents is 'Price in cents (integer) to avoid floating point issues';
comment on column public.menu_items.available is 'Whether the item is currently available for order';
comment on column public.menu_items.emoji is 'Optional emoji representation of the menu item';
comment on column public.menu_items.created_at is 'Timestamp when the item was created';
comment on column public.menu_items.updated_at is 'Timestamp when the item was last updated';

......
After executing the initialization SQL script in the SQL Editor, you can see the created data tables in the Table Editor. The specific execution logic of the database initialization code is as follows:
- Create the menu_items table:
- This table stores all items on the burger shop menu. It includes fields such as name, description, price_cents (price in cents to avoid floating-point precision issues), category, and available (whether it's available for sale). This basically covers all the information needed for a menu item.
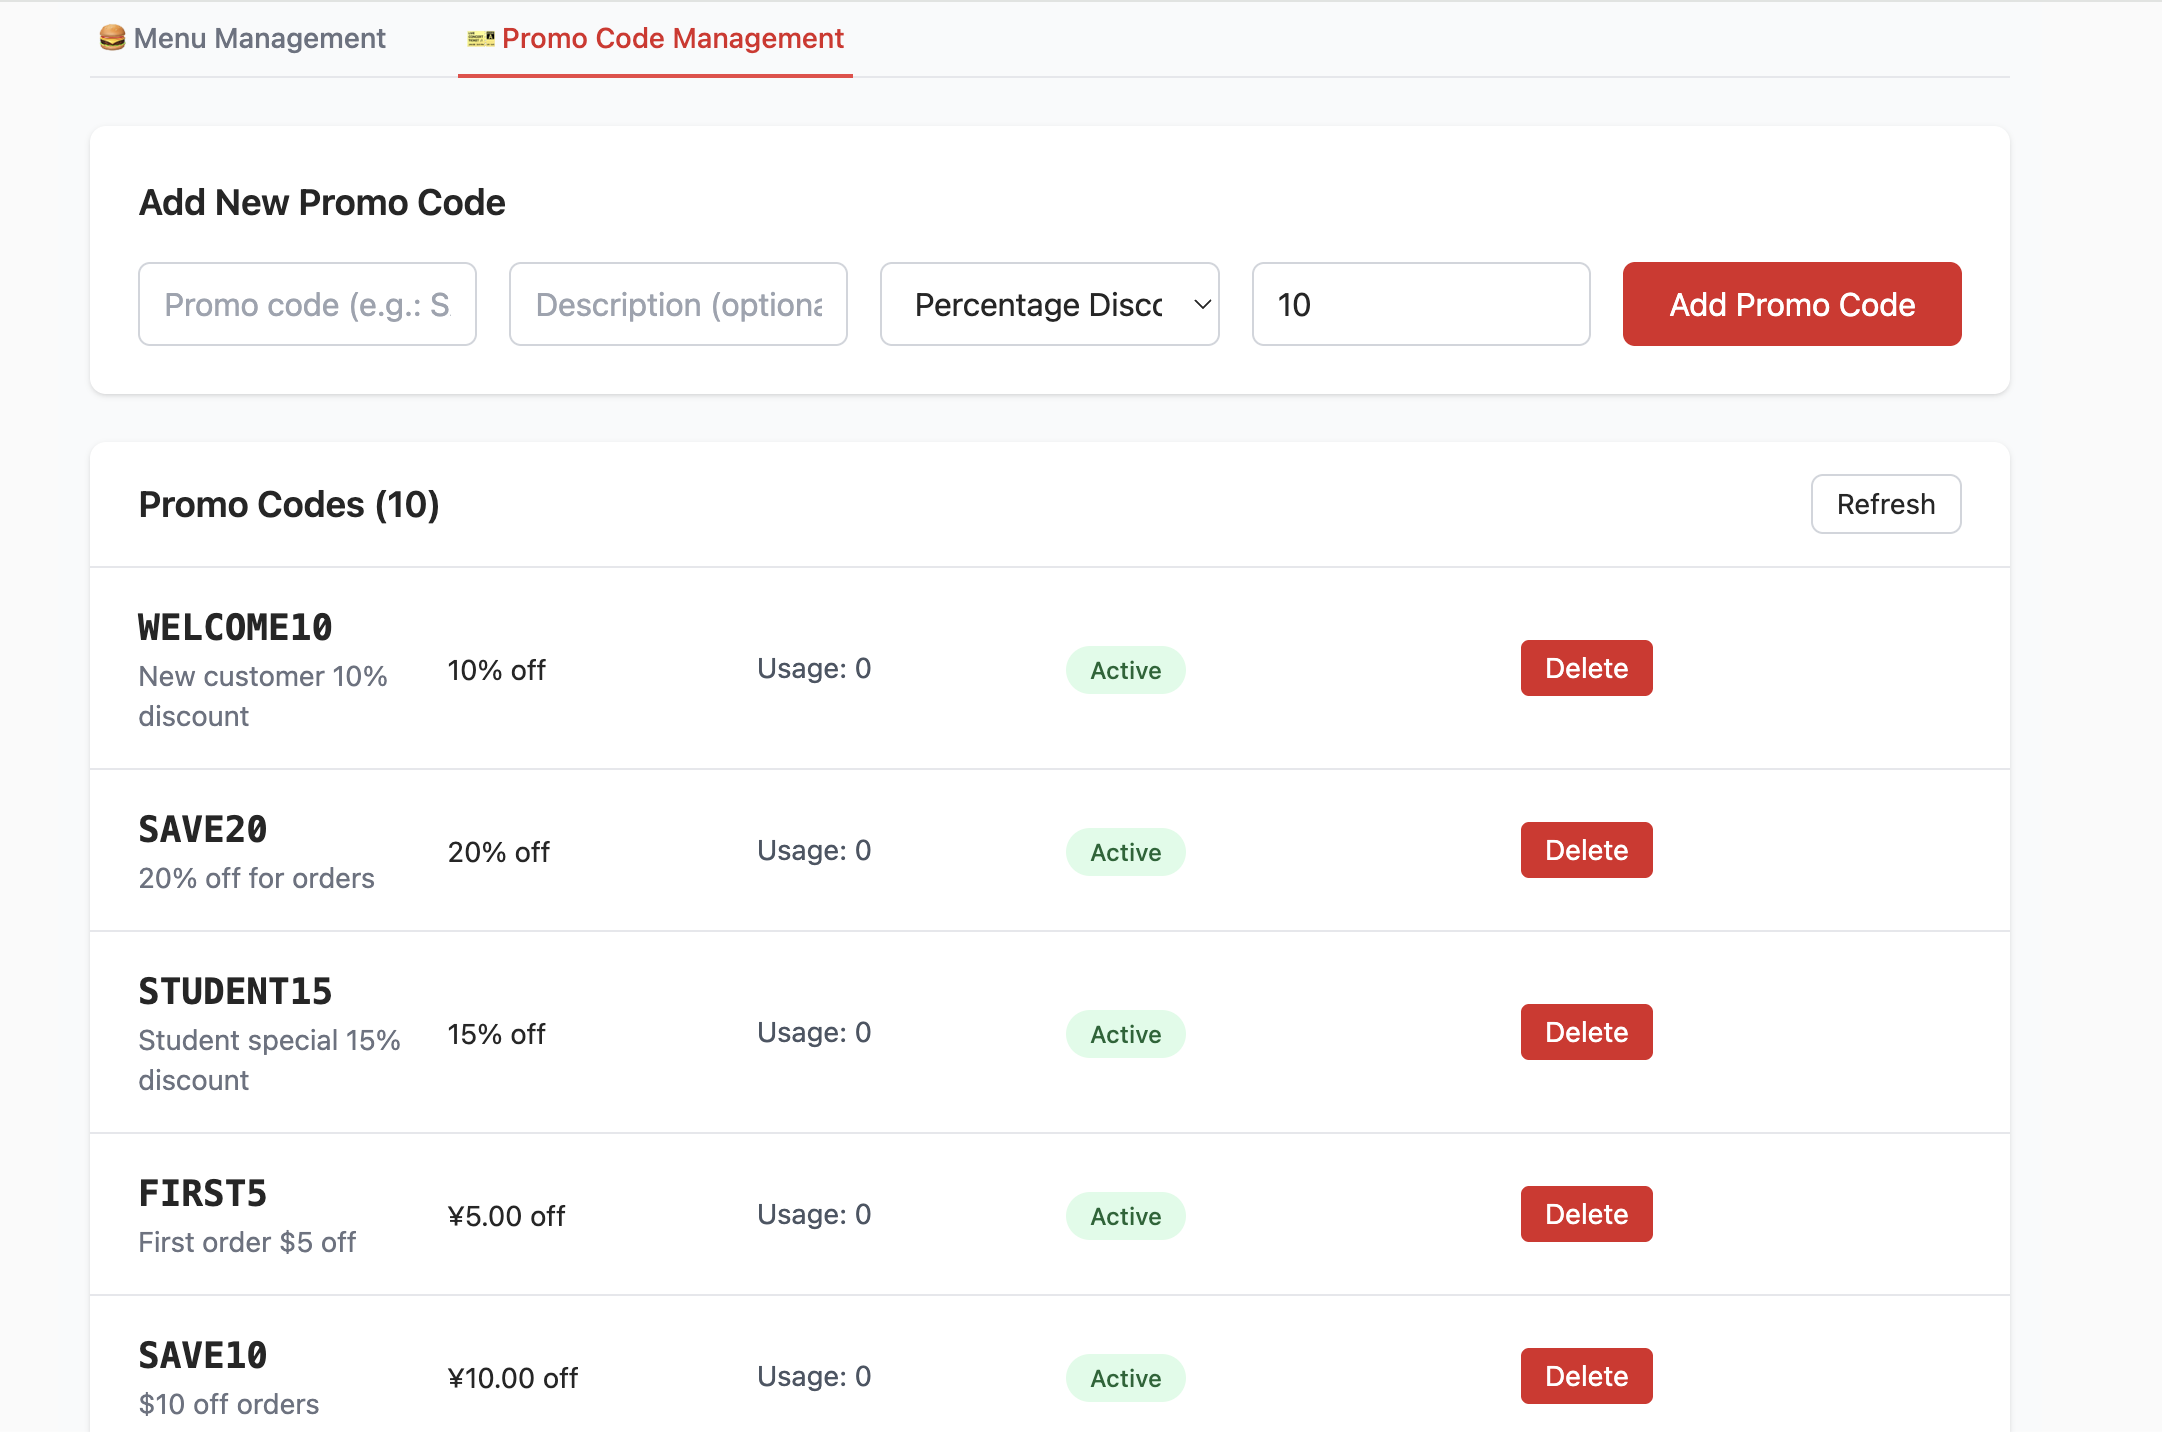
- Create the promo_codes table:
- This table manages promotional activities, such as discount codes. It defines fields like code (discount code), discount_type (discount type, such as percentage or fixed amount), discount_value (discount value), etc.
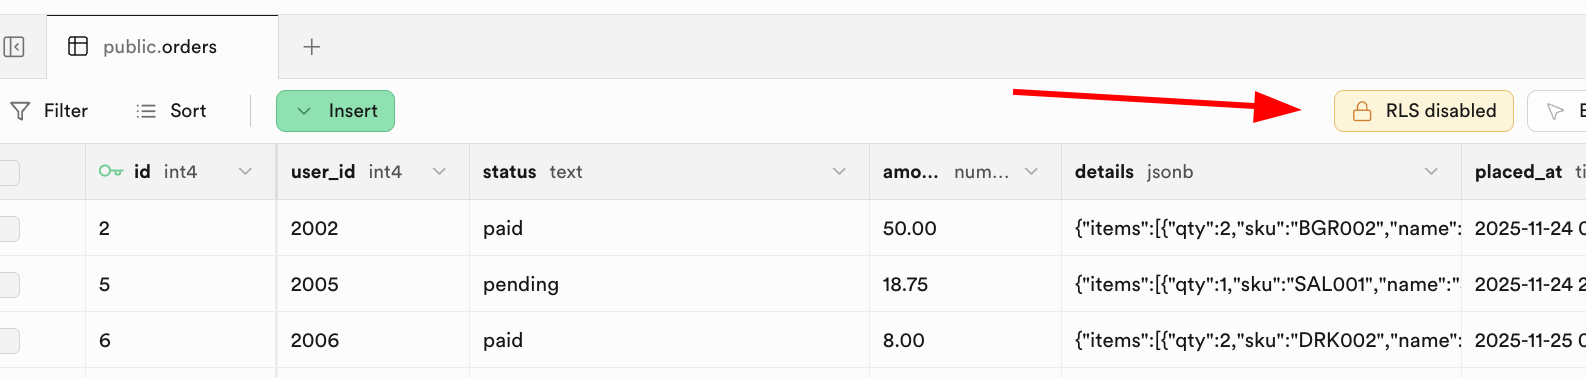
- Disable Row Level Security (RLS):
- To facilitate development and testing, the script explicitly disables RLS. However, as we learned earlier about RLS core logic: RLS is a critical feature of Supabase for ensuring data security, enabling fine-grained policy control over "who can access/modify which data" (for example, only allowing admins to edit promo codes while regular users can only view the menu). Therefore, in a production environment, you must enable RLS and configure reasonable policies to block unauthorized access at the foundation level (such as preventing users from maliciously modifying menus created by others or leaking promo code rules).
- Insert seed data:
- So that the frontend project can display real menu and promotion data immediately after starting (without manually entering test data), the
init.sqlscript also inserts "seed data" (sample data) into themenu_itemsandpromo_codestables. For example, you can see various burgers, sides, drinks, and a variety of discount codes.
Setting Up the Database Connection
With the database prepared, we need to connect this frontend project to Supabase so it can properly read data from the database. We need to write the Supabase project URL and anon key into the specified configuration. This project provides two flexible configuration methods:
- Configuration via environment variables
Create a .env file in the project root directory and fill in your Supabase credentials:
NEXT_PUBLIC_SUPABASE_URL=https://your-project.supabase.co
NEXT_PUBLIC_SUPABASE_ANON_KEY=your-anon-key- Direct setup on the project page
For quick demos and switching between different Supabase projects, the homepage provides a Settings button in the upper right corner. You can click it and directly enter or paste the Supabase URL and anon key in the popup modal.
After clicking "Save," this information is used to dynamically create a Supabase client instance, as shown in the code below:
import { createClient, type SupabaseClient } from '@supabase/supabase-js';
// Optional client factory for demos: returns null when env is not set.
export function maybeCreateBrowserClient(): SupabaseClient | null {
const url = process.env.NEXT_PUBLIC_SUPABASE_URL;
const anon = process.env.NEXT_PUBLIC_SUPABASE_ANON_KEY;
if (!url || !anon) return null;
return createClient(url, anon);
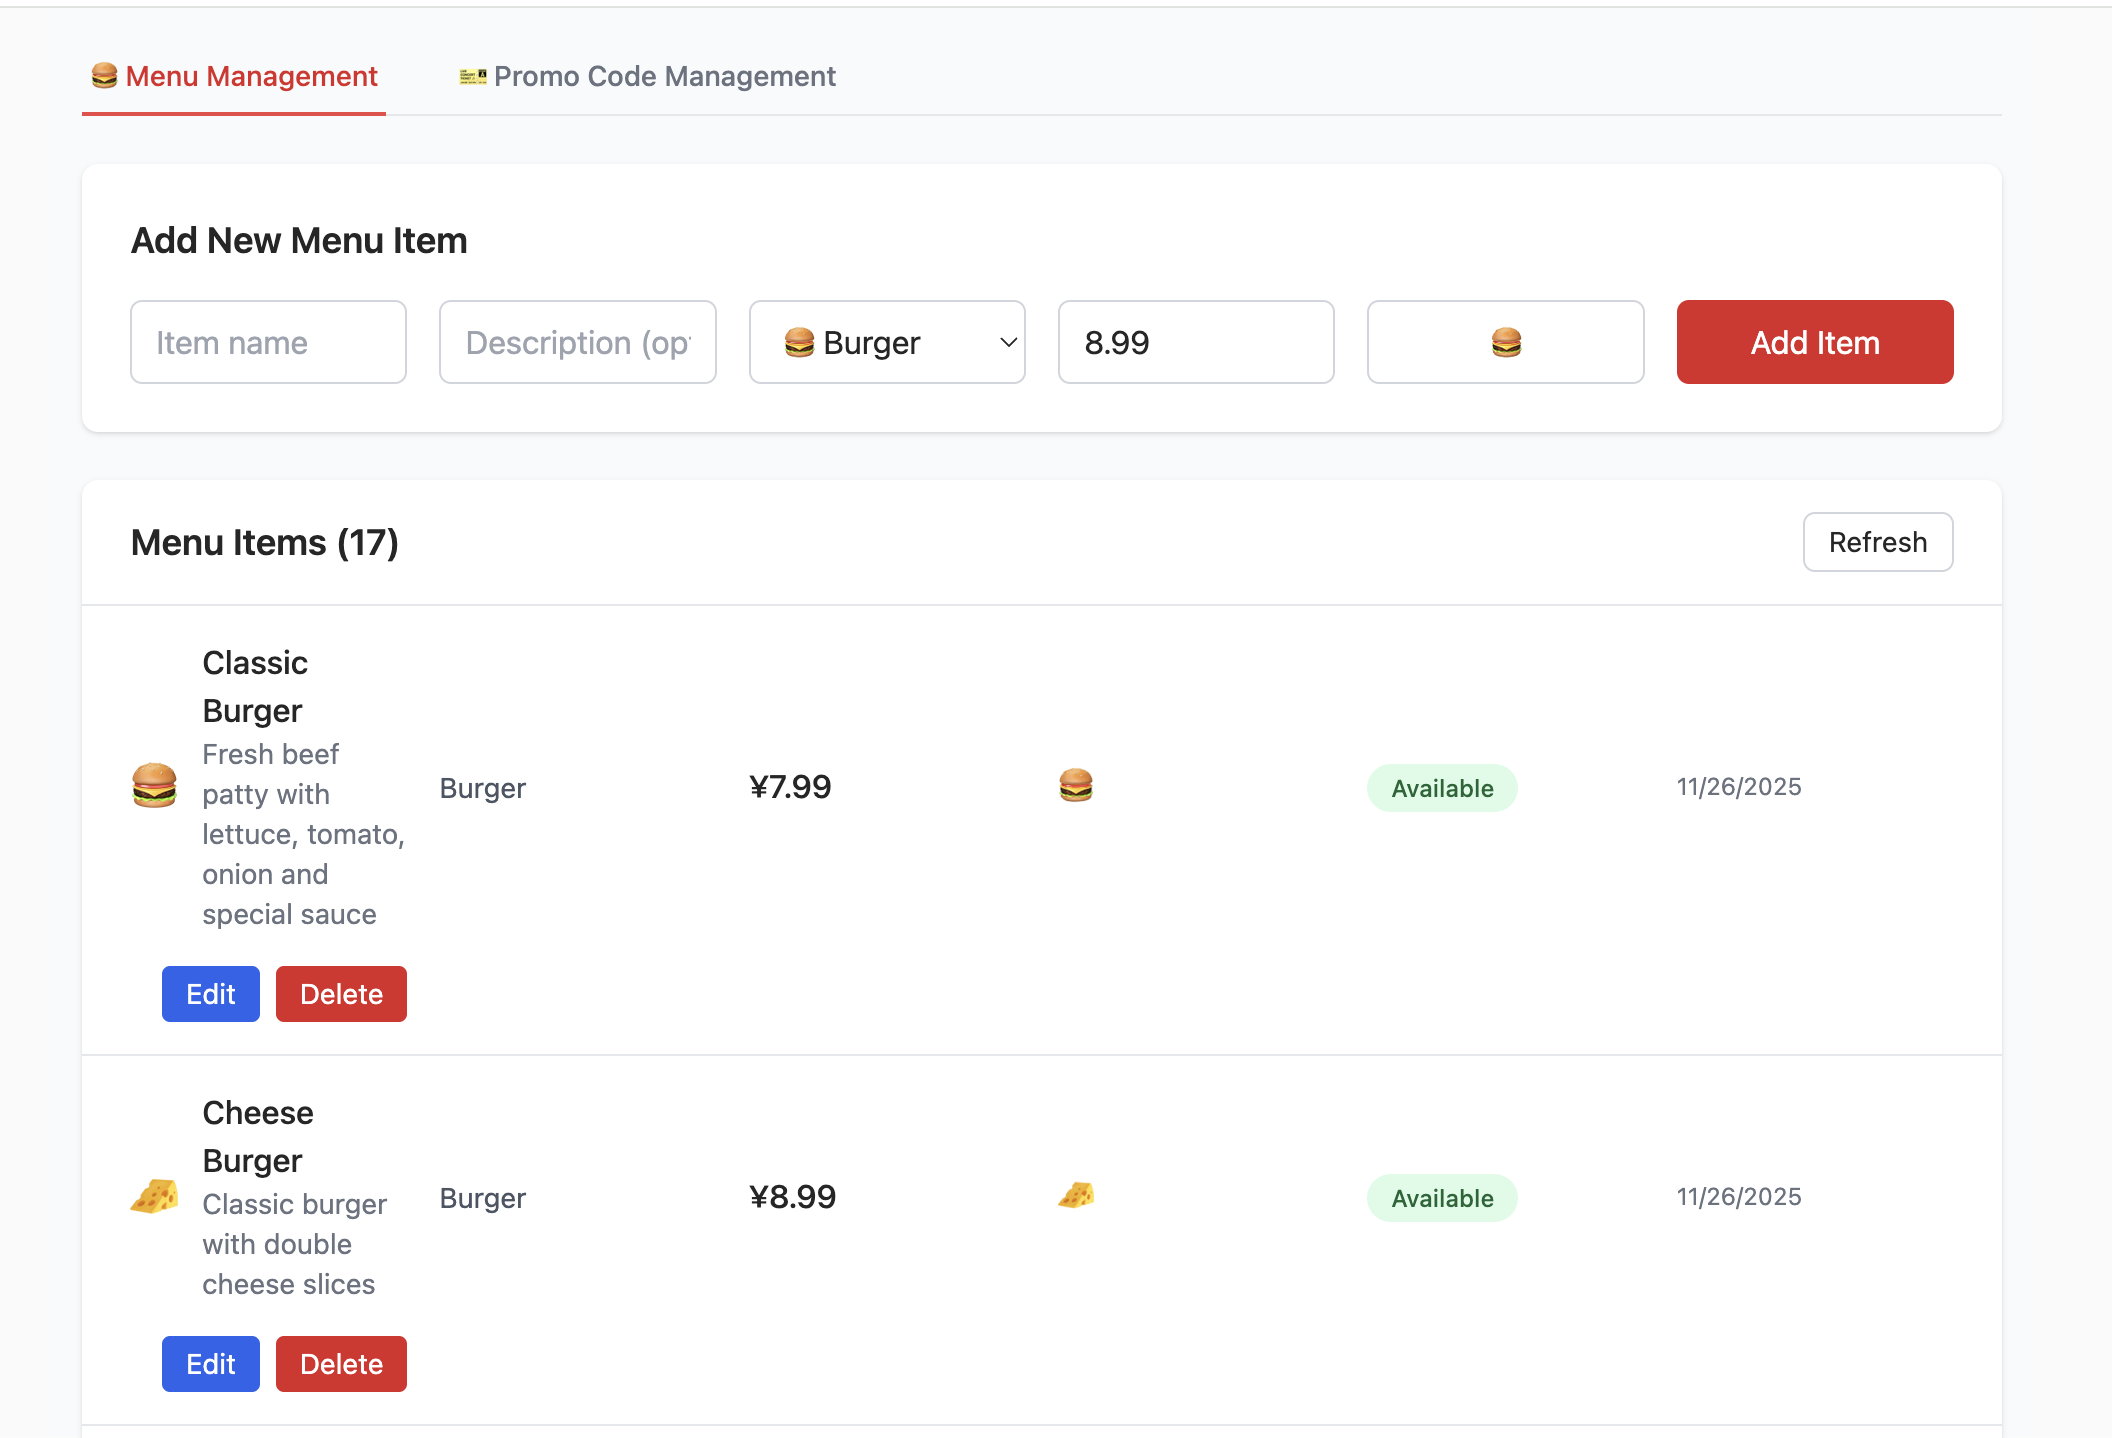
}After creating the database and filling in the corresponding Supabase Link configuration, you'll see the following interface. You can try adding, deleting, querying, and modifying products, and observe the changes in the corresponding data tables in Supabase.
Homework
- Try adding and deleting existing items, and view the impact of modification operations on data table content changes in the Table Editor.
3.4 Project 2 - Burger Shop Authenticated Users
Project 1 implemented "Menu CRUD + Database Connection." Project 2 introduces core capabilities closer to real business: user authentication (Auth) and Row Level Security (RLS) permission management.
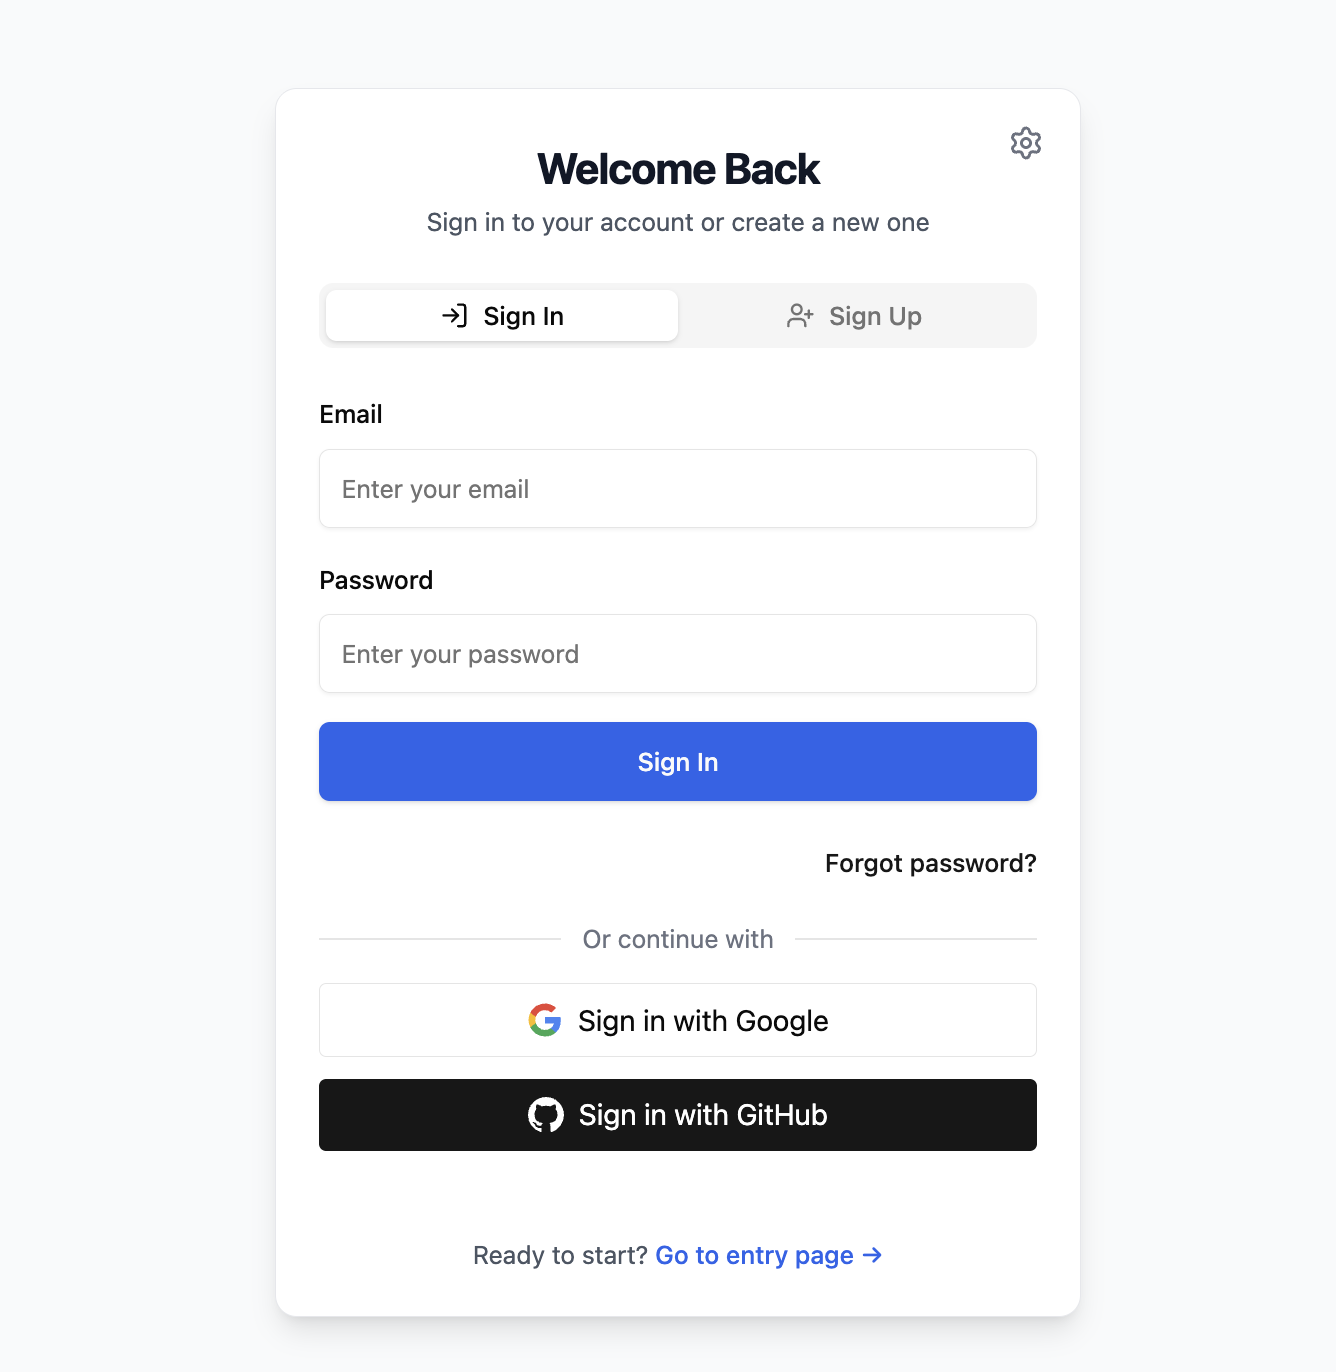
Project 2 includes an independent login page that supports users logging in via "Email + Password." The core logic calls Supabase Auth's native methods to quickly implement the authentication process without manually developing complex login verification logic:
const { error: err } = await supabaseClient.auth.signUp({
  email,
  password,
  options: {
    data: {
      full_name: fullName || null,
      birthday: birthday || null,
      avatar_url: avatarUrl || null
    }
  }
});
After successful login, Supabase automatically creates a session for the user and automatically carries authentication information in all subsequent database requests. Through RLS, each user can only see their own account information (purchased items, remaining wallet balance) based on their authentication information, and cannot see other users' account information. This achieves data isolation after different users log in — each person can only see their own content.
As with Project 1, you need to first use init.sql to initialize the data tables (Note: if you encounter initialization errors, please first delete the already created data tables in the Table Editor, or directly delete this Supabase Project and create a new one).
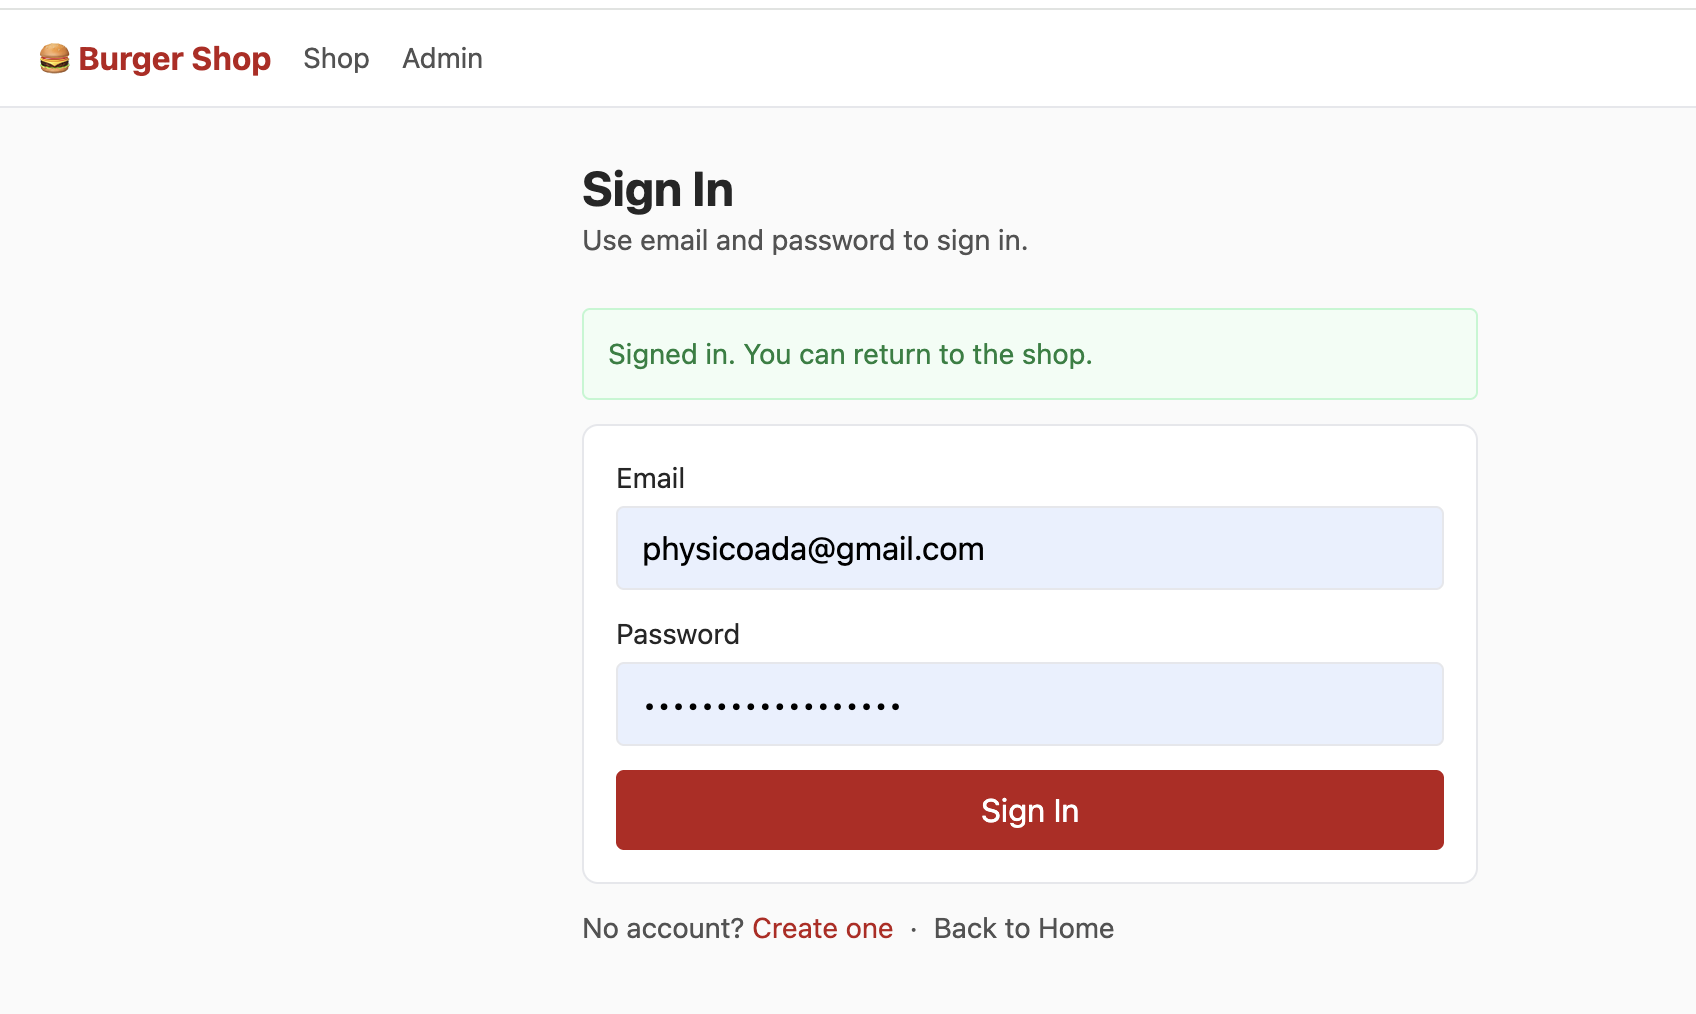
After successfully registering an account with your email, confirming the registration in your email, and logging in, you'll see the following content in the Shop interface:
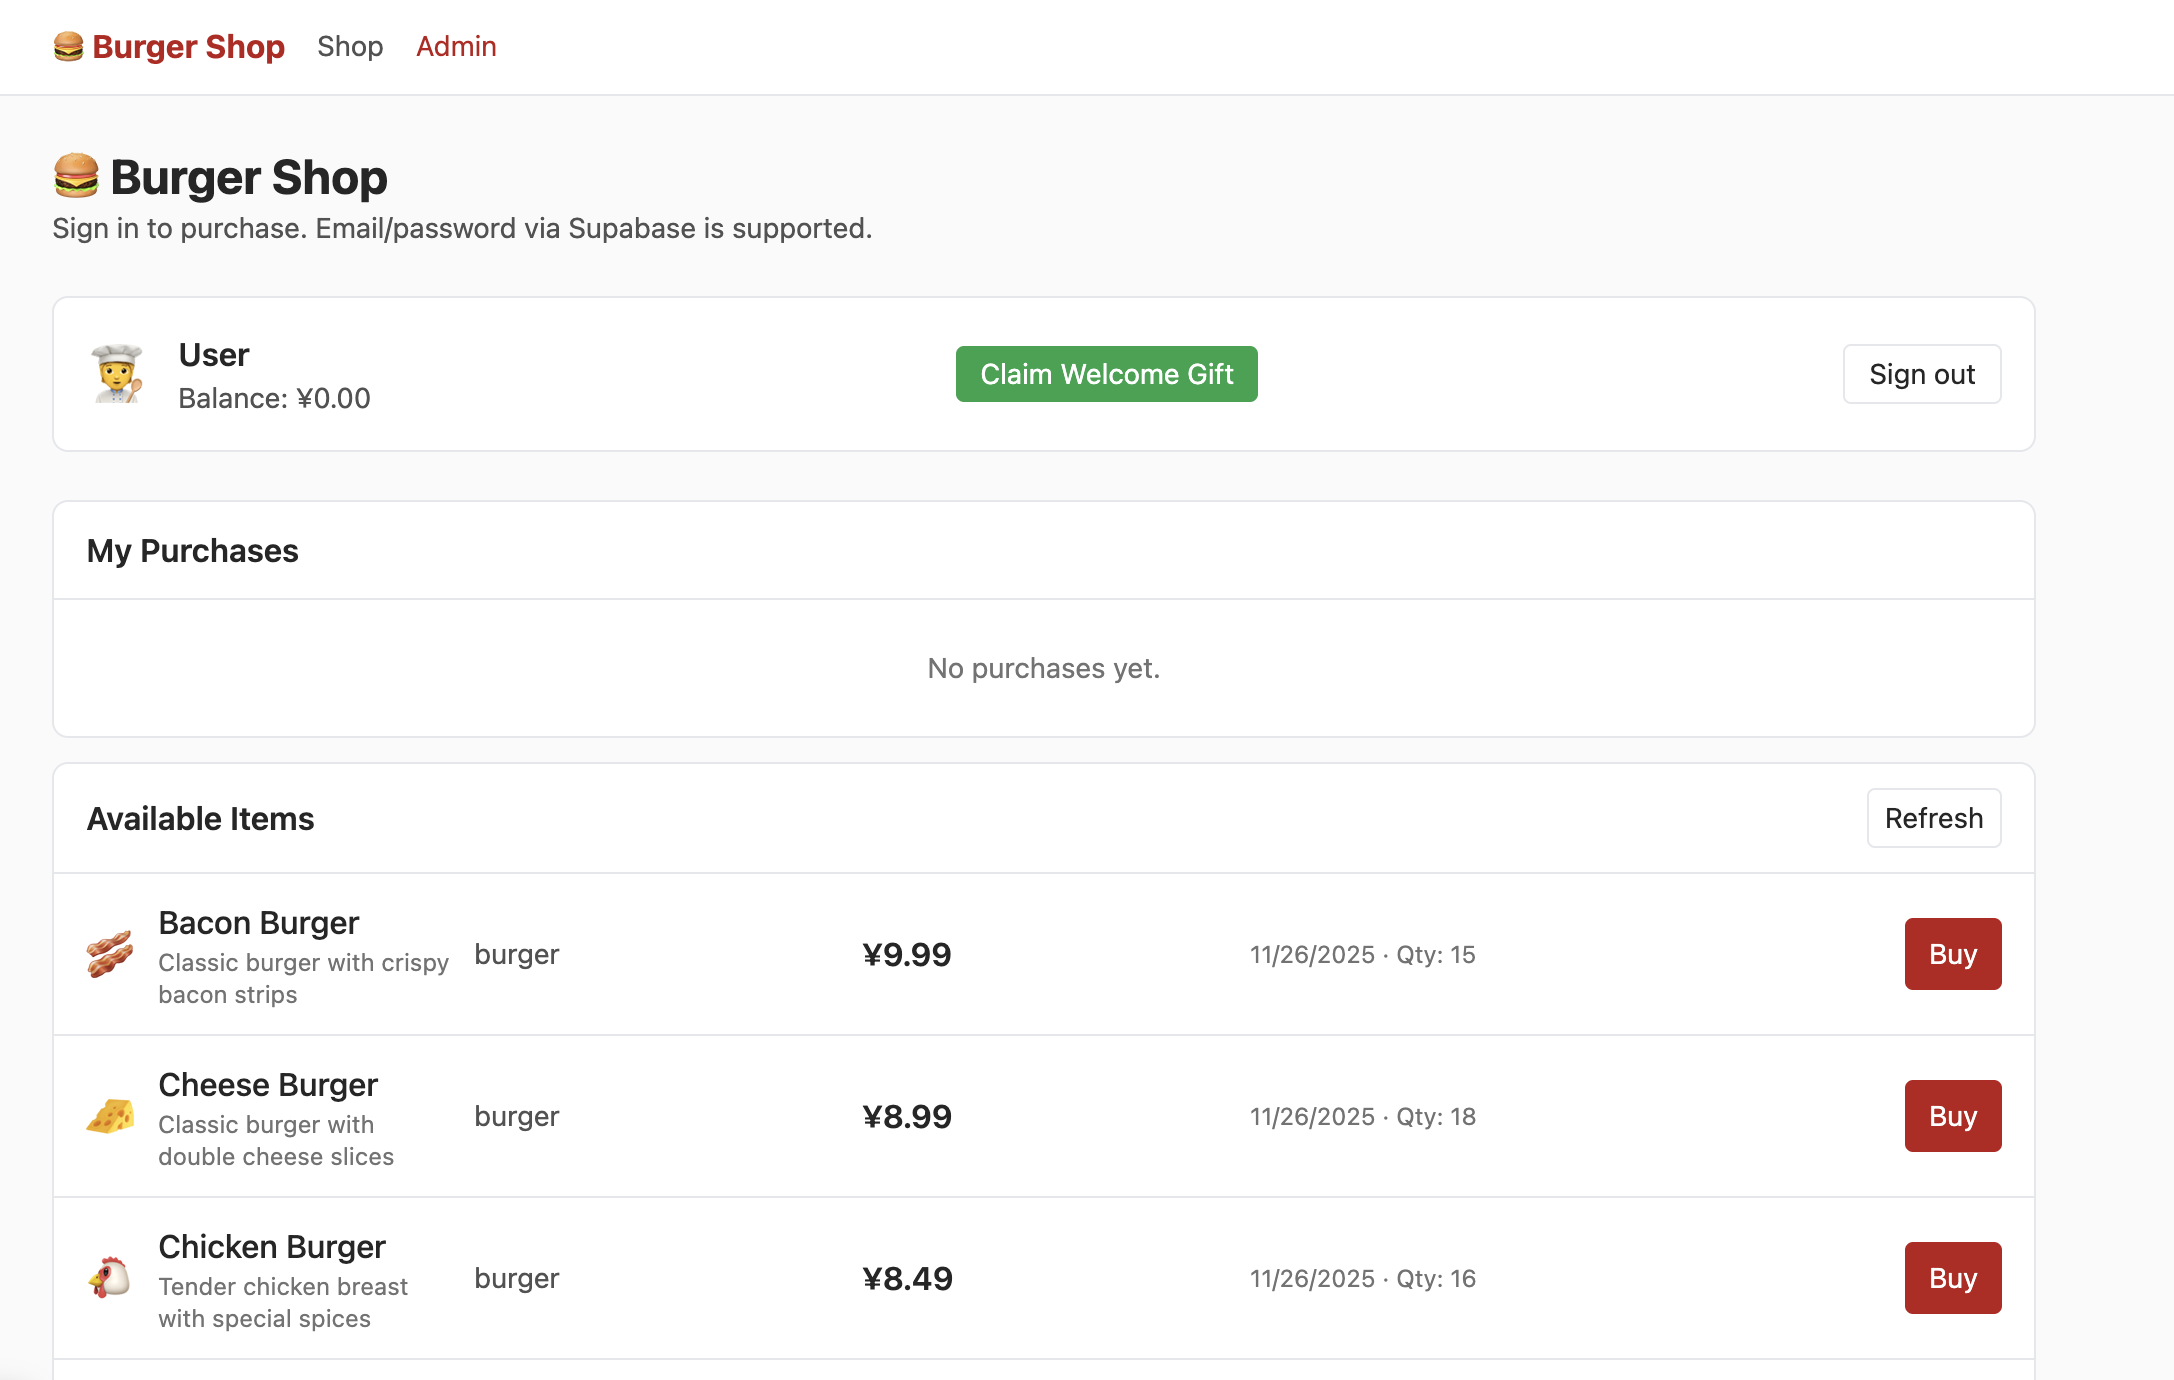
But at this point, clicking "admin" won't show you the following interface. You need to try finding the section that controls user permissions in the data table and change the permission to admin so you can properly see the following content in the Admin interface:

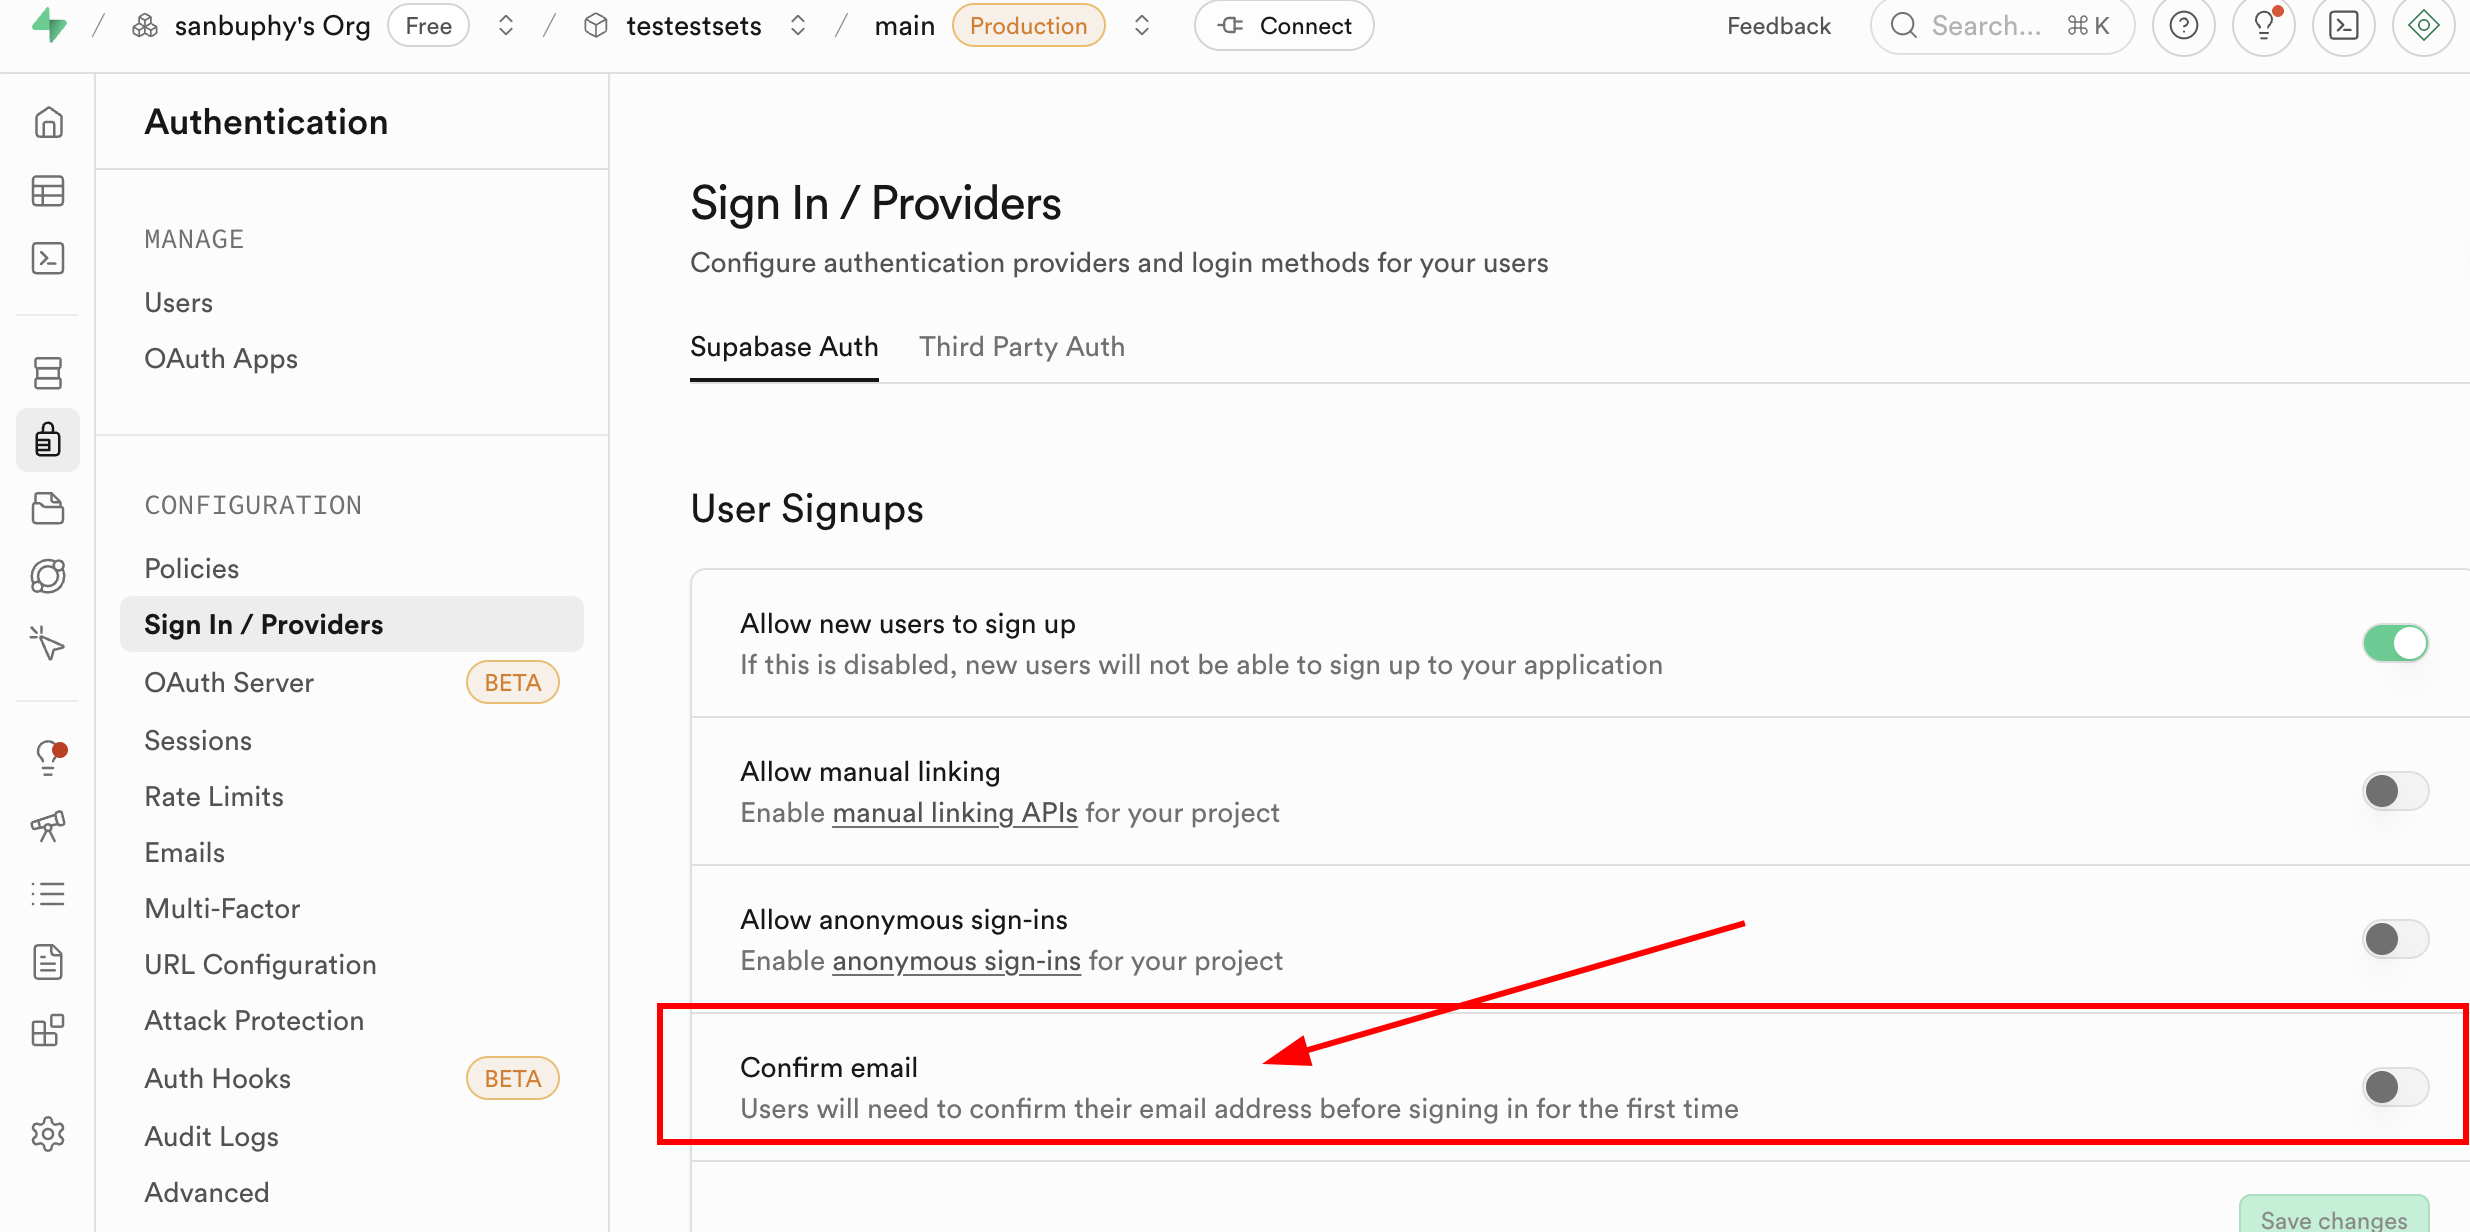
It's worth noting that currently every time you register with a new email, you need to confirm the registration in your email before you can log in. However, this step is not mandatory. You can find Sign In / Providers in Supabase's Authentication section and click Confirm email to disable the mandatory email confirmation.
Homework
- Please first claim the beginner gift pack and complete a product purchase operation.
- Try to find the data table location for user permission settings, change the permission to
admin, and successfully modify product quantities in the order management interface. - Try to locate the wallet balance-related table in the data tables and increase the remaining wallet balance through modification.
4. Building Your First Supabase Application
After systematic learning in the previous sections, you've mastered Supabase's core capabilities (database operations, user authentication, RLS security policies). Now it's time to get hands-on and build your first application with database support and a user login system!
4.1 Standard Process for Connecting Any Application to a Supabase Database
We can use a standardized process to connect any application to a Supabase database:
- First, organize requirements and sync information, clarifying the goal and informing AI
- You need to clearly describe the current application's core features and the new database requirements to the AI. Example: "I have a local React Todo app where data only exists in browser local storage. I need to add a 'cloud data sync' feature and connect to a Supabase database. Please help me analyze: what data operations does this app involve (such as adding todos, modifying status, deleting todos)? What data tables need to be created to store this data?"
- Add key constraints (optional): such as field format requirements (timestamps use
timestamptz, amounts use integers in cents), data permission rules (only visible to yourself), to make the AI's analysis more aligned with actual needs. - Review the results returned by the AI. If the AI's approach has omissions (such as not considering a "todo deadline" field), add prompts to correct: "You missed the deadline field, please add it."
- Have the AI generate an
init.sqlscript adapted for Supabase based on the confirmed table structure: "Based on the approach and table structure discussed above, return an init.sql script that can be used for initialization in Supabase." Then you need to execute the script in the SQL Editor. If execution errors occur, feed the error information back to the AI and have it fix the script. - After running the init.sql script in Supabase, have the AI refactor the current code based on the script so it can properly interact with the Supabase database: "Please refactor the project code based on my SQL script and the settings discussed above so it can communicate with the corresponding Supabase database and handle data."
- After refactoring is complete, you only need to configure the Supabase URL and key parameters (production projects typically only use environment variable configuration), then check everything. If there are no issues, you've successfully connected the application to the Supabase database.
- Run the project and test all database interaction features. Go to the Supabase Table Editor to view data syncing in real time.
- If problems occur (such as data not being inserted, only seeing partial data), feed the issue details back to the AI and have it diagnose the cause and fix the code.
Additionally, if the goal is to develop a user login page, you can directly have the AI help integrate the login page: "Now you need to help me add Supabase's user login system to this application, using email for registration and login." You also need to clarify the page navigation logic and paths to the AI (such as redirecting to the system homepage after successful login, what the homepage URL is, and staying on the current page with an error message when login fails). After integration, you need to try registering and logging in, then verify that you can see the new user data in Supabase's Authentication section, and that you can properly enter the application interface that was previously inaccessible without logging in.
Of course, you can also directly have the AI reference a specific project's implementation to migrate the corresponding Supabase features. For example, if a certain Project uses advanced database and Edge Function features, you can directly have the AI migrate the similar features as follows: "Please reference the Supabase-related feature implementation logic in this project {paste the absolute path of the reference project here} and add similar implementation logic to the current project (such as user login, database management, function requests, etc.)."
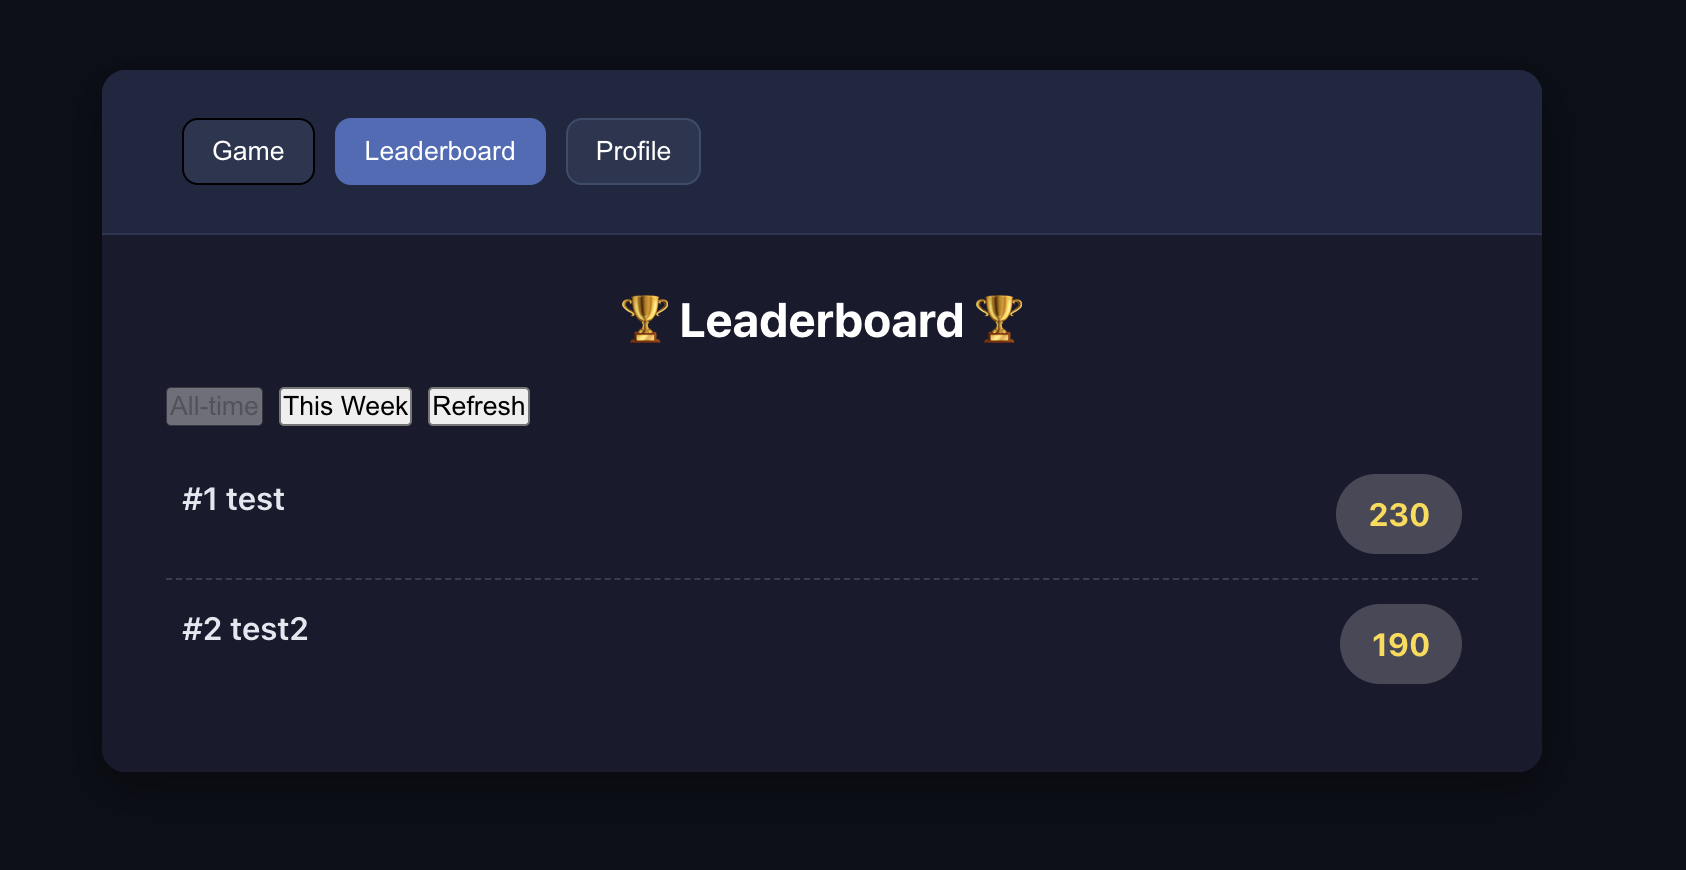
4.2 Case Study: Building an Online Snake Game
Following the SOP mentioned above, let's practice with a specific real-world case: Project5-Supabase-Demos/apps_snakegame — adding a score leaderboard to an existing "Snake" game project, including user login and basic database features.

4.2.1 Analyzing the Project, Identifying Data Requirements
First, similar to the standardized process mentioned earlier, we can present the requirements to the AI and have it propose a modification plan based on our project and requirements. We'll then build on this modification plan.
You can use the following prompt to guide the AI:
"I have a Snake game, located at {paste the absolute path of the Snake game here}. Now I want to combine it with Supabase to add an online leaderboard feature and support a user login system. The leaderboard can display rankings based on username and email.
Please help me analyze: What data tables do I need to create to implement this feature? What fields should each table contain?"
At this point, you'll get a response similar to the following:
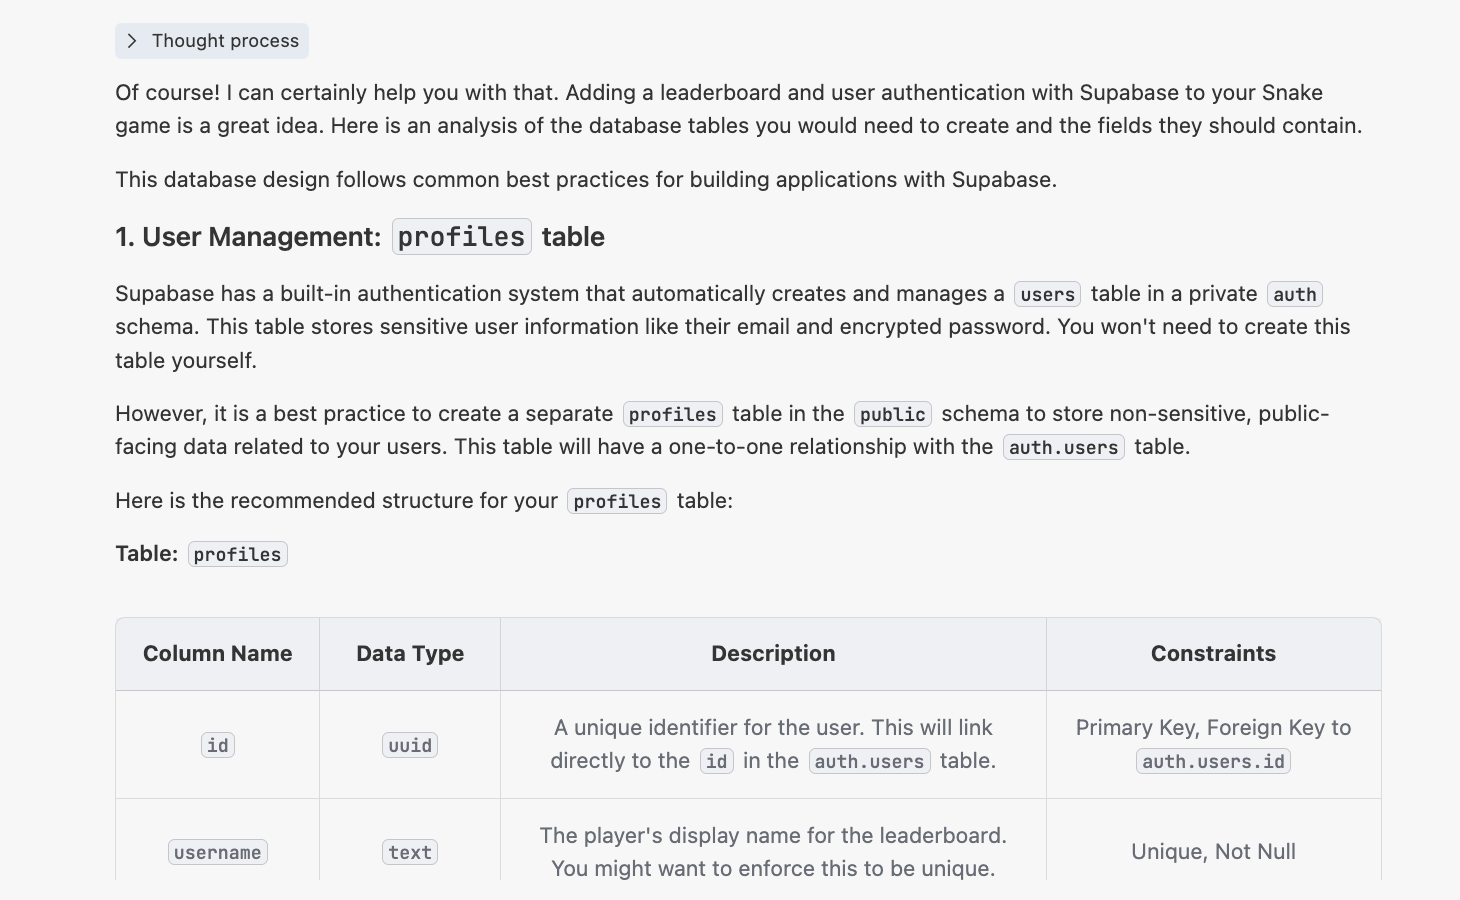
4.2.2 Generating the init.sql Script
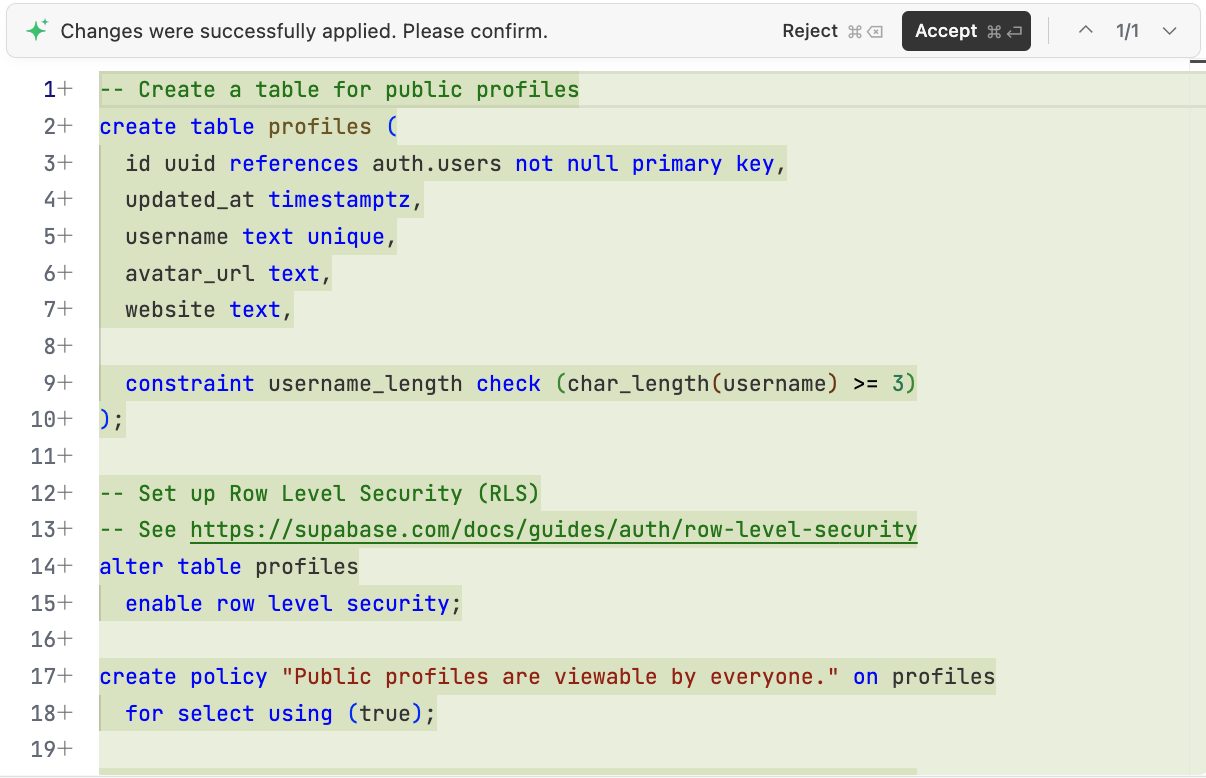
After confirming the needed parts, we can have the AI generate the database initialization script to be executed in Supabase: "Please generate a scripts/init.sql script in the project based on the above analysis for initializing the required database in Supabase."
4.2.3 Refactoring the Project Code
Next, we just need to have the AI refactor the current Snake code based on the previous content: "Now please use Supabase to implement the leaderboard feature based on the previous thinking and SQL tables. The leaderboard is a separate page that needs to be able to differentiate different users' total scores by email and username. You also need to support an email-based user login system — users must register and log in to play this game."
If the current AI conversation has too many turns and you want to start a new session for project refactoring, you can include the init.sql mentioned above as context and have the AI refactor the project based on the SQL file.
If you find that the AI's user login system implementation isn't working properly, you can directly include the address of Project5-Supabase-Demos/apps/project-burger-shop-auth-users-2 in the prompt and have the AI implement the user login system based on that project. Also verify that the necessary conditions for connecting to Supabase have been properly set to avoid errors due to incorrect Supabase configuration.
During code modification, if the actual effect doesn't match expectations (such as leaderboard data not displaying, login verification not working, etc.), just completely record the specific phenomenon and report it back to the AI to gradually approach the correct result. The criteria for successful refactoring are: users can successfully complete registration and login operations, and after logging in, they can properly view the corresponding game leaderboard.

Homework
- Integrate the user management system into the Snake game demo version.
- Integrate the user management system into your application (if you've previously developed an application).
5. Becoming a Supabase Master
The above covers the basic operations of Supabase. In the upcoming journey, we'll explore Supabase's advanced principles and features. You'll understand why we chose Supabase as our teaching example and how to use Supabase to implement more advanced operations, helping you achieve more complex interactive features. After learning these features, even when facing other similar tools beyond Supabase, you'll be able to draw parallels and understand the core principles of backend services at a more fundamental level. Of course, you don't need to master everything in a short time — perhaps just learning third-party login support is enough. You can browse the following content first and come back to study in depth when your project encounters corresponding needs.
5.1 Why We Chose Supabase
Before diving into advanced topics, let's revisit this question: Among the many backend technology solutions available, why did we ultimately choose Supabase as our technology foundation?
Startup teams commonly face a contradiction when selecting technology: they want full control over the backend system but must also launch products quickly. Building a backend from scratch typically means investing months in setting up databases with real-time sync, user authentication, API services, file storage, scheduled tasks, monitoring and alerting, and other core components — unless team members have accumulated rich practical experience in the relevant fields. Under the dual pressure of insufficient funding and narrow market windows, getting bogged down in infrastructure can easily lead to delayed iterations and missed early growth opportunities.
Supabase packages these backend capabilities as ready-to-use services (PostgreSQL database, real-time subscriptions, authentication, object storage, edge functions, auto-generated APIs, etc.), allowing startup teams to focus their scarce resources on core feature development, avoiding slowed launch speed due to infrastructure building — this has become a pragmatic survival strategy in the current venture capital environment. Of course, we could also use other all-in-one backend products for development, such as PocketBase (lightweight and minimalist) and Appwrite (cross-platform compatible). However, considering the completeness of features, SQL ecosystem maturity, and GitHub community attention, Supabase is more suitable for supporting the long-term stable operation of businesses.
Among similar products, Supabase's open-source strategy has a greater advantage. Taking Firebase, which has a higher market share, as an example: its closed-source nature easily leads to platform lock-in, and migration costs are extremely high. Supabase adopts a fully open-source model, supports private deployment, avoids vendor lock-in risks, and allows switching to other competing products as needed.
In summary, technology selection needs to match business scale and goals. For personal projects or very small-scale testing, ultra-lightweight solutions like PocketBase are sufficient. If an enterprise needs to interface with complex identity systems or meet listed company compliance audit requirements, enterprise-level full identity governance solutions like WorkOS are more appropriate. But for validating MVPs and bearing core business scenarios with early users, Supabase's complete features are more than sufficient. It can not only independently support at least a ten-thousand-user scale but also flexibly integrate third-party services like Stripe (payments), Resend (email), and Cloudflare (CDN). Even if business needs expand to enterprise-level requirements in the future, Supabase's open-source architecture can be deployed in parallel with enterprise systems, with different features using the most suitable platform. This progressive flexibility allows startup teams to avoid premature investment in heavy infrastructure while retaining future-proof evolution space.
5.2 Google and GitHub Login Support
In the previous tutorials, we covered how to register and log in directly using email. However, in practice, we often want to simplify the registration process, such as using third-party login with Google and GitHub for quick system registration and login. We'll cover every detail in this tutorial section. At the same time, a complete authentication system must also provide secure and reliable password reset functionality, which we'll also integrate into this section's project.
This project (Project5-Supabase-Demos/apps/project-burger-shop-auth-advanced-supabase-6) fully demonstrates how to implement these advanced features.
5.2.1 OAuth Flow: How Does Third-Party Login Work?
The core of third-party login is the OAuth 2.0 open authorization protocol. Its essence is "authorization proxy": allowing users to authorize our application (the burger shop project) to access their public information (such as email, avatar) on a third-party platform (such as Google) without exposing the third-party platform's password to our application, fundamentally eliminating password leakage risks.
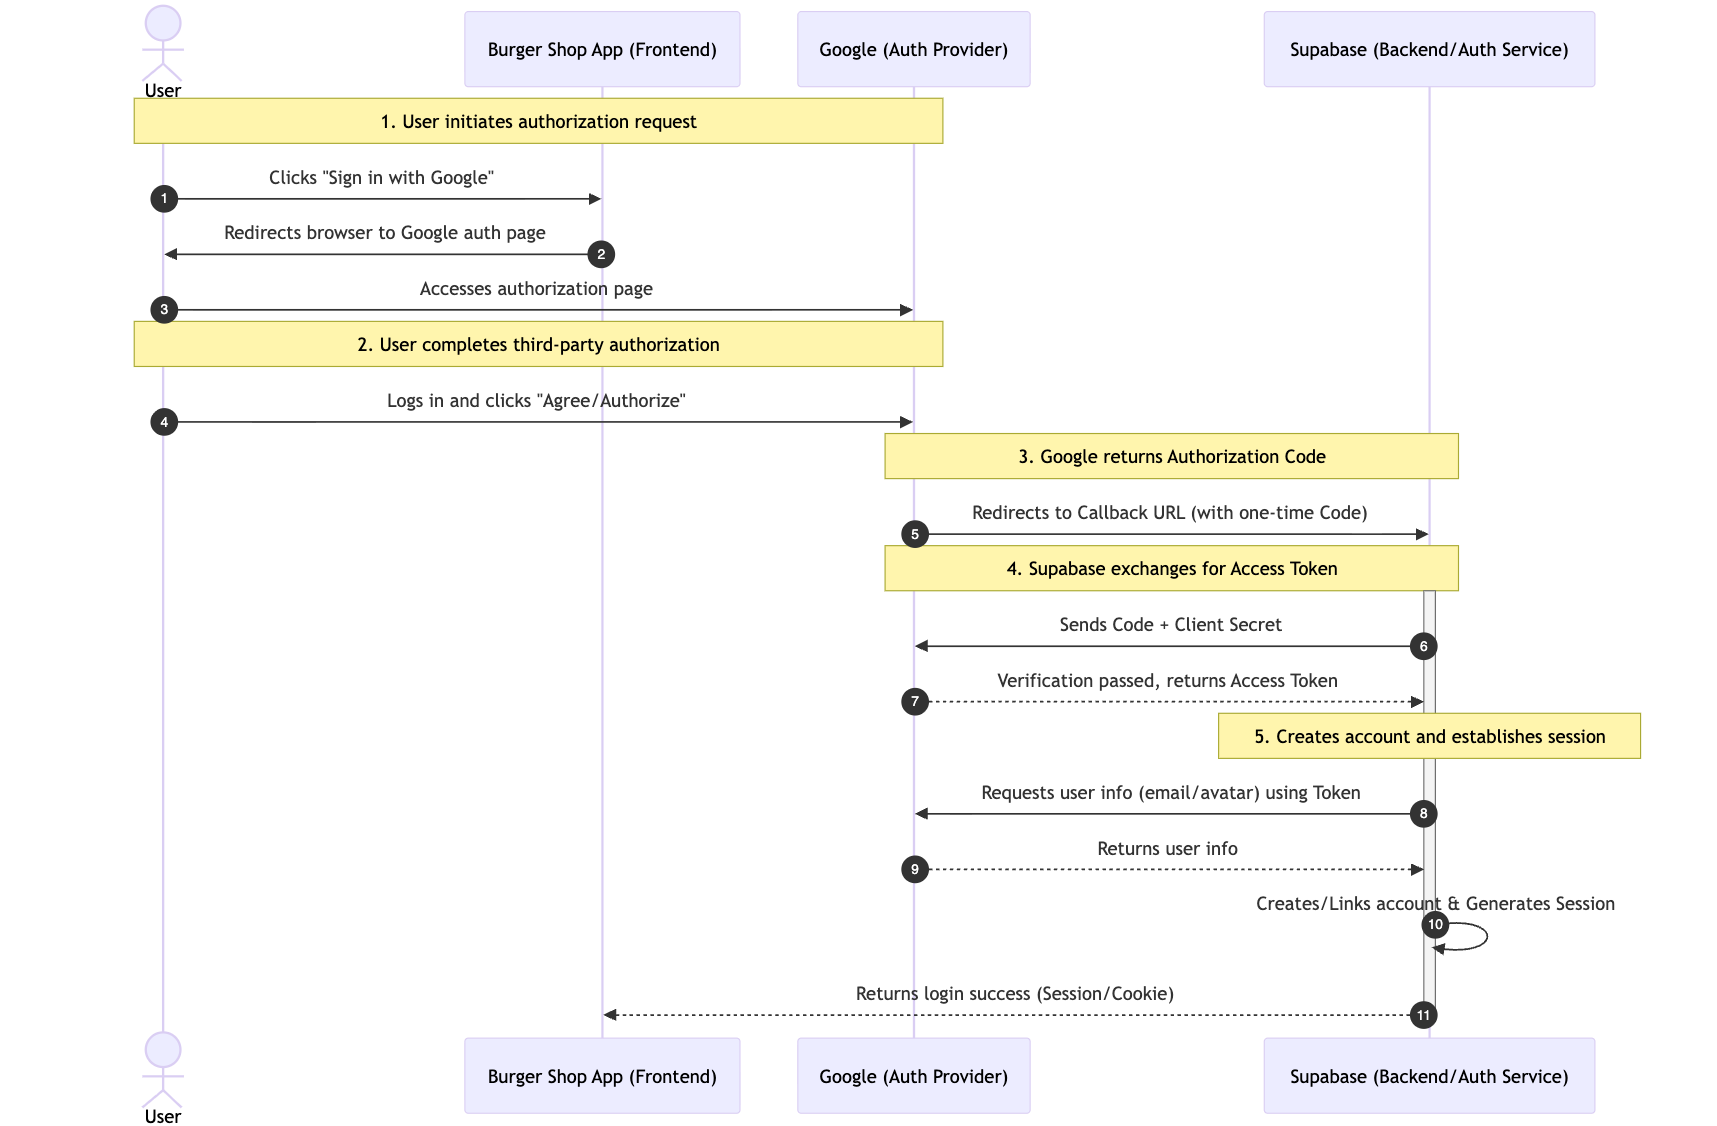
The complete flow can be broken down into 5 key steps, using Google login as an example:
- User initiates authorization request: The user clicks the "Sign in with Google" button on the page, and our application automatically redirects the user to Google's official authorization page (ensuring the security of the authorization process and avoiding phishing risks).
- User completes third-party authorization: The user logs into their account on the Google page (verifying user identity) and agrees to the permissions requested by our application (such as "Get email address").
- Google returns a one-time authorization code: After authorization is approved, Google redirects the user back to our pre-agreed "Callback URL" and appends a one-time, short-lived authorization code in the URL parameters (rather than directly returning user information, further enhancing security).
- Supabase exchanges for Access Token: Our backend (hosted by Supabase, no self-building required) takes this authorization code and makes a request to Google's official interface to exchange it for an Access Token that can be used to obtain user information (the authorization code is only used to exchange for the Token, avoiding direct Token transmission on the frontend).
- Creates account and establishes session: Supabase uses the Access Token to pull the user's public information (such as email, avatar) from Google, and automatically creates an account for that user in our project (if first-time login) or directly links to an existing account, ultimately generating a valid user session (Session), completing the login.
5.2.2 Configuring Google Cloud to Get Client ID and Secret
Regardless of the third-party login method, we typically need to obtain a Client ID and Secret for configuration. For Google third-party login, you first need to create an OAuth 2.0 Client ID in the Google Cloud Platform to obtain the corresponding parameters.
- Go to Google Cloud Console:
- Visit Google Cloud Console.
- Create a new project or select an existing one.
- Configure the OAuth consent screen:
- In the left navigation bar, find "APIs & Services" -> "OAuth consent screen".
- Select "External" user type, then click "Create".
- Fill in the application name, user support email, and other required information.
- In the "Authorized domains" section, add your Supabase project domain in the format
*.supabase.co. - Save and continue. You can temporarily skip the "Scopes" and "Test users" steps and just save.
- Create Credentials:
- Go to "APIs & Services" -> "Credentials".
- Click "+ CREATE CREDENTIALS" and select "OAuth client ID".
- Select "Web application" for "Application type".
- Give it a name, such as "Supabase Auth".
- In the "Authorized redirect URIs" section, click "ADD URI" and enter your Supabase project's callback URL. You can find this URL in the Supabase Dashboard under "Authentication" -> "Providers" -> "Google". Its format is typically
https://<your-project-id>.supabase.co/auth/v1/callback.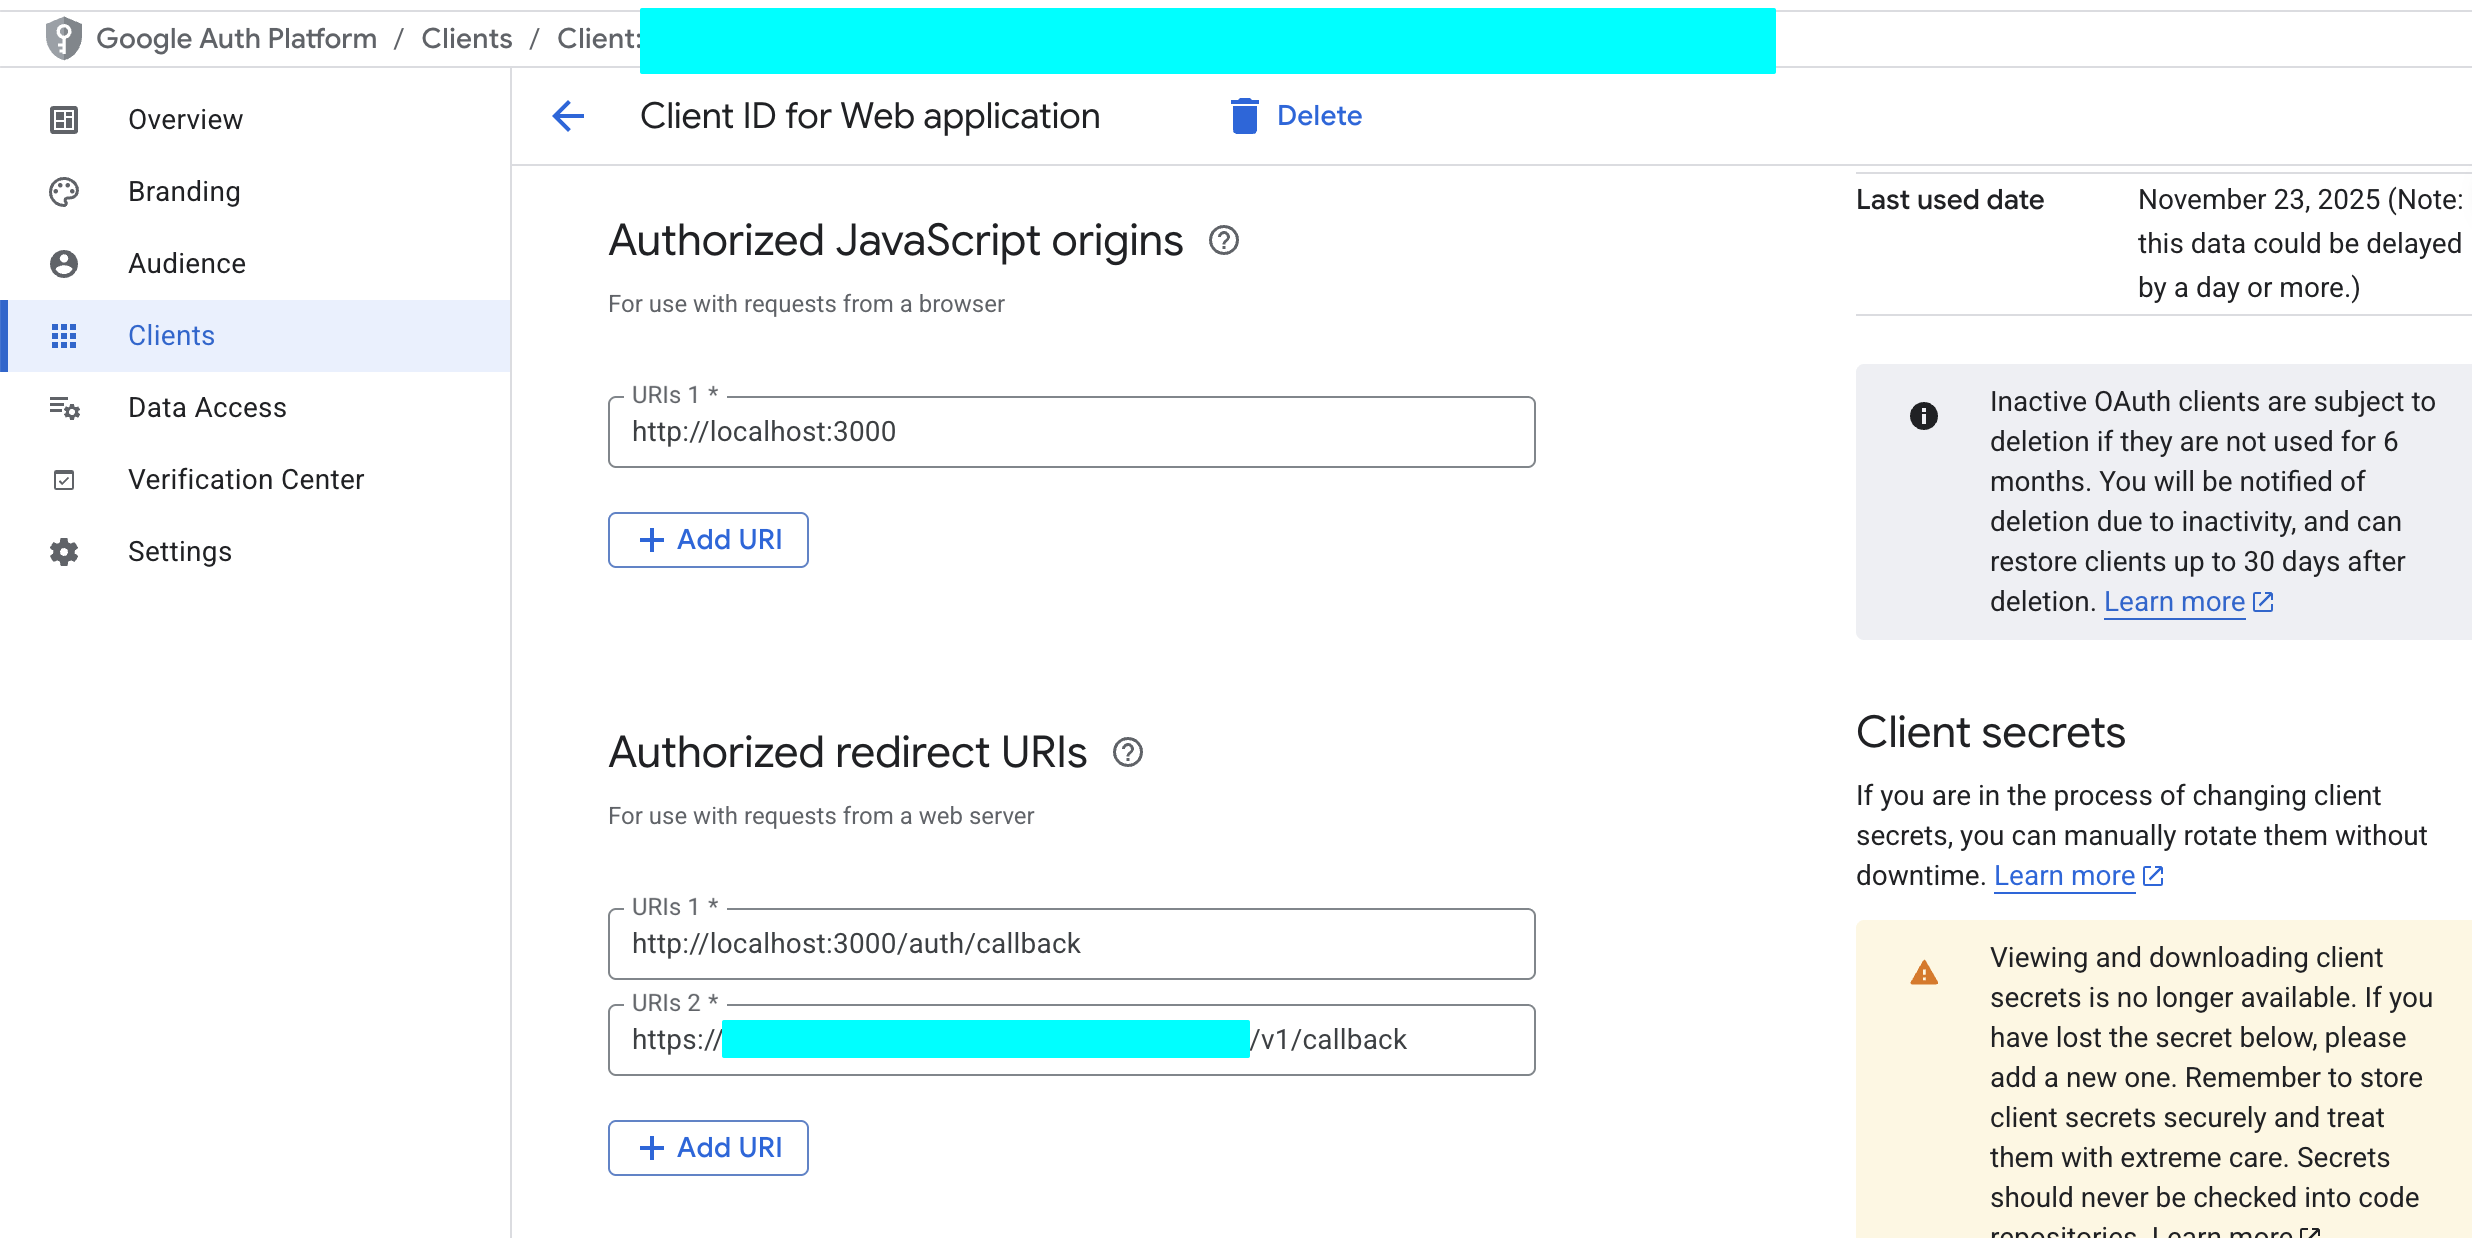
- Click "CREATE".
- Get Client ID and Client Secret:
- After successful creation, a popup will display your Client ID and Client Secret. Be sure to copy and save them immediately.
5.2.3 Configuring GitHub to Get Client ID and Secret
Similarly, you also need to register an OAuth application on GitHub.
Go to GitHub Developer Settings:
- Log in to your GitHub account.
- Click your avatar in the upper right corner and go to "Settings".
- At the bottom of the left navigation bar, find "Developer settings".
Register a new application:
Select "OAuth Apps" and click "New OAuth App".
Fill in the application name, such as "My Burger Shop".
Homepage URL: Enter your application's live URL or local development URL
http://localhost:3000.Authorization callback URL: Enter your Supabase project's callback URL. Similarly, you can find it in the Supabase Dashboard under "Authentication" -> "Providers" -> "GitHub". The format is
https://<your-project-id>.supabase.co/auth/v1/callback.Click "Register application".
Get Client ID and Client Secret:
After successful registration, the page will display your Client ID.

Click "Generate a new client secret" to generate your Client Secret. Again, copy and save it immediately.
5.2.4 Configuring Providers in Supabase
Now, let's configure the credentials we obtained into Supabase.
- Go to Supabase Dashboard:
- Select your project and go to "Authentication" -> "Providers".
- Enable and configure Google:
- Find "Google" and enable it.
- Paste the Client ID and Client Secret you obtained from Google Cloud into the corresponding input fields.
- Click "Save".
- Enable and configure GitHub:
- Find "GitHub" and enable it.
- Paste the Client ID and Client Secret you obtained from GitHub into the corresponding input fields.
- Click "Save".
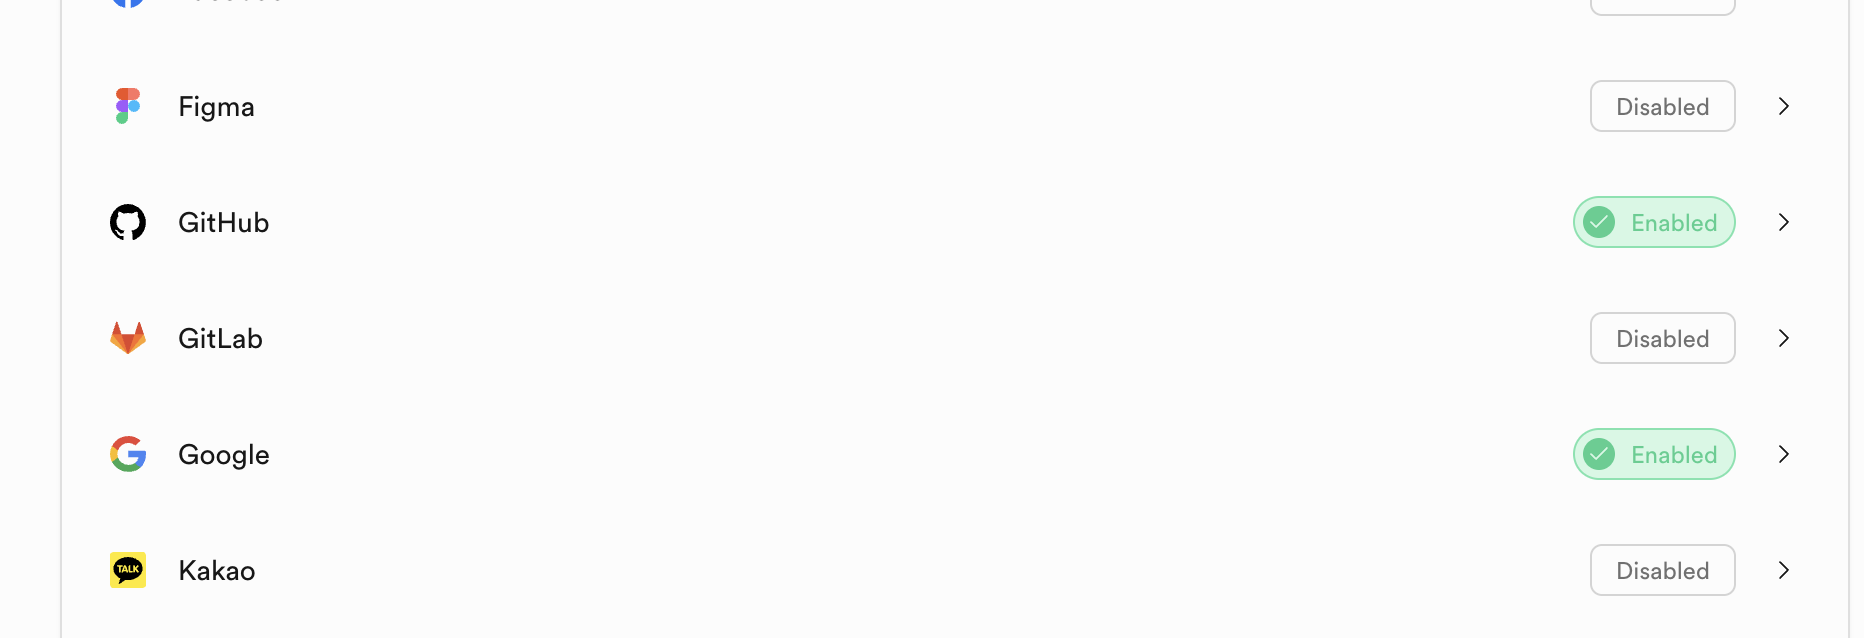
At this point, you can already use third-party accounts to log in to the website you've built. You can directly have the AI reference the Project5-Supabase-Demos/apps/project-burger-shop-auth-advanced-supabase-6 project to support a user login system in your project, integrating a user login interface with GitHub and Google authentication at minimal cost.
5.2.6 Password Reset Implementation
As a mature user login component, password reset is also a crucial part. This project (project-burger-shop-auth-advanced-supabase-6) also includes a complete implementation of this feature. You can directly have the AI replicate the complete password reset component based on this project's password reset functionality. The main steps are as follows:
- Initiate request: The user enters their email on the forgot password page, and the frontend calls the
supabase.auth.resetPasswordForEmail()function with a specified redirect URL (such as /auth/reset). - Send email: Supabase sends an email containing a unique reset link to that email address.
- Access link: The user clicks the link in the email and is redirected to the specified reset page within the application.
- Update password: On the reset page, the user enters a new password. The frontend calls
supabase.auth.updateUser()to submit the new password to Supabase. Supabase automatically verifies the link's validity and completes the password update.
Finally, if you feel the current password reset email is too basic, you can customize the "Reset Password" email template in the Supabase Dashboard under Authentication -> Email Templates.
In addition to the Reset password feature, you'll also see many other advanced settings related to user management (such as Invite user, etc.). You can refer to the respective development documentation for each feature and use Vibe coding tools to add the corresponding functionality yourself.
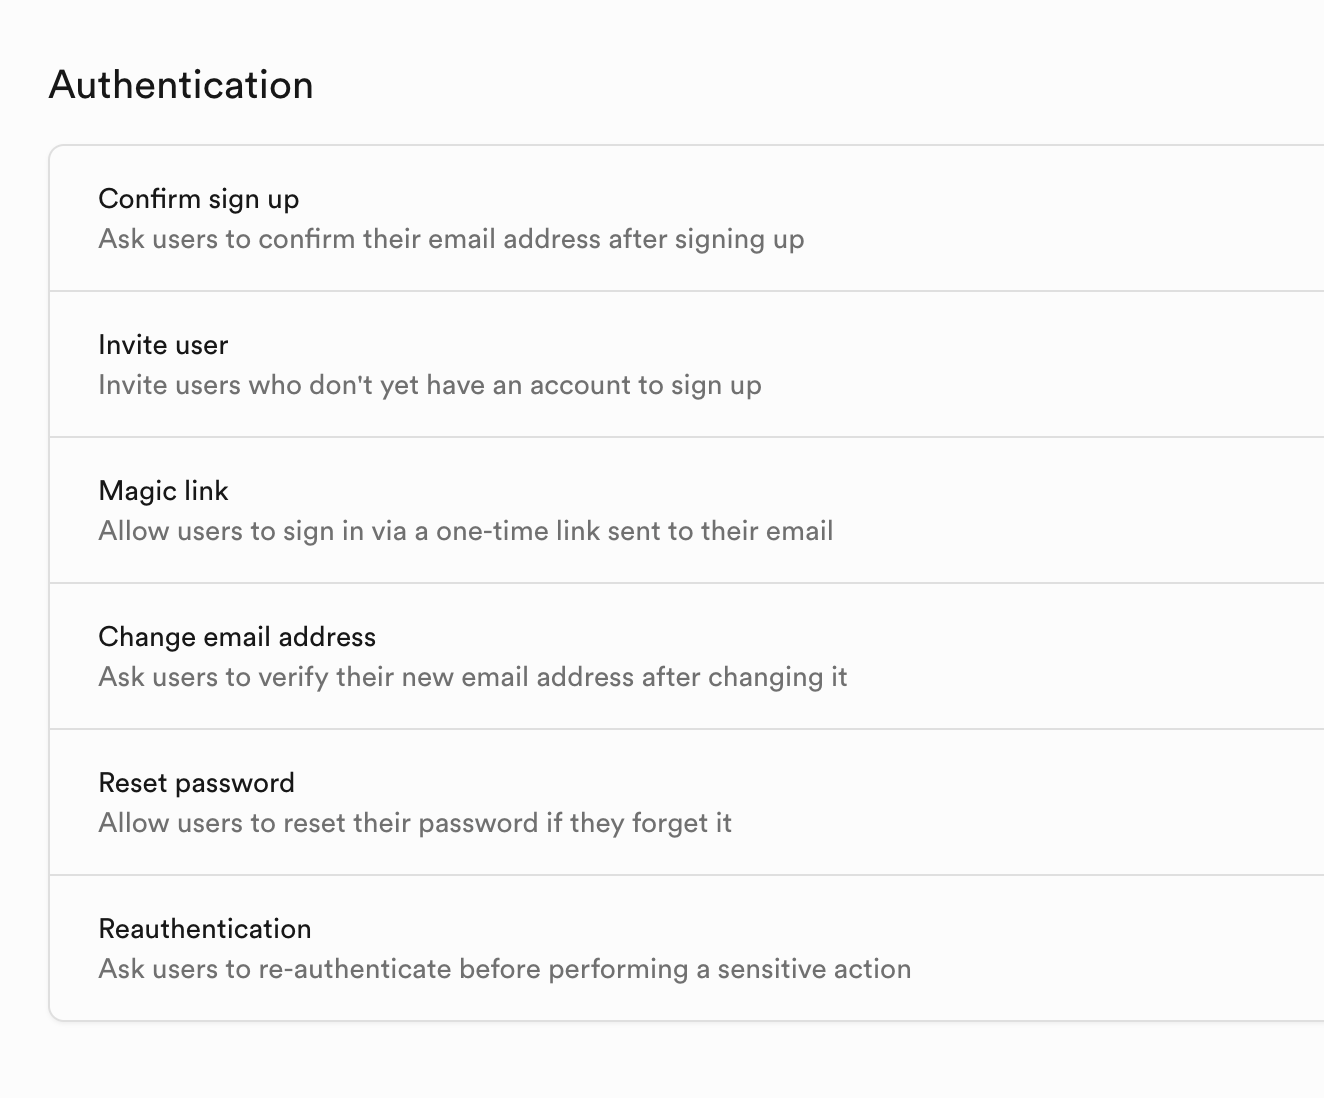
5.3 Realtime Features
Supabase's real-time feature is one of its most powerful characteristics, providing great convenience for building collaborative documents, real-time dashboards, game lobbies, or customer service systems.
This project (Project5-Supabase-Demos/apps/project-burger-shop-realtime-orders-3) demonstrates the three core capabilities of Supabase Realtime — database change listening (Postgres Changes), Broadcast, and Presence — through building a multi-person real-time chat room and cursor position sharing feature.
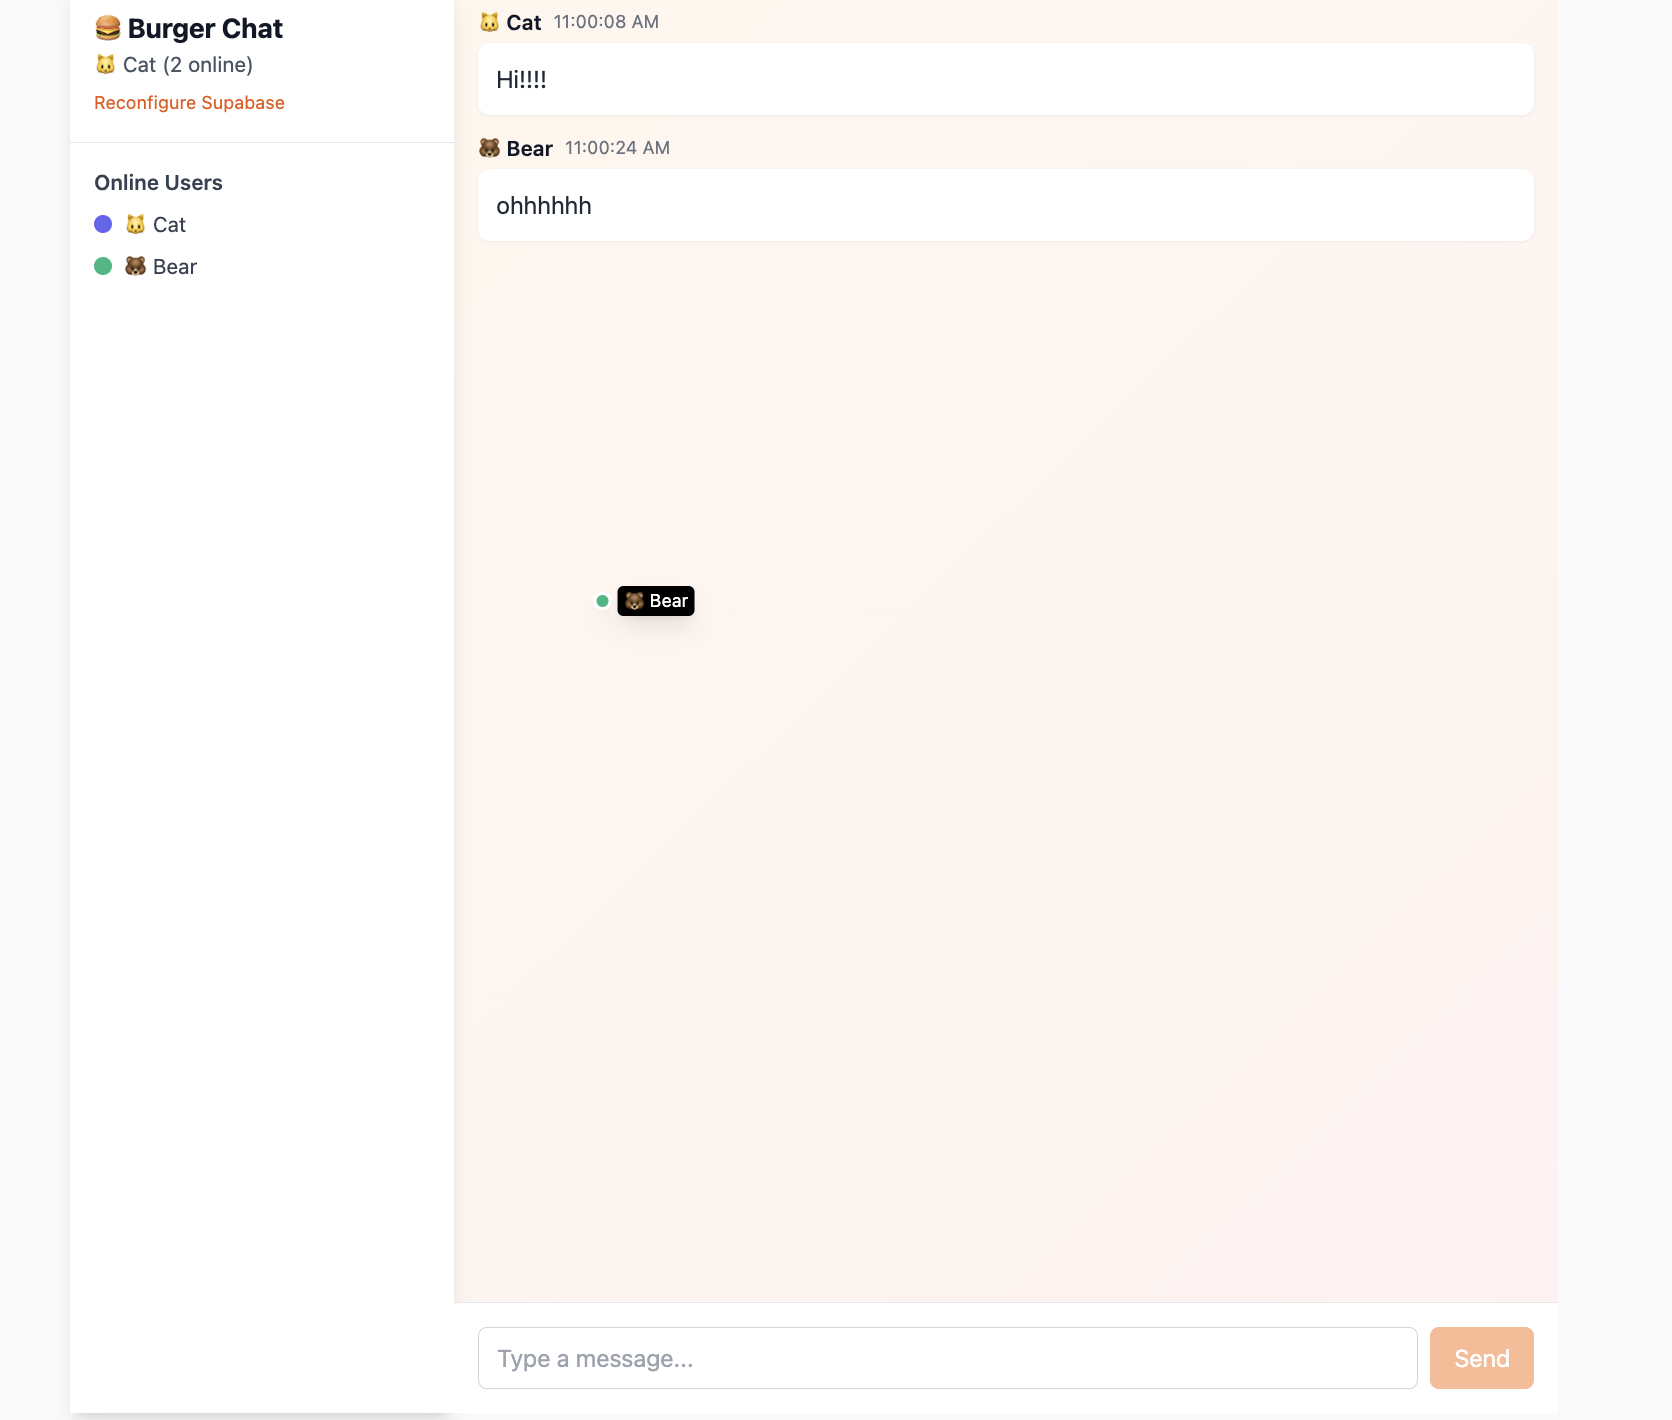
If you find the related code sections somewhat challenging, you can directly have the AI reference this section's documentation content to modify your program.
5.3.1 Real-time Database Changes with Postgres Changes
The most common Realtime feature is real-time monitoring of database changes via Postgres Changes. It allows clients to subscribe to INSERT, UPDATE, or DELETE events on specific tables, specific rows, or even specific columns in the database. Once a database change occurs (whether through API calls, Supabase Dashboard operations, or SQL script execution), Supabase uses PostgreSQL's underlying replication mechanism to immediately push the changed data to all frontend clients subscribed to that channel via WebSocket, without the frontend needing to repeatedly poll.
Generally, this feature can be enabled by finding "Enable Realtime" in the Table Editor and clicking it, but it's more convenient to initialize it via SQL script execution. For example:
-- Enable realtime replication
ALTER TABLE public.chat_messages REPLICA IDENTITY FULL;
DO $$
BEGIN
  IF NOT EXISTS (
    SELECT 1 FROM pg_publication_tables
    WHERE pubname = 'supabase_realtime'
      AND schemaname = 'public'
      AND tablename = 'chat_messages'
  ) THEN
    ALTER PUBLICATION supabase_realtime ADD TABLE public.chat_messages;
  END IF;
END $$;
This statement adds the chat_messages table to Supabase's preset supabase_realtime publication. Once a table is added to this special publication, Supabase's real-time server starts listening for all its data changes.
Based on the special data table above, we can use listening code to monitor data changes in the table in real time. What we need to implement is that when one user sends a message, all other online users can immediately see it on their screens. This can be achieved by subscribing to the INSERT events of the chat_messages table.
    const sub = supabase
      .channel('chat_messages_channel')
      .on('postgres_changes', {
        event: 'INSERT',
        schema: 'public',
        table: 'chat_messages'
      }, (payload: any) => {
        console.log('New message received:', payload.new);
        const newMessage = payload.new as Message;
        // ... //
      .subscribe((status: string) => {
        console.log('Chat subscription status:', status);
});.channel('chat_messages_channel'): Creates an isolated communication channel..on('postgres_changes', ...): This is the core subscription method. We tell Supabase we're only interested inINSERTevents on thechat_messagestable.payload.new: When a new message is inserted into the database, Supabase pushes the complete content of this new data to all subscribed clients viapayload.new..subscribe(): Starts the subscription.
5.3.2 Message Broadcast and Sync: Broadcast & Presence
For more "instant" interactions that don't need to be stored in the database, such as cursor movement and online status, Supabase provides Broadcast and Presence features.
- Presence: Used for tracking the shared state of all clients within a channel. Ideal for implementing "who's online" functionality.
- Broadcast: Used for sending low-latency temporary messages to all other clients within a channel.
The core idea of Presence is: let each client declare its online status, and Supabase's server is responsible for reliably syncing these statuses to all other clients in the channel. Implementing Presence involves the following key steps:
- Create a channel that supports Presence
First, we create a channel called lobby_presence specifically for handling these interactions, and specify a unique key in the configuration to identify the current user. This key is typically the user's ID.
const ch = supabase.channel
('lobby_presence', {
  config: {
    presence: { key: anonymousUser.id },
  }
});- Subscribe to the channel and announce "I'm online"
Once the channel is created, we need to subscribe to it. In the successful subscription callback (status === 'SUBSCRIBED'), we call the channel.track() method. This method broadcasts the current user's information (such as user ID, name, avatar color, etc.) to all other clients in the channel, declaring their "online" status.
const me = {
  id: anonymousUser.id,
  name: anonymousUser.name,
  color: anonymousUser.color
};

ch.subscribe(async (status) => {
  if (status === 'SUBSCRIBED') {
    await ch.track(me);
  }
});- Sync the complete online list
When a new user joins the channel, they need to get the current list of all online users. This is achieved by listening to the presence sync event. The sync event fires when you first join a channel, providing you with a complete "snapshot."
The channel.presenceState() method returns an object containing the state information of all currently online users in the channel. We process it and update the application's state to render the complete online user list.
ch.on('presence', { event: 'sync' }, ()
=> {
  const state = ch.presenceState();
  const flat = {};
  Object.values(state).forEach((arr) => {
    arr.forEach((u) => { flat[u.id] =
    { ...u }; });
  });
  setOnline(flat);
});- Listen for individual user joins and leaves
In addition to the sync event, we can also listen for join and leave events to respond immediately when a new user enters or leaves, such as displaying a "User has joined" notification.
ch.on('presence', { event: 'join' }, ({
key, newPresences }) => {
  console.log('User joined:', key,
  newPresences);
});

ch.on('presence', { event: 'leave' }, ({
key, leftPresences }) => {
  console.log('User left:', key,
  leftPresences);
});
Through the above steps, we've built a fully functional online status system. Supabase automatically handles cases where users unexpectedly disconnect (such as closing the browser or losing network) and triggers leave events at the appropriate time, ensuring the accuracy of the online list.
Once Presence lets us know "who's present," Broadcast enables "conversation" between them, but the conversation content is stored ephemerally. A typical example is real-time cursor tracking. If every mouse movement resulted in database reads and writes, it would cause enormous performance waste and latency. Broadcast perfectly solves this problem — it allows messages to be passed directly between clients via WebSocket, completely bypassing the database.
Broadcast's working mode mainly relies on two core methods: channel.send() for sending and channel.on() for receiving.
- Sending side: Broadcast my cursor position
We add a listener for the mousemove event. When the mouse moves, we construct a payload containing the user ID, coordinates, and color, then broadcast it via channel.send(), specifying the event name as 'cursor'.
const handleMouseMove = (e) => {
  const payload = {
    id: anonymousUser.id,
    x: e.clientX,
    y: e.clientY,
    name: anonymousUser.name,
    color: anonymousUser.color
  };

  channelRef.current?.send({
    type: 'broadcast',
    event: 'cursor',
    payload
  });
};

document.addEventListener('mousemove', handleMouseMove);- Receiving side: Listen for and render others' cursors
Within the same channel, all clients use channel.on() to listen for broadcast-type messages with the event 'cursor'. Once a matching message is received, the callback function is triggered. We parse the sender's data from the payload and use it to update the local online state, thereby rendering other users' cursor positions on the screen in real time.
ch.on('broadcast', { event: 'cursor' }, ({ payload }) => {
  setOnline((prev) => ({
    ...prev,
    [payload.id]: {
      ...(prev[payload.id] || {}),
      x: payload.x,
      y: payload.y
    }
  }));
});
Through this approach, Presence and Broadcast work together; Presence maintains the online user list, while Broadcast handles transmitting ephemeral states like cursor positions between these users, ultimately achieving rich real-time interactive features at a lower cost.
5.4 Storage
Beyond structured data like user information and orders that can be clearly defined, a complete application typically also needs to handle large amounts of unstructured files — such as user avatars, product display images, and user-uploaded order documents. The characteristics of such files are variable sizes and potentially enormous quantities (for example, an e-commerce platform's product images could number in the tens or hundreds of thousands). If stored directly on the application's own business servers, it would significantly increase server storage load, potentially slow down data read/write speeds, and affect overall application performance.
In actual development, these unstructured files are uniformly managed by "object storage services." OSS and Amazon S3 are both examples of such services. They are "professional storage tools" specifically designed for massive file storage, efficiently handling file storage, backup, and rapid retrieval needs. When we access these files in our application, we don't directly retrieve them from the object storage service's "underlying warehouse." Instead, we use URL addresses: each file stored in object storage is assigned a unique URL (similar to an address like "https://xxx.oss.com/avatar/user123.jpg" — you can think of this "website" as having only one image). This URL serves as the file's "dedicated access address." Frontend pages only need to use this address to directly download or load avatars and product images without relying on the application's business server as an intermediary, which both improves file loading speed and reduces the load on business servers.
This project (project-burger-shop-storage-uploads-4) deeply demonstrates how to build a modern file upload system using Supabase Storage through a user avatar upload feature, giving developers an intuitive understanding of the complete process from uploading unstructured files to accessing them via URL. Additionally, this project uses the Uppy library to provide an excellent file upload interface and combines the Tus plugin for resumable uploads by pointing Uppy's upload endpoint to Supabase's standard API (<supabaseUrl>/storage/v1/upload/resumable). You can refer to this similar approach to implement upload feature components.
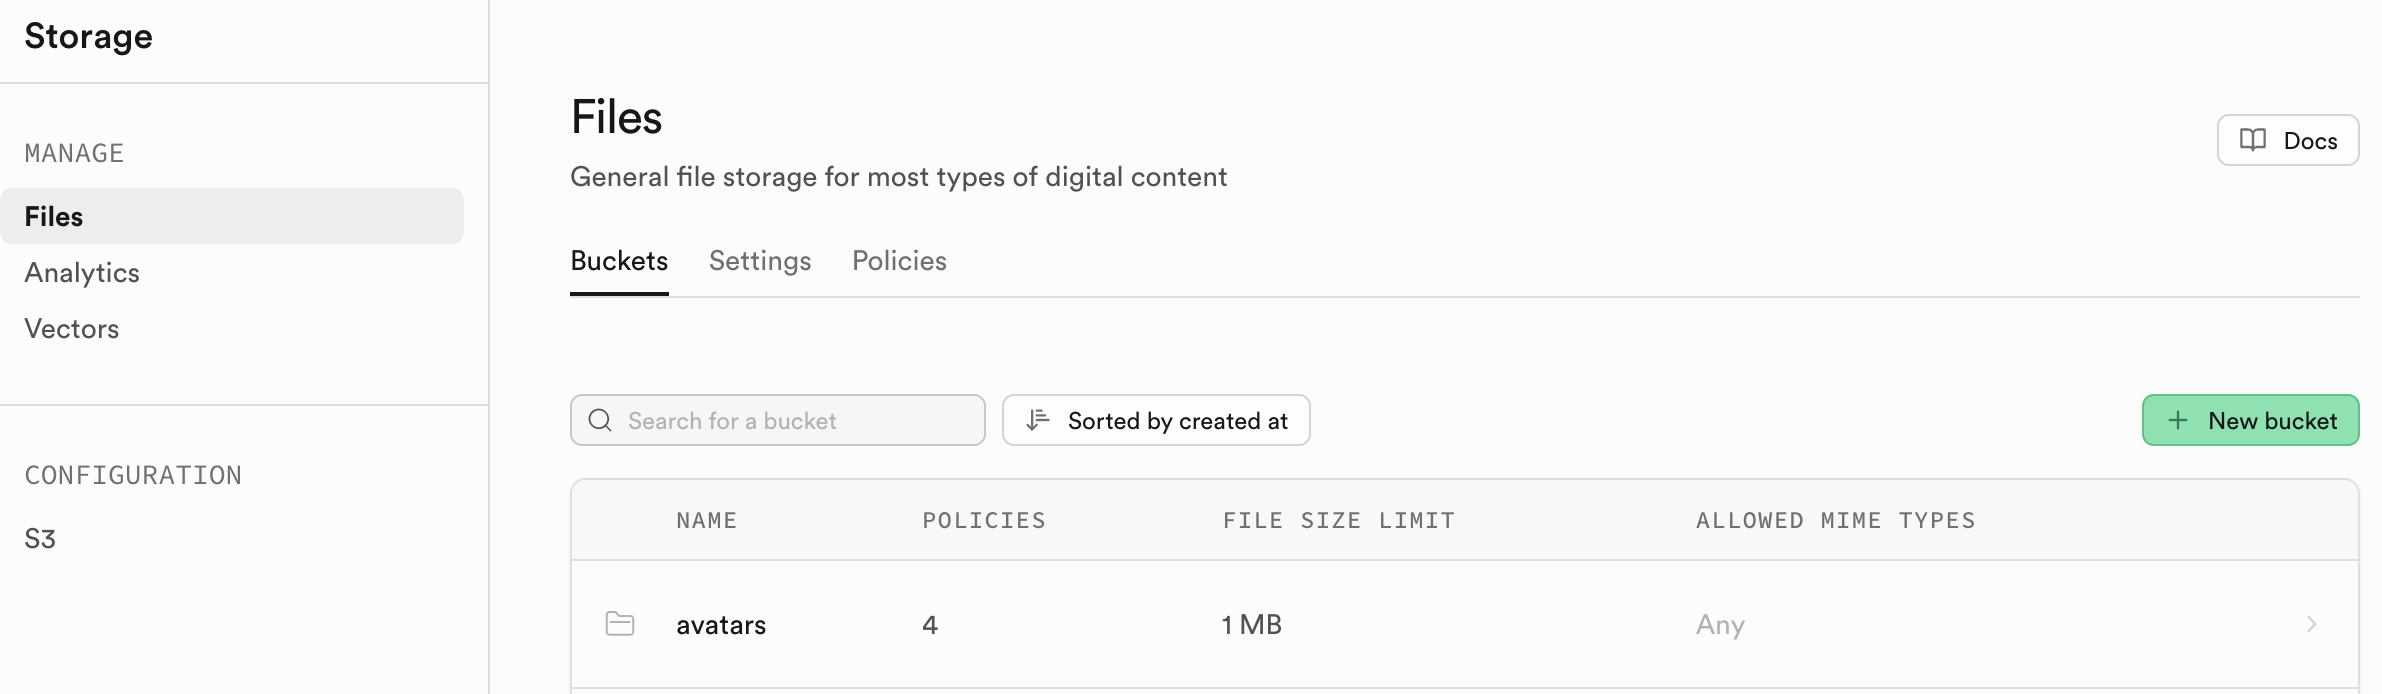
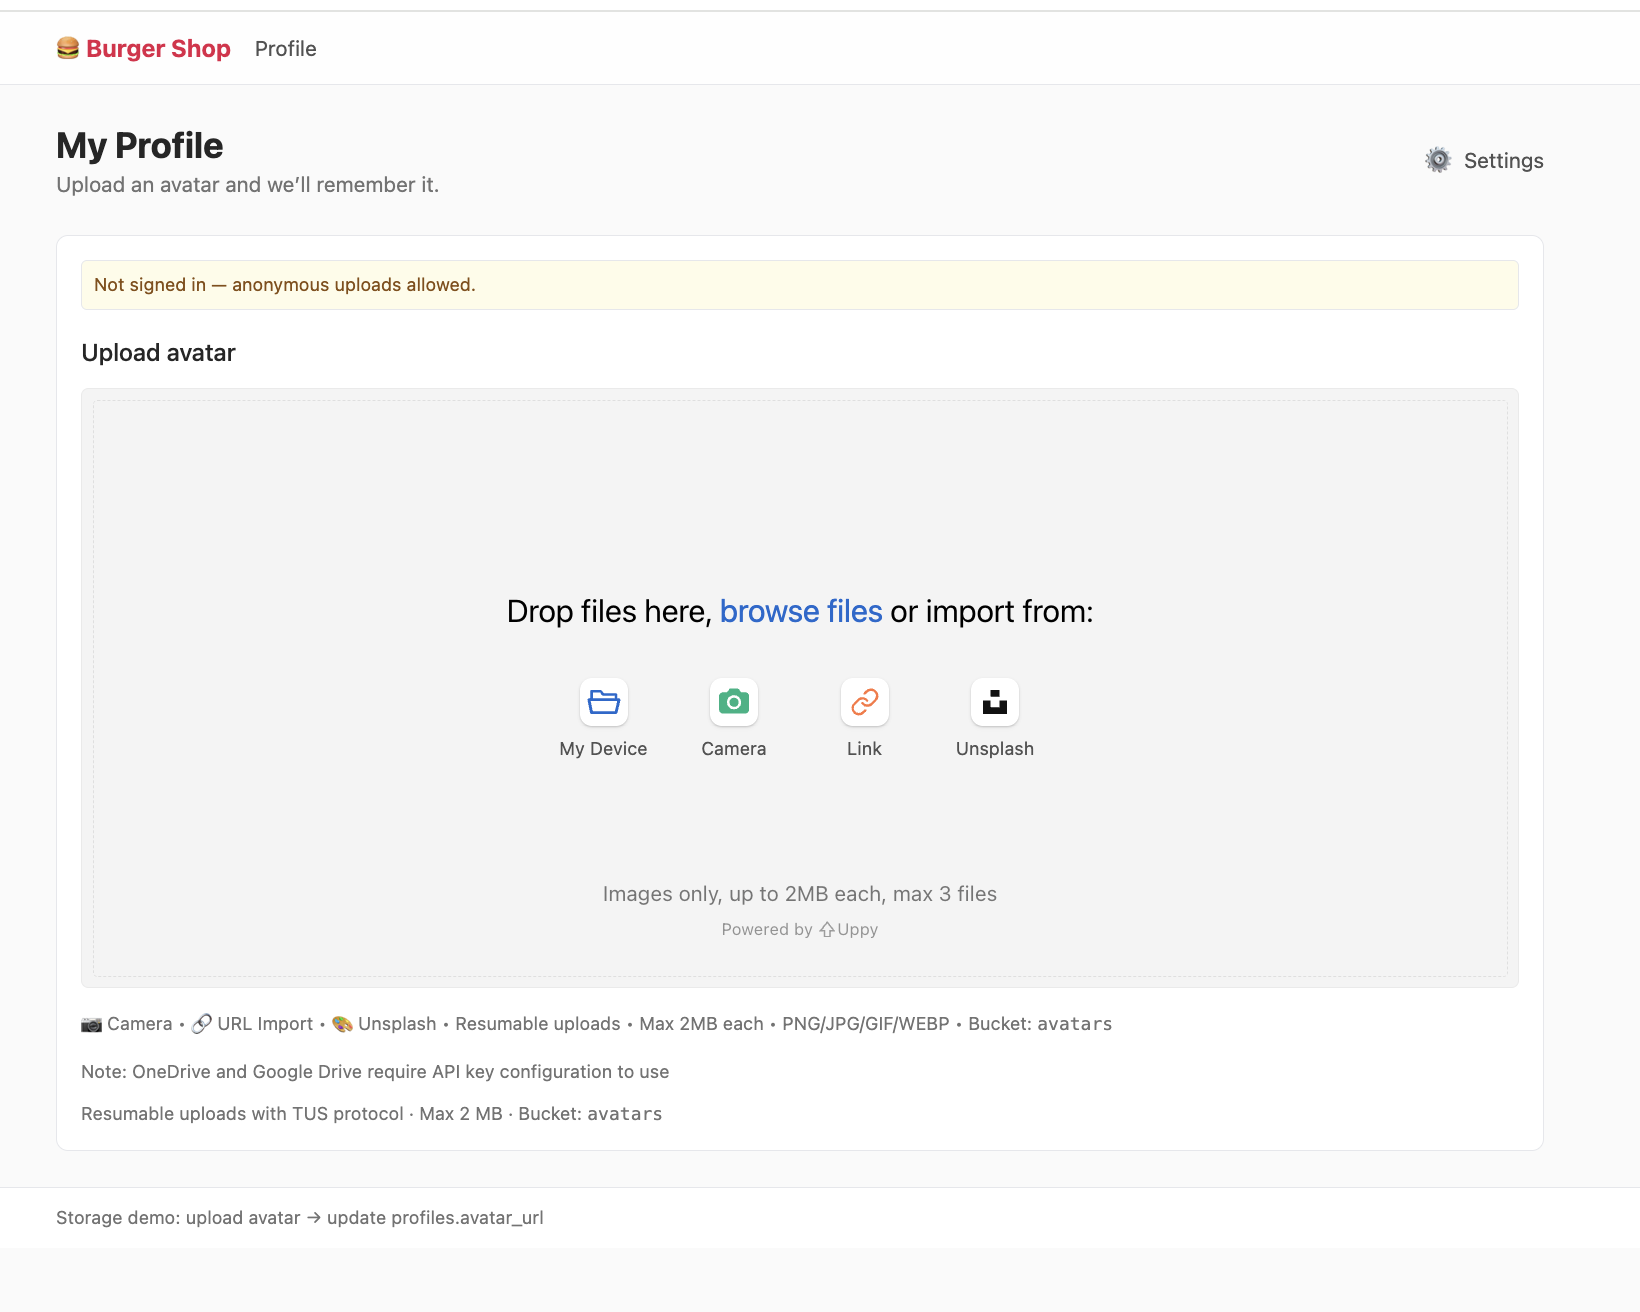
5.4.1 Storage Buckets
The organizational unit of Supabase Storage is the Storage Bucket. You can think of it as a folder in a computer operating system. Each Bucket can have its own independent security policies and configuration.
All files in Storage can be directly accessed through a public URL, but this doesn't mean anyone can arbitrarily upload or modify files. Specific access permissions are controlled by more granular policies. Like the database, Storage's access permissions are managed through Row Level Security policies. SQL policies are written on two special tables: storage.objects and storage.buckets, and can precisely define who can read (SELECT), upload (INSERT), update (UPDATE), or delete (DELETE) files.
For example, we can create a policy that only allows users to upload to a folder named after their user_id and only allows image file types:
CREATE POLICY "Allow authenticated
uploads to avatars bucket"
ON storage.objects FOR INSERT
TO authenticated
WITH CHECK (
  bucket_id = 'avatars' AND
  auth.uid() = (storage.foldername(name))
  [1]::uuid AND
  (storage.extension(name) IN ('png',
  'jpg', 'jpeg'))
);

CREATE POLICY "Allow public read access
to avatars"
ON storage.objects FOR SELECT
USING ( bucket_id = 'avatars' );
5.4.2 Getting Accessible File URLs
This project requires you to manually create a public bucket named "avatars." All files will be uploaded and stored under this public bucket. After a file is successfully uploaded, we only get its storage path in Storage, such as public/avatar1.png. This is just a string stored in the database. To make the browser able to render this image, we need to convert it to an accessible HTTP URL.
Supabase provides two distinctly different strategies for obtaining this URL, which differ fundamentally in security, persistence, and cost control.
1. Public URL - Permanent Link
This is the most straightforward approach. If your file is stored in a Public Bucket, you can get a fixed, permanent public link.
const { data } = supabase.storage
  .from('avatars')
  .getPublicUrl('public/avatar1.png');
const publicUrl = data.publicUrl;
These links have two core characteristics: First, they're simple and direct — their URL structure is fixed, making them easy to concatenate and manage in practice, lowering the technical barrier. Second, they're cache-friendly — as permanent links, they can be effectively cached by CDNs (Content Delivery Networks) and browsers, significantly improving resource access speed and optimizing user experience. Based on these characteristics, they're suitable for truly public resource scenarios such as website logos, product catalog images, and blog article illustrations, effectively meeting the access and management needs of such resources.
However, in production environments, these links carry a clear risk of bandwidth theft (Hotlinking). Since the links are permanently public, external parties can easily embed your image links in their own high-traffic websites, resulting in bandwidth being illegally consumed. This behavior generates significant unnecessary traffic costs for your Supabase project, and the consumed bandwidth doesn't serve your own application — a typical cost waste that needs to be highly guarded against in production environments. Therefore, we need to turn to temporary signed URLs for exposing external resources.
2. Signed URL - Temporary Authorized Link
To solve the security and cost issues of public URLs, Supabase provides a way to generate temporary signed URLs. This is the recommended best practice for most online applications, such as text-to-image applications generating time-limited image viewing links for users, e-commerce platforms only allowing users who've placed orders to get temporary invoice download addresses, and paid content platforms providing short-lived course playback links for subscribers — preventing both file theft and bandwidth abuse, with extremely strong adaptability.
const { data, error } = await supabase.storage
  .from('avatars')
  .createSignedUrl('private/user-invoice.pdf', 3600); // Link valid for 3600 seconds (1 hour)
const signedUrl = data?.signedUrl;
Temporary signed URLs have three core advantages: Security and controllability means the links have security markers and expiration times — once expired, they can't be used. Permission binding is simple — only those who can view the file can generate this link, and even if the file is stored in a Private Bucket, they can open it normally using this link. Preventing bandwidth theft is because the links are temporary — if copied elsewhere, they quickly expire and can't be used for malicious bandwidth abuse. Thanks to these advantages, files that need permission management like user avatars, private photos, paid content, and order invoices can all use this method.
From a security and cost control perspective, it's recommended to develop the habit of prioritizing temporary signed URLs. Only consider using Public URLs when a resource clearly needs to be permanently public with unrestricted access (such as the application's public logo, public event promotional images, etc.). This way, you can meet specific business needs while minimizing unnecessary risks and cost consumption.
5.5 Edge Functions
Edge Functions are one of the most core-valuable forms in the Serverless (serverless architecture) ecosystem, providing lightweight, efficient function execution support for "no self-built backend" scenarios.
What is Serverless? Serverless (serverless architecture) doesn't mean there are literally no servers. Rather, it means developers don't need to worry about purchasing, operating, configuring, and scaling servers. You only need to write business code (functions), and the cloud service provider automatically allocates resources to run the code when specific events trigger it, billing based on actual runtime.
When your application needs to execute logic that cannot or should not be completed on the client side (browser) — such as interacting with third-party APIs that require private keys, performing computation-intensive tasks, or enforcing complex business rules — Edge Functions come into play. Supabase Edge Functions are built on Deno and TypeScript, deployed on global edge nodes that are physically close to your users, providing extremely low function execution latency.
Currently, mainstream cloud providers have all launched their own Edge Function services. Common ones include:
- AWS Lambda@Edge: An edge function service extended from AWS Lambda that can work with CloudFront CDN, supporting Node.js, Python, and other languages.
- Cloudflare Workers: Cloudflare's edge functions, deployed across their 275+ global edge nodes, supporting JavaScript/TypeScript, with "millisecond-level latency" as the core advantage.
- Vercel Edge Functions: Edge functions adapted for Vercel frontend projects, deeply integrated with Next.js, supporting TypeScript, focusing on "seamless connection between frontend and edge logic."
Returning to Supabase, when your application needs to execute logic that "can't be completed on the client side (browser)" — such as calling third-party APIs with private keys (like LLM interfaces), processing computation-intensive tasks (like image compression), or enforcing permission checks (like file access rules) — Supabase Edge Functions can come into play. Built on the Deno runtime and TypeScript, deployed on global edge nodes, they can achieve extremely low execution latency with "physical proximity to users," serving as the core tool for writing custom, trusted server-side logic.
This project (Project5-Supabase-Demos/apps/project-burger-shop-edge-function-5) demonstrates the simplest application flow of Edge Functions through a real-time streaming chat feature with a large language model (LLM).
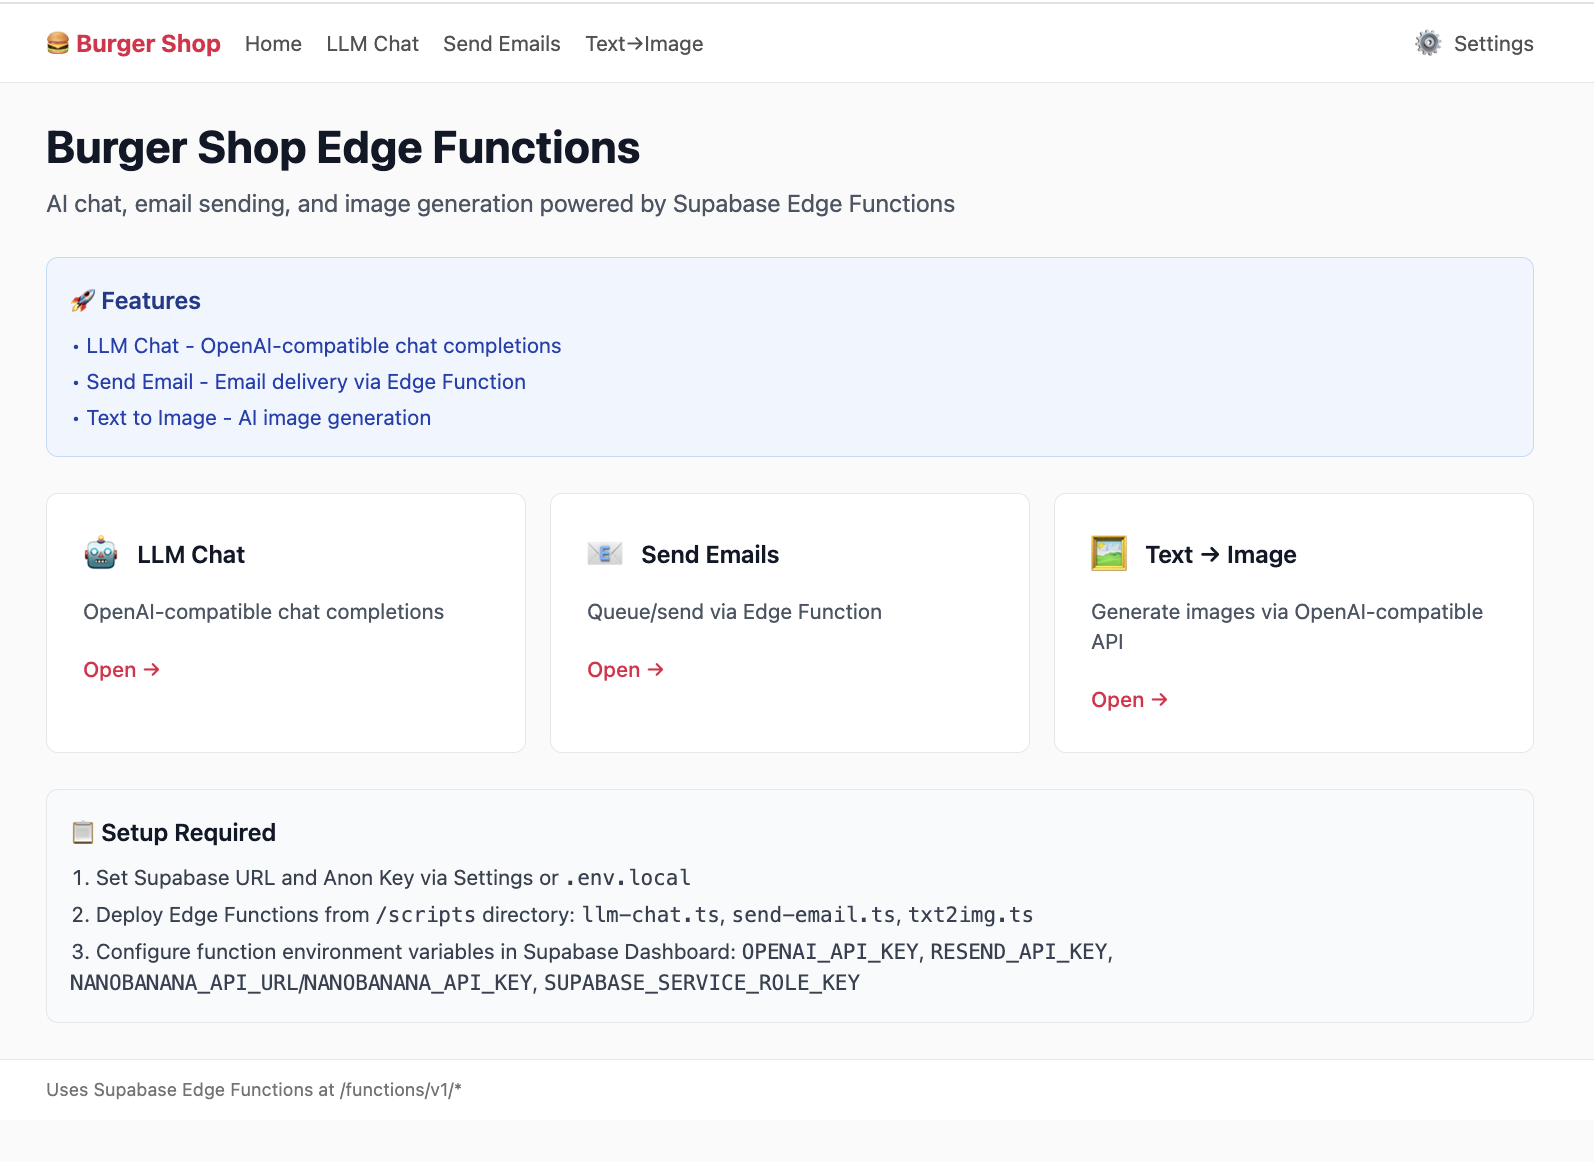
5.5.1 LLM Chat Case Analysis
Suppose you want to integrate a ChatGPT-like chatbot into your application. You need to call OpenAI's API on the server side, which requires a private API Key. This Key must absolutely never be exposed in frontend code, otherwise anyone could steal your Key by viewing the webpage source code, incurring high costs. This is exactly where Edge Functions shine. We'll create a function called "llm-chat" that serves as a secure proxy between the frontend and the OpenAI API.
Refer to the code in project-burger-shop-edge-function-5/scripts/llm-chat.ts. Let's see how it works:
// scripts/llm-chat.ts
import "jsr:@supabase/functions-js/edge-runtime.d.ts";
import { OpenAI } from "npm:openai";

const OPENAI_API_KEY = Deno.env.get("OPENAI_API_KEY");

Deno.serve(async (req) => {
  try {
    const openai = new OpenAI({ apiKey: OPENAI_API_KEY });
    const { prompt } = await req.json();

    const stream = await openai.chat.completions.create({
      model: "gpt-3.5-turbo",
      messages: [{ role: "user", content: prompt }],
      stream: true,
    });

    return new Response(stream.toReadableStream(), {
      headers: { "Content-Type": "text/event-stream" },
    });
  } catch (err) {
  }
});
In this case, regarding key security, OPENAI_API_KEY is securely stored as an environment variable on Supabase's server. The local frontend code cannot access this key at all, effectively ensuring key security.
5.5.2 Creating and Deploying Functions
Supabase provides a very user-friendly interface that lets you complete deployment without touching the command line.
- Go to the Edge Functions panel:
- Log in to your Supabase project Dashboard.
- In the left navigation bar, click the code-like icon to enter "Edge Functions."
- Create a new function:
- Click the "Create a new function" button.
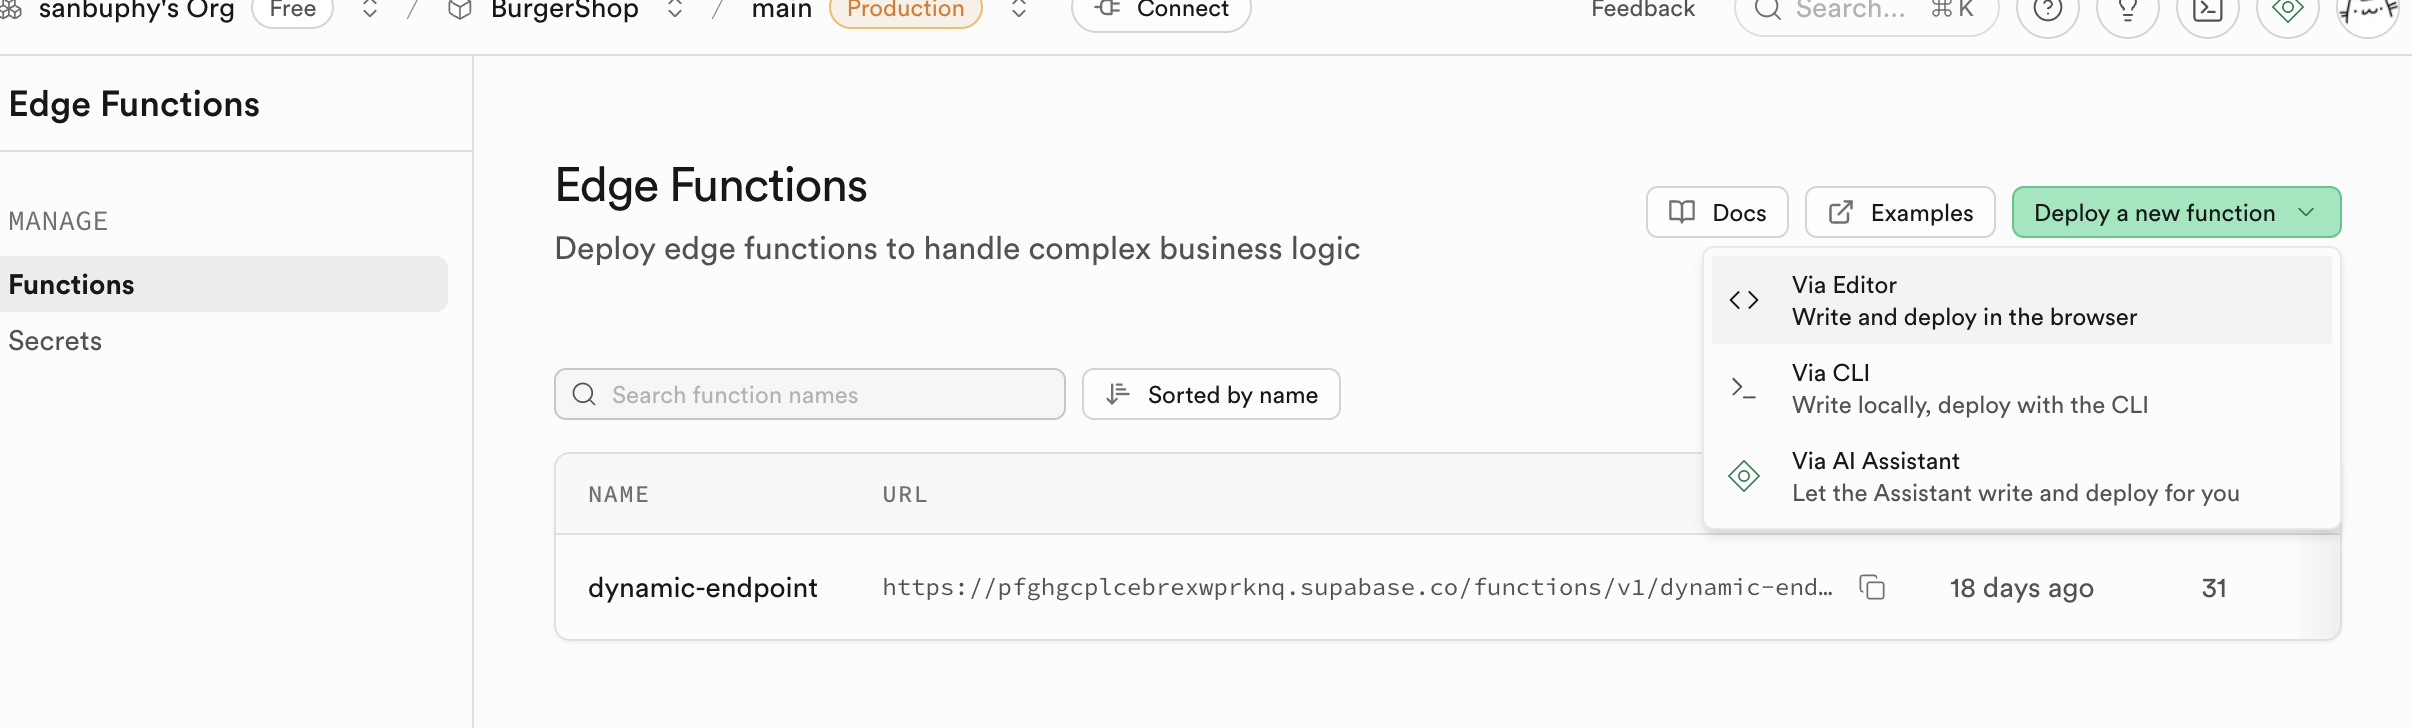
- Name the function, for example
llm-chat. - Paste code:

- In the popup online editor, delete all default placeholder code.
- Open your local
llm-chat.tsfile and copy its entire contents. - Paste the copied code into Supabase's online editor.
- Configure environment variables (Secrets):
- Find Secrets in the sidebar.
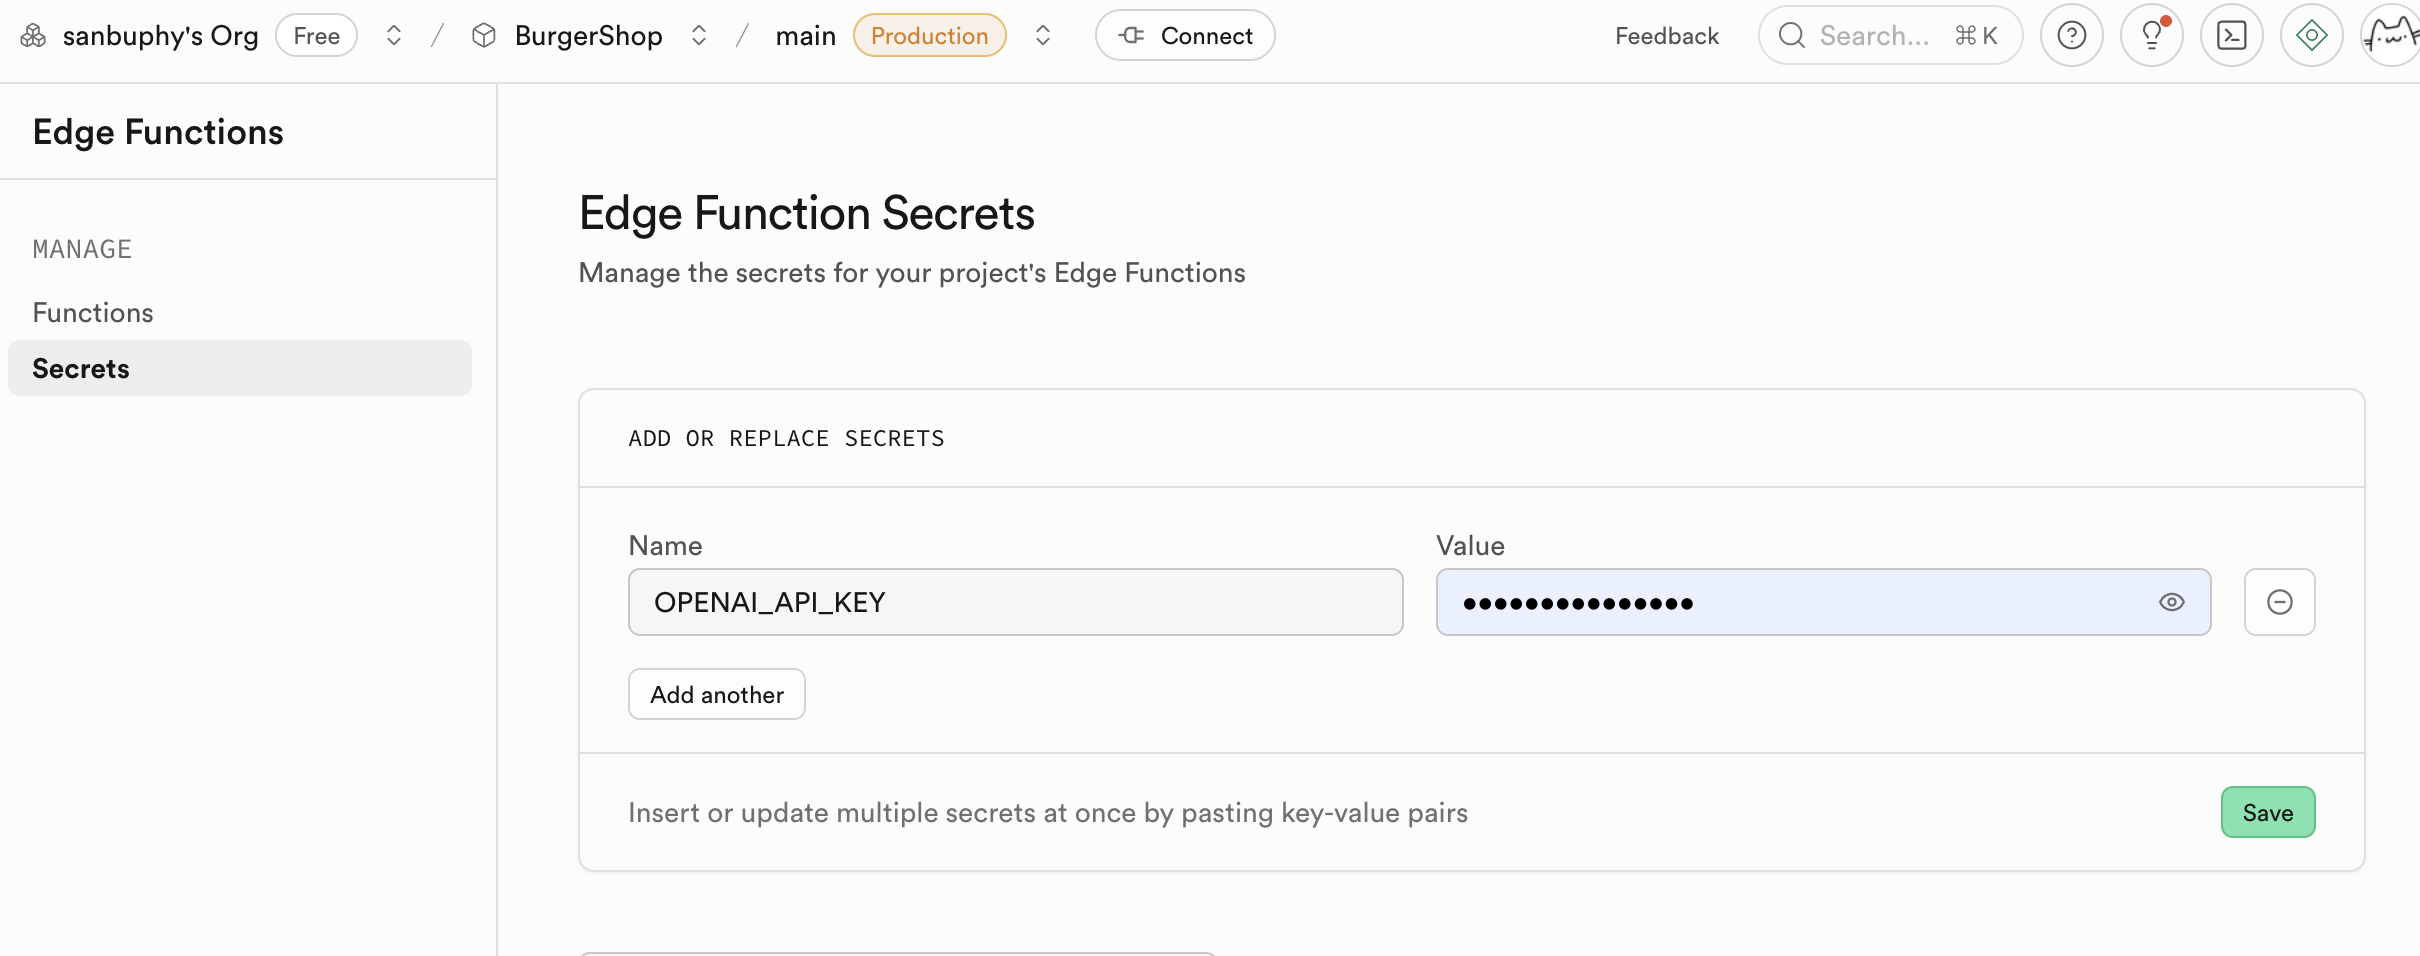
- Name: Enter
OPENAI_API_KEY. - Value: Paste your own OpenAI API Key.
- Click "Save." The Secret set here will be encrypted and stored, and securely injected into your function's runtime environment.
- Find Secrets in the sidebar.
If a function needs updating, remember to execute "Deploy updates" in the Edge Function section. Supabase will build and deploy this function in the cloud. Within a few minutes, your function will be accessible online.
Beyond serving as a secure proxy for language models, Edge Functions' application scenarios go far beyond this. In fact, any task requiring server-side logic processing — whether simple API calls, data validation, or more complex computations — can be implemented through Edge Functions. It provides you with a lightweight, scalable backend without managing any server infrastructure.
If you want to explore more possibilities, you can refer to other examples in the project. For example:
- Image generation (txt2img.ts): This function demonstrates how to use Edge Functions to call third-party text-to-image APIs (such as Stability AI, Midjourney, etc.) to dynamically generate images. This is a typical compute-intensive or secure external service calling scenario. Like the llm-chat case, the API key is securely stored on the Supabase backend, and the frontend only sends text descriptions then receives and displays the generated images — the entire process is secure and efficient.
- Sending email (send-email.ts): Sending welcome emails, transaction notifications, or password reset emails in applications is a common requirement. The send-email.ts example demonstrates how to integrate email services (such as Resend, SendGrid) through Edge Functions. You don't need to expose sensitive email service API Keys in client code — just create a function and have the frontend trigger email sending by calling this function.