Starting from NanoBanana: Build Your Own Asset Production Agent
Chapter 1: Generate Your First Image Asset in 1 Minute
Before we discuss design, style, or prompt engineering, let's generate the first image with the fewest possible steps.
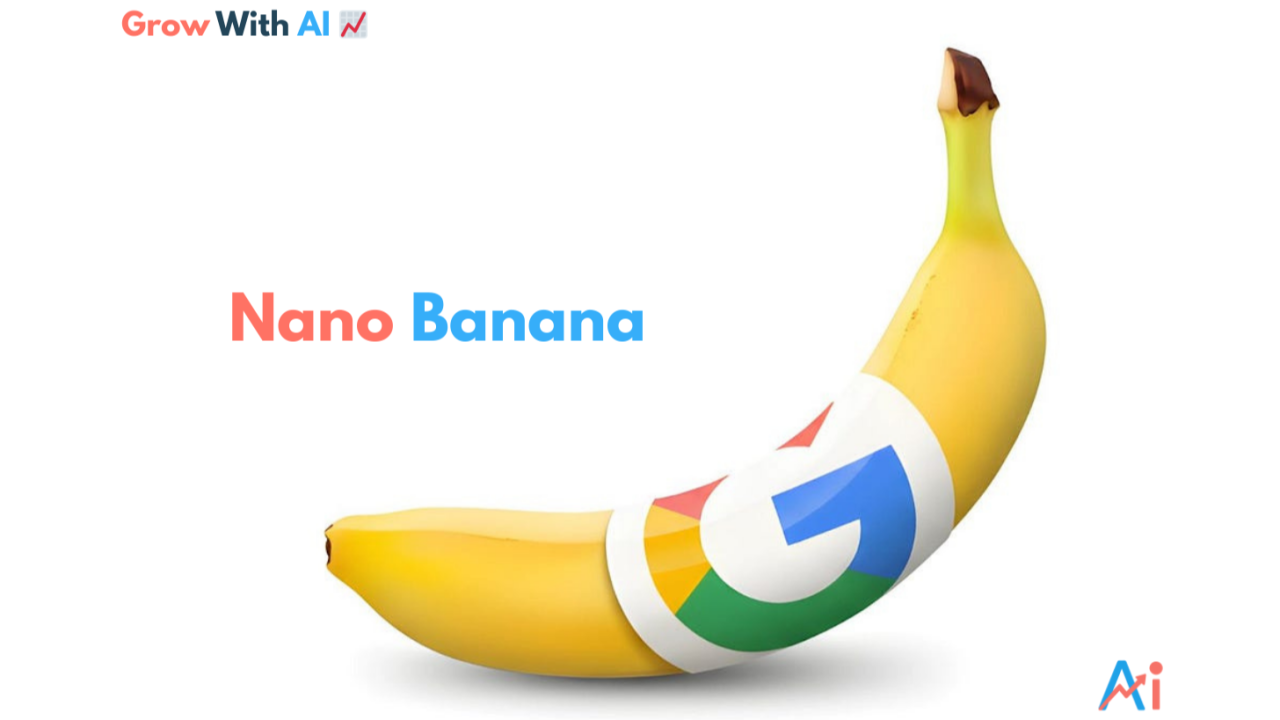
1.1 Meet NanoBanana
Before discussing design style and prompt engineering, let's solve a more important thing first: confirm that you can actually generate an image.
Mainstream large models now already support image generation and editing. These are usually called generative models.
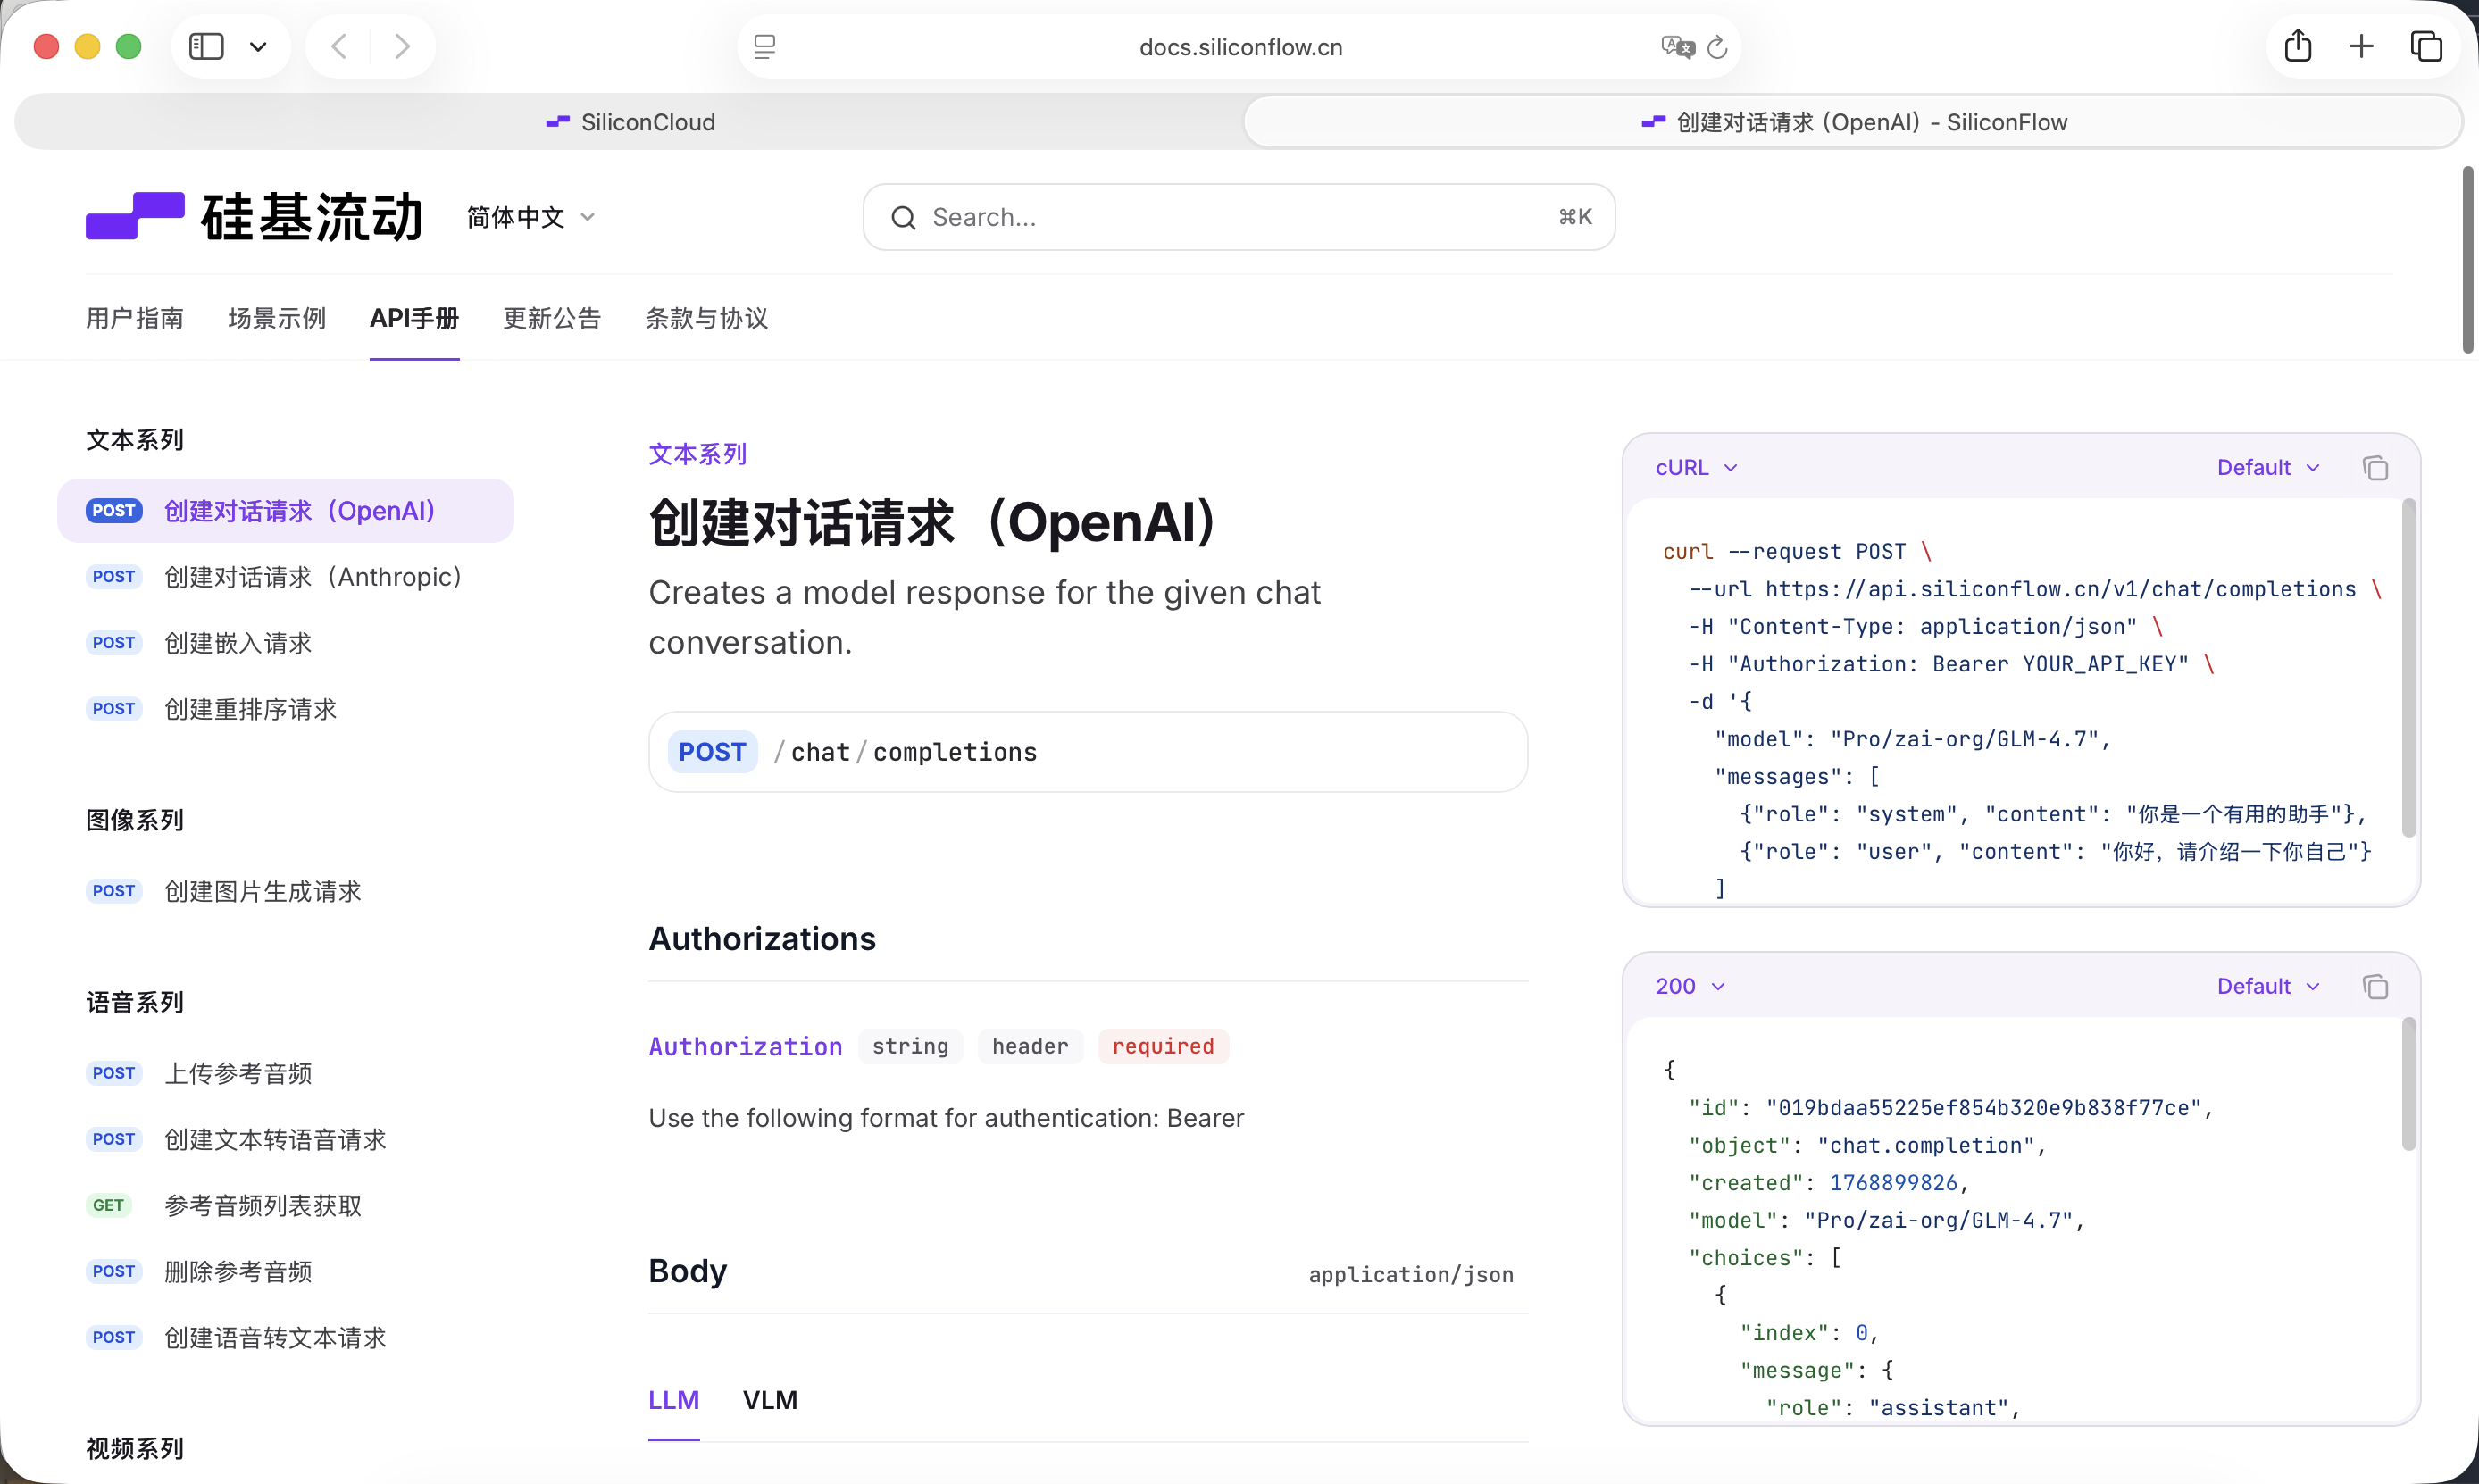
To keep the process as simple as possible, this tutorial uses a model with stable image generation and editing capabilities as the example: NanoBanana. It is an image generation model from Google. Its formal name is Gemini 3.1 Flash Image Preview. It supports direct image generation from natural language, and also supports editing based on existing images.
In terms of core capability, it is not fundamentally different from other models you may have heard of (such as GPT-4o, Claude, Qwen, Midjourney, and others): you provide the description, and the model generates the result.
You can think of it as a "brush." In this chapter we care about only one thing: 👉 can this brush draw its first stroke in your hands?
In practical usage, NanoBanana can be used directly through official platforms like Google AI Studio, and it can also be integrated into development workflows via API. This tutorial uses the API approach. A NanoBanana 2 model is also available now, and you can try the latest model as well.
1.2 A "Hello World" Level Generation
Before we start, you only need to complete these three steps:
- Create a new folder in Trae
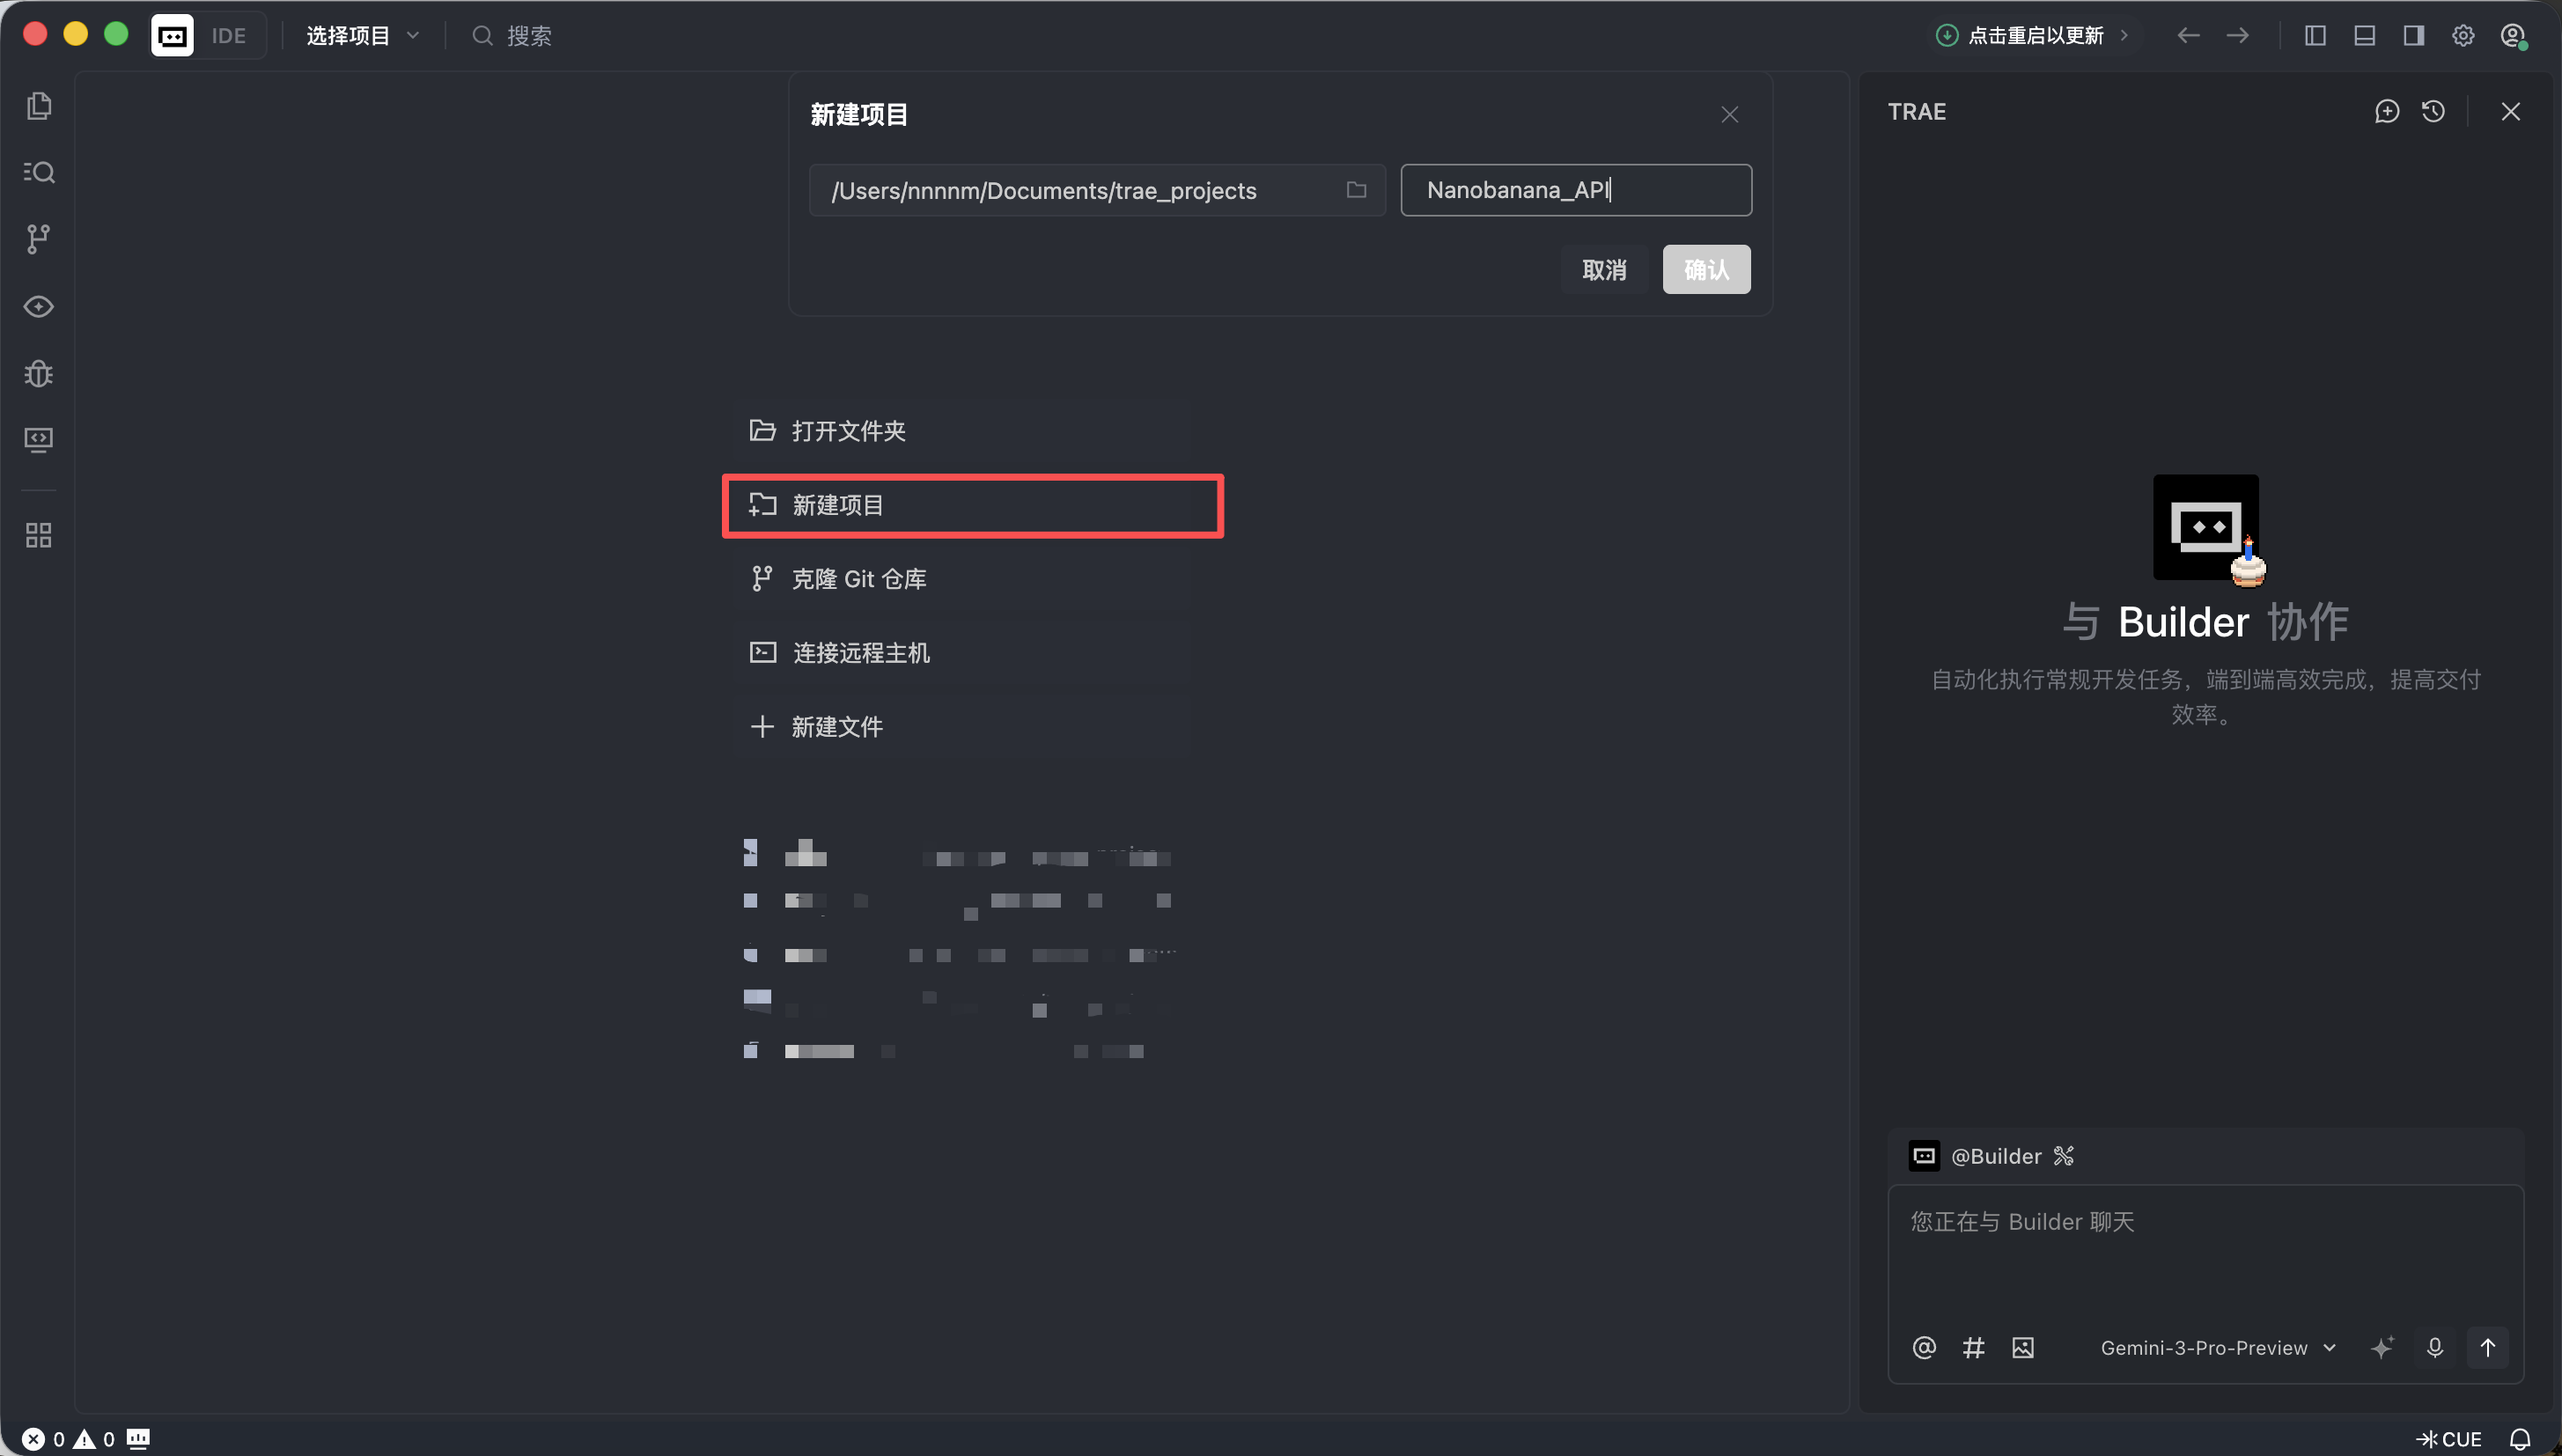
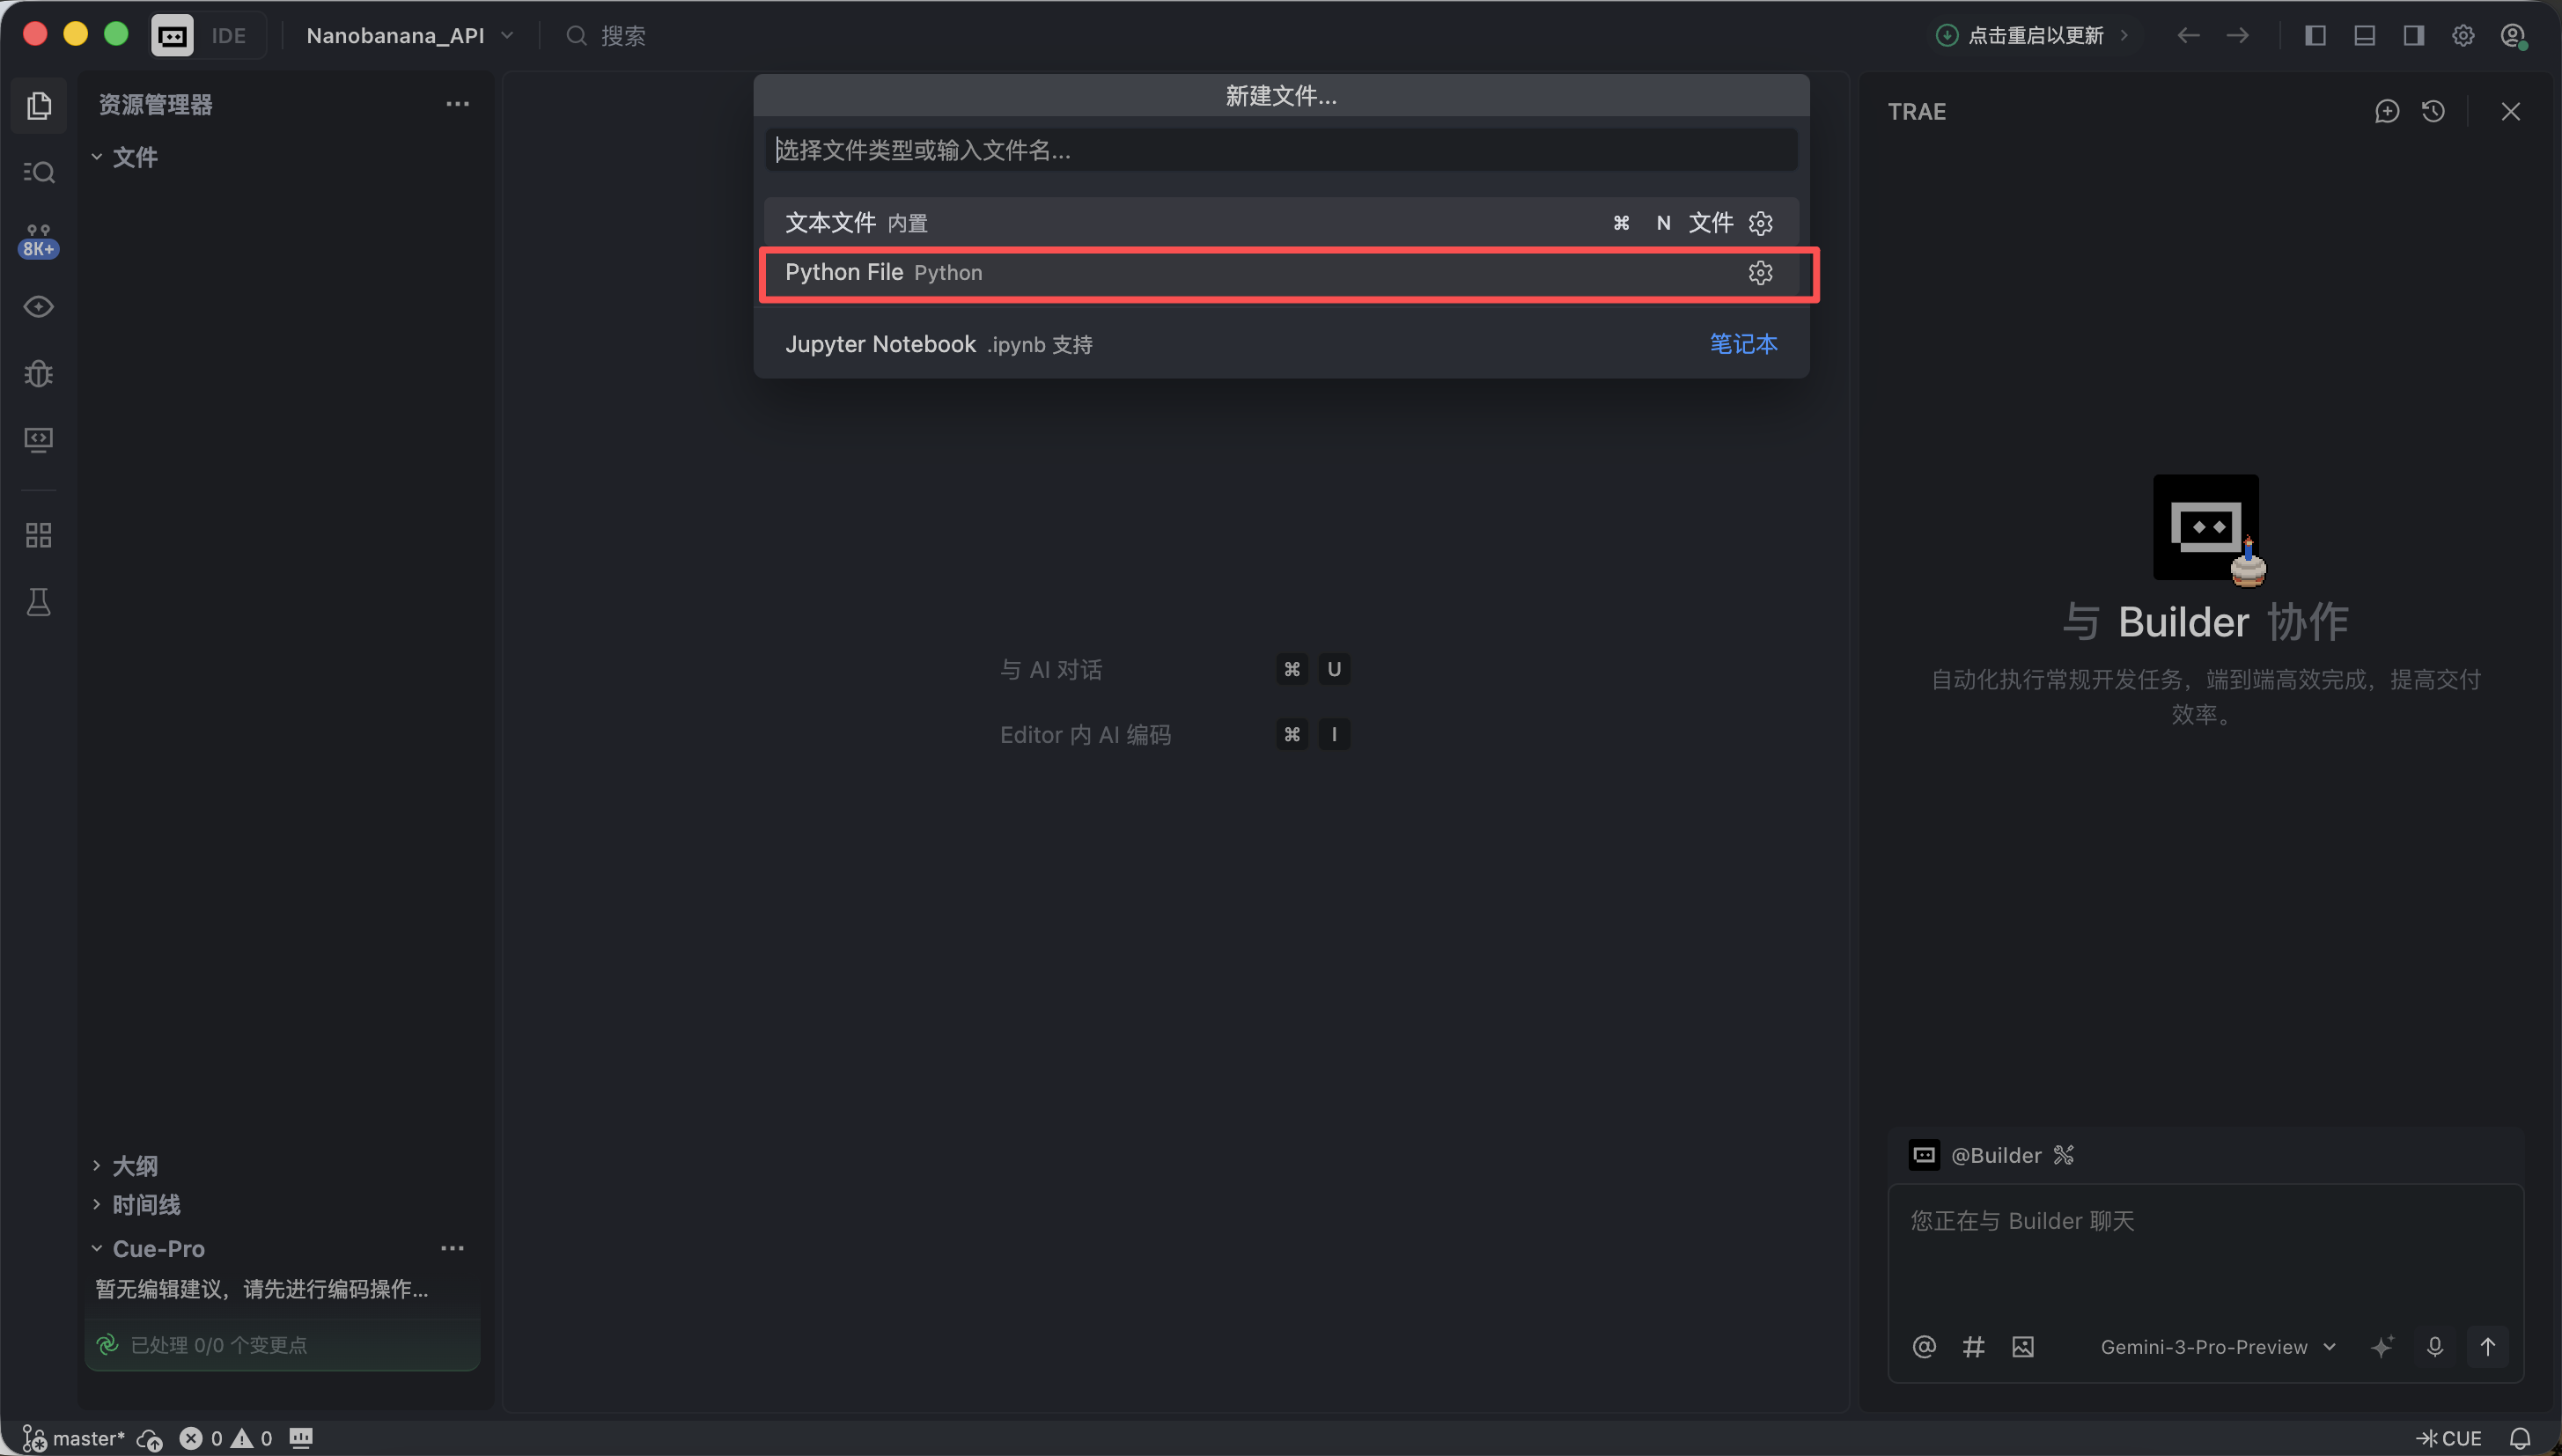
- Create a new Python file
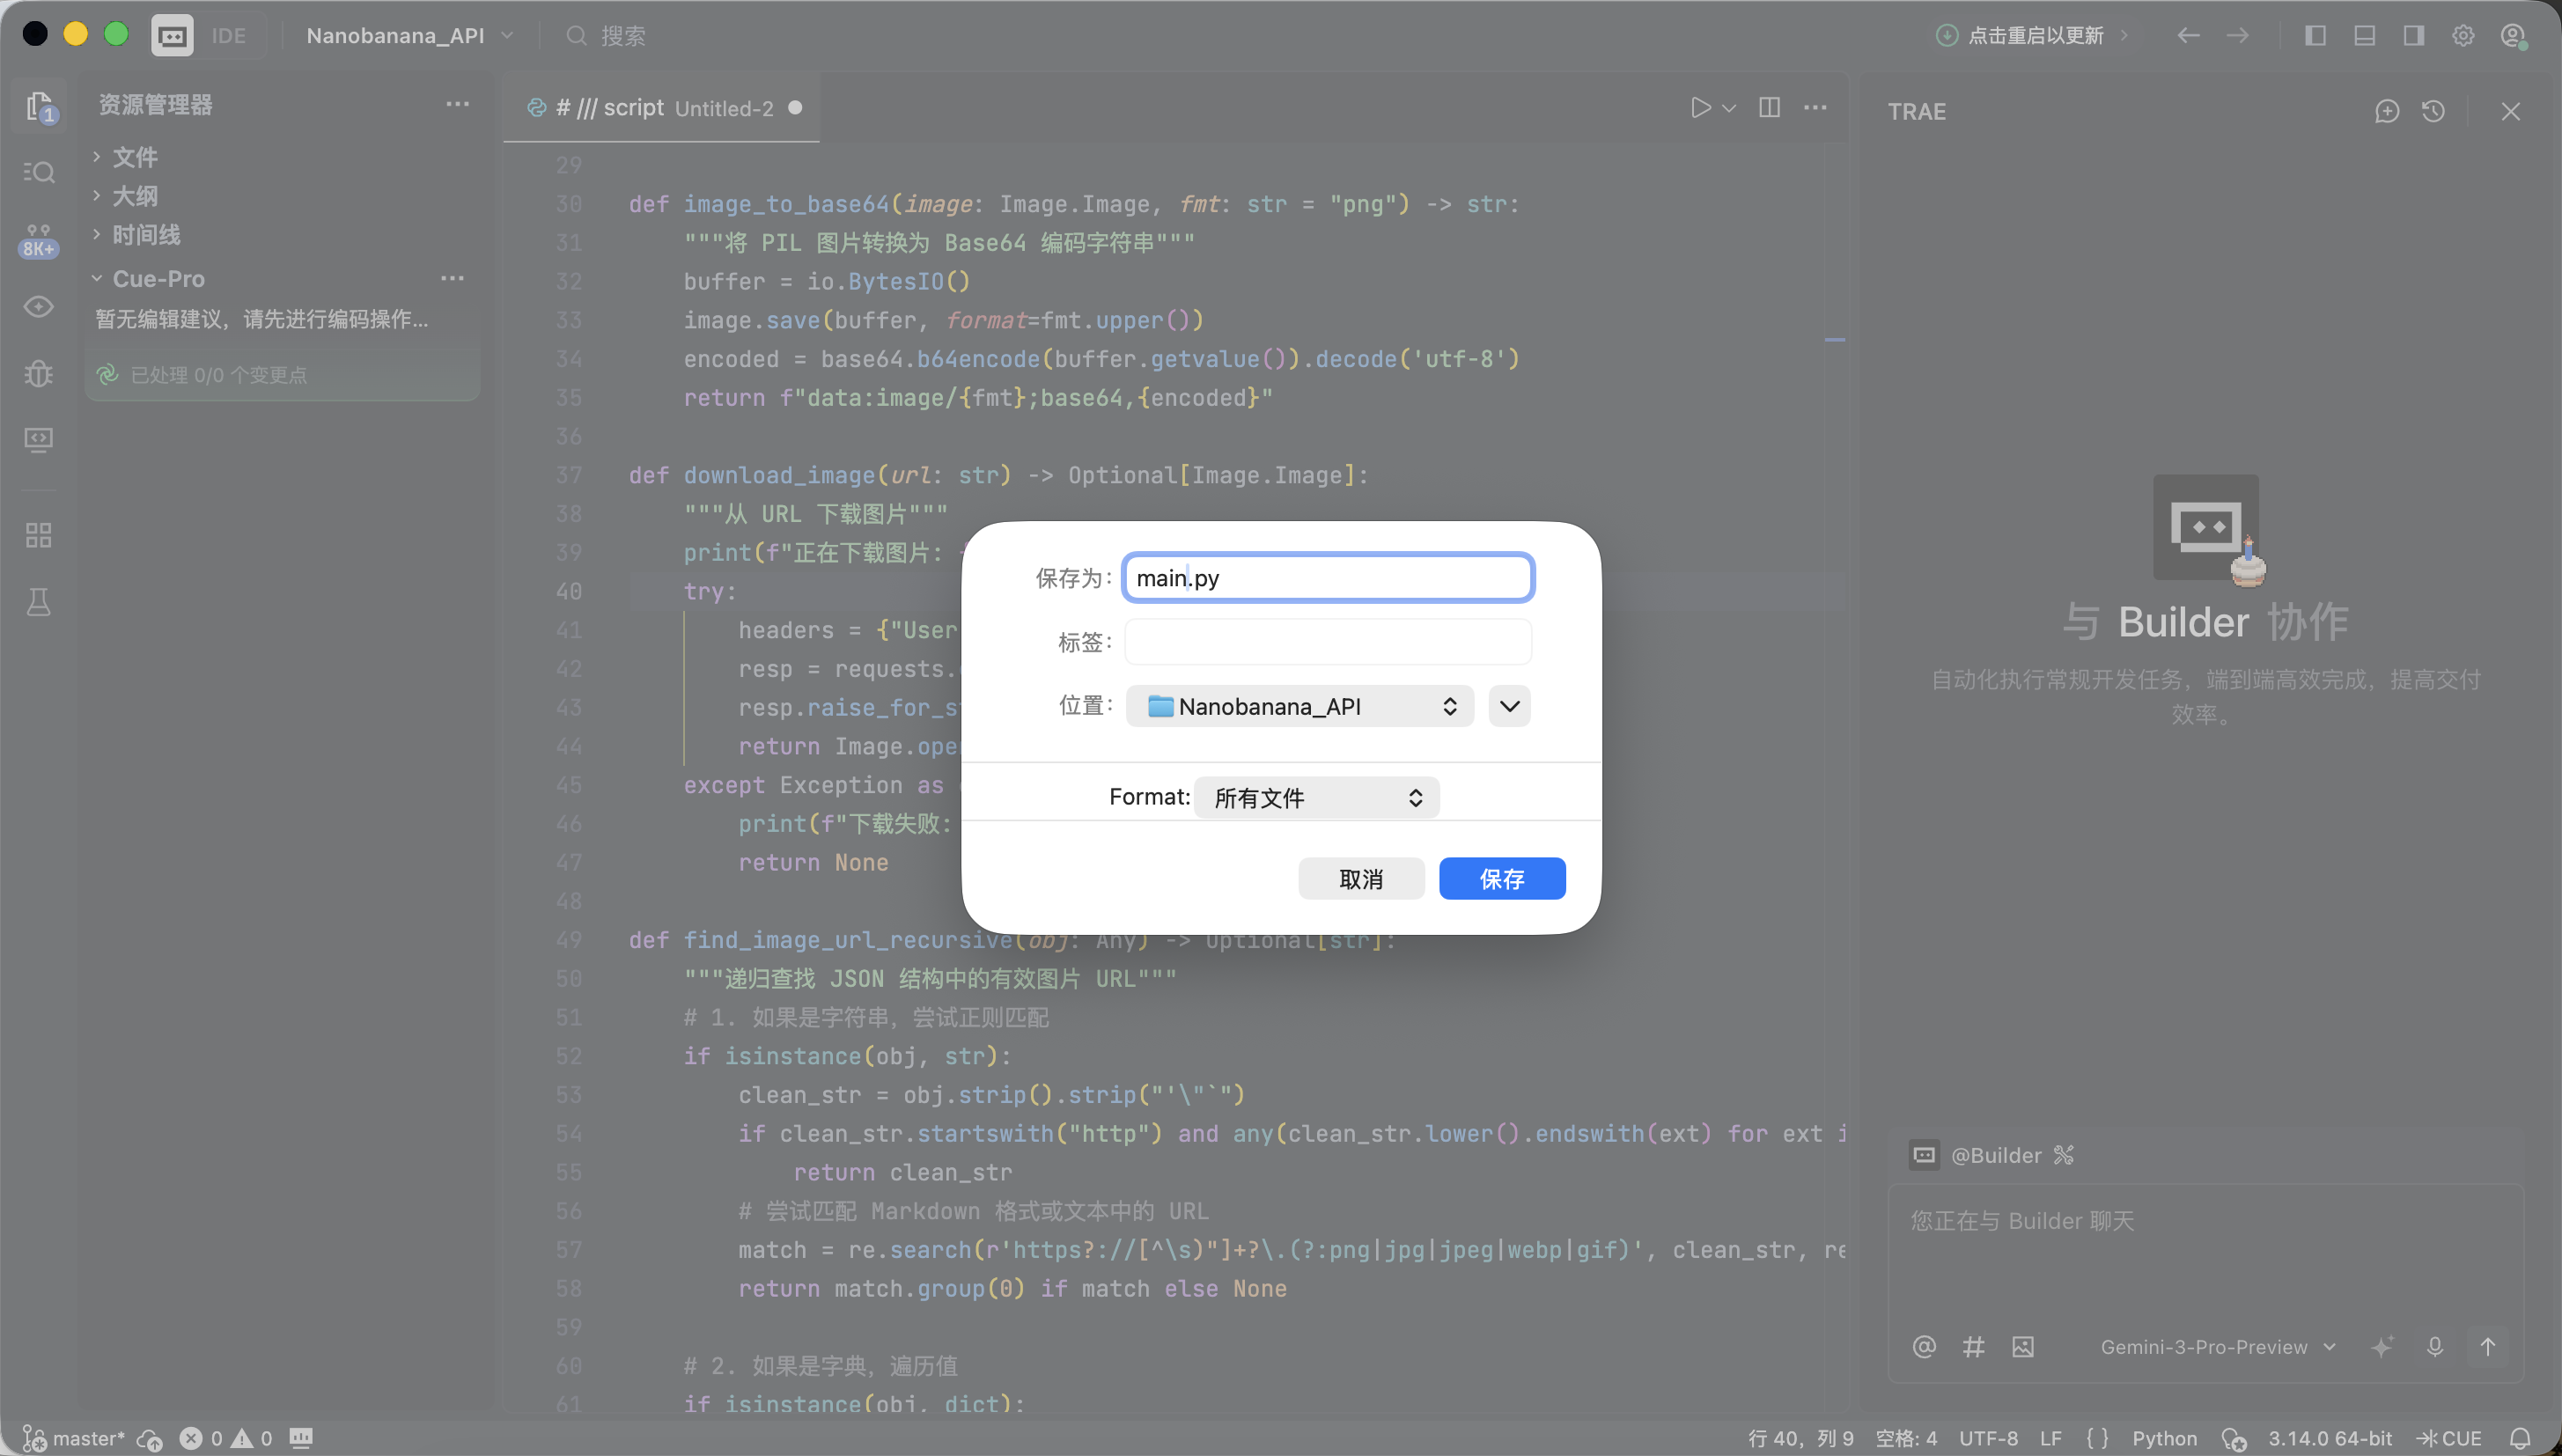
- Paste the full code below
Trae will automatically complete environment setup and dependency installation. No extra configuration is needed.
The code uses a NanoBanana API Key. We will not expand on the application process here. As long as you can obtain the key and fill in the corresponding parameter, that is enough. At this stage, you do not need to understand every line of code. It only needs to run successfully.
# /// script
# dependencies = [
# "gradio>=4.0.0",
# "pillow>=10.0.0",
# "requests>=2.31.0",
# ]
# ///
import gradio as gr
import requests
import base64
from PIL import Image
import io
import os
import time
import re
from typing import Optional, Dict, Any, List
# 配置 API 信息
NANOBANANA_API_URL: str = "YOUR API URL"
NANOBANANA_API_KEY: str = "YOUR API KEY"
OUTPUT_DIR: str = "outputs"
# 确保输出目录存在
os.makedirs(OUTPUT_DIR, exist_ok=True)
def image_to_base64_data_uri(image: Image.Image) -> str:
"""
将 PIL 图像转换为 OpenAI API 兼容的 data URI 格式。
"""
buffer = io.BytesIO()
# 统一转为 PNG 以保证兼容性
image.save(buffer, format="PNG")
encoded = base64.b64encode(buffer.getvalue()).decode('utf-8')
return f"data:image/png;base64,{encoded}"
def base64_to_image(base64_str: str) -> Optional[Image.Image]:
"""
将纯 base64 字符串转换为 PIL Image。
"""
try:
image_bytes = base64.b64decode(base64_str)
return Image.open(io.BytesIO(image_bytes))
except Exception as e:
print(f"Base64 解码失败: {e}")
return None
def extract_base64_from_response(content: Any) -> Optional[str]:
"""
核心解析逻辑:从 API 返回的 content 中提取图片 Base64 数据。
兼容 Markdown 格式和结构化列表格式。
"""
if not content:
return None
base64_data = None
# 1. 尝试结构化提取 (List)
# 对应返回格式: [{"type": "image_url", "image_url": {"url": "data:..."}}]
if isinstance(content, list):
for part in reversed(content): # 倒序查找,通常最新的图片在最后
if isinstance(part, dict):
# 检查 image_url 或 output_image 字段
img_field = part.get("image_url") or part.get("image") or part.get("output_image")
if isinstance(img_field, dict):
url = img_field.get("url", "")
if url.startswith("data:image/") and "," in url:
return url.split(",", 1)[1].strip()
# 如果列表中没有结构化图片,尝试把列表里的文本拼起来找 Markdown
text_parts = [
str(p.get("text", ""))
for p in content
if isinstance(p, dict) and p.get("type") in ["text", "input_text"]
]
content_str = "".join(text_parts)
else:
content_str = str(content)
# 2. 尝试 Markdown 正则提取 (String)
# 对应返回格式: "Here is your image: "
pattern = re.compile(r"!\[.*?\]\((data:image/[^;]+;base64,[^)]+)\)", re.IGNORECASE)
match = pattern.search(content_str)
if match:
data_url = match.group(1)
if "," in data_url:
return data_url.split(",", 1)[1].strip()
return None
def synthesize(prompt: str, input_image: Optional[Image.Image]) -> Optional[Image.Image]:
"""
调用 Nanobanana API 进行生成。
"""
if not prompt or not prompt.strip():
gr.Warning("请输入提示词")
return None
print(f">>> 开始任务: {prompt[:50]}...")
headers = {
"Content-Type": "application/json",
"Authorization": f"Bearer {NANOBANANA_API_KEY}"
}
# 构造符合 OpenAI Vision / Chat 标准的 payload
messages = []
if input_image is not None:
# 图生图/多模态输入模式
print(">>> 检测到输入图片,使用多模态模式")
img_base64 = image_to_base64_data_uri(input_image)
messages.append({
"role": "user",
"content": [
{"type": "text", "text": prompt},
{"type": "image_url", "image_url": {"url": img_base64}}
]
})
else:
# 纯文生图模式
messages.append({
"role": "user",
"content": prompt
})
payload = {
"messages": messages,
# 使用第一段代码中验证可用的模型
"model": "gemini-2.5-flash-image",
# 可选参数,视 API 支持情况而定
"stream": False
}
try:
# 增加超时时间,图片生成通常较慢
response = requests.post(NANOBANANA_API_URL, headers=headers, json=payload, timeout=120)
# 检查 HTTP 状态
if response.status_code != 200:
error_msg = f"API 请求失败: {response.status_code} - {response.text}"
print(error_msg)
gr.Error(error_msg)
return None
result = response.json()
# Debug: 打印返回结果的前一部分,方便调试
print(f"API 原始响应 (截取): {str(result)[:200]}...")
# 提取 Content
content = None
if "choices" in result and len(result["choices"]) > 0:
content = result["choices"][0].get("message", {}).get("content")
if not content:
gr.Warning("API 返回结果中没有 content 字段")
return None
# 使用之前验证过的逻辑提取 Base64
base64_str = extract_base64_from_response(content)
if base64_str:
output_image = base64_to_image(base64_str)
if output_image:
return output_image
# 如果没提取到图片,可能是模型拒绝了或只返回了文本
text_content = str(content) if not isinstance(content, list) else " ".join([str(x) for x in content])
gr.Info(f"未生成图片,模型返回文本: {text_content[:100]}...")
return None
except requests.exceptions.Timeout:
gr.Error("请求超时,请稍后重试")
return None
except Exception as e:
import traceback
traceback.print_exc()
gr.Error(f"发生未知错误: {str(e)}")
return None
# Gradio 界面配置
with gr.Blocks(title="Nanobanana Image Generator") as app:
gr.Markdown("# 🍌 Nanobanana Text/Image to Image")
gr.Markdown("基于 Gemini-2.5-Flash-Image 模型,支持文生图与图生图。")
with gr.Row():
with gr.Column():
prompt_input = gr.Textbox(
label="提示词 (Prompt)",
placeholder="例如: A cyberpunk cat holding a neon sign...",
lines=3
)
image_input = gr.Image(
label="参考图 (可选,用于图生图)",
type="pil",
height=300
)
submit_btn = gr.Button("开始生成", variant="primary")
with gr.Column():
image_output = gr.Image(label="生成结果", format="png")
submit_btn.click(
fn=synthesize,
inputs=[prompt_input, image_input],
outputs=image_output
)
if __name__ == "__main__":
app.launch(share=True)When Trae indicates successful execution, click the local link it provides (usually http://127.0.0.1:7860).
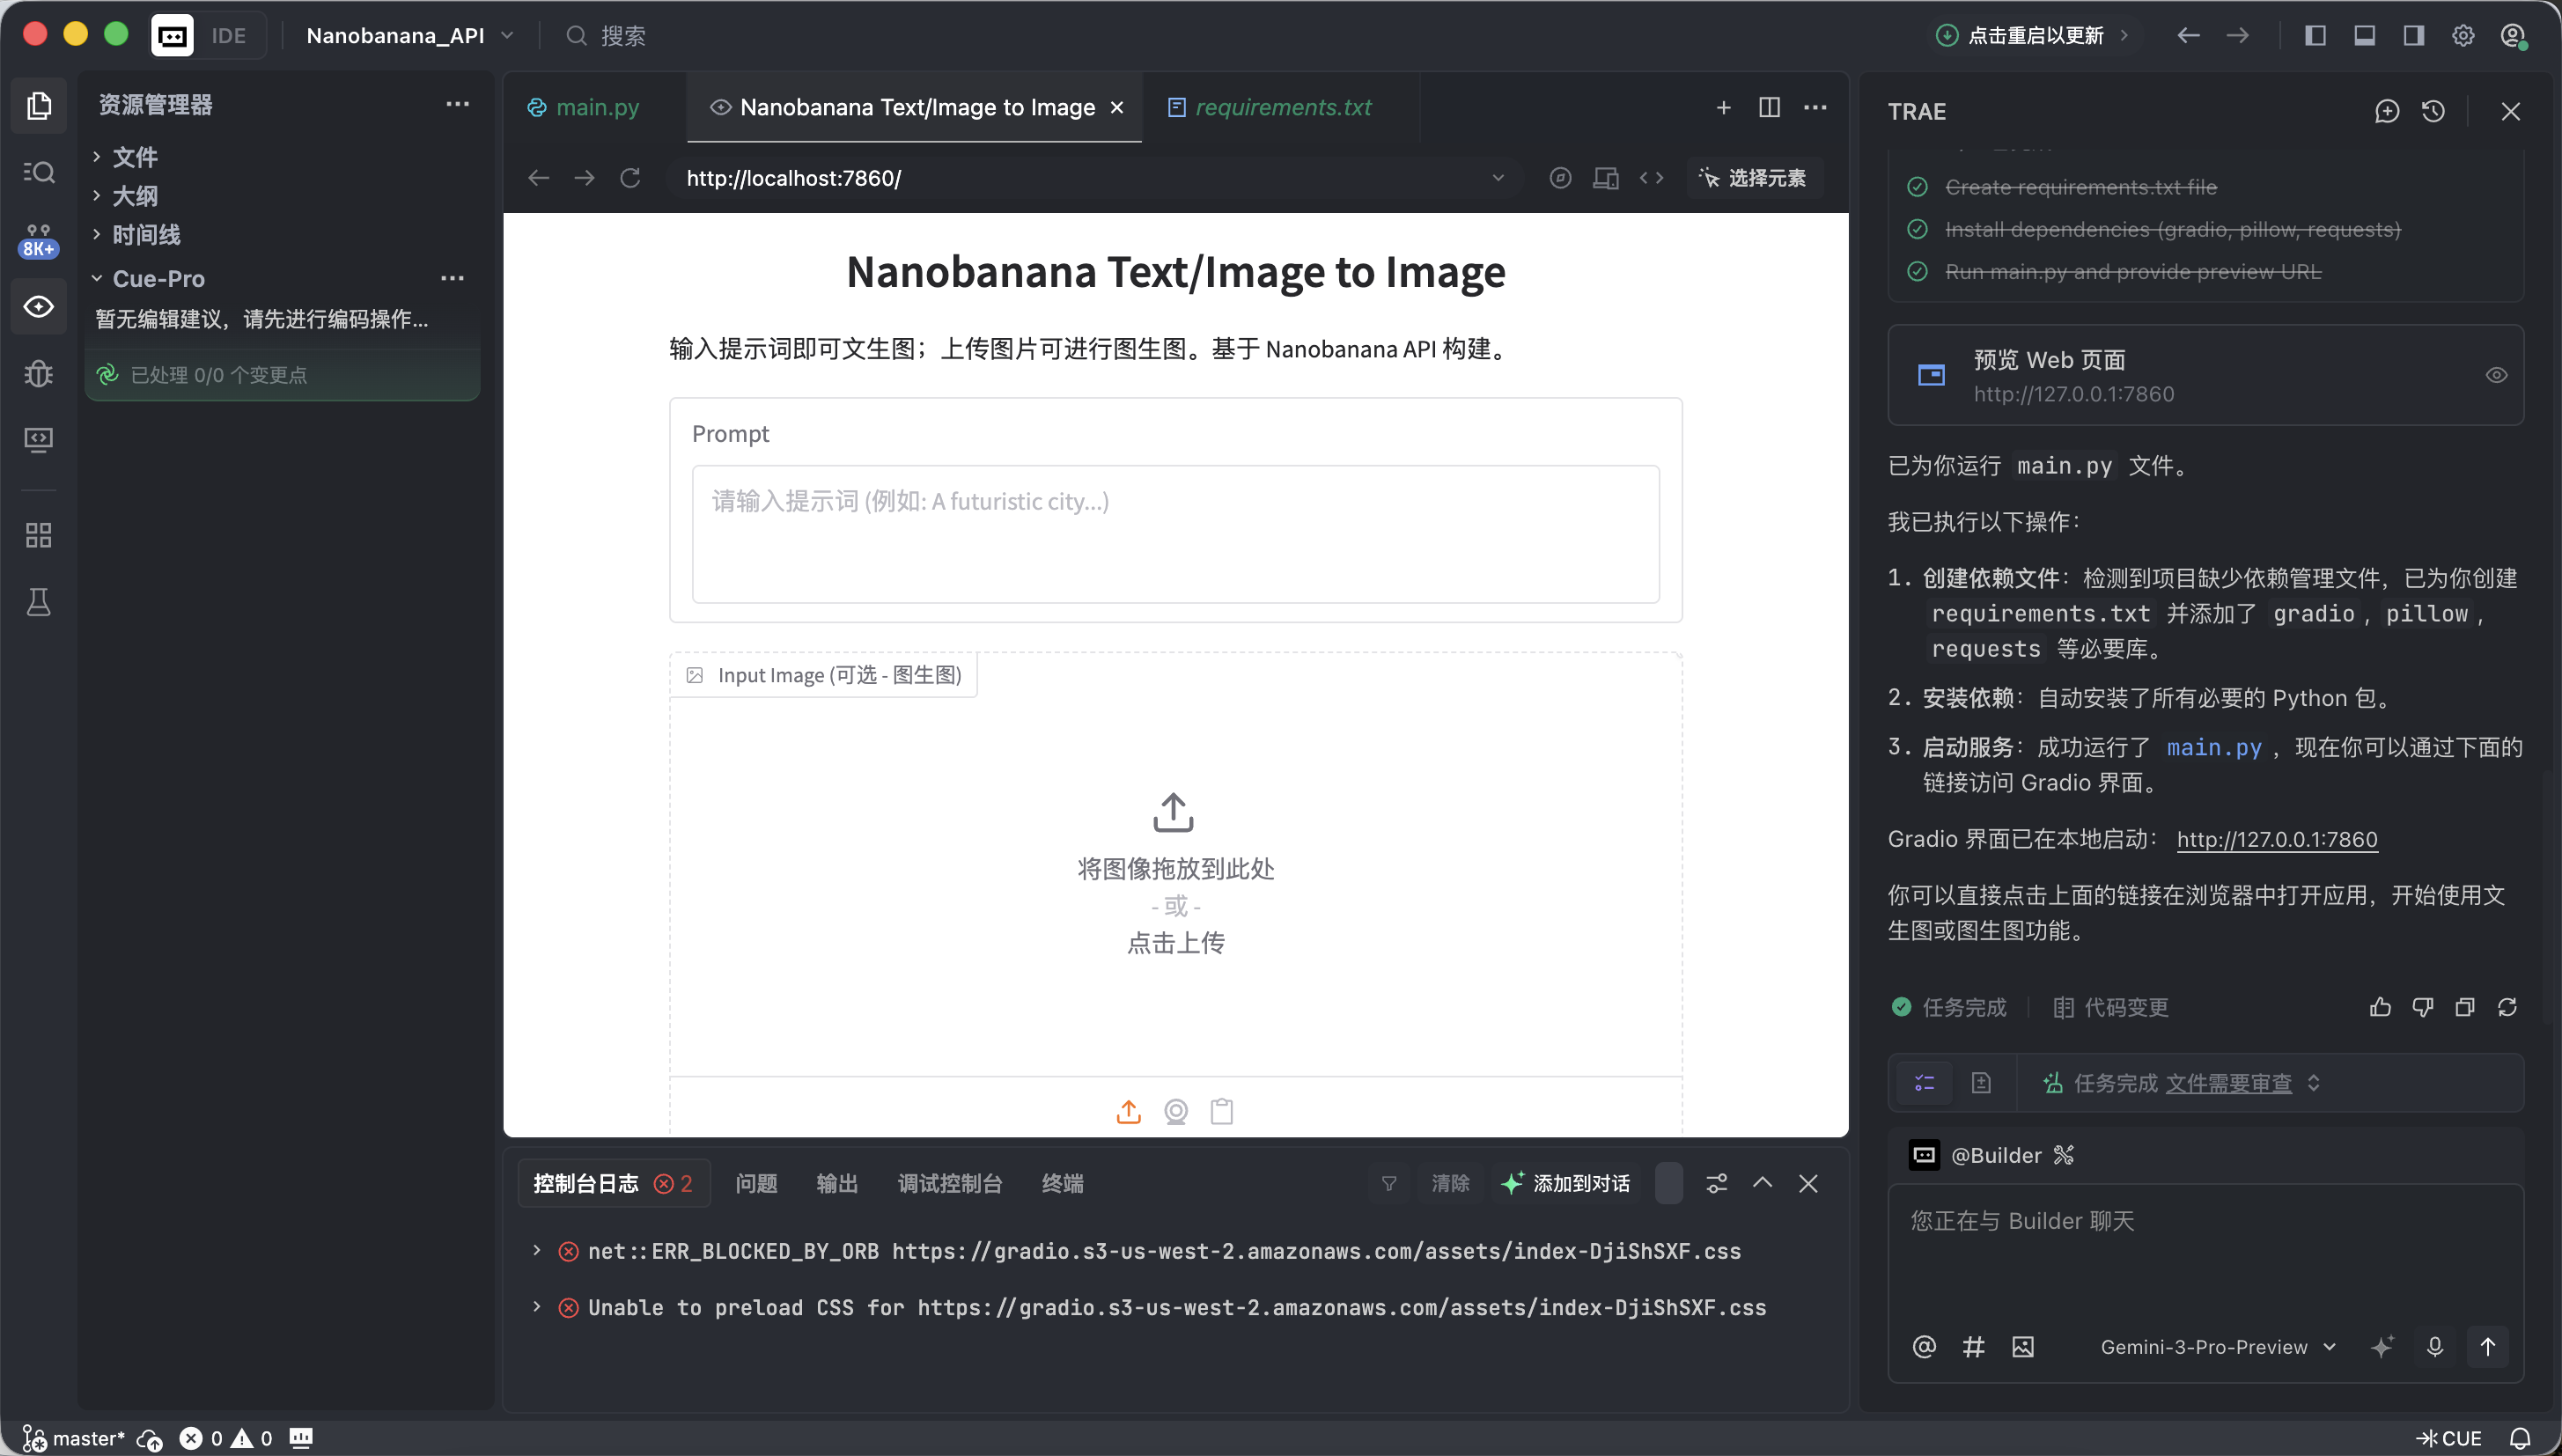
If everything is correct, you will see a working AI drawing interface.
This interface looks simple, but it already includes two of the most important capabilities in commercial-grade drawing tools: text-to-image and image-to-image.
- Left side: Instruction area ( Input Zone) - this is where you issue commands.
- Prompt (prompt box): Enter your creative description (English is recommended).
- Input Image (reference image box):
- Text-to-image mode: keep it empty.
- Image-to-image mode: drag a local image here, and AI will create based on it.
- Submit button: click to send instructions and start generation.
- Right side: display area ( Output Zone) - this is where results appear.
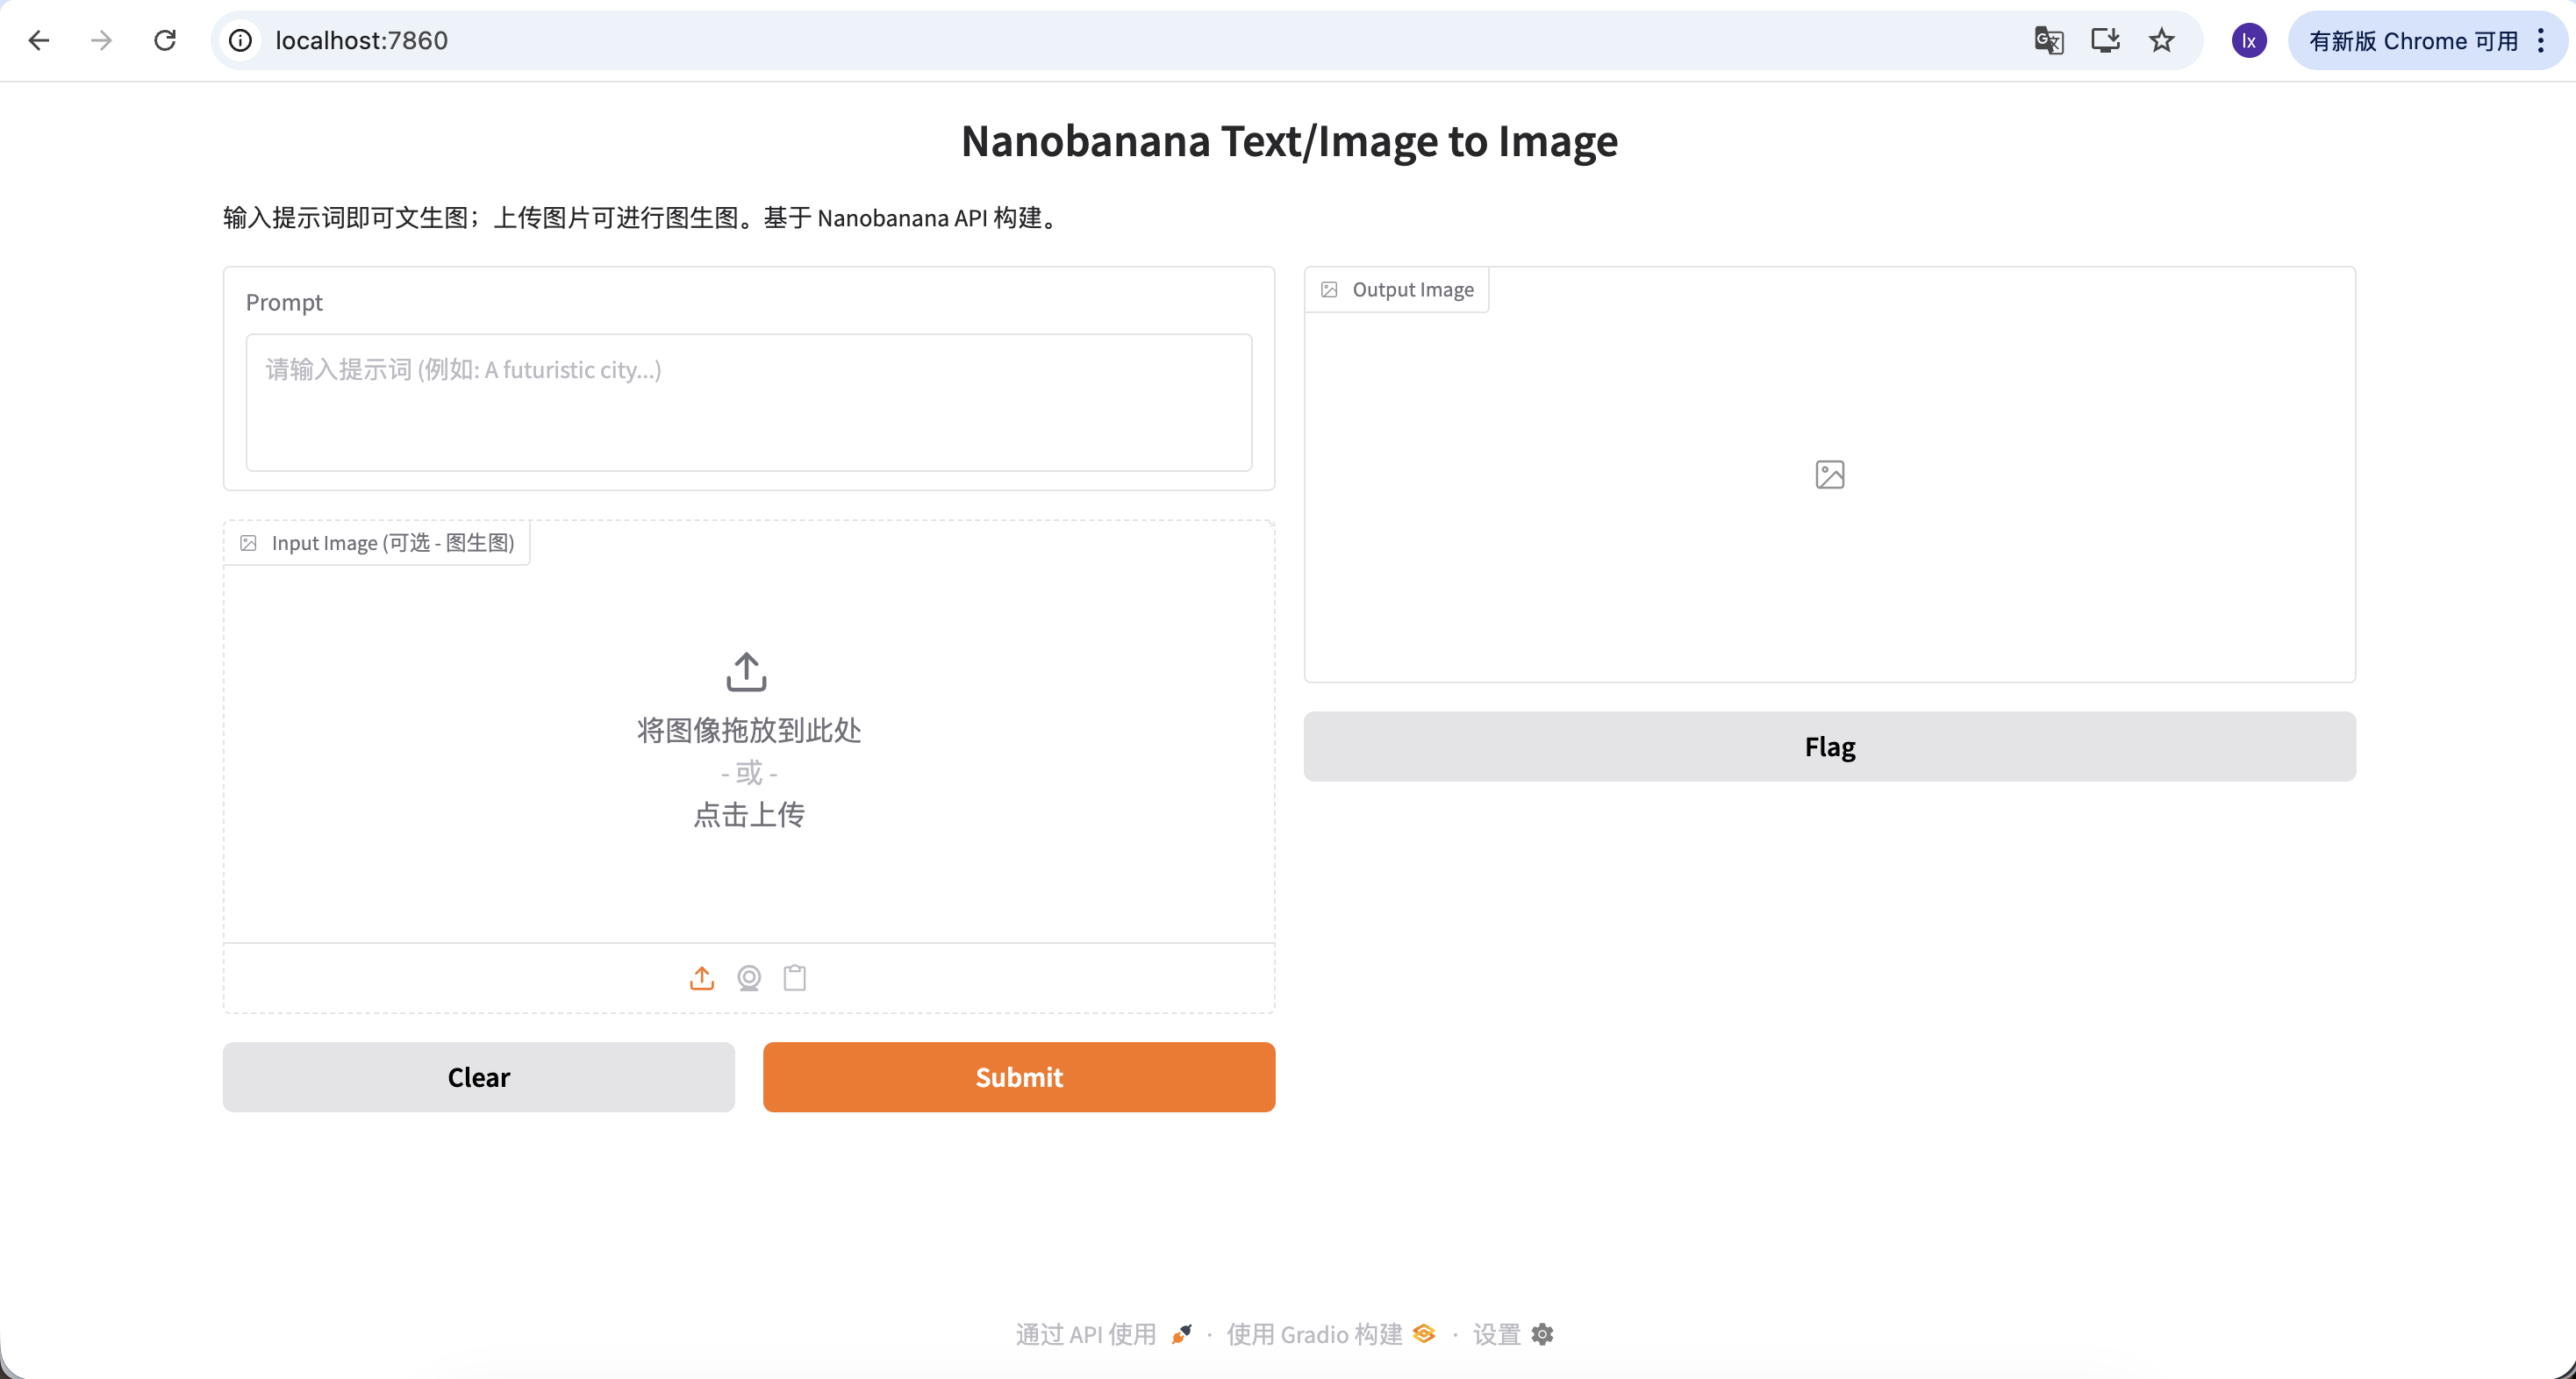
Now we can try generating your first image.
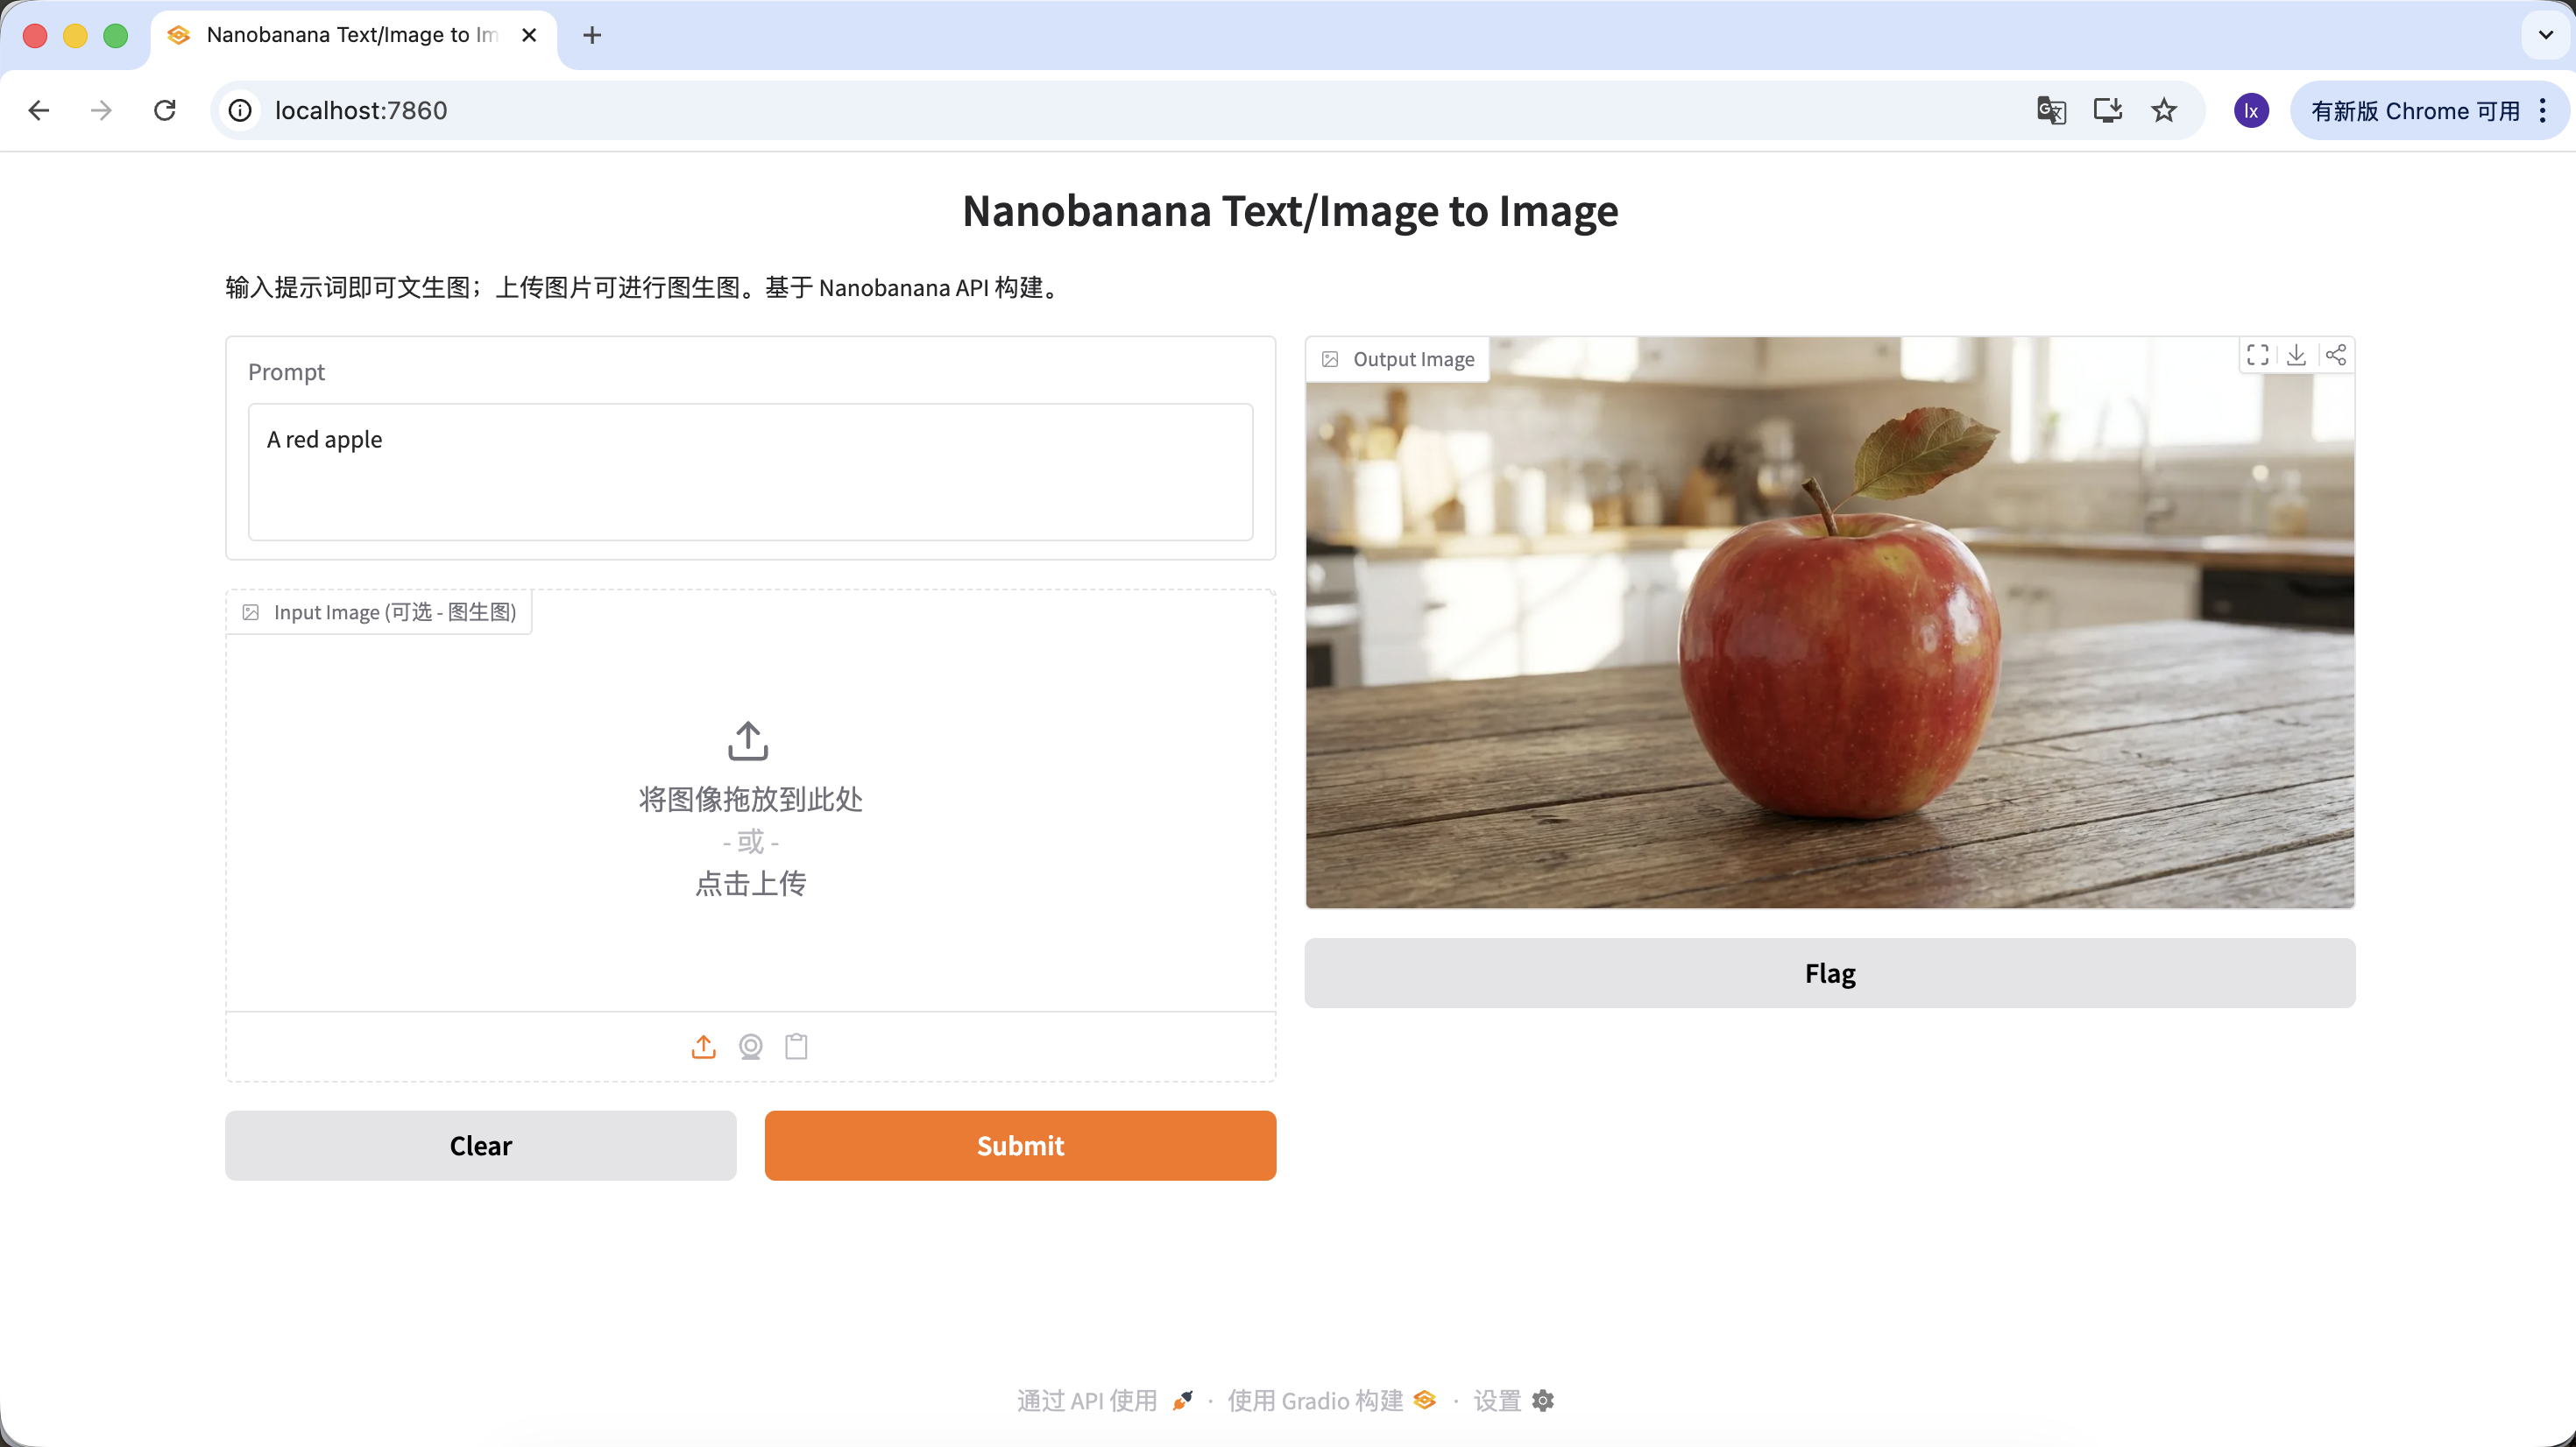
The example prompt used here is:
A red apple
This is intentionally simplified, without style details or parameter constraints.
Actual Process
After running the code, the flow can be summarized in three steps:
- Send the text description to the model
- The model generates the corresponding image
- The image is saved as a local file
After a few seconds, you will see generated results locally. Because model generation is stochastic, the same prompt can produce different outputs. You can generate multiple times and choose the image you prefer.
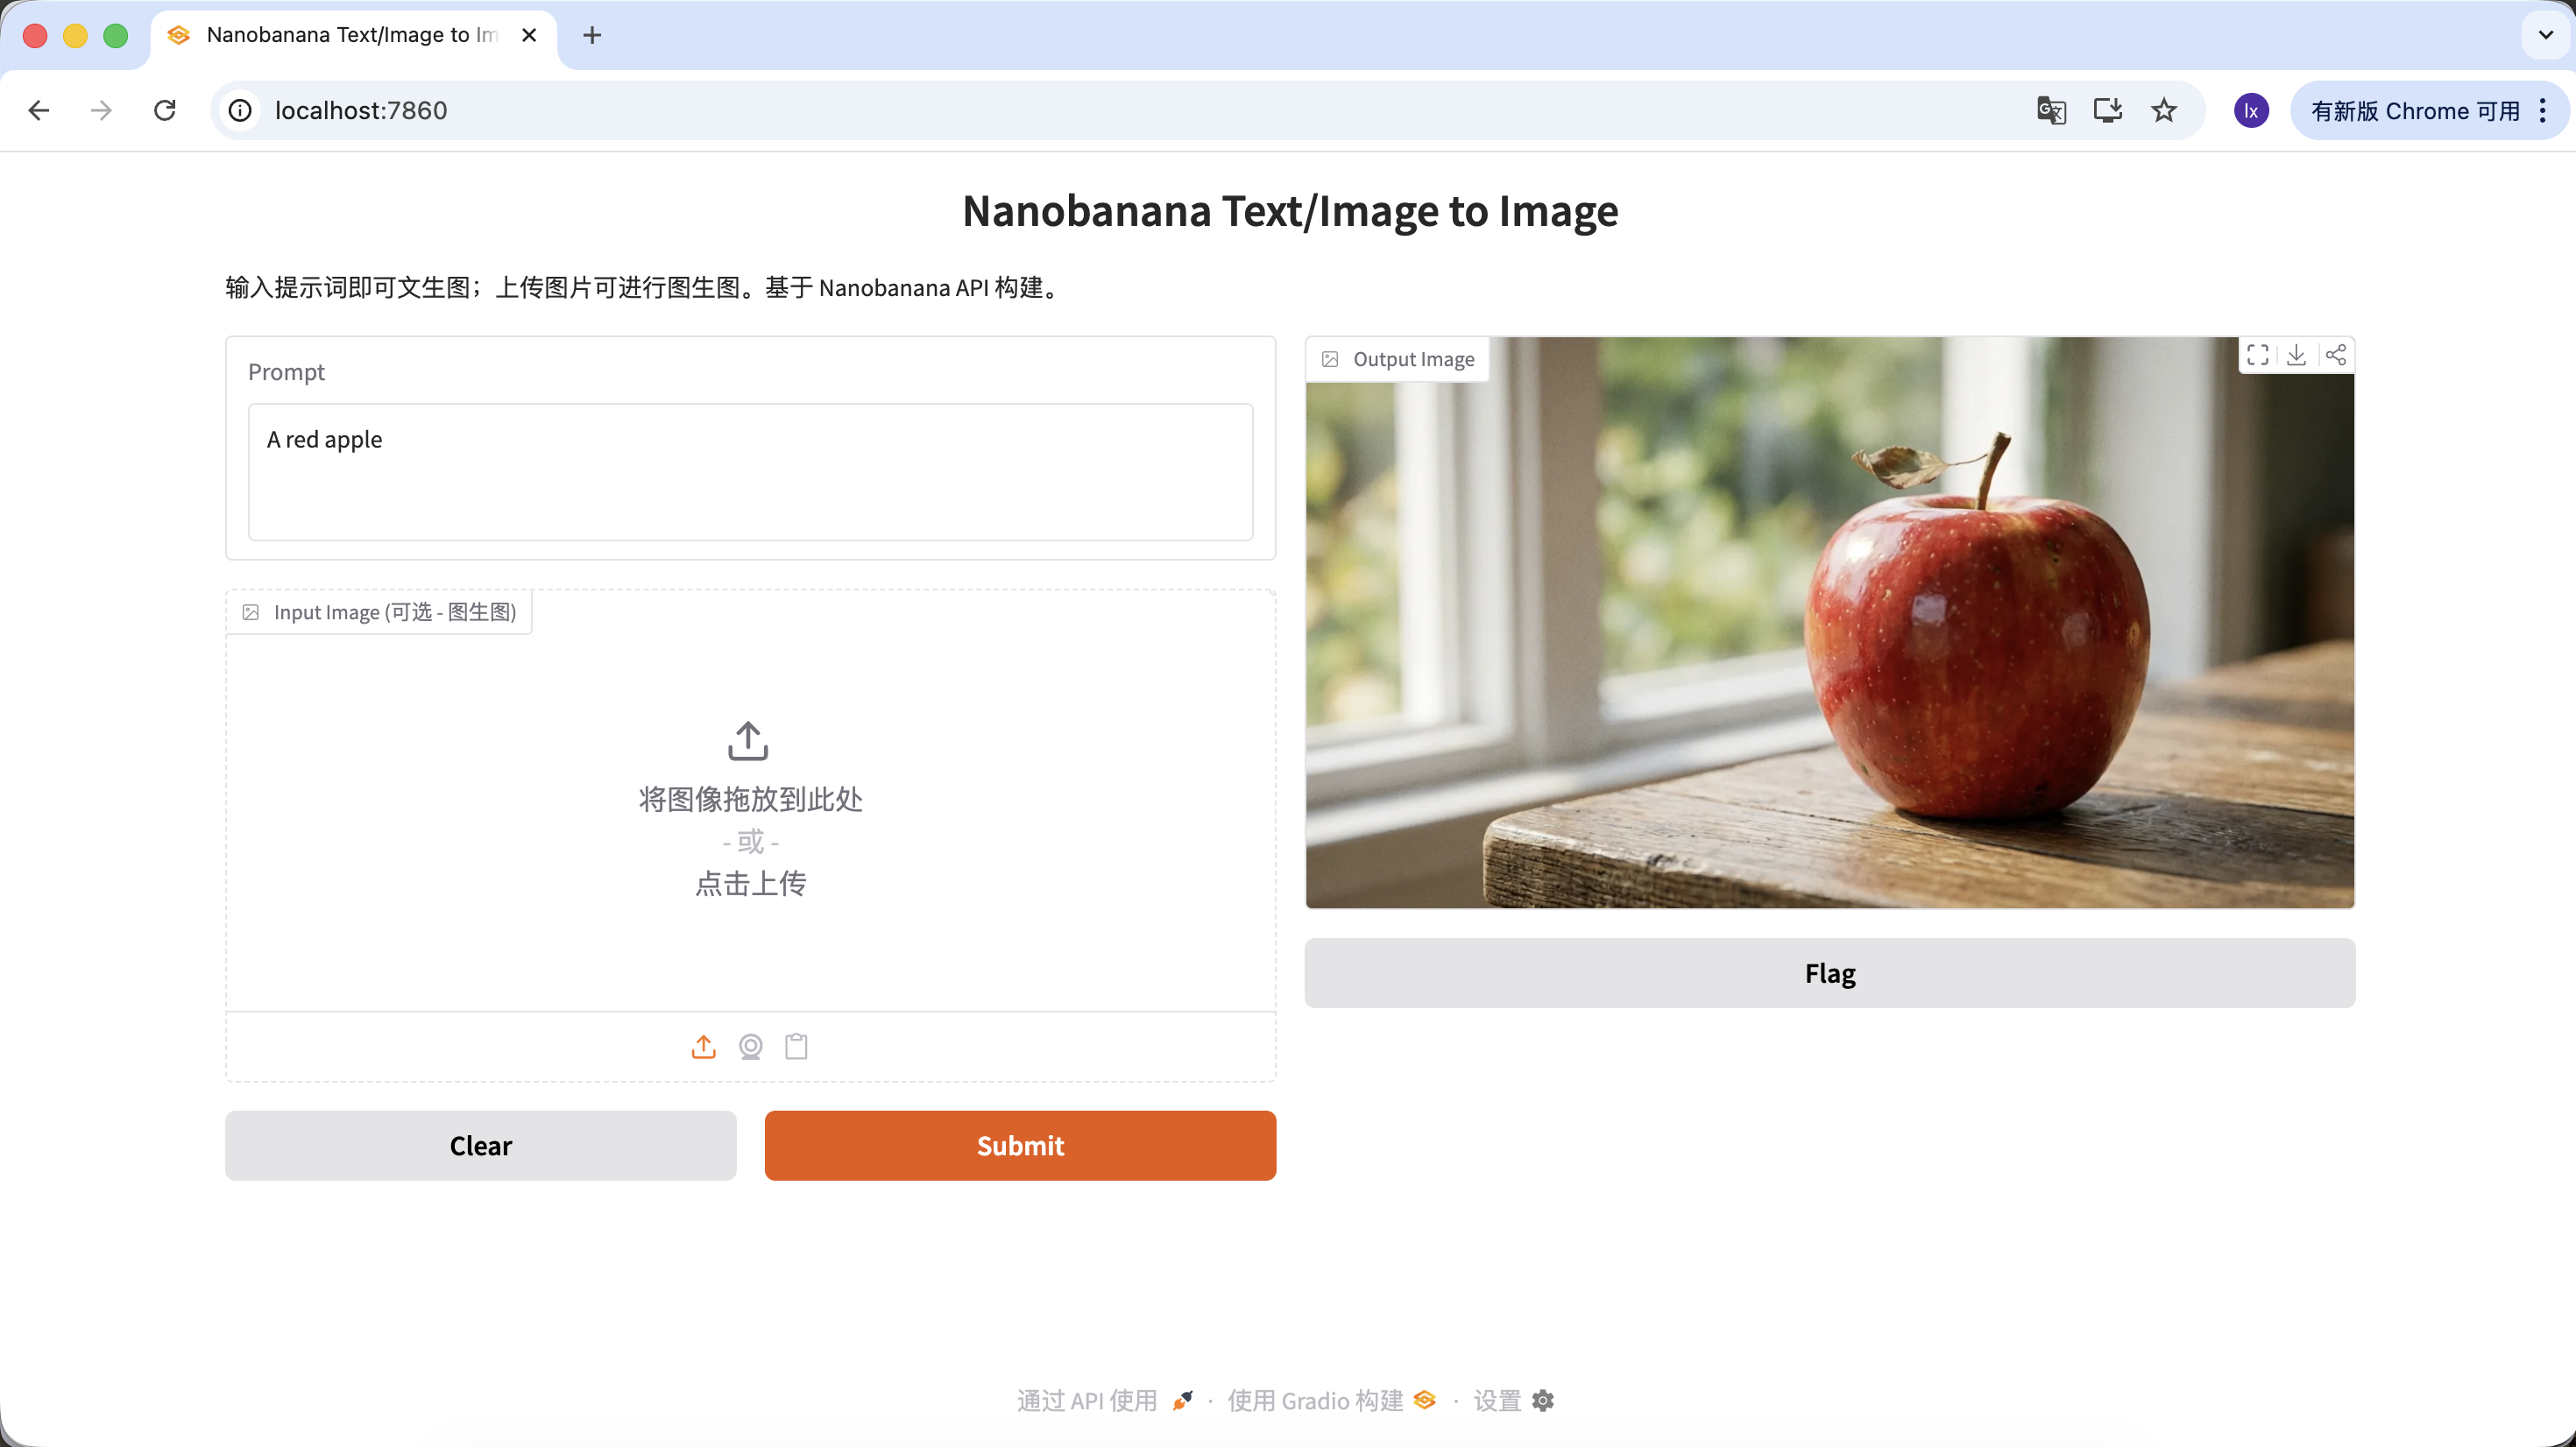
You can also enrich your prompt with more constraints and descriptions. For example, the prompt below tends to generate a more distinctive result:
"A hyper-realistic close-up of a fresh red apple with water droplets on its skin, sitting on a dark rustic wooden table. Cinematic dramatic lighting, rim light, shallow depth of field, bokeh background, 8k resolution, macro photography."
(一个超写实的带水珠的新鲜红苹果特写,放在深色粗糙木桌上。电影级戏剧光效,轮廓光,浅景深,背景虚化,8k分辨率,微距摄影。)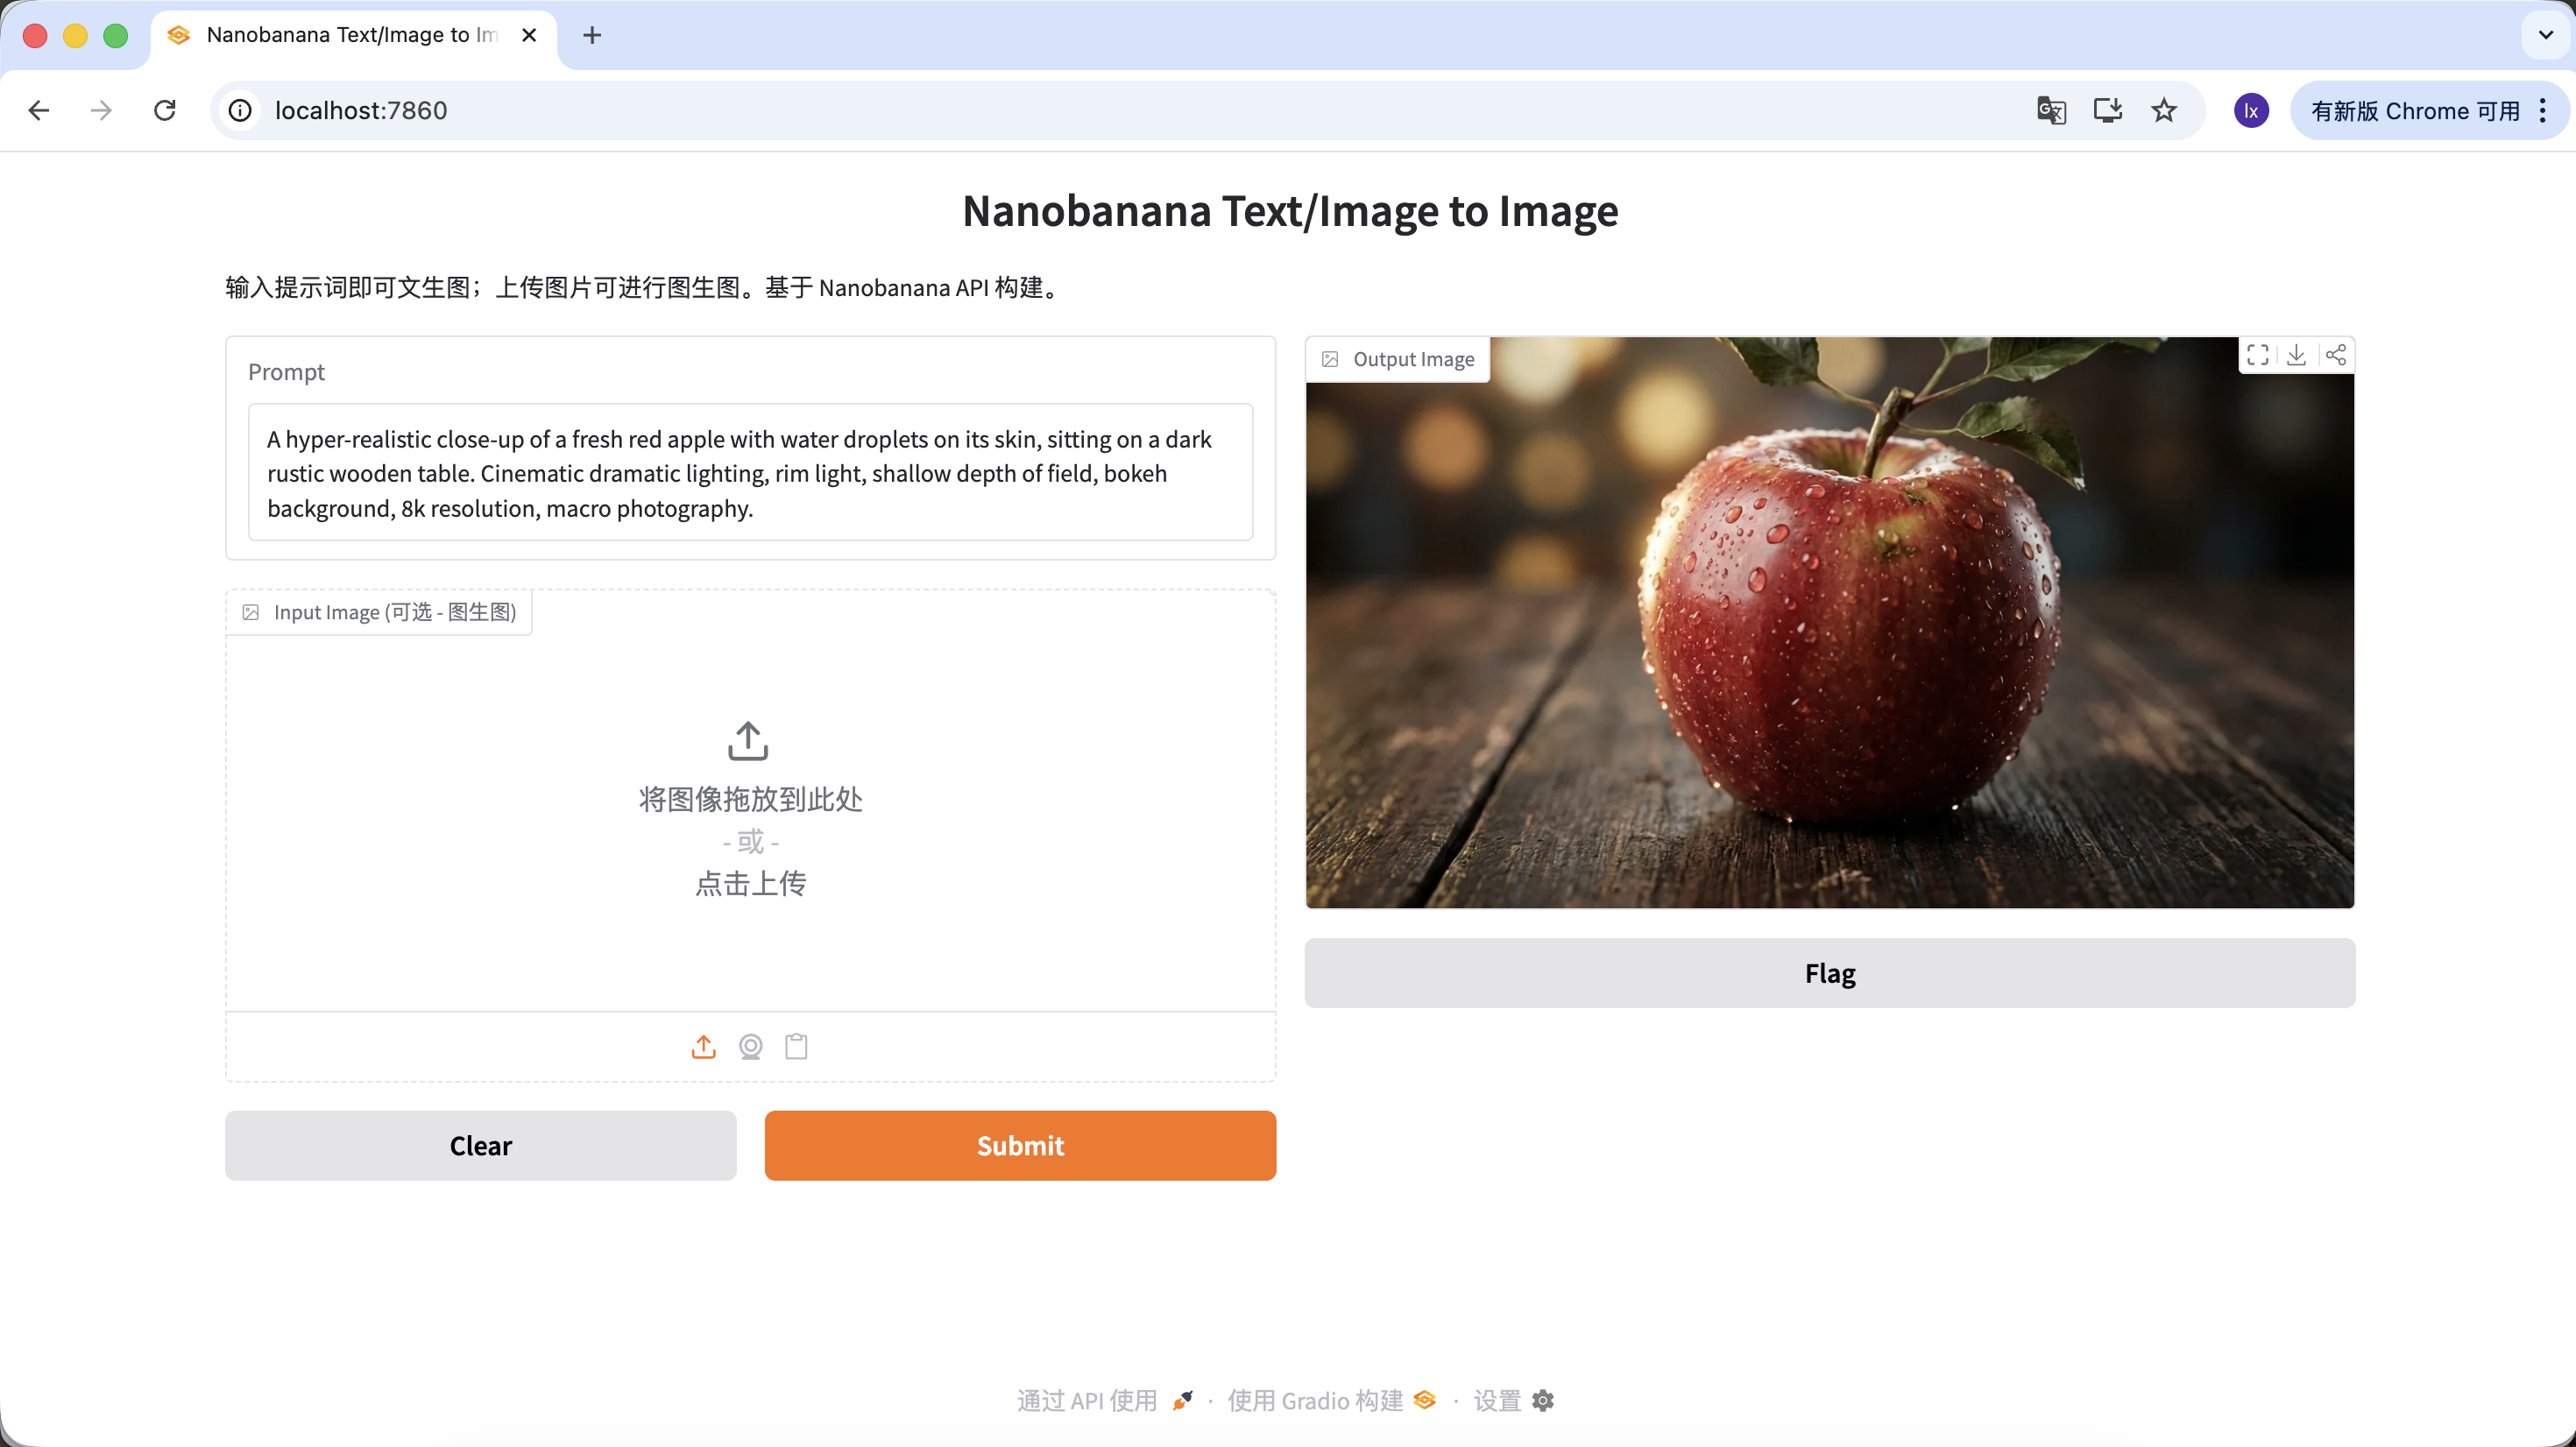
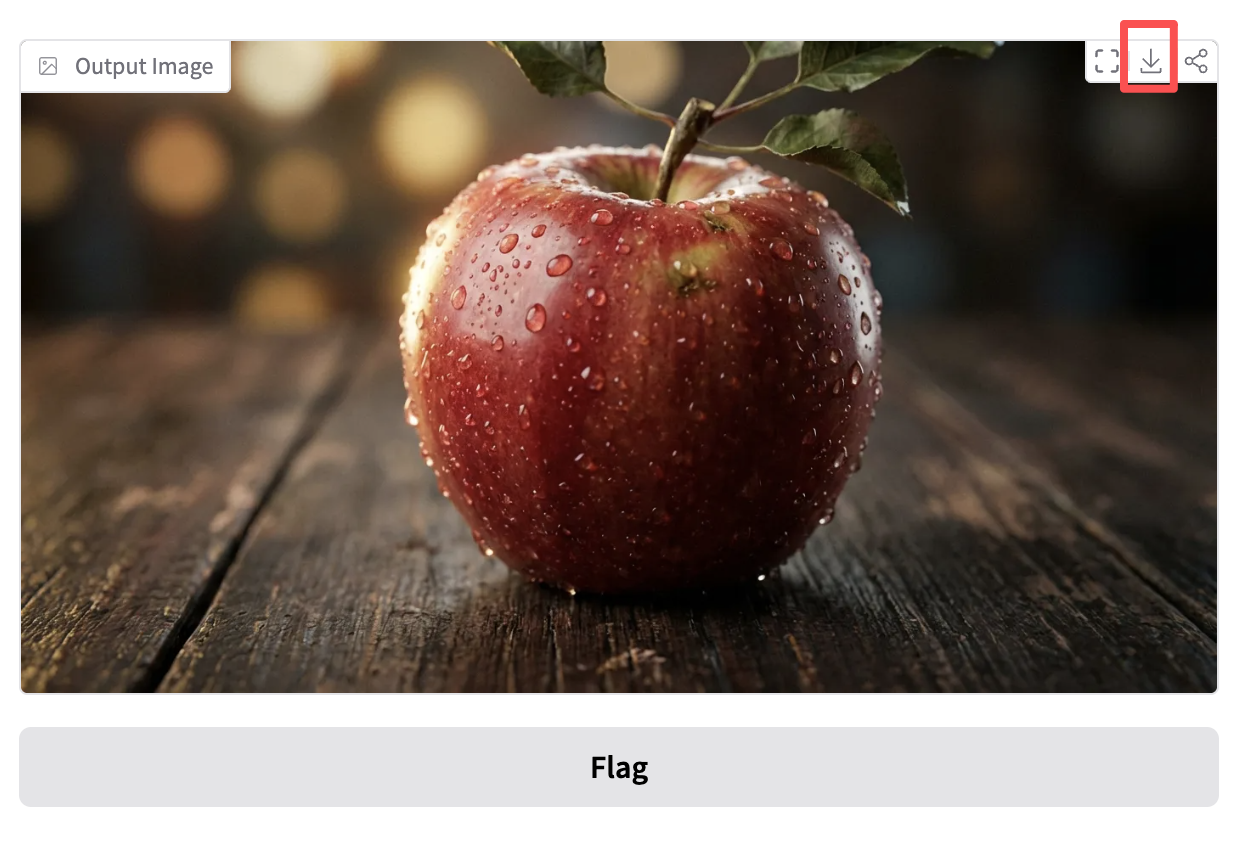
Click download in the Output Image area to save the image locally.
1.3 Common Material-Generation Scenarios for Image Models
In real work, large-model image generation is more often used for efficiently producing design assets, rather than creating one-off art pieces.
If you look at high-engagement cases from design marketing accounts, you will find that most outputs are concentrated in two scenarios:
- Text-to-image (0 to 1)
- Reference-image generation (1 to N)
1) Text-to-Image: Quickly Get Design Assets
This category is about efficiency. When you need to fill visual blanks in design (such as empty states, avatars, and illustrations), AI essentially acts as an instant stock-image library.
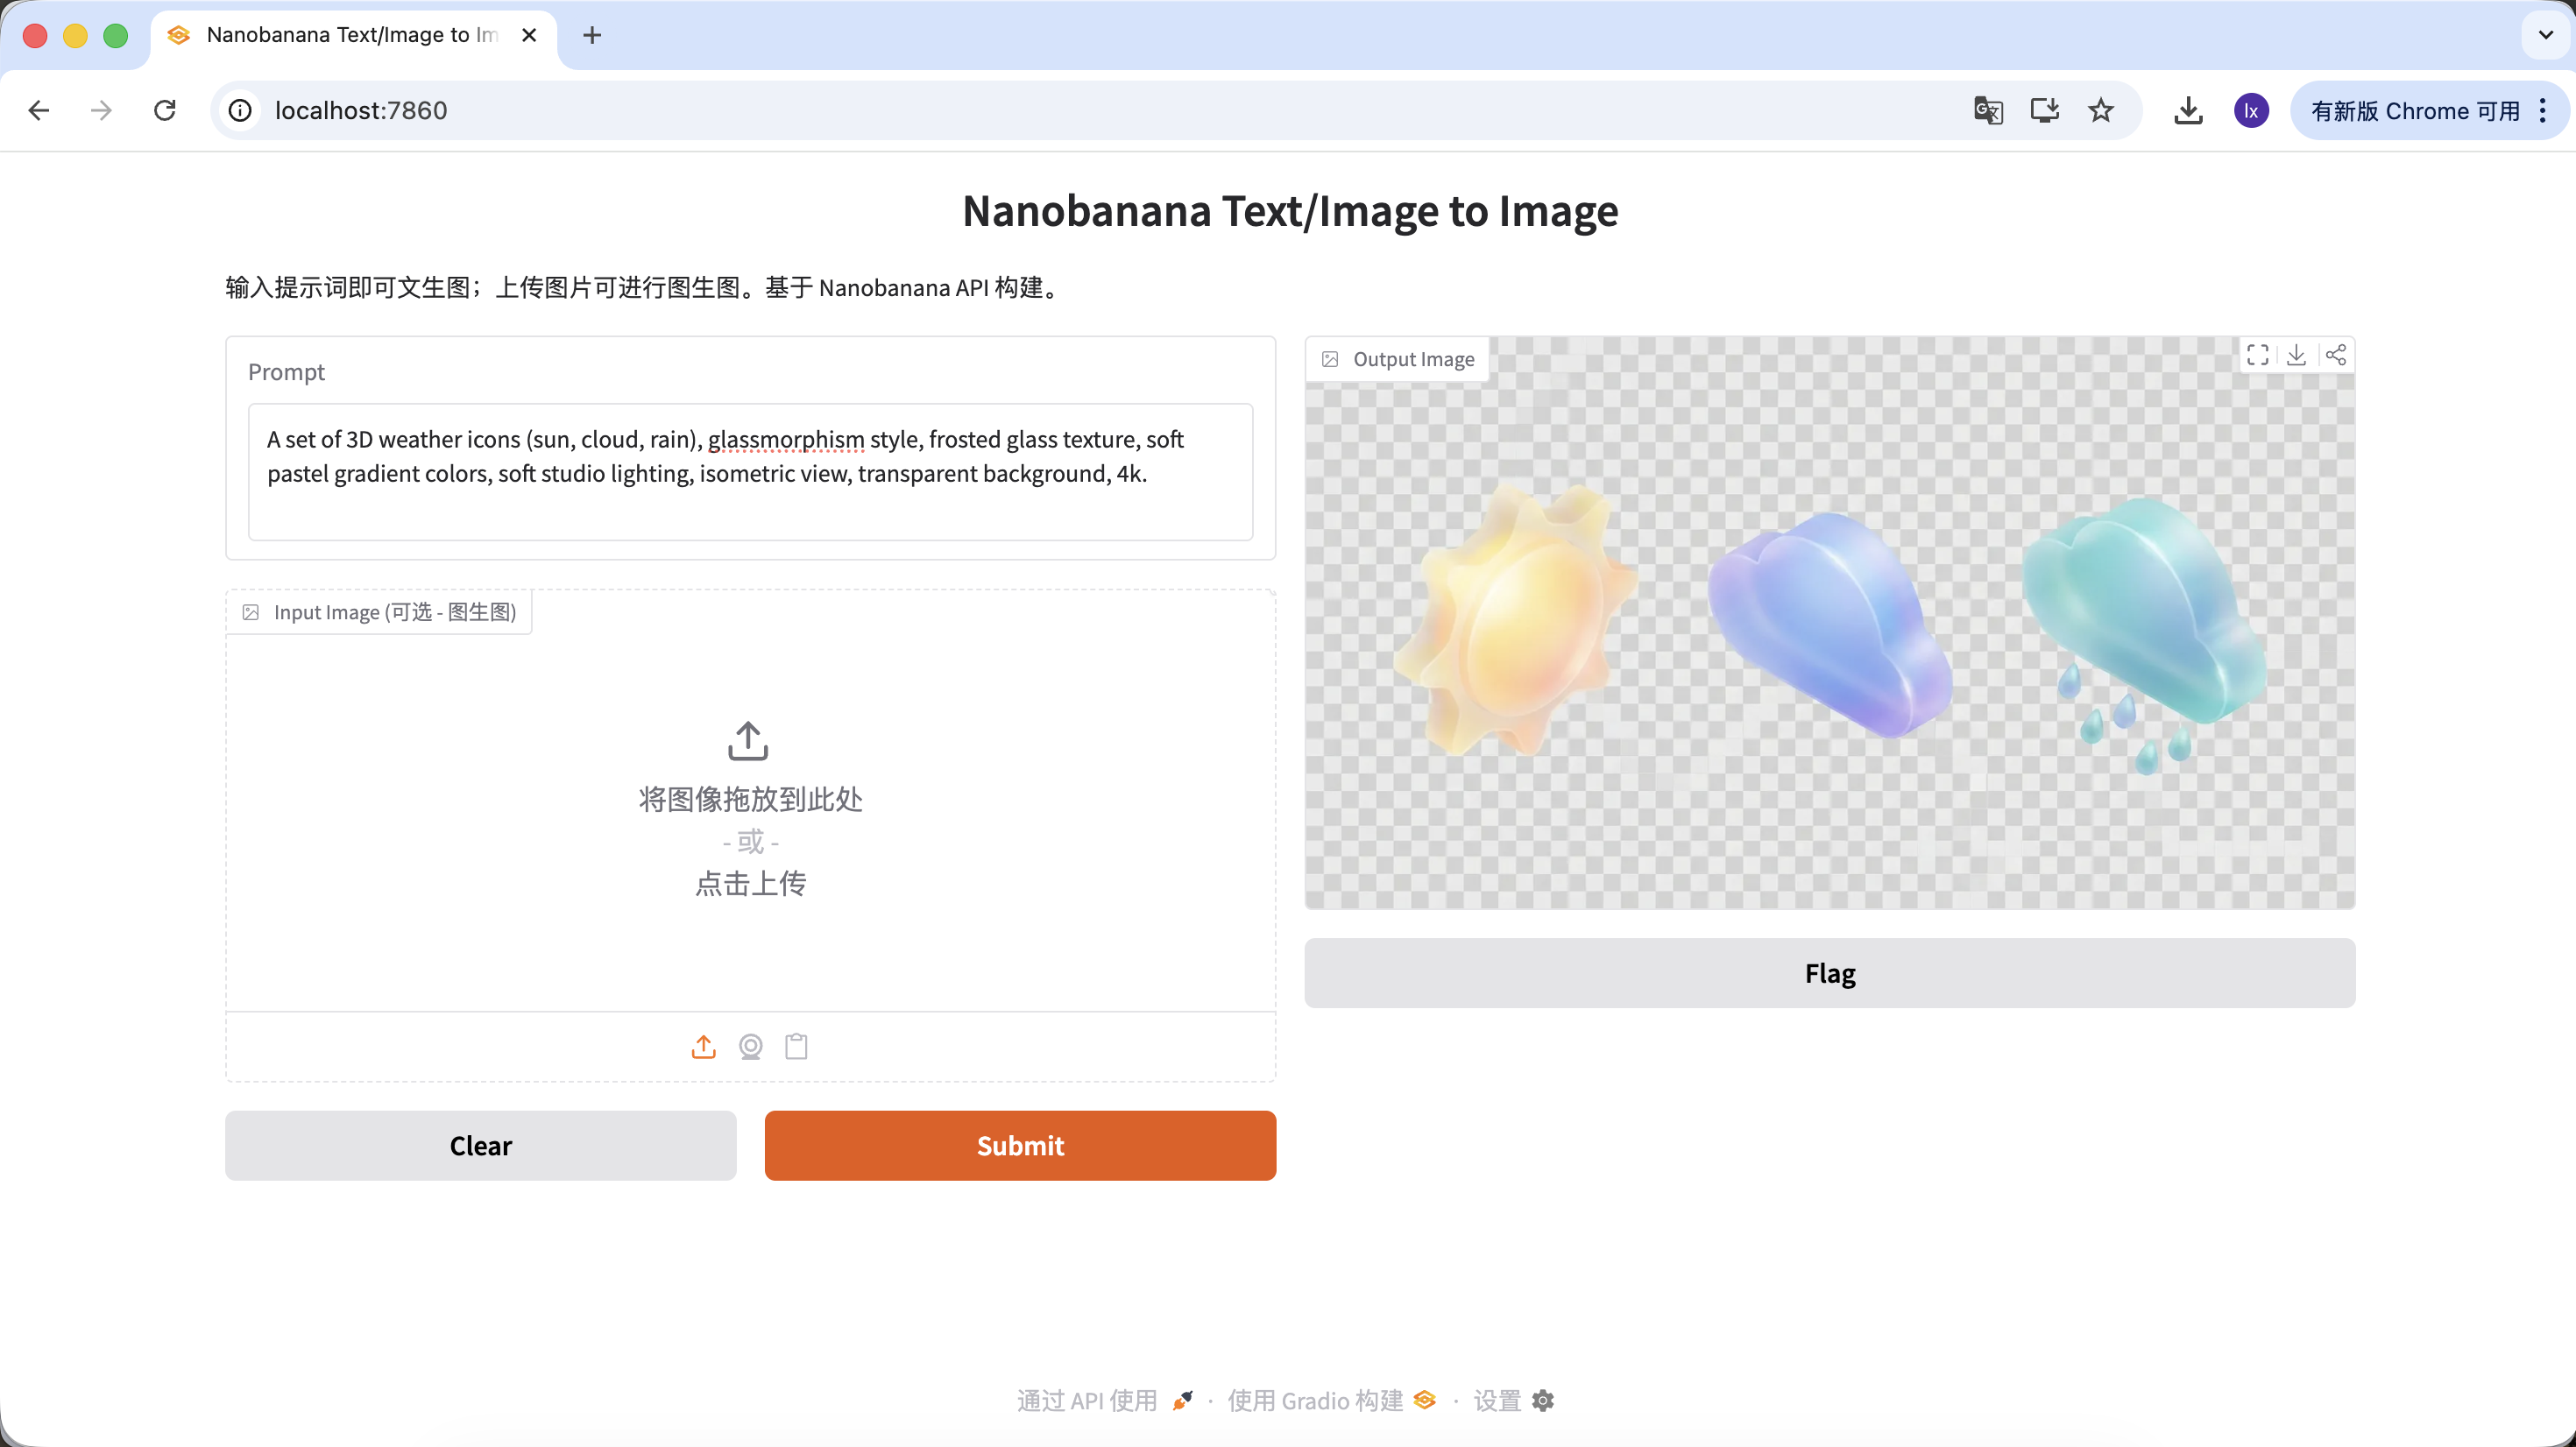
Generate UI Design Assets
- Trend: frosted-glass and clay-style 3D icons, common on Dribbble
- Typical appearance: translucent materials, glowing edges, candy-like color palettes for functional or weather icons
Example Prompt:
A set of 3D weather icons (sun, cloud, rain), glassmorphism style, frosted glass texture, soft pastel gradient colors, soft studio lighting, isometric view, transparent background, 4k.
(一套 3D 天气图标,毛玻璃风格,磨砂质感,柔和渐变色,影棚光,等轴视图)
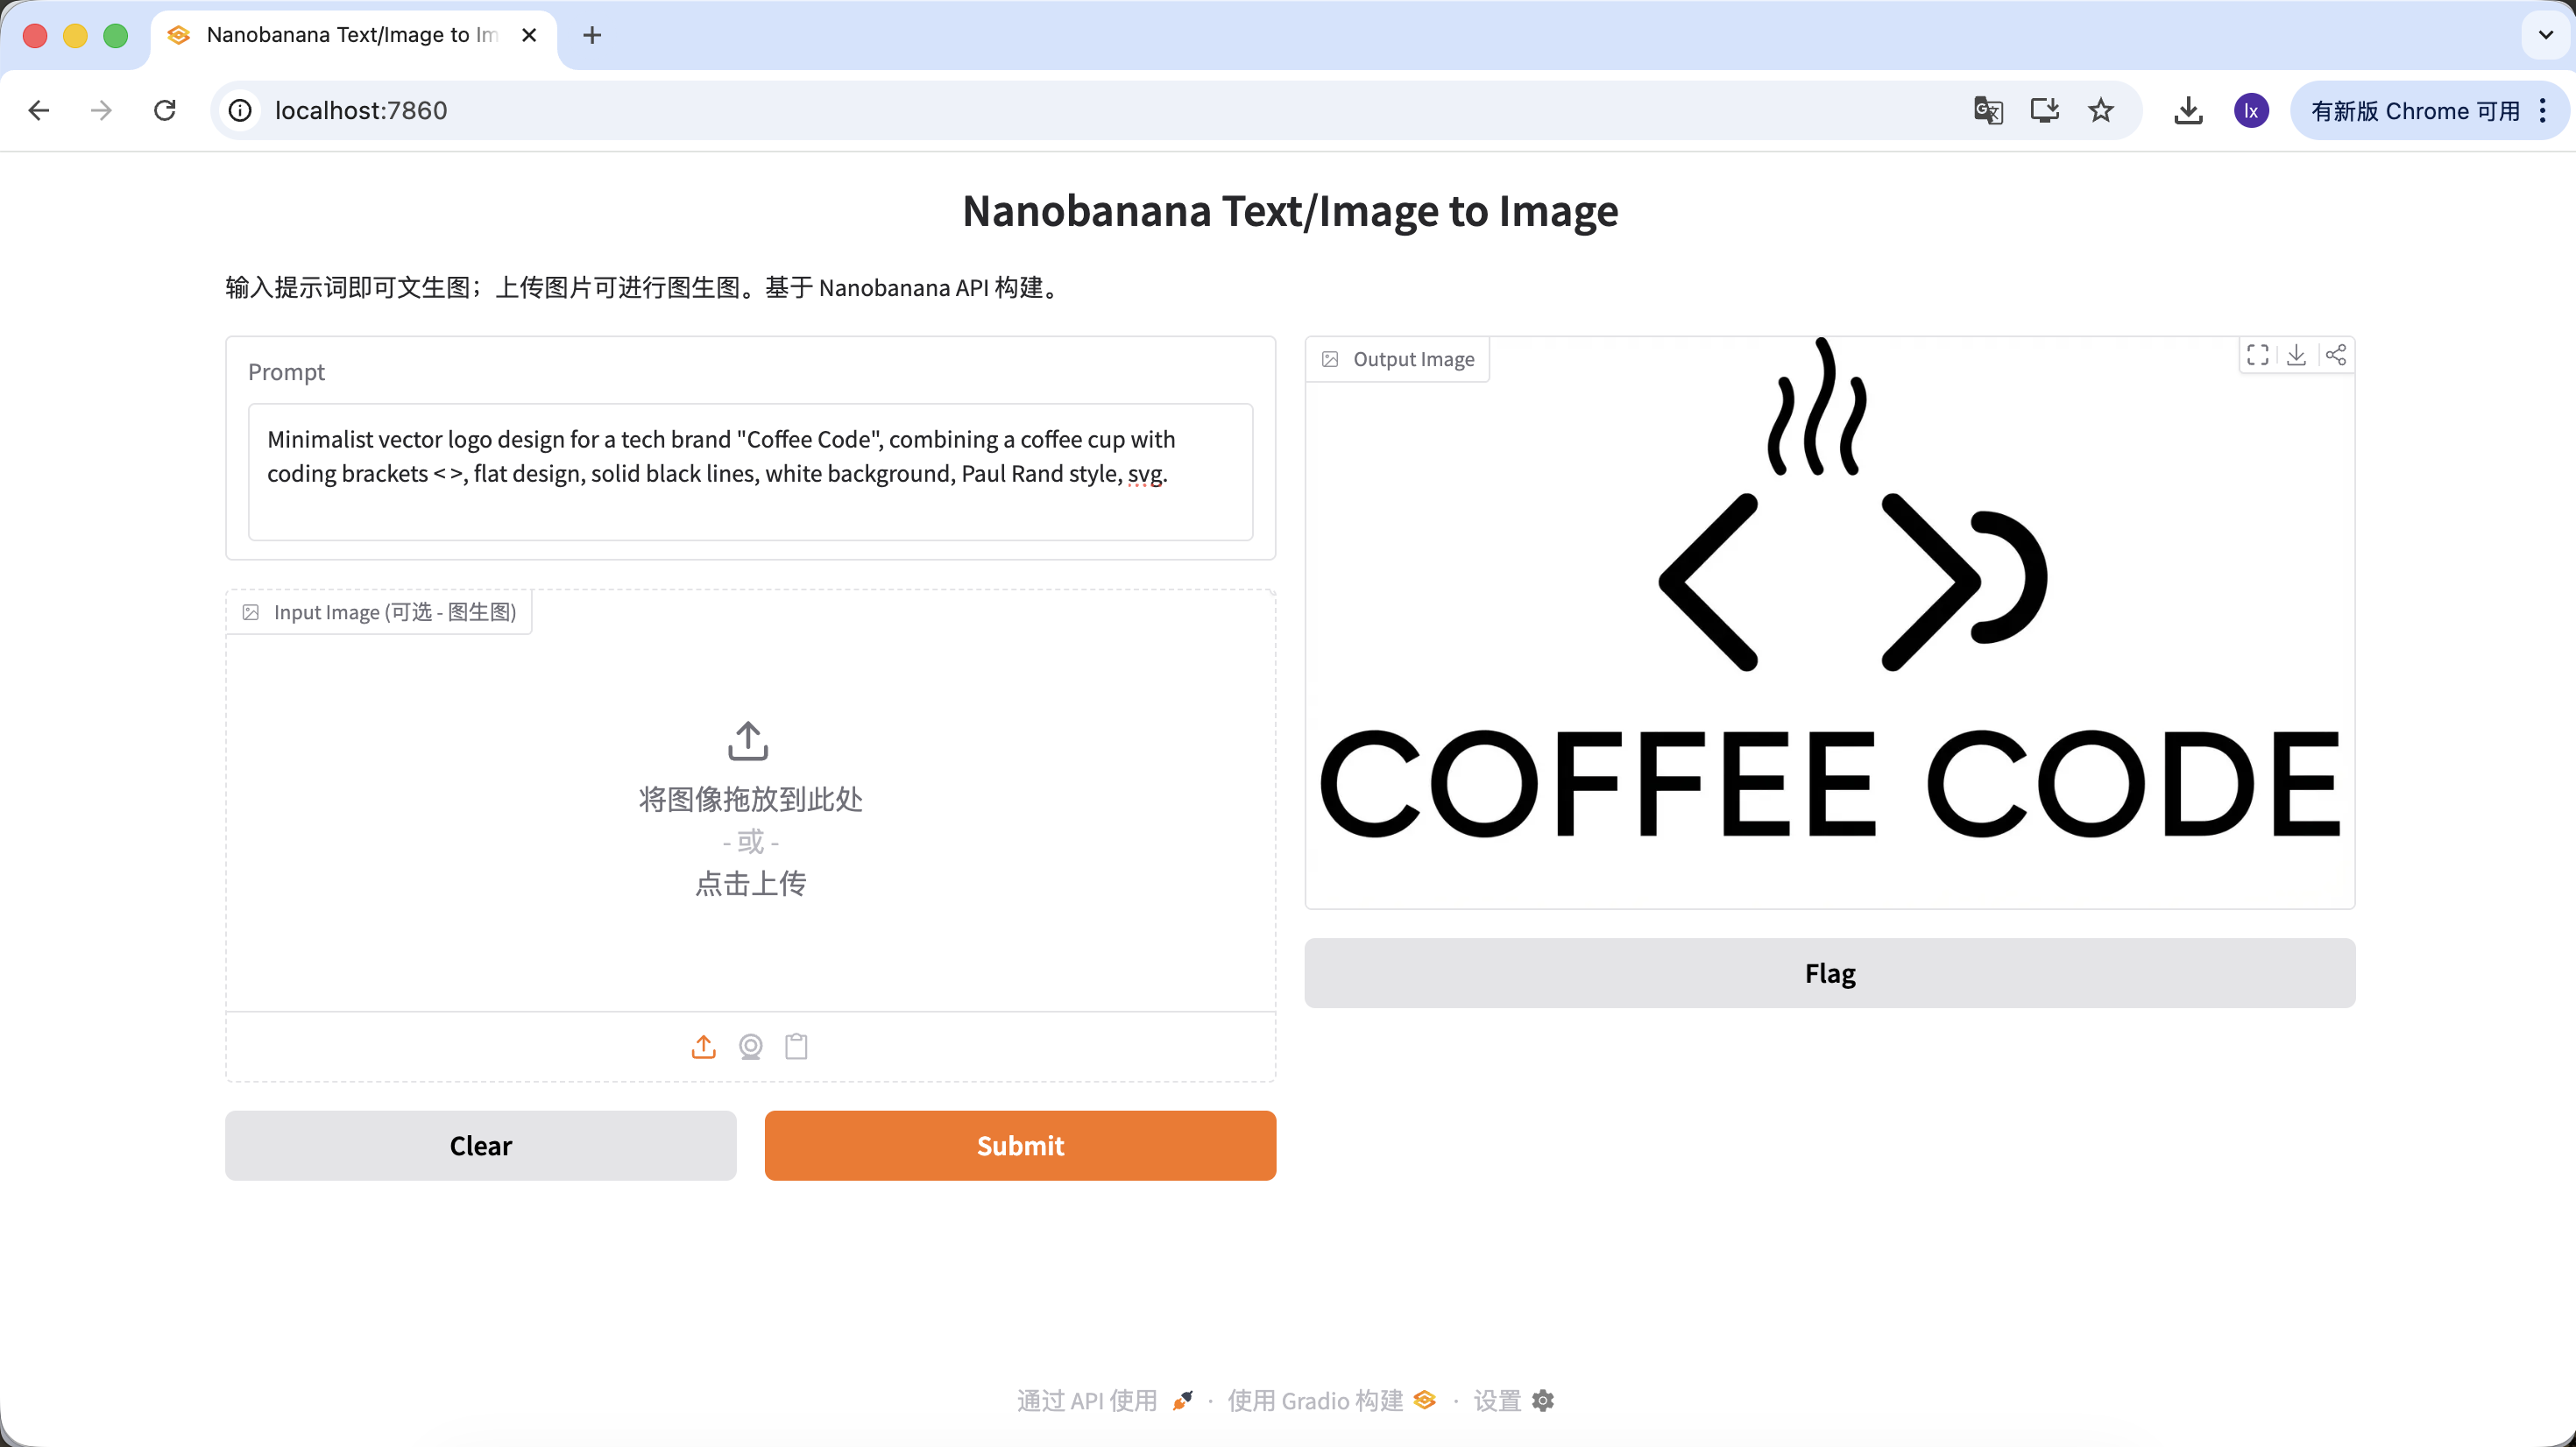
Generate Logos
- Trend: minimalist lines and geometric combinations with a tech feel
- Typical appearance: black-and-white color schemes, negative space, clear brand identity
Example Prompt:
Minimalist vector logo design for a tech brand "Coffee Code", combining a coffee cup with coding brackets < >, flat design, solid black lines, white background, Paul Rand style, svg.
(极简矢量 Logo,结合咖啡杯与代码符号,扁平设计,纯黑线条)
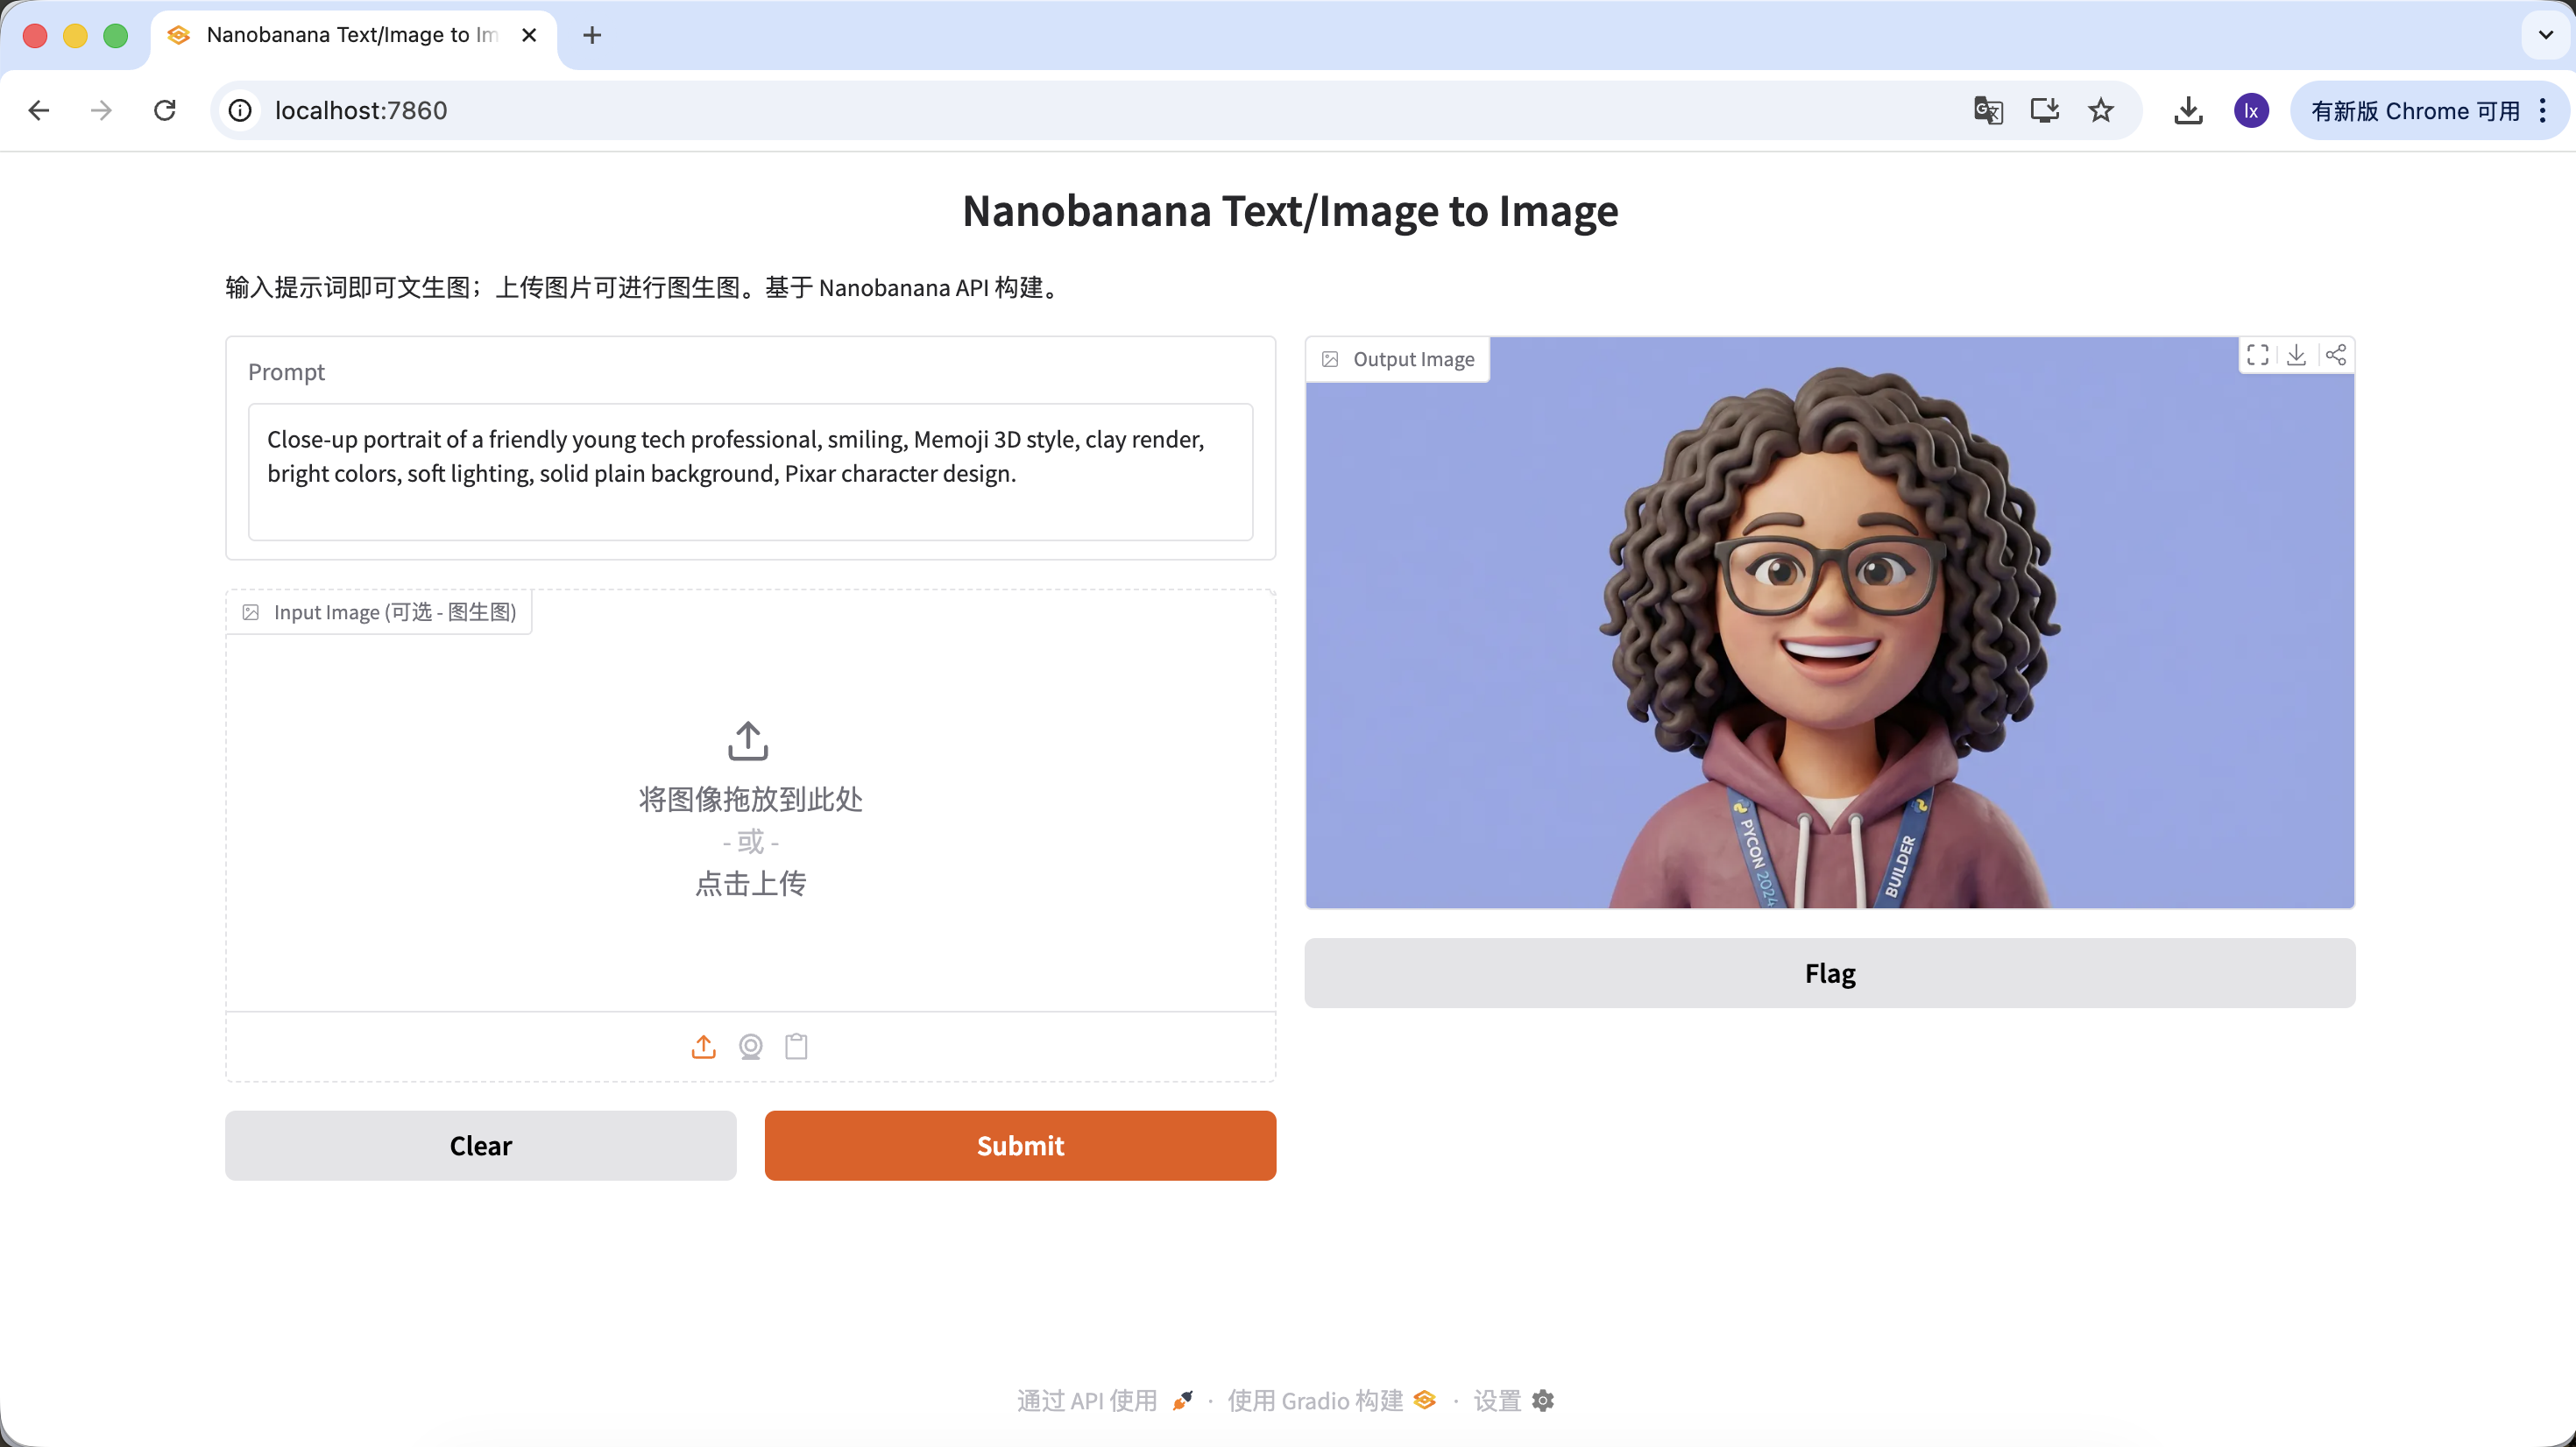
Generate Website User Avatars
- Trend: SaaS websites often use 3D virtual avatars to avoid real-person copyright risk
- Typical appearance: friendly expressions, cartoon proportions, Pixar- or Memoji-like styles
Example Prompt:
Close-up portrait of a friendly young tech professional, smiling, Memoji 3D style, clay render, bright colors, soft lighting, solid plain background, Pixar character design.
(友好的年轻科技从业者,3D Memoji 风格,黏土渲染)
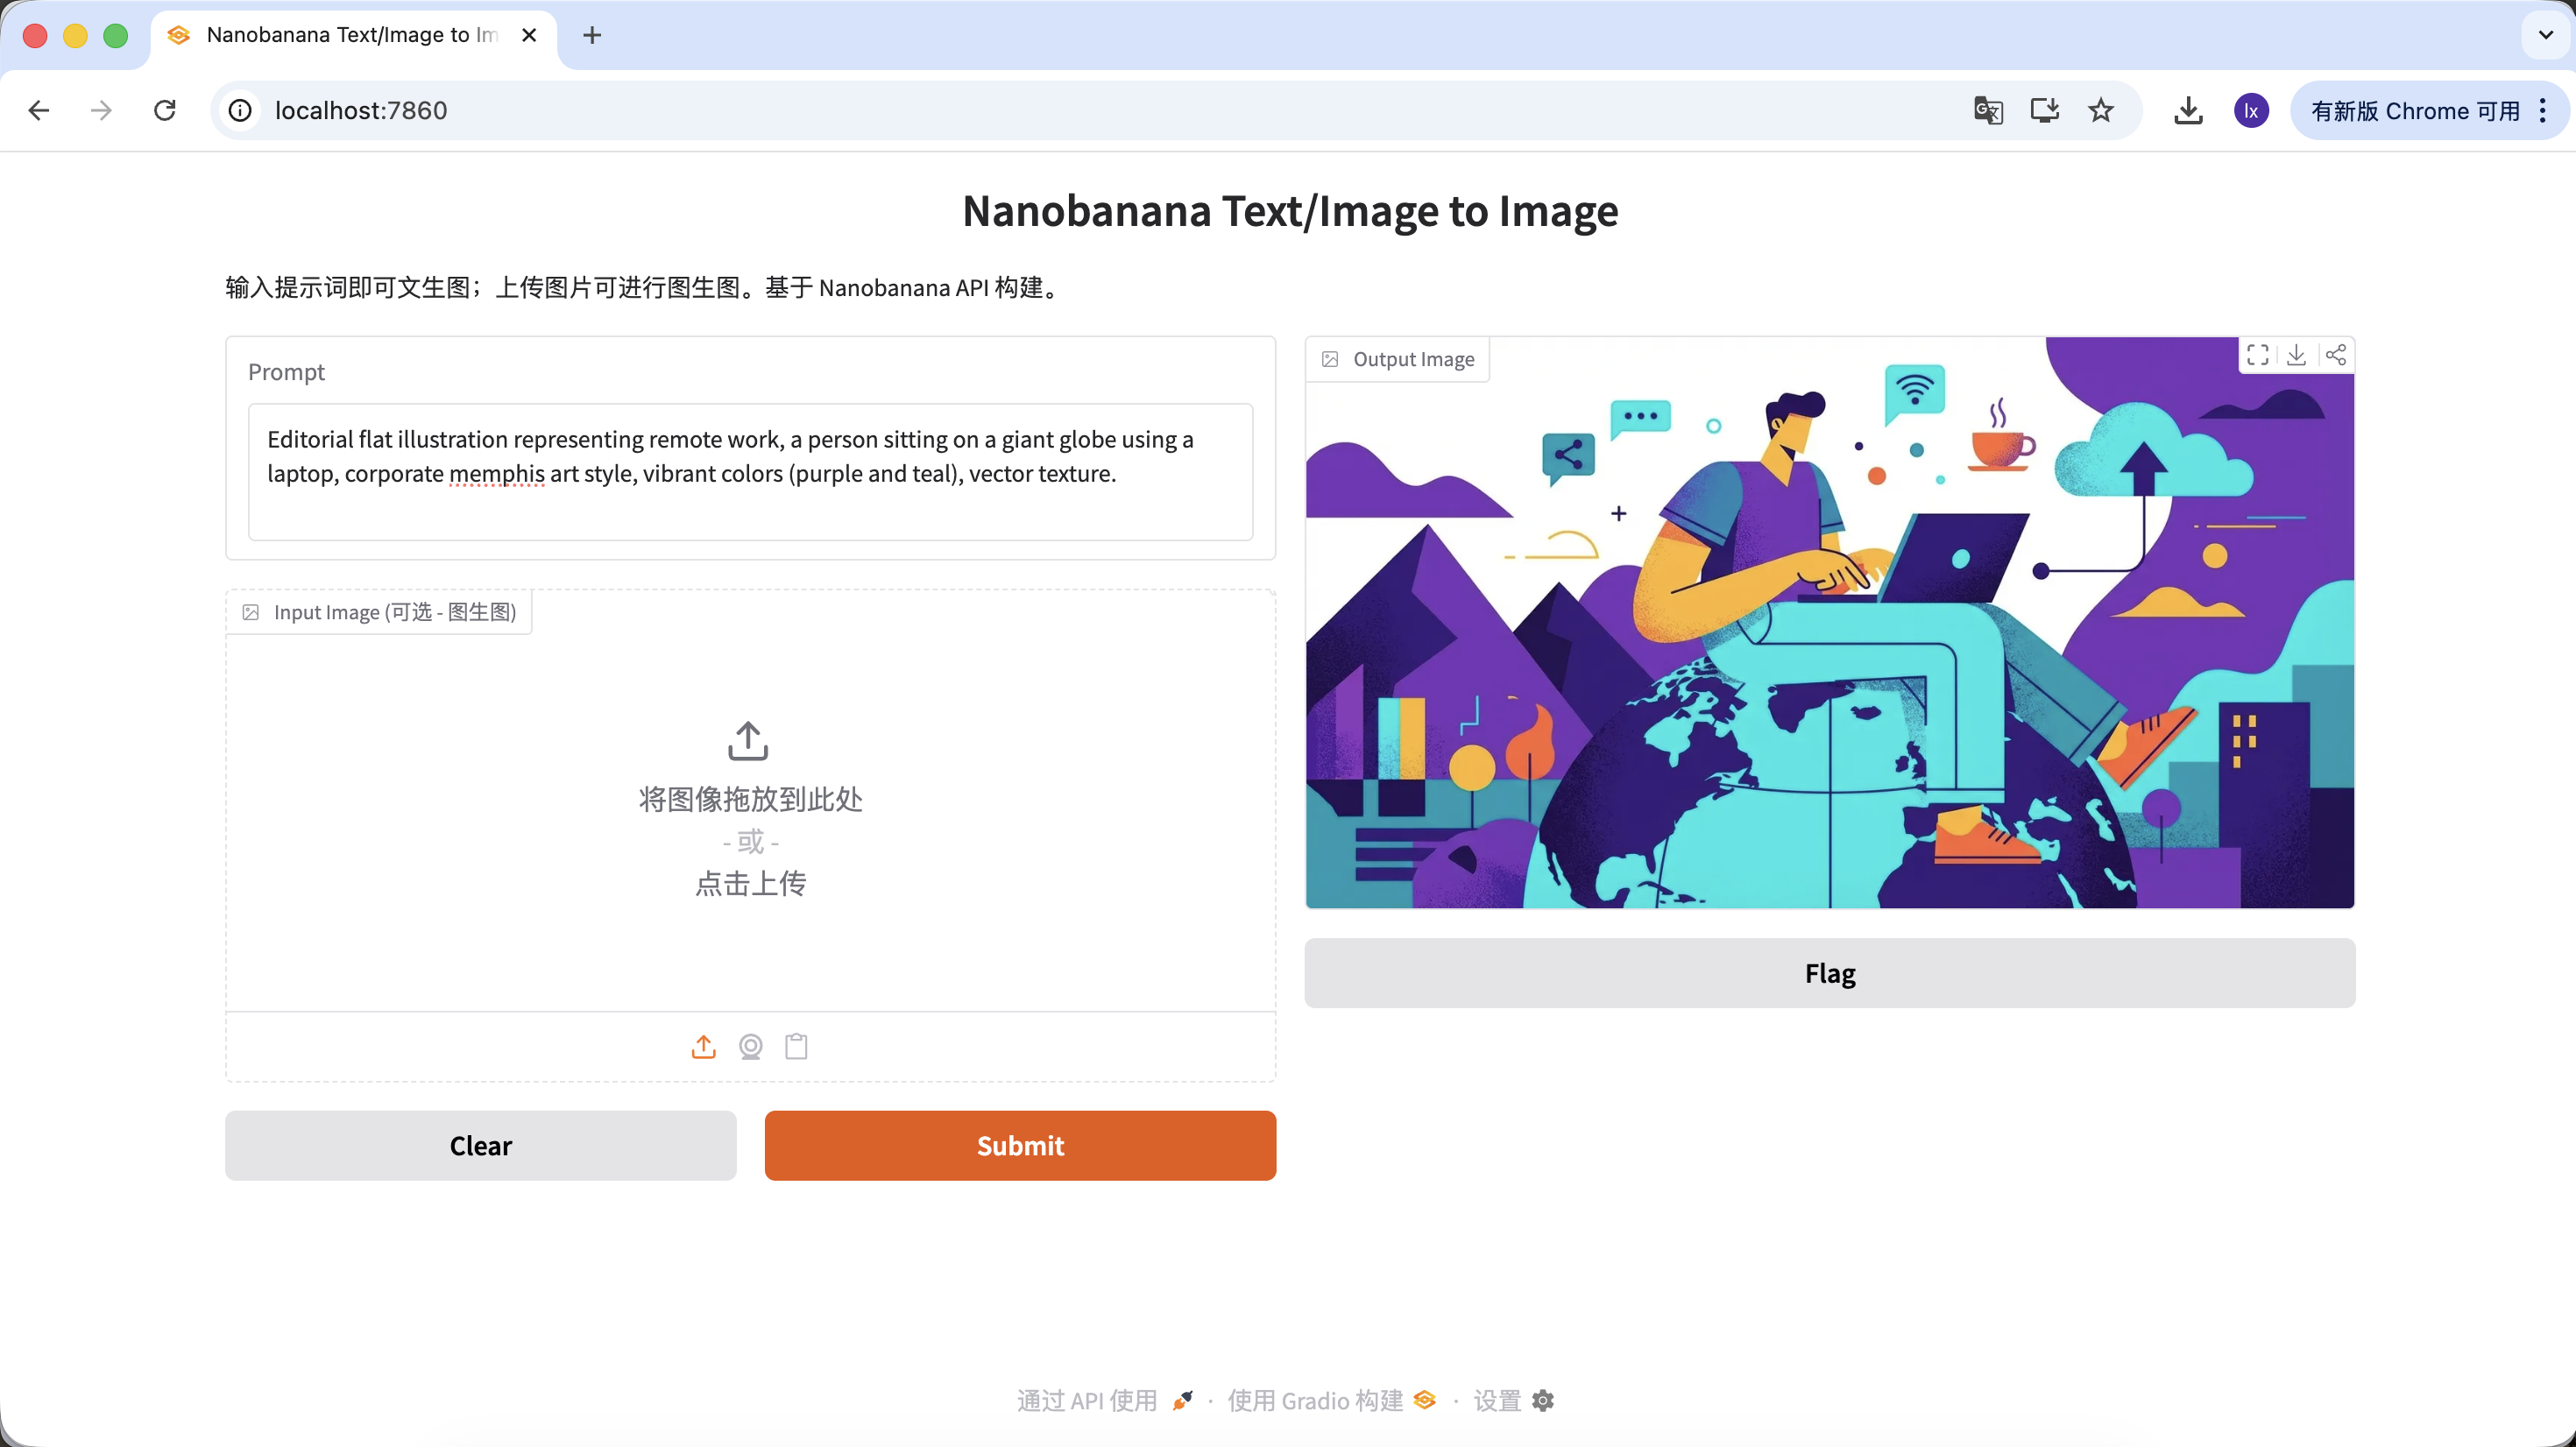
Generate Article Illustrations
- Trend: abstract flat illustrations commonly used in tech-company blogs
- Typical appearance: purple-blue palettes, exaggerated character proportions, floating UI elements
Example Prompt:
Editorial flat illustration representing remote work, a person sitting on a giant globe using a laptop, corporate memphis art style, vibrant colors (purple and teal), vector texture.
(远程办公主题扁平插画,企业孟菲斯风格)
2) Reference-Image Generation: Keep Visual Consistency
This category focuses more on scalability. Use it when you already have a satisfactory key visual and need to generate a full set of assets in the same style.
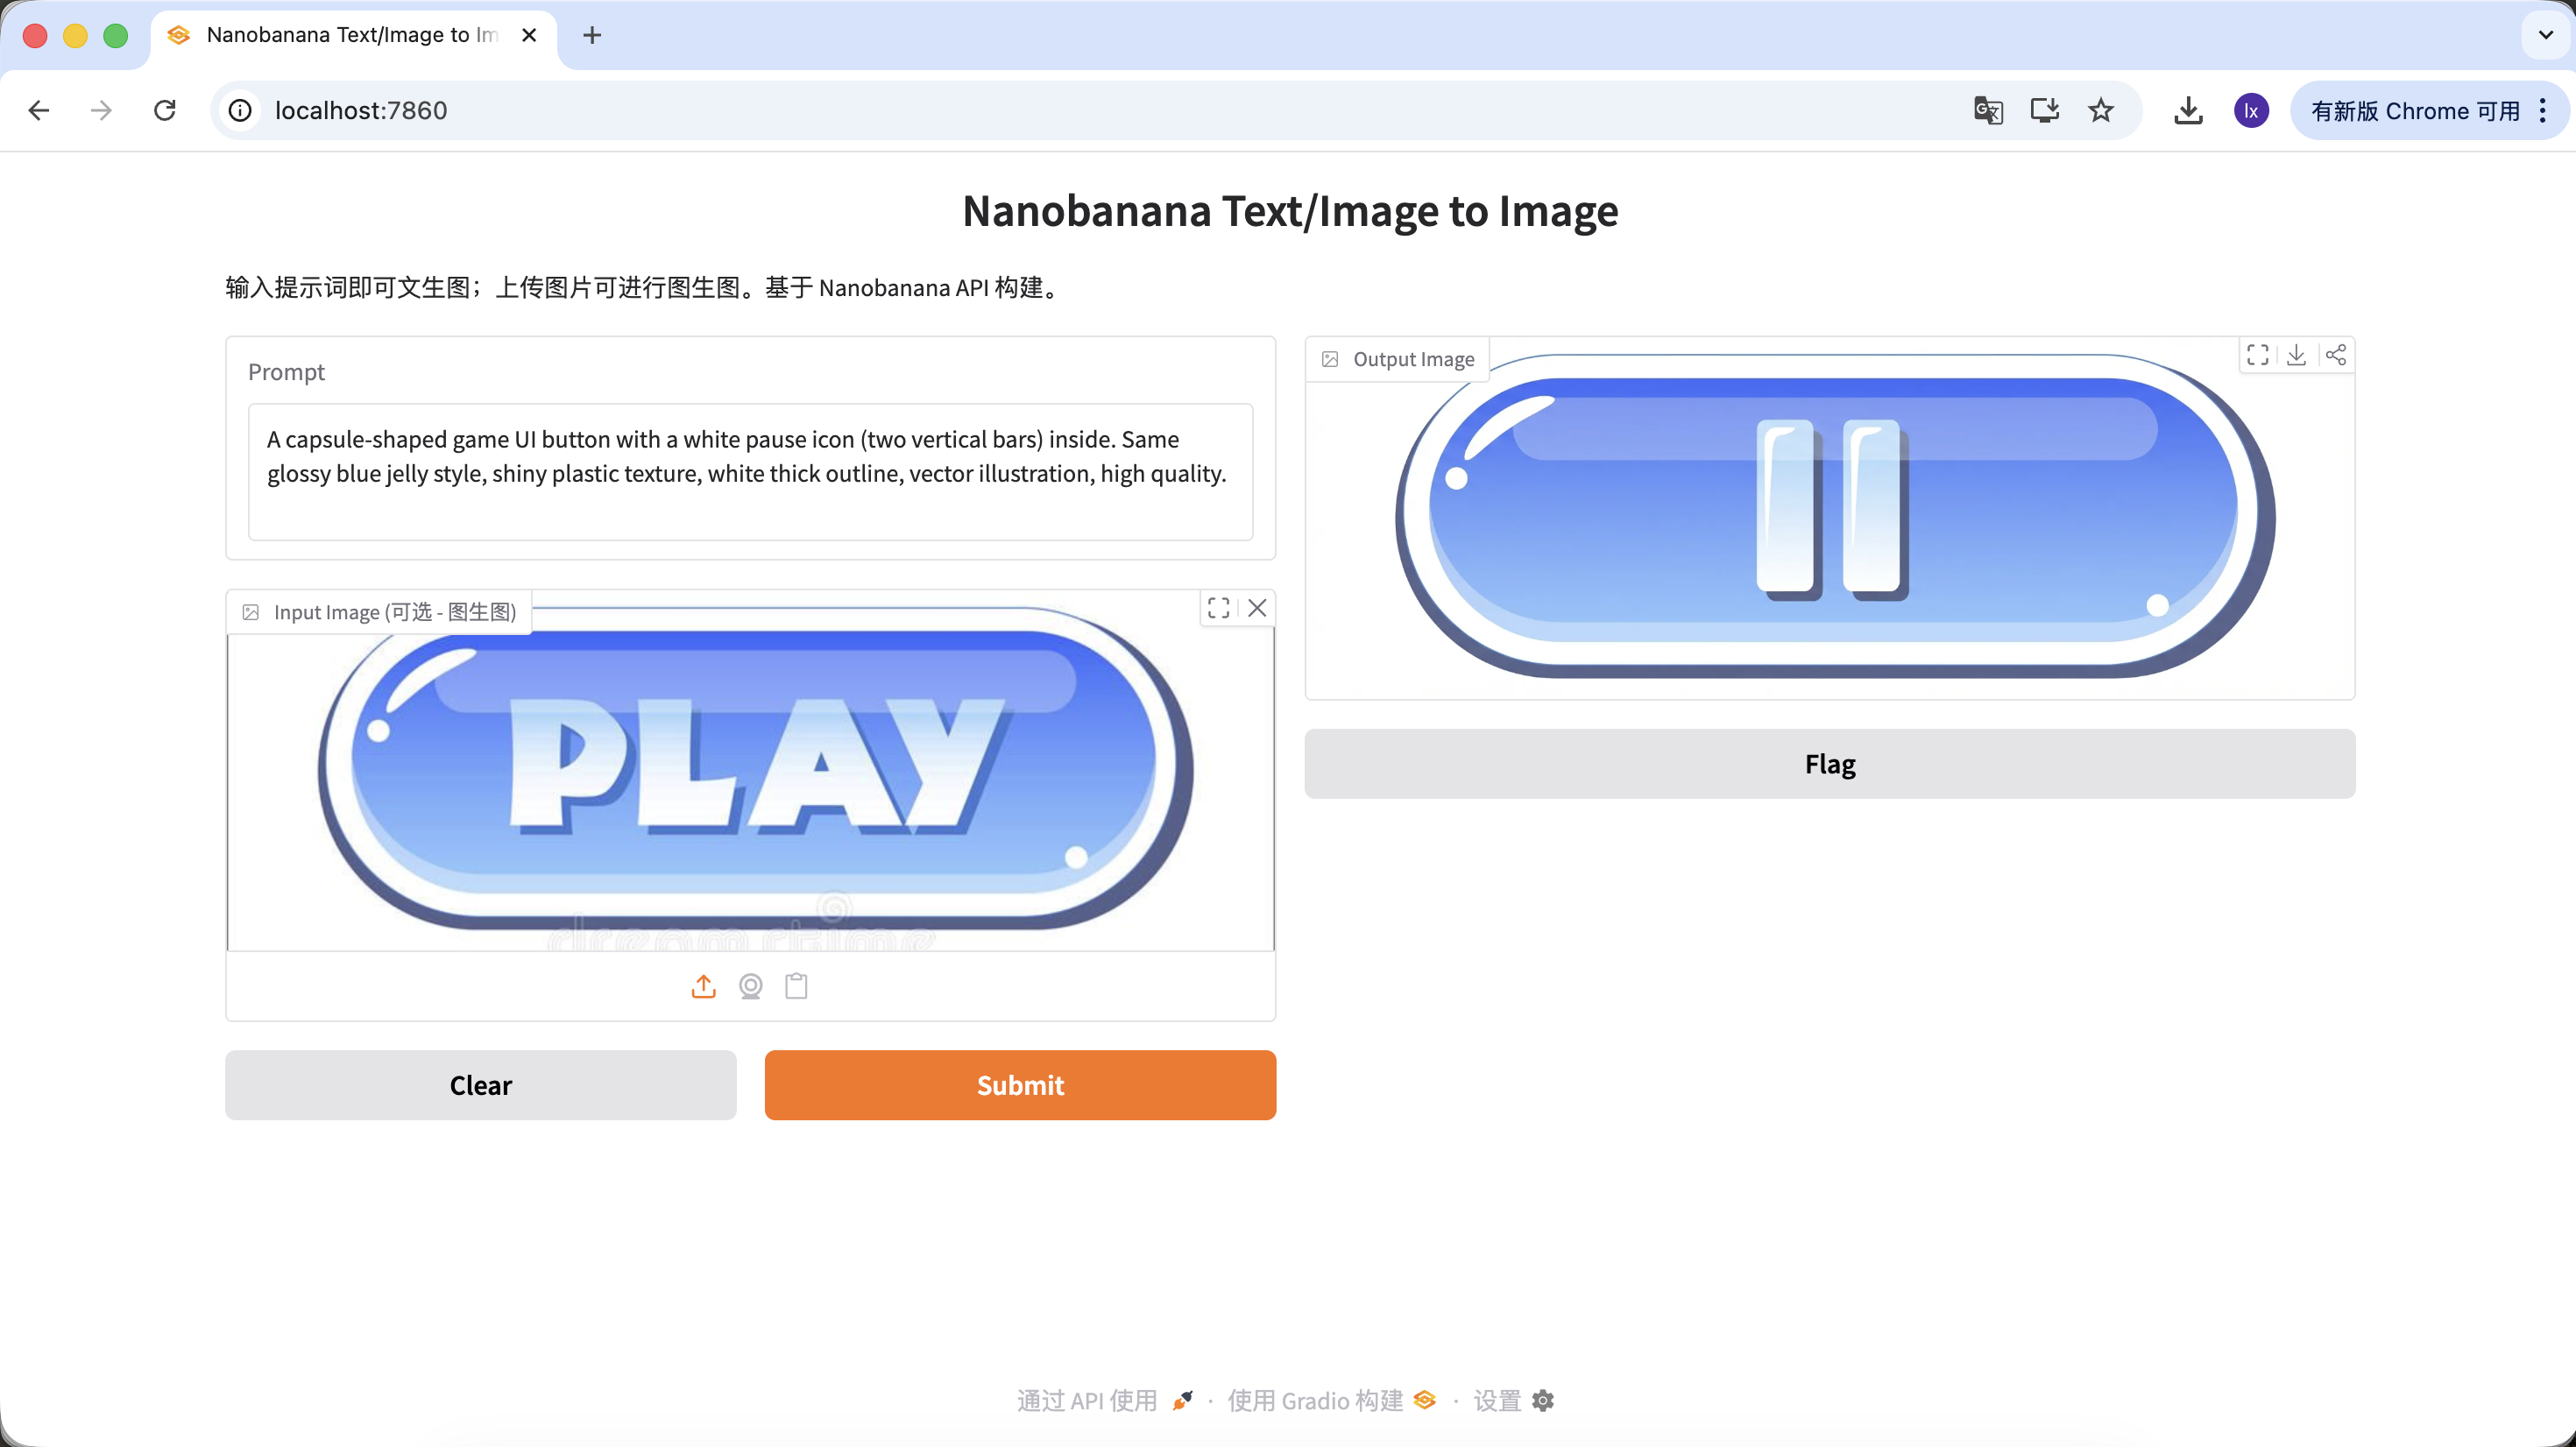
Generate a Similar Set of Buttons or Interaction Assets from a Key Visual
In game development, UI consistency is very important. Suppose you already have a main-screen "PLAY" button and now need to expand a full set of function buttons in a unified style (such as pause, settings, home). With pure manual drawing, it is hard to keep gloss, perspective, and color values fully consistent across every button.
Basic workflow:
- Save the existing blue "PLAY" button image

- Drag it into the Input** Image** area as the reference master
- Keep style descriptions in the prompt unchanged and only modify the subject content
With this flow, you can get different functions in the same style by only changing subject descriptions.
Example Prompt:
Variant A: Pause Button (icon type)
A capsule-shaped game UI button with a white pause icon (two vertical bars) inside. Same glossy blue jelly style, shiny plastic texture, white thick outline, vector illustration, high quality.
(胶囊形游戏 UI 按钮,白色暂停图标,蓝色果冻质感)
Variant B: Settings Button (complex icon)
A capsule-shaped game UI button with a white gear icon (settings symbol) inside. Same glossy blue jelly style, shiny plastic texture, white thick outline, vector illustration, high quality.
(胶囊形游戏 UI 按钮,白色齿轮图标,蓝色果冻质感)

Variant C: Replay Button (shape variation)
If you need to change the button shape, describe that shape directly in the prompt. The model will try to change the structure while keeping material characteristics.
A round game UI button with a white circular arrow icon (replay symbol) inside. Same glossy blue jelly style, shiny plastic texture, white thick outline, vector illustration, high quality.
(圆形游戏 UI 按钮,循环箭头图标,蓝色果冻质感)
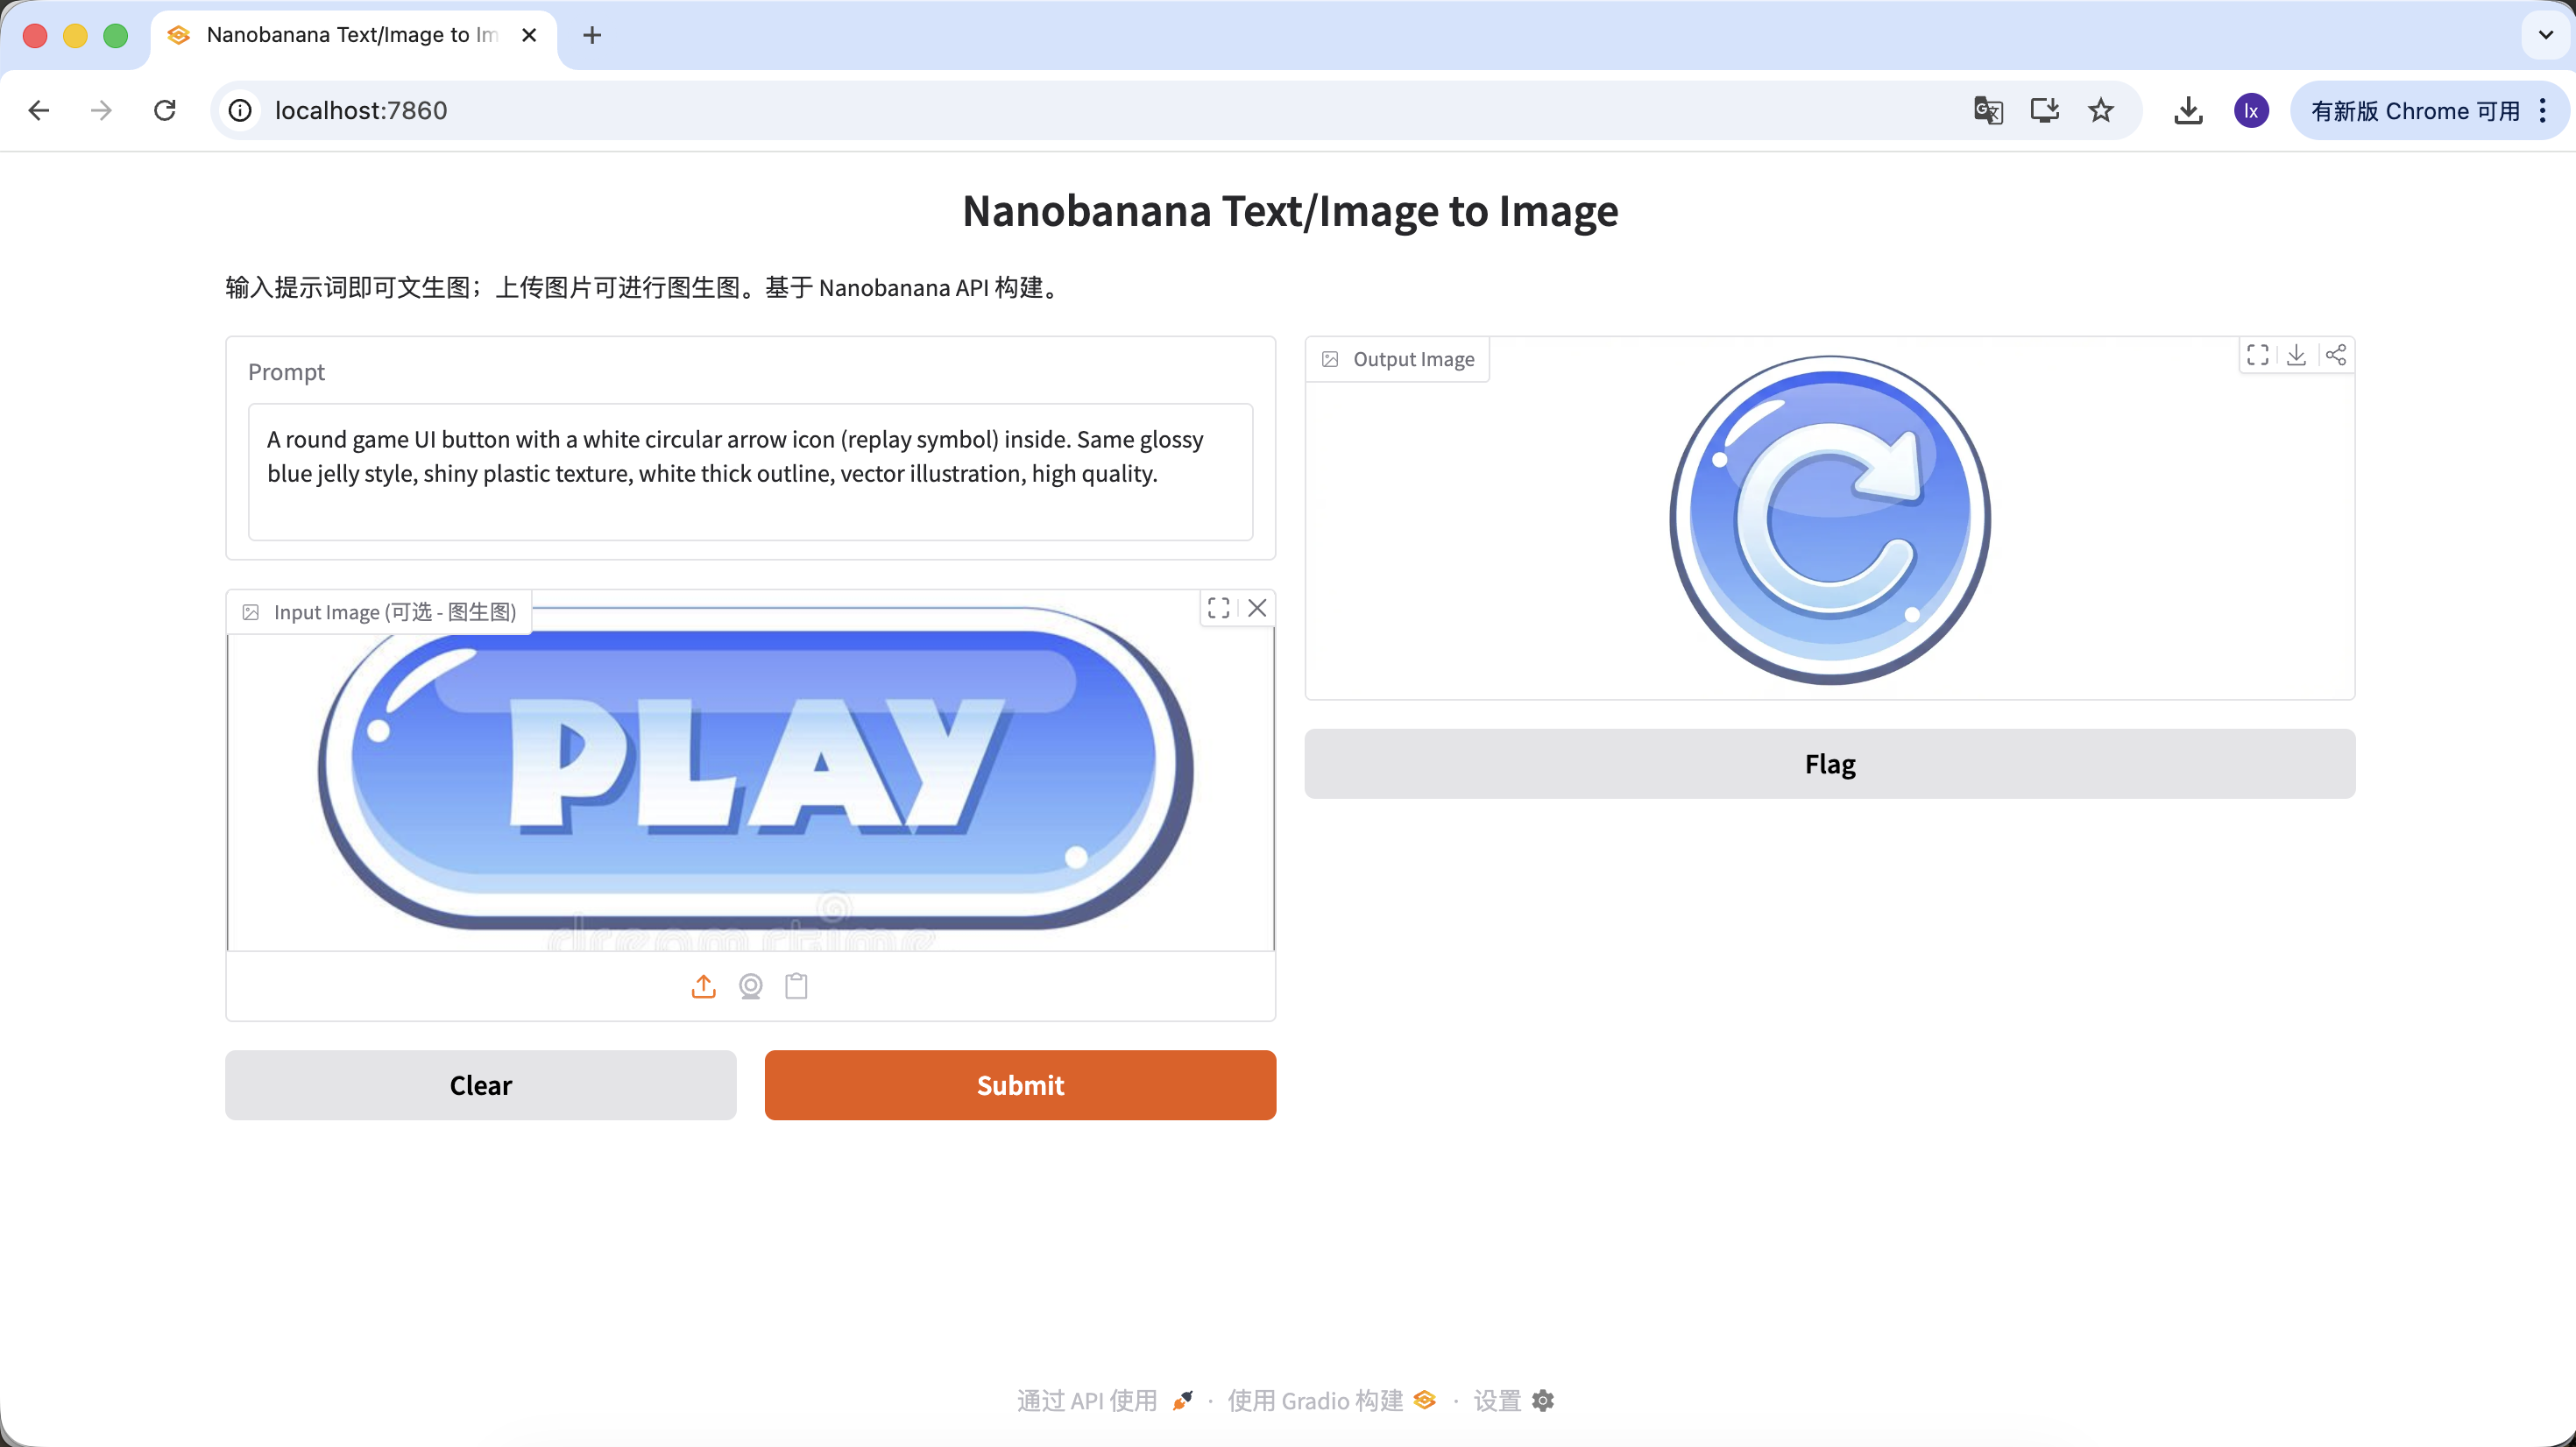
With this set of operations, you can not only change button function and icon, but also button shape, while keeping high consistency in material, color, and lighting. This is exactly the core value of large models in design-asset scaling scenarios.
Chapter 2: A More Controllable Image Generation Assistant - Lovart as an Example
In the first part, we directly called NanoBanana with code and experienced the basic "input -> generate" flow. This works when requirements are simple. But as tasks include more constraints, for example:
- multiple images with consistent style
- repeated iteration on existing results
- dynamically adjusting generation direction based on user input
the one-shot calling pattern gradually becomes insufficient.
At this point, we need to introduce an AI Agent. This section uses Lovart as an example to show how the overall workflow changes when image generation gains a "thinking layer." Note: this is not an advertisement. It is only to help everyone quickly grasp the convenience of AI Agents.
2.0 First Look at Lovart: Your AI Design Agent
Lovart is an agent-based web design tool. Compared with ordinary image generation tools, it adds one extra layer of "thinking and planning" before generation.

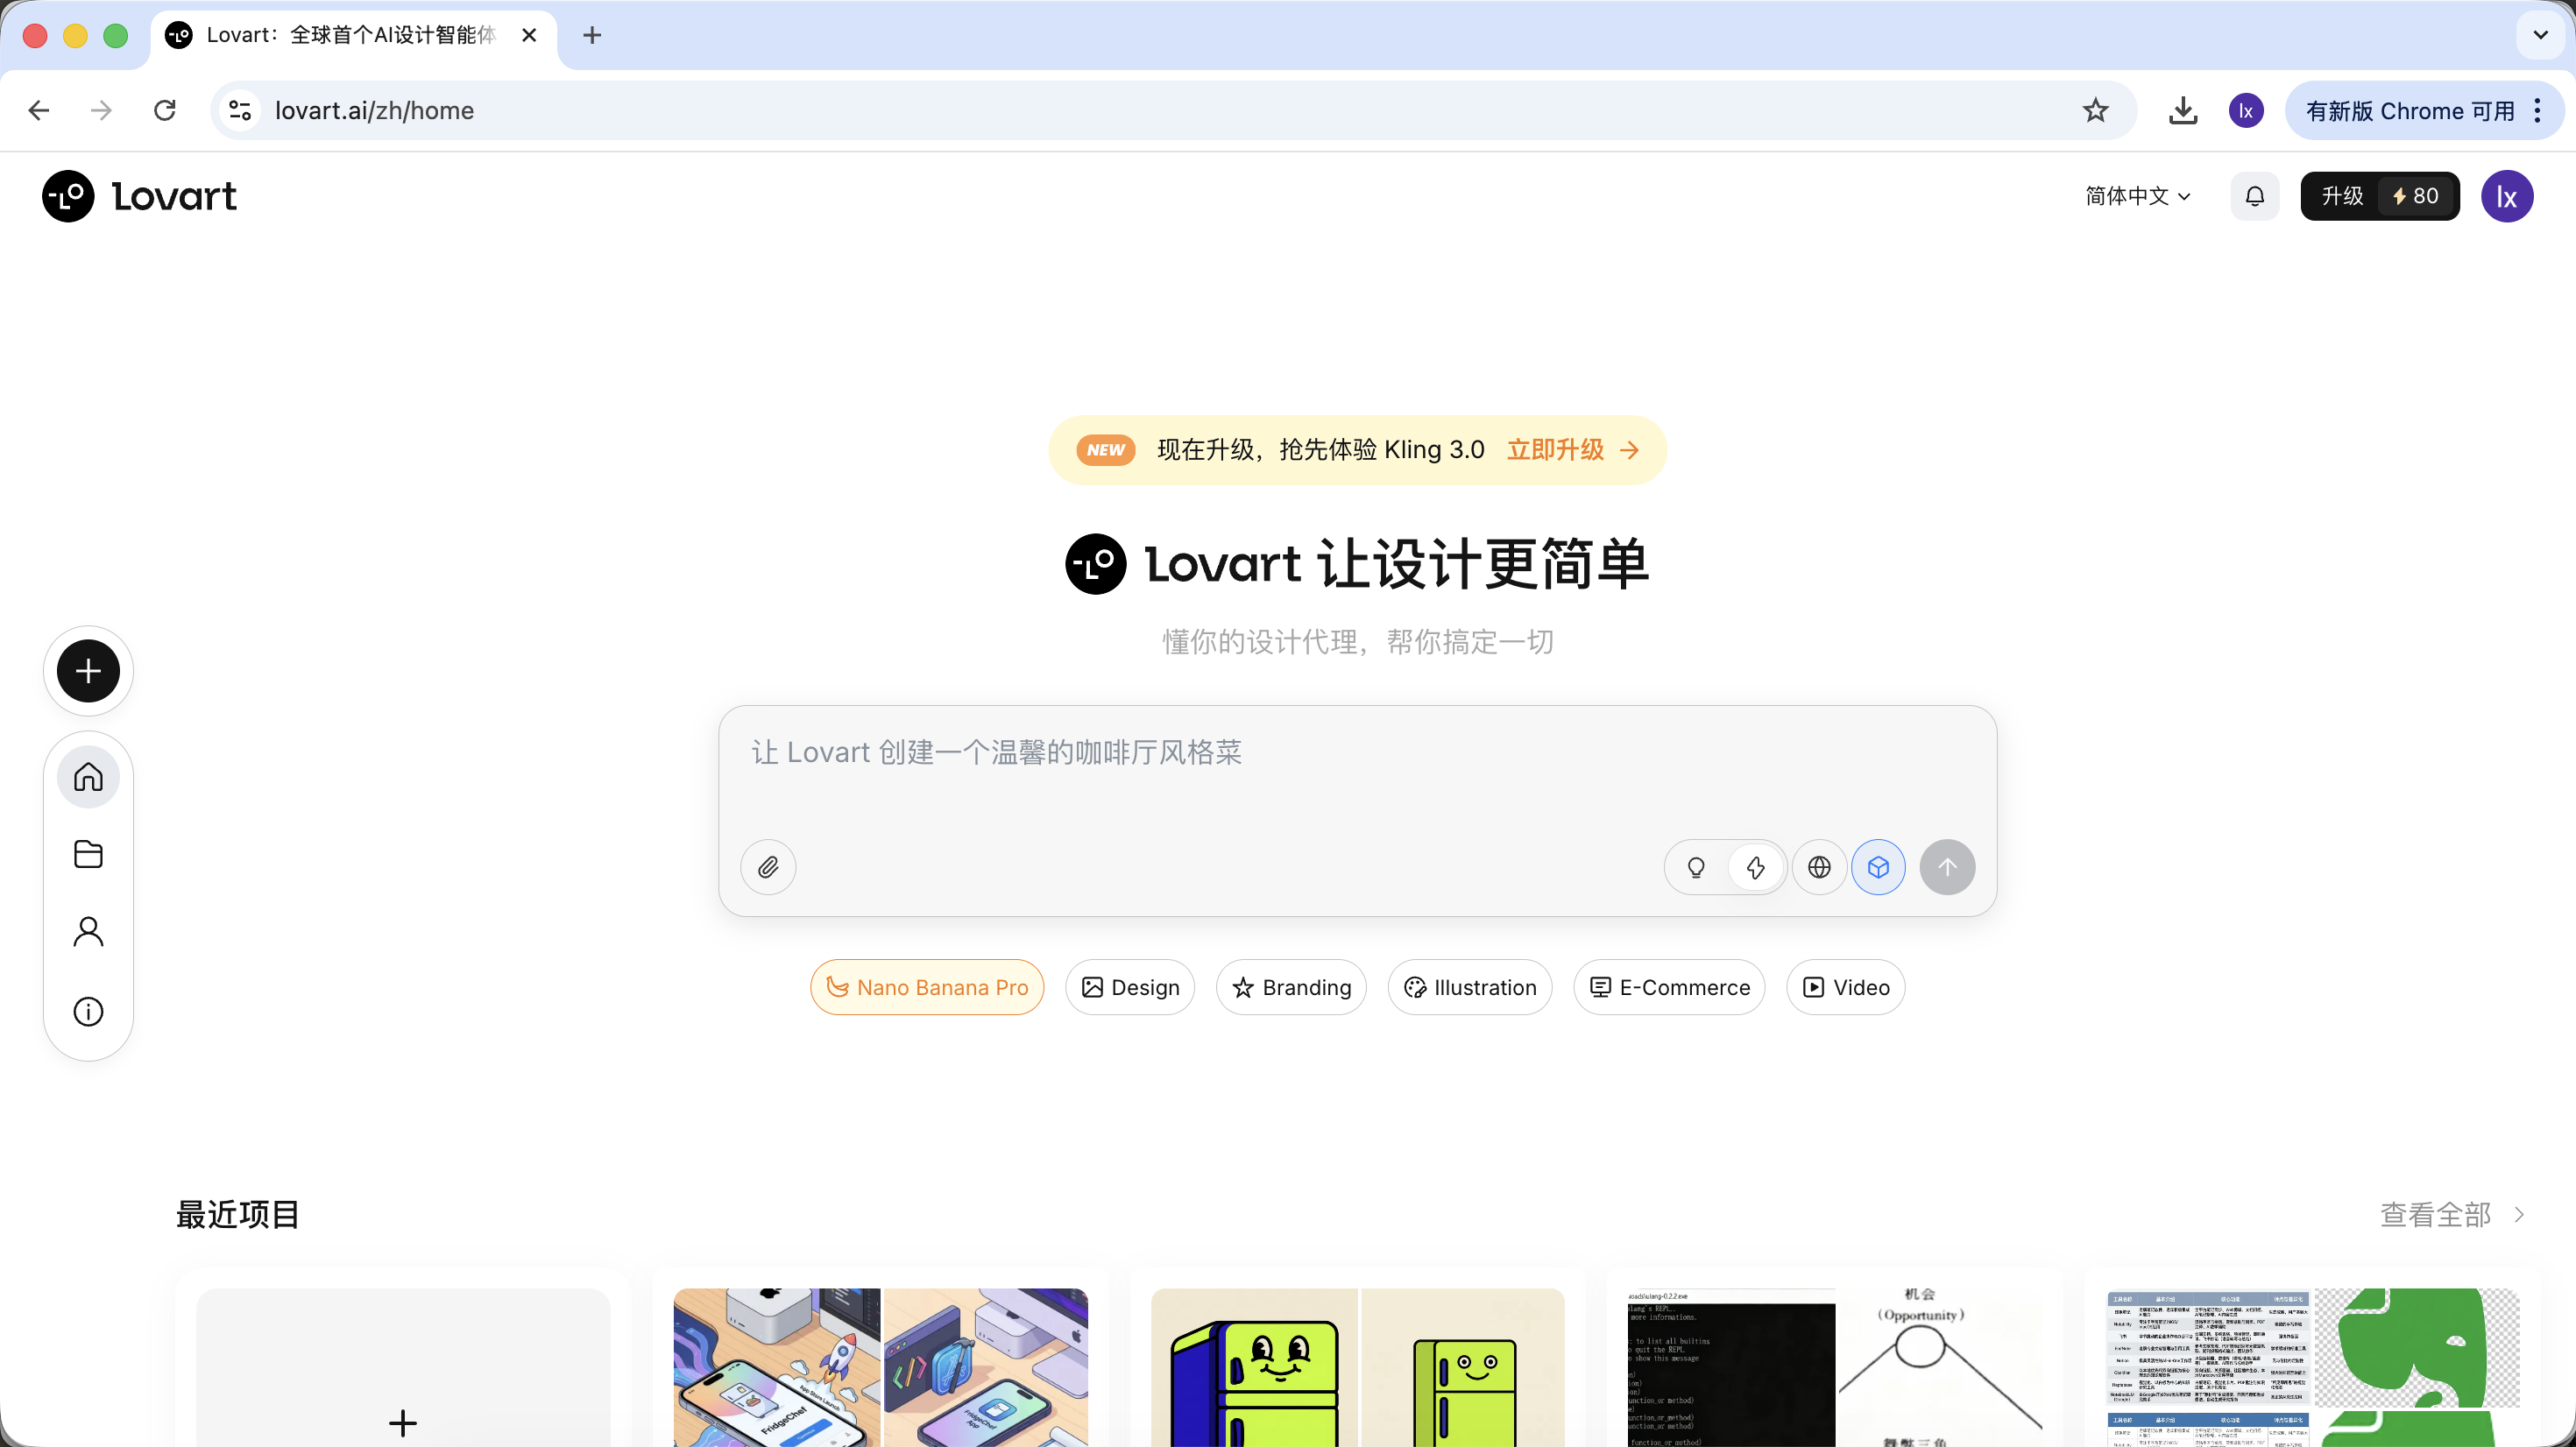
After entering Lovart, you mainly need to understand the following controls:
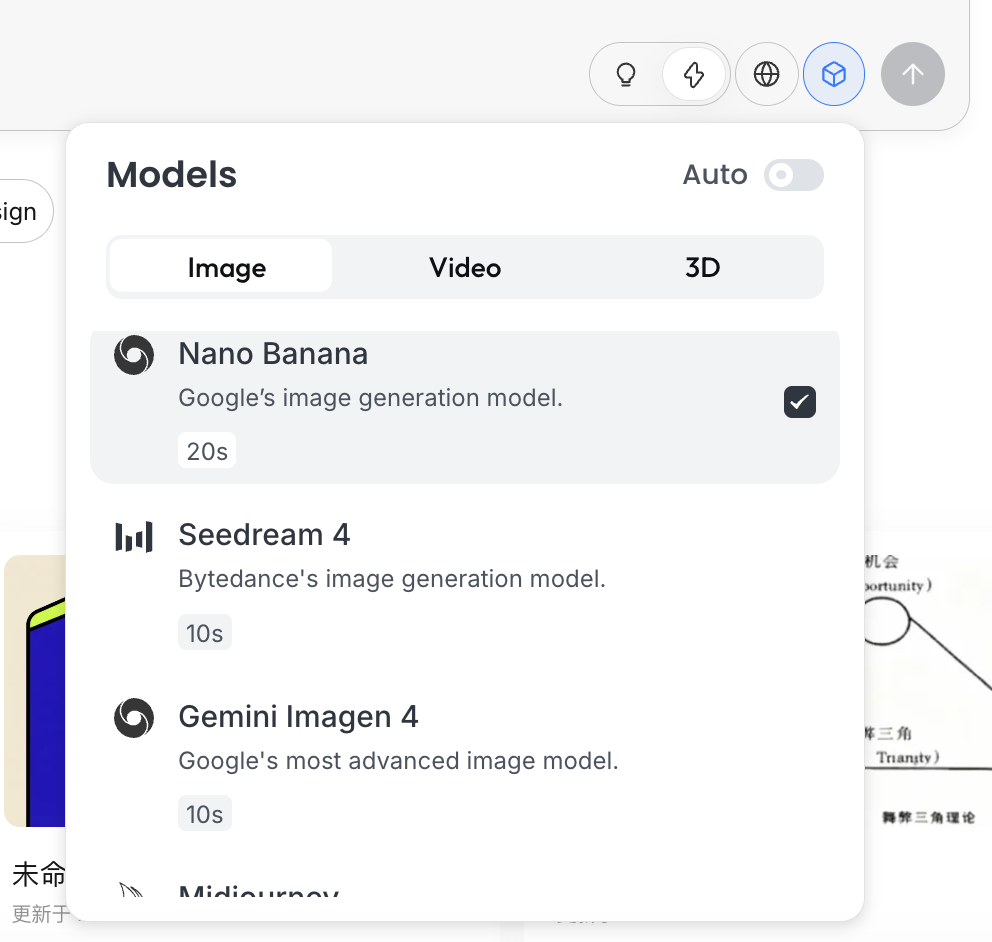
Model Selection
Click the cube icon below the input box to view currently available generation models (such as GPT Image, Flux, etc.).
To stay consistent with earlier examples, this section still uses NanoBanana as the underlying generation model.
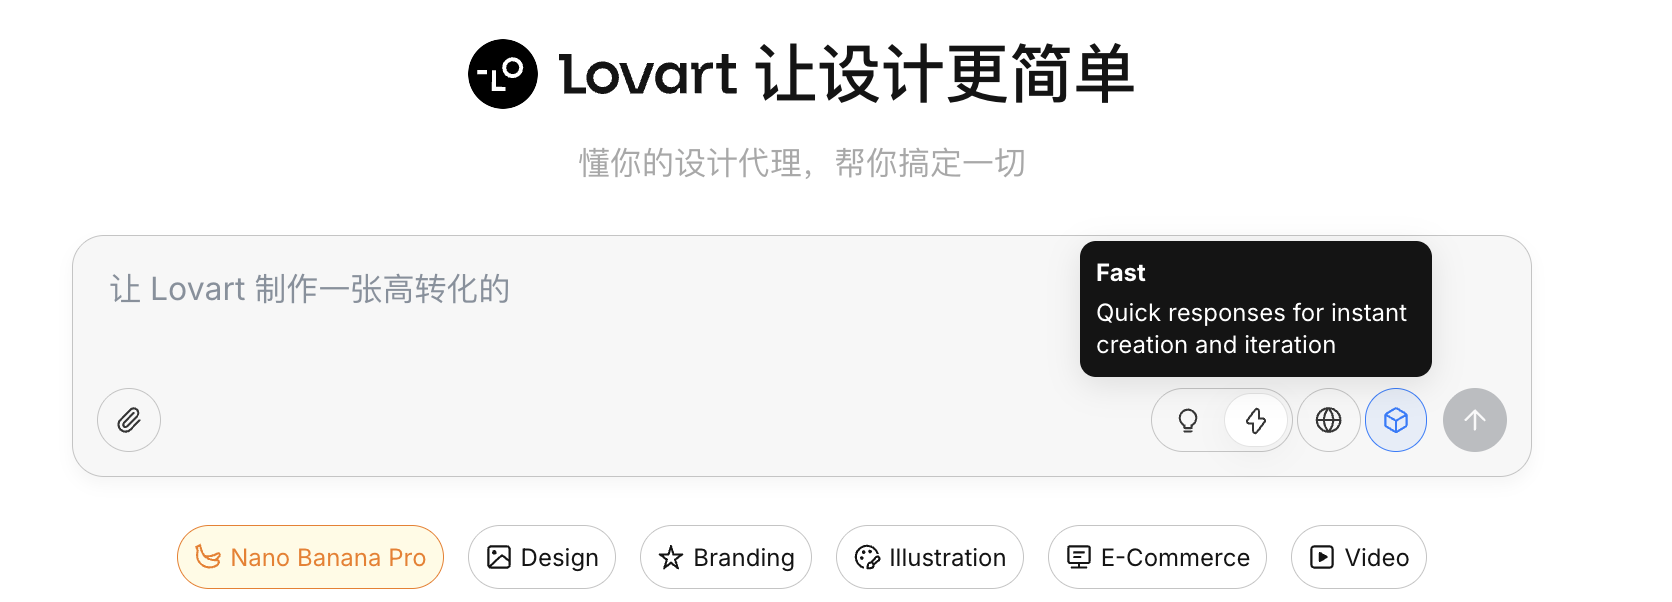
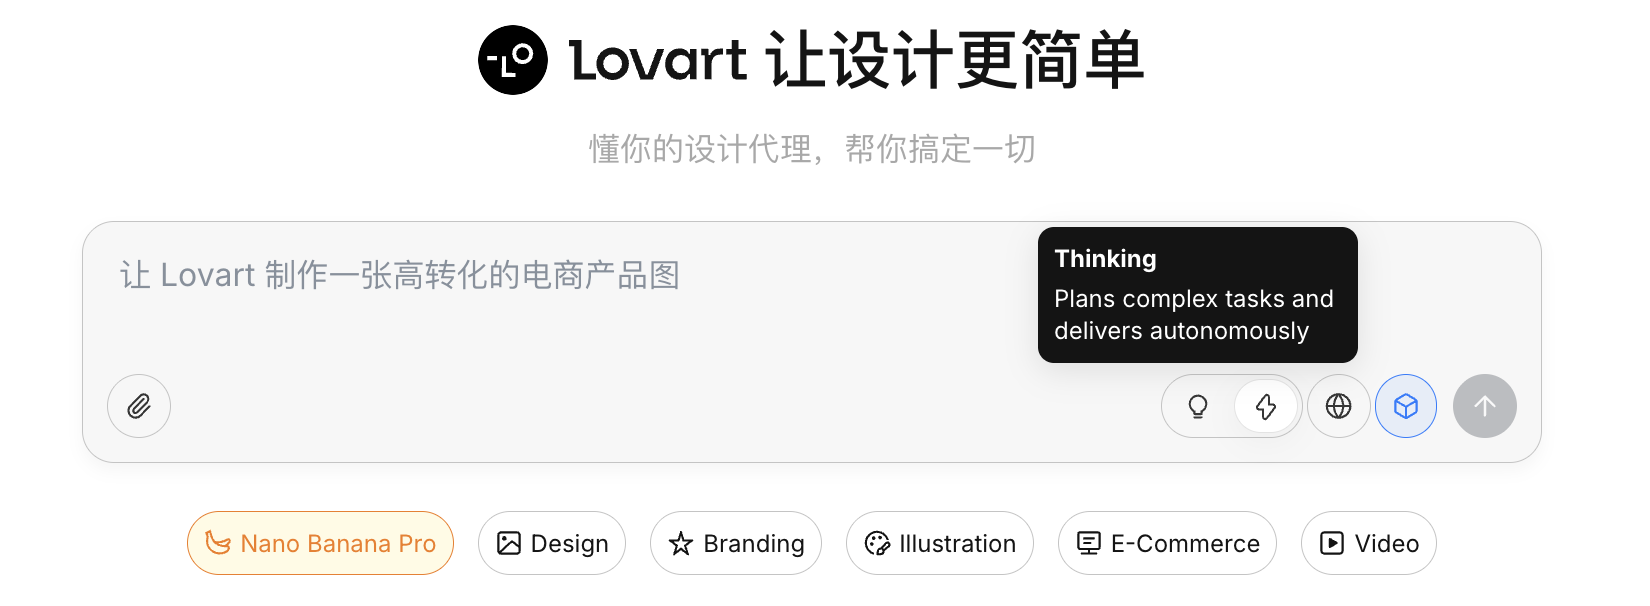
Thinking Mode
This is Lovart's core switch:
- Fast Mode (⚡): close to native API behavior, fast response, suitable for single images with clear instructions
- Thinking Mode (💡): agent mode, where AI first decomposes requirements and rewrites prompts, then generates
Internet Capability
After enabling the globe icon, the agent can retrieve online information during generation (for example design trends and color styles) as auxiliary input.
2.1 Why Is Native API Still Not Enough?
Even if you can already generate good images via Python, native APIs still have limitations in complex tasks. The key reason is that native APIs are fundamentally imperative. If you ask for a concrete object, they can execute directly. But when the input becomes "plan a complete set of game assets," they will not proactively decompose that goal into executable substeps.
Lovart's core difference is its agent mechanism. Between user input and the image generation model, it adds a logic layer for understanding and planning: first identify user intent, then decompose tasks and rewrite prompts, and only then execute generation.
2.2 Practical Demo: Build a Full IP Sticker Pack in 5 Minutes
Take "create an IP sticker pack of a programmer duck" as an example and look at how the agent participates in the full workflow.
Step 1: Planning (Agent Thinking Capability)
Native API issue: You need to think through character settings and emotional states yourself, and write separate prompts for every image.
Lovart approach:
- Turn on 💡 Thinking Mode
- Input one instruction:
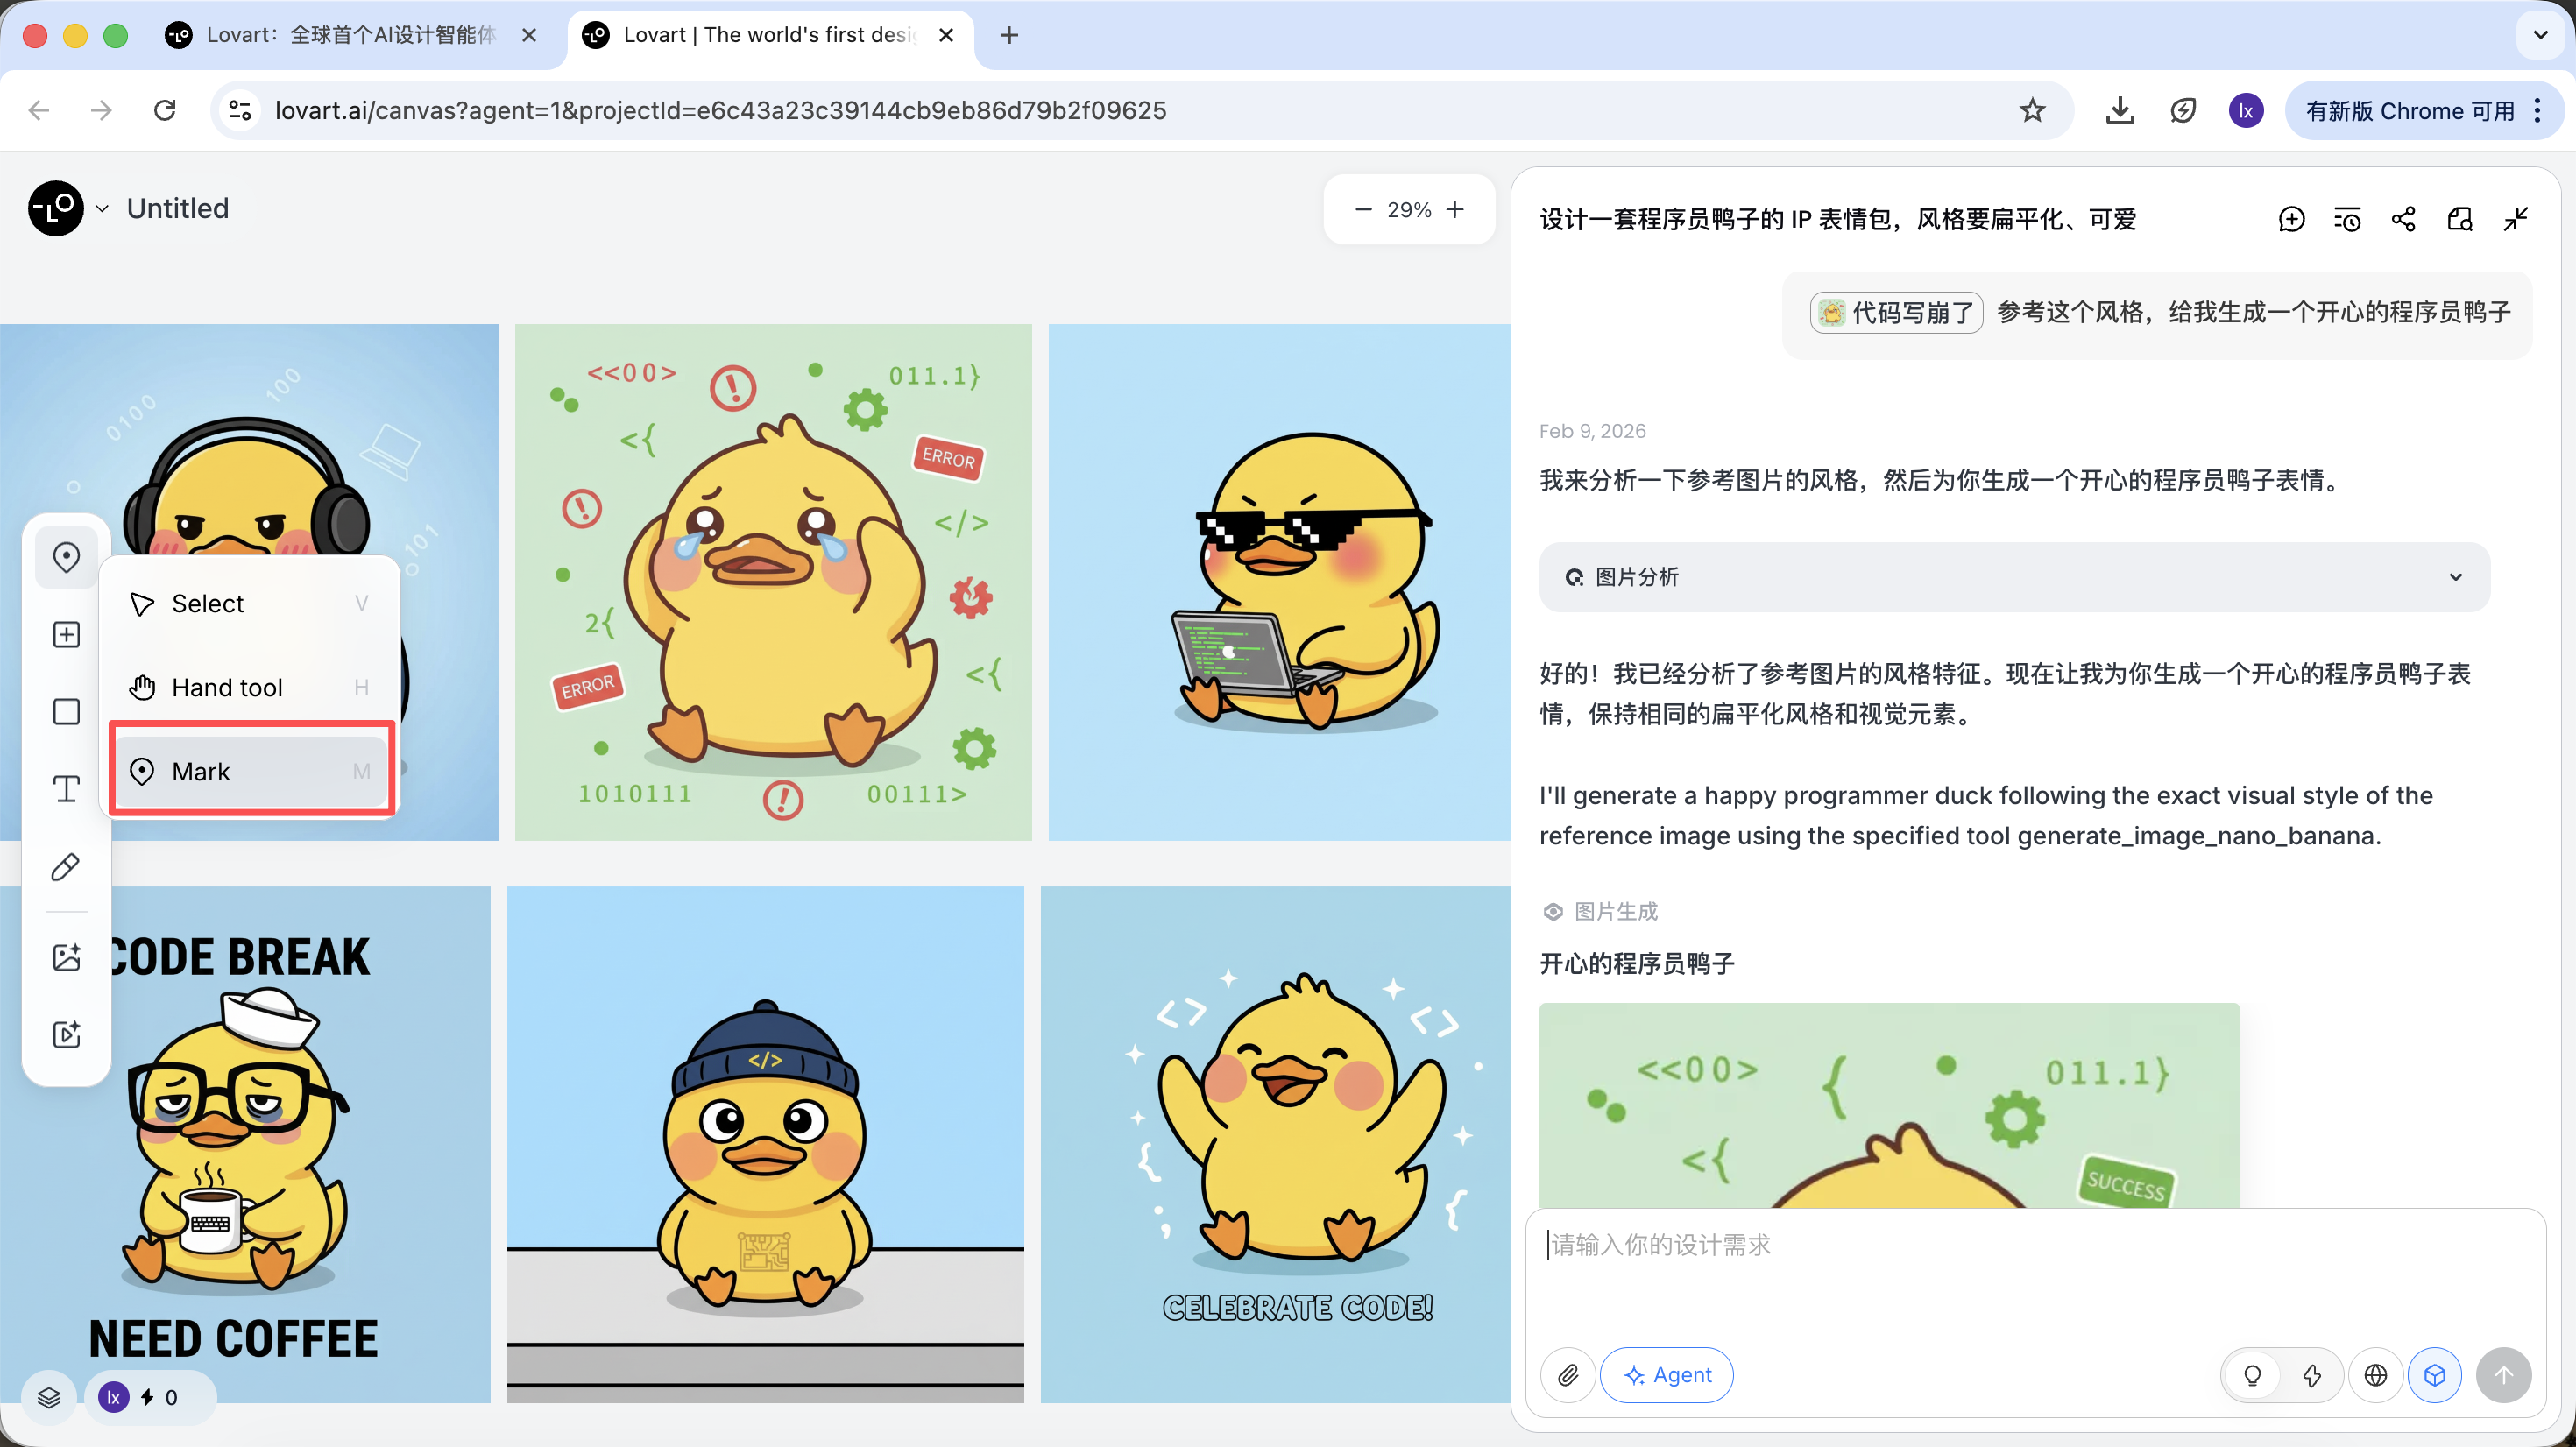
设计一套程序员鸭子的 IP 表情包,风格要扁平化、可爱
AI does not draw immediately. It first searches online for relevant programmer-duck references, then outputs a decomposed plan, automatically creates scenarios such as Debug, Coffee Break, Panic, and generates multiple visual descriptions.
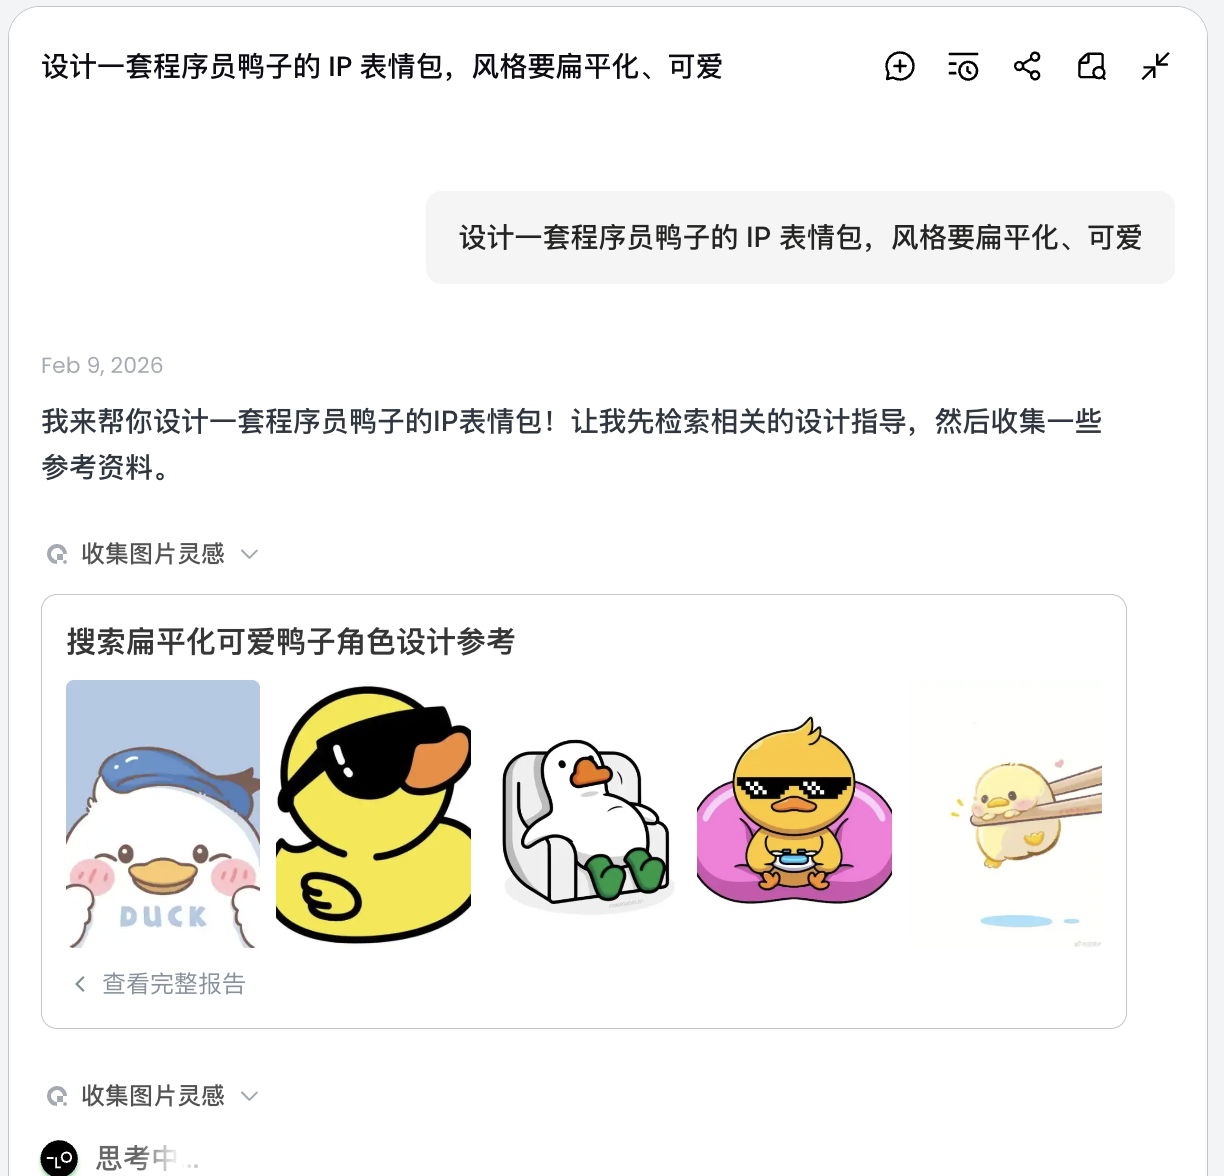
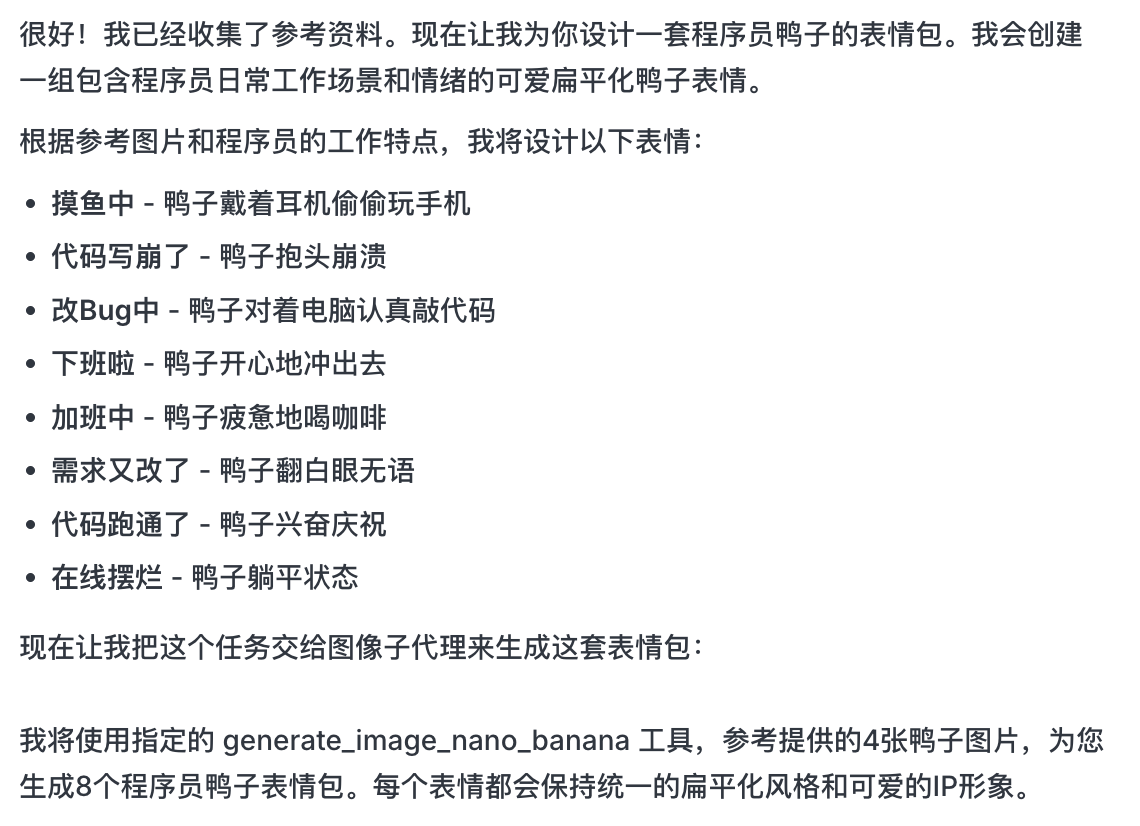
At this step, AI shifts from "executor" to "planner." After AI analyzes the requirement, you can see programmer-duck images with multiple styles and contents on the Lovart canvas and start selecting your preferred style.

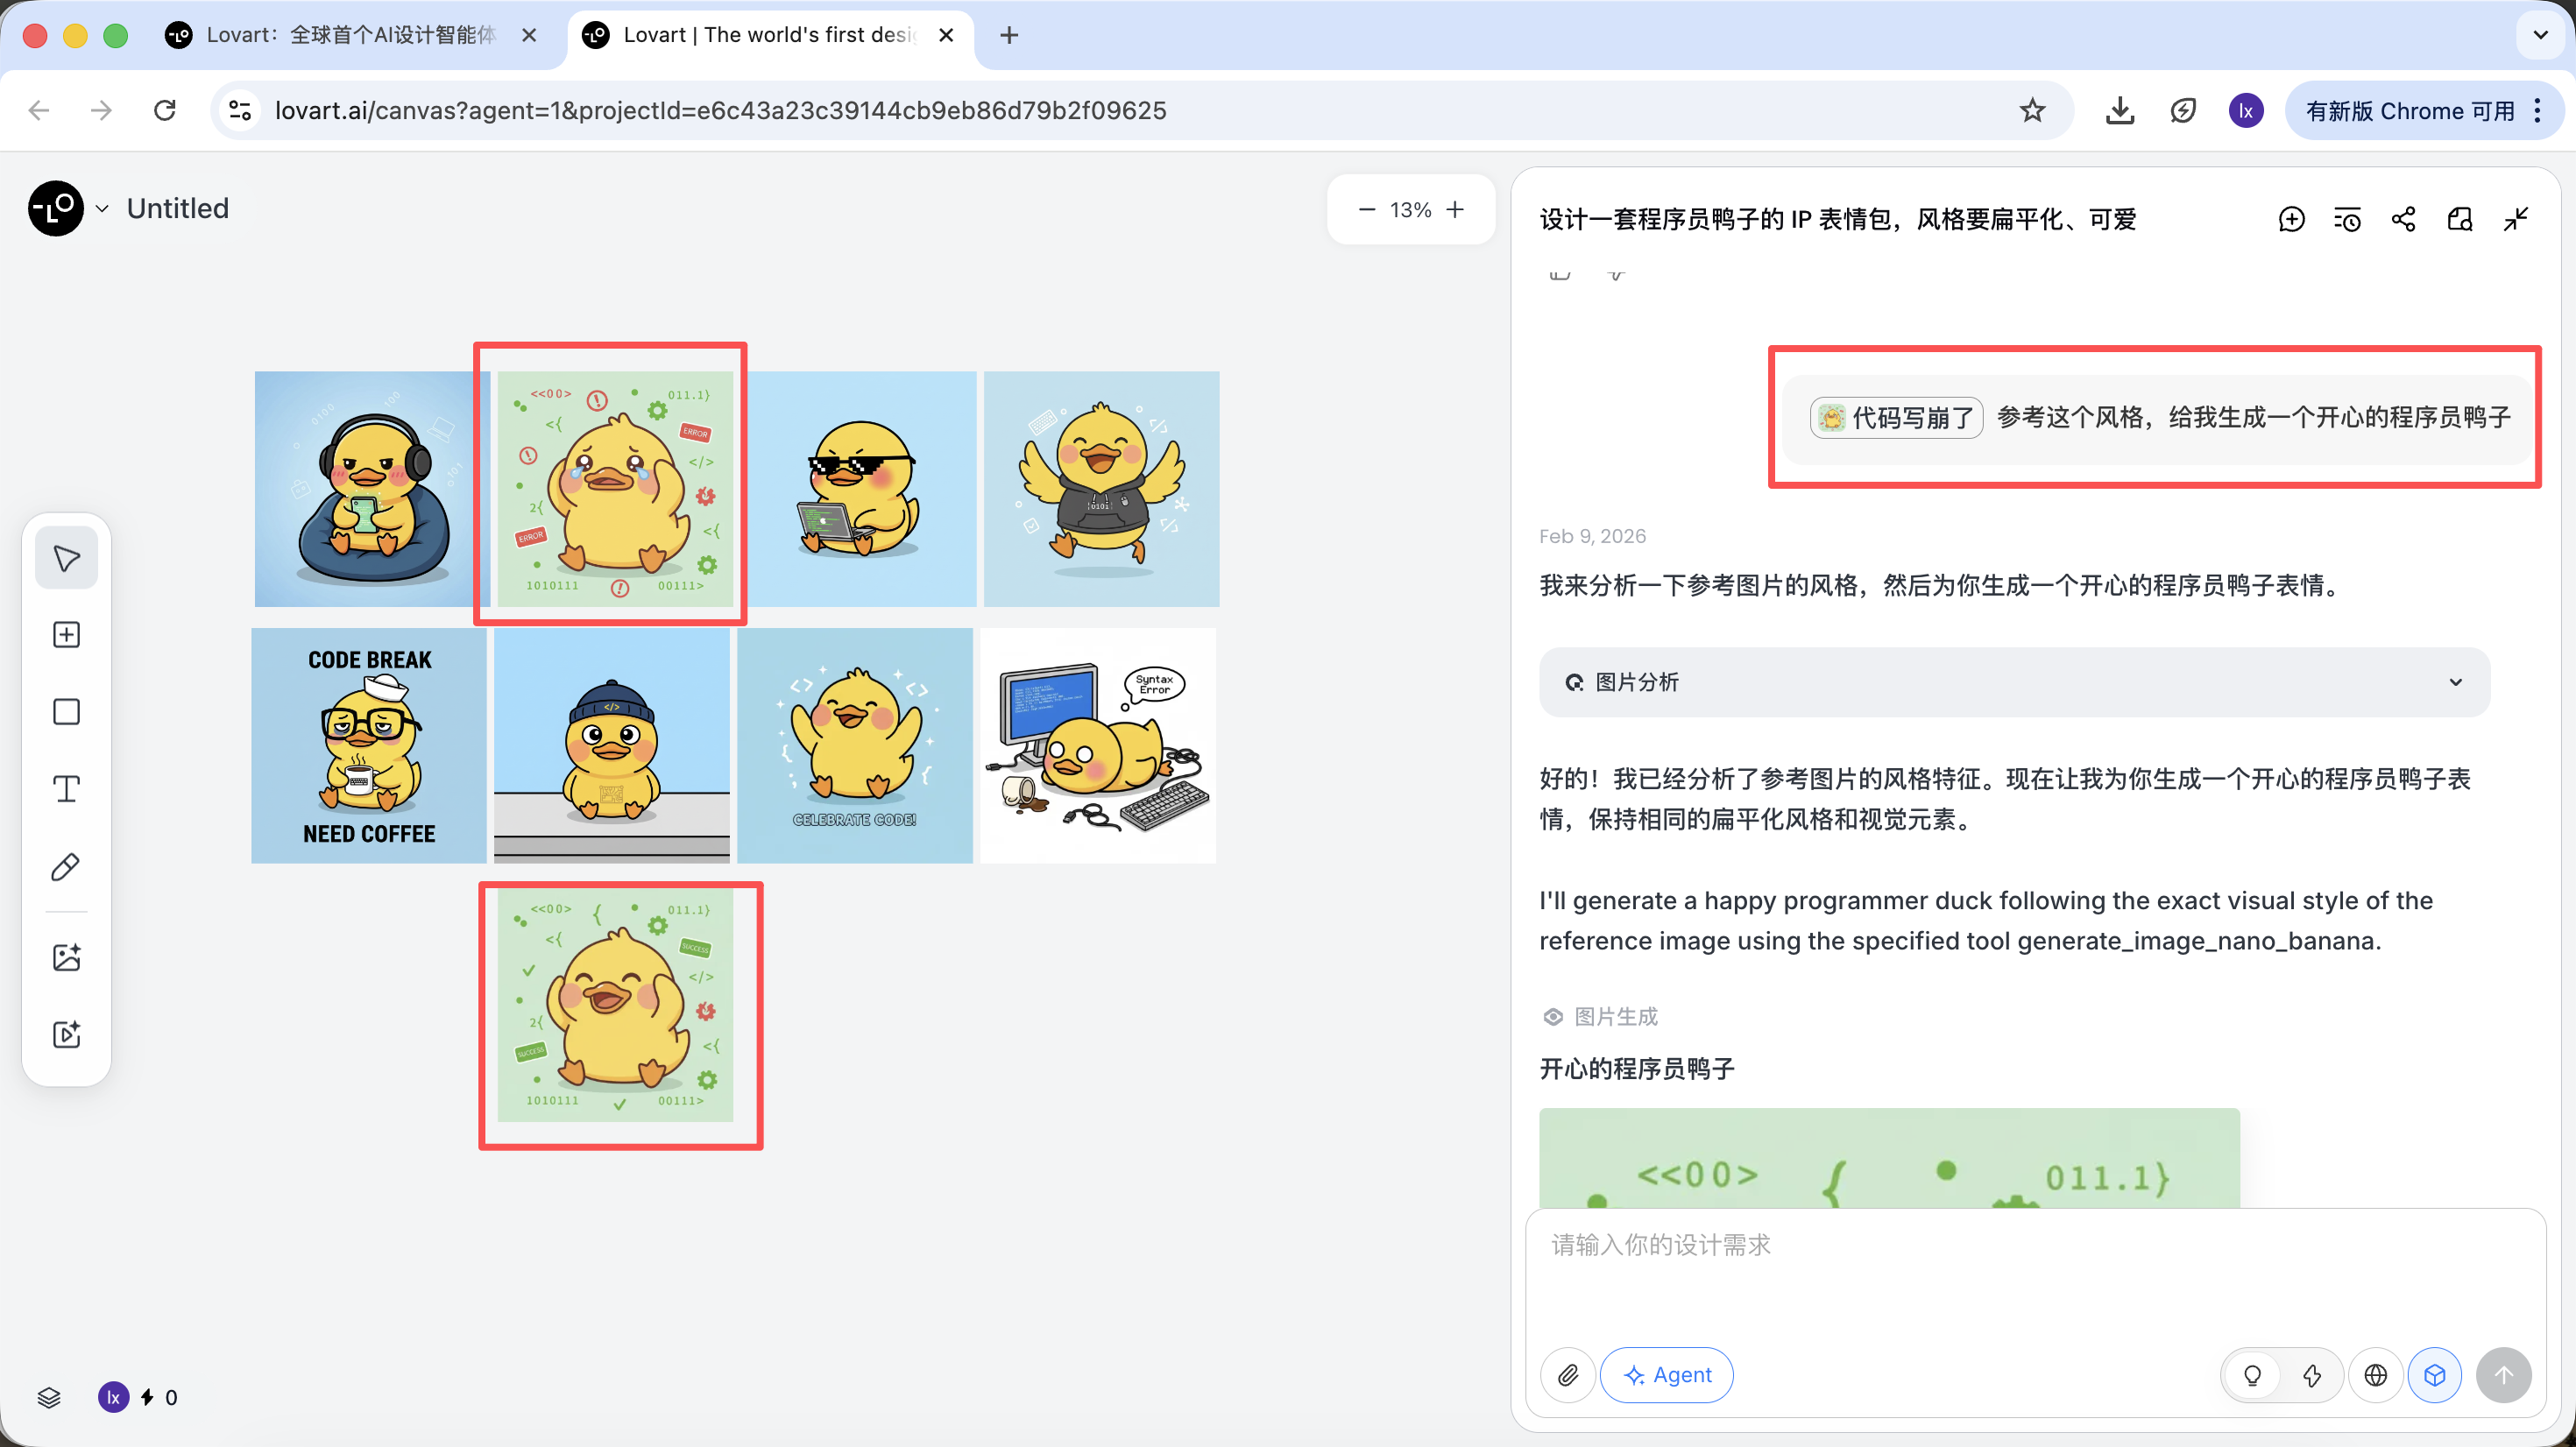
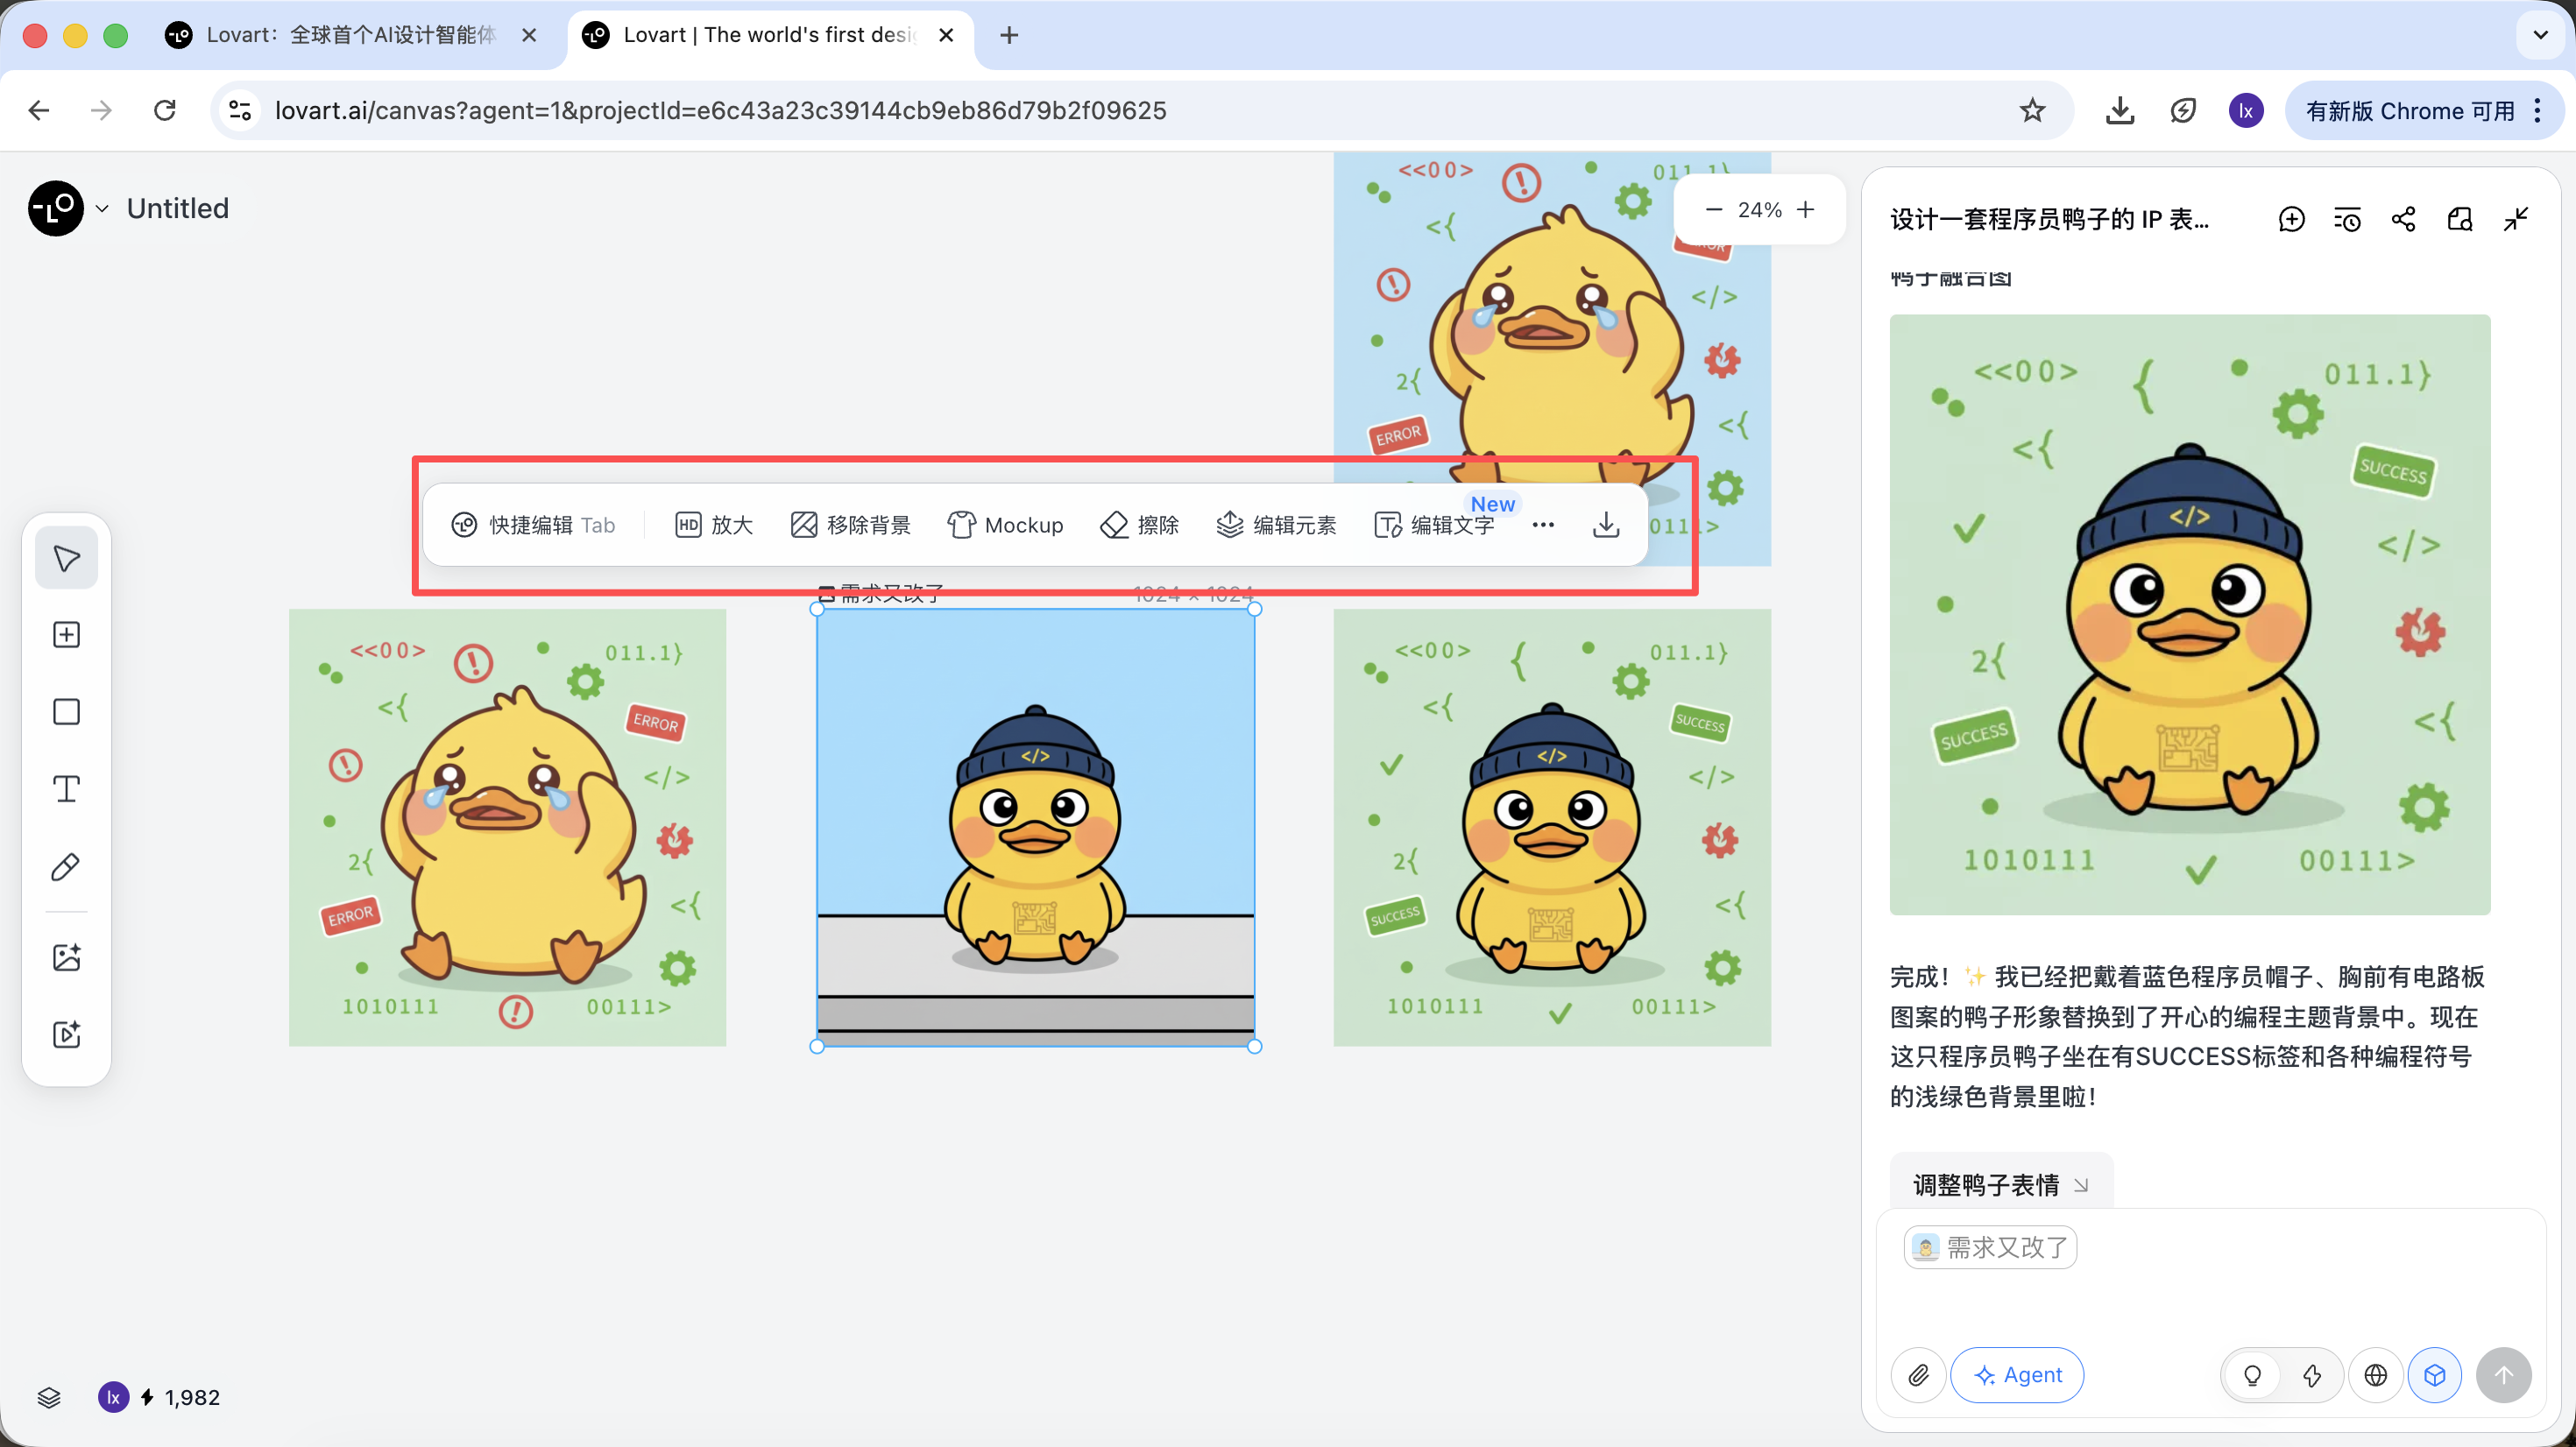
Step 2: Consistency (Reference-Based Visual Anchoring)
In Lovart, images are not only outputs. They are also inputs for follow-up generation.
Full Reference Image
- Choose your favorite "standard duck" from drafts and click the image on the canvas
- The image automatically appears in the dialogue area as a reference
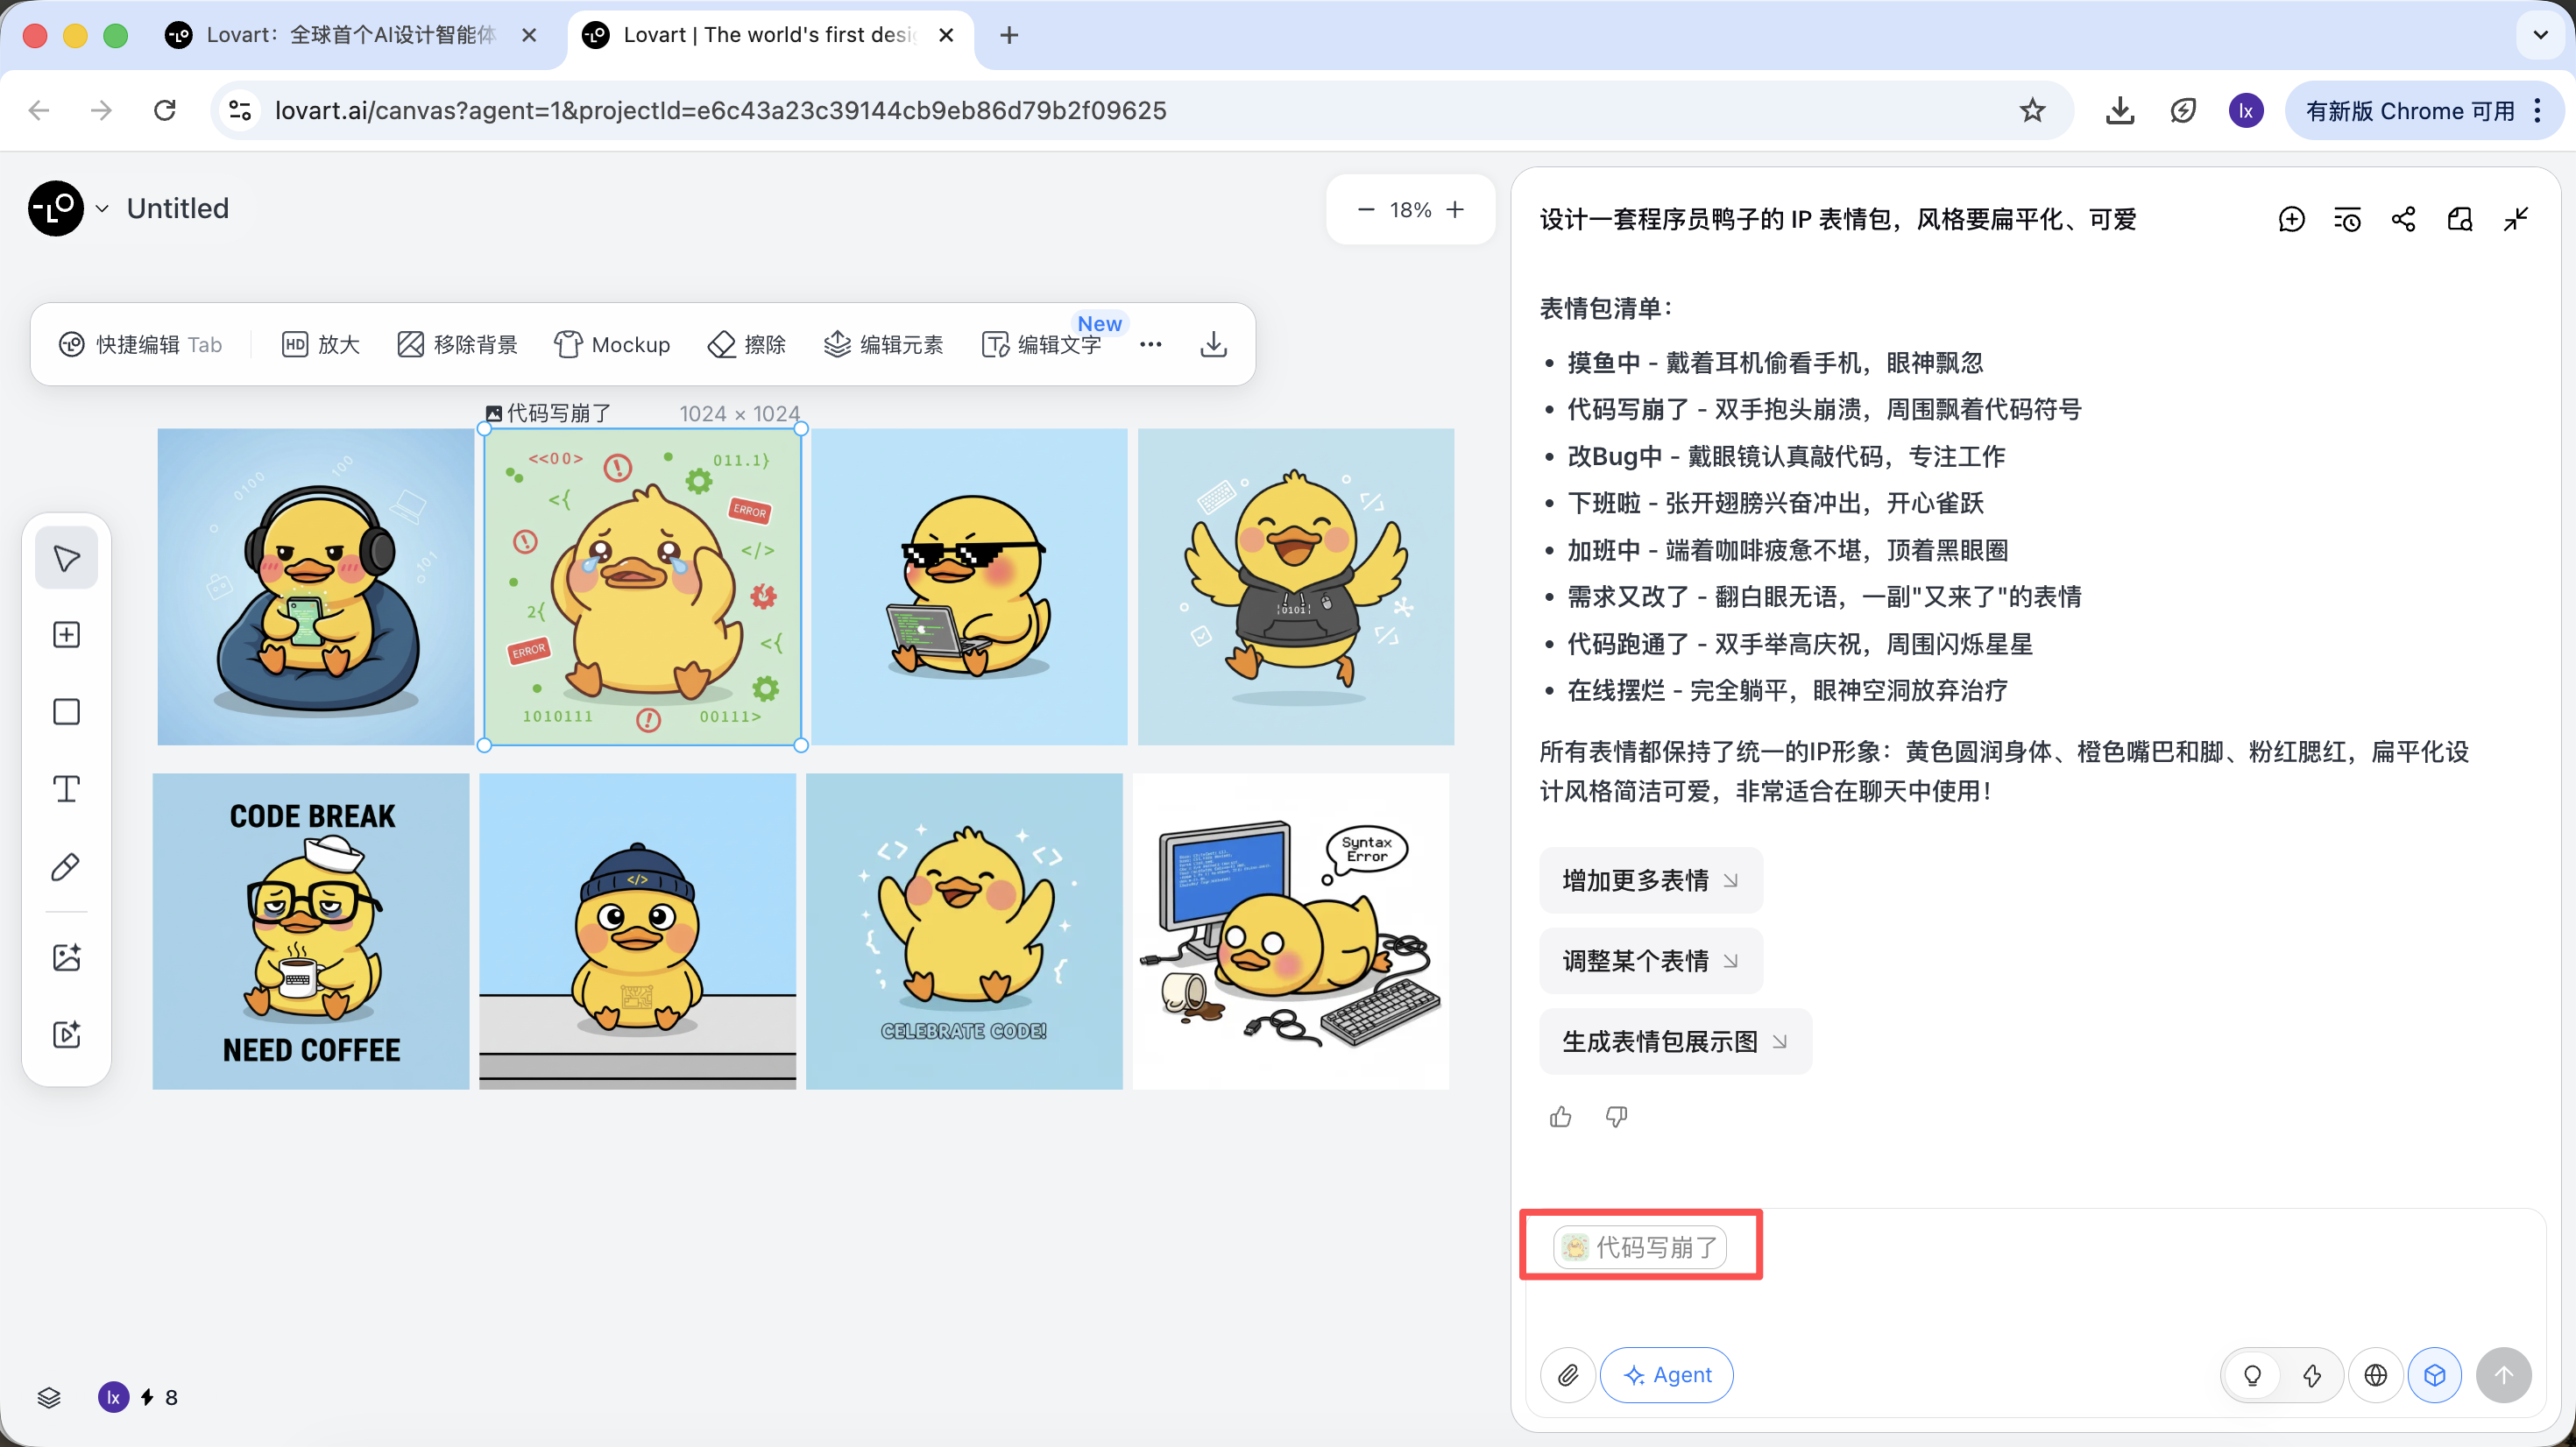
- Input a new action (such as happy) and generate
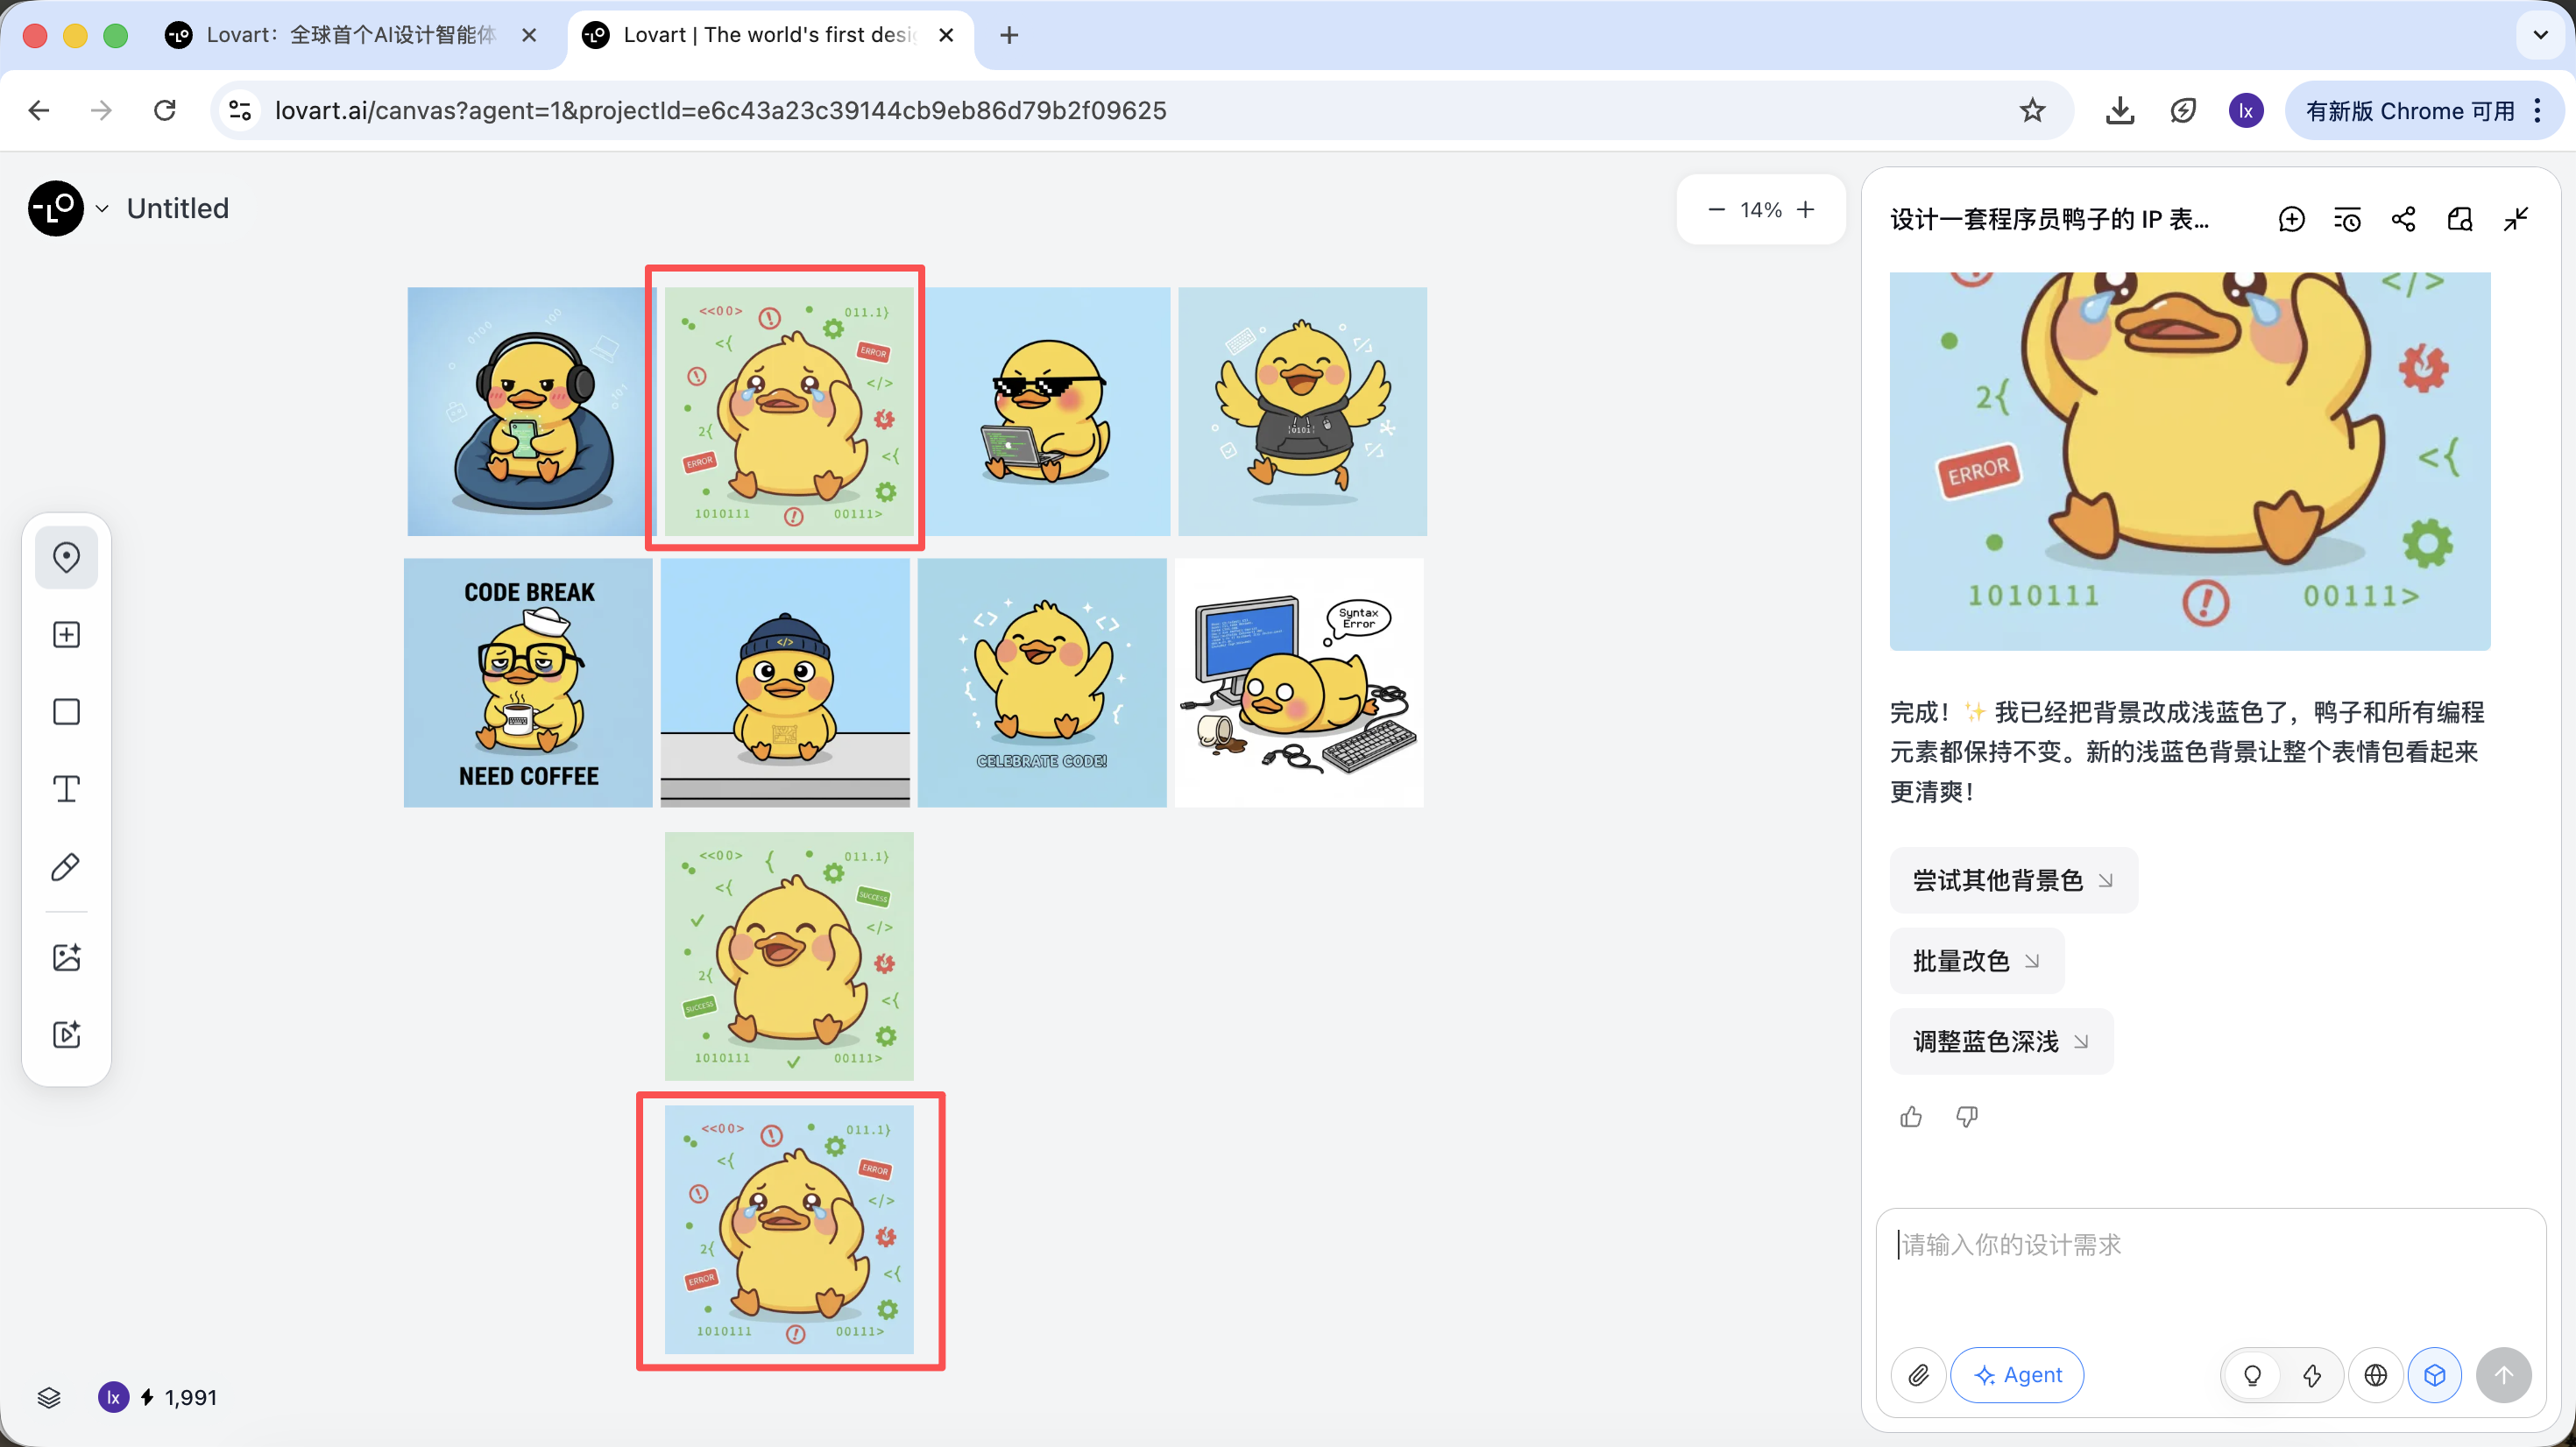
The generated result will inherit color palette, proportions, and detail characteristics from the master reference.
Local Reference / Multi-Image Composition
Besides using full images as references, Lovart also supports:
- selecting only local regions (for example, only reference a hat or expression)
Click the left tab on the canvas, choose "Mark," and annotate the local region in the target image. That part is automatically synced into the dialogue box. For example, we can change only the background color here.
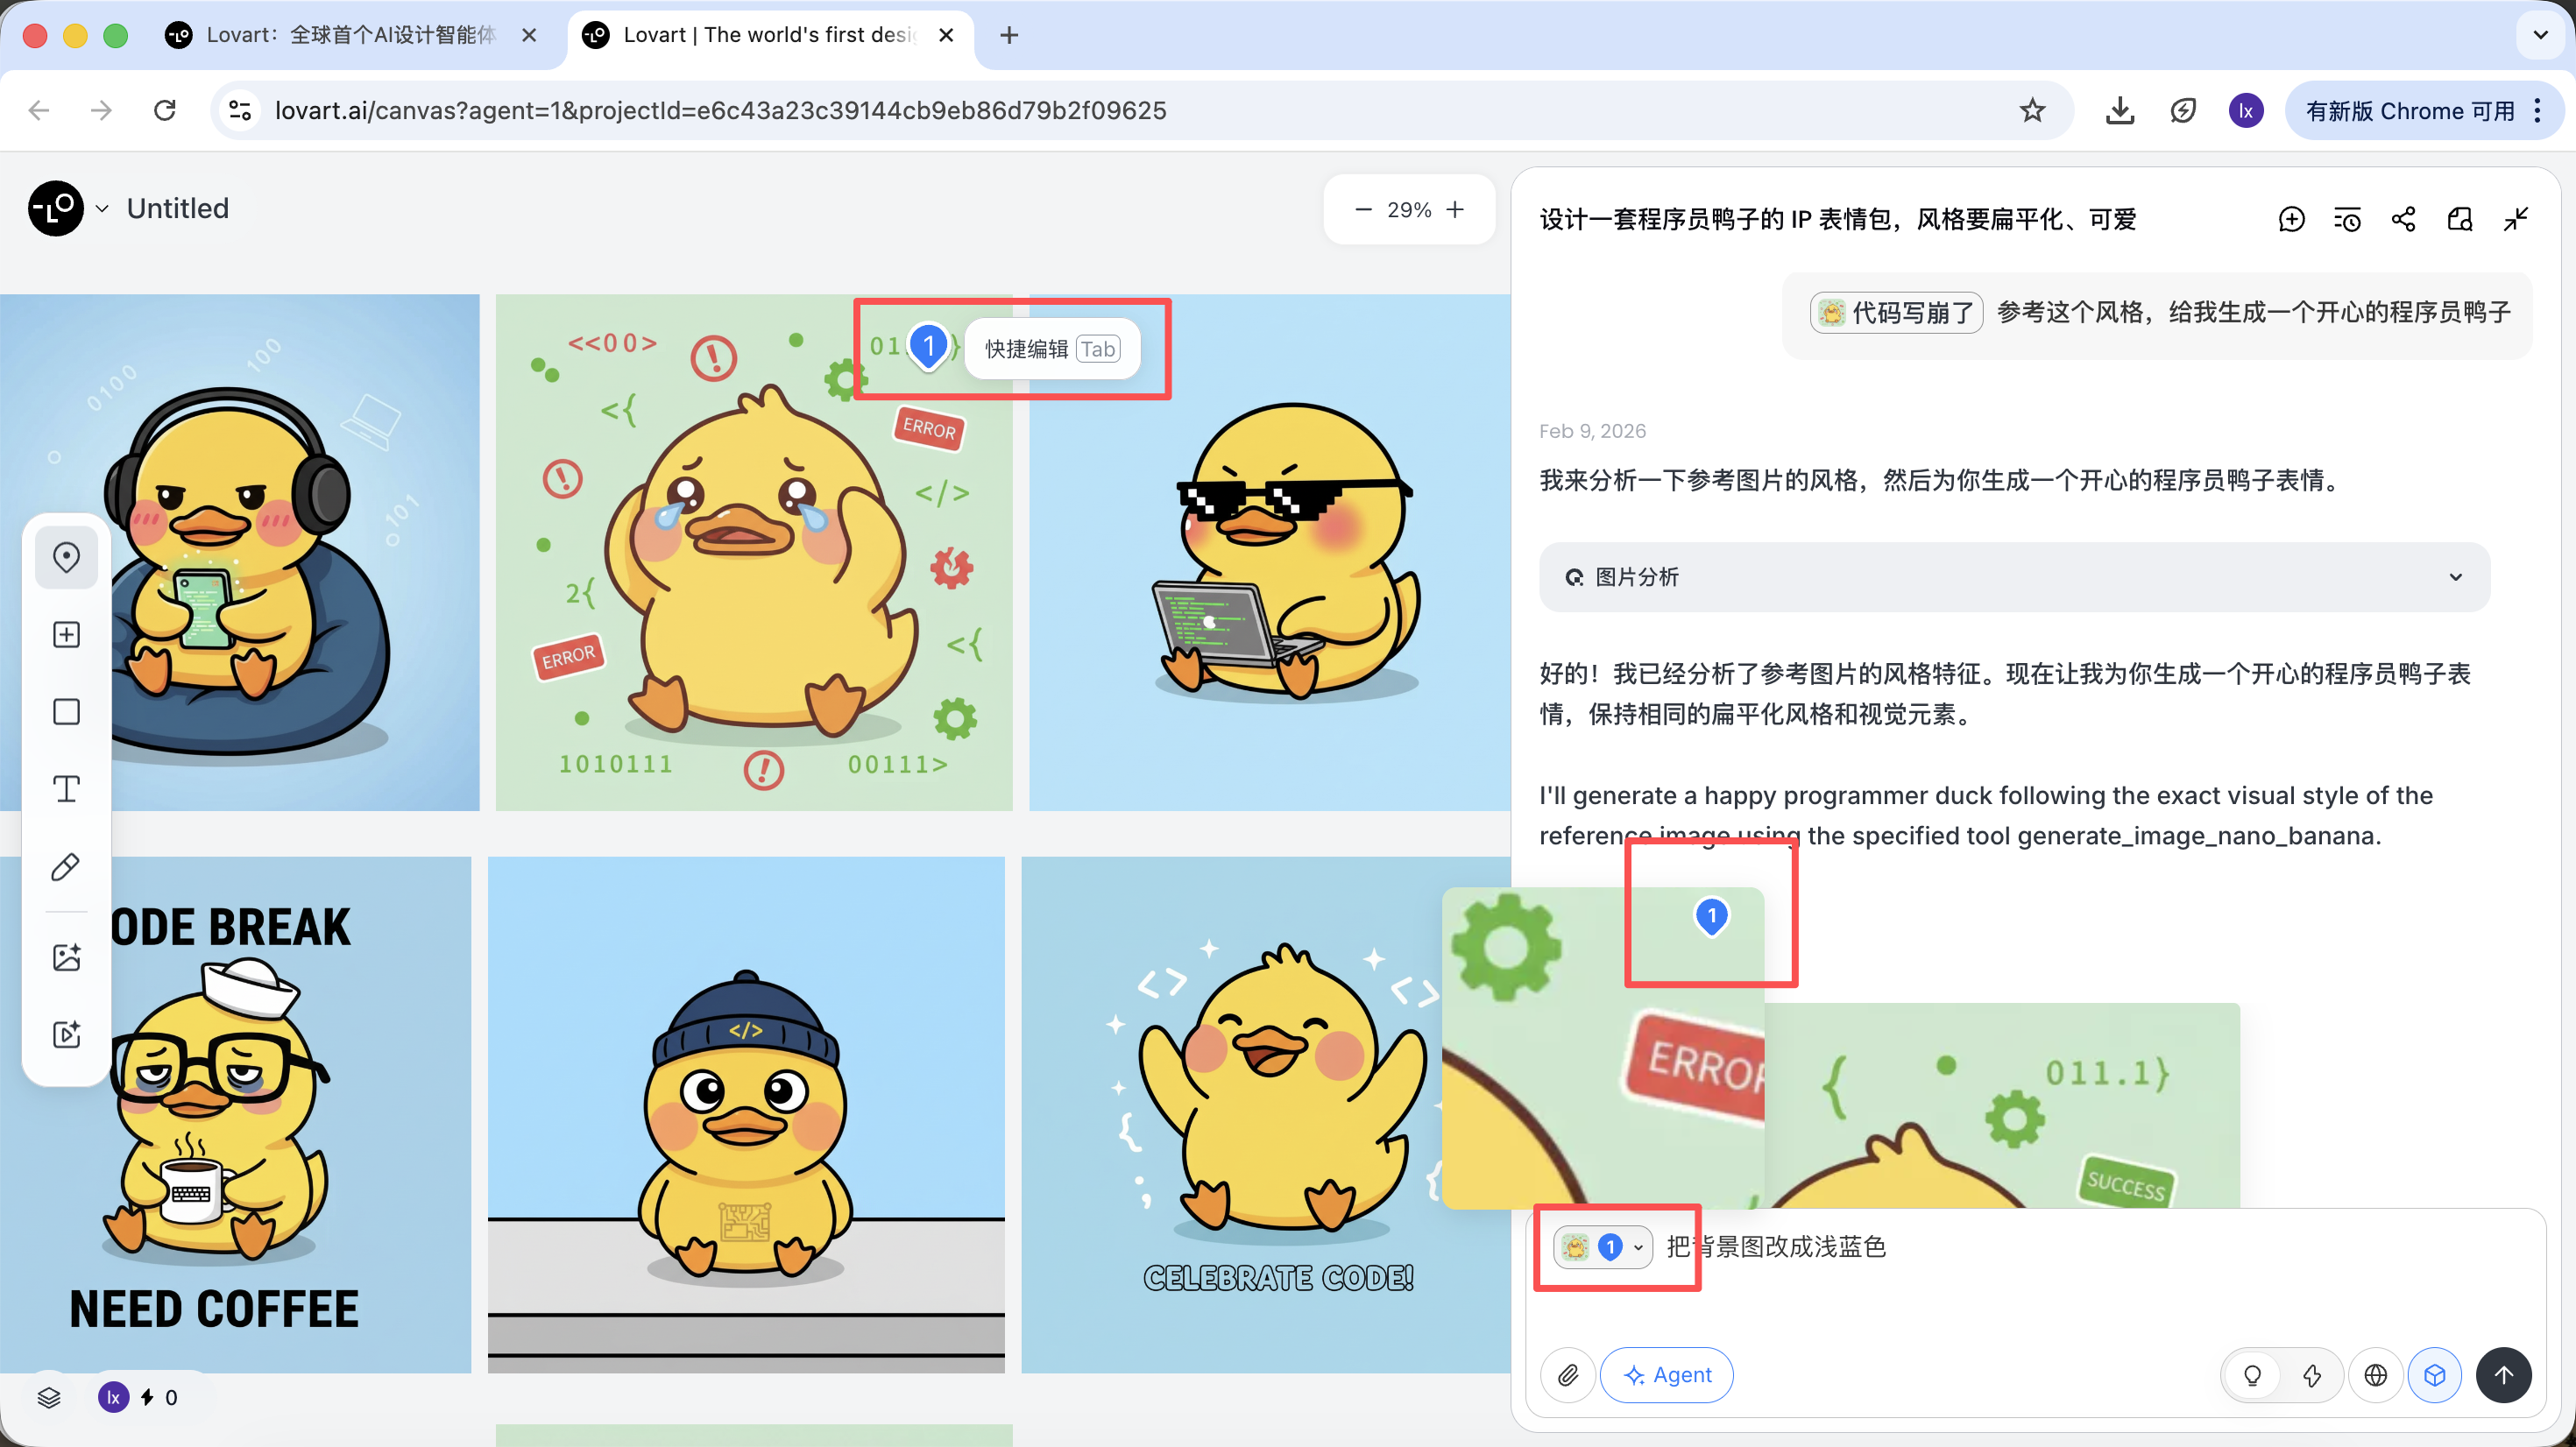
You can see the newly generated image only changes the background color, which matches our requirement.
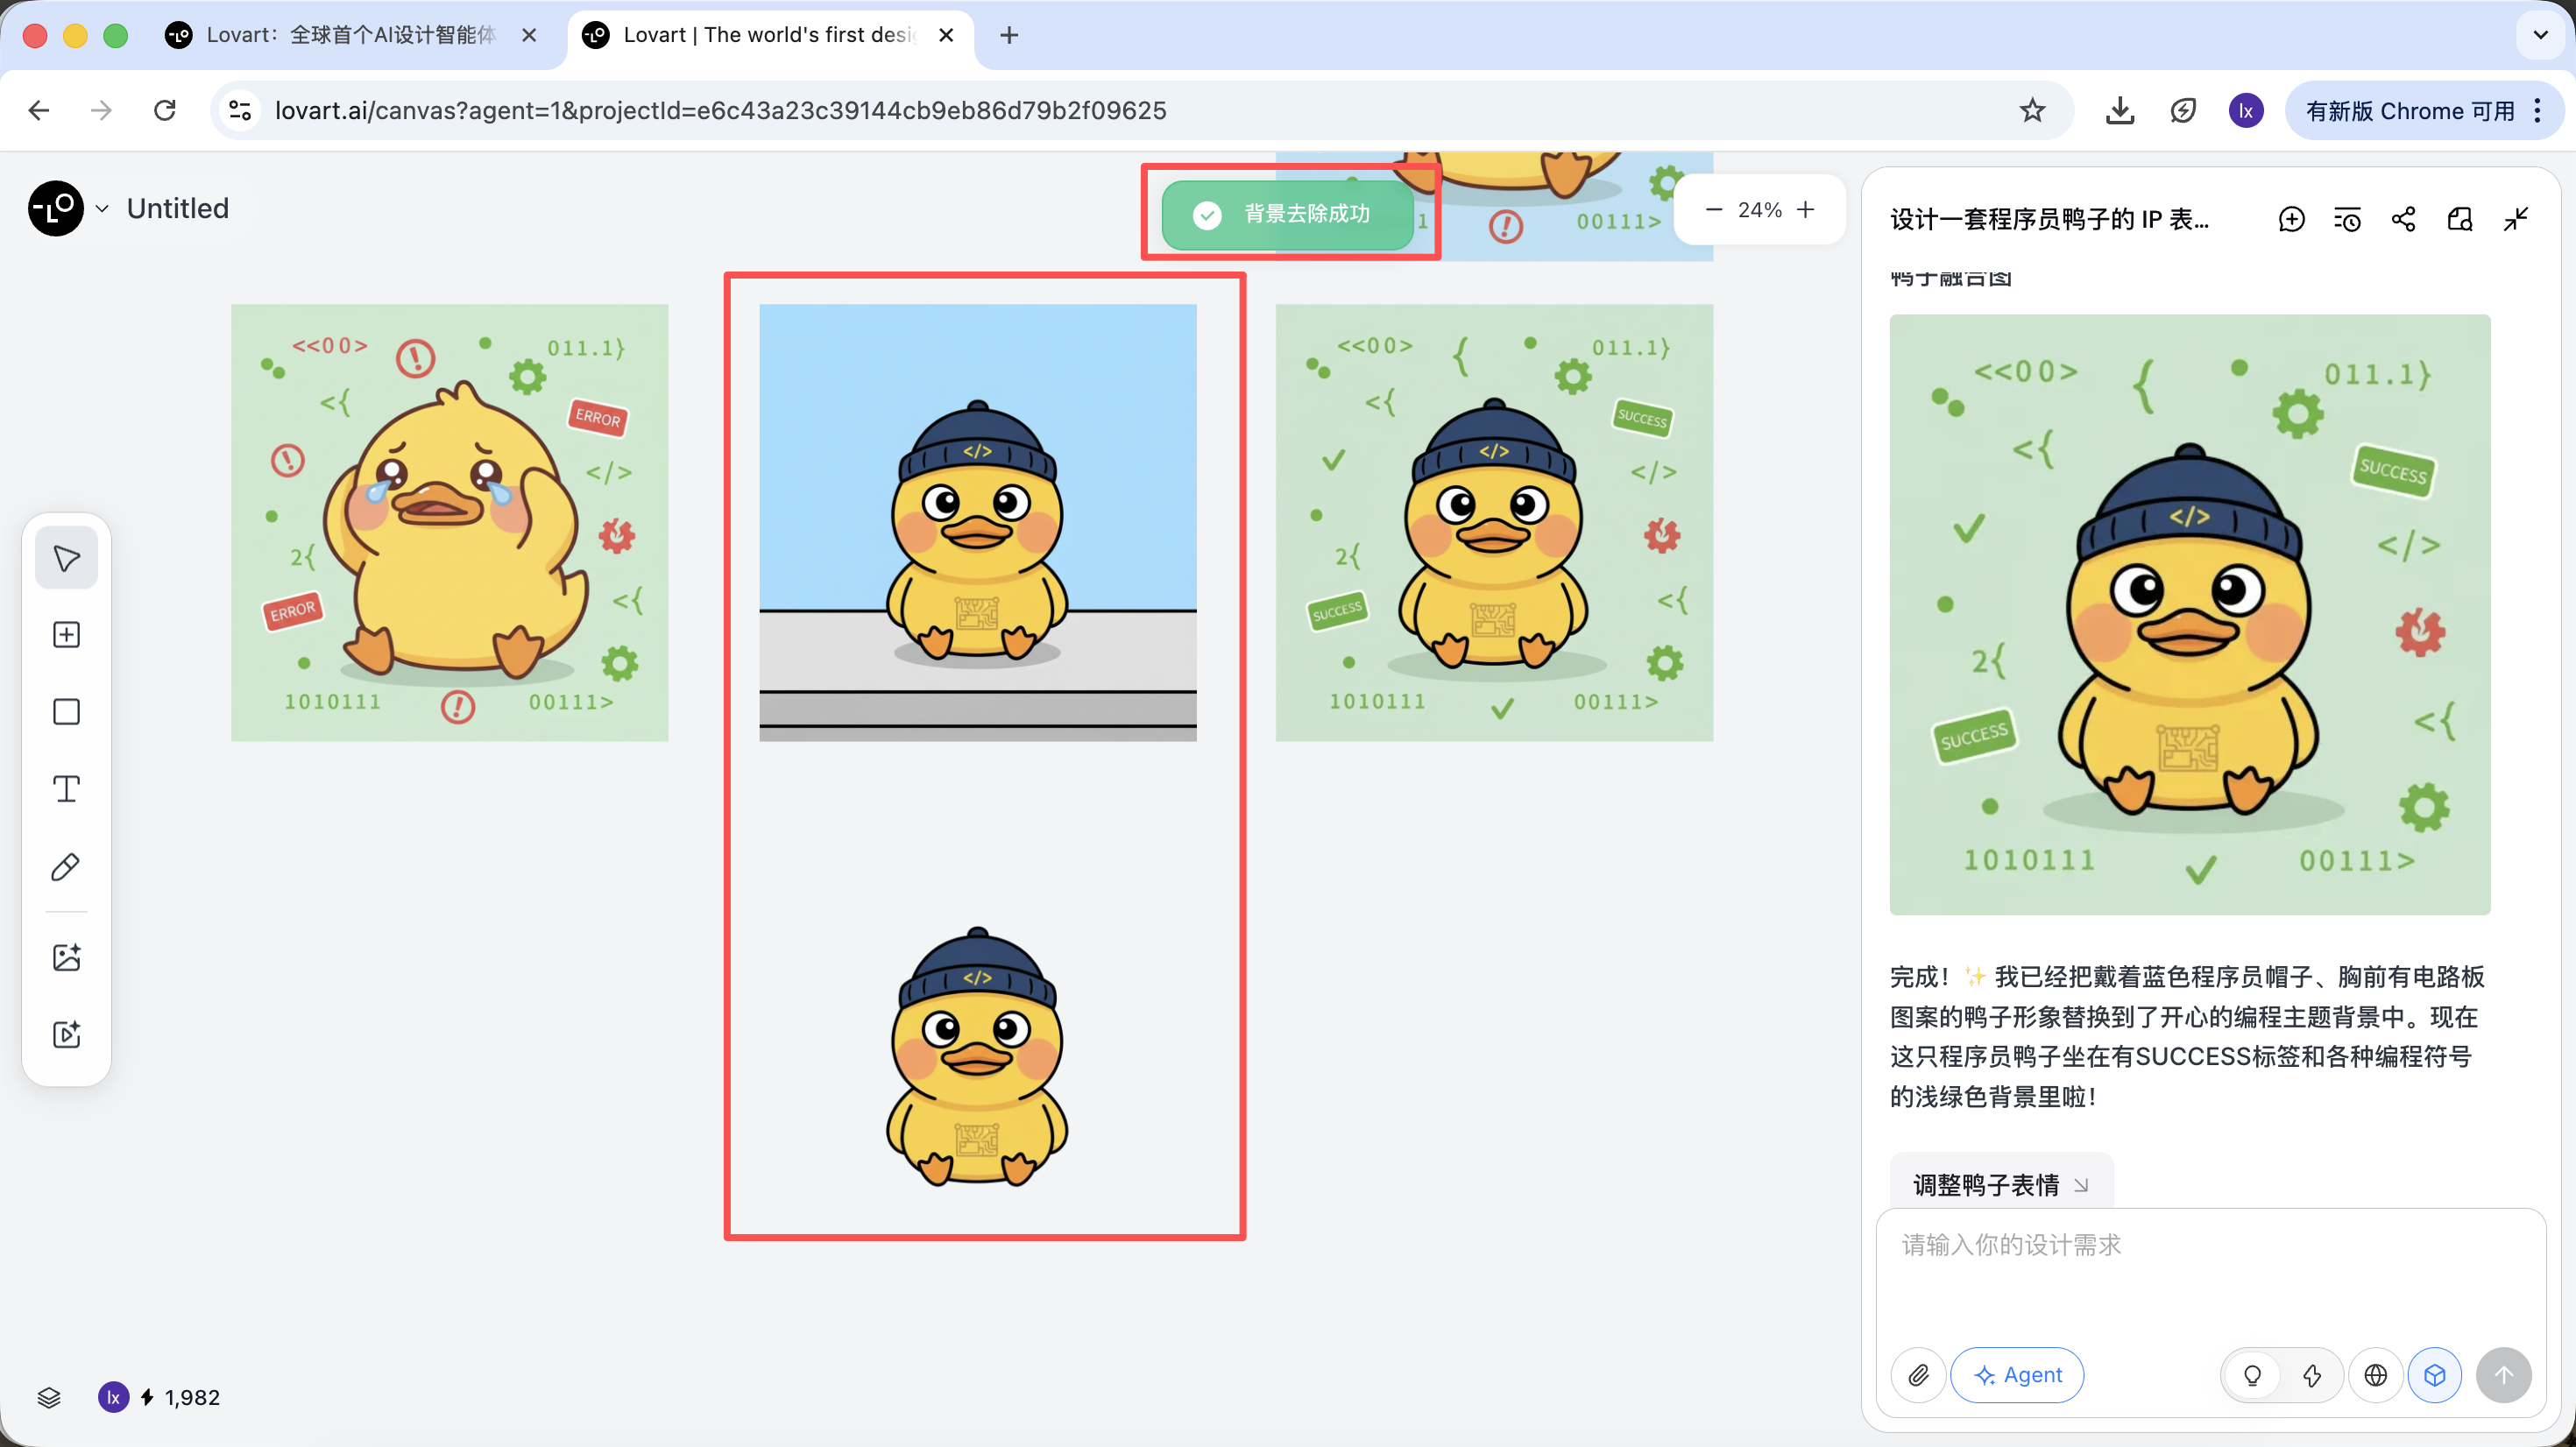
- referencing sub-elements from multiple images and combining them into a new result
For example: you can keep the main character from image A, while replacing only the hat with the style from image B. The agent automatically merges these visual constraints in the background.
Using programmer ducks as an example, we can keep the duck from the first image and replace the subject element in the second image.

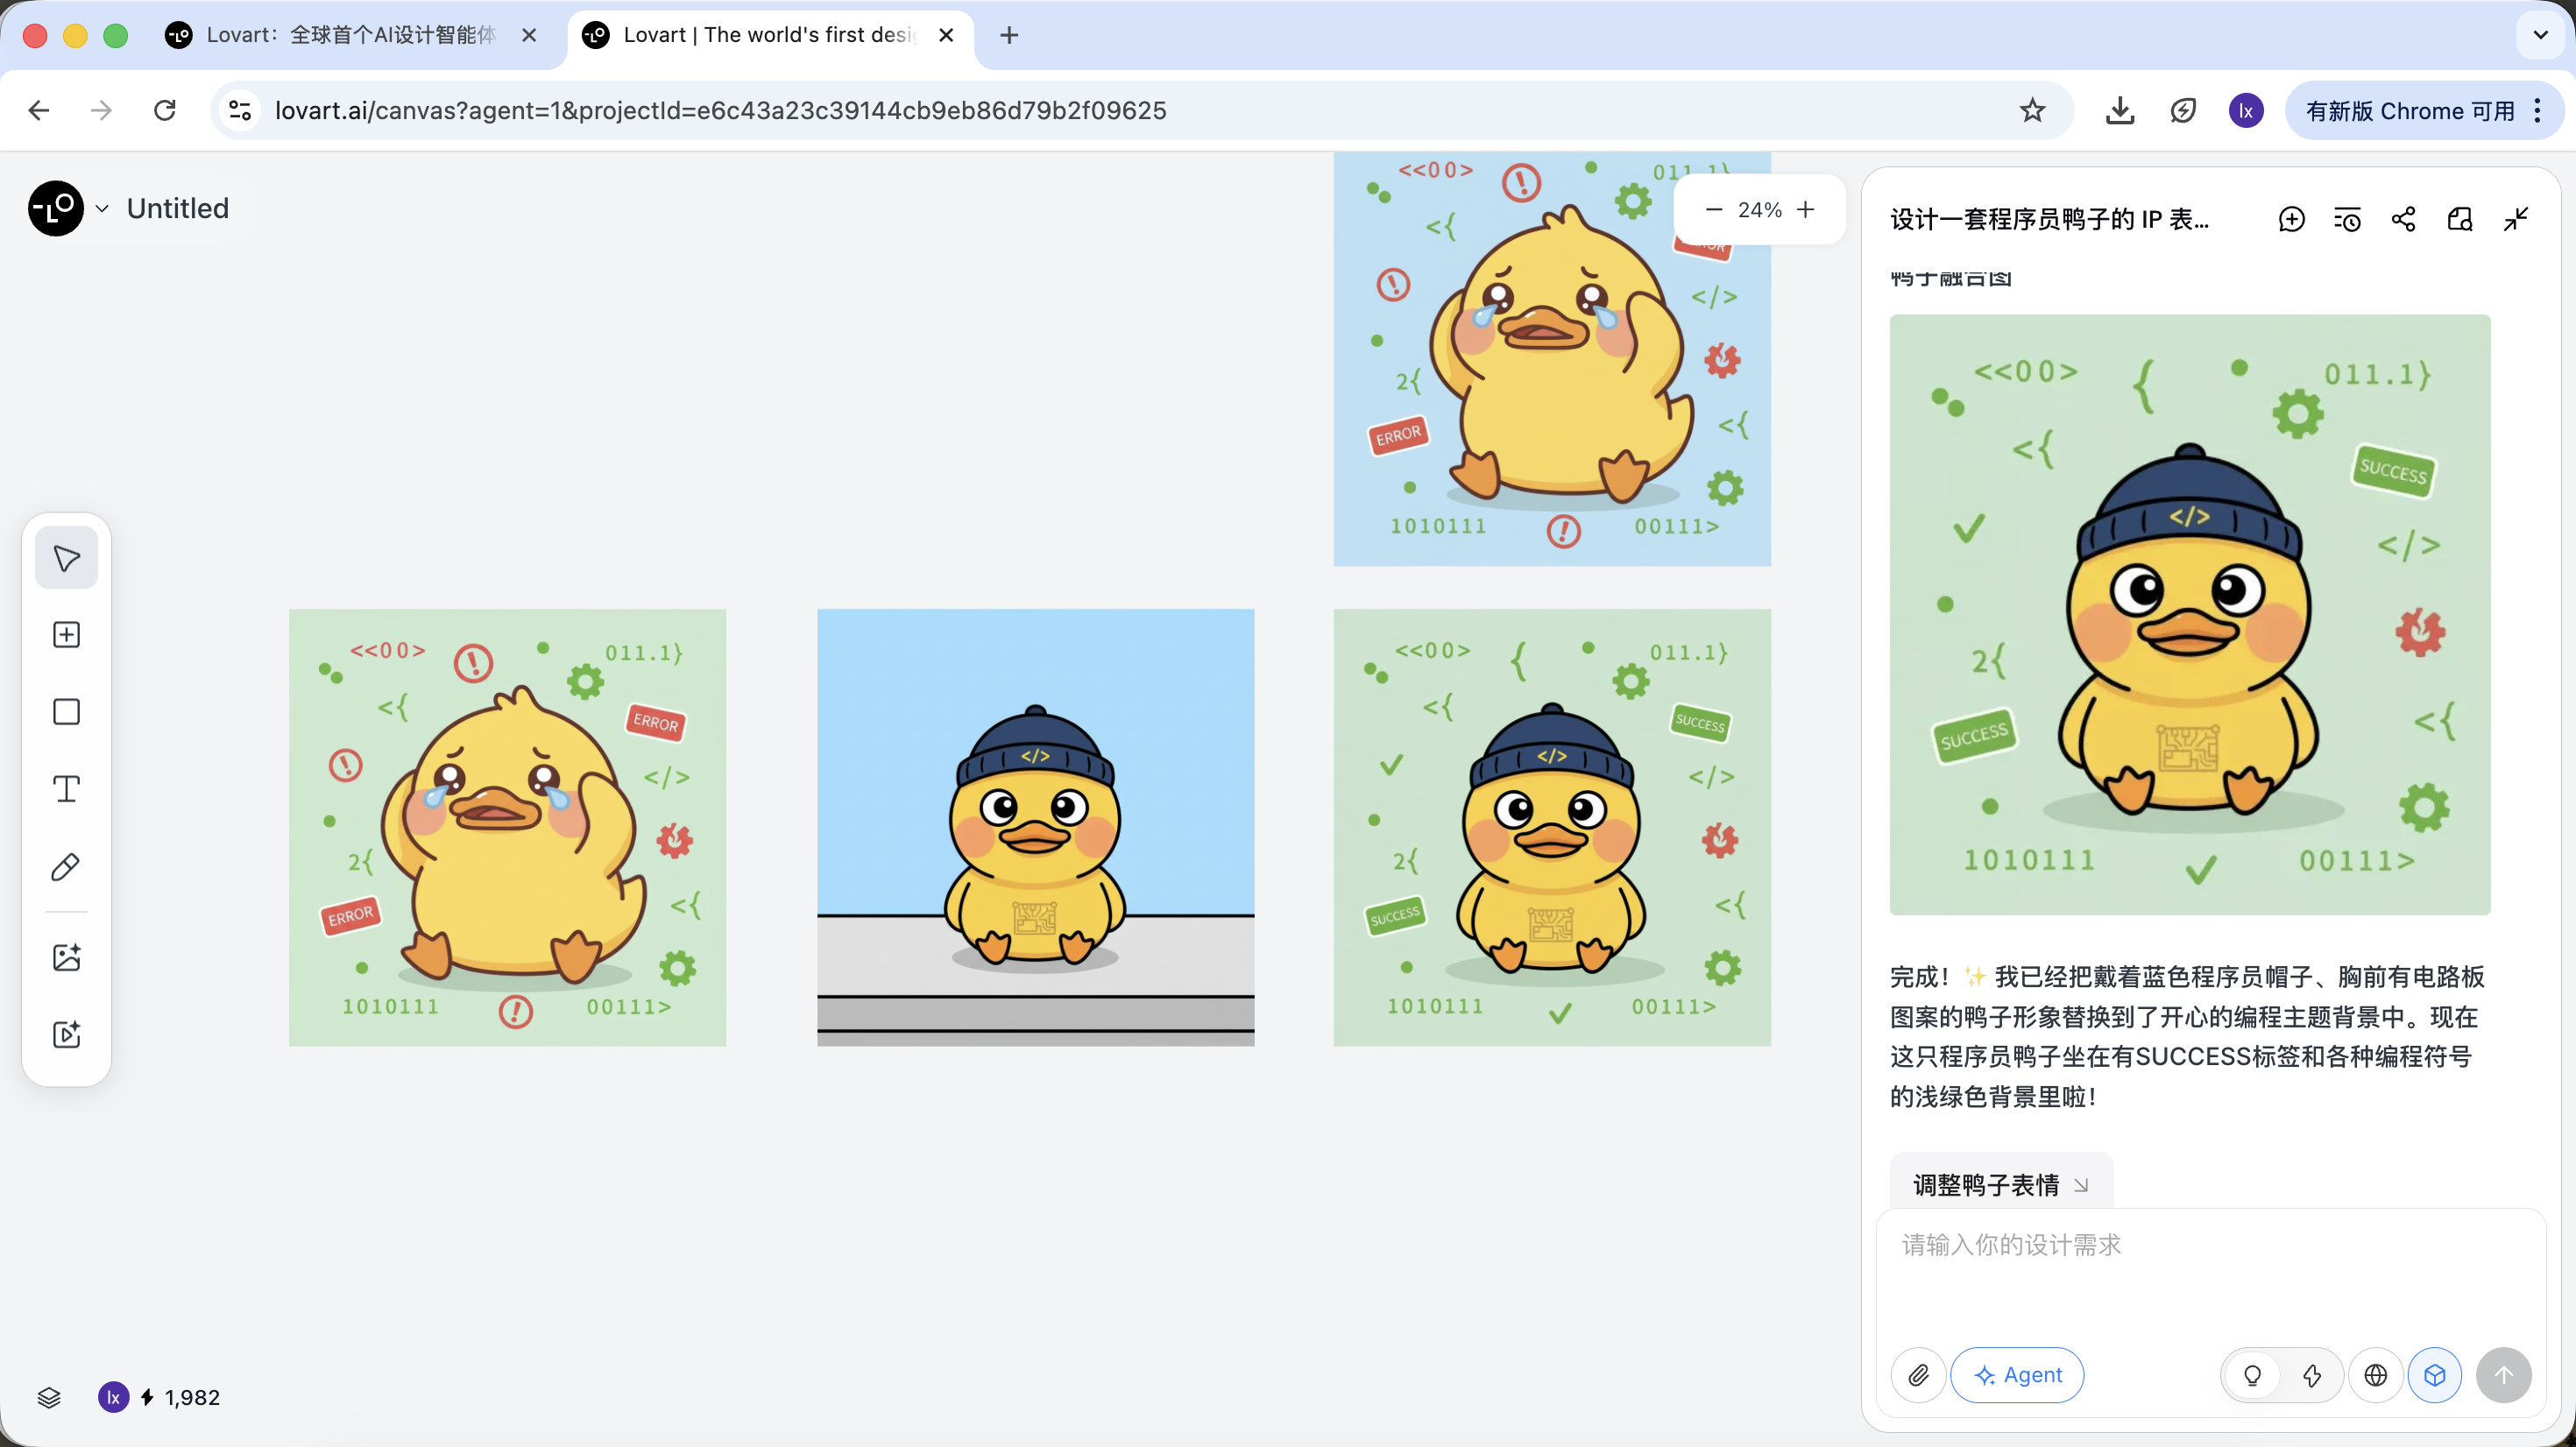
The final effect is also very strong. You can try other combinations too.
Step 3: Delivery (Agent Tool Calling)
After generation, you can directly execute operations such as upscale, background removal, and erasing.
These are not simple filters. They are results from the agent orchestrating different tools automatically.
After style direction is confirmed, you can quickly generate a full set of sticker images.
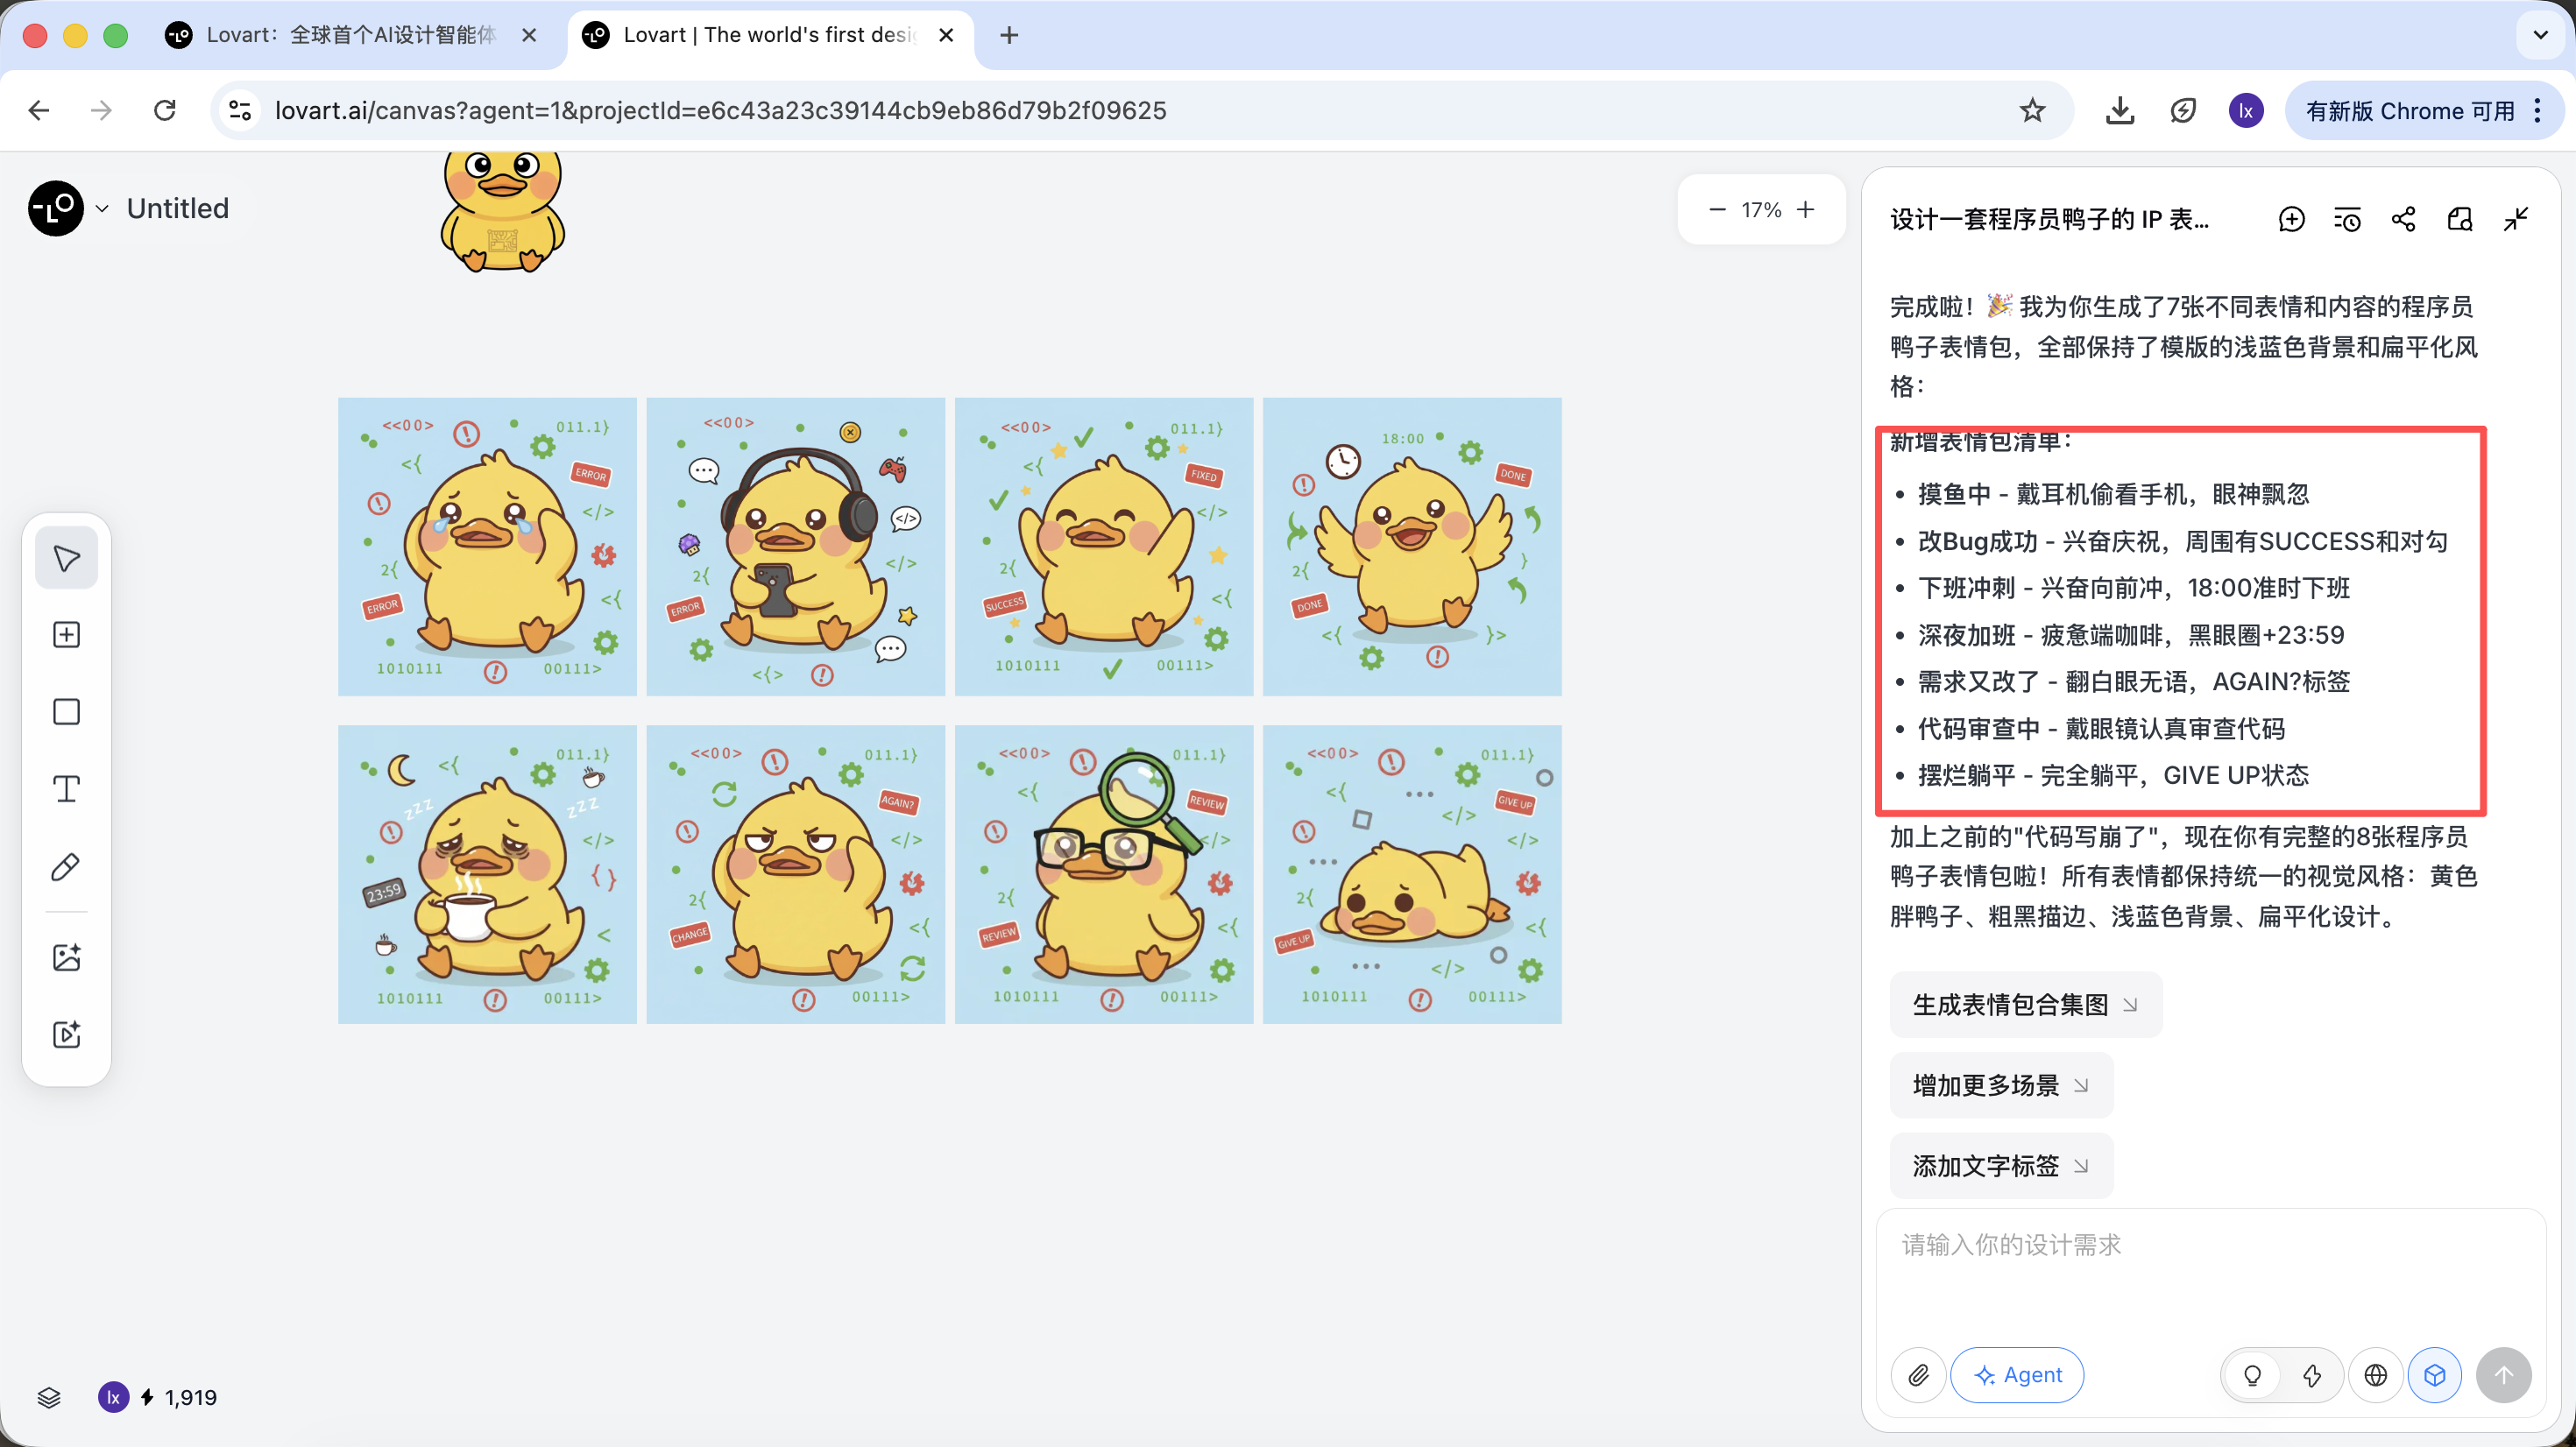
What we finally get is production-ready assets that can be delivered directly, not just one showcase image.
2.3 Usage and Pricing Notes
Lovart uses a subscription model. Different plans correspond to different usage quotas and feature permissions. Refer to the official site for specific details.
This tutorial does not recommend or compare any specific plan. If you need it in actual use, choose paid upgrades based on your own situation. Currently, payment methods include Alipay and others.
Summary
Lovart does not replace underlying models. Instead, through an agent mechanism, it upgrades image generation from "single execution" to a "continuous workflow."
When tasks involve planning, consistency, and delivery, the advantage of this type of tool becomes very clear.
Chapter 3: Build an Intelligent Drawing Assistant by Yourself
Besides using Lovart directly, we can also implement a simplified drawing assistant ourselves.
In this chapter, we use "automatic illustration for articles" as an example. Starting from a real problem, we build a minimal practical agent with a thinking layer step by step.
3.1 Pain Point: Why Sending Long Articles Directly to an Image Model Does Not Work
If you directly send a long article to NanoBanana and ask for illustration, the result is usually not ideal. The issue is not that the model "cannot draw." The issue is that it is not good at understanding long text.
Image generation models are better at short and clear visual descriptions. But when the input becomes an article with structure, key points, and contextual relationships, the model cannot determine which parts should be represented visually. This often causes off-topic images, or results that capture only scattered details without overall summarization.
In essence, image models have "execution" capability but lack an analysis-and-selection process for long text.
3.2 Solution: Use an Agent to Split "Understanding" and "Execution"
To solve this, the key is not a more complicated prompt. The key is to think clearly before drawing. So we introduce an independent "thinking layer" into the generation flow, and use it to build the simplest practical agent.
This agent has only one core objective: make the final generated image match the user's true intent as closely as possible.
The full flow can be summarized as: long-text input -> language-model understanding and intent judgment -> generation of suitable visual prompt -> image-model execution -> output image
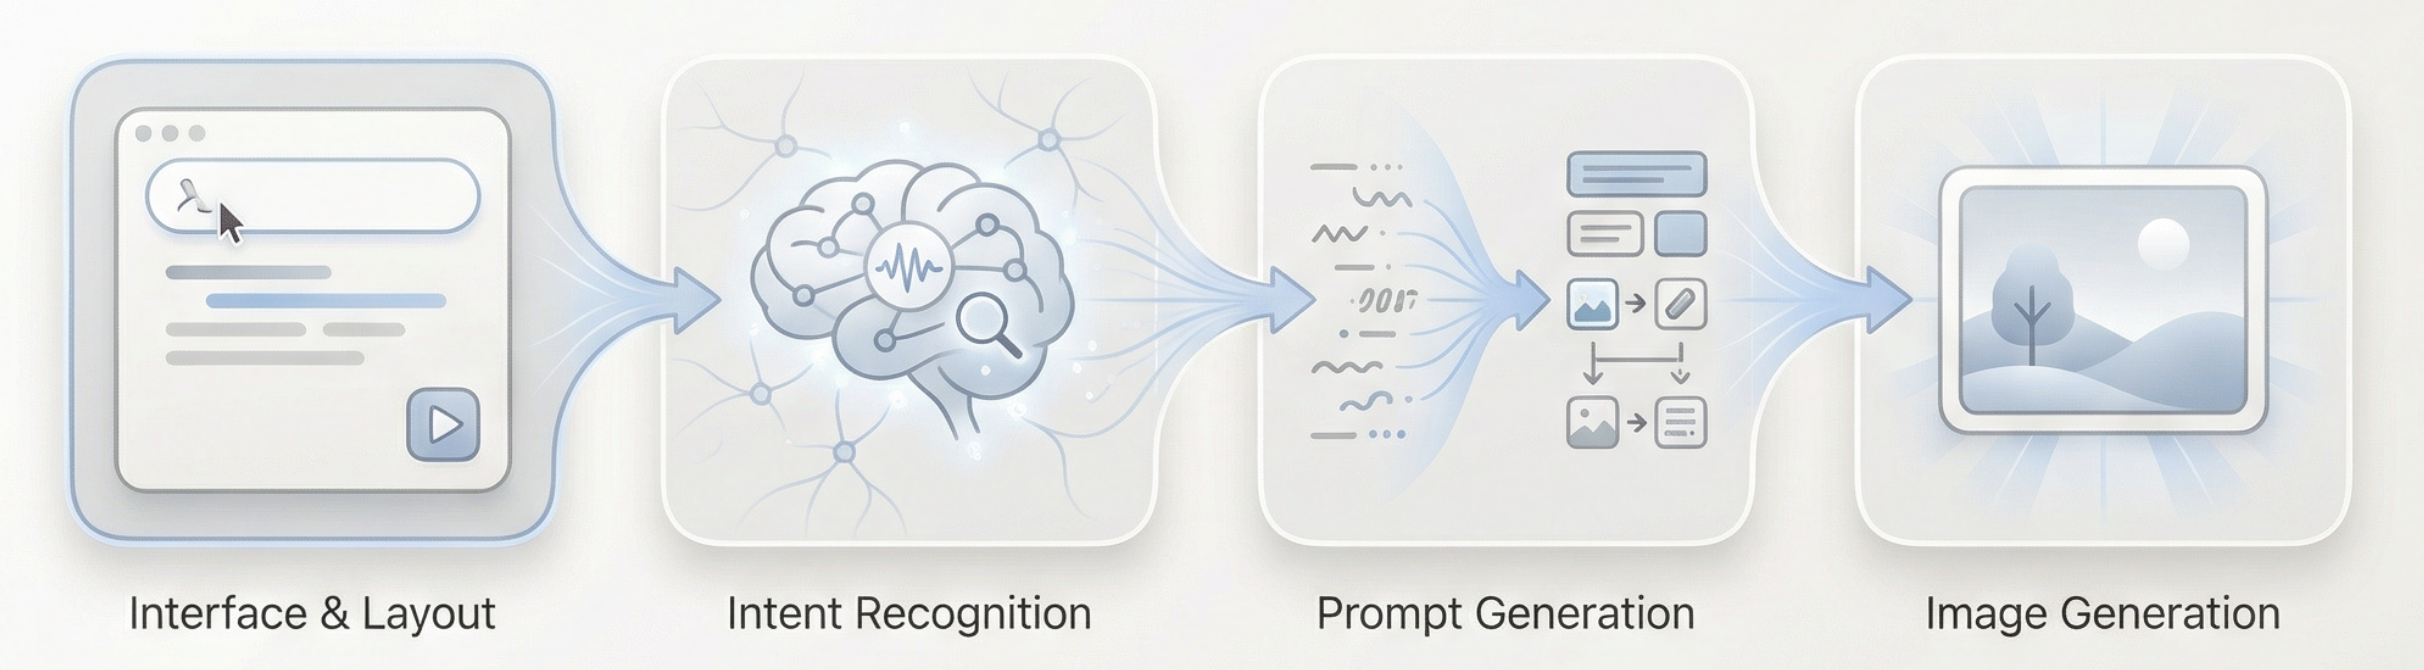
How can our agent understand user intent?
Here we use a simplified thinking layer with three intents: invalid input, direct drawing instruction, and long text that needs understanding.
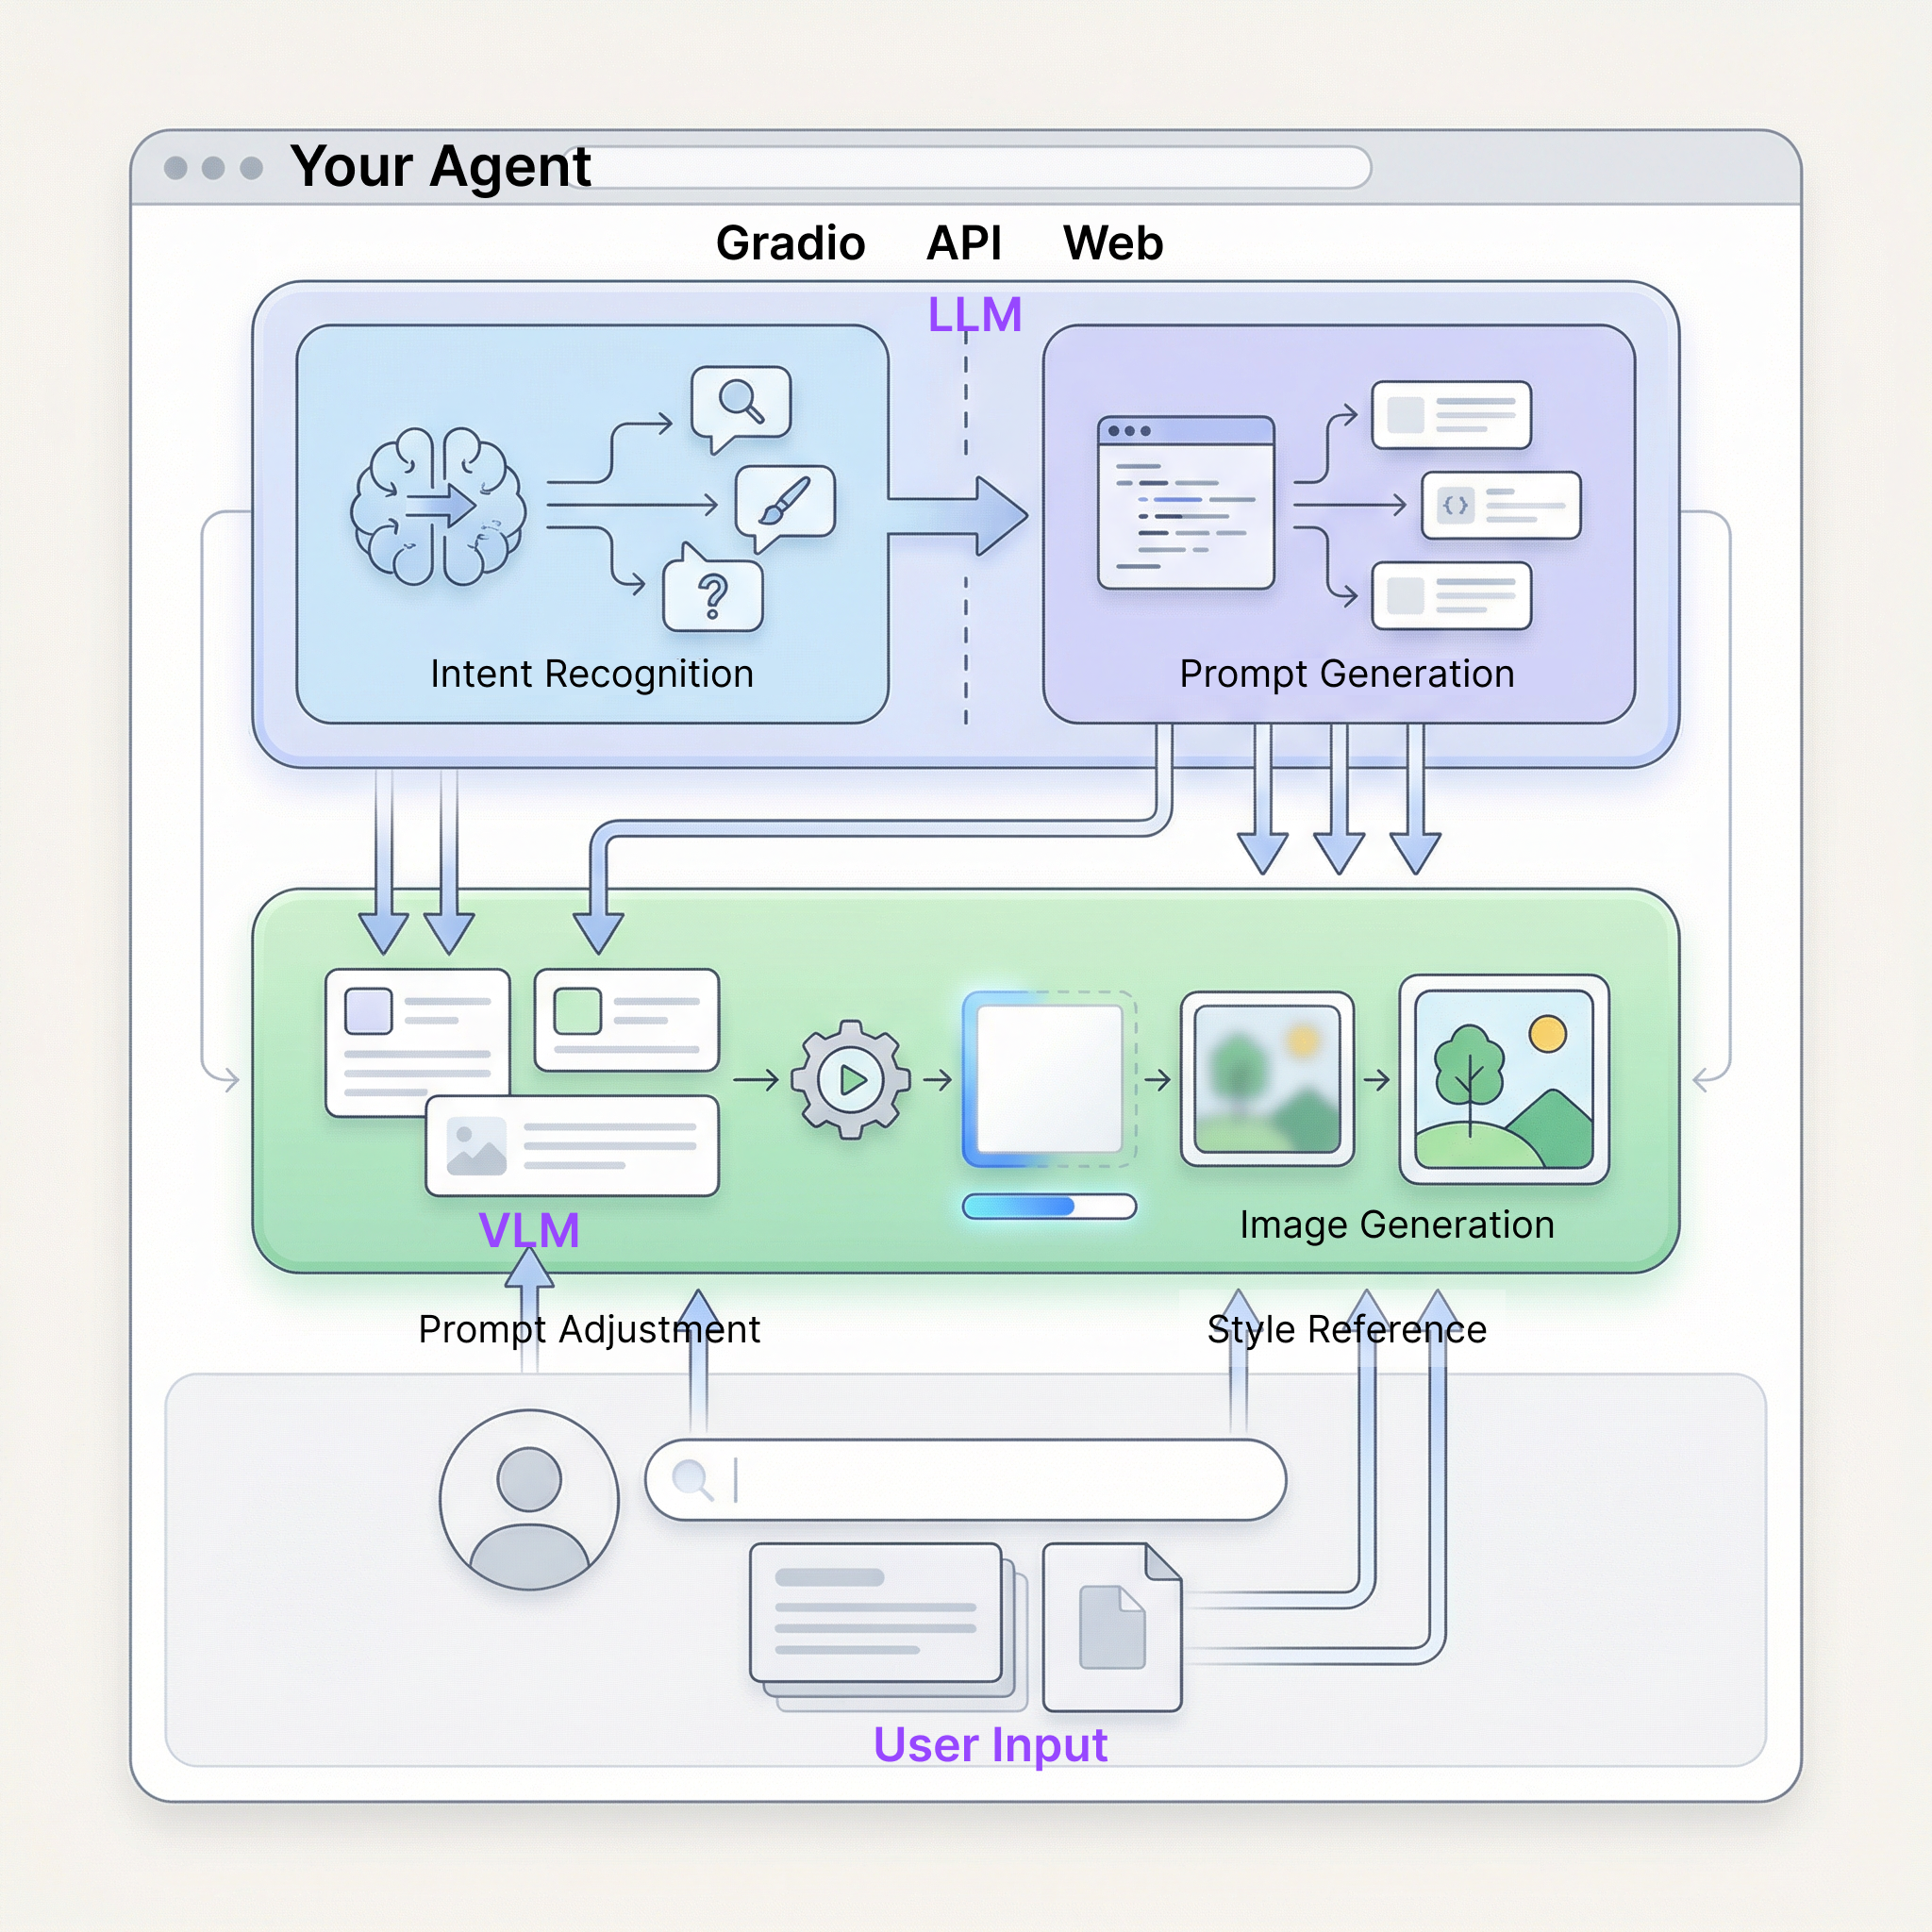
In this agent, role division can be summarized in four points:
- Language model as decision core It understands article content, judges user intent, routes tasks to suitable generation paths, and decides "what to do next" and how to generate visual prompts.
- Image model as executor The image model does not do understanding or intent judgment. It only receives prepared visual instructions and focuses on rendering.
- User as interactive guide Besides entering text directly, users can manually adjust generated prompts or add reference images to guide and fine-tune final results.
- Gradio and backend APIs as application carrier They connect UI, model invocation, and result display to ensure the full agent can run stably as a complete web app.
3.3 Practical Preparation: Obtain APIs
Looks fun, right? To run the full flow above, we only need two types of APIs.
Hand: NanoBanana API (Image Generation)
Directly reuse the API Key and API URL already configured in Chapter 1. No additional setup is required.
Brain: SiliconFlow API (Text Thinking)
We need a large language model to handle the "thinking layer." This tutorial uses model services provided by SiliconFlow: https://cloud.siliconflow.cn
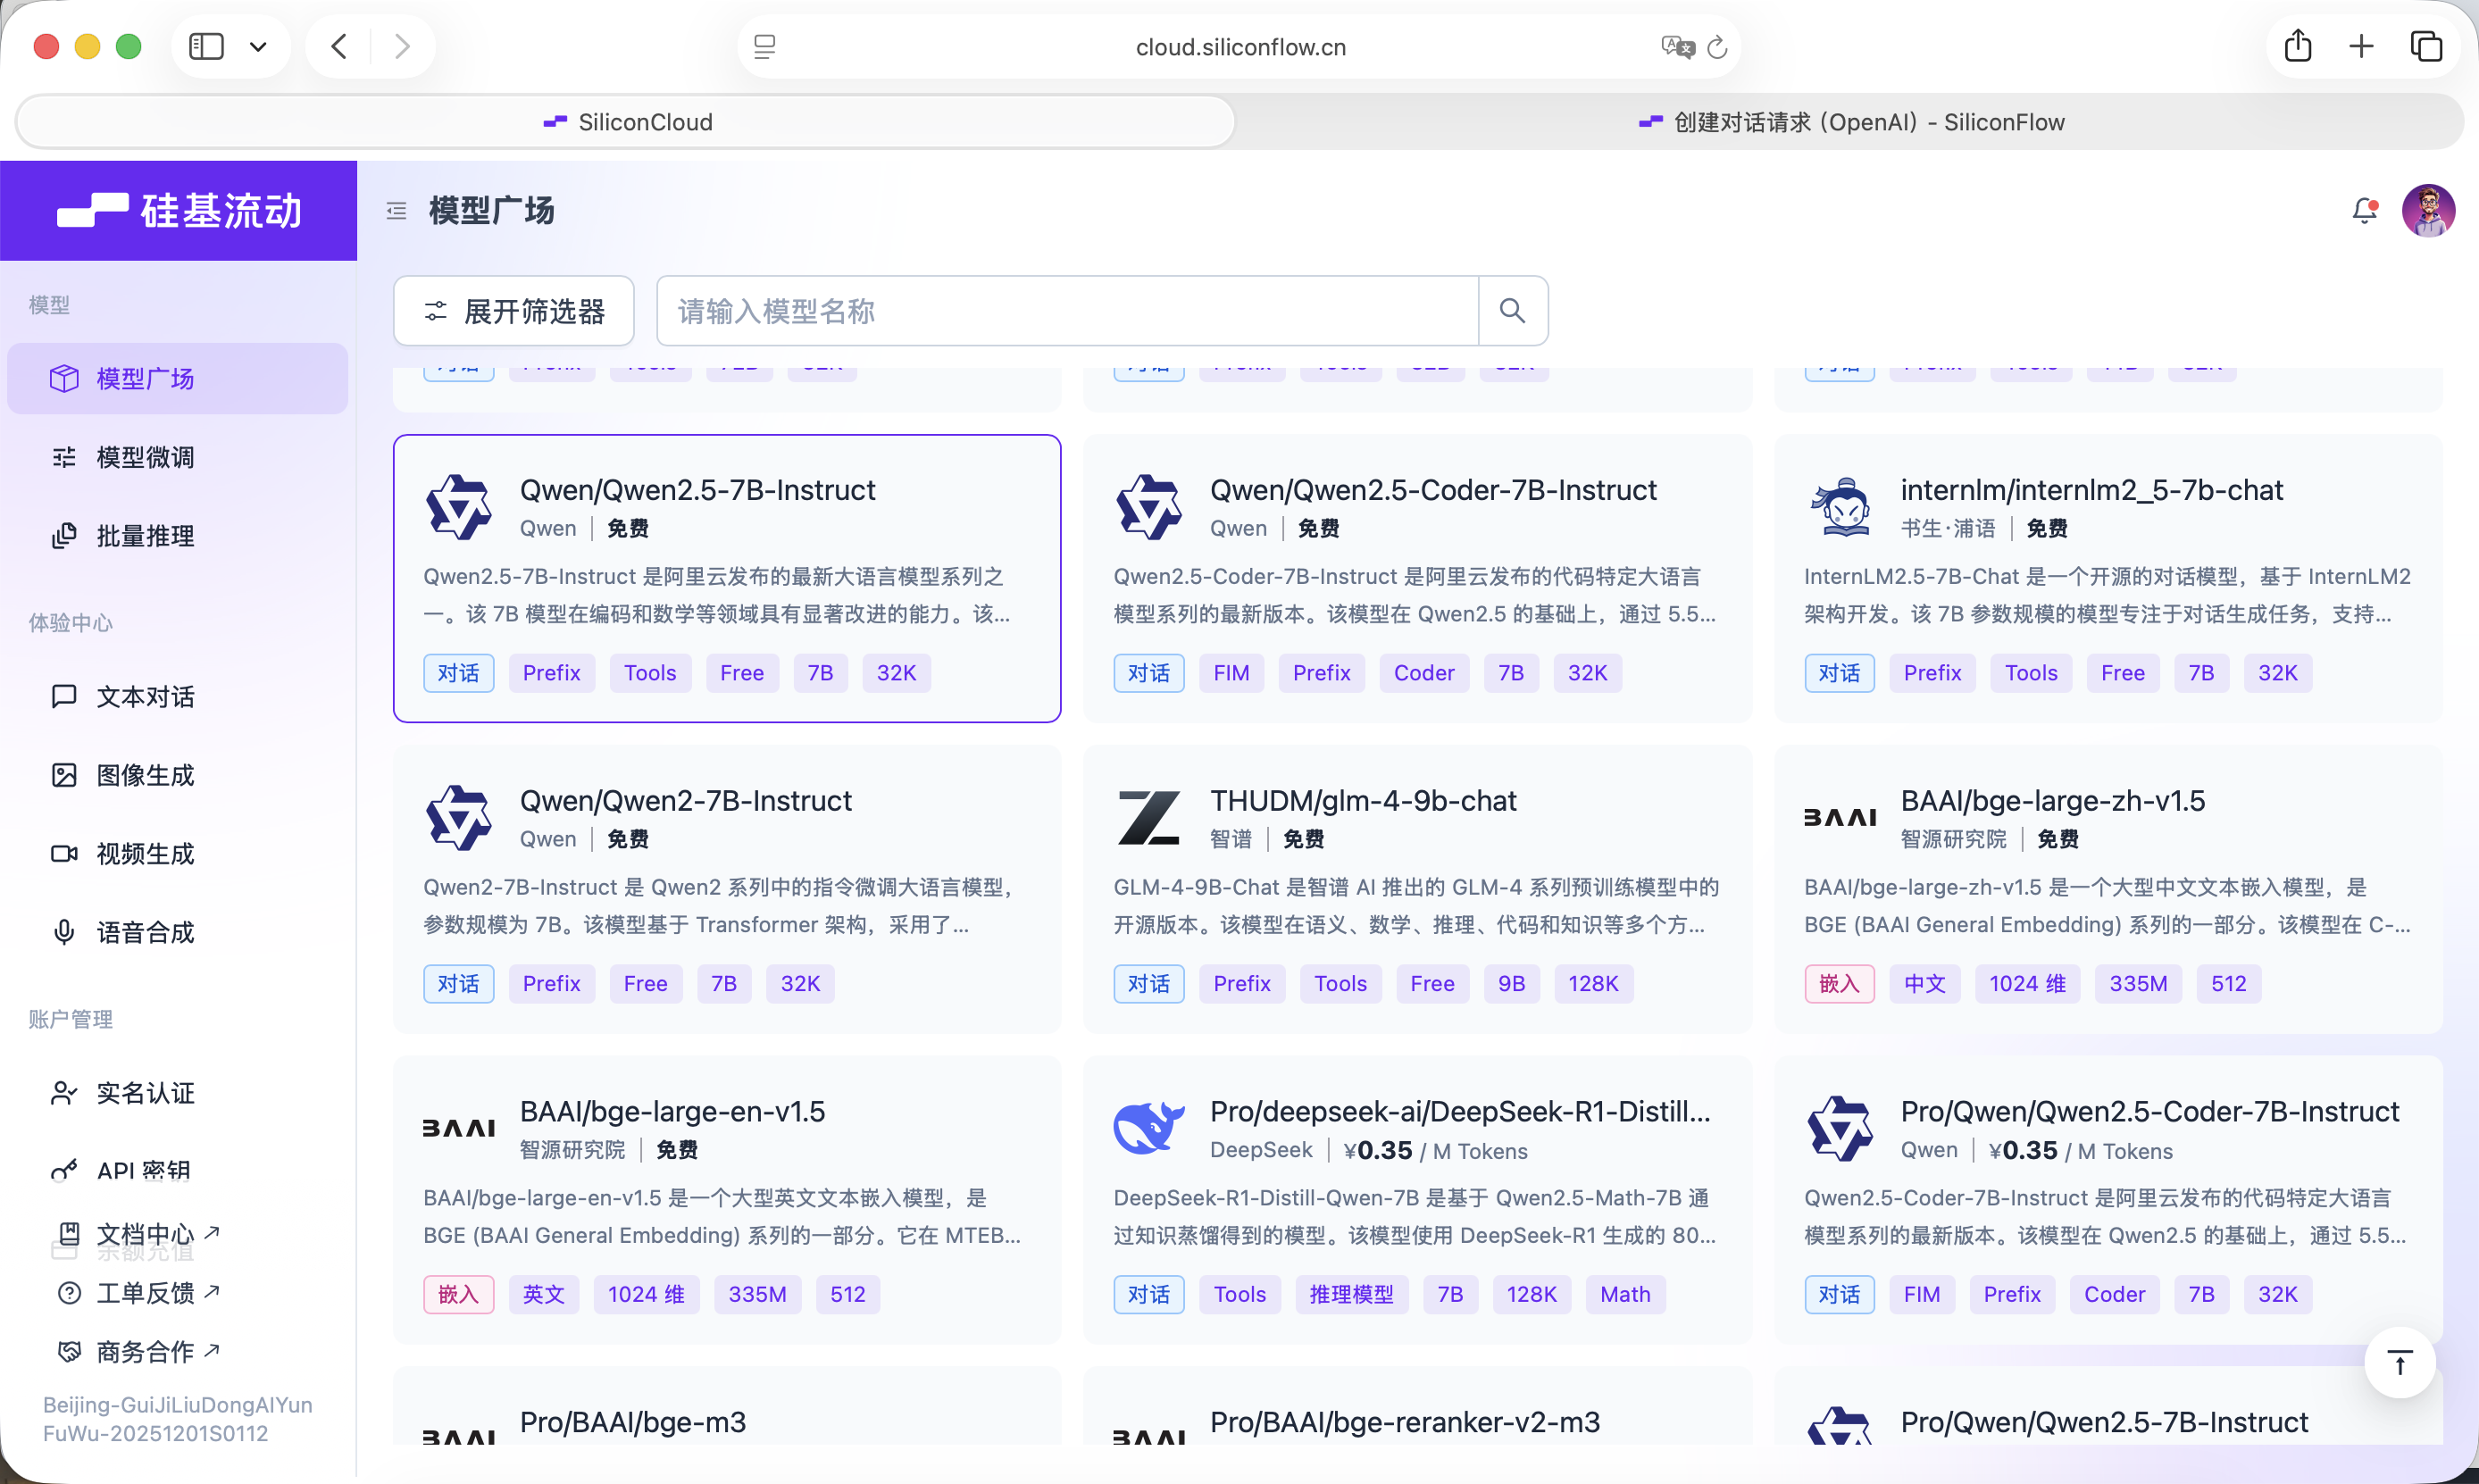
SiliconFlow provides interfaces compatible with OpenAI API conventions, so it can be called conveniently via standard network requests. Here we use the free Qwen2.5-7B-Instruct model. Everything needed for invocation is already included in the prompt below. Before you start, you only need to register an account and create an API Key on the official site.
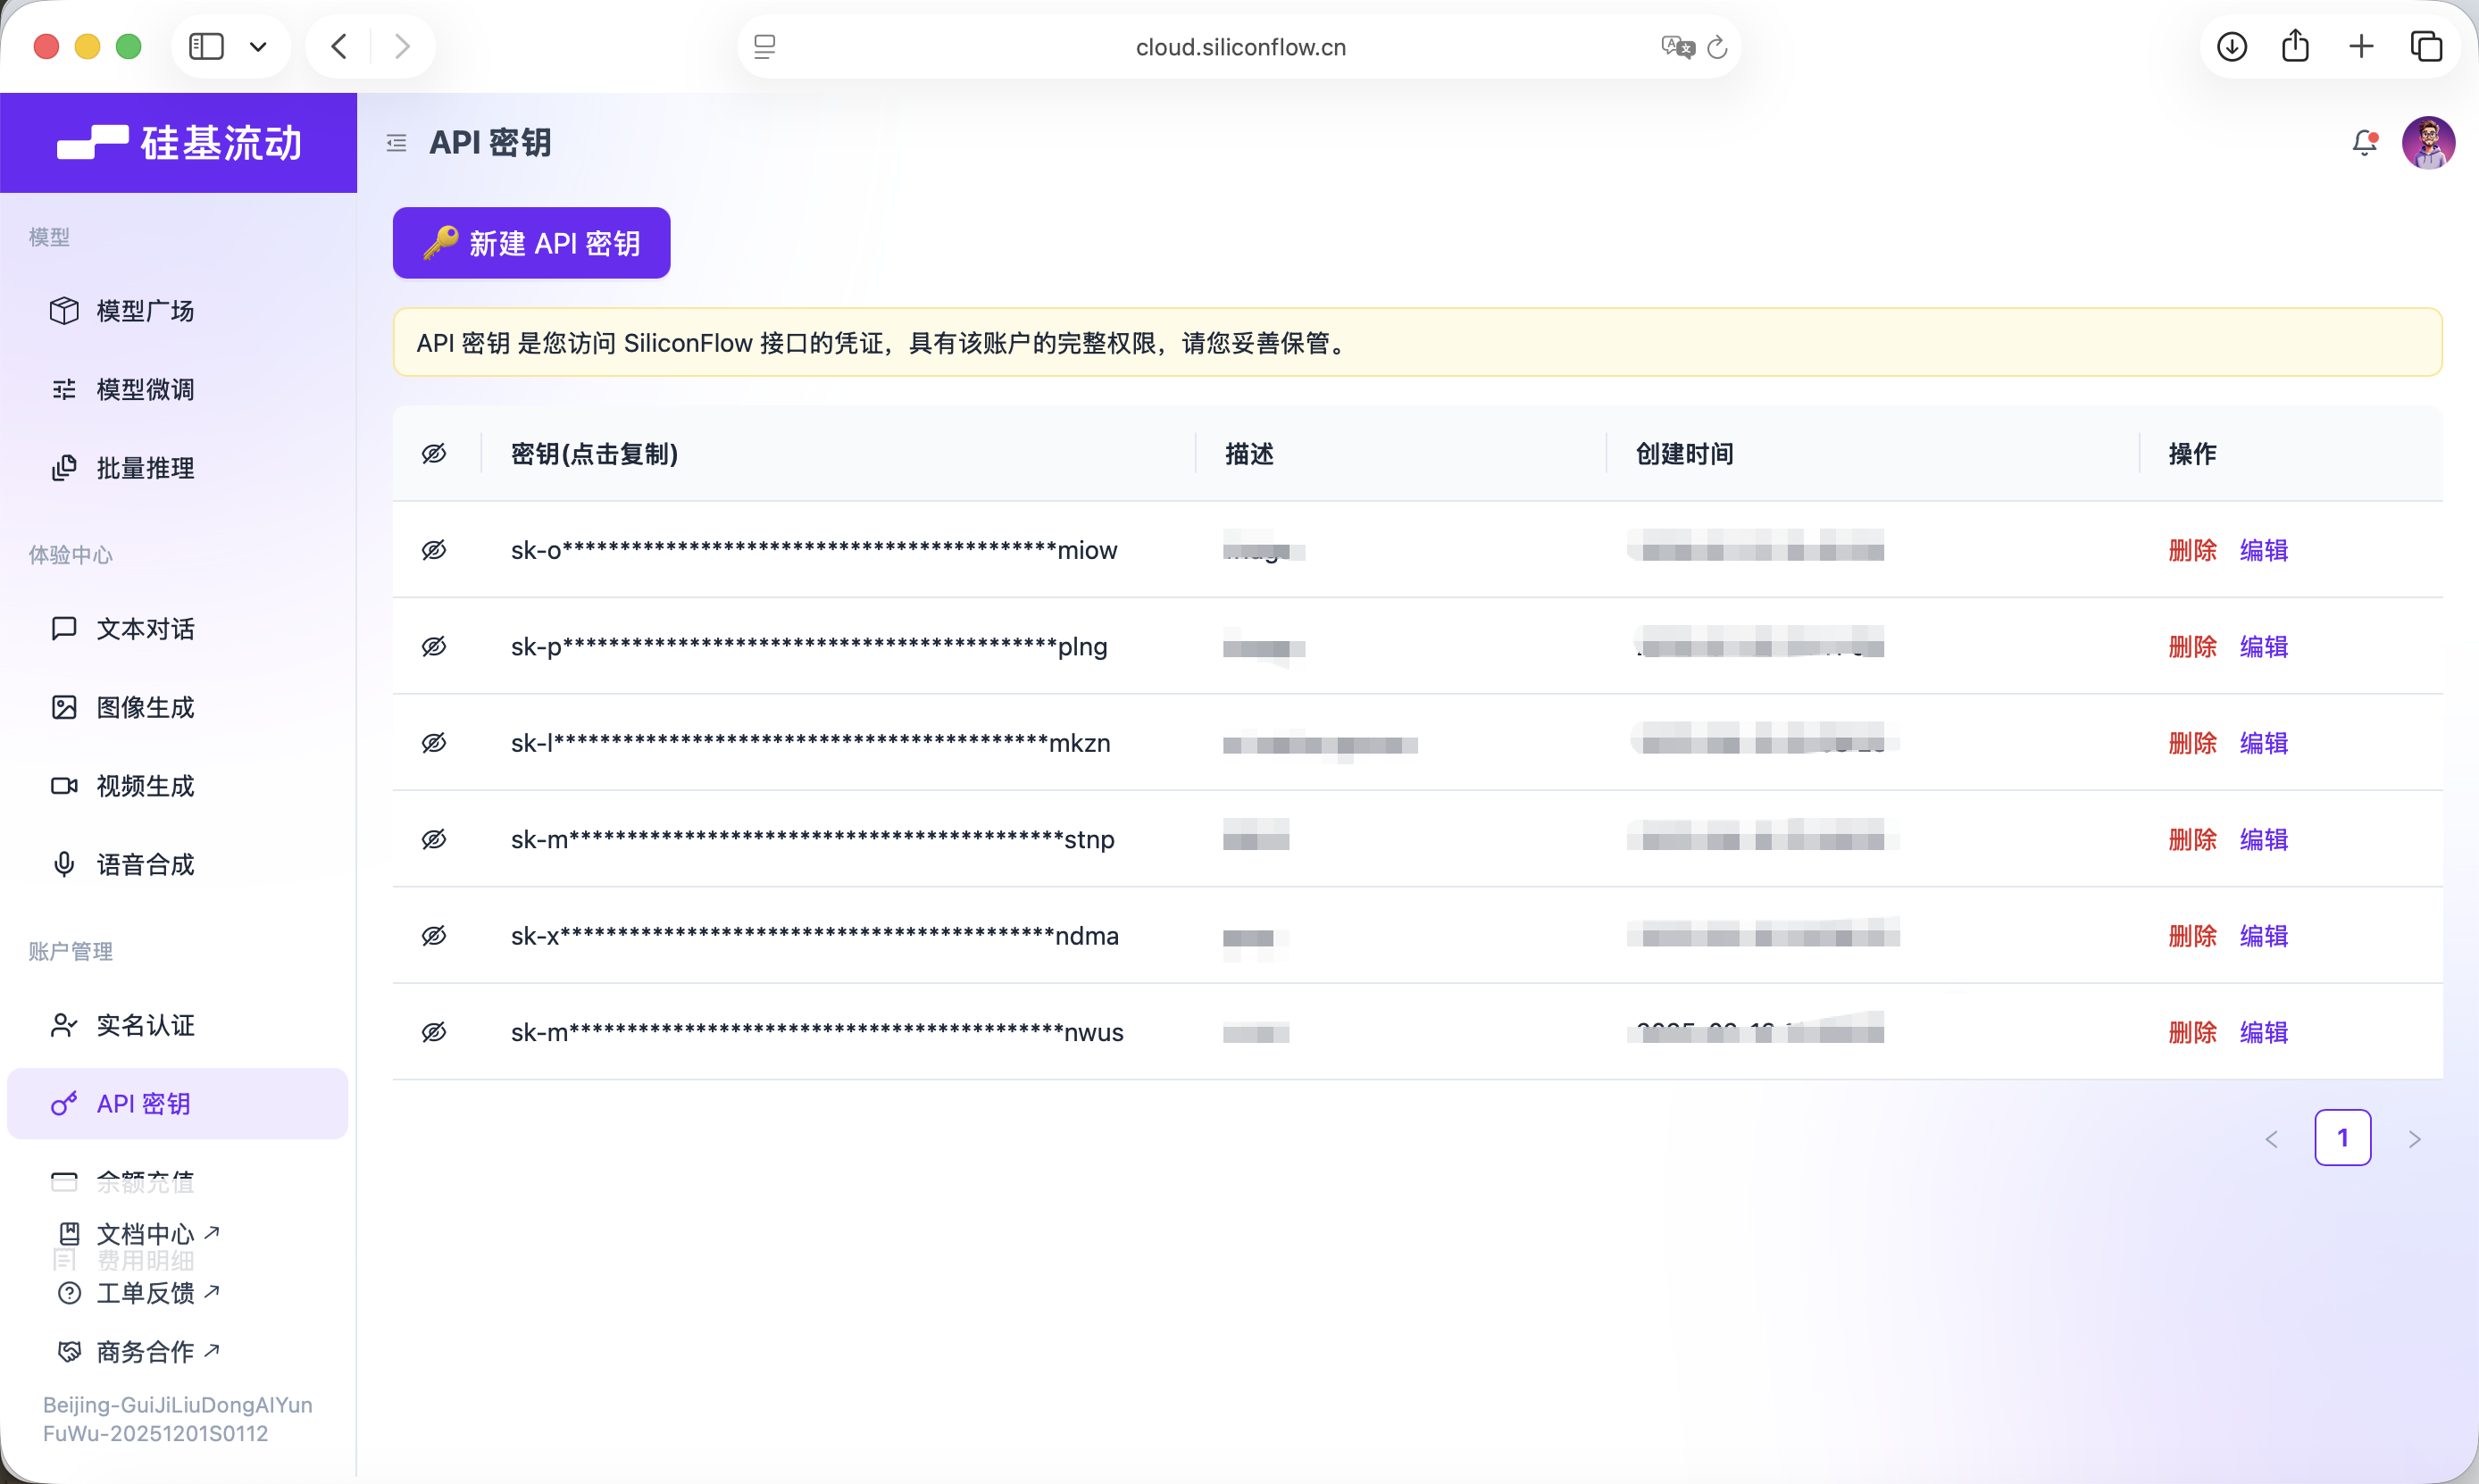
This key will be used for later model calls.
3.4 Build the Agent:
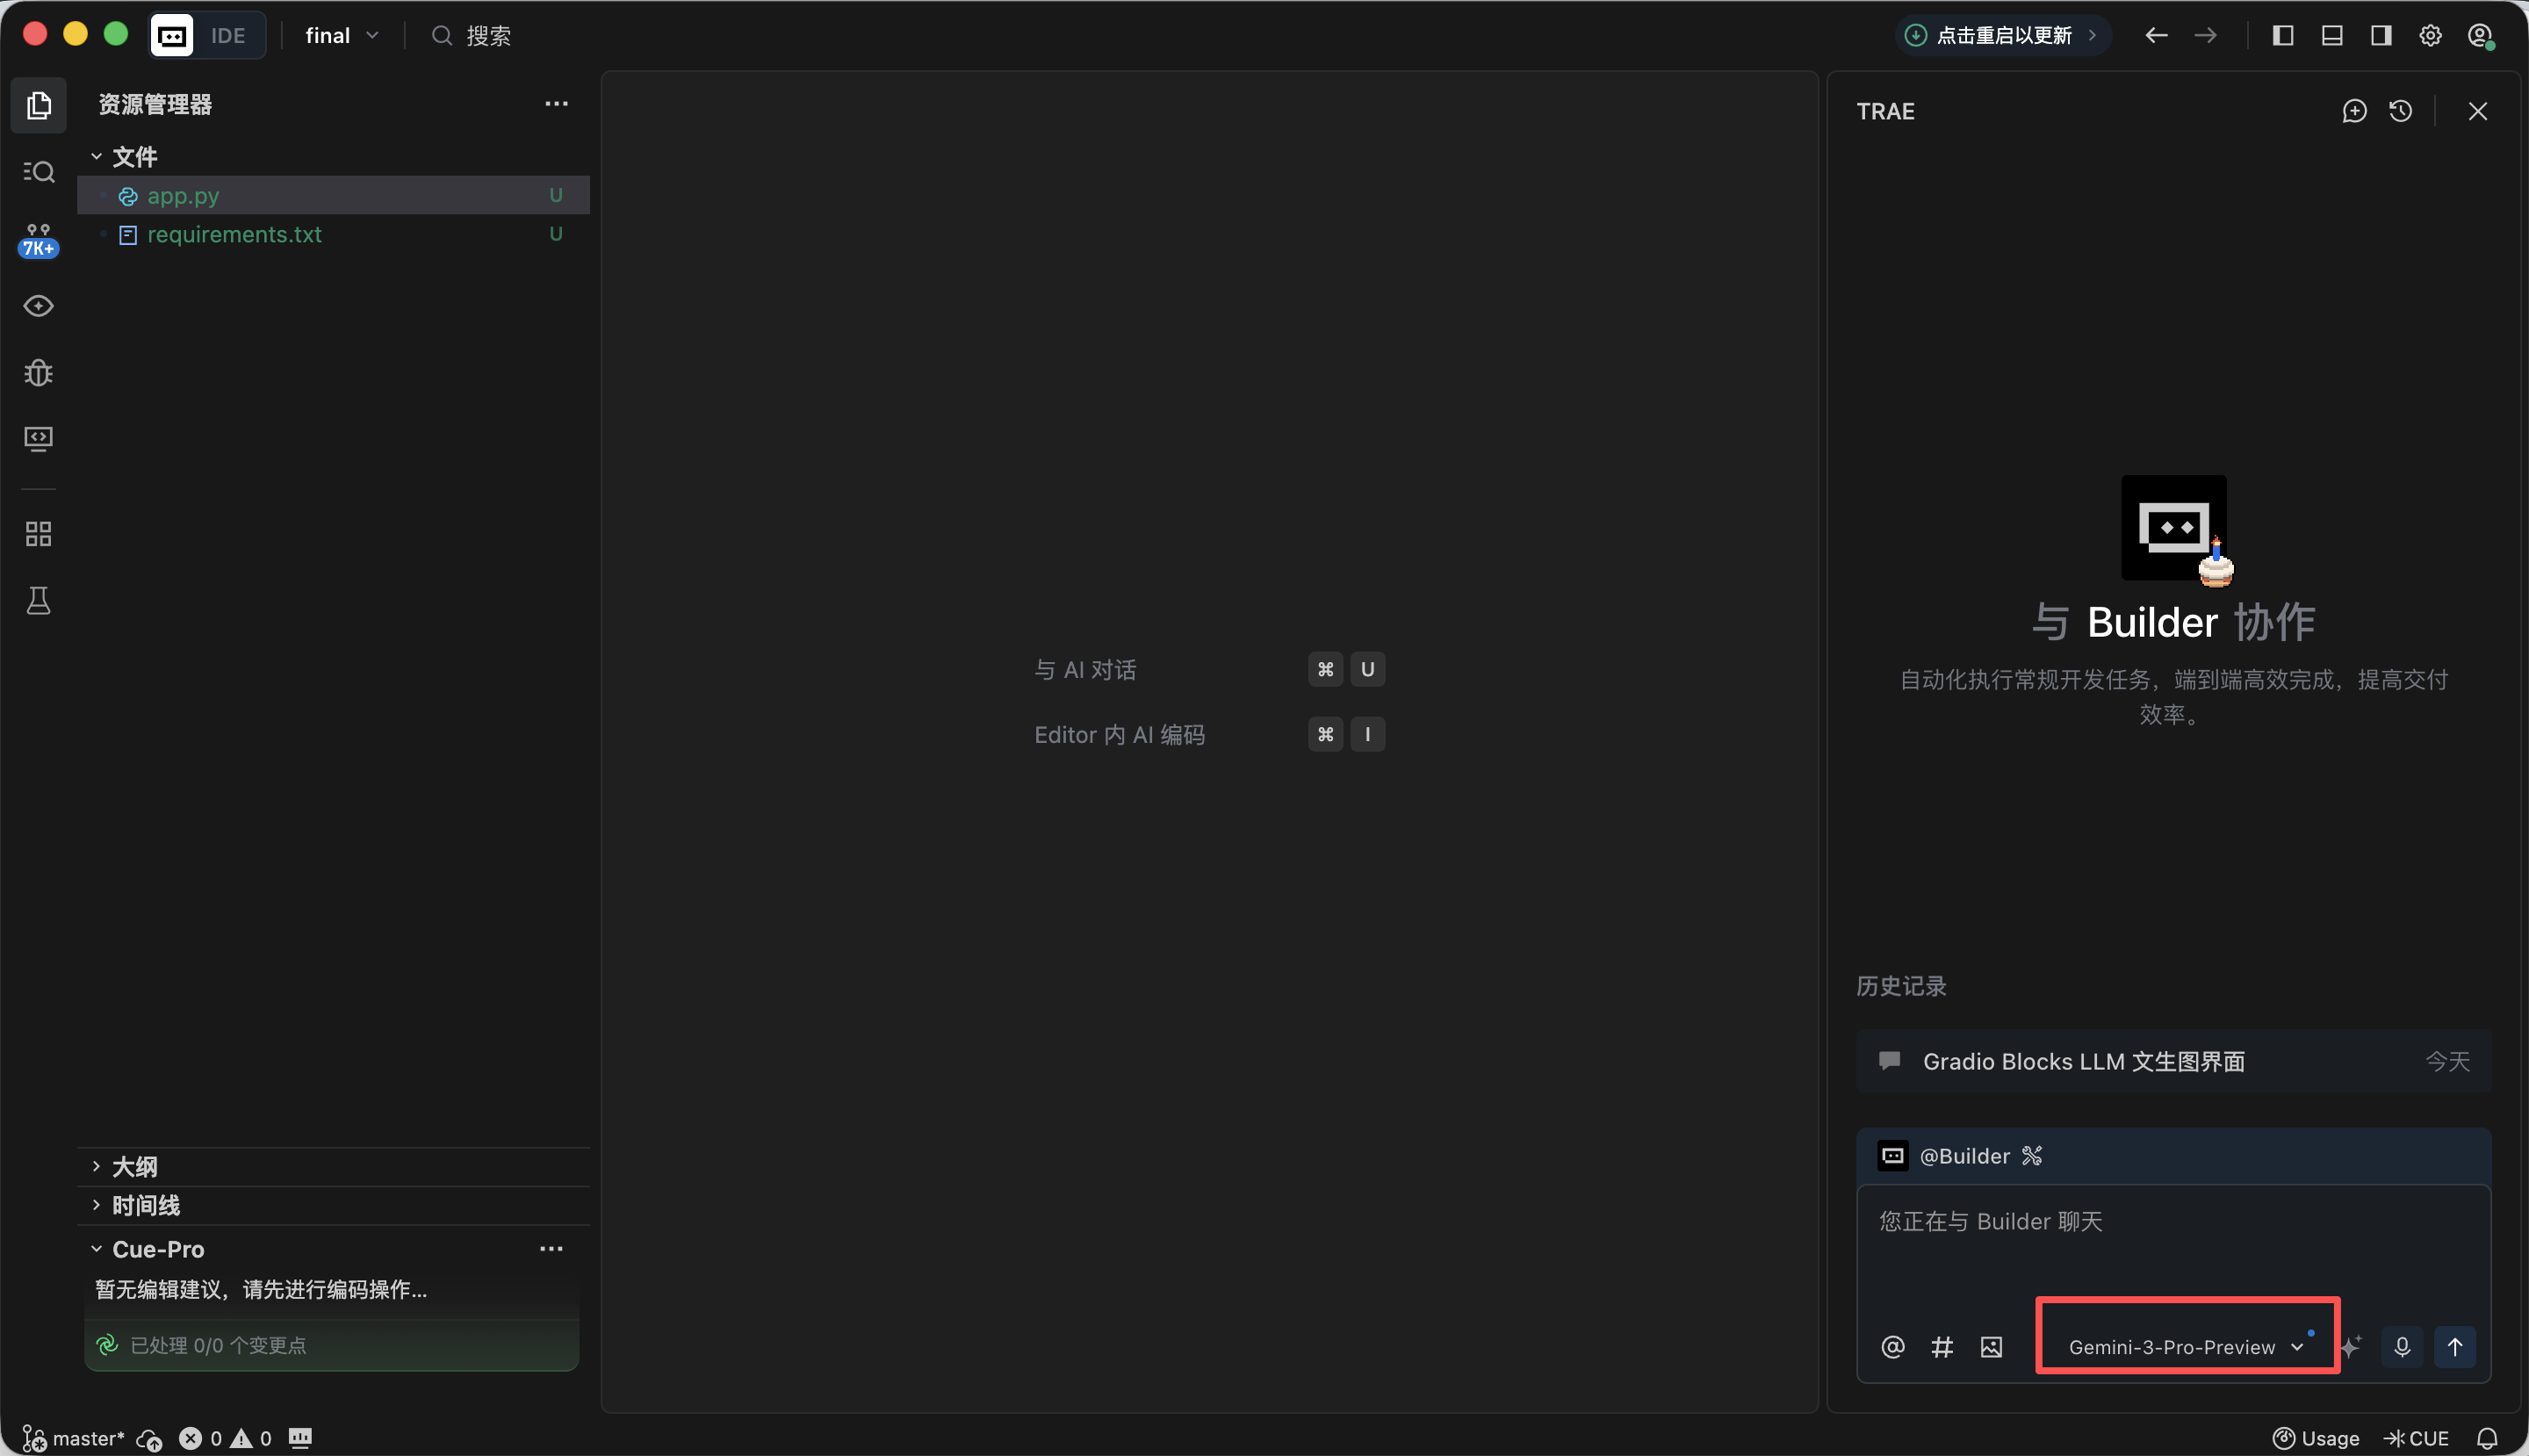
In this experiment we mainly use Trae to help write code. The tutorial uses Gemini-3-Pro-Preview. The overall approach is: create a new project, copy the full prompt below into the dialogue box, replace API keys step by step, run code, and complete testing.
Step 1️⃣: Gradio Blocks Base Framework and UI Layout
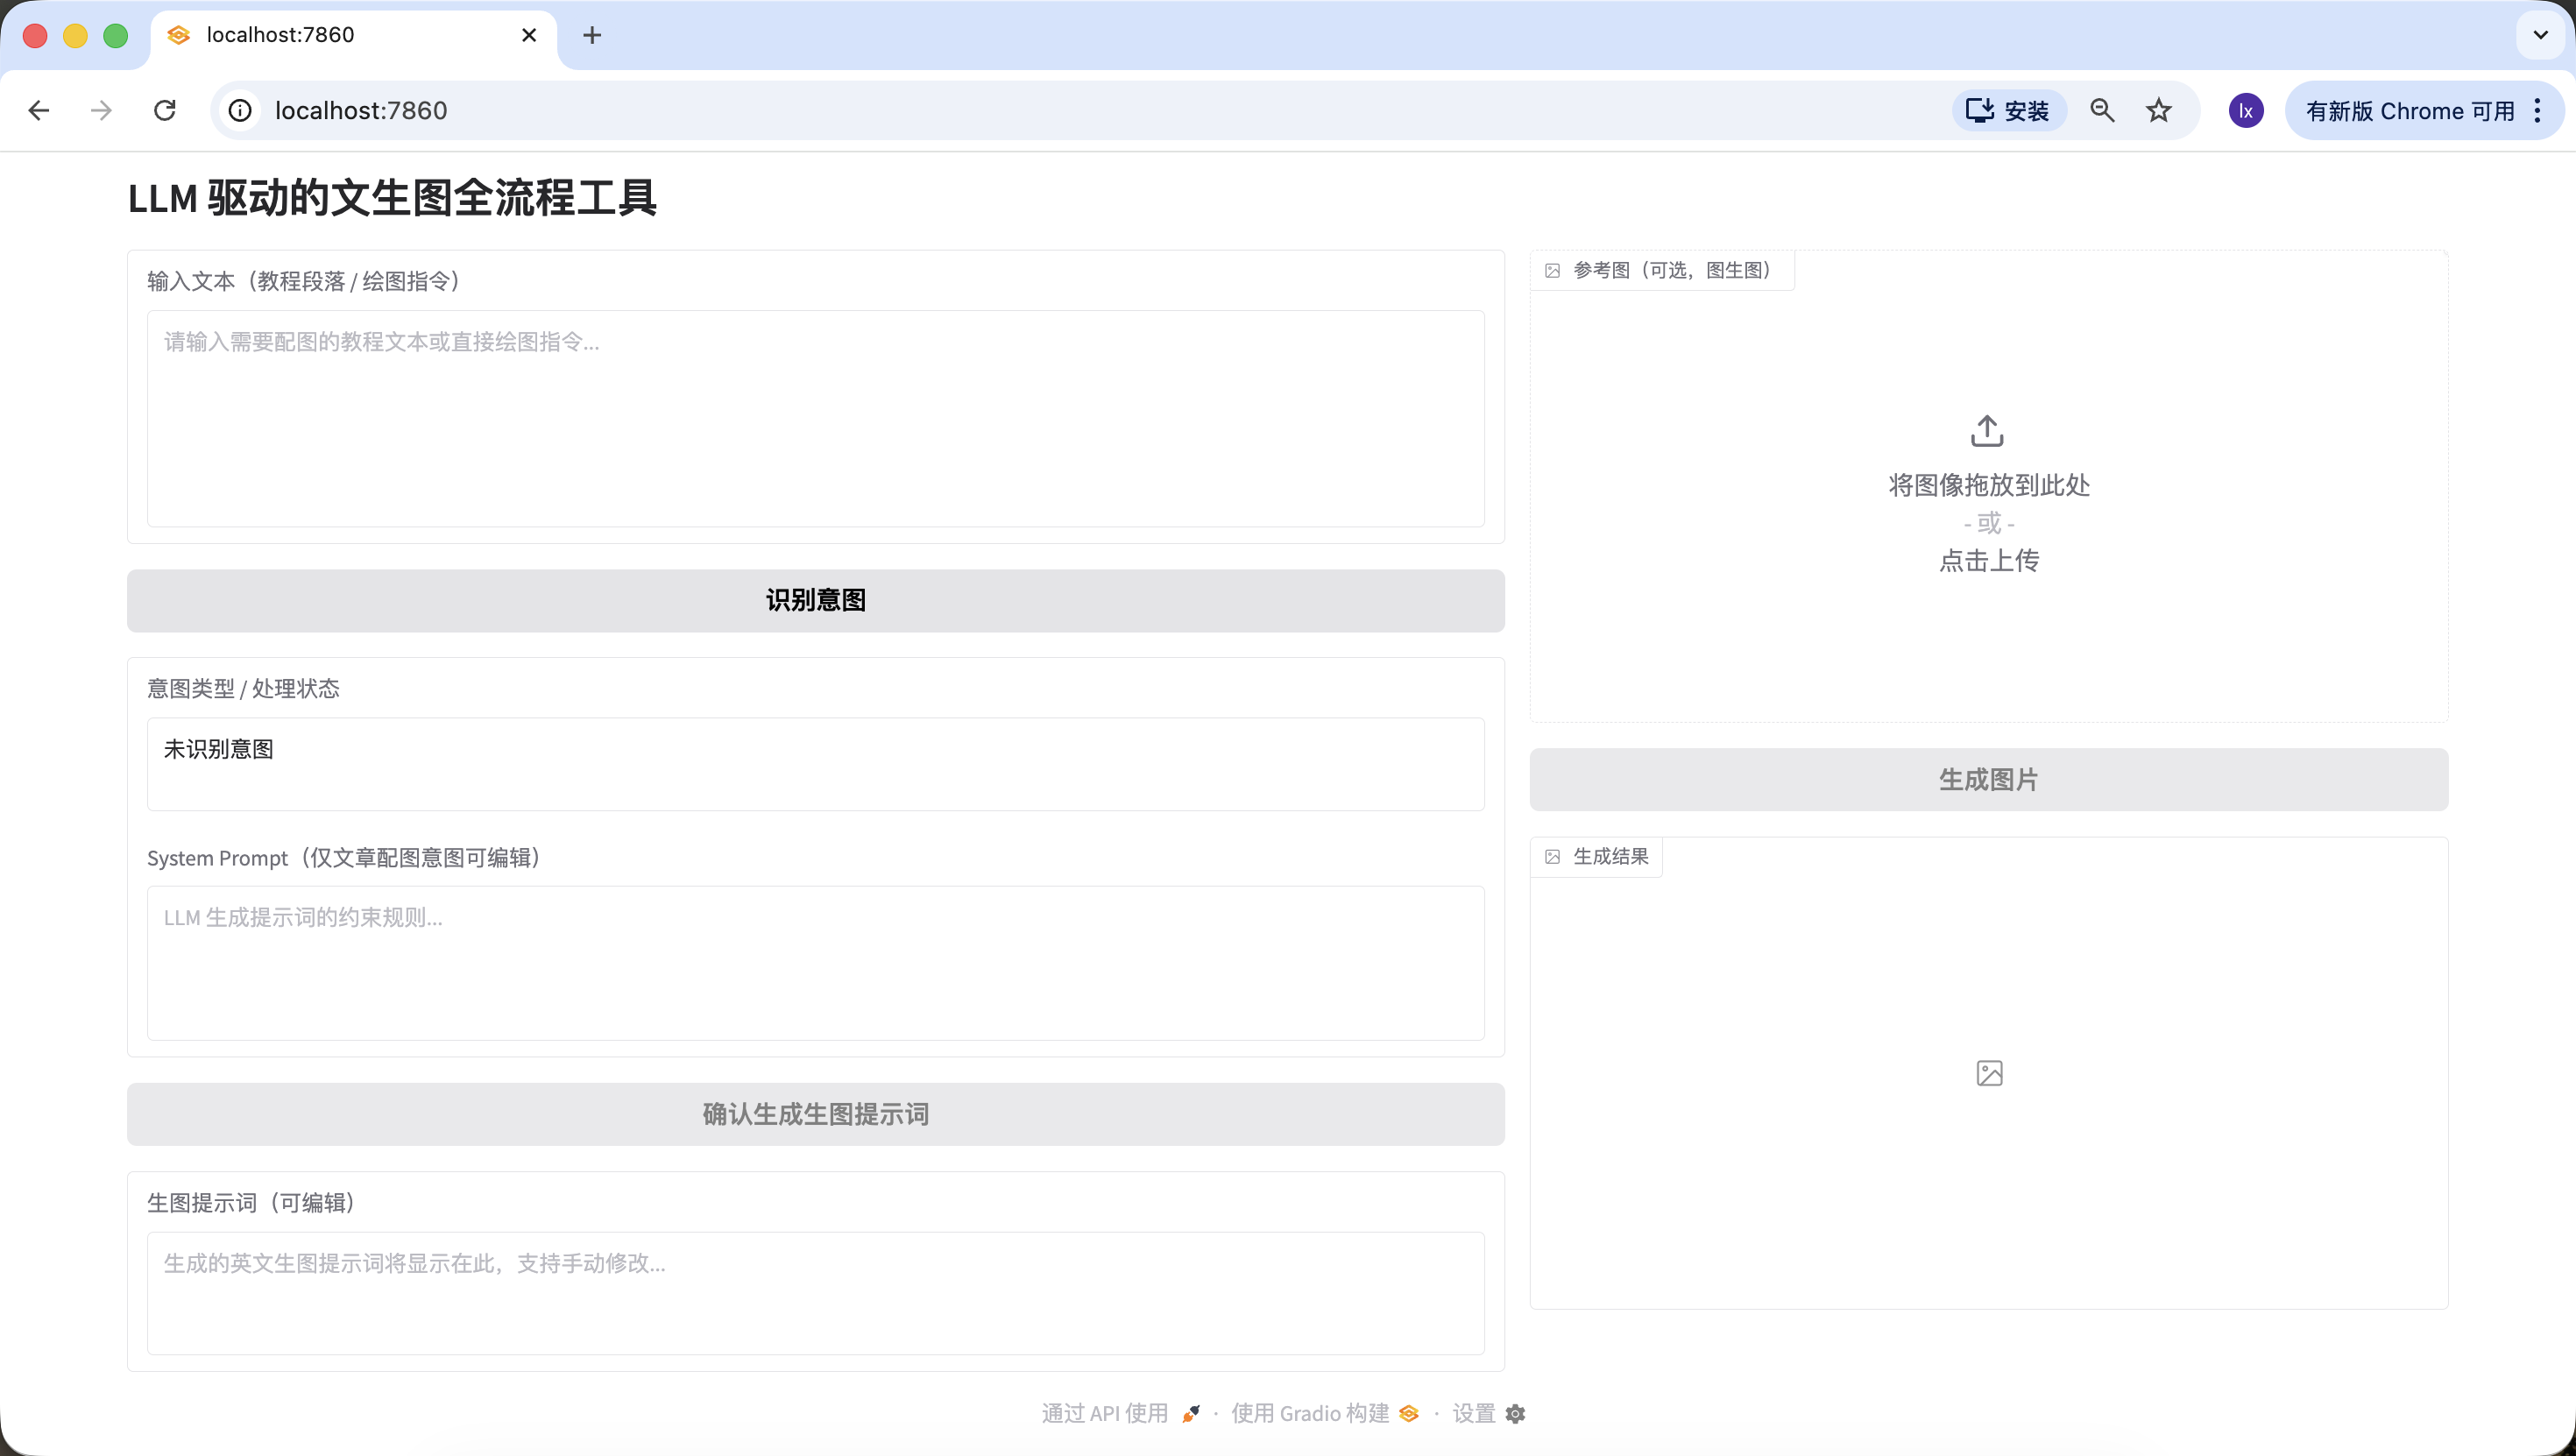
In this step, our main goal is to build the "appearance" of the whole agent first and complete the front-end page design. Copy the prompt below into Trae. After implementation, you will get a local URL (usually http://127.0.0.1:7860) to view the interface and verify the result.
板块 1:Gradio Blocks 基础框架与界面布局
1、任务目标
·基于 Gradio 4.0.0+ 的 Blocks 布局,实现「LLM+Nanobanana 文生图」项目的基础界面,严格遵循固定左右分栏布局,初始化所有 UI 组件并设置正确的初始状态。
2、技术栈要求
·必须使用 Gradio 4.0.0+ 的 Blocks 模式开发,禁止使用 Interface 模式;
·依赖:gradio>=4.0.0,pillow>=10.0.0(仅导入,暂不实现图片处理逻辑);
·代码需是完整可运行的 Python 文件,包含所有必要的导入语句。
3、界面布局规则(核心约束,融合实战细节)
·整体布局:
页面标题:LLM 驱动的文生图全流程工具;
固定左右分栏:左侧占 60% 宽度,右侧占 40% 宽度,使用 gr.Row 和 gr.Column 实现比例控制。
·左侧 60%(提示词生成流程区)组件清单:
input_text:gr.Textbox,标签「输入文本(教程段落 / 绘图指令)」,lines=6,占位符「请输入需要配图的教程文本或直接绘图指令...」;
identify_intent_btn:gr.Button,value="识别意图",初始状态正常可点击;
intent_status:gr.Textbox,标签「意图类型 / 处理状态」,lines=2,interactive=False,初始值「未识别意图」;
system_prompt:gr.Textbox,标签「System Prompt(仅文章配图意图可编辑)」,lines=4,interactive=False,占位符「LLM 生成提示词的约束规则...」;
confirm_prompt_btn:gr.Button,value="确认生成生图提示词",interactive=False(初始禁用防误触);
generation_prompt:gr.Textbox,标签「生图提示词(可编辑)」,lines=3,interactive=True,初始值为空,占位符「生成的英文生图提示词将显示在此,支持手动修改...」。
·右侧 40%(Nanobanana 生图功能区)组件清单:
ref_image:gr.Image,标签「参考图(可选,图生图)」,type=filepath,height=300,允许上传;
generate_btn:gr.Button,value="生成图片",interactive=False(初始禁用,无提示词不可点击);
result_image:gr.Image,标签「生成结果」,type=pil,height=300,初始为空,interactive=False。
4、交互逻辑要求
·所有组件的 interactive 初始状态严格按上述配置,后续通过函数动态更新;
·按钮禁用状态需直观(置灰),避免用户误操作。
5、输出要求
·生成完整的 Python 代码,仅实现界面布局和组件初始化,不包含任何业务逻辑;
·代码注释清晰,组件命名与实战版一致(input_text/identify_intent_btn 等);
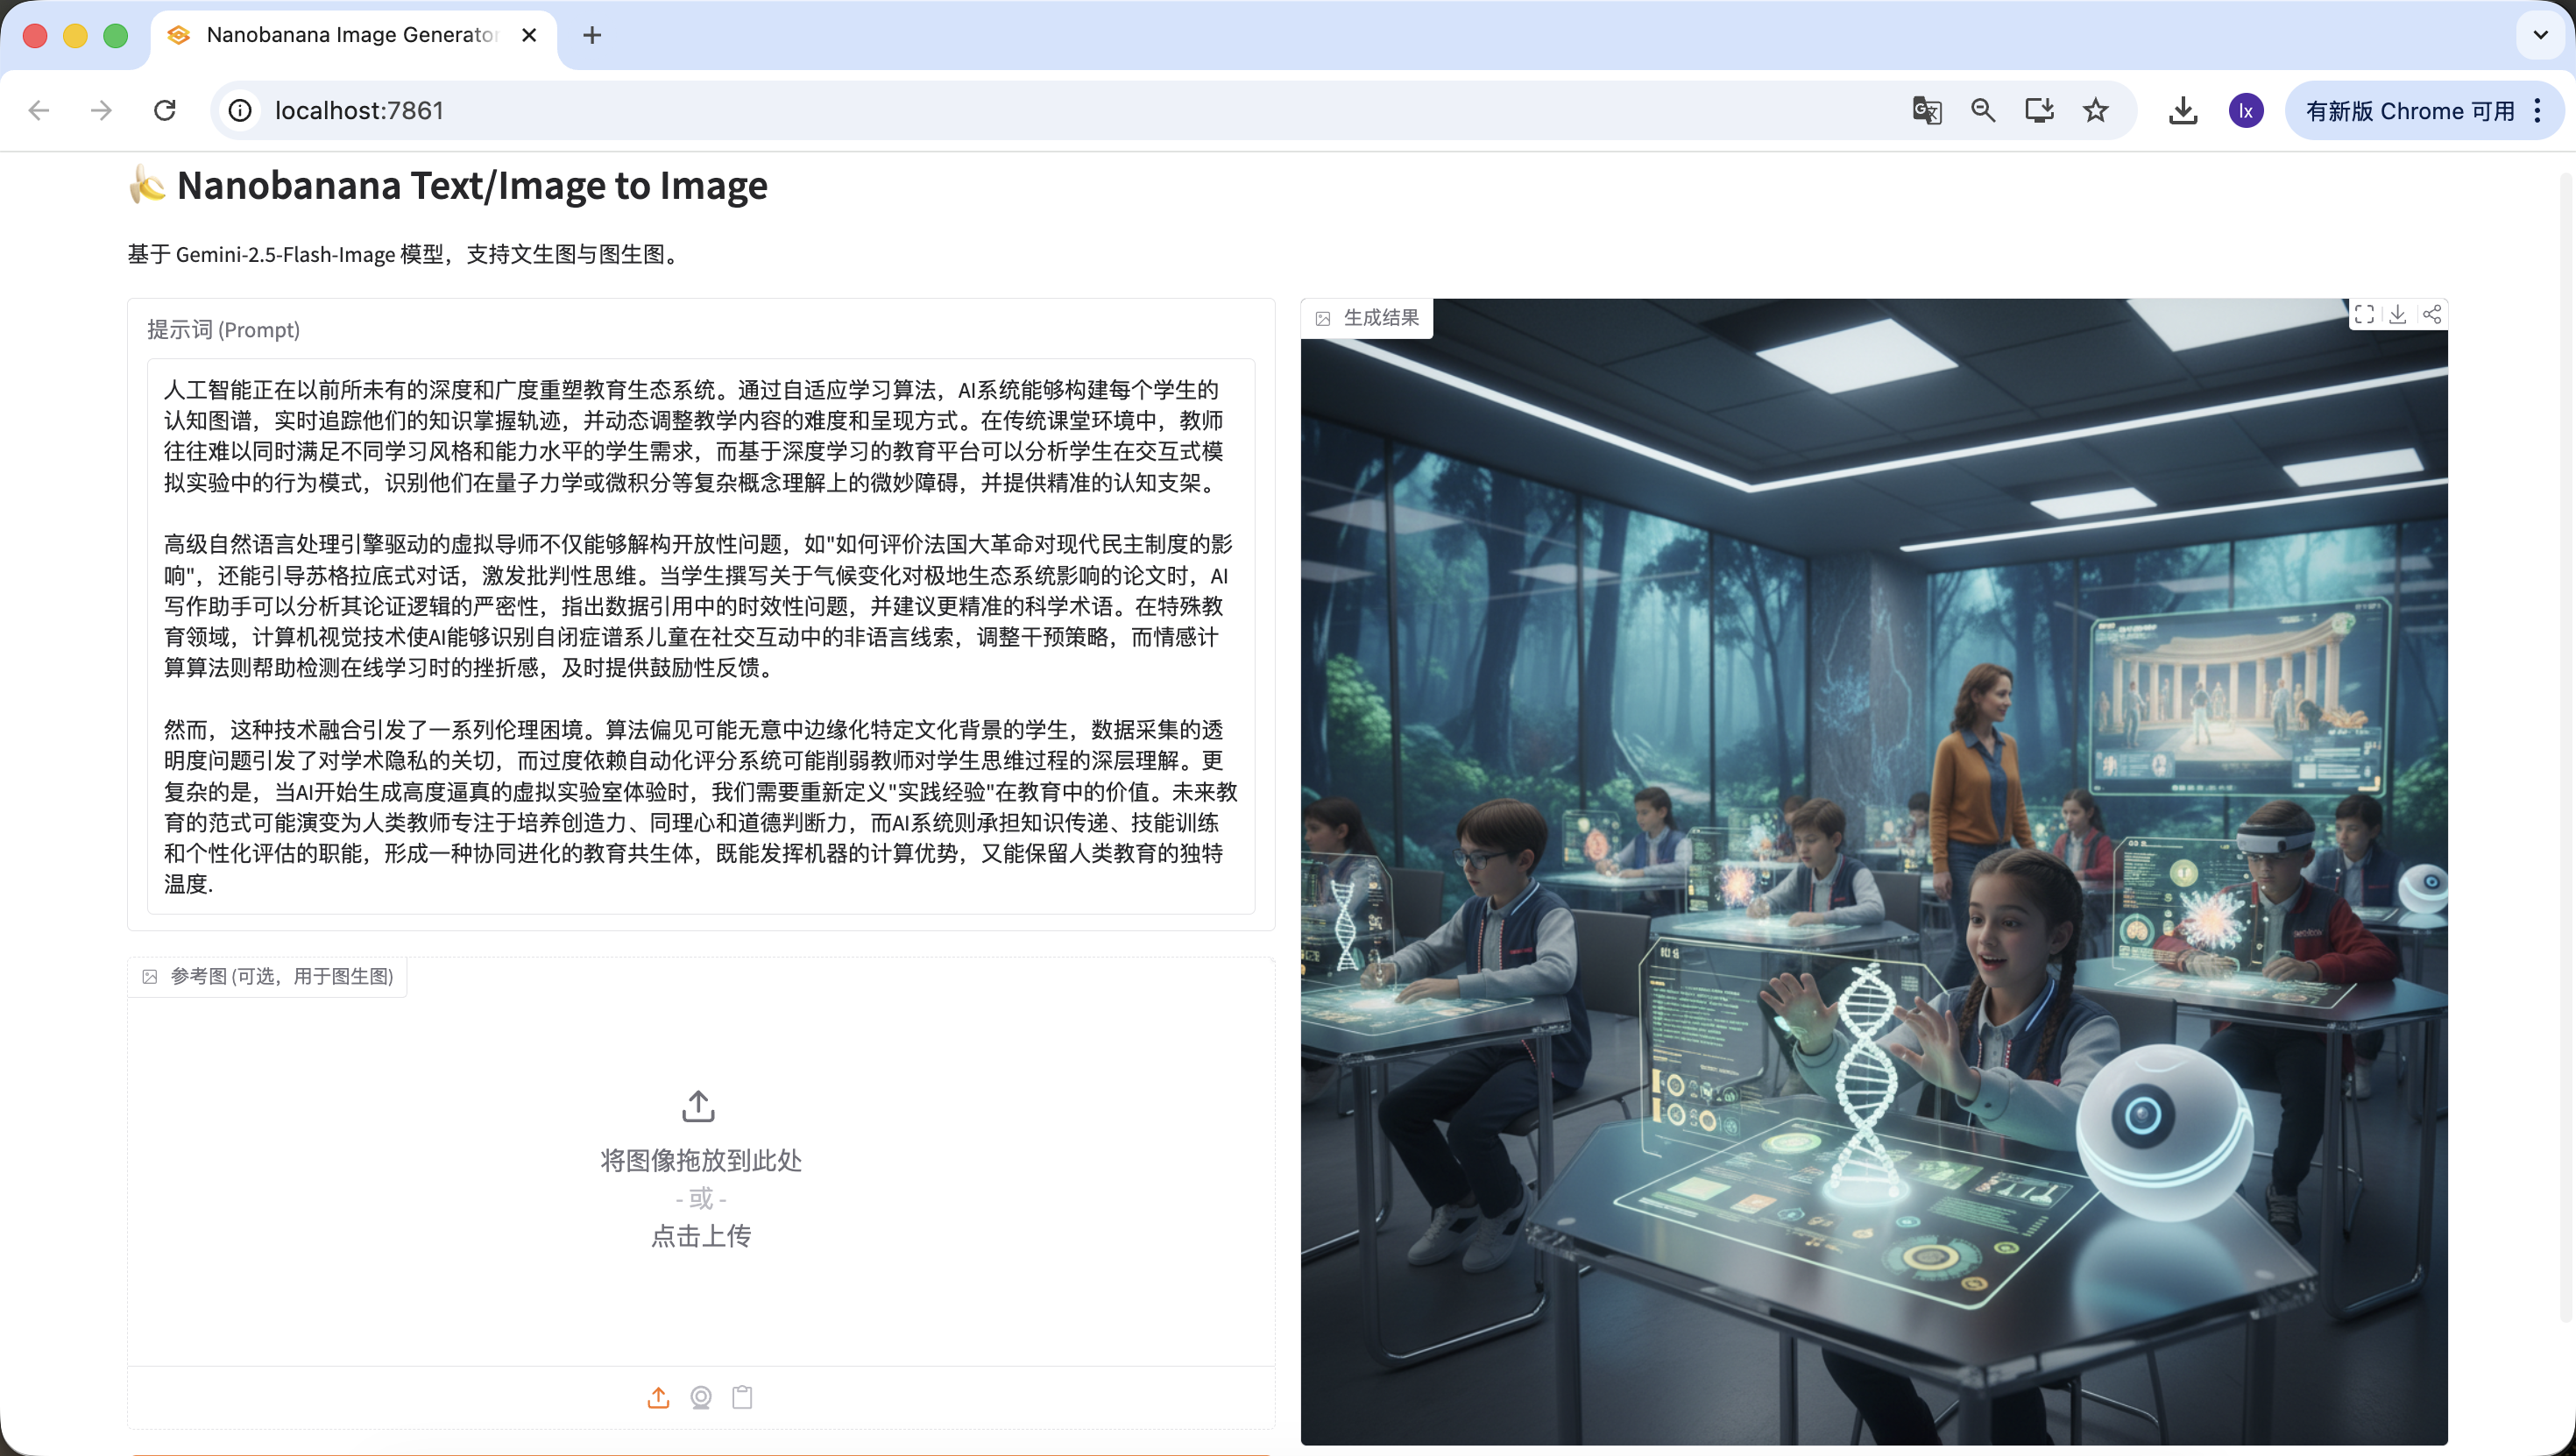
·代码可直接运行,界面结构与描述完全一致。After opening http://127.0.0.1:7860 in the browser, you can see Trae generated the page according to requirements. It is generally aligned, and we can move on to the next step.
Step 2️⃣: LLM Intent Recognition Module (SiliconFlow API)
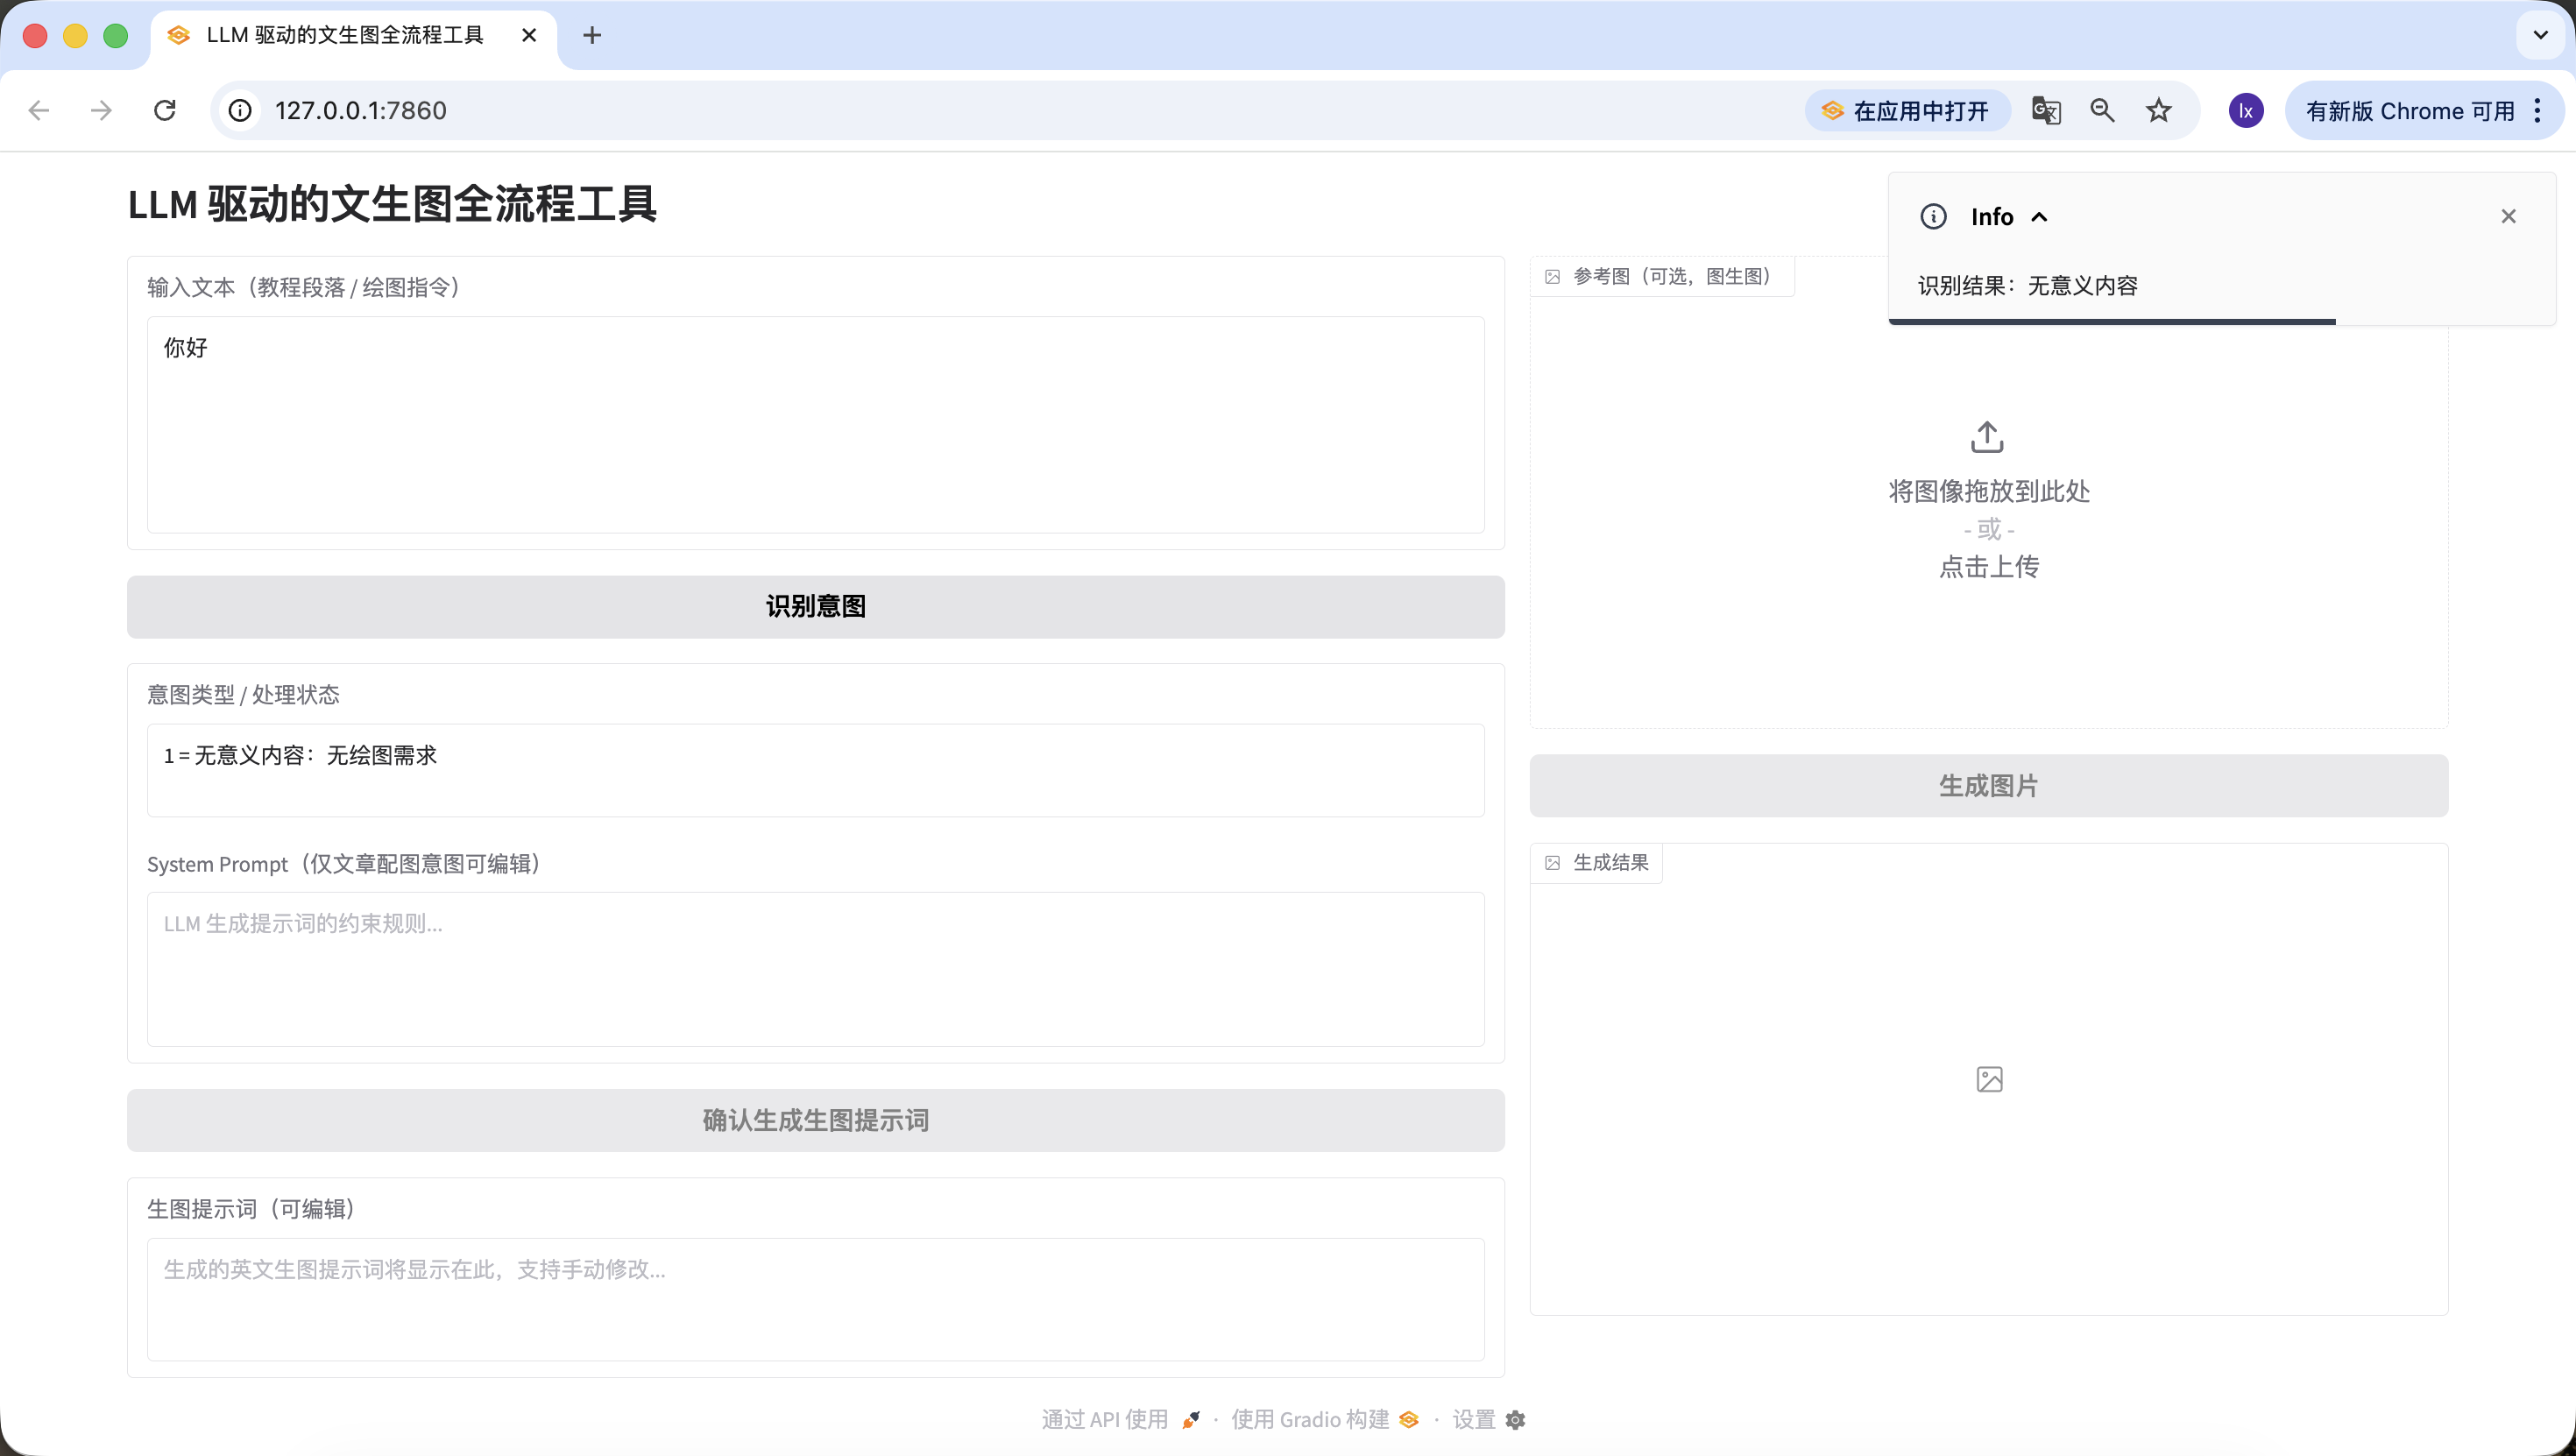
When using VLMs for drawing in daily work, there are usually three common input cases:
- Meaningless content, such as "hello" or "have you eaten today," which cannot map to drawable requirements.
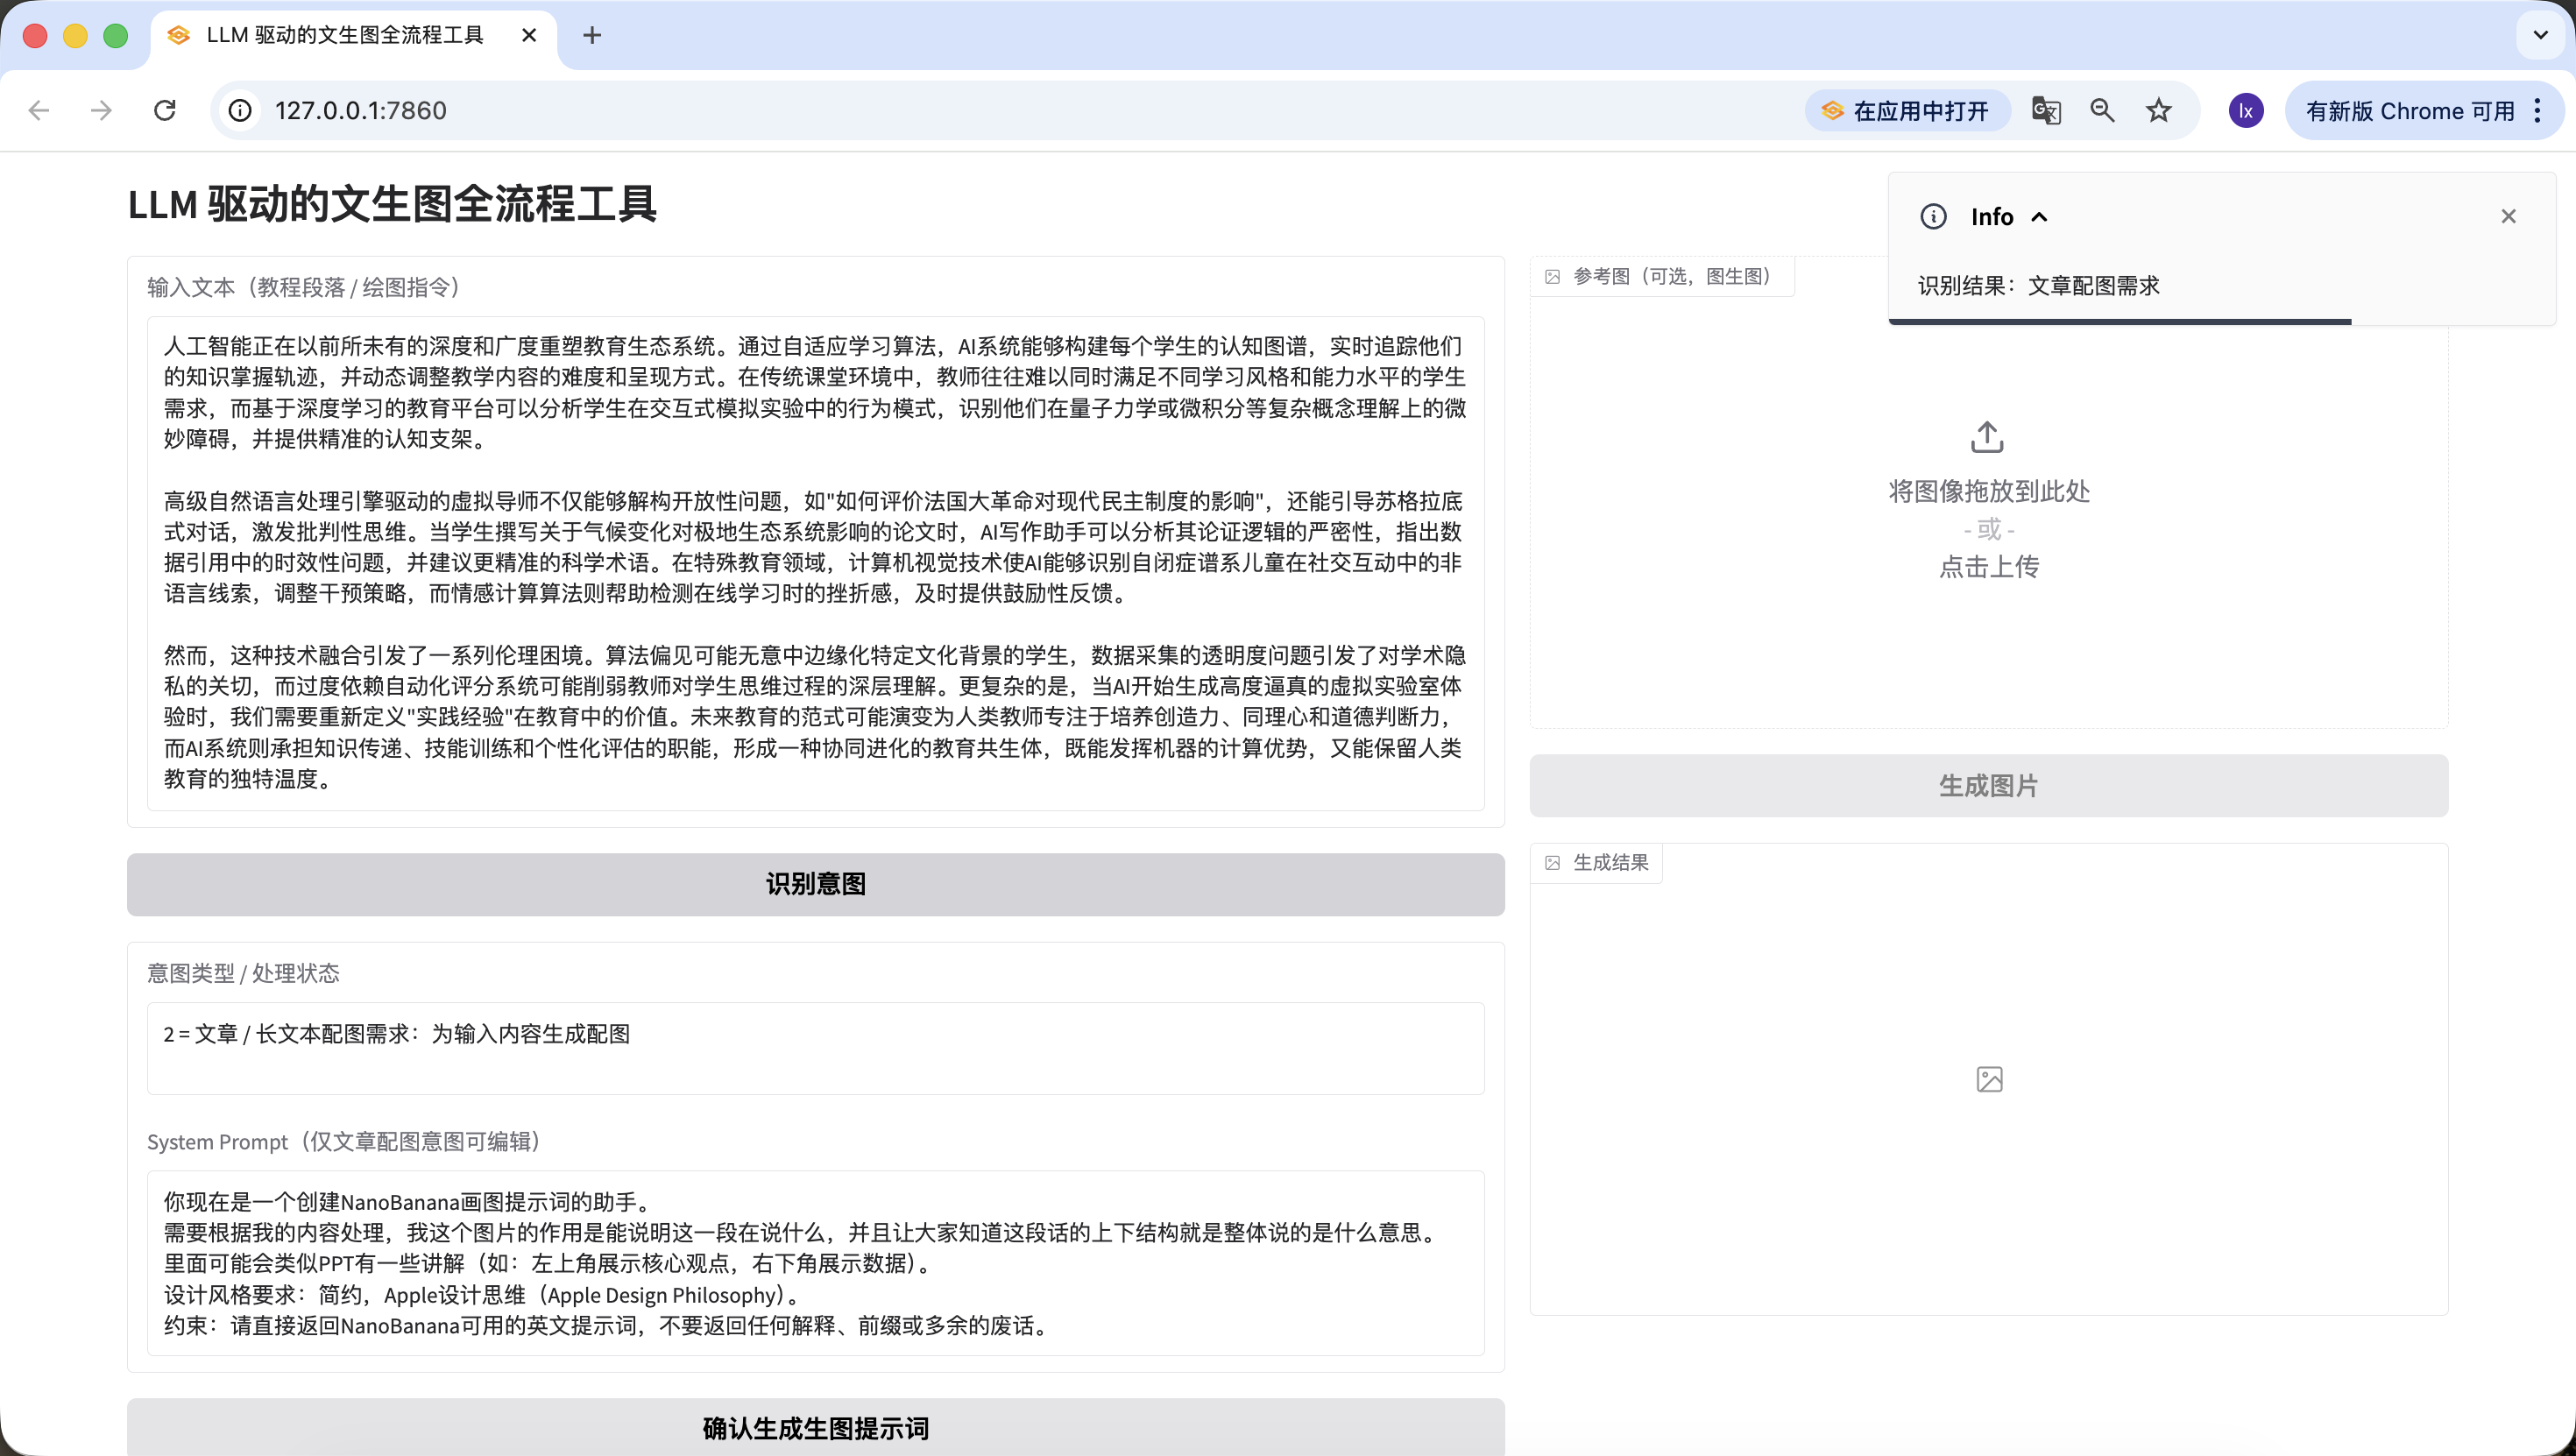
- Articles/long text, such as a structured paragraph around 200 words, where you must first understand structure/content before generating an image that summarizes the text.
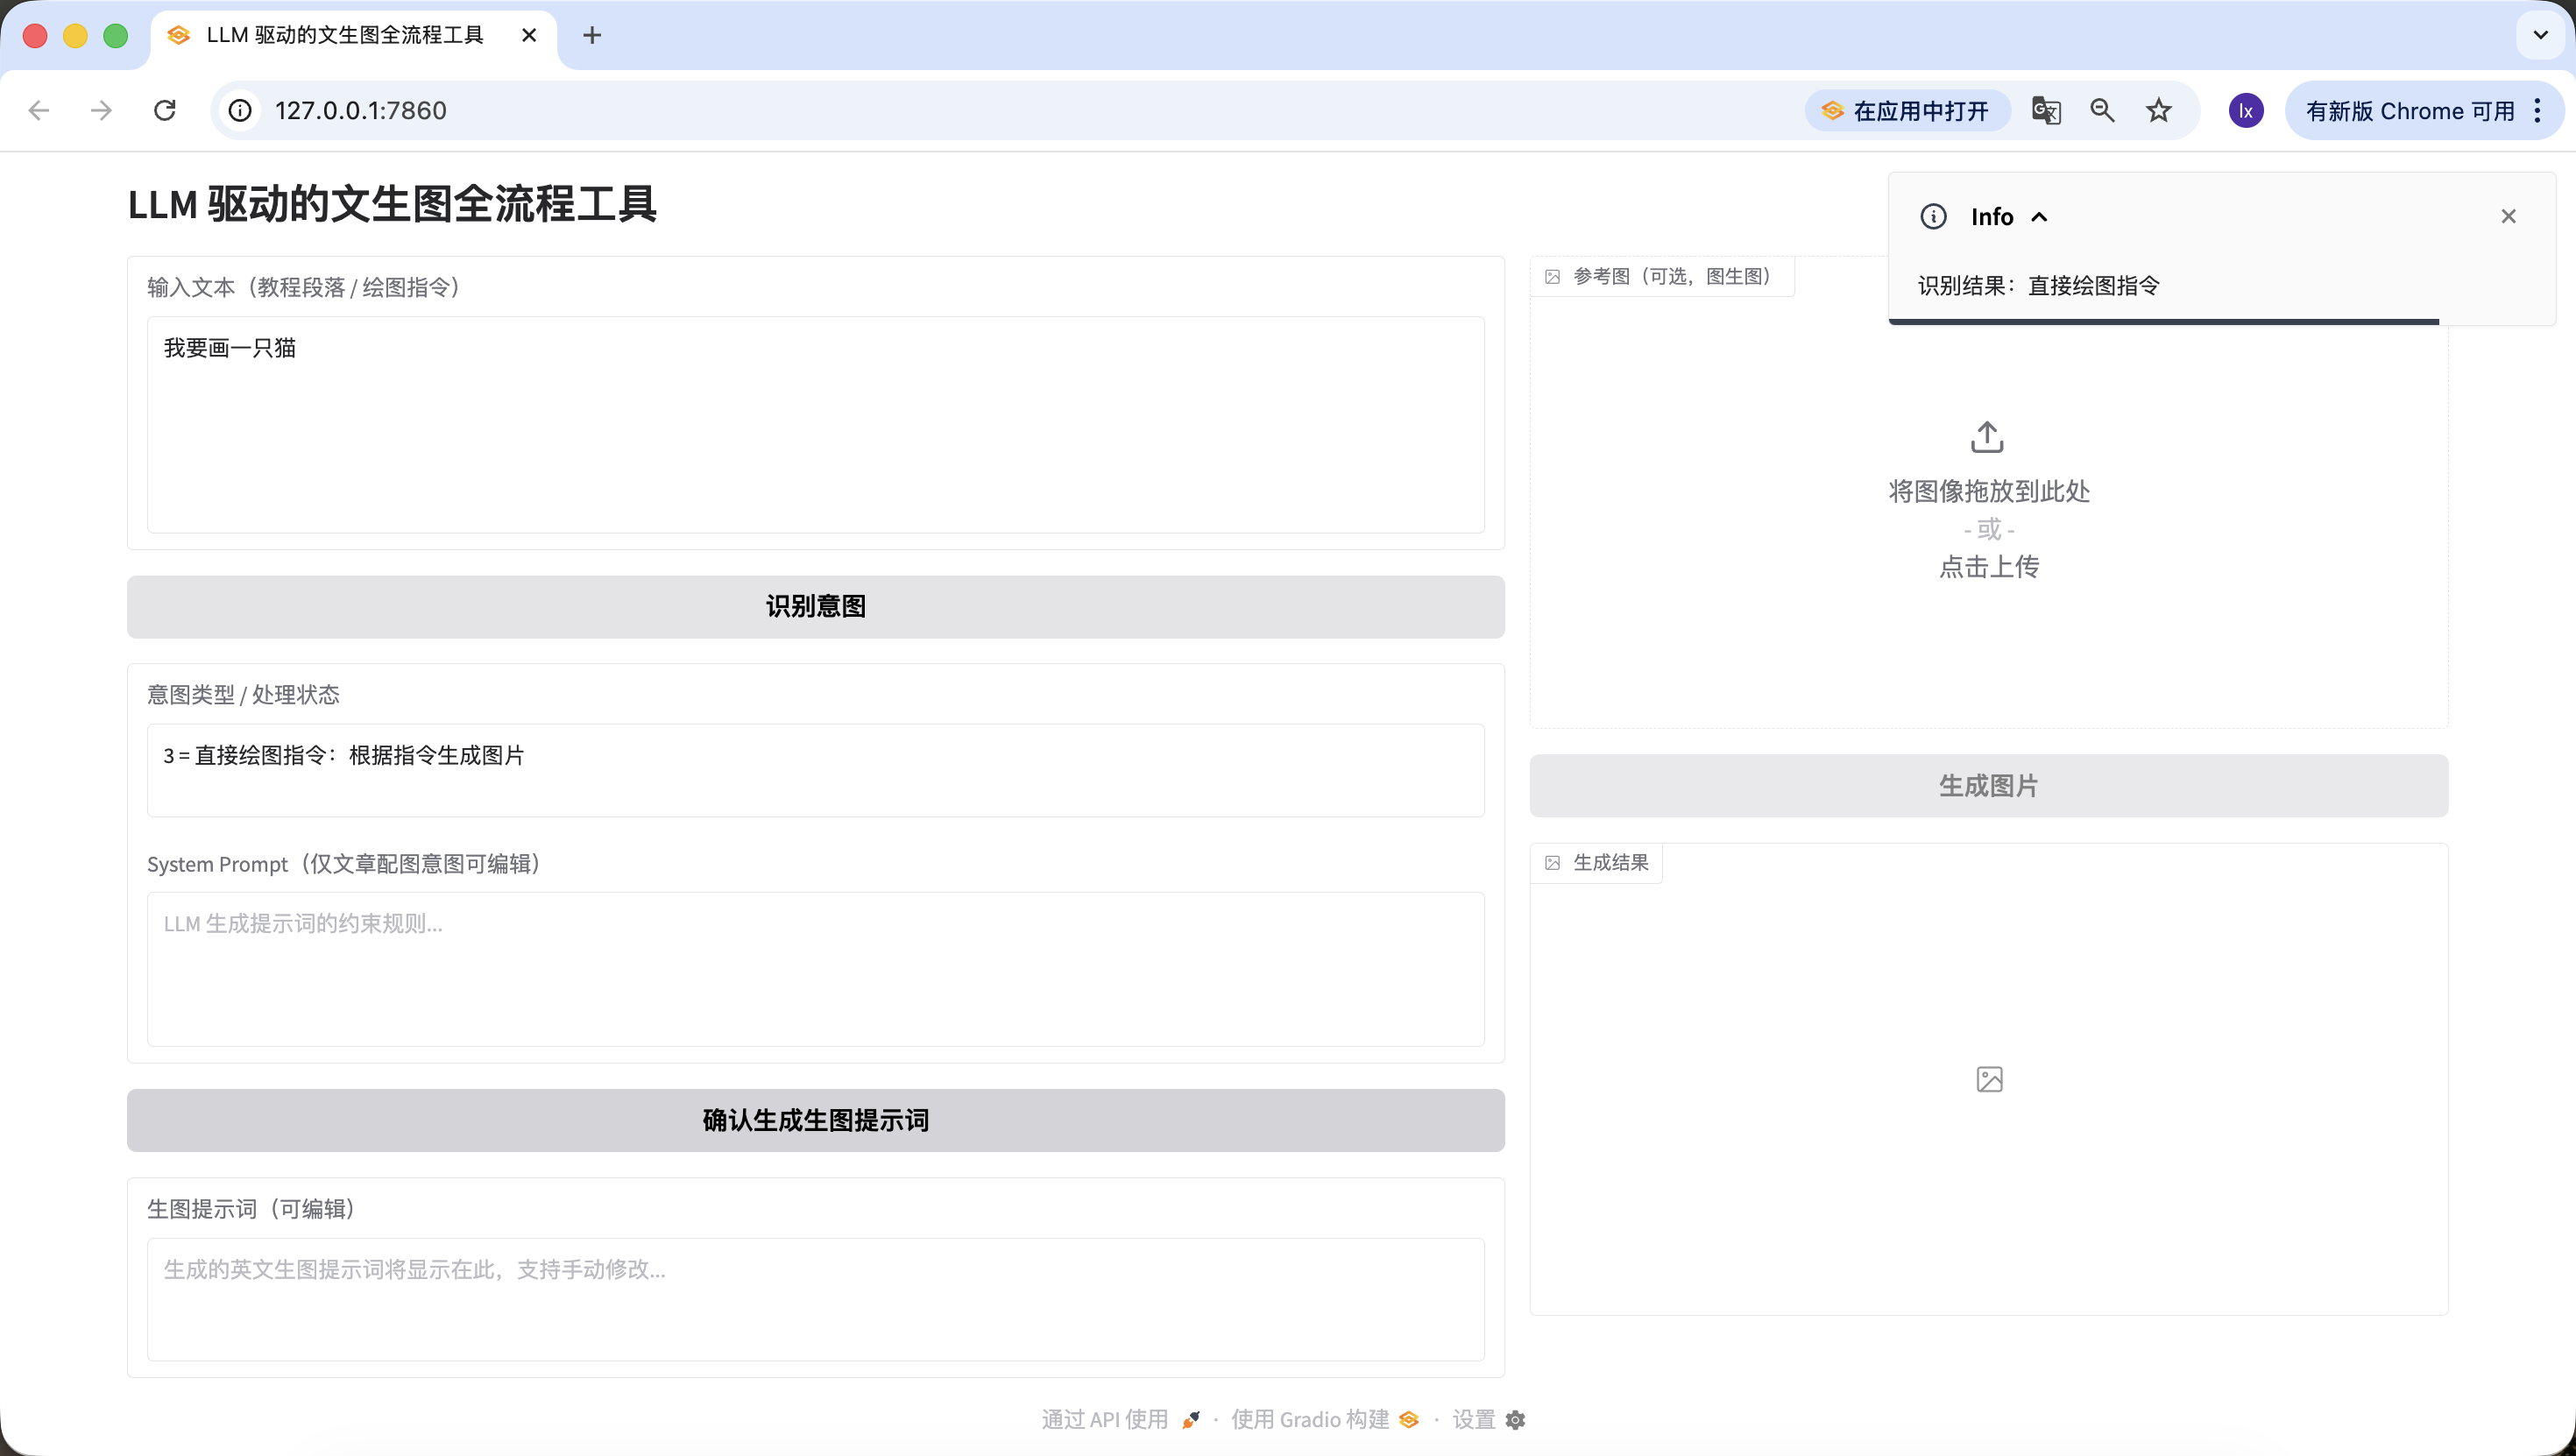
- Direct drawing instructions, such as "draw a dog taking a bath," where requirements are already specific enough for immediate generation.
As before, copy the prompt below into Trae and add the API obtained in earlier steps.
板块 2:LLM 意图识别模块(Siliconflow API)
1、任务目标
在已实现的 Gradio 界面基础上,为「识别意图」按钮添加点击逻辑,调用 Siliconflow API 完成意图识别,并联动组件状态。

2、技术栈要求
基于 Gradio 4.0.0+ Blocks;
依赖:requests>=2.31.0,openai;
输出完整可运行 Python 文件,包含板块 1 界面 + 本模块逻辑。

3、核心业务规则(绝对不可偏离)
·意图分类规则(仅 3 类,严格返回数字 + 描述)
1 = 无意义内容:仅闲聊、寒暄、无关对话,没有任何绘图或配图需求(如 “你好”“今天吃了吗”);
2 = 文章 / 长文本配图需求:用户输入一段完整文章、教程、段落、说明性文字,内容偏叙事 / 说明 / 讲解,隐含需要为这段内容生成配图的意图,不需要用户明确说 “为这段文字配图”;
3 = 直接绘图指令:用户输入简短、明确的画图命令,没有长文本背景,直接要求画某个内容(如 “画一只 Apple 风格的猫”)。
·LLM 调用约束(融合实战版模板)
接口地址:https://api.siliconflow.cn/v1/chat/completions;
模型:Qwen/Qwen2.5-7B-Instruct;
temperature=0.1;
统一定义代码:
python
运行
LLM_BASE_URL = "https://api.siliconflow.cn/v1"
LLM_API_KEY = ""  # 用户自行替换
LLM_MODEL = "Qwen/Qwen2.5-7B-Instruct"# 实战验证的意图识别模板(固化到代码中)
INTENT_PROMPT_TEMPLATE = """你需要识别用户输入文本的意图,仅返回以下 3 类结果中的一种(格式:数字 + 中文描述):
1 = 无意义内容;2 = 文章 / 长文本配图需求;3 = 直接绘图指令。

用户输入:{user_input}

识别结果:
仅提取返回结果中的数字和描述,禁止额外内容。"""

4、组件联动规则
·结果为 1:intent_status 显示「1 = 无意义内容:无绘图需求」,system_prompt 保持禁用,confirm_prompt_btn 禁用;
·结果为 2:intent_status 显示「2 = 文章 / 长文本配图需求:为输入内容生成配图」,启用 system_prompt 并填充默认规则,激活 confirm_prompt_btn;
·结果为 3:intent_status 显示「3 = 直接绘图指令:根据指令生成图片」,system_prompt 禁用且填充默认规则,激活 confirm_prompt_btn。

5、异常处理
API 异常、解析异常均给出友好提示,不崩溃,组件恢复初始状态。

6、输出要求
生成完整可运行代码,替换 LLM_API_KEY 即可使用,逻辑清晰注释完整,意图识别模板严格使用实战版。
Refresh http://127.0.0.1:7860 and test whether it correctly detects all three cases.
- Meaningless content: try inputting "你好", "谢谢", and so on. It should be recognized correctly.
- Article/long text: here we use a paragraph about AI generated by Doubao. You can also test with your own paper paragraph.
人工智能正在以前所未有的深度和广度重塑教育生态系统。通过自适应学习算法,AI系统能够构建每个学生的认知图谱,实时追踪他们的知识掌握轨迹,并动态调整教学内容的难度和呈现方式。在传统课堂环境中,教师往往难以同时满足不同学习风格和能力水平的学生需求,而基于深度学习的教育平台可以分析学生在交互式模拟实验中的行为模式,识别他们在量子力学或微积分等复杂概念理解上的微妙障碍,并提供精准的认知支架。

高级自然语言处理引擎驱动的虚拟导师不仅能够解构开放性问题,如"如何评价法国大革命对现代民主制度的影响",还能引导苏格拉底式对话,激发批判性思维。当学生撰写关于气候变化对极地生态系统影响的论文时,AI写作助手可以分析其论证逻辑的严密性,指出数据引用中的时效性问题,并建议更精准的科学术语。在特殊教育领域,计算机视觉技术使AI能够识别自闭症谱系儿童在社交互动中的非语言线索,调整干预策略,而情感计算算法则帮助检测在线学习时的挫折感,及时提供鼓励性反馈。

然而,这种技术融合引发了一系列伦理困境。算法偏见可能无意中边缘化特定文化背景的学生,数据采集的透明度问题引发了对学术隐私的关切,而过度依赖自动化评分系统可能削弱教师对学生思维过程的深层理解。更复杂的是,当AI开始生成高度逼真的虚拟实验室体验时,我们需要重新定义"实践经验"在教育中的价值。未来教育的范式可能演变为人类教师专注于培养创造力、同理心和道德判断力,而AI系统则承担知识传递、技能训练和个性化评估的职能,形成一种协同进化的教育共生体,既能发挥机器的计算优势,又能保留人类教育的独特温度.
This is also detected successfully.
- Direct drawing instruction: here we input "我要画一只猫", and it is also correctly detected.
At this point, we have successfully completed step 2: intent recognition.
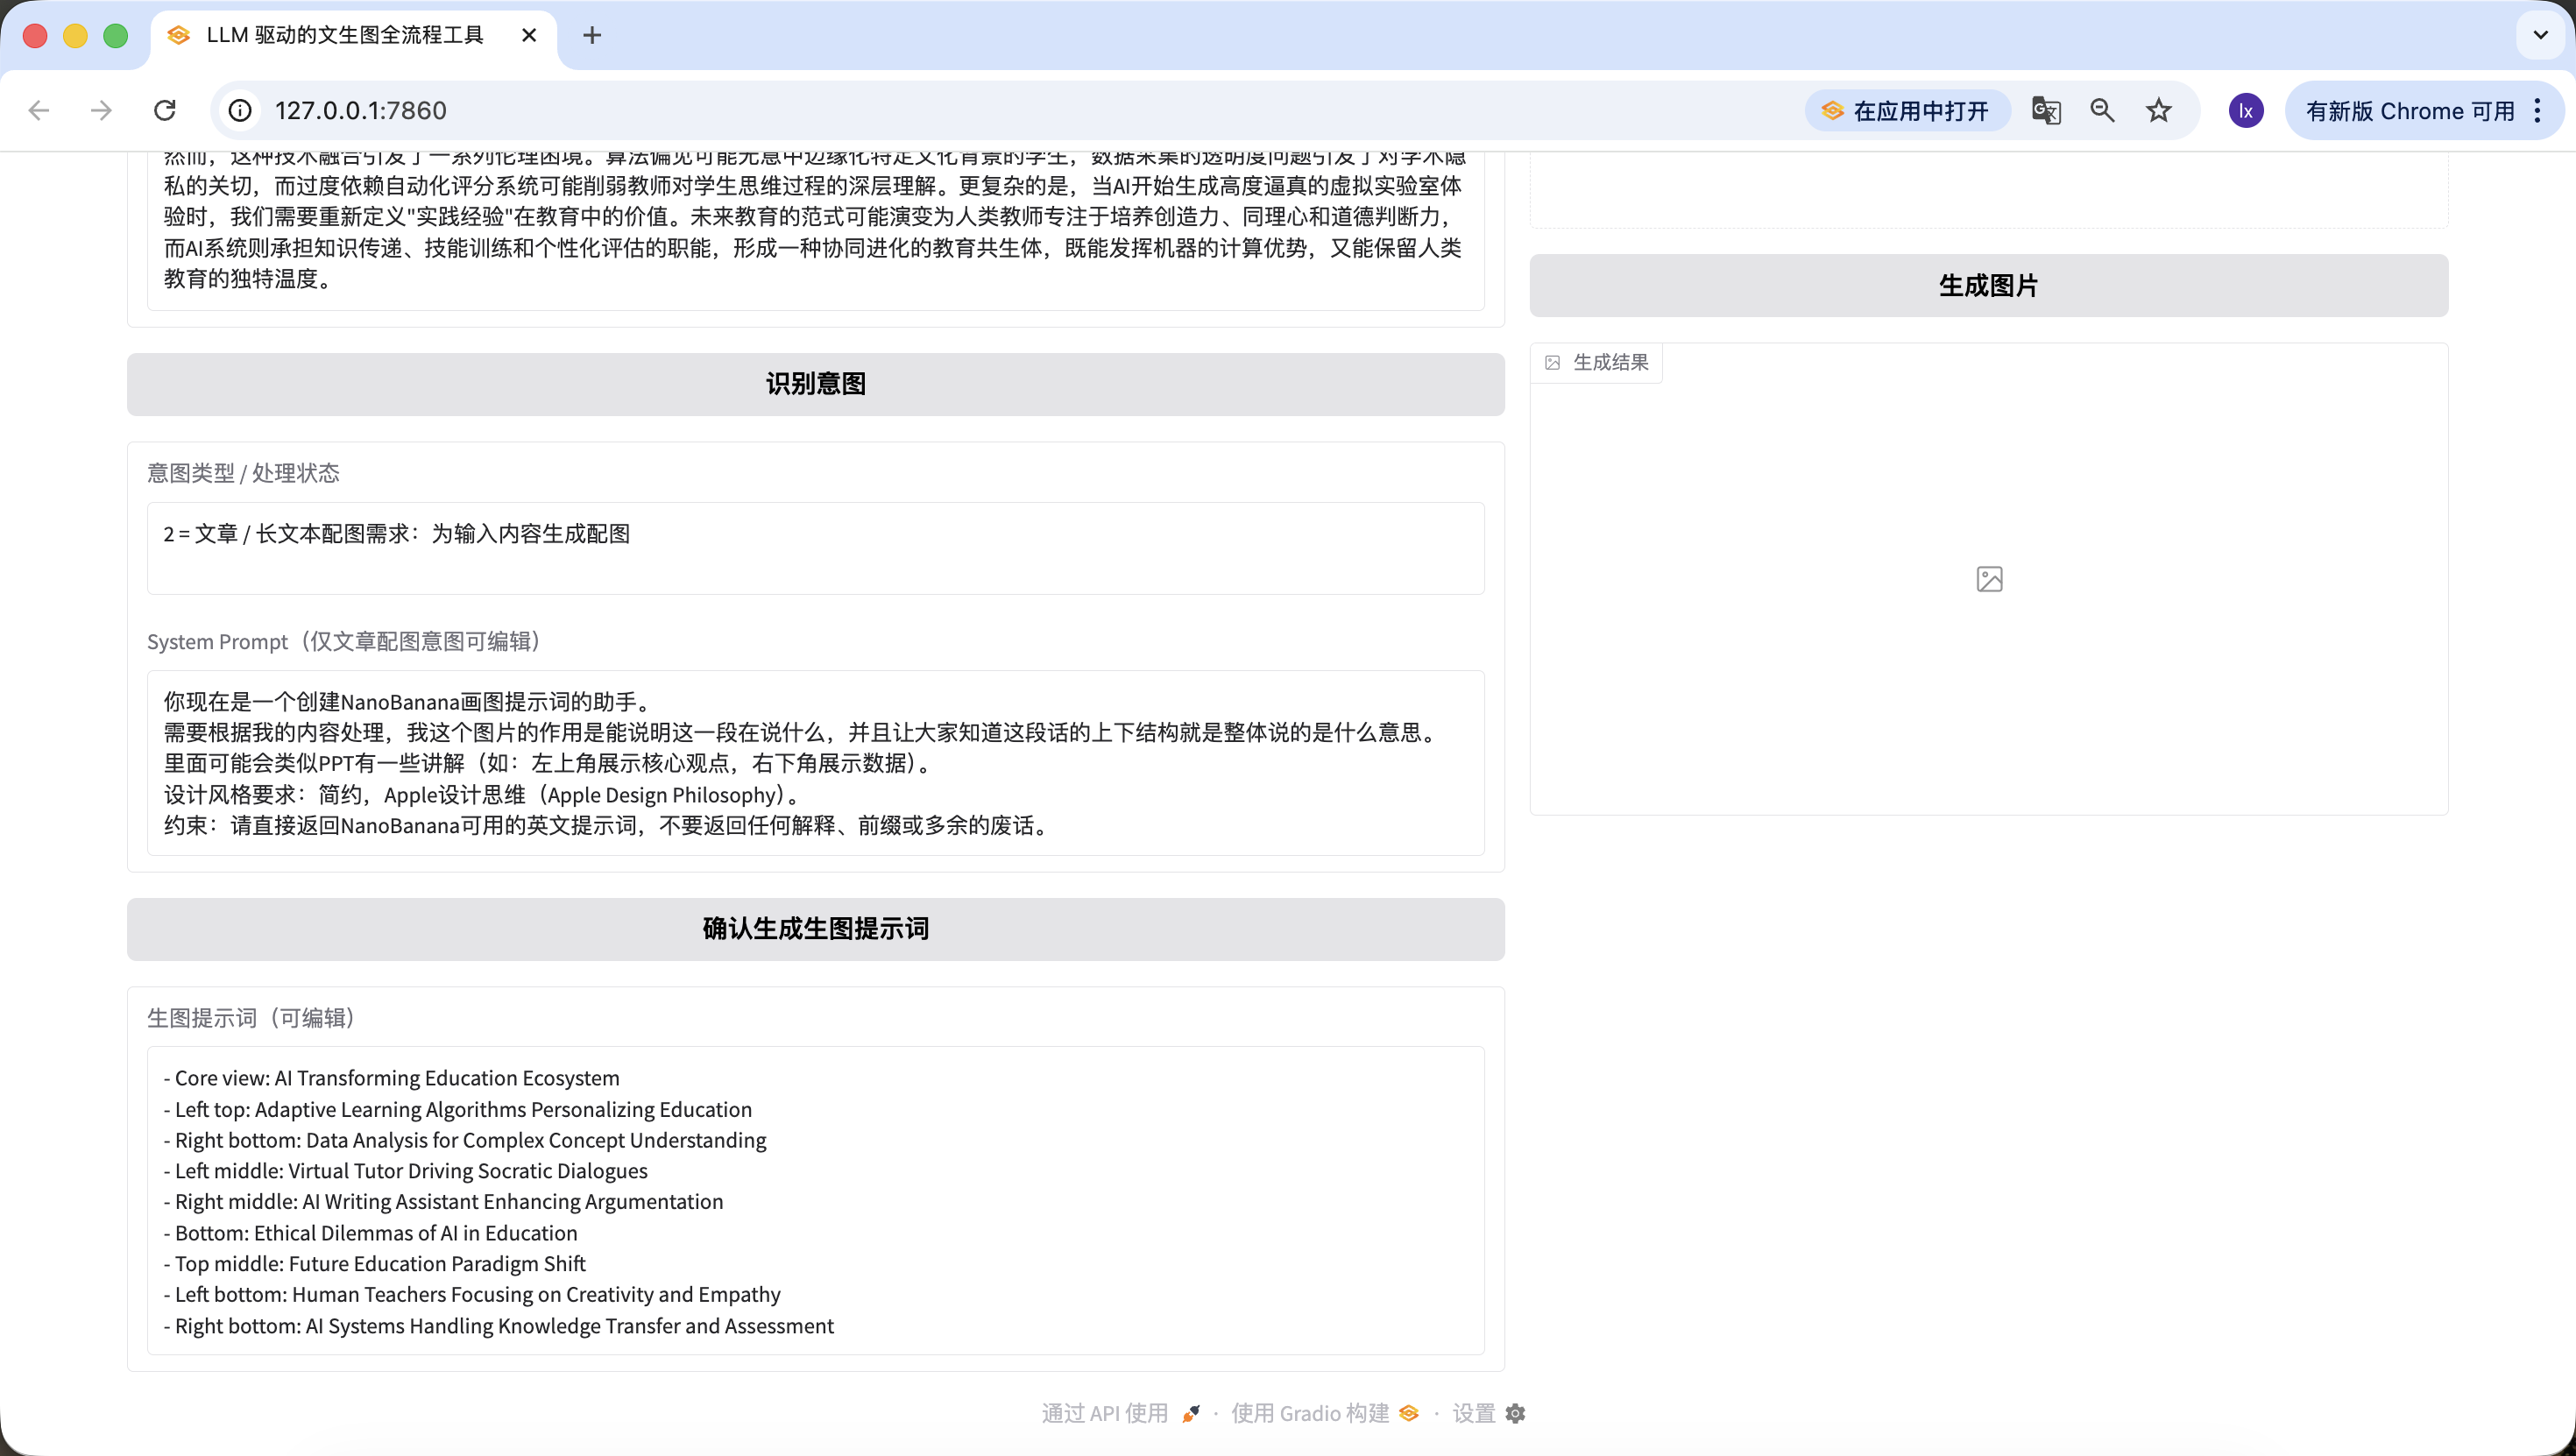
Step 3️⃣: Prompt Generation Module (Second LLM Call)
After intent recognition, for articles or long text there is one more crucial step: generating the drawing prompt. This is exactly the core of this agent.
板块 3:生图提示词生成模块(LLM 二次调用)
1、任务目标
在意图识别基础上,实现「确认生成生图提示词」按钮逻辑,调用 LLM 将文本优化为适合绘图的英文视觉提示词,填充到编辑框并联动「生成图片」按钮。

2、技术栈要求
同板块 2,输出完整代码 = 板块 1 + 板块 2 + 本模块;
共用板块 2 定义的 LLM_BASE_URL、LLM_API_KEY、LLM_MODEL,不新增密钥。

3、核心业务规则(融合实战版 Prompt 组装逻辑)
·提示词生成输入规则(必须严格遵循)
生图提示词生成不再是简单字符串拼接,而是构建标准 Chat 消息列表,代码结构如下:
python
运行
messages=[# System角色:网页上用户最终确认/编辑后的system_prompt内容{"role": "system", "content": final_system_prompt},# User角色:承载待处理数据,明确任务目标{"role": "user", "content": f"请为以下内容生成视觉提示词:\n\n{user_input}"}]
意图为 2 时:System 内容取用户编辑后的 system_prompt 最终版本;
意图为 3 时:System 内容取禁用状态下填充的默认规则
user_input 为用户最初输入到 input_text 框的原始文本。
·实战验证的 System Prompt 预设(固化到代码中)
python
运行
SYSTEM_PROMPT_DEFAULT = """你现在是一个创建NanoBanana画图提示词的助手。
需要根据我的内容处理,我这个图片的作用是能说明这一段在说什么,并且让大家知道这段话的上下结构就是整体说的是什么意思。
里面可能会类似PPT有一些讲解(如:左上角展示核心观点,右下角展示数据)。
设计风格要求:简约,Apple设计思维(Apple Design Philosophy)。
约束:请直接返回NanoBanana可用的英文提示词,不要返回任何解释、前缀或多余的废话。"""
·LLM 调用约束
与板块 2 共用同一套 LLM_BASE_URL、LLM_API_KEY、LLM_MODEL;
temperature=0.7(保证提示词的创意性与适配性);
max_tokens=200(限制输出长度,匹配提示词约束);
严格使用上述标准 Chat 消息列表结构,禁止字符串拼接。
·示例输入输出(核心参考)
输入示例 1(文章配图意图):原始文本:「AI 如何改变教育:随着人工智能技术的发展,教师的角色从知识传授者转变为引导者,AI 助手可辅助学生完成个性化学习,课堂上人机协作成为常态。」最终 System Prompt:SYSTEM_PROMPT_DEFAULT(未修改)输出预期:"Minimalist illustration, Apple Design Philosophy, 1024x1024. Top left shows 'AI + Education' core concept, bottom right shows data of teacher-student-AI collaboration, soft color palette, clean lines, no redundant elements."
输入示例 2(直接绘图指令):原始文本:「画一只 Apple 风格的猫,坐在 MacBook 旁边」最终 System Prompt:SYSTEM_PROMPT_DEFAULT(禁用状态)输出预期:"Minimalist cat, Apple style, 1024x1024, sitting next to a silver MacBook, clean white background, soft shadows, geometric shapes, no extra details."
·提示词输出强制约束
纯英文,无中文;
必须包含 Apple Design Philosophy/Apple style + 1024x1024;
长度 50–200 字符,代码内校验;
无额外解释、前缀或废话,仅返回提示词本身。

4、组件联动规则
生成成功:将提示词填入 generation_prompt 框,激活 generate_btn,intent_status 追加「提示词生成成功,可修改后生成图片」;
生成失败:提示具体原因(如 API 调用失败、长度不达标),generate_btn 保持禁用,generation_prompt 框为空;
用户手动修改 / 清空 generation_prompt 框:
清空时自动禁用 generate_btn;
非空时保持 generate_btn 激活。

5、异常处理
API 调用失败:友好提示「提示词生成失败:{具体错误信息}」,不崩溃;
提示词校验失败:明确提示原因(如 “未包含 Apple style”“长度仅 40 字符”),允许重试;
响应解析失败:提示「无法解析 LLM 返回结果,请重试」。

6、输出要求
完整可运行代码,替换 LLM_API_KEY 即可使用;
代码结构清晰、注释完善,界面美观简洁;
严格实现标准 Chat 消息列表结构,参数与示例逻辑一致;
包含提示词长度、内容校验逻辑,错误提示友好。
Use the same long text from step 2 for testing.
It is worth noting that the default System Prompt we preset for prompt generation is:
你现在是一个创建NanoBanana画图提示词的助手。 需要根据我的内容处理,我这个图片的作用是能说明这一段在说什么,并且让大家知道这段话的上下结构就是整体说的是什么意思。 里面可能会类似PPT有一些讲解(如:左上角展示核心观点,右下角展示数据)。 设计风格要求:简约,Apple设计思维(Apple Design Philosophy)。 约束:请直接返回NanoBanana可用的英文提示词,不要返回任何解释、前缀或多余的废话。
If you want to switch to other preset templates, you can modify the earlier prompt or directly modify it through Trae dialogue.
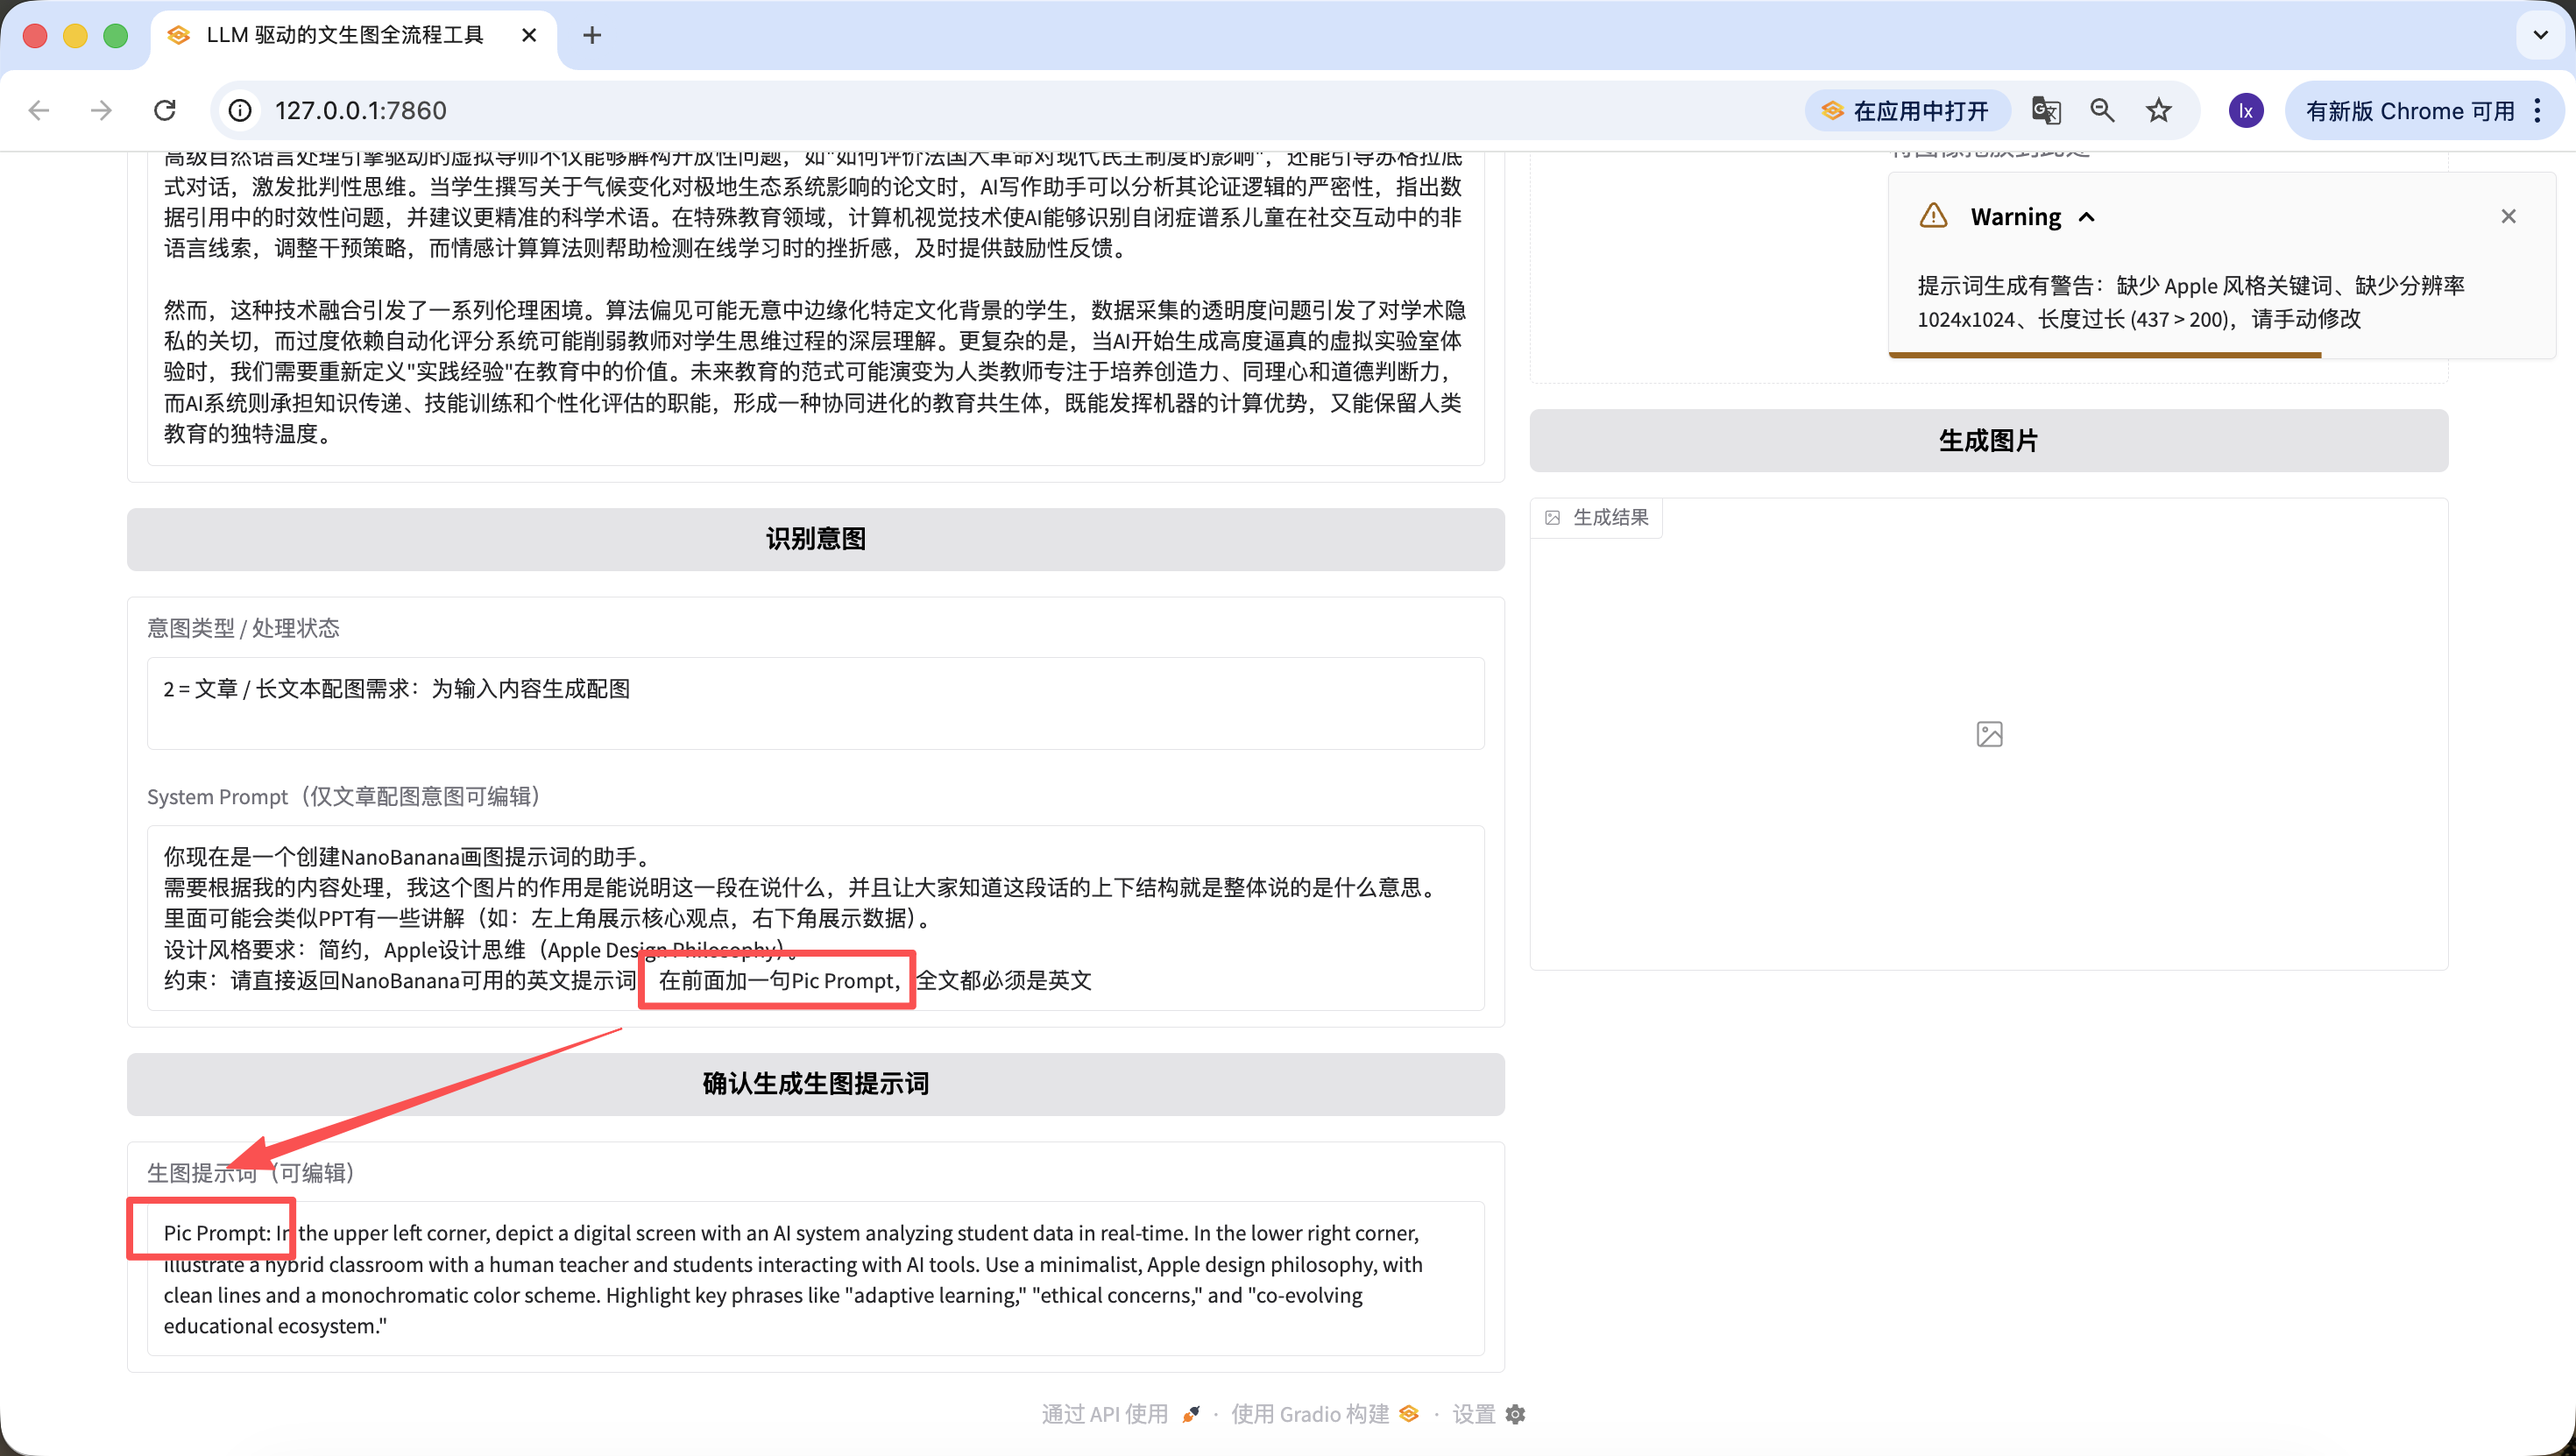
Besides changing underlying code, we can also edit quickly on the webpage. For example, I added one line, "add 'Pic Prompt' at the beginning." You can see the new generated prompt also starts with it. This design is for quickly adjusting the system prompt for generation, so we can switch styles fast.
Step 4️⃣: NanoBanana Text-to-Image / Image-to-Image Module
Finally we are at the last step. Without connecting an image model, it is not a complete agent.
板块 4:Nanobanana 文生图 / 图生图模块(最终版)
1、任务目标
实现「生成图片」按钮逻辑,调用真实 Nanobanana API,支持文生图 / 图生图,解析 Base64 并展示图片。

2、技术栈要求
基于 Gradio 4.0.0+ Blocks;
依赖:requests, pillow, base64, io, re;
完整代码 = 板块 1+2+3 + 本模块。

3、核心 API 配置(实战验证固化)
固化代码配置:
python
运行
# 固化到代码中的API配置
NANOBANANA_API_URL = "https://api.zyai.online/v1/chat/completions"
NANOBANANA_MODEL = "gemini-2.5-flash-image"
NANOBANANA_API_KEY = ""  # 用户自行替换
鉴权方式:Header Authorization: Bearer {NANOBANANA_API_KEY}。

4、图片预处理要求(必须实现)实现函数 image_to_base64_data_uri (ref_image_path),核心逻辑:
将 PIL 图片转为 PNG 格式;
自动缩放到 1024x1024 分辨率;
透明通道转为白色背景;
编码为 Base64,返回格式:data:image/png;base64,...。

5、请求构建规则(严格按实战版分支逻辑)
·核心函数定义实现函数 generate_image (prompt, ref_image_path):
入参:prompt(generation_prompt 框内容)、ref_image_path(ref_image 上传的文件路径);
返回:PIL Image(展示到 result_image)或错误提示。
·逻辑分支 1:纯文生图(ref_image_path 为空)
python
运行
messages = [{"role": "user", "content": prompt}]
·逻辑分支 2:图生图(ref_image_path 有值)
python
运行
# 先调用图片预处理函数
image_base64 = image_to_base64_data_uri(ref_image_path)
messages = [{"role": "user","content": [{"type": "text", "text": prompt},{"type": "image_url", "image_url": {"url": image_base64}}]}]

6、响应解析要求(必须兼容两种格式)从 choices [0].message.content 中提取图片 Base64,支持:
结构化 JSON 返回的 image_url 字段;
Markdown 格式
;
统一提取 Base64 编码,解码后转换为 PIL Image 返回。

7、组件联动与异常处理
生成成功:将 PIL Image 展示到 result_image,intent_status 提示「图片生成成功」;
生成 / 解析 / 上传失败:在 intent_status 显示清晰文字提示(如 “Base64 解析失败”“API 调用超时”),不崩溃。

8、输出要求
完整可运行代码,替换 LLM_API_KEY 和 NANOBANANA_API_KEY 即可直接运行,全流程可用,分支逻辑严格匹配实战版。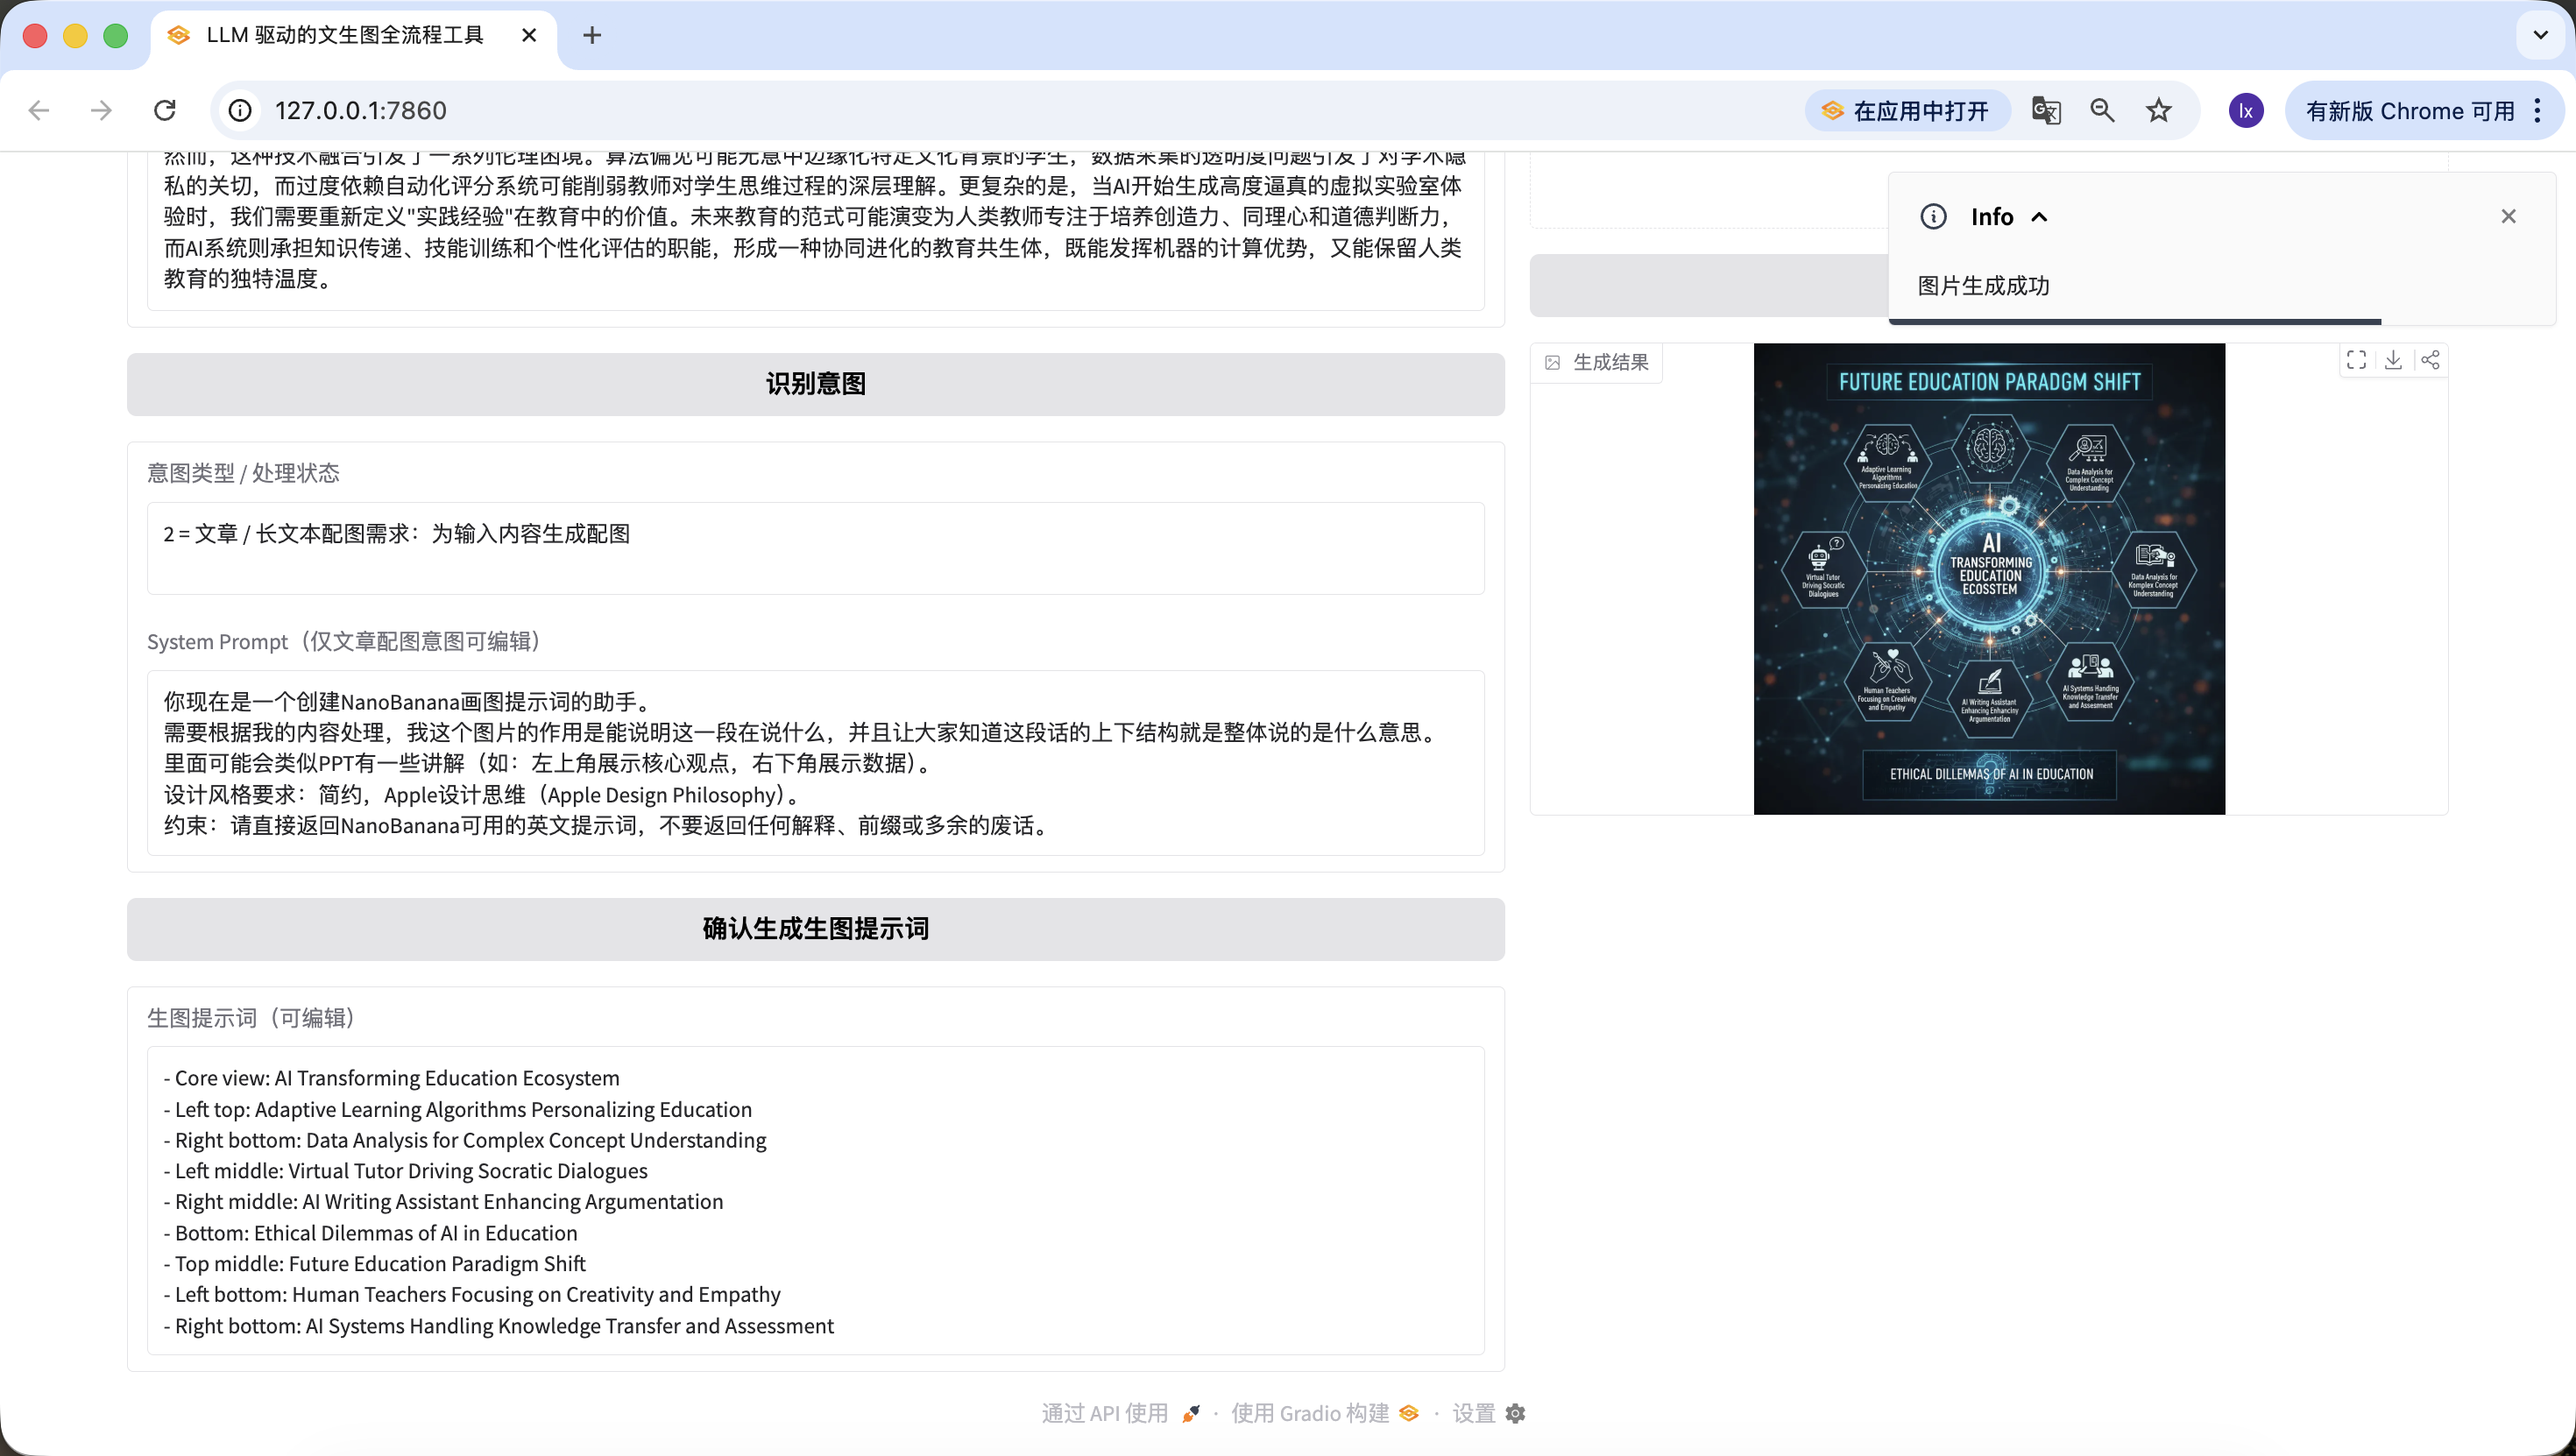
So exciting. We finally generated the first image of this agent. Looking closely, the generated image matches both our text and prompt. At this point, you have basically implemented your own agent.
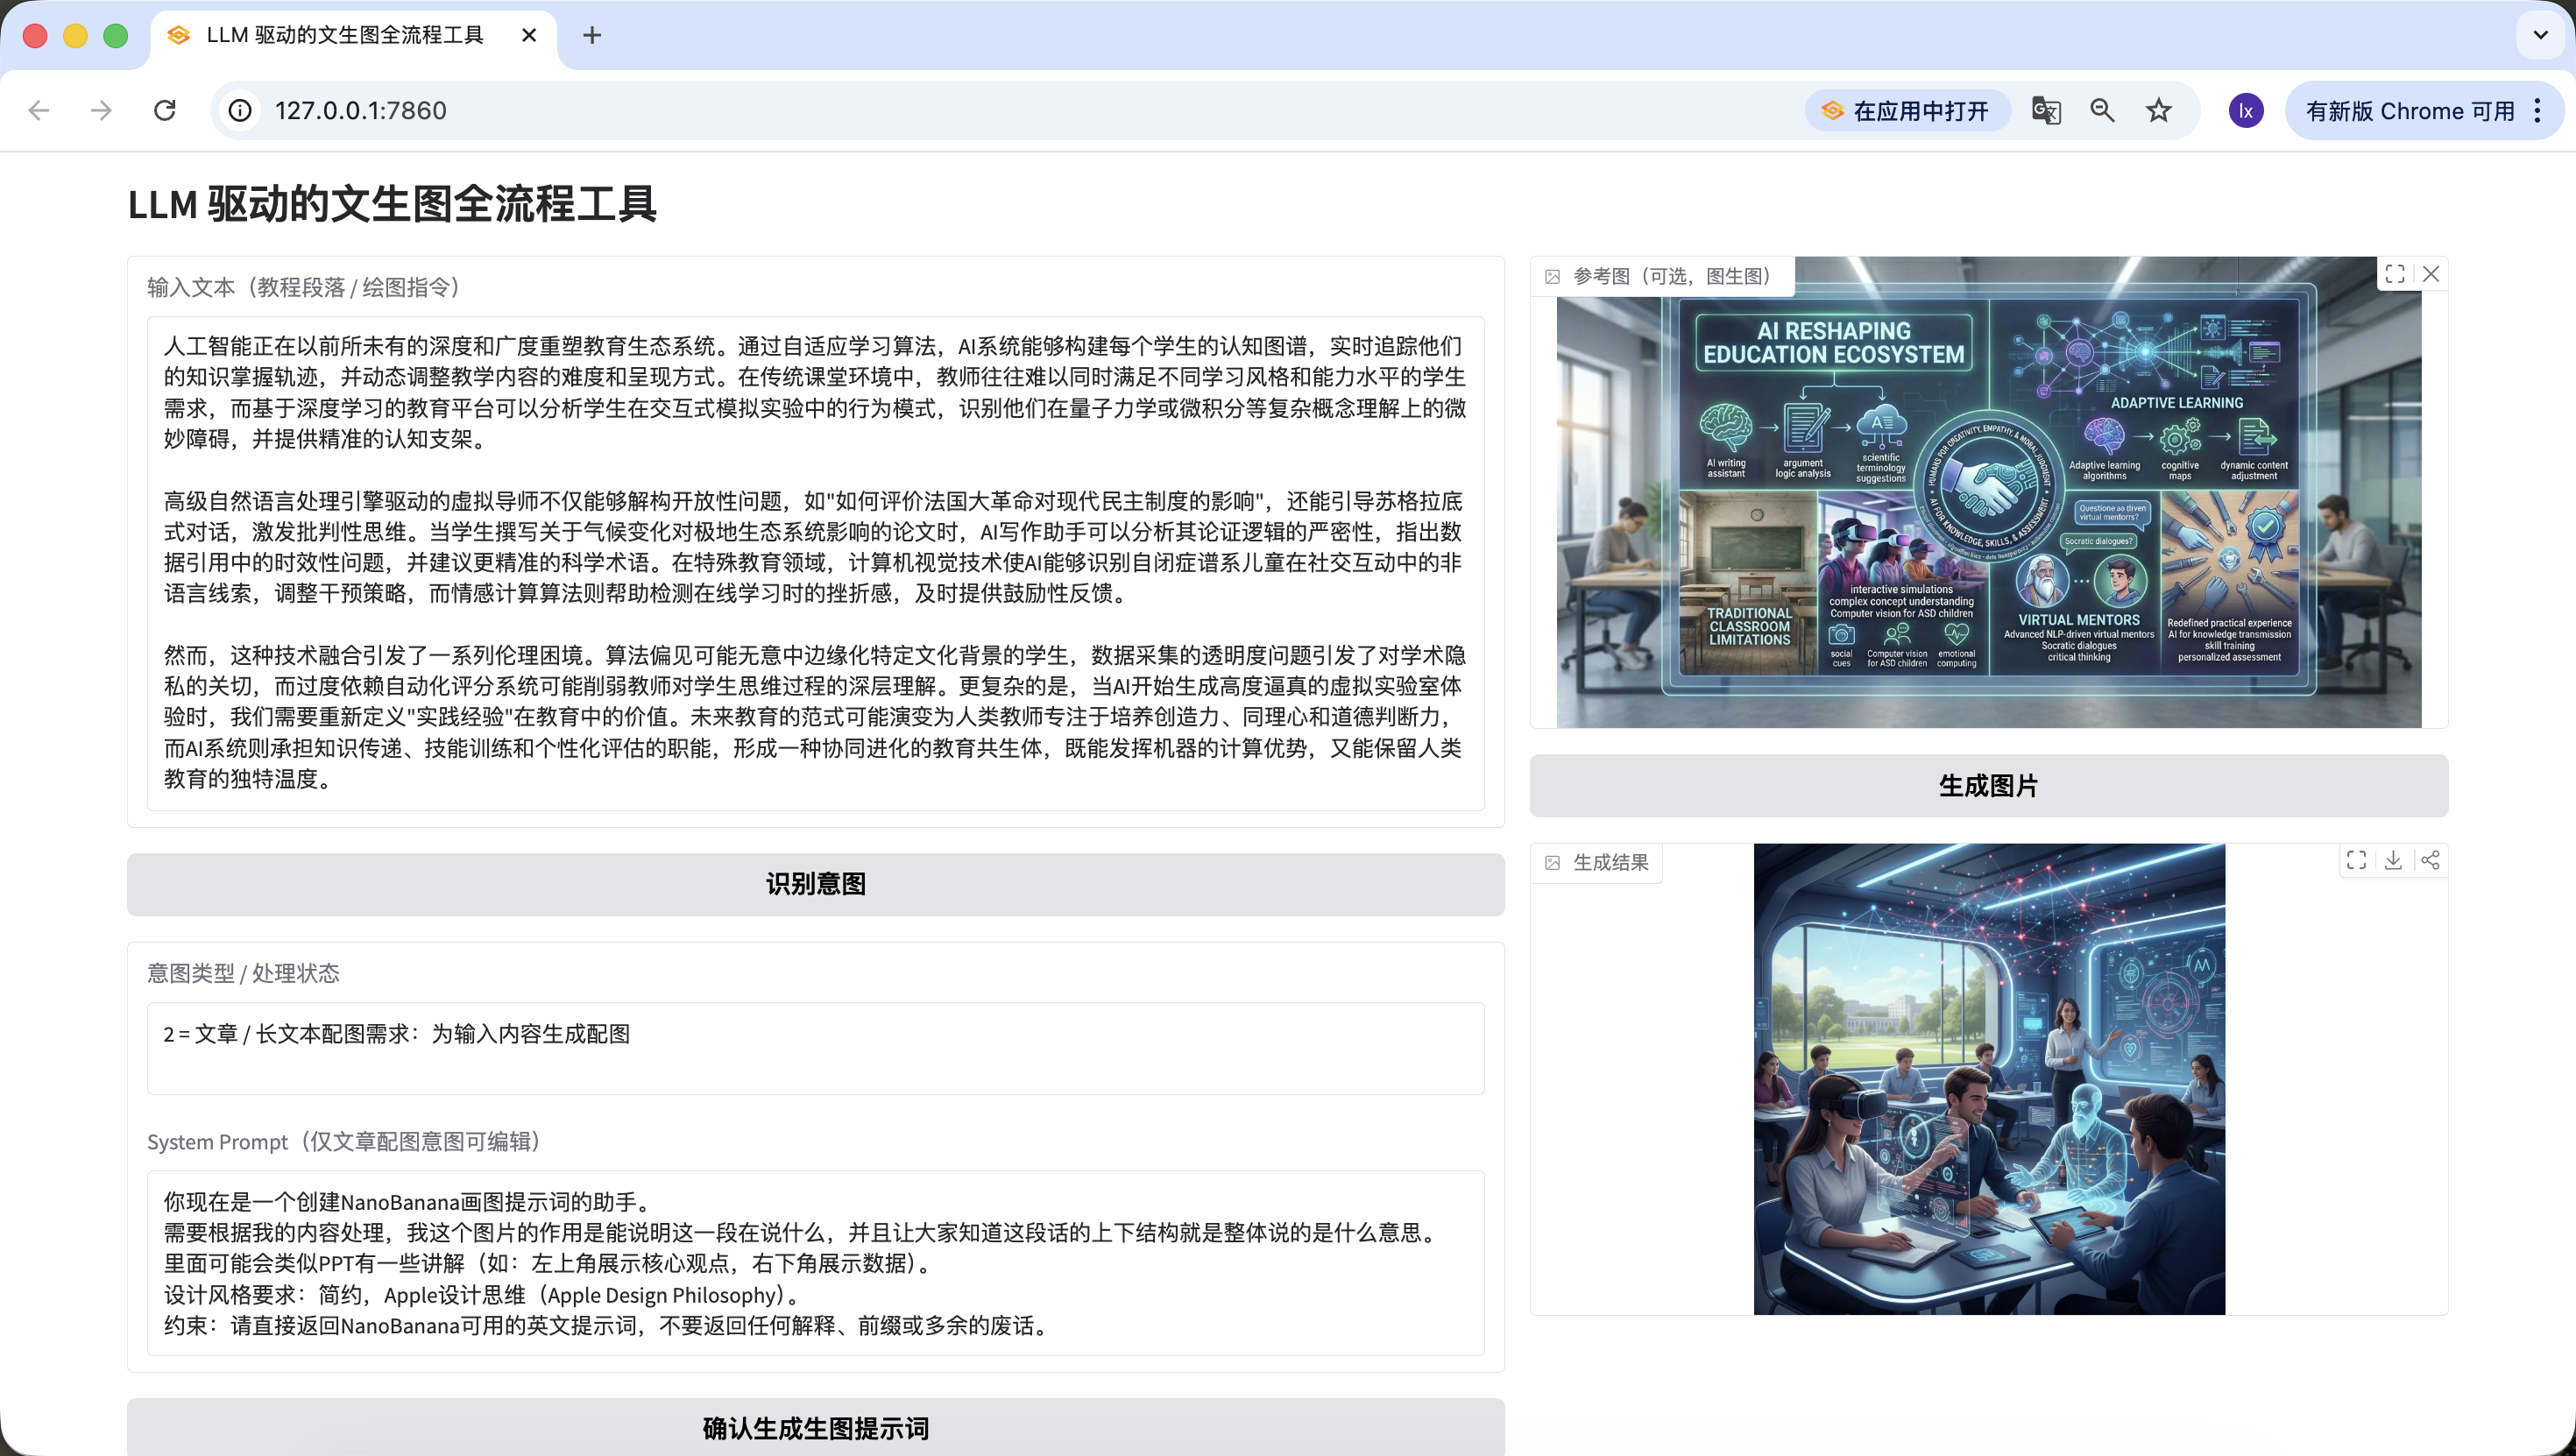
We also added image-to-image. Upload an image you like, and AI will automatically borrow style cues.
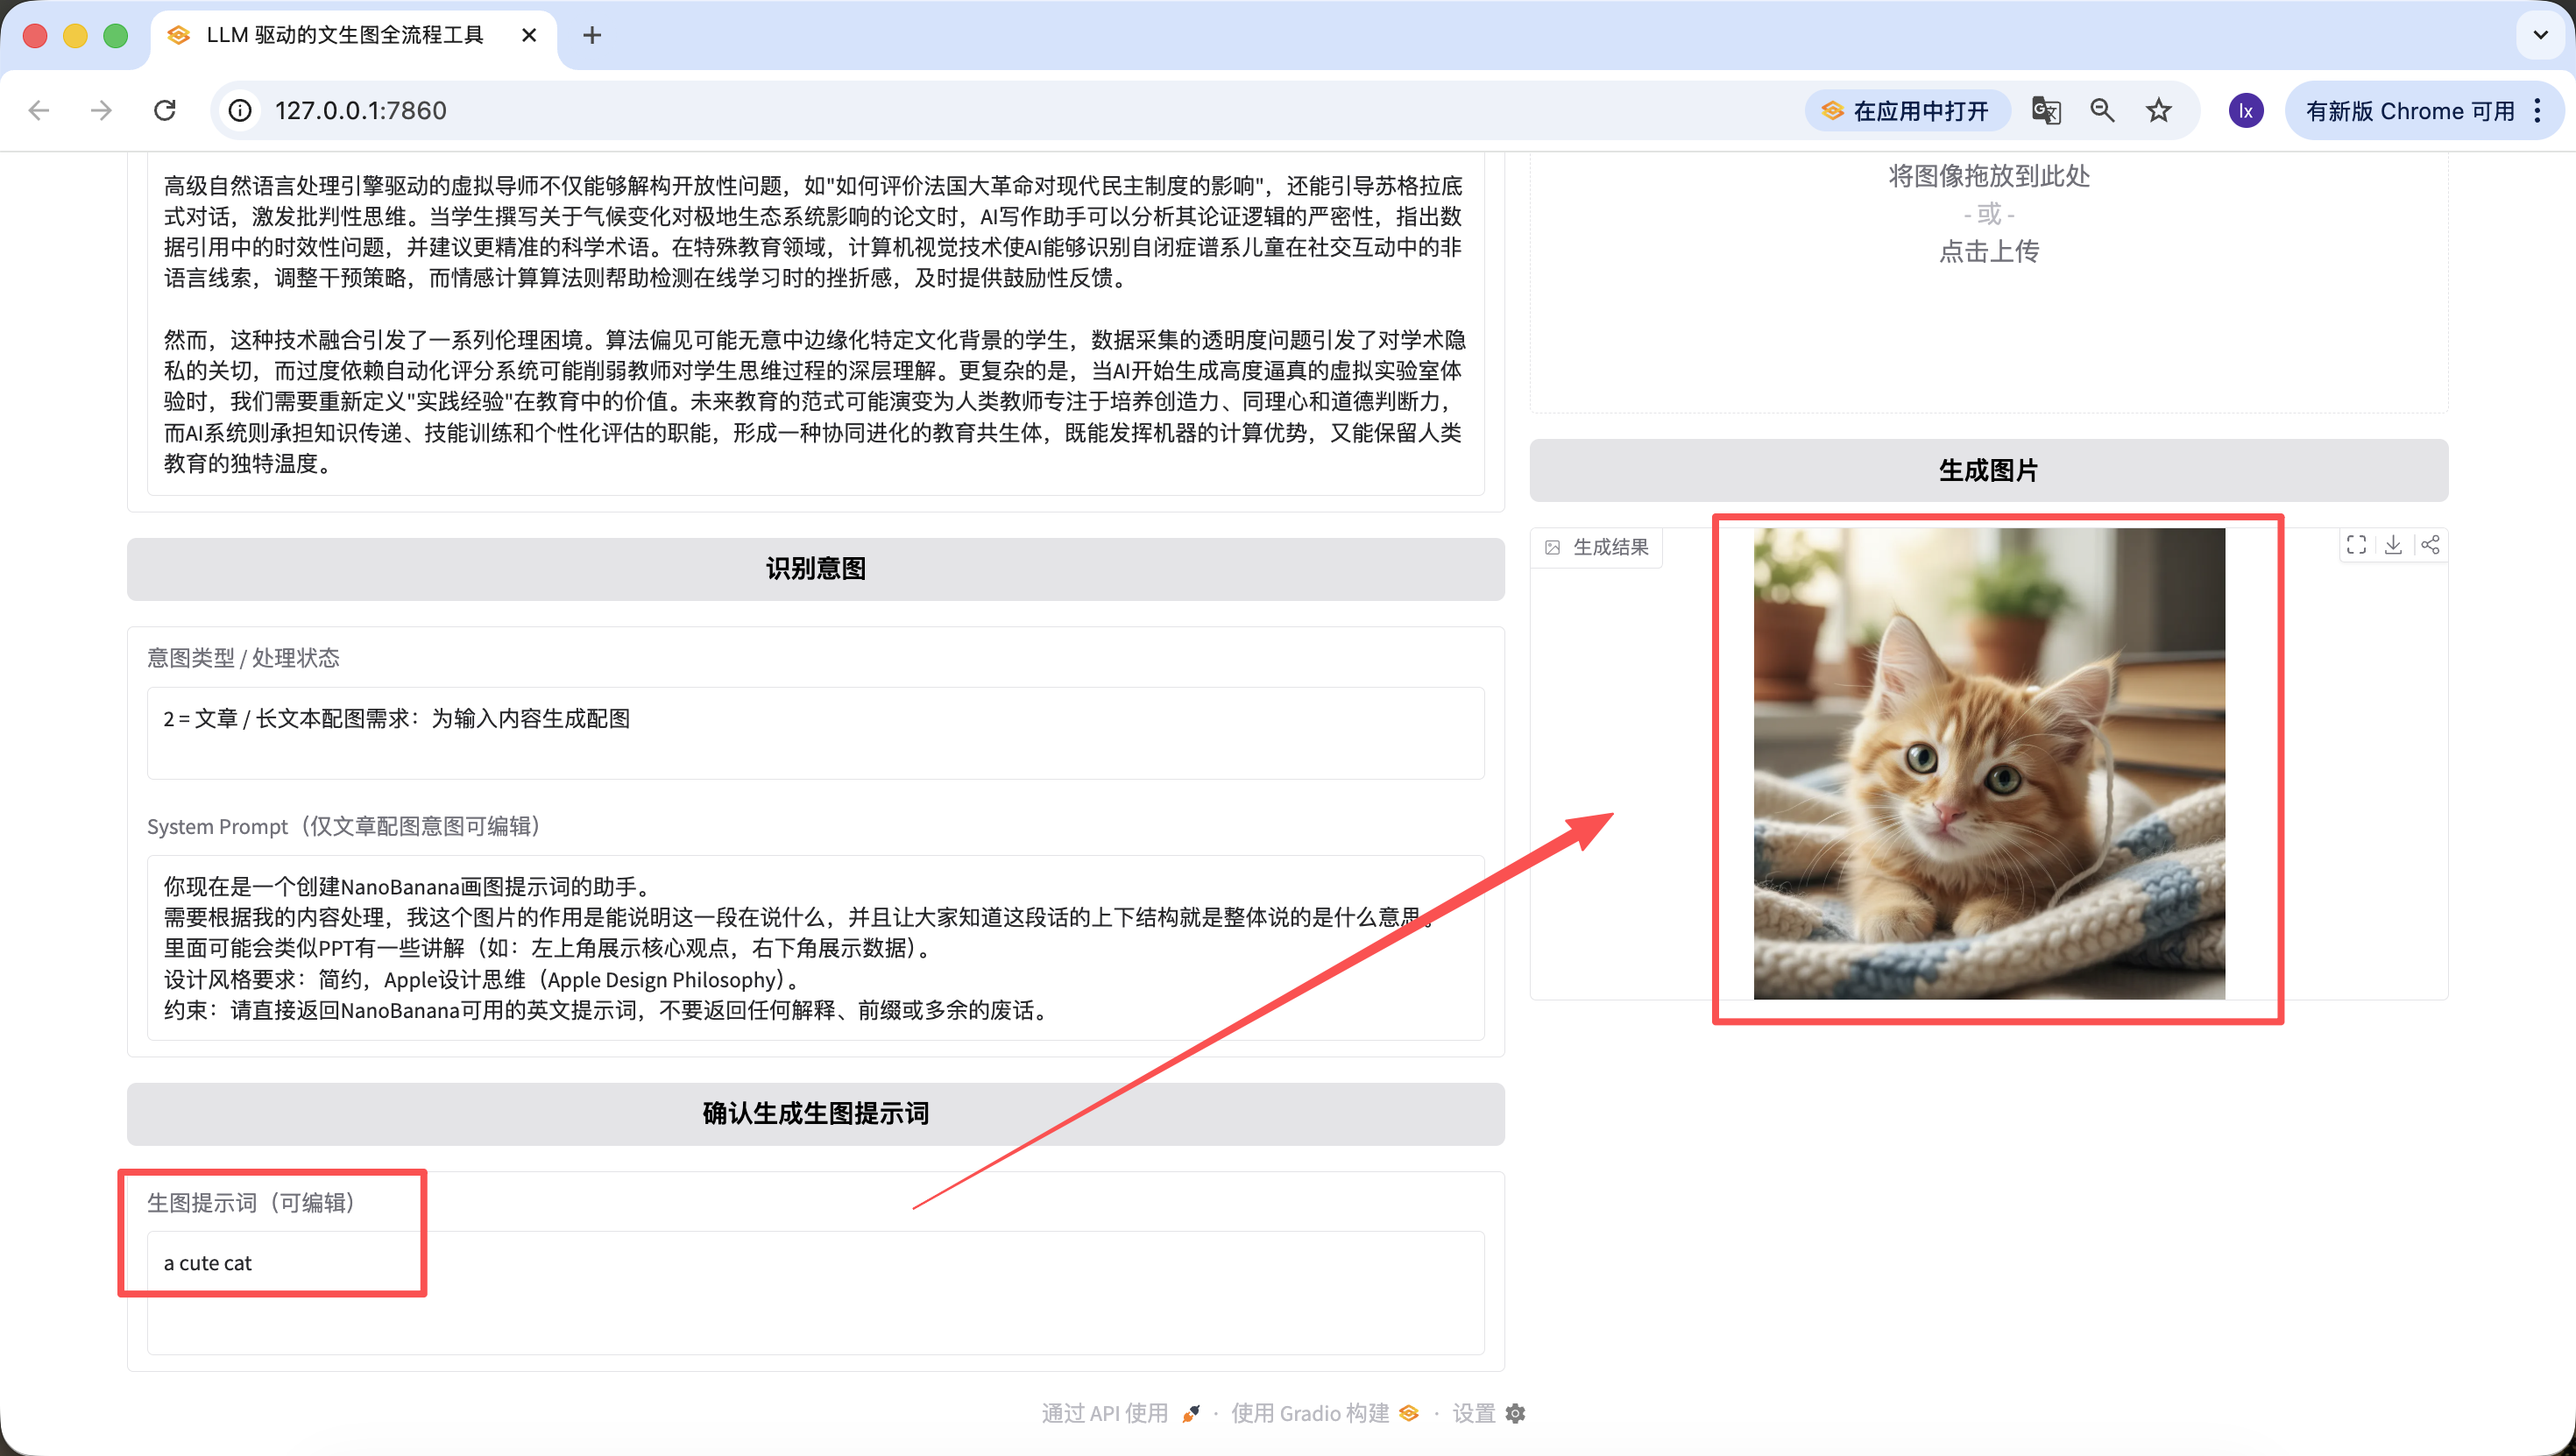
It is also worth mentioning that prompts generated in earlier steps can be edited directly on the webpage, and generation always uses the final prompt at click time. Even if I change it here to "a cute cat," the final output will be just a cute kitten.
Chapter 4: Summary
Whew, finally finished. Honestly, when I finished the last line, I exhaled deeply myself, and you followed the full path to here. Running through this full workflow is already impressive by itself. It means you really put your hands on the keyboard and completed things step by step. Bravo.
During the writing of this tutorial, I kept asking what we really want to leave behind. The answer is not model names, parameter values, or fixed tricks. It is helping you gradually build a feel for division of labor: what AI can safely understand and plan for you, and where you only need to decide direction. Once this division is established, many workflows that once looked complex start becoming smooth.
Looking back, this path is not actually complicated. Clarify the problem you want to solve, let a language model decompose long text, then pass organized visual intent to an image model for rendering, and finally package the full process into your own assistant. At that point, you are no longer simply "using models." You are building a system that can work with you over the long term. That is exactly what this tutorial most wants to deliver.
But you already did great. If you have made it this far, you already have a solid initial grasp of Vibe Coding. Give yourself a short break.