
05. PyTorch Tensor Fundamentals | PyTorch 张量基础操作
难度: Easy | 环境: CPU-first | 标签: PyTorch, 张量, shape | 目标人群: 刚开始学习 PyTorch Tensor、shape 和 dtype 的学习者
🚀 云端运行环境
本章节的实战代码可以点击以下链接在免费 GPU 算力平台上直接运行:
(国内推荐:魔搭社区免费实例)

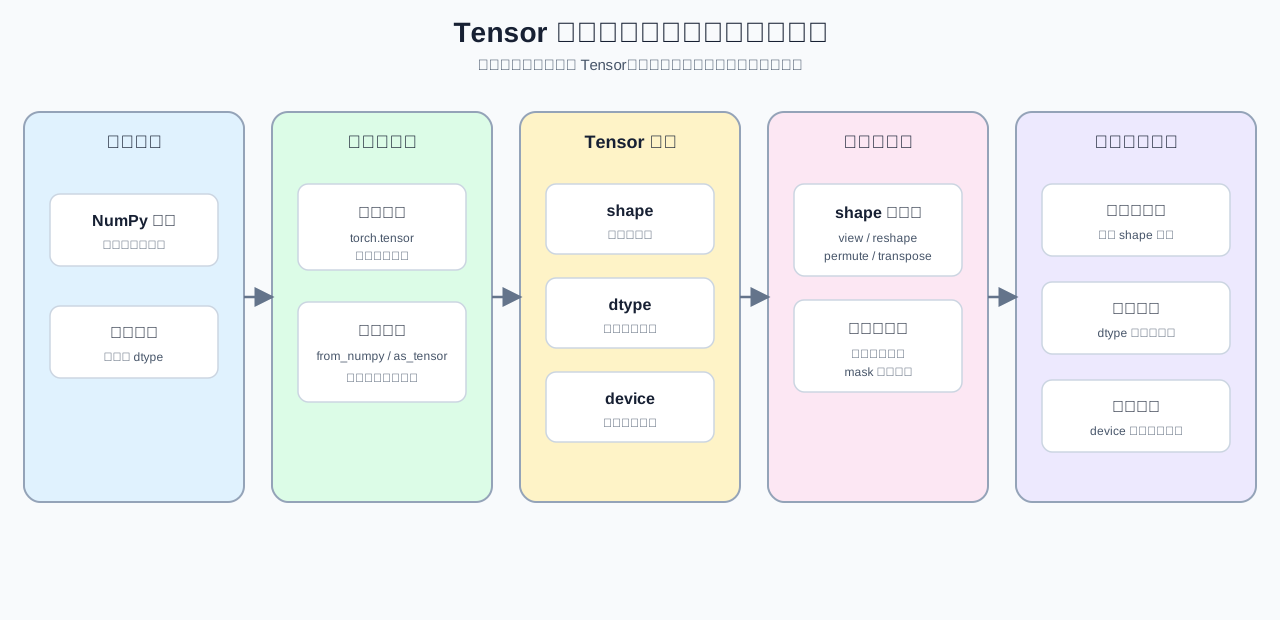
本节聚焦:先读懂 Tensor 的 shape、dtype 和 device,再完成基本的 shape 变换和整数索引。学习时可以沿着一条固定顺序走:先确认数据的结构,再确认数值类型和所在位置,最后判断它能否作为后续计算的输入。代码会从 NumPy 数组和新建 Tensor 开始,覆盖 torch.tensor、from_numpy、as_tensor 以及 dtype/device 转换;这些属性也会影响数据对象的大小与所在位置。
如果你主要来自 NumPy,可以先把 Tensor 看成带 dtype 和 device 信息、能够参与 PyTorch 运算的数组容器;本节的重点不是记住 API 名字,而是把 ndarray -> Tensor -> 后续计算输入 这条转换链看顺。
关键词: tensor, shape, dtype
前置阅读
导语: 如果你刚从 Python / NumPy 进入 PyTorch,先确认数组如何转换成 Tensor、以及 shape / dtype / device 如何随转换变化,再开始本节的 Tensor 操作。
- 04. Python Config and Data Entry | Python 配置与数据入口
- 0B 组页
- P1: 01. Data Types and Precision | 大模型的数据格式与混合精度
Q1:如何读取 Tensor 的基本属性并完成 NumPy 转换?
进入 PyTorch 后,先确认 Tensor 的形状、数据类型和所在设备。对于主要用过 NumPy 的学习者,可以把 Tensor 看成带有 shape、dtype 和 device 属性的数组容器;这些属性帮助你判断数据能否进入下一步计算。
这里先把最常见的属性接口认熟:x.shape 看维度,x.dtype 看数值类型,x.device 看数据放在哪;顺手把最常见的创建和转换语法也认一下:torch.tensor、torch.from_numpy、torch.as_tensor、to(dtype=...)。
import torch
import numpy as np


def describe_tensor(x):
    """返回 Tensor 的 shape、dtype 和 device,便于做最小属性检查。"""
    return {
        'shape': tuple(x.shape),
        'dtype': str(x.dtype).replace('torch.', ''),
        'device': str(x.device),
    }


# `torch.tensor` 会创建新 Tensor;`from_numpy` / `as_tensor` 会尽量复用 NumPy 的底层内存。
t = torch.tensor([[1, 2, 3], [4, 5, 6]], dtype=torch.float32)
n = np.array([[1, 2, 3], [4, 5, 6]], dtype=np.float32)
t_from_np = torch.from_numpy(n)
t_as = torch.as_tensor(n)
# 先看三个基础属性,再看不同构造方式的差异。
print('Tensor 描述:', describe_tensor(t))
print('NumPy 形状:', n.shape, 'dtype:', n.dtype)
print('from_numpy:', describe_tensor(t_from_np))
print('as_tensor:', describe_tensor(t_as))
print('Tensor->NumPy:', t.numpy())
print('dtype 转换为 int64:', t.to(torch.int64).dtype)

# 这里改 NumPy,观察共享内存的张量会一起变。
n[0, 0] = 99
print('修改 NumPy 后,from_numpy 的首元素:', t_from_np[0, 0].item())
print('修改 NumPy 后,as_tensor 的首元素:', t_as[0, 0].item())
print('torch.tensor 创建的 t 不受影响:', t[0, 0].item())
Q1验证:Tensor 和 NumPy 的最小对照是否一致?
这里先确认两件事:Tensor 的 shape / dtype 是否正确,转换成 NumPy 后数值是否还一致。你可以把它理解成先确认“容器对不对”,再确认“里面的值对不对”。这一组最主要的语法目标,是先会读懂 tensor -> numpy -> tensor 这条最短转换链。
t = torch.tensor([[1.0, 2.0], [3.0, 4.0]], dtype=torch.float32)
n = t.numpy()
assert tuple(t.shape) == (2, 2)
assert str(t.dtype) == 'torch.float32'
assert np.array_equal(n, np.array([[1.0, 2.0], [3.0, 4.0]], dtype=np.float32))
print('✅ Tensor 基本属性通过')
Q2:不同 shape 变换分别改变了什么?
进入批量、序列和多头结构后,shape 变换会直接影响后续算子的输入契约。需要区分:view 依赖底层布局,reshape 会尽量返回视图但必要时可能复制,permute / transpose 主要改变维度顺序;这些操作的结果要结合 shape 和布局一起检查。
下面的对照表把四种操作的作用、布局要求和结果变化放在同一口径下。
| 操作 | 主要作用 | 需要关注 | 结果 |
|---|---|---|---|
view | 在满足布局条件时重新解释形状 | 底层布局是否支持 | 通常不复制数据 |
reshape | 调整形状 | 不满足视图条件时可能复制 | 返回目标 shape |
permute | 按指定顺序重排维度 | 维度顺序和连续性 | 通常产生新的 stride 视图 |
transpose | 交换两个维度 | 被交换的维度 | 改变维度顺序 |
x = torch.arange(24).reshape(2, 3, 4)
# 先看最常见的几个变换:展平、重排、换维度顺序。
print('原始 shape:', x.shape)
print('flatten 后:', x.view(-1).shape)
print('reshape 成 (3, 8):', x.reshape(3, 8).shape)
print('permute 后:', x.permute(0, 2, 1).shape)
print('transpose 后:', x.transpose(1, 2).shape)
print('permute 和 transpose 结果一致吗:', torch.equal(x.permute(0, 2, 1), x.transpose(1, 2)))
# 这里重点感受不同 API 的语义,而不是死记输出。
Q2验证:形状和维度顺序是否保持?
这里直接检查几个最常见的变换:能不能展平、能不能转回、维度顺序有没有按预期交换,以及 permute 后布局是否仍然连续。你要把 view / reshape / permute / transpose 的输出 shape 和它们的语义一起看;同时记住,改 dtype 不是改 shape。
x = torch.arange(24).reshape(2, 3, 4)
y = x.permute(0, 2, 1)
z = y.transpose(1, 2)
# `view` 依赖当前布局,`permute` / `transpose` 负责换轴,`reshape` 会按条件返回视图或创建副本。
assert x.view(-1).shape == (24,)
assert y.shape == (2, 4, 3)
assert z.shape == (2, 3, 4)
assert x.is_contiguous()
assert not y.is_contiguous()
print('✅ shape 变换通过')
Q3:dtype 和 device 如何决定 Tensor 的使用方式?
进入后续算子之前,要同时确认 dtype 和 device。浮点张量通常用于数值计算,整型张量通常用于索引或 id;device 则决定 Tensor 所在的计算位置。这里使用 float()、long() 和 to(...) 完成最小转换,并保持本节的 CPU 环境。
idx = torch.tensor([0, 1, 2], dtype=torch.long)
vals = idx.float()
# 整型张量更适合做索引;浮点张量更适合做数值计算。
print('idx dtype:', idx.dtype)
print('vals dtype:', vals.dtype)
print('to int64:', vals.to(torch.int64).dtype)

# `to(dtype=...)` 是最常见的类型转换入口。
float_x = torch.tensor([1.0, 2.0, 3.0], dtype=torch.float32)
print('float_x -> long:', float_x.to(torch.int64))
Q3验证:dtype、整数索引和 device 是否清楚?
这里检查三件事:整数索引是否保持整型,浮点张量转换后 dtype 是否变化,以及 Tensor 是否位于预期的 CPU device。
idx = torch.tensor([0, 1, 2], dtype=torch.long)
vals = idx.float()
assert idx.dtype == torch.int64
assert vals.to(torch.int64).dtype == torch.int64
assert vals.dtype == torch.float32
cpu_x = torch.tensor([1.0, 2.0, 3.0])
assert cpu_x.device.type == 'cpu'
assert cpu_x.to(dtype=torch.float64).dtype == torch.float64
print('✅ dtype、索引和 device 通过')
本节小结
- 先把
Tensor / shape / dtype / device认清,再看后面的训练接口。 shape负责结构,dtype负责数值语义,device负责运行位置。from_numpy和as_tensor可能共享 NumPy 的底层数据,修改一侧时要留意另一侧是否同步变化。
相关阅读
导语: 完成本节后,可以继续查阅 Tensor 创建、视图规则和下一节的布局索引实践。
- PyTorch Tensor 官方文档:查阅 Tensor 的属性、创建方式和基础 API。
- PyTorch Tensor Views 官方文档:理解
view、reshape、stride 与连续性。 - 06. PyTorch Tensor Layout and Indexing | PyTorch 张量布局与索引:继续练习布局、切片和索引。