
25. Quantization W8A16 | W8A16 量化
难度: Medium | 环境: CPU-first | 标签: 量化压缩, W8A16, Linear | 目标人群: 量化压缩学习者
🚀 云端运行环境
本章节的实战代码可以点击以下链接在免费 GPU 算力平台上直接运行:
(国内推荐:魔搭社区免费实例)

本节导读
模型变大以后,推理时最先遇到的问题往往不是“代码能不能跑”,而是权重太大、显存占用高、每一步都要从显存里读很多数据。前面的推理内容已经把这条压力线铺开了,本节开始进入量化:先不改完整推理框架,只尝试把最稳定的一部分——权重——压小。
这一节会把这个思路落到一个最小 Linear 层里:先把一块浮点权重压成 8-bit 存储,再在前向时把它接回普通矩阵乘法。学完后,你应该能看懂 Weight-only 量化为什么能省显存、它和真正低精度计算有什么区别,以及后面的 4-bit / QLoRA 为什么是在这个基础上继续往前走。
本节先建立通用的 W8A16 表示与前向路径,再把量化对象、校准算法和部署封装分别连接到后续的 GPTQ / AWQ 机制与真实 backend 验证。
关键词: W8A16, INT8, quantization
前置阅读
导语: 先熟悉 dtype、线性层和量化的基本对象,再观察权重存储精度变化如何影响前向计算。
- P1: 01. Data Types and Precision | 大模型的数据格式与混合精度
- P1: 12. TensorCore and Mixed Precision | Tensor Core 与混合精度
- P1: 21. Quantization Theory and INT4/INT8 | 量化理论与 INT4/INT8
Step 1: 量化对象、时机与 W8A16 总览
量化首先改变的是模型状态的表示方式:本节把对象固定为权重,把激活保持在 FP16/FP32,并沿着“浮点权重 → INT8 与 scale → 反量化前向”的链路观察存储和误差。W8 表示权重以 8-bit 形式保存,A16 表示激活仍沿用 16-bit(教学实现也允许 FP32)路径;它描述的是表示组合,不等于已经调用了 INT8 Tensor Core kernel。主图同时标出量化对象、处理阶段和 W8A16 前向路径,帮助你把本节机制放进完整的量化视野。 这四个对象的关系是:权重决定存储账本,INT8 表示决定保存格式,反量化决定教学实现的计算路径,GPU 实验只验证真实模型层上的局部代价。
| 本节对象 | 输入 | 机制 | 输出与观察指标 |
|---|---|---|---|
| 浮点权重 | FP32 / FP16 权重张量 | absmax 对称量化 | torch.int8 权重、scale、存储字节数 |
| W8A16 线性层 | INT8 权重 + FP16/FP32 激活 | 前向前反量化 | 输出形状、MSE / 余弦相似度 |
| 机制扩展与部署 | 校准权重、运行时状态和目标 backend | GPTQ/AWQ、FP8、KV Cache 量化各自改变不同成本 | 后续再验证完整模型显存、延迟、吞吐和质量 |
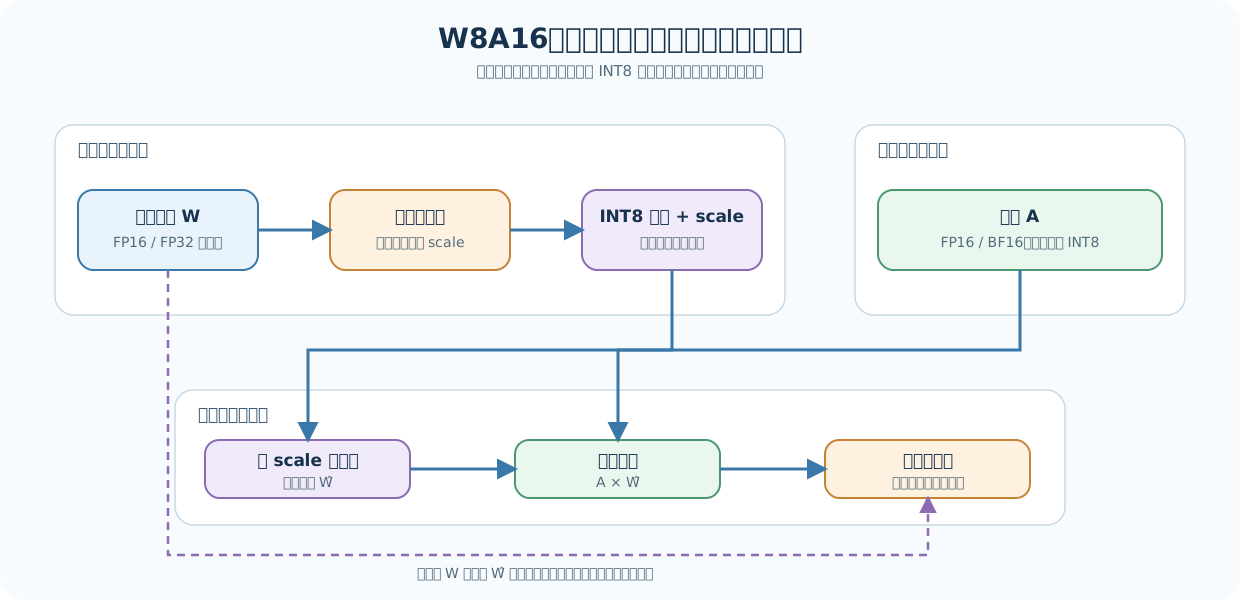
Step 2: 量化数据流如何改变存储与计算表示
本步先把量化看成一条数据流:高精度权重根据动态范围映射到整数表示,同时保存缩放信息;前向计算时,再让低比特权重和高精度激活共同产生输出。这里先理解每一步保存什么、改变什么,具体函数实现放到 Step 4。
| 流程阶段 | 主要变化 | 保留的信息 | 观察重点 |
|---|---|---|---|
| 输入 | 高精度权重进入量化流程 | FP16 / FP32 权重 | 作为误差参照 |
| 映射 | 根据动态范围确定缩放关系,并映射到有限整数范围 | 缩放信息、整数权重 | 是否覆盖原始数值范围 |
| 存储 | 权重以低比特形式保存,激活仍保持较高精度 | INT8 权重、scale、FP16 / FP32 激活 | 权重存储与计算精度分开 |
| 前向 | 反量化参与矩阵计算并产生近似输出 | 输出张量 | 形状、误差与计算代价 |
Step 3: 如何由动态范围得到量化与反量化结果
W8A16 先根据动态范围确定 scale,再完成整数映射和恢复。这里的公式解释了 Step 2 中“映射”和“前向”两个阶段如何衔接。采用以 127 为正向上限的对称教学实现,整数结果会被限制在 INT8 可表示范围内。比如权重 x=2.5 且 absmax=2.5 时,scale=127/2.5=50.8,量化值约为 round(2.5×50.8)=127,恢复后再得到接近 2.5 的浮点值。量化误差来自舍入和截断,不等于完整模型质量损失。
| 阶段 | 公式 / 操作 | 需要观察的结果 |
|---|---|---|
| 动态范围 | absmax = max(abs(x)) | 找到当前权重范围 |
| 缩放 | scale = 127 / absmax | 全零输入需要防止除零 |
| 量化 | round(x * scale) 后截断到 INT8 范围 | 存储为 torch.int8 |
| 反量化 | x_dequant = x_int8 / scale | 得到近似浮点权重 |

Step 4: 实现、测试与结果解读
题目区围绕两个实现对象展开:输入是浮点权重、缩放配置和线性层输入,输出是 INT8 权重、scale 以及反量化后的前向结果。absmax_quantize 负责浮点权重到 INT8 的映射,W8A16Linear 负责在前向前恢复近似浮点权重。测试区检查全零输入、整数 dtype、输出形状和数值误差;完成后再用权重字节数解释“权重节省”与“完整模型显存”的区别。
| 实现对象 | 题目区关注点 | 测试观察 |
|---|---|---|
absmax_quantize | absmax、scale、round、clamp | dtype、有限值、边界输入 |
W8A16Linear | 反量化后参与普通矩阵乘法 | 输出形状与误差 |
| 存储账本 | INT8 权重的字节数 | 不外推完整模型收益 |
import torch
import torch.nn as nn
import torch.nn.functional as Fdef absmax_quantize(x: torch.Tensor) -> tuple[torch.Tensor, torch.Tensor]:
"""
将浮点张量 X 量化为 INT8,并返回缩放因子。
Args:
x: 浮点类型的张量
Returns:
x_quant: dtype 为 torch.int8 的量化张量
scale: 标量张量形式的缩放因子
"""
# ==========================================
# TODO 1: 计算张量的绝对最大值 absmax
# ==========================================
# absmax = ???
# 防除零保护:全零张量时 absmax 为 0,设为一个非零值避免除以 0
if absmax == 0:
absmax = torch.tensor(1.0, device=x.device) # 保持设备一致性
# ==========================================
# TODO 2: 计算缩放因子 scale (对称量化,基于 127 计算)
# ==========================================
# scale = ???
# ==========================================
# TODO 3: 量化过程
# 1. 乘以 scale
# 2. round 到最近整数
# 3. clamp 到 INT8 可表示范围 [-128, 127]
# ==========================================
# x_scaled = ???
# x_quant = ???
return x_quant, scale
class W8A16Linear(nn.Module):
"""
Weight-only INT8 量化线性层。
在内存中,我们存储的是非常微小的 INT8 权重。
在计算时,我们将权重反量化回与输入一致的浮点类型(如 FP16/FP32),再进行矩阵乘法。
这种教学实现保留浮点前向,主要验证权重存储和反量化关系;它不等于纯 INT8 计算,也不保证真实带宽或延迟收益。
"""
def __init__(self, in_features: int, out_features: int):
super().__init__()
self.register_buffer("weight_int8", torch.zeros((out_features, in_features), dtype=torch.int8))
self.register_buffer("scale", torch.tensor(1.0))
self.bias = nn.Parameter(torch.zeros(out_features))
def from_float(self, linear_layer: nn.Linear):
"""
从高精度的 Linear 层中吸收权重并进行 PTQ 量化
"""
with torch.no_grad():
w_quant, scale = absmax_quantize(linear_layer.weight)
self.weight_int8.copy_(w_quant)
self.scale.copy_(scale)
if linear_layer.bias is not None:
self.bias.copy_(linear_layer.bias)
def forward(self, x: torch.Tensor) -> torch.Tensor:
# ==========================================
# TODO 4: 反量化与前向传播
# 1. 将 weight_int8 转换回与输入 x 相同的类型 (如 float32/float16);输入激活仍走高精度计算路径
# 2. 除以 self.scale 恢复其数值范围
# 3. 将 bias 也对齐到输入 dtype,再使用 F.linear
# ==========================================
# w_fp = ???
# w_dequant = ???
# out = ???
return outdef test_absmax_quantization_contract():
zero_q, zero_scale = absmax_quantize(torch.zeros(5))
assert zero_q.dtype == torch.int8
assert torch.count_nonzero(zero_q) == 0
assert torch.isfinite(torch.as_tensor(zero_scale)).item()
x_fp = torch.tensor([-0.8, 1.5, -3.0, 2.5, 0.0])
x_q, scale = absmax_quantize(x_fp)
assert torch.allclose(scale, torch.tensor(127.0 / 3.0))
assert x_q[3].item() == 106
def test_w8a16_storage_contract():
fp_linear = nn.Linear(128, 64)
q_linear = W8A16Linear(128, 64)
q_linear.from_float(fp_linear)
fp_bytes = fp_linear.weight.element_size() * fp_linear.weight.numel()
q_bytes = q_linear.weight_int8.element_size() * q_linear.weight_int8.numel()
assert q_linear.weight_int8.dtype == torch.int8
assert q_bytes * (fp_linear.weight.element_size() // q_linear.weight_int8.element_size()) == fp_bytes
def test_dequantized_linear_contract():
fp_linear = nn.Linear(4, 3)
with torch.no_grad():
fp_linear.weight.copy_(torch.tensor([
[1.0, -2.0, 3.0, -4.0],
[0.5, 0.25, -0.75, 1.5],
[-1.0, 0.0, 1.0, -2.0],
]))
fp_linear.bias.copy_(torch.tensor([0.1, -0.2, 0.3]))
q_linear = W8A16Linear(4, 3)
q_linear.from_float(fp_linear)
x = torch.tensor([[1.0, -1.0, 0.5, 2.0], [0.0, 1.0, -1.0, 3.0]])
out = q_linear(x)
restored_weight = q_linear.weight_int8.to(x.dtype) / q_linear.scale
reference = F.linear(x, restored_weight, q_linear.bias)
assert torch.allclose(out, reference, atol=1e-6)
def test_dtype_and_output_contract():
torch.manual_seed(42)
fp_linear = nn.Linear(128, 64)
q_linear = W8A16Linear(128, 64)
q_linear.from_float(fp_linear)
x_fp32 = torch.randn(2, 10, 128)
out_fp = fp_linear(x_fp32)
out_q = q_linear(x_fp32)
cosine = F.cosine_similarity(out_fp.flatten(), out_q.flatten(), dim=0)
assert out_q.shape == out_fp.shape
assert torch.isfinite(out_q).all()
assert cosine > 0.99
x_half = x_fp32.to(torch.float16)
q_half = q_linear(x_half)
assert q_half.dtype == torch.float16
assert q_half.shape == out_fp.shape
def test_w8a16_integration():
torch.manual_seed(42)
fp_linear = nn.Linear(8, 4)
q_linear = W8A16Linear(8, 4)
q_linear.from_float(fp_linear)
x = torch.randn(2, 8)
assert q_linear(x).shape == fp_linear(x).shape
def run_w8a16_tests():
for test in (
test_absmax_quantization_contract,
test_w8a16_storage_contract,
test_dequantized_linear_contract,
test_dtype_and_output_contract,
test_w8a16_integration,
):
test()
print('✅ W8A16 机制测试通过:量化、存储、反量化、dtype 与集成路径均已验证。')
run_w8a16_tests()🛑 STOP HERE 🛑
请先尝试自己完成代码并跑通测试。
如果你正在 Colab 中运行,并且遇到困难没有思路,可以向下滚动查看参考答案。
参考代码与解析
代码
def absmax_quantize(x: torch.Tensor) -> tuple[torch.Tensor, torch.Tensor]:
    """
    将浮点张量 X 量化为 INT8,并返回缩放因子。
    """
    # TODO 1: 计算张量的绝对最大值 absmax
    absmax = torch.max(torch.abs(x))

    # 防除零保护:全零张量时 absmax 为 0,设为一个非零值避免除以 0
    if absmax == 0:
        absmax = torch.tensor(1.0, device=x.device)  # 保持设备一致性

    # TODO 2: 计算缩放因子 scale  (对称量化,基于 127 计算)
    scale = 127.0 / absmax

    # TODO 3: 量化过程
    x_scaled = x * scale
    x_quant = torch.clamp(torch.round(x_scaled), -128, 127).to(torch.int8)

    return x_quant, scale

class W8A16Linear(nn.Module):
    """
    Weight-only INT8 量化线性层。
    在内存中存储 INT8 权重,前向时反量化到与输入一致的浮点类型进行计算。
    这种方式主要缓解从内存读取权重的带宽压力,而非将计算链路改为纯 INT8。
    """
    def __init__(self, in_features: int, out_features: int):
        super().__init__()
        self.register_buffer("weight_int8", torch.zeros((out_features, in_features), dtype=torch.int8))
        self.register_buffer("scale", torch.tensor(1.0))
        self.bias = nn.Parameter(torch.zeros(out_features))

    def from_float(self, linear_layer: nn.Linear):
        """
        从高精度的 Linear 层中吸收权重并进行 PTQ 量化
        """
        with torch.no_grad():
            w_quant, scale = absmax_quantize(linear_layer.weight)
            self.weight_int8.copy_(w_quant)
            self.scale.copy_(scale)
            if linear_layer.bias is not None:
                self.bias.copy_(linear_layer.bias)

    def forward(self, x: torch.Tensor) -> torch.Tensor:
        # TODO 4: 反量化与前向传播
        # 1. 将 weight_int8 转换回与输入 x 相同的类型
        w_fp = self.weight_int8.to(x.dtype)

        # 2. 将 scale 对齐到输入 dtype,再恢复其数值范围
        w_dequant = w_fp / self.scale.to(dtype=x.dtype)

        # 3. 使用 F.linear 进行标准的矩阵乘法
        bias = self.bias.to(dtype=x.dtype)
        out = F.linear(x, w_dequant, bias)
        return out
解析
1. TODO 1(计算绝对最大值)
absmax = torch.max(torch.abs(x))找到张量中最“极端”的值,用它来确定量化动态范围。- 如果
absmax为 0,需要先做保护,避免除零。
2. TODO 2(计算缩放因子)
scale = 127.0 / absmax将浮点范围映射到 INT8 的对称区间。- 关于
-127和-128:数学上对称量化描述为[-127, 127],因为 0 点严格对齐。代码中clamp使用-128只是利用 INT8 数据类型的完整存储范围。由于scale基于 127 计算,-128这个边界值在实际量化中极少被用到,两者精度差别极小。
3. TODO 3(量化过程)
- 先执行
x_scaled = x * scale,再torch.round,最后torch.clamp到可用区间。 - 这一步的本质是把连续浮点数离散化成有限的 INT8 取值。
torch.int8是最终存储格式,能直接把权重显存压到更低。
4. TODO 4(反量化与前向传播)
- 反量化时先把
weight_int8转回与输入一致的数据类型。 - 再除以
scale恢复近似的浮点值范围。 - 最后用
F.linear完成标准前向传播。
5. register_buffer 的作用
weight_int8和scale不是可训练参数,但它们需要和模型一起保存、加载和迁移设备,所以适合注册为 buffer。- 它们会随
state_dict()保存,并在model.to(device)时自动迁移,但不会被优化器更新。这正是量化权重所需要的——属于模型状态,但不参与训练。
6. 进阶思考
- 本页实现的是
per-tensor量化,工业界常见更细粒度的per-channel量化。 W8A16主要压缩的是权重显存,激活仍保持高精度,以平衡收益与精度。- 本节实现的 W8A16 方案,收益主要在于压缩权重显存和降低带宽压力,计算仍在浮点域完成。若进一步将激活也量化为 INT8(W8A8),则可以充分利用 INT8 Tensor Core 获得计算加速。
Step 5:可选 GPU 实验——测量 W8A16 的存储与反量化代价

实验在 FP16 baseline 和 W8A16 线性层之间做对照。它只测真实层的权重存储、前向耗时、峰值显存和输出误差;不等价于真实 INT8 kernel,也不是完整模型部署。
5.1 环境、固定 workload 与证据边界
先运行 dry_run 检查环境,固定模型 revision、层尺寸、dtype、batch、序列长度、warmup 和重复次数。当前小节只比较真实模型层的 W8A16 存储与教学反量化路径;真实 INT8 kernel 和端到端部署收益由 67 节验证。
| 证据等级 | 本节可以说明什么 | 不应直接推出什么 |
|---|---|---|
| environment_preflight | 当前环境、模型来源和配置可以开始测量 | 没有产生 GPU 性能或质量结论 |
| gpu_real_model_state_measurement | 真实模型层的权重字节数、教学反量化路径和固定输入下的相对变化 | 目标 GPU 是否使用真实 INT8 kernel、完整模型吞吐或服务质量 |
| real_backend_benchmark | 由 67 在固定 backend 和 workload 下验证加载、kernel、显存、延迟、吞吐和质量 | 不能外推到其他硬件、版本或 workload |
5.2 执行对照并保存 JSON
将 RUN_MODE 切换为 real_gpu 后运行代码,保存 baseline / candidate、配置、runtime、失败状态和结果 JSON。
5.3 读取结果并解释证据
读取 JSON 后,先核对实际环境和固定配置,再比较 FP16 baseline 与 W8A16 的权重字节数、前向耗时、峰值显存和输出误差。结果证据等级为 gpu_real_model_state_measurement;完整模型、真实 backend 和端到端质量转到 67 节。
5.4 GPU 实验结果记录
权重字节数只描述本层权重存储,不等于完整模型显存;真实 INT8 kernel 和部署收益转到 67 验证。
| role | baseline / candidate | artifact | runtime/config | dtype | batch / seq_len | 权重存储 | forward latency | peak memory | output MSE | failure | evidence level | decision |
|---|---|---|---|---|---|---|---|---|---|---|---|---|
| reference | baseline | FP16 model layer in memory / JSON path | gpu_real_model_state_measurement | |||||||||
| quantized | candidate | W8A16 layer in memory / JSON path | gpu_real_model_state_measurement | accept / tune / reject |
import json
import platform
import time
from pathlib import Path

RUN_MODE = 'dry_run'  # cpu / dry_run / real_gpu;dry_run 只做环境检查
MODEL_ID = 'Qwen/Qwen2.5-0.5B-Instruct'  # real_gpu 使用真实模型权重和 token 输入
PROMPT = 'Explain why lower precision can reduce weight storage.'
SEED = 42
IN_FEATURES = 4096
OUT_FEATURES = 4096
BATCH_SIZE = 1
SEQ_LEN = 128
DTYPE = torch.float16
WARMUP = 5
ITERS = 20
OUTPUT_PATH = Path('benchmarks/results/25_w8a16_gpu.json')

torch.manual_seed(SEED)
cuda_available = torch.cuda.is_available()
if RUN_MODE == 'real_gpu' and not cuda_available:
    raise RuntimeError('RUN_MODE=real_gpu 但 CUDA 不可用,请先完成 GPU 环境预检。')
device = torch.device('cuda' if RUN_MODE == 'real_gpu' else 'cpu')
runtime = {
    'python': platform.python_version(), 'torch': torch.__version__,
    'cuda': torch.version.cuda, 'cuda_available': cuda_available,
    'device': torch.cuda.get_device_name(0) if cuda_available else 'cpu',
}

def _sync():
    """确保 CUDA 异步操作完成后再读取计时或显存。"""
    if device.type == 'cuda':
        torch.cuda.synchronize()

def _measure(fn):
    """在固定 warmup / iters 下测量一个前向函数。"""
    for _ in range(WARMUP): fn()
    _sync()
    if device.type == 'cuda': torch.cuda.reset_peak_memory_stats()
    start = time.perf_counter()
    for _ in range(ITERS): fn()
    _sync()
    elapsed = (time.perf_counter() - start) * 1000 / ITERS
    peak = torch.cuda.max_memory_allocated() / 2**20 if device.type == 'cuda' else None
    return {'latency_ms': round(elapsed, 4), 'peak_memory_mb': None if peak is None else round(peak, 2)}

evidence_level = 'environment_preflight' if RUN_MODE == 'dry_run' else 'gpu_real_model_state_measurement'
result = {'stage': evidence_level, 'run_mode': RUN_MODE, 'runtime': runtime, 'config': {
    'in_features': IN_FEATURES, 'out_features': OUT_FEATURES, 'batch_size': BATCH_SIZE,
    'seq_len': SEQ_LEN, 'dtype': str(DTYPE), 'model_id': MODEL_ID, 'warmup': WARMUP, 'iters': ITERS, 'seed': SEED,
}, 'workload': {'model_id': MODEL_ID, 'layer_scope': 'one q_proj-like linear layer', 'batch_size': BATCH_SIZE, 'seq_len': SEQ_LEN},
   'json_path': str(OUTPUT_PATH), 'evidence_level': evidence_level, 'baseline': 'FP16 layer in memory',
   'candidate': 'W8A16 layer in memory', 'artifact_path': None, 'failure': None}
if RUN_MODE == 'dry_run':
    result['decision'] = {'decision': 'ready_to_measure', 'reason': '仅完成环境与配置检查,尚未运行 GPU 机制测量。'}
else:
    # real_gpu 分支加载真实模型;CPU / dry_run 不下载模型,避免把预检变成训练任务。
    if RUN_MODE == 'real_gpu':
        from transformers import AutoModelForCausalLM, AutoTokenizer
        tokenizer = AutoTokenizer.from_pretrained(MODEL_ID, use_fast=True)
        model = AutoModelForCausalLM.from_pretrained(MODEL_ID, dtype=DTYPE).to(device).eval()
        input_ids = tokenizer(PROMPT, return_tensors='pt').input_ids.to(device)
        with torch.no_grad(): x = model.model.embed_tokens(input_ids).to(DTYPE)
        source = model.model.layers[0].self_attn.q_proj
        IN_FEATURES, OUT_FEATURES = source.in_features, source.out_features
        fp = nn.Linear(IN_FEATURES, OUT_FEATURES, bias=source.bias is not None, device=device, dtype=DTYPE)
        with torch.no_grad():
            fp.weight.copy_(source.weight.to(DTYPE))
            if source.bias is not None: fp.bias.copy_(source.bias.to(DTYPE))
        del model, source
        if device.type == 'cuda': torch.cuda.empty_cache()
    else:
        # cpu 模式只运行小型确定性张量,真实模型状态验证留给 real_gpu。
        weight = torch.randn(OUT_FEATURES, IN_FEATURES, device=device, dtype=DTYPE)
        x = torch.randn(BATCH_SIZE, SEQ_LEN, IN_FEATURES, device=device, dtype=DTYPE)
        fp = nn.Linear(IN_FEATURES, OUT_FEATURES, bias=True, device=device, dtype=DTYPE)
        with torch.no_grad(): fp.weight.copy_(weight); fp.bias.zero_()
    result['config'].update({'in_features': IN_FEATURES, 'out_features': OUT_FEATURES,
                           'actual_input_shape': list(x.shape), 'weight_source': 'real_model' if RUN_MODE == 'real_gpu' else 'synthetic_cpu'})
    q = W8A16Linear(IN_FEATURES, OUT_FEATURES).to(device)
    q.from_float(fp.float())
    baseline = _measure(lambda: fp(x))
    candidate = _measure(lambda: q(x))
    with torch.no_grad():
        ref, approx = fp(x), q(x)
        mse = torch.mean((ref.float() - approx.float()) ** 2).item()
    result.update({'baseline': baseline, 'candidate': candidate, 'metrics': {
        'weight_fp_bytes': int(fp.weight.numel() * fp.weight.element_size()),
        'weight_int8_bytes': int(q.weight_int8.numel() * q.weight_int8.element_size()),
        'output_mse': round(mse, 8), 'output_shape': list(approx.shape),
    }, 'decision': {'decision': 'measure', 'reason': '仅验证 W8A16 GPU 机制;不代表真实 INT8 kernel 加速。'}})
OUTPUT_PATH.parent.mkdir(parents=True, exist_ok=True)
OUTPUT_PATH.write_text(json.dumps(result, ensure_ascii=False, indent=2), encoding='utf-8')
print(json.dumps(result, ensure_ascii=False, indent=2))成熟库探针(可选):如果环境已安装兼容版本的 torchao,可以在同一固定 workload 下验证 PyTorch 原生 INT8 weight-only 路径。该探针不替代上面的手写实现,也不把单层结果解释为完整模型收益。
RUN_TORCHAO_PROBE = False  # 默认关闭;需要成熟库验证时改为 True
TORCHAO_OUTPUT = Path('benchmarks/results/25_w8a16_torchao_probe.json')

if not RUN_TORCHAO_PROBE:
    print('torchao probe skipped; set RUN_TORCHAO_PROBE=True on a compatible CUDA environment.')
else:
    if not torch.cuda.is_available():
        raise RuntimeError('RUN_TORCHAO_PROBE=True requires CUDA.')
    try:
        from torchao.quantization import Int8WeightOnlyConfig, quantize_
    except ImportError as exc:
        raise ImportError('请安装与当前 PyTorch 兼容的 torchao,再运行成熟库探针。') from exc
    torch.manual_seed(SEED)
    probe = nn.Linear(IN_FEATURES, OUT_FEATURES, device='cuda', dtype=DTYPE).eval()
    probe_input = torch.randn(BATCH_SIZE, SEQ_LEN, IN_FEATURES, device='cuda', dtype=DTYPE)
    quantize_(probe, Int8WeightOnlyConfig())
    torch.cuda.synchronize()
    with torch.inference_mode():
        probe_output = probe(probe_input)
    torch.cuda.synchronize()
    probe_result = {
        'json_path': str(TORCHAO_OUTPUT),
        'workload': {'layer_scope': 'one Linear layer', 'batch_size': BATCH_SIZE, 'seq_len': SEQ_LEN},
        'baseline': 'FP16 Linear in memory', 'candidate': 'torchao Int8WeightOnlyConfig',
        'library': 'torchao',
        'config': 'Int8WeightOnlyConfig',
        'input_shape': list(probe_input.shape),
        'output_shape': list(probe_output.shape),
        'device': torch.cuda.get_device_name(0),
        'torchao_version': getattr(__import__('torchao'), '__version__', 'unknown'),
        'evidence_level': 'mature_library_gpu_probe',
        'decision': 'api_path_executed_not_full_backend_benchmark',
        'artifact_path': None,
        'failure': None,
    }
    TORCHAO_OUTPUT.parent.mkdir(parents=True, exist_ok=True)
    TORCHAO_OUTPUT.write_text(json.dumps(probe_result, ensure_ascii=False, indent=2), encoding='utf-8')
    print(json.dumps(probe_result, ensure_ascii=False, indent=2))
5.4 GPU 实验结果记录
权重字节数只描述本层权重存储,不等于完整模型显存;真实 INT8 kernel 和部署收益转到 67 验证。复测时如果环境、模型或 workload 不一致,应在 failure 中记录原因。
| role | baseline / candidate | artifact | runtime/config | dtype | batch / seq_len | 权重存储 | forward latency | peak memory | output MSE | failure | evidence level | decision |
|---|---|---|---|---|---|---|---|---|---|---|---|---|
| reference | baseline | FP16 model layer in memory / JSON path | gpu_real_model_state_measurement | |||||||||
| quantized | candidate | W8A16 layer in memory / JSON path | gpu_real_model_state_measurement | accept / tune / reject |
相关阅读
完成 W8A16 的最小实现后,可以继续阅读量化校准方法和真实部署 backend。